

Acesonic PK-6000 User Manual

User Manual Version 1.0
PK-6000 Pocket Karaoke
PK-6000 POCKET-SIZE ENTERTAINMENT SYSTEM
RECORD MUSIC, VIEW PHOTOS AND VIDEOS
& BROADCAST YOUR PERFORMANCE!
®

TABLE OF CONTENTS
Welcome ..................................................................................................... 4
PK-6000 Package Contents | Minimum Computer Requirements | About this User
Manual
Connect to Your Computer ............................................................................ 5
Product Overview .........................................................................................6
Your New PK-6000 | Proper Care of Your PK-6000 | Safe Operations | Initial Setup
and System Settings | FM Wireless Notes | Battery Charging | Common Connection
Scheme | Battery Indication | Initial Performance Settings
Using the PK-6000: General ....................................................................... 11
First Use of the PK-6000 | Unlocking the Screen | Main Interface
Nested Functions and Global Controls ......................................................... 14
Settings Mode ........................................................................................... 15
Listening to Music ..................................................................................... 16
Playing Movies ........................................................................................... 17
Browsing Images ....................................................................................... 18
FM Radio: Listening and Recording ............................................................. 19
(2)

Audio Recording ........................................................................................ 20
Text Viewer ................................................................................................ 21
Other Functions and Settings ..................................................................... 22
Karaoke Functions ..................................................................................... 23
Karaoke Song Selection System | Song Lists | Audio Songs Play | Song Selection
Interface | Shortcut Options Menu | Enable/Disable | Microphone Volume | Delay
Eects Setting | MPX Selection | FM Transmission Enable/Disable and FM ID | FM
Transmission Band | FM Transmission Band Selection | FM Interference Test | Score |
Record | TV Output Enable/Disable | Song Selection | EQ Setting | Playing Modes
FAQ (Frequently Asked Questions) ..............................................................39
Troubleshooting and Help ........................................................................... 42
PK-6000 Technical Specications .............................................................. 44
Acesonic Value-Added Service .................................................................... 45
(3)

WELCOME
PK-6000 Package Contents
Earbuds (1) | MiniUSB-to-USB Cable (1) | MiniUSB-to-Composite Video Cable (1) |
Acesonic Media Converter Software, sample les | User Manual (1) | Microphone (1) |
Touchscreen Stylus (1) | 900mAh Lithium-Ion Battery (1) | AC Adapter (1) | Warranty
Card (1) | Quick Start Guide (1)
Minimum Computer Requirements
• Microsoft Windows 98/2000/XP/ME/VISTA/Win7 with Pentium CPU, 200 MHz or
faster, CD drive, minimum of 40MB disk space, USB
• Macintosh OS X 10.1 or higher, PPC or Intel CPU, 40MB disk space, CD drive, USB
About This User Manual
is manual was developed for the rst version of this product. For updating instructions
following a product upgrade, refer to a newer User Manual on the included CD or the
Acesonic Web site (www.acesonic.com).
All pictures in this manual are for reference only. Refer to the actual product for
authoritative examples of screens and functions.
Product is subject to change without prior notice.
(4)

CONNECT TO YOUR COMPUTER
e PK-6000 connects to your computer with the included MiniUSB-to-USB cable.
Because it adheres to computer industry standards for a “USB mass storage device,”
the PK-6000 connects to both Macintosh computers (OS X 10.1 or newer) and PCs
(Windows 98 to Windows 7) with no special drivers.
With its power turned on, connect the PK-6000 to your PC or Macintosh and see it
mount in My Computer (PC) or on the Desktop (Mac). You can treat it like any other
external storage device, like a ash drive or hard drive, and add, rename, copy, move and
delete les.
You can also use the PK-6000 as a portable ash drive to take any type of computer le
from your work computer to home, for example. is will work as long as both computers
have USB ports and you have enough free memory (internally or on an installed
MicroSD card) on your PK-6000.
You do not need to store les in special folders or directories, as each function on the PK6000 (Karaoke, Video, Text Reader, etc.) will scan the memory, internally and in the SD
card slot, for the les that it is capable of playing.
(5)

PRODUCT OVERVIEW
Your New PK-6000
e PK-6000 is a powerful multimedia device that can be used for entertainment,
performing, reading, recording and making presentations. Its fully integrated Karaoke
system plays MP3+G music/lyric les, while its video output, built-in mini-boom mic,
wireless FM broadcasting and computer connectivity give you total control over the use
and presentation of movies, videos, FM radio, MIDI les and more. Browse images,
read text documents, mix voice and sound, record FM broadcasts and display screens in
either Chinese and English. e elegant but practical design features a state-of-the-art
touchscreen interface with intuitive, icon-based controls.
Proper Care of Your PK-6000
• is player is a precision-made electronic product. Do not attempt to disassemble it
yourself. Do not remove, replace or alter any part of the player.
• Do not drop, hit or otherwise impact the PK-6000.
• Do not use the PK-6000 in extreme high or low temperature, wet or moist areas, or in
excessive dirt or dust, strong magnetic elds and continuous bright sunlight.
• Keep the PK-6000 away from water cups, soda cans, etc.
• Use a damp cloth to gently clean the PK-6000, with no chemical solutions of any kind.
(6)

Safe Operations
• Adjust the volume properly to avoid damage to your hearing.
• Only use appropriate batteries, chargers and accessories. Using improper products will
void the warranty and may be dangerous.
• Please follow local environmental protection regulations to dispose of the used device
and accessories.
• If there is any problem during operation, please contact local distributor or our Service
Center.
• To avoid causing interference, do not use the PK-6000 on an airplane or in other
restricted areas.
Initial Setup and System Settings
Important: e rst time you turn on the PK-6000 you need to calibrate the included
Stylus. Use fully charged batteries and follow the instructions on page 11 under First Use
of the PK-6000.
Although other software may work, use Format Factory v2.30 or Acesonic Media
Converter Software (on included CD) to ensure that all les are converted properly.
If your system les become corrupted or damaged, you can perform a rmware update
and return your PK-6000 to its original factory settings.
(7)

You can copy the sample AVI and MP3+G les on the included CD to your PK-6000
by connecting the unit to your computer with the included USB cable. You can place the
les in any location on the PK-6000, as the system looks for les automatically every time
you turn it on. See Connect to Your Computer on page 5 for more information.
Always back up your data. Acesonic is not responsible for any loss caused by missing data.
FM Wireless Notes
e PK-6000 can transmit through an external radio over FM. When the band settings
of the device and the external radio are synchronized, the transmitted sound will play
through the radio. (Note: For best results in both sound quality and reception, use quality
components and set up devices as indicated in Figure B at right.)
Battery Charging
You can charge the device by (1) connecting the USB cable to your PC or (2) connecting
to the AC adapter. During charging, the bars in the battery charge icon will display in
rolling fashion. When the PK-6000 is fully charged, the screen will display the message,
“Fully Charged” and the battery icon will display full, stationary bars.
Important: Rechargeable batteries have limited lives. If your PK-6000 does not fully
recharge, you should check the battery. For your convenience, you can purchase a second
original-issue battery from the seller.
> continued on page 10 >
(8)
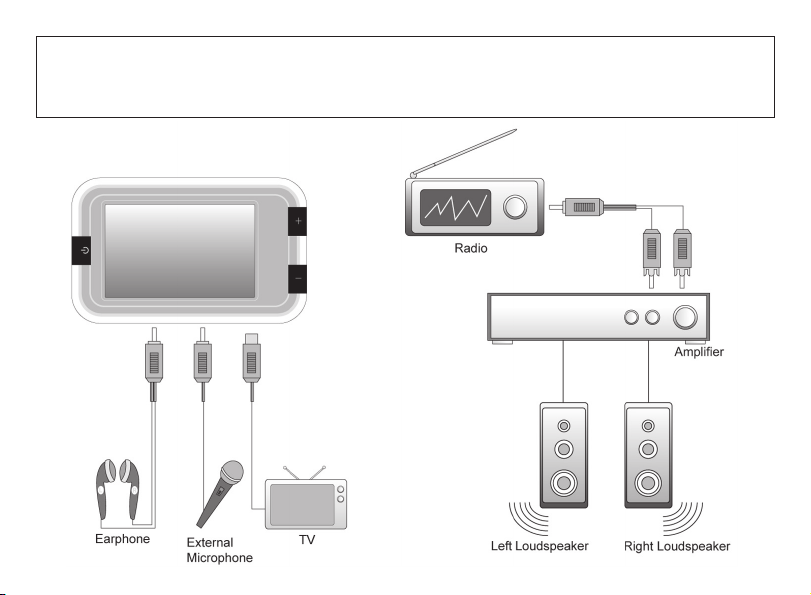
Common Connection Scheme (Figure B): For karaoke use, enable FM transmission so that mixed
sound from mic and music will broadcast over radio as shown. Connect earphones to monitor
yourself, connect mic for singing and use USB-to-Composite-Video cable to connect to TV.
(9)

Battery Indication
Always refer to the battery charge icon before use to view the charge level, and ensure
that the PK-6000 is fully charged before each use.
When the battery icon displays full bars, the power is at its highest level. e indicator
bars in the battery icon will decrease over a period of time according to your usage.
When the battery charge is almost depleted, the middle frame of the battery icon will
display “blank,” and you should recharge at this time. If the PK-6000 is forced to power
on in this condition, the screen will display the message “Low Voltage” before the device
automatically powers o.
Initial Performance Settings
Important: For the best karaoke sound quality, set the music volume at 50%, microphone
volume at 100% and Echo delay to 100ms.
To prevent the display from shutting o while you are using the PK-6000, go to
“SETTINGS -> Power” menu and set “Display O” value to “Disable” or a sucient
period of time, such as “5 Min” or “15 Min.
(10)
USING THE PK-6000: GENERAL
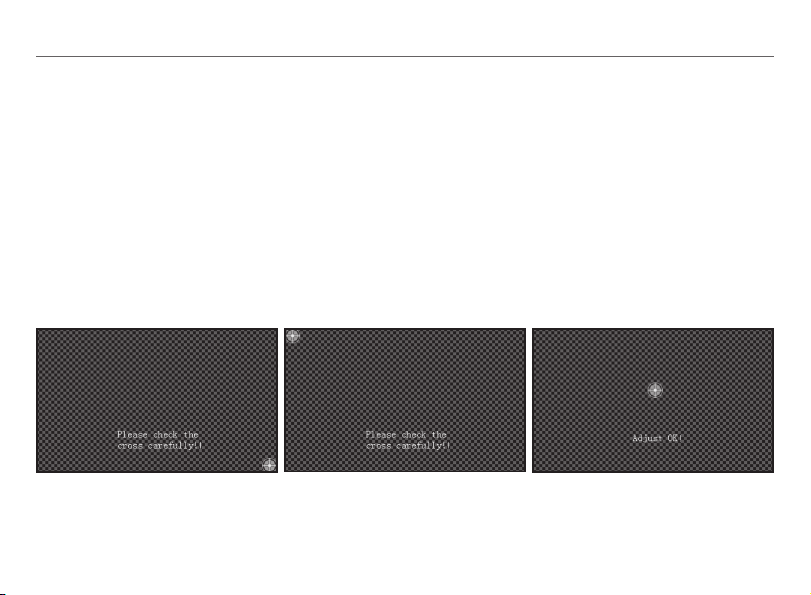
First Use of the PK-6000
e rst time you use this device, ensure that you have installed fully charged batteries.
Hold down the power button for several seconds to start the device. To calibrate the
Stylus for continued use, enter “Menu Settings” and select “Screen Calibration.” You will
be taken through several steps as shown below to click the touchscreen with the Stylus
to ensure its correct operation. Important: Do not power o before completing the
calibration or you will have to repeat the steps. If you upgrade rmware or reset your PK6000 to its original factory settings, you will have to perform the calibration again.
e text on the rst two calibration screens advise you to “Please check the cross carefully” with the
Stylus. e nal screen reads “Adjust OK” after you have successfully clicked your way through.
(11)
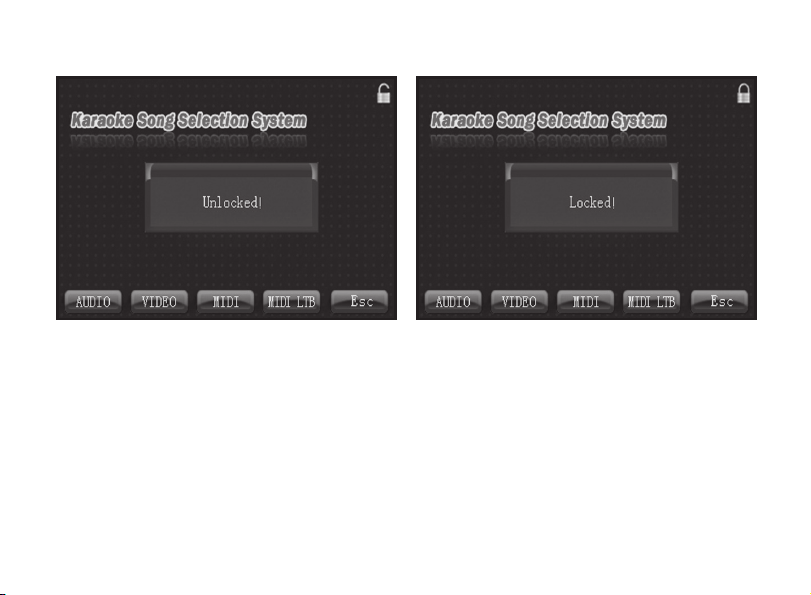
Unlocking the Screen
Figure 01 Figure 02
In Figures 01 and 02, note the lock icon at the upper right of the screens (unlocked
in 01, locked in 02). Click and hold for 2 to 3 seconds to toggle between the settings.
In Karaoke and Video modes, automatic locking is disabled (you can do it manually).
Otherwise, you set the locking function to your preference by setting the screensaver time.
(12)
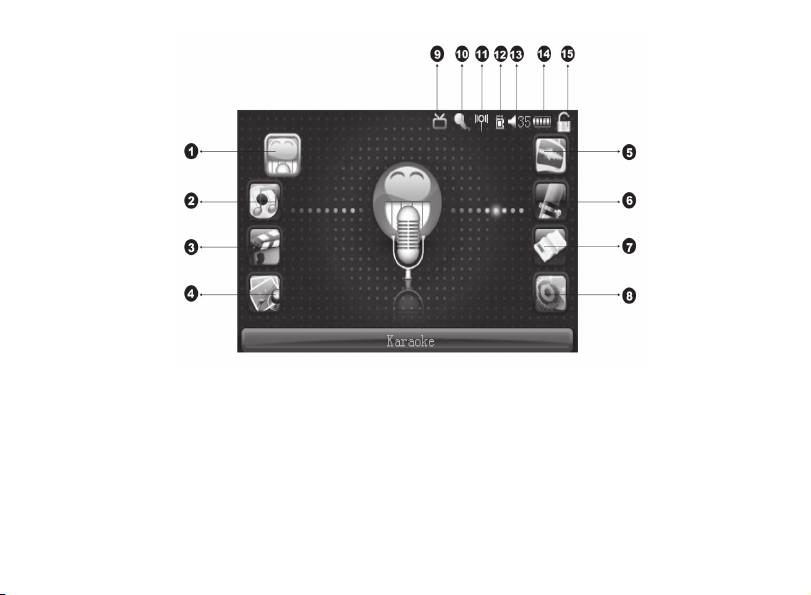
Main Interface
Figure 03
Legend for Figure 03: (1) Karaoke, (2) Music, (3) Movies, (4) Image Browser, (5) Radio,
(6) Recording, (7) Text Reader, (8) Settings, (9) TV Output, (10) Microphone, (11) FM
Transmission, (12) SD Expansion Card, (13) Volume, (14) Battery Power Display,
(15) Locking Key.
(13)

NESTED FUNCTIONS AND GLOBAL CONTROLS
Controls for FM Transmission, Microphone settings, Echo delay and other functions are
located on the right-hand Shortcut Options Menu (see page 27), which is only displayed
when you are in a mode that can make use of these functions.
On the Shortcut Options Menus you will initially see each function with a green “O”
sign. Click on the appropriate “O” sign to toggle it to “On,” at which time you can
make the settings appropriate to each function. You can start FM Transmission and select
the frequency, turn on the Mic and control its volume, set Echo delay times and choose
predened EQ settings such as “Classical,” “Jazz,” “Rock,” etc.
In the play modes (Music, Karaoke, Movies) you control volume with the + and - buttons
located at the base of the PK-6000 case. e numerical value of the volume will be
displayed at the upper right of the screen.
(14)
 Loading...