

Acesonic DGX-400 User Manual
DGX-400
400 Disc DVD CD G Karaoke Changer/+
With USB SD/M Reader/MMC/ S
USER MANUAL
CAUTION:
To ensure your player will work at its best, read this
manual carefully before attempting to operate the
machine. Keep this manual in a safe place for
future reference.
......
www.acesonic.com

Accessories
**DESIGN AND SPECIFICATION ARE SUBJECT TO CHANGE WITHOUT NOTICE
Confirm the following items upon opening the box:
1. User Manual
2. One AV cable
3. One remote control
Record your product information in the table provided below
and refer to it whenever contacting your dealer about your
purchase.
Date of Purchase:
Model No.:
Machine Serial No.:
Selling Dealer:
Dealer Address:
Dealer Telephone No.:
DGX-400
1

Features and Capabilities
Main Functions
*The unit not only stores 400 discs, but it can also manage each
individual discs' information.
*You can edit a disc name (or label) stored in the rotary table so you
can find the disc you need quickly. The disc names will be arranged
automatically.
*Compatible discs are CD,VCD,DVCD,CDG,MP3,WMA,SVCD,DVD,DVD-9 ,DVD-
R, MPEG-4 and MIDI format.
System Functions
*Video Output
Includes four modes: VIDEO, P-SCAN YPBPR, S-VIDEO, and PC-VGA
*Video Output Formats
PAL60, NTSC, PAL, AUTO
*TV Screen Mode Output
4:3PS, 4:3LB, 16:9
*Audio Output
Includes six analog audio output channels.
Supports coaxial cable mode.
Supports composite audio output mode (L/R) in the state of AV.
Other Accessorial Functions
*Multiple music effect modes can meet your different tastes.
The unit is equipped with karaoke functions such as echo and tempo
*
control. It is also capable of scoring.
*Conveniently navigate the multi functional menu with your remote
control.
*Contains multiple foreign language support.
*Multi angles, multi sub-pictures, multi sound streams
*Multi levels of fast forward, fast backward and slow motion.
Multi play modes such as dynamic enlargement, step play, memory,
*
program and repeat
-
Power
Wide voltage range: 90-250V~
*
Low power consumption: power consumption of the system is less than
*
25W.
Video Output Interface X1
Composite Audio Output Interface X2
S-VIDEO X1
Mic Input Interface for Karaoke X2
Simulate Six Sound Channels Output X1
Score In Interface X1
Coaxial Audio Output Interface X1
Full function remote control X1
2

Table of Contents
Accessories-------------------------------1
Features and Capabilities -----------------------2
Table of Contents--------------------------3-4
Safety Precautions--------------------–-----5
Note-----------------------------------6
Maintenance-------------------------------7
Disc Information ----------------------------8
Front panel-------------------------------9
Back panel-------------------------------10
Display window -----------------------------11
Remote control -----------------------------12
Using Your Remote Control -----------------------13
How to Hook Up Your Player--------------------14-18
Proper Operation----------------------------19
Managing Discs--------------------------20-32
Inserting Discs ---------------------------20
Removing Discs ---------------------------21
Playing Temporary Discs - - - -----------------22
Random Play Mode---------------------------22
Sequence Play Mode--------------------------22
Program Play Mode--------------------------23
Selecting Discs -------------------------23-28
Managing the Favorites List--------------------29
How to Search for a Disc by Disc Name---------------30
Editing Disc Information -- - - ------------------30
USB Device/Card Reader(SD/MMC/MS) Function------------31
Power off Timing---------------------------32
3

Table of Contents
Playing Discs - ----------------------33-48
Playing MIDI Discs-------------------33-37
Confirming Playback Mode------------------38
Searching for a Scene-----------------39-40
Repeat Playback----------------------41
Common Buttons-----------------------42
Zoom Functions ------------------------43
Changing the Angle ---------------------44
Changing the Subtitle Language--------------44
How to Use the Select Menu(VCDs,SVCDs)----------45
How to Use the Title Menu (DVD)--------------45
Practice Songs-----------------------45
Setting Sound Effects-------------------46
Function Setup----------------------47-48
Troubleshooting ------------------------49
Specifications----------------------- 50
4

Safety Precautions
Warning:
To reduce the risk of fire or electric shock, do not expose
this apparatus to rain or moisture. To avoid electrical shock,
do not open the cabinet. Refer all servicing to qualified
personnel only. To prevent fire or shock hazard, do not place
objects filled with liquids, such as vases, on the apparatus.
Caution:
The use of optical instruments with this product will
increase eye hazard. This unit is equipped with a radium-laser
beam. Do not attempt to open the cabinet to prevent exposure to
your eyes. If by chance the laser becomes exposed, do not look
directly at the beam to prevent optical hazards.
Safety:
If your machine needs maintenance, contact your dealer and
take the unit to a qualified professional for any type of
repair. Inappropriate usage of the unit that is not defined as
safe behavior in this manual may cause shock or fire. Safety
can only be guaranteed by following the guidelines that are
defined in this manual. For your safety, read through the user
guide and take heed to all attentions and warnings listed,and
on the unit itself as well.
5
Notes
*Any disc that is not listed above will cause the player to
display “NO DISC” in the DISPLAY WINDOW. Future
media and disc formats maybe supported with firmware
upgrade, when available.
*Encoding methods of some media formats may affect
the playback (e.g. Unable to fast forward or fast
backward or load time). Be sure that the encoding
process conforms to the standards for that particular
format.
*Dirty, scratched, warped, and defective discs may cause
a considerable time delay during the loading and reading
of the disc. In extreme cases, this may render the disc
Video Signal Formats
This player also accommodates NTSC and PAL color
systems, with automatic detection and override settings.
Digital Audio Formats
This player accommodates, Dolby Digital 5.1 Channels,
DTS, and AC-3.
NOTE
*Depending on the AUDIO SETUP> SPDIF settings
digital audio signals may not be output as they are
recorded on the disc.
Handling and Cleaning of
Handling
*At anytime, when handling discs, always hold them
from their edges and/or by the circle in the center.
*NEVER write on the any surface of the disc for it may
render the disc unreadable.
*Store discs in a clean and dry environment. Storing
CD’s vertically will also help prevent warping.
*After use, insert CD into jacket or case to minimize
wear and tear DO NOT stack CDs on top of one another.
*Do not bend or press the disc. Do not expose the disc
to direct sunlight or any heat source.
Cleaning
*Wipe the discs from time to time using a soft cloth.
Always wipe from the center towards the edges. NOT in
circular motions.
*DO NOT clean with any other cleaning solution, unless
it is specifically made for disc cleaning.
Notes Regarding Discs
*Some DVD's, the player starts playback automatically
after inserting the disc, regardless whether or not PLAY
BACK CONTROL is on or off.
*The image may be poor, noisy, or grainy due to actual
defects on the disc itself.
*Some functions may not be possible on all discs as
described in this manual.
CAUTION
Power-Cord
Handle the power cord only by its plug, do not unplug
the power cord by tugging or yanking on the cord.
Touching or unplugging the cord while your hands are
wet may lead to an electric shock or a short circuit. If the
cord becomes damaged or its wires become exposed,
please replace the cord as soon as possible in order to
prevent an electric fire or shock. Check the power cord
every few months to ensure it is functioning properly.
NOTE
CDs revolve at very high speeds inside of players. Never
attempt to play cracked or warped CDs; doing so may
cause the disc to shatter inside or the player to
malfunction.
6

Maintenance
1. Keeping Your Unit Dustproof
You should keep the front cover closed in case dust enters the
rotary table.
2. Cleaning The Unit
First, for safety, unplug the power plug from the socket. You
can use a dry or damp soft cloth to clean the player. If you need
to use a cleanser, Use mild detergent so it will not damage the
machine's surface. Wide with a damp cloth. Afterwards, rub the
player with a dry cloth. This method is the most commonly used
method. In ordinary cases, it is not necessary to use any
cleanser to clean the unit.
3. Diagnosing If You Need Maintenance On The Unit
You need maintenance if:
A)Power line or plug suffers damage;
B)Liquid or other foreign substance enters the player;
C)The machine can't work normally when you operate it
according to the user guide;
D)The machine suffers damage from a fall or other reasons;
E)There are abnormal occurrences when the player is in the
working mode.
*If you come across these problems, pull the power plug from the
socket, and bring your machine to a professional maintenance
technician.
*If your machine needs replacement of some parts, the
professional maintenance technician will install the new part.
The new part should be recommended by the manufacturer or should
have the same characteristics as the original part.
4. Safety Inspection
After finishing maintenance or repair, the professional
maintenance technician should perform some safety inspections to
make sure the machine is normal.
The laser head used in the machine is a precise component, if
its lens surface becomes dirty, the lenses ability to read discs
will worsen, affecting the quality of picture. If you discover
this problem, contact the dealer.
7
Disc Information
This player can play following discs:the
DVDMIDI
(KARAOK DVD)
MIDI
Sound(MOVing
BACKGROUND)
Disc mark
Content
Time
Dimensions
74 min.
12cm 12cm 12cm 12cm 12cm 12cm 12cm
CD
Sound
CD-G
GRAPHICS
Sound
/Image
WMA
Sound
VIDEO
CD2.0
VIDEO CD
Sound
/Image
74 min. 74 min.
12cm
DVCD
DVCD
VIDEO
Sound
/Image
MP3
DIGITAL AUDIO
Sound
SVCD
SUPER-VCD
VIDEO
Sound
/Image
PBC menu:
It is recorded in VCD2.0 disc,showing the content of the disc and
convenient for customers to look up program
CD+G:
Audio with
For example: lyric,photo character
VCD disc version
image information.
, or graphic.
:
1.0 version: the moving image and music.
2.0 version: high definition still with PBC function.
er
MP3 disc
CD quality audio in a compressed format
Super VCD
:
Combining the strongpoint of DVD and VCD, t has high quality audio
DVD
MIDI :
is Music Instrument Digital Interface .
MIDI
DVD is a disc with music file recorded midi format which can be played
MIDI s with
.
i.
in equipment with normal midi connector.
MPEG4:
MPEG4 is compress standard, image quality near dvd disc, sound quality
cd .
to audio
DVD Disc
:
ed is close
DVD is Digital Video Disc. It contains movie and music with eight swing and
store different s
32 language .With MPEG-II and digital stereo effect function, the
user can enjoy high quality image and good acoustics at home.
MPEG4
MPEG4
Sound
/Image
12cm
can
DVD
Sound
/Image
135 min.
12cm
8

Front Panel
DISPLAY
POWER
123456789101112 13 14151617181920 21 22 23 24
40 41 42 43 44
1. DISPLAY button
2. POWER button
3. SEQUENCE button: select the disc format to
enter the sequence play mode; select
"CLOSE" to exit sequence play mode.
USB/CARD
4. button
5. EDIT button
6. STYLE button: select the disc by disc .
7. SEARCH button
8. FORMAT button: select the disc by disc format
9. Disc Library: select the disc by disc attach
(including 15 disc attaches such as disc
lib1,disc lib2 )
10. DISC NAME button
11. DISC NO button
12. TIME button: set
13. FRONT COVER
14. PROGRAM button
15. EFFECT button
16. the previous song
:go to
17. :quicken the speed of backward
18. :PAUSE/STEP
19. :quicken the speed of forward
20. :PLAY
21. MUTE button
22. :STOP
23. :The next song
24.UP/DOWN/ENTER dial: the player will turn the
rotary table if you rotate this dial when the
front cover is open;the function of this dial
is same as the direction buttons on the remote
control if you rotate this dial when the front
cover is closed; the function of this dial is
same as the ENTER button if you press it.
SEQUENCE
..
RANDOM REPEAT TIME
STYLEUSB/CARD
EDIT
SEARCH DISC LIBRARY
of timer
FORMAT
fast
fast
DISC NAME
DISC NO
45
type
3032343536373839
29
3133
OPEN/CLOSE
DELETE
ABC DEF
JKL
GHI
MNO
RETURN
PQRS
WXYZTUV
MENU
PROGRAM
EFFECT
L/R
SETUP
MUTE
DISC EJECT
LEFT
PUSH ENTER
25
27
TEMP DISC
RIGHT
26
28
25. TEMP DISC button: the player will send disc
400 to the loading position of the
front cover automatically if you press this
button when the front cover is open; the player
will send disc 400 to the playing
position to play automatically if you press
this button when the front cover is closed.
26. :the function of this button is same as
e
th button on the remote control.
27. DISC EJECT button: the player will uplift the
disc which is at the loading position of
the front cover if you press this button when
the front cover is open; if you press this
button when the front cover is closed,
the player will send the disc which is at the
playing position to the related disc slot,
secondly the player will send the disc to the
loading position of the front cover, thirdly
the player will open the front cover, lastly
the player uplifts the disc.
28. :the function of this button is same as
the button on the remote control.
29. OPEN/CLOSE button
30. L/R button
31. RETURN button
32. DELETE button
33. SETUP button
34. MENU button
35. NUMBER button
36. REMOTE SENSOR
37. REPEAT button
38. RANDOM button: nter random play mode;
Es
select "CLOSE" to exit random play mode.
39. FRONT PANEL DISPLAY
40. KEYBOARD jack
41. MICROPHONE 1 jack
42. MICROPHONE 2 jack
43. USB jack
44. MMC/MS/SD jack
45. EARPHONE jack

Rear Panel
I
12345 678 910 11 12
19
POWER
CLASS 1 LASER PRODUCT
CAUTION
CAUTION:TO REDUCE THE RISK OF ELECTRIC SHOCK
DO NOT REMOVE COVER
NO USER-SERVICEABLE PARTS INSIDE
REFER SERVICING TO QUALIFIED SERVICE PERSONNEL
1. FRONT RIGHT SPEAKER OUTPUT
2. FRONT LEFT SPEAKER OUTPUT
3. SURROUND RIGHT SPEAKER OUTPUT
4. SURROUND LEFT SPEAKER OUTPUT
5. SUB WOOFER OUTPUT
6. CENTRE SPEAKER OUTPUT
7. RIGHT AUDIO OUTPUT
8. LEFT AUDIO OUTPUT
9. SCORE IN
Cr/Pr/R
OPTICAL
Y/Y/G
Cb/Pb/B
VGA
S-VIDEO
RS232C
STATE
REMOTE
GND
COAXIAL
SCORE IN
+5V
1415161718
10. COAXIAL OUTPUT
11. VIDEO OUTPUT
RCA
12. YUV OUTPUT
COMPONENT VIDEO
13. VGA OUTPUT
14. S-VIDEO OUTPUT
15. OPTICAL OUTPUT
16. STATE, REMOTE, GND, +5V INTERFACE
17. RS232C INTERFACE
18. POWER IN
19. POWER SWITCH
MAIN
13
10
Display Window
Sequence mode
Random mode
RAND
PROG
A-B
ALL
Current disc
No.
Disc indicator
Repeat mode
Repeat A-B mode
Program mode
PBC mode
CONT
Favorite disc
FAVORITE
Disc format
Disc
DISC
DVD S V CD-G
PBC
MIDI WMA MP3 MP4
1DISC
HDCD
DISC SELECT NEXT
Select disc NO
Select disc
Next disc
JPEG
TITLE
Title No. of DVD
Title of DVD
Disc name, attach etc.
CHAP. TRACK
Track No.
Chapter No. of DVD
Chapter of DVD
Microphone
MUTE
Track
Mute
LS
L/R
L
DTS
R
C
S
RS
Time and state
Lock panel
LOCKED
DOLBY
ON
OFF
Timing
Dolby
Angle
When stopped:
DVD
TITLE
DISC
CHAP.
During play:
Example:
DVD
TITLE
DISC
CHAP.
Other indicators:
:
When repeat the same title, chapter or track.
set to
ALL:When repeat to play the entire disc.
A-B:
When repeat section.
ANGLE:
PROG:
Angle is changed.
During program playing.
set to
set to a
VCD DISC
When stopped:
VCD
DISC
During play:
Lights up when using PBC
R
L
VCD
DISC
TRACK
TRACK
R
L
When stopped:
CD
DISC
During play:
Example:
CD
DISC
TRACK
TRACK
R
L
11
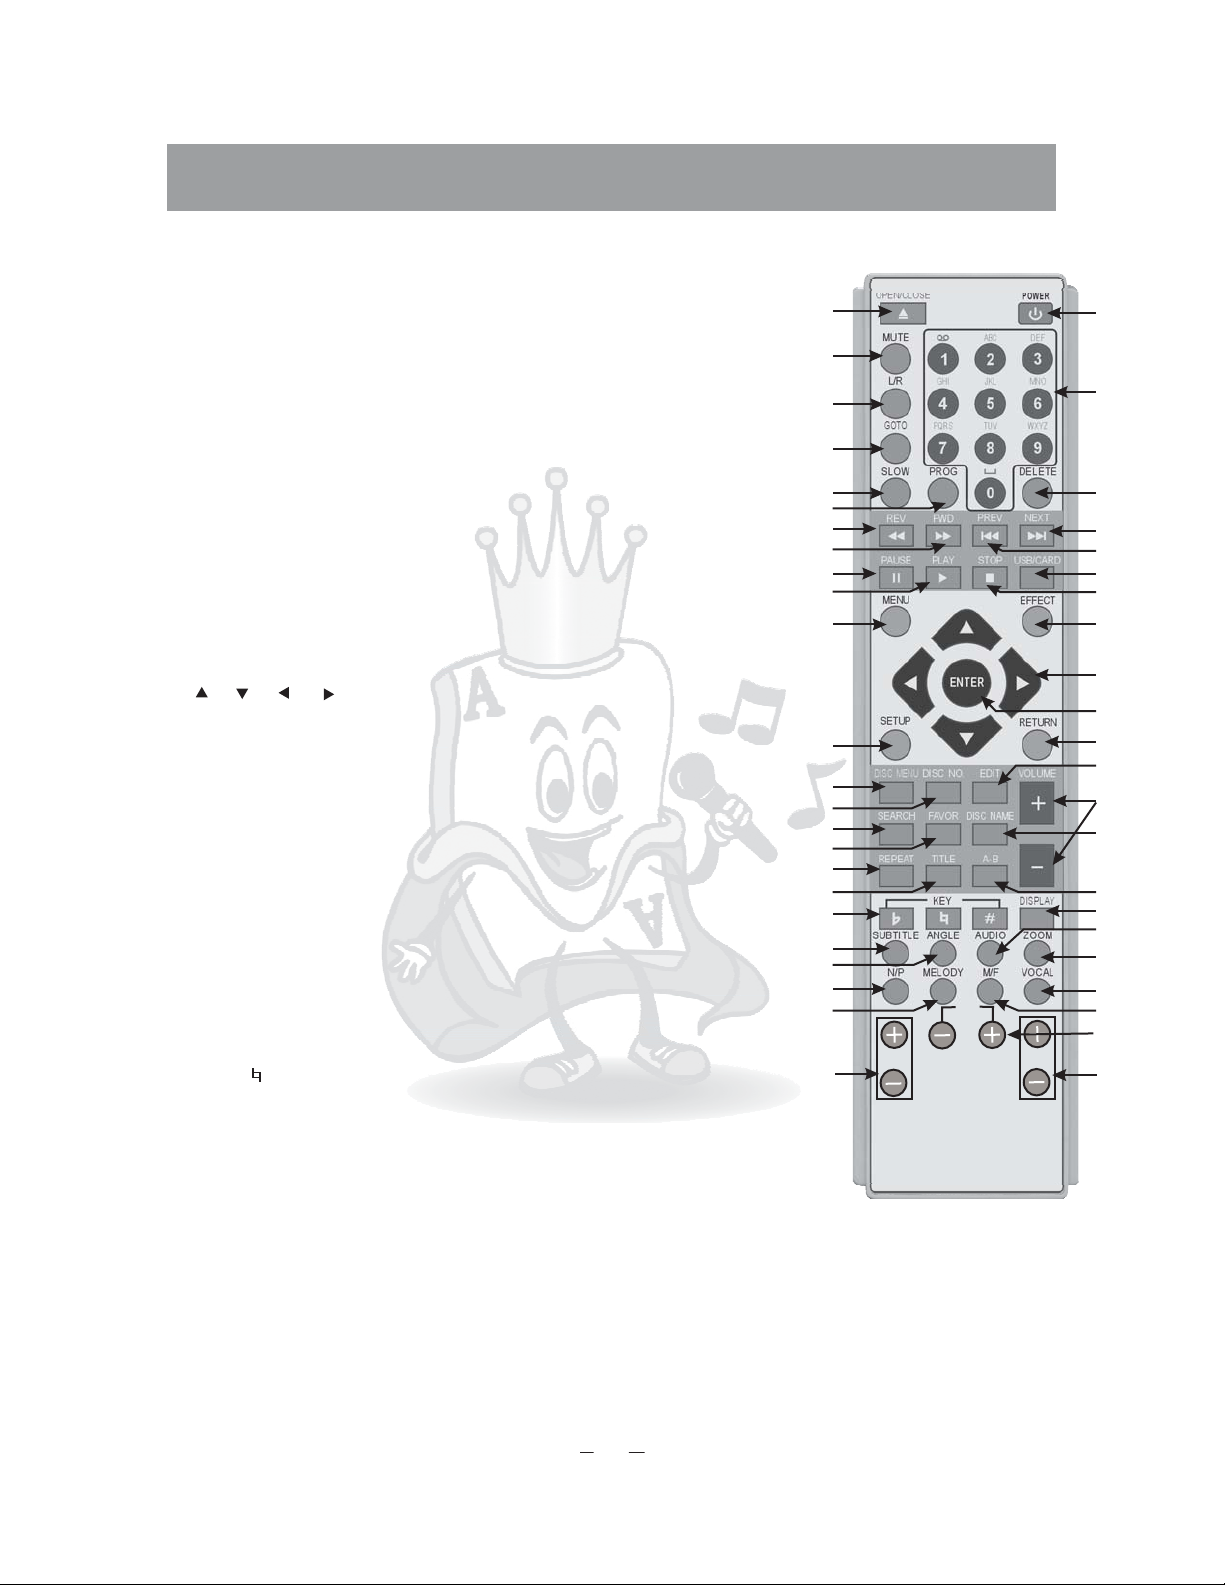
Remote Control
1. POWER button
2. OPEN/CLOSE button: open/close the front cover.
3. MUTE button: open/close the audio output.
4. L/R button: sound channel.
switch the left and right
5. GOTO button: select the playing start-point randomly by GOTO function.
6. SLOW button: slow the speed of playing forward.
7. PROG button: the function of MIDI , or
program .
function
ordering songs use for
8. NUMBER buttons: used to order songs or edit the discs' information.
They also are used to input the disc NO or disc name when the player
explore a certain disc.
9. DELETE button:delet .
ing the song or canceling the wrong number
10. REV button: quicken the speed of playing backward.
11. FWD button: quicken the speed of playing forward.
12. NEXT button: next song
13. PREV button: previous song
14. PAUSE button: he image will move forward step
goes to the
goes to the
Pause the disc t
by step if you press the button repeatedly.
15. PLAY button
USB/CARD
16. button: switch the different data sources.(include READ
DISC,READ U DISC, READ CARD)
17. STOP button: stop playing if you press the button in the playing mode
(Play the next pre-engaging song if you press the button when the
player plays the songs in program list).
18. MENU button: open/close the menu.
19. EFFECT button: set the parameter or mode of effect.
20.///buttons: adjust the cursor position.
21. ENTER button
22. SETUP button: set system function .
s
23. RETURN button
24. DISC MENU button: enter thedisc manage .
menu
25. DISC NO button: select the disc by disc NO.
26. EDIT button: in order to facilitate searching a certain disc by
various methods quickly, you'd better edit the new
ly inserted disc
information immediately.
27. SEARCH button: search the disc you want in the disc list
.
28. FAVOR button: select the disc you want in favorite disc list.
29. DISC NAME: select the disc by disc name.
30. REPEAT button: select the repeat mode (DVD disc includes repeat
chapter and repeat title; CD/VCD/SVCD disc includes repeat
single song and repeat the entire disc; MP3/MP4 disc includes
repeat single song, repeat dir and repeat the entire disc)
31. TITLE button: displays all information in the current title.
(This function is only available to DVD disc)
32. A-B button: set the repeated section playing.
33. VOLUME+/ : increase or decrease the volume.
-
to
34. KEY b/ /#: adjust the key.
35. DISPLAY button: open or close the status bar.
36. SUBTITLE button: change the language of subtitle.(This function
is only available to the discs with multi languages of subtitle)
-
37. ANGLE button: change the angle.(This function is only
available to the DVD discs which support multi angles)
38. AUDIO button: select different language
a
(This function is only available to the discs which have
been recorded with multi languages)
39. ZOOM button: enlarge the image.
40. N/P button: adjust the TV service pattern.
41. MELODY BUTTON: the melody when the player plays MIDI disc .
set s
(NTSC/PAL)
(It is only available to the songs without vocal)
42. VOCAL button: set the function when the player plays MIDI disc .
vocal
(This function is only available to the songs vocal)
43. M/F button: adjust the tone when the player plays MIDI disc (This function
is common used in KARAOKE when the male/female voice plays in an out-of-character role)
ly
s
44. ECHO button: to adjust the Echo volume of the Microphones
45. MIC1 buttons: to adjust the volume of the microphone 1
46. MIC2 buttons: to adjust the volume of the microphone 2
2
3
4
5
6
7
10
11
14
15
18
22
24
25
27
28
30
31
34
36
37
40
41
45
MIC1 VOL
s
ECHO
1
8
9
12
13
16
17
19
20
21
23
26
33
29
32
35
38
39
42
43
44
MIC2 VOL
46
12

Remote Control Operation
Power source for the remote controll.
The remote control is powered by two batteries
Caution for battery replacement.
Load the new batteries with their polarities (+ and -) aligned correctly.
Keep the batteries from heat source to avoid causing short-circuit.
If you do not intend to use the remote control for a long period of time, please remove
the batteries and store them in a cool and dry
Remove the spent batteries immediately and dispose of
Do not use an old and new batter together.(Also never use an alkaline battery
together with a manganese battery.)
AAA .
s
area
them properly.
y
Remote control
Negative
electrode
Positive
electrode
Positive
electrode
Negative
electrode
30
30
Senser ranges about 8 meters
Notes on batteries Notes on the remote control
*Improper use of batteries may cause battery
leakage and corrosion. To operate the remote
control correctly, follow the instructions
below.
*
Do not insert batteries into the remote
controlin the wrong direction.
*
Do not charge, heat, open, or short-circuit
the batteries. Do not throw batteries into
a fire.
*
Do not leave dead or exhausted batteries
*
Point the remote control at the remote
sensor of the player.
*
Do not drop the remote control.
*
Do not leave the remote control near an
extremely hot or humid place.
*
Do not spill water or put anything wet
on the remote control.
*
Do not open the remote control.
together, or mix old and new batteries.
*
If you do not use the remote control for a
long period of time, remove the batteries
to avoid possible damage from battery corrosion.
*
If the remote control does not function correctly
or if the operating range become smaller,
replace all batteries with new ones.
*
If battery leakage occurs, wipe up the battery
liquid from the battery compartment, then insert
new batteries.
* Do not expose the remote sensor of the player to a strong light source such as direct
sunlight or other illumination. If you do so, you may not be able to operate the player
via the remote control.
13
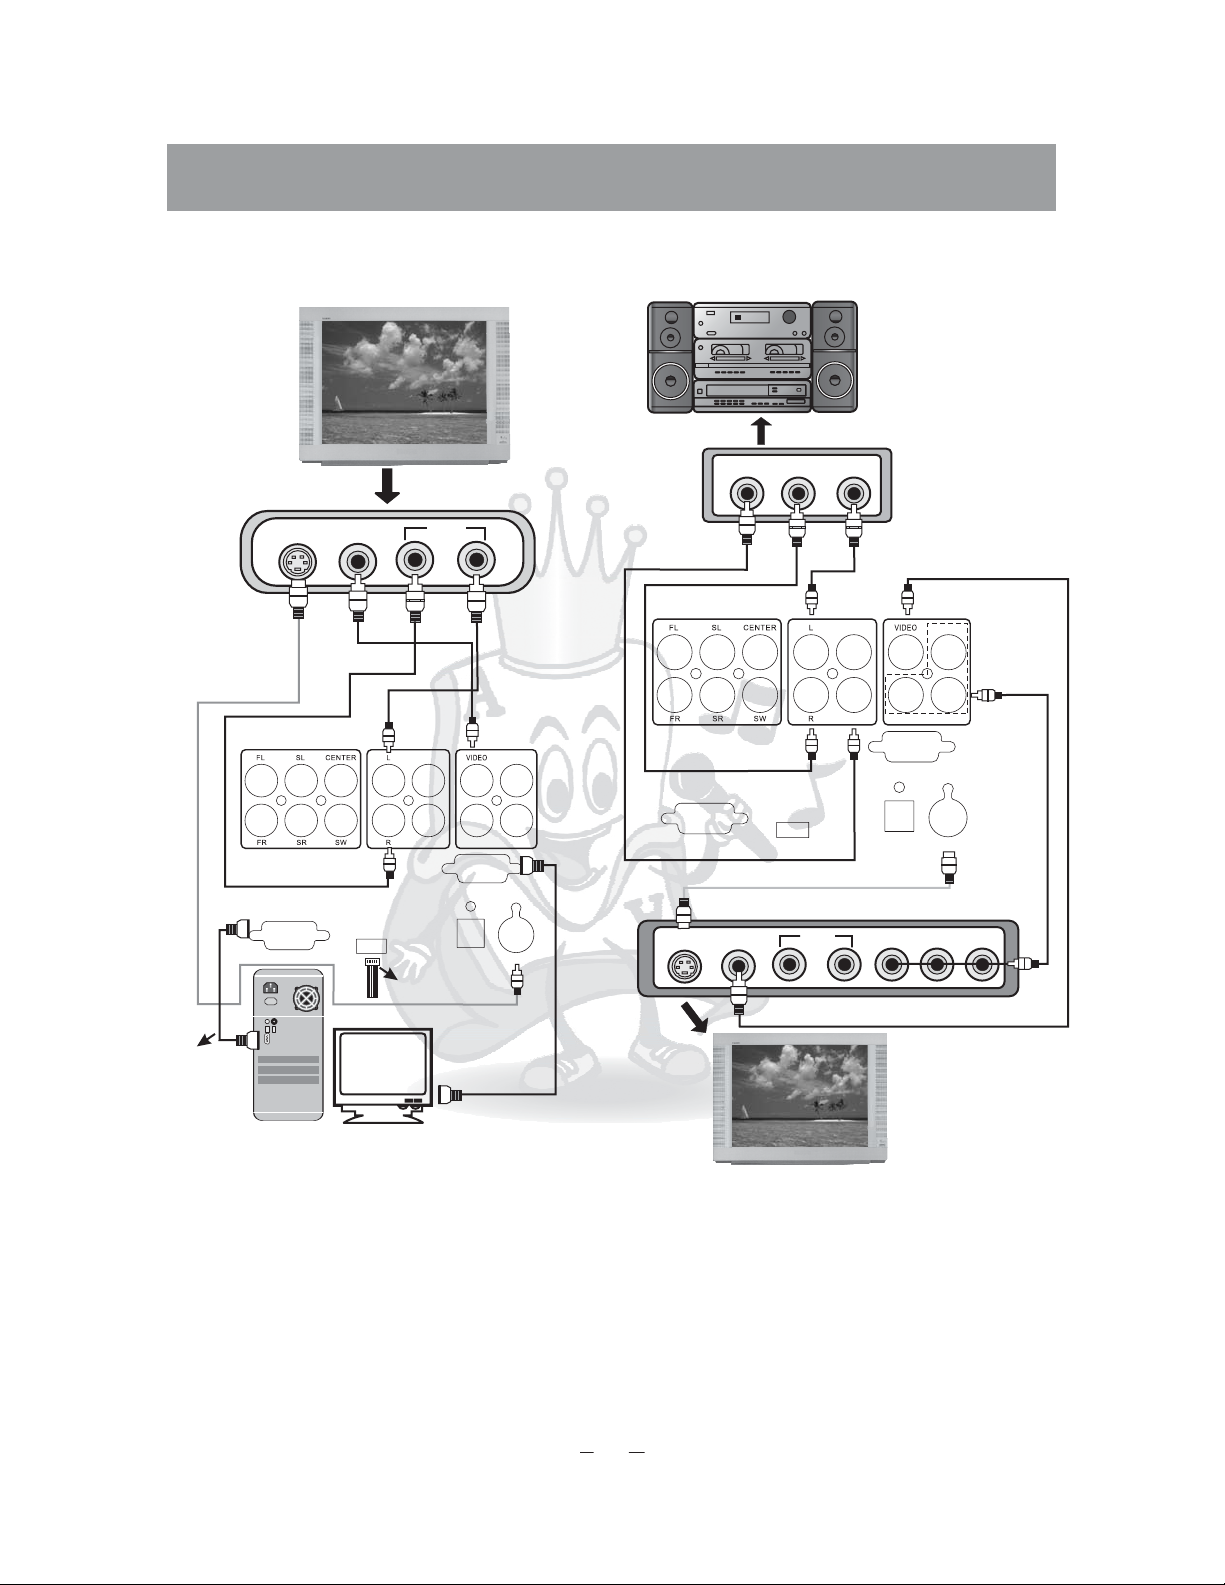
Hooking Up The Player
Connecting to
S-VIDEO
Connecting to AUDIO R
Connecting to TV with AV input
AUDIO
S-VIDEO
VIDEO
R
Connecting
to AUDIO L
COAXIAL
SCORE IN
L
Cr/Pr/R
WhiteRedYellow
Yellow
Y/Y/G
Cb/Pb/B
Connecting to TV with AV input and
Amplifier with karaoke scroe output
Red
STATE
R
REMOTE
GND
Red
+5V
L
White
Connecting to AUDIO L
White
COAXIAL
Cr/Pr/R
SCORE IN
VGA
OPTICAL
Connecting to
SCORE OUT
Connecting to AUDIO R
RS232C
SCORE OUT
Yellow
Y/Y/G
Cb/Pb/B
S-VIDEO
Connect to the TV's COMPONENT VIDEO IN
RS232C
Red
STATE
REMOTE
GND
VGA
+5V
OPTICAL
S-VIDEO
Connecting to PC's monitor
S-VIDEO
Connecting to TV S-VIDEO
VIDEO
AUDIO
L
R
YUV
Remote Receiver of Outer
Connecting to TV VIDEO
Connect to PC's
serial port(RS232)
Yellow
Note:
1.Refer to the user manual to connect the player to the TV and amplifier..
2. hen you connect the player to your TV, be sure to turn off
W
the power and unplug both units from the wall outlet before making any connections.
3.Connect the player to your TV directly. If you connect the player toaVR,TV/V R combination
CC
or video selector, the playback picture may be distorted as DVD video disc are copy protected.
4.If you place the player near a tuner or radio, the radio broadcast sound might be distorted n
this case, place the player away from the tuner and radio.
5.The output sound of the player has a wide dynamic range, make sure to adjust the receiver's
volume to a moderate listening level, otherwise,the speaker may be damaged by a sudden high
volume sound.
6.Turn off the amplifier before you connect or disconnect the player's power cord, If you leave
the amplifier power on, the speakers may be damaged.
7.S-VIDEO and VIDEO can be connected to TV
8.S-VIDEO cable is not supplied with the player, It be purchased .
a.
can additionally
14
.I
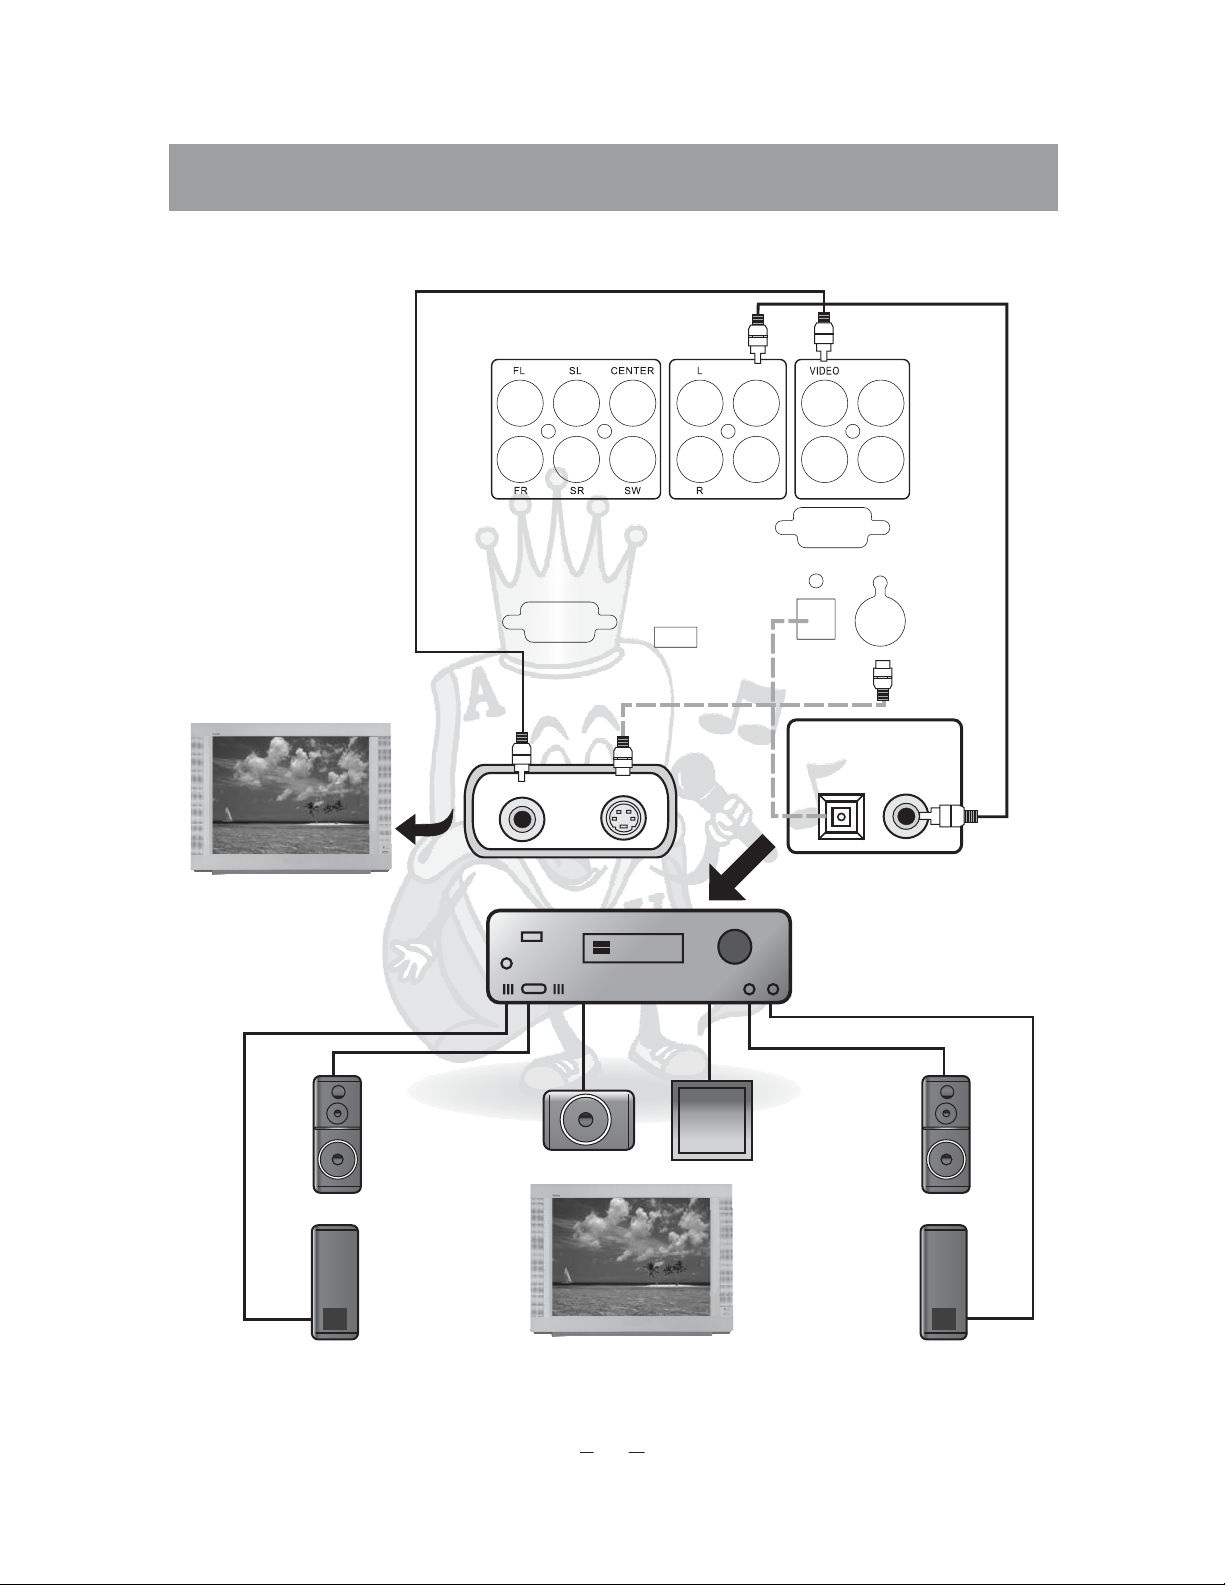
Hooking Up The Player
Connecting to digital output
Yellow
Connecting to
TV VIDEO
Yellow
VIDEO
RS232C
STATE
REMOTE
Connecting to
S-VIDEO of TV
S-VIDEO
GND
+5V
COAXIAL
SCORE IN
Cr/Pr/R
VGA
OPTICAL
OPTICAL COAXIAL
Amplifier
Y/Y/G
Cb/Pb/B
S-VIDEO
PCM
Amplifier
SUB WOOFER
Centre
speaker
Front
left speaker
Back left
speaker
*-
Note the optical or coaxial output jack can't output MIDI music.
MIDI music only can be output by mix audio.
ed
Front right
speaker
Back right
speaker
15
 Loading...