

Acesonic DGX-212 User Manual
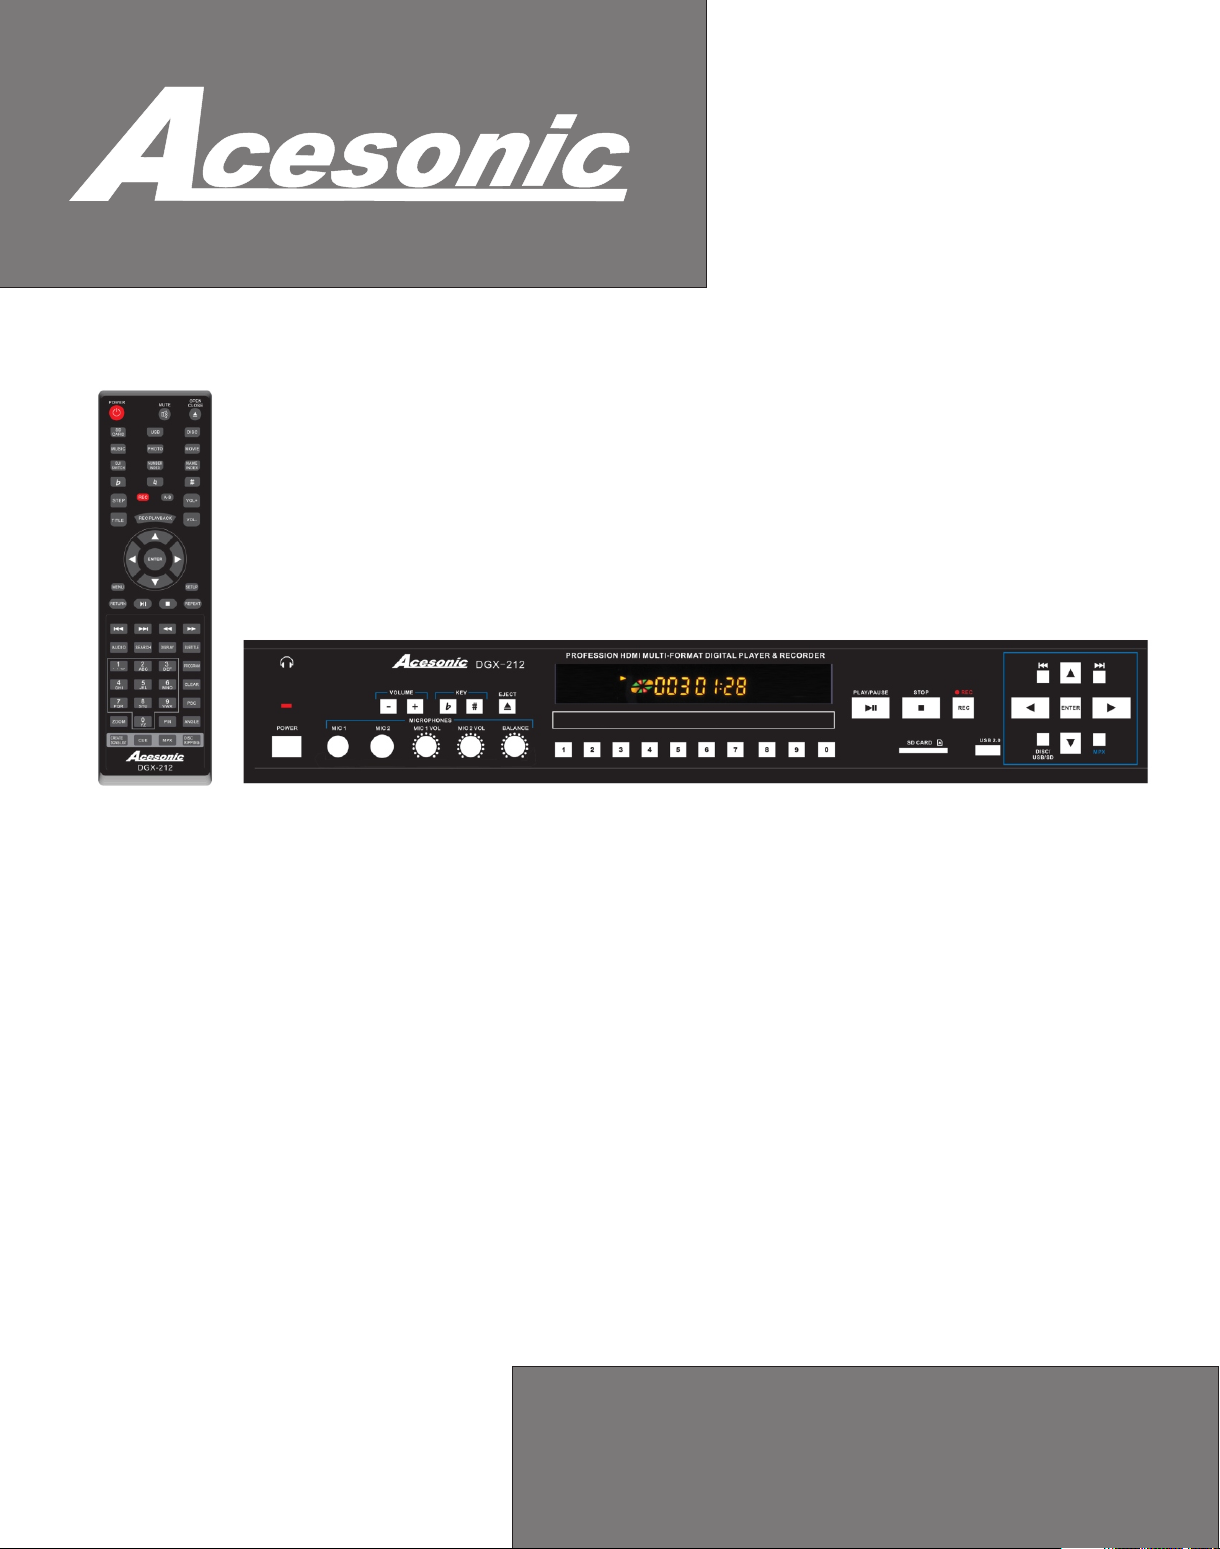
DGX-212
®
HDMI Multi-Format Karaoke Player
with 4X CDG to M P3G C onv ert er with Digital R eco rdi ng
User Manual v.1.0
NOTE: To ensure this system works safely and to its fullest potential, please read the User Manual
carefully before use and keep it handy for future reference.
CAUTION:
To assure t his pla yer wil l work at i ts best , pleas e
read th is user ’s m anual c arefu lly bef ore ope ratio n
and kee p for fut ure ref erenc e.
www.acesonic.com

Acesonic DGX-212
Thank you for purchasing Acesonic's DGX212 HDMI Multi-Format Karaoke Player with
Digital Recording. Acesonic takes pride in
providing its customers with only the most
advanced and highest quality products on
the market.
With proper care and use you will get many
years of satisfying use from your Acesonic
product.
Be sure to keep original packaging in case
re-shipping is required for returns or repairs.
Care and cleaning: Use a slightly damp cloth
to clean the front panel and other surfaces of
the DGX-212. Do not use the device in areas
that are wet or prone to dampness. Always
allow enough room below and around the
device to provide sufficient air flow for
cooling when it is being used.
First Things First
Included Accessories
Please check that you have all of the
following accessories supplied to you. If
anything is missing, please contact your
dealer immediately.
RCA Composite (Yellow/Red/White)
Audio/Video Cable (1)
Remote Control (1)
User's Manual (1)
Table of Contents
First Things First ........................................1
Important Information Before You Start...2
Compatible Video Formats .......................3
Front Panel Functions and Operations....4
Back Panel Functions and Operations ....4
Remote Control Functions ........................5
Player Connections....................................7
Basic Operation: Playback........................9
Playback from USB and SD Cards ...........9
Basic Operation: Karaoke.......................10
Basic Operation: System Setup .............11
Basic Operation: Language Setup.........12
Recording & CDG Disc Ripping..............14
Ripping CDG Disc into MP3G files .........15
Other Advanced Operations ...................16
Creating song list .....................................17
Song Searching/Programing ..................17
Troubleshooting Chart 1..........................18
Troubleshooting Chart 2..........................19
Safety, Warnings and Precautions.........20
Technical Specifications & Contact
Information................................................22
NOTE
Your Acesonic DGX-212 HDMI Multi-Format
Karaoke Player with Digital Recording arrives
with everything you need to start making music
and converting (“ripping”) CD+G files to the
MP3+G format. If you need speakers or other
audio components, they can be obtained from
Acesonic, or you can use any standard audio
equipment that conforms to contemporary
standards. If you are familiar with audio
equipment, use the enclosed Quick Start Guide
for setup. Please fill out your Warranty
Registration Card and return it right away.
1

Before Operation
About This Manual
The display window information and On
Screen Display (OSD) items are all in UPPER
CASE letters.
Important Information Before You
Start
Compatible Media and File Formats
This unit supports the following disc and file
formats:
Precautions
Power Cord: When you are away on travel or
won't use the DGX-212 for an extended
period of time, unplug the unit from the wall
outlet.
When unplugging the player from the wall
outlet, always pull the plug, not the cord.
Do NOT handle the power cord with wet
hands.
Avoid moisture, water and dust
Do not place the player in a moist
environment or in an area where there
might be an excessive amount of dust build
up (e.g. near a fan).
If water or any liquid should get into the unit,
turn off the power and unplug the unit from
the wall outlet immediately. Consult your
dealer or an authorized repair station.
Using the unit in this state may lead to fire
or electrical shock.
Avoid high temperatures.
DVD, AVI, Video CD, Video CD 2.0
CD+Graphics, Audio CD, HDCD
MP3, MP3+G, JPEG, Kodak, MPEG
Above media is playable on the following discs:
DVD±R, DVD±RW, DVD±R DL, DVD±RW DL,
CD-R/RW
Card reader compatible formats:
SD Memory Card (FAT32 format only).
Important Reminders
Any disc that is not listed above will cause the
player to display NO DISC in the Display
Window. Future media and disc formats maybe
supported with firmware upgrades, when
available.
Encoding methods of some media formats may
affect playback, e.g., unable to fast forward,
long load time, etc. Be sure that the encoding
process conforms to the standards for that
particular format.
Do not expose the player to direct sunlight
or place near any heating device.
Notes on Installation
Select a place where the unit will be level,
dry, and not too cold or hot.
Do not use unit on its side or where subject
to vibrations (e.g. speakers).
Leave sufficient distance between the TV
and unit.
Do not leave heavy objects on top of unit.
Prevent Unit Malfunction
No parts in this unit are user-serviceable. If
the unit no longer functions, unplug it from
the wall outlet and contact your dealer for
service options.
Never block the vents on the unit. Vents are
used to circulate air and keep the
temperature of the player down. Blocking
the vents may result in damage of the unit.
Dirty, scratched, warped and defective discs
may cause a considerable time delay during the
loading and reading of data. In extreme cases,
such conditions may render the disc completely
unreadable by the player.
Video Signal Formats
This player accommodates both NTSC and PAL
systems, with automatic detection and override
settings.
Digital Audio Formats
This player accommodates stereo, analog and
several high-resolution digital audio signals.
Note: Depending on AUDIO SETUP > SPDIF
settings, digital audio signals may not be output
as they are recorded on the disc.
2

Before Operation
Notes Regarding Discs
With some DVDs, the player starts playback automatically after inserting the disc, whether or
not PLAYBACK CONTROL is on or off.
The image may be poor, noisy or grainy due to defects on the actual disc, and some functions as
described in this manual may not be possible on all discs.
Maintenance of Discs
Handling
When handling discs, always hold them from their edges and/or by the circle in the center.
NEVER write on the any surface of the disc for it may render the disc unreadable.
Store discs in a clean and dry environment. Storing CDs vertically will also help prevent
warping.
After use, insert CD into jacket or case to minimize wear and tear. DO NOT stack CDs on top of
one another.
Do not bend or press the disc. Do not expose the disc to direct sunlight or any heat source.
Cleaning
Wipe the discs from time to time using a soft cloth. Always wipe from the center towards the
edges, NOT in circular motions.
DO NOT clean with any other cleaning solution, unless it is specifically made for disc
cleaning.
CDs revolve at very high speeds inside of players. Never attempt to play cracked or warped
CDs, since doing so may cause the disc to shatter or the player to malfunction.
Power Cord
Handle the power cord only by its plug, and do not unplug it by yanking on the cord. Touching the
cord while your hands are wet may lead to an electric shock or a short circuit.
If the cord becomes damaged or its wires become exposed, please replace the cord as soon as
possible in order to prevent an electric fire or shock. Check the power cord every few months to
ensure it is functioning properly.
Compatible Video Formats
USB/SD Card Disc
Type Supported? Supported?
DivX 4.12 (AVI) Yes Yes
DivX 5.02 (AVI) Yes Yes
DivX 5.20 (AVI) Yes Yes
DivX 5.21 (AVI) Yes Yes
XVID (AVI) Yes Yes
DivX 6.0 (AVI) Yes Yes
DivX 5.11 (AVI) Yes Yes
DivX 3.11 (AVI) No No
DivX 7.0 No No
MP4 Yes Yes
MPEG-1 Yes Yes
MPEG-2 Yes Yes
VOB No Yes
DAT Yes Yes
3
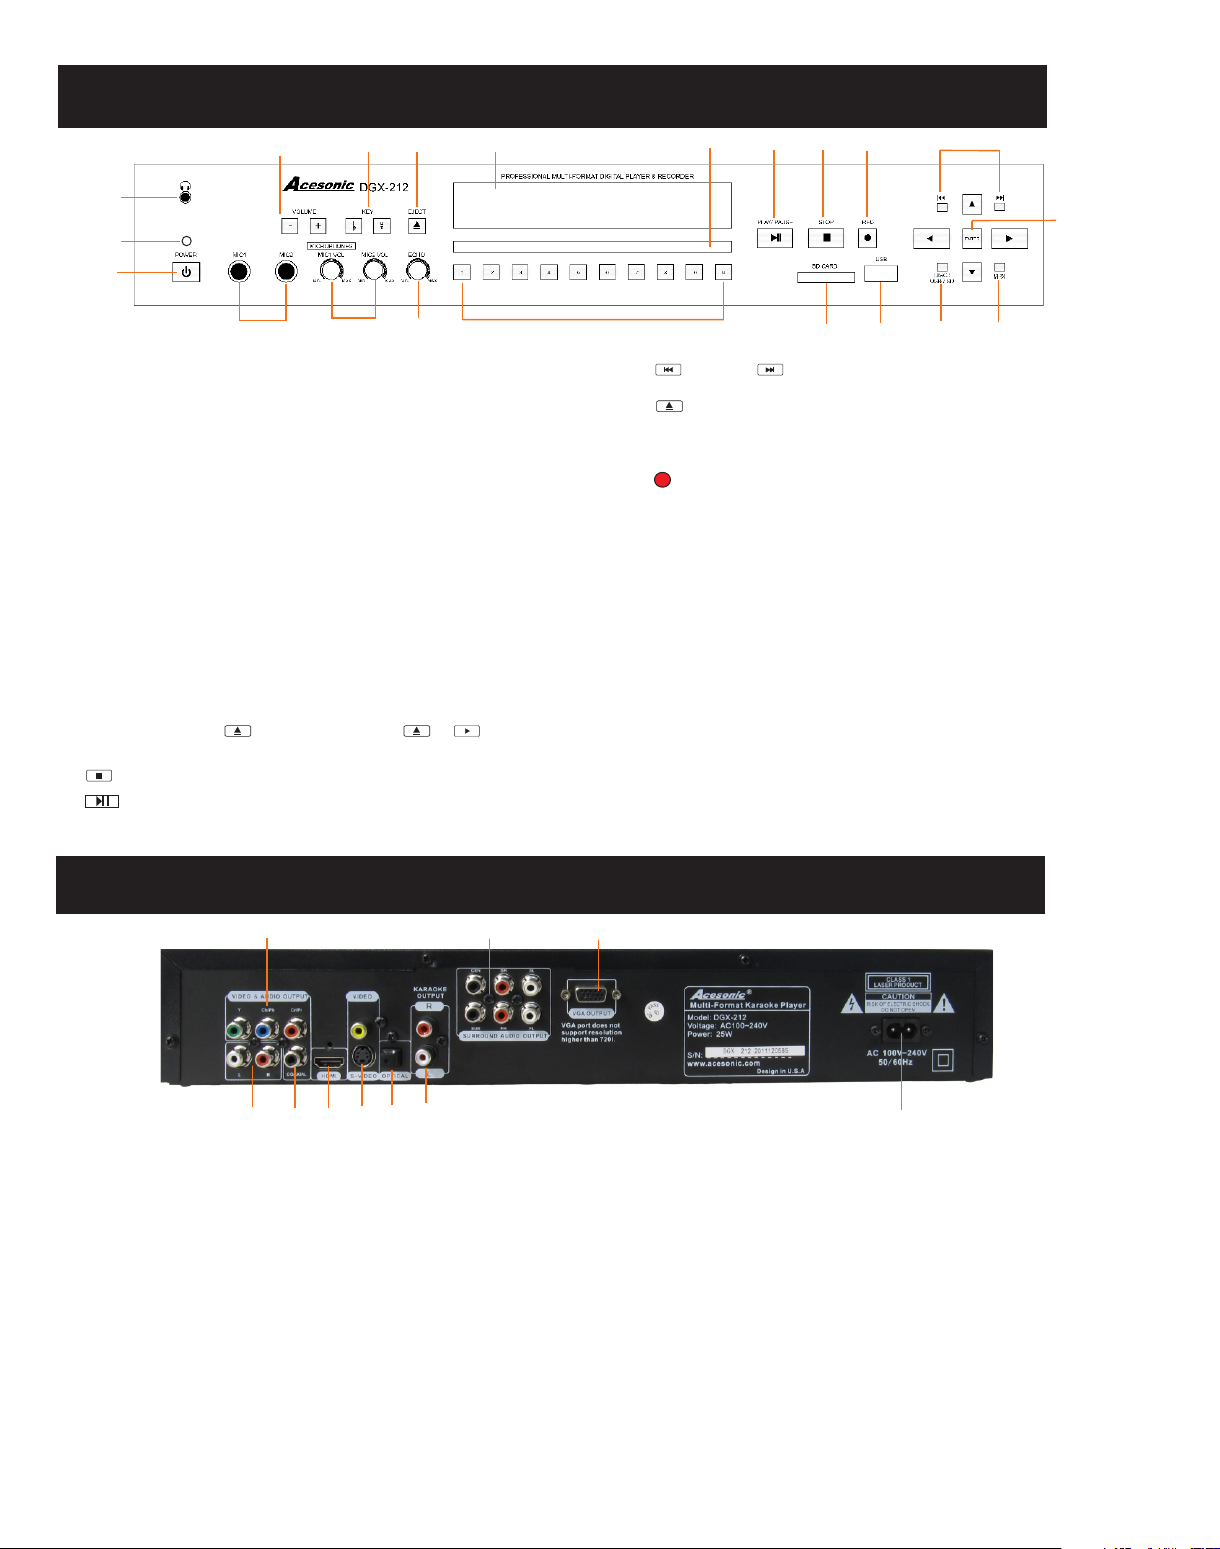
FRONT PANEL FUNCTIONS AND OPERATION:
21
20
14
13
8
9
11
10
15
7
1
12
18
2
1. POWE R - Press t he butt on to tur n the uni t on or off.
2. MIC 1 & 2 IN PUT jac ks - Conn ects mi croph ones wi th 1/4 in . plugs .
3. MIC 1 & 2 VO L knob - Co ntrol the volume output from MIC
CHANN EL 1 an d 2.
4. ECHO B utton - C ontro l the amo unt of EC HO(de lay) ap plied t o MIC
CHANN ELS 1 and 2 .
5. SD CAR D READE R - Play or r ecord M P3+G so ngs. We would
recom mend us ing hig h speed ( class 4 o r highe r) SDHC ( Secur e
Digital High C apaci ty) car ds for sm ooth re cordi ng and pl aybac k.
Note: R eader s uppor ts FAT32 fo rmat only.
6. USB IN TERFAC E - Conne ct USB de vices s uch as fl ash dri ves or
exter nal har d drive s. You can pl ay MP3, V CD, MP3 +G audi o files .
Note: U SB conn ectio n suppo rts FAT32 format only.
7. REMO TE SENS OR wind ow- Rec eive si gnals f rom rem ote con trol.
8. DISP LAY WINDO W - Displ ays pla yer sta tus suc h as time , disc
forma t and son g numbe r. If no dis c is in the t ray, the display window
will display N O DISC. D etail ed info rmati on will a lso be sh own on th e
TV scre en if con necte d.
9.DIS C TRAY - Press to open tray. Press or to close t he
tray, it w ill pla y the dis c automatically.
10. STOP - Stops pl aying a nd reco rding .
11. PLAY/PAUSE - Pre ss to sta rt play ing the d isc or te mpora rily
suspe nd play ing.
3
4
16
12. PREV or NEXT - Press to go to the previous or next track
13. OPEN/ CLOSE - U sed to op en and cl ose dis c tray.
14. KEY C ONTRO L But tons- The - bu tton fl atten s by a half t one,
while the + butt on shar pens by a h alf ton e.
15. REC ORD But ton - Pre ss this b utton t o start r ecord ing sin ging
(audio MP3 fil e only) f rom VCD o r CD disc s, or rec ord MP3 +G(A/ V
files ) from CD G or MP3G d isc fil es. See t he foll owing p age for m ore
infor matio n.
16. NUMERIC KEYS 0-9: Input track selections or programming
commands. Note: In the Play Back Control (PBC) function operation, the
number keys are also used to select menu items.
17. Mul tiple x(MPX )- Sele cts Lef t/Rig ht, MON O, and St ereo au dio
outpu t for CDs a nd audi o track f or DVDs .
18. ENT ER - Conf irm sel ectio ns.
19. DVD /USB - Sw itche s betwe en DVD mo de, USB m ode and C ARD
mode.
20. Mas ter Volu me Cont rol - Controls the overall music or audio
volum e of the pl ayer.
21. Hea dphon e Outpu t Jack - Li sten to y our mus ic or mov ies in
priva te.
6
5
19
BACK PANEL FUNCTIONS AND OPERATION:
7
6
8
17
10
4
1.ELE CTRIC P LUG - Con necti on to aut o-det ect AC powe r suppl y
(100- 240V,50-6 0 Hz).
2.OPT ICAL OU TPUT - Co nnects to digital amplifier or receiver for
surro und sou nd. Cha nge set tings i n the SET UP menu first, as
follo ws: SET UP > AUDIO S ETUP > SPDIF O UTPUT >SPD IF/RA M
OR SPDI F/PCM . Note: K araok e does no t work wi th OPTI CAL output .
3. S-VI DEO OUT PUT - Out put for S -VIDE O.
4. STER EO OUTP UTS - Yellow RC A output s for use i n TVs w ith
compo site in puts.
5.COA XIAL OU TPUT - Co nnects to digital amplifier or receiver for
surro und sou nd. Cha nge in th e SETUP m enu first, as follows:
SETUP > AU DIO SET UP > SP DIF OUT PUT > SPDIF/ RAM OR
SPDIF /PCM. N ote: Ka raoke d oes not w ork wit h COAXI AL ou tput.
9
5
2
3
1
6. 5.1 CHANNEL AUDIO OUTPUT - RCA outputs for analog 5.1 digital
output. To use 5.1 channels, press 5.1CH on the remote or change
settings in the SETUP menu before using 5.1 channels. See below.
SETUP> SPEAKER SETUP> DOWNMIX> OFF
7.COM PONEN T VIDEO O UTPUT- Video output for use Y,Pb,Pr
compo nent ca bles.
8.VGA VIDE O OUTPU T- Vid eo outp ut usin g VGA cable s.
9.HDM I AUD IO/VI DEO OUT PUT- mu sic A/V & kar aoke vo cal out put
by usin g HDMI ca ble.
10. Kar aoke Ou tput - Re d and whi te RCA out puts fo r mixed v ocals
and mus ic audi o outpu t. We rec ommen d to use this output or HDMI
outpu t for kar aoke ex perie nce.
SUBWOOFER>ON
4

Remote Functions
1. POWER BUTTON - Turns the player on or off.
2. SD CARD - Press to change to SD card mode.
3.MUSIC BUTTON - In USB/SD Card mode, use this
button to call out all the music files and display on the
screen.
1
2
10
11
12
3
4
13
14
5
15
16
6
17
18
7
19
8
20
4. GUI SWITCH - Press the button to switch between
windows and playback display mode. See more detail
on page 17.
5. SHARP BUTTON (#) - Raises the key by a half tone.
LOW BUTTON (b) - Lower the key by a half tone
NATURAL BUTTON - Go back to original key tone.
6. TITLE BUTTON - DVD’s have an indication number
which makes it easier to locate chapters.
7.MENU BUTTON - Press MENU once to return to the
root menu for DVD’s.
8.PLAY BUTTON - Press to begin playback or to close
disc tray and begin playing automatically.
9. NUMBER KEY 0-9 - Inp ut numb ers for t rack
se lection or progr amming purpose s. In the PBC
fu nction, the numb er keys a re also used to select
10. CLOSE/EJECT BUTTON
11. USB PORT - Press to change to USB mode if a USB
device is connected.
12. DVD DISC - Press to change to disc mode.
13. NAME INDEX BUTTON - Use this button to do song
search by song name in the DISC/USB/SD mode. There
must be a name in the song name (ex: love from
1001_love.mp3) to make this function work. See more
detail on page 17.
14. NUMBER INDEX BUTTON - Use this button to do
song search by song-number in the DISC/USB/SD
9
mode. There must be a song number in the song name
(ex: 1001 from 1001_love.mp3) to make this function
work. See more detail on page 17.
. RECORD BUTTON - Record singing (audio MP3
15
file only) from CD/VCD discs or record MP3+G (A/V
files)from CDG/MP3G discs or files. * Ripping a single
or multiple files from CDG disc, simply press DISC
RIPPING(#45) button to start ripping process.
16. MUSIC VOL - Adjust the volume of music audio
output.
17.PLAYBACK BUTTON - After recording your singing,
you can use this button to playback right away.
18. DIRECTION - Use the
ENTER & BUTTONS
direction buttons for navigation in selection menu and
use the enter button to confirm entry or selection.
19. SETUP BUTTON - Open SETUP menu, see the
following pages for more detail .
20. SUBTITLE BUTTON - With DVD discs, press
SUBTITLE repeatedly until the desired language is
5
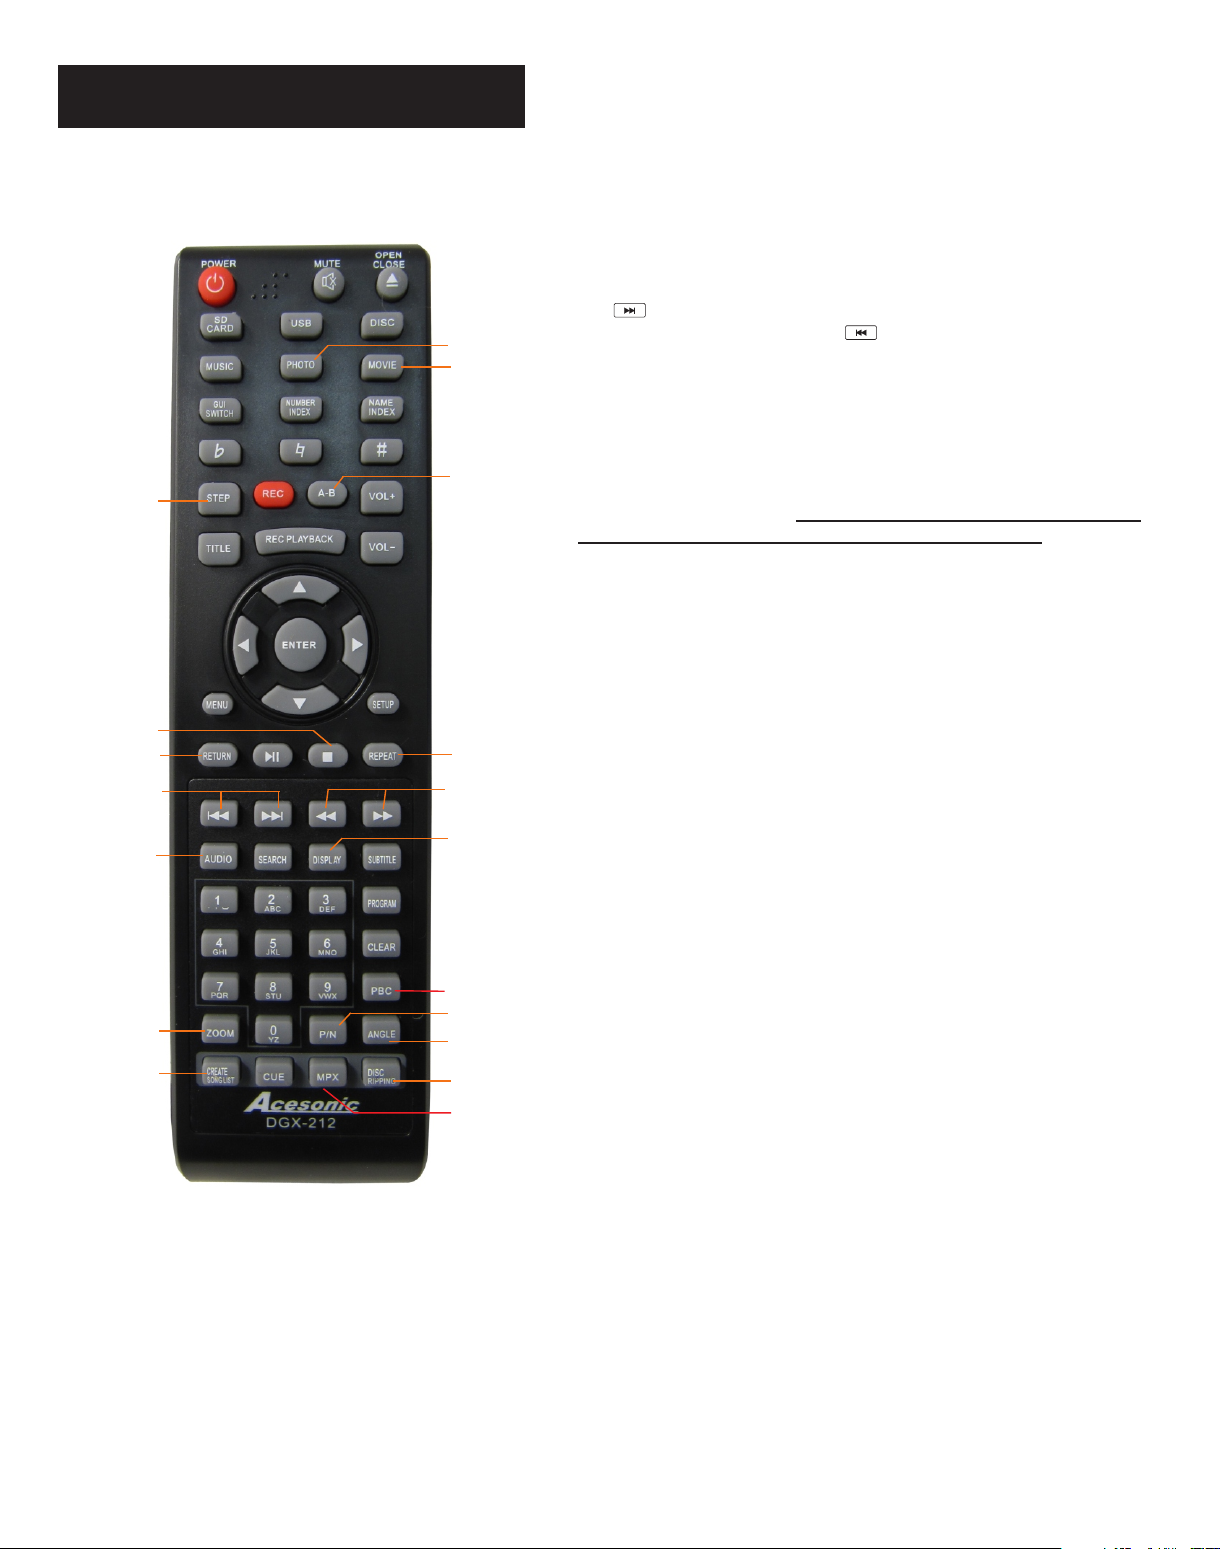
Remote Functions
28
29
30
21
22
23
24
25
26
27
31
32
33
34
35
36
37
38
STEP BUTTON- Press to play the frame step by step.
21.
Press the PLAY button once to return to normal playback.
22. STOP BUTTON - Press to STOP playback.
23.RETURN BUTTON - This button is used to return to a
menu screen while playing.
24. SKIP FORWARD BUTTON - Press to go to the
beginning of the next track. SKIP BACKWARD BUTTON -
Press to go to the beginning of the current or previous track.
25. AUDIO: Select audio sound track options for DVD discs.
26. ZOOM BUTTON - Enlarge a section of video or picture
currently being viewed.
27. CREATE SONGLIST BUTTON - If you have files in a
Disc,SD CARD or USB MODE. You can use this function to
scan songs in the storage device and create a song list into a
text file for further use. Please redo this function whenever
the contant has been changed(song add/delete)
28. PHOTO BUTTON - In USB/SD Card mode, use this button
to call out all the photo files and display on the screen.
29. MOVIE BUTTON - In USB/SD Card mode, use this button
to call out all the movie files and display on the screen.
30. A-B BUTTON - A-B REPE AT funct ion allows yo u to repeat a
segment of a track until stopped. To use this function:
1.Set a starting point A. 2.Set an end point B. Afterwards, the
unit plays from A to B. 3. P re ss A- B ag ai n, t il l A-B d is ap pe ar s.
31. REPEAT BUTTON - Allows you to repeat a track or disc.
1. Repeat a track - Press REPEAT, the screen shows REP
ONE, the unit plays the current track.
32.FWD>> << REW BUTTONS - Press FWD to shift the
playing location forward quickly. Press REW to shift the
playing location backwards quickly.
33. DISPLAY BUTTON - Show the elapsed or remaining time
for single track or the entire disc.
34. PBC BUTTON - This function is only available for videocd version 2.0 or higher.The function of PBC may differ by
different discs. When PBC mode is on, users can select items
in the menu by using the PREVIOUS/NEXT keys. When PBC
mode is off, users can not select items in the menu, but you
can use the numeral keys directly or the PREVIOUS/NEXT
keys.
35. P/N BUTTON - PAL/NTSC switch.
2. Repeat all - Press REPEAT, the screen shows REP ALL,
the unit plays all the tracks on the disc.
36. ANGLE BUTTON - With DVDs, select multi-angle views.
37. DISC RIPPING BUTTON - Used to rip whole CD+G disc or
just one track into SD card or USB storage. see more details
on page 12.
38. MPX - Switch between the left mono , the right mono or
stereo sounds. Use to turn vocals on/off on multiplex CD+G
or VCD disc. For DVD disc, use AUDIO button (#32) to switch
audio channel.
6
 Loading...