

Acesonic DGX-209 User Manual
DGX-209 Multi Format Karaoke Player
With Tempo Control and USB Port
USER’S MANUAL
www.acesonic.com
1

Table of Contents
Safety Precautions…………………………………………………………………………………………….3
Caution
Warning
Precautions
Notes on Discs
Before Use……………………………………………………………………………………………………..4
Playable Media
Regional code
Copy Protection
MP3+G Introduction
General Information
Front Panel Functions………………………………………………………...………………………………..5
Rear Panel Functions…………………………………………………………….……………………………..5
Remote Control………………………………………………………………………….……………………..6
Connections
Connecting the Power Supply…………………………………………………………..….......………………7
Connecting the Video-Out to a TV……...……………………………….………………….…...……………7
Connecting the Audio-Out to a Amplifier……………………………………….………………………….…8
Connecting with Microphones……………………………………….……………….………………………9
Connecting with USB devices……………………………………….……………………………………… 9
Basic Operation…………………………..……………………………………………………………….…10
Special Karaoke Operation…………………………..……………………………………………………..13
Special VCD, SVCD and MPEG4 Operation……………………………..…………….…………………15
Special MP3, WMA and JPEG Operation…………………………………………………………………16
Special USB Operation
Special USB Operation……………………………………………………...……..…………………………17
MP3 Ripping (Audio CD to USB)….....……………………..……………………………………….………18
DATA Transferring (Disc to USB) ……..……..……………..……………………………………….………18
System Setup
General Setup…………………………..………………………………..……………………………………19
Speaker Setup…………………………..………………………………..……………………………………19
Audio Setup…………………………..………..………………………..………………….…………………20
Video Setup…………………………..…..……………………………..……….……………………………20
Preference Setup…………………………..………………………………..…………………………………21
Troubles Shooting…………….…………..………………………………..………………………………22
Specifications………………………..………………………………..……………………….……………24
www.acesonic.com
Safety Precautions
2
Caution:
▪ This appliance is a class laser product. However this player uses a visible laser beam, which could cause hazardous
radiation exposure if directed. Be sure to operate the player correctly as instructed.
▪ When this player is plugged to the wall outlet, do not place your eyes close to the opening of the disc tray and other
openings to look into the inside of this player.
▪ Use of controls or adjustments or performance of procedures other than those specified herein may result in hazardous
radiation exposure.
▪ To prevent risk of electric shock, do not remove cover.
▪ No user serviceable parts inside.
▪ Dripping or splashing liquid can damage the unit, and no objects filled with liquids, such as vases etc, shall be placed
on the apparatus.
Warning:
▪ To prevent fire or shock hazard, do not expose this appliance to rain or moisture.
▪ To reduce the risk of fire or electric shock, and annoying interference, use the recommended accessories only.
▪ This device is not intended for continuous operation.
Precautions
Cleaning the Unit
Use a soft, dry cloth. If the surfaces are extremely dirty, use a soft cloth lightly moistened with a mild detergent
solution. Do not use strong solvents such as alcohol, benzene, or thinner, as these might damage the surface or the
unit.
Power supply voltage
Check that the operating voltage (AC 90V ~ 240V 50/60Hz) indicated on the type plate is identical to the voltage of
your local power supply. If not, please consult your dealer.
Power consumption
When the system is switched to Standby mode, it is still consuming power. To disconnect the system from the power
supply completely, remove the AC power plug from the wall jack.
Avoid high temperatures, moisture, water and dust
Do not expose the player, batteries or discs to humidity, rain, sand or excessive heat (caused by heating equipment or
direct sunlight).
Avoid condensation
The lens may cloud over when the player is suddenly moved from cold to warm surroundings, making it impossible
to play a disc. Leave the player in a warm environment until the moisture evaporates.
Do not block the vents
Do not operate the DVD Player in an enclosed cabinet, allow about 10 cm (4 inches) of free space all around the
player for adequate ventilation.
Do not stack anything on top of the Player
Do not stack anything on top of the player. Tt will make the top cover touch the disc or DVD loader.
Notes on Discs
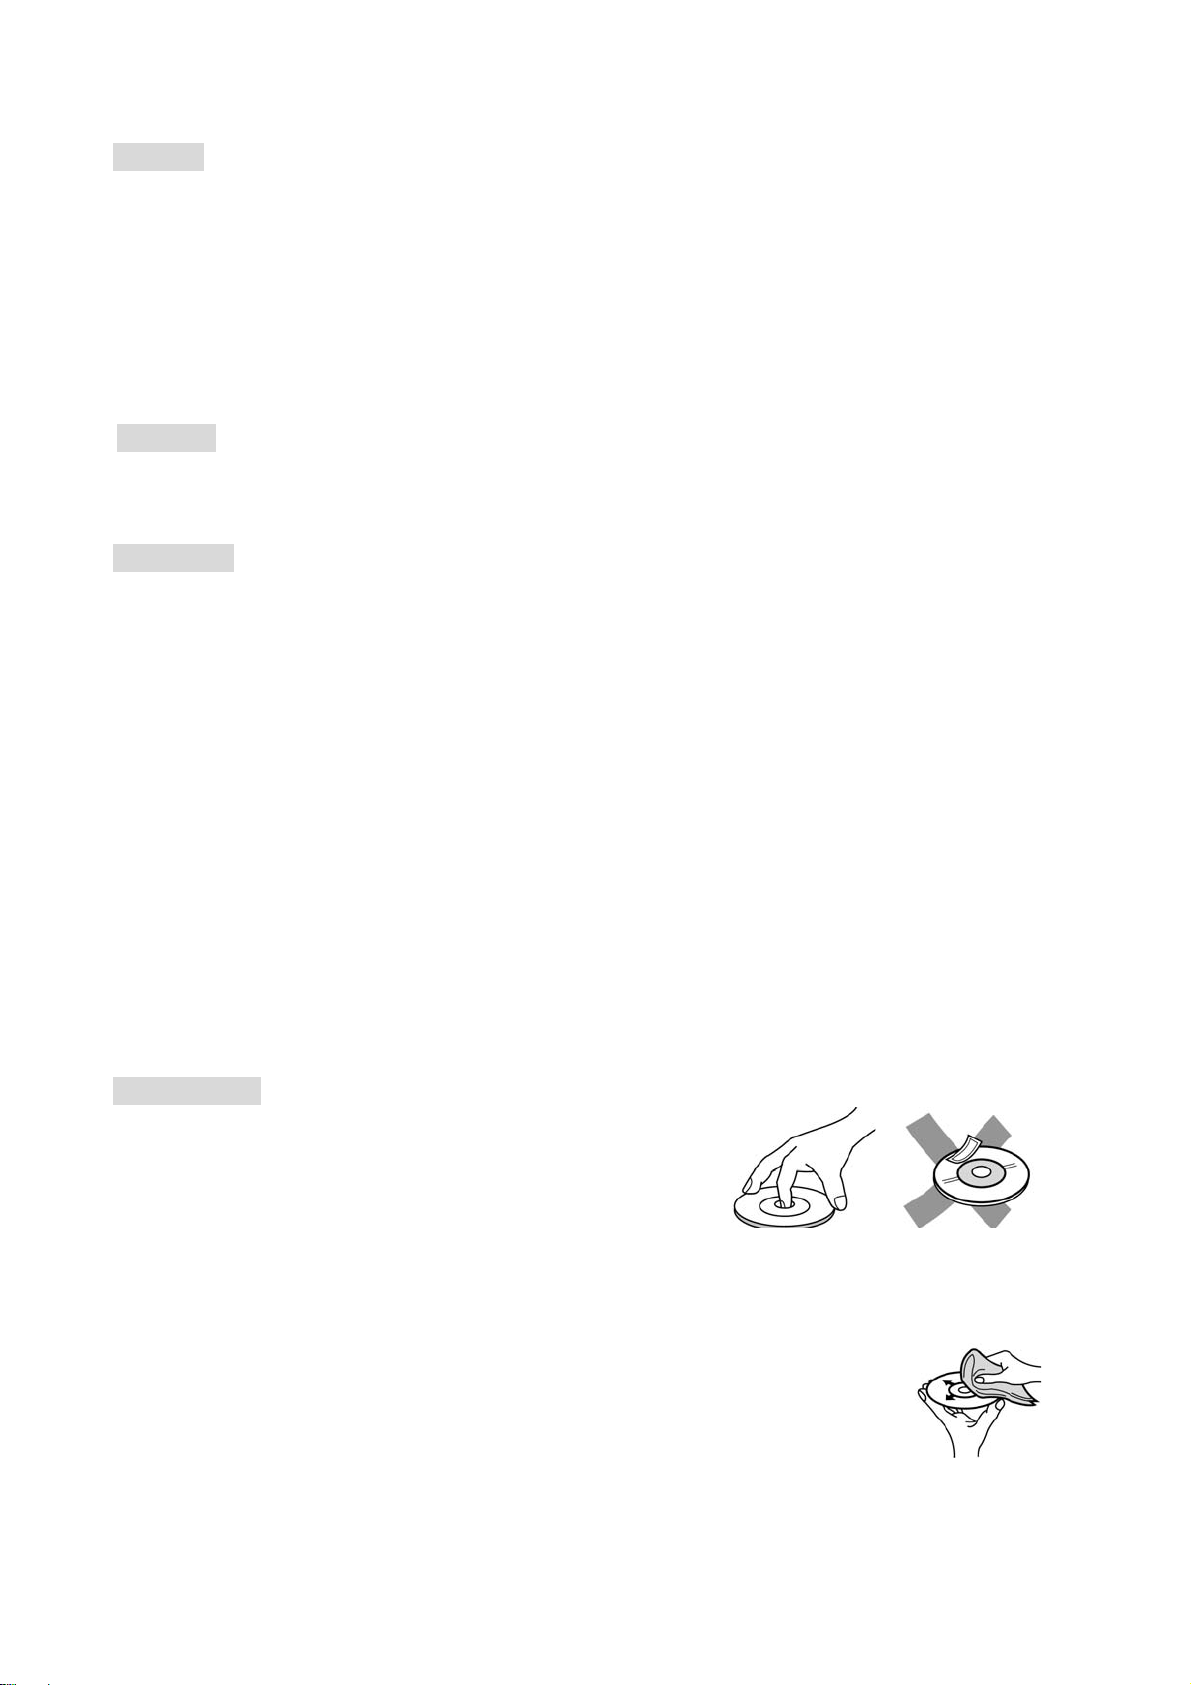
Care of Discs
Hold the disc by the edges so that fingerprints will not get on the surface.
Do not touch the playing surface (unprinted side).
Do not stick paper or tape on the disc.
toring Discs
S
Keep the disc in
Do not use cracked, heavily scratched,
Keep the disc away from heat of direct sunlight
leaning Discs
C
Fingerprints and
playing, clean the disc with a clean cloth. Wipe the disc from the center out.
Do not use any abrasive materials or solvents such as benzene and
commercially available cleaners, or anti-static spray intended for older vinyl records..
its case after playing.
or warped disc.
dust on the disc can cause poor picture quality and sound distortion. Before
alcohol, thinner,
www.acesonic.com
3
Before Use
Playable Media
DVD: DVD disc (8cm/12cm disc)
Video CD: VCD disc (8cm/12cm disc)
Audio CD: Audio CD (8cm/12cm disc)
In addition, this unit can play a DVD+/-R, DVD+/-RW, SVCD and CD-R/CD-RW that contains audio titles, MP3+G,
CD+G, MP3, WMA, JPEG or DivX files
<NOTE>
¾ Depending on the conditions of the recording equipment or the CD-R/RW, DVD+/-R/RW discs cannot be played
on the player.
¾ Do not attach any seal or label to either side of a disc
¾ Do not use irregularly shaped CDs, It may result in malfunction.
Regional code
This player can play only DVD discs labeled same as the rear of the unit or “All”
Copy Protection
Many DVD discs are encoded with copy protection. Because of this, you should only connect your DVD player directly
to your TV not to the VCR. Connecting to the VCR results in a distorted picture from copy-protected DVD discs.
MP3+G Information
The MP3+G consist of two files, the audio track compressed to the MP3 format and a separate CDG file that contains
the graphic (Lyric) data. MP3+G is derived from the CD+G disc format. MP3+G is created by extracting the CD-Audio
packets from the CD+G disc with a CD-ROM that is capable of also extracting the RW channels from the disc. The
digital audio portion is compressed to MP3 and the RW Channels (CD+G graphics) are stored to a CDG file.
This is a great way to back up your karaoke discs to your USB, Hard drive or CD's. The player reads each file and
synchronizes the information to display the interpreted graphics along with the music.
The two files of an MP3+G (one with a *.cdg extension and one with a *.mp3 extension) must have exactly the same
name with the exception of their file extension.
Burning MP3+G Files To Disc
There are several software applications. “Nero burning rom” one of applications makes creating karaoke MP3+G discs
from MP3+G files a snap. Simply select the MP3+G songs that you want and this program will encode them and then
burn them to a blank CDR or DVD-R disc with the click of a button. No other software is required.
with most modern CD and DVD writers.
Ripping Tracks From CDG Discs
There are several software applications that will rip tracks from a CDG and convert them to MP3+G files. A popular
one is Audio Grabber, Keep in mind that in order to rip tracks from a CDG you must have a CD-ROM or CD writer that
can read sub channel data.
Not all CD writers support the CDG format. Though virtually any writer will read and write the audio portion of a CDG,
you must have the proper drive to read and write the graphic data.
Supported MP3+G Format (Specially MP3 file):
The specification of MP3 in MP3+G file must keep the following specifications otherwise the MP3G file will not play
properly.
Format MP3
Bit Rate 80~348kbps
Sampling Frequency 44.1khz
It will also work
www.acesonic.com
4
General Information
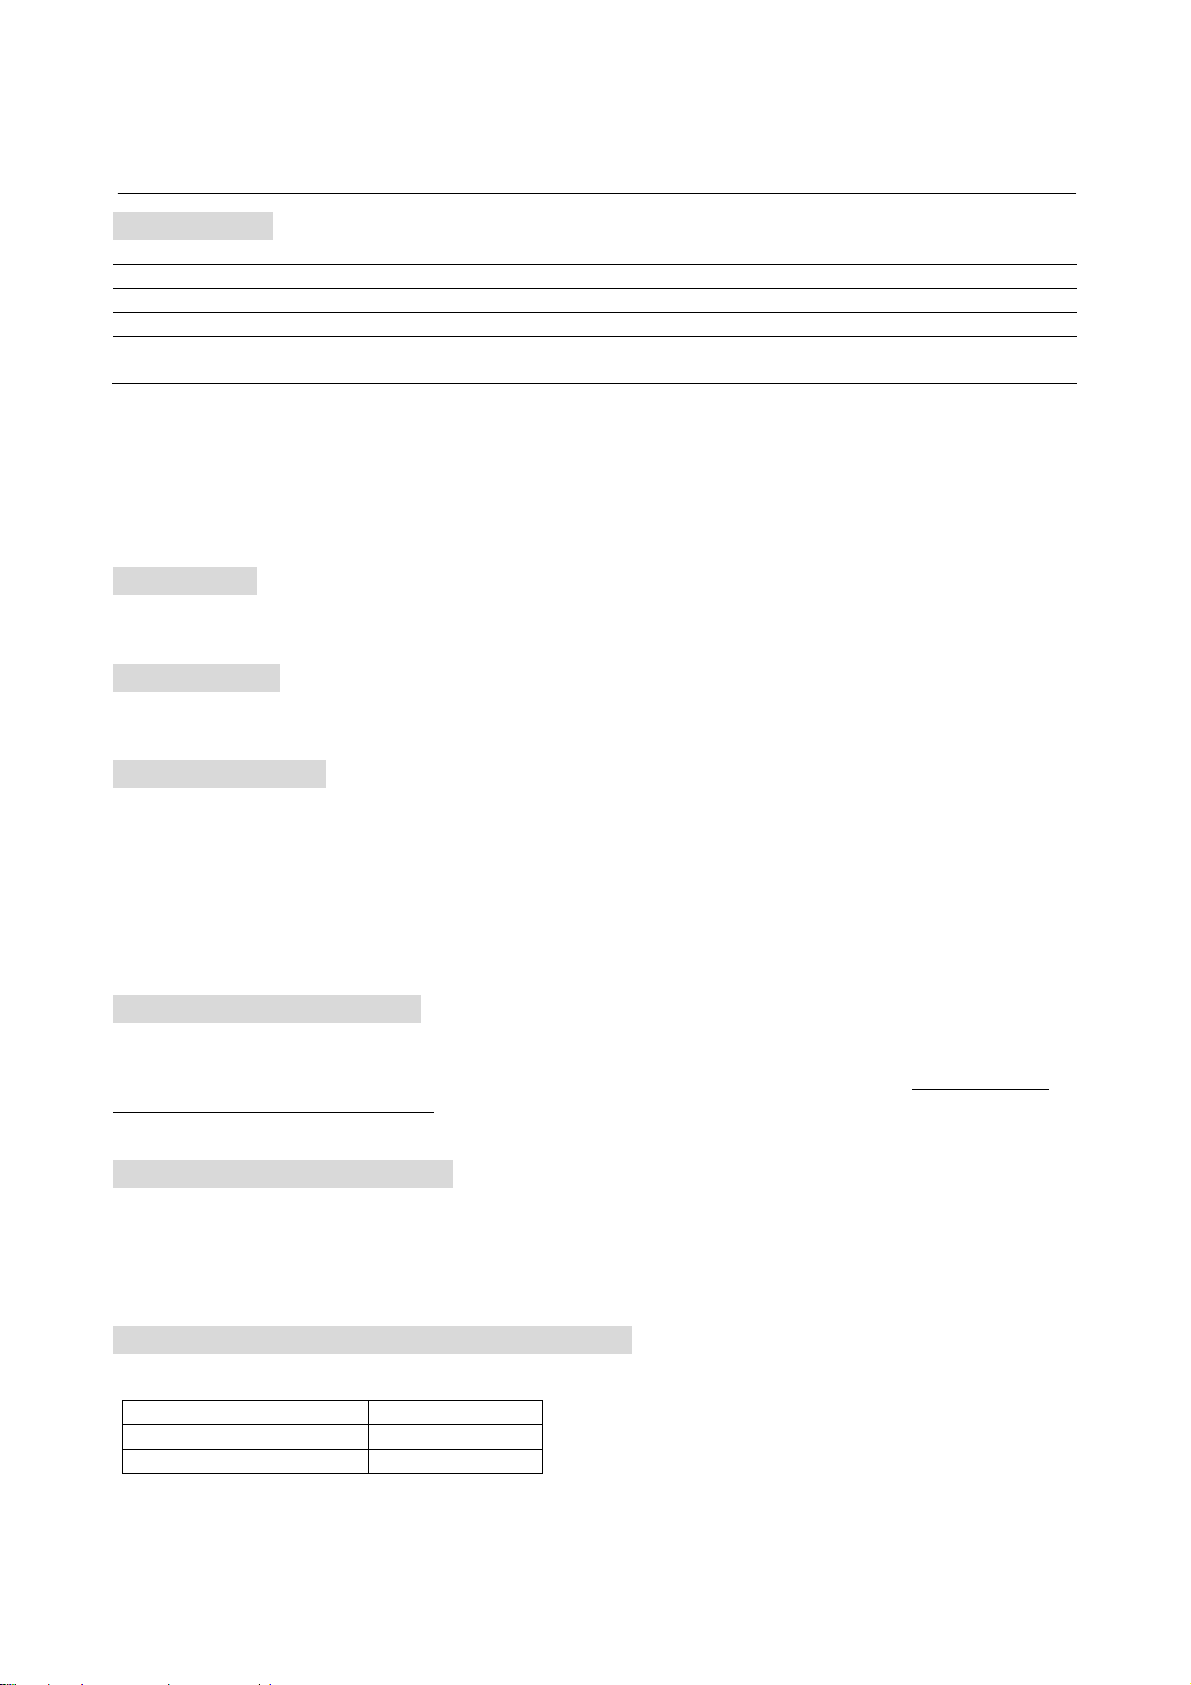
Front Panel Functions
1. POWER ON/OFF: Turns the power ON and OFF, when the power is ON, indicator lights and display on.
2. USB PORT: to connect USB devices such as USB memory, MP3 Player or external HDD.
3. OPEN/CLOSE: to open or close the CD Tray.
4. PLAY/PAUSE: to start playing or to pause the disc.
5. STOP: stops/ends playback.
6. PREV/NEXT: skip to Previous/Next track
7. MIC INPUT JACK: to connect the Microphone.
8. MIC VOLUME: to adjust the MIC volume
9. ECHO: to adjust the Echo level
10. MUSIC VOLUME: to adjust the Music output level
11. NUMBER(0~9): to select the file or track number
12. TEMPO(-/+): to adjust the TEMPO of music.
13. KEY(b/#): to change the Key of voice
14. Multiplex(=L/R/ST): to select Vocal ON/OFF
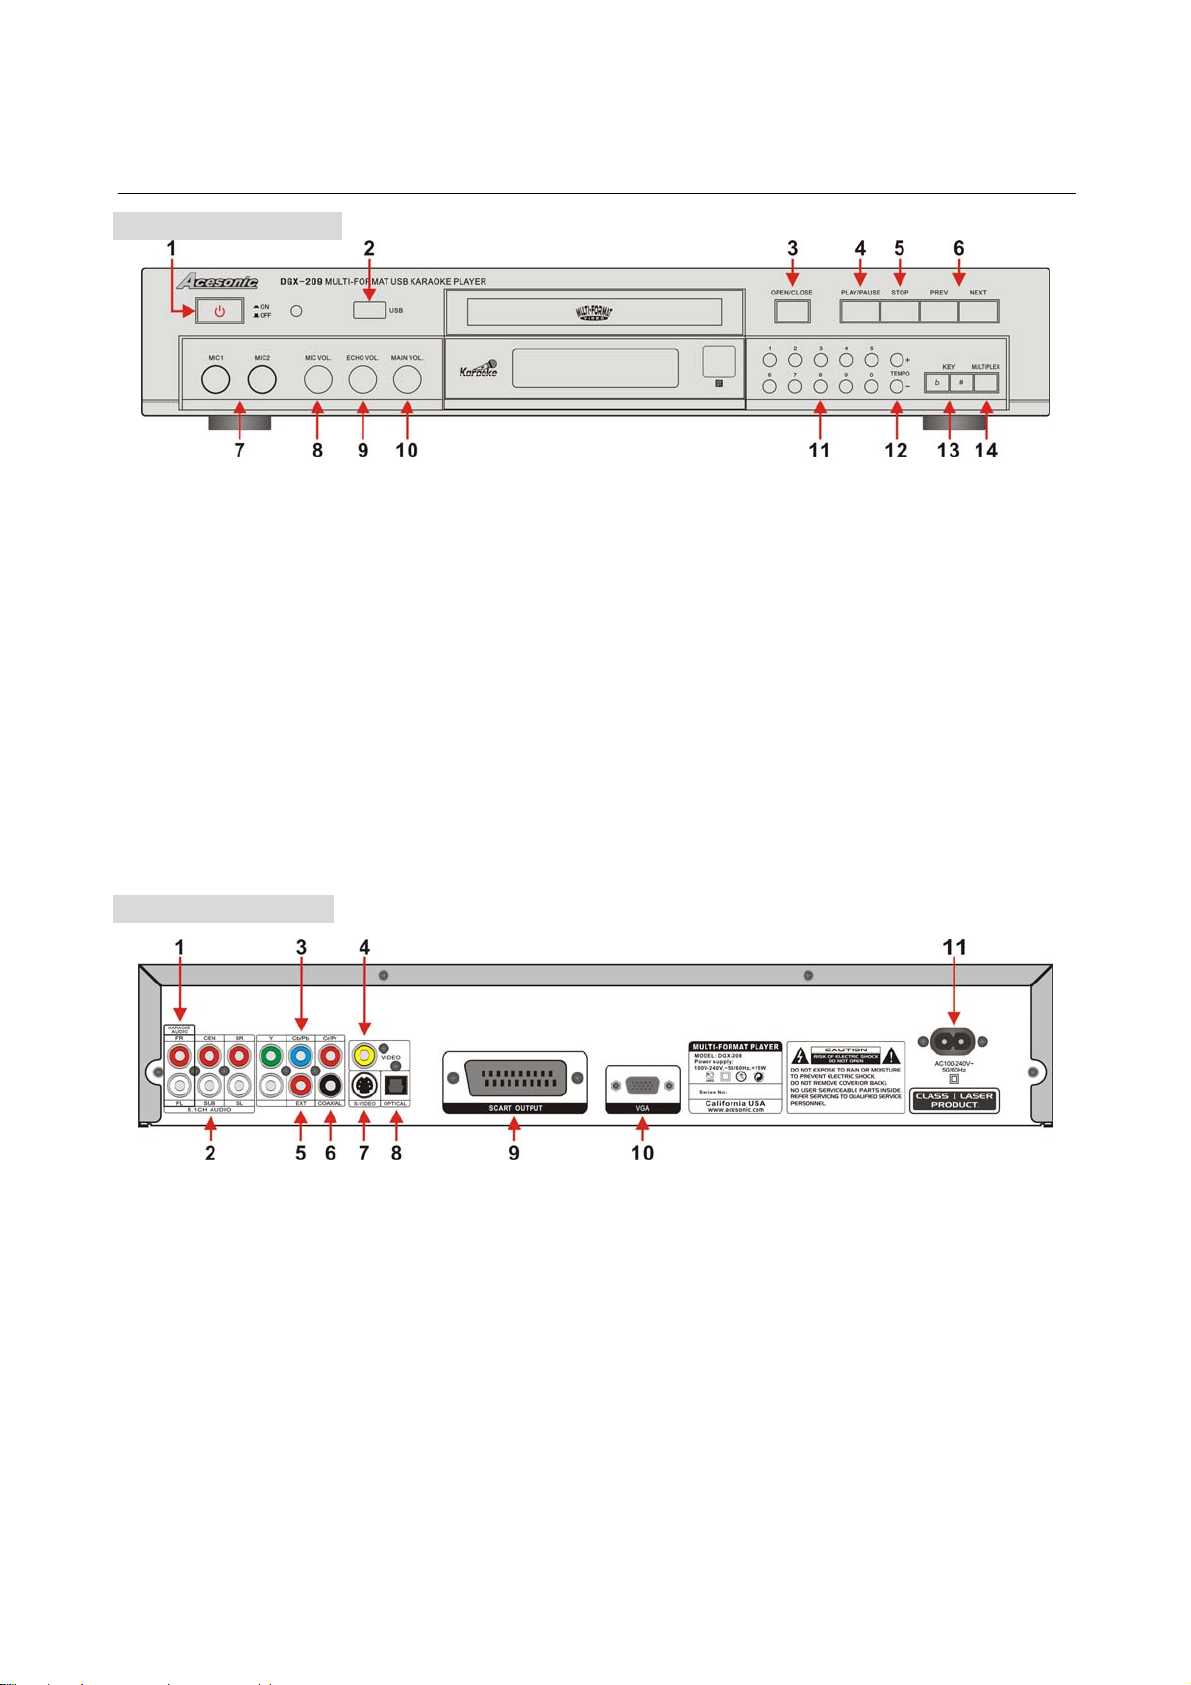
Rear Panel Functions
1. KARAOKE 2CH OUT: Karaoke ON or Scoring ON modes use analog 2CH (FR/FL) out.
2. 5.1CH ANALOG AUDIO OUT: Karaoke OFF and Prologic ON modes use analog 5.1CH.
3. COMPONENT(Y, Pb, Pr) VIDEO OUT: Connect to the Y, Cb, Cr Video Input of your TV using YUV cable
for best picture.
4. COMPOSITE VIDEO OUT: Connect to the Video Input of your TV using RCA cable.
5. EXT(External Scoring Input): Connect the RCA Cable from Mic output port of Amplifier in order to get
Scoring input signal.
6. COAXIAL DIGITAL AUDIO OUT: Connect to Coaxial Digital Input of the amplifier for better quality
surround sound using Coaxial Cable.
7. S-VIDEO OUTPUT: Connect to the S-Video Input of your TV using S-Video cable for better picture.
8. OPTICAL DIGITAL AUDIO OUT: Connect to Optical Digital Input of the amplifier for best quality
surround sound using Optical Cable.
9. SCART OUT: connection mainly used for TV’s in Europe. TV display (4:3) built-in video, RGB out and
5
www.acesonic.com

audio.
10. VGA OUT: Connects to the VGA port of TV or monitor
11. AC POWER CORD: Connection to auto-detect AC power supply (AC100V~240V, 50/60Hz)
www.acesonic.com
6

General Information
Remote Control
1. POWER
2. OPEN/CLOSE (EJECT)
3. PBC
INFO
M/F (Male/Female Key Change)
CUE (Single Play)
L/R/ST (=Multiplex)
AUDIO
N/P (NTSC/PAL)
USB/DISC
4. NUMERIC (0~9 & Alphabet)
5. CANCEL
6. PROGRAM
7. MENU
8. TITLE (=Song Search)
9. PgUp/PgDn (Page Up/Down)
10. ARROW
ENTER
11. TEMPO (+/-)*
12. KEY (#/b) CONTROL
13. VOLUME (+/-)
14. PLAY/PAUSE
STOP
PREV (PREVIOUS TRACK)
NEXT (NEXT TRACK)
FR (FAST REVERSE)
FF (FAST FORWARD)
SUBTITLE
REPEAT
RETURN
A-B
GOTO
ZOOM
SETUP
EQ (EAUALIZER)
ANGLE
MUTE
Remote Control Operation Range
Point the remote control at the remote sensor and press the buttons
Distance: about 23ft(7m) from the front of the remote sensor
Angle: About 30° in each direction of the front of the remote sensor
Remote control battery installation
Detach the battery cover on the rear of the remote control and insert
two AAA size batteries with + and – aligned correctly.
*Do not expose batteries to heat or flame
*Tempo Control:
Tempo (playback speed) changes might not work on several
situations:
1. VOB file from USB Port
2. sub title will be off on DVD disc
www.acesonic.com
7

3. some special CDG/VCD/DVD format
www.acesonic.com
8
 Loading...