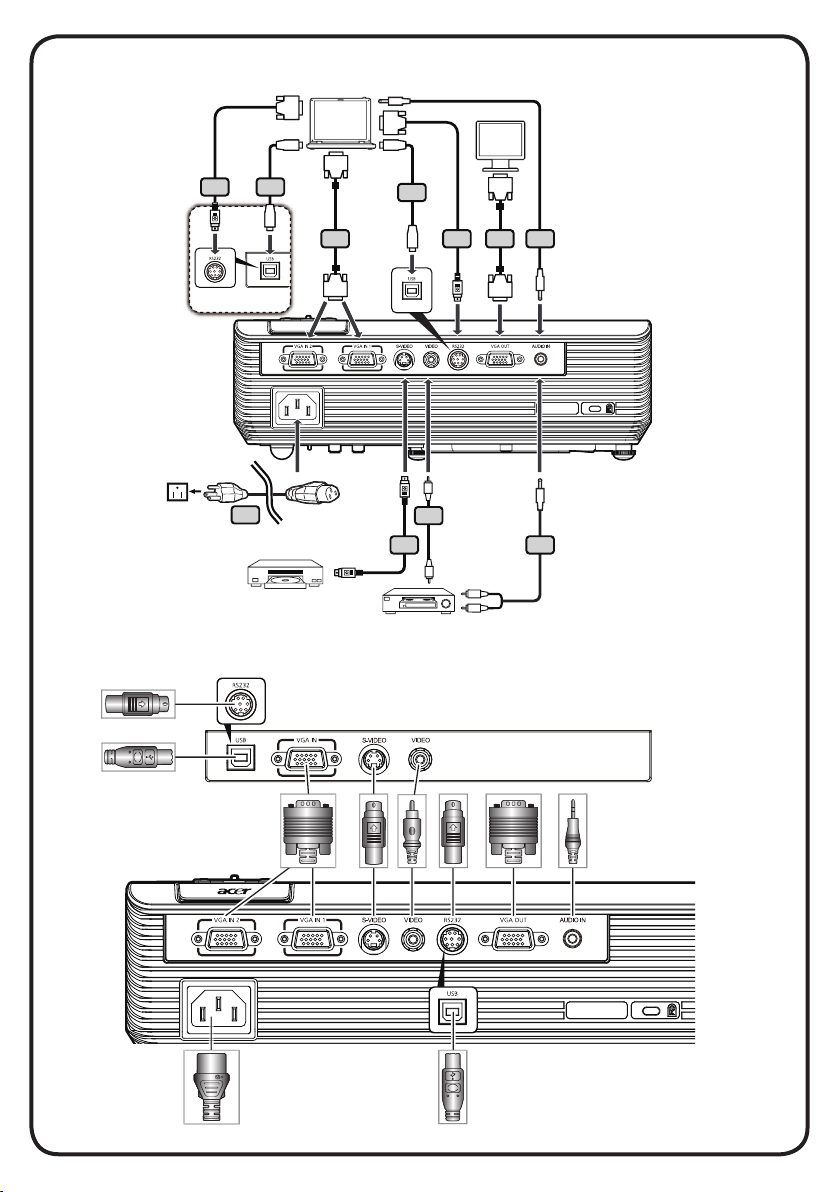
Acer X1261N, X1161P, X110P, X1161PA, X1261 User Manual [sv]

...
Acer X1261N, X1161P, X110P, X1161PA, X1261 User Manual

INSTALLATION


VGA


RS232


RS232


USB


USB


D-Sub


4

8


8


USB


4


2


6


2


X1161 series


D-Sub


D-Sub


Y


1


3

5

7

Y

S-Video Output

R W

Video Output

INTERFACE CONNECTOR

molex

E62405SP

molex

Note: Connector interface is subject to model’s specifications

English

Quick Start

INSTALLATION

1.Power Cord (*)

2.VGA Cable (*)

3.Composite Video Cable

4.RS232 Cable

5.S-Video Cable

6.Audio Cable Jack/Jack

7.Audio Cable Jack/RCA

8.USB Cable (*)

Note: Connector interface is subject to model’s specifications

Note: “(*)” Only for X1161N series.

INTERFACE CONNECTOR

Connecting to a Computer

1.Ensure the projector and your computer are turned off.

2.Connect one end of the VGA cable to the “VGA IN” connector on the projector; connect the other end to the VGA connector on the computer and tighten the screws.

3.Connect one end of the power cord into the AC power socket on the projector; connect the other end to an electrical outlet.

Powering On the Projector

1.Remove the lens cap.

2.Turn on the projector first and then the computer.

3.Adjust the position, focus and zoom.

4.Run you presentation.

Powering Off the Projector

1.Press the power button twice.

2.Do not remove AC power cord from outlet until the projector fan shut down.

Svenska

SNABBSTART

INSTALLATION

1.Nätsladd (*)

2.VGA kabel (*)

3.Kompositvideokabel

4.RS232 sladd

5.S-Videokabel

6.Uttag för ljudsladd/Uttag

7.Ljudsladdsuttag/RCA

8.USB kabel (*)

OBS: Anslutningsgränssnitt beror på modellens specifikationer

OBS: “(*)” Endast för X1161N-serien

GRÄNSSNITTSPORTAR

Ansluta till en dator

1.Se till att både projektorn och datorn är avstängda.

2.Anslut ena änden av VGA-kabeln till porten “VGA IN” på projektorn, anslut den andra änden till VGA-porten på datorn och dra åt skruvarna.

3.Anslut ena änden av nätkabeln till nätanslutningsingången på

projektorn, och den andra änden till ett nätuttag.

Starta projektorn

1.Ta bort linsskyddet.

2.Slå färst på projektorn, och därefter datorn.

3.Ställ in position, focus och zoom.

4.Genomför presentationen.

Stänga av projektorn

1.Tryck två gånger pa power-knappen.

2.Nätsladden till projektorn får inte kopplas ur förrän fläkten stannat.

Loading...