

Acer UM.CX2EE.P01 Quick Start Guide
XR342CK
Acer LCD Monitor Quick Start Guide (QSG)
Important safety instructions
Please read the following instructions carefully.
1. To clean the LCD monitor screen:
• Turn off the LCD monitor and unplug the power cord.
• Spray a non-solvent cleaning solution onto a rag and clean the screen gently.
2. Do not place the LCD monitor near a window. Exposing the monitor to rain, moisture or sunlight can severely damage
it.
3. Do not apply pressure to the LCD screen. Excessive pressure may cause permanent damage to the display.
4. Do not remove the cover or attempt to service this unit yourself. An authorized technician should perform servicing of
any nature.
5. Store the LCD monitor in a room with a temperature of -20° to 60° C (-4° to140° F). Storing the LCD monitor outside
this range may result in permanent damage.
6. Immediately unplug your monitor and call an authorized technician if any of the following circumstances occur:
• Monitor-to-PC signal cable is frayed or damaged.
• Liquid spills onto the LCD monitor or the monitor is exposed to rain.
• The LCD monitor or case is damaged.
7. In order to prevent damage to the LCD pannel, do not place the monitor face down on a surface.
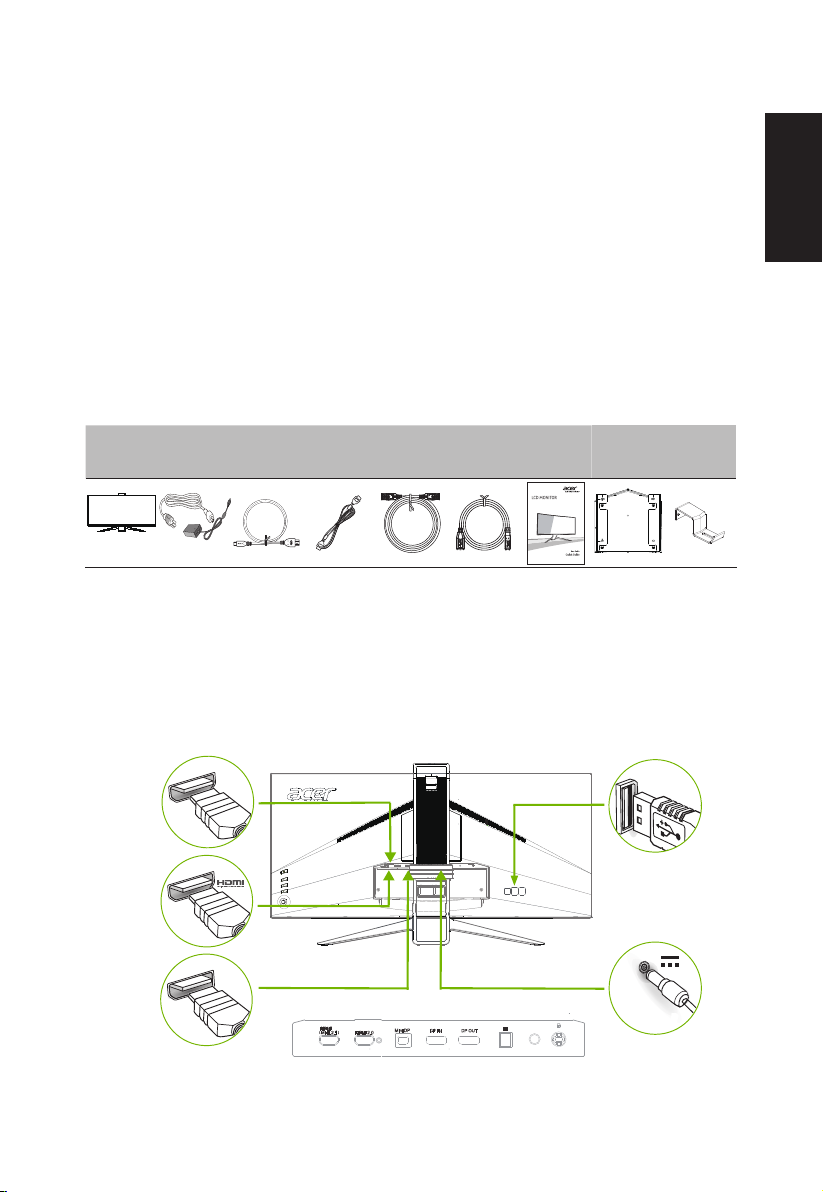
Package contents
English
LCD
monitor
Power
Adapter
MHL cable
(optional)
HDMI
cable
(optional)
DP cable
(optional)
USB cable
(optional)
Quick start
guide
XR342CK
Wall
mount
BKT
Headset
hook
Connecting your monitor to a computer
1. Turn off your computer and unplug your computer's power cord.
2. Connect the signal cable to the HDMI (optional) and /or DP (optional) and /or MHL (optional) input socket of the
monitor, and the HDMI (optional) and /or DP (optional) and /or MHL (optional) output socket of the graphics card on
the computer. Then tighten the thumbscrews on the signal cable connector.
3. Connect the USB Cable(Optional)
Connect the USB 3.0 cable to port for fast charge.
Connect the USB 3.0 cable to port.
4. Insert the monitor power cable into the power port at the back of the monitor.
5. Connect the power adapter and power cord to the monitor, then to a properly grounded AC outlet.
MHL
USB
DP
English
1
2
3
4
5
X
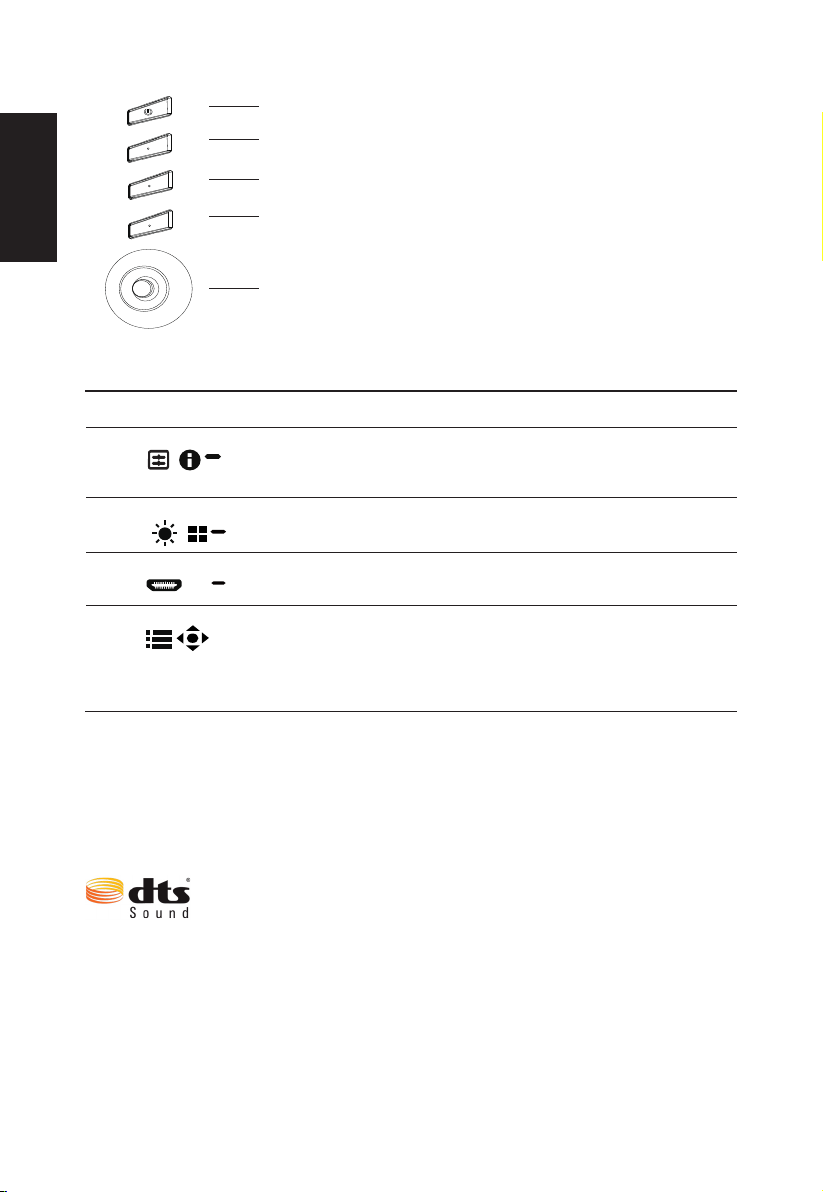
External controls
1 Power button Turns the monitor on/off.Blue indicates power on. Amber indicates
2 Function key
/
3 Function key
/
4 Function key
/
5 Function key
/
standby/ power saving mode.
a. Press to view Main page. Press again to enter hotkey1 function.
b. When the Function Menu is active, press this key to view the basic
information for your monitor and current input or reset the custom
color settings to the factory defaults.
a. Press to view Main page.Press again to enter hotkey2 function.
b. When the Function Menu is active, press this button to select
select scenario mode or game mode .
a. Press to view Main page.Press again to enter Input select
function.
b. When the Function Menu is active, this button will quit the OSD.
a. Press to view
the Function Menu.
b. The single toggle button on the backside of the Display bezel
operates like a joystick. To move the cursor, simply toggle the
button in four directions. Press the button to select desired option.
Red indicates operable. Grey indicates inoperable.
Main page
.Press again to enter next function in
AdaptiveSync:
It can allow a AdaptiveSync supported graphics source to dynamically adjust display refresh
ratebasedontypicalcontentframeratesforpowerefcient,virtuallystutterfreeandlow-
latency display update.
DTS Sound:
For DTS patents, see http://patents.dts.com. Manufactured under license
from DTS Licensing Limited. DTS, the Symbol, & DTS and the Symbol
together are registered trademarks, and DTS Sound is a trademark of DTS,
Inc. © DTS, Inc. All Rights Reserved.
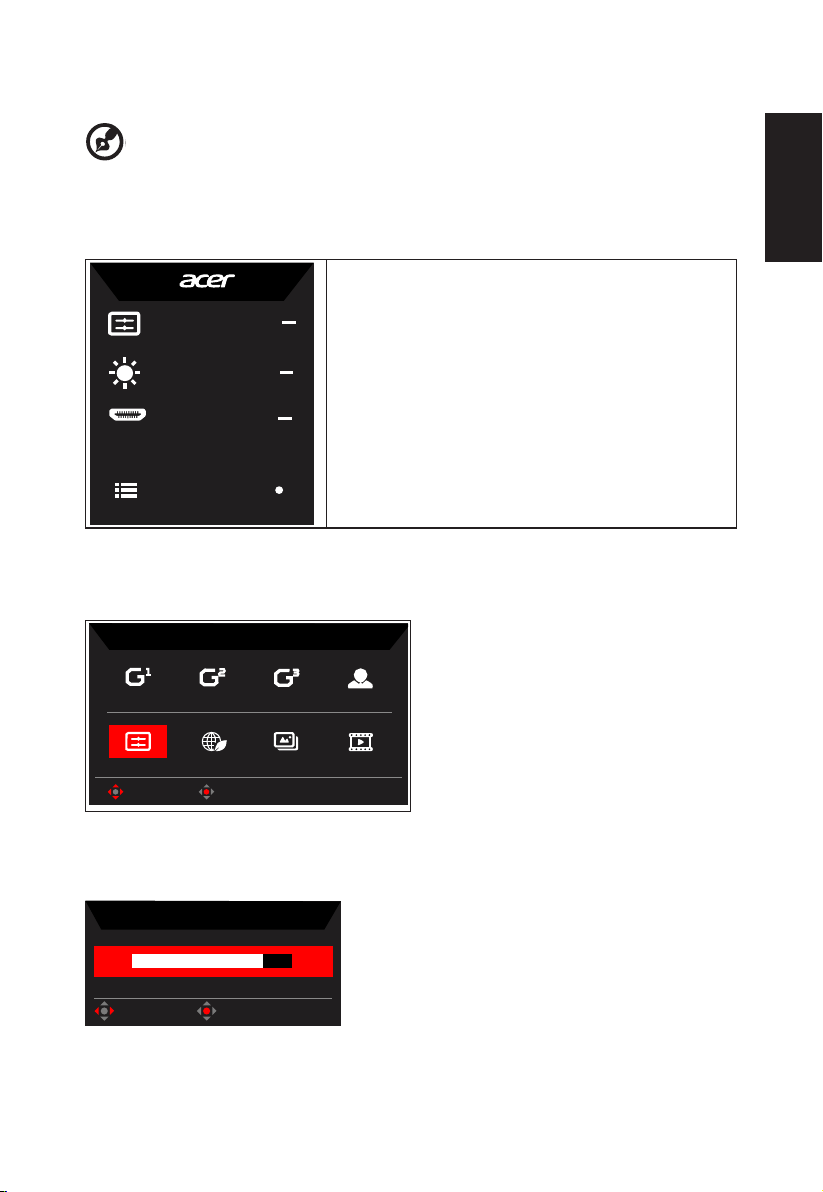
Adjusting the OSD settings
Game mode
Acon
Brightness
80
Input
MHL
Menu
Acon
Racing
Sports
User
Movie
Graphics
ECO
Standard
Modes
OK
Move
‑‑‑‑‑‑‑‑‑‑‑‑‑‑‑‑‑‑‑‑‑‑‑‑‑‑‑‑‑‑‑‑‑‑‑‑‑‑‑‑‑‑‑‑‑‑‑‑‑‑‑‑‑‑‑‑‑‑‑‑‑‑‑‑‑‑‑‑‑‑‑‑‑‑‑‑‑‑‑‑‑‑‑‑‑‑‑‑‑‑‑‑‑‑‑‑‑‑‑‑‑‑‑‑‑‑‑‑‑
Note: Thefollowingcontentisforgeneralreferenceonly.Actualproductspecicationsmayvary.
The OSD (onscreen display) can be used to adjust the settings of your LCD monitor. Press the MENU
key to open the OSD. You can use the OSD to adjust the picture quality and general settings. For
advanced settings, please refer to following page:
Main page
1. Hot Key1 (Modes, Brightness, Input, Volume,
Gamma, Contrast, Blue Light, Over Drive,PIP/PBP)
2. Hot Key2 (Modes, Brightness, Input, Volume,
Gamma, Contrast, Blue Light, Over Drive,PIP/PBP)
3. Input selection
4. Menu OSD
Hot key1 (default: Game mode)
Tochoosegamemode(G1,G2,G3)whichuser-denedproletouseorscenariomode(User,Standard,
ECO, Graphics, Movie)
English
Hot key2 (default: Brightness)
Open the Brightness control and select your preferred brightness setting . When you are done, press the
joystick to quit current page and store.
Brightness
80
Adjust
OK

English
Input
Input
HDMI2.0
Auto Source
Off
Enter
Move
X
Selecting the input
Open the Input control and select HDMI2.0, HDMI (MHL2.1) or DP In, Mini DP or Auto Source. When you
are done, press the joystick to exit current page and store.
The Function page
Open the Function page to adjust the functions, settings which you want using the arrows. When you are
done, toggle the joystick to the left or right to go back one level or use
store.
Picture
Game Mode - User
Picture
Color
Audio
Gaming
OSD
System
Save seng to...
Move
1. Press the MENU key to open the OSD.
2. Toggle the joystick to the up or down to select Picture from the OSD.Then toggle to the right to
navigate to the element you wish to adjust and press the joystick to enter it.
3. Toggle to the left or right to adjust the sliding scales.
4. The Picture menu can be used to adjust the Brightness, Contrast, Black Boost, Blue Light, ACM
and Super Sharpness.
5. Brightness: Adjust the brightness from 0 to 100.
‑‑‑‑‑‑‑‑‑‑‑‑‑‑‑‑‑‑‑‑‑‑‑‑‑‑‑‑‑‑‑‑‑‑‑‑‑‑‑‑‑‑‑‑‑‑‑‑‑‑‑‑‑‑‑‑‑‑‑‑‑‑‑‑‑‑‑‑‑‑‑‑‑‑‑‑‑‑‑‑‑‑‑‑‑‑‑‑‑‑‑‑‑‑‑‑‑‑‑‑‑‑‑‑‑‑‑‑‑
Note: Adjusts the balance between light and dark shades.
6. Contrast: Adjust the contrast from 0 to 100.
‑‑‑‑‑‑‑‑‑‑‑‑‑‑‑‑‑‑‑‑‑‑‑‑‑‑‑‑‑‑‑‑‑‑‑‑‑‑‑‑‑‑‑‑‑‑‑‑‑‑‑‑‑‑‑‑‑‑‑‑‑‑‑‑‑‑‑‑‑‑‑‑‑‑‑‑‑‑‑‑‑‑‑‑‑‑‑‑‑‑‑‑‑‑‑‑‑‑‑‑‑‑‑‑‑‑‑‑‑
Note: Sets the degree of difference between light and dark areas.
7. Black Boost: Adjust the black level from 0 to 10. Enhances shadows by increasing the
brightness without changing lighter shades.
‑‑‑‑‑‑‑‑‑‑‑‑‑‑‑‑‑‑‑‑‑‑‑‑‑‑‑‑‑‑‑‑‑‑‑‑‑‑‑‑‑‑‑‑‑‑‑‑‑‑‑‑‑‑‑‑‑‑‑‑‑‑‑‑‑‑‑‑‑‑‑‑‑‑‑‑‑‑‑‑‑‑‑‑‑‑‑‑‑‑‑‑‑‑‑‑‑‑‑‑‑‑‑‑‑‑‑‑‑
Note: If the image is very bright or has few shadow areas, adjusting this setting may not result in
any noticeable changes to the image.
8. Blue Light: Filters out blue light to protect your eyes by adjusting how much blue light is shown -80%, 70%, 60%, or 50%.
Brightness
Contrast
Black Boost
Blue Light
ACM
Super Sharpness
Enter
80
50
9
Off
Off
Off
X
to exit current page and
‑‑‑‑‑‑‑‑‑‑‑‑‑‑‑‑‑‑‑‑‑‑‑‑‑‑‑‑‑‑‑‑‑‑‑‑‑‑‑‑‑‑‑‑‑‑‑‑‑‑‑‑‑‑‑‑‑‑‑‑‑‑‑‑‑‑‑‑‑‑‑‑‑‑‑‑‑‑‑‑‑‑‑‑‑‑‑‑‑‑‑‑‑‑‑‑‑‑‑‑‑‑‑‑‑‑‑‑‑
Game Mode - User
0
On
Gaming
OSD
System
DTS
Picture
Color
Volume
Audio
X
Save seng to...
Enter
Move
Note: Higher values allow more blue light through. For the best protection select a lower value.
9. ACM: Turn ACM on or off. The default is off.
10. Super Sharpness: Turn the Super Sharpness On or Off. Super Sharpness technology can simulate
high-resolution images by boosting the pixel density of the original source to make images sharper
and clearer.
Color
Game Mode - User
Picture
Color
Audio
Gaming
OSD
System
Save seng to...
Move
Picture
Color
Audio
Gaming
OSD
System
Save seng to...
Move
Gamma
Colour Temp
Enter
sRGB Mode
6-axis Hue
6-axis Saturate
Enter
R Gain
G Gain
B Gain
R Bias
G Bias
B Bias
Game Mode - User
2.2
User
50
50
50
X
50
50
50
Off
X
1. Press the MENU key to open the OSD.
2. Toggle the joystick to the up or down to select Color from the OSD.Then toggle to the right to
navigate to the element you wish to adjust and press the joystick to enter it.
3. Toggle to the left or right to adjust the sliding scales.
4. Gamma mode allows you to adjust the luminance tone.The default value is 2.2 (standard value for
Windows).
5. Color temperature: Default is warm. You can choose Cool, Normal, Warm, Bluelight or User.
6. sRGB: Default is off. You can turn sRGB on or off to better color match with peripheral devices,
such as printers and digital cameras.
7. 6-axis Hue: Adjust the red, green, blue, yellow, magenta and cyan hue.
8. 6-axis Saturate: Adjust the red, green, blue, yellow, magenta and cyan saturation.
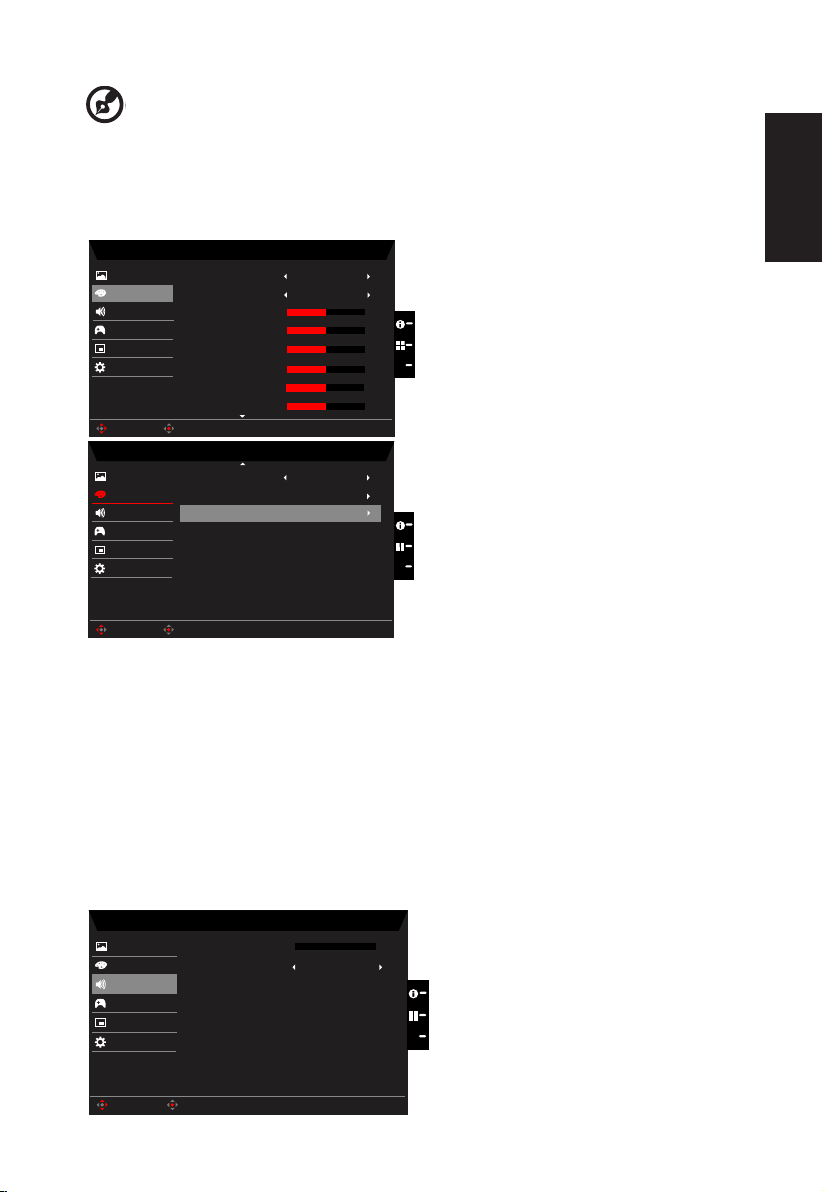
Audio
English
1. Press the MENU key to open the OSD.
Game Mode - User
OSD
System
Picture
Color
Over Drive
Audio
Normal
Off
Aim point
Gaming
Save seng to...
Enter
Move
X
2. Toggle the joystick to the up or down to select Audio from the OSD.Then toggle to the right to
navigate to the element you wish to adjust and press the joystick to enter it.
3. Toggle to the left or right to adjust the sliding scales.
4. Volume: Adjust the volume
5. DTS: Turn DTS Sound On or Off. Your monitor is equipped with two 7W speakers on the rear. DTS
English
Soundisstratiedandcreatesaremarkablesonicow.
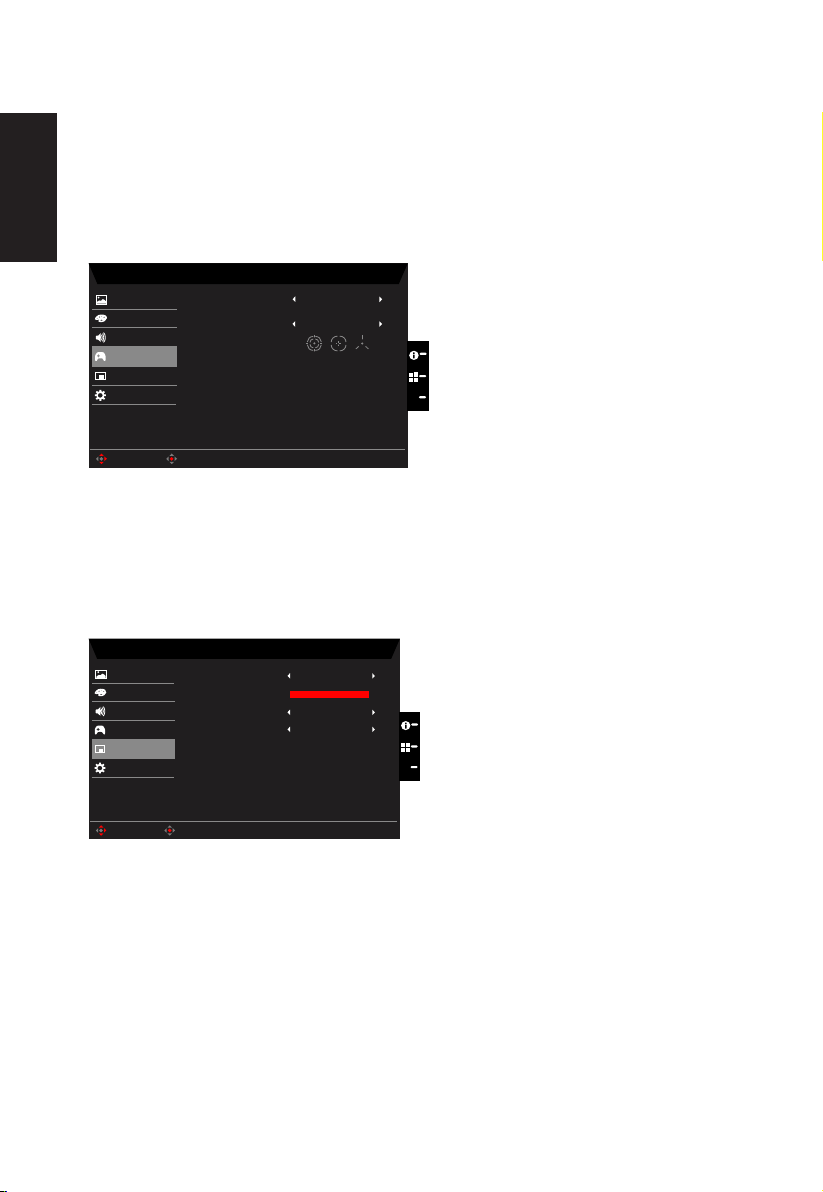
Gaming
1. Press the MENU key to open the OSD.
2. Toggle the joystick to the up or down to select Gaming from the OSD.Then toggle to the right to
navigate to the element you wish to adjust and press the joystick to enter it.
3. Toggle to the left or right to adjust the sliding scales.
4. OD: Select Off, Normal, or Extreme.
5. Aim point: Show an Aim point on the screen for shooting games.
OSD
Game Mode - User
Picture
Color
Audio
Gaming
OSD
System
Language
OSD Timeout
Transparency
Refresh rate num
English
120
Off
Off
X
Save seng to...
Move
Enter
1. Press the MENU key to open the OSD.
2. Toggle the joystick to the up or down to select OSD from the OSD.Then toggle to the right to
navigate to the element you wish to adjust and press the joystick to enter it.
3. Toggle to the left or right to adjust the sliding scales.
4. Language: Set the OSD menu language.
5. OSD timeout: Adjust the delay before turning off the OSD menu.
6. Transparency: Select the transparency when using gaming mode. The transparency can be 0%
(OFF), 20%, 40%, 60%, or 80%.
7. Refresh rate num: Display the panel’s current refresh rate on the screen.
 Loading...