

Acer TravelMate P453-MG User Manual [en, ru, de, es, fr, it, cs, pl]

English
Français
Deutsch
Italiano
Español
Português
Nederlands
Norsk
Dansk
Svenska
Suomi
Русский
Polski
Magyar
Čeština
Slovenčina
Slovenski
Hrvatski
Română
Български
Eesti
Latviski
Lietuviškai
Ελληνικά
Türkçe
한국어
繁體中文
简体中文
Bahasa Indonesia
ä·Â
Contents
Ver.: 01.01.01


TravelMate Notebook
Quick Guide
Product registration
When using your product for the first time, it is recommended that you immediately
register it. This will give you access to some useful benefits, such as:
• Faster service from our trained representatives.
• Membership in the Acer community: receive promotions and participate in customer
surveys.
• The latest news from Acer.
Hurry and register, as other advantages await you!
How to register
To register your Acer product, please visit www.acer.com. Select your country, click
PRODUCT REGISTRATION and follow the simple instructions.
You will also be asked to register your product during the setup process, or you can
double-click the Registration icon on the desktop.
After we receive your product registration, you will be sent a confirmation email with
important data that you should keep in a safe place.
Obtaining Acer accessories
We are happy to inform you that Acer's warranty extension program and Notebook
accessories are available online. Come and visit our online shop and find what you need
at store.acer.com.
The Acer store is being progressively rolled out, and, unfortunately may not be available in
some regions. Please check back regularly to see when it will be available in your country.

© 2012. All Rights Reserved.
TravelMate Notebook Quick Guide
This revision: 07/2012
Model number: __________________________________
Serial number: ___________________________________
Date of purchase: ________________________________
Place of purchase: ________________________________
Acer recommends...
Productivity Software
Work Great with Microsoft® Office 2010 - Express your ideas, solve problems and simplify everyday projects with
Office 2010.
Photo editing - Easily edit and print your photos with Windows Live Photo Gallery. Then share them on Facebook,
YouTube or Windows Live.
™
Search & Decide with Bing - Find and organize the answers you need using Bing
informed decisions.
, so you can make faster, more

3
First things first
We would like to thank you for making an Acer notebook your choice for
meeting your mobile computing needs.
Your guides
To help you use your Acer notebook, we have designed a set of guides:
First off, the Setup Poster helps you get started with setting up your
computer.
The Quick Guide introduces you to the basic features and functions of
your new computer.
For more on how your computer can help you to be more productive,
please refer to the User’s Manual. The User’s Manual contains useful
information applying to your new computer. It covers basic topics such as
using the keyboard and audio, etc.
This guide contains detailed information on such subjects as system
utilities, data recovery, expansion options and troubleshooting. In addition it
contains warranty information and the general regulations and safety
notices for your notebook.
Follow these steps to access it:
1 Type "User" from Start.
2 Click on Acer User’s Manual.
English
4
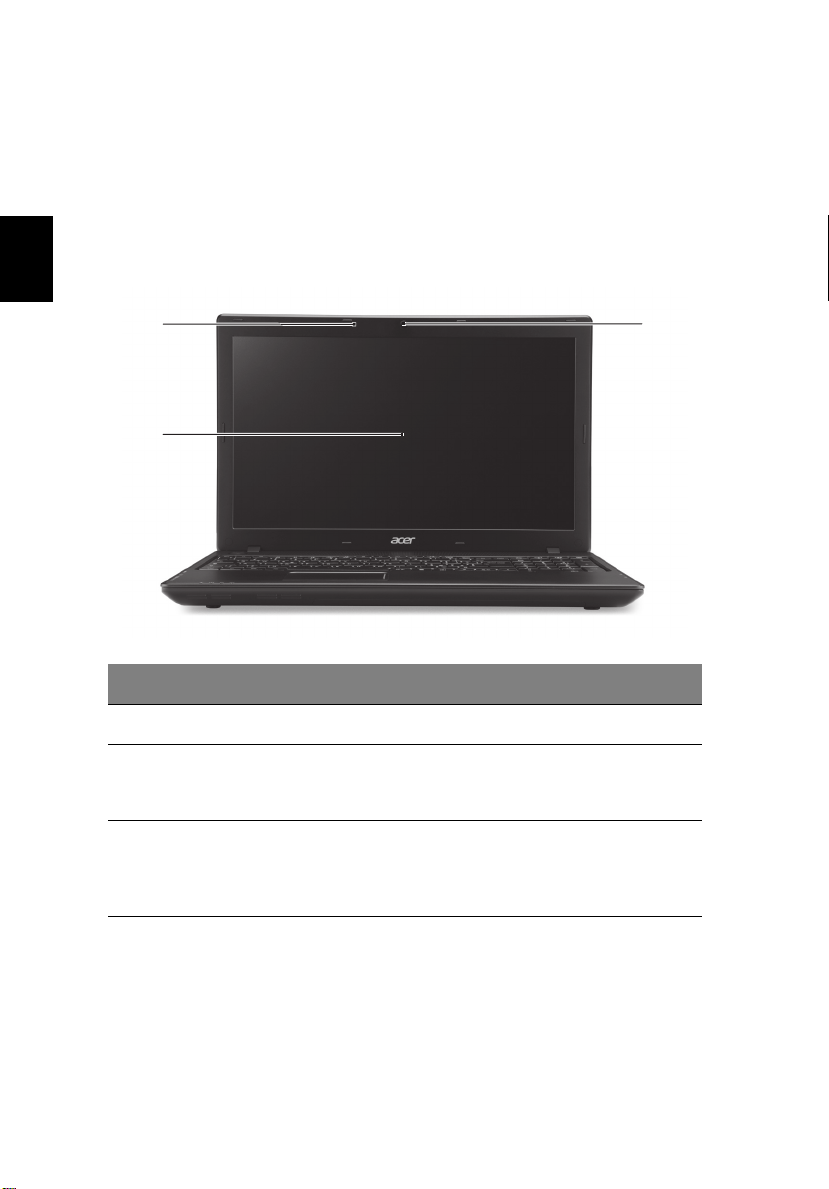
Your Acer notebook tour
English
After setting up your computer as illustrated in the setup poster, let us show
you around your new Acer notebook.
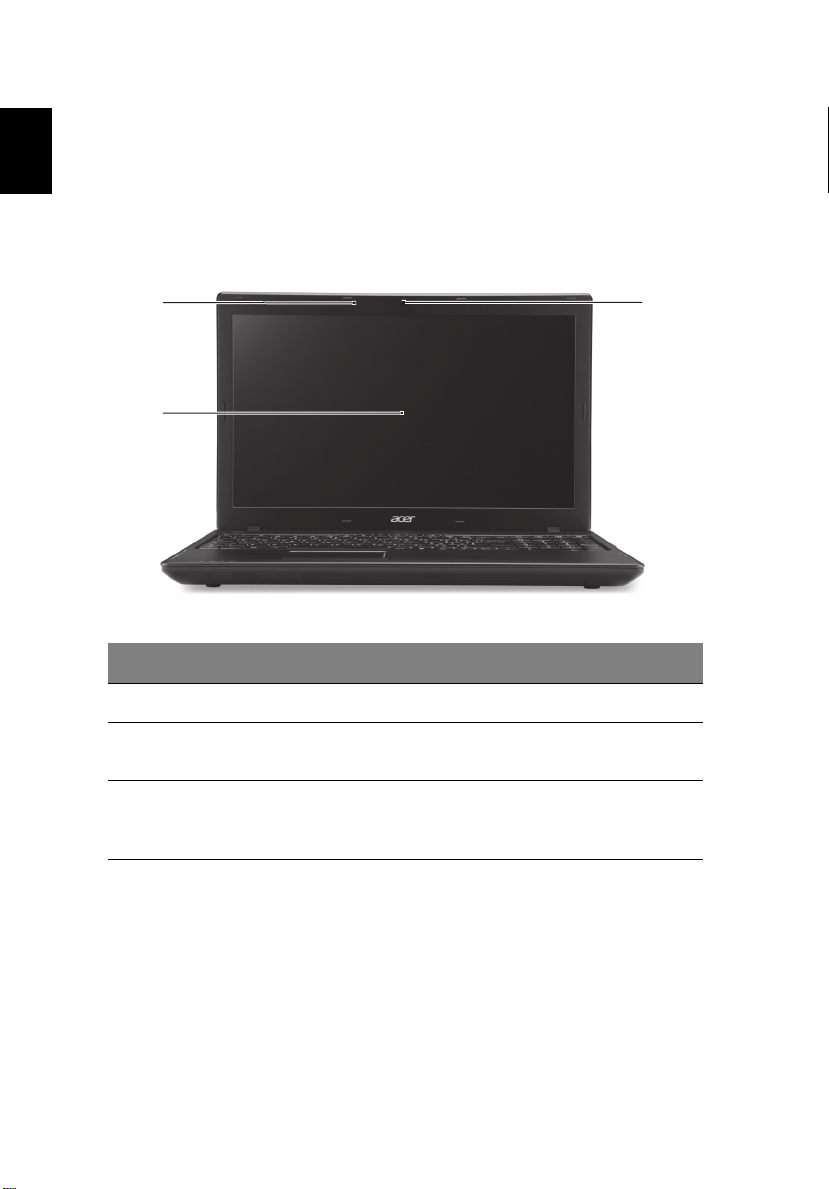
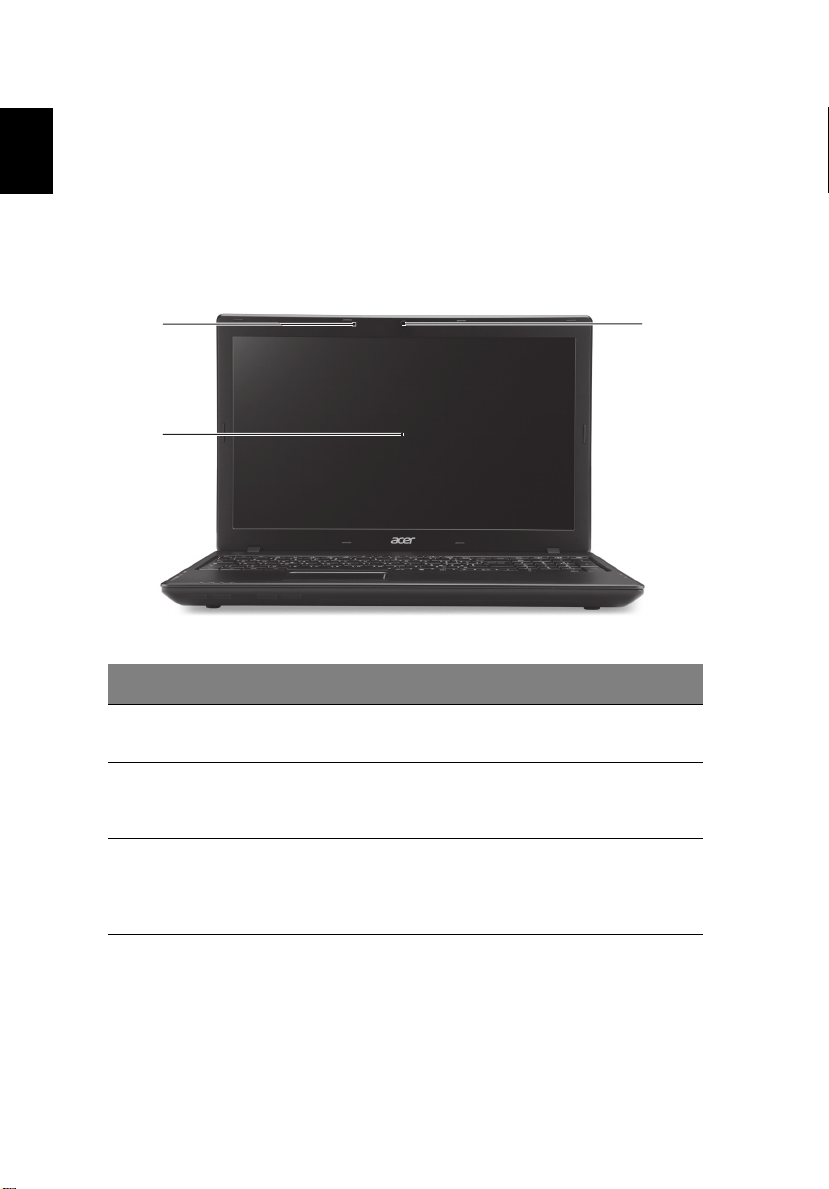
Top cover view
1
2
# Icon Item Description
1 Microphone Internal microphone for sound recording.
2 Display screen
Also called Liquid-Crystal Display (LCD),
displays computer output.
3
3 Webcam
Web camera for video communication.
A light next to the webcam indicates that the
webcam is active (for selected models only).
5
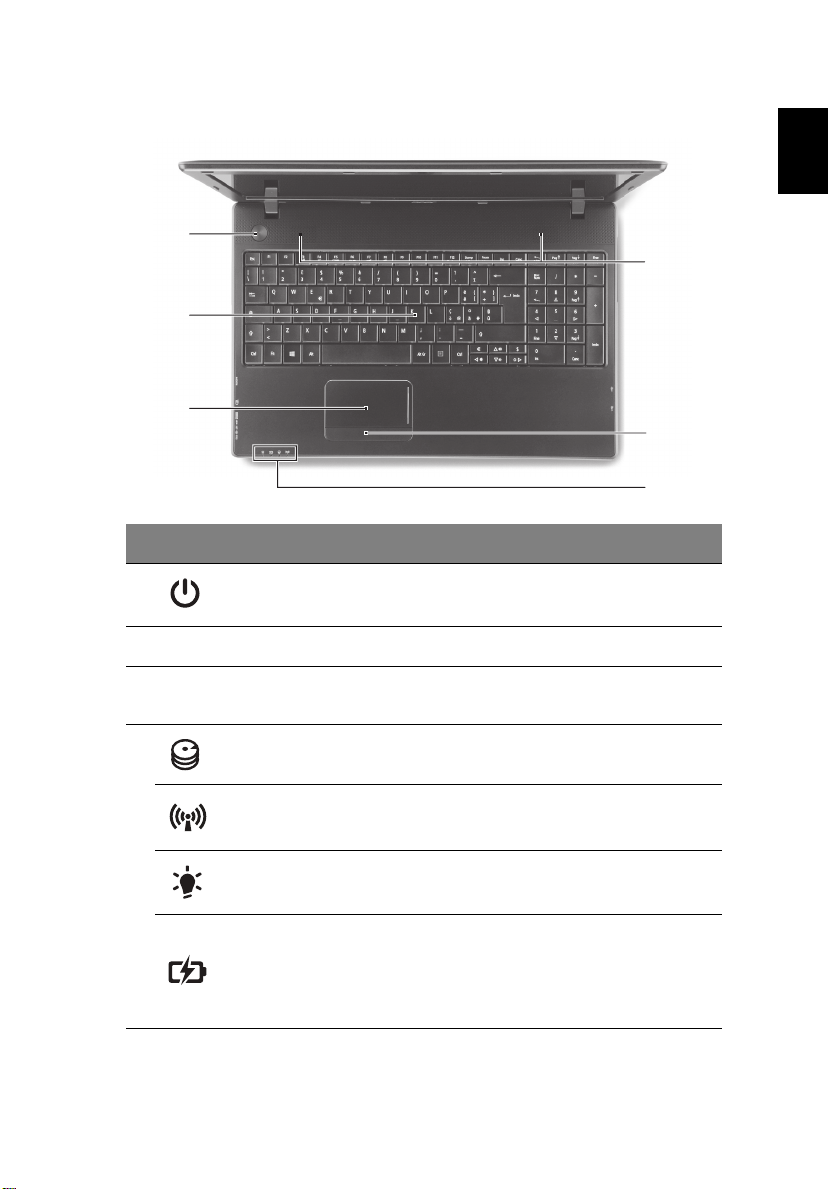
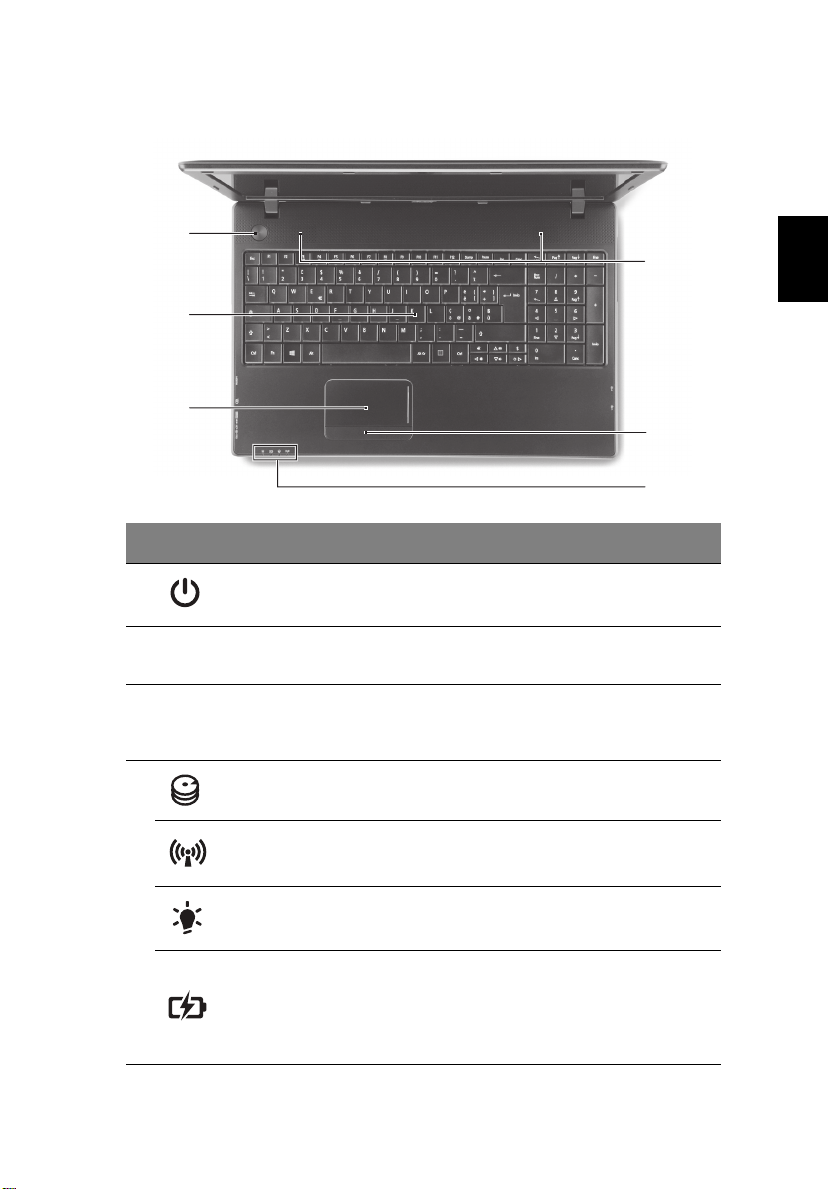
Keyboard view
1
2
3
# Icon Item Description
1
2 Keyboard For entering data into your computer.
3Touchpad
Power button/
indicator
Turns the computer on and off. Indicates the
computer's power status.
Touch-sensitive pointing device which
functions like a computer mouse.
English
6
5
4
HDD indicator Indicates when the hard disk drive is active.
Communication
indicator
4
Power indicator Indicates the computer's power status.
Battery indicator
Indicates the computer’s wireless
connectivity device status.
Indicates the computer's battery status.
1. Charging: The light shows amber when
the battery is charging.
2. Fully charged: The light shows blue when
in AC mode.
6
# Icon Item Description
English
5
6 Speakers
Click buttons (left
and right)
The left and right buttons function like the left
and right mouse buttons.
Left and right speakers deliver stereo audio
output.
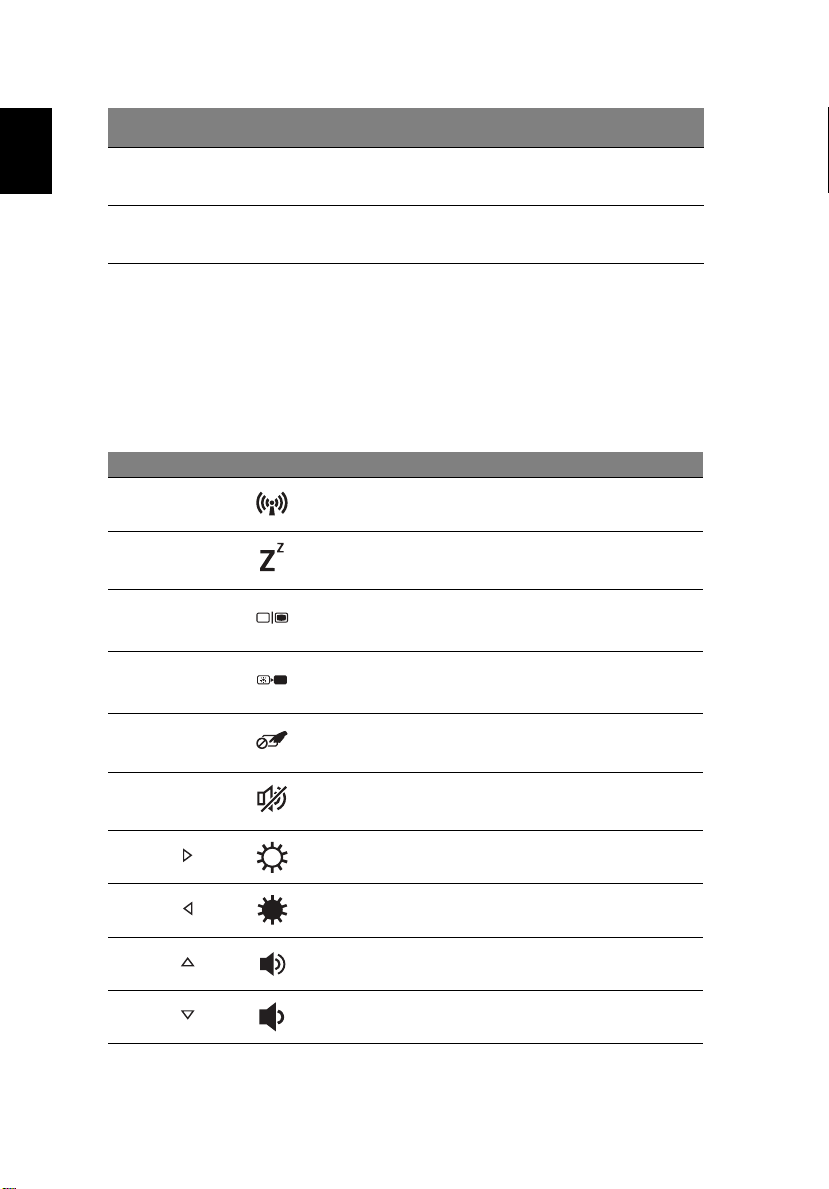
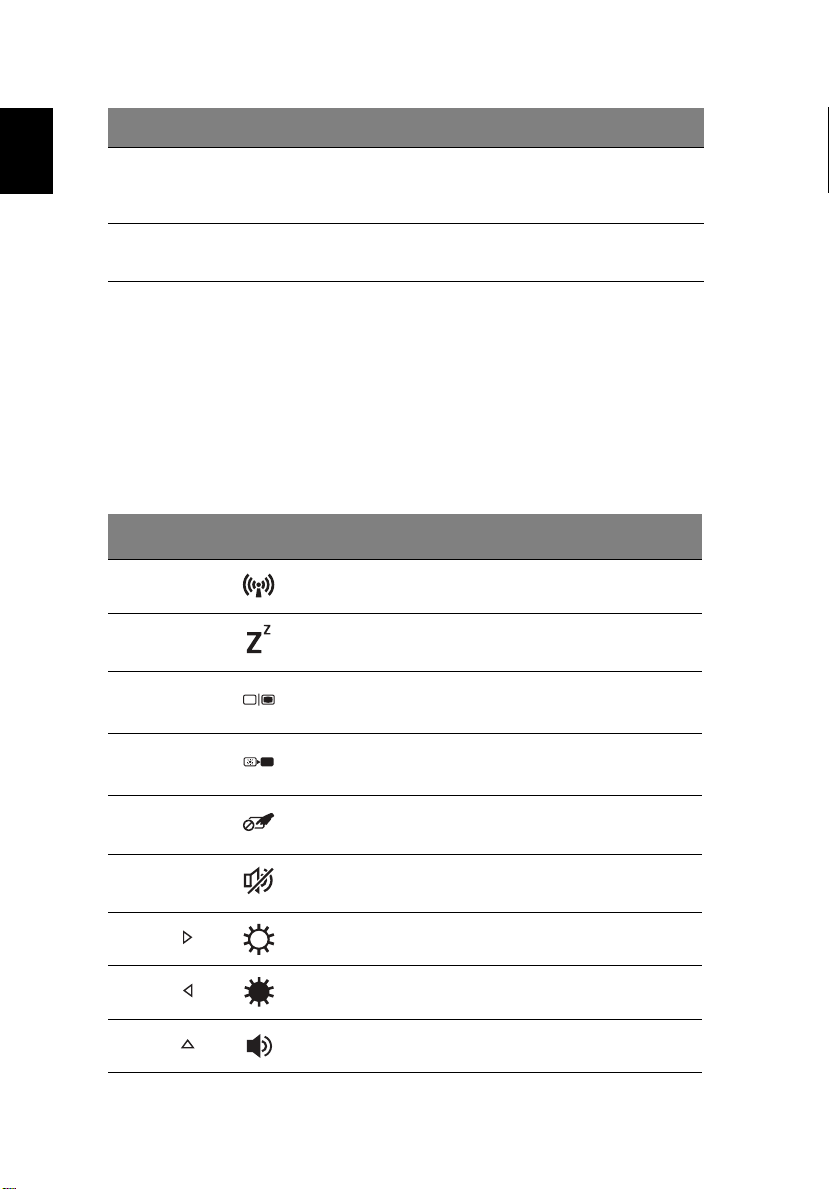
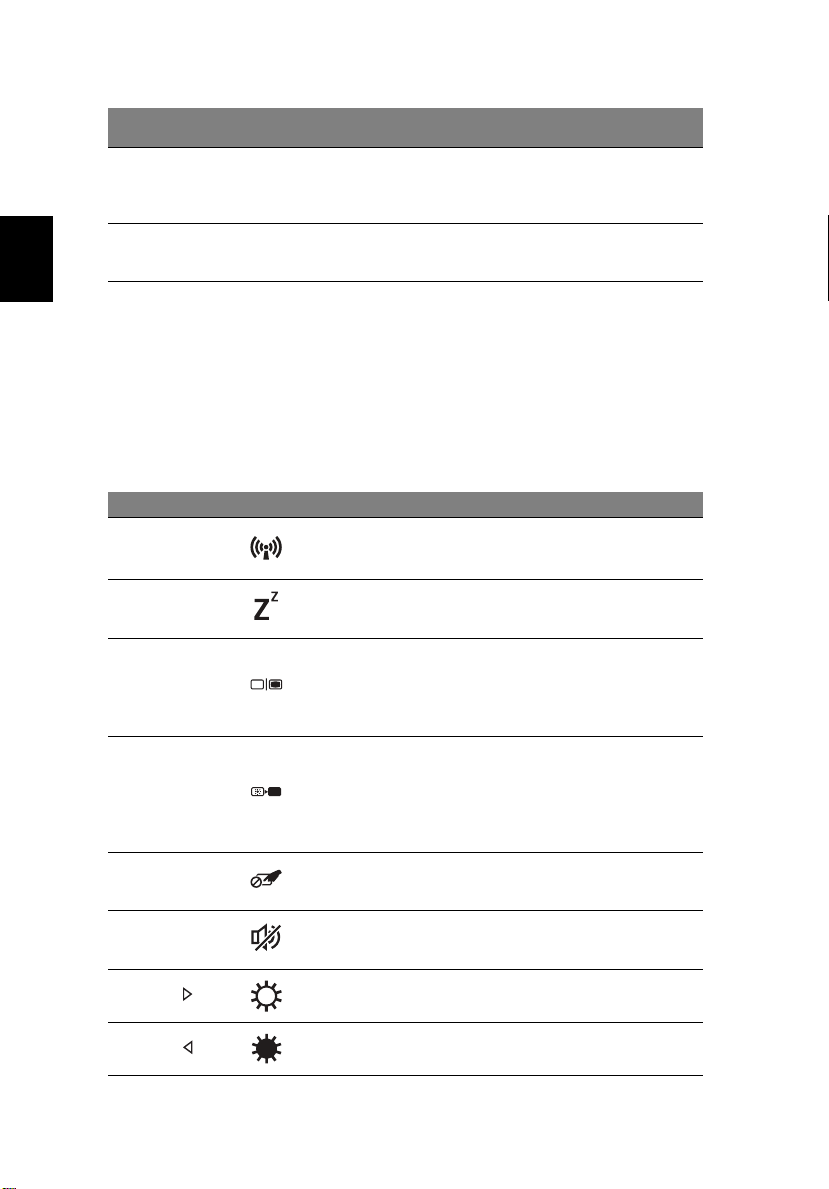
Hotkeys
The computer employs hotkeys or key combinations to access most of the
computer's controls like screen brightness and volume output.
To activate hotkeys, press and hold the <Fn> key before pressing the other
key in the hotkey combination.
Hotkey Icon Function Description
<Fn> + <F3> Communication
<Fn> + <F4> Sleep Puts the computer in Sleep mode.
<Fn> + <F5> Display toggle
<Fn> + <F6> Screen blank
<Fn> + <F7> Touchpad toggle
Enables/disables the computer’s
communication devices.
Switches display output between
the display screen, external monitor
(if connected) and both.
Turns the display screen backlight
off to save power. Press any key to
return.
Turns the internal touchpad on and
off.
<Fn> + <F8> Speaker toggle Turns the speakers on and off.
<Fn> + < >
<Fn> + < >
<Fn> + < >
<Fn> + < >
Brightness up Increases the screen brightness.
Brightness down Decreases the screen brightness.
Volume up Increases the sound volume.
Volume down Decreases the sound volume.
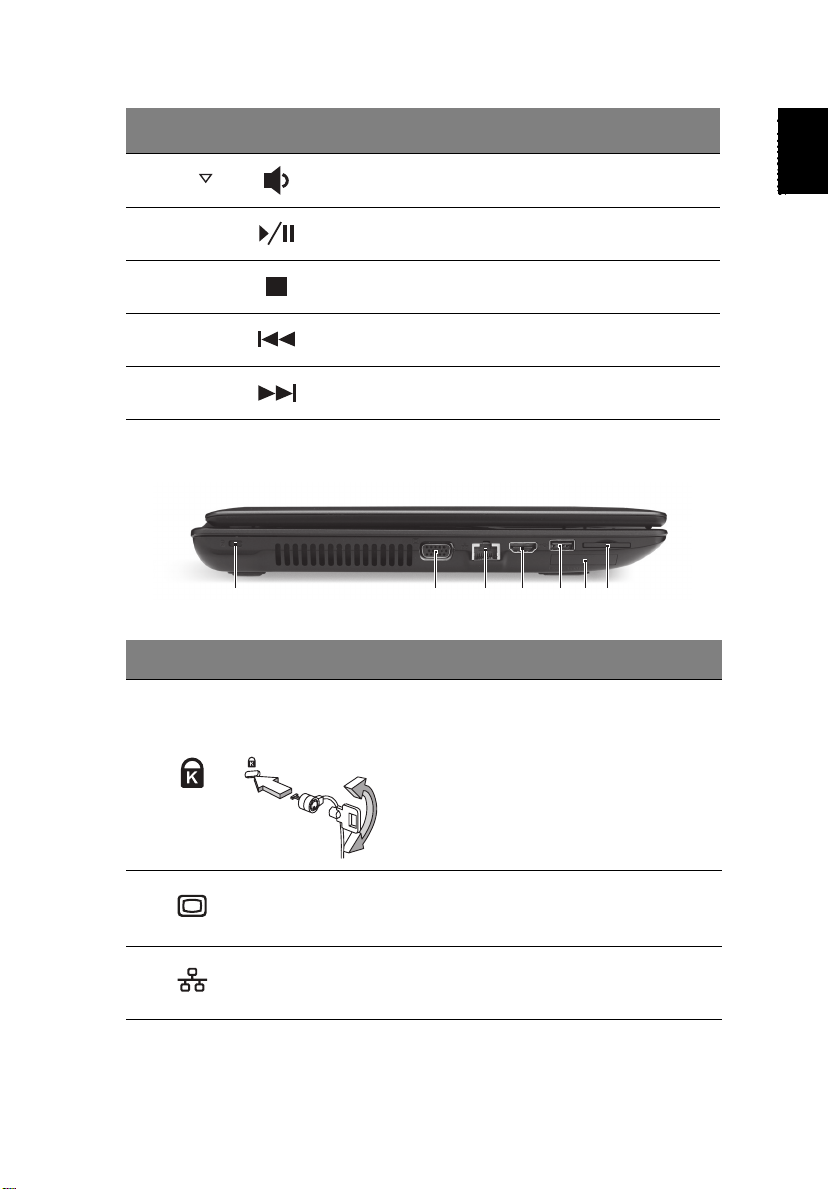
7
Hotkey Icon Function Description
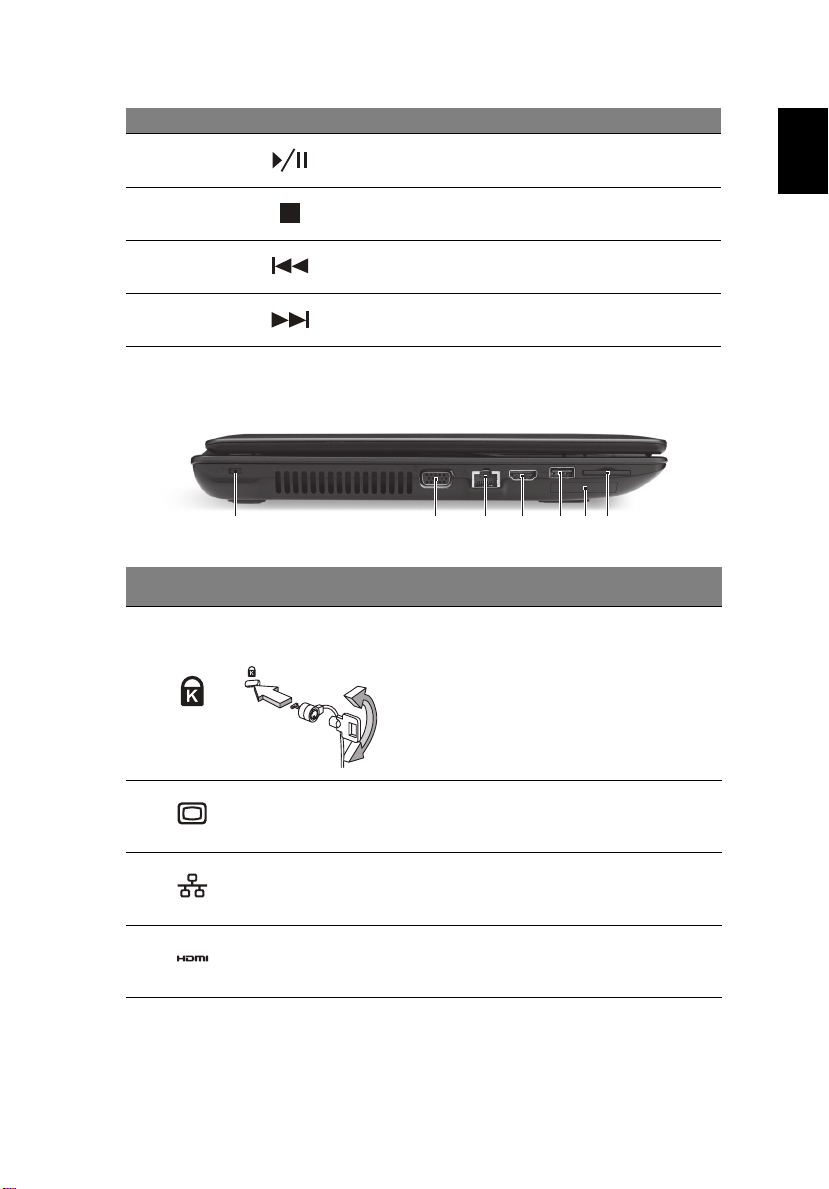
<Fn> + <Home> Play/Pause Play or pause a selected media file.
<Fn> + <Pg Up> Stop Stop playing the selected media file.
<Fn> + <Pg Dn> Previous Return to the previous media file.
<Fn> + <End> Next Jump to the next media file.
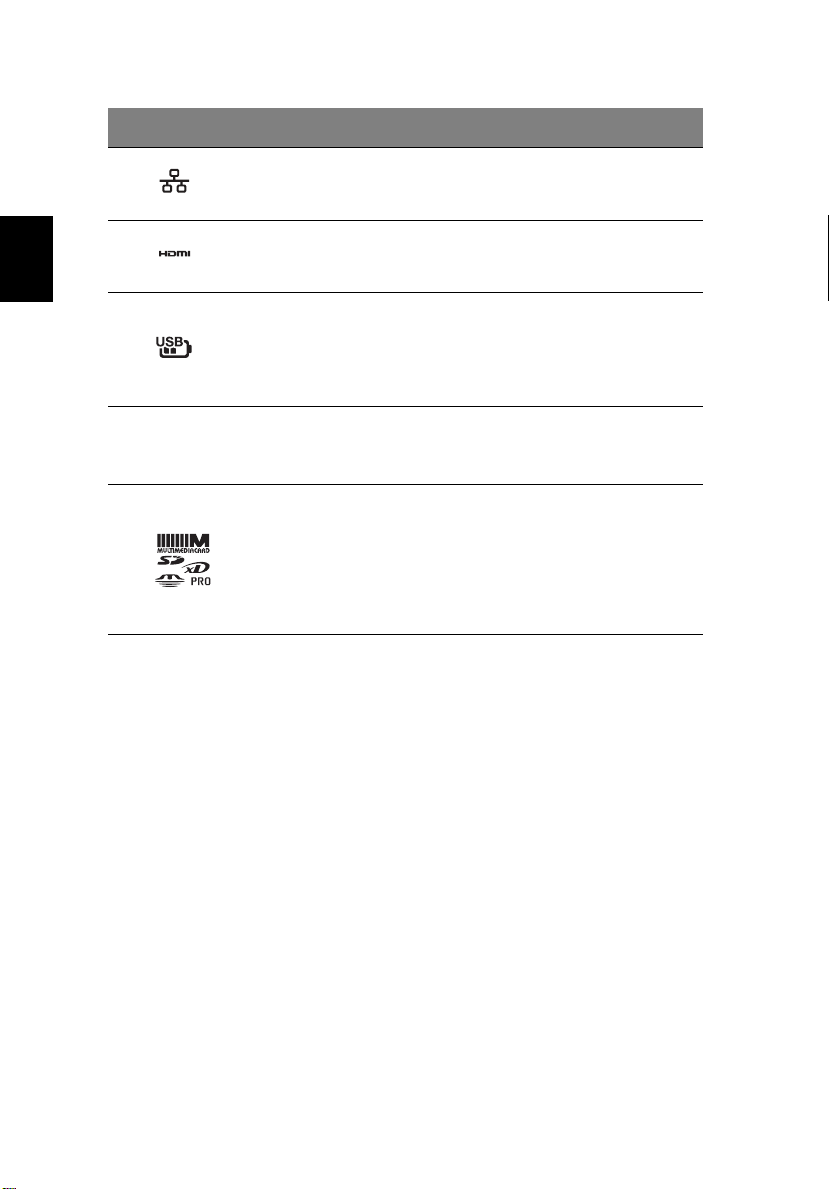
Left view
21 3 754 6
# Icon Item Description
Kensington lock
slot
1
Connects to a Kensington-compatible
computer security lock.
Note: Wrap the computer security lock
cable around an immovable object such as
a table or handle of a locked drawer. Insert
the lock into the notch and turn the key to
secure the lock. Some keyless models are
also available.
English
2
3
4 HDMI port
External display
(VGA) port
Ethernet (RJ-45)
port
Connects to a display device (e.g., external
monitor, LCD projector).
Connects to an Ethernet 10/100/1000based network.
Supports high-definition digital video
connections.
8
# Icon Item Description
English
Connects to USB devices.
5USB port
6
7
ExpressCard/34
slot
Multi-in-1 card
reader
If a port is black it is USB 2.0 compatible, if
it is blue it is also USB 3.0 compatible (see
below).
Accepts one ExpressCard/34 module.
Note: Push to remove/insert the module.
Accepts Secure Digital (SD),
MultiMediaCard (MMC), Memory Stick PRO
(MS PRO), xD-Picture Card (xD).
Note: Push to remove/install the card. Only
one card can operate at any given time.
Information on USB 3.0
• Compatible with USB 3.0 and earlier USB devices.
• For optimal performance, use USB 3.0-certified devices.
• Defined by the USB 3.0 specification (SuperSpeed USB).
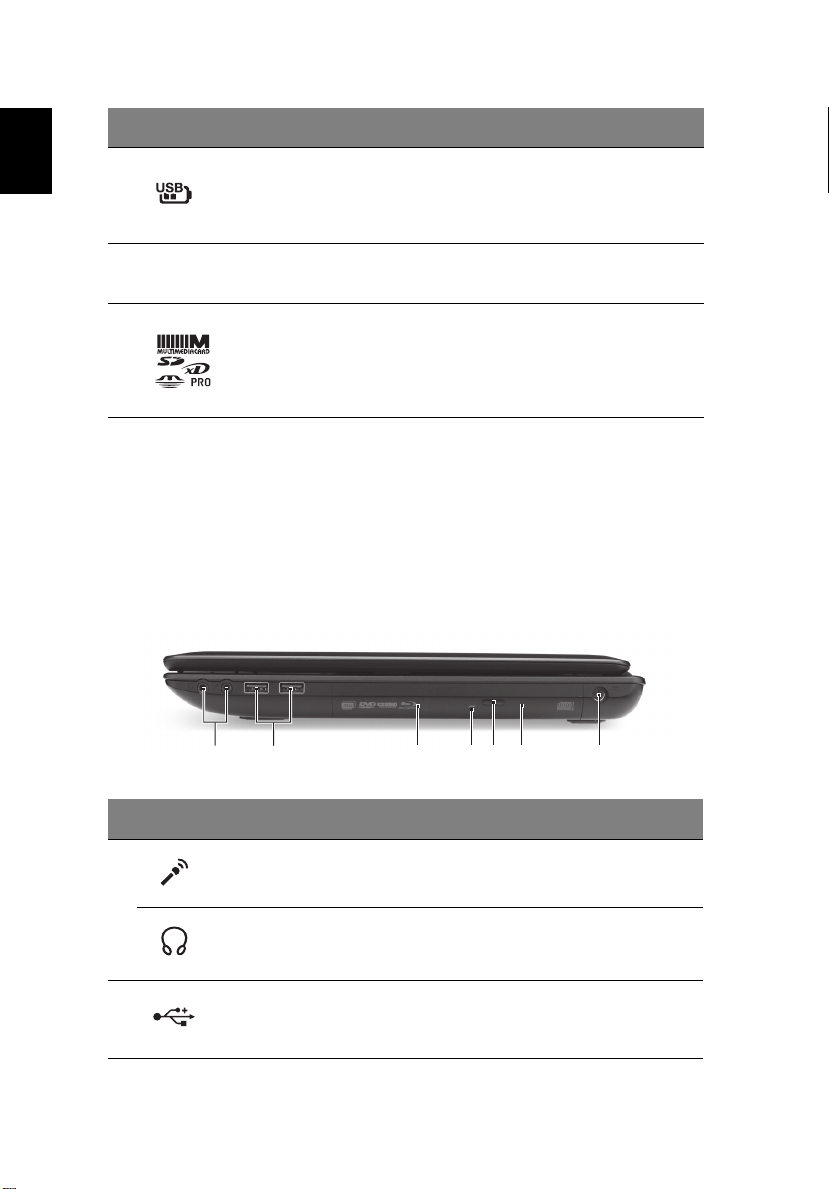
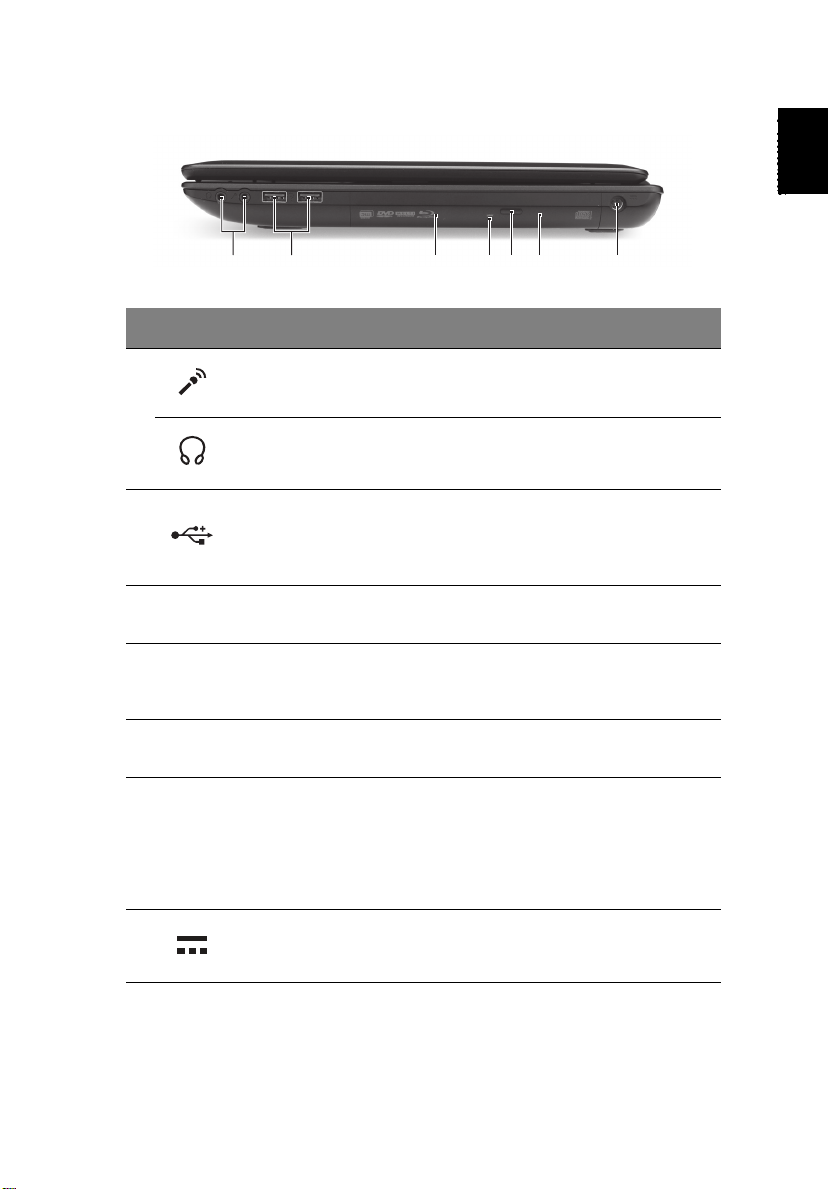
Right view
1 543276
# Icon Item Description
Microphone jack Accepts inputs from external microphones.
1
Headphones/
speaker jack
2 USB port
Connects to audio devices (e.g., speakers,
headphones).
Connects to USB devices.
If a port is black it is USB 2.0 compatible, if it
is blue it is also USB 3.0 compatible.
9
# Icon Item Description
3 Optical drive Internal optical drive; accepts CDs or DVDs.
4
5
6
7 DC-in jack Connects to an AC adapter.
Optical disk
access indicator
Optical drive eject
button
Emergency eject
hole
Lights up when the optical drive is active.
Ejects the optical disk from the drive.
Ejects the optical drive tray when the
computer is turned off.
Note: Insert a paper clip to the emergency
eject hole to eject the optical drive tray when
the computer is off.
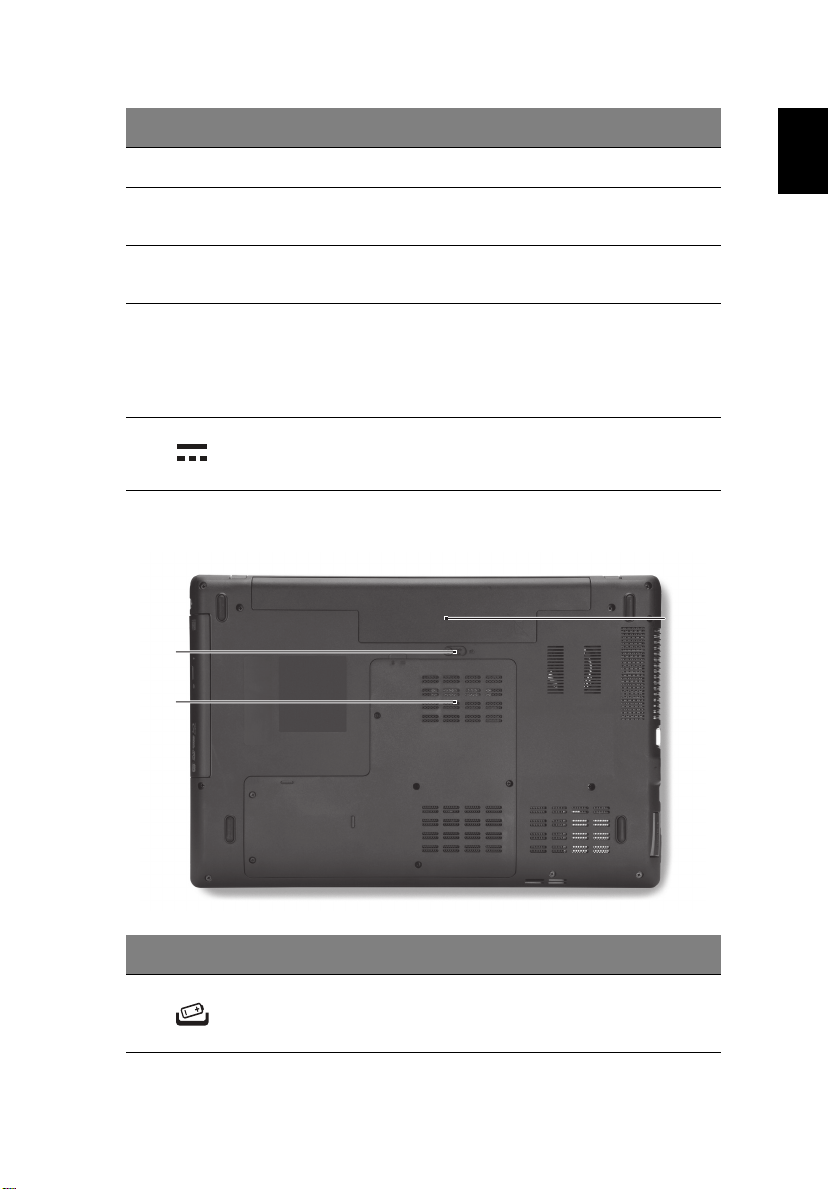
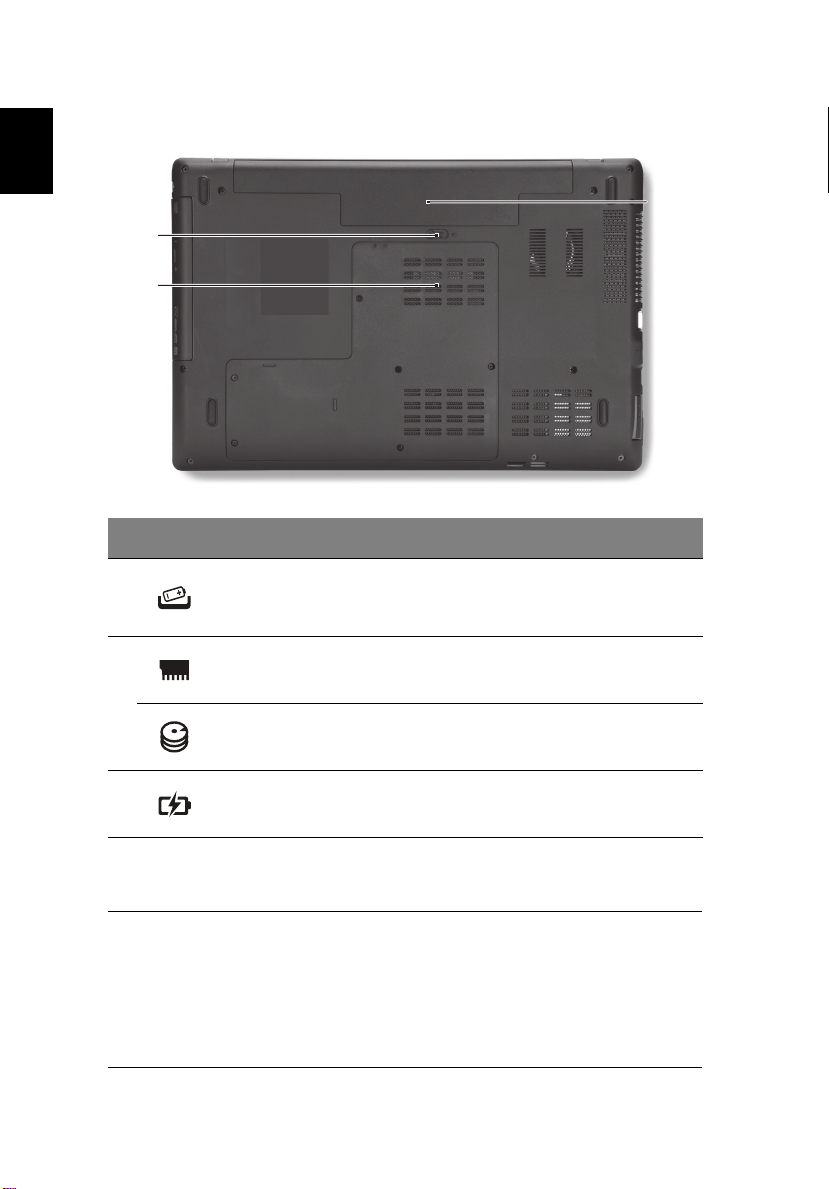
Base view
1
English
3
2
# Icon Item Description
1
Battery release
latch/lock
Releases the battery for removal.
Insert a suitable tool into the latch and slide
to release.

10
# Icon Item Description
English
Memory
compartment
2
Hard disk bay
3 Battery bay Houses the computer's battery pack.
Houses the computer's main memory.
Houses the computer's hard disk (secured
with screws).
Environment
• Temperature:
• Operating: 5°C to 35°C
• Non-operating: -20°C to 65°C
• Humidity (non-condensing):
• Operating: 20% to 80%
• Non-operating: 20% to 80%
Part no.: NC.V6Z11.01M
Ver.: 01.01.01

Notebook TravelMate
Guide rapide
Enregistrer votre produit
Lors de la première utilisation de votre produit, il est recommandé de l’enregistrer
immédiatement. Cela vous donne accès à des avantages utiles, comme :
• Service plus rapide de nos représentants entraînés.
• Une adhésion à la communauté Acer : recevez des promotions et participez à nos
enquêtes clients.
• Les dernières nouvelles d’Acer.
Dépêchez-vous et inscrivez-vous, car d’autres avantages vous attendent !
Comment s’enregistrer
Pour enregistrer votre produit Acer, veuillez visiter www.acer.com. Sélectionnez votre
pays, cliquez sur ENREGISTRER VOTRE PRODUIT et suivez simplement les
instructions.
Il vous sera également demandé d’enregistrer votre produit pendant le processus
d’installation, ou vous pouvez double-cliquer sur l’icône Enregistrement sur le bureau.
Une fois votre demande d’inscription reçue, nous vous enverrons un email de
confirmation avec les données importantes que vous devrez conserver précieusement.
Obtenir des accessoires Acer
Nous sommes heureux de vous informer que le programme d’extension de garantie Acer
et les accessoires pour notebook sont disponibles en ligne. Venez et visitez notre
boutique en ligne et trouvez ce dont vous avez besoin sur store.acer.com.
La boutique Acer est progressivement mise en œuvre, et, malheureusement, peut ne pas
être disponible dans certaines régions. Veuillez consulter le site régulièrement pour voir
quand il sera disponible dans votre pays.

© 2012 Tous droits réservés.
Guide rapide du notebook TravelMate
Cette révision : 07/2012
Modèle : ______________________________________
No. de série : __________________________________
Date d’achat : _________________________________
Lieu d’achat : __________________________________

3
Pour commencer
Nous désirons vous remercier d’avoir fait d’un notebook Acer votre choix
pour répondre à vos besoins informatiques mobiles.
Vos guides
Pour vous aider à utiliser votre notebook Acer, nous avons conçu plusieurs
guides :
Tout d’abord, le Poster de configuration vous aide à configurer votre
ordinateur.
Le Guide rapide présente les fonctionnalités et fonctions de base de votre
ordinateur.
Pour plus d’information sur l’aide que votre ordinateur peut vous apporter
pour être plus productif, veuillez vous reporter au Manuel d’utilisation. Le
Manuel d’utilisation contient des informations utiles qui s’appliquent à
votre nouvel ordinateur. Il couvre les notions de base, telles que l’utilisation
du clavier et du son, etc.
Ce guide contient des informations détaillées sur des sujets tels que les
utilitaires systèmes, la récupération des données, les options d’extension
et le dépannage. De plus, il contient des informations de garantie et les
réglementations générales et les avis de sécurité pour votre notebook.
Procédez comme suit pour y accéder :
1 Saisissez « utilisation » depuis Démarrer.
2 Cliquez sur Manuel d’utilisation Acer.
Français
4
Visite guidée de votre notebook Acer
Après avoir configuré votre ordinateur comme illustré dans le poster de
Français
configuration, nous allons vous faire explorer votre nouveau notebook
Acer.
Vue de l'écran
1
2
# Icône Élément Description
1 Microphone
2 Écran d’affichage
3 Webcam
Microphone interne pour l’enregistrement
sonore.
Également appelé écran LCD (Liquid Crystal
Display), il affiche les données de
l’ordinateur.
Webcam pour communication vidéo.
Une lumière à côté de la webcam indique
que la webcam est active (pour certains
modèles seulement).
3

5
Vue du clavier
1
2
3
# Icône Élément Description
1
2Clavier
Bouton/Indicateur
d’alimentation
Met l’ordinateur sous tension et hors tension.
Indique l’état d’alimentation de l’ordinateur.
Pour l’entrée des informations dans votre
ordinateur.
Français
6
5
4
3Touchpad
Indicateur du
disque dur
Indicateur de
communication
4
Indicateur
d’alimentation
Indicateur de la
batterie
Périphérique de pointage sensible au touché
qui fonctionne comme une souris.
Indique l’activité du disque dur.
Indique l’état du périphérique de connectivité
sans fil de l’ordinateur.
Indique l’état d’alimentation de l’ordinateur.
Indique l’état de la batterie de l’ordinateur.
1. Charge : La lumière est orange lorsque la
batterie se recharge.
2. Pleine charge : La diode est bleue en
mode secteur.
6
# Icône Élément Description
Français
5
6 Haut-parleurs
Boutons (gauche
et droit)
Le bouton gauche et le bouton droit
fonctionnent comme le bouton gauche et le
bouton droit d’une souris.
Les haut-parleurs de gauche et de droite
produisent une sortie audio stéréo.
Touches spéciales
L’ordinateur emploie des touches spéciales (combinaisons de touches)
pour accéder à la plupart des contrôles de l’ordinateur comme la luminosité
de l’écran et le volume sonore.
Pour activer les touches spéciales, appuyez et maintenez la touche <Fn>
avant d’appuyer sur l’autre touche dans la combinaison de la touche
spéciale.
Tou che
spéciale
<Fn> + <F3> Communication
<Fn> + <F4> Sommeil
<Fn> + <F5>
<Fn> + <F6> Écran noir
Icône Fonction Description
Active/désactive les périphériques de
communication de l’ordinateur.
Place l’ordinateur en mode de
Sommeil.
Choix de
l’affichage
Permet de permuter l’affichage entre
l’écran d’affichage, le moniteur
externe (s’il est connecté) et les deux.
Désactive le rétro éclairage de l’écran
pour économiser l’énergie. Appuyez
sur une touche pour le rallumer.
<Fn> + <F7> Touchpad Active et désactive le touchpad.
<Fn> + <F8> Haut-parleur Active et désactive les haut-parleurs.
<Fn> + < >
<Fn> + < >
<Fn> + < >
Luminosité + Augmente la luminosité de l’écran.
Luminosité - Diminue la luminosité de l’écran.
Volume + Augmente le volume sonore.
7
Tou che
spéciale
<Fn> + < >
<Fn> +
<Origine>
<Fn> +
<Pg préc.>
<Fn> +
<Pg suiv.>
<Fn> + <Fin> Suivant Passez au fichier multimédia suivant.
Icône Fonction Description
Volume - Diminue le volume sonore.
Lecture/Pause
Arrêter
Précédent
Lisez ou effectuez une pause d’un
fichier multimédia sélectionné.
Arrêtez la lecture du fichier
multimédia sélectionné.
Retournez au fichier multimédia
précédent.
Vue gauche
21 3 754 6
# Icône Élément Description
Français
Fente pour
cadenas
Kensington
1
2
3
Port d’affichage
(VGA) externe
Port Ethernet
RJ-45
Se connecte à un cadenas de sécurité pour
ordinateur Kensington.
Remarque : Enroulez le câble du cadenas
de sécurité pour ordinateur autour d’une
table, de la poignée d’un tiroir verrouillé, ou
de tout autre objet fixe. Insérez le cadenas
dans l’encoche et tournez la clef pour
verrouiller le cadenas. Certains modèles ne
possèdent pas de clef.
Se connecte à un périphérique d’affichage
(p.ex. un moniteur externe, un projecteur
LCD).
Se connecte à un réseau Ethernet 10/100/
1000 Base.

8
# Icône Élément Description
Français
4 Port HDMI
5Port USB
6
7
Emplacement
pour
ExpressCard/34
Lecteur de cartes
multiples en un
Prend en charge les connexions vidéo
numériques à haute définition.
Se connecte à des périphériques USB.
Si un port est noir, il est compatible
USB 2.0, si un port est bleu, il est
également compatible USB 3.0 (voir cidessous).
Accepte un module ExpressCard/34.
Remarque : Poussez pour retirer/insérer la
carte.
Accepte une carte mémoire Secure Digital
(SD), MultiMediaCard (MMC), Memory
Stick Pro (MS PRO) et xD-Picture (xD).
Remarque : Poussez pour retirer/installer
la carte. Seule une carte peut fonctionner à
un moment donné.
Informations sur USB 3.0
• Compatible avec USB 3.0 et périphériques USB antérieurs.
• Pour des performances optimales, utilisez des périphériques certifiés
USB 3.0.
• Défini par la spécification USB 3.0 (SuperSpeed USB).
9
Vue droite
1 543276
# Icône Élément Description
Prise microphone
1
Prise hautparleurs/casque
2Port USB
3 Lecteur optique
4
Indicateur
d’accès du disque
optique
Accepte les entrées de microphones
externes.
Se connecte à des périphériques audio
(p.ex. haut-parleurs ou un casque stéréo).
Se connecte à des périphériques USB.
Si un port est noir, il est compatible USB 2.0,
si un port est bleu, il est également
compatible USB 3.0.
Lecteur optique interne, accepte les CD ou
les DVD.
S’allume lorsque le lecteur optique est actif.
Français
5
6
7
Bouton d’éjection
du lecteur optique
Trou d’éjection
d’urgence
Prise
d’alimentation
Éjecte le disque optique du lecteur.
Éjecte le plateau du lecteur optique lorsque
l’ordinateur est hors tension.
Remarque : Insérez un trombone dans le
trou d’éjection d’urgence pour éjecter le
plateau du lecteur optique même quand
l’ordinateur est éteint.
Se connecte à l’adaptateur secteur.
10
Vue de la base
Français
3
1
2
# Icône Élément Description
1
2
3
Verrou/Loquet de
libération de la
batterie
Compartiment
mémoire
Baie du disque
dur
Baie de la
batterie
Environnement
• Température :
• En marche : 5°C à 35°C
• À l’arrêt : -20°C à 65°C
• Humidité (sans condensation) :
• En marche : 20% à 80%
• À l’arrêt : 20% à 80%
Libère la batterie pour le retrait.
Insérez un outil approprié dans le loquet et
faites glisser pour libérer.
Contient la mémoire principale de
l’ordinateur.
Contient le disque dur de l’ordinateur (fixé
avec des vis).
Contient la batterie de l’ordinateur.
Part no.: NC.V6Z11.02P
Ver.: 01.01.01

TravelMate-Notebook
Kurzanleitung
Produktregistrierung
Wenn Sie das Produkt zum ersten Mal verwenden, sollten Sie es umgehend registrieren.
Sie kommen so in den Genuss einer Reihe von Vorteilen, einschließlich:
• Schnellere Dienstleistungen durch unsere geschulten Vertreter.
• Mitgliedschaft in der Acer-Community: Empfang von Sonderangeboten und
Teilnahme an Kundenumfragen.
• Die aktuellsten Neuigkeiten von Acer.
Registrieren Sie sich auf der Stelle, da noch andere Vorteile auf Sie warten!
Wie Sie Ihr Produkt registrieren können
Un Ihr Acer Produkt zu registrieren, besuchen Sie bitte www.acer.com. Wählen Sie Ihr
Land aus, klicken Sie auf PRODUKTREGISTRIERUNG und folgen Sie den einfachen
Anweisungen.
Sie werden während des Einrichtungsprozesses ebenfalls zur Registrierung Ihres
Produktes aufgefordert. Alternativ können Sie einen Doppelklick auf das Symbol
Registrierung auf dem Desktop ausführen.
Nachdem wir Ihre Produktregistrierung erhalten haben, senden wir Ihnen eine
E-Mail zur Bestätigung, die wichtige Informationen enthält, die Sie an einem sicheren Ort
aufbewahren sollten.
Acer Zubehör
Wir freuen uns Ihnen mitzuteilen, dass das Garantie-Erweiterungsprogramm von Acer
sowie Notebook-Zubehör online erhältlich sind. Besuchen Sie unseren Online Shop unter
store.acer.com.
Der Acer Store befindet sich im Aufbau und könnte möglicherweise in einigen Regionen
nicht verfügbar sein. Bitte schauen Sie regelmäßig vorbei, um zu erfahren, wann er in
Ihrem Land verfügbar ist.

© 2012 Alle Rechte vorbehalten.
TravelMate-Notebook-Kurzanleitung
Diese Überarbeitung: 07/2012
Modellnummer: ________________________________
Seriennummer: ________________________________
Kaufdatum: ___________________________________
Kaufort: ______________________________________

Das Wichtigste zuerst
Wir möchten uns bei Ihnen dafür bedanken, dass Sie sich in Bezug auf
mobilen Computerbedarf für ein Acer-Notebook entschieden haben.
Hilfen
Als Hilfe für Sie beim Benutzen Ihres Acer-Notebooks haben wir einen Satz
von Richtlinien aufgestellt:
Zuallererst hilft Ihnen das Übersichtsblatt, den Computer das erste Mal in
Betrieb zu nehmen.
Die Kurzanleitung stellt Ihnen die grundlegenden Features und
Funktionen Ihres neuen Computers vor.
Für weitere Informationen dazu, wie Ihnen Ihr Computer helfen kann, noch
produktiver zu arbeiten, lesen Sie bitte das Benutzerhandbuch. Das
Benutzerhandbuch enthält nützliche Informationen über Ihren neuen
Computer. Es werden Themen wie z. B. die Verwendung von Tastatur und
Audio usw. behandelt.
Dieses Benutzerhandbuch enthält detaillierte Informationen zu Themen
wie z. B. Systemprogramme, Datenwiederherstellung,
Erweiterungsoptionen und Problembehebung. Darüber hinaus enthält es
Informationen zur Garantie und allgemeine Bestimmungen und
Sicherheitshinweise zu Ihrem Notebook.
3
Deutsch
Gehen Sie folgendermaßen vor, um auf die Bedienungsanleitung
zuzugreifen:
1 Geben Sie unter Start „Benutzer“ ein.
2 Klicken Sie auf Acer Benutzerhandbuch.
4
Ihre Acer-Notebook-Tour
Nachdem Sie den Computer wie im Übersichtsblatt gezeigt aufgestellt
haben, finden Sie im Folgenden eine Übersicht über Ihr neues AcerNotebook.
Deutsch
Oberseite
1
2
# Symbol Element Beschreibung
1 Mikrofon Internes Mikrofon für die Tonaufnahme.
2 Anzeigebildschirm
3 Webcam
Wird auch als LCD (Liquid-Crystal-Display)
bezeichnet. Zeigt die Ausgabe des
Computers an.
Web-Kamera für Videokommunikation.
Ein Licht neben der Webcam bedeutet,
dass die Webcam aktiv ist (nur für
ausgewählte Modelle).
3
Tastatur Übersicht
5
1
2
3
# Symbol Element Beschreibung
1
2Tastatur
3Touchpad
Ein/Aus-Taste/Anzeige
FestplattenAnzeige
Schaltet den Computer ein und aus. Zeigt
den Ein/Aus-Status des Computers an.
Dient der Eingabe von Daten in den
Computer.
Berührungssensibles Zeigegerät, das die
gleichen Funktionen besitzt wie eine
Computer-Maus.
Leuchtet auf, wenn die Festplatte aktiv ist.
Deutsch
6
5
4
Anzeige für
Kommunikation
4
Energieanzeige Zeigt den Ein/Aus-Status des Computers an.
Akkuanzeige
Zeigt den Verbindungsstatus der drahtlosen
Geräte des Computers an.
Zeigt den Akkustatus des Computers an.
1. Aufladung: Die Leuchte erscheint gelb,
wenn der Akku aufgeladen wird.
2. Voll geladen: Die Leuchte erscheint blau,
wenn Netzstrom verwendet wird.
6
# Symbol Element Beschreibung
Deutsch
5
6 Lautsprecher
Anklicktasten
(links und
rechts)
Die linken und rechten Tasten funktionieren
wie die linken und rechten Tasten einer
Maus.
Linker und rechter Lautsprecher bieten
Audioausgabe in Stereo.
Hotkeys
Der Computer besitzt Direkttasten oder Tastenkombinationen für den
Zugriff auf Computersteuerungen wie z. B. Bildschirmhelligkeit und
Ausgangslautstärke.
Zum Aktivieren von Hotkeys müssen Sie zuerst die <Fn>-Taste drücken
und halten und dann die andere Taste der Hotkey-Kombination drücken.
Direkttaste Symbol Funktion Beschreibung
<Fn> + <F3> Kommunikation
<Fn> + <F4> Energiesparmodus
<Fn> + <F5> Display-Schalter
<Fn> + <F6> Bildschirm leer
<Fn> + <F7> Touchpad-Schalter
Aktiviert/Deaktiviert die
Kommunikationsgeräte des
Computers.
Schaltet den Computer in den
Energiesparmodus.
Wechselt die Anzeigeausgabe
zwischen Anzeigebildschirm,
externem Monitor (falls
angeschlossen) und
gleichzeitig beiden Anzeigen.
Schaltet die
Hintergrundbeleuchtung des
Bildschirms aus, um Energie
zu sparen. Drücken Sie zum
Einschalten eine beliebige
Ta st e .
Schaltet das interne Touchpad
ein oder aus.
<Fn> + <F8> Lautsprecherschalter
<Fn> + < >
<Fn> + < >
Heller Erhöht die Bildschirmhelligkeit.
Dunkler
Schaltet die Lautsprecher ein
und aus.
Verringert die
Bildschirmhelligkeit.

Direkttaste Symbol Funktion Beschreibung
7
<Fn> + < >
<Fn> + < >
<Fn> + <Pos1> Wiedergabe/Pause
<Fn> + <Seite
nach oben>
<Fn> + <Seite
nach unten>
<Fn> + <Ende>Weiter
Lautstärke + Erhöht die Lautstärke.
Lautstärke - Verringert die Lautstärke.
Stopp
Zurück
Linke Seite
21 3 754 6
# Symbol Element Beschreibung
Deutsch
Geben Sie hiermit die
ausgewählte Mediendatei
wieder und halten Sie die
Wiedergabe an.
Beenden Sie hiermit die
Wiedergabe der ausgewählten
Mediendatei.
Hiermit gelangen Sie zur
vorherigen Mediendatei
zurück.
Hiermit springen Sie zur
nächsten Mediendatei.
Steckplatz für
KensingtonSchloss
1
2
Anschluss für
externe Anzeige
(VGA)
Hier können Sie ein Kensingtonkompatibles Sicherheitsschloss für den
Computer anbringen.
Hinweis: Binden Sie ein
Diebstahlsicherungskabel an ein
unbewegliches Objekt wie einen Tisch
oder einen Griff einer abgeschlossenen
Schublade. Stecken Sie das Schloss in
den Anschluss für die Diebstahlsicherung,
und schließen Sie dieses ab. Es gibt auch
Modelle ohne Schlüssel.
Dient dem Anschluss eines
Anzeigegerätes (z. B. einem externen
Monitor oder LCD-Projektor).
8
# Symbol Element Beschreibung
Deutsch
3
4 HDMI-Anschluss
5 USB-Anschluss
6
7
Ethernet (RJ-45)Anschluss
ExpressCard/34Steckplatz
Mehrere-in-1Kartenleser
Hier schließen Sie ein auf Ethernet
10/100/1000-basiertes Netzwerk an.
Unterstützt digitale High-Definition-VideoVerbindungen.
Dient dem Anschluss von USB–Geräten.
Wenn ein Anschluss schwarz ist, ist er mit
USB 2.0 kompatibel; wenn er blau ist, ist er
auch mit USB 3.0 kompatibel (siehe
unten).
Eignet sich für ein ExpressCard/34 Modul.
Hinweis: Drücken Sie hier, um das Modul
zu entfernen/einzusetzen.
Eignet sich für Secure Digital (SD),
MultiMediaCard (MMC), Memory Stick
PRO (MS PRO) und xD-Picture Card (xD).
Hinweis: Drücken Sie hier, um die Karte
zu entfernen/einzusetzen. Es kann nicht
mehr als eine Karte gleichzeitig verwendet
werden.
Informationen zu USB 3.0
• Kompatibel mit USB 3.0 und früheren USB-Geräten.
• Für eine optimale Leistung sollten zertifizierte USB 3.0 Geräte
verwendet werden.
• Definiert nach USB 3.0 Spezifikation (SuperSpeed USB).
 Loading...