

Acer S1110, T200, XS-S10, S1210, T210 Installation Manual
...
1
2
S1110/T200/XS-S10/S1210/T210/XS-X10/
S1310W/T220/XS-W10
INSTALLATION
5
USB
D-Sub
R
W
RBG
9
D-Sub
RS232
8
RBG
2
3
7
2
Y
6
5
4
1
USB
D-Sub
D-Sub
INTERFACE CONNECTOR
HDTV adapter
Y
RS232
5
E62405SP
R
Note: Connector interface is subject to model's specifications
1
2
AUDIO-R
AUDIO-L
AUDIO
IN 1
AUDIO
IN 2
AUDIO
OUT
VGA IN 1
VGA IN 2
VGA OUT
HDMI
USB B
LAN
RS232
S-VIDEO
VIDEO
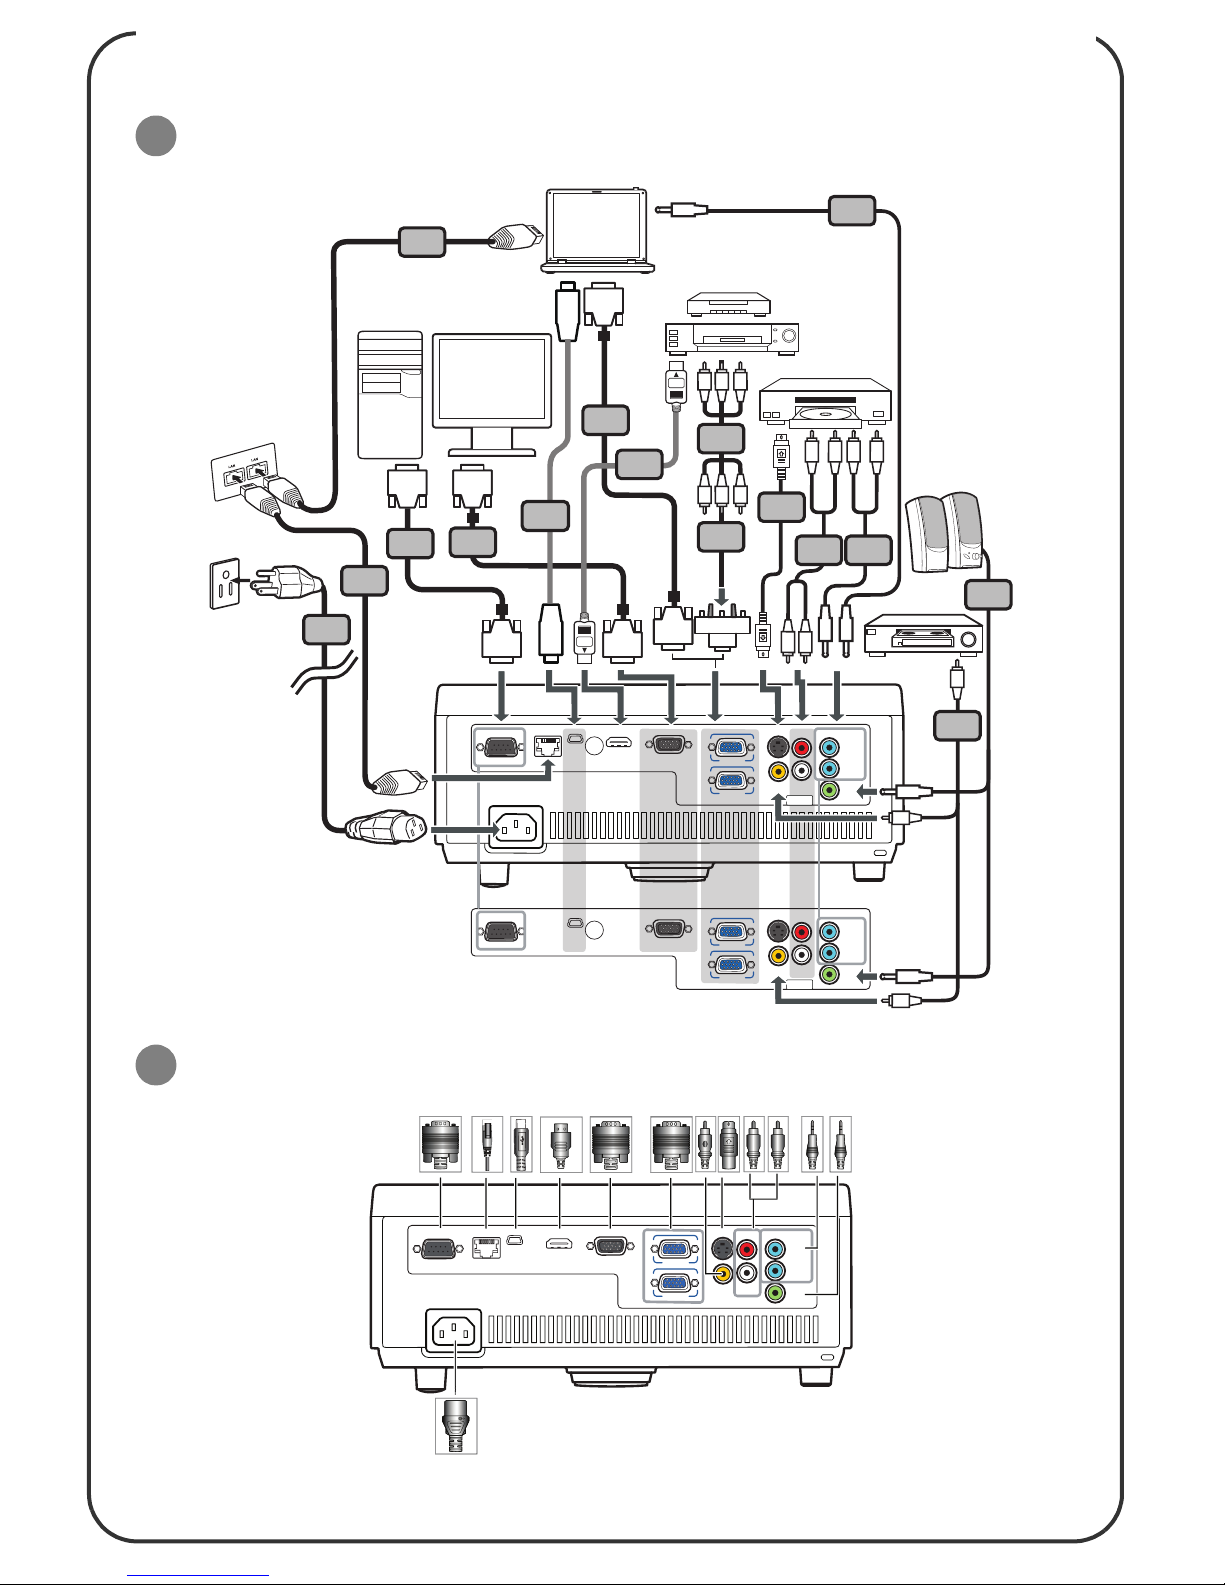
S1210Hn/S1213/T212/XS-X13/S1213Hn/T212DT/
XS-X13HG/S1313W/S1310WHn/S1313WHn
INSTALLATION
5
10
D-Sub
USB
RBG
2
9
11
RS232
D-Sub
RBG
8
7
2
3
10
1
RS232
RS232
LAN
D-Sub
USB B
HDMI
USB BRS232
USB
D-Sub
VGA OUT
VGA OUT
HDTV adapter
S-VIDEO
VGA IN 1
VGA IN 2
S-VIDEO
VGA IN 1
VGA IN 2
R
L
R
W
6
5
5
5
L
R
Y
AUDIO-R
AUDIO
IN 1
AUDIO
IN 2
AUDIO-L
VIDEO
VIDEO
S1213Hn
AUDIO-R
AUDIO-L
S1213
AUDIO
OUT
AUDIO
IN 1
AUDIO
IN 2
AUDIO
OUT
4
Y
Y
INTERFACE CONNECTOR
E62405SP
R
Note: Connector interface is subject to model's specifications

1
2
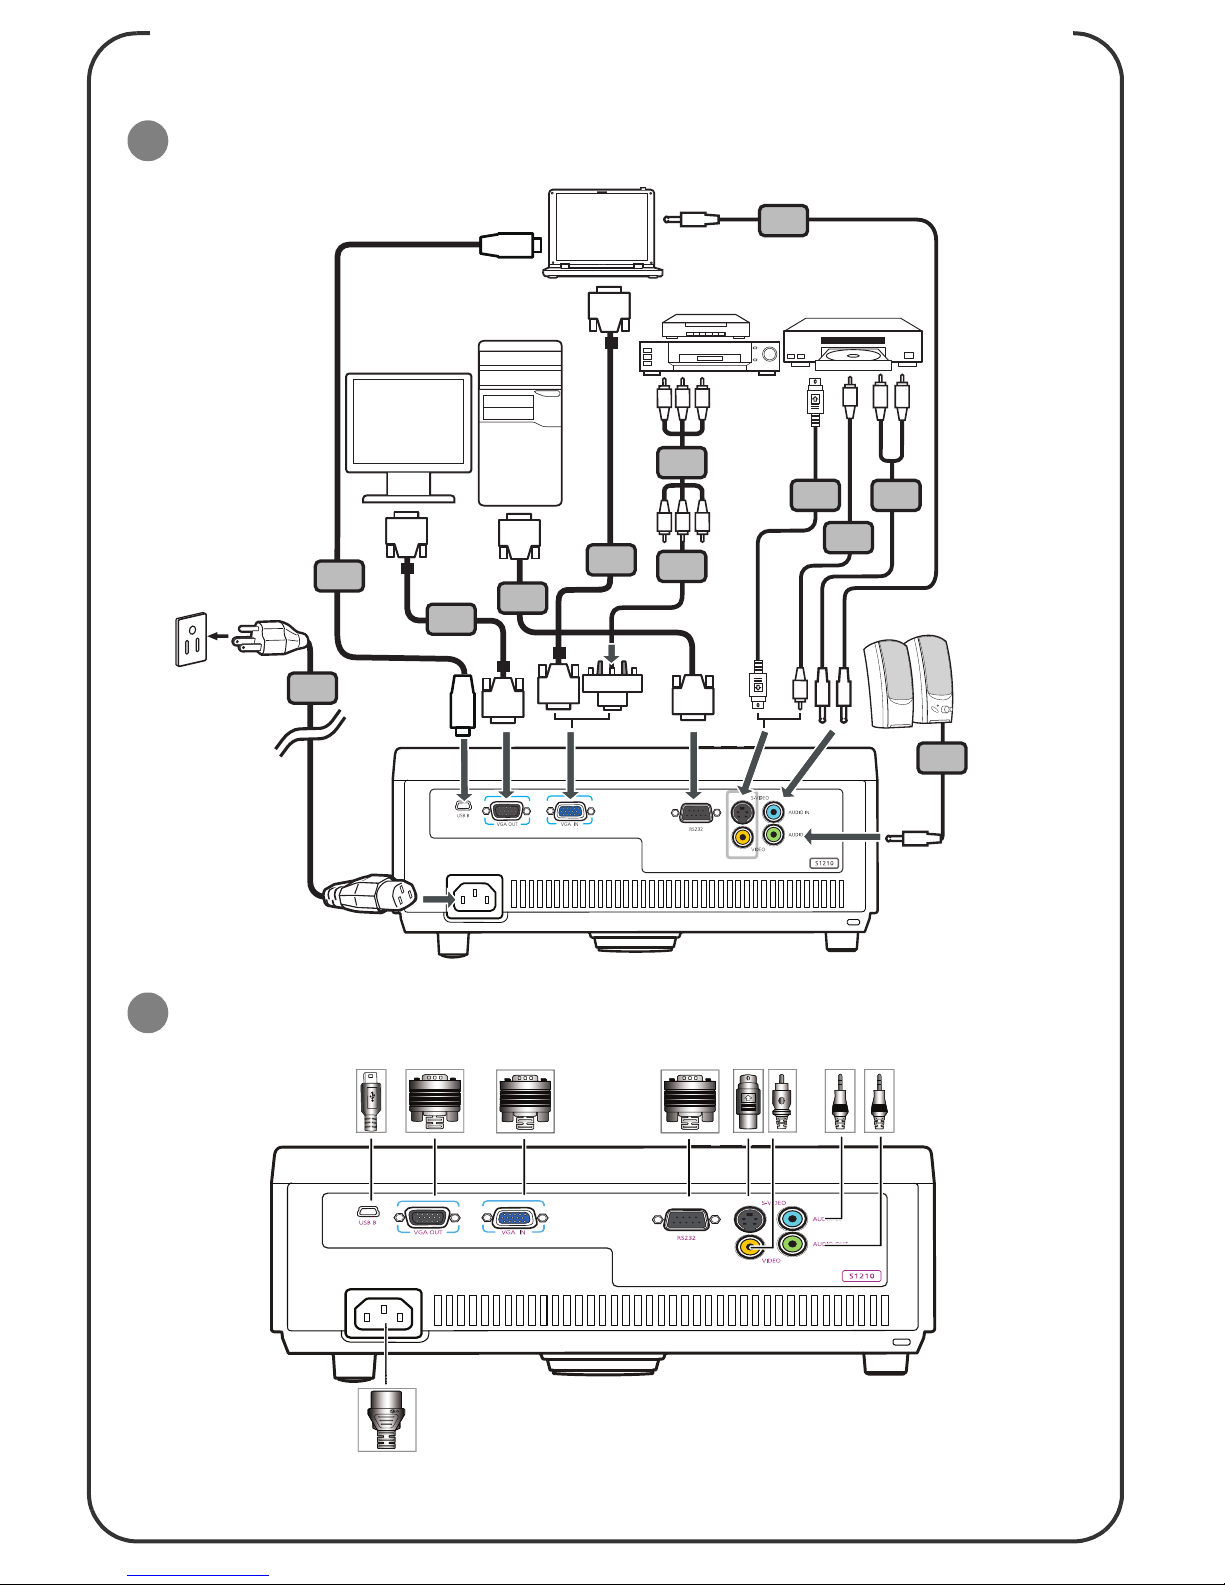
Connecting to a Computer
Powering On the Projector
Powering Off the Projector
1
2
Menghubungkan ke Komputer
Pemberian Daya pada Proyektor
Memutus Daya pada Proyektor
English Bahasa Indonesia
Quick Start
INSTALLATION
1. Power cord
2. VGA cable
3. VGA to component video/HDTV
adapter
4. Composite video cable
5. Audio cable
6. S-Video cable
7. RS232 cable
8. USB cable
9. 3 RCA component cable
10. RJ45 cable
11. HDMI cable
Note: Connector interface is subject to model's specifications
INTERFACE CONNECTOR
Start Cepat
INSTALASI
1. Kabel daya
2. Kabel VGA
3. VGA ke video komponen/adaptor
HDTV
4. Kabel video gabungan
5. Kabel audio
6. Kabel S-Video
7. Kabel RS232
8. Kabel USB
9. 3 Kabel komponen RCA
10. Kabel RJ45
11. Kabel HDMI
Catatan: Antarmuka penghubung untuk spesifikasi model
PENGHUBUNG ANTARMUKA
1. Ensure the projector and your
computer are turned off.
2. Connect one end of the VGA cable to
the "VGA IN" connector on the
projector; connect the other end to
the VGA connector on the computer
and tighten the screws.
3. Connect one end of the power cord
into the AC power socket on the
projector; connect the other end to an
electrical outlet.
1. Remove the lens cap.
2. Turn on the projector first and then
the computer.
3. Adjust the position, focus and zoom.
4. Run your presentation.
1. Pastikan proyektor dan komputer
Anda mati.
2. Hubungkan salah satu ujung kabel
VGA ke penghubung "VGA IN"
pada proyektor; hubungkan ujung
kabel yang lain ke penghubung
VGA pada komputer dan
kencangkan sekrup.
3. Hubungkan salah satu ujung kabel
daya ke dalam soket daya AC pada
proyektor; hubungkan ujung kabel
yang lain ke outlet elektrik.
1. Lepaskan tutup lensa.
2. Hidupkan proyektor dahulu,
kemudian komputer.
3. Sesuaikan posisi, fokus dan zum.
4. Jalankan presentasi Anda.
1. Press the power button twice.
2. Do not remove AC power cord from
outlet until the projector fans shut
down.
1. Tekan tombol daya (power) dua
kali.
2. Jangan pindahkan kabel daya AC
dari stop kontak hingga kipas
proyektor mati.
1
2
Připojení k počítači
Zapnutí projektoru
Vypnutí projektoru
1
2
Tilslutter til en computer
Sådan tændes der for projektoren
Sådan slukkes der for projektoren
Čeština Dansk
Rychlý úvod
INSTALACE
1. Napájecí kabel
2. VGA kabel
3. Adaptér VGA na komponentní video /
HDTV
4. Kompozitní video kabel
5. Audio kabel
6. S-video kabel
7. RS232 kabel
8. Kabel USB
9. 3x kabel komponentního videa/RCA
10. Kabel RJ45
11. Kabel HDMI
Poznámka: Konektor rozhraní je závislý na specifikacích modelu
KONEKTOR ROZHRANÍ
Kvikstart
INSTALLATION
1. El-ledning
2. VGA kabel
3. VGA til komponentvideo/HDTV
adapter
4. Komposit video kabel
5. Lydkabel
6. S-video kabel
7. RS232 kabel
8. USB kabel
9. 3 RCA komponentkabel
10. RJ45 kabel
11. HDMI kabel
Bemærk: Stikgrænseflade afhænger af modellens specifikationer
GRÆNSEFLADESTIK
1. Ujistěte se, že jsou projektor i váš
počítač vypnuty.
2. Připojte jeden konec VGA kabelu na
konektor "VGA IN" (VGA vstup) na
projektoru; připojte druhý konec na
VGA konektor na počítači a utáhněte
šroubky.
3. Připojte jeden konec napájecího
kabelu k AC napájecí zástrčce na
projektoru; připojte druhý konec k
elektrické zásuvce.
1. Sejměte kryt čočky.
2. Napřed zapněte projektor a poté
počítač.
3. Upravte polohu, zaostření a zvětšení.
4. Spusťte svou prezentaci.
1. Kontroller, at projektoren og
computeren er slukket.
2. Forbind VGA kablets ene ende til
projektorens "VGA IN" stik og den
anden ende til computerens VGA
stik. Stram derefter skruerne.
3. Forbind netledningens ene ende til
projektorens AC strømstik og den
anden ende til en stikkontakt.
1. Fjern linsehætten.
2. Tænd først for projektoren og
derefter for computeren.
3. Juster position, fokus og zoom.
4. Kør din præsentation.
1. Dvakrát stiskněte vypínač.
2. Neodpojujte AC napájecí kabel ze
zásuvky, dokud se ventilátory
projektoru nevypnou.
1. Tryk to gange på strømkontakten.
2. Fjern ikke AC netledningen fra
kontakten, før projektorens
ventilatorer har stoppet.

1
2
Verbinden mit einem Computer
Einschalten des Projektors
Ausschalten des Projektors
1
2
Conexión a un Ordenador
Encender el proyector
Apagar el proyector
Deutsch Español
Schnellstart
INSTALLATION
1. Netzkabel
2. VGA-Kabel
3. VGA-auf-Component-Video/HDTVAdapter
4. Composite-Videokabel
5. Audiokabel
6. S-Videokabel
7. RS232-Kabel
8. USB-Kabel
9. 3 RCA Component-Kabel
10. RJ45-Kabel
11. HDMI-Kabel
Hinweis: Die Anschlussschnittstelle variiert je nach dem Modell.
SCHNITTSTELLENANSCHLUSS
1. Stellen Sie sicher, dass der Projektor
und Ihr Computer ausgeschaltet sind.
2. Verbinden Sie ein Ende des VGAKabels mit dem "VGA IN"-Anschluss
am Projektor. Verbinden Sie das
andere Ende des Kabels mit dem
VGA-Anschluss am Computer und
ziehen die Schrauben fest.
3. Verbinden Sie ein Ende des
Netzkabels mit dem
Wechselstromeingang am Projektor
und verbinden das andere Ende mit
einer Steckdose.
Inicio Rápido
INSTALACIÓN
1. Cable de alimentación
2. Cable VGA
3. Adaptador VGA a vídeo
componente/HDTV
4. Cable de vídeo compuesto
5. Cable de audio
6. Cable de S-Video
7. Cable RS232
8. Cable USB
9. Cable de vídeo componente con 3
conectores RCA
10. Cable RJ45
11. Cable HDMI
Nota: El conector de la interfaz está sujeto a las especificaciones
del modelo.
CONECTOR DE LA INTERFAZ
1. Asegúrese de que el proyector y su
ordenador estén apagados.
2. Conecte un extremo del cable VGA
al conector "ENTRADA VGA" del
proyector, conecte el otro extremo
del conector VGA al ordenador y
apriete los tornillos.
3. Conecte un extremo del cable de
alimentación a la toma de entrada
CA del proyector, y el otro extremo
a una toma de corriente eléctrica.
1. Entfernen Sie die
Objektivabdeckung.
2. Schalten Sie zuerst den Projektor
und dann den Computer ein.
3. Passen Sie die Position, den Fokus
und den Zoomfaktor ein.
4. Führe Sie Ihre Präsentation aus.
1. Drücken Sie zweimal den
Stromschalter.
2. Ziehen Sie erst dann das Netzkabel
aus der Steckdose heraus, wenn das
Gebläse des Projektors
ausgeschaltet ist.
1. Retire la tapa de la lente.
2. Encienda primero el proyector y
luego el ordenador.
3. Ajustar la posición, el zoom y el
enfoque.
4. Ejecute su presentación.
1. Pulse dos veces el botón de
encendido.
2.
No extraiga el cable de alimentación
CA de la toma hasta que los
ventiladores del proyector se apaguen
.
1
2
Keát noái vôùi maùy tính
Baät nguoàn maùy chieáu
Taét nguoàn maùy chieáu
1
2
Connexion à un ordinateur
Mise sous tension du projecteur
Mise hors tension du projecteur
Tieáng Vieät
Français
Khôûi ñoäng nhanh
LAÉP ÑAËT
1. Daây nguoàn
2. Caùp VGA
3. Adapter VGA keát noái vôùi video keát
hôïp/HDTV
4. Caùp video toång hôïp
5. Caùp aâm thanh
6. Caùp S-Video
7. Caùp RS232
8. Caùp USB
9. Caùp keát hôïp 3 RCA
10.Caùp RJ45
11.Caùp HDMI
Löu yù: Giao dieän ñaàu caém phaûi tuaân thuû caùc thoâng soá kyõ thuaät
cuûa maãu maùy chieáu
ÑAÀU CAÉM GIAO DIEÄN
Démarrage rapide
INSTALLATION
1. Cordon d'alimentation
2. Câble VGA
3. Adaptateur VGA vers Composant
vidéo/HDTV
4. Câble Vidéo Composite
5. Câble audio
6. Câble S-Vidéo
7. Câble RS232
8. Câble USB
9. Câble de composant 3 RCA
10. Câble RJ45
11. Câble HDMI
Remarque : l'interface connecteur est soumis aux spécifications
du modèle
CONNECTEUR INTERFACE
1. Ñaûm baûo ñaõ taét caû maùy
chieáu vaø maùy tính
2. Caém ñaàu naøy cuûa caùp VGA vaøo ñaàu
caém "VGA IN" treân maùy chieáu; caém
ñaàu coøn laïi vaøo ñaàu caém VGA treân
maùy tính vaø sieát chaët caùc vít.
3. Caém ñaàu naøy cuûa daây nguoàn vaøo oå
caém ñieän AC (xoay chieàu) treân maùy
chieáu; caém ñaàu coøn laïi vaøo oå caém
ñieän.
1. Thaùo naép oáng kính.
2. Baät maùy chieáu tröôùc vaø maùy tính
sau.
3. Chænh vò trí, tieâu cöï vaø möùc zoom.
4. Khôûi chaïy thuyeát trình cuûa baïn.
1. Assurez-vous que le projecteur et
votre ordinateur sont hors tension.
2. Branchez l'une des extrémités du
câble VGA au connecteur "VGA IN"
du projecteur ; branchez l'autre
extrémité du connecteur VGA à
l'ordinateur puis serrez les vis.
3. Branchez l'une des extrémités du
cordon d'alimentation dans la prise
d'alimentation CA du projecteur ;
branchez l'autre extrémité dans une
prise électrique.
1. Enlevez le protège-objectif.
2. Allumez d'abord le projecteur et
ensuite l'ordinateur.
3. Ajustez la position, la mise au point
et le zoom.
4. Lancez votre présentation.
1. Nhaán nuùt nguoàn hai laàn.
2. Khoâng ruùt giaây nguoàn AC khoûi oå
caém ñieän cho ñeán khi caùc quaït maùy
chieáu taét haún.
1. Appuyez deux fois sur le bouton
Marche/Arrêt.
2. Ne débranchez pas le cordon
d'alimentation CA de la prise tant
que les ventilateurs du projecteur
fonctionnent.
 Loading...