

Page 1

User Manual for
Acer s50 and s60 Handhelds
Page 2

COPYRIGHT
Copyright © 2002 Acer Inc. or its subsidiaries
All Rights Reserved. Printed in Taiwan.
Acer s50 and s60 Handhelds User Manual
Original issue: August 2002
Acer and the Acer logo are registered trademarks of Acer Inc. Graffiti, HotSync, and Palm OS are registered trademarks.
HotSync, Palm, and the Palm logo are trademarks of Palm, Inc. or its subsidiaries. Other company’s product names or trademarks
are used herein for identification purpose only and belong to their respective companies.
Changes may be made periodically to the information in this publication without obligation to notify any person of such
revision or changes. Such changes will be incorporated in new editions of this User Manual or supplementary documents and
publications.
No part of this publication may be reproduced, stored in a retrieval system, or transmitted, in any form or by any means,
electronic, mechanical, photocopy, recording, or otherwise, without the prior written permission of Acer Inc.
DISCLAIMER AND LIMITATION OF LIABILITY
Acer and its subsidiaries makes no representations or warranties, either expressed or implied, with respect to the contents
hereof and specifically disclaims the implied warranties of merchantability or fitness for a particular purpose. Acer and its
subsidiaries assume no responsibility for any damage or loss resulting from the use of this Acer s50 and s60 Handhelds
User Manual.
NOTES
Record the device ID, serial number, purchase date, and place of purchase information in the space provided below. The serial
number and device ID are recorded on the label affixed to your Acer handheld. All correspondence concerning your unit should
include the serial number, device ID, and purchase information.
Acer s50 and s60 handhelds
Device ID: _________________________________
S/N: _______________________________________
Purchase Date: ____________________________
Place of Purchase: _________________________
Page 3

Your guides
First things first
Your guides
First things first
We would like to thank you for making Acer handheld your choice for your handheld
needs. Your new sleek Acer handheld is packed with user-friendly applications and
utilities designed to make organising work-related information and synchronising it
with your personal activities a time-efficient task. We hope you enjoy using your Acer
handheld as much as we enjoyed creating it for you.
To help you use your handheld, we have designed a set of guides:
• First off, the Just for Starters poster helps you get started with setting up
your handheld.
• This online Acer s50 and s60 Handhelds User Manual introduces you to
the many ways your handheld can help you organise and manage both
business and personal information so as to make your everyday activities a
more productive and satisfying experience. This User Manual provides clear
and comprehensive information about your handheld, so read it thoroughly.
• The handy Acer s50 and s60 Handhelds Quick Guide useful for taking a
quick reference glance on your handheld’s basic functionalities. Keep it on
your desktop or in your backpack for easy access. This Quick Guide is also
available in PDF format on the Acer s50 and s60 Handhelds Installation
CD.
®
•A Graffiti
strokes of this powerful writing software.
For more information about our products, services, and support information, please
visit our web site at http://www.acer.com/
pocket reference card to remind you of the standard writing
.
iii
Page 4

First things first
Maintaining your Acer handheld
Maintaining your Acer handheld
This section provides information on the following:
• Proper care and usage of your handheld
• Resetting your handheld
Proper care and usage of your handheld
Your handheld’s rugged and tough construction is designed to provide you with years
of reliable and trouble-free service. Observing the following general maintenance
procedures will help ensure this:
1 Take care not to scratch the screen of your handheld. Keep the screen clean. When
working with your handheld, use the supplied stylus or plastic-tipped pens intended
for use with touch-sensitive screens. Never use an actual pen or pencil or other sharp
object on the screen surface.
2 Your handheld is not waterproof and should not be exposed to rain or moisture.
Under extreme conditions, water may enter the circuitry through the front panel
buttons. In general, treat your handheld as you would a pocket calculator or other
small electronic device.
3 Take care not to drop your handheld or subject it to any strong impact. Do not place
your handheld in your back pocket; if you sit on it, you may damage it.
4 Protect your handheld from temperature extremes. For example, do not leave your
handheld on the dashboard of a car on a hot day or on a day when temperatures are
below the freezing point. Also, keep it away from heaters and other sources of heat.
5 Do not use or store your handheld in any location that is extremely dusty, damp or
wet.
6 Use a soft, damp cloth to clean your handheld. If the surface of the screen becomes
soiled, clean it with a soft cloth moistened with diluted window-cleaning solution.
Battery considerations
Please note the following considerations for the battery in your handheld.
• Under normal conditions, your handheld battery should remain charged by
placing it in the cradle for just a few minutes each day. You can conserve
battery life by minimising the use of the backlight feature and changing the
the Auto-off setting that automatically turns off the handheld after a period
of inactivity. For more information on the Auto-off setting, refer to "Setting
the Auto-off interval time" on page 247.
• If the battery becomes low in the course of normal use, an alert appears on
the handheld screen indicating low battery status. If this alert appears,
perform a HotSync operation to back up your data; then leave your handheld
in the cradle to recharge the unit. This will prevent accidental data loss.
• If the battery drains to the point where your handheld does not operate, it
stores your data safely for about a week. In this case, there is enough residual
energy in the battery to store the data, but not enough to turn on your
handheld. If your handheld does not turn on when you press the power
button, you should recharge your unit immediately.
• If your battery drains and you have the unit in an uncharged state for an
extended period of time, you can lose all the data stored in it.
iv
Page 5

• There are no serviceable parts inside your handheld so do not attempt to
open the unit.
• If you ever dispose of your handheld, please dispose it without damaging the
environment. Take your handheld to the nearest environmental recycling
center.
Assigning security options
The Security application in your handheld lets you set options to protect entries from
unauthorised users in a variety of ways:
The security application lets you:
• Mask or hide entries you have defined as private.
– The Mask option displays a gray bar over private records.
– The Hide option completely hides private records.
• Assign a password to viewing options to enhance security.
– Assigning a password requires you to enter a password before private
entries can be viewed.
– Not assigning a password lets you view private entries when you select
Show Records from the Security dialog box.
• Lock and turn off your handheld so that a password must be entered before
you can use the device again.
• Hide records that you have defined as private, with or without a password.
– Without a password, private records are hidden until you set the Security
application to display them.
– With a password, you must enter the password to view the private
entries.
For more information on how to set these security features, refer to "Security" on
page 16.
First things first
Assigning security options
v
Page 6

First things first
Assigning security options
vi
Page 7

Contents
First things first iii
Your guides . . . . . . . . . . . . . . . . . . . . . . . . . . . . . . iii
Maintaining your Acer handheld . . . . . . . . . . . . . . . . . . . . . iv
Proper care and usage of your handheld . . . . . . . . . . . . . . . . . iv
Battery considerations . . . . . . . . . . . . . . . . . . . . . . . . iv
Assigning security options . . . . . . . . . . . . . . . . . . . . . . . . v
1 Entering data in your Acer handheld 1
Entering data using Graffiti . . . . . . . . . . . . . . . . . . . . . . . . 1
The Graffiti alphabet . . . . . . . . . . . . . . . . . . . . . . . . . 1
The Graffiti numbers . . . . . . . . . . . . . . . . . . . . . . . . . 3
The Graffiti punctuation marks . . . . . . . . . . . . . . . . . . . . . 4
The Graffiti symbols and extended characters . . . . . . . . . . . . . . . 5
The Graffiti accented characters . . . . . . . . . . . . . . . . . . . . 5
The Graffiti non-English characters . . . . . . . . . . . . . . . . . . . 6
Graffiti navigation strokes . . . . . . . . . . . . . . . . . . . . . . . 6
Using Graffiti ShortCuts . . . . . . . . . . . . . . . . . . . . . . . . 6
Graffiti tips . . . . . . . . . . . . . . . . . . . . . . . . . . . . . 8
Using the onscreen keyboard . . . . . . . . . . . . . . . . . . . . . . . 8
Beaming data . . . . . . . . . . . . . . . . . . . . . . . . . . . . . 9
2 Managing your applications 11
Using Applications Launcher . . . . . . . . . . . . . . . . . . . . . . . 11
Categorising applications . . . . . . . . . . . . . . . . . . . . . . .12
Changing the Applications Launcher display . . . . . . . . . . . . . . .13
Displaying the last selected category of applications . . . . . . . . . . . . 15
Setting preferences for applications . . . . . . . . . . . . . . . . . . . .15
Security . . . . . . . . . . . . . . . . . . . . . . . . . . . . . . . .16
Displaying private records . . . . . . . . . . . . . . . . . . . . . . .20
Assigning and editing passwords . . . . . . . . . . . . . . . . . . . . 21
Locking your handheld . . . . . . . . . . . . . . . . . . . . . . . .23
Recovering from a forgotten password. . . . . . . . . . . . . . . . . .27
3 Working with your basic applications 29
Common applications tasks . . . . . . . . . . . . . . . . . . . . . . . . 29
Creating records . . . . . . . . . . . . . . . . . . . . . . . . . . . .29
Editing records . . . . . . . . . . . . . . . . . . . . . . . . . . . . .30
Selecting text . . . . . . . . . . . . . . . . . . . . . . . . . . . . 30
Using the Edit menu . . . . . . . . . . . . . . . . . . . . . . . . .30
Deleting records in your basic applications . . . . . . . . . . . . . . . . .31
Purging records. . . . . . . . . . . . . . . . . . . . . . . . . . . . .32
Categorising records. . . . . . . . . . . . . . . . . . . . . . . . . . .34
System-defined categories . . . . . . . . . . . . . . . . . . . . . . .34
vii
Page 8

User-defined categories . . . . . . . . . . . . . . . . . . . . . . . 34
Finding records . . . . . . . . . . . . . . . . . . . . . . . . . . . . 36
Finding Address Book records . . . . . . . . . . . . . . . . . . . . . 36
Using the Find option . . . . . . . . . . . . . . . . . . . . . . . . 37
Using Phone Lookup . . . . . . . . . . . . . . . . . . . . . . . . . 38
Sorting records in your basic applications . . . . . . . . . . . . . . . . . . 39
Attaching notes . . . . . . . . . . . . . . . . . . . . . . . . . . . . 39
Choosing fonts . . . . . . . . . . . . . . . . . . . . . . . . . . . . 40
Getting information on an application . . . . . . . . . . . . . . . . . . . 41
Application-specific tasks . . . . . . . . . . . . . . . . . . . . . . . . 41
Using Date Book . . . . . . . . . . . . . . . . . . . . . . . . . . . . 41
Scheduling events . . . . . . . . . . . . . . . . . . . . . . . . . . 41
Adding Address Book information to an event . . . . . . . . . . . . . . 48
Setting the alarm for an event . . . . . . . . . . . . . . . . . . . . . 48
Setting alarm options . . . . . . . . . . . . . . . . . . . . . . . . 49
Changing the Date Book view . . . . . . . . . . . . . . . . . . . . . 50
Date Book menus . . . . . . . . . . . . . . . . . . . . . . . . . . 54
Using Address Book . . . . . . . . . . . . . . . . . . . . . . . . . . 56
Creating an Address Book entry . . . . . . . . . . . . . . . . . . . . 56
Selecting different types of phone numbers and addresses . . . . . . . . . 57
Duplicating an entry . . . . . . . . . . . . . . . . . . . . . . . . . 58
Editing Address Book entries . . . . . . . . . . . . . . . . . . . . . 59
Sorting Address Book entries . . . . . . . . . . . . . . . . . . . . . 59
Address Book menus . . . . . . . . . . . . . . . . . . . . . . . . . 60
Using To Do List . . . . . . . . . . . . . . . . . . . . . . . . . . . . 63
Creating To Do List items . . . . . . . . . . . . . . . . . . . . . . . 63
Setting To Do List priorities . . . . . . . . . . . . . . . . . . . . . . 63
Checking off a To Do List item . . . . . . . . . . . . . . . . . . . . . 64
Changing To Do List items details . . . . . . . . . . . . . . . . . . . 65
Sorting To Do items . . . . . . . . . . . . . . . . . . . . . . . . . 67
Displaying completed and due items . . . . . . . . . . . . . . . . . . 68
To Do List menus . . . . . . . . . . . . . . . . . . . . . . . . . . 69
Using Memo Pad . . . . . . . . . . . . . . . . . . . . . . . . . . . . 69
Creating memos. . . . . . . . . . . . . . . . . . . . . . . . . . . 69
Reviewing memos . . . . . . . . . . . . . . . . . . . . . . . . . . 70
Sorting memos . . . . . . . . . . . . . . . . . . . . . . . . . . . 70
Memo Pad menus . . . . . . . . . . . . . . . . . . . . . . . . . . 71
Using Calculator . . . . . . . . . . . . . . . . . . . . . . . . . . . . 73
Using the Calculator buttons . . . . . . . . . . . . . . . . . . . . . 73
Displaying recent calculations . . . . . . . . . . . . . . . . . . . . . 73
Calculator menus . . . . . . . . . . . . . . . . . . . . . . . . . . 74
4 Working with your supplementary applications 75
Installing handheld applications . . . . . . . . . . . . . . . . . . . . . 75
Using Clock . . . . . . . . . . . . . . . . . . . . . . . . . . . . . . 76
Clock modes . . . . . . . . . . . . . . . . . . . . . . . . . . . . 76
City Clock mode. . . . . . . . . . . . . . . . . . . . . . . . . . . 77
viii
Page 9

Big Clock mode . . . . . . . . . . . . . . . . . . . . . . . . . . .86
Timer mode . . . . . . . . . . . . . . . . . . . . . . . . . . . . .87
Clock menu . . . . . . . . . . . . . . . . . . . . . . . . . . . . .88
Using AudioBox . . . . . . . . . . . . . . . . . . . . . . . . . . . .89
Copying MP3 files into a Memory Stick. . . . . . . . . . . . . . . . . .89
AudioBox main screen . . . . . . . . . . . . . . . . . . . . . . . .90
Background playback . . . . . . . . . . . . . . . . . . . . . . . . .90
AudioBox functions. . . . . . . . . . . . . . . . . . . . . . . . . .91
AudioBox playlist . . . . . . . . . . . . . . . . . . . . . . . . . .93
Deleting MP3 files . . . . . . . . . . . . . . . . . . . . . . . . . .94
AudioBox menu . . . . . . . . . . . . . . . . . . . . . . . . . . .96
Using Recorder . . . . . . . . . . . . . . . . . . . . . . . . . . . . .97
Recorder main screen . . . . . . . . . . . . . . . . . . . . . . . . .97
Storage media . . . . . . . . . . . . . . . . . . . . . . . . . . . .98
Audio recording function . . . . . . . . . . . . . . . . . . . . . . .98
Audio playback function . . . . . . . . . . . . . . . . . . . . . . 100
Recorder command buttons . . . . . . . . . . . . . . . . . . . . . 101
File Manager . . . . . . . . . . . . . . . . . . . . . . . . . . . 103
Recorder menus . . . . . . . . . . . . . . . . . . . . . . . . . . 105
Using WalkReader. . . . . . . . . . . . . . . . . . . . . . . . . . . 108
Generating eBooks for WalkReader . . . . . . . . . . . . . . . . . . 108
eBook categories. . . . . . . . . . . . . . . . . . . . . . . . . . 108
Working on the WalkReader Manager screen . . . . . . . . . . . . . . 109
File Manager . . . . . . . . . . . . . . . . . . . . . . . . . . . 112
Working in Browse mode . . . . . . . . . . . . . . . . . . . . . . 112
Working with bookmarks . . . . . . . . . . . . . . . . . . . . . . 114
Using the Jump To function . . . . . . . . . . . . . . . . . . . . . 117
Working with hyperlinks . . . . . . . . . . . . . . . . . . . . . . 118
Using the eBook notes feature . . . . . . . . . . . . . . . . . . . . 119
Note Manager . . . . . . . . . . . . . . . . . . . . . . . . . . . 120
WalkReader menus . . . . . . . . . . . . . . . . . . . . . . . . . 122
Using PhotoWiz . . . . . . . . . . . . . . . . . . . . . . . . . . . 125
Selecting image source . . . . . . . . . . . . . . . . . . . . . . . 125
Working in Thumbnail mode . . . . . . . . . . . . . . . . . . . . . 126
Working in View mode . . . . . . . . . . . . . . . . . . . . . . . 130
PhotoWiz menus . . . . . . . . . . . . . . . . . . . . . . . . . . 132
Using Filer . . . . . . . . . . . . . . . . . . . . . . . . . . . . . . 137
Filer main screen . . . . . . . . . . . . . . . . . . . . . . . . . . 137
File management commands . . . . . . . . . . . . . . . . . . . . . 139
Folder operation . . . . . . . . . . . . . . . . . . . . . . . . . . 142
Filer menus . . . . . . . . . . . . . . . . . . . . . . . . . . . . 144
Using Service Launcher. . . . . . . . . . . . . . . . . . . . . . . . . 147
QuickLaunch function. . . . . . . . . . . . . . . . . . . . . . . . 147
Using Backup. . . . . . . . . . . . . . . . . . . . . . . . . . . . . 148
Backup function . . . . . . . . . . . . . . . . . . . . . . . . . . 148
Restore function . . . . . . . . . . . . . . . . . . . . . . . . . . 150
Deleting a backup file from a Memory Stick. . . . . . . . . . . . . . . 153
ix
Page 10

Backup menu . . . . . . . . . . . . . . . . . . . . . . . . . . . 154
5 Working with your PC utilities 155
Installing PC utilities . . . . . . . . . . . . . . . . . . . . . . . . . 155
Selecting files when using the PC utilities . . . . . . . . . . . . . . . . . 155
Using Palm Desktop . . . . . . . . . . . . . . . . . . . . . . . . . 155
Using IntelliSync Lite . . . . . . . . . . . . . . . . . . . . . . . . . 156
Using Voice Converter. . . . . . . . . . . . . . . . . . . . . . . . . 156
Voice Converter toolbar . . . . . . . . . . . . . . . . . . . . . . 157
Voice Converter source file list . . . . . . . . . . . . . . . . . . . . 159
Voice Converter menus . . . . . . . . . . . . . . . . . . . . . . . 159
Using WalkReader Converter . . . . . . . . . . . . . . . . . . . . . . 161
WalkReader Converter toolbar. . . . . . . . . . . . . . . . . . . . 161
WalkReader Converter source file list . . . . . . . . . . . . . . . . . 165
WalkReader Converter menus . . . . . . . . . . . . . . . . . . . . 165
Using PhotoWiz Converter . . . . . . . . . . . . . . . . . . . . . . . 169
Converting image files . . . . . . . . . . . . . . . . . . . . . . . 170
6 Using the Attention Manager 173
Insistent alarms . . . . . . . . . . . . . . . . . . . . . . . . . . . 173
Using the Reminder command buttons . . . . . . . . . . . . . . . . 174
Setting the alarm preferences . . . . . . . . . . . . . . . . . . . . 174
Setting alarm sound effects . . . . . . . . . . . . . . . . . . . . . 174
Using the Reminders list screen . . . . . . . . . . . . . . . . . . . 175
Subtle alarms . . . . . . . . . . . . . . . . . . . . . . . . . . . . 176
Understanding the blinking alarm indicator . . . . . . . . . . . . . . 176
7 Managing your desktop email 177
Setting up Mail on your computer. . . . . . . . . . . . . . . . . . . . 177
Setting up the Mail application and HotSync options . . . . . . . . . . 177
Synchronising Mail with your email application . . . . . . . . . . . . . 179
Viewing, creating, and replying to email . . . . . . . . . . . . . . . . . 180
Viewing email items . . . . . . . . . . . . . . . . . . . . . . . . 180
Creating email items . . . . . . . . . . . . . . . . . . . . . . . . 182
Looking up an address . . . . . . . . . . . . . . . . . . . . . . . 185
Adding details to email items . . . . . . . . . . . . . . . . . . . . 186
Creating a signature for your email item . . . . . . . . . . . . . . . 187
Storing and editing email items. . . . . . . . . . . . . . . . . . . . . 188
Storing and editing unsent email items . . . . . . . . . . . . . . . . 188
Saving an email as a draft copy . . . . . . . . . . . . . . . . . . . 189
Filing an email item . . . . . . . . . . . . . . . . . . . . . . . . 191
Deleting email items . . . . . . . . . . . . . . . . . . . . . . . . . 193
Categorising and sorting email items . . . . . . . . . . . . . . . . . . 197
Managing your email application with HotSync . . . . . . . . . . . . . . 199
Using filters to control downloading . . . . . . . . . . . . . . . . . 200
Defining filter strings . . . . . . . . . . . . . . . . . . . . . . . 202
Mail menus. . . . . . . . . . . . . . . . . . . . . . . . . . . . 203
x
Page 11

8 Beaming information 207
Beaming a business card . . . . . . . . . . . . . . . . . . . . . . . . 207
Beaming a record . . . . . . . . . . . . . . . . . . . . . . . . . . . 207
Beaming an application . . . . . . . . . . . . . . . . . . . . . . . . 208
Receiving beamed information . . . . . . . . . . . . . . . . . . . . . 210
Turning off beaming. . . . . . . . . . . . . . . . . . . . . . . . . . 211
9 Exchanging and updating data using HotSync operations 213
Performing a HotSync operation . . . . . . . . . . . . . . . . . . . . . 213
Creating a user profile . . . . . . . . . . . . . . . . . . . . . . . 213
Performing a local HotSync operation . . . . . . . . . . . . . . . . . 214
Selecting HotSync setup options . . . . . . . . . . . . . . . . . . . . . 216
Customising HotSync application settings . . . . . . . . . . . . . . . . . 218
IR HotSync operations . . . . . . . . . . . . . . . . . . . . . . . . . 220
Preparing your computer for infrared communication . . . . . . . . . . 220
Configuring HotSync Manager for infrared communication . . . . . . . . 221
Performing an IR HotSync operation. . . . . . . . . . . . . . . . . . 223
Returning to using the cradle for local USB
HotSync operations . . . . . . . . . . . . . . . . . . . . . . . . 224
Performing a HotSync operation via a network . . . . . . . . . . . . . . . 225
Performing a HotSync operation via a network . . . . . . . . . . . . . 228
Using File Link . . . . . . . . . . . . . . . . . . . . . . . . . . . . 229
10 Setting preferences for your Acer handheld 231
Opening Preferences . . . . . . . . . . . . . . . . . . . . . . . . . 232
Alarm preferences . . . . . . . . . . . . . . . . . . . . . . . . . . 232
Buttons preferences . . . . . . . . . . . . . . . . . . . . . . . . . . 234
Connection preferences . . . . . . . . . . . . . . . . . . . . . . . . 237
Connection Types . . . . . . . . . . . . . . . . . . . . . . . . . 238
Setting an Infrared to modem connection . . . . . . . . . . . . . . . 239
Date & Time preferences . . . . . . . . . . . . . . . . . . . . . . . . 242
Digitizer preferences . . . . . . . . . . . . . . . . . . . . . . . . . 244
Formats preferences . . . . . . . . . . . . . . . . . . . . . . . . . . 244
Setting default country . . . . . . . . . . . . . . . . . . . . . . . 245
Setting time, date, week start, and number display formats . . . . . . . . 245
General preferences . . . . . . . . . . . . . . . . . . . . . . . . . . 247
Setting the Auto-off interval time. . . . . . . . . . . . . . . . . . . 247
Setting the sounds and volumes . . . . . . . . . . . . . . . . . . . 248
Turning Beam Receive on and off . . . . . . . . . . . . . . . . . . . 249
Setting your Acer handheld to stay on while in the cradle . . . . . . . . . 249
Setting the backlight power saving mode . . . . . . . . . . . . . . . 250
HiDensity preferences . . . . . . . . . . . . . . . . . . . . . . . . . 250
Network preferences . . . . . . . . . . . . . . . . . . . . . . . . . 251
Connecting to your ISP or dial-in service . . . . . . . . . . . . . . . . 255
Customising service templates . . . . . . . . . . . . . . . . . . . . 255
Entering DNS numbers and IP addresses . . . . . . . . . . . . . . . . 259
Creating a login script. . . . . . . . . . . . . . . . . . . . . . . . 261
xi
Page 12

Using non-ASCII characters in login scripts . . . . . . . . . . . . . . . 263
Plug-in applications . . . . . . . . . . . . . . . . . . . . . . . . 264
Troubleshooting TCP/IP connections . . . . . . . . . . . . . . . . . 264
Network Preferences menus. . . . . . . . . . . . . . . . . . . . . 265
Owner preferences . . . . . . . . . . . . . . . . . . . . . . . . . . 265
Phone preferences . . . . . . . . . . . . . . . . . . . . . . . . . . 267
Communicating with your mobile phone . . . . . . . . . . . . . . . 267
Setting up related Network preferences . . . . . . . . . . . . . . . . 267
Setting up related Connection Preferences. . . . . . . . . . . . . . . 267
Setting up Phone preferences . . . . . . . . . . . . . . . . . . . . 268
ShortCuts preferences. . . . . . . . . . . . . . . . . . . . . . . . . 268
11 Frequently Asked Questions 271
Software installation problems . . . . . . . . . . . . . . . . . . . . . 272
Operating problems . . . . . . . . . . . . . . . . . . . . . . . . . 273
Tapping and writing problems . . . . . . . . . . . . . . . . . . . . . 274
Application problems . . . . . . . . . . . . . . . . . . . . . . . . . 275
HotSync problems . . . . . . . . . . . . . . . . . . . . . . . . . . 276
Beaming problems . . . . . . . . . . . . . . . . . . . . . . . . . . 278
Recharging problems . . . . . . . . . . . . . . . . . . . . . . . . . 279
Password problems . . . . . . . . . . . . . . . . . . . . . . . . . . 279
Technical support . . . . . . . . . . . . . . . . . . . . . . . . . . 280
Finding version and memory information . . . . . . . . . . . . . . . 280
Index 281
xii
Page 13

1 Entering data in your
Acer handheld
You can enter data into your handheld in several ways:
• Using Graffiti
• Using the onscreen keyboard
• Beaming data
Entering data using Graffiti
You can use Graffiti writing commands to create letters, numbers, punctuation, and
symbols.
1 Entering data in your Acer handheld
Entering data using Graffiti
The Graffiti alphabet
Draw Graffiti letters using the following strokes.
Letter Strokes Letter Strokes
AN
BO
CP
DQ
ER
FS
GT
HU
IV
1
Page 14

1 Entering data in your Acer handheld
Entering data using Graffiti
JW
KX
LY
MZ
Space Backspace
Carriage
Return
Period
Tap twice.
To write Graffiti letters
1 Tap the screen where you want to write letters, for example, on a line next to a time
in Date Book.
NOTE: A blinking cursor must appear onscreen above the Graffiti writing before you can
begin writing text.
2 Refer to the Graffiti alphabet table to find the stroke shape for the letter you want to
write. For example, the stroke shown below creates the letter n.
Lift stylus here.
Start stroke at
heavy dot.
You use the same shape to create both the uppercase and lowercase version of a
letter.
3 Position the stylus in the left hand side of the Graffiti writing area.
4 Start your stroke at the heavy dot, and draw the stroke shape as it appears in the
tables.
5 Lift the stylus from the screen at the end of the stroke shape.
Your handheld recognises your stroke immediately and displays the letter at the
insertion point onscreen. As soon as you lift the stylus from the screen, you can begin
the stroke for the next character you want to write.
Graffiti writing automatically capitalises the first letter of a new record or sentence.
To write additional capital letters, you must first write the Caps Shift stroke to shift to
2
Page 15

1 Entering data in your Acer handheld
Entering data using Graffiti
Caps Lock mode— just as you press the Shift key on a keyboard—and then write the
desired character stroke.
Caps Shift
When Caps Shift is active, an Up arrow appears in the lower right corner of the
handheld screen.
Caps Shift
If you accidentally activate the Caps Shift, draw the Backspace stroke to cancel it.
To write capital letters:
1 Choose from the following options:
• To enter a single capital letter, write the Caps Shift stroke. Then write the
character stroke.
• To enter all capital letters (Caps Lock), write the Caps Lock stroke, as shown
below. All subsequent letters are capitalised.
Caps Lock
Caps Lock
2 To return to lowercase or release the Caps Lock, draw the Caps Shift stroke again.
The Graffiti numbers
Draw Graffiti numbers using the following strokes.
Number Strokes Number Strokes
05
16
27
38
49
3
Page 16

1 Entering data in your Acer handheld
Entering data using Graffiti
To write Graffiti numbers
1 Tap the screen where you want to write numbers.
NOTE: A blinking cursor must appear onscreen above the Graffiti writing before you can
begin writing numbers.
2 Refer to the Graffiti number table to find the stroke shape for the number you want
to write. For example, the stroke shown below creates the number 3.
Start stroke at
heavy dot.
Lift stylus here.
3 Position the stylus in the right hand side of the Graffiti writing area.
4 Start your stroke at the heavy dot, and draw the stroke shape as it appears in the
tables.
5 Lift the stylus from the screen at the end of the stroke shape.
Your handheld recognises your stroke immediately and displays the number at the
insertion point onscreen. As soon as you lift the stylus from the screen, you can begin
the stroke for the next character you want to write.
The Graffiti punctuation marks
You can create any punctuation symbol available from a standard keyboard using
Graffiti writing.
All punctuation marks begin with a single tap on the Graffiti writing area. This tap
activates the Punctuation Shift, indicated by a dot displayed above the writing area.
The next stroke you make with the stylus creates a punctuation mark. When
Punctuation Shift is active, you can write a symbol stroke on either side of the Graffiti
writing area (the letter or number side).
Punctuation Shift
Create punctuation marks using the following strokes:
Punctuation
mark
Period
.
Comma
,
Apostrophe
'
Stroke Punctuation
mark
Dash
—
Left Paren
(
Right Paren
)
Stroke
4
Page 17

1 Entering data in your Acer handheld
Entering data using Graffiti
Question
?
Exclamation
!
Additional Graffiti punctuation marks include the following:
Slash
/
Dollar
$
@ # % ^ & * < > – + = |
\ { } [ ] ~ ` ; : " tab
The Graffiti symbols and extended characters
Symbol
Shift
Symbol Shift
Draw symbols or extended characters using the following strokes:
•
+
±
:
X
,
==c
ƒ
,
,
,
,
Y
∅
.
?
!
,
The Graffiti accented characters
To draw accented characters, you first draw the stroke for the letter, and then draw
the accent stroke. Graffiti writing then adds the accent to the letter.
For example, the following illustration shows the strokes required to draw an
accented e.
= e
Using these accent strokes, you can write the following accented letters:
5
Page 18

1 Entering data in your Acer handheld
Entering data using Graffiti
a a a a a a
à á â ã ä å è é ê ì í î ï ò ó ô õ ö ù ú û ü ÿ D ñ
The Graffiti non-English characters
You can write the following characters in the lowercase alphabet mode without
special punctuation or shifting. You must write these non-English characters in the
left side of the Graffiti writing area.
c
a
e
Graffiti navigation strokes
Graffiti writing includes additional strokes for navigating within text or fields in your
applications.
Command Stroke
Move cursor right
Move cursor left
Previous field
(Address Book only)
Next Field
(Address Book only)
Open Address
Record
(Address Book only)
Using Graffiti ShortCuts
Graffiti ShortCuts let you easily enter commonly used words and phrases. You can
create ShortCuts of up to 45 character using the ShortCut preferences. Refer to
"ShortCuts preferences" on page 268 for detailed instructions on how to create a
ShortCut.
6
Page 19

1 Entering data in your Acer handheld
Entering data using Graffiti
Predefined Graffiti ShortCuts
Your handheld includes the following predefined Graffiti ShortCuts for common
entries.
Entry ShortCut
Date stamp ds
Time stamp ts
Date/time stamp dts
Meeting me
Breakfast br
Lunch lu
Dinner di
To use a ShortCut
Draw the ShortCut stroke followed by the ShortCut character(s).
When you draw the ShortCut stroke, the ShortCut symbol appears at the insertion
point.
ShortCut
To edit a ShortCut:
1 Tap the Applications icon .
2 In the All or System screen, tap the Prefs icon .
3 Tap the pick list in the upper right corner of the Preferences screen, then select
ShortCut.
4 Tap the ShortCut you want to edit.
5 Tap Edit.
6 Make the changes you want.
7Tap OK.
To delete a ShortCut
1 Tap the Applications icon .
2 In the All or System screen, tap the Prefs icon .
3 Tap the pick list in the upper right corner of the Preferences screen, then select
ShortCut.
4 Tap the ShortCut you want to delete.
7
Page 20

1 Entering data in your Acer handheld
Using the onscreen keyboard
5 Tap Delete.
6Tap Yes.
Graffiti tips
When using Graffiti, keep the following tips in mind:
• For greater accuracy, draw letters with large strokes; strokes that nearly fill
the Graffiti writing area are easily interpreted.
• To delete characters, set the insertion point to the right of the character you
want to delete, and draw the Backspace stroke (a line from right to left) in
the Graffiti writing area.
• Write at natural speed. Writing too slowly can produce errors.
• Do not write at an angle. Vertical strokes should be parallel to the sides of
the Graffiti writing area.
• When letters and numbers can be written using two different strokes, use the
one that’s easiest for you.
• Press firmly.
Using the onscreen keyboard
You can open the onscreen keyboard anytime you need to enter text or numbers on
your handheld.
NOTE: You can enter Graffiti characters while using the onscreen keyboard.
To use the onscreen keyboard
1 Open any application (such as Address Book).
2 Tap any record, or tap New.
3 Choose one of the following to display the alphabetic or numeric keyboard:
• Tap on the Graffiti writing area to display the alphabetic keyboard.
• Tap on the Graffiti writing area to display the numeric keyboard.
Tap here to display the
alphabetic keyboard.
TIP: To select either keyboard, tap the Menu icon and then tap Edit. Tap Keyboard, and
then select an option.
4 Tap the desired characters or numbers.
Tap here to display the
numeric keyboard.
8
Page 21

1 Entering data in your Acer handheld
Beaming data
Alphabetic
Backspace
5 Tap Done to enter the text or numbers.
Beaming data
Caps Lock
Caps Shift
Tap here to display
alphabetic keyboard
Numeric
Tap here to display
numeric keyboard.
Your handheld is equipped with an infrared (IR) port that you can use to beam
information to another Palm OS handheld that is close by and also has an IR port. The
IR port is located on the top part of your handheld, indicated by the Infrared icon
, behind the small dark shield.
Refer to "8 Beaming information" on page 207 for more information on beaming
procedures.
Carriage return
International
Tap here to display
internationalkeyboard.
9
Page 22

1 Entering data in your Acer handheld
Beaming data
10
Page 23

2 Managing your
applications
Using Applications Launcher
By default, Applications Launcher displays all the available applications installed on
the internal memory of your handheld. You can choose to display only selected
applications by arranging applications into categories.
NOTE: For instructions on how to display the applications stored in a Memory Stick, refer to
"Switching memory source" on the Acer s50 and s60 Handhelds Quick Guide.
To open Applications Launcher
2 Managing your applications
Using Applications Launcher
• Tap the Applications icon .
The All category of Applications Launcher appears.
NOTE: The first time you launch Applications Launcher, it will display the All screen. If the
Remember Last Category preference option is selected, next time you launch Applications
Launcher, it will open in the last screen it was in from its last session. To set this option, refer
to "Displaying the last selected category of applications" on page 15.
In addition to providing a way for you to open applications, Applications Launcher
also displays the current time, battery level, and the category of the displayed
applications.
11
Page 24

2 Managing your applications
Using Applications Launcher
Categorising applications
The category feature enables you to manage the number of application icons that
appear in the Applications Launcher screen. You can assign an application to a
category and then display a single category or all your applications.
NOTE: When you have a Memory Stick properly seated in the Memory Stick slot, the last
item in the category pick list refers to the Memory Stick.
To categorise an application
1 Tap the Menu icon .
2 From the App menu, tap Category.
Tap here.
3 Tap the pick list next to an application name to select a category.
Tap here.
4Tap Done.
12
Page 25

2 Managing your applications
Using Applications Launcher
To create a new category
1 Do either of the following to display the Edit Categories screen:
• In the Category screen, tap any of the pick lists, then select Edit Categories.
• In the Applications Launcher screen, tap the category pick list on the
upper-right corner of the screen, then select Edit Categories.
2 In the Edit Categories screen, tap New.
3 In the New Category screen, enter a new category name.
Tap here.
NOTE: Category names are case-sensitive. You can have categories named 'GRAPHICS' and
'graphics’ at the same time.
4Tap OK.
To display applications by category:
• In Applications Launcher, do one of the following:
– Tap the Applications icon repeatedly to cycle through all the
categories.
– Tap the pick list in the upper right corner of the screen; then tap the
category you want to display.
Changing the Applications Launcher display
By default, Applications Launcher displays applications as icons. As an alternative, you
can display applications in a list format.
To change the view of applications
1 Tap the Menu icon .
13
Page 26

2 Managing your applications
Using Applications Launcher
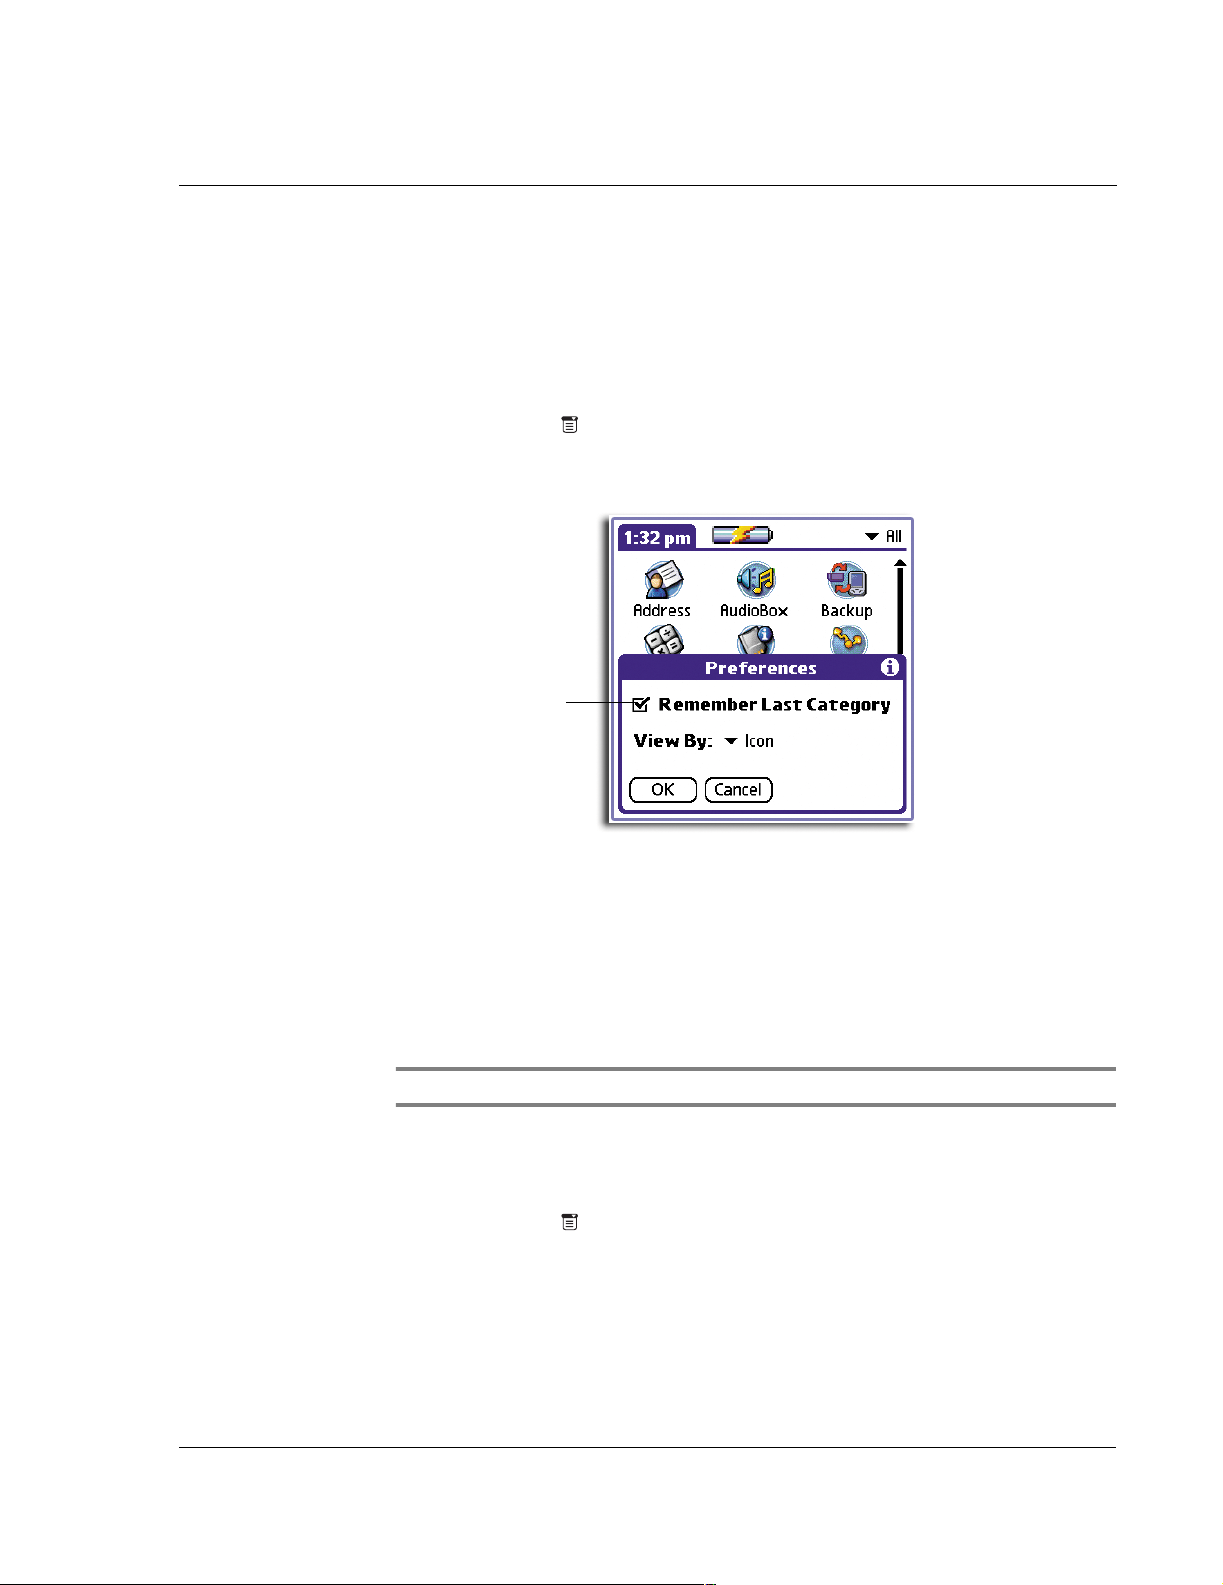
2 From the Options menu, tap Preferences.
3 In the Preferences dialog box, tap the View By pick list, and then tap List.
Tap here.
Tap here.
4Tap OK.
Icons in the Applications Launcher screen will now be shown in a list format.
14
Page 27
2 Managing your applications
Setting preferences for applications
Displaying the last selected category of applications
The first time you launch Applications Launcher, it will display the All screen. If the
Remember Last Category preference option is selected, next time you launch
Applications Launcher, it will open in the last screen it was in from its last session.
To display the last selected category of applications
1 Tap the Menu icon .
2 From the Options menu, tap Preferences.
3 In the Preferences dialog box, tap Remember Last Category.
Select check box.
4Tap OK.
Each time you return to Applications Launcher, the category of the last application
you opened is displayed.
Setting preferences for applications
You can set preferences for individual applications in the Preferences dialog box. This
will allow you to customise your applications to fit your work methods.
NOTE: Not all applications have preferences settings.
To set preferences for an application
1 Open an application.
2 Tap the Menu icon .
3 From the Options menu, select Preferences.
4 Enter the desired preference settings.
5Tap OK.
15
Page 28

2 Managing your applications
Security
Security
The Security application in your handheld allows you to prevent unauthorised access to
your records by setting such entries as private records. Private records remain visible
and accessible until you select the security setting Hide Records.
NOTE: You can set records as private in all basic applications, except Mail.
You can mask or hide private records. When you mask private records, a gray
placeholder appears where the record would normally be displayed and a Lock icon
is visible opposite the masked entry; when you hide records, they are not visible
anywhere in the list.
You can mask or hide records without assigning a password, or you can assign a
password if you want records to remain masked or hidden until a password is entered.
To make a record private
1 Open one of the basic applications (except Mail), then display the entry you want to
make private for editing.
2 Tap Details.
3 Tap the Private check box.
4Tap OK.
An alert box appears.
Tap here.
5Tap OK.
To mask a private record
1 From within any basic application you have a private record in, tap the Menu icon .
2 From the Options menu, tap Security to display the Change Security dialog box.
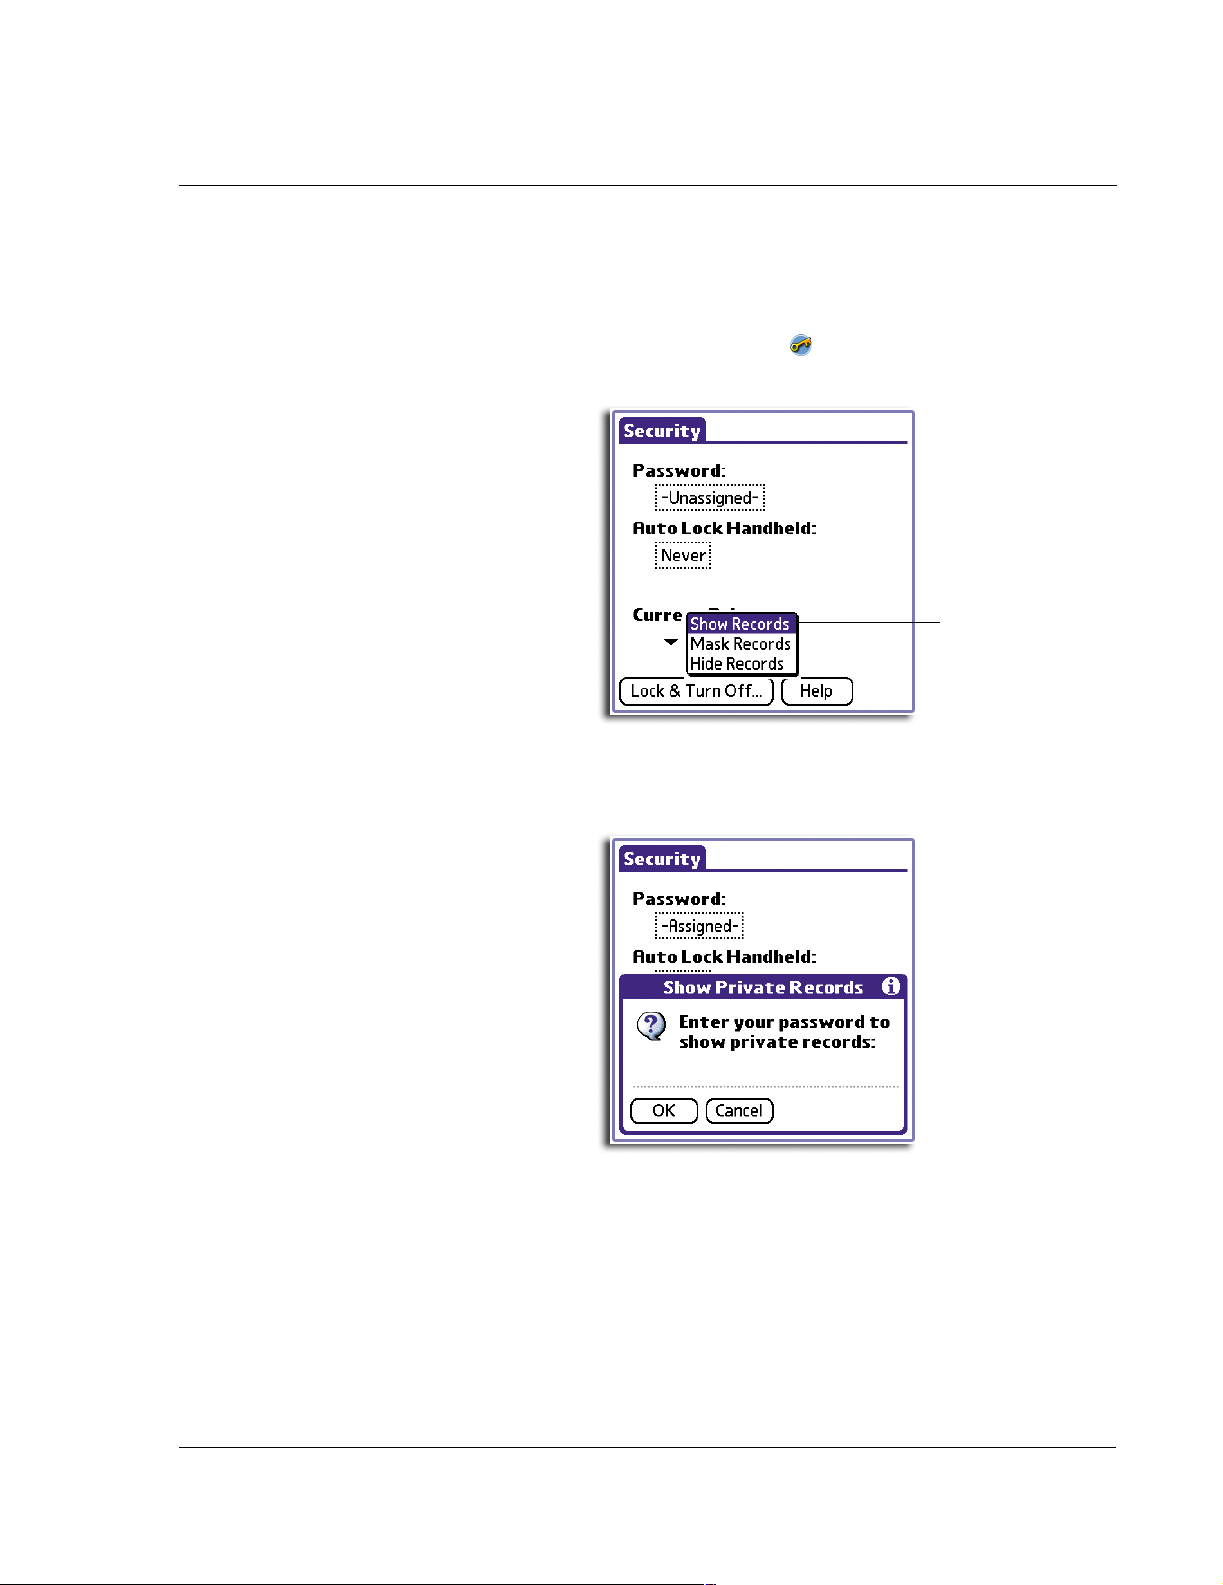
3 Tap the Current Privacy pick list.
16
Page 29

4 Tap Mask Records.
5Tap OK.
The Mask Records screen appears.
2 Managing your applications
Security
Tap here.
Tap here.
6Tap OK.
To mask all private records
1 In Applications Launcher, tap the Security icon to display the Security screen.
17
Page 30

2 Managing your applications
Security
2 From the Current Privacy pick list, tap Mask Records.
3 Open one of the basic applications (except Mail) and view a record.
Records marked as private are masked with a gray bar and are marked with the
Lock icon .
Tap here.
To hide a private record
1 From within any private record, tap the Menu icon .
2 From the Options menu, tap Security.
3 Tap the Current Privacy pick list.
18
Page 31

4Tap Hide Records.
5Tap OK.
The Hide Records screen appears.
2 Managing your applications
Security
Tap here.
Tap here.
6Tap OK.
To hide all private records
1 In Applications Launcher, tap the Security icon to display the Security screen.
19
Page 32

2 Managing your applications
Security
2 From the Current Privacy pick list, tap Hide Records.
3 Open one of the basic applications (except Mail).
Records marked as private are not anymore displayed.
Displaying private records
Using the Security application, you can also display private records that have been
previously masked or hidden.
Tap here.
NOTE: If you have assigned a password to your device, you must enter it before
private records are displayed.
To unmask individual records
1 Tap a masked record.
If you do not have a password, a masked record becomes visible.
If you have a password, the Show Private Records dialog box appears. Go to step 2.
2 Enter your password.
20
Page 33
2 Managing your applications
Security
3Tap OK.
To display all private records
1 In Applications Launcher, tap the Security icon to display the Security screen.
2 From the Current Privacy pick list, tap Show Records.
Tap here.
If you do not have a password, masked and hidden records become visible.
If you have a password, the Show Private Records dialog box appears. Go to step 3.
3 Enter your password.
4Tap OK.
Assigning and editing passwords
You can assign a password to protect your private records and to lock your handheld.
Once you define a password, you can change or remove it at any time. You must enter
the current password before you can change or remove it.
If you have forgotten your password, you can delete it. Refer to "Recovering from a
forgotten password" on page 27
.
21
Page 34

2 Managing your applications
Security
To assign a password
1 In Applications Launcher, tap the Security icon .
2 Tap the Password box.
3 Enter a password.
Tap here.
NOTE: You have the option to enter a specific text on the Hint line to help you remember
your password if you forget it.
4Tap OK.
Another Password screen will appear for confirmation of the new password.
5 Reenter the password.
6Tap OK.
To change or remove a password
1 In Applications Launcher, tap the Security icon .
2 Tap the Password box.
A password prompt appears.
22
Page 35

3 Enter your current password.
4Tap OK.
The screen below appears.
2 Managing your applications
Security
Tap here.
5 Choose from the following options:
• To change your password and hint, enter a new password and hint, and tap
OK.
• To remove your password, tap Unassign.
Locking your handheld
You can lock your handheld with a password to protect information. This password
must then be entered to operate your handheld and gain access to the information
stored in it.
Locking your handheld automatically
You can set your password to lock automatically when any of the following occur:
• When you turn off the power
• At a time you specify
23
Page 36
2 Managing your applications
Security
• After a period of inactivity you specify
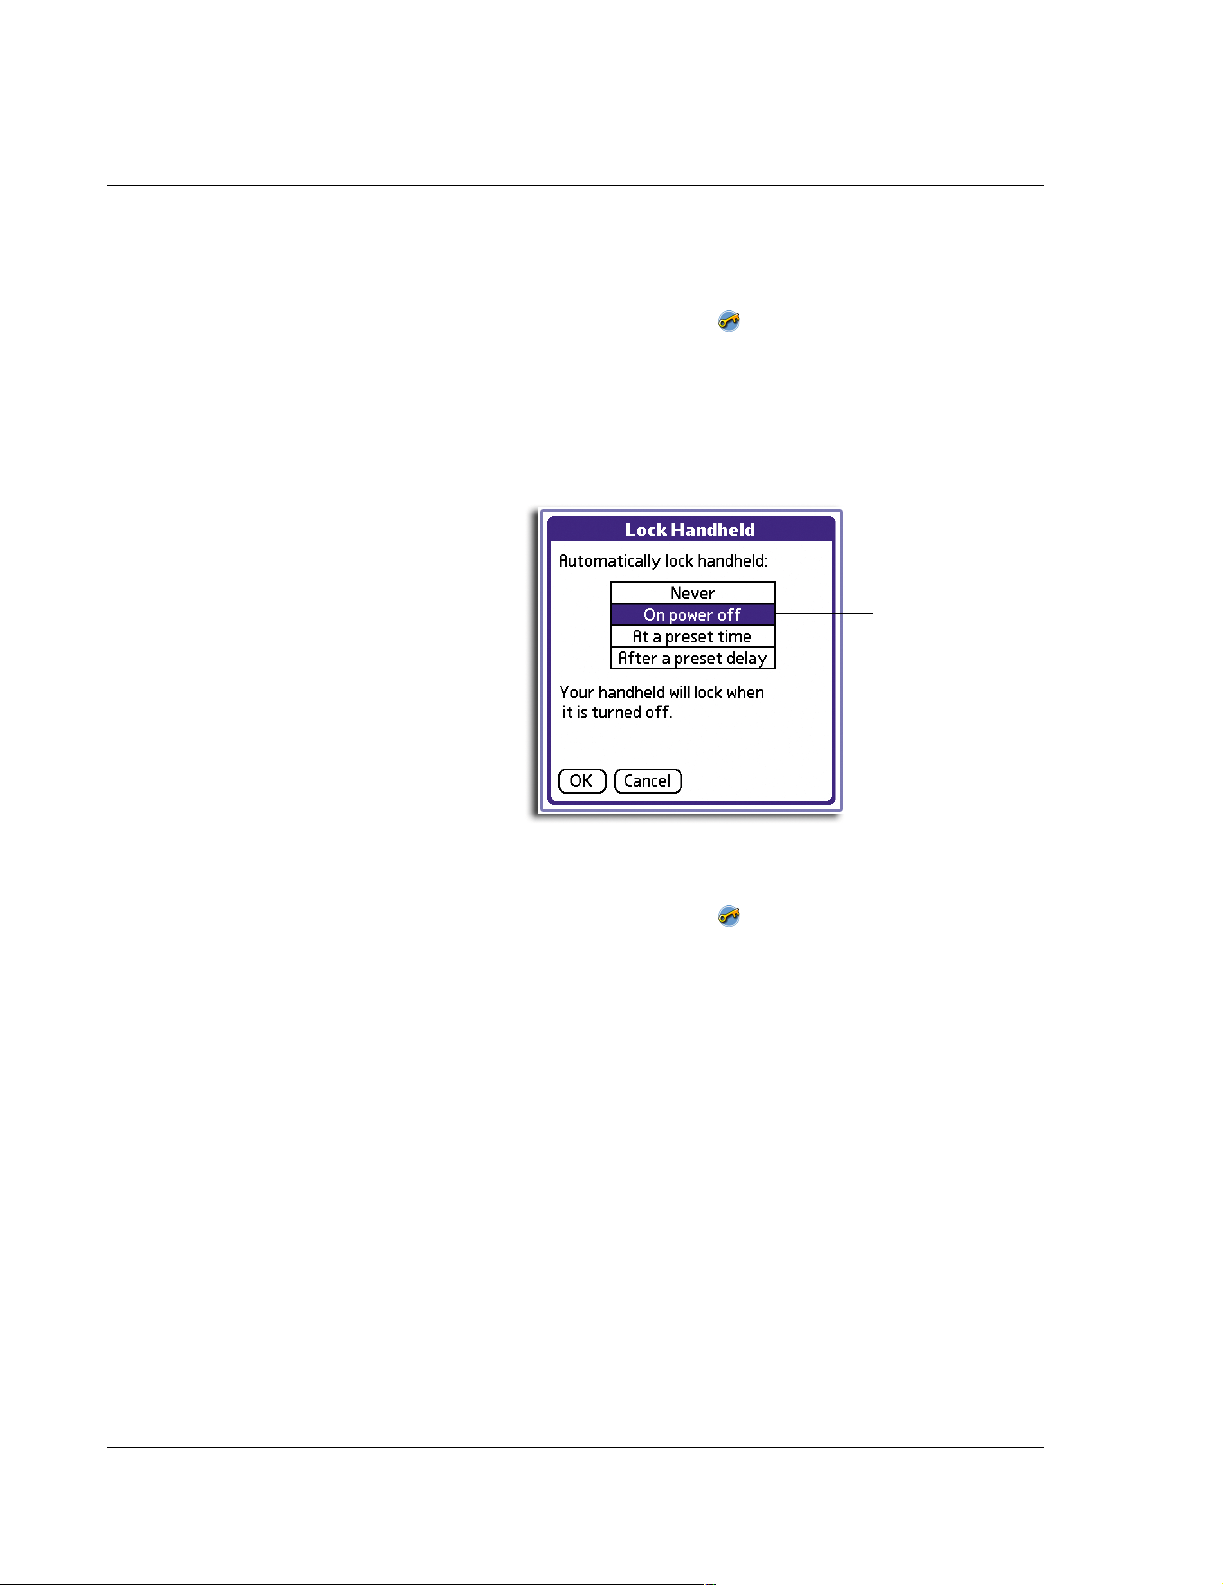
To lock your handheld when you turn it off:
1 In Applications Launcher, tap the Security icon .
2 Tap the Auto Lock Handheld box.
A password prompt appears.
3 Enter your current password.
The Lock Handheld screen appears.
4 Tap On power off.
Tap here.
5Tap OK.
To set your handheld to lock at a preset time:
1 In Applications Launcher, tap the Security icon .
2 Tap the Auto Lock Handheld box.
A password prompt appears.
3 Enter your current password.
The Lock Handheld screen appears.
24
Page 37
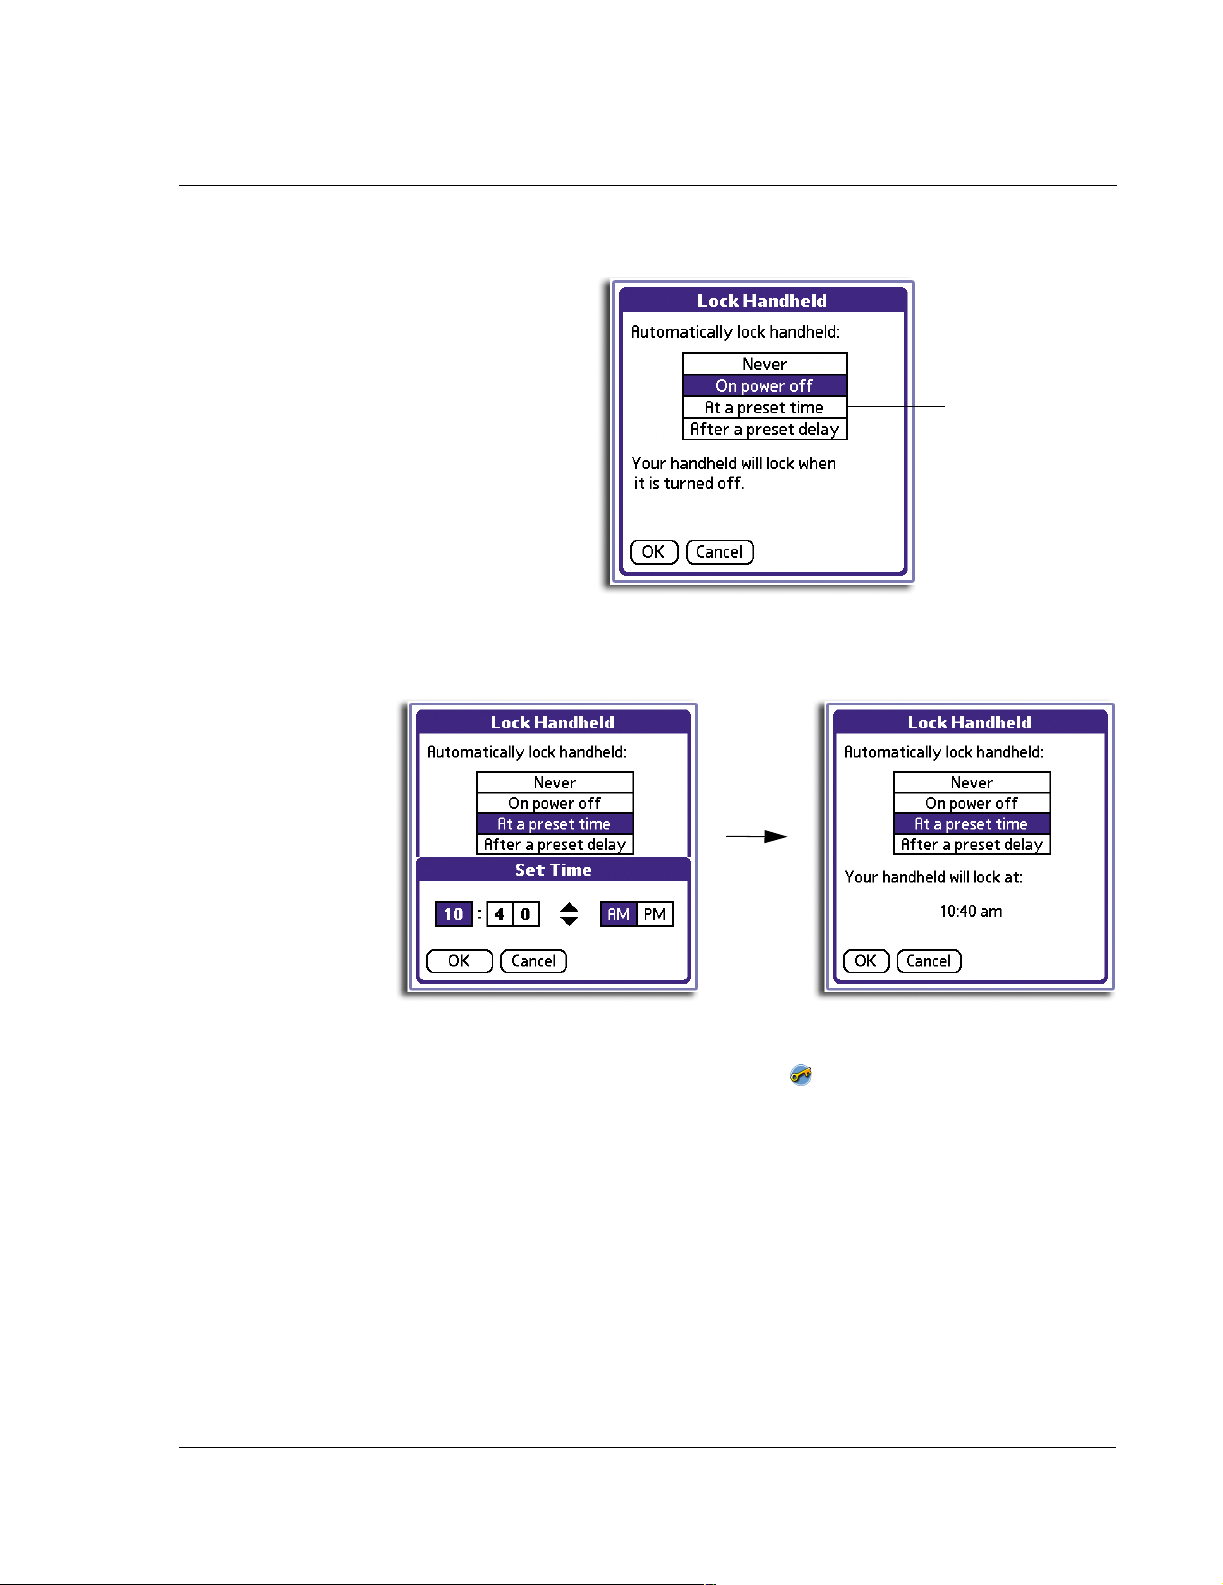
2 Managing your applications
4 Tap At a preset time.
5 In the Set Time screen, tap the arrows to set the time.
6Tap OK.
The time you set for will be indicated on the Lock Handheld Screen.
Security
Tap here.
To set your handheld to lock after a period of inactivity:
1 In Applications Launcher, tap the Security icon .
2 Tap the Auto Lock Handheld box.
A password prompt appears.
3 Enter your current password.
The Lock Handheld screen appears.
25
Page 38

2 Managing your applications
Security
4 Tap After a preset delay.
5 Set the period of inactivity by entering the length of time and selecting a time unit.
Tap here.
Tap to select the unit of time - Minute(s) or Hour(s)
Enter the number of time units here.
6Tap OK.
Locking your handheld manually
You can turn off and lock your handheld manually using the Turn Off & Lock option. A
password is required before using this option so set first a password as described in
"To assign a password" on page 22 before performing the procedures below.
To turn off and lock your handheld manually:
1 In Applications Launcher, tap the Security icon .
2 Tap the Lock & Turn Off button.
26
Page 39

2 Managing your applications
Security
Tap here.
3 In the System Lockout screen, tap the Off & Lock button.
4 To start your handheld, turn it on and then enter your password on the prompt.
5Tap OK.
Recovering from a forgotten password
If you forget the password, your handheld will present the hint you have set (if you
set one) to help you remember your password. If you still cannot remember your
password, you must perform a hard reset to resume using your handheld. Performing
a hard reset deletes all the records in your handheld; however, you can restore all
synchronised data at the next HotSync operation.
For instructions on how to perform a hard reset, refer to "Performing a hard reset" on
the Acer s50 and s60 Handhelds Quick Guide; for more information on HotSync
operations, refer to "9 Exchanging and updating data using HotSync operations" on
page 213.
27
Page 40
2 Managing your applications
Security
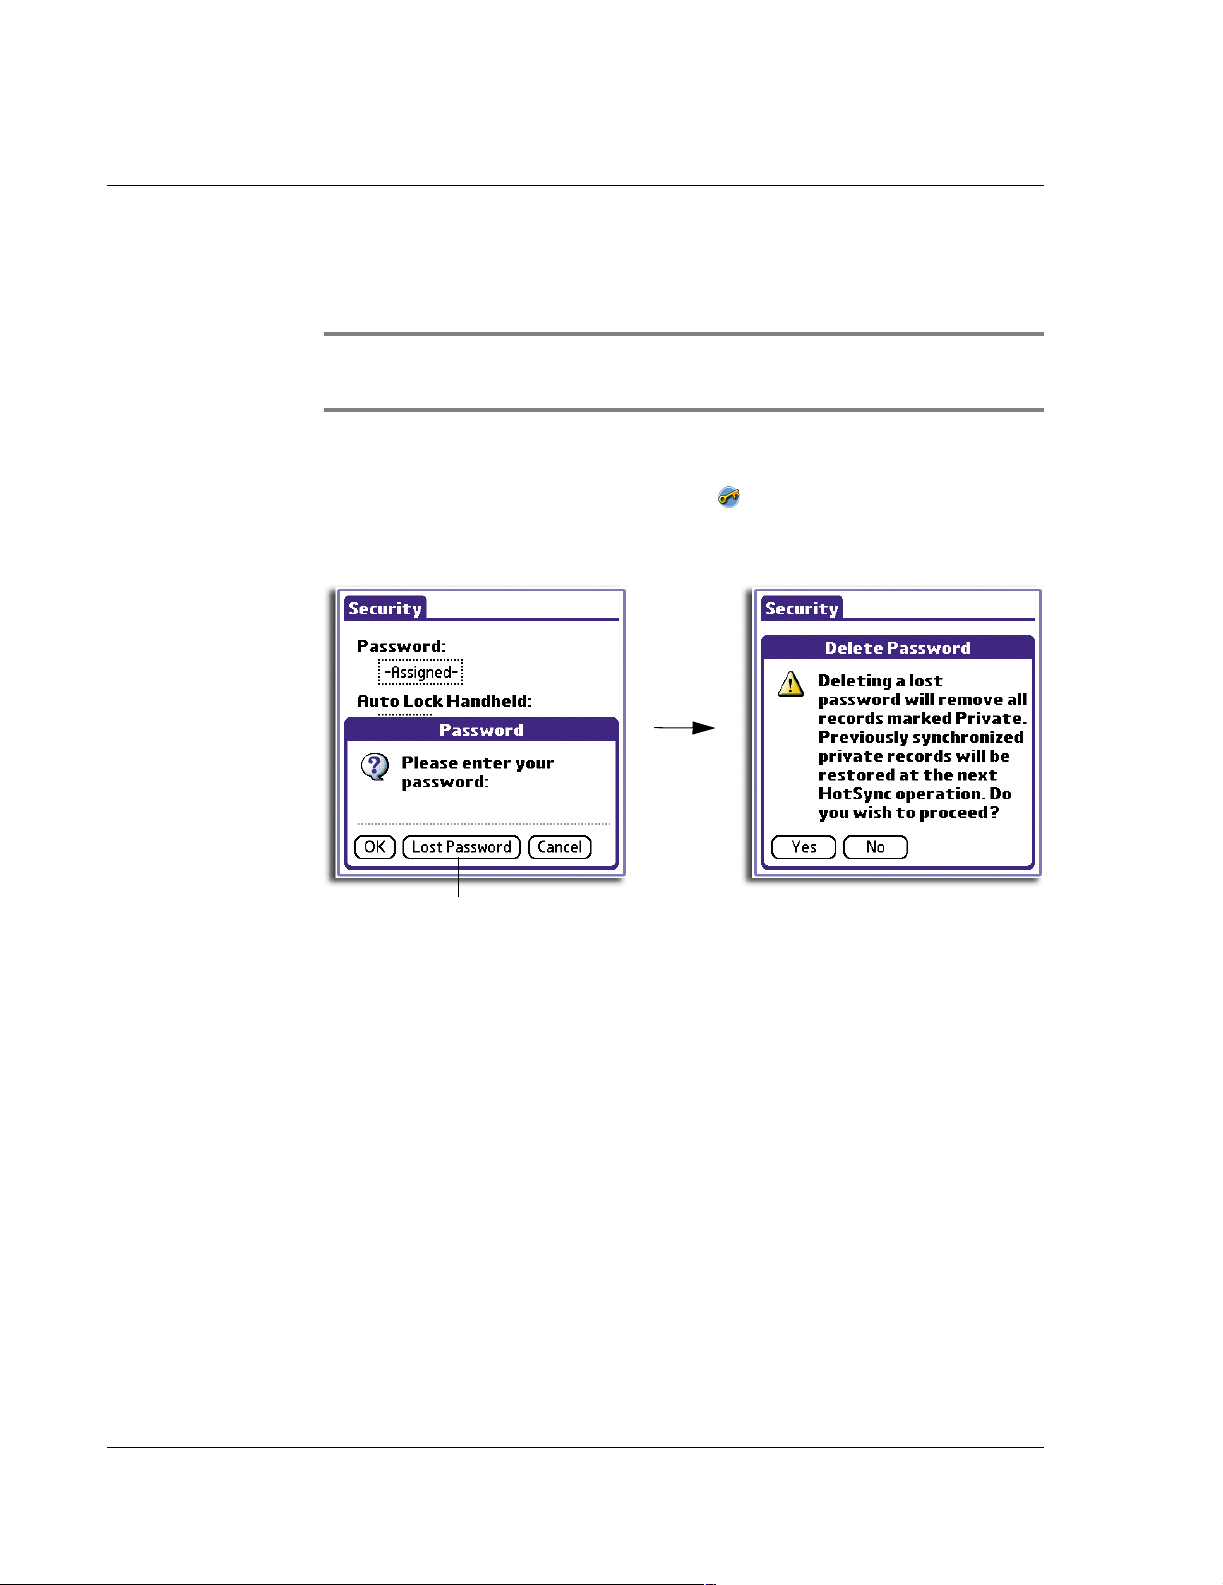
If you forget your password when your handheld is unlocked, your you can delete the
forgotten password. Deleting a forgotten password also deletes all entries and files
marked as Private.
IMPORTANT: If you synchronise your handheld with your computer before deleting a
forgotten password, private entries are restored the next time you perform a HotSync
operation.
To remove a forgotten password:
1 In Applications Launcher, tap the Security icon .
2 Tap the Password box.
3 In the Password dialog box, tap Lost Password.
Tap here.
4Tap Yes.
28
Page 41

3 Working with your basic applications
Common applications tasks
3 Working with your
basic applications
Your handheld includes the following basic applications:
• Date Book
• Address Book
•To Do List
• Memo Pad
•Calculator
• Mail - refer to "7 Managing your desktop email" on page 177 for more
information on using this application
This chapter is organised into two sections, namely:
• Common application tasks
• Application-specific tasks
Common applications tasks
The tasks described in this section use the term record to refer to an individual item in
any of the basic applications, for example, a single Date Book event, Address Book
entry, To Do List item, or Memo Pad memo.
Creating records
You can use the following procedure to create a new record in Date Book, Address
Book, To Do List, and Memo Pad.
To create a record
1 Select the application in which you want to create a record.
2Tap New.
(For Date Book only, select start and end times for your appointment and tap OK.)
3 Enter text for the record.
NOTE: The first letter of each field (except numeric and email fields) is automatically
capitalised.
4 As an option, tap Details to select attributes for the record.
5 In the Address Book and Memo Pad only, tap Done.
The new record is saved automatically.
29
Page 42
3 Working with your basic applications
Editing records
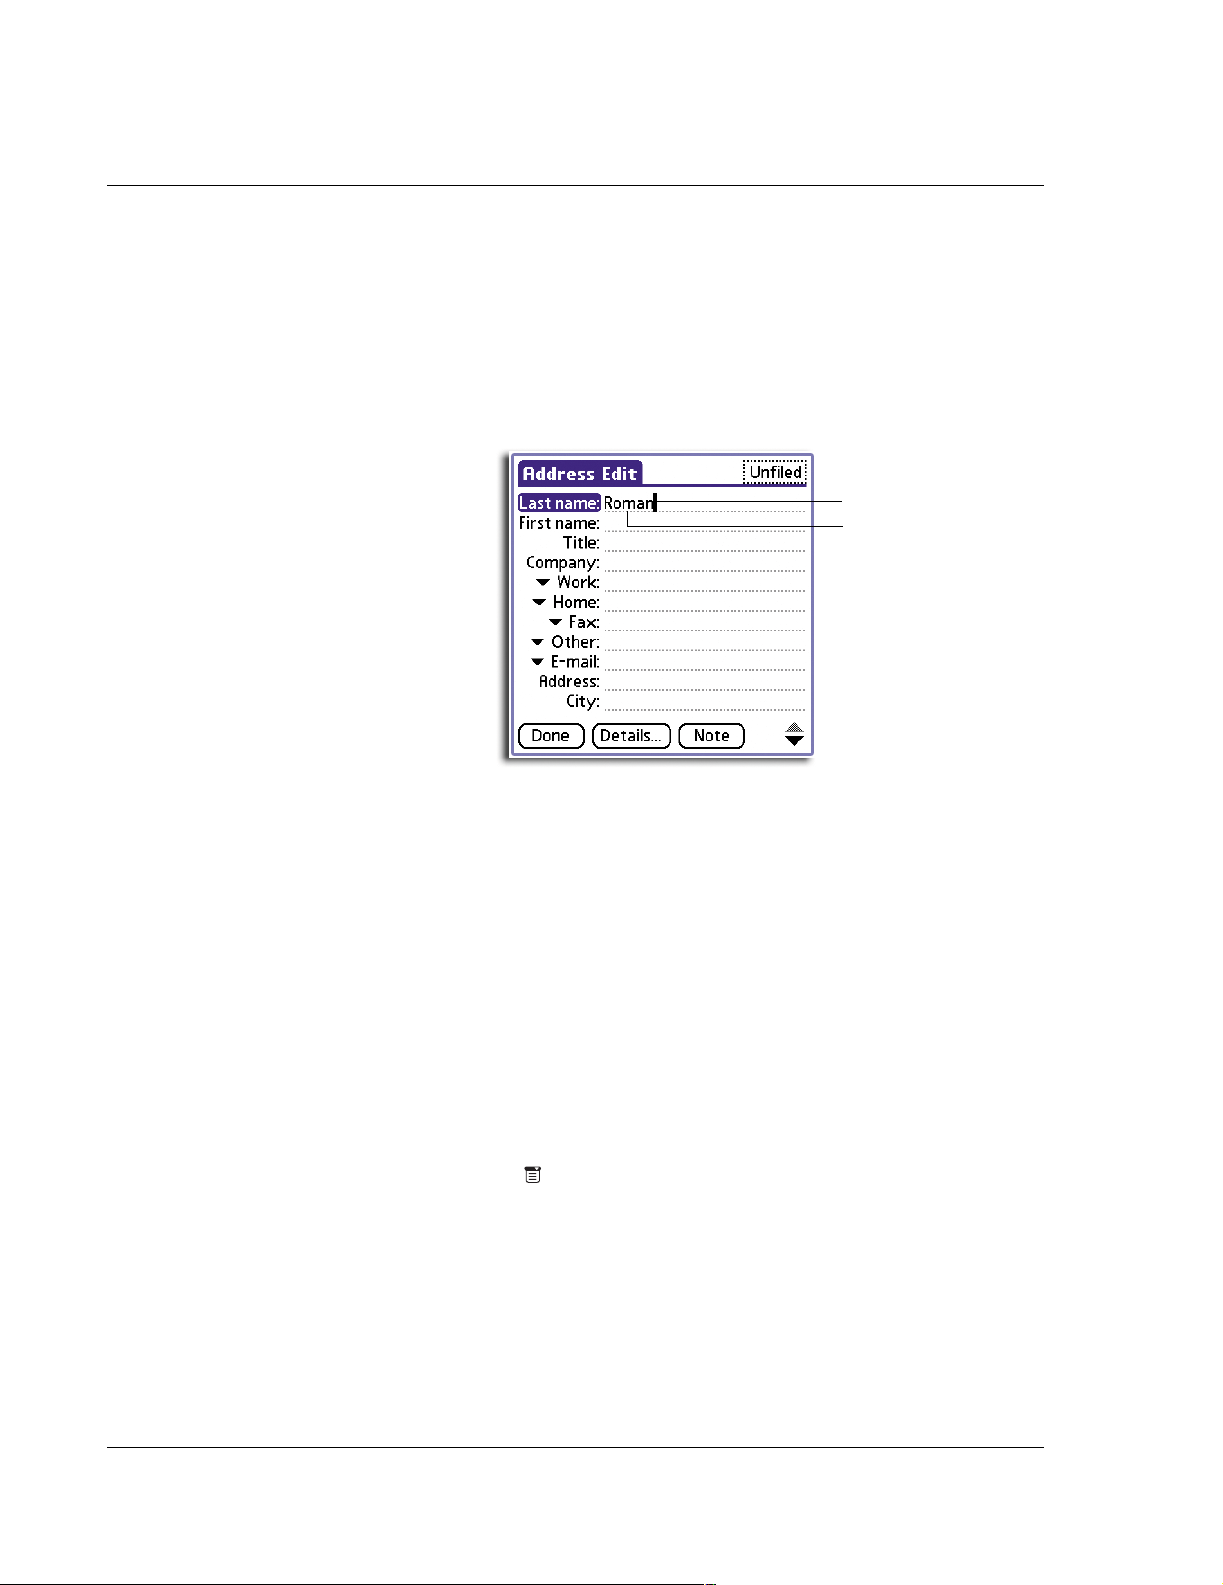
Editing records
After you create a record, you can change, delete, or add new information at any
time. Two indicators will tell you when your screen is in edit mode:
• A blinking cursor appears within the information, and
• The information appears on a dotted gray line called an edit line.
You can enter text in any of the ways described in "1 Entering data in your Acer
handheld" on page 1.
Cursor
Edit line
Selecting text
Select the text you want to edit using one of the following techniques:
• Double-tap on a word in a field to select the word.
• Triple-tap on any word on a line to select the entire line.
• Drag across a line of text to select some or all of the information, or drag
down to select text across multiple lines.
Using the Edit menu
The Edit menu is available from any screen where you enter or edit text. As a general
rule, the Edit menu commands affect selected text.
To use the Edit menu
1 Do one of the following to display the Edit menu.
• Tap the Menu icon ; then tap the Edit menu to display the edit commands.
• Tap the inverted application title tab at the top of the screen; then tap the
Edit menu to display the edit commands.
• In the text Graffiti area, drag a diagonal line from the lower left to upper
right to display the Command toolbar. To select a command, either:
– Tap the icon representing a command on the Command toolbar, or
30
Page 43

3 Working with your basic applications
Deleting records in your basic applications
– Draw the Graffiti shortcut in the text area of your screen
2 Choose from the following commands, depending on the application you are using.
Undo Reverses the action of the last edit command made. Undo also
reverses deletions done using the backspace.
Cut Removes a selection from its current location and temporarily
stores it in your handheld’s internal memory. You can then paste
the text into another area of the current application or into a
different application.
Copy Copies a selection and temporarily stores it in your handheld’s
internal memory. You can paste the selection into another area of
the current application or into a different application
Paste Inserts a selection from your handheld’s memory into a selected
point in a record. Paste produces no result if you have not used the
Cut or Copy commands
Select All Selects all the text in the current record or screen.
Keyboard Opens the onscreen keyboard. Tap Done to close the keyboard.
Graffiti Help Opens screens that shows all the Graffiti character strokes. Use this
anytime you forget a stroke for a character or a shortcut for a
command.
Deleting records in your basic applications
You can delete records in any of the basic applications.
To delete a record in any of the basic applications:
1 Select the record you want to affect.
2 Do one of the following:
• Tap the Menu icon , open the Record menu, and then tap the Delete
command.
The Delete command differs depending on the application you are using:
– Date Book: Delete Event
– Address Book: Delete Address
– To Do List: Delete Item
– Memo Pad: Delete Memo
• Tap the inverted application title tab at the top of the screen, open the
Record menu, and then select the desired Delete command.
• In the Details dialog box of the application, tap Delete, and then tap OK.
31
Page 44

3 Working with your basic applications
Purging records
• In the text Graffiti area, drag a diagonal line from the lower left to upper
right to display the Command toolbar; then tap the Delete icon or draw a
Graffiti 'D' in the text area.
• Delete the text of the record.
NOTE: In Date Book, deleting the text of a repeating event deletes all instances of the
event.
A confirmation dialog box appears.
If your want to archive a copy of the deleted file on your computer, select the Save
Archive option. The record will be transferred to the archive folder on your computer
the next time you perform a HotSync operation.
Delete icon
3Tap OK.
Purging records
Over time, as you use Date Book and To Do List, you’ll accumulate records that are no
longer useful. For example, events that occurred months ago remain in Date Book,
and completed To Do List items remain in the list.
Outdated records take up memory on your handheld, so it is a good idea to remove
them by using Purge. If you think Date Book or To Do List records might prove useful
later, you can purge them from your handheld and save them in an archive file.
Purging is also available in Mail. See "Deleting email items" on page 193 for more
information.
Purging is not available in Address Book or Memo Pad; delete outdated records from
these two applications manually.
Select check box to archive
a copy of the deleted file
to your computer.
Tap here to delete selected file.
32
Page 45
3 Working with your basic applications
Purging records
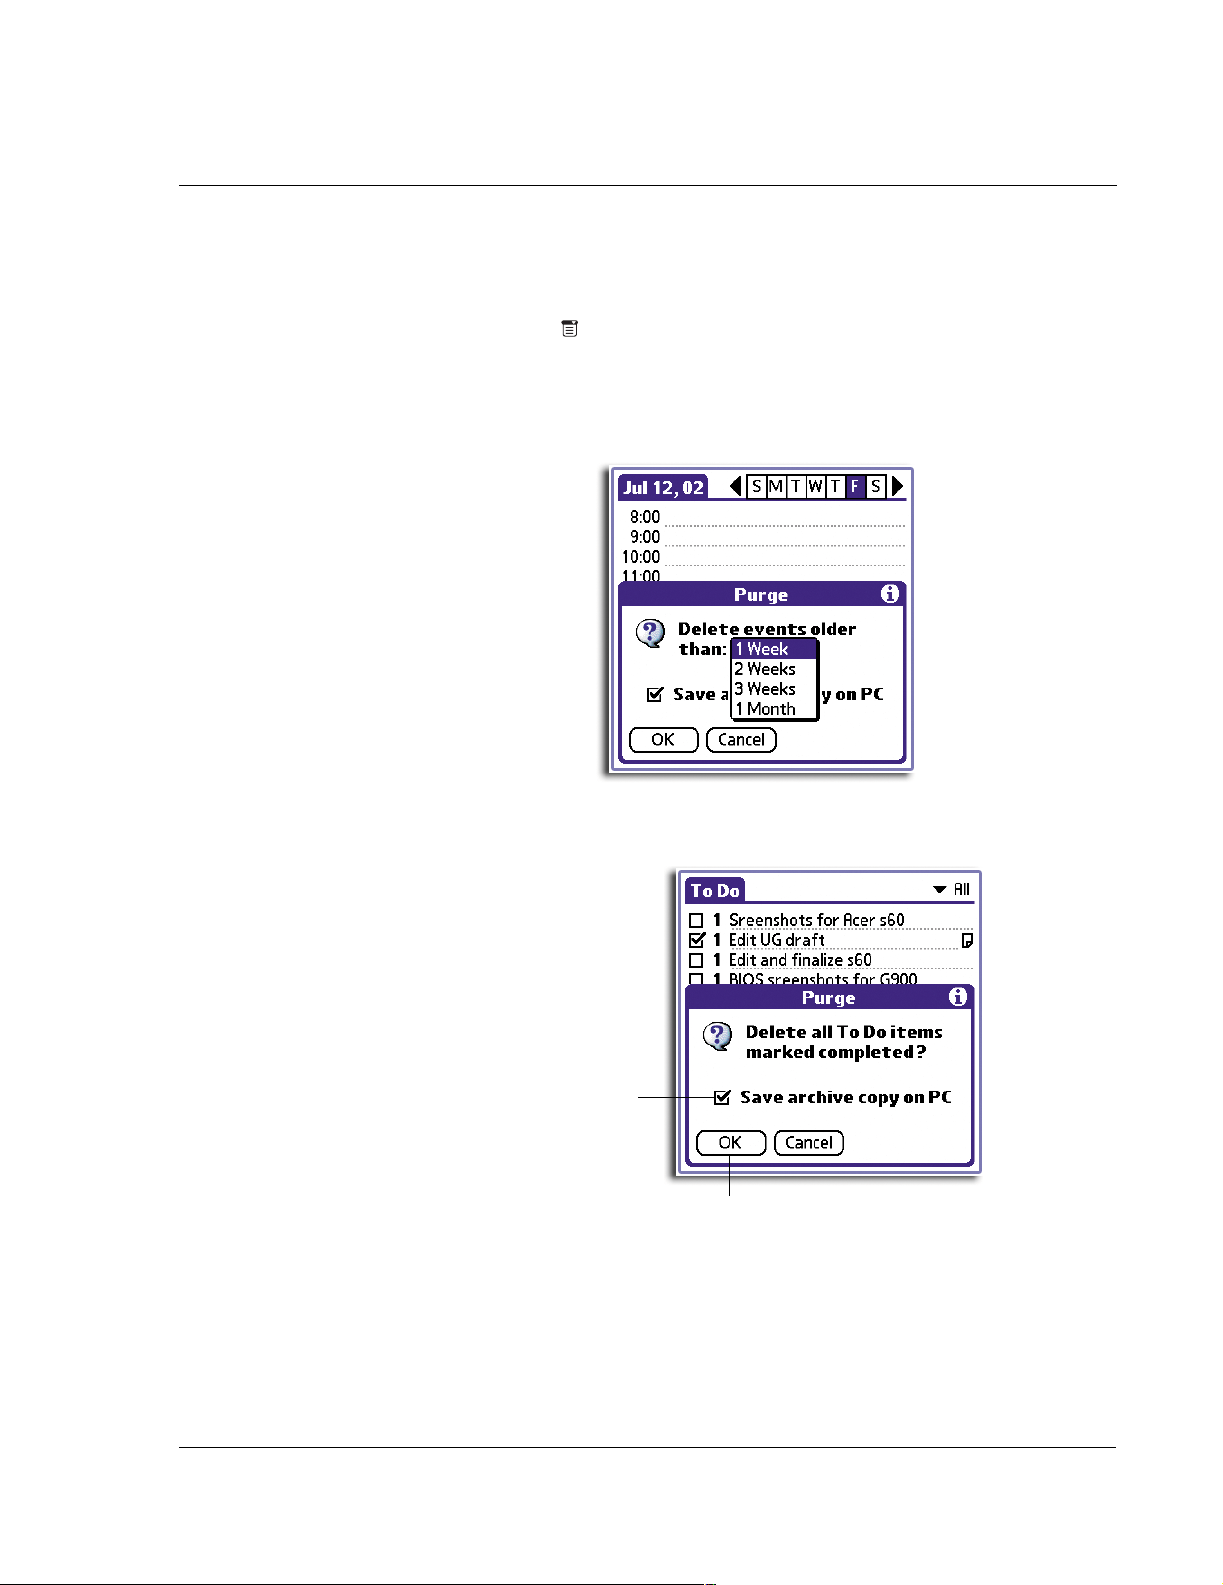
To purge records
1 Open the application from which you want to purge records.
2 Tap the Menu icon , open the Record menu, and then tap Purge.
A confirmation dialog box appears.
3 Choose from the following options on the confirmation dialog box that appears.
• Date Book: Select the Delete Events Older Than pick list and select an
option—1 week, 2 weeks, 3 weeks or 1 month.
• Date Book or To Do List: Select Save Archive Copy on PC to save a copy of
purged records in an archive file on your computer the next time you perform
a HotSync operation. Tap OK.
Select check box to archive
a copy of the purged file
to your computer.
Tap here to purged completed items.
33
Page 46

3 Working with your basic applications
Categorising records
Categorising records
You can categorise records in the Address Book, To Do List, and Memo Pad
applications for easy retrieval. (Date Book does not have categories.)
NOTE: You can also categorise applications. Refer to "Categorising applications" on page 12
for more information.
When you create a record, it is automatically assigned to the currently displayed
category. If the All category is displayed, the record is assigned to the Unfiled
category. A record can remain unfiled or it can be assigned to a category at any time.
System-defined categories
Each basic application has a default set of categories:
• Address Book: Business, Personal, and QuickList category
In QuickList, you can store names, addresses, and phone numbers you might
need during emergencies (hospitals, fire department, police stations, etc.).
• To Do List: Business, Personal, and All category
• Memo Pad: Business, Personal, and All category
You can modify or delete the default categories.
User-defined categories
In addition to the default categories, you have the option to create new categories.
An application can have up to 15 user-defined categories.
To move a record into a category
1 Select the record you want to categorise.
2 Tap Details. (From the Address View screen, tap Edit first.)
3 In the Details dialog box, tap the Category pick list to display the list of available
categories.
4 Select the desired category.
5Tap OK.
To display a category of records
1 Open the application from which you want to categorise records.
2 Tap the pick list in the upper right corner of the screen.
NOTE: In the Date Book Agenda view, the pick list is in the upper right of the To Do List.
3 Select a category you want to display.
The list screen will now display only the records associated with the selected category.
34
Page 47
3 Working with your basic applications
Categorising records
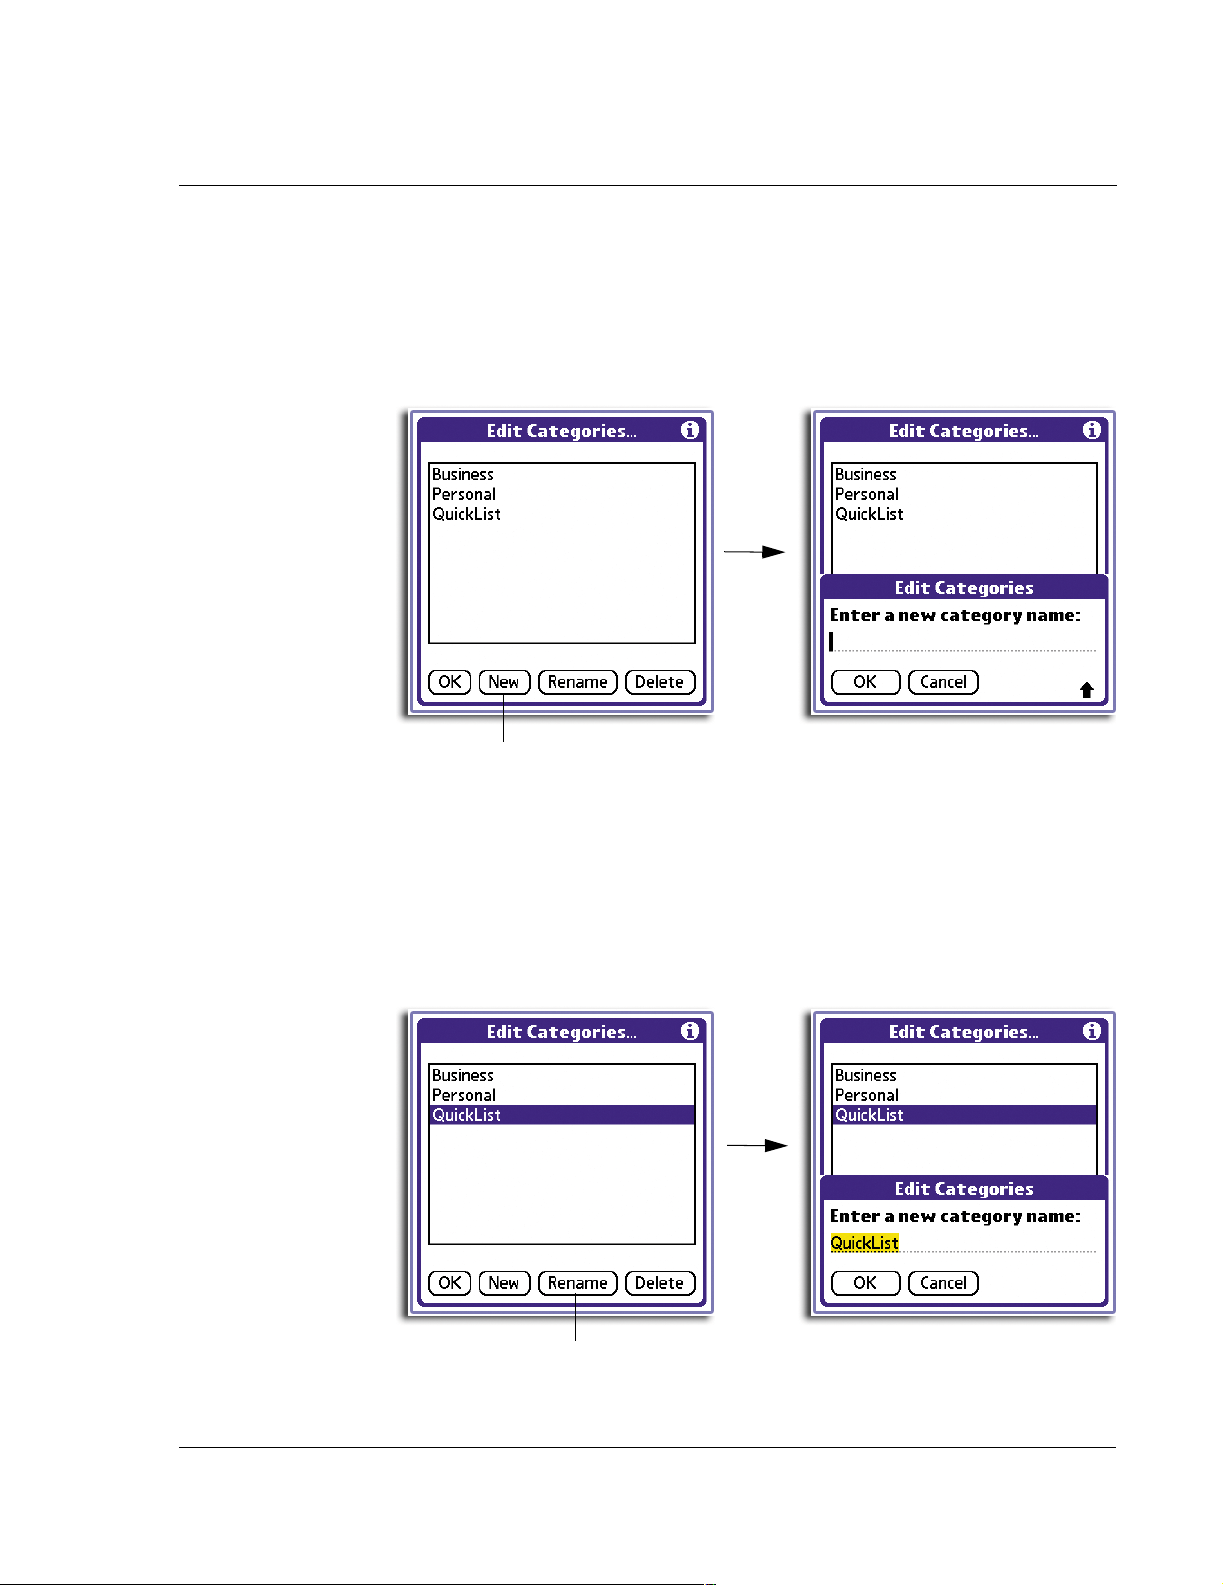
To create a new category
1 Open the application from which you want to categorise records.
2 Tap the pick list in the upper right corner of the screen.
3 Tap Edit Categories.
4Tap New.
Tap here.
5 Enter the name for the new category.
6Tap OK.
7 Tap OK to exit the Edit Categories dialog box.
To rename a category
1 Tap the pick list in the upper right corner of the screen.
2 Tap Edit Categories.
3 Select the category you want to rename.
Tap here.
35
Page 48

3 Working with your basic applications
Finding records
4Tap Rename.
5 Enter the new name for the category.
6Tap OK.
7 Tap OK to exit the Edit Categories dialog box.
TIP: You can move records from multiple categories into a single category by renaming all
discrete categories with a single category name. For example, if you rename the Personal
Category to Business, all records formerly associated with the Personal category will now
appear under the Business category.
Finding records
Your handheld lets you find information in several ways:
• All internal applications: Find locates a specified text, starting with the
current application.
NOTE: Find does not search through applications stored in a Memory Stick.
• Date Book, To Do List, and Memo Pad: Use Phone Lookup to display the
Address list screen and add the information from this list to a record.
• Address Book: Enter the first letters of a name in the Look Up line to
immediately scroll to that name.
• Mail: Use Lookup to access information in your Address Book.
Finding Address Book records
You can look up Address Book records in two ways:
• Use the scroll button on the front panel of your handheld.
– In the Address list screen, the scroll button moves up or down an entire
screen of records. Holding down the button will accelerate scrolling and
display every third screen.
– In Address view screen, the scroll button moves to the previous or next
address record.
• Type the first few letters of a name in the Look Up line at the bottom of the
Address screen.
36
Page 49

3 Working with your basic applications
Finding records
Look Up line
The list scrolls to the first entry that begins with that letter. If you write
another letter, the list scrolls to the first entry that begins with those two
letters. For example, writing a "b" scrolls to "Bennet", and writing "br"
scrolls further to 'Bristol'.
Using the Find option
The Find option lets you locate text in any or all applications. For example, if the text
"dog" appears in Address Book and Date Book, the Find option displays both
occurrences in the Find dialog box.
To use the Find option
1 Tap the Find icon to display the Find screen.
TIP: Select text in an application before tapping Find to automatically place the text in the
Find dialog box.
2 Enter the text you want to find.
The Find option is not case sensitive; searching for "alex" also finds "Alex".
37
Page 50

3 Working with your basic applications
Finding records
3Tap OK.
Tap here to start search.
Find searches for the text in all records and all notes within all internal applications.
Find will locate all matches that begin with the supplied text. It will not find words
where the supplied text appears in the middle or at the end of a word. For example,
searching for 'break' will find 'breakfast' but not 'fastbreak'.
As your handheld searches for the text, you can tap Stop to stop the search at any
time. To continue the search after tapping Stop, tap Find More.
Using Phone Lookup
The Phone Lookup option lets you add a telephone number from the Address list to
an entry in another application. For example, you can add your dentist’s telephone
number to your dental appointment date in Date Book.
To use Phone Lookup
1 Display the record in which you want to insert a phone number.
The record can be in Date Book, To Do List, Memo Pad, or Mail.
2 Do one of the following to display the Phone Lookup screen:
• Tap the Menu icon . Open the Options menu, and then tap Phone Lookup.
• Tap the inverted application title tab at the top of the screen; then tap
Options and tap Phone Lookup.
38
Page 51

3 Working with your basic applications
Sorting records in your basic applications
• In the text Graffiti area, drag a diagonal line from the lower left to upper
right to display the Command toolbar. In the text area, write an L, the
shortcut for the Phone Lookup command.
The Phone Lookup screen appears.
3 Do one of the following:
• Select a record.
• Write the first few letters of the name you want to add.
The List scrolls to the first record in the list that starts with the letters you
enter. When you see the name you are looking for, tap it.
4 Tap Add.
TIP: You can also search based on selected text. Drag to highlight the text, then write the
Graffiti Phone Lookup command stroke “L”. Your handheld replaces the selected text and
adds the name and its associated information.
Sorting records in your basic applications
In basic applications that display lists—Address Book, To Do List, and Memo Pad, you
can sort listed records in various ways. Refer to following pages for instructions:
• Address Book - refer to page 59
• To Do List - refer to page 67
• Memo Pad - refer to page 70
Attaching notes
You can attach notes to records in all the basic applications except the Memo Pad.
A note can be up to several thousand characters long.
To attach a note to a record
1 Display the entry to which you want to add a note.
39
Page 52

3 Working with your basic applications
Choosing fonts
2 Tap Details.
NOTE: In Address Book only, tap Edit first to be able to display and tap Details.
3Tap Note.
4 Enter your note.
5Tap Done.
A Note icon appears to the right of any item containing a note.
To review or edit a note
• Tap the Note icon .
To delete a note
1 Tap the Note icon .
2 Tap Delete.
3Tap Yes.
Choosing fonts
You can change the font style in all basic applications. You can choose a different font
style for each application.
To change the font style
1 Open an application.
2 Do one of the following to display the Select Font screen:
• Tap the Menu icon . Open the Options menu, and then tap Font.
• Tap the inverted application title tab at the top of the screen; then tap Font
in the Options menu.
• In the text Graffiti area, drag a diagonal line from the lower left to upper
right to display the Command toolbar. In the text area, write an F, the
shortcut for the Font command.
40
Page 53

3 Working with your basic applications
Getting information on an application
3 Tap the font style you want, then tap OK.
Getting information on an application
You can get information on any application by displaying its About box. The About
box displays the name, version number, and copyright information of the application.
To display the About box
1 Tap the Menu icon , then tap Options.
2 In the Options menu, tap About.
The text following the About command differs based on your location. For example, if
you are in Date Book, the command is About Date Book; if you are in Address Book,
the command is About Address Book.
Application-specific tasks
This section explains how-to instructions specific for each task of your basic
applications.
Using Date Book
Scheduling events
An entry in Date Book is called an event. An event can refer to any activity that you
associate with a particular day.
You can schedule the following types of events in Date Book:
• Timed events, which have both times and dates
• Untimed events, for example, birthdays or anniversaries
41
Page 54

3 Working with your basic applications
Using Date Book
• Repeating events, such as a weekly meeting held on the same day at the
same time
• Continuous events, such as a vacation or three-day conference
• All day events, which reflect the default hours of a day as set by the user
When you schedule an event, its description appears on the time line, and its duration
is set to 1 hour by default. You can easily change the start time and duration for any
event.
Scheduling timed events
You can schedule timed events for the current date or for future dates.
To schedule a timed event for the current date:
1 Tap the time line next to the time that corresponds to the start of the event.
2 Enter a description of the event.
Event description can be up to 255 characters in length.
Time bar shows
default duration.
Tap a line next to
desired time; then
enter text.
3 Set the event’s duration:
• If the event is 1-hour long, skip to the end of this procedure.
• If the event is longer or shorter than an hour, tap directly on the time to open
the Set Time dialog box. Proceed to step 4.
Tap the
time to
display the
Set Time
dialog box.
42
Page 55

3 Working with your basic applications
Using Date Book
TIP: You can open the Set Time dialog box (to select a start time) by making sure no event is
selected, and then writing a number on the number side of the Graffiti writing area.
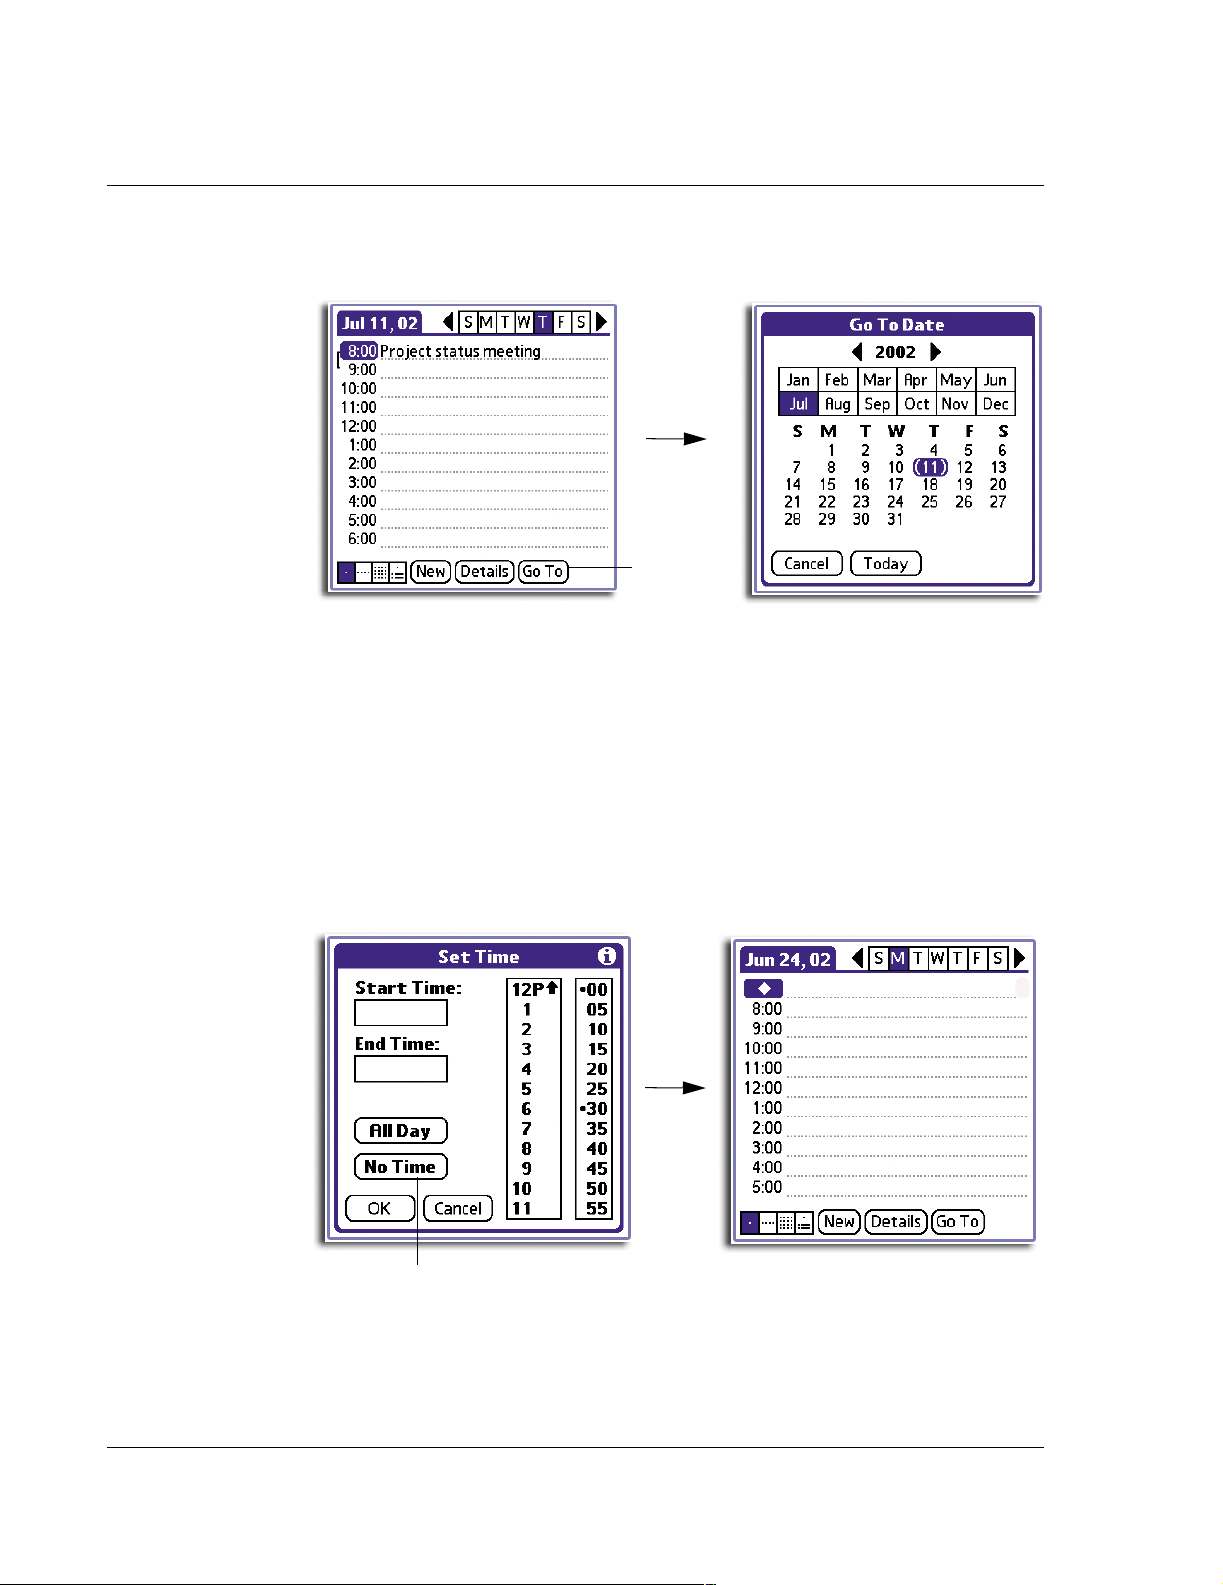
4 Set the duration of the event in either of the following ways:
• Tap the time columns in the Set Time dialog box to set the Start Time; then
tap on the End Time time columns to set the End Time.
• Tap All Day if the event lasts all day. The default hours of a standard business
day are set by the user, and may be changed using the Preferences command
in Date Book. See the section "Changing the displayed Start and End Times"
on page 54.
Tap to scroll to
earlier hours.
Start Time
Tap to change
hours.
Tap to change
minutes.
Tap to scroll to
later hours.
5Tap OK.
To schedule a timed event for another date:
1 Select the date you want in one of the following ways:
• Tap the desired day of the week in the date bar at the top of the screen. If
necessary, tap the Previous week or Next week arrows to move to another
week.
Previous/Next
week arrows
43
Page 56
3 Working with your basic applications
Using Date Book
• Tap Go To at the bottom of the screen to open the Go to Date dialog box.
Select a date by tapping a year, month, and day in the calendar.
2 After locating the desired date, follow the steps for scheduling an event for the
current day.
Scheduling untimed events
You can schedule untimed events for any date. Untimed events appear at the top of
the list of times marked with a diamond.
Tap here.
To schedule an untimed event:
1 Select the event date you want, as described in the previous procedure, "To schedule
a timed event for another date".
2Tap New.
3 In the Set Time dialog box, tap No Time.
Tap here.
You can tap OK instead but make sure nothing is entered for the start or end time.
44
Page 57

3 Working with your basic applications
Using Date Book
TIP: You can also create a new untimed event by making sure no event is selected and then
writing letters in the Graffiti writing area. When you start writing, the untimed event appears
at the top of the screen
4 Enter a description of the event.
5 Tap a blank area on the screen to deselect the untimed event.
NOTE: If you create a timed event and later want to make it an untimed event, tap directly
on the event time on the Date Book screen; then tap No Time and tap OK.
Rescheduling events
You reschedule events using the Details option in Date Book. You can also use the
Details option to convert untimed events into timed events.
To reschedule an event:
1 Tap the event you want to reschedule.
2 Tap Details.
3 To change the time, tap the Time box, then select a new time.
To change the date, tap the Date box, then select a new date
4Tap OK.
Scheduling repeating or continuous events
The Repeat function lets you schedule events that recur at regular intervals or extend
over a period of consecutive days.
Repeating events include a birthday or a weekly photography lesson that falls on the
same day of the week and the same time of day.
Continuous events might include a business trip or a vacation.
To schedule a repeating or continuous event:
1 Tap the event. (Be sure to tap the event and not the time next to the event.)
Typically, a continuous event is an untimed event.
2 Tap Details.
3 Tap the Repeat box to open the Change Repeat dialog box.
45
Page 58

3 Working with your basic applications
Using Date Book
4 Tap Day, Week, Month, or Year to set how often the event repeats.
For a continuous event, tap Day.
5 Enter a number that corresponds to how often you want the event to repeat on the
Every line.
For example, if you select Month and enter the number 3, the event repeats every
third month.
6 To set an end date for the repeating or continuous event, tap the End On pick list and
tap Choose Date. Use the date picker to select an end date.
7Tap OK.
The new repeating event is indicated by the Repeat icon on the far right on the
event line.
Tap here.
Making changes to repeating or continuous events
When changes are made to a repeating or continuous event you have the option of
applying the change to just the current event, the current event and all future
occurrences of this event, or all occurrences of this event - past, present, and future.
To delete repeating events:
1 In the Event Details screen of the event you want to delete, tap Delete.
The Repeating Event screen appears asking for confirmation of the delete.
46
Page 59

3 Working with your basic applications
Using Date Book
NOTE: You can also tap the Menu icon; select Record, and then tap Delete Event. This opens
the Repeating Event screen.
2 Select one of the following options:
Current Deletes a single occurrence of this event.
Future Deletes the current event and all future occurrences of this event.
All Deletes all past, current, and future occurrences of this event.
The event is removed from your Date Book and you are returned to the Day view
where you started. These steps apply to all changes you make to repeating or
continuous events.
About scheduling repeating or continuous events
Keep the following in mind when scheduling repeating or continuous events:
• If you change the start date of a repeating event, your handheld calculates
the number of days you moved the event. It then automatically changes the
end date to maintain the duration of the repeating event.
• If you change the repeat interval (e.g., daily to weekly) of a repeating event,
past occurrences (prior to the day on which you change the setting) are not
changed, and your handheld creates a new repeating event.
• If you change the date of an occurrence of a repeating event (e.g., from
January 14 to January 15) and apply the change to all occurrences, the new
date becomes the start date of the repeating event. Your handheld adjusts
the end date to maintain the duration of the event.
• If you change other repeat settings (for example, time, alarm, private) of a
repeating event and apply the change to all occurrences, your handheld
creates a new event. The start date of this new event is the day on which the
setting is changed. Past occurrences (prior to the day of the change) are not
changed.
• If you apply a change to a single occurrence of a repeating event (e.g., time),
that occurrence no longer shows the Repeat icon.
47
Page 60
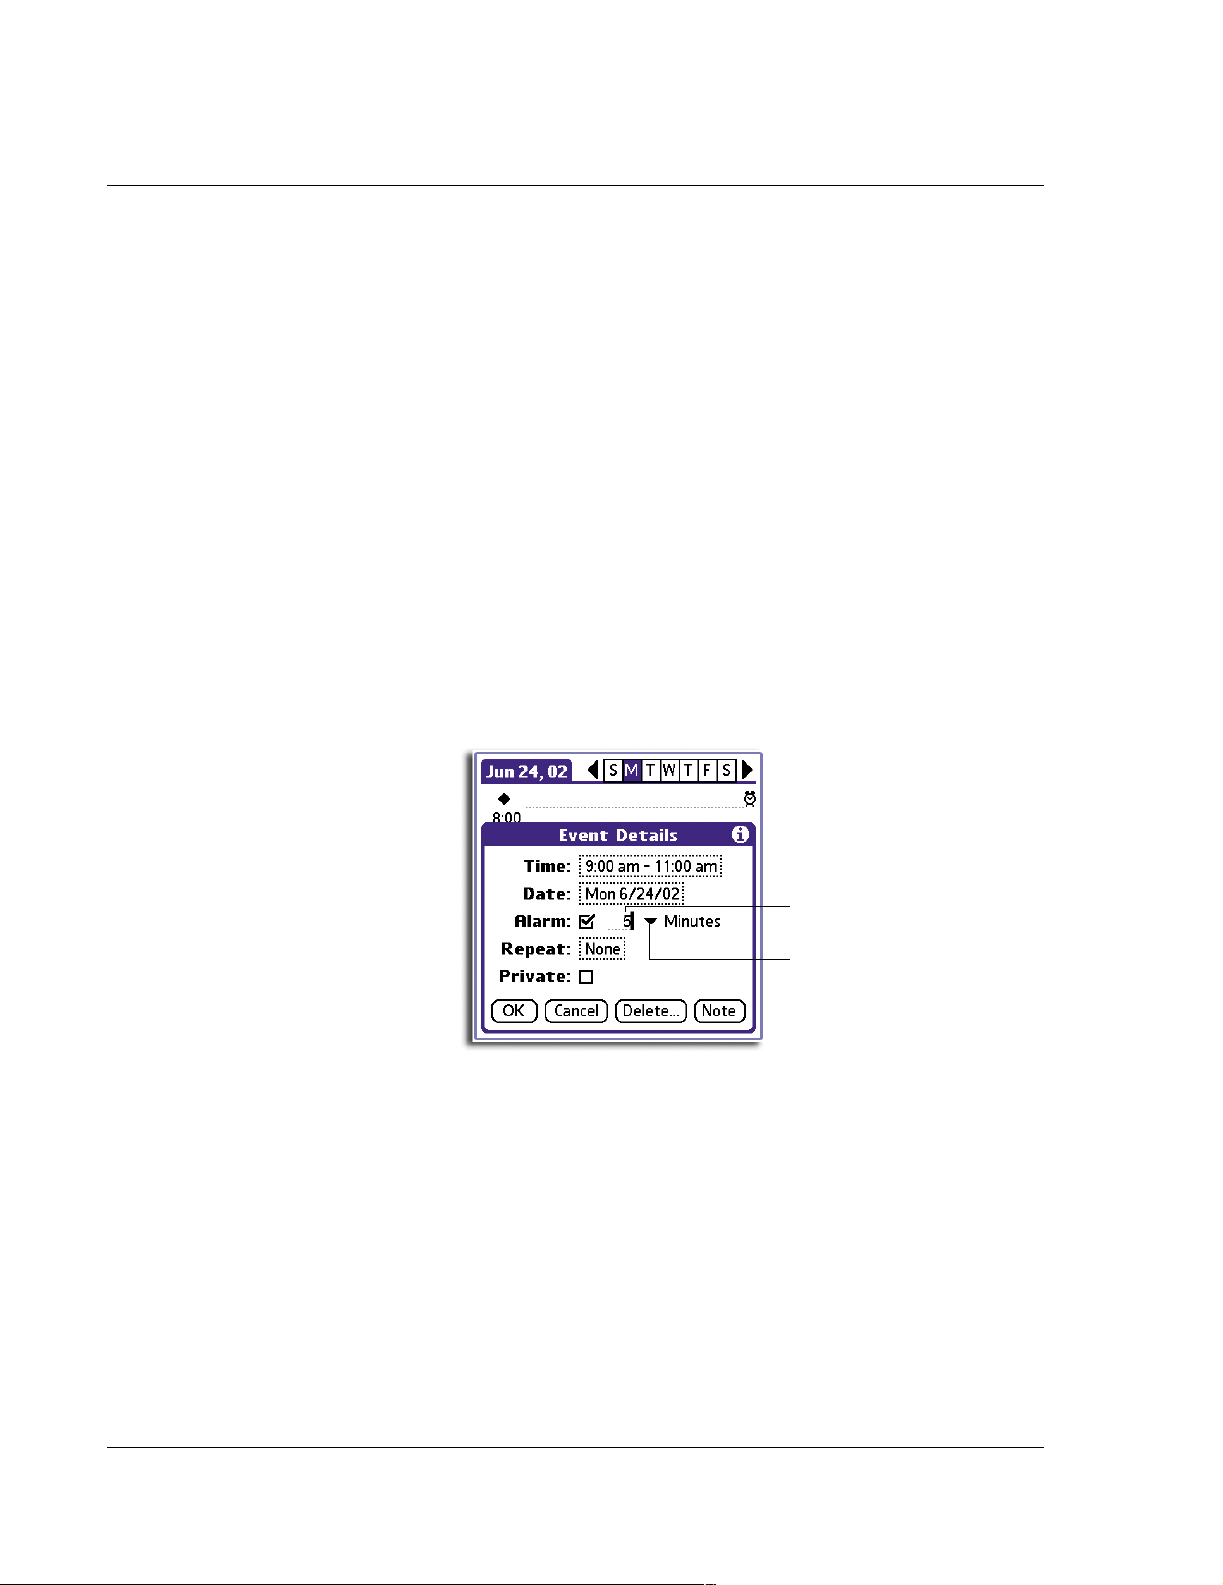
3 Working with your basic applications
Using Date Book
Adding Address Book information to an event
You can add a name, address, and telephone number to an event using the Phone
Lookup option. For instructions, refer to "Using Phone Lookup" on page 38.
Setting the alarm for an event
The Alarm setting lets you set an audible alarm for events in your Date Book, and
display an onscreen reminder. For untimed events, only the reminder message
appears.
To set an alarm for an event
1 Tap the event to which you want to assign an alarm.
2 Tap Details.
3 Tap the Alarm check box to select it.
The default setting, 5 Minutes, appears.
4 Set the alarm time:
• Select the 5 next to the Alarm check box and enter any number from 0 to 99
(inclusive) as the number of time units.
• Tap the pick list to change the time unit; select Minutes, Hours, or Days.
Enter number of
time units here.
Tap here to
select unit of time.
5Tap OK.
Once an alarm has gone off, a Reminder screen appears. You can tap the Snooze
button to dismiss the alarm for a 5-minute period. Refer to "Using the Reminder
command buttons" on page 174 for more information on working on the Reminder
screen.
48
Page 61
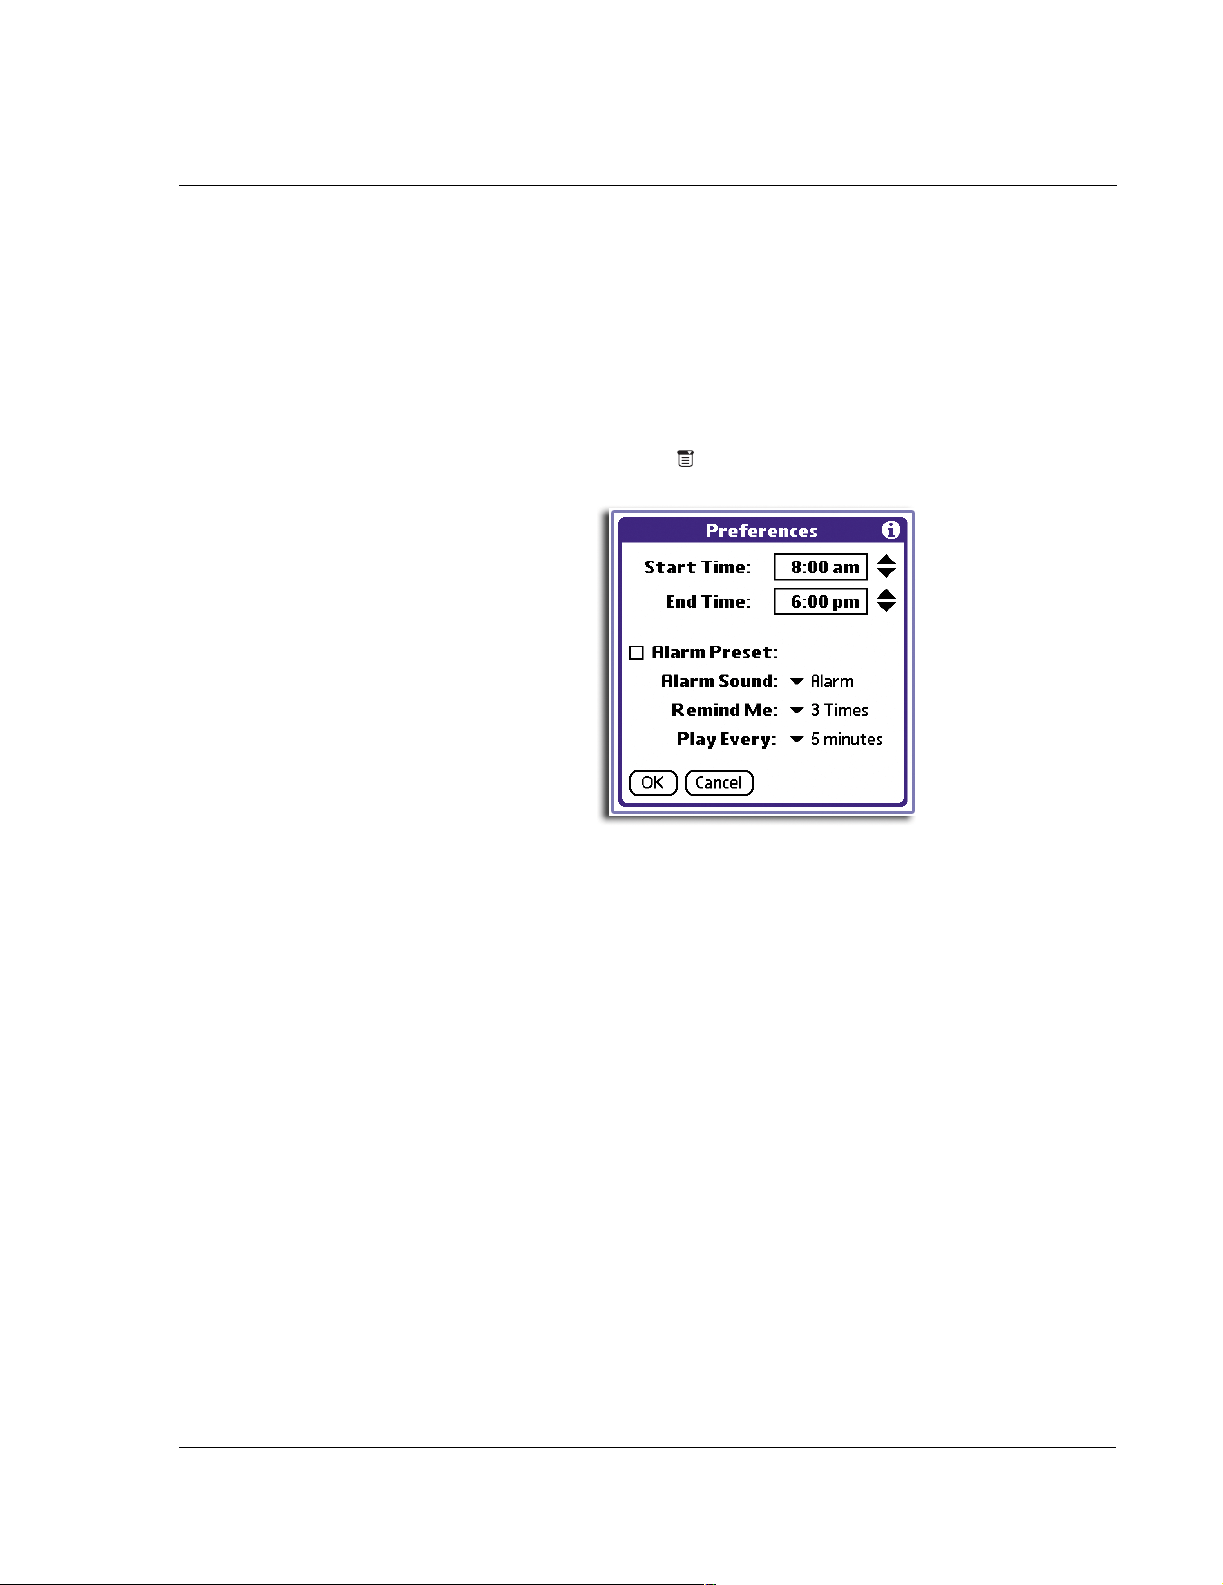
3 Working with your basic applications
Using Date Book
Setting alarm options
You can use Preferences to set alarm options, including:
• For the alarm to go off automatically for each new event
• Set a tone for the alarm
• Set the number of times the alarm sounds
To set alarm options
1 In Date Book, tap the Menu icon , open the Options menu, and then tap
Preferences.
2 Select from the following options:
Start/End Time Let you set the start and end time for the Date Book view. See
"Changing the displayed Start and End Times" on page 54.
Alarm Preset Let you set an alarm for each new event automatically. The silent
alarm for untimed events is defined by minutes, days, or hours
before midnight of the date of the event.
Alarm Sound Tap the pick list to set the tone of the alarm. Options include Alarm,
Alert, Bird, Concert, Phone, Sci-fi, and Wake Up.
Remind Me Tap the pick list to define how many times the alarm sounds—once
or twice; or three, five, or ten times.
Play Every Tap the pick list to define how often the alarm sounds—every
minute; or every 5, 10, or 30 minutes.
3Tap OK.
49
Page 62

3 Working with your basic applications
Using Date Book
Changing the Date Book view
Date Book includes four views for displaying your appointments:
•Day view
• Week view
•Month view
• Agenda view
To display the Date Book views:
Do one of the following:
• Repeatedly press the Date Book application button on the front panel of
your handheld to cycle through all the Date Book views.
• Tap a view icon in the lower-left area of the Date Book screen.
Date Book view icons
Working in Week view
Week view displays a calendar of your events for an entire week. This view lets you
quickly review your appointments and available time slots. In addition, the graphical
display helps you spot overlaps and conflicts in your schedule.
To work in Week view:
1 Do one of the following to display the Week view:
• Tap the Week view icon .
• Press the Date Book application button until the Week view appears.
2 Tap the left and right navigation controls to move forward or backward a week at a
time, or tap on a specific day to display the details of an event.
NOTE: The Week view also shows untimed events and events before and after the range of
times displayed.
50
Page 63
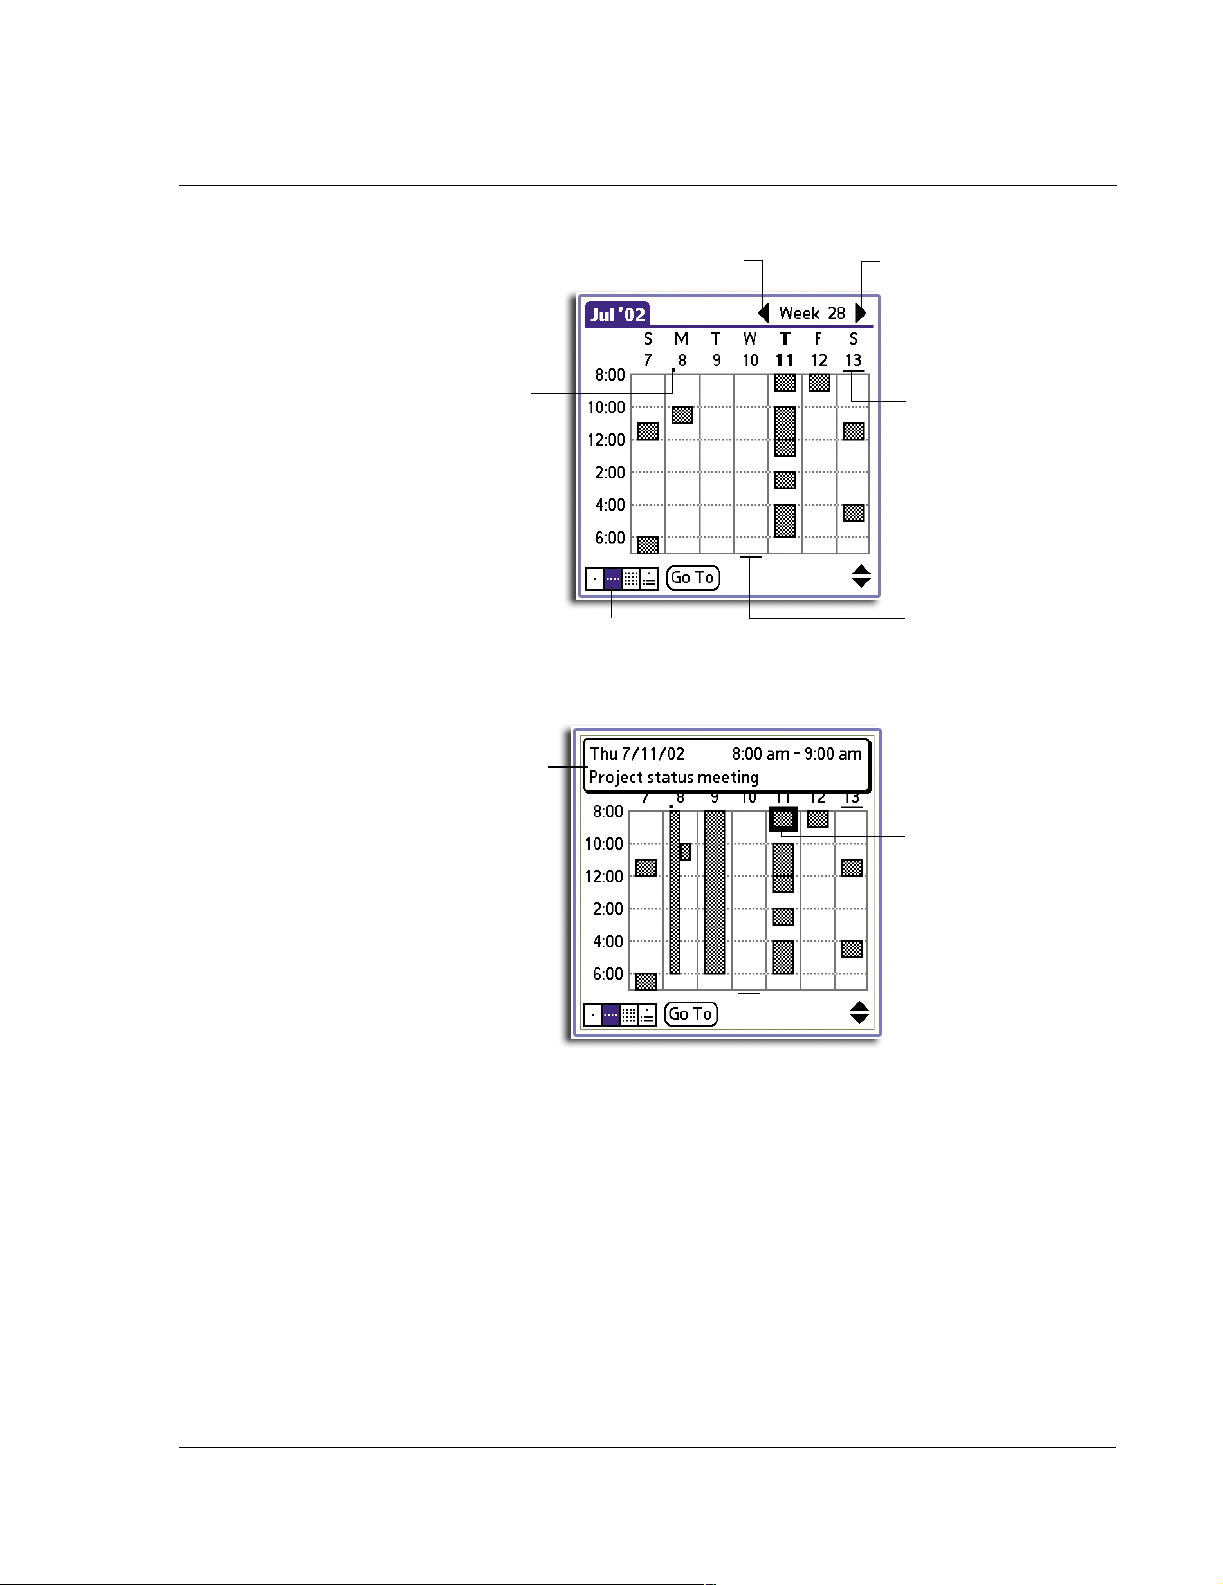
3 Working with your basic applications
Using Date Book
Dot indicates
untimed event.
Previous week
Week view icon
Next week
Bar indicates
earlier event.
Bar indicates
later event.
3 Tap an event to display a description of the event at the top of the screen.
Event details
Tap to show event details.
Tips on working in Week view
Keep the following points in mind when working in Week view:
• To reschedule an event while in Week view, tap and drag the event to a
different time or day.
• Tap a blank time on any day to move to that day and have the time selected
for a new event.
• Tap any day or date that appears at the top of the Week view to move
directly to that day without selecting an event.
• The Week view displays the time span defined by the Start Time and End
Time in the Date Book Preferences settings. If you have an event before or
after this time span, a bar appears at the top or bottom of that day's column.
Use the scroll arrows to scroll to the event.
51
Page 64

3 Working with your basic applications
Using Date Book
Spotting event conflicts
With the ability to define specific start and end times for any event, it is possible to
schedule events that overlap (an event that starts before a previous event finishes).
An event conflict (time overlap) appears in the Week view as overlapping time bars
and in the Day view as overlapping brackets to the left of the conflicting times.
Event conflict
in Day view
Event conflict
in Week view
Working in Month view
The Month view screen shows which days have events scheduled. Dots and lines in the
Month view indicate events, repeating events, and untimed events.
To display the Month view:
Do one of the following:
• Tap the Month view icon .
• Press the Date Book application button until the Month view appears.
Previous/next month
Dots on right side indicate events.
Crosses below date indicate untimed events.
Month view icon
You can control the dots and lines that appear in the Month view. See "Display
Options" on page 55 for more information.
52
Page 65

3 Working with your basic applications
Using Date Book
Tips on working in Month view
Keep the following points in mind when working in Month view:
• Tap a day in the Month view to display that day in the Day view.
• Tap the next/previous arrows in the upper right corner of the screen to move
forward or backward a month.
• Tap the Go To button to open the date selector and select a different month.
• Use the scroll buttons on the front panel of your handheld to move between
months. Press the top button to display the previous month, the bottom
button to display the next month.
Working in Agenda view
The Agenda view lets you view appointments, untimed events, and To Do List items in
a single screen. Although it is primarily a viewing option, you can also use the Agenda
view to check off completed To Do List items. To go to the Day view of any event on
the Agenda view screen, simply tap the desired event.
To work in the Agenda view:
1 Do one of the following to display the Agenda view:
• Tap the Agenda view icon .
• Press the Date Book application button until the Agenda view appears.
Tap the navigation bars to move forward or backward a day at a time or to display
more events and To Do items.
Scroll the list
for each view
Agenda view icon
Tips on working in Agenda view
• Tap any appointment while in Agenda view to display the Day view of the
appointment.
• Check off completed To Do List items in the Agenda view, or click a
description of an item to go directly into the To Do List application.
• You can change the category of To Do List items shown. Tap the pick list and
select the new category. For more information on To Do List items, refer to
"Using To Do List" on page 63.
53
Page 66

3 Working with your basic applications
Using Date Book
Changing the displayed Start and End Times
To change the start and end time in Date Book:
1 Tap the Menu icon , open the Options menu, and then tap Preferences.
The Start Time and End Time values are used by the various Date Book screens. The
Day view schedules events to start and end at these times when the All Day option is
selected. The Week view displays the time span defined by the Start Time and End
Time values.
2 Tap Start Time and use the up/down arrows to select a new start time value for the
Date Book screens.
3 Tap End Time and use the up/down arrows to select a new end time value for the Date
Book screens.
NOTE: If the selected time slots for the Start and End time do not fit on one screen, you can
tap the scroll arrows to scroll up and down.
4Tap OK.
Displaying the current time
To display the current time:
1 Tap and hold down the stylus on the date in the date bar to display the current time.
2 Release the stylus to redisplay the date.
Date Book menus
Date Book menus are shown here for your reference only. Features that are not
explained in this section are discussed elsewhere in this User Manual.
Date Book has three menus: Record, Edit and Options.
54
Page 67

3 Working with your basic applications
Using Date Book
Options menu
Display Options In Day or Month view, you can change which events appear in
Date Book. In Day view, you can display time bars that
highlight event conflicts.
In Day view:
• Show Time Bars. Tap to display time bars showing
the duration of an event and any event conflicts.
• Compress Day View. Tap to display start and end
times for each event with the blank time slots on the
bottom of the screen absent to minimise scrolling.
Clear the option to display all time slots.
In Month view:
Select whether to display Timed, Untimed, or Daily Repeating
events. You can activate any or all of these options.
55
Page 68

3 Working with your basic applications
Using Address Book
Using Address Book
Creating an Address Book entry
A record in Address Book is called an entry. You can create entries on your handheld
or you can use your Palm Desktop software to create entries on your computer and
then download them to your handheld during your next HotSync operation.
Palm Desktop software also has data import capabilities that allow you load database
files into the Address Book on your handheld.
To create a new Address Book entry:
1 Press the Address Book application button on the front panel of your handheld to
display the Address screen.
2Tap New.
Cursor at
Last name
Tap here.
3 Enter the last name of the person you want to add to your Address Book.
NOTE: The first letter of each field (except numeric and email fields) is automatically
capitalised.
4 Tap the First Name field to move to it.
TIP: You can also use the Graffiti Next Field Stroke to move to the next field. Refer to
"Graffiti navigation strokes" on page 6 for more information.
5 Enter the individual’s first name in the First Name field.
6 If you want to be able to sort the Address Book by company name, enter the
information you want in the Company field.
7 Enter any other information that you want to include in the entry.
56
Tap here to add a note.
Page 69
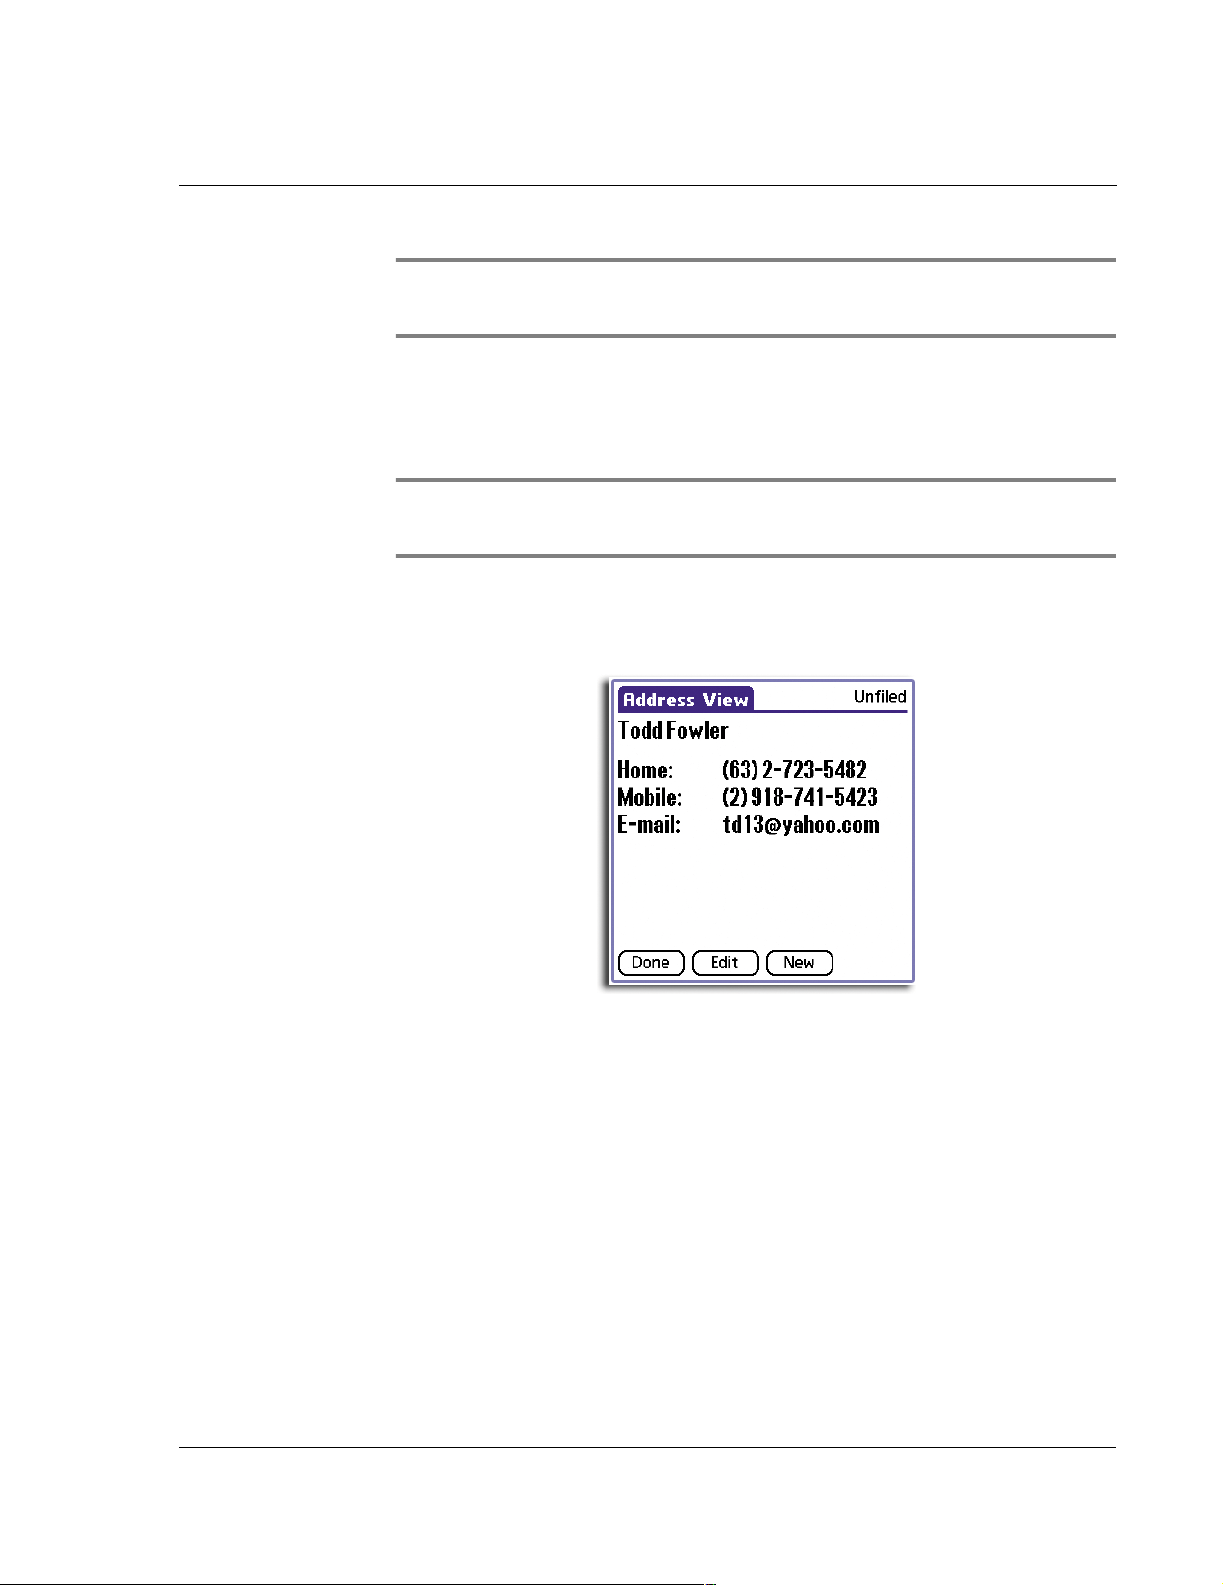
3 Working with your basic applications
Using Address Book
NOTE: As you enter letters in the Title, Company, City and State fields, text appears for the
first logical match that exists in your Address Book. As you enter more letters, a closer match
appears. As soon as the word appears, tap in the next field to accept the word.
8 Tap the scroll arrows to move to the next page of information.
9 To attach a note to an entry, tap Note. Enter the information you want in the Graffiti
writing area, and then tap Done.
10 When you have finished entering information, tap Done.
TIP: To create an entry that always appears at the top of the Address List, begin the Last
name or Company field with a symbol, as in *If Found Call.* This entry can contain contact
information in case you lose your handheld.
To view details of an address entry:
1 Tap the address entry in Address list view.
The entry appears in the Address View screen.
2 Tap Done when you have finished viewing the entry.
Selecting different types of phone numbers and addresses
You can select the types of phone numbers or email addresses that an Address Book
entry displays. Any changes you make apply only to the current entry.
To select other types of phone numbers in an entry
1 In the Address View screen of the entry that you want to change, tap Edit.
57
Page 70

3 Working with your basic applications
Using Address Book
2 Tap the pick list next to the label you want to change.
Tap here.
Tap the
pick list.
3 Select a new label.
Duplicating an entry
You can duplicate existing entries, which can be helpful when you want to enter
multiple people from a single organisation. When you duplicate an entry, the word
Copy appears next to the name in the First Name field.
To duplicate an entry
1 From the Address Book, tap a name you want to duplicate.
2 Do one of the following:
• Tap the Menu icon ; then tap Duplicate Address from the Record menu.
• Tap the inverted application title tab at the top of the screen; then tap
Duplicate Address from the Record menu.
• In the Graffiti text area of your device’s screen, drag a diagonal line from the
lower left to upper right to display the Command toolbar; then write a T in
the Graffiti text area to initiate the Duplicate Record command.
58
Page 71
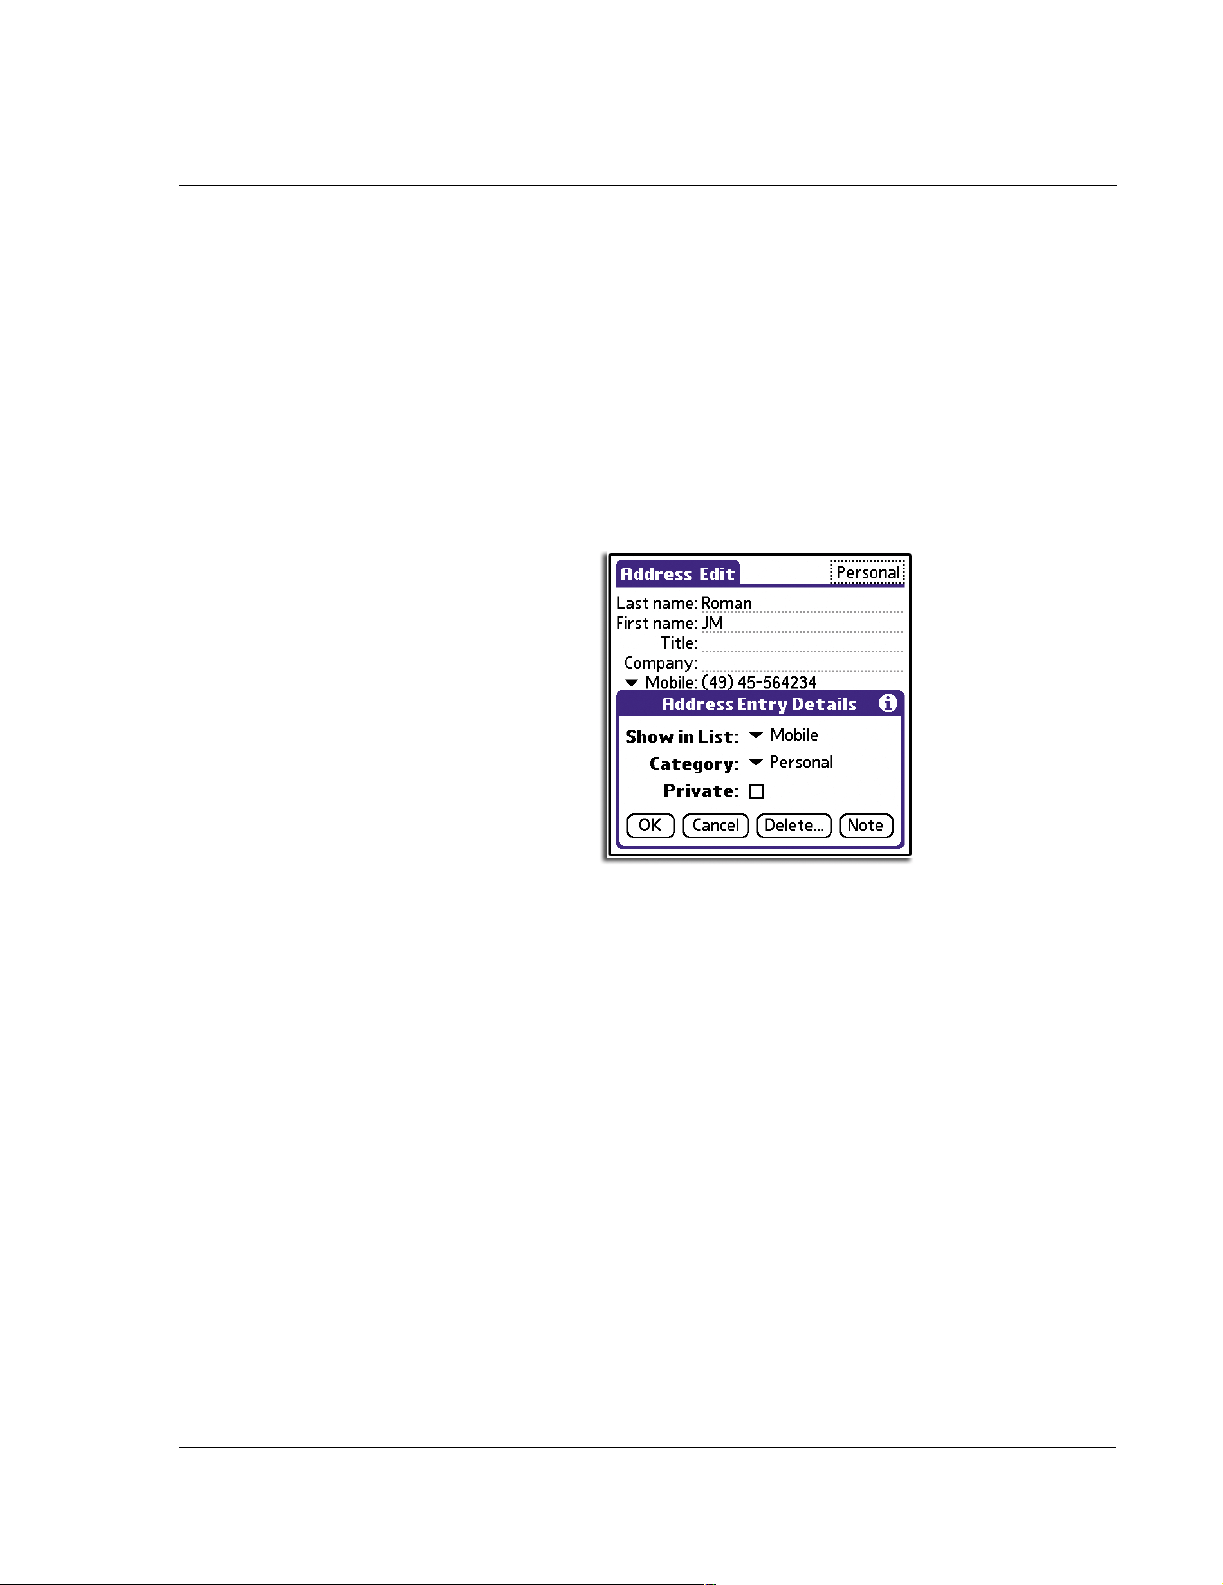
3 Working with your basic applications
Using Address Book
3 Edit the record as necessary.
Editing Address Book entries
You can change the type of information that appears in the Address screen,
categorise an entry, and hide an entry for security reasons. You can also delete
entries.
To edit an Address Book entry
1 Tap the entry that you want to change in the Address list.
2 Tap Edit.
3 Tap Details.
4 In the Address Entry Details dialog box, select any of the following settings:
Show in List Let you select which type of phone or other information to appear
in the Address List screen. Options include Work, Home, Fax, Other,
E-mail, Main, Pager and Mobile. The Identifying letters W, H, F, O,
M or P appear next to the record on which information is displays.
(There is no identifying letter when E-mail is selected.)
Category Let you select a category to which you want to assign the entry.
Private Let you hide the entry when Security is turned on.
You can also use the Delete and Note buttons.
• Delete. Tap to delete the entry.
• Note. Let you create a note. Tap the button, then enter information in the
Graffiti writing area, and tap OK.
5Tap OK.
Sorting Address Book entries
You can change how Address Book lists are sorted by using Preferences.
To sort Address Book entries
59
Page 72

3 Working with your basic applications
Using Address Book
1 In Address Book, tap the Menu icon .
2 Open the Options menu, and then tap Preferences.
The Preferences screen appears.
3 Choose an option to sort Address Book lists from the List By pick list:
Last Name, First Name Address Book list is sorted alphabetically by an
individual’s last name and then first name.
Company, Last Name Address Book list is sorted by the company name, and
then an individual’s last name.
4Tap OK.
Address Book menus
Address Book menus are shown here for your reference only. Features that are not
explained in this section are discussed elsewhere in this User Manual.
Address Book has three menus: Record, Edit and Options.
Record menu
The Record menu differs depending on whether you are viewing it from the Address
list screen or from the Address View screen.
60
Page 73
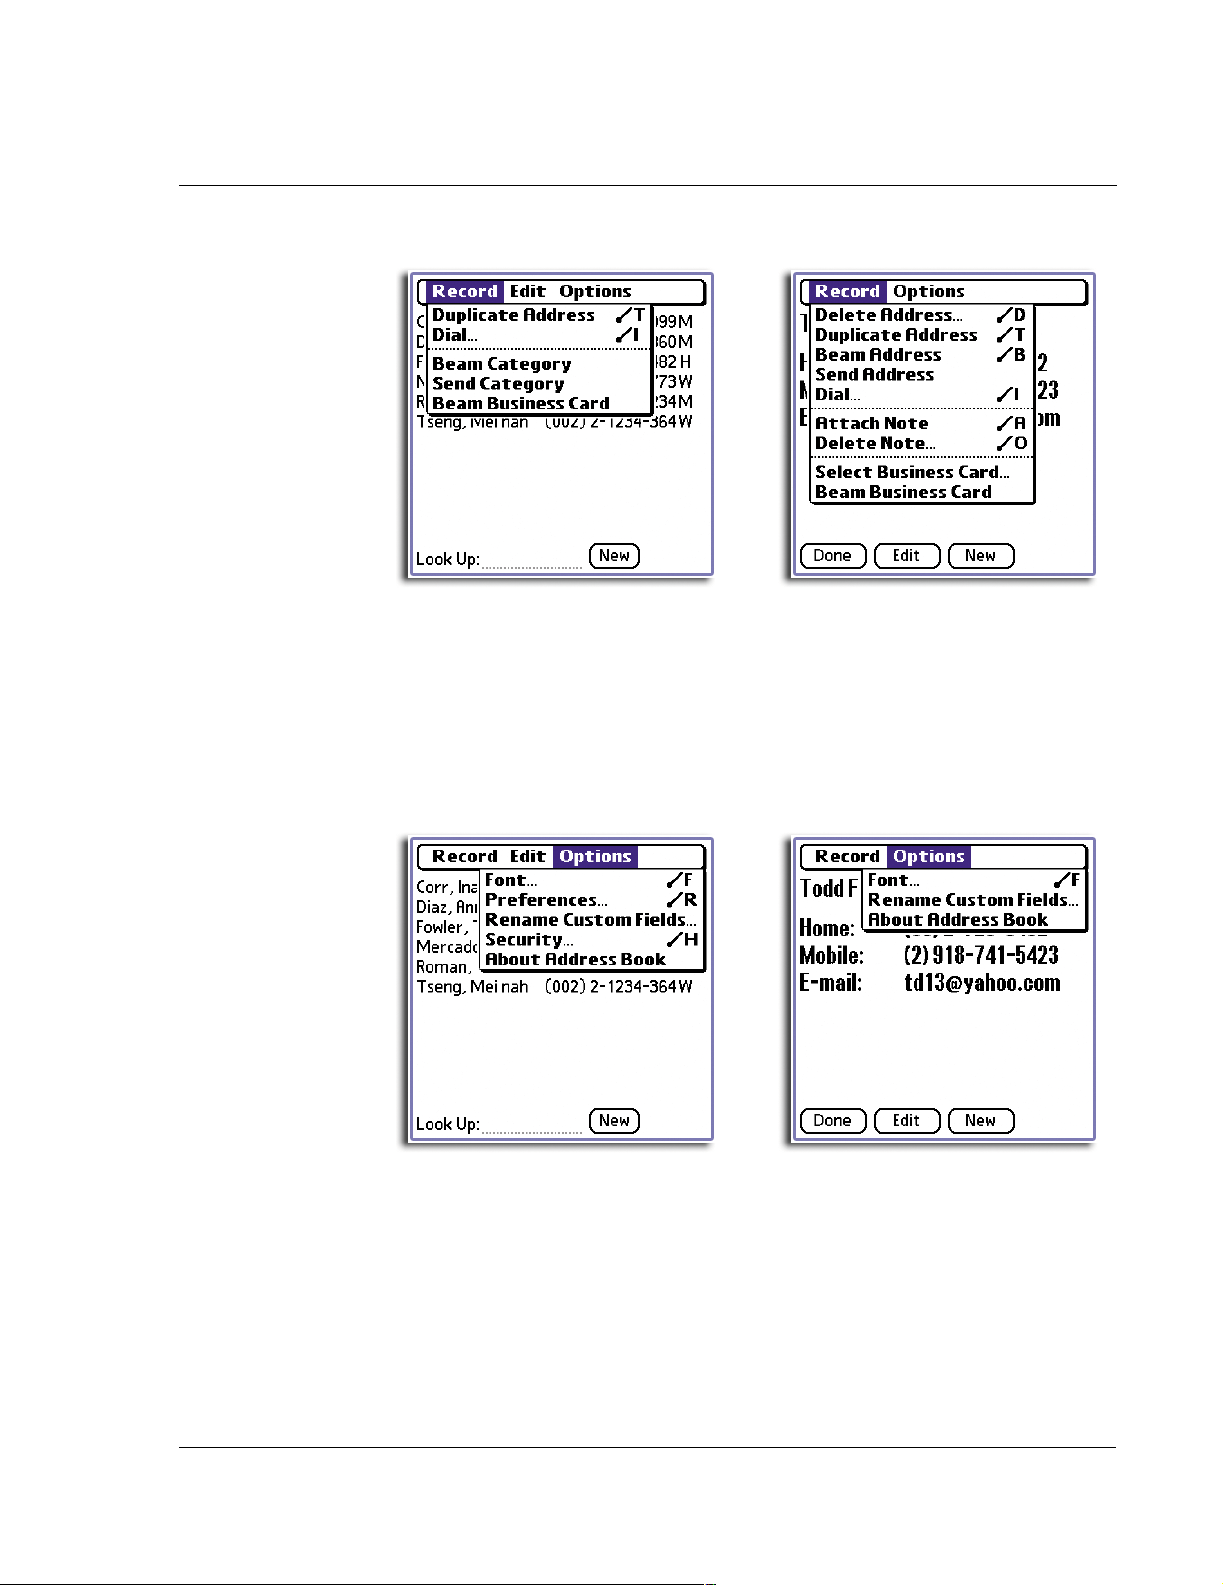
3 Working with your basic applications
Using Address Book
Address list
Dial Initiates dialing of an infrared-equipped mobile phone by sending
the telephone number through the IR port of your handheld to the
phone.
Address View
Options menu
The Options menu differs depending on whether you are viewing it from the Address
list or from the Address View screen.
Address list
Address View
61
Page 74

3 Working with your basic applications
Using Address Book
Preferences
• Remember Last Category. Determines how Address
Book appears when you return to it from another
application. If you check on the box, Address Book
shows the last category you selected. If you clear it,
Address Book displays the All category.
• Enable Tap Dialing. Allow automatic dialing by
tapping a telephone number in Address Book. You must
have an infrared-equipped mobile phone near your
handheld to use this feature.
Rename Custom
Fields
These custom fields appear at the end of the Address Edit screen.
Rename them to identify the kind of information you enter in
them. Names of these custom fields appear in all entries.
62
Page 75

Using To Do List
Creating To Do List items
A To Do List item is a reminder of some task that you have to complete. A record in
the To Do List is called an item.
To create a To Do List item
1 Press the To Do List application button on the front panel of your handheld to
display the To Do List screen.
2Tap New.
3 Working with your basic applications
Using To Do List
New To Do
edit line
Tap here.
3 Enter the text of the To Do List item.
The text can be longer than one line.
TIP: If no To Do List item is currently selected, writing in the Graffiti writing area
automatically creates a new item.
4 Tap anywhere onscreen to deselect the To Do List item.
TIP: You can add a name, address, and phone number to a To Do List item using the Phone
Lookup option. For more information, refer to "Using Phone Lookup" on page 38.
Setting To Do List priorities
You can set priorities for tasks in your To Do List according to their importance or
urgency. By default, items are arranged by priority and due date; on top of the list are
priority 1 (most important) items. Changing an item’s priority may move its position in
the list.
63
Page 76
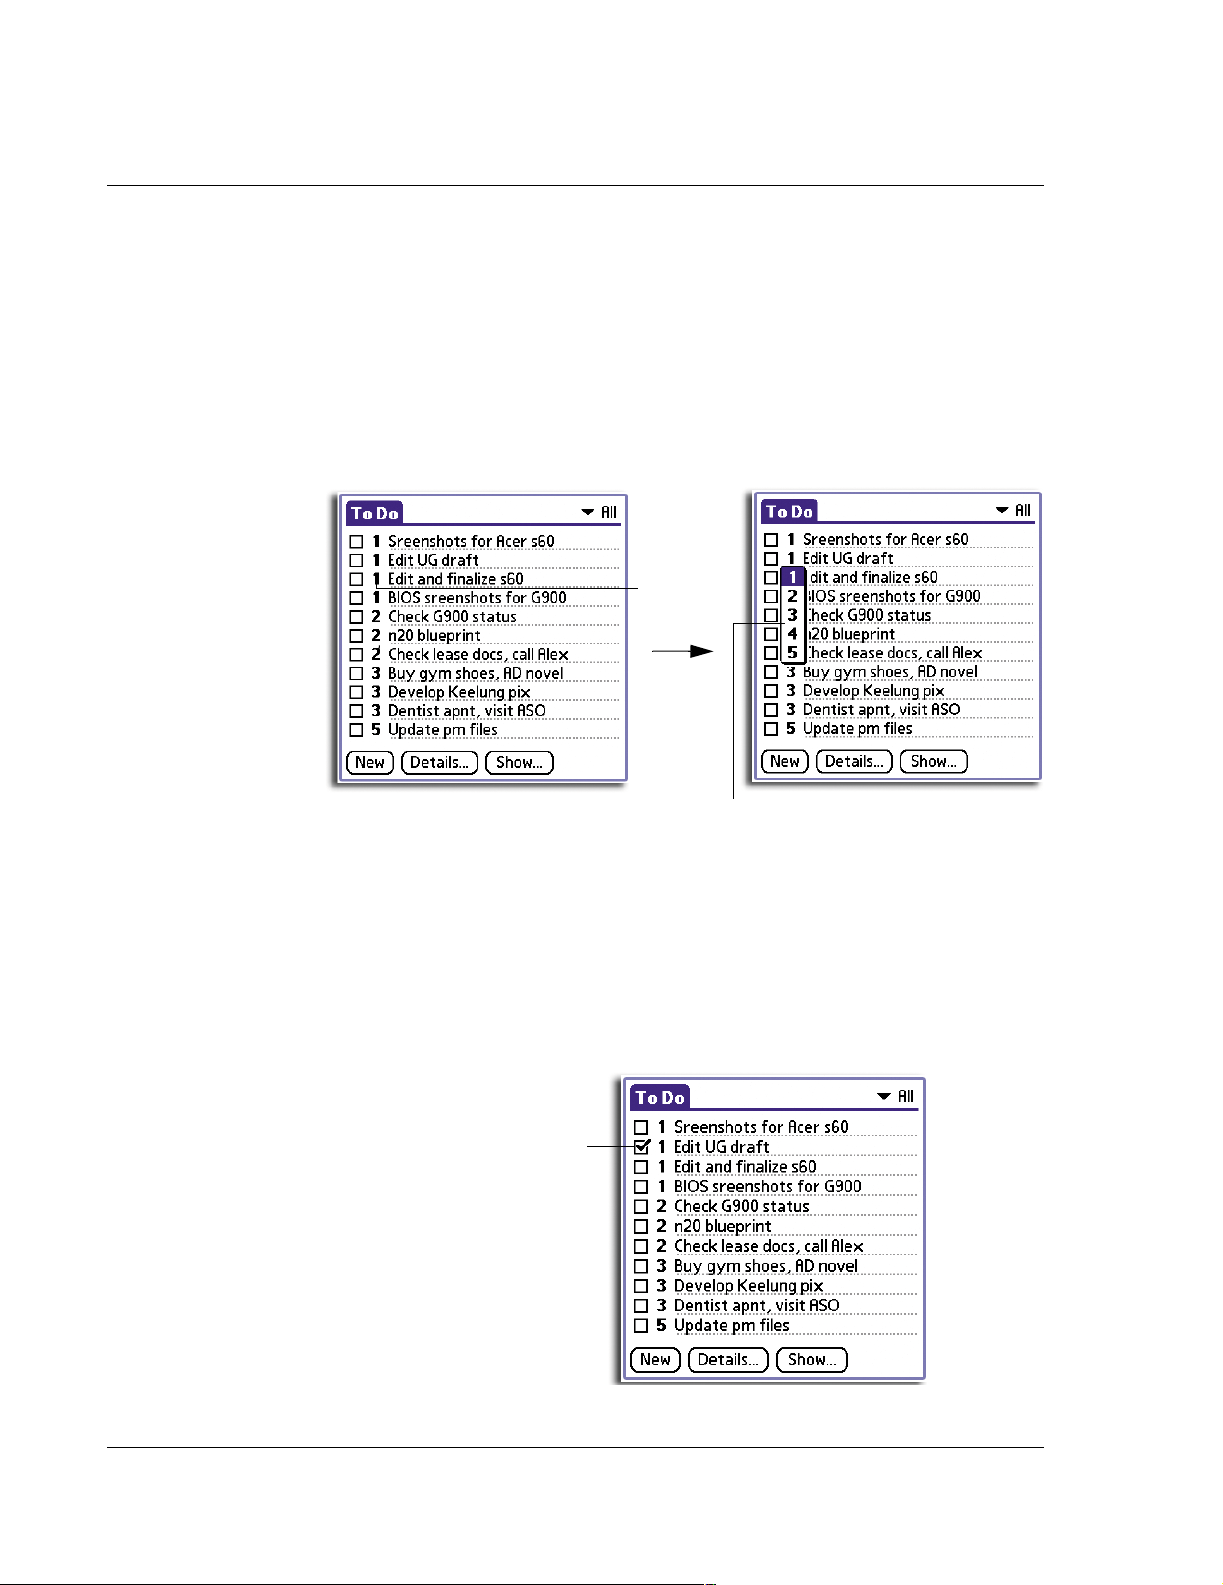
3 Working with your basic applications
Using To Do List
New To Do List items automatically have a priority level of 1. If you select another item
first, before creating a new item, the item you create appears beneath the selected
item with the same priority as the selected item.
To set the priority of a To Do List item
1 If priorities are not visible in the To Do List, tap the Show button at the bottom of the
screen. Tap Show Priorities, and tap OK.
2 Tap the Priority number on the left side of the To Do List item.
The drop-down column of priority levels appears.
Tap here.
Tap here to select priority level.
3 Tap the Priority number that you want to set for the item, with 1 as the most
important and 5 as the least important.
Checking off a To Do List item
You can check off a To Do List item to indicate that you have completed it.
To check off a To Do List item
Tap the check box on the left side of the item. The check mark indicates that the item
has been completed already.
Completed To Do List item
64
Page 77
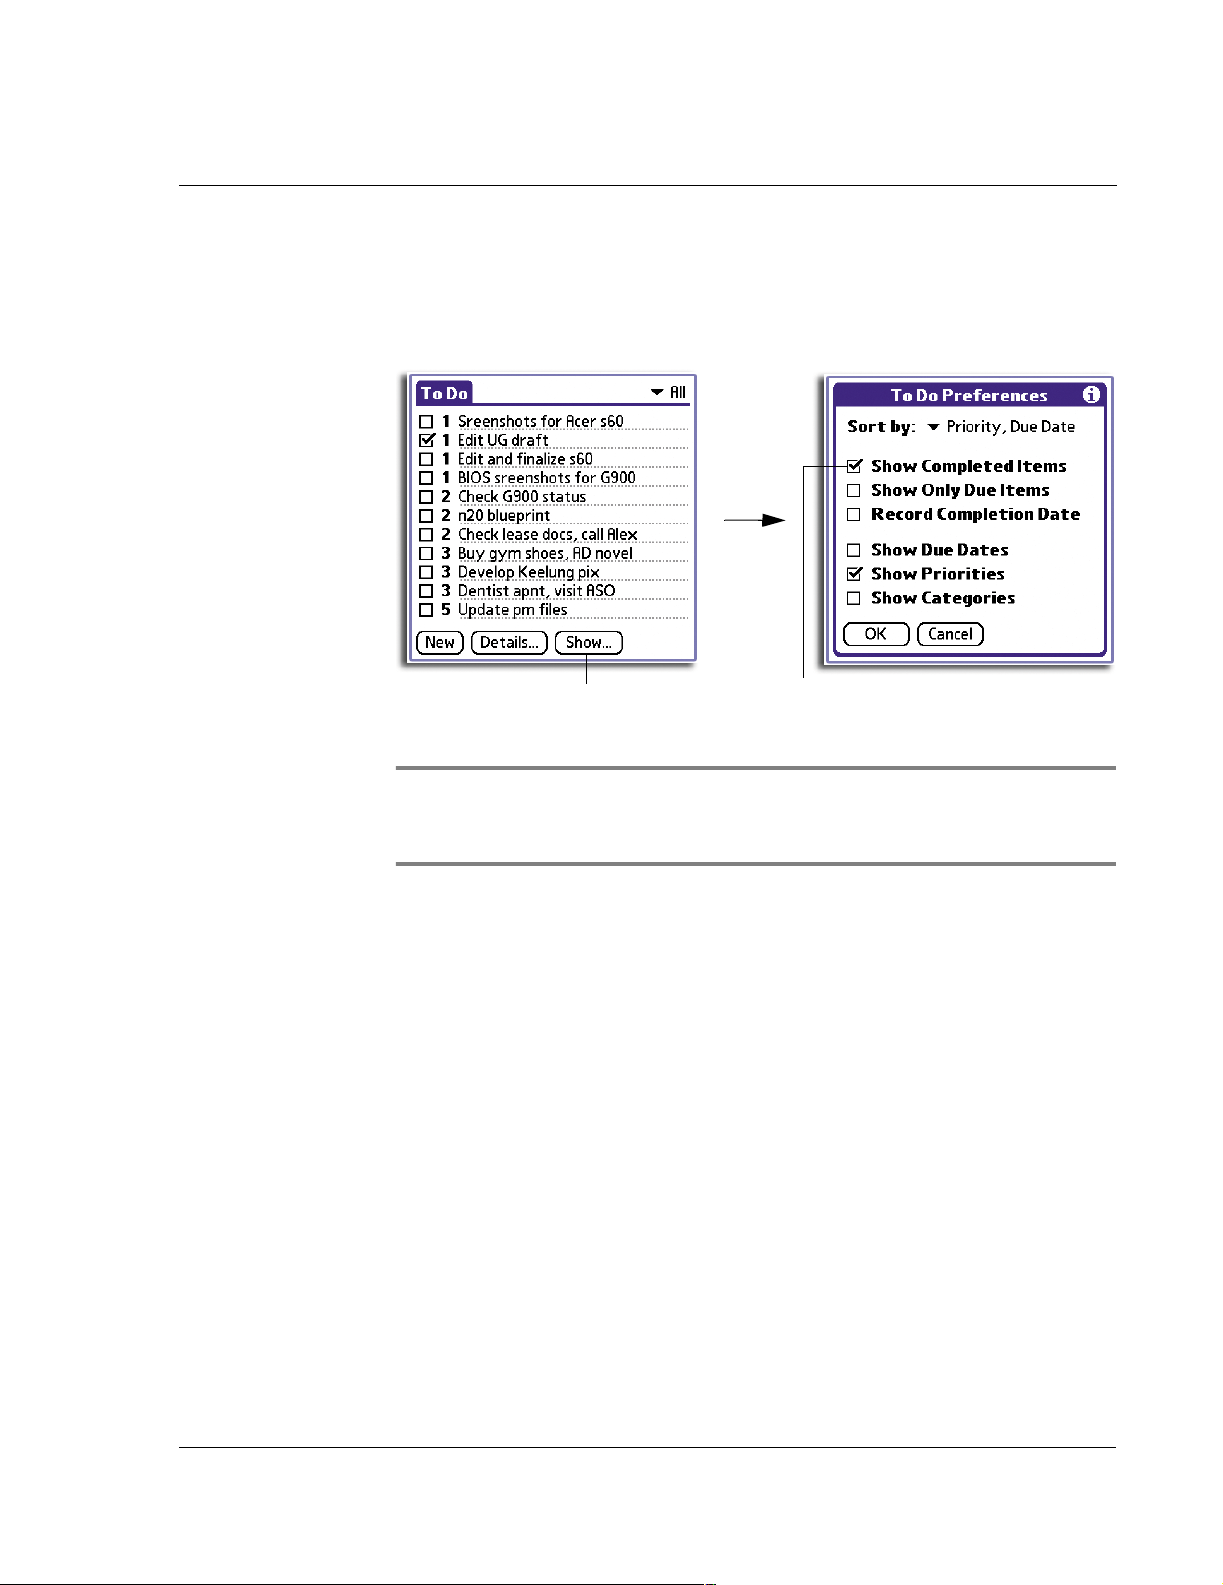
3 Working with your basic applications
Using To Do List
To remove a completed To Do List item
1 At the bottom of the To Do List screen, tap the Show button to display the To Do
Preferences dialog box.
2 Tap the Show Completed Items check box to deselect it.
Tap here.
Your completed To Do items disappear from the list.
NOTE: Items that no longer appear on the list because Show Completed Items is turned off
have not been deleted. They are still in the internal memory of your handheld. You must
purge completed items to remove them from memory. Refer to "Purging records" on page 32
for more information.
Tap the check box to turn off this option.
Changing To Do List items details
You can change the details of a To Do List item including the priority level, the item
category, the assigned due date, and the security status.
To change the To Do List item details
1 In the To Do List screen, tap the item that you want to change.
2 Tap Details to display the To Do Item Details screen.
65
Page 78
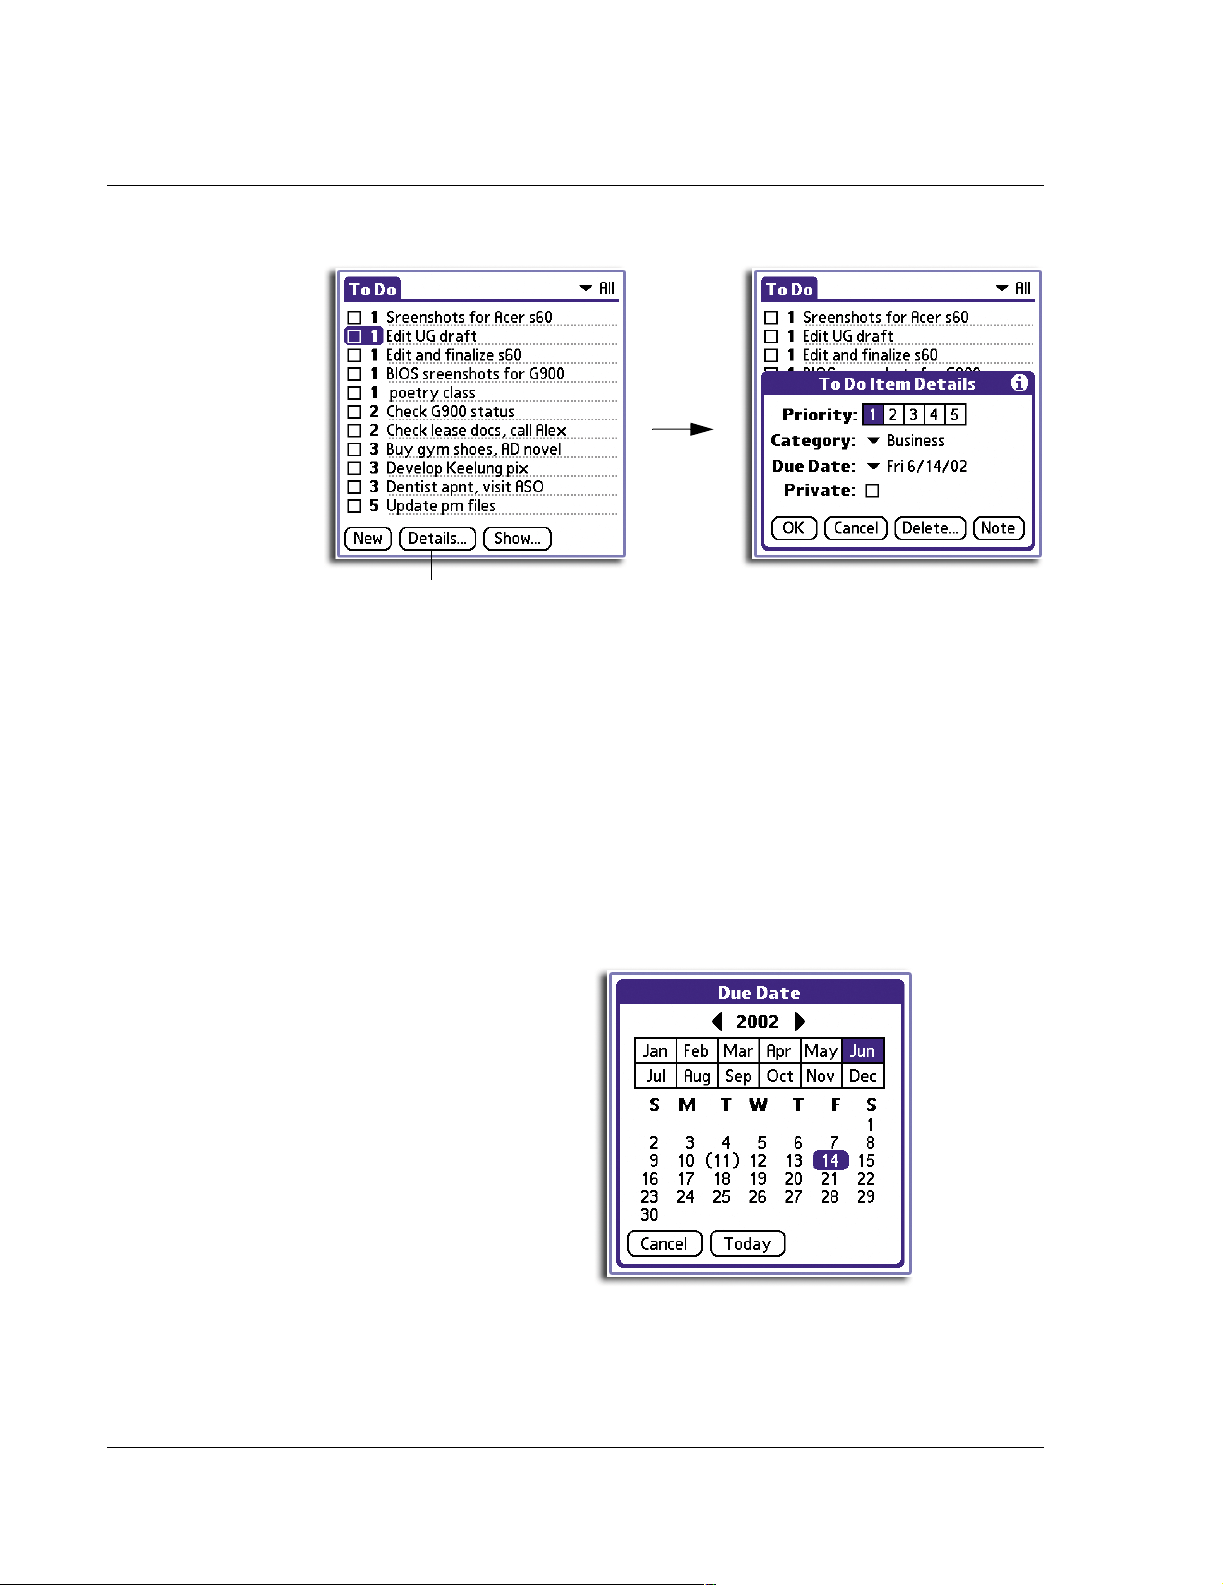
3 Working with your basic applications
Using To Do List
Tap here.
3 Choose from the following options:
Priority Tap the Priority number that you want to set for the item, with 1 as
the most important and 5 as the least important.
Category Tap the pick list to select a category for the item.
Due Date Tap the pick list to open the Due Date pick list, then tap the date that
you want to assign the item. Options include:
• Today. Assigns the current date.
• Tomorrow. Assigns tomorrow’s date.
• One Week Later. Assigns the date exactly one week from
the current date.
• No Date. Removes the due date from the item.
• Choose Date. Displays the date selector from where you can
select a particular due date for the item.
Private Tap Private to hide this item when Security is turned on.
66
Page 79
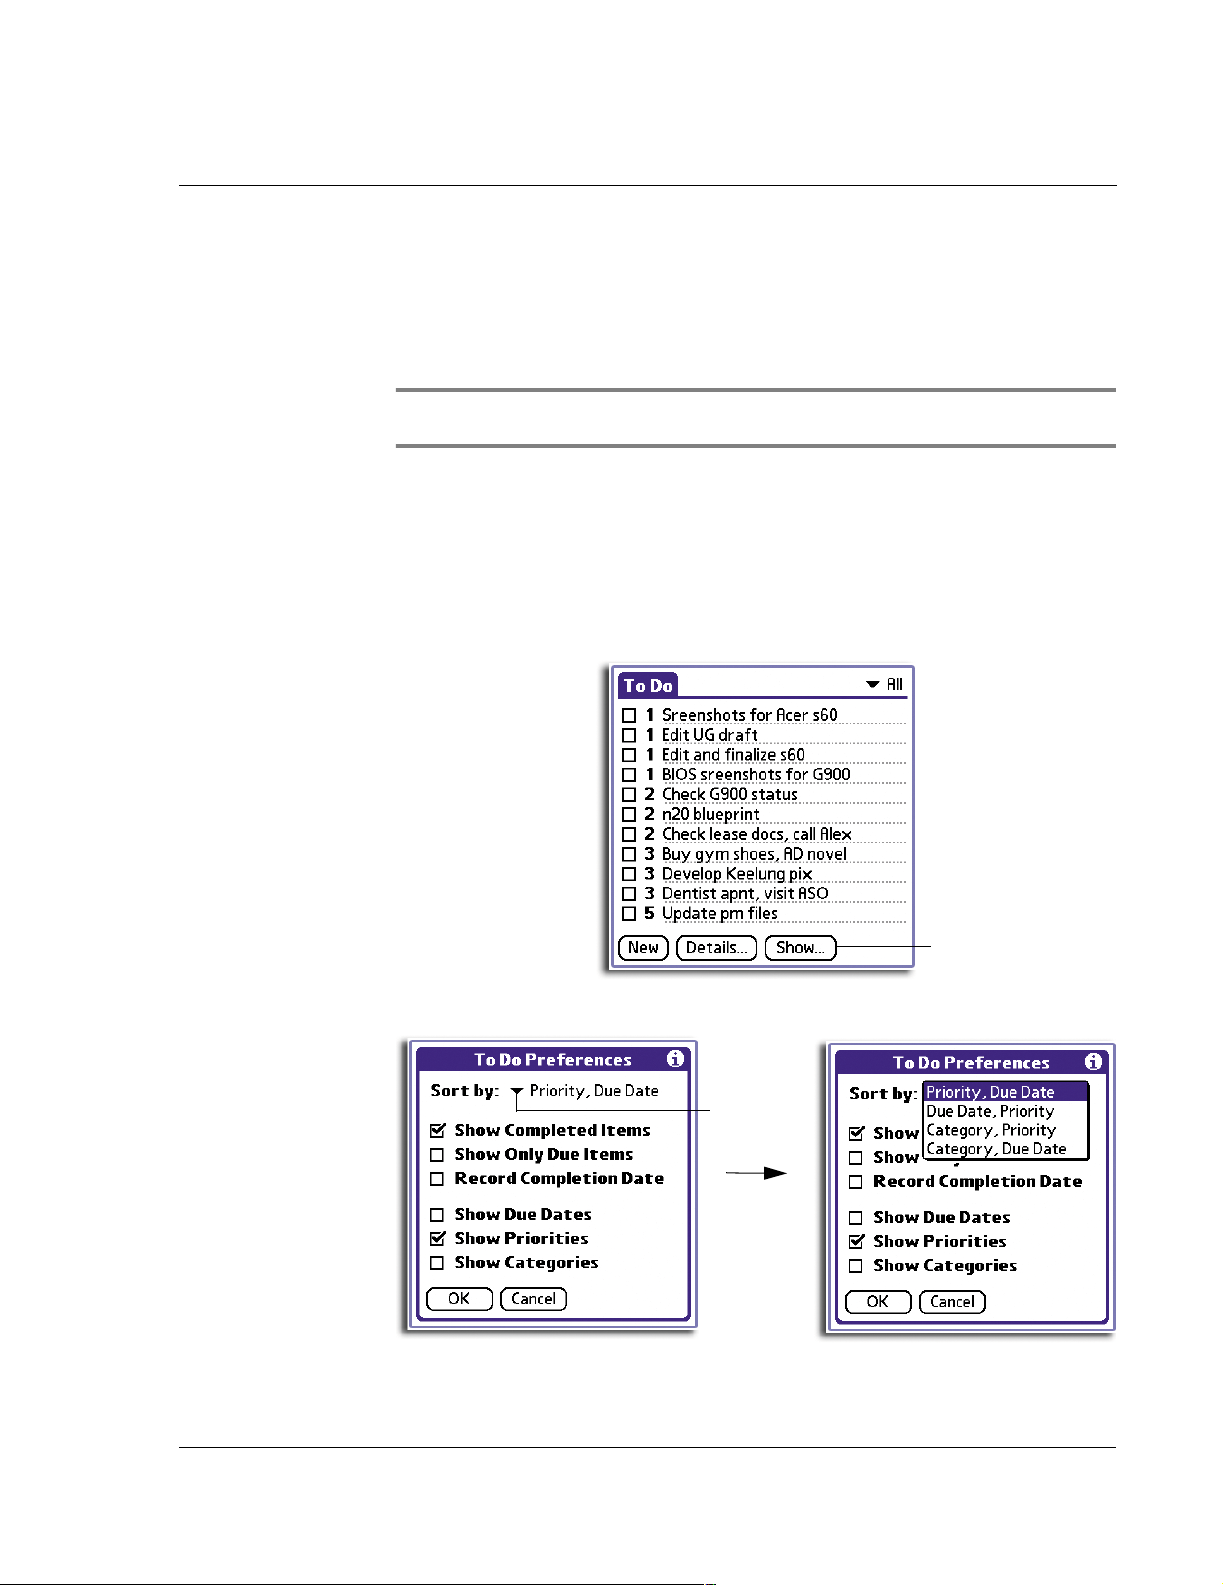
3 Working with your basic applications
Using To Do List
You can also use the Delete and Note buttons.
• Delete. Tap to delete the item.
• Note. Let you create a note. Tap the button, then enter information in the
Graffiti writing area, and tap OK.
4Tap OK.
TIP: If you turn on the Show Due Dates option in the To Do Preferences dialog box, you can
tap directly on the due date in the To Do List to open the pick list shown in step 3.
Sorting To Do items
After setting the item’s option details, you can then sort To Do List items by priority,
due date, or category.
To sort To Do List items
1 In the list screen of To Do List, tap Show.
2 Tap the Sort By pick list.
Tap here.
Tap here.
67
Page 80
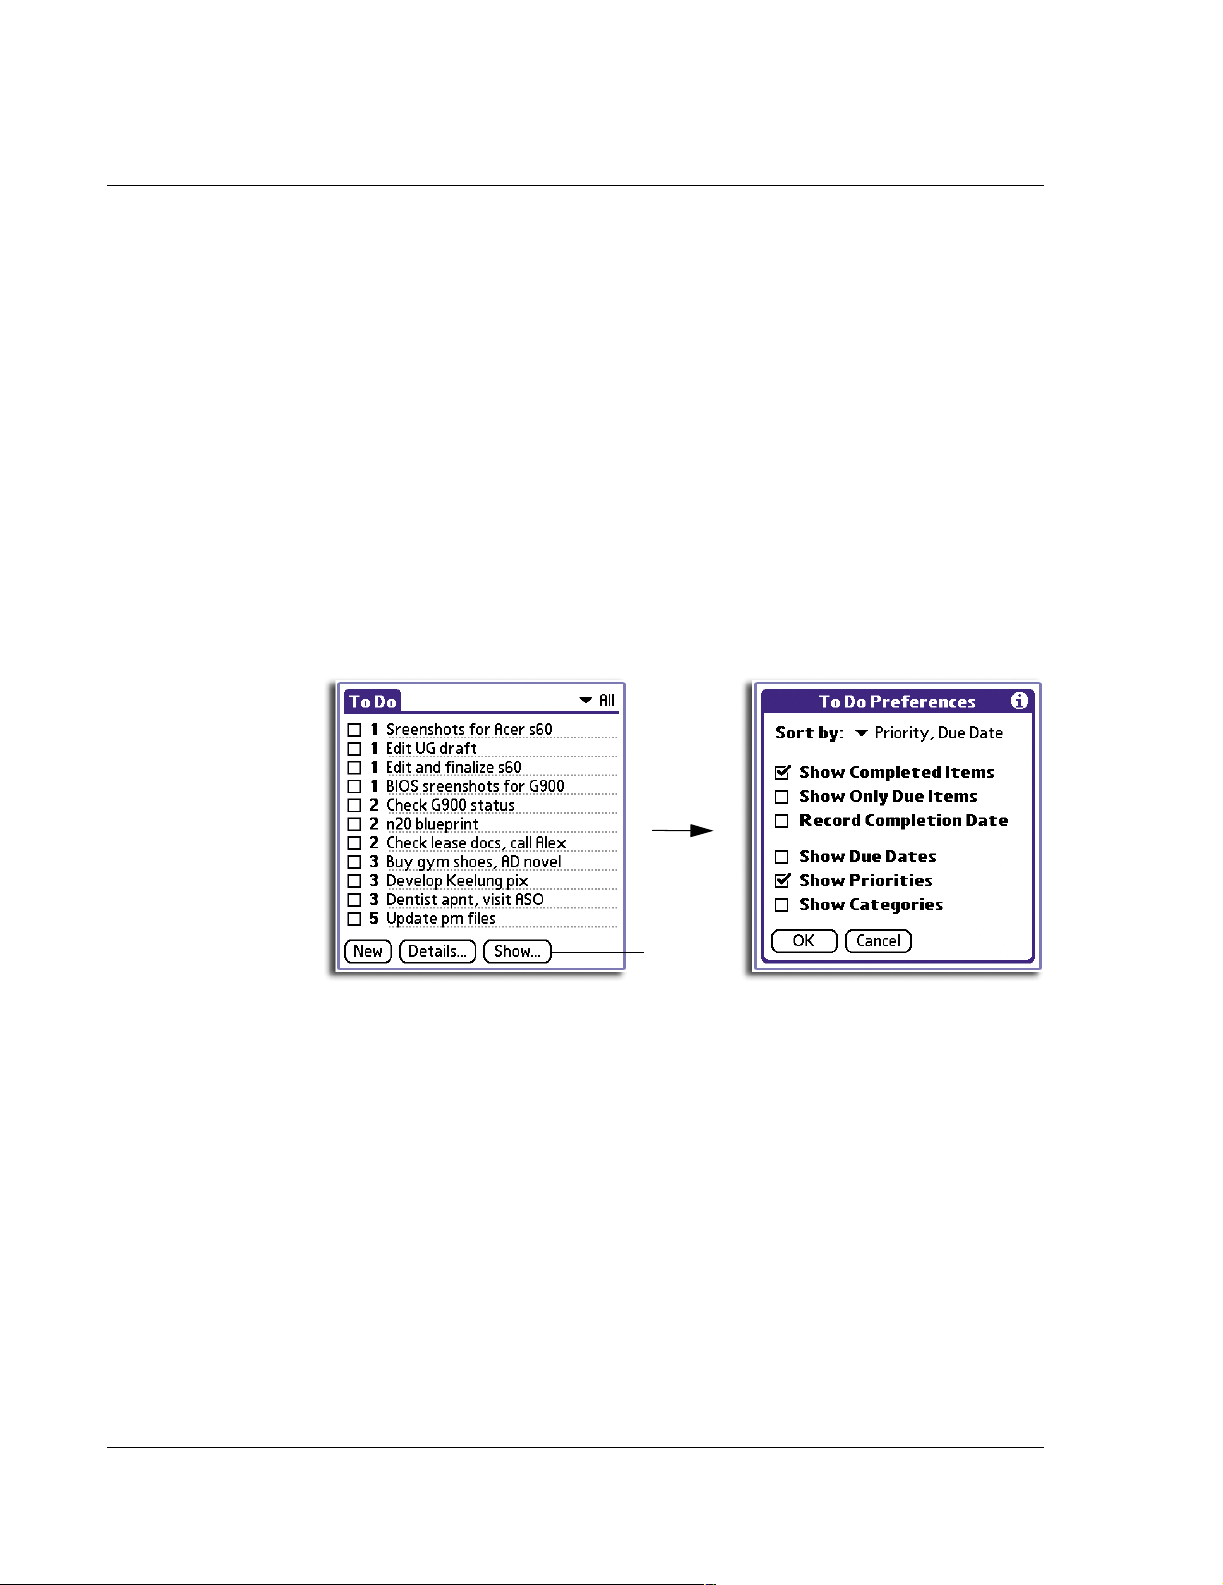
3 Working with your basic applications
Using To Do List
3 Select an option from the Sort by pick list:
Priority, Due Date Sort items by priority first, and then due date.
Due Date, Priority Sort items by due date first, and then priority
Category, Priority Sort items by category first, and then priority
Priority, Category Sort items by priority first, and then category.
4Tap OK.
Displaying completed and due items
You can have the To Do List display completed items and their completion dates, as
well as due items and their due dates.
To display completed and due items in the To Do List:
1 At the bottom of the To Do List screen, tap the Show button to display the To Do
Preferences dialog box.
Tap here.
2 In the To Do Preferences dialog box, tap any of the following settings to activate it.
Show Completed Items Displays completed items in the To Do List. If this
setting is turned off, completed To Do items disappear
from the list, but are kept in the internal memory of
your handheld. You must purge completed items to
remove them from memory.
Show Only Due Items Displays only the items that are currently due, past
due, or have no due date specified. When this setting
is active, items that are not yet due do not appear in
the list until their due date.
Record Completion Date Replaces the due date with the actual date when you
complete (check) the item. If you do not assign a due
date to an item, the completion date still appears
when you complete the item.
68
Page 81

Show Due Date Displays the due dates for items in the To Do List and
Show Priorities Displays the priority setting for each item.
Show Categories Displays the category for each item.
3Tap OK.
To Do List menus
To Do List has three menus: Record, Edit and Options.
Using Memo Pad
Creating memos
A record in Memo Pad is called a memo. A memo can contain up to 4,000 characters.
The number of memos you can store is limited only by the free space available in your
handheld’s internal memory.
When you create a new memo, you can add information to it from the Address Book
application, such as a phone number or address, using the Phone Lookup option.
Refer to "Using Phone Lookup" on page 38.
3 Working with your basic applications
Using Memo Pad
displays an exclamation mark next to items that
remain incomplete after the due date passes.
To create a new memo
1 Press the Memo Pad application button on the front panel of your handheld to
display the Memo List screen.
2Tap New.
Tap here.
69
Page 82
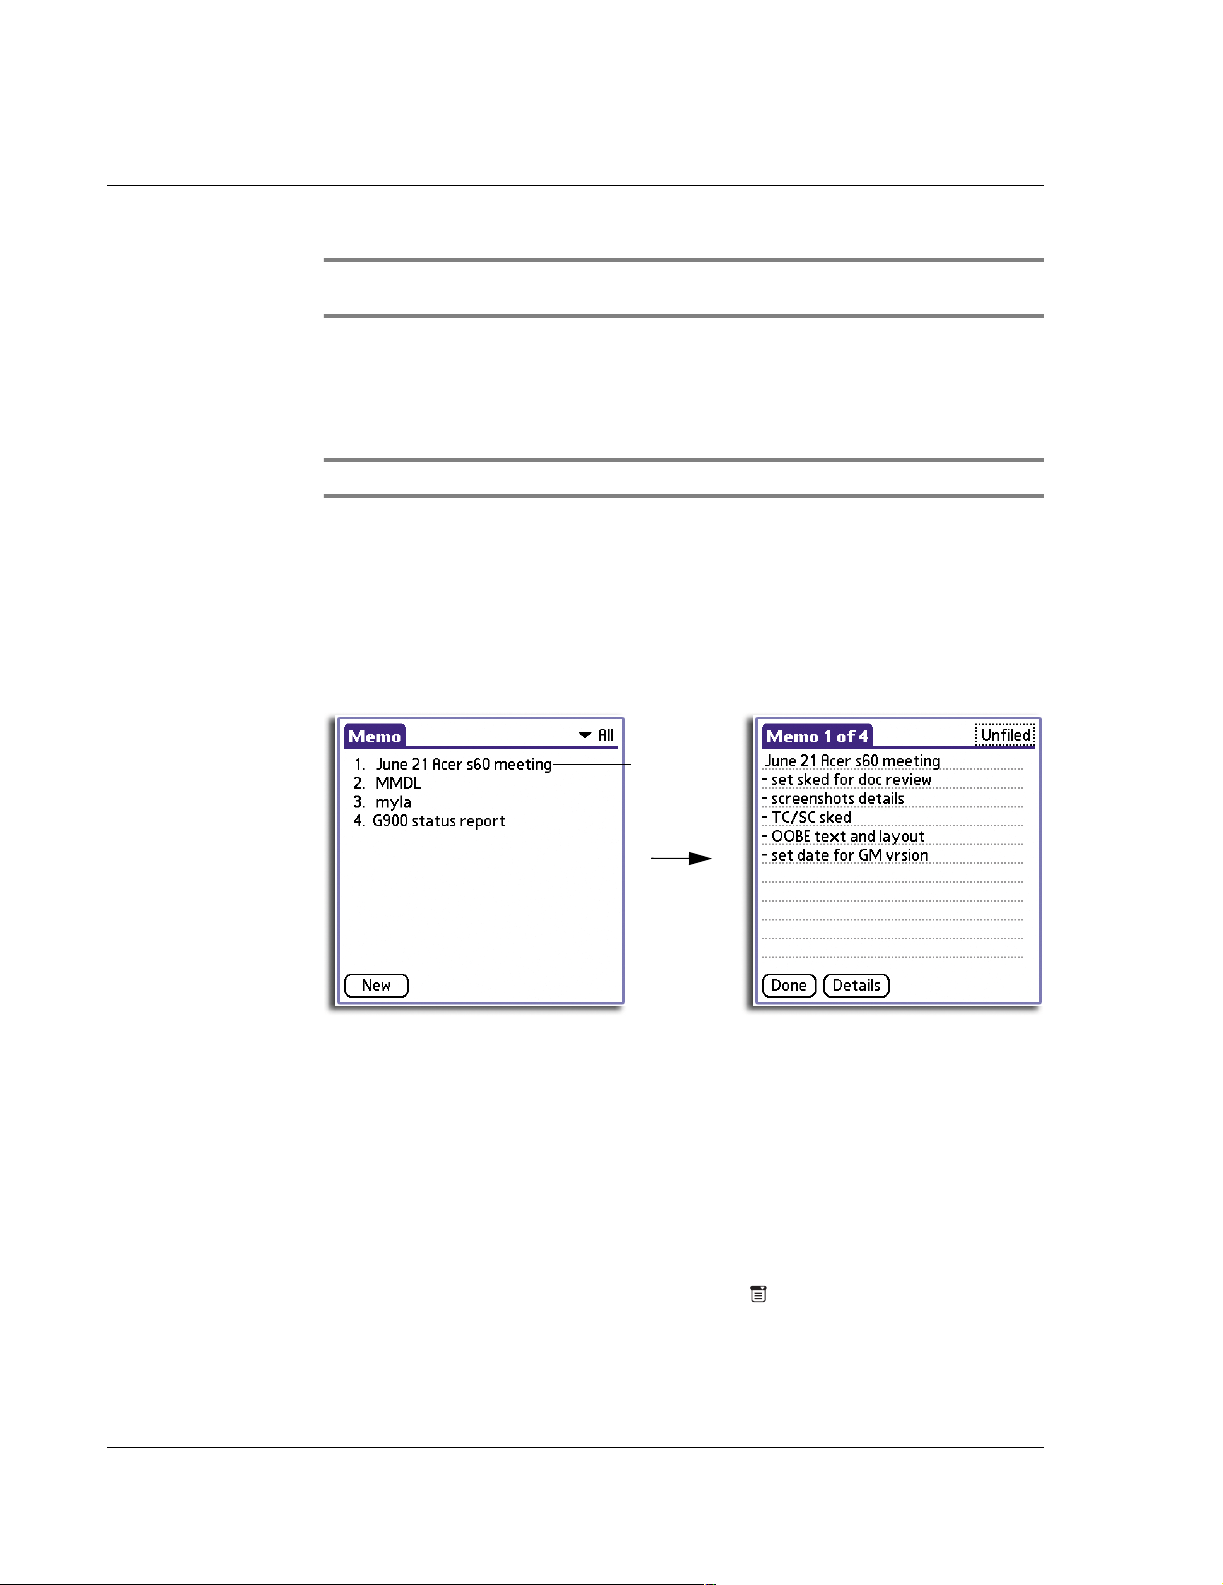
3 Working with your basic applications
Using Memo Pad
TIP: You can also create a new memo by beginning to write in the Graffiti writing area in
the Memo List screen. The first letter is automatically capitalised and begins your new memo.
3 Enter the text you want to appear in the memo. Use the Graffiti carriage return stroke
to move down to new lines in the memo.
Refer page 6 for more information on Graffiti navigation strokes.
4Tap Done.
NOTE: You can categorise memos. See "Categorising records" on page 34.
Reviewing memos
The Memo list displays the first line of a memo. This makes it easy to locate and review
your memos.
To review a memo
1 In the Memo List, tap the text of the memo.
Tap a memo
to review its
contents
2 Review or edit the text in the memo.
3Tap Done.
Sorting memos
You can use the Memo Pad Preferences menu to change the order memos appear in
the Memo List screen.
To automatically sort memos
Sort new and existing memos in numerical and then alphabetical sequence.
1 In the list screen of Memo Pad, tap the Menu icon .
2 From the Options menu, tap Preferences.
70
Page 83
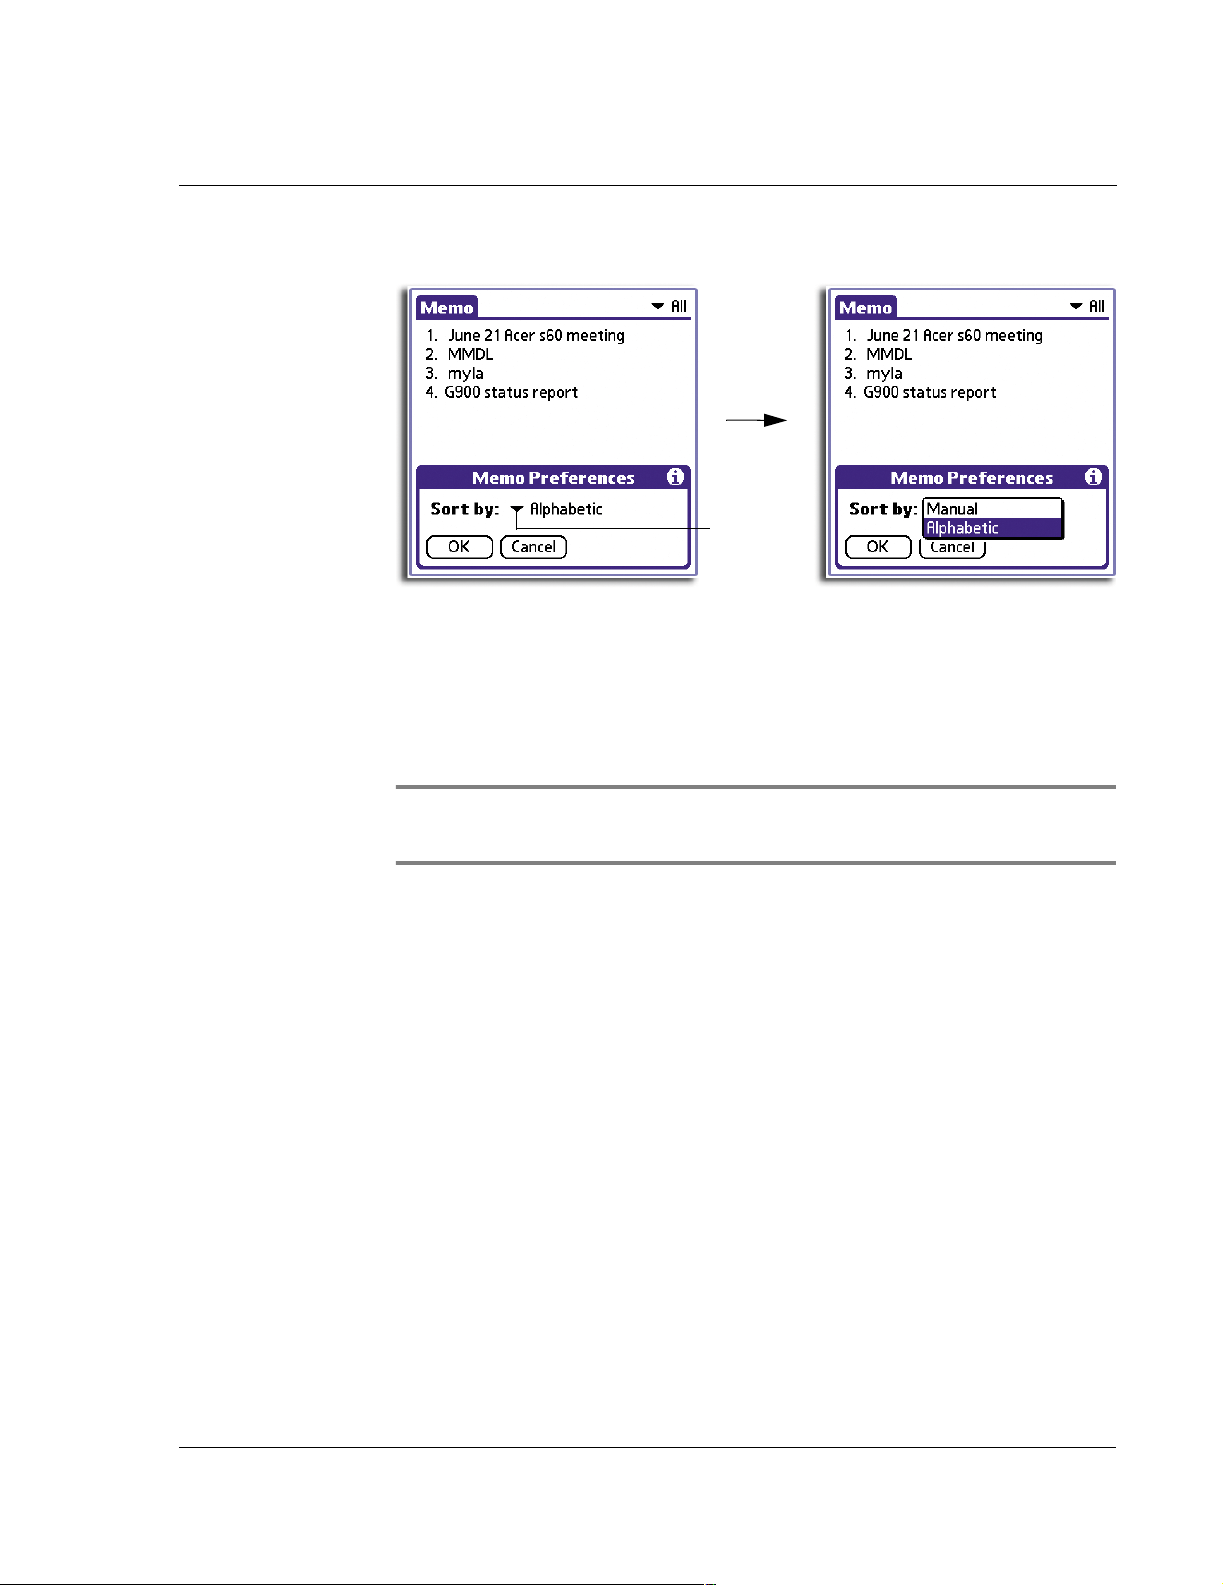
3 Working with your basic applications
Using Memo Pad
3 In the Preferences dialog box, tap the Sort by pick list and select Alphabetic.
Tap here.
4Tap OK.
To manually sort memos
Sort new memos in the sequence in which you create them.
1 In the Memo Pad Preferences dialog box, tap Manual from the Sort by pick list.
2 In the list screen, tap and drag a memo to a new location in the list.
TIP: To display the list of your memos on your computer as you arranged them manually on
your handheld, open Memo Pad in the Palm Desktop software, click List By, and select Order
on Handheld.
Memo Pad menus
Memo Pad menus are shown here for your reference only. Features that are not
explained in this section are discussed elsewhere in this User Manual.
Memo Pad has three menus: Record, Edit and Options.
71
Page 84
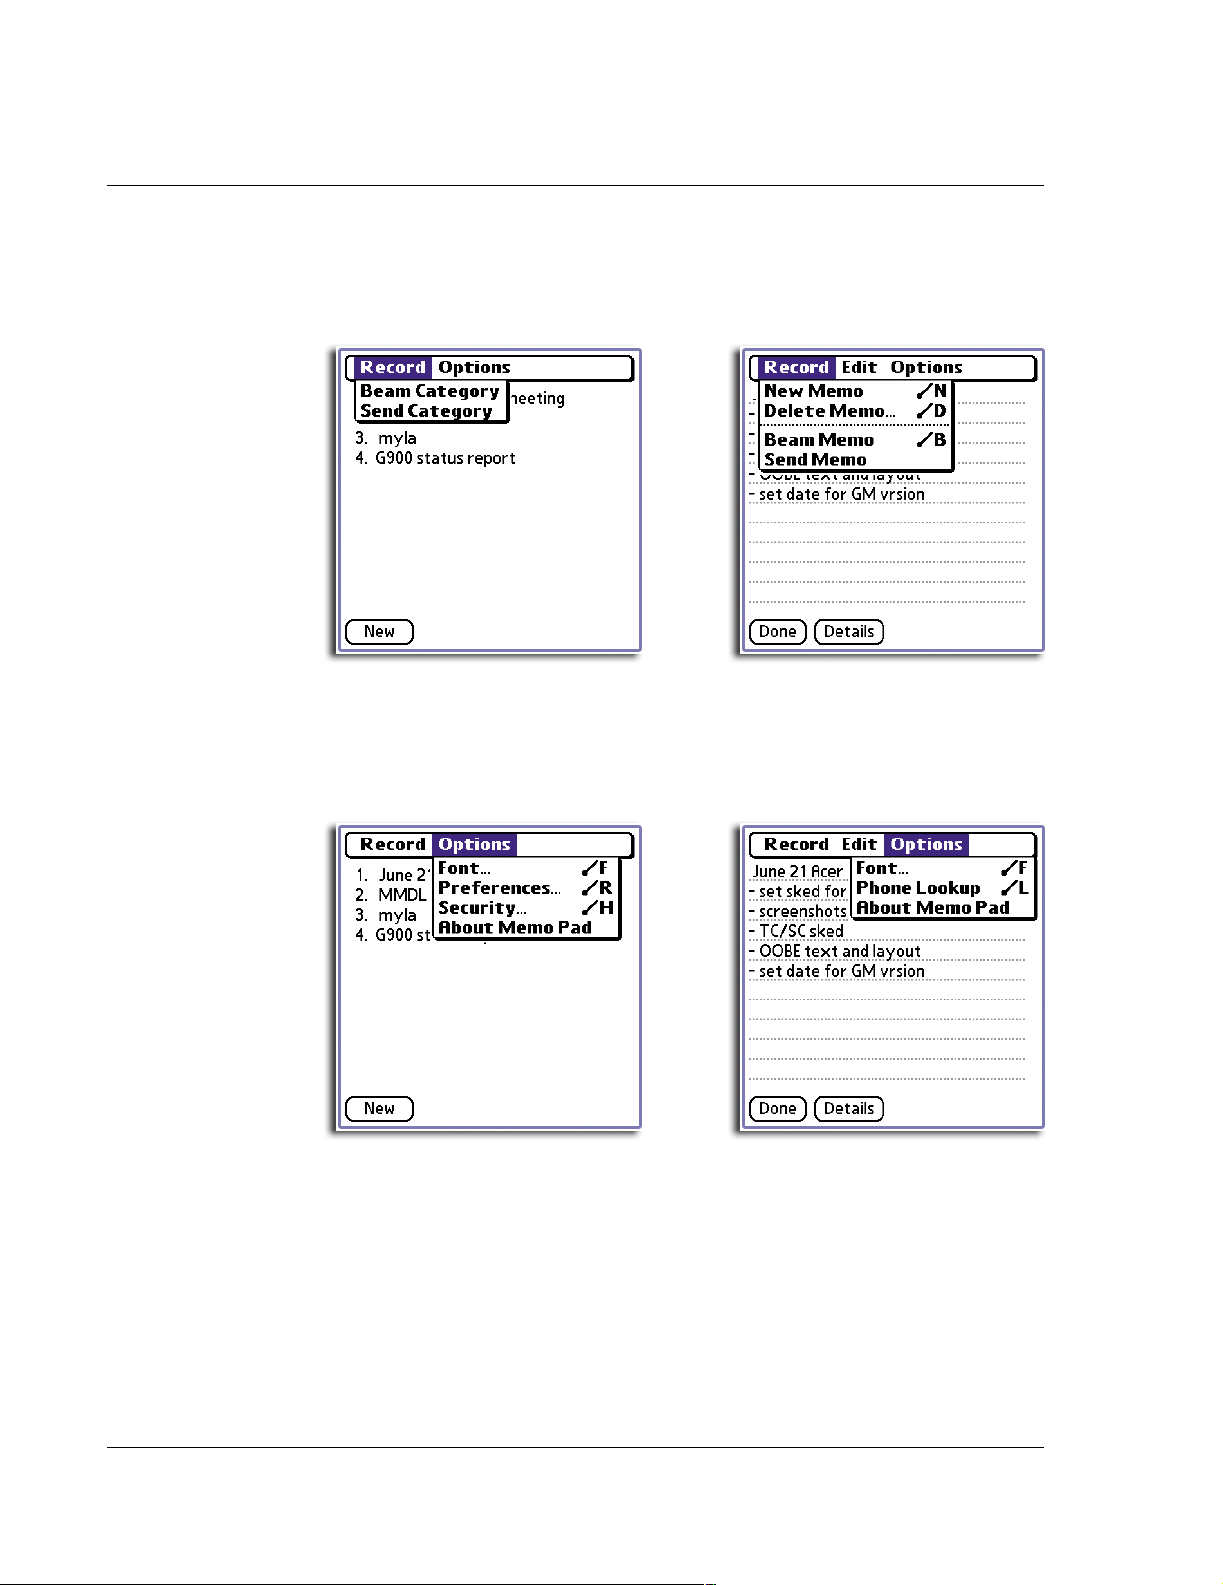
3 Working with your basic applications
Using Memo Pad
Record menus
The Record menu differs depending on whether you are viewing it from the Memo
List screen or from an open memo.
Memo List
Open memo
Options menus
The Options menu differs depending on whether you are viewing it from the Memo
List screen or from an open memo.
Memo List
Open memo
72
Page 85

Using Calculator
Using the Calculator buttons
The Calculator includes several buttons to help you perform calculations.
3 Working with your basic applications
Using Calculator
Clears the entire calculation and enables you to begin a fresh
calculation.
Clears the last number you entered. Tap this button if you make a
mistake while entering a number in the middle of a calculation.
This button enables you to reenter the number without starting the
calculation over.
Places the current number in memory. Each new number you enter
with the M+ button is added to the total stored in memory. The
number that you add can be either a calculated value or any
number you enter by pressing the number buttons. Tapping this
button has no effect on the current calculation (or series of
calculations); it merely places the value into memory until it is
recalled.
Recalls the total stored value from memory and inserts it in the
current calculation.
Clears any value that is stored in the Calculator memory.
Calculates the square root of a number. Enter a number then tap
this button.
Toggles the current number between a negative and positive value.
If you want to enter a negative number, enter the number first and
then tap the +/- button.
Displaying recent calculations
The Recent Calculations command lets you review the last series of calculations and
helps you confirm a chain of calculations.
To display recent calculations
1 Tap the Menu icon to display the menu bar.
2 Tap Options.
3 Tap Recent Calculations.
73
Page 86
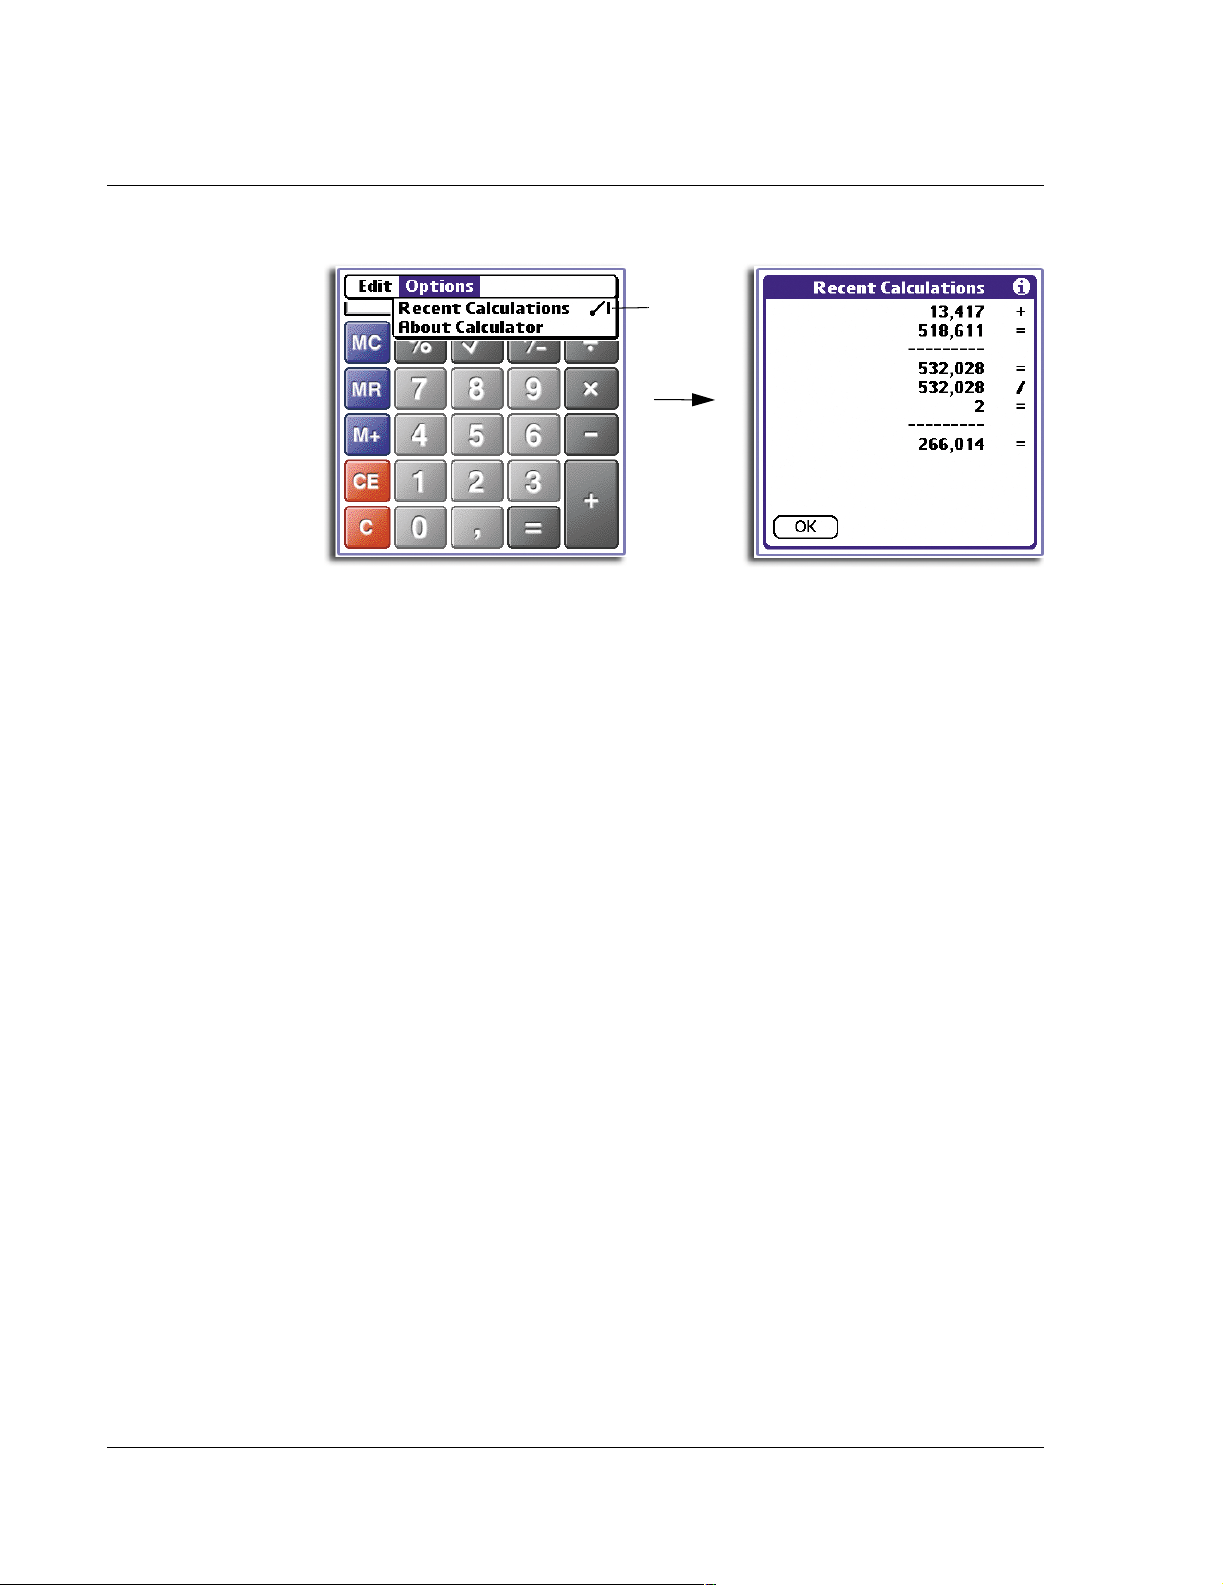
3 Working with your basic applications
Using Calculator
4 When you have finished reviewing the calculations, tap OK.
Calculator menus
Calculator has two menus: Edit and Options.
Tap here.
74
Page 87

4 Working with your supplementary applications
Installing handheld applications
4 Working with your
supplementary applications
Your handheld includes several supplementary applications that provide innovative
features to make your handheld a functional everyday companion:
•Clock
• AudioBox *
•Recorder *
• WalkReader
This chapter explains how to use your handheld’s supplementary applications.
* These applications are only available for Acer s60.
Installing handheld applications
By default, only the Service Launcher and Filer applications are factory-installed in
your handheld. To use the other handheld applications you need to download them
to your computer using the Acer s50 and s60 Handhelds Installation CD, then perform
a HotSync operation to install them to your handheld.
To install supplementary handheld applications
Downloading AudioBox and Recorder is only useful for Acer s60 handheld users.
These two applications will not run even if installed in an Acer s50 handheld.
1 Exit any open programs, including those that run at startup such as Microsoft
and disable any virus-scanning software.
2 Insert the Acer s50 and s60 Handhelds Installation CD into the computer’s
CD-ROM drive.
3 Select the language of choice.
4 Select your handheld model.
5 Click Install Supplementary Applications.
6 Click Install Handheld Applications.
7 Select the check box before the application(s) you want to install.
8 If you are installing Clock, WalkReader, Backup, or PhotoWiz, click Execute to start the
installation process.
If you are installing AudioBox or Recorder, on the confirmation prompt that appears
after clicking Execute, click Continue to start the installation process.
Clicking the Execute button will transfer all selected application(s) to the
Palm Desktop Install Tool.
• PhotoWiz
• Filer
• Service Launcher
• Backup
®
Office,
75
Page 88

4 Working with your supplementary applications
Using Clock
9 Perform a HotSync operation to install selected application(s) to your handheld.
For more information on performing a HotSync operation, refer to "9 Exchanging and
updating data using HotSync operations" on page 213.
Using Clock
Clock makes it easy for you to check the date and time as well as set alarm reminders
for your schedule. It also serves as a handy timer for time-critical activities.
Clock modes
Clock operates in three modes: City Clock, Big Clock and Timer, each one designed to
suit a particular activity in your daily schedule.
To switch between Clock modes
1 In the active Clock screen, tap the mode pick list on the upper-right corner to display
the mode options.
Tap here.
2 Select a Clock mode.
Clock shows the main screen of the selected mode.
76
Page 89

4 Working with your supplementary applications
Using Clock
City Clock mode
main screen (default mode)
Big Clock mode
main screen
Timer mode
main screen
City Clock mode
City Clock serves three main functions: date and time display for a local city, date and
time display for two other preselected cities (default: New York and Tokyo) and an
alarm function.
77
Page 90

4 Working with your supplementary applications
Using Clock
Local time and
date display
Time and date
display for two
preselected cities
Time display is in hh:mm:ss format. There are two possible display modes: 12H AM/PM
(default) and 24H. Refer to "Preferences" on page 89 for more information.
Date display is shown in mm/dd/yyyy format. Current weekday is also shown.
You can set up to three alarm reminders. When an alarm reminder is set, the
corresponding alarm indicator on the City Clock main screen is highlighted. Refer to
"Alarm setting" on page 83 for more information.
Alarm icon
Alarm indicators
Date and time display
The City Clock mode shows the date and time display for the local city. This is based on
the current settings under the Date & Time panel of Preferences. Refer to page 242 for
more information.
Display for two other preselected cities is also shown. By default, the date and time
for New York and Tokyo is displayed.
Editing the city display and city list
You can select a different city to display, edit the details of a current city entry or add
a new city to the current city list.
To change the preselected city display:
1 Tap the city pick list to display the available city options.
2 Tap the city you want to display.
78
Page 91

4 Working with your supplementary applications
Using Clock
Tap a city pick list.
NOTE: When "DST" is visible, the displayed city has a preset Daylight Saving Time
information.
To edit city details:
1 Tap a city pick list to display the current city list.
2 Select Edit Cities on the bottom of the city list to display the Edit Cities screen.
Tap a city pick list.
3 In the Edit Cities screen, tap the city entry you want to edit.
The City Details screen for the selected entry appears.
Tap here.
79
Page 92
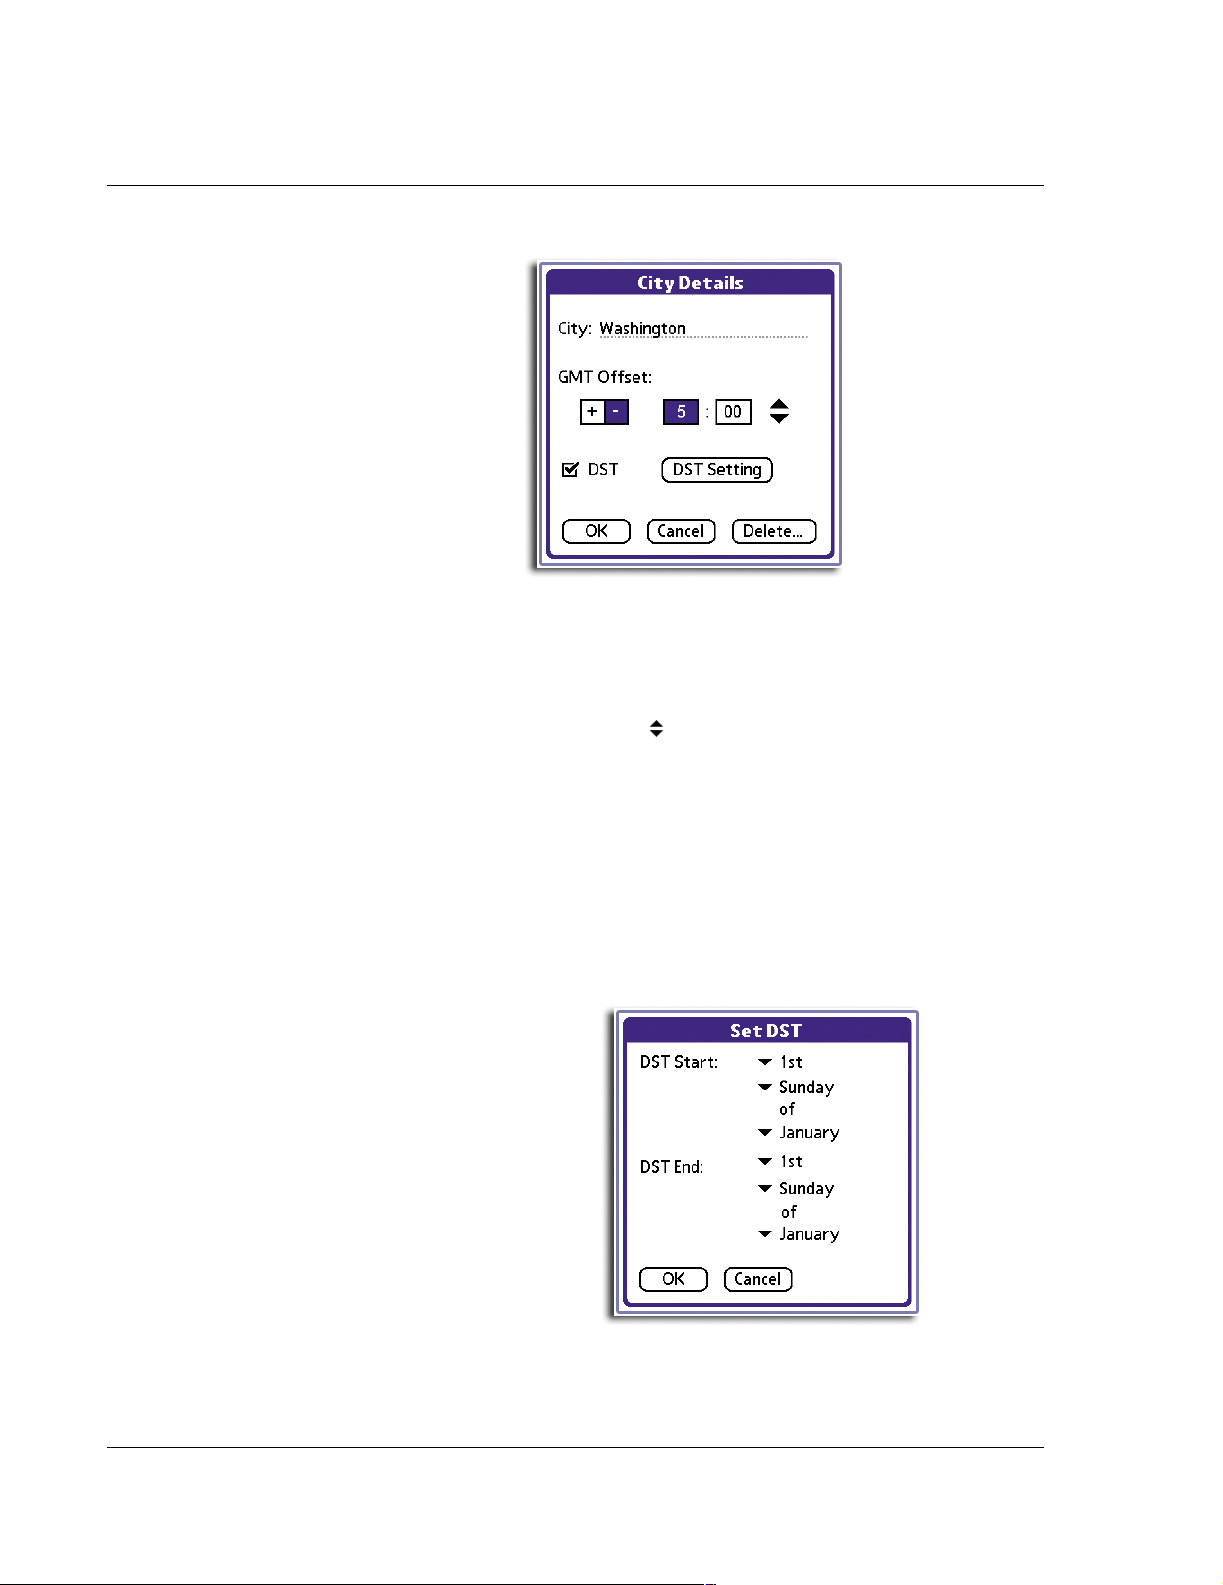
4 Working with your supplementary applications
Using Clock
4 Edit the city details.
City Defines the city name.
GMT Offset Defines the GMT (Greenwich Mean Time) offset value. The first
number frame represents the hour value from 1 to 12. The second
number frame represents the minute value. Tap the individual
frames then use the control to set the values. Options include 00,
15, 30, and 45.
DST Tap the check box to apply DST information (if available) to the
selected city. If no DST information is available for the selected city,
tapping the check box will automatically display the Set DST screen.
DST Tap the check box to apply DST information (if available) to the
selected city. If no DST information is available tapping the check
box will automatically display the Set DST screen.
DST Setting Tap to define the DST settings. Follow the steps below:
1 Tap DST Setting to display the Set DST screen.
2 Tap the pick lists to define the DST information.
3 Tap OK.
80
Page 93
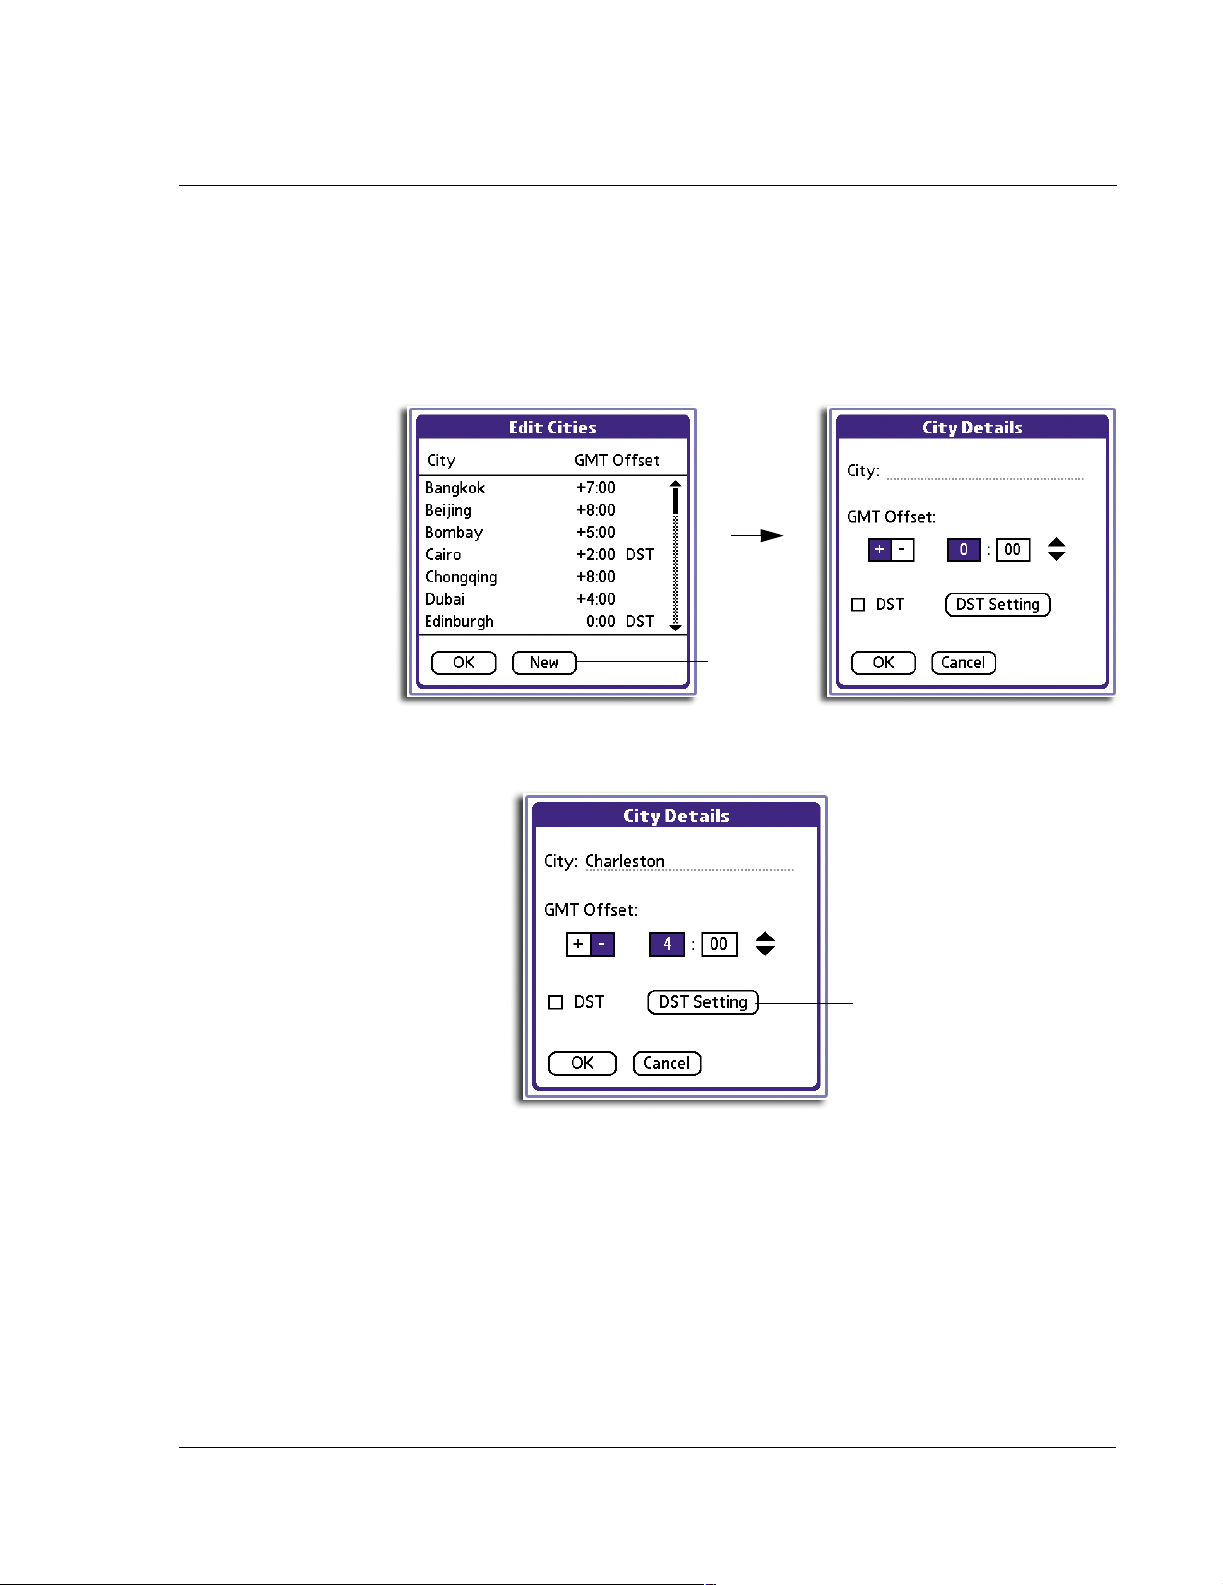
4 Working with your supplementary applications
Using Clock
5 Tap OK on the City Details screen to apply the new city settings.
To add a new city to the current city list:
1 Tap a city pick list to display the current city list.
2 Select Edit Cities on the bottom of the city list to display the Edit Cities screen.
3 In the Edit Cities screen, tap New to display a blank City Details screen.
Tap here.
4 Define the detail settings for the new city entry.
You can tap DST Setting to define DST information for the new city entry.
Tap here to set DST information.
81
Page 94

4 Working with your supplementary applications
Using Clock
5 Tap OK on the City Details screen to add the new city to the current city list.
New city entry
6 Tap OK on the Edit Cities screen to revert to the City Clock main screen.
To delete a city from the current city list:
1 Tap the city pick list to display the current city list.
2 Select Edit Cities on the bottom of the city list to display the Edit Cities main screen.
3 Tap the city entry you want to delete.
4 Tap Delete to display the Delete City dialog box.
Tap here.
82
Page 95

4 Working with your supplementary applications
Using Clock
5Tap OK.
If the city deleted is one of the two current preselected cities in the City Clock main
screen, the deleted city will be replace by the local city defined in the system
preferences settings.
Local city
Alarm setting
City Clock enables you to set an alarm to remind you of scheduled activities.
To set an alarm
1 In the City Clock main screen, tap the Alarm icon to display the Alarm Settings
screen.
Tap here.
2 Define the alarm settings as follows:
83
Page 96
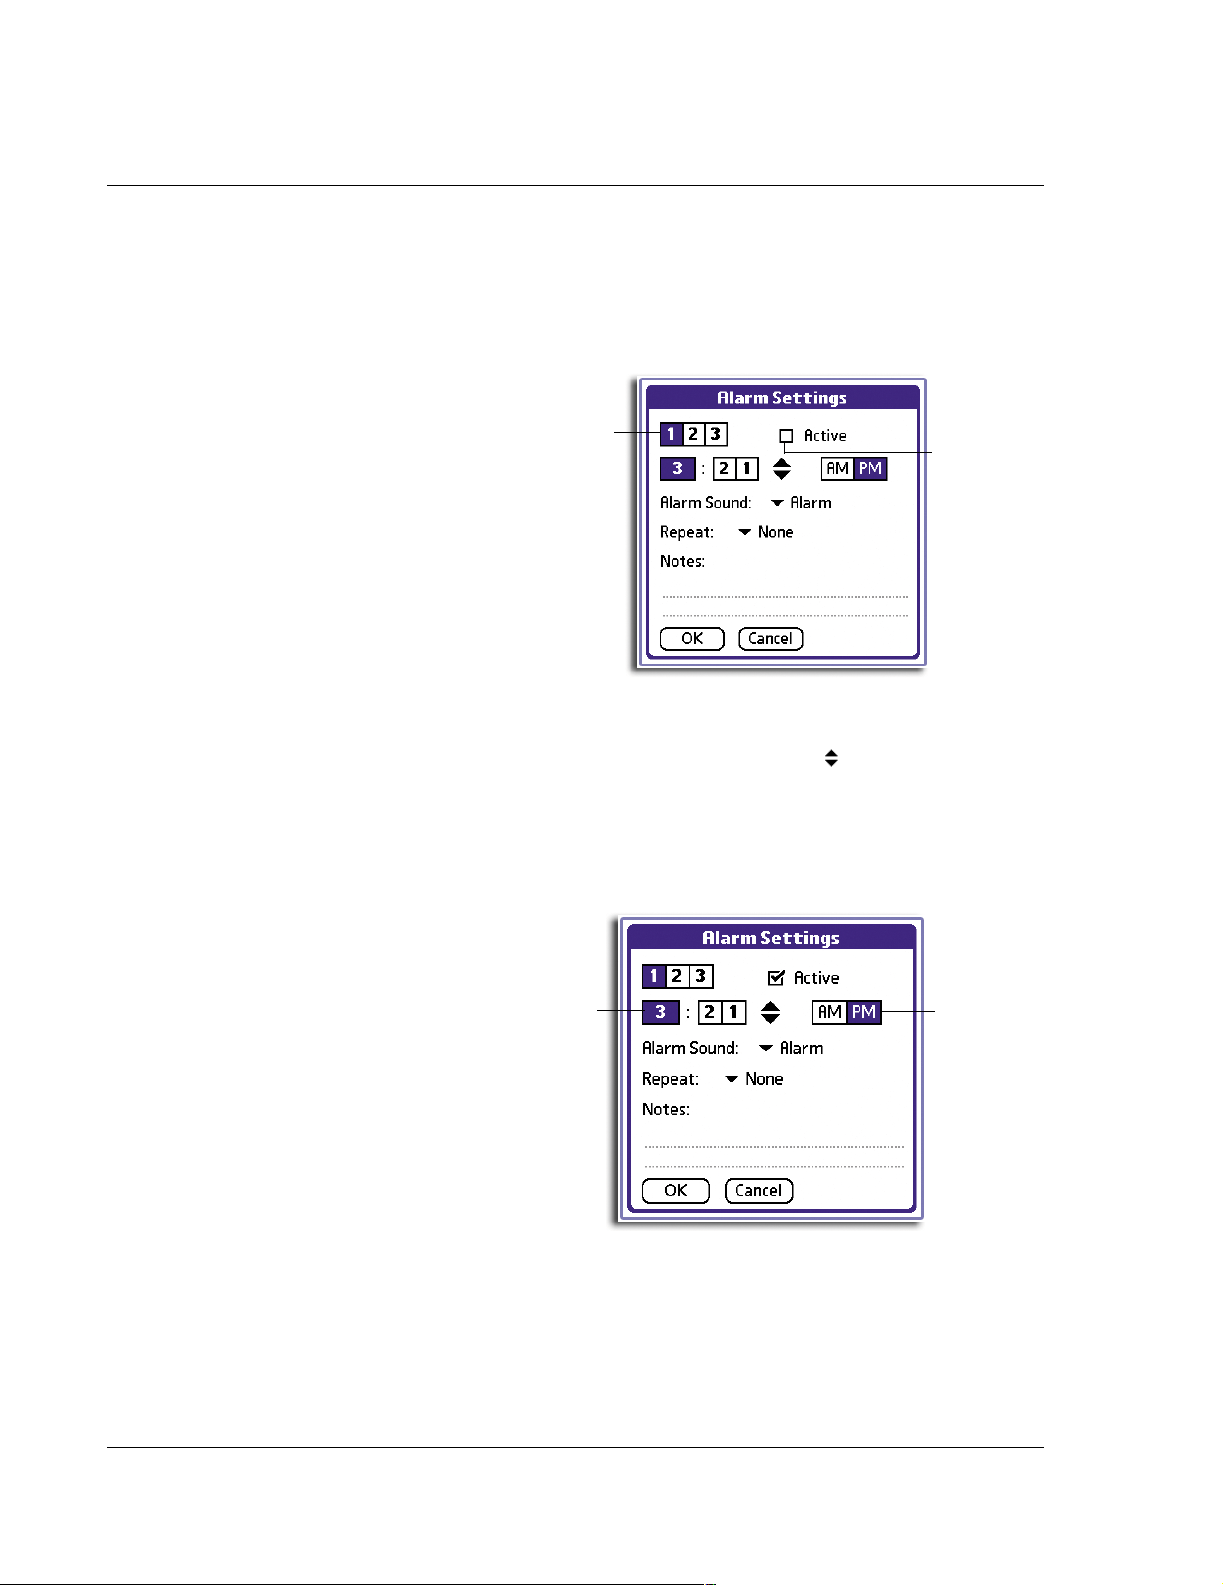
4 Working with your supplementary applications
Using Clock
Alarm indicator Set the code for the alarm reminder. Follow the steps below:
1 Tap a number frame to set the alarm indicator.
2 Tap the Active check box to enable it.
Tap here
to select
the alarm
indicator.
Alarm time Define when the alarm will be activated. Follow the steps
below:
1 Tap the number frame then use the control to set the
values.
The first number frame represents the hour value (1 to 12). The
second and third number frame represents the minute options.
Tap here
to activate
the alarm
indicator.
2 If the active time display format is 12H, tap an option from
the AM/PM setting.
Tap the hour
/minute
frames to set
alarm time.
If applicable,
select an
AM/PM
option.
84
Page 97

4 Working with your supplementary applications
Using Clock
Alarm Sound Define the background sound to use when alarm is activated.
Tap the pick list to display the options which include Alarm,
Alert, Bird, Concerto, Phone, Sci-Fi, and Wake-up.
NOTE: You can install MIDI files in your handheld that you can use
as an alarm sound. To install MIDI files, follow the instructions on
the "To install add-on applications on your handheld" section on the
Acer s50 and s60 Handhelds Quick Guide.
Repeat Define how often will the alarm be activated.
Tap the pick list to display the options which include:
• None. The alarm will only be activated once.
• Daily. The alarm will be activated everyday.
• Weekly. The alarm will be activated once every week
based on the selected weekday.
85
Page 98
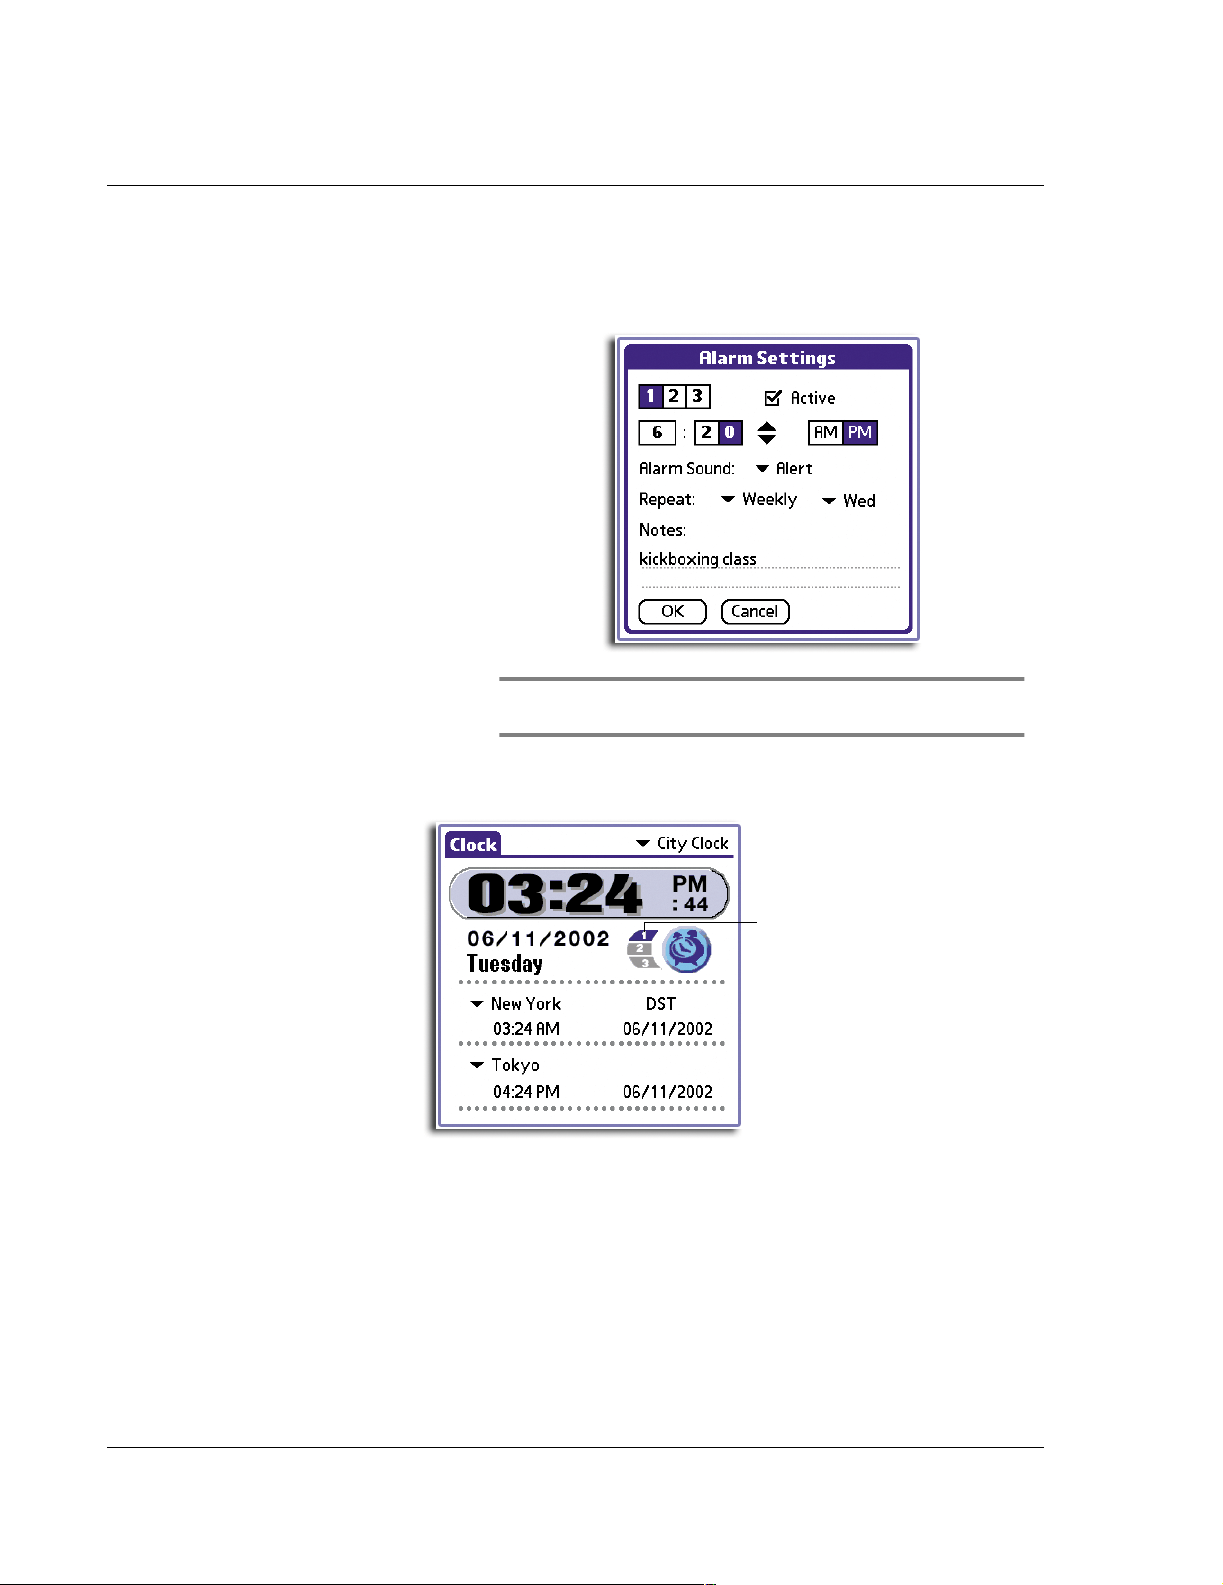
4 Working with your supplementary applications
Using Clock
Notes Enter a brief description about the alarm reminder. This
description will appear on the Reminder page when the alarm
is activated.
NOTE: Refer to "6 Using the Attention Manager" on page 173 for
more information on the Reminder page.
3Tap OK.
The set alarm reminder is denoted
by a highlighted indicator on the
City Clock main screen.
Big Clock mode
The large time display in Big Clock mode makes it the mode of choice for those who
prefer the visual manner of displaying time. The three pointers—hours, minutes and
seconds, function just like a physical clock or watch.
86
Page 99

4 Working with your supplementary applications
Using Clock
Depending on the time of the day, this mode also displays a background picture: a
bright, sunny scene from 06:00:00 to 17:59:59, and a starry, moonlit skyscape from
18:00:00 to 05:59:59.
Timer mode
In Timer mode, you can use your handheld as a stopwatch to measure time span for
time-critical events such as a sports competition, a time-balancing experiment (or even
in monitoring that east-to-west overseas call to your loved ones. Mind that phone bill
please!). Time display is shown in hh:mm:ss format.
To work in Timer mode
1 Tap to start timing an event. The timer will start to count and the button will
changed to .
87
Page 100

4 Working with your supplementary applications
Using Clock
2Tap to stop and reset the timer.
Clock menu
The Clock menu shown here is for your reference only. Features that are not explained
in this section are discussed elsewhere in this User Manual.
Clock has one only menu: Options.
For information on how to open and use menus, refer to "Using menus and menu
commands" on the Acer s50 and s60 Handhelds Quick Guide.
Options menu
88
 Loading...