

Page 1

I
imedia S3811
Service Guide
PRINTED IN TAIWAN
Page 2

II
Revision History
Please refer to the table below for the updates made on imedia S3811 series guide.
Date Chapter Updated
Page 3

III
Copyright
Copyright © 2010 by Acer Incorporated. All rights reserved. No part of this publication may be
reproduced, transmitted, transcribed, stored in a retrieval system, or translated into any language or
computer language, in any form or by any means, electronic, mechanical, magnetic, optical, chemical,
manual or otherwise, without the prior written permission of Acer Incorporated.
Disclaimer
The information in this guide is subject to change without notice.
Acer Incorporated makes no representations or warranties, either expressed or implied, with respect to
the contents hereof and specifically disclaims any warranties of merchantability or fitness for any
particular purpose. Any Acer Incorporated software described in this manual is sold or licensed "as is".
Should the programs prove defective following their purchase, the buyer (and not Acer Incorporated, its
distributor, or its dealer) assumes the entire cost of all necessary servicing, repair, and any incidental or
consequential damages resulting from any defect in the software.
Page 4
IV
Conventions
The following conventions are used in this manual:
SCREEN
MESSAGES
NOTE
Denotes actual messages that appear
on screen.
Gives bits and pieces of additional
information related to the current
topic.
WARNING
CAUTION
IMPORTANT
Alerts your to any damage that might
result from doing or not doing specific
actions.
Gives precautionary measures to
avoid possible hardware or software
problem.
Reminds you to do specific actions
relevant to the accomplishment of
procedures.
Page 5

V
Preface
Before using this information and the product it supports, please read the following general information.
1. This Service Guide provides you with all technical information relating to the BASIC
CONFIGURATION decided for Acer's "global" product offering. To better fit local market
requirements and enhance product competitiveness, your regional office MAY have decided to
extend the functionality of a machine (e.g. add-on card, modem, or extra memory capability).
These LOCALIZED FEATURES will NOT be covered in this generic service guide. In such cases,
please contact your regional offices or the responsible personnel/channel to provide you with
further technical details.
2. Please note WHEN ORDERING FRU PARTS, that you should check the most up-to-date
information available on your regional web or channel. If, for whatever reason, a part number
change is made, it will not be noted in the printed Service Guide. For ACER-AUTHORIZED
SERVICE PROVIDERS, your Acer office may have a DIFFERENT part number code to those
given in the FRU list of this printed Service Guide. You MUST use the list provided by your regional
Acer office to order FRU parts for repair and service of customer machines.
Page 6

VI
Introducing the Motherboard.................................................................................1
Features...................................................................................................2
Mainboard Components........................................................................4
Block Diagram.........................................................................................5
imedia S3811 .........................................................................................6
I/O Port Introduction..............................................................................9
Hardware Specifications and Configurations......................................12
Using BIOS...............................................................................................................16
Setup Utility Menus..............................................................................17
Product Information.............................................................................19
Standard CMOS Features......................................................................20
Advanced BIOS Features.......................................................................22
Advanced Chipset Features..................................................................26
Integrated Peripherals..........................................................................27
Power Management Setup..................................................................28
PC Health Status....................................................................................30
Frequency/Voltage Control..................................................................31
BIOS Security Features..........................................................................32
Machine Disassembly and Replacement................................................................34
General Information.............................................................................35
Standard Assembly Process..................................................................36
Standard Disassembly Process..............................................................50
Machine Disassembly and Replacement................................................................63
Power-On Self-Test (POST)...................................................................64
POST Error Messages List......................................................................68
Error Symptoms List..............................................................................70
Undetermined Problems......................................................................74
Jumper and Connector Information......................................................................75
FRU (Field Replaceable Unit) List.........................................................................89
Exploded Diagram................................................................................89
FRU List..................................................................................................93
Page 7

1
Introducing the Motherboard
Introduction
Thank you for choosing the H57D02 motherboard. This motherboard is a high performance, enhanced
function motherboard designed to support the LGA1156 socket for 2nd Generation IntelR CoreTM
Family/PentiumR/CeleronR processors for high-end business or personal desktop markets.
This motherboard is based on IntelR H57 Chipset for best desktop platform solution. H57 is a single-chip,
highly integrated, high performance Hyper-Threading peripheral controller, unmatched by any other single
chip-device controller. This motherboard supports up to 16 GB of system memory with dual channel DDR3
1333/ 1066 SDRAM. Two PCI are supported, fully compliant with PCI rev 2.2 specification at 33MHz. High
resolution graphics via PCI Express x16 slot, intended for Graphics Interface, is fully compliant to the PCI
Express Base Specification revision 2.0. In addition, one PCI Express slot is supported. It implements an
EHCI (Enhanced Host Controller Interface) compliant interface that provides fourteen USB 2.0 ports (six
USB 2.0 ports at the back panel and four USB 2.0 headers support additional eight USB 2.0 ports).
The motherboard is equipped with advanced full set of I/O ports in the rear panel, including PS/2 mouse
and PS/2 keyboard connectors, one HDMI port, one D_sub (VGA) port, one Lan port, six USB 2.0 ports,
and audio jacks for microphone, line-in and line-out. In addition, this motherboard supports two SATA
6Gb/s connectors .
Chapter1
Page 8

2
Features
Operating system
Windows®7 Home Premium x86/x64, Windows® 7 Home Basic x86, Windows®7 Starter x86
Processor
The motherboard uses an LGA1156 type of socket that carries the following
Features:
l Accommodates 2nd Generation IntelR CoreTM Family / PentiumR / CeleronR processors
l Supports “Hyper-Threading” technology CPU
l One PCI Express x16 Gen2 port supporting up to 5 GB/s direction peak bandwidth
“Hyper-Threading” technology enables the operating system into thinking it’s hooked up to two processors,
allowing two threads to be run in parallel, both on separate “logical” processors within the same physical
processor.
Chipset
The Intel H57 Express Chipset is a single-chip with proven reliability and performance.
l Support one PCI Express slot
l Integrated two SATA 3.0 Gb/s Host Controller
l Fourteen USB 2.0 ports supported
l Serial Peripheral Interface (SPI) support
l Integrated Graphics Support with PAVP 1.5
l • Intel® High Definition Audio Controller
Memory
l Supports DDR3 1333/1066 DDR3 SDRAM with Dual-channel architecture
l Accommodates four unbuffered DIMMs
l Up to 4 GB per DIMM with maximum memory size up to 16 GB
Onboard LAN
The onboard LAN provides the following features:
l Supports PCI ExpressTM 1.1
l Integrated 10/100 /1000 transceiver
l Wake-on-LAN and remote wake-up support
Audio
l 5.1 Channel High Definition Audio Codec
l ADCs support 44.1k/48k/96kHz sample rate
l Meets Microsoft WLP 3.10 Vista premium and mobile PCs audio requirements
l Direct Sound 3DTM compatible
Expansion Options
The motherboard comes with the following expansion options:
l One PCI Express x16 slot for Graphics Interface
l One PCI Express x1 slot
l Two SATA connectors
Page 9

3
Integrated I/O
The motherboard comes with the following expansion options:
l Two PS/2 ports for mouse and keyboard
l One VGA port
l One HDMI port
l Six USB ports
l One LAN port
l Audio jacks for microphone, line-in and line-out
BIOS Firmware
The motherboard uses AMI BIOS that enables users to configure many system features including the
following:
l Power management
l Wake-up alarms
l CPU parameters
l CPU and memory timing
l Graphic parameters
The firmware can also be used to set parameters for different processor clock speeds.
1. Some hardware specifications and software items are subject to change
without prior notice.
2. Due to chipset limitation, we recommend that motherboard be operated
in the ambiance between 0 and 50 ° C.
Dimensions and weight
l 270 (H) x 296(D) x 175(W) mm (without bezel)
l 7.4Kg
Page 10
4
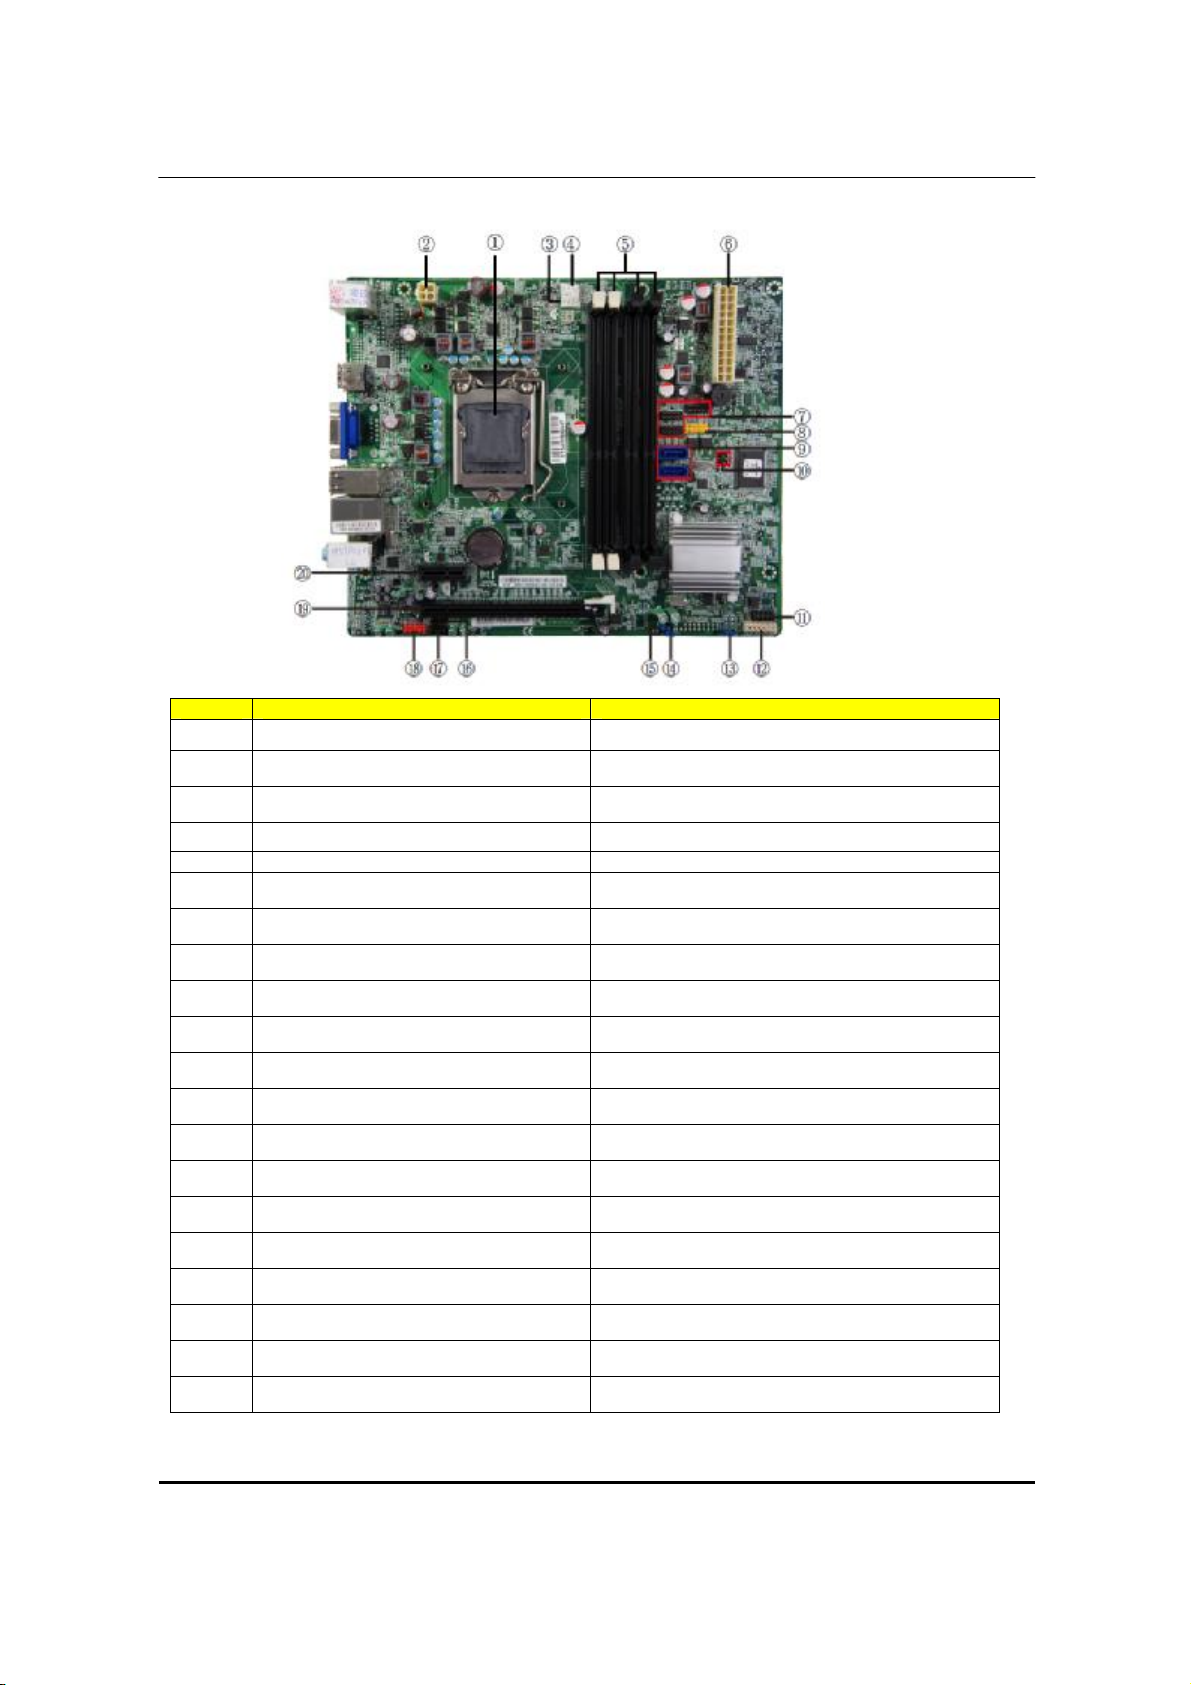
Mainboard Components
No Label Component
1 CPU Socket LGA1156
2
ATX12V 4-pin +12V power connector
3 SYS_FAN System cooling fan connector
4 CPU_FAN CPU cooling fan connector
5 DIMM1~4 240-pin DDR3 SDRAM slots
6
ATX_POWER Standard 24-pin ATX power connector
7
USB1/2/4 Front panel USB headers
8
USB 3 Front panel CR headers
9
SATA1~2 Serial ATA connectors
10
11
12
13
14
15
16
17
18
19
20
This concludes Chapter 1. The next chapter explains how to install the motherboard.
GPIO1~2 GPIO header 1~2
BIOS_FLASH Reflash BIOS connectors
F_PANEL Front panel switch/LED header
BIOS_WP BIOS Write protection connectors
CLR_CMOS Clear CMOS jumper
ME_Enable ME Enable/Disable header
SPDIF_OUT SPDIF out header
SPK Internal speaker header
F_AUDIO Front panel audio header
PCIE16X Express x1 slot
PCIEX 1X Express x1 slot
Page 11
5
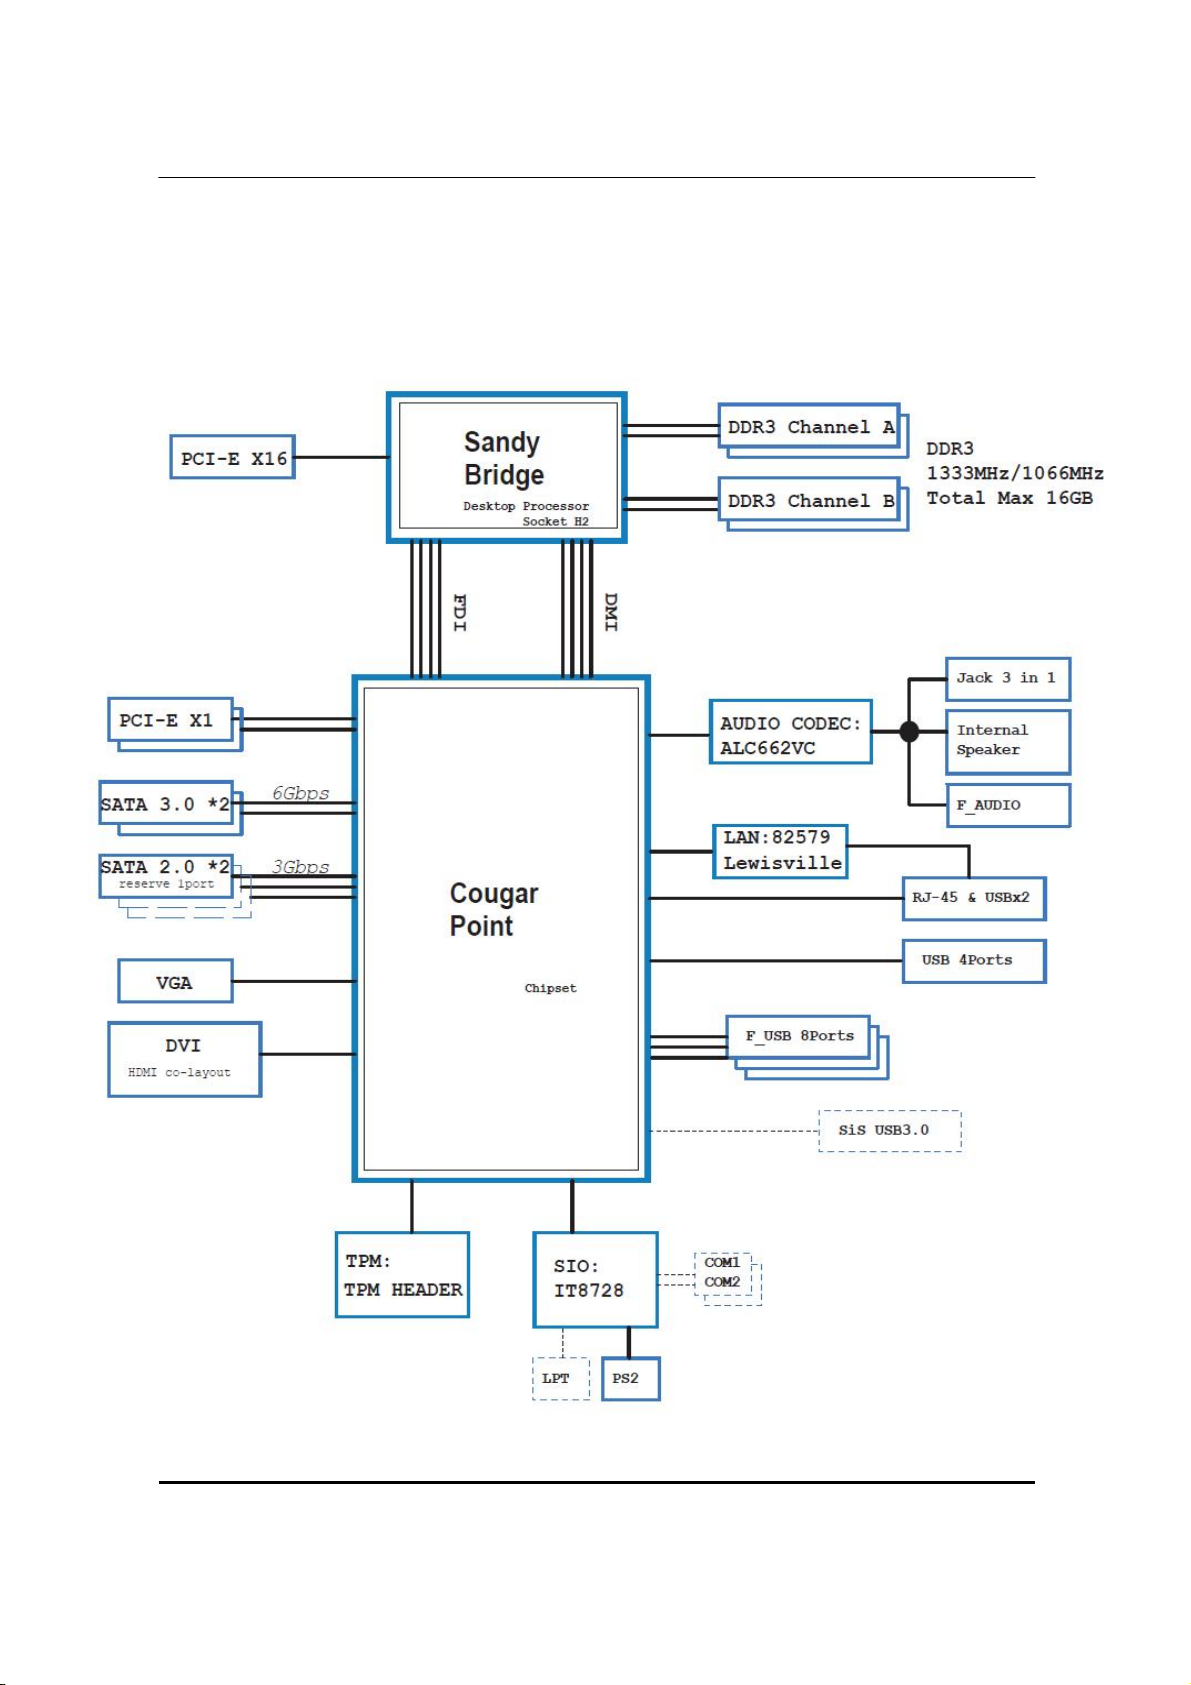
Block Diagram
Page 12
6
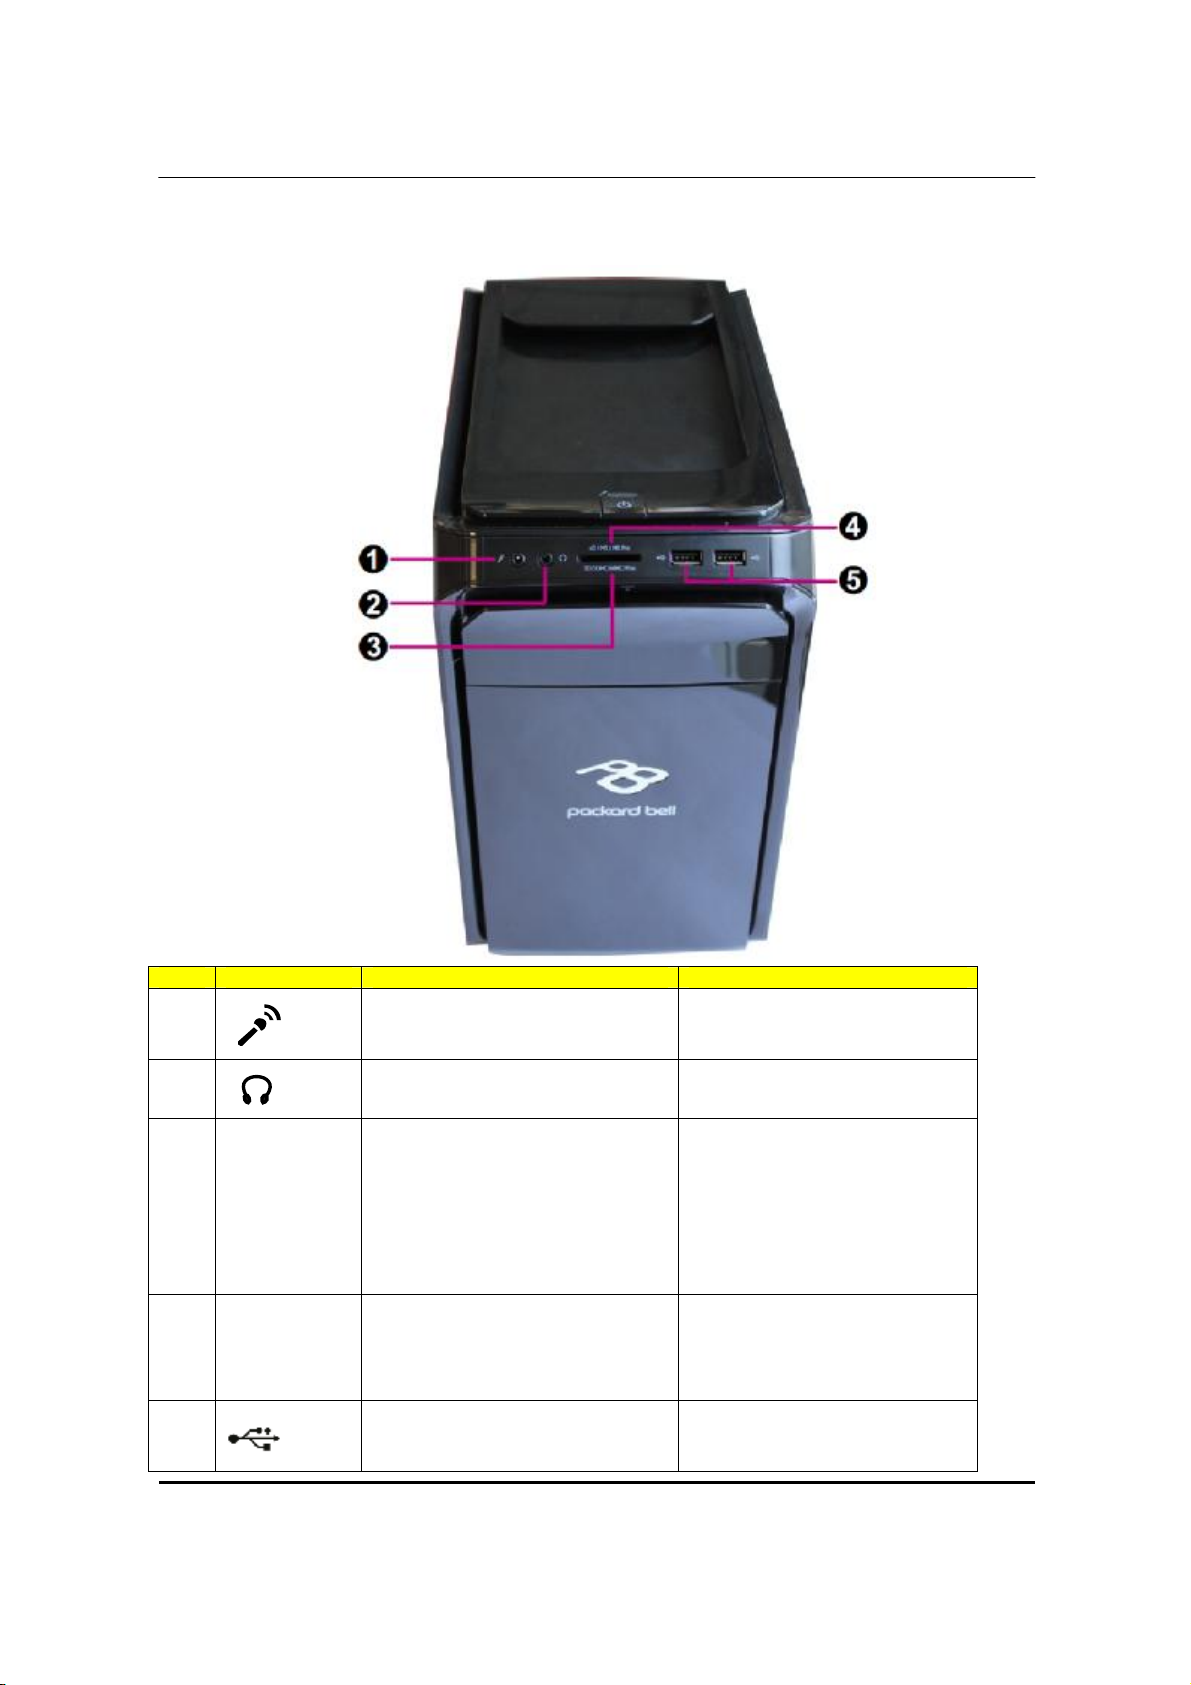
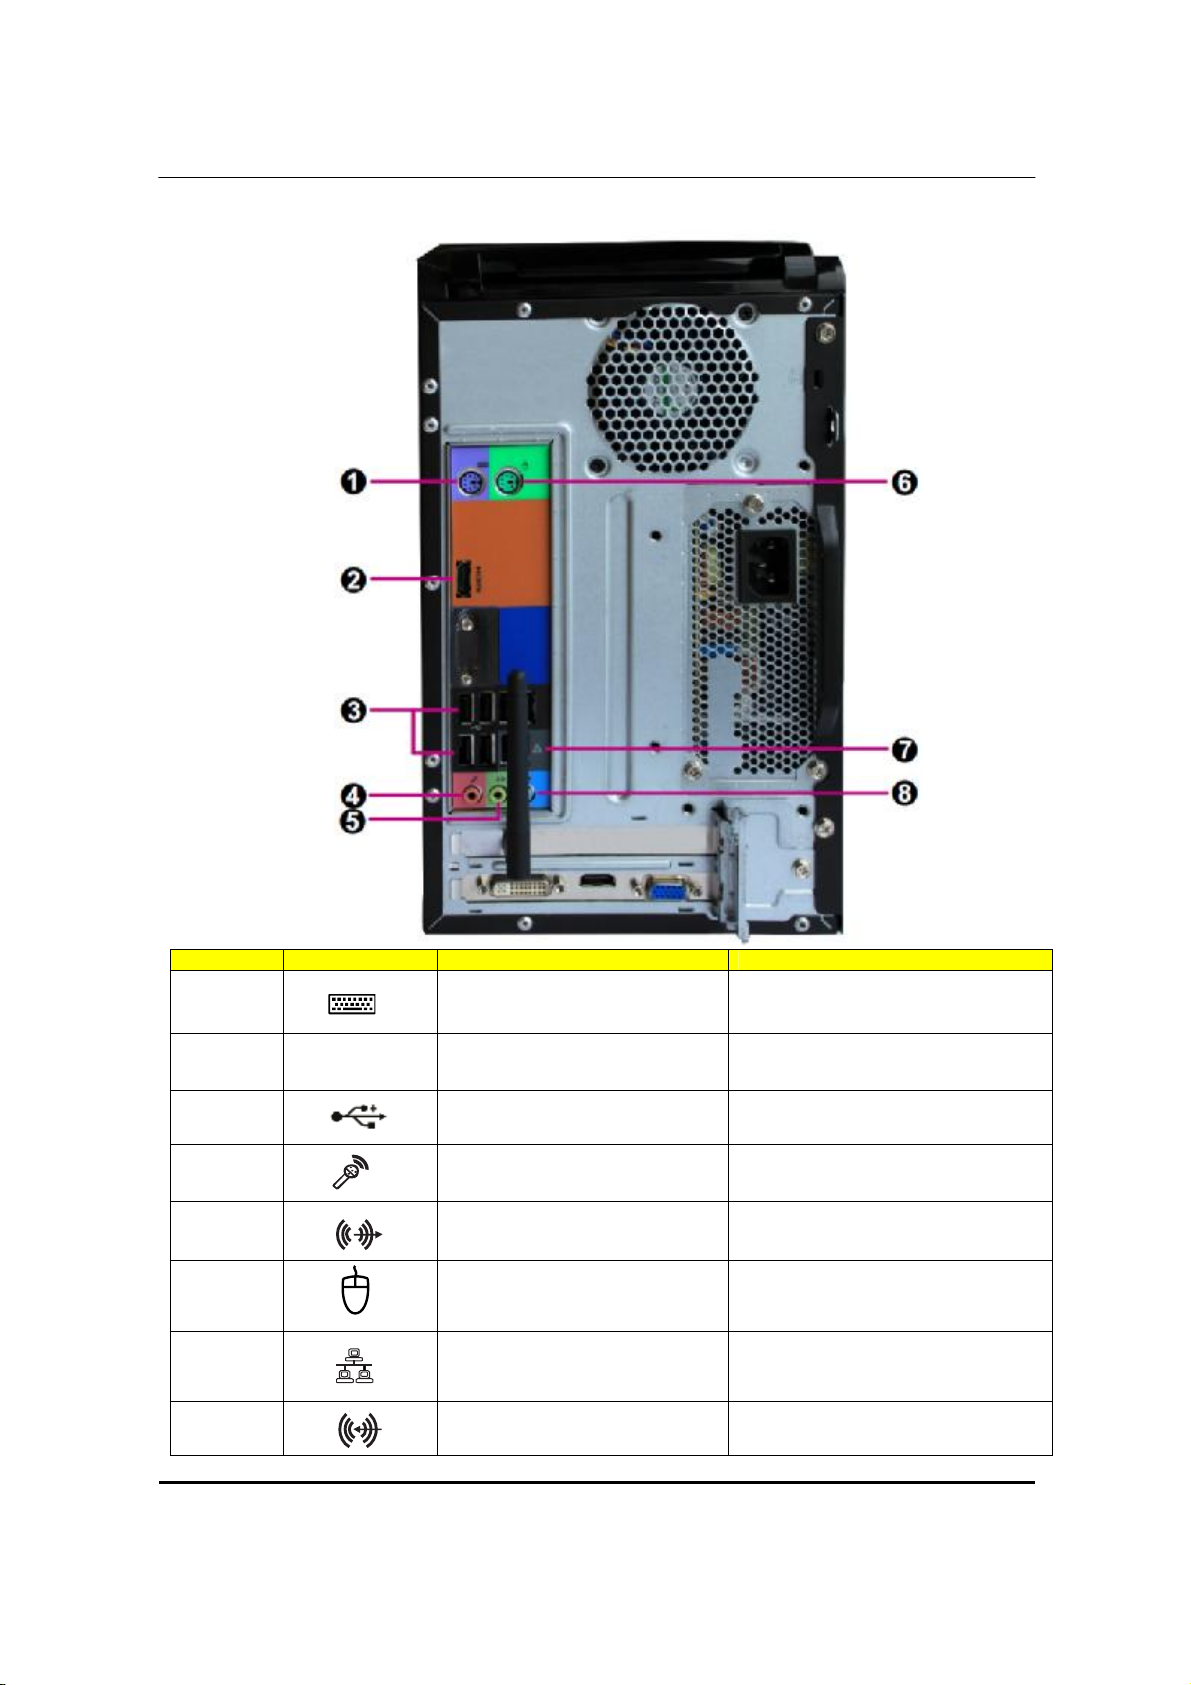
imedia S3811
The computer’s front panel consists of the following:
Front view
No Icon Component Description
1
2
3
SD/SDHC/MMC
4 xD/MS/MS Pro
Microphone-in jack
Headphone/Speaker-out/line-out port.
SD Plus: Ultra II SD PLUS Memory
Card
SDHC: Secure Digital High Capacity
MMC Plus: MultiMediaCard PLUS
XD
MS: Memory Stick
MS Pro: Memory Stick PRO
Accepts input from external
microphones.
Connects to audio line-in devices
(e.g.,speakers,headphones).
5
USB ports.
Connects to USB 2.0 devices
(e.g.,USB mouse, USB camera).
Page 13
7
Rear view
No Icon Component Description
1
2
3
4
5
6
7
HDMI HDMI Port
PS/2 keyboard connector
High Definition Multimedia Interface
USB 2.0 ports
Microphone jack
Line-out jack
PS/2 mouse connector
Network port
Connects to USB 2.0 devices
(e.g., USB mouse, USB camera).
Accepts input from external
microphones.
Accepts audio line-in devices
(e.g.,audio CD player,)
Lights to indicate the status of wireless
LAN communications.
8
Line-in jack
Accepts audio line-out devices
(e.g.,audio CD player,)
Page 14

8
Audio Jack Function Table
Color/Use Headphone 2CH 4CH 5.1CH
Blue Line-in Line-in Rear Speaker Rear Speaker
Green Headphone Front speaker Front speaker Front speaker
Pink Mic-in Mic-in Mic-in Center & bass
Page 15
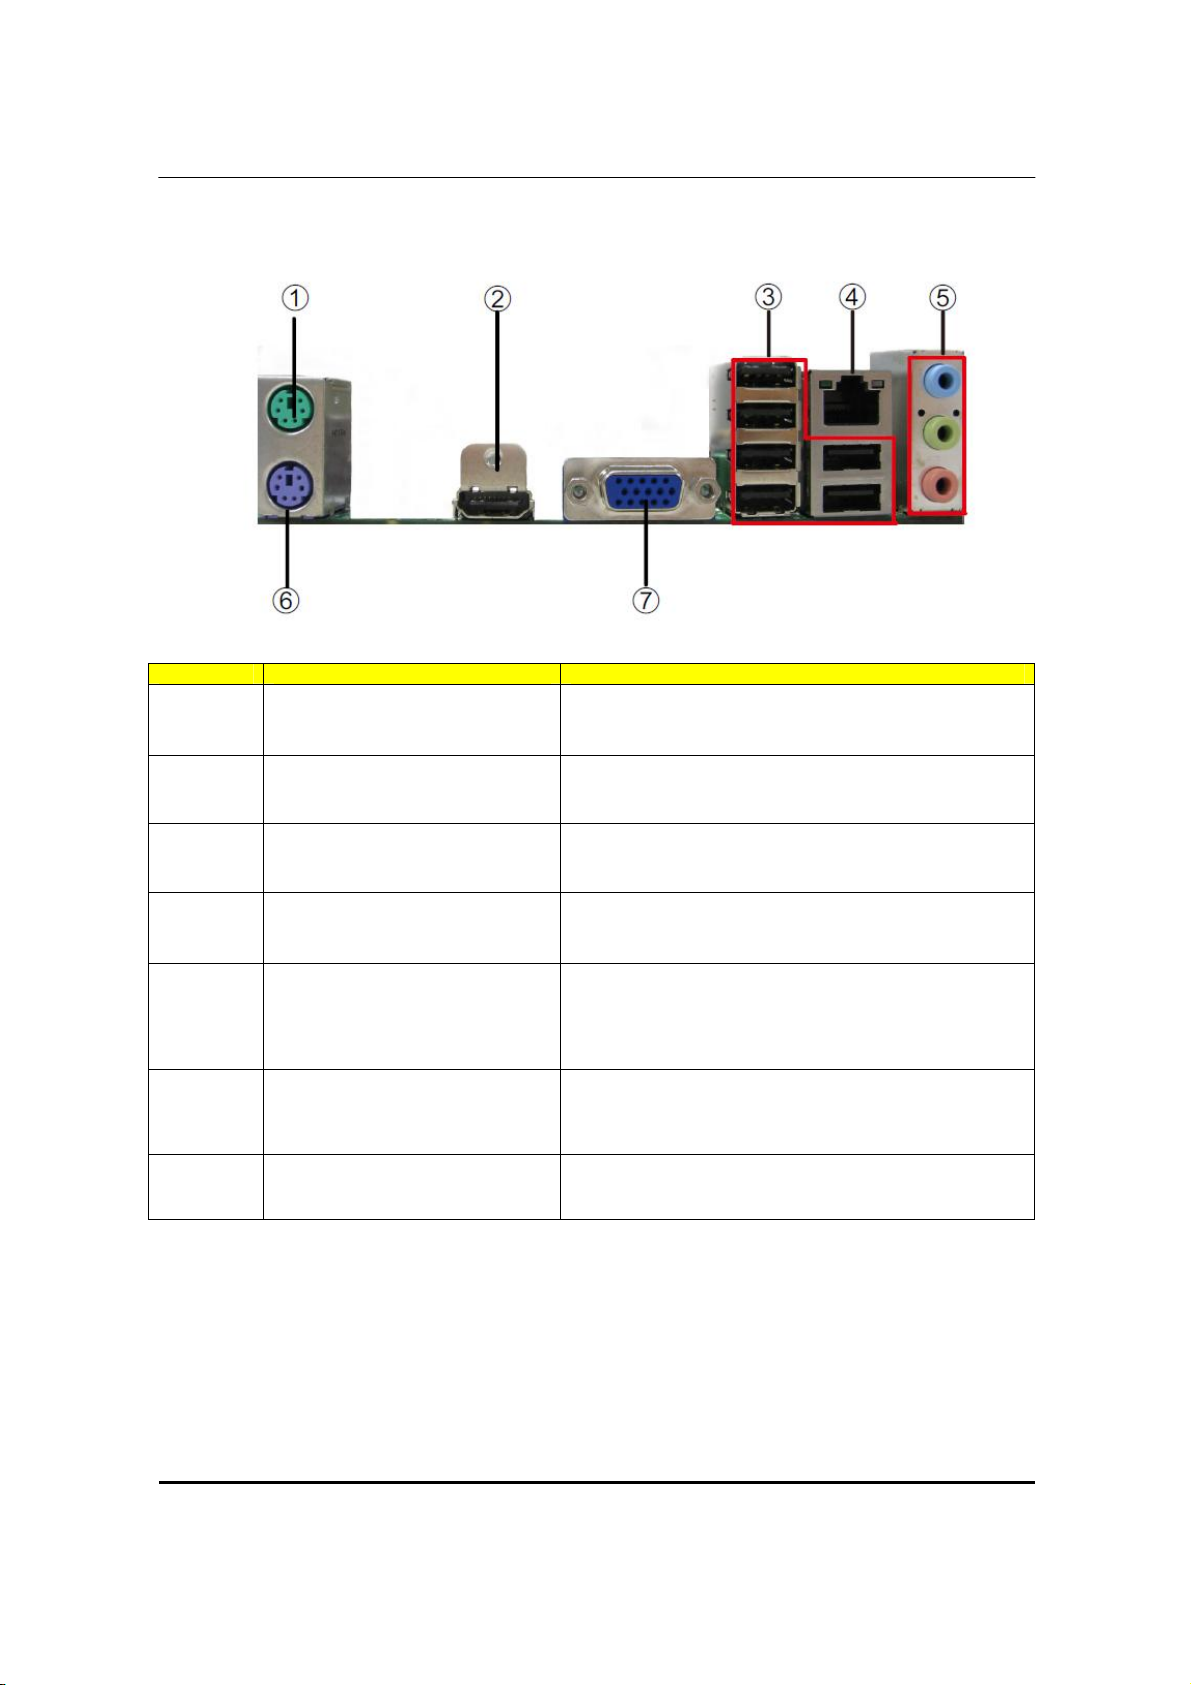
9
I/O Port Introduction
The backplane of the motherboard has the following I/O ports:
No Component Description
1 PS2 Mouse
2 HDMI Port Connect the HDMI port to the HDMI devices
Use the upper PS/2 port to connect a PS/2 pointing
device.
3 USB Ports Use the USB ports to connect USB devices.
4 LAN Port
5 Line-in / Line-out / Microphone
6 PS2Keyboard Use the lower PS/2 port to connect a PS/2 keyboard.
7 VGA Port Connect your monitor to the VGA port.
Connect an RJ-45 jack to the LAN port to connect your
computer to the Network.
Use the three audio ports to connect audio devices. The
first jack is for stereo line-in signal. The second jack is for
stereo line-out signal. The third jack is for microphone.
Page 16
10
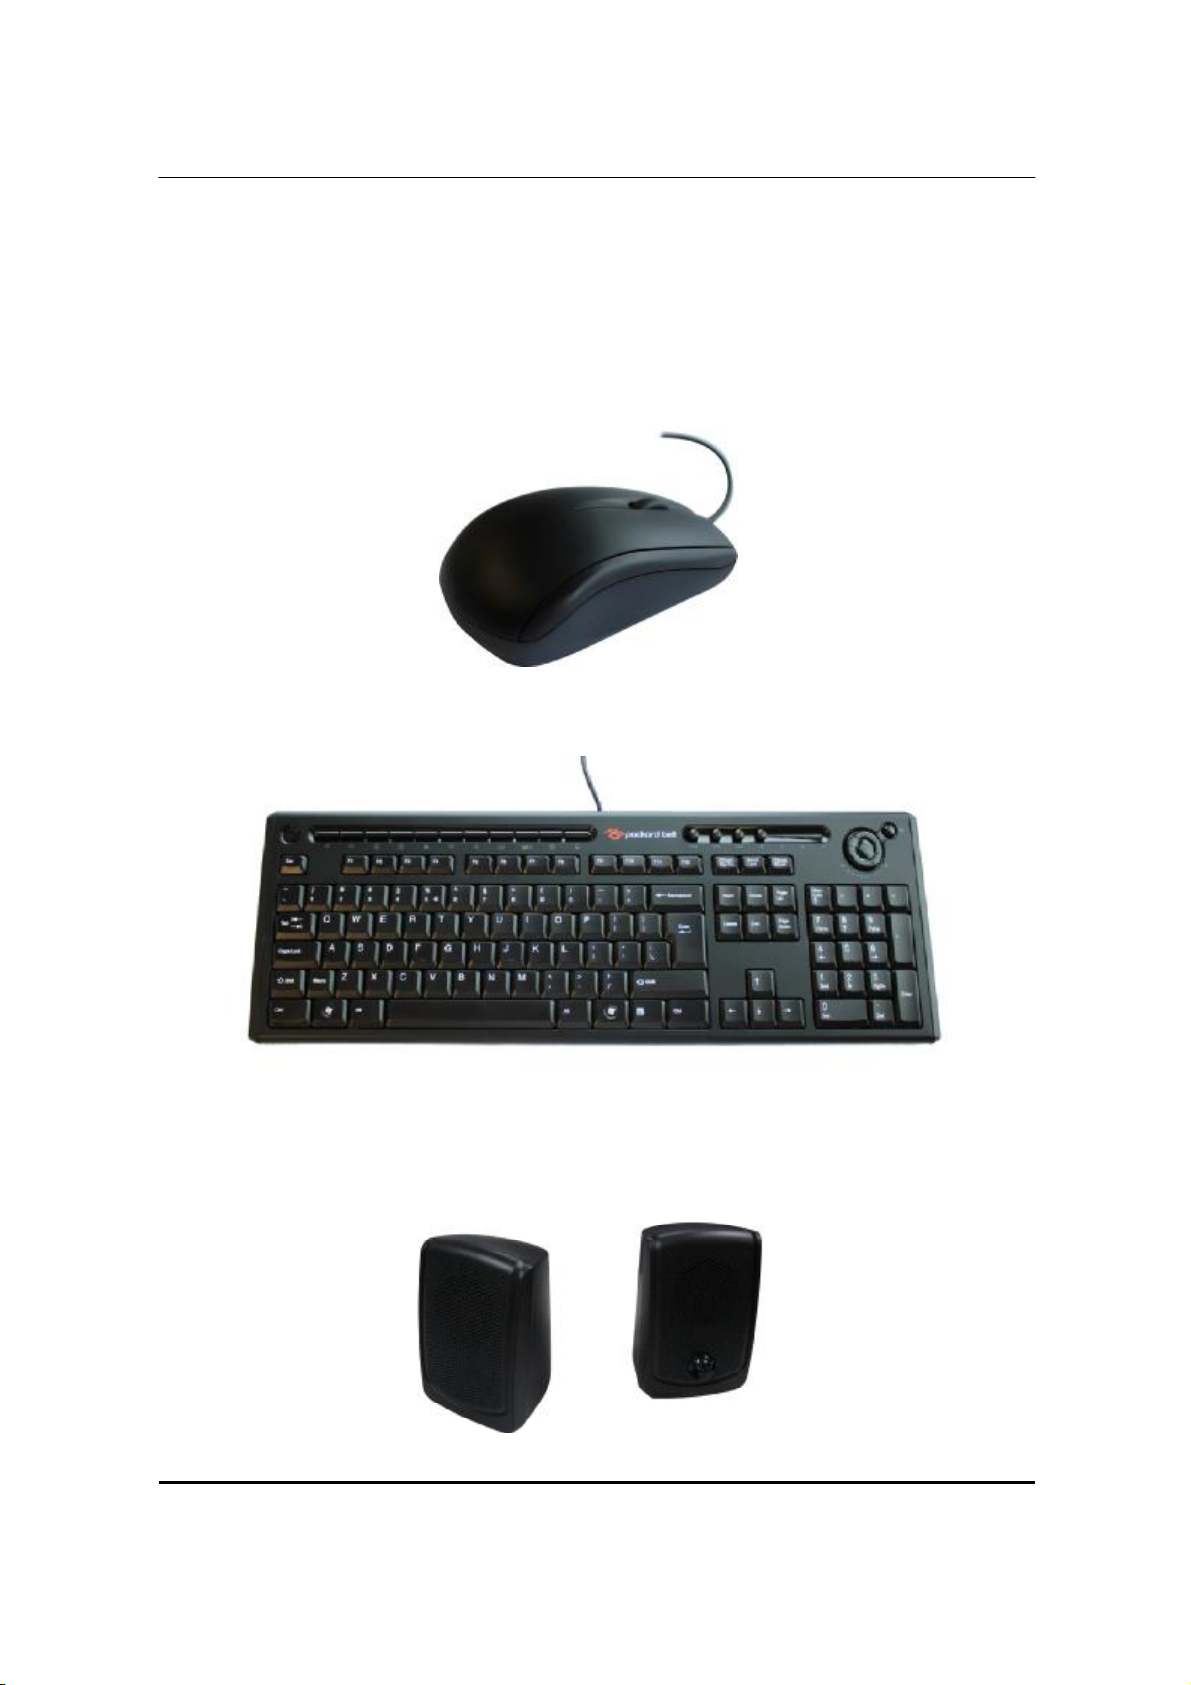
System Peripherals
The imedia S3811 series computer consist of the system itself, and system peripherals, like a mouse,
keyboard, card reader and a set of speakers (optional). This section provides a brief description of the
basic system peripherals.
Mouse (PS/2 or USB, manufacturing option)
The included mouse is a standard two-button wheel mouse. Connect the mouse to the PS/2 mouse port
or USB port on the back panel of the system.
Keyboard (PS/2 or USB, manufacturing option)
Connect the keyboard to the PS/2 keyboard port or USB port on the back panel of the system.
Speakers
For systems bundled with speakers, before powering on the system, connect the speaker cable to the
audio out (external speaker) port on the back panel of the system.
For more detailed information about the speakers, please refer to the included operating instructions.
NOTE: speakers are optional and the appearance might be different depending on the actual product.
Page 17

11
Card Reader (Option)
Memory cards are used in a wide selection of digital cameras, PDAs, MP3 players and mobile phones.
Selected computers include an “all-in-one”memory card reader that allows you read and write the most
common types, such as SD (Secure Digital)™/ MMC (Multi Media Card™), CF (Compact Flash®), xD
(XD-PICTURE CARD), Micro SD and MS/MS Pro (Memory Stick®).
NOTE: Card reader are optional and the appearance might be different depending on the actual product.
Page 18
12
Hardware Specifications and Configurations
Processor
Item Specification
Type
Socket
Speed
FSB
BIOS
Item Specification
BIOS code programmer AFUDOS
BIOS version P01-A0 (or newer version)
BIOS ROM type SPI ROM
BIOS ROM size 2MB
BIOS ROM package 32-pin DIP package(SST)
Support protocol
Boot from CD-ROM feature Yes
LGA1156 socket for 2nd Generation IntelR CoreTM
Family/ PentiumR/CeleronR processors
socket LGA1156
Depends on CPU which is configured
Depends on CPU which is configured
ACPI 2.0, APM 1.2, SMBIOS 2.3, WFM support,
ASD
Support to LS-120 FDD drive Yes
NOTE: The BIOS can be overwritten/upgraded by using the flash utility.
BIOS Hotkey List
Item Specification Specification
DEL Enter BIOS Setup Utility
F12 Enter Boot Menu
Press while the system is booting to enter BIOS
setup Utility.
Press while the system is booting to enter Boot
Menu.
Main Board Major Chips
Item Specification
Chipset Intel H57
AGP controller Intel H57
Super I/O controller ITE8721CX
Audio controller Realtek ALC662-VC0
LAN controller Realtek 8111E
HDD controller Intel H57
Keyboard controller ITE8721CX
Page 19
13
System Memory
Item Specification
Memory slot number
Support memory size per socket 1GB to 4GB
Support maximum memory size 16 GB
Support memory type DDR3 DRAM
Support memory interface DDR3 1066/1333
Support memory module package 240-pin DIMM
Support parity check feature Yes
Support to Error Correction Code (ECC) feature
Memory module combinations
NOTE: Dual channel should be enabled always when plug-in 2 same memory size DDRII memory module.
4 slots
ECC checking with double-bit detect and single-bit
correct
You can install memory modules in any
combination as long as they match the
specifications.
Cache Memory
Item Specification
First-Level Cache Configurations
Cache function control Always enabled
Second-Level Cache Configurations
L2 Cache RAM size Up to 2MB per core (exclusive)
L2 Cache RAM speed One-half the processor core clock frequency
L2 Cache function control Enable/Disable by BIOS Setup
Video Interface
Item Specification
Video controller Intel H57
Video controller resident bus PCIE
Video Interface X16
Audio Interface
Item Specification
Audio controller Realtek
Audio controller Type ALC662-VC0
Audio Channel 5.1ch
Audio function control Enable/disable by BIOS Setup
Mono or stereo 5.1 channel
Sampling rate DACs: 44.1k/48k/96k/192k Hz
MPU-401 UART support Yes
Microphone jack Supported
Headphone jack Supported
Page 20
14
IDE Interface
Item Specification
IDE controller Intel H57
Number of SATA connector 4
Support bootable CD-ROM Yes
USB Port
Item Specification
Universal HCI USB 2.0
USB Class Support legacy keyboard for legacy mode
USB Number support up to 12 ports
Power Management
Devices
Power Button Enabled Enabled Enabled Disabled
USB Keyboard Enabled Enabled Enabled N/A
LAN Disabled Disabled Disabled Disabled
RTC Disabled Enabled Disabled Disabled
Modem (Ring) Disabled Disabled Disabled N/A
S1
(Idle)
S3
(Suspend to
RAM)
S4
(Suspend to
DIsk)
(Shut Down)
S5
Page 21

15
Power Management Function (ACPI support function)
Device Standby Mode
l Independent power management timer for hard disk drive devices
(0-15 minutes, time step=1 minute).
l Hard disk drive goes into Standby mode (for ATA standard interface).
l Disable V-sync to control the VESA DPMS monitor.
l Resume method: device activated (Keyboard for DOS, keyboard & mouse for Windows).
l Resume recovery time: 3-5 sec.
Global Standby Mode
l Global power management timer (2-120 minutes, time step=10 minute).
l Hard disk drive goes into Standby mode (for ATA standard interface).
l Disable H-sync and V-sync signals to control the VESA DPMS monitor.
l Resume method: Return to original state by pushing external switch button, modem ring in,
keyboard and mouse for APM mode.
l Resume recovery time: 7-10 sec.
Suspend Mode
l Independent power management timer (2-120 minutes, time step=10 minutes) or pushing
external
l switch button.
l CPU goes into SMM.
l CPU asserts STPCLK# and goes into the Stop Grant State.
l LED on the panel turns amber colour.
l Hard disk drive goes into SLEEP mode (for ATA standard interface).
l Disable H-sync and V-sync signals to control the VESA DPMS monitor.
l Ultra I/O and VGA chip go into power saving mode.
l Resume method: Return to original state by pushing external switch button, modem ring in,
keyboard and mouse for APM mode.
l Return to original state by pushing external switch button, modem ring in and USB keyboard for
ACPI mode.
ACPI
l ACPI specification 1.0b.
l S0, S1, S3 and S5 sleep state support.
l On board device power management support.
l On board device configuration support.
Page 22

16
Chapter2
Using BIOS
About the Setup Utility
The computer uses the latest “American Megatrends Inc.” BIOS will support for Windows Plug and Play. The
CMOS chip on the motherboard contains the ROM setup instructions for configuring the motherboard BIOS.
The BIOS (Basic Input and Output System) Setup Utility displays the system’s configuration status and provides
you with options to set system parameters. The parameters are stored in battery-backed-up CMOS RAM that
saves this information when the power is turned off. When the system is turned back on, the system is configured
with the values you stored in CMOS.
The BIOS Setup Utility enables you to configure:
l Hard drives, diskette drives and peripherals
l Video display type and display options
l Password protection from unauthorized use
l Power Management features
The settings made in the Setup Utility affect how the computer performs. Before using the Setup Utility, ensure
that you understand the Setup Utility options.
This chapter provides explanations for Setup Utility options.
The Standard Configuration
A standard configuration has already been set in the Setup Utility. However, we recommend that you read this
chapter in case you need to make any changes in the future.
This Setup Utility should be used:
l when changing the system configuration
l when a configuration error is detected and you are prompted to make changes to the Setup
Utility
l when trying to resolve IRQ conflicts
l When making changes to the Power Management configuration
l when changing the password or making other changes to the Security Setup
Entering the Setup Utility
When you power on the system, BIOS enters the Power-On Self Test (POST) routines. POST is a series of
built-in diagnostics performed by the BIOS. After the POST routines are completed, the following message
appears:
Press DEL to enter SETUP
Page 23
17
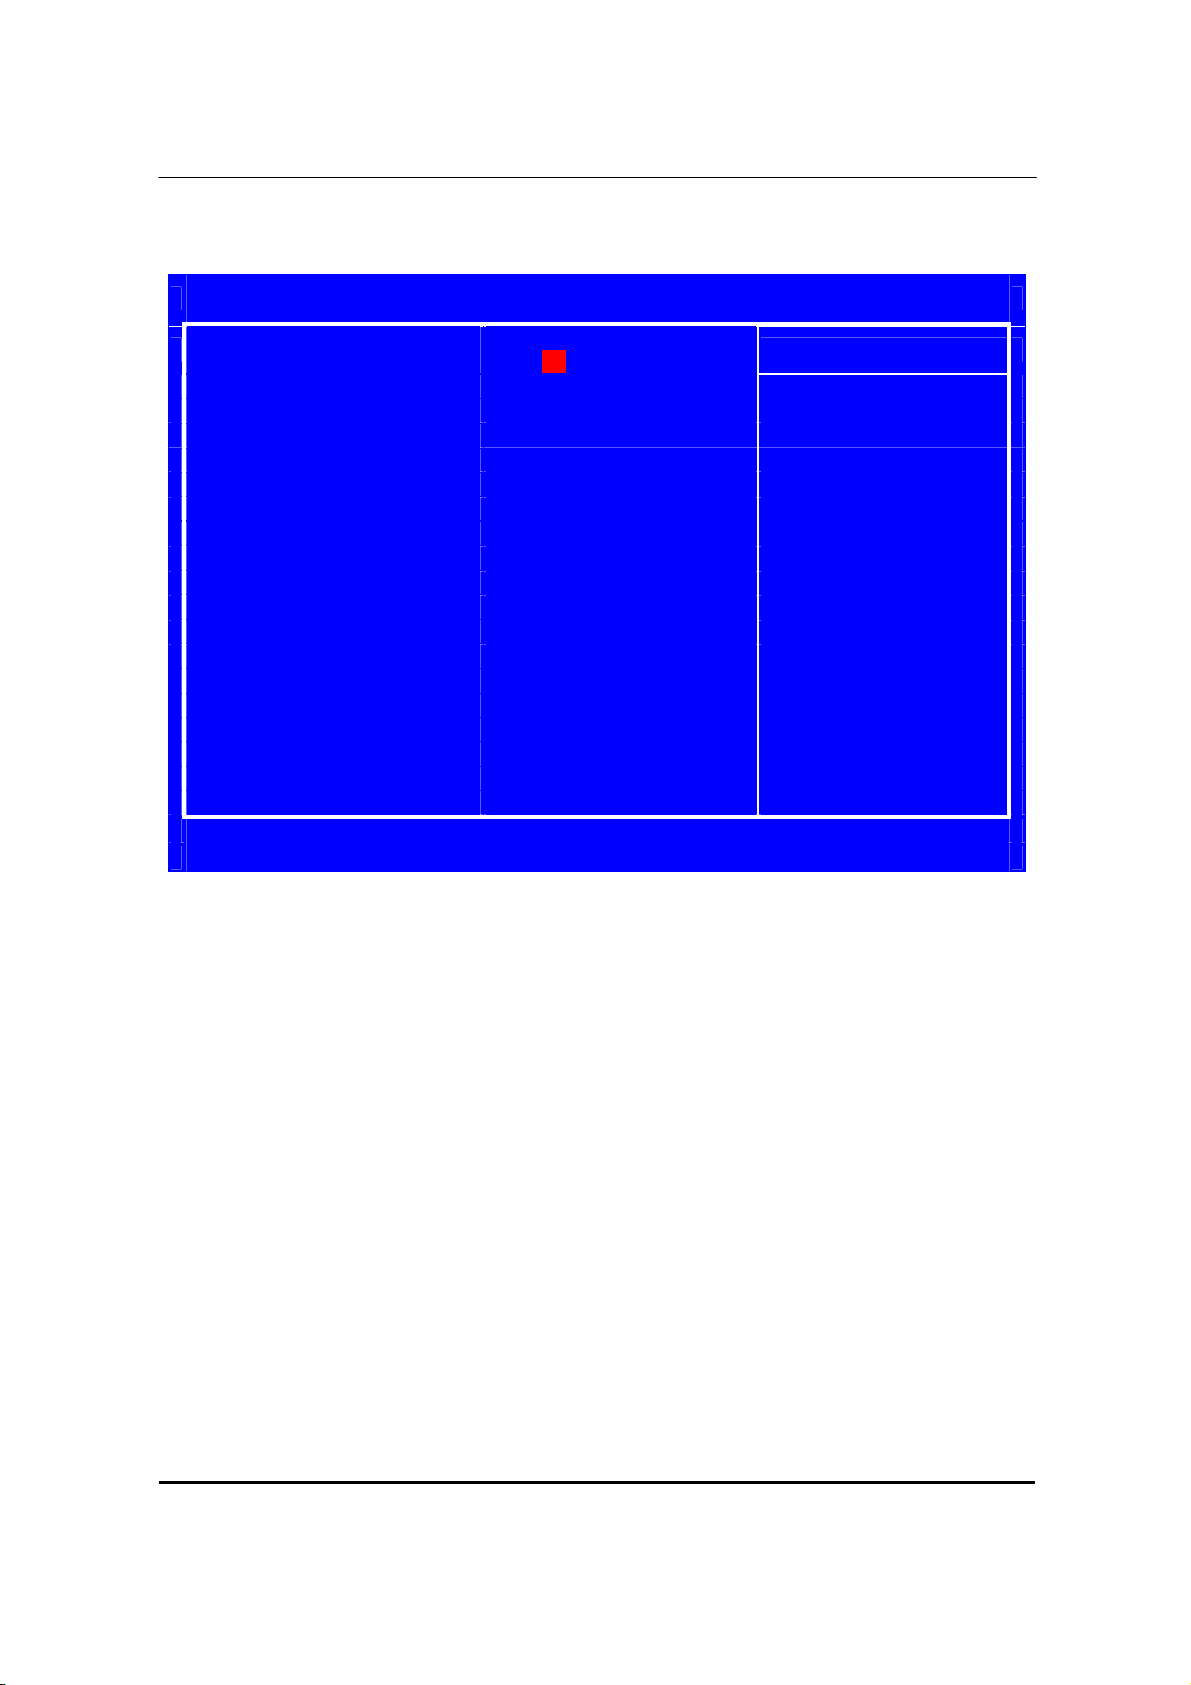
Setup Utility Menus
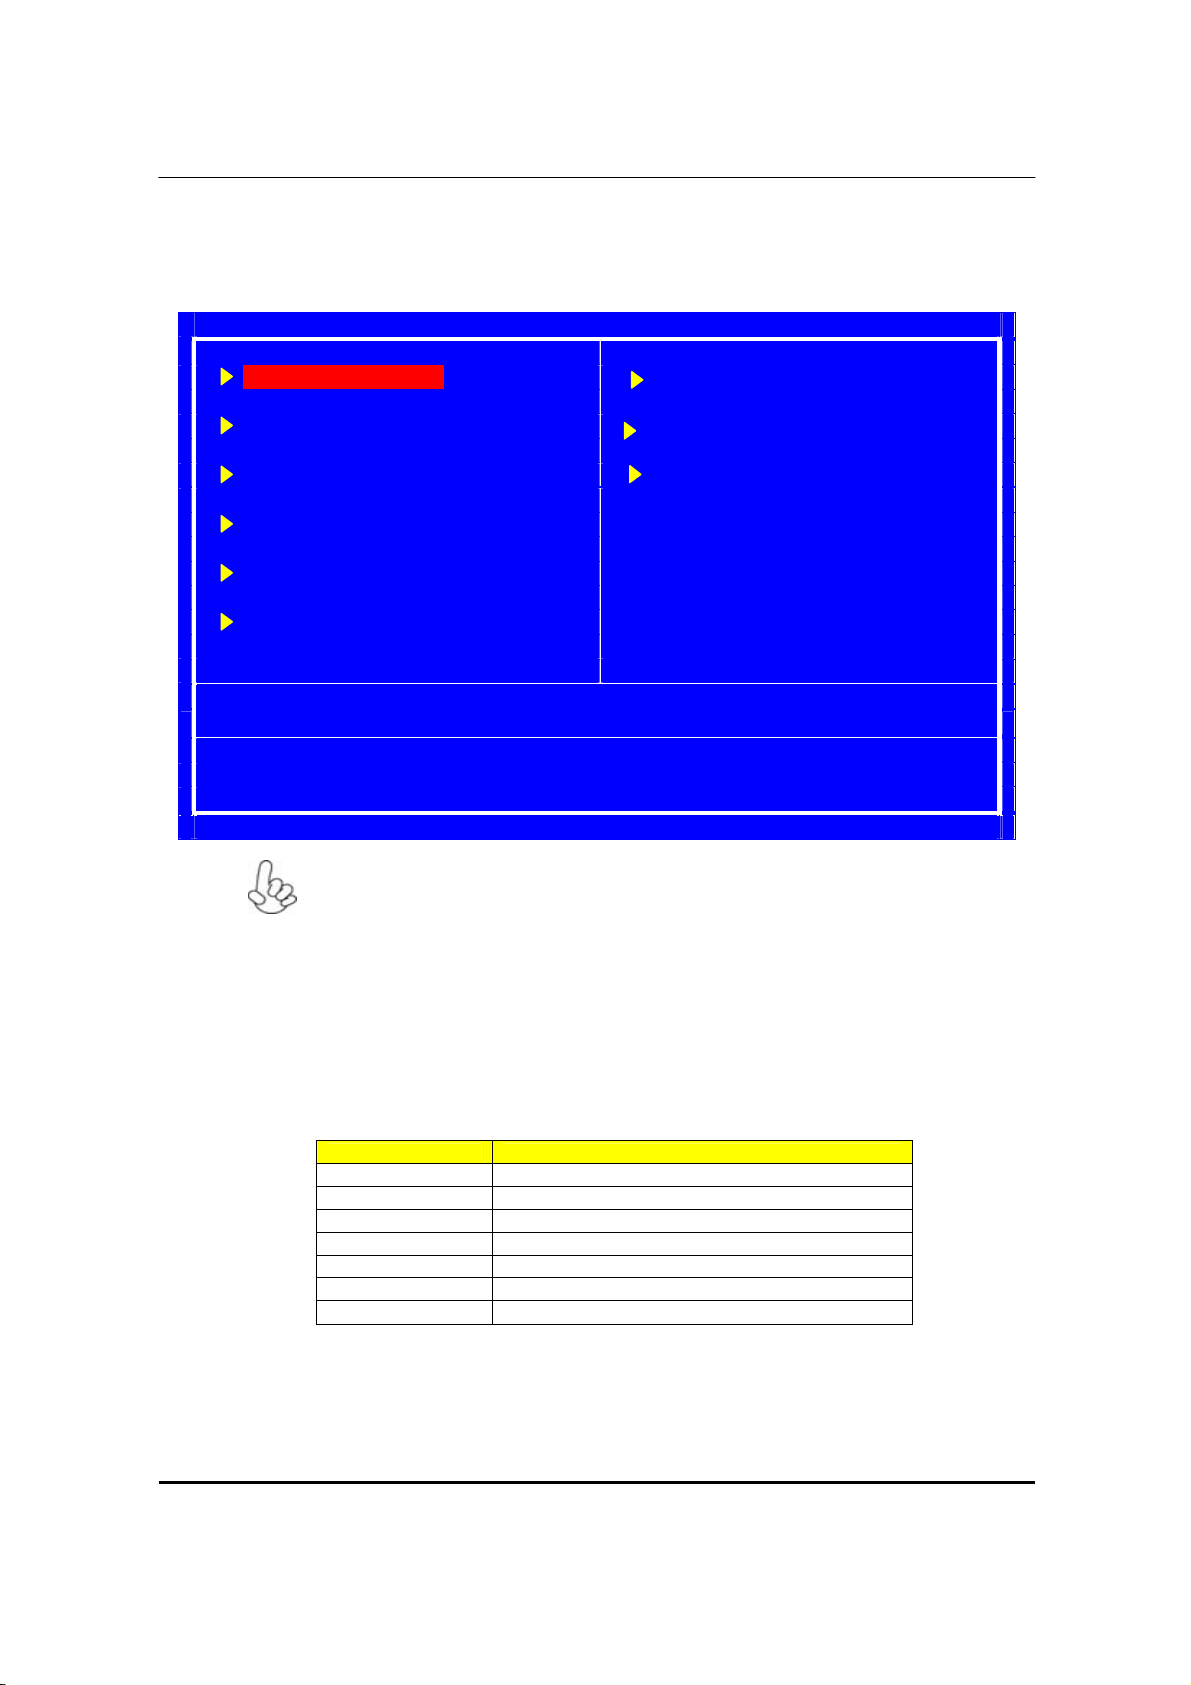
Pressing the DEL key accesses the BIOS Setup Utility:
CMOS Setup Utility – Copyright (C ) 1985-2010, American Megatrends, Inc.
Product Information
Standard CMOS Features Frequency/Voltage Control
Advanced BIOS Features BIOS Security Features
Advanced Chipset Features Load Default Settings
Integrated Peripherals Save & Exit Setup
Power Management Setup Exit Without Saving
↑↓→←:Move Enter:Select +/-/:Value F10:Save & Exit Setup
Esc: Exit F1:General Help F9:Load Default Settings
V02.66 © Copyright 1985-2010, American Megatrends, Inc
PC Health Status
The default BIOS setting for this motherboard applies for most conditions with optimum
performance. It is not suggested to change the default values in the BIOS setup and the
manufacture takes no responsibility to any damage caused by changing the BIOS settings.
BIOS Navigation Keys
The BIOS navigation keys are listed below:
Key Function
‘••’ Move
Enter Select
+/-+PU/PD Value
ESC Exit
F1 General Help
F9 Load Default Settings
F10 Save & Exit Setup
Page 24

18
Updating the BIOS
You can download and install updated BIOS for this motherboard from the manufacturer’s Web site. New
BIOS provides support for new peripherals, improvements in performance, or fixes for known bugs. Install
new BIOS as follows:
1 If your motherboard has a BIOS protection jumper, change the setting to allow BIOS flashing.
2 If your motherboard has an item called Firmware Write Protect in Advanced BIOS features,
disable it. (Firmware Write Protect prevents BIOS from being overwritten.
3 Create a bootable system disk. (Refer to Windows online help for information on creating a
bootable system disk.)
4 Download the Flash Utility and new BIOS file from the manufacturer’s Website. Copy these files
to the system diskette you created in Step 3.
5 Turn off your computer and insert the system diskette in your computer’s diskette drive. (You
might need to run the Setup Utility and change the boot priority items on the Advanced BIOS
Features Setup page, to force your computer to boot from the floppy diskette drive first.)
6 At the A:\ prompt, type the Flash Utility program name and press <Enter>.
7 Type the filename of the new BIOS in the “File Name to Program” text box. Follow the onscreen
directions to update the motherboard BIOS.
8 When the installation is complete, remove the floppy diskette from the diskette drive and restart
your computer. If your motherboard has a Flash BIOS jumper, reset the jumper to protect the
newly installed BIOS from being overwritten.
Using BIOS
When you start the Setup Utility, the main menu appears. The main menu of the Setup Utility displays a list of
the options that are available. A highlight indicates which option is currently selected. Use the cursor arrow keys
to move the highlight to other options. When an option is highlighted, execute the option by pressing <Enter>.
Some options lead to pop-up dialog boxes that prompt you to verify that you wish to execute that option. Other
options lead to dialog boxes that prompt you for information.
Some options (marked with a triangle u ) lead to submenus that enable you to change the values for
the option. Use the cursor arrow keys to scroll through the items in the submenu.
In this manual, default values are enclosed in parenthesis. Submenu items are denoted by a triangle u
Page 25
19
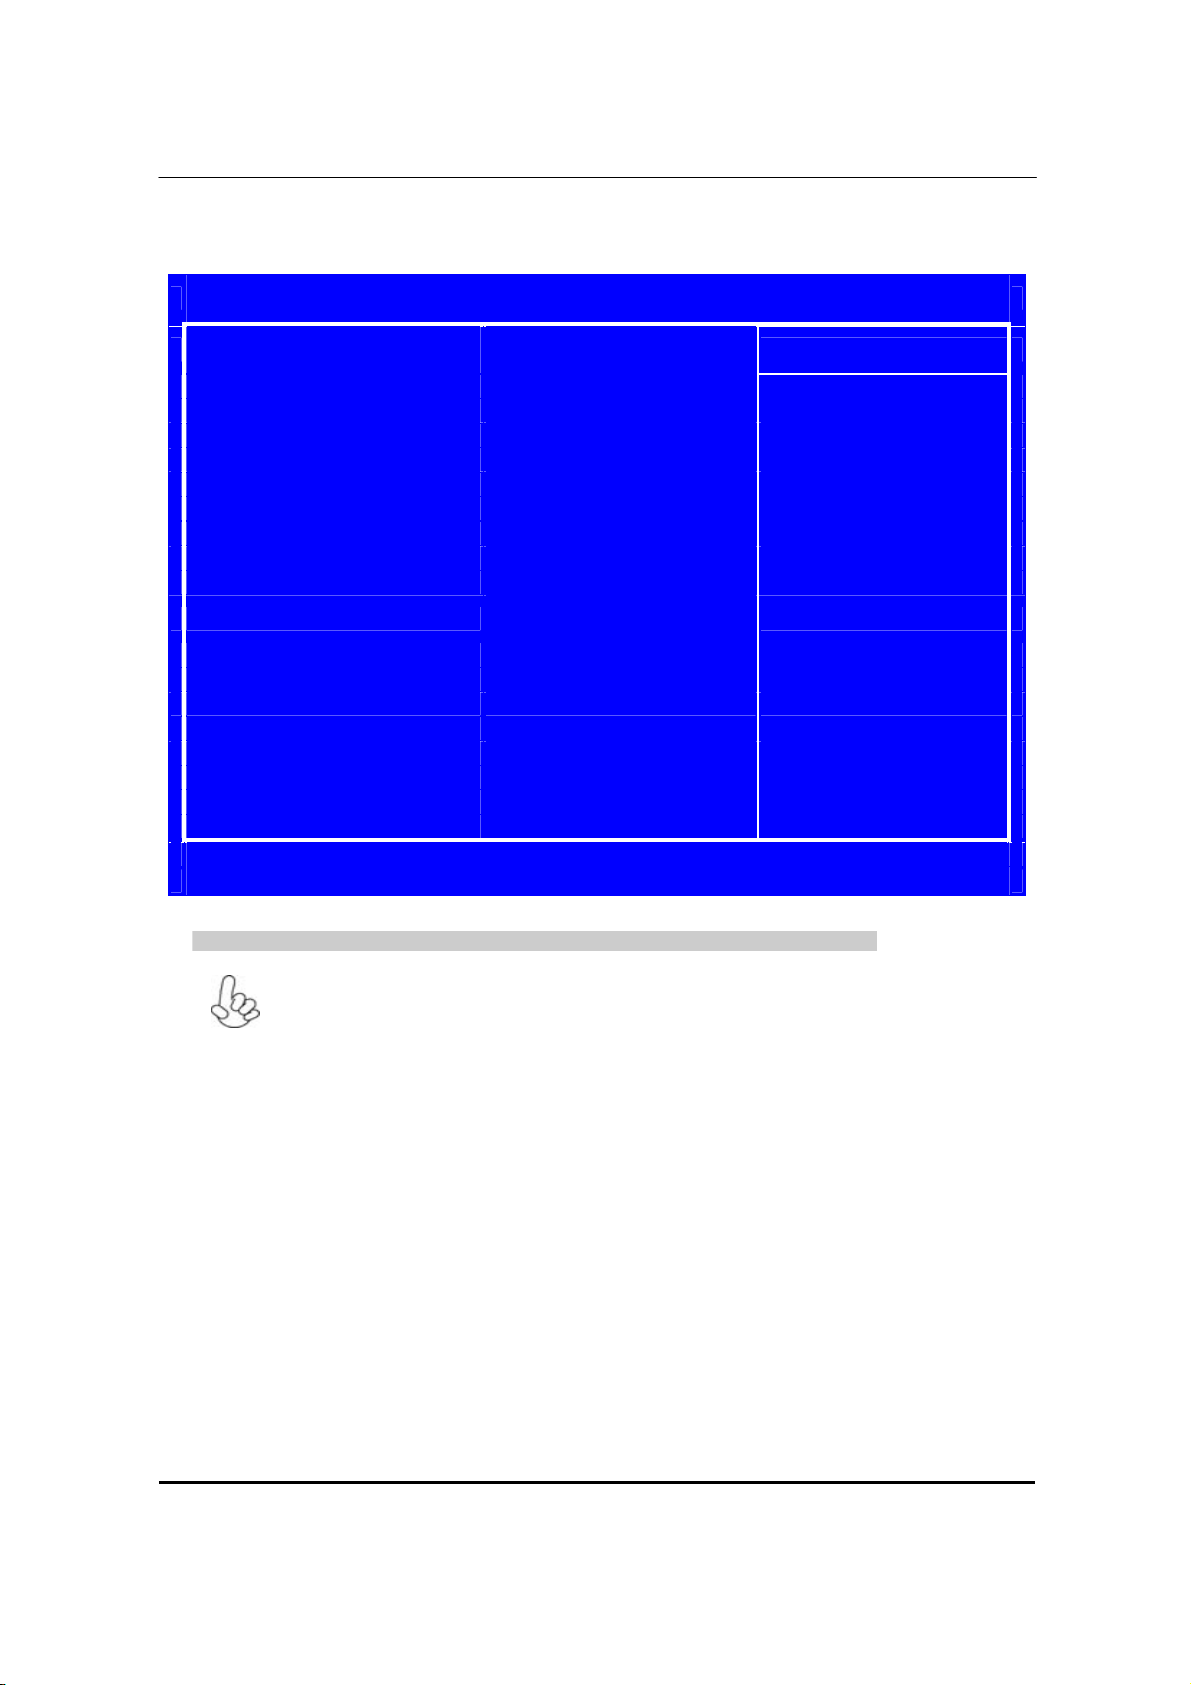
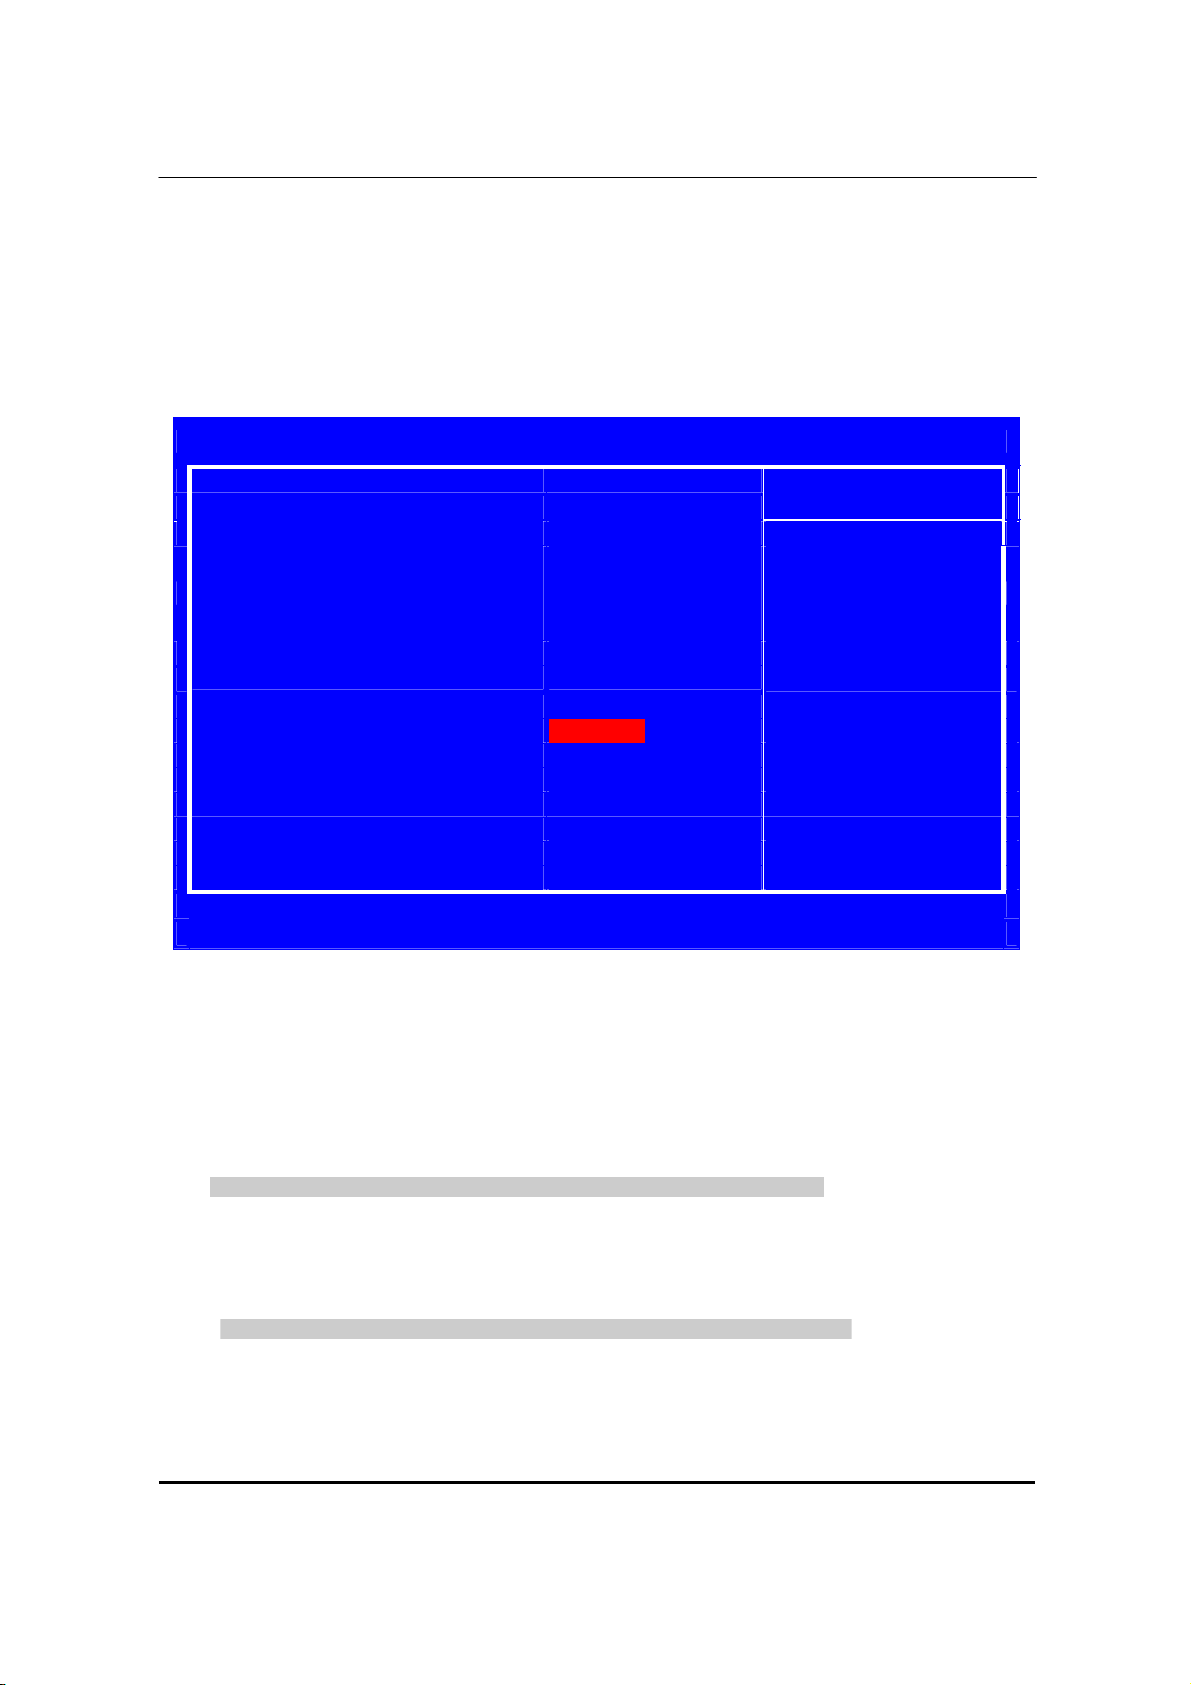
Product Information
This option displays basic information about your system.
CMOS Setup Utility
Product Information
Processor Type
Intel(R) Core(TM) i7 CPU
Processor Speed 2.93GHz
System Memory 8192 MB
Product Name Imedia S3811
System Serial Number
System BIOS Version P01-A4
BIOS Release Date 08/19/2010
Asset Tag Number
↑↓→←:Move Enter:Select +/-/:Value F10:Save & Exit Setup
Esc: Exit F1:General Help F9:Load Default Settings
870 @ 2.93GHz
Item Help
Press <ESC> to return to the main menu setting page
For the purpose of better product maintenance, the manufacture reserves the right to change the
BIOS items presented in this manual. The BIOS setup screens shown in this chapter are for
reference only and may differ from the actual BIOS.
Please visit the manufacture’s website for updated manual.
Page 26
20
Standard CMOS Features
]to configure
This option displays basic information about your system.
CMOS Setup Utility
Standard CMOS Features
System Date
Wed, 11/ 05 / 2010
System Time 10 : 54 : 28
u AHCI Port 1
u AHCI Port 2
[Hard Disk]
[ATAPI CDROM] Use [ENTER], [TAB] or
[SHIFT-TAB] to select a
field.
Halt On All ,But Keyboard Use[+]or[ system Date
↑↓→←:Move Enter:Select +/-/:Value F10:Save & Exit Setup
Esc: Exit F1:General Help F9:Load Default Settings
Date and Time
The Date and Time items show the current date and time on the computer. If you are running a Windows OS,
these items are automatically updated whenever you make changes to the Windows Date and Time
Properties utility.
Item Help
Page 27
21
uAHCI Port1 /Port2
Your computer has one IDE channel which can be installed with one or two devices
(Master and Slave). In addition, this motherboard supports two SATA channels and
each channel allows one SATA device to be installed. Use these items to configure
each device on the IDE channel.
Press <Enter> to display the IDE submenu:
CMOS Setup Utility-Copyright( C ) 1985-2009, American Megatrends, Inc.
SATA Port 1
AHCI Port 1
Item Help
----------------------------------------- ------------------------
Device :
Vendor:
Size:
Hard Disk
ST3320418AS
320.0GB
S.M.A.R.T. stands for
Self-Monitoring,
Analysis and Reporting
Technology.
----------------------------------------- ------------------------
S.M.A.R.T. [Enabled]
↑↓→←:Move Enter:Select +/-/:Value F10:Save & Exit Setup
Esc: Exit F1:General Help F9:Load Default Settings
SATA Port0 (Auto)
Use this item to configure the type of the IDE device that you specify. If the feature is enabled, it will enhance
hard disk performance by reading or writing more data during each transfer.
S.M.A.R.T. (Enabled)
The S.M.A.R.T. (Self-Monitoring, Analysis and Reporting Technology) system is a diagnostics technology that
monitors and predicts device performance. S.M.A.R.T. software resides on both the disk drive and the host
computer.
Press <Esc> to return to the Standard CMOS Setup page.
Halt On (All, But Keyboard)
This item defines the operation of the system POST (Power On Self Test) routine. You can use this item to
select which types of errors in the POST are sufficient to halt the system.
Press <Esc> to return to the main menu setting page.
Page 28

22
Advanced BIOS Features
This page sets up more advanced information about your system.
CMOS Setup Utility
Advanced BIOS Features
Quick Boot Enabled
Quiet Boot Enabled
1st Boot Device ST3320418AS
2nd Boot Device ATAPI DVD A DH16A6S Allows BIOS to skip
3rd Boot Device USB:Generic-Compact Certain tests while
4th Boot Device LAN Booting. This will
u Hard Disk Drive Priority
u Optical Disk Drive Priority
u Removable Device Priority
u Network Device Priority
Press Enter Decrease the time
Press Enter Needed to boot the
Press Enter System.
Press Enter
Bootup Num-Lock On
USB Beep Message Disabled
↑↓→←:Move Enter:Select +/-/:Value F10:Save & Exit Setup
Esc: Exit F1:General Help F9:Load Default Settings
Quick Boot (Enabled)
If you enable this item, the system starts up more quickly be elimination some of the power on test routines.
Quiet Boot (Enabled)
This item is used to enable/disable the quiet boot.
[Disabled]: Displays the normal POST messages.
[Enabled]: Displays OEM customer logo instead of POST messages.
1st/2nd/3rd/4th Boot Device (Hard Drive/CD/DVD/Kingston DataTravel/Network)
Use this item to determine the device order the computer used to look for an operating system to load at
start-up time. The devices showed here will be different depending on the exact devices installed on your
motherboard.
Item Help
Page 29

23
uHard Disk Drive Priority (Press Enter)
Press <Esc> to return to the Advanced BIOS Features screen.
Scroll to this item and press <Enter> to view the following screen:
CMOS Setup Utility
Hard Disk Drive Priority
Hard Disk Drive Priority
-------------------------------------------------------------------
Specifies the boot
Item Help
1st Drive ST3320418AS sequence from the
available devices.
↑↓→←:Move Enter:Select +/-/:Value F10:Save & Exit Setup
Esc: Exit F1:General Help F9:Load Default Settings
Press <Esc> to return to the Advanced BIOS Features screen.
uOptical Disk Drive Priority D/DVD Drives (Press Enter)
Scroll to this item and press <Enter> to view the following screen:
CMOS Setup Utility
Optical Disk Drive Priority
Optical Disk Drive Priority
------------------------------------------------------------------
Specifies the boot
Item Help
1st Drive ATAPI DVD A DH16A6S sequence from the
available devices.
↑↓→←:Move Enter:Select +/-/:Value F10:Save & Exit Setup
Esc: Exit F1:General Help F9:Load Default Settings
Page 30

24
u Removable Device Priority (Press Enter)
Scroll to this item and press <Enter> to view the following screen:
CMOS Setup Utility
Removable Device Priority
Removable Device
------------------------------------------------------------------
Specifies the boot
Item Help
1st Drive USB: Generic Compact sequence from the
2nd Drive USB: Multiple Flash available devices.
↑↓→←:Move Enter:Select +/-/:Value F10:Save & Exit Setup
Esc: Exit F1:General Help F9:Load Default Settings
Press <Esc> to return to the Advanced BIOS Features screen.
Page 31

25
u Network Device Priority (Press Enter)
Scroll to this item and press <Enter> to view the following screen:
CMOS Setup Utility
Network Device Priority
Item Help
Network Device Priority
----------------------------------------------------------------- Specifies the boot
sequence from the
available devices.
↑↓→←:Move Enter:Select +/-/:Value F10:Save & Exit Setup
Esc: Exit F1:General Help F9:Load Default Settings
Press <Esc> to return to the Advanced BIOS Features screen.
Boot Up NumLock (On)
This item defines if the keyboard Num Lock key is active when your system is started.
USB Beep Message (Disabled)
This item disables/enables the beep during USB device enumeration.
Press <Esc> to return to the main menu setting page.
Page 32

26
Advanced Chipset Features
These items define critical timing parameters of the motherboard. You should leave the items on this page at
their default values unless you are very familiar with the technical specifications of your system hardware. If
you change the values incorrectly, you may introduce fatal errors or recurring instability into your system.
CMOS Setup Utility
Advanced Chipset Features
Intel EIST
Intel Turbo Boost
Intel AES-NI
Intel XD Bit
Enabled
Enabled
Enabled
Enabled
Intel EIST (Enhanced
Item Help
Intel VT Enabled Intel Speedstep
Memory Hole Remapping Enabled Techbology)
Primary Video Auto Automatically adjusts
Intel processor
Voltage and core
Frequency according
To system performance
Demand.
↑↓→←:Move Enter:Select +/-/:Value F10:Save & Exit Setup
Esc: Exit F1:General Help F9:Load Default Settings
Intel EIST (Enabled)
This item allows users to enable or disable the EIST (Enhanced Intel SpeedStep technology).
Intel Turbo Boost(Enabled)
This item enables or disables Intel Turbo Boost.
Intel XD Bit (Enabled)
This item allows users to enable or disable the Intel XD bit.
Intel VT (Enabled)
Hardware Virtualization Technology enables processor feature for running multiplesimultaneous
Virtual Machines allowing specialized software applications to run infull isolation of each other.
Memory Hole Remapping (Enabled)
This item allows users to enable or disable memory hole remapping.
Press <Esc> to return to the main menu setting page.
Page 33

27
Integrated Peripherals
This page sets up some parameters for peripheral devices connected to the system.
CMOS Setup Utility
Integrated Peripherals
Onboard SATA Controller Enabled
Onboard SATA Mode AHCI Options
Onboard USB Controller Enabled Enabled
Legacy USB Support Enabled Disabled
USB Storage Emulation
Onboard Graphics Controller
Onboard Audio Controller
Auto
Disabled
Enabled
Onboard LAN Controller Enabled
Onboard LAN Option ROM Disabled
↑↓→←:Move Enter:Select +/-/:Value F10:Save & Exit Setup
Esc: Exit F1:General Help F9:Load Default Settings
OnBoard SATA Mode (AHCI)
Use this item to select the onboard SATA mode.
OnBoard SATA Controller (Enabled)
This item allows you to enable or disable the onboard SATA controller.
OnBoard USB Controller (Enabled)
Use this item to enable or disable the use of USB controller.
Legacy USB Support (Enabled)
Use this item to enable or disable support for legacy USB devices. Setting to Auto allows the system to detect
the presence of USB device at startup. If detected, the USB controller legacy mode is enabled. If no USB device
is detected, the legacy USB support is disabled.
USB Storage Emulation (Auto)
If Auto, USB device equal or less than 2GB will be emulated as Floppy and remaining as hard drive. Forced
FDD option can be used to force a HDD formatted drive to boot as FDD (Ex.ZIP drive).
Onboard Audio Controller (Enabled)
This item enables or disables the onboard audio controller.
Onboard LAN Controller (Enabled)
Use this item to enable or disable the Onboard LAN.
Onboard LAN Option ROM (Disabled)
This item enables or disables the onboard LAN option ROM function.
Press <Esc> to return to the main menu setting page.
Item Help
Page 34

28
Power Management Setup
This page sets up some parameters for system power management operation.
CMOS Setup Utility
Power Management Setup
ACPI Suspend Mode S3 (STR)
Deep Power off mode Enabled Select the ACPI
Power On by RTC Alarm Disabled state used for
Power On by PCIE Devices Disabled System Suspend.
Wake Up by PS/2 KB/Mouse Enabled
Wake Up by USB KB/Mouse Enabled
Restore On AC Power Loss Last State
↑↓→←:Move Enter:Select +/-/:Value F10:Save & Exit Setup
Esc: Exit F1:General Help F9:Load Default Settings
ACPI Suspend Type (S3 (STR))
Use this item to define how your system suspends. In the default, S1 (POS), the suspend mode is equivalent to
a software power down. If you select S3 (STR), the suspend mode is suspend to RAM, i.e., the system shuts
down with the exception of a refresh current to the system memory.
Deep Power Off Mode (Enabled)
Under ACPI (Advanced Configuration and Power management Interface) you can create a software power
down. In a software power down, the system can be resumed by Wake Up Alarms. This item lets you install a
software power down that is controlled by the power button on your system. If the item is set to Instant-Off, then
the power button causes a software power down. If the item is set to Delay 4 Sec, then you have to hold the
power button down for four seconds to cause a software power down.
Power On by RTC Alarm (Disabled)
The system can be turned off with a software command. If you enable this item, the system can automatically
resume at a fixed time based on the system’s RTC (real time clock). Use the items below this one to set the
date and time of the wake-up alarm. You must use an ATX power supply in order to use this feature.
Power On by PCIE Devices (Disabled)
The system can be turned off with a software command. If you enable this item, the system can automatically
resume if there is an incoming call on the PCIE LAN card. You must use an ATX power supply in order to use
this feature. Use this item to do wake-up action if inserting the PCIE card.
Wake Up by PS/2 KB/Mouse (Enabled)
This item enables or disables you to allow keyboard or mouse activity to awaken the system from power saving
mode.
Wake Up by USB KB/Mouse (Enabled)
This item allows you to enable/disable the USB device wakeup function from S3 mode.
Item Help
Page 35

29
Restore On AC Power Loss (Last State)
This item defines how the system will act after AC power loss during system operation.
When you set to Off, it will keep the system in Off state until the power button is pressed.
Press <Esc> to return to the main menu setting page.
Page 36

30
PC Health Status
On motherboards support hardware monitoring, this item lets you monitor the parameters for critical voltages,
temperatures and fan speeds.
CMOS Setup Utility
PC Health Status
PC Health Status
----------------------------------------- -----------------
CPU Temperature (PECI Mode) : 38
System Temperature : 41°C/105°F
CPU Fan Speed : 1104 RPM
System Fan Speed : N/A
CPU Core : 1.152 V
+1.05V : 1.392 V
+3.30V : 3.024 V
+5.00V : 5.068 V
+12.0V : 11.831 V
5VSB : 4.945 V
VBAT : 3.336 V
Smart Fan Enabled
↑↓→←:Move Enter:Select +/-/:Value F10:Save & Exit Setup
Esc: Exit F1:General Help F9:Load Default Settings
SMART Fan (Enabled)
Item Help
This item allows you to enable/disable the control of the system fan speed by changing the fan voltage.
Press <ESC> to return to the main menu setting page
Page 37

31
Frequency/Voltage Control
On motherboards support hardware monitoring, this item lets you monitor the parameters for critical voltages,
temperatures and fan speeds.
CMOS Setup Utility - Copyright (C) 1985-2009, American Megatrends, Inc.
Frequency/Voltage Control
Frequency/Voltage Control
---------------------------------------- Clock to All DIMM/PCI/PCIE Enabled
Spread Spectrum Enabled Options
Disabled
Enabled
↑↓→←:Move Enter:Select +/-/:Value F10:Save & Exit Setup
Esc: Exit F1:General Help F9:Load Default Settings
Clock to All DIMM/PCI/PCIE (Emabled)
This item allows you to enable or disable the Clock to all DIMM/PCIE
------------------
Item Help
Spread Spectrum (Enabled)
If you enable spread spertrum, it can significantly reduce the EMI (Electro-Magneticinterface) generated by the
system and voltage according to its temperature
Press <Esc> to return to the main menu setting page.
Page 38

32
BIOS Security Features
This page enables you to set the clock speed and system bus for your system. The clock speed and system bus
are determined by the kind of processor you have installed in your system.
CMOS Setup Utility
BIOS Security Features
BIOS Security Features
-------------------------------------------
----------------------
Item Help
Supervisor Password :Not Installed Install or Change the
User Password :Not Installed Password.
Change Supervisor Password Press Enter
↑↓→←:Move Enter:Select +/-/:Value F10:Save & Exit Setup
Esc: Exit F1:General Help F9:Load Default Settings
Supervisor Password (Not Installed)
This item indicates whether a supervisor password has been set. If the password has been installed, Installed
displays. If not, Not Installed displays.
User Password (Not Installed)
This item indicates whether a user password has been set. If the password has been installed, Installed
displays. If not, Not Installed displays.
Change Supervisor Password (Press Enter)
You can select this option and press <Enter> to access the sub menu. You can use the sub menu to change the
supervisor password.
Press <Esc> to return to the main menu setting page.
Load Default Settings
This option opens a dialog box that lets you install stability-oriented defaults for all appropriate items in the
Setup Utility. Select <OK> and then press <Enter> to install the defaults. Select <Cancel> and then press
<Enter> to not install the defaults.
Press <Esc> to return to the main menu setting page.
Page 39

33
Save & Exit Setup
Highlight this item and press <Enter> to save the changes that you have made in the Setup Utility and exit the
Setup Utility. When the Save and Exit dialog box appears, select [OK] to save and exit, or select [Cancel] to
return to the main menu.
Exit Without Saving
Highlight this item and press <Enter> to discard any changes that you have made in the Setup Utility and exit
the Setup Utility. When the Exit Without Saving dialog box appears, select [OK] to discard changes and exit,
or select [Cancel] to return to the main menu.
If you have made settings that you do not want to save, use the “Exit
Without Saving” item and select [OK] to discard any changes you have
made.
Page 40

34
Chapter3
Machine Disassembly and Replacement
To disassemble the computer, you need the following tools:
l Wrist grounding strap and conductive mat for preventing electrostatic discharge.
l Wire cutter.
l Phillips screwdriver (may require different size).
NOTE: The screws for the different components vary in size. During the disassembly process, group the screws
with the corresponding components to avoid mismatches when putting back the components.
Page 41

35
General Information
Before You Begin
Before proceeding with the disassembly procedure, make sure that you do the following:
1. Turn off the power to the system and all peripherals.
2. Unplug the AC adapter and all power and signal cables from the system.
Page 42

36
Standard Assembly Process
1. Opening the chassis
1.1 Remove the two screws
1.2 Remove side cover.
2. Removing PSU bracket
2.1 Rotate the PSU bracket
Page 43

37
3. Removing HDD bracket
3.1 Remove the screw
3.2 Rotate the bracket
4. Removing front bezel
4.1 Pushing three hooks
Page 44

38
4.2 Rotate the front bezel
5. Insert the ODD devices
5.1 Pushing HDD devices into bracket
5.2 Fix two screws
Page 45

39
6. Setting the Motherboard
6.1 Motherboard view
6.2 Open the CPU cover
6.3 Put the CPU in the seat and close the cover
Page 46

40
6.4 Tie CPU fan cable
6.5 Pulling in CPU fan power cable to MB
6.6 Fix four screws of CPU Cooler connect to MB
Page 47

41
6.7 Open the Memory latch
1
1 3 2 4
6.8 Press down the memory
6.9 Memory install rule
DIMM4 DIMM2 DIMM3 DIMM1
1x1G 1GB
2x1G 1GB 1GB
3x1G 1GB 1GB 1GB
4x1G 1GB 1GB 1GB 1GB
1x1G+1x2G 1GB 2GB
1x2G 2GB
2x2G 2GB 2GB
3x2G 2GB 2GB 2GB
4x2G 2GB 2GB 2GB 2GB
Page 48

42
7. Assembly motherboard
7.1 Pushing rear I/O Shield in chassis
7.2 Insert the motherboard and fix six screws
8. Insert the system Fan
8.1 Tie system fan cable
Page 49

43
8.2 Pushing system fan
8.3 Fix two screw
8.4 Pulling in system fan power cable to MB
Page 50

44
9. Pulling in Audio/USB1/CR/PANEL cable to MB and put in cable clip
10. Insert the HDD
10.1 Pushing HDD into bracket
10.2 Fix four screws
Front Back
Page 51

45
10.3 Pushing HDD into chassis
10.4 Fix the screws
11. Pulling in HDD &ODD SATA cable on Motherboard
SATA 2:ODD
SATA 1:HDD
SATA 1 SATA 2
Page 52

46
12. Insert VGA card
12.1 Rotate the bracket
12.2 Remove PCI slot
12.3 Install VGA card on motherboard
Page 53

47
12.4 Rotate the bracket
13. Insert the PSU
13.1 Pushing PSU into bracket
13.2 Fix four screws
13.3 ATV 12V power cable insert
Page 54

48
13.4 ATX power cable insert
13.5 Insert the ODD/HDD power-cable
Insert the ODD power-cable Insert the HDD power-cable
Long for HDD used
Short for ODD used
Page 55

49
14. Overview
Page 56

50
Standard Disassembly Process
1. Opening the chassis
1.1 Remove the two screws
1.2 Remove the side cover
2. Removing the power-supply
2.1 Rotate the power-supply
Page 57

51
2.2 Pulling out the 20 pins power connector and 4 pins power connector
2.3 Pulling out the ODD power-cable and HDD power-cable
2.4 Remove four screws
Page 58

52
2.5 Remove the power-supply
3. Pulling out the SATA ODD cable and SATA HDD cable
4. Removing the HDD
4.1 Remove the screw
ODD Cable HDD Cable
Page 59

53
4.2 Rotate the bracket
4.3 Remove four screws
4.4 Remove the HDD
Front Back
Page 60

54
5. Removing the VGA Card
5.1 Rotate the bracket
5.2 Remove the VGA Card
6. Pulling out the Audio/USB1/CR/PANEL cable
Page 61

55
7. Removing system Fan
7.1 Pulling out the system Fan cable
7.2 Remove two screws
7.3 Remove system Fan
Page 62

56
8. Removing the Main Board
NOTE:
Circuit boards >10 cm² has been highlighted with the
NOTE:
RTC battery has been highlighted with the
8.1 Remove eight screws then you can pull out MB and remove it.
8.2 Remove the Rear IO Shield.
8.3 Remove the RTC battery.
yellow rectangle as above image shows. Please detach the
Circuit boards and follow local regulations for disposal.
yellow circle as above image shows. Please detach
the RTC battery and follow local regulations for disposal.
Page 63

57
8.4 Pulling out the CPU cooler power-cable from the main board
8.5 Remove the four CPU Cooler screws
8.6 Remove the CPU
Page 64

58
8.7 Release the four latch show bellow then remove the Memory
9. Removing front bezel
9.1 Pushing three hooks
9.2 Rotate the front bezel
Page 65

59
10. Removing the ODD
10.1 remove two screws
10.2 Pulling out the ODD
11. Removing the ODD bracket
11.1 Remove five screws.
Page 66

60
11.2 Removing the ODD bracket
12. Pulling out Card reader & USB & Audio module and power switch & HDD led cable
12.1 Removing top bezel (Pushing the hooks)
12.2 Removing Cable-Tie
Page 67

61
12.3 Pushing the Cable
12.4 Removing power switch & HDD-LED _holder
Front Back
12.5 Pulling out HDD LED cable
Page 68

62
12.6 Removing power switch & HDD led cable
12.7 Removing HDD led housing
12.8 Removing the two screw and pulling out Card reader & USB & Audio module
Page 69

63
Machine Disassembly and Replacement
This chapter provides troubleshooting information for the imedia S3811 Service Guide
l Power-On Self-Test (POST)
l POST Error Messages List
l Error Symptoms List
l Undetermined Problems
Chapter4
Page 70

64
Power-On Self-Test (POST)
Disable NMI, Parity,video for EGA, and DMA controllers. Initialize BIOS, POST,
Runtime data area. Also initialize BIOS modules on POST entry and GPNV area.
INT1Ch vector to "POSTINT1ChHandlerBlock."
Each time you turn on the system, the Power-on Self Test (POST) is initiated. Several items are tested
during POST, but is for the most part transparent to the user.
The Power-On Self Test (POST) is a BIOS procedure that boots the system, initializes and diagnoses the
system components, and controls the operation of the power-on password option. If POST discovers errors
in system operations at power-on, it displays error messages on screen, generates a check point
code at port 80h or even halts the system if the error is fatal.
The main components on the main board that must be diagnosed and/or initialized by POST to ensure
system functionality are as follows:
l Microprocessor with built-in numeric co-processor and cache memory subsystem
l Direct Memory Access (DMA) controller
l Interrupt system
l Three programmable timers
l ROM subsystem
l RAM subsystem
l CMOS RAM subsystem and real time clock/calendar with battery backup
l Onboard parallel interface controller
l Embedded hard disk interface and one diskette drive interface
l Keyboard and auxiliary device controllers
l I/O ports
l One parallel port
l One PS/2-compatible mouse port
l One PS/2-compatible keyboard port
NOTE: When Post executes a task, it uses a series of preset numbers called check points to be latched
at port 80h, indicating the stages it is currently running. This latch can be read and shown on a debug
board.
The following table describes the BIOS common tasks carried out by POST. Each task is denoted by an
unique check point number. For other unique check point numbers that are not listed in the table, refer to
the corresponding product service guide.
Post Checkpoints List: The list may vary accordingly depending on your BIOS
Checkpoint Description
03
Initialized CMOS as mentioned in the Kernel Variable "wCMOSFlags."
04 Check CMOS diagnostic byte to determine if battery power is OK and CMOS
checksum is OK. Verify CMOS checksum manually by reading storage area.
If the CMOS checksum is bad, update CMOS with power-on default values and
clear passwords. Initialize status register A.
05 Initializes the interrupt controlling hardware (generally PIC) and interrupt vector
table.
06 Do R/W test to CH-2 count reg. Initialize CH-0 as system timer. Install the
POSTINT1Ch handler. Enable IRQ-0 in PIC for system timer interrupt. Traps
07 Fixes CPU POST interface calling pointer.
Page 71

65
KB-5.
t. Give control to ADM module
Checkpoint Description
08 Initializes the CPU. The BAT test is being done on KBC.Program the keyboard
controller command byte is being done after Auto detection of KB/MS using AMI
C0 Early CPU Init Start -- Disable Cache – Init Local APIC
C1 Set up boot strap processor Information
C2 Set up boot strap processor for POST
C5 Enumerate and set up application processors
C6 Re-enable cache for boot strap processor
C7 Early CPU Init Exit
0A Initializes the 8042 compatible Key Board Controller.
0B Detects the presence of PS/2 mouse.
0C Detects the presence of Keyboard in KBC port.
0E Testing and initialization of different Input Devices. Also, update the
Kernel Variables.
Traps the INT09h vector, so that the POST INT09h handler gets control for IRQ1.
Uncompress all available language, BIOS logo, and Silent logo modules.
13 Early POST initialization of chipset registers.
20 Relocate System Management Interrupt vector for all CPU in the system.
24 Uncompress and initialize any platform specific BIOS modules. GPNV is
2A Initializes different devices through DIM.
2C Initializes different devices. Detects and initializes the video adapter installed in the
system that had optional ROMs.
2E Initializes all the output devices.
31 Allocate memory for ADM module and uncompress i
for initialization. Initialize language and font modules for ADM. Activate ADM
module.
33 Initializes the silent boot module. Set the window for displaying text information.
37 Displaying sign-on message, CPU information, setup key message, and any
OEM specific information.
38 Initializes different devices through DIM. USB controllers are initialized at this point.
Page 72

66
Checkpoint Description
39
3A
3B
3C
40
Initializes DMAC-1 & DMAC-2.
Initialize RTC date/time.
Test for total memory installed in the system. Also, Check for DEL or ESC
keys to limit memory test. Display total memory in the system.
Mid POST initialization of chipset registers.
Detect different devices (Parallel ports, serial ports, and coprocessor in CPU, …
etc.) successfully installed in the system and update the BDA, EBDA…etc.
52
60
75
78
7C
84
85
87
8C
8D
8E
90
A1
Updates CMOS memory size from memory found in memory test. Allocates
memory for Extended BIOS Data Area from base memory. Programming the
memory hole or any kind of implementation that needs an adjustment in system
RAM size if needed.
Initializes NUM-LOCK status and programs the KBD typematic rate.
Initialize Int-13 and prepare for IPL detection.
Initializes IPL devices controlled by BIOS and option ROMs.
Generate and write contents of ESCD in NVRam.
Log errors encountered during POST.
Display errors to the user and gets the user response for error.
Execute BIOS setup if needed / requested. Check boot password if
installed.
Late POST initialization of chipset registers.
Build ACPI tables (if ACPI is supported)
Program the peripheral parameters. Enable/Disable NMI as selected
Initialize system management interrupt by invoking all handlers.
Please note this checkpoint comes right after checkpoint 20h
Clean-up work needed before booting to OS.
Page 73

67
Prepares the runtime language module. Disables the system configuration display if
Checkpoint Description
A2 Takes care of runtime image preparation for different BIOS modules. Fill the free
area in F000h segment with 0FFh. Initializes the Microsoft IRQ Routing Table.
needed.
A4 Initialize runtime language module. Display boot option popup menu.
A7 Displays the system configuration screen if enabled. Initialize the CPU’s before
boot, which includes the programming of the MTRR’s.
A9 Wait for user input at config display if needed.
AA Uninstall POST INT1Ch vector and INT09h vector.
AB Prepare BBS for Int 19 boot. Init MP tables.
AC End of POST initialization of chipset registers. De-initializes the ADM module.
B1 Save system context for ACPI. Prepare CPU for OS boot including final
MTRR values.
00 Passes control to OS Loader (typically INT19h).
Page 74

68
POST Error Messages List
If you cannot run the diagnostics program tests but did receive a POST error message, use “POST Error
Messages List” to diagnose system problems. If you did not receive any error message, look for a
description of your error symptoms in “Error Symptoms List” on page 66.
NOTE: When you have deemed it necessary to replace an FRU, and have done so, you must run a total
system check to ensure that no other activity has been affected by the change. This system
check can be done through the diagnostics program.
NOTE: Check all power supply voltages, switch, and jumper settings before you replace the main board.
Also check the power supply voltages if you have a “system no-power” condition.
If you are unable to correct the problem by using the “BIOS Messages List” table and “Error Symptoms
List” table, go to “Undetermined Problems”.
To diagnose a problem, first find the BIOS error messages in the left column. If directed to a check
procedure, replace the FRU indicated in the check procedure. If no check procedure is indicated, the first
Action/FRU listed in right column is the most likely cause.
BIOS Messages Action/FRU
BIOS ROM
checksum error System halted
The checksum of the BIOS code in the BIOS chip is incorrect, indicating the BIOS
code may have become corrupt. Contact your system dealer to replace the BIOS.
CMOS Battery
Failed
CMOS Checksum
Error- defaults
loaded
CPU at nnnn Displays the running speed of CPU.
Display switch is set
incorrectly
Press ESC to skip
memory test
HARD DISK
initializing - Please
HARD DISK
INSTALL FAILURE
Hard disk(s)
diagnosis fail
The CMOS battery is no longer functional. Contact your system dealer for a
replacement the BIOS.
Checksum of CMOS is incorrect, so the system loads the default equipment
configuration. A checksum error may indicate that CMOS has become corrupt. A
weak battery may have caused this error. Check the battery and replace if
necessary.
The display switch on the motherboard can be set to either monochrome or color.
This message indicates the switch is set to a different setting than indicated
in Setup. Determine which setting is correct, and
then either turn off the system and change the jumper, or enter Setup and
change the Video selection.
The user may press Esc to skip the full memory test.
Some hard drives require extra time to initialize.
Cannot find or initialize the hard drive controller or the drive. Make sure the controller
is installed correctly. If no hard drives are installed, be sure the Hard Drive Selection
in Setup is set to NONE.
The system may run specific disk diagnostic
routines. This message appears if one or more hard disks return an error when the
diagnostics run.
Page 75

69
BIOS Messages Action/FRU
Keyboard Error Or
No Keyboard
Present
Cannot initialize the keyboard. Make sure the keyboard is attached correctly and no
keys are pressed during POST. To purposely configure the system without a
keyboard, set the error halt condition in Setup to HALT ON ALL, BUT KEYBOARD.
The BIOS then ignores the missing keyboard during POST.
Keyboard is locked
out - Unlock the key
Memory Test: This message displays during a full memory test, counting down the memory
Memory test fail If POST detects an error during memory testing, additional information appears giving
Override enabled Defaults loaded
Press TAB to show
POST screen
Primary master hard
disk fail
Primary slave hard
disk fail
Secondary master
hard disk fail
Secondary slave
hard disk fail
This message usually indicates that one or more keys have been pressed during the
keyboard tests. Be sure no objects are resting on the keyboard.
areas being tested.
specifics about the type and location of the memory error.
If the system cannot boot using the current CMOS configuration, the BIOS can
override the current configuration with a set of BIOS defaults designed for the most
stable, minimal-performance system operations.
System OEMs may replace the Phoenix Technologies Award BIOS POST display
with their own proprietary display. Including this message in the OEM display
permits the operator to switch between the OEM display and the default POST
display.
POST detects an error in the primary master IDE
hard drive.
POST detects an error in the secondary master IDE
hard drive.
POST detects an error in the primary slave IDE hard drive.
POST detects an error in the secondary slave IDE
hard drive.
Page 76

70
Error Symptoms List
NOTE: To diagnose a problem, first find the error symptom in the left column. If directed to a check procedure,
replace the FRU indicated in the check procedure. If no check procedure is indicated, the first Action/ FRU listed
in right column is the most likely cause.
Error Symptom Action/FRU
Processor / Processor Fan
NOTE: Normally, the processor fan should be operative, and the processor clock setting should be exactly
set to match its speed requirement before diagnosing any processor problems.
Processor fan does not run but power
supply fan runs.
Processor test failed. 1. Processor.
NOTE: Ensure the memory modules are installed properly and the contact leads are clean before
diagnosing any system problems.
Memory test failed. 1. See "Memory"
Incorrect memory size shown or
repeated during POST.
System works but fails to enter power
saving mode when the Power
Management Mode is set to Enabled.
Blinking cursor only; system does not
work.
NOTE: Ensure hard disk drive is configured correctly in BIOS Setup, cable/jumper are set correctly
before diagnosing any hard disk drive problems. (If only one drive is installed, please make sure
the drive is connected to master connector or the drive is set to master.)
Hard disk drive test failed. 1. Enter BIOS Setup and Load default settings.
Hard disk drive cannot format
completely.
Hard disk drive has write error. 1. Enter BIOS Setup and Load default settings.
Hard disk drive LED fails to light, but
system operates normally.
1. Ensure the system is not in power saving mode. See
“Power Management” in chapter 2.
2. With the system power on, measure the voltage of processor
fan connector. Its reading should be +12Vdc. Its reading
should be +12Vdc. If the reading shows normal, but the fan
still does not work, then replace a good fan.
3. Main board.
2. Main board.
Main board and Memory
2. Main board
1. Insert the memory modules in the DIMM sockets
properly, then reboot the system.
2. Memory module.
3. Main board.
1. Enter BIOS Setup and load default settings.
In Windows Systems, check settings in Power
Management Property of Control Panel.
2. Reload software from Recovery CD.
1. Diskette/IDE drive connection/cables
2. Diskette/IDE disk drives
3. See “Undetermined Problems”.
4. Main board
Hard Disk Drive
2. Hard disk drive cable.
3. Hard disk drive.
4. Main board.
1. Enter BIOS Setup and Load default settings.
2. Hard disk drive cable.
3. Hard disk drive.
4. Main board.
2. Hard disk drive.
1. With the system power on, measure the voltage of hard disk
LED connector.
2. Hard drive LED cable.
Page 77

71
sound feature w
orks normally.)
Error Symptom Action/FRU
NOTE: Ensure CD/DVD-ROM drive is configured correctly in BIOS Setup, cable/jumper are set correctly
and its laser beam is clean before diagnosing any CD/DVD-ROM drive problems.
CD/DVD-ROM drive LED doesn't come
on but works normally.
CD/DVD-ROM drive LED flashes for
more than 30 seconds before LED
shutting off.
Software asks to reinstall disc.
Software displays a reading CD/DVD
error.
CD/DVD-ROM drive cannot load or eject
when the system is turned on and its
eject button is pressed and held.
CD/DVD-ROM drive does not read and
there are no messages are displayed.
CD/DVD-ROM drive can play audio CD
but no sound output.
Real-time clock is inaccurate.
CD/DVD-ROM Drive
1. CD/DVD-ROM drive
1. CD/DVD-ROM may have dirt or foreign material on it.
Check with a known good disc.
2. CD/DVD-ROM is not inserted properly.
3. CD/DVD-ROM is damaged.
1. Disconnect all cables from CD/DVD-ROM drive except
power cable, then press eject button to try to unload the disk.
2. CD/DVD-ROM drive power.
3. CD/DVD-ROM drive
1. CD may have dirt or foreign material on it. Check with a
known good disc.
2. Ensure the CD/DVD-ROM driver is installed properly.
3. CD/DVD-ROM drive.
1. Ensure the headphone jack of the CD/DVD-ROM has an
output.
2. Turn up the sound volume.
3. Speaker power/connection/cable.
4. CD/DVD-ROM drive.
Real-Time Clock
1. Ensure the information in the Standard CMOS
Feature of BIOS Setup is set correctly.
2. RTC battery.
3. Main board
Audio software program invokes but no
sound comes from speakers.
Modem ring cannot wake up system
from suspend mode.
Data/fax modem software program
invokes but cannot receive/send data/
fax
Fax/voice modem software program
invokes but has no sound output. (Data
files are received normally; voice from
modem cannot be produced, but system
Audio
1. Speaker power/connection/cable.
Modem
1. For the External Modem, make sure Power on By Ring in
BIOS Setup or Power Management is set to Enabled. For the
PCI modem, make sure Wake up by PCI card is set to Enabled.
2. If PCI modem card is used, reinsert the modem card to
PCI slot firmly or replace the modem card.
3. In Win 98, ensure the telephone application is configured
correctly for your modem and set to receive messages and/or
fax.
1. Ensure the modem card is installed properly.
1. Ensure the modem voice-in cable from modem adapter card
to main board
Page 78

72
not set
Error Symptom Action/FRU
Video and Monitor
Video memory test failed.
Video adapter failed.
Display problem:
- Incorrect colors
No high intensity
Missing, broken, or incorrect characters
Blank monitor (dark)
Blank monitor (bright)
Distorted image
Unreadable monitor
Other monitor problems
Display changing colors. 1. Monitor signal connection/cable
1. Remove all non-factory-installed cards.
2. Load default settings (if screen is readable).
3. Main board
1. Monitor signal connection/cable.
2. Monitor
3. Video adapter card
4. Main board
2. Monitor
3. Main board
Display problem not listed above
(including blank or illegible monitor).
Execute “Load BIOS Default Settings” in BIOS Setup to confirm ports presence before diagnosing any
parallel/serial ports problems.
Serial or parallel port loop-back test
failed.
Printing failed. 1. Ensure the printer driver is properly installed. Refer to the
Printer problems. 1. Refer to the service manual for the printer.
Some or all keys on keyboard do not
work.
Pressing power switch does not turn off
system. (Only unplugging the power
cord from electrical outlet can turn off the
system.)
Pressing power switch does not turn on
the system.
1. “Monitor"
2. Load default settings (if screen is readable).
3. Main board
Parallel/Serial Ports
1. Make sure that the LPT# or COM# you test is the same as the
setting in BIOS Setup.
2. Loop-back.
3. Main board.
printer service manual.
2. Printer.
3. Printer cable.
4. Main board.
Keyboard
1. Keyboard
Power Supply
1. Ensure the Soft-off by PWR-BTTN. in BIOS Setup of Power
Management is not set to Instant-off.
2. Power switch cable assembly
1. Ensure the power override switch (situated at the back of the
machine, just above the connector for the power cable) is
to OFF.
2. Power switch cable assembly.
Page 79

73
Error Symptom Action/FRU
Executing software shutdown from
Windows98 Start menu does not turn off
the system. (Only pressing power switch
can turn off the system).
No system power, or power supply fan is
not running.
Any other problems. 1. Undetermined Problems
1. Load default settings.
2. Reload software from Recovery CD.
1. Power Supply
2. Main board
Other Problems
Page 80

74
Undetermined Problems
If an error message is present, go to “POST Error Messages List” on page 64. If you did not receive any
messages, if the symptom is listed in “or “Error Symptoms List” on page 66. If you still cannot solve the
problem, continue with this check:
1. Check the power supply voltages. If the voltages are correct continue with the following
steps:
2. Power off the system unit.
3. Perform the following checks, one by one, until you have isolated the problem FRU.
4. Load default settings in setup.
5. Check all main board jumper positions and switch settings.
6. Check all adapter card jumper positions.
7. Check all device jumper positions.
8. Check all cables and connectors for proper installation.
9. If the jumpers, switches and voltage settings are correct, remove or disconnect the following,
one at a time.
10. Non-Acer devices
l External devices
l Any adapter card (modem card, LAN card or video card, if installed)
l CD/DVD-ROM drive
l Hard disk drive
l DIMM
l Processor
l Main board
11. Power on the system unit.
12. Repeat steps 2 through 5 until you find the failing device or adapter.
Page 81

75
Chapter5
Jumper and Connector Information
Safety Precautions
l Follow these safety precautions when installing the motherboard
l Wear a grounding strap attached to a grounded device to avoid damage from static electricity
l Discharge static electricity by touching the metal case of a safely grounded object before working on
the motherboard
l Leave components in the static-proof bags they came in
l Hold all circuit boards by the edges. Do not bend circuit boards
Choosing a Computer Case
There are many types of computer cases on the market. The motherboard complies with the specifications for the
Micro ATX system case. Firstly, some features on the motherboard are implemented by cabling connectors on the
motherboard to indicators and switches on the system case. Make sure that your case supports all the features
required. Secondly, this motherboard supports one or two floppy diskette drives and two enhanced IDE drives.
Make sure that your case has sufficient power and space for all drives that you intend to install.
Most cases have a choice of I/O templates in the rear panel. Make sure that the I/O template in the case matches
the I/O ports installed on the rear edge of the motherboard.
This motherboard carries an Micro ATX form factor of 244 X 244 mm. Choose a case that accommodates this
form factor.
Installing the Motherboard in a Case
Refer to the following illustration and instructions for installing the motherboard in a case.
Most system cases have mounting brackets installed in the case, which correspond the holes in the motherboard.
Place the motherboard over the mounting brackets and secure the motherboard onto the mounting brackets with
screws.
Ensure that your case has an I/O template that supports the I/O ports and expansion slots on your motherboard.
Page 82

76
Checking Jumper Settings
This section explains how to set jumpers for correct configuration of the motherboard.
Do not over-tighten the screws as this can stress the motherboard.
Setting Jumpers
Use the motherboard jumpers to set system configuration options. Jumpers with more than one pin are
numbered. When setting the jumpers, ensure that the jumper caps are placed on the correct pins.
The illustrations show a 2-pin jumper. When the
jumper cap is placed on both pins, the jumper is
SHORT. If you remove the jumper cap, or place
the jumper cap on just one pin, the jumper is OPEN.
SHORT OPEN
This illustration shows a 3-pin jumper. Pins 1
and 2 are SHORT
Page 83

77
Checking Jumper Settings
The following illustration shows the location of the motherboard jumpers. Pin 1 is labeled.
Jumper Settings
Jumper Type
CLR_CMOS 3-pin CLEAR CMOS
ME_ENABLE 3-pin
Description Setting (Default) IIIustration
1-2: NORMAL.
2-3: CLEAR
Before clearing the CMOS, make sure
to turn the system off
MEENABLE
1-2: NORMAL.
2-3: CLEAR
1
CLR_COMS
1
ME_DISABLE
Page 84

78
Connecting Case Components
After you have installed the motherboard into a case, you can begin connecting the motherboard components.
Refer to the following:
1 Connect the CPU cooling fan cable to CPU_FAN.
2 Connect the standard power supply connector to ATX_POWER
3 Connect the auxiliary case power supply connector to ATX12V.
4 Connect the case switches and indicator LEDs to the F_PANEL.
5 Connect the system cooling fan connector to SYS_FAN.
6.Connect the case speaker cable to SPK.
Connecting 24-pin power cable
Users please note that when installing 24-
pin power cable, the latche of power cable
falls on the left side of the ATX_POWER1connector
latch, just as the picture shows.
24-pin power cable
Page 85

79
CPU_FAN: Cooling Fan Power Connectors
Pin Signal Name Function
1 GND System Ground
2 +12V Power +12V
3 Sense Sensor
4 PWM CPU FAN control
SYS_FAN: Cooling Fan Power Connector
Pin Signal Name Function
1 GND System Ground
2 +12V Power +12V
3 Sense Sensor
ATX_POWER:ATX 24-pin Power Connector
Pin Signal Name Pin Signal Name
1 +3.3V 13 +3.3V
2 +3.3V 14 -12V
3 Ground 15 COM
4 +5V 16 PS_ON
5 Ground 17 Ground
6 +5V 18 Ground
7 Ground 19 Ground
8 PWRGD 20 -5V
9 +5VSB 21 +5V
10 +12V 22 +5V
11 +12V 23 +5V
12 +3.3V 24 Ground
ATX12V: ATX 12V Power Connector
Pin Signal Name
1 Ground
2 Ground
3 +12V
4 +12V
SPK: Internal speaker
Pin Signal Name Pin Signal Name
1 Output 2 GND
3 Output 4 Ground
5 GND 6 GND
7 N/A 8 VCC
Page 86

80
Front Panel Header
The front panel header (PANEL1) provides a standard set of switch and LED headers commonly found on
ATX or Micro ATX cases. Refer to the table below for information:
Pin Signal Name Function Pin
1 HD_LED_P Hard disk LED(+) 2 FP PWR/SLP *MSG LED(+)
3 HD_LED_N Hard disk LED(-) 4 FP PWR/SLP *MSG LED(-)
5 RST_SW_N Reset Switch(-) 6 PWR_SW_P Power Switch(+)
7 RST_SW_P Reset Switch(+) 8 PWR_SW_N Power Switch(-)
9 RSVD Reserved 10 Key No pin
Hard Drive Activity LED
Connecting pins 1 and 3 to a front panel mounted LED provides visual indication that data is being read from
or written to the hard drive. For the LED to function properly, an IDE drive should be connected to the onboard
IDE interface. The LED will also show activity for devices connected to the SCSI (hard drive activity LED)
connector.
Power/Sleep/Message waiting LED
Connecting pins 2 and 4 to a single or dual-color, front panel mounted LED provides power on/off, sleep, and
message waiting indication.
Reset Switch
Supporting the reset function requires connecting pin 5 and 7 to a momentary-contact switch that is normally
open. When the switch is closed, the board resets and runs POST.
Power Switch
Supporting the power on/off function requires connecting pins 6 and 8 to a momentary-contact switch that is
normally open. The switch should maintain contact for at least 50 ms to signal the power supply to switch on
or off. The time requirement is due to internal de-bounce circuitry. After receiving a power on/off signal, at
least two seconds elapses before the power supply recognizes another on/off signal.
Signal Name Function
Page 87

81
Installing Hardware
Installing the Processor
Caution: When installing a CPU heatsink and cooling fan make sure that you DO NOT
scratch the motherboard or any of the surface-mount resistors with the clip of the
cooling fan.If the clip of the cooling fan scrapes across the motherboard, you may
cause serious damage to the motherboard or its components.
On most motherboards, there are small surface-mount resistors near the processor
socket, which may be damaged if the cooling fan is carelessly installed.
Avoid using cooling fans with sharp edges on the fan casing and the clips. Also,
install the cooling fan in a well-lit work area so that you can clearly see the
motherboard and processor socket.
Before installing the Processor
This motherboard automatically determines the CPU clock frequency and system bus frequency for the
processor. You may be able to change these settings by making changes to jumpers on the
motherboard, or changing the settings in the system Setup Utility. We strongly recommend that you do
not over-clock processors or other components to run faster than their rated speed.
Warning: Over-clocking components can adversely affect the reliability of the system and
introduce errors into your system. Over-clocking can permanently damage the
motherboard by generating excess heat in components that are run beyond the
rated limits.
This motherboard has an LGA1156 socket. When choosing a processor, consider the
performance requirements of the system. Performance is based on the processor
design, the clock speed and system bus frequency of the processor, and the quantity
of internal cache memory and external cache memory.
Page 88

82
CPU Installation Procedure
The following illustration shows CPU installation components.
A Opening of the Load Plate Put your thumb on the tail of the load
plate and press the tail down Rotate the load plate to fully open
position.
B. Disengaging of the Load Lever· Hold the hook of lever and pull it to the
left side to clear retention tab. Rotate the load lever to fully open
position.
C. Removing the Cap· Be careful not to touch the contact at any time.
D. Inserting the Package·Grasp the package. Ensure to grasp on
the edge of the substrate. Make sure pin 1 indicator is on your
bottom-left side. Aim at the socket and place the package
carefully into the socket by purely vertical motion.
E. Closing the Load Plate·Rotate the load plate onto the package IHS
(Intergraded Heat Spreader).· Engage the load lever while pressing
down lightly onto the load plate.·Secure the load lever with the hook
under retention tab.
F. Fasten the cooling fan supporting base onto the CPU socket on the motherboard.
G. Make sure the CPU fan is plugged to the CPU fan connector. Please refer to the
CPU cooling fan user’s manual for more detail installation procedure.
1. To achieve better airflow rates and heat dissipation, we suggest that
you use a high quality fan with 3800 rpm at least. CPU fan and
heatsink installation procedures may vary with the type of CPU fan/
heatsink supplied. The form and size of fan/heatsink may also vary.
2. DO NOT remove the CPU cap from the socket before installing a CPU.
3. Return Material Authorization (RMA) requests will be accepted
only if the motherboard comes with the cap on the LGA1156 socket.
Page 89

83
Installing Memory Modules
This motherboard accommodates two memory modules. It can support four 240-pin DR3 1066/1333. The
total memory capacity is 16 GB.
DDR3 SDRAM memory module table
Memory Memory Bus
DDR3 1066 533 MHz
DDR3 1333 667 MHz
Do not remove any memory module from its antistatic packaging until you are ready to install
it on the motherboard. Handle the modules only by their edges. Do not touch the
components or metal parts. Always wear a grounding strap when you handle the modules.
Installation Procedure
Refer to the following to install the memory modules.
1. This motherboard supports unbuffered DDR3 SDRAM only.
2. Push the latches on each side of the DIMM slot down.
3. Align the memory module with the slot. The DIMM slots are keyed with
notches and the DIMMs are keyed with cutouts so that they can only be
installed correctly.
4. Check that the cutouts on the DIMM module edge connector match the
notches in the DIMM slot.
5. Install the DIMM module into the slot and press it firmly down until it seats
correctly. The slot latches are levered upwards and latch on to the edges of
the DIMM.
6. Install any remaining DIMM modules.
Page 90

84
Installing Serial ATA Hard Drives
To install the Serial ATA (SATA) hard drives, use the SATA cable that supports the Serial ATA protocol. This
SATA cable comes with an SATA power cable. You can connect either end of the SATA cable to the SATA hard
drive or the connector on the motherboard.
SATA cable (optional)
Refer to the illustration below for proper installation:
1. Attach either cable end to the connector on the motherboard.
2. Attach the other cable end to the SATA hard drive.
3. Attach the SATA power cable to the SATA hard drive and connect the other
end to the power supply.
This motherboard does not support the “Hot-Plug” function.
SATA power cable (optional)
Page 91

85
Installing Add-on Cards
The slots on this motherboard are designed to hold expansion cards and connect them to the system bus.
Expansion slots are a means of adding or enhancing the motherboard’s features and capabilities. With these
efficient facilities, you can increase the motherboard’s capabilities by adding hardware that performs tasks
that are not part of the basic system.
PCIE16X Slot The PCI Express x16 slot is used to install an external PCI Express graphics card
that is fully compliant to the PCI Express Base Specification revision 2.0
PCIE1X1 Slot The PCI Express x1 slot is fully compliant to the PCI Express Base Specification
revision 2.0 as well.
Before installing an add-on card, check the documentation for the card carefully. If the card
is not Plug and Play, you may have to manually configure the card before installation.
Page 92

86
Follow these instructions to install an add-on card:
1. Remove a blanking plate from the system case corresponding to the slot you are going to
use.
2. Install the edge connector of the add-on card into the expansion slot. Ensure that the edge
connector is correctly seated in the slot.
3. Secure the metal bracket of the card to the system case with a screw.
1.For some add-on cards, for example graphics adapters and network adapters,
you have to install drivers and software before you can begin using the add-on
card.
2. The onboard PCI interface does not support 64-bit SCSI cards.
Page 93

87
Connecting Optional Devices
Refer to the following for information on connecting the motherboard’s optional devices:
F_AUDIO1: Front Panel Audio header
This header allows the user to install auxiliary front-oriented microphone and line-out ports
for easier access.
Pin Signal Name Pin
Signal Name
1 PORT 1L 2 AUD_GND
3 PORT 1R 4 PRESENCE#
5 PORT 2R 6 SENSE1_RETURN
7 SENSE_SEND 8 KEY
9 PORT 2L 10 SENSE2_RETURN
GPIO1~2: Button recovery jumper
Pin Signal Name Pin Signal Name
1 GP36(GP16) 2 GND
Page 94

88
SATA 1~4: Serial ATA connectors
These connectors are used to support the new Serial ATA devices for the highest date transfer rates (3 Gb/s ),
simpler disk drive cabling and easier PC assembly. It eliminates limitations of the current Parallel ATA
interface. But maintains register compatibility and software compatibility with Parallel ATA.
Pin Signal Name Pin Signal Name
1 Ground 2 TX+
3 TX- 4 Ground
5 RX- 6 RX+
7 Ground - -
SPDIFO: SPDIF out header(Option)
This is an optional header that provides an S/PDIF (Sony/Philips Digital Interface) output to digital multimedia
device through optical fiber or coaxial connector.
Pin Signal Name Function
1 +5VA 5V analog Power
2 Key No pin
3 SPDIF SPDIF digital output
4 GND Ground
F_USB1~4: Front Panel USB headers
The motherboard has four USB ports installed on the rear edge I/O port array. Additionally, some computer
cases have USB ports at the front of the case. If you have this kind of case, use auxiliary USB connector to
connect the front-mounted ports to the motherboard.
Pin Signal Name Function
1 USBPWR Front Panel USB Power
2 USBPWR Front Panel USB Power
3 USB_FP_P0- USB Port0 Negative Signal
4 USB_FP_P1- USB Port1 Negative Signal
5 USB_FP_P0+ USB Port0 Positive Signal
6 USB_FP_P1+ USB Port1 Positive Signal
7 GND Ground
8 GND Ground
9 Key No pin
10 USB_FP_OC0 Overcurrent signal
Please make sure that the USB cable has the same pin assignment as indicated
above. A different pin assignment may cause damage or system hang-up.
Page 95

89
FRU (Field Replaceable Unit) List
Exploded Diagram
Chassis_P5-15L w/ card reader ME BOM
Chapter6
Chapter6
Item
1 SM_SIDE_COVER 22 SM_ODD_CAGE
2 SCREW-6-32-6L 23 WCL-10
3 RUBBER_FOR_POWER_BKT
4 SM_POWER_BKT
5 CABLE CLIP
6 SM_PCI_SLOT_COVER
7 SM_PCI_EMI_SHIELDING
8 SM_PCI_CLAMP
9 SM_REAR_PLATE
10 SM_POWER_ASM_BKT
11 SM_MB_BKT
12 STANDOFF
13 CLIP
Description Item
24
25
26
27
28
29
30
31
32
33
34
SM_HDD_CAGE
SM_FRONT_PLATE
RIVET_32_FLAT_HEAD
RIVET_32_UMBRELLA_HEAD
TOP COVER CABLE ROUTING
TOP-COVER
TOP-MAIN_BEZEL
SPRING_ODD_EJECTION
POWER BUTTOM
MYLAR
HDD-LENS
Description
14 STANDOFF_FIX
15 SCREW-FOR-ODD_CAGE
16 SM_C_BASE
17 CHASSIS FOOT
18 SM_DUST_COVER
19 LED HOUSING
CARD READER USB CABLE ASSY
20
(with card reader)
21 POWER PCB
EJECT_CONNECT
35
EJECT-BOTTOM
36
FRONT-MAIN_BEZEL-W_CR
37
ODD-DOOR
38
SPRING_DOOR_ODD
39
FRONT-COVER
40
PB LOGO
41
Page 96

90
Page 97

91
Chassis_P5-15L w/o card reader ME BOM
Item
1 SM_SIDE_COVER 22 SM_ODD_CAGE
2 SCREW-6-32-6L 23 WCL-10
3 RUBBER_FOR_POWER_BKT
4 SM_POWER_BKT
5 CABLE CLIP
6 SM_PCI_SLOT_COVER
7 SM_PCI_EMI_SHIELDING
8 SM_PCI_CLAMP
9 SM_REAR_PLATE
10 SM_POWER_ASM_BKT
11 SM_MB_BKT
12 STANDOFF
13 CLIP
Description Item
24
25
26
27
28
29
30
31
32
33
34
SM_HDD_CAGE
SM_FRONT_PLATE
RIVET_32_FLAT_HEAD
RIVET_32_UMBRELLA_HEAD
TOP COVER CABLE ROUTING
TOP-COVER
TOP-MAIN_BEZEL
SPRING_ODD_EJECTION
POWER BUTTOM
MYLAR
HDD-LENS
Description
14 STANDOFF_FIX
15 SCREW-FOR-ODD_CAGE
16 SM_C_BASE
17 CHASSIS FOOT
18 SM_DUST_COVER
19 LED HOUSING
USB CABLE ASSY
20
(without card reader)
21 POWER PCB
EJECT_CONNECT
35
EJECT-BOTTOM
36
FRONT-MAIN_BEZEL-W_CR
37
ODD-DOOR
38
SPRING_DOOR_ODD
39
FRONT-COVER
40
PB LOGO
41
Page 98

92
Page 99

93
FRU List
The FRU list will be updated later.
 Loading...