

Page 1

Acer Altos R500
User’s guide
Page 2

Copyright © 2001 Acer Incorporated
All Rights Reserved.
Acer Altos R500
User’s guide
Changes may be made periodically to the information in this publication without obligation
to notify any person of such revision or changes. Such changes will be incorporated in new
editions of this manual or supplementary documents and publications. This company makes
no representations or warranties, either expressed or implied, with respect to the contents
hereof and specifically disclaims the implied warranties of merchantability or fitness for a
particular purpose.
Record the model number, serial number, purchase date, and place of purchase information in
the space provided below. The serial number and model number are recorded on the label
affixed to your computer. All correspondense concerning your unit should include the serial
number, model number, and purchase information.
No part of this publication may be reproduced, stored in a retrieval system, or transmitted, in
any form or by any means, electronic, mechanical, photocopy, recording, or otherwise,
without the prior written permission of Acer Incorporated.
Model Number : _________________________________
Serial Number: ___________________________________
Purchase Date: ___________________________________
Place of Purchase: ________________________________
Acer and the Acer Logo are registered trademarks of Acer Inc. Other company’s product
names or trademarks are used herein for identification purposes only and belong to their
respective companies.
Page 3

iii
Notices
FCC notice
This device has been tested and found to comply with the limits for a Class B
digital device pursuant to Part 15 of the FCC Rules. These limits are designed to
provide reasonable protection against harmful interference in a residential
installation. This device generates, uses, and can radiate radio frequency
energy, and if not installed and used in accordance with the instructions, may
cause harmful interference to radio communications.
However, there is no guarantee that interference will not occur in a particular
installation. If this device does cause harmful interference to radio or television
reception, which can be determined by turning the device off and on, the user
is encouraged to try to correct the interference by one or more of the following
measures:
• Reorient or relocate the receiving antenna
• Increase the separation between the device and receiver
• Connect the device into an outlet on a circuit different from that to which
the receiver is connected
• Consult the dealer or an experienced radio/television technician for help
Notice: Shield cables
All connections to other computing devices must be made using shielded cables
to maintain compliance with FCC regulations.
Notice: Peripheral devices
Only peripherals (input/output devices, terminals, printers, etc.) certified to
comply with the Class B limits may be attached to this equipment. Operation
with noncertified peripherals is likely to result in interference to radio and TV
reception.
Caution! Changes or modifications not expressly approved by the
manufacturer could void the user’s authority, which is granted by
the Federal Communications Commission, to operate this
computer.
Page 4

iv
Use conditions
This part complies with Part 15 of the FCC Rules. Operation is subject to the
following two conditions: (1) this device may not cause harmful interference,
and (2) this device must accept any interference received, including interference
that may cause undesired operation.
Notice: Canadian users
This Class B digital apparatus meets all requirements of the Canadian
Interference-Causing Equipment Regulations.
Remarque à l’intention des utilisateurs canadiens
Cet appareil numérique de la classe B respected toutes les exigences du
Règlement sur le matériel brouilleur du Canada
.
Important safety instructions
Read these instructions carefully. Save these instructions for future
reference.
1 Follow all warnings and instructions marked on the product.
2 Unplug this product from the wall outlet before cleaning. Do not
use liquid cleaners or aerosol cleaners. Use a damp cloth for
cleaning.
3 Do not use this product near water.
4 Do not place this product on an unstable cart, stand, or table. The
product may fall, causing serious damage to the product.
5 Slots and openings in the cabinet and the back or bottom are
provided for ventilation; to ensure reliable operation of the
product and to protect it from overheating, these openings must
not be blocked or covered. The openings should never be blocked
by placing the product on a bed, sofa, rug, or other similar surface.
This product should never be placed near or over a radiator or
heat register, or in a built-in installation unless proper ventilation
is provided.
6 This product should be operated from the type of power indicated
on the marking label. If you are not sure of the type of power
available, consult your dealer or local power company.
Page 5

7 Do not allow anything to rest on the power cord. Do not locate
this product where persons will walk on the cord.
8 If an extension cord is used with this product, make sure that the
total ampere rating of the equipment plugged into the extension
cord does not exceed the extension cord ampere rating. Also,
make sure that the total rating of all products plugged into the
wall outlet does not exceed the fuse rating.
9 Never push objects of any kind into this product through cabinet
slots as they may touch dangerous voltage points or short out
parts that could result in a fire or electric shock. Never spill liquid
of any kind on the product.
10 Do not attempt to service this product yourself, as opening or
removing covers may expose you to dangerous voltage points or
other risks. Refer all servicing to qualified service personnel.
11 Unplug this product from the wall outlet and refer servicing to
qualified service personnel under the following conditions:
a When the power cord or plug is damaged or frayed
b If liquid has been spilled into the product
c If the product has been exposed to rain or water
d If the product does not operate normally when the operating
instructions are followed. Adjust only those controls that are
covered by the operating instructions since improper
adjustment of other controls may result in damage and will
often require extensive work by a qualified technician to
restore the product to normal condition.
e If the product has been dropped or the cabinet has been
damaged
f If the product exhibits a distinct change in performance,
indicating a need for service.
12 Replace the battery with the same type as the product's battery we
recommend. Use of another battery may present a risk of fire or
explosion. Refer battery replacement to a qualified serviceman.
13 Warning! Batteries may explode if not handled properly. Do not
disassemble or dispose of them in fire. Keep them away from
children and dispose of used batteries promptly.
v
Page 6

vi
14 Use only the proper type of power supply cord set (provided in
your accessories box) for this unit. It should be a detachable type:
UL listed/CSA certified, type SPT-2, rated 7A 125V minimum, VDE
approved or its equivalent. Maximum length is 15 feet (4.6
meters).
Laser compliance statement
The CD-ROM drive in this computer is a laser product. The CD-ROM drive’s
classification label (shown below) is located on the drive.
CLASS 1 LASER PRODUCT
CAUTION: INVISIBLE LASER RADIATION WHEN OPEN. AVOID EXPOSURE TO
BEAM.
Page 7

Notices iii
FCC notice iii
Important safety instructions iv
Laser compliance statement vi
1 System overview 1
Overview 3
Processors 3
Memory 4
System chipsets 4
Expansion slot 6
Hardware management support 6
Features summary 7
Weight 8
Power consumption 8
Thermal dissipation 9
2 System tour 11
External and internal structure 13
Front panel 13
Rear panel 15
Internal components 16
Disk drives 17
Hard disk drive 17
3.5-inch floppy disk drive 17
CD-ROM drive 18
Contents
3 Setting up your system 21
Preinstallation requirements 23
Selecting a site 23
Checking the package contents 23
Basic connections 24
Connecting the PS/2 keyboard 24
Connecting the PS/2 mouse 25
Connecting the VGA monitor 26
Connecting to the network 27
Connecting the power cable 28
Connecting option 29
USB devices 29
Turning on your system 30
Power-on problems 30
Page 8

Turning off your system 32
4 Upgrading your system 33
Installation precautions 35
ESD precautions 35
Preinstallation instructions 35
Post-installation instructions 36
Opening your system 37
Removing the system cover 37
Replacing the system cover 38
System boards 39
Mainboard layout 39
SCSI card layout 42
Adaptec ZCR daughter card layout 42
Installing an expansion card 44
Hot-swapping a SCSI SCA hard disk drive 47
Removing and installing the CPU 50
Removing the CPU 50
Installing the CPU 51
Removing and installing memory modules 53
Removing a DIMM 53
Installing a DIMM 54
5 Setup utility 57
BIOS Setup utility 59
Entering Setup 60
System Information 62
Product Information 64
Disk Drives 65
IDE Channel Type 66
Onboard Peripherals 69
Power Management 71
Boot Options 74
Date and Time 76
System Security 77
Setting and changing the password 79
Removing a password 80
IPMI Configuration 81
RDM Configuration 84
Advanced Options 87
Memory/Cache Options 87
PnP/PCI Options 89
CPU Frequency 92
Page 9

Chipset Settings 93
93
Load Default Settings 94
Abort Settings Change 95
Exit Setup 96
Appendix A: ASM Pro quick installation guide 97
Installing ASM Pro 99
System requirements 99
System setup 99
Installing ASM Pro Console 100
Installing ASM Pro Server Agent 100
Installing RDM 107
System requirements 107
Connecting communication peripherals 108
RDM Console setup 111
Installing AWM and Microsoft Internet
Information Service (IIS) 113
System requirements 113
Installing AWM 113
Setting up Microsoft IIS 114
Running AWM 115
Appendix B: System rack installation guide 117
ESD precautions 118
Vertical mounting hole pattern 119
Screw types used 120
Installing cage nuts 121
Installing the system into the rack 122
129
Contents
Index 131
Page 10

Page 11

1 System overview
Page 12

The Acer Altos R500 is a 1U, high-density, rackmountable
dual-processor system loaded with a host of new and
innovative features. The system offers a new standard for
flexible productivity ideal for local or wide area networks
and multiuser server environments.
Page 13

Overview
The Acer Altos R500 system is a PCI bus based dual processor system
built on an extended ATX baseboard. It comes with two socket 370
processor slots utilizing two Intel
processors integrated with the Server Works RCC chipset. The dualchannel SCSI architecture supports Ultra 160/m SCSI with bandwidth of
up to 160 MB/s for each channel. The mainboard also integrates the
®
82550 10/100 Mbps PCI Ethernet chipset that supports WOL
Intel
(Wake on LAN) for better remote site management.
For expandability, the system includes two 64-bit/66 MHz PCI bus slots
and four DIMM slots that allow memory installation up to a maximum
of 4 GB.
For connectivity, the mainboard provides two USB (Universal Serial Bus)
connectors, PS/2 interface for both mouse and keyboard, one UART
serial port, and four LAN ports.
For its storage features, Altos R500 supports one slim-type CD-ROM
drive, one slim-type floppy disk drive and three hot-swappable SCSI
hard disk drive.
The system is fully compatible with MS-DOS V6.X, Novell Netware, SCO
UNIX Openserver SCO, Unixware, Red Hat Linux 6.X., Sun Solaris,
Windows NT 4.0 and Windows 2000 Professional.
®
Coppermine-T or Tualatin®
3
Processors
The Intel Tualatin processor implements Dynamic Execution
performance, a multi-transaction system bus, and Intel MMX media
enhancement technology. It also offers Streaming SIMD (Single
Instruction Multiple Data) Extensions - 70 new instructions enabling
advanced imaging, 3D, streaming audio and video, and speech
recognition applications. With its on-die 512-KB level two (L2) cache
implementing the Advanced Transfer Cache Architecture, the Tualatin
processor delivers higher performance than previous Pentium
processors while maintaining binary compatibility with all previous
Intel Architecture processors.
The mainboard supports 100 or 133 MHz GTL+ host bus frequencies for
Tual atin processors running at 1 GHz and above.
Page 14

4
1 System overview
Memory
The four DIMM sockets on board accept using 64-, 72-, 128-, 144-,
512-MB and 1-GB SDRAM (synchronous DRAM) DIMMs for a maximum
memory upgrade capacity of up to 4 GB. For data integrity, the default
setting of the ECC (error-correcting code) function of the memory
system in BIOS is enabled. See “Memory/Cache Options” on page 87
for more on this BIOS setting.
Note: The SDRAM should work under 3.3 volts only; 5-volt
memory devices are not supported.
The mainboard supports both 200 and 266 MHz SDRAM DIMMs
(PC-1600 and PC-1200).
System chipsets
Server Works RCC chipset
The Server Works RCC chipset was specifically designed to meet the
needs of high performance systems. It consists of following
components:
• HE-SL-T (north bridge) provides the host interface, memory system
control interface and PCI interface.
• CIOB2 (I/O bridge) is a peripheral chip that performs PCI bridging
function between the hub interface and the PCI bus. It can provide
arbitration support for six PCI devices and manage 2 x 66 Mhz PCI
slots.
• CSB5 (south bridge) integrates LPC interface and super I/O
functions like keyboard and mouse interface, floppy disk
controller, advanced digital data separator, serial port, on-chip 12
mA AT bus drivers, one floppy direct drive support, and Intelligent
Power Management (IPM) support.
Page 15

SCSI subsystem
The dual-channel AIC-7899 single-chip host adapter delivers Ultra
160/m SCSI data transfer rates which double the Ultra-2 SCSI data
transfer rate of up to 160 MByte/s. With two channels, it delivers a
total of 320 MByte/s bandwidth. In addition, the AIC-7899 features a
66 MHz, 64-bit PCI interface that supports zero wait-state memory
which also operates on 33 MHz, 32-bit PCI buses. It supports up to 15
devices on a 12-meter cable (or 25 meters in a point-to-point
configuration), making it ideal for both clustering and RAID
configurations.
LAN subsystem
5
Another cost-effective feature for network solution is the integration
of four Intel
sophisticated 32-bit PCI component and enhanced scatter-gather bus
mastering capabilities, it enables high-level command processing and
multiple operations which lowers CPU utilization. It also offers several
new features including:
• IPSec integration
• Host side cardbus interface
• Enhanced power management
• Optimized support for flash devices and modem combination
interface
• Auto-Negotiation capability
82550 10/100 Mbps Fast Ethernet controllers. With its
Video subsystem
The ATI Rage XL harbors 2D and 3D display capabilities that bring life
to any multimedia and work applications. It also supports hardware
DVD decoding. With remarkable color depths and high resolutions of
up to 1600 x 1200 it enhances every visual experience on your system.
The onboard ATI Rage XL chipset comes with 2 MB VRAM (video RAM)
and supports up to 1024 x 768 display mode at high colors.
Page 16

6
1 System overview
Expansion slot
PCI bus
The mainboard has two 64-bit/66 MHz PCI bus slot with a riser card.
Hardware management support
The mainboard supports a power management function that conforms
to the power saving standards of the U.S. Environmental Protection
Agency (EPA) Energy Star program. It also offers Plug-and-Play feature
which helps save users from configuration problems, thus making the
system more user-friendly.
Additional features include hardware support for ASM Pro (Advanced
System Manager Pro) and RDM (Remote Diagnostic Management).
ASM detects problems in the CPU thermal condition, CPU working
voltage detection (±12V/±5V/3.3V/1.5V), and PCI bus utilization
calculation. It also detects if the CPU fan or the chassis fan
malfunctions. Meanwhile, RDM allows execution of the RDM
diagnostic program from a remote RDM station to fix detected
problems or to reboot the system.
Page 17

Features summary
The system has the following major components:
• FC-PGA (Flip-Chip Pin Grid Array) 370 processor socket that
supports Intel
processor running at 1/133 to 1.26/133 MHz and future
generations of Pentium CPUs
• Server Works RCC chipset which includes the north, south and I/O
bridge
• SCSI controller Adaptec AIC-7899 chipset supports dual channel 64bit LVD Ultra 160/m device connection in 64-bit/66 MHz PCI bus:
• Channel A- one 68-pin Ultra160 SCSI connector
• Channel B- one 68-pin Ultra160 SCSI connector
• Onboard 10/100 Mbp/s Intel 82550 LAN chip that supports WOL
• Four DIMM sockets that accept 64-, 72-, 128-, 144-, 256-, and
512-MB and 1-GB SDRAM (synchronous DRAM) DIMMs for a
maximum memory upgrade capacity of 4 GB
• Storage support for:
• One slim-type CD-ROM drive
• One slim-type floppy disk drive
• Three hot-swappable SCSI hard disk drive
• Two 64-bit/66 MHz PCI slot
• NS PC87417 Super I/O chipset
• ATI Rage XL video chipset
• System clock/calendar with battery backup
• Auxiliary power connector for ATX power supply
• Advanced Server Management (ASM) and Remote Diagnostic
Management (RDM) controller chipsets
• External ports:
Coppermine DO Stepping or Tualatin processors
7
• 2 USB ports • 1 serial port
• PS/2-compatible keyboard port • 4 LAN ports (RJ-45)
• PS/2-compatible mouse port • Monitor/video port
Page 18

8
1 System overview
Weight
The table below lists the weight of individual components used in
deployment of this system in third-party racks.
Item Weight in Kg Weight in lbs
Fully configured
system
Rack mount kit 3.1 Kg 6.82 lbs
CPU and fan sink 0.35 Kg 0.77 lbs
Hard disk drive 1Kg 2.2 lbs
Power supply module 1.3 Kg 2.86 lbs
Floppy disk drive 0.16 Kg 0.35 lbs
CD-ROM drive 0.3 Kg 0.66 lbs
PCI card 0.04 ~ 0.4 Kg 0.09 ~ 0.88 lbs
13 Kg 28.6 lbs
Power consumption
The server power supply is rated for a maximum 220W DC output.
Maximum input AC power consumption is approximately _____.
• Using 110V AC power, a fully loaded system can consume up to
2.80A
• Using 220V AC power, a fully loaded system can consume up to
1.40A
Deployment of ultra-dense 1U servers represent a significant power
requirement. A simple formula to calculate server power requirements
for an installation is:
(Number of servers) x (307W) = maximum power requirements for servers
Page 19

Thermal dissipation
The server has the following cooling systems:
• Two 9-cm CPU fan blowers
• One rear chassis fan
A fully configured Altos R500 server under maximum workload can
produce approximately 1047 BTU/hr. Air temperature measurements
around the server may vary as much as 25°C (45°F) from front to back.
Deployment of multiple ultra-dense servers will produce a significant
amount of heat. For example, 42 servers under maximum workload can
generate as much as 43,974 BTU/hr.
9
Page 20

10
1 System overview
Page 21

2 System tour
Page 22

This chapter discusses the features and components of your
computer.
Page 23
External and internal structure
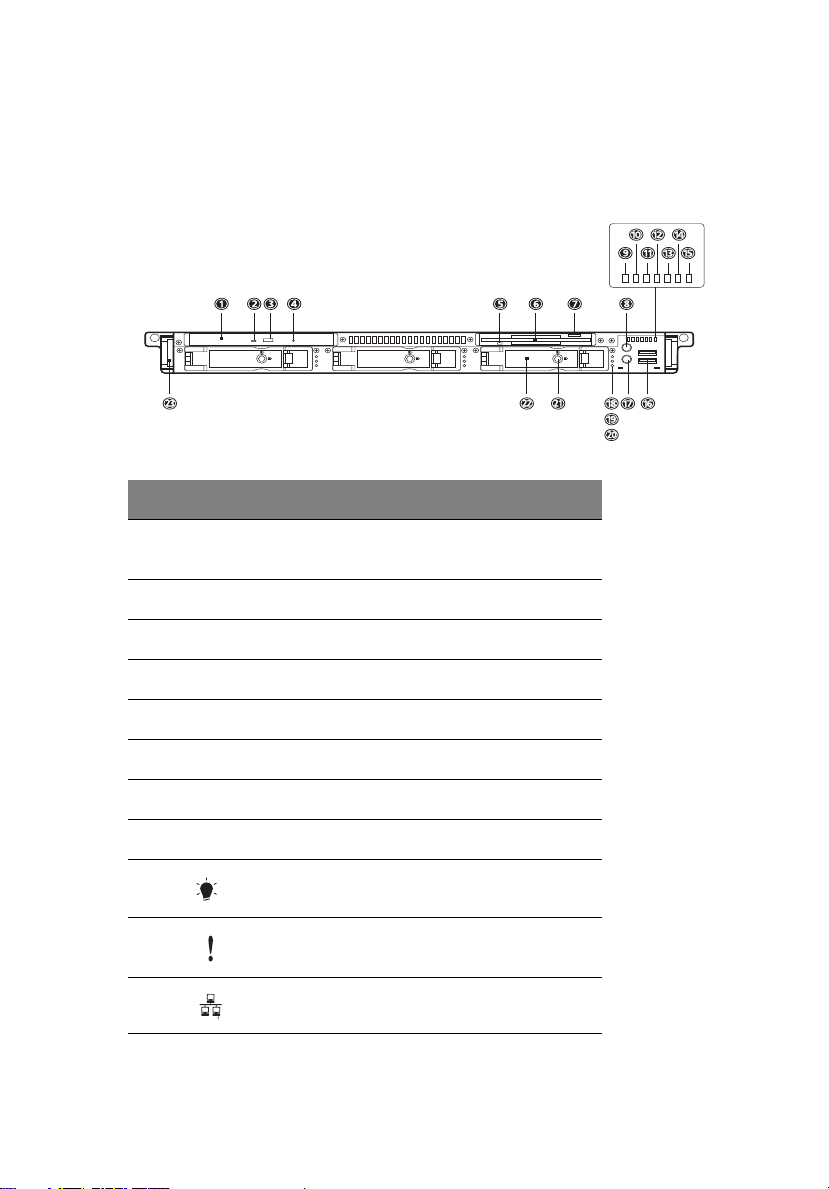
Front panel
No. Icon Description
1 Slim type CD-ROM drive emergency eject
hole
2 Slim type CD-ROM drive indicator
3 Slim type CD-ROM drive eject button
13
4 Slim type CD-ROM drive
5 Slim type floppy drive indicator
6 Slim type floppy drive
7 Slim type floppy drive eject button
8 Service ID button
9Power indicator
10 System health indicator
11 LAN 1 access indicator
Page 24
14
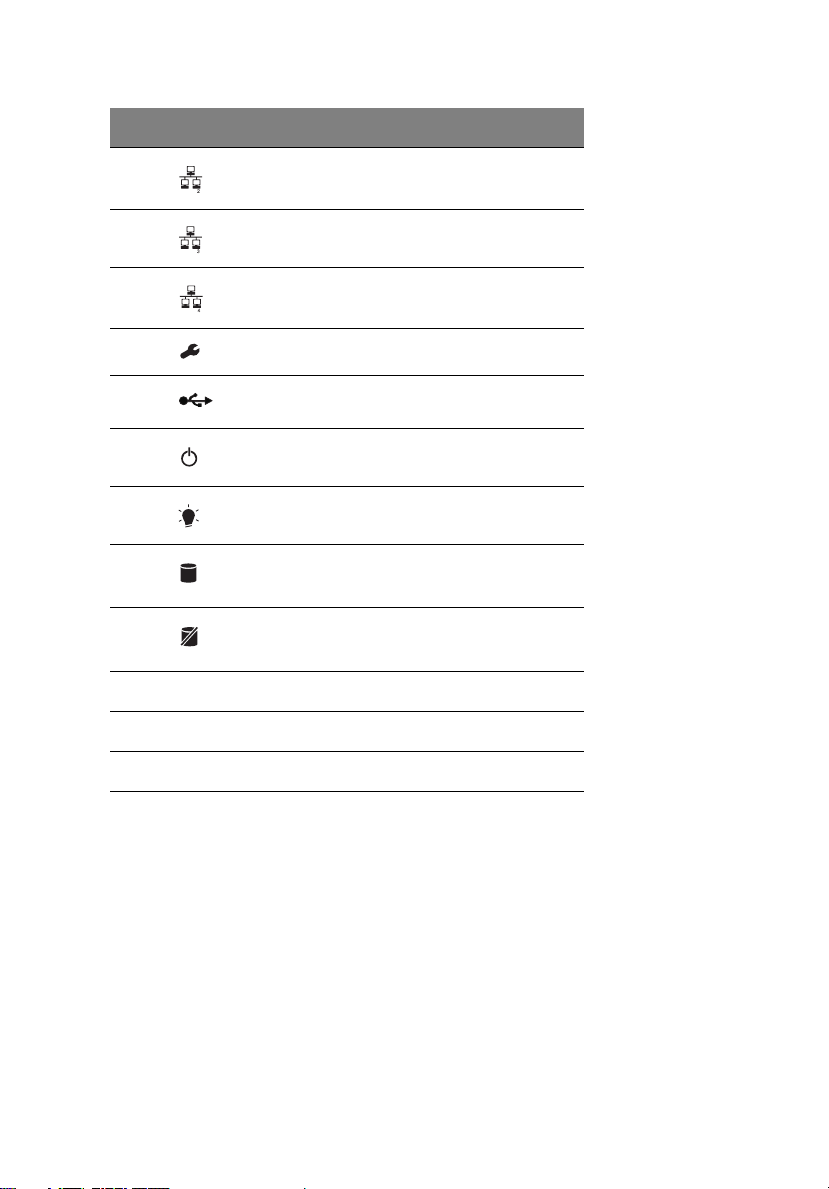
No. Icon Description
12 LAN 2 access indicator
13 LAN 3 access indicator
14 LAN 4 access indicator
15 Service ID indicator
16 USB ports (2 ports, black)
17 Power button
18 Hard disk power indicator
19 Hard disk activity indicator
20 Hard disk error indicator
2 System tour
21 Drive tray lock
22 Drive tray
23 Metal handle
Page 25
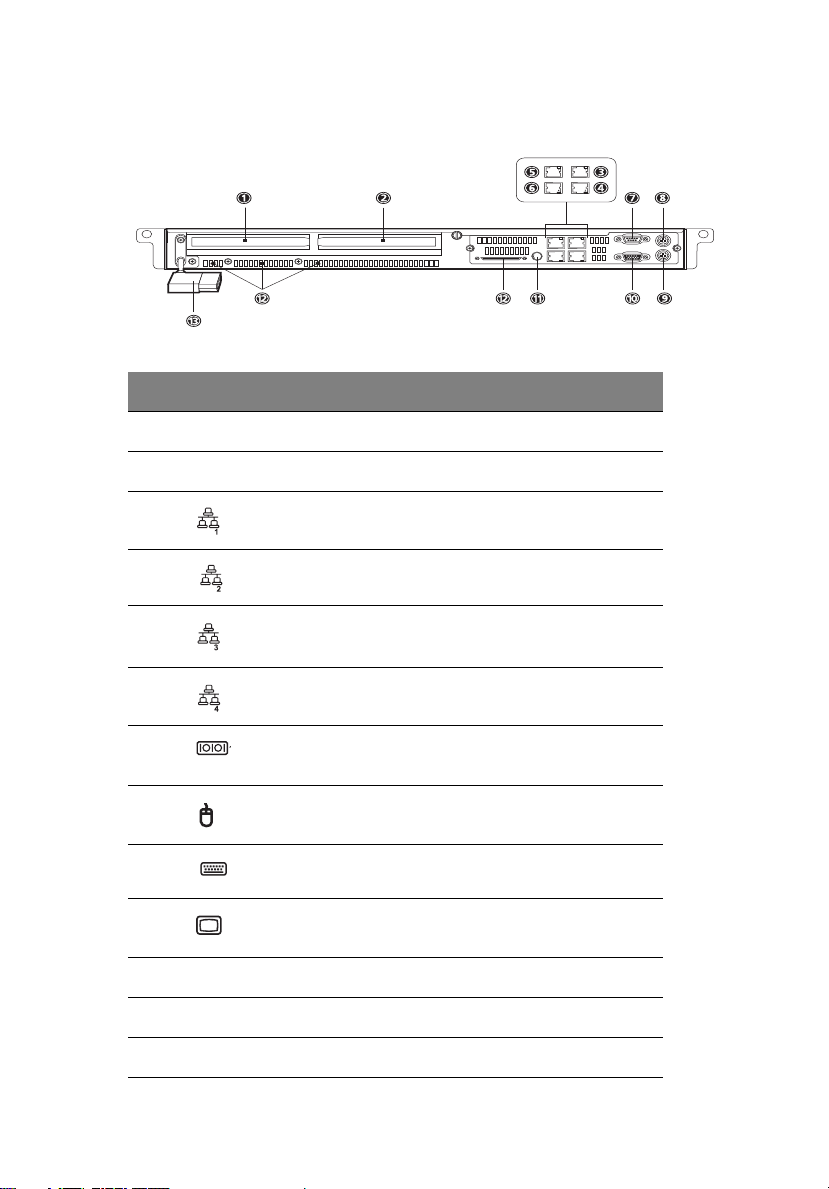
Rear panel
No. Icon Color Description
1 Add-on card bracket 1
2 Add-on card bracket 2
3 LAN 1 port (RJ-45)
3 LAN 2 port (RJ-45)
5 LAN 3 port (RJ-45)
15
6 LAN 4 port (RJ-45)
7 Teal or
turquiose
8 Green PS/2 mouse port
9 Purple PS/2 keyboard port
10 Blue Monitor/VGA port
11 Service indicator button
12 Very high density SCSI connector
13 Power cable socket
Serial port
Page 26
16
No. Icon Color Description
14 Ventilation
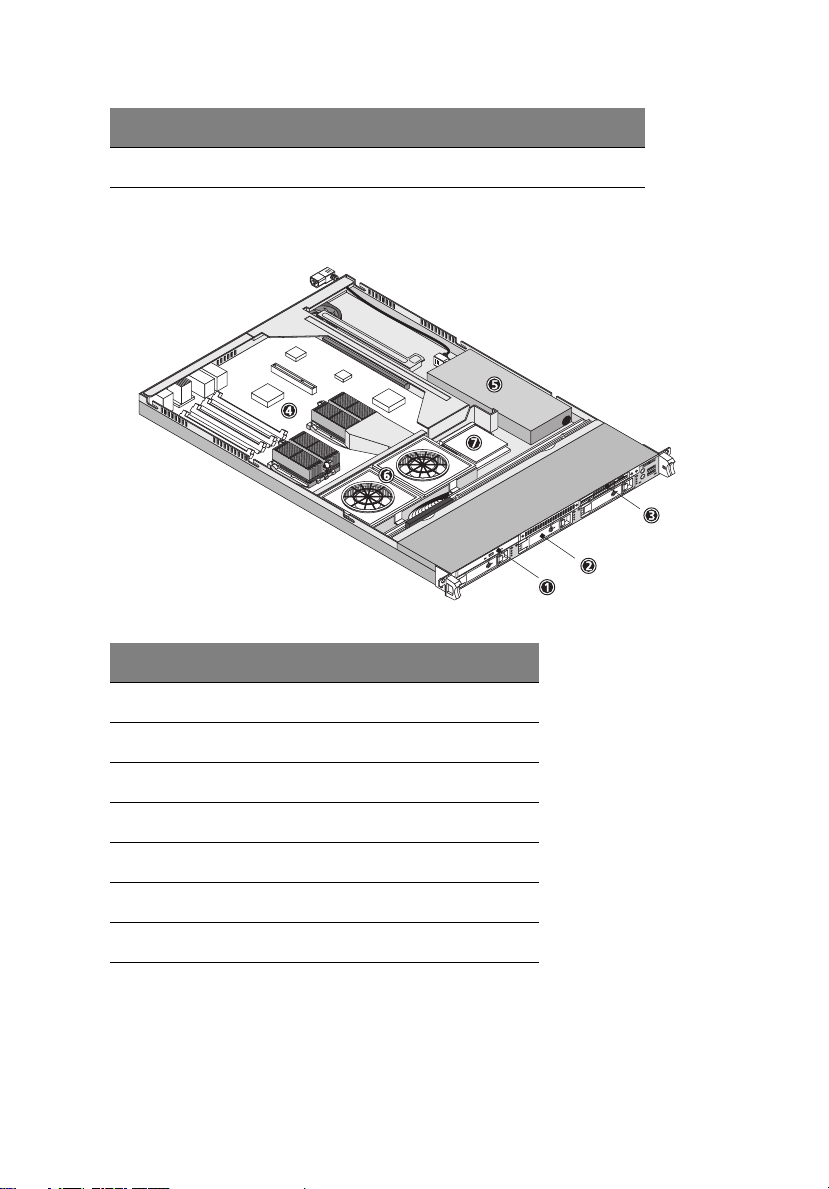
Internal components
2 System tour
No. Item
1 Slim type CD-ROM drive
2 Hot-swappable SCSI hard disk drive
3 Slim type floppy drive
4 Mainboard
5 Power supply
6 Housing fans
7 Raptor card (optional)
Page 27
17
Disk drives
Your system comes with the following disk drives:
Hard disk drive
Your system provides three hot-swappable SCSI hard disk drive trays
with SCSI connector card.
3.5-inch floppy disk drive
Your system’s 3.5-inch slim-type floppy disk drive can handle 1.44- and
2.88-MB capacity diskettes.
Floppy diskettes are compact, lightweight, and easy to carry around.
Here are some tips on how to take care of your diskettes:
• Always make backup copies of the diskettes that contain
important data or program files.
• Keep diskettes away from magnetic fields and sources of heat.
• Avoid removing a diskette from the floppy drive when the drive
activity indicator is on.
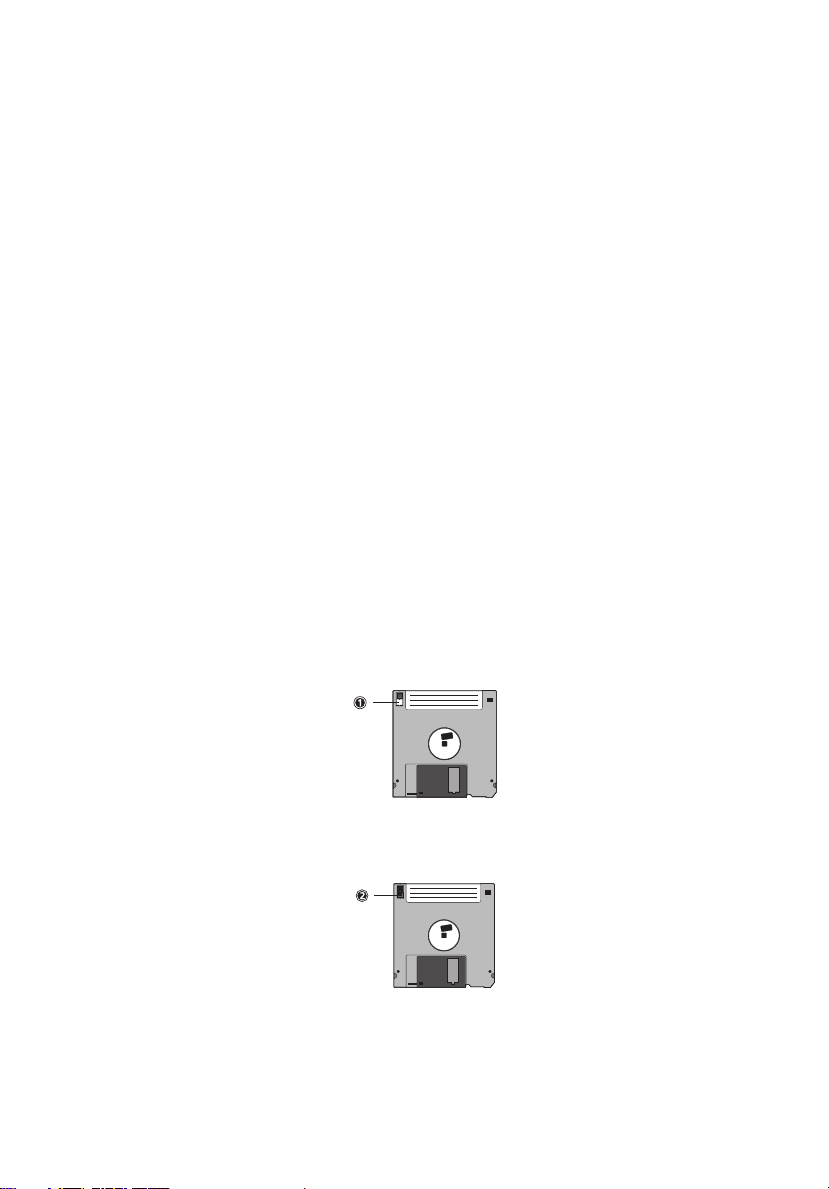
• Write-protect your diskettes to prevent accidental erasure. To do
this, slide the write-protect tab to the write-protect position (1).
Sliding the write-protect tab to the not-write-protect position (2)
will allow you to store and modify data in your diskettes.
Page 28

18
• When you put a label on a 3.5-inch diskette, make sure that the
label is properly attached (flat on the surface) and within the
labeling area (area with a slight surface depression) on the
diskette. An improperly attached label may cause a diskette to get
stuck in the floppy drive when you are inserting or removing it.
2 System tour
CD-ROM drive
Your system comes with a slim-type CD-ROM drive. This drive is located
on the front panel of your system. The CD-ROM drive allows you to
play different types of compact discs (CDs) and video CDs.
CDs, like diskettes, are also compact, lightweight, and easy to carry
around. However, they are more delicate than diskettes and must be
handled with extra care.
To insert a CD into your system’s CD-ROM drive:
1 Gently push the eject button located on the front panel.
2 When the disc tray slides open, insert the CD. Make sure that the
label or title side of the disc is facing upward.
Caution! Hold the disc by the edges to avoid leaving smudges or
fingerprints.
3 Push the eject button again to close the tray.
Ejecting the CD tray
• To eject the CD or DVD tray when the computer is turned on, press
the CD-ROM drive eject button
• To eject the CD or DVD tray when the computer is turned off,
insert the tip of a pen or a paperclip into the emergency eject hole
to pop out the tray.
Page 29

19
To take care of your CDs:
• Keep your discs in a disk case when not in use to avoid scratches or
other damage. Any kind of dirt or damage can affect the data on
the disc, impair the disc lens reader on the CD-ROM drive, or stop
the system from successfully reading the disc.
• When handling discs, always hold them by the edges to avoid
smudges or fingerprints.
• When cleaning discs, use a clean, dust-free cloth and wipe in a
straight line from the center to the edge. Do not wipe in a circular
motion.
• Clean your CD-ROM drive periodically. You may refer to a cleaning
kit for instructions. Cleaning kits can be purchased in any system
or electronics shop.
Page 30

20
2 System tour
Page 31

3 Setting up your
system
Page 32

This chapter contains step-by-step instructions on
how to set up your system.
Page 33

Preinstallation requirements
Selecting a site
Before unpacking and installing the system, select a suitable site for
the system for maximum efficiency. Consider the following factors
when choosing a site for the system:
• Near a grounded power outlet
• Clean and dust-free
• Sturdy surface free from vibration
• Well-ventilated and away from sources of heat
• Secluded from electromagnetic fields produced by electrical
devices such as air conditioners, radio and TV transmitters, etc.
Checking the package contents
Check the following items from the package:
• Acer Altos R500 system
• Acer Altos R500 User’s guide
• CD-ROM driver kit
• One front bezel for rackmount installation
• Two additional CPU fan sinks
23
If any of the above items are damaged or missing, contact your dealer
immediately.
Save the boxes and packing materials for future use.
Page 34

24
3 Setting up your system
Basic connections
The system unit, PS/2 keyboard, PS/2 mouse, and monitor constitute
the basic system. Before connecting any other peripherals, connect
these peripherals first to test if the system is running properly.
Connecting the PS/2 keyboard
Plug the PS/2 keyboard cable into the PS/2 keyboard port (purple
port) located on the rear panel of your system.
Note: If you are using a USB keyboard, plug the mouse cable into
either USB ports located on the front panel of your system.
Page 35

Connecting the PS/2 mouse
Plug the PS/2 mouse cable into the PS/2 mouse port (green port)
located on the rear panel of your system
Note: If you are using a USB mouse, plug the mouse cable into
either USB ports located on the front panel of your system.
25
Page 36

26
3 Setting up your system
Connecting the VGA monitor
To connect the VGA monitor, simply plug the monitor cable into the
monitor/VGA port
system.
(blue port) located on the rear panel of your
Page 37

27
Connecting to the network
You can connect your computer to a Local Area Network (LAN) using a
network cable. To do so, simply plug the network cable into any of the
four network ports
system.
Note: Consult your operating system manual for information on
how to configure your network setup.
(black port) located on the rear panel of your
Page 38

28
3 Setting up your system
Connecting the power cable
Plug the power cable into the power cable socket located on the rear
panel of your system. Then plug the other end of the power cable into
a power outlet. The figure below shows a complete connection of the
whole system.
Page 39

29
Connecting option
USB devices
Universal Serial Bus (USB) is a new serial bus design that is capable of
cascading low-/medium-speed peripherals (less than 12 Mbps) such as a
keyboard, mouse, joystick, scanner, printer and modem. With USB,
complex cable connections can be eliminated.
Your system comes with two USB ports located on the front panel.
These ports allow you to connect additional serial devices to your
system without using up its system resources.
To connect a USB device, simply plug the device cable into either USB
ports (black port) located on the front panel of your system.
Note: Most USB devices have a built-in USB port which allows
you to daisy-chain other devices.
Page 40

30
3 Setting up your system
Turning on your system
After making sure that you have set up the system properly and
connected all the required cables, you can now power on your system.
To power on the system, press the power button on the front panel.
The system starts up and displays a welcome message. After that, a
series of power-on self-test (POST) messages appears. The POST
messages indicate if the system is running well or not.
Note: If the system does not turn on or boot after pressing the
power button, go to the next section for the possible causes of the
boot failure.
Aside from the POST messages, you can determine if the system is in
good condition by checking if the following occurred:
• Power indicator on the front bezel lights up (green)
• Power, Num Lock, and Caps Lock indicators on the keyboard light
up
Power-on problems
If the system does not boot after you have applied power, check the
following factors that might have caused the boot failure.
• The external power cable may be loosely connected.
Check the power cable connection from the power source to the
power cable socket on the rear panel. Make sure that the cable is
properly connected to the power source and to the power cable
socket.
• No power comes from the grounded power outlet.
Have an electrician check your power outlet.
Page 41

• Loose or improperly connected internal power cables.
Check the internal cable connections. If you are not confident to
perform this step, ask a qualified technician to assist you.
Warning! Make sure all power cords are disconnected from
the electrical outlet before performing this task.
Note: If you have gone through the preceding actions and the
system still fails to boot, ask your dealer or a qualified technician
for assistance.
31
Page 42

32
3 Setting up your system
Turning off your system
To turn off your computer, on the Windows taskbar click on the Start
button, point to Shut Down..., select Shut down from the dropdown
window then click on OK. You can then turn off all peripherals
connected to your computer.
If you cannot shut down your computer, press the power button for at
least four seconds. Quickly pressing the button may put the computer
in a Suspend mode only.
Page 43

4 Upgrading your
system
Page 44

This chapter contains basic information
about your system boards that you will find
helpful when performing the instructions of
the upgrade process which are also
discussed in this chapter.
Page 45

Installation precautions
Before you install any system component, we recommend that you
read the following sections. These sections contain important ESD
precautions along with preinstallation and post-installation
instructions.
ESD precautions
Electrostatic discharge (ESD) can damage your processor, disk drives,
expansion boards, and other components. Always observe the
following precautions before you install a computer component:
1 Do not remove a component from its protective packaging until
you are ready to install it.
2 Wear a wrist grounding strap and attach it to a metal part of the
computer before handling components. If a wrist strap is not
available, maintain contact with the computer throughout any
procedure requiring ESD protection.
Preinstallation instructions
Always observe the following before you install any component:
1 Turn off your system and all the peripherals connected to it.
2 Unplug all cables from the power outlets.
3 Open your system according to the instructions on page 35.
4 Follow the ESD precautions described above when handling a
computer component.
5 Remove any expansion board(s) or peripheral(s) that block access
to the DIMM socket or other component connector.
35
See the following sections for specific installation instructions on the
component you wish to install.
Page 46

36
Warning! Failure to properly turn off the computer before
you start installing components may cause serious
damage.
Do not attempt the procedures described in the following
sections unless you are a qualified service technician.
4 Upgrading your system
Post-installation instructions
Observe the following after installing a computer component:
1 See to it that all components are installed according to the
described step-by-step instructions.
2 Replace any expansion board(s) or peripheral(s) that you have
previously removed.
3 Connect the necessary cables.
4 Replace the system cover.
5 Turn on the system.
Page 47

Opening your system
Caution: Before you proceed, make sure that you have turned
off your system and all peripherals connected to it. Read the
“Preinstallation instructions” on page 35.
Warning! DO NOT attempt the procedures in the following
sections unless you are confident of your capability to
perform them. Otherwise, ask a service technician for
assistance.
Removing the system cover
You need to open your system before you can install additional
components.
1 Turn off the power to the system unit and unplug all cables.
2 Place your system unit on a flat, steady surface.
3 Turn the thumbscrew counterclockwise with your fingers to
release the cover.
37
Page 48

38
4 Hold the cover with both hands and gently pull back the cover to
detach it from the housing.
4 Upgrading your system
Replacing the system cover
1 Align the cover to the housing frame and then push it back in to
slide it back into place.
2 Turn the thumbscrew clockwise to secure the cover.
Page 49

System boards
Mainboard layout
The mainboard becomes accessible once you open the system. It
should look like the figure shown below.
39
Page 50

40
4 Upgrading your system
Item Description
BT1 Battery
CN1 Upper: PS/2 mouse connector
Lower: PS/2 keyboard connector
CN2 Upper: Serial port connector
Lower: VGA port connector
CN4 External high-density 68-pin SCSI connector
CN5 SCSI HDD LED connector (connects to the
SCSI backplane board)
CN9 SCSI board connector (connects to the SCSI
backplane board)
CN10 CPU 1 fan connector
CN10 LED board connector (connects to the LED
CN11 Slim-type CD-ROM drive connector
CN12 Gold finger (connects to the PCI riser card)
CN13 Slim-type floppy drive connector
CN14 24-pin ATX power supply connector
CPU1 CPU 1 socket
CPU2 CPU 2 socket
DM1 to
DM4
DM5 RAID card connector (connects to the
FAN1 CPU 1 fan blower connector
FAN2 CPU 2 fan blower connector
board)
DIMM slots
Adaptec daughter card)
Page 51

Item Description
FAN3 Rear system fan connector
JK1 LAN jack (RJ-45)
Upper: LAN1
Lower: LAN2
JK2 LAN jack (RJ-45)
Upper: LAN3
Lower: LAN4
PCI1 64-bit/66 MHz PCI slot (debug only,
optional)
SW1 Service LED switch
SW2 Password switch (optional)
SW3 CPU frequency switch (optional)
41
U11/U18/
U24/U29
U17 Server Works HE-SL chipset (north bridge)
U46 ATI RageXL VGA chipset
U50 Winbond IPMI chipset (W83910F)
U53 Server Works CIOB2 chipset (I/O bridge)
U54
U55 NS PC87417 Super I/O chipset
U57 Adaptec AIC-7899 chipset
U75 Winbond firmware socket
U80 System BIOS firmware socket
Intel 82550 LAN chipsets
Server Works CSB5 chipset (south bridge)
Page 52

42
SCSI card layout
Small Computer System Interface (SCSI)
Item Description
CN1 HDD connector
CN2 HDD connector
CN3 HDD connector
CN4 SCSI connector (connects the SCSI card to
the mainboad)
CN5 HDD indicator connector
CN6 Power connector
4 Upgrading your system
Adaptec ZCR daughter card layout
Zero-Channel RAID (ZCR)
Page 53

The daughter card enables RAID (redundant array of independent
disks) through PCI interfacing via a 144-pin SO-DIMM connector.
Warning! The ZCR daughter card is designed for use in a
3.3-volt signaling platform. Do not apply 5-volt signals to
any signal pins of the daughter card.
Item Description
43
Page 54

44
4 Upgrading your system
Installing an expansion card
To install an expansion card:
1 Remove the system cover. See “Removing the system cover” on
page 37 for more information.
2 Remove the metal bracket from the housing by removing the two
screws. Save the screws for later use.
Page 55

3 Gently pull out the metal bracket with the riser card from the
mainboard.
4 Remove the expansion card bracket. Save the screw for later use.
45
5 Align then insert the expansion card into the riser card.
Page 56

46
4 Upgrading your system
6 Secure the expansion card to the metal bracket with a screw.
7 Reinstall the metal bracket with the riser card into the mainboard
system and secure it with the two screws you have previously
removed.
8 Replace the system cover.
Page 57

47
Hot-swapping a SCSI SCA hard disk drive
You can hot-swap (remove and replace) a SCSI hard disk drive any time
when it fails to operate (indicated by a red LED).
Warning! NEVER attempt to remove a hard disk drive
when it is active. Doing so may result to data loss, system
crash and damage to both the hard disk drive and to the
server system.
Follow these steps to install a hot-swappable SCSI hard disk:
1 Unlock the drive tray with a hex key.
2 Press your finger to the drive tray to release it. Gently pull it out
from the hot-swap cage.
Page 58

48
4 Upgrading your system
3 Remove the four tray screws to open the drive tray. Keep the
screws for later use.
4 When applicable, pull out any previously installed hard disk.
5 Install a hard disk on the drive tray.
6 Secure the hard disk to the drive tray with the four tray screws you
have removed earlier.
Page 59

49
7 Insert the tray into the hot-swap cage with the lever still extended.
Make sure that the drive is properly inserted before closing the
lever.
8 Push the lever back until it clicks into place and then lock the drive
tray using the hex key.
Page 60

50
4 Upgrading your system
Removing and installing the CPU
The Intel Tualatin processor comes in a FC-PGA (Flip-Chip Pin Grid
Array) 370-pin package. The FC-PGA package is designed for the new
breed of sleek, high performance, small form factor PCs.
The mainboard supports an Intel
to 1.26/133 MHz, and future generations of Pentium CPUs.
Caution: Always observe the ESD precautions when installing or
removing a system component. Refer to the “Installation
precautions” on page 35.
Removing the CPU
Follow these steps to remove a CPU:
1 Remove the system cover. See page 37 for more detailed
instructions.
2 Locate the CPU socket on your mainboard.
3 Disconnect the 3-pin and 2-pin heatsink cables from the
mainboard.
4 Release the heatsink metal bracket by pressing the hook (1).
Unhook one side of the heatsink metal bracket (2) and gently lift it
before removing the other side (3).
5 Gently press the socket lever down to release the lever and then
pull it up to a 90° angle (5). Carefully remove the CPU (6).
Tualatin processor running at 1/133
Page 61

51
Installing the CPU
Before you proceed make sure that there is no CPU installed in the CPU
socket. Follow the steps below to install a CPU:
1 Locate the CPU socket on your mainboard.
2 Raise the socket lever up to a 90° angle.
3 Remove the processor from its protective packaging.
4 Insert the new CPU into the CPU socket (1 and 2). Make sure that
pin 1 (indicated by a notched corner) of the CPU connects to hole 1
of the socket.
Press down the socket lever to lock the new CPU into the socket
(3).
5 Attach one side of the heatsink metal bracket to the CPU socket
(5) and then gently press down the other side of the metal bracket
(6) until it locks into place (7).
Page 62

52
4 Upgrading your system
Note: You need to install a terminator board into the CPU 2
socket if you only install one CPU (must be installed in the CPU 1
socket).
6 Connect the 3-pin and 2-pin heatsink cables to the mainboard.
Caution: The heatsink becomes very hot when the system is on.
NEVER touch the heatsink with any metal or with your hands.
Page 63

53
Removing and installing memory modules
The four DIMM sockets on board accept 64-, 72-, 128-, 144-, 256-, and
512-MB SDRAM (synchronous DRAM) DIMMs for a maximum memory
upgrade capacity of up to 4 GB.
For the system to function properly, you have to install at least two
DIMMs of 1.3 or 2.4 ___. Install it in either DIMM slot ____ or _______.
The SDRAM DIMMs should work under 3.3 volts only; 5-volt memory
devices are not supported. The mainboard supports both 200 and
266 MHz SDRAM DIMMs (PC-1600 and PC-1200). Contact your dealer
for qualified DIMM vendors.
This mainboard supports 100 and 133 MHz SDRAM. However, they
cannot be used at the same time in the system.
Warning! Do not use both 100 MHz and 133 MHz SDRAM
together. This might cause your system to malfunction.
Each of the DIMM sockets is independent from the others. This
independence allows you to install DIMMs with different capacities to
form different configurations.
Removing a DIMM
Before you can install a new DIMM in a socket, remove first any
previously installed DIMM from that socket.
1 Remove the system cover. See page 37 for more detailed
instructions.
2 Locate the DIMM socket on the mainboard.
Page 64

54
3 Press the holding clips on both sides of the socket outward to
release the DIMM.
Note: Place your forefingers on the top of the DIMM before
pressing the holding clips to gently disengage the DIMM from the
socket.
4 Upgrading your system
Installing a DIMM
Before you can install a new DIMM in a socket, remove first any
previously installed DIMM from that socket.
1 Locate the DIMM socket on the mainboard.
2 Align then insert the DIMM into the socket.
3 Press the holding clips inward to lock the DIMM in place.
Page 65

55
Note: The DIMM socket is slotted to ensure proper installation.
If you slip in a DIMM but it does not completely fit, you may have
inserted it the wrong way. Reverse the orientation of the DIMM.
Reconfiguring the system memory
The system automatically detects the amount of memory installed.
Run Setup to view the new value for total system memory and make a
note of it.
Page 66

56
4 Upgrading your system
Page 67

5 Setup utility
Page 68

This chapter gives information about the
system BIOS and discusses how to configure
the system by changing the settings of the
BIOS parameters.
Page 69

59
BIOS Setup utility
The BIOS Setup utility is a hardware configuration program built into
your computer's Basic Input/Output System (BIOS). Since most
computers are already properly configured and optimized, there is no
need to run this utility. However, if you encounter configuration
problems and get the "Run Setup" message, you will need to run this
utility.
The Setup program loads the configuration values in a battery-backed
nonvolatile memory called CMOS RAM. This memory area is not part
of the system RAM which allows configuration data to be retained
when power is turned off.
Note: If you repeatedly receive Run Setup messages, the battery
may be bad. In this case, the system cannot retain configuration
values in CMOS. Ask a qualified technician for assistance.
Before you run Setup, make sure that you have saved all open files.
The system reboots immediately after you exit Setup.
Page 70

60
5 Setup utility
Entering Setup
Power on the computer to start the system POST (Power On Self Test)
process. While booting, press the key combination Ctrl+Alt+Esc
simultaneously.
The Basic Setup Utility main menu will appear.
Note: You must press Ctrl+Alt+Esc while the system is booting.
This key combination does not work during any other time.
The system supports two Setup Utility levels: Basic and Advanced.
If you are an advanced user, you may want to check the detailed
configuration of your system. Detailed system configurations are
contained in the Advanced Level. To view the Advanced Level, press F8
while viewing the Basic Setup main menu.
The Key Help Guide (press <Alt+H> to activate) shows you how to
move around the BIOS setup screen:
• Use the Up and Down arrow keys to move around the Setup
Utility screen.
•Use the Left and Right arrow keys to move to the next page or to
return to the previous page if the setup screen has more than one
page available.
• Use the Page Up, Page Down, +, or - keys to select the options if
they are available.
• Press Esc to return to the Main menu.
Note: A parameter with an asterisk (*) mark indicates that the
parameter appears only when you are in the Advanced Level.
Also, grayed items on the screens have fixed settings and are not
user-configurable.
Page 71

Basic Setup Utility main menu
Advanced Setup Utility main menu
61
The parameters on the screens shown in this User’s guide display
default system values. These values may not be the same as those in
your computer. The grayed-out items on the screens have fixed settings
and are not user-configurable.
In the descriptive table following each of the main menu option
screens, the settings in boldface are the default and suggested
parameter settings.
Page 72

62
5 Setup utility
System Information
The following screen appears if you select System Information from
the main menu:
Parameter Description
Processor Type of processor currently installed in your system
Processor Speed Clock speed of the processor currently installed in
your system
Level 1 Cache Total amount of first-level or the internal fast
accessed memory size (i.e., the memory integrated
into the CPU)
Level 2 Cache Total amount of second-level cache memory size
that comes with the CPU. The available cache sizes
are 256 or 512 KB
Diskette Drive A Current system settings for diskette drive A.
IDE Secondary
Channel Slave
Current configuration of the IDE device connected
to the slave port of the secondary IDE channel
Page 73

Parameter Description
Total Memory Total amount of onboard memory. The memory
size is automatically detected by BIOS during the
POST. If you install additional memory, the system
automatically adjusts this parameter to display the
new memory size.
63
1st Bank
2nd Bank
3rd Bank
4th Bank
Serial Port Serial port address and IRQ setting
PS/2 Mouse Pointing device installation setting. Displays None
Type and size of DIMM installed in DIMM sockets 1,
2, 3 and, 4 respectively. The None setting indicates
that there is no DIMM installed.
if no pointing device is installed.
Page 74

64
5 Setup utility
Product Information
Product Information displays general data about the system, such as
the product name, serial number, BIOS version, etc. These information
is necessary for troubleshooting and may be required when asking for
technical support. These entries are for your reference only and cannot
be changed.
The following shows how the Product Information screen appears:
Parameter Description
Product Name Official name of the system
System S/N System’s serial number
Mainboard ID Mainboard’s identification number
Mainboard S/N Mainboard’s serial number
System BIOS Version Version of the BIOS utility
SMBIOS Version Version of the SMBIOS
BIOS Release Date
Page 75

Disk Drives
Select Disk Drives to input configuration values for the system disk
drives. The following shows the Disk Drives screen:
Parameter Description Option
65
Diskette Drive A Indicates the floppy disk drive
type
IDE Primary
Channel Master
and Slave
IDE Secondary
Channel Master
and Slave
These items let you select the IDE
hard disk parameters that your
system supports.
Auto. Enables BIOS to automatically detect the parameters of
installed HDDs during the POST
(power-on self-test).
User. HDD parameters manually
configured.
None. No HDD is connected to the
system.
Note: The IDE CD-ROM is always
automatically detected.
1.44 MB, 3.5-inch
None
360 KB, 5.25-inch
1.2 MB, 5.25-inch
720 KB, 3.5-inch
2.88 MB, 3.5-inch
Auto
User
None
Page 76

66
5 Setup utility
IDE Channel Type
The following screens appear if you select any of the the IDE drive
parameters from the Disk Drives screen:
Parameter Description Option
Device
Detection
Mode
Device Type Indicates a hard disk type device
Cylinder Specifies the number of cylinders in your
Head Specifies the number of heads in your hard
Sector Specifies the number of sectors in your hard
Lets you specify the type of hard disk
installed in your system. If you want BIOS
to automatically configure your hard disk,
select Auto. If you know your hard disk
type, you can enter the setting manually.
hard disk, and is automatically set depending on your Type parameter setting.
disk, and is automatically set depending on
your Type parameter setting.
disk, and is automatically set depending on
your Type parameter setting.
Auto
User
None
User Input
User Input
User Input
Page 77

Parameter Description Option
Size Specifies the size of your hard disk, in MB User Input
67
Hard Disk
LBA Mode
Hard Disk
Block Mode
Hard Disk 32bit Access
When set to Auto, the BIOS utility automatically detects if the installed hard disk supports the function. If supported, it allows
you to use a hard disk with a capacity of
more than 528 MB. This is made possible
through the Logical Block Address (LBA)
mode translation. However, this enhanced
IDE feature works only under DOS, Windows 3.x, Windows 95, Windows 98, Windows NT 3.5 and above, and Windows
2000. Other operating systems require this
parameter to be set to Disabled.
Enhances disk performance depending on
the hard disk in use. If you set this parameter to Auto, the BIOS utility automatically
detects if the installed hard disk drive
suports the Block Mode function. If supported, it allows data transfer in blocks
(multiple sectors) at a rate of 256 bytes per
cycle.
Improves system performance by allowing
the use of the 32-bit hard disk access. This
enhanced IDE feature works only under
DOS, Windows 3.x, Windows 95, Windows
98, Windows NT, Windows 2000, and Novell
Netware. If your software or hard disk
does not support this function, set this
parameter to Disabled.
Auto
Disabled
Auto
Disabled
Enabled
Disabled
Advanced
PIO Mode
When set to Auto, the BIOS utility automatically detects if the installed hard disk supports the function. If supported, it allows
for faster data recovery and read/write
timing that reduces hard disk activity time.
This results in better hard disk performance. To disregard the feature, change
the setting to Disabled.
Auto
Mode 0
Mode 1
Mode 2
Mode 3
Mode 4
Enabled
Disabled
Page 78

68
Parameter Description Option
5 Setup utility
DMA
Transfer
Mode
The Ultra DMA and Multi-DMA modes
enhance hard disk performance by increasing the transfer rate. However, besides
enabling these features in the BIOS Setup,
both the Ultra DMA and Multi-DMA modes
require the DMA driver to be loaded.
Auto
Multiword
Mode 0, 1, 2
Enabled
Disabled
Page 79

Onboard Peripherals
Onboard Peripherals allows you to configure the onboard
communication ports and the onboard devices. Selecting this option
displays the following screen:
Parameter Description Option
69
Serial Port Enables or disables the serial port Enabled
Disabled
Base Address Sets the I/O base address of the
serial port
IRQ Sets the IRQ (interrupt request)
channel of the serial port
Floppy Disk
Controller
PS/2 Mouse
Controller
USB Host
Controller
Enables or disables the onboard
floppy disk controller
Enables or disables the onboard PS/2
mouse controller
Enables or disables the onboard USB
host controller
3F8h
2F8h
3E8h
2E8h
4
11
Enabled
Disabled
Enabled
Disabled
Enabled
Disabled
Page 80

70
Parameter Description Option
5 Setup utility
USB Legacy
Mode
Onboard SCSI Enables or disables the onboard SCSI
Onboard
Ethernet Chip 1
Onboard
Ethernet Chip 2
Onboard
Ethernet Chip 3
Onboard
Ethernet Chip 4
Activates or deactivates the USB keyboard connected to your system.
When activated, the USB keyboard
functions in a DOS environment.
controller
Enables or disables the first onboard
network feature
Enables or disables the second
onboard network feature
Enables or disables the first third network feature
Enables or disables the fourth
onboard network feature
Disabled
Enabled
Enabled
Disabled
Enabled
Disabled
Enabled
Disabled
Enabled
Disabled
Enabled
Disabled
Page 81

Power Management
The Power Management menu allows you to configure the system’s
power management feature.
The following screen shows the parameters on the Power
Management screen:
71
Parameter Description Option
Power
Management
Mode
IDE Hard Disk
Standby Timer
Allows you to reduce power consumption. When this parameter is set to
Enabled, you can configure the IDE hard
disk and system timers. Setting it to Disabled deactivates the power-management
feature and its timers.
Allows the hard disk to enter standby
mode after inactivity of 1 to 15 minutes,
depending on your setting. When you
access the hard disk again, allow 3 to 5 seconds (depending on the hard disk) for the
disk to return to normal speed. Set this
parameter to Off if your hard disk does not
support this function.
Enabled
Disabled
Off
1 minute
15 minutes
Page 82

72
Parameter Description Option
5 Setup utility
System Sleep
Timer
Sleep Mode Lets you specify the power-saving mode
Power Switch
< 4 sec.
System Wakeup Event
Modem Ring
Indicator
This parameter sets the system to the
lowest power-saving mode after a specified period of inactivity. Any keyboard or
mouse action or any activity detected from
the IRQ channels resumes system operation.
that the system will enter after a specified
period of inactivity.
This parameter becomes configurable only
if the System Sleep Timer is on. Any keyboard or mouse action, or any enabled
monitored activities occurring through the
IRQ channels resume system operation.
When set to Power off, the system automatically turns off when the power switch
is pressed for less than 4 seconds. When
set to Suspend, the system enters the suspend mode when the power switch is
pressed for less than 4 seconds.
The system wake-up event allows the system to resume operation when the modem
ring indicator is enabled.
When Enabled, any fax/modem activity
wakes up the system from suspend mode.
Off
On
Standby
Suspend
Power off
Suspend
Enabled
Disabled
PCI Power
Management
RTC Alarm Allows you to set a certain time on a cer-
Resume
Day
Resume
Time
Enables or disabled the PCI power
managment function
tain day to wake-up your system from suspend mode.
If RTC alarm is enabled, the system will
resume operation on the day indicated
here.
If RTC alarm is enabled, the system will
resume operation at the time indicated
here.
Enabled
Disabled
Disabled
Enabled
User input
User input
Page 83

Parameter Description Option
73
Restart on AC
Power Failure
When power failure occurs and this setting
is enabled, the system will be turned on,
when the power comes back, if the system
was on.
When power failure occurs and this setting
is disabled, the system remains off when
the power comes back, even if the system
was on before the power failure occurs.
Enabled
Disabled
Page 84

74
5 Setup utility
Boot Options
This option allows you to specify your preferred settings for boot up.
The following screen appears if you select Boot Options from the
main menu:
Parameter Description Option
Boot Sequence This parameter allows you to specify the
boot search sequence during POST.
1st. The system checks this drive first.
2nd. The system then checks this drive if it
can not boot from the 1st specified drive.
3rd. If the 1st and 2nd searches fail then it
boots from this drive.
BIOS will display an error message if the
drive(s) specified is not bootable.
Fast Boot Allows the system to boot faster by
skipping some POST routines
Disabled
Auto
Page 85

Parameter Description Option
75
Silent Boot Enables or disables the Silent Boot func-
tion. When set to Enabled, BIOS is in
graphical mode and displays only an identification logo during POST and while
booting. After booting the screen displays
the operating system prompt (such as DOS)
or logo (such as Windows 95). If any error
occurs while booting, the system automatically switches to text mode.
Even if your setting is Enabled, you may
also switch to text mode while booting by
pressing the Delete key when you see the
"Press DELETE key to enter setup" message
on the screen.
When set to Disabled, BIOS is in the conventional text mode where you see the system initialization details on the screen
Num Lock
After Boot
Memory Test When set to Enabled, this parameter
Release All
Blocked
Memory
Allows you to activate the Num Lock function upon booting
allows the system to perform a RAM test
during the POST routine. When set to Disabled, the system detects only the memory
size and bypasses the test routine.
When set to Enabled, this parameter
allows the system to bypass testing the
defective memory banks detected earlier
Enabled
Disabled
Enabled
Disabled
Enabled
Disabled
Disabled
Enabled
Configuration
Tab le
POST Error
Stop
Displays preboot system configuration
table when enabled
When enabled, if the POST finds an error,
it will stop and the user has to press F1 to
continue. If disabled, even when the POST
finds an error, it will not stop
Enabled
Disabled
Enabled
Disabled
Page 86

76
5 Setup utility
Date and Time
The real-time clock keeps the system date and time. After setting the
date and time, you do not need to enter them every time you turn on
the system. As long as the internal battery remains good
(approximately seven years) and connected, the clock continues to
keep the date and time accurately even when the power is off.
Parameter Description
Date Set the date following the weekday-month-day-year
format. Valid values for weekday, month, day, and year
are:
Weekday: Sun, Mon, Tue, Wed, Thu, Fri, Sat
Month: Jan, Feb, Mar, Apr, May, Jun, Jul, Aug, Sep, Oct,
Nov, Dec
Day: 1 to 31
Year: 1980 to 2079
Time Set the time following the hour-minute-second format.
Valid values for hour, minute, and second are:
Hour: 00 to 23
Minute: 00 to 59
Second: 00 to 59
Page 87

System Security
The Setup program has a number of security features to prevent
unauthorized access to the system and its data.
The following screen appears if you select System Security from the
main menu:
Parameter Description Option
77
Supervisor
Password
User Password Secures your system against
Disk Drive
Control
Prevents unauthorized access to the
BIOS Setup utility. The Present
setting allows you to set a
Supervisor password.
unauthorized use. Once you set
this password, you have to type it
whenever you boot the system.
User password is available only
when a Supervisor password is set.
The Present settings allows you to
set a User password.
The disk drive control features
enable or disable the read/write
functions of disk drives. These
parameter can also control the
diskette drive boot function to prevent loading operating systems or
other programs from a certain drive
while the other drives remain
operational.
None
Present
None
Present
Page 88

78
Parameter Description Option
5 Setup utility
Floppy Drive Sets the control level of the floppy
drive
Processor
Serial Number
The Pentium III processor incorporates an individual serial number in
each chip that can identify individual CPUs. When enabled, CPUs
can be identified by processor serial
number. Disable this parameter to
deactivate this feature.
Normal
Write Protect All
Sectors
Write Protect Boot
Sectors
Disabled
Disabled
Enabled
Page 89

79
Setting and changing the password
To set or change a Supervisor/User password:
1 Enable the Supervisor Password or User Password parameter in the
System Security menu by pressing the Up or Down arrow key to
select Present. The corresponding password window appears:
Supervisor Password window
User Password window
2 Type a password then press Enter. The password may consist of up
to seven alphanumeric characters.
Note: Be careful when typing your password because the actual
characters do not appear on the screen; password characters
appear as asterisks (*).
3 Retype the password to verify your first entry then press Enter.
4 Highlight the “Set or Change Password” option then press
Enter.
5Press Esc to return to the System Security screen.
6Press Esc to exit Setup. The Exit Setup screen appears.
7 Choose “Yes” to save your settings and exit Setup. Your password
will be saved to CMOS.
Page 90

80
5 Setup utility
Removing a password
To remove your Supervisor/User password:
1 Disable the Supervisor Password or User Password parameter in
the System Security menu by pressing the up or down arrow key
to select None.
2 Press Esc to return to the System Security menu.
3 Press Esc to exit Setup. The Exit Setup screen appears:
4 Choose Yes to save your settings and exit Setup. Your previous
password will be removed from CMOS.
Page 91

81
IPMI Configuration
Intelligent Platform Management Interface
The system event log enables you to record and monitor events that
occur in your system like system temperature changes, fan stops, and
others. This feature also allows you to specify the appropriate settings
for your system’s event handling.
The following table describes the parameters in the IPMI configuration
screen. Settings in boldface are the default and suggested parameter
settings.
Parameter Description Option
IPMI
Specification
Version
Specifies the version of Intelligent Platform
Management Interface (IPMI)
Page 92

82
Parameter Description Option
5 Setup utility
IPMI BIOS
Version
BMC
Firmware
Version
System Event
Logging
Clear Event
Log Area
Existing Event
Log Number
Remaining
Event Log
Number
View Event
Logs
Event Control
BIOS POST BIOS checks the bad processors and
Shows the version of IPMI BIOS
Specifies the version of BaseBoard
Management Controller (BMC) Firmware
Enables or disables the event logging
function of your system
Clears the event log whenever the event
log area is full
Number of events currently located in the
event log area
Number of spaces that are still available
for logging system events
Opens the system event log file for viewing
memory modules during POST. When this
parameter is enabled, BIOS will stop POST
operation whenever it finds a bad processor or memory. Otherwise, if disabled the
system will continue running.
Enabled
Disabled
Disabled
Enabled
Enabled
Disabled
Memory ECC ECC (error correcting code) tests the
accuracy of data as it passes in and out of
memory. This parameter enables or
disables the monitoring of this function.
PCI Devices PCI (Peripheral Component Interconnect) is
a 32-bit bus that supports a 64-bit extension for new processors, such as Pentium
processors. It can run at clock speeds of 33
or 66 MHz. This parameter monitors the
activity of this bus when set to Enabled.
Enabled
Disabled
Enabled
Disabled
Page 93

Parameter Description Option
83
AC Power
Lost/Recovery
Hardware
Watchdog
BIOS POST
Watchdog
OS Boot
Watchdog
Time for
Loading OS
Time-out
Action
Boot Retry
Counter
BMC will log AC power lost and recovery
event.
If system hardware reset fails, BMC will
power off system for 10 seconds, then
power on again. It will try twice. If system
still fails to power on, BMC will perform
CPU reduction or power off the system.
BIOS will have a watchdog for POST. If
POST hangs up, BMC will reset the system.
It will try twice. If POST still hangs up, BMC
will power off the system.
Enabled
Disabled
Enabled
Disabled
Enabled
Disabled
Page 94

84
RDM Configuration
5 Setup utility
Parameter Description Option
RDM 4.3 BIOS
Version
Console
Redirection
Shows the version number of the RDM BIOS
This parameter lets you enable or disable
the connection to the RDM manager
station. If enabled and conditions are met,
the RDM-enabled server automatically dials
the RDM manager station using the phone
number specified in the Remote Console
Phone No. parameter when the server
reboots. Once the connection is established, both the RDM server and the RDM
manager station display the same screen
which enables the RDM manager station to
function the same as the server console.
Setting this to Disabled deactivates the
RDM manager station.
Disabled
Enabled
Page 95

Parameter Description Option
85
Hidden
Partition
Communication Protocol
COM Port Baud
Rate
Detect Tone When enabled, RDM first checks for the
Remote
Console Phone
No.
If you want the hidden partition to become
accessible, set this parameter to Enabled.
When enabled, the server boots to the hidden partition.
This parameter specifies the parity, stop
bits, and data length for the COM port to
use for RDM connection. This is fixed at N
(none), 8, 1 setting and is non-configurable.
This parameter lets you set the transfer rate
of the COM port for RDM connection. The
parameter setting depends on your modem
specification; therefore, before you change
the setting of this parameter, check the
documentation that came with your
modem.
existence of a telephone tone before it dials
out.
When disabled, RDM proceeds with the
dialing process without checking for a
telephone tone.
This parameter allows you to set the phone
number of the RDM manager station that
the RDM module must dial once RDM is
activated and the Remote Console is
enabled. To set, simply highlight the
parameter and enter the Remote Console
phone number.
If the remote console phone number is
using an (X) line, then you must enter six
commas (,) after the phone number and
before the extension number, if any. When
entering the extension number, we recommend that you insert a comma after each
number. The commas specify delay.
If this parameter is left blank, the Remote
Console calling function is disregarded.
Disabled
Enabled
N
8
1
9600
57600
Enabled
Disabled
User input
Page 96

86
5 Setup utility
Parameter Description Option
Dial Out Retry
Times
This parameter lets you specify the maximum number of times the RDM server must
retry to connect to the RDM manager
station once the server fails and RDM is
activated. If the server has completed the
specified number of tries and the connection still fails, the server bypasses RDM and
goes into normal mode.
Modem Initial
Command
Some modems require specific commands
for initialization. This parameter allows you
to specify the required command to enable
your system to support special types of
modems. If you do not specify any command, BIOS uses the default method to ini-
tialize the modem
Emergency Management
RDM Work
Mode
When detecting system failure, the RDM
module will take some actions according to
the active mode.
Waiting: Page and wait for the RDM Station
to call in
Reboot: Page, then reboot
Disabled: No action
Note: If Waiting is selected, a password
consisting of at least three alphanumeric
characters must be set.
2
4
8
Infinite
User input
a
.
Disabled
Waiting
Reboot
Waiting Mode
Prevents unauthorized access to the server User input
Password
Paging Times Allows you to set the number of times that
the RDM module must dial when the server
fails or hangs
1
2
4
8
Paging No. Allows you to set the pager number that
User input
the RDM module must dial when the server
fails or hangs
a. Specify an initialization command only when you receive a Modem Initial Command Fail
error message. Otherwise, leave this parameter blank.
Page 97

Advanced Options
Note: To avoid damaging the system, do not change any settings
in the Advanced Options submenu if you are not a qualified
technician .
The following screen shows the Advanced Options parameters:
Memory/Cache Options
87
Memory/Cache Options allows you to configure the advanced system
memory functions.
Parameter Description Option
Level 1 Cache Enables or disables the first-level or
internal memory, that is, the memory
integrated into the CPU.
Enabled
Disabled
Page 98

88
Parameter Description Option
5 Setup utility
Level 2 Cache Enables or disables the second-level cache
memory which is incorporated in the CPU
module.
Memory
Remap
Function
Enabled
Disabled
Page 99

PnP/PCI Options
PnP/PCI Options allows you to specify the settings for your PCI
devices. Selecting this option displays the following screen:
89
Parameter Description Option
PCI IRQ
Setting
PCI Slot 1
PCI Slot 2
Select Auto to let BIOS automatically configure the plug-and-play (PnP) devices
installed on your system; Otherwise, select
Manual.
Note: Refer to the documentation that
came with your PCI card for more technical
information.
When you set the PCI IRQ Setting parameter to Auto, these parameters specify the
auto-assigned interrupt for each of the PCI
devices.
When you set the PCI IRQ Setting parameter to Manual, you need to specify the
interrupt that you want to assign for each
PCI device installed in your system.
Auto
Manual
User input
Page 100

90
Parameter Description Option
5 Setup utility
Onboard LAN 1
Onboard LAN 2
Onboard LAN 3
Onboard LAN 4
Onboard SCSI Allows you to manually assign the inter-
Onboard RAID User input
USB Host
Controller
PCI IRQ Sharing Setting this parameter to Yes allows you to
When you set the PCI IRQ Setting parameter to Auto, this parameter specifies the
auto-assigned interrupt for the onboard
LAN controlers installed in your system.
When you set the PCI IRQ Setting parameter to Manual, you need to specify the
interrupt that you want to assign for the
onboard LAN controllers installed in your
system.
rupt for the onboard SCSI when the PCI
IRQ Setting parameter is set to Manual.
This parameter is grayed and not user-configurable when the PCI IRQ Setting is set to
Auto.
Allows you to manually assign the
interrupt for the USB host controller when
the PCI IRQ Setting parameter is set to
Manual. This parameter is grayed and not
user-configurable when the PCI IRQ Setting
is set to Auto.
assign the same IRQ to two different
devices. To disable the feature, select No.
Note: If there are no IRQs available to
assign for the remaining device function, it
is recommended that you enable this
parameter.
User input
User input
Disabled
Enabled
Yes
No
 Loading...