

Page 1

TX/LP Series
Ultra ATA/100 RAID Cards
User's Manual
Page 2

Copyright
Copyright by Promise Technology, Inc. (“Promise”), 2001. No part of this
manual may be reproduced or transmitted in any form without the
expressed, written permission of Promise.
Trademarks
All trademarks are the property of their respective holders.
Important data protection information
You should back up all data before installing any drive controller or storage
peripheral. Promise is not responsible for any loss of data resulting from the
use, disuse or misuse of this or any other Promise product.
Notice
Although Promise has attempted to ensure the accuracy of the content of
this manual, it is possible that this document may contain technical
inaccuracies, typographical, or other errors. Promise Technology, Inc.
assumes no liability for any error in this publication, and for damages,
whether direct, indirect, incidental, consequential or otherwise, that may
result from such error, including, but not limited to loss of data or profits.
Promise provides this publication “as is” without warranty of any kind,
either express or implied, including, but not limited to implied warranties of
merchantability or fitness for a particular purpose.
The published information in the manual is subject to change without notice.
Promise reserves the right to make changes in the product design, layout,
and driver revisions without notification to its users.
Page 3

FastTrak100 TX/LP™ Series User Manual
Table of Contents
INTRODUCTION.............................................................................................................1
WHAT IS THE FASTTRAK100 TX/LP SERIES RAID CARD?............................................1
KEYS FEATURES AND BENEFITS .................................................................................3
QUICK START ...............................................................................................................5
UNPACKING YOUR FASTTRAK100...............................................................................5
INSTALLING THE CARD ................................................................................................6
INSTALLING THE HARD DRIVES ...................................................................................7
CHECKING CMOS SETTINGS.......................................................................................9
CREATING YOUR DISK ARRAY .................................................................................10
USING FASTBUILD™ CONFIGURATION UTILITY......................................................14
VIEWING FASTTRAK100 BIOS SCREEN ....................................................................14
NAVIGATING THE FASTBUILD ™ SETUP M ENU ...........................................................15
CREATING ARRAYS AUTOMATICALLY .......................................................................16
VIEWING DRIVE ASSIGNMENTS ................................................................................18
M ANUALLY CREATING AN ARRAY .............................................................................19
DELETING AN ARRAY ...............................................................................................26
REBUILDING A MIRRORED ARRAY ...........................................................................27
VIEWING CONTROLLER SETTINGS ............................................................................29
INSTALLING DRIVERS ................................................................................................30
WINDOWS 2000........................................................................................................30
WINDOWS NT4 .........................................................................................................32
WINDOWS ME...........................................................................................................34
WINDOWS 95/98.......................................................................................................36
DOS/WINDOWS 3.1X.................................................................................................39
NETWARE 3.12..........................................................................................................40
NETWARE 4.11..........................................................................................................42
NETWARE 5...............................................................................................................44
NETWARE E RROR AND INFORMATIONAL MESSAGES..................................................45
LINUX........................................................................................................................46
USING THE FASTCHECK™ MONITORING UTILITY...................................................47
INSTALLING FASTCHECK............................................................................................47
RUNNING FASTCHECK ..............................................................................................48
CLOSING FASTCHECK ...............................................................................................48
USING FASTCHECK ARRAY WINDOW .......................................................................49
SYNCHRONIZING AN ARRAY ...................................................................................53
REBUILDING AN ARRAY ...........................................................................................55
USING CONTROLLER WINDOW ..................................................................................58
USING OPTIONS WINDOW .........................................................................................62
Page 4

FastTrak100 TX/LP™ Series User Manual
UNDERSTANDING DISK ARRAY CONCEPTS.............................................................70
ABOUT FASTTRAK100 TX/LP SERIES DISK ARRAY ADAPTER ...................................70
ABOUT ADAPTER BIOS.............................................................................................70
FASTBUILD
™
AUTO M ENU SETUP.............................................................................70
RESERVED SECTOR ..................................................................................................70
DISK ARRAY TERMS .................................................................................................71
ABOUT RAID LEVELS ................................................................................................72
TROUBLESHOOTING & TIPS......................................................................................76
M OTHERBOARD ISSUES.............................................................................................76
SYSTEM CMOS ISSUES .............................................................................................77
DRIVE-RELATED E RRORS..........................................................................................77
OPERATING SYSTEM-RELATED ISSUES......................................................................81
P ERFORMANCE TIPS.................................................................................................83
FREQUENTLY ASKED QUESTIONS .............................................................................86
P RE-INSTALLATION....................................................................................................86
DRIVE ISSUES ...........................................................................................................88
INSTALLATION ISSUES................................................................................................89
P OST-INSTALLATION ..................................................................................................89
CONTACTING PROMISE SUPPORT .........................................................................A-1
LIMITED WARRANTY................................................................................................B-1
RETURNING PRODUCT FOR REPAIR........................................................................C-1
Page 5

FastTrak100 TX/LP™ Series User Manual
Introduction
The PC which you are using either already contains a Promise Technology
FastTrak100 TX4, TX2, or LP RAID card installed by a third-party or you have
acquired a FastTrak100 retail product for your existing PC and will be installing the
card yourself.
For PC owners wishing to install their Promise Technology FastTrak100 TX4/TX2/LP
card, proceed to the Quick Start section (see page 5).
For PCs with a Promise Technology FastTrak100 TX4/TX2/LP card already installed,
consult the Troubleshooting section of the manual (see page 76) if you are
experiencing any difficulties with the hard drive being recognized by the card. If your
operating system has crashed for some reason or you have downloaded updated
drivers from the Promise website (www.promise.com), you may wish to reinstall
software drivers for the FastTrak100 card. Use the Installing Drivers section (see
page 30).
In order to serve you better and provide information updates, please take a moment to
register your controller at http://www.promise.com/warranty .
What is the FastTrak100 TX/LP Series RAID Card?
Promise originally designed the FastTrak100 card as a cost-effective, high
performance RAID card that adds performance and/or reliability to PC desktops and/or
servers using Ultra ATA/100, Ultra ATA/66, or EIDE drives. The FastTrak100 TX/LP
Series models offer some major performance differences as described below.
The Fas tTrak100 TX/LP Series models all support newer motherboards that offer a
66MHz PCI bus (versus the traditional 33MHz bus) and the capability of transferring
data across the PCI bus at speeds up to 266MB per second (versus the previous
133MB per second). As Ultra ATA/100 drive performance continues to improve, the
use of the Promise ATA RAID card in a 66 MHz PCI slot will allow data transfers to
exceed the older 133MB. Of course, the FastTrak100 TX/LP series cards are
backward compatible with standard 33MHz PCI slots.
The FastTrak100 TX4 model offers four independent data channels to support a
maximum of four Ultra ATA drives. This multiplies the sustained data transfer rate of
attached drives that are striped together under RAID 0 or RAID 0+1 (up to 200MB per
second). The FastTrak100 TX2 offers two independent data channels to support a
maximum of four Ultra ATA drives -- though Promise recommends using just one drive
per channel for maximum performance. The FastTrak100 LP offers the same features
as the TX2 but in a low profile form factor designed for low profile PCs.
FastTrak100 supports striping (RAID 0), mirroring (RAID 1), striping/mirroring (RAID
0+1), or spanning (JBOD) operation, respectively. With striping, identical drives can
read and write data in parallel to increase performance. Mirroring increases read
1
Page 6

FastTrak100 TX/LP™ Series User Manual
performance through load balancing and elevator sorting while creating a complete
backup of your files. Striping with mirroring offers both high read/write performance
and fault tolerance. Spanning uses the full capacity of all attached drives without
requiring identical drive size, but offers no other RAID functionality.
A FastTrak100 striped array can double (TX2 and LP models using two drives) or
quadruple (TX4 model using four drives) the sustained data transfer rate of Ultra
ATA/100 drives. FastTrak100 fully supports Ultra ATA/100 specification of up to 100
MB/sec per drive, depending on individual drive specifications.
All FastTrak100 models also offer fault tolerant, data redundancy for entry-level
network file servers or simply for desktop PC users wanting to continually protect
valuable data on their PC. Each FastTrak100 model offers RAID 1 mirroring (for two
drives) and RAID 0+1 mirroring plus striping (for four drives) to protect data. Should a
drive that is part of a mirrored array fail, FastTrak100 uses the mirrored drive (which
contains identical data) to assume all data handling. When a new replacement drive
is later installed, FastTrak100 rebuilds data to the new drive from the mirrored drive to
restore fault tolerance.
When attached drives are used with optional Promise SuperSwap(tm) "hot" swap
chassises, the FastTrak100 models allow replacing a failed drive without shutting
down the PC operation under RAID 1 mirroring. Because of its four independent data
channels, the FastTrak100 TX4 also supports "hot" swapping under RAID 0+1 using
four drives.
FastTrak100's bootable BIOS supports individual drives larger than 8.4GB. With
FAT32 and NTFS partitioning, the array can be addressed as one large single volume.
2
Page 7

FastTrak100 TX/LP™ Series User Manual
Keys Features and Benefits
The following information offers an overview of the major features of your new
Promise FastTrak100 TX4, TX2 or LP card. The table is divided into two areas:
Advanced Hardware Design, and Compatibility.
Advanced Hardware Design
Features Benefits
Supports 66MHz PCI bus
motherboards (automatically
backward compatible with 33MHz
PCI slots)
Supports data striping (RAID 0),
mirroring (RAID 1), and
striping/mirroring combination
(RAID 0+1)
Supports Ultra DMA 5/4/3/2/1/0,
DMA 2/1/0
Independent data channels Drives can multiply their data transfer
PCI Plug-n-Play, PCI Interrupt
sharing and coexists with
mainboard IDE controllers
Supports concurrent IDE channel
operation
Supports IDE bus master operation Allows multitasking during disk transfers that
Utilizes FastBuild
from the FastTrak100 onboard
BIOS
Displays status and error checking
messages during bootup
Employs the latest Promise PCI
Ultra ATA/100 ASIC technology
Mirroring supports automatic
background rebuilds
TM
automenu
Allows maximum data transfers of up to 200MB
per second (133 MB/s in 33 MHz slot) over the
bus to dramatically reduce the time to save and
retrieve large files.
Provides dramatic increase in drive performance
and/or fault tolerant options. Offers
performance customization and data rebuilds
from the BIOS menu.
Burst data transfer rates up to 100MB/sec from
Ultra ATA/100 drives to boost overall system
performance.
performance when striped together and each
drive uses a separate data channel.
Easy to install; support four ATA drives on the
FastTrak100 while still supporting 4 devices on
motherboard ATA controller.
Drive workload is distributed in parallel between
members of the array.
increase CPU efficiency. The CPU is free to
process tasks during IDE data transfers through
the PCI Bus to/from system memory.
Offers pre-set application specific settings that
can be optimized for Desktop, Server, or A/V
Editing. Has "Auto Setup" option for quick and
easy array builds.
Notifies user of possible errors and allows for
recovery of mirrored drive arrays directly from
FastBuild
Fully supports Ultra ATA/100 specifications with
100 MB/sec timing and CRC error-checking at
high speeds.
Fault tolerance can be restored automatically
without rebooting.
TM
.
3
Page 8

FastTrak100 TX/LP™ Series User Manual
Compatibility
Features Benefits
Complies with PCI v2.2 Local Bus
standard
Compliant with PCI IDE Bus Master
standard. PCI IDE Bus Master
support for Windows 98/95/ME,
Windows NT4/2000, Netware
3.12/4.1x/5.0, RedHat Linux 6.2/7.0
Tested compatibility to coexist with
mainboards that have integrated
IDE controllers
Compatible with Ultra ATA/100,
Ultra ATA/66, Ultra ATA/33, EIDE
and Fast ATA -2 drives supporting
multi-word DMA
Features LBA and Extended
Interrupt13 drive translation in
controller onboard BIOS
DMI NT compatibility FastTrak will appear as an instrumented
Provides highest level of hardware compatibility.
Provides 32-bit I/O, IDE Bus Master, and Ultra
ATA performance for optimal system
performance.
Improves system performance of new and
existing installations including mainboards with
Intel chipsets.
Works with newest and current IDE drive
specifications. Promise engineers experienced
with IDE devices perform verification testing
with major drive manufacturers and
development partners.
Breaks capacity barriers for support of drives
greater than 8.4GB in capacity. Offers flexible
storage options for space demanding
applications.
component under DMI (Desktop Management
Interface)
4
Page 9

FastTrak100 TX/LP™ Series User Manual
Quick Start
This section is designed to quickly get your FastTrak100 TX/LP series controller up
and running using the default settings, which will be optimal for most users. If you
wish to modify any of the default settings, please refer to page 14, Using FastBuild™
Configuration Utility.
Unpacking Your FastTrak100
When you receive the FastTrak100, the package should contain the items listed below:
• FastTrak100 TX4, TX2, or LP Ultra ATA/100 RAID Card
• FastTrak100 TX/LP Series User’s Manual
• FastTrak100 Driver floppy diskette
• Two (TX2/LP models) or four (TX4) internal 80-wire/40-pin Ultra ATA/100 hard
drive cables (18” length)
If ANY of the contents are missing or appear to be damaged, please contact your
dealer or distributor immediately.
WARNING: Before installing the adapter into an existing system,
backup any necessary data. Failure to follow this accepted PC
practice could result in data loss.
NOTE: FastTrak100, like every other valuable part of your system, is subject to
static electricity. Be sure that you’re properly grounded (Promise recommends that
you wear an anti-static strap, or touch a grounded object), and that your system is
unplugged before installing FastTrak100.
5
Page 10
FastTrak100 TX/LP™ Series User Manual
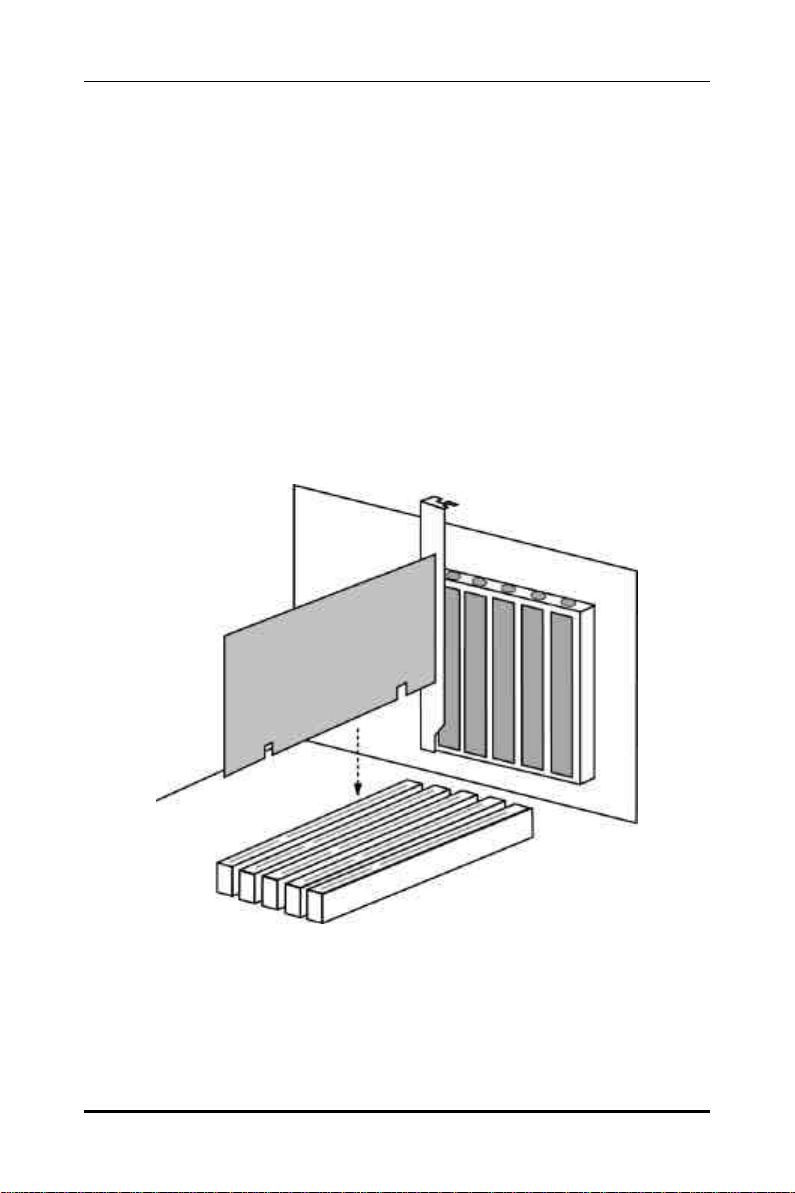
Installing The Card
Installing the FastTrak100 TX/LP Series controller card in a system is a simple process.
The card fits into any available 32-bit PCI slot (must be PCI 2.1 or 2.2 compliant), or the
32-bit portion of a 64-bit PCI slot, on the system’s motherboard (see figure below).
1. Remove the cover of your system.
2. Remove the inside slot cover of an available 32-bit PCI slot on the
motherboard.
3. Install the FastTrak100 controller card into the open slot (see Figure 1
below).
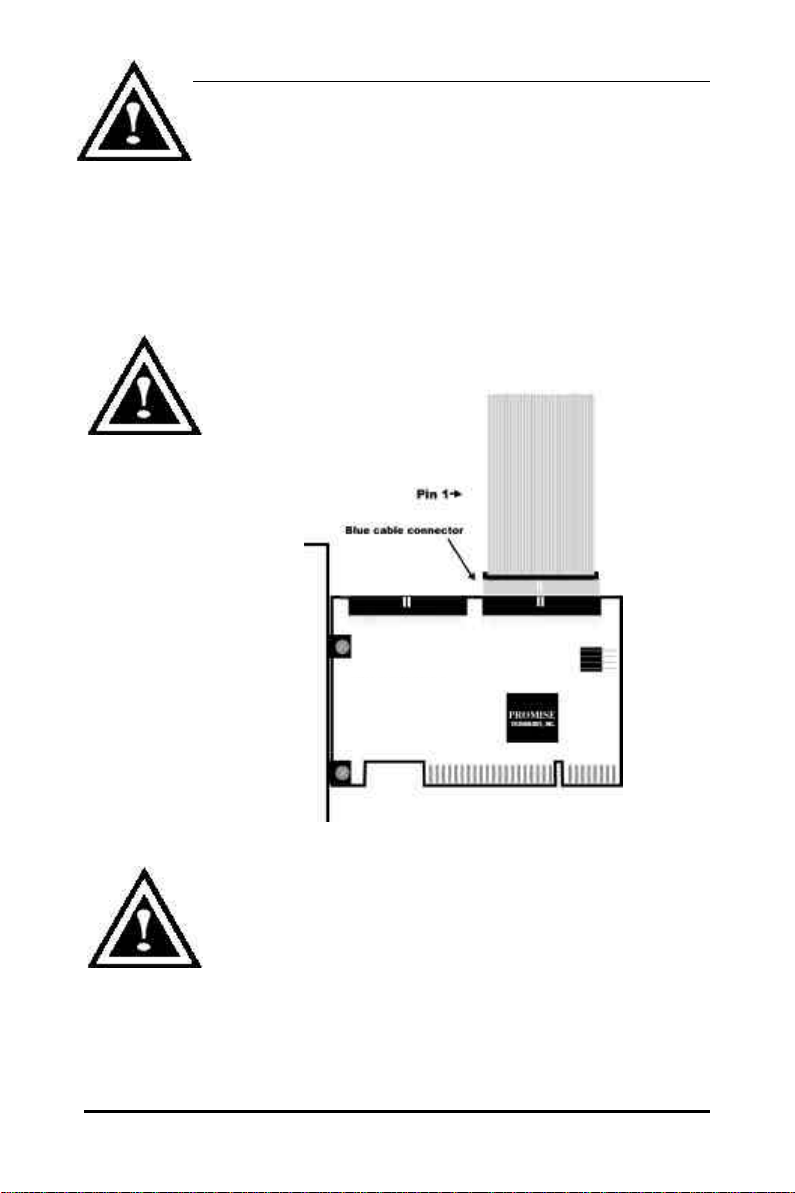
4. Attach your system case’s 2- or 4-pin LED cable to the LED connector on
the FastTrak100 controller card (see figure next page). Make sure that pin 1
on the connector is aligned with pin 1 of the cable.
5. Fasten the controller card bracket to the system case (see below).
Figure 1
6
Page 11

FastTrak100 TX/LP™ Series User Manual
Installing The Hard Drives
WARNING: If you wish to include your current bootable drive
using the Windows NT 4.x or Windows 2000 operating system as
part of a bootable Mirrored (RAID 1) array on your FastTrak100,
do NOT connect the hard drive to the FastTrak100 controller yet.
You MUST install the Windows NT4 or 2000 driver software first
(see page 30) to this drive while it is still attached to your existing hard drive
controller.
Hard drives must be Ultra ATA/100, Ultra ATA/66, Ultra ATA/33, EIDE and/or Fast
ATA-2 compatible to operate with the FastTrak100 RAID Adapter. For optimal
performance, install all identical drives of the same model and capacity. The drives’
matched performance allows the array to function better as a single drive.
1. Promise recommends using identical drives as part of a FastTrak100 array.
If striping for performance, use up to four new drives. If mirroring for
protection, you can use two new drives OR use an existing drive and a
new drive (the new drive must be the same size or larger than the existing
drive).
a. For TX4 model users, set the jumpers of each hard drive to
"Master" only. Attach 1 drive only to each of the TX4’s data
channels (do not use a Master/Slave configuration).
b. For TX2 or LP model users, configure the jumpers of the hard
drive you’re preparing to connect to the FastTrak100 TX2 or LP
models using the correct “Master” or “Cable -Select” settings in the
positions described in the table below.
NOTE: Sometimes the Master drive with no slave attached is called “Single.”
The master slave setting differentiates two drives chained on the same
connector.
Jumper Settings
# of Drives IDE Channel 1 IDE Channel 2
1 M ---2 M M
3 M & S M
4 M & S M & S
M = Master, S = Slave
2. Install the hard drives into the hard drive bays of your system, including the
power cables.
7
Page 12
FastTrak100 TX/LP™ Series User Manual
WARNING: Use of removable hard drive enclosures other than
Promise SuperSwap is not supported and may result in
performance loss or other undesired results.
3. Attach one Ultra ATA cable to each hard drive. Then attach one cable to
each of the IDE connectors on the FastTrak100 controller card. The colored
edge of the cable(s) indicates pin 1 (see below), and the blue cable
connector must be attached to the FastTrak100 connector.
NOTE: The TX4 model houses four data channel connectors.
Attach only one drive per connector.
IDE 2 IDE 1
NOTE: You must use an 80-wire, 40-pin cable when connecting
an Ultra ATA/100 hard drive to the FastTrak100 controller card.
The FastTrak100 TX2 and LP package contains two 80-wire, 40pin cables. FastTrak100 TX4 contains four of these cables.
8
Page 13

FastTrak100 TX/LP™ Series User Manual
Checking CMOS Settings
No changes are necessary in the Motherboard CMOS Setup for resources or drive
types. Since FastTrak100 is a PCI Plug-n-Play (PnP) device, the Interrupt and Port
address resources are automatically assigned by the Motherboard's PCI
PnP BIOS.
The FastTrak100 system resources including port address, interrupt, and BIOS
address are automatically determined by the system PnP BIOS. To customize
IRQ settings, enter the Motherboard BIOS's Advanced PCI setup and follow the
manufacturer's procedures. If the system has limited IRQ resources, the FastTrak100
card can be set for the same IRQ as other PCI cards if those cards support PCI
interrupt sharing.
If you wish to boot from a FastTrak100 drive array AND continue to use hard drives
attached to your motherboard's IDE controller, refer to your motherboard manual for
the specific BIOS settings to use in order to establish their proper boot order.
9
Page 14

FastTrak100 TX/LP™ Series User Manual
Creating Your Disk Array
You will now use the onboard FastBuild BIOS utility to create your array using the
attached drives. There are three different scenarios in creating this array. You can
create an array for performance, you can create a Security array using new hard
drives (recommended), or you can create a Security array using an existing hard
drive and a new hard drive.
WARNING: If creating a Security array using an existing hard
drive, backup any necessary data. Failure to follow this accepted
PC practice could result in data loss.
1. Boot your system. If this is the first time you have booted with the
FastTrak100 card and drives installed, the Promise onboard BIOS will
display the following screen.
FastTrak100 (tm) BIOS Version 1.xx (Build xxxx)
(c) 1995-2001 Promise Technology, Inc. All Rights Reserved.
No array defined . . .
Press <Ctrl-F> to enter FastBuild (tm) Utility
Or press <ESC> key to continue booting the system.
2. Press <Ctrl-F> keys to display the FastBuild (tm) Utility Main Menu
3. Press “1” to display the Auto Setup Menu below. This is the fastest and
easiest method to creating your first array.
FastBuild (tm) Utility 1.xx (c) 1995-2001 Promise Technology, Inc.
[Auto Setup Options Menu]
Optimize Array for: Performance
Typical Application usage: A/V Editing
[ Auto Setup Configuration ]
Mode.................................................Stripe
Drives used in Array................................2
Array Disk Capacity.........................16126
[ Keys Available ]
10
Page 15

FastTrak100 TX/LP™ Series User Manual
[↑] Up [↓] Down [←, →, Space] Change Option [ESC] Exit [Ctrl-Y] Save
NOTE: If you wish to customize certain settings at a later time, you may do so by
manually creating your array (see page 19 in Using FastBuild Configuration Utility).
11
Page 16

FastTrak100 TX/LP™ Series User Manual
Creating an Array for Performance
NOTE: FastTrak100 allows users to create striped arrays with 1, 2, 3, or 4 drives.
To create an array for best performance, follow these steps:
1. Using the Spacebar, choose “Performance” under the Optimize Array for
section.
2. Select how you will use your PC most under the Typical Application usage
section. The choices are A/V Editing, Server, and Desktop (the default).
3. Press <Ctrl-Y> keys to Save and create the array.
4. Reboot your system.
5. Once the array has been created, you will need to FDISK and format the
array as if it were a new single hard drive.
6. Proceed to Installing Drivers section of the manual (see page 30).
Creating a Security Array With New Drives
NOTE: Under the Security setting, FastTrak100 permits two drives to be used for a
single Mirrored array or four drives to be used for a Mirrored/Striped array in Auto
Setup.
NOTE: When creating a Security array with new drives, a feature called Gigabyte
Boundary will automatically be set to ON. For a description of the Gigabyte
Boundary feature, see page 20.
To create an array for data protection using new hard drives, follow these steps:
1. Using the Spacebar, choose “Security” under the Optimize Array for
section.
2. Press <Ctrl-Y> keys to Save your selection.
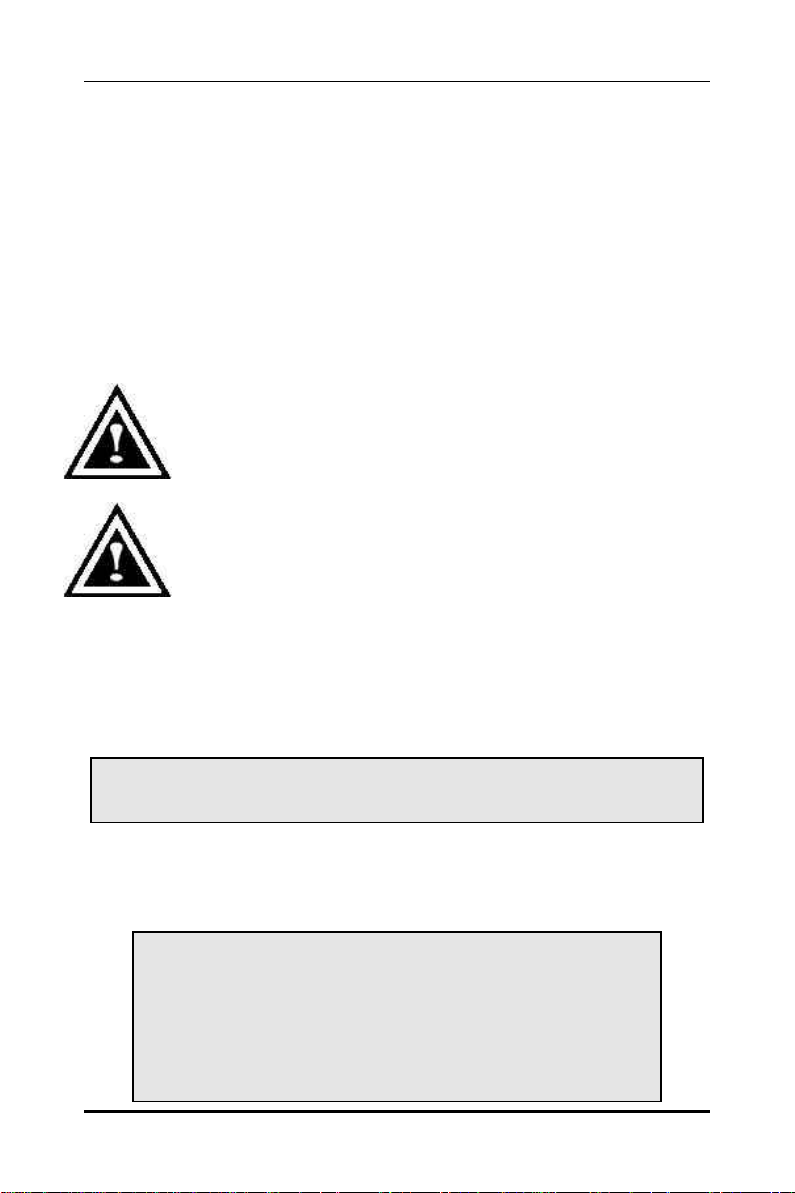
3. The window below will appear.
Do you want the disk image to be duplicated to another? (Yes/No)
Y - Create and Duplicate
N - Create Only
4. Press “N” for the Create Only option.
5. A window will appear almost immediately confirming that your Security
array has been created. Press any key to reboot the system.
Array has been created.
<Press Any Key to Reboot>
6. Proceed with normal FDISK and format procedures as if you had just
installed a new hard drive.
12
Page 17
FastTrak100 TX/LP™ Series User Manual
7. Once the arrayed drives have been formatted, proceed to the Installing
Driver chapter on page 30 to install your operating system and/or
FastTrak100 driver.
Creating a Security Array With An Existing Data Drive
NOTE: Under the Security setting, FastTrak100 permits two drives to be used for a
single Mirrored array or four drives to be used for a Mirrored/Striped array in Auto
Setup.
You would use this method if you wish to use a drive that already contains data
and/or is the bootable system drive in your system. You will need another drive of
identical or larger storage capacity.
WARNING: Backup any necessary data before proceeding. Failure to
follow this accepted PC practice could result in data loss.
WARNING: If you wish to include your current bootable drive using
the Windows NT 4.x or Windows 2000 operating system as part of a
bootable Mirrored (RAID 1) array on your FastTrak100, do NOT
connect the hard drive to the FastTrak100 controller yet. You MUST
install the Windows NT4 or 2000 driver software first (see page 30) to
this drive while it is still attached to your existing hard drive controller.
Follow these steps:
1. Using the Spacebar, choose “Security” under the Optimize Array for
section.
2. Press <Ctrl-Y> keys to Save your selection. The window below will appear.
Do you want the disk image to be duplicated to another? (Yes/No)
Y - Create and Duplicate
N - Create Only
3. Press “Y” for the Create and Duplicate option. The window below will
appear asking you to select the Source drive to use. FastBuild will
copy all data from the Source drive to the Target drive.
Source Disk
Channel:ID Drive Model Capacity (MB)
Target Disk
Channel:ID Drive Model Capacity (MB)
[Please Select A Source Disk]
Channel:ID Drive Model Capacity (MB)
13
Page 18

FastTrak100 TX/LP™ Series User Manual
1 :Master QUANTUMCR8.4A 8063
2 :Master QUANTUMCR8.4A 8063
[↑] Up [↓] [ESC] Exit [Ctrl-Y] Save
4. Use the arrow keys to choose which drive contains the existing data to be
copied.
5. Press [Ctrl-Y] keys to Save selection and start duplication. The following
progress screen will appear.
Start to duplicate the image . . .
Do you want to continue? (Yes/No)
Y – Continue N - Abort
6. Select “Y” to continue. If you choose “N”, you will be returned to step 1.
7. Once complete, the following screen will appear confirming that your
Security array has been created. Press any key to reboot the system.
Array has been created.
<Press Any Key to Reboot>
8. Proceed to the Installing Driver chapter on page 30 to install the
FastTrak100 driver and/or operating system.
14
Page 19

FastTrak100 TX/LP™ Series User Manual
Using FastBuild™ Configuration Utility
The FastBuildTM Configuration Utility offers several menu choices to create and
manage the drive array on the Promise FastTrak100 adapter. For purposes of this
manual, it is assumed you have already created an array in the previous chapter and
now wish to make a change to the array or view other options.
Viewing FastTrak100 BIOS Screen
When you boot your system with the FastTrak100 card and drives installed, the
Promise onboard BIOS will detect the drives attached and show the following screen.
FastTrak100 (tm) BIOS Version 1.xx (Build xxxx)
(c) 1995-2001 Promise Technology, Inc. All Rights Reserved.
Scanning IDE drives . . . . .
If an array exists already, the BIOS will display the following screen showing the
card’s BIOS version and status of the array.
FastTrak100 (tm) BIOS Version 1.xx (Build xxxx)
(c) 1995-2001 Promise Technology, Inc. All Rights Reserved.
ID MODE SIZE TRACK-MAPPING STATUS
1 * 2+0 Stripe 16126M 611/128/32 Functional
Press <Ctrl-F> to enter FastBuild (tm) Utility....
The array status consists of three possible conditions: Functional, Critical, Offline.
Functional - The array is operational.
Critical - A mirrored array contains a drive that has failed or disconnected. The
remaining drive member in the array is functional. However, the array has temporarily
lost its ability to provide fault tolerance. The user should identify the failed drive
through the FastBuild Setup utility, and then replace the problem drive.
Offline - A mirrored array has 2 drives that have failed/disconnected or a striped
array has 1 drive that has failed or been disconnected. When the array condition is
“offline,” the user must replace the failed drive(s), and then restore data from a
backup source.
15
Page 20

FastTrak100 TX/LP™ Series User Manual
Navigating the FastBuild™ Setup Menu
When using the menus, these are some of the basic navigation tips: Arrow keys
highlights through choices; [Space] bar key allows to cycle through options;
[Enter] key selects an option; [ESC] key is used to abort or exit the current menu.
Using the Main Menu
This is the first option screen when entering the FastBuildTM Setup.
FastBuild (tm) Utility 1.xx (c) 1995-2001 Promise Technology, Inc.
[ Main Menu ]
Auto Setup.......................................................[ 1 ]
View Drive Assignments.................................[ 2 ]
Define Array ....................................................[ 3 ]
Delete Array.....................................................[ 4 ]
Rebuild Array...................................................[ 5 ]
Controller Configuration...................................[ 6 ]
[ Keys Available ]
Press 1...6 to Select Option [ESC] Exit
To create a new array automatically, follow the steps under “Creating Arrays
Automatically” on page 16. Promise recommends this option for most users.
To manually create an array or define an array as bootable, follow the steps under
“Manually Creating Arrays” on pa ge 19. You will need to manually create an array if
you wish to modify block size.
To view drives assigned to arrays, see “Viewing Drive Assignments” on page 18.
To delete an array (but not delete the data contained on the array), select “Deleting
An Array” on page 26.
To rebuild a mirrored array, see “Rebuilding an Array” on page 27.
To view controller settings, see “Viewing Controller Configuration” on page 29.
NOTE: After installing the FastTrak100 card and configuring an array
using FastBuild, you should FDISK and format the arrayed drive(s) if
you are using new, blank drives
16
Page 21

FastTrak100 TX/LP™ Series User Manual
Creating Arrays Automatically
The Auto Setup <1> selection from the Main Menu can intuitively help create your disk
array. It will assign all available drives appropriate for the disk array you are creating.
After making all selections, use Ctrl-Y to Save selections. FastBuild will automatically
build the array.
FastBuild (tm) Utility 1.xx (c) 1995-2001 Promise Technology, Inc.
[Auto Setup Options Menu]
Optimize Array for: Performance
Typical Application usage: A/V Editing
[ Auto Setup Configuration ]
Mode.................................................Stripe
Spare Drive Count....................................1
Drives used in Array................................2
Array Disk Capacity (size in MB).....16126
[ Keys Available ]
[↑] Up [↓] Down [←, →, Space] Change Option [ESC] Exit [Ctrl-Y] Save
Optimize Array For
Select whether you want Performance (RAID 0), Security (RAID 1 or RAID 0+1), or
Capacity (Spanning) under the “Optimize Array for” setting.
Performance (RAID 0 Striping)
Supports the maximum performance. The storage capacity equals the number of
drives times the capacity of the smallest drive in the disk array.
NOTE: FastTrak100 permits striped arrays using 1, 2, 3, or 4 drives attached in
Auto Setup mode.
Security (RAID 1 Mirroring, or RAID 0+1 Striping/Mirroring)
Creates a mirrored (or fault tolerant) array for data security.
NOTE: Under the Security setting, FastTrak100 permits two drives to be used
for a single Mirrored array or four drives to be used for a Mirrored/Striped array
in Auto Setup.
17
Page 22

FastTrak100 TX/LP™ Series User Manual
Capacity (Spanning)
Achieves the maximum amount of capacity by adding the sum of all attached
drives. The Stripe Block option does not apply.
18
Page 23

FastTrak100 TX/LP™ Series User Manual
Defining Typical Application Usage
Allows the user to choose the type of PC usage that will be performed in order to
optimize how FastTrak100 handles data blocks to enhance performance. Your choice
will determine the block size used. You may choose from: A/V Editing (for audio/video
applications, or any similar application that requires large file transfers), Server (for
numerous small file transfers), or Desktop (a combination of large and small file sizes).
Using a “Hot” Spare Drive
If a third drive is attached and is not assigned to a mirrored two-drive disk array (one
optimized for “Security”), it will be recognized as a Spare Drive. Such a drive is
immediately used as a “standby” replacement. It is automatically added to an array
once a disk member of the array has been detected as “failed.” To restore fault
tolerance as quickly as possible, FastTrak100 begins to perform an automatic data
rebuild on the “spare” drive in the background without t he need to restart the system.
At a later time, the failed drive can be physically removed from the FastTrak100 card
and an extra drive added in its place to function as the “spare” drive.
NOTE: Due to IDE limitations when drives are in a Master/Slave configuration, if the
drive that fails is on the same channel as the “spare” drive, there is a possibility that
the “spare” drive will fail to be recognized by the system. For this reason Promise
recommends using “spare” drives only on the FastTrak100 TX4.
NOTE: The hot spare drive must have a capacity that is equal to or larger than the
smallest array member.
Creating Multiple Disk Arrays
1. If you plan to create multiple arrays, attach only the drives necessary to create
the first disk array and complete the <1> Auto Setup.
2. Install the additional drives needed for the second array and again use the <1>
Auto Setup.
NOTE: If you wish to customize the settings of individual disk arrays (such as block
size), you must manually create disk arrays with the Define Array <3> option from
the Main Menu.
19
Page 24

FastTrak100 TX/LP™ Series User Manual
Viewing Drive Assignments
The View Drive Assignments <2> option in the Main Menu displays whether drives
are assigned to a disk array or are unassigned.
Under the “Assignment” column, drives are labeled with their assigned disk array or
shown as “Free” if unassigned. Such “Free” drives can be used for a future array or
used as a spare drive when a drive fails in a mirrored array, provided the free drive’s
capacity is equal to or larger than the smallest array member. Unassigned drives are
not accessible by the OS. The menu also displays the data transfer mode that relates
to speed used by each drive (U5 refers to 100MB/sec transfers, U4 refers to
66MB/sec transfers, etc...)
FastBuild (tm) Utility 1.xx (c) 1995-2001 Promise Technology, Inc.
[ View Drive Assignments ]
Channel:ID Drive Model Capacity(MB) Assignment Mode
1 : Master QUANTUMCR8.4A 8063 Array 1 U5
1 : Slave QUANTUMCR8.4A 8063 Free U5
2 : Master QUANTUMCR8.4A 8063 Array 1 U5
[ Keys Available ]
[↑] Up [↓] Down [ESC] Exit Mode (U=UDMA, P=PIO, D=DMA)
20
Page 25

FastTrak100 TX/LP™ Series User Manual
Manually Creating an Array
The Define Array <3> option from the Main Menu allows users to begin the process of
manually defining the drive elements and RAID levels for one or multiple disk arrays
attached to FastTrak100. Users will commonly create one or two drive arrays with
FastTrak100, though the card will support a maximum of four arrays1.
NOTE: For most installations, Promise recommends the <1> Auto Setup for easy
disk array creation.
FastBuild (tm) Utility 1.xx (c) 1995-2001 Promise Technology, Inc.
[Define Array Menu]
Array No RAID Mode Total Drv Capacity(MB) Status
Array 1 Stripe 2 16126 Functional
Array 2 —— —— —— ——
Array 3 —— —— —— ——
Array 4 —— —— —— ——
[ Keys Available ]
Note: * — Bootable Array
[↑] Up [↓] Down [ESC] Exit [Enter] Select [Space] Change Boot Drive
1. To manually create an array from the Define Array Menu, use the arrow keys to
highlight the array number you wish to define, and press [Enter] to select.
2. The Define Array Definition Menu will next appear that allows drive assignments
to the disk array (see next page).
1
A user may use a single drive in either striping or spanning mode with FastTrak100.
In this rare scenario, the card will create an individual array ID but will offer
conventional controller performance depending on the drive type. At a later time, a
second drive can be added to the array and the array re-created to support RAID 1
mirroring.
21
Page 26

FastTrak100 TX/LP™ Series User Manual
Selecting Array Type
1. Under the Definition section of this menu, highlight the Array # for which you
want to assign a RAID level.
2. Use the [Space] key to cycle through three array types: Performance (RAID 0
Striping), Security (RAID 1 Mirroring, RAID 0+1 Striping/Mirroring (for 4 drives),
or Capacity (Spanning)). See page 70 about RAID levels.
FastBuild (tm) Utility 1.xx (c) 1995-2001 Promise Technology, Inc.
[ Define Array Definition Menu ]
Array No RAID Mode Total Drv Capacity(MB) Status
Array 1 Stripe 2 16126 Functional
Stripe Block: 64 KB Gigabyte Boundary: ON
[ Drive Assignments ]
Channel:ID Drive Model Capacity (MB) Assignment
1 : Master QUANTUMCR8.4A 8063 Y
1 : Slave QUANTUMCR8.4A 8063 N
2 : Master QUANTUMCR8.4A 8063 Y
[ Keys Available ]
[↑] Up [↓] Down [ESC] Exit [Space] Select [Ctrl-Y] Save
Selecting Stripe Block
For RAID 0 and RAID 0+1 arrays you may manually select the “stripe block size.” Use
the Spacebar to scroll through choices progressing as follows (1, 2, 4, 8, 16 . . .
1024).
The size selected affects how FastTrak100 sends and retrieves data blocks from the
drives. You will need to perform your own testing to determine how the data block
size is affecting your particular use of the array. In general, a larger block size is
better when handling large data transfers (such as in A/V editing or graphics) while a
smaller block size is better when handling e-mail and other common server data. The
default is 64K.
Gigabyte Boundary
The Gigabyte Boundary feature is designed for mirrored arrays (RAID 1 or
RAID 0+1) in which a drive has failed and the user cannot replace the drive with the
same capacity or larger. Instead, the Gigabyte Boundary feature permits the
installation of a replacement drive that is slightly smaller (within 1 gigabyte) than the
remaining working drive (for example, a 20.5 GB drive would be rounded down to 20
GB). This can be helpful in the event that a drive fails and an exact replacement model
22
Page 27

FastTrak100 TX/LP™ Series User Manual
is no longer available. Without this feature enabled, FastTrak100 will NOT permit the
use of a replacement drive that is slightly smaller than the remaining working drive.
For the Gigabyte Boundary feature to work, the Gigabyte Boundary feature must be
set to “ON” when the original mirrored array is created. When enabled, the Gigabyte
Boundary feature rounds the drive capacity of both drives to the common whole GB
drive size. For example, with the Gigabyte Boundary feature enabled, the remaining
working drive can be 20.5 GB and the replacement drive can be 20.3, since both are
rounded down to 20GB. This permits the smaller drive to be used. Please note that
users will lose a small amount of available storage capacity from both drives in order
to arrive at a common drive size.
NOTE: The Gigabyte Boundary feature is automatically disabled when creating a
mirrored array (RAID 1) from an existing drive (versus using two brand new drives).
This protects the existing drive's partition table in order to maintain data integrity.
Assigning Drive(s) to Array
1. Under the [ Drive Assignments ] section, highlight a drive using the [↑] or [↓]
keys.
2. With the [Space] bar key, change the Assignable option to “Y” to add the
drive to the disk array.
3. Press <Ctrl-Y> to save the disk array information. Depending on the array
type selected, the following scenarios will take place:
a) If choosing a Striping, Spanning, or Mirroring/Striping array, the initial
Define Array Menu screen will appear with the arrays defined. From
there you may ESC to exit and return to the Main Menu of FastBuild.
b) If you selected a Mirroring array for two drives, there is an additional
window that appears as described in order to create the array. To do
this you will use either two brand new drives, or one drive that
contains existing data that you wish to mirror.
Creating A Mirrored Array Using New Drives
As described in the Drive Assignments Option section above, if you selected a
mirroring array and wish to use two new assigned drives, follow the directions here.
1. After assigning new drives to a Mirroring array and saving the information
with <Ctrl-Y>, the window below will appear.
Do you want the disk image to be duplicated to another? (Yes/No)
Y - Create and Duplicate
N - Create Only
2. Press “N” for the Create Only option.
23
Page 28

FastTrak100 TX/LP™ Series User Manual
3. A window will appear almost immediately confirming that your Security
array has been created. Press any key to reboot the system
Array has been created.
<Press Any Key to Reboot>
24
Page 29

FastTrak100 TX/LP™ Series User Manual
Adding Fault Tolerance to an Existing Drive
FastTrak100 will create a mirrored array using an existing system drive with data.
You must assign the existing drive and another drive of same or larger capacity to the
Mirroring array. The BIOS will send the existing data to the new blank drive.
WARNING: Backup any necessary data before proceeding. Failure
to follow this accepted PC practice could result in data loss.
WARNING: If you wish to include your current bootable drive using the
Windows NT 4.x or Windows 2000 operating system as part of a bootable
Mirrored (RAID 1) array on your FastTrak100, do NOT connect the hard drive to
the FastTrak100 controller yet. You MUST install the Windows NT4 or 2000
driver software first (see page 30) to this drive while it is still attached to your
existing hard drive controller.
1. After assigning the drives to a Mirroring array, press <Ctrl-Y> keys to Save your
selection. The window below will appear.
Do you want the disk image to be duplicated to another? (Yes/No)
Y - Create and Duplicate
N - Create Only
NOTE: The Gigabyte Boundary feature is automatically disabled when creating a
mirrored array (RAID 1) from an existing drive (versus using two brand new drives).
This protects the existing drive's partition table in order to maintain data integrity.
2. Press “Y” for the Create and Duplicate option. The window below will appear
asking you to select the Source drive to use. FastBuild will copy all data from the
Source drive to the Target drive.
Source Disk
Channel:ID Drive Model Capacity (MB)
Target Disk
Channel:ID Drive Model Capacity (MB)
[Please Select A Source Disk]
Channel:ID Drive Model Capacity (MB)
1 :Master QUANTUMCR8.4A 8063
2 :Master QUANTUMCR8.4A 8063
[↑] Up [↓] [ESC] Exit [Ctrl-Y] Save
25
Page 30

FastTrak100 TX/LP™ Series User Manual
26
Page 31
FastTrak100 TX/LP™ Series User Manual
3. Use the arrow keys to choose which drive contains the existing data to be
copied.
WARNING: All target drive data will be erased. Make sure you choose
the correct drive.
4. Press [Ctrl-Y] keys to Save selection and start duplication. The following
confirmation screen will appear.
Start to duplicate the image . . .
Do you want to continue? (Yes/No)
Y – Continue N - Abort
5. Select “Y” to continue. If you choose “N” , you will be returned to step 1.
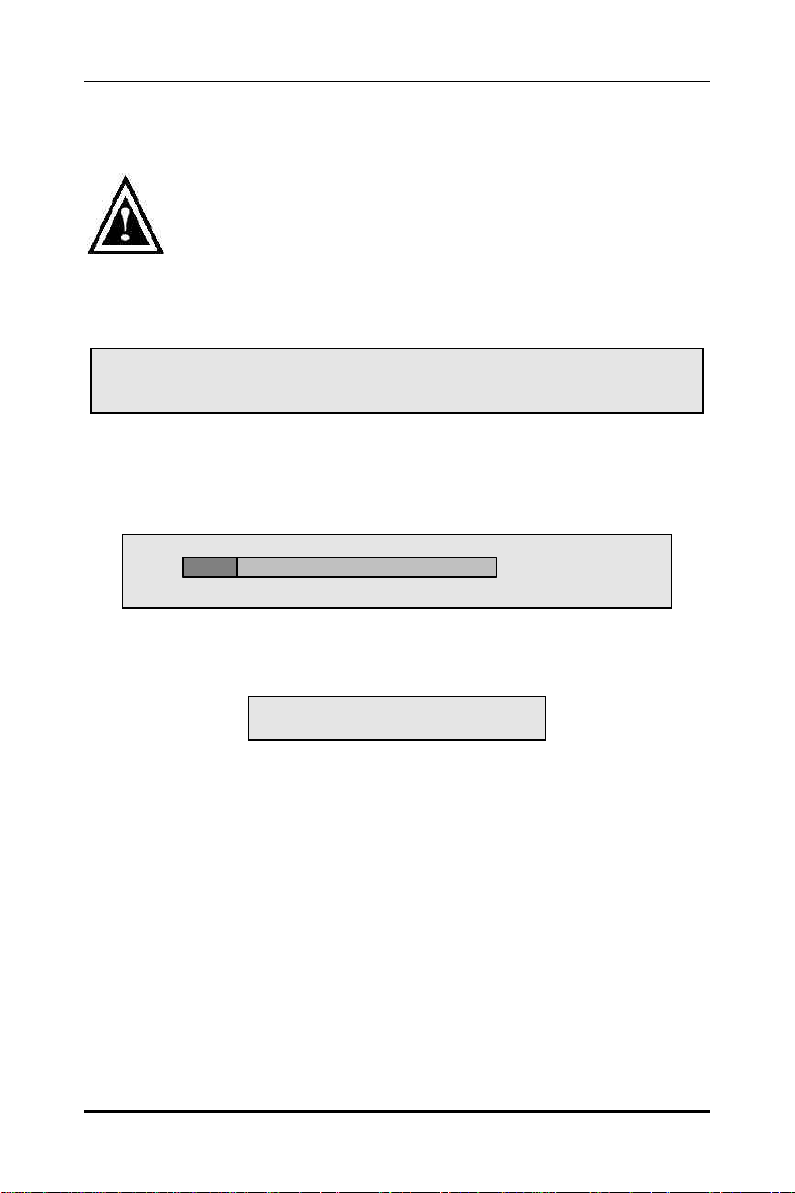
6. Once “Y” is selected, the following progress screen will appear. The process
will take a few minutes.
Please Wait While Duplicating The Image
10%
Complete
7. Once mirroring is complete, the following screen will appear confirming that your
Security array has been created. Press any key to reboot the system.
Array has been created.
<Press Any Key to Reboot>
27
Page 32

FastTrak100 TX/LP™ Series User Manual
Making a FastTrak100 Disk Array Bootable
WARNING: In order for you to boot from an array on the FastTrak100,
your PC or server must be configured in the CMOS Setup to use the
FastTrak100 as a bootable device (versus the onboard controller or
another add-in card). This option is not available if the FastTrak100 is
being used as a secondary controller.
1. Once you have returned to the Define Array Menu window (below), you
will see the array(s) you have created. You now may use the menu to
select which previously-defined array will be used as the bootable array.
FastBuild (tm) Utility 1.xx (c) 1995-2001 Promise Technology, Inc.
[ Define Array Menu ]
Array No RAID Mode Total Drv Capacity(MB) Status
* Array 1 Stripe 2 13044
Functional
Note: * — Bootable Array
[↑] Up [↓] Down [ESC] Exit [Enter] Select [Space] Change Boot Drive
2. Highlight the array that you want to boot from using the [↑] Up [↓] Down
keys.
3. Press the [Space] bar key.
4. An * asterisk will appear next to the array number indicating it as bootable.
The system will now recognize this array as the first array seen.
5. The system will then use this bootable array as the (fixed) boot C: drive.
NOTE: The bootable array must contain your configured operating system.
Creating a “Hot” Spare Drive for Mirrored Arrays
For automatic rebuilds of a mirrored array, attach an extra “spare” drive to the
FastTrak100. Drives that are not assigned to an array and are the same size or
larger than the original will be used for the automatic rebuild. This is performed in the
background under all supported operating systems, except DOS. At a later time, the
system can be turned off and the failed drive can be physically removed.
NOTE: Due to IDE limitations when drives are in a Master/Slave configuration, if the
drive that fails is on the same channel as the “spare” drive, there is a possibility that
28
Page 33

FastTrak100 TX/LP™ Series User Manual
the “spare” drive will fail to be recognized by the system. For this r eason Promise
recommends using “spare” drives only on the FastTrak100 TX4.
29
Page 34

FastTrak100 TX/LP™ Series User Manual
How FastTrak100 Orders Arrays
During startup, the disk arrays on the FastTrak100 are recognized in this order: 1)
The array set to bootable in the FastBuildTM Setup, and 2) the Array number (i.e.
Array 0, Array 1…). This would be involved in determining which drive letters will be
assigned to each disk array.
How FastTrak100 Saves Array Information
All disk array data is saved into the reserved sector on each array member. Promise
suggests that users record their disk array information for future reference.
Another feature of the FastTrak100 disk array system is to recognize drive members
even if drives are moved between different FastTrak100 card connectors. Since
each drive’s array data identifies itself to the array, it is possible to move or swap
drives without modifying the array setup. This is valuable when adding drives, or
during a rebuild.
30
Page 35

FastTrak100 TX/LP™ Series User Manual
Deleting An Array
The Delete Array <4> Menu option allows for deletion of disk array assignments. This
is not the same as deleting data from the drives themselves. If you delete an array by
accident (and before it has been used again), the array can normally be recovered by
defining the array identically as the deleted array.
WARNING: Deleting an existing disk array could result in its data
loss. Make sure to record all array information including the array type,
the disk members, and stripe block size in case you wish to undo a
deletion.
FastBuild (tm) Utility 1.xx (c) 1995-2001 Promise Technology, Inc.
[ Delete Array Menu ]
Array No RAID Mode Total Drv Capacity(MB) Status
Array 1 Stripe 2 16126 Functional
Array 2 Mirror 2 8063 Functional
Array 3 —— —— —— ——
Array 4 —— —— —— ——
[ Keys Available ]
[↑] Up [↓] Down [ESC] Exit [Del] Delete
1. To delete an array, highlight the Array you wish to delete and press the [Del] key.
2. The View Array Definition menu will appear (see below) showing which drives
are assigned to this array.
FastBuild (tm) Utility 1.xx (c) 1995-2001 Promise Technology, Inc.
[ Define Array Menu ]
Array No RAID Mode Total Drv Capacity(MB) Status
Array 1 Stripe 2 16126 Functional
Stripe Block: 64 KB Gigabyte Boundary: OFF
[ Drive Assignments ]
Channel:ID Drive Model Capacity (MB) Assignment
1 : Master QUANTUMCR8.4A 8063 Y
2 : Master QUANTUMCR8.4A 8063 Y
3. Confirm yes to the following warning message with the <Ctrl-Y> key to continue
array deletion:
31
Page 36

FastTrak100 TX/LP™ Series User Manual
Are you sure you want to delete this array?
Press Ctrl-Y to Delete, others to Abort
4. After deleting the array, you should create a new array using Auto Setup or the
Define Array menu from the FastBuild Main Menu.
32
Page 37

FastTrak100 TX/LP™ Series User Manual
Rebuilding A Mirrored Array
The Rebuild Array <5> Menu option can be used to recover from an error in a
mirrored disk array. You will receive an error message when booting your system
from the FastTrak BIOS.
NOTE: Drives MUST be replaced if they contain any physical errors.
Follow these steps BEFORE using the Rebuild Array menu option:
1. On bootup, the FastTrak100 Startup BIOS will display an error message
identifying which drive has failed.
2. Press <Ctrl-F> keys to enter FastBuild Main Menu.
3. Select submenu Define Array <3>.
4. Select the failed array and identify the Channel and ID of the failed drive.
5. Power off and physically remove the failed drive.
6. Replace the drive with an identical model.
7. Reboot the system and enter the FastBuild Main Menu.
8. Select the <5> Rebuild Array option. The following screen will appear.
FastBuild (tm) Utility 1.xx (c) 1995-2001 Promise Technology, Inc.
[ Rebuild Array Menu ]
Array No RAID Mode Total Drv Capacity(MB) Status
Array 1 Stripe 2 16126 Functional
Array 2 Mirror 2 8063 Critical
Array 3 —— —— —— ——
Array 4 —— —— —— ——
[ Keys Available ]
[↑] Up [↓] Down [ESC] Exit [Enter] Select
9. Highlight the array whose Status is “Critical”.
10. Press [Enter]. The following screen will then appear (see next page).
33
Page 38

FastTrak100 TX/LP™ Series User Manual
FastBuild (tm) Utility 1.xx (c) 1995-2001 Promise Technology, Inc.
[ Rebuild Array Menu ]
Array No RAID Mode Total Drv Status
Array 2 Mirror 2 Critical
Stripe Block: Not Available Gigabyte Boundary:
ON
[ Select Drive for Rebuild ]
Channel:ID Drive Model Capacity (MB)
1 : Slave QUANTUMCR8.4A 8063
[ Keys Available ]
[↑] Up [↓] Down [ESC] Exit [Enter] Select
11. Under [Select Drive for Rebuild], highlight the replacement drive.
12. Press [Enter] and confirm that the data will be copied on to the selected
drive. All data on the replacement drive will be written over with mirrored
information from the array drive. A progress bar will appear as below.
Please Wait While Duplicating The Image
10%
Complete
13. Once the rebuild process is complete, the user will be asked to reboot the
system.
34
Page 39

FastTrak100 TX/LP™ Series User Manual
Viewing Controller Settings
The Controller Configuration <6> menu selection allows you to enable or disable the
FastTrak100 BIOS from halting (the default) if it detects an error on boot up. You may
also view the system resources (Interrupt and I/O port address) of FastTrak’s data
channels.
FastBuild (tm) Utility 1.xx (c) 1995-2001 Promise Technology, Inc.
[ Adapter Configuration - Options ]
Halt On Error: Enable
[ System Resources Configuration ]
Channel 1 (IDE1) Interrupt : A I/O Port : FFF0
Channel 2 (IDE2) Interrupt : A I/O Port : FFA8
[ Keys Available ]
[←, →, Space] Change Option [ESC] Exit
Halting FastTrak BIOS On Bootup Errors
The [Adapter Configuration – Options] section allows you to enable or disable
FastTrak100 to Halt operation at the BIOS startup screen should an error be detected.
This is the only option that can be changed on this screen.
Viewing FastTrak System Resources
The [System Resources Configuration] section of this submenu displays the PCI slot
interrupt and port address used by the FastTrak100. The resources used are
determined by the Mainboard PCI PnP BIOS for the PCI slot in which the FastTrak100
resides.
In the rare case that there is a resource conflict, refer to the Mainboard BIOS
documentation on changes on resources allocated to the FastTrak100 PCI slot.
35
Page 40

FastTrak100 TX/LP™ Series User Manual
Installing Drivers
This section details the FastTrak100 driver installation when used with various
operating systems. The software includes the driver necessary to identify
FastTrak100 to the operating system.
Windows 2000
Installing Driver During New Windows 2000 Installation
1. Start the installation:
a. Floppy Install: Boot the computer with the Windows 2000
installation diskettes.
b. Floppyless Install: Boot from floppy and type “WINNT”. After files
have been copied, the system will reboot. On the reboot, press
<F6> after the message “Setup is inspecting your computer’s
hardware configuration...” appears.
c. CD-ROM Install: Boot from the CD-ROM. Press <F6> after the
message “Press F6 if you need to install third party SCSI or RAID
driver” appears.
2. When the “Windows 2000 Setup” window is generated, press “S” to
Specify an Additional Device(s)
3. Insert the Promise Technology driver diskette into drive A: and press
“Enter” key.
4. Choose “Win2000 Promise FastTrak100 TX/LP(tm) Series Controller” from
the list that appears on screen, and then press the “Enter” key.
5. The Windows 2000 Setup screen will appear again saying “Setup will load
support for the following mass storage devices:” The list will include
“Win2000 Promise FastTrak100 controller”.
NOTE: If you need to specify any additional devices to be installed, do so
at this time. Once all devices are specified, continue to the next step –
6. From the Windows 2000 Setup screen, press the Enter key. Setup will now
load all device files and then continue the Windows 2000 installation.
36
Page 41

FastTrak100 TX/LP™ Series User Manual
Installing Driver in Existing Windows 2000 System
WARNING: If you will be moving the boot drive containing the existing
Windows 2000 operating system to a mirrored RAID 1 array on the
FastTrak100 card, the FastTrak100 driver MUST be loaded to the hard
drive while it is still attached to your existing hard drive controller. Do
not attach this drive or any other hard drive to the FastTrak100 controller card
before completing this step.
NOTE: If you have the FastTrak100 TX4, you will need to go through these steps
twice, since the TX4 appears as 2 controllers to the system.
1. After installing the FastTrak100 card and rebooting your system, Windows
2000 setup will show a “New Hardware Found” dialog box. Under
Windows 2000, the “PCI RAID Controller” will be displayed. Click on “Next”.
2. Choose “Display a list of known drivers for this device so that I can choose
a specific driver”. Click on “Next”.
3. In the “Install Drivers” dialog box, press “Have disk…”
4. When the “Install From Disk” appears, insert the Promise Technology
FastTrak100 diskette in drive A:.
5. Type “A:\Win2000” in the text box. Press “Enter”.
6. Choose “Win2000 Promise Fas tTrak100 TX/LP(tm) Series Controller” from
the list that appears on screen, and then press the “Enter” key.
7. When the "System Settings Change" dialog box appears, remove the floppy
diskette and click on “Yes” to restart the system. Windows 2000 will then
restart for the driver installation to take effect.
Confirming Windows 2000 Installation
1. From Windows 2000, open the Control Panel from “My Computer” followed
by the System icon.
2. Choose the “Hardware” tab, and then click the “Device Manager” tab.
3. Click the “+” in front of “SCSI & RAID Controllers hardware type.” The driver
“Win2000 Promise FastTrak100 TX/LP(tm) Series Controller” should appear
(2 listings will appear if you have the FastTrak100 TX4).
37
Page 42

FastTrak100 TX/LP™ Series User Manual
Windows NT4
Installing Drivers During Windows NT 4.0 Installation
1. Start the system installation by booting from the Windows NT disk:
a. Floppy install: boot the system with the Windows NT installation
diskettes.
b. Floppyless install: boot from floppy and type “WINNT /B”. After
files have been copied, the system will reboot. On the reboot,
press the “F6” key when the message “Setup is inspecting your
computer’s hardware configuration…” appears.
c. CD-ROM disk install: boot from the CD-ROM disk and press the
“F6” key when the message “Setup is inspecting your computer’s
hardware configuration…” appears.
2. When the “Windows NT Setup” window is generated, press “S” to Specify
an Additional Device(s).
3. Press “O” to select “Other” and press the “Enter” key.
4. Insert the Promise Technology FastTrak100 driver diskette into drive A:
and press the “Enter” key.
5. Choose “WinNT Promise FastTrak100 TX/LP(tm) Series Controller” from the
list that appears on screen, and then press the “Enter” key.
6. The Windows NT Setup screen will appear again saying “Setup will load
support for the following mass storage devices:” The list will include
“WinNT Promise FastTrak100 TX/LP(tm) Series Controller”.
NOTE: If you need to specify any additional devices to be installed, do so
at this time. Once all devices are specified, continue to the next step -
7. From the Windows NT Setup screen, press the Enter key. Setup will now
load all device files and then continue the Windows NT installation.
8. After a successful installation, the “SCSI Adapter Setup” box will show that
the “WinNT Promise FastTrak100 TX/LP(tm) Series Controller” driver has
been installed.
38
Page 43

FastTrak100 TX/LP™ Series User Manual
Installing Driver with Existing Windows NT 4.0
WARNING: If you plan to move your boot drive to a mirrored RAID 1
FastTrak array, hard drives should NOT be connected to the
FastTrak100 controller card before performing the following
procedure. The FastTrak100 drivers must be loaded on the system
hard drive (running under the existing hard drive controller) before any hard drives
are connected to the FastTrak100 controller card.
1. Choose “Settings” from the “Start ” menu.
2. Choose “Control Panel” from the “Settings” menu.
3. Double-click on the “SCSI Adapters” icon, which generates the “SCSI
Adapters” dialog box.
4. Choose “Drivers,” and then press “Add.”
5. In the “Install Drivers” dialog box, press “Have Disk…”
6. When the “Ins tall From Disk” appears, insert the “FastTrak100 Driver”
diskette in drive A:.
7. Type “A:\NT4” in the text box window, then choose “OK.”
8. When the “Install Driver” dialog box appears, select “WinNT Promise
FastTrak100 TX/LP(tm) Series Controller” and then press “OK.”
9. When the “Select SCSI Adapter Option” dialog box appears, press “Install.”
10. After a successful installation, the “SCSI Adapter Setup” box will show that
the “WinNT Promise FastTrak100 TX/LP(tm) Series Controller” has been
installed.
11. Power off your system.
12. If moving the boot drive to the FastTrak card, now attach the hard drives,
otherwise reboot.
Removing the Driver from Windows NT 4.x
1. In “Start” Button choose “Control Panel” in “Setup” group.
2. In “Control Panel,” select “SCSI Adapter,” next choose “Drivers” label
3. Choose “Remove” button.
4. After successful removal, the “SCSI Adapter Setup” box will show that
“WinNT Promise FastTrak100 TX/LP(tm) Series Controller” has been
removed.
39
Page 44

FastTrak100 TX/LP™ Series User Manual
Windows ME
Installing Drivers During Windows ME Installation
The following details the installation of the FastTrak100 drivers while installing
Windows ME (with the FastTrak100 controller card already in place). If you’re
installing the FastTrak100 drivers on a system with ME already installed, see
“Installing Drivers with Existing Windows ME System.”
NOTE: If you have the FastTrak100 TX4, you will need to go through these steps
twice, since the TX4 appears as 2 controllers to the systems.
1. Install Windows ME fully.
2. After installation, go the “Start” menu and choose “Settings.”
3. From the “Settings” menu, choose “Control Panel.”
4. In the “Control Panel” window, double -click on the “System” icon.
5. In the “System” window, choose the “Device Manager” tab .
6. In the hierarchical display under “Other Devices” is a listing for “PCI RAID
Controller.” Choose it and then press the “Properties” button.
7. Choose the “Driver” tab in the “Properties” window, choose “Update
Driver,” and then press “Next.”
8. Choose “Search for a better driver than the one your device is using now
(recommended),” then press “Next.”
9. Choose “Specify Location,” and then type “A: \WIN9x-ME” in the text box.
10. Insert the “FastTrak100 Driver” diskette into the A: drive.
11. Press the “Next” button. A mess age informing you that Windows Millennium
has found “Win9x -ME Promise FastTrak100 TX/LP(tm) Series Controller”
should appear.
12. Press “Next,” then “Finish,” then “Yes” when asked if you want to restart
your computer. Be sure to remove the diskette from drive A:.
40
Page 45

FastTrak100 TX/LP™ Series User Manual
Installing Drivers with Existing Windows ME System
The following section details the installation of FastTrak100 drivers on a system that
has Millennium already installed and running. If you’re installing the FastTrak100
drivers on a system during an installation of ME, see “Installing Drivers During
Windows ME Installation.”
NOTE: If you have the FastTrak100 TX4, you will need to go through these steps
twice, since the TX4 appears as 2 controllers to the systems.
1. After installing the FastTrak100 controller card and configuring the hard
drives, power up the system and boot.
2. The “Add New Hardware Wizard” will appear, informing you that it has
found a “PCI RAID Controller.”
3. Click on “Next,” and from the generated list box, choose “Search for a
better driver than the one your device is using now.”
4. Click on “Next,” and from the generated choices, choose “Specify a
location.”
5. Insert the “FastTrak100 Driver” diskette in drive A:.
6. Type “A:\WIN9x-ME” in the text box that appears.
7. Click on “Next.” A message in forming you that Windows Millennium has
found “Win9x -ME Promise FastTrak100 TX/LP(tm) Series Controller” should
appear.
8. Click on “Next,” and then on “Finish.”
9. Choose “Yes” when asked if you want to restart your computer. Be sure to
eject the diskette from drive A:.
Confirming Driver Installation in Windows ME
To confirm that the driver has been properly loaded in ME, perform the following steps:
1. Choose “Settings” from the “Start” menu.
2. Choose “Control Panel,” and then double -click on the “System” icon.
3. Choose the “Device Manager” tab, and then click the “+” in front of “SCSI &
RAID controllers.” “Win9x -ME Promise FastTrak100 TX/LP(tm) Series
Controller” should appear (2 listings will appear if you have the FastTrak100
TX4).
41
Page 46

FastTrak100 TX/LP™ Series User Manual
Windows 95/98
Installing Drivers During Windows 95/98 Installation
The following three sections detail the installation of the FastTrak100 drivers while
installing Windows 95/98 (with the FastTrak100 controller card already in place). If
you’re installing the FastTrak100 drivers on a system with Windows 95/98 already
installed, see “Installing Drivers with Existing Windows 95/98” on page 38.
NOTE: If you have the FastTrak100 TX4, you will need to go through these steps
twice, since the TX4 appears as 2 controllers to the systems.
Windows 98
1. After installing the FastTrak100 controller card and configuring the hard
drive(s), partition and format your hard drive(s), if necessary.
2. Install Windows 98 normally.
3. After installation, go the “Start” menu and choose “Settings.”
4. From the “Settings” menu, choose “Control Panel.”
5. In the “Control Panel” window, double -click on the “System” icon.
6. In the “System” window, choose the “Device Manager” tab.
7. In the hierarchical display under “Other Devices” is a listing for “PC I RAID
Controller.” Choose it and then press the “Properties” button.
8. Choose the “Driver” tab in the “Properties” window, choose “Update
Driver,” and then press “Next.”
9. Choose “Search for a better driver than the one your device is using now
(recommended),” then press “Next.”
10. Choose “Specify Location,” and then type “A: \WIN9x-ME” in the text box.
11. Insert the “FastTrak100 Driver” diskette into the A: drive.
12. Press the “Next” button. A message informing you that Windows 98 has
found “Win9x -ME Promise FastTrak100 TX/LP(tm) Series Controller” should
appear.
13. Press “Next,” then “Finish,” then “Yes” when asked if you want to restart
your computer. Be sure to remove the diskette from drive A:.
Windows 95
1. After installing the FastTrak100 controller card and configuring the hard
drives, partition and format your hard drive(s), if necessary.
2. Install Windows 95 normally.
3. After installation, go to the “Start” menu and choose “Settings.”
42
Page 47

FastTrak100 TX/LP™ Series User Manual
4. From the “Settings” menu, choose “Control Panel.”
5. In the “Control Panel” window, double -click on the “System” icon.
6. In the “System” window, choose the “Device Manager” tab.
7. In the hierarchical display under “Other Devices” is a listing for “PCI Mass
Storage Controller.” Choose it and then press the “Properties” button.
8. Choose the “Driver” tab in the “Properties” window, and then press the
“Update Driver” button.
9. When asked if you want Windows to search for the driver, choose “Yes
(recommended).”
10. Insert the “FastTrak100 Driver” diskette into the A: drive, then press “Next.”
11. When Windows informs you that it was unable to find the drivers, press
“Other Locations…”
12. In the “Select Other Location” dialog box, type “A: \WIN9x-ME”.
13. Press the “Next” button. A message informing you that Windows 95 has
found “Win9x -ME Promise FastTrak100 TX/LP(tm) Series Controller” should
appear.
14. Press “Finish.” (If Windows can’t find the “FastTrak.MPD” file, type
“A:\WIN9x-ME” in the “Copy files from:” text box).
15. Choose “Yes” when asked if you wish to restart the system, and remove
the diskette.
43
Page 48

FastTrak100 TX/LP™ Series User Manual
Installing Drivers with Existing Windows 95/98
The following three sections detail the installation of FastTrak100 drivers on a system
that has Windows 95/98 already installed. If you’re installing the FastTrak100 drivers
on a system during a Windows 95/98 installation, see “Installing Drivers During
Windows 95/98 Installation” on page 36.
NOTE: If you have the FastTrak100 TX4, you will need to go through these steps
twice, since the TX4 appears as 2 controllers to the systems.
Windows 98
1. After installing the FastTrak100 controller card and configuring the hard
drives, power up the system and boot Windows.
2. The “Add New Hardware Wizard” will appear, informing you that it has
found a “PCI RAID Controller.”
3. Check the “Search for the best driver for your device” box and click the
Next button.
4. Check the “Specify a Location” box and click Next button.
5. Type “A:\WIN9x-ME” in the text box that appears.
6. Insert the “FastTrak100 Driver” diskette in drive A:.
7. Click on “Next.” The Add New Hardware wizard will say it has found
“Win9x -ME Promise FastTrak100 TX/LP(tm) Series Controller”.
8. Click on “Next,” and then on “Finish.”
9. Choose “Yes” when asked if you want to restart your computer. Be sure to
eject the diskette from drive A:.
Windows 95
1. After installing the FastTrak100 controller card and configuring the hard
drives, power up the system and boot Windows.
2. The “Update Device Drive Wizard” will appear, informing you that it has
found a “PCI Mass Storage Controller.”
3. Insert the “FastTrak100 Driver” diskette in drive A:.
4. Type “A:\WIN9x-ME” in the text box, then click on “Next.” Windows will
inform you that it has found the “Win95-98 Promise FastTrak100 controller”.
5. Click on “Finish,” and when prompted to insert the “FastTrak100 Driver”
diskette, click on “OK.”
6. If a message informing you that the file “FastTrak.MPD” cannot be found, go
to the “Copy files from:” text box and type: “A: \WIN9x-ME”.
44
Page 49

FastTrak100 TX/LP™ Series User Manual
7. Choose “Yes” when asked whether you want to start your computer. Be
sure to remove the diskette from drive A:.
Confirming Driver Installation in Windows 98/95
To confirm that the driver has been properly loaded in Win 95/98, perform the
following steps:
1. Choose “Settings” from the “Start” menu.
2. Choose “Control Panel,” and then double -click on the “System” icon.
3. Choose the “Device Manager” tab, and then click the “+” in front of “SCSI &
RAID controllers.” “Win9x -ME Promise FastTrak100 TX/LP(tm) Series
Controller” should appear (2 listings will appear if you have the FastTrak100
TX4).
DOS/Windows 3.1x
For first-time installation, follow the standard procedure of installing DOS on to your
hard disk (partition all hard drives with FDISK and format before performing the
following procedure):
1. Insert “Disk 1” of your DOS installation diskettes into drive A:.
2. Type “A:SETUP” at the “A: \” promp t.
3. Continue with normal DOS installation procedure, and refer to your DOS
manual for additional details.
NOTE: The FastTrak100 BIOS supports both DOS and Windows 3.1x without
software drivers.
45
Page 50

FastTrak100 TX/LP™ Series User Manual
Netware 3.12
NWPA Update Package Installation Instructions for NetWare 3.12
Before installing the FastTrak100 NetWare driver, make sure that you have installed
the latest update for the NetWare 3 operating system.
1. From the website at http://developer.novell.com/devres/sas/certinfo.htm
download NWPA_UP.EXE from the "Download the Update Package" link.
2. Install DOS and the CD-ROM driver on the target server machine.
3. Create the directory C:\SERVER.312, then change to that directory.
4. Copy NWPA_UP.EXE to C:\SERVER.312.
5. Execute NWPA_UP.EXE in the C:\SERVER.312 directory.
6. Delete NBI.NLM and NWTAPE.CDM.
7. Execute 312PTD.EXE in the same directory.
For New Netware 3.12 Servers:
Note: If your server already has NetWare 3.12 installed, jump to step 8 of the
next section "For Existing NetWare 3.12 Servers."
1. Change directory to the D:\NETWARE.312\ENGLISH directory on the CDROM drive, if it is drive letter is D:
2. Enter install at the DOS command line. Proceed through the installation of
NetWare 3.12 as usual, until the installation program ends with the cursor at
the server console command line.
3. At the server console enter the following commands:
load C:\SERVER.312\312ptd\native\start\npapatch
load C:\SERVER.312\mmattrfx
load C:\SERVER.312\nbi31x
4. Load the “FASTTRAK.HAM” driver.
5. Continue installation by loading INSTALL.NLM.
6. Create AUTOEXEC.NCF, as Install prompts you.
7. Create STARTUP.NCF, add the following lines before the line "load
FASTTRAK":
load c:\SERVER.312\312ptd\native\start\npapatch
load c:\SERVER.312\mmattrfx
46
Page 51

FastTrak100 TX/LP™ Series User Manual
load c:\SERVER.312\nbi31x
8. Save the file.
9. DOWN and EXIT the server.
10. Remove the NetWare CD-ROM.
11. Reboot the server.
For Existing Netware 3.12 Servers:
8. Copy Fasttrak driver FASTTRAK.HAM & FASTTRAK.DDI into the Netware
3.12 boot directory. Ex. C:\SERVER.312\
9. Edit STARTUP.NCF and add the following lines after any set parameters but
before any file loading:
load c:\SERVER.312\312ptd\native\start\npapatch
load c:\SERVER.312\mmattrfx
load c:\SERVER.312\nbi31x
Also add a subsequent line to "load FASTTRAK" to load the
FASTTRAK.HAM driver.
10. Boot the server
47
Page 52

FastTrak100 TX/LP™ Series User Manual
Netware 4.11
NWPA Update Package Installation Instructions for NetWare 4.11
Before installing the FastTrak100 NetWare driver, make sure that you have installed
the latest update for the NetWare 4 operating system.
1. From the website at http://developer.novell.com/devres/sas/certinfo.htm
download NWPA_UP.EXE from the "Download the Update Package" link.
2. Install DOS and the CD-ROM driver on the target server machine.
3. Create the directory C:\UPDATE, and then change to that directory.
4. Copy NWPA_UP.EXE to C:\UPDATE.
5. Execute NWPA_UP.EXE in the C:\UPDATE directory.
6. Delete NBI31X.NLM, NWTAPE.CDM, and NWTAPE.DDI.
For New Netware 4.11 Servers:
Note: If your server already has NetWare 4.11 installed, jump to step 7 of the next
section "For Existing Netware 4.11 Servers."
7. Change directory to the D:\ directory on the CD-ROM drive, if its drive letter
is D:
8. Enter install at the DOS command line. Proceed through the installation of
NetWare 4.11 as usual.
9. When prompted by Install to select a device driver to load, select the
FASTTRAK.HAM driver.
10. Switch to console mode by using <ALT><ESC> before continuing
installation, and type "load c:\update\IDEHD.CDM". Do this is to make sure
that the IDEHD.CDM is version 2.00 (1998-8-5) or newer. (The older default
IDEHD.CDM doesn't support LBA mode addressing, and will have problems
with the FASTTRAK.HAM driver.)
11. After IDEHD.CDM is loaded, use <ALT><ESC> to switch to the installation
monitor and proceed through the installation of NetWare 4.11 as usual.
When the installation program prompts you to edit STARTUP.NCF, enter the
following lines after any set parameters but before any file loading, then
save the file:
load c:\update\nwpa
load c:\update\nbi
load c:\update\idehd.cdm
48
Page 53

FastTrak100 TX/LP™ Series User Manual
12. DOWN and EXIT the server.
13. Reboot the server.
For Existing Netware 4.11 Servers:
7. Copy the Fasttrak driver FASTTRAK.HAM & FASTTRAK.DDI into the
Netware 4.11 boot directory. Ex. C:\NWSERVER\
8. Edit STARTUP.NCF and add the following lines after any set parameters but
before any file loading:
load c:\update\nwpa
load c:\update\nbi
load c:\update\idehd.cdm
Also add subsequent line "load FastTrak" to load the
FASTTRAK .HAM driver.
9. Boot the server.
49
Page 54

FastTrak100 TX/LP™ Series User Manual
Netware 5
For new NetWare 5 servers:
1. Start the Netware 5 installation as you normally would.
2. When you reach the point in the installation where you install storage
adapters, choose “Modify” in the “Options” window and press ENTER.
3. Highlight the “Storage Adapters” field and press ENTER.
4. Press the INSERT key on your keyboard to “Add” a device.
5. Insert the FastTrak100 driver disk into your A: floppy drive.
6. Press the insert key again to “Add an unlisted driver”.
7. Press F3 and type “A:\NETWARE” in the “Specify a directory path:” window.
Press ENTER.
8. The FASTTRAK.HAM driver should be listed in the “Select a driver to install:”
window. Press ENTER to select this driver.
9. If you need to install any additional drivers for other storage adapters,
choose “Yes” in the “Do you want to select an addition al storage driver?”
window. If not, choose “No”.
10. Choose “Return to driver summary” in the “Additional Driver Options”
window and press enter.
11. Choose “CONTINUE” in the options window and press ENTER.
12. Continue the installation as you would normally.
For existing NetWare 5 servers:
1. From the System Console type “load NWCONFIG”.
2. Choose “Driver Options”.
3. Choose “Configure disk and storage device drivers”.
4. Choose “Select an additional driver”.
5. Press the INSERT key on your keyboard.
6. Insert the FastTrak100 driver disk into your A: floppy drive.
7. Press F3 and type “A:\NETWARE” in the “Specify a directory path:” window.
Press ENTER.
50
Page 55

FastTrak100 TX/LP™ Series User Manual
8. The FASTTRAK.HAM driver should be listed in the “Select a driver to install:”
window. Press ENTER to select this driver.
9. Choose “Yes” when asked if you want to copy this driver.
51
Page 56

FastTrak100 TX/LP™ Series User Manual
Netware Error and Informational Messages
The FastTrak100 TX/LP series Netware driver will display error and other
informational messages to the console.
"Warning...Master/Slave Device on Channel [1/2] for Promise
RAID [0/1/0+1] Deactivated"
A problem has been detected in one of the drives of the array and the drive has been
taken “offline.”
If this is a RAID 0 or Spanning array, the entire array has been taken “offline” and you
have likely lost data. Fix/replace the drive that has failed, then restore data from a
backup source.
If this is a Mirroring array (RAID 1 or RAID 0+1) the array is in “critical” mode.
However, a “critical” array will continue to save and retrieve data from the remaining
working drive(s). Promise recommends replacing the failed drive as soon as possible
since a “Critical” array offers no data redundancy.
“Device on Channel [1/2] for "Mirror RAID Model" is Rebuilding”
This message will appear after a failed disk has been replaced with another drive. If
there is a “spare” unassigned drive present on the FastTrak100 a rebuild will
automatically be performed from the remaining working drive.
NOTE: During Array Rebuild, users may continue to access the array and perform
normal PC functions however the array will NOT provide data redundancy until
Rebuild is completed. If you choose to continue using the PC during rebuild, system
performance will be slightly degraded and the process will take longer.
“Device on Channel [1/2] for "Mirror RAID Model" Rebuild
Completed”
This message will be displayed when the array has completed rebuilding. The array is
now “functional” and fault tolerant.
52
Page 57

FastTrak100 TX/LP™ Series User Manual
Linux
For the latest Linux drivers and documentation, please visit the Technical Support
area at www.promise.com.
53
Page 58

FastTrak100 TX/LP™ Series User Manual
Using The FastCheck™ Monitoring Utility
You can monitor the operating status of all arrays and drives configured on the
FastTrak100 TX/LP series controllers using the supplied FastCheck monitoring utility
for Windows-based operating systems. FastCheck generates visual and audible
messages alerting you of possible problems with the disk array or controller.
FastCheck visually identifies the physical location of attached drives on the
FastTrak100 by IDE channel and setting (Master/Slave). It also displays which drives
are included as part of individual arrays. Administrators can customize FastCheck to
maintain operating logs and event notification, set Password access to the utility, and
schedule maintenance on Mirrored (RAID 1) or a Striped/Mirrored (RAID 0/1) arrays.
Installing FastCheck
1. From the Start Button on the Windows Taskbar, choose Run.
2. Insert Promise FastCheck Utility Diskette.
3. In the Run dialog box, type in “A:\” and click OK.
4. Follow the directions from the setup program.
5. During installation, click YES when prompted to run the utility on every startup. If
NO is selected, FastCheck will not initialize during startup. You may manually
execute the utility via the Start button.
NOTE: Promise recommends having FastCheck load during Startup. This
insures you that it will be ready to post alerts on errors.
54
Page 59
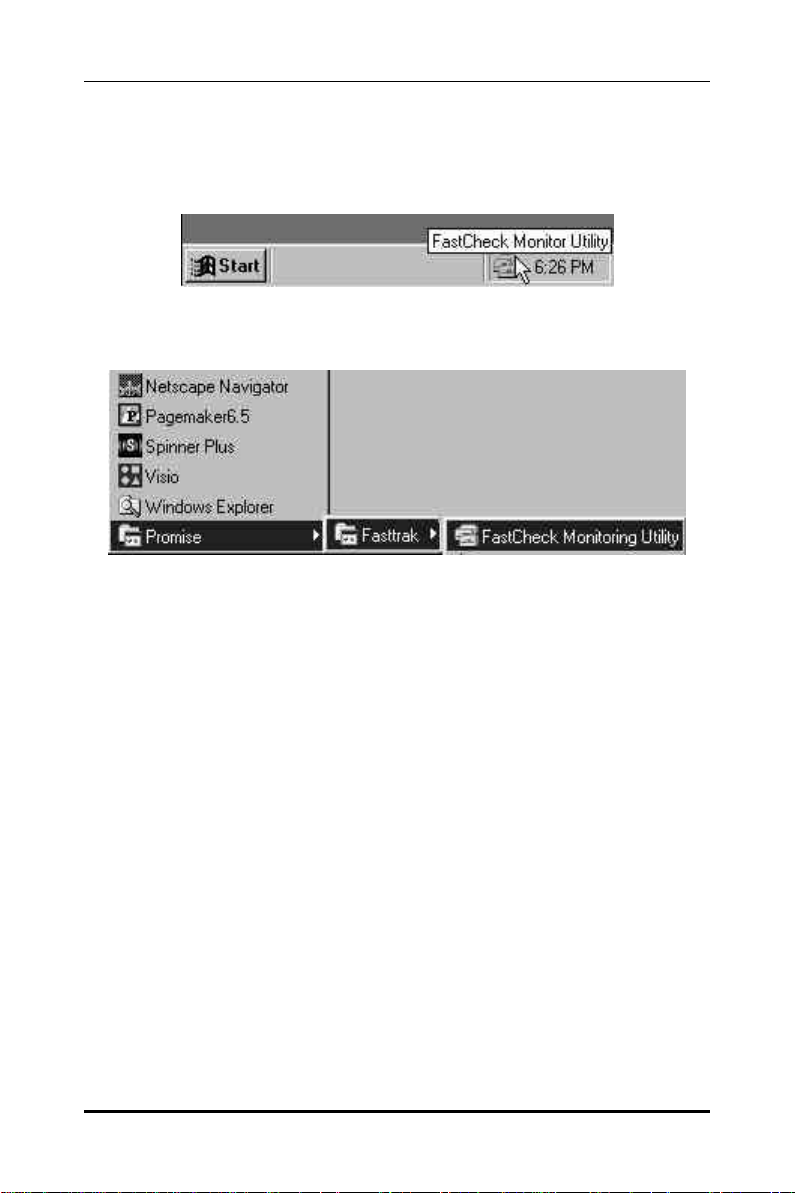
FastTrak100 TX/LP™ Series User Manual
Running FastCheck
As described in the Installation section, the default option for FastCheck is to load
during startup of Win95/98/NT/2000/ME. It appears minimized on the taskbar under
Win 95/98/NT4/2000/Millennium (see below).
To start FastCheck, double-click on the FastCheck icon on the taskbar (above) or you
may also use the Taskbar Start/Promise/FastTrak/FastCheck menus shown below.
Closing FastCheck
Once FastCheck is opened (either automatically on startup or manually), the
monitoring utility remains running in the background even if the user “closes ” the
FastCheck window.
To completely shut down FastCheck, perform the following steps.
1. Right-click the FastCheck icon on the Taskbar.
2. Select Exit from the pop-up window.
3. FastCheck will no longer be running and will no longer be monitoring the array.
55
Page 60

FastTrak100 TX/LP™ Series User Manual
Using FastCheck Array Window
Once FastCheck is selected, the FastCheck Monitoring Utility window will appear. The
main pane has three information window tabs: Array, Controller, and Options. The
user can switch screens by clicking on the tab. The Array Window is the active
screen by default as shown below:
The Array Window (see above) displays information about the arrays configured on
your FastTrak100 through the FastBuild BIOS. From this window, you can also
perform data Synchronization of mirrored arrays, or Rebuild data from one drive to a
replacement drive within a mirrored array.
While the Array Window does not allow you to change the array configurations
directly, it clearly identifies which drives are associated with each array shown in the
left pane.
Viewing Array Information
By left-clicking on the Array #, the right pane shows the following information
categories for that array:
RAID mode: (Striping, Mirroring, Mirroring & Striping, Spanning).
Mapping: (similar to physical drive specifications) describing # of cylinders,
heads, and sectors of the array’s “virtual” drive as seen by the system.
Size: Storage capacity of the array.
56
Page 61

FastTrak100 TX/LP™ Series User Manual
Status: (Functional, Critical, Offline)
Functional: Means the array is providing full functionality
Critical: Used only in reference to a Mirroring array (RAID 1 or RAID 0+1). A
problem has been detected in one of the drives of the array and the
drive has been taken “offline.” However, a “critical” array will continue
to save and retrieve data from the remaining working drive(s). Promise
recommends replacing the failed drive as soon as possible since a
“Critical” array offers no data redundancy.
Offline: This would appear most commonly within a RAID 0 or Spanning array.
The “Offline” results from a drive having failed which has taken the
entire array “offline.” In this case, you have likely lost data. Fix/replace
the drive that has failed, then restore data from a backup source.
Viewing Arrayed Drive Information
By left-clicking on a drive member of an array in the left pane, the right pane shows
the following information categories for that drive:
Status (also shown under the Array Window) can be Functional, Critical, or
Offline. The meanings are shown below.
Functional: Means the drive is working normally .
Critical: A problem has been detected in the drive and the drive taken offline
as part of a mirroring array. Mirrored arrays will continue to function
without the drive. Fix/replace the drive that has failed, then restore data
from a backup source.
57
Page 62

FastTrak100 TX/LP™ Series User Manual
Offline: Drives that are NOT identified as “bad” may be taken offline if part of a
Striping or Spanning array containing a “bad” drive. These drives do NOT
need to be replaced, however.
S.M.A.R.T. Status: Indicates whether attached hard drive implements Self-
Monitoring Analysis & Reporting Technology to predict drive failure.
Size: Indicates capacity of individual drive.
Location: Shows physical location of drive. Indicates on which IDE channel (1
or 2), and whether drive is Master or Slave on cable. This allows user to
identify drives for removal/replacement.
Mapping: Indicates physical parameters of drive (cylinders, heads, sectors).
Timing: Shows selection of drive timing (directly related to burst speed) based
on type of drive and cable used.
Optional Enclosure Management for SuperSwapTM Drive Chassis
If using your FastTrak100 with an optional Promise Technology SuperSwapTM hotswap drive chassis, the FastCheck array window will also display voltage, fan, and
drive temperature status of the SuperSwap unit when a drive icon is selected as
follows below:
Encl. Type: Identifies SuperSwap and other compatible enclosure models.
H/W Conf: Indicates which enclosure subsystems are being monitored.
Fan Status: Shows operating status of SuperSwap fan and approximate RPM
rate.
Temp: Shows internal temperature of enclosure in both ° F and ° C.
Voltage 5V: Shows approximate voltage status of 5V power regulator.
Voltage 12V: Shows approximate voltage status of 12V power regulator.
Refer to the SuperSwap manual for operating parameters.
58
Page 63
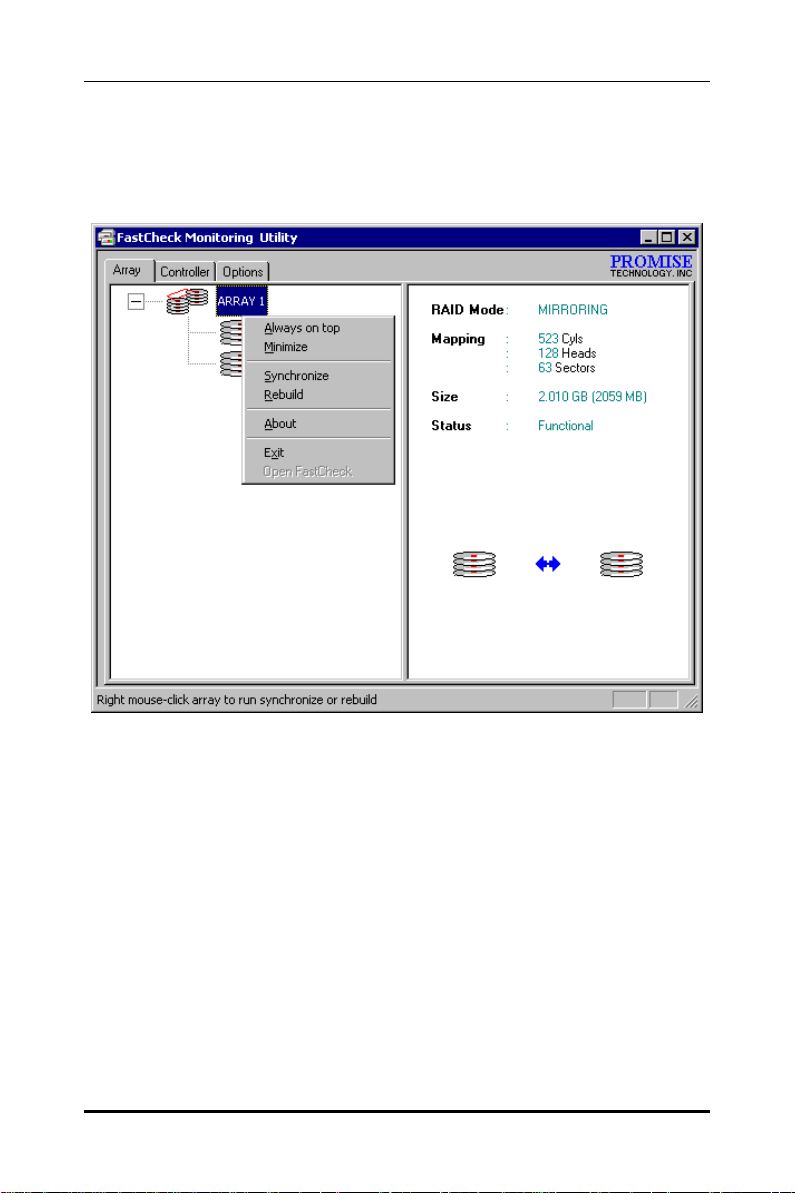
FastTrak100 TX/LP™ Series User Manual
Using Array Pull-down Menu
At the bottom of the Array window, it indicates to right-click on an Array to perform
synchronization or rebuild operations. Right-clicking displays the following pull-down
menu:
From this menu, users may choose to have the Window Always Appear on Top of
applications, Minimize, Synchronize mirrored drives, Rebuild a mirrored array,
use About to check FastCheck version #, or Exit the onscreen window.
59
Page 64

FastTrak100 TX/LP™ Series User Manual
Synchronizing An Array
Synchronization is a periodic maintenance procedure for Mirroring (RAID 1, RAID 0+1)
arrays to maintain data consistency on all mirrored drives. In operation, array
synchronization compares data on the mirrored drives for any differences. If there
are differences detected, data from the primary drive(s) is automatically copied to the
secondary drive(s). This assures that all mirrored drives will contain the exact
information.
NOTE: You may instead choose to schedule array synchronization automatically
under the Options Tab view versus manually initiating synchronization (see page
64).
1. To synchronize, choose the Array Tab View (see figure on previous page).
2. Right-click on the array you wish to synchronize and choose “Synchronize”
from the context menu.
3. Click “Yes” to initiate Synchr onization (see below) when the Confirmation
window appears. To cancel this option, click the No button.
WARNING: Once initiated, synchronization can NOT be halted in
order to prevent data errors.
60
Page 65

FastTrak100 TX/LP™ Series User Manual
4. Once Synchronization is confirmed, the following information screen appears.
Click OK button or close the window to proceed.
NOTE: During Array Synchronization, users may continue to access the working
array and perform normal PC functions. However, system performance will be
slightly degraded and the process will take longer.
5. A progress bar will appear at the bottom of the FastCheck Monitoring window
showing synchronization in progress and the percentage that has been
completed.
61
Page 66

FastTrak100 TX/LP™ Series User Manual
Rebuilding An Array
This command effectively copies or overwrites data from an existing data drive in the
array on to a blank drive. The operation will be typically used when a failed drive has
been replaced with a new drive as part of a mirrored array.
1. To perform a Rebuild, choose the Array Tab View.
2. Right click the array number and choose Rebuild from the context menu.
3. Once Rebuild is selected, you will be asked to “Initialize Rebuild process on
Array #” by clicking OK.
Using Rebuild Wizard
1. Initiating rebuild array will open the Rebuild Wizard Step 1 screen shown below.
2. Select the Target drive that will receive data. Make sure you select the blank
new or replacement drive. The unselected drive will contain “good” data. It will
be the remaining working drive of an array, or a system drive containing existing
data that you wish to mirror.
WARNING: Make absolutely sure and double-check which drive is
which. If data exists on the target drive, it will be over-written.
62
Page 67

FastTrak100 TX/LP™ Series User Manual
3. Click the Next button to proceed to Rebuild Wizard Step 2 (see next page) or
Cancel button to stop.
63
Page 68

FastTrak100 TX/LP™ Series User Manual
4. Rebuild Wizard Step 2 confirms the Target or “Rebuild” disk by Array # and drive
ID.
5. Click Finish button to initiate physical Rebuild, Back button to review Step 2, or
Cancel button to Stop. A final confirmation window appears as below:
6. Click “Yes” to initiate Rebuild. To cancel this option, click the No button.
WARNING: Once initiated, Array Rebuild can NOT be halted in order
to prevent data errors.
64
Page 69

FastTrak100 TX/LP™ Series User Manual
NOTE: During Array Rebuild, users may continue to access the array and perform
normal PC functions however the array will NOT provide data redundancy until
Rebuild is completed. If you choose to continue using the PC during rebuild, system
performance will be slightly degraded and the process will take longer.
7. Once Array Rebuild has begun, users are returned to the FastCheck Monitoring
window. A progress bar showing the rebuild progress in percentage will appear
at the bottom of the FastCheck Monitoring window.
NOTE: When a “spare” unassigned drive is present on the FastTrak100, a rebuild
will automatically be performed from the remaining working drive.
65
Page 70
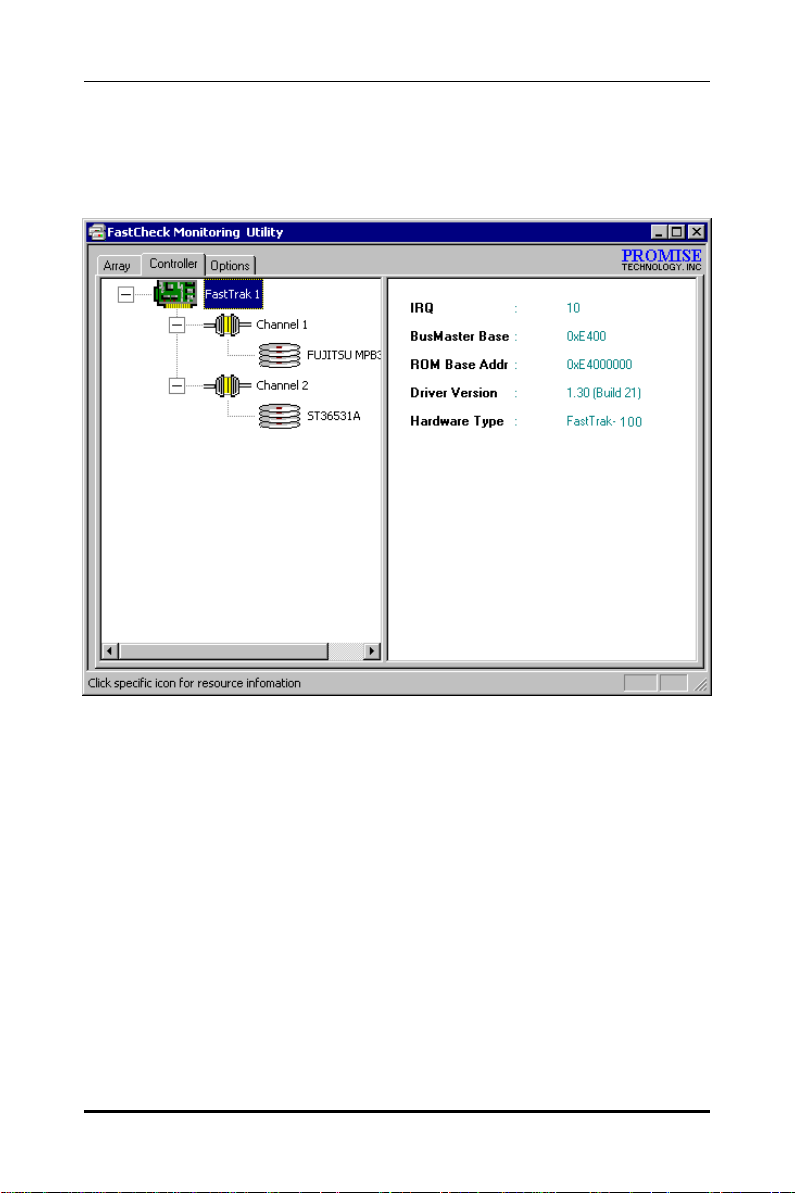
FastTrak100 TX/LP™ Series User Manual
Using Controller Window
Clicking on the Controller tab will reveal the Controller Window. This displays physical
information about the location of FastTrak100, data channels on the card, and the
attached drives.
Viewing Controller Card Information
By left-clicking on the FastTrak controller icon, the right pane shows the following
information categories for that array:
IRQ: Identifies interrupt request assigned to PCI slot.
Bus Master Base: Shows base address in hex numbering for board’s bus
master Input/Output function.
ROM Base Address: Shows base address in hex numbering for FastTrak’s
Flash ROM chip.
Driver Version: Identifies which version of the Promise FastTrak100 driver
you have installed.
Hardware Type: Identifies which FastTrak product is installed.
66
Page 71

FastTrak100 TX/LP™ Series User Manual
Viewing IDE Channel Information
Left-clicking on a given Channel icon or # in the left pane, will show the Base IO
addresses of the channel in the right pane (used for troubleshooting).
67
Page 72

FastTrak100 TX/LP™ Series User Manual
Viewing Drive Information
Left-clicking on a given Drive icon or ID in the left pane, will show similar information
categories as the Array Window Drive Information in the right pane.
Status: (also shown under the Array Window) can be Functional, Critical, or
Offline. The meanings are shown below.
Functional: Means the drive is working normally .
Critical: A problem has been detected in the drive and the drive taken offline
as part of a mirroring array. Mirrored arrays will continue to function
without the drive. Fix/replace the drive that has failed, then restore data
from a backup source.
Offline: Drives that are NOT identified as “bad” may b e taken offline if part of
a Striping or Spanning array containing a “bad” drive. These drives do
NOT need to be replaced, however.
S.M.A.R.T. Status: Indicates whether attached hard drive implements Self-
Monitoring Analysis & Reporting Technology to predict drive failure
Size: Indicates capacity of individual drive.
Location: Shows physical location of drive. Indicates on which IDE channel (1
or 2), and whether drive is Master or Slave on cable. This allows user to
identify drives for removal/replacement.
Mapping: Indicates physical parameters of drive (cylinders, heads, sectors).
68
Page 73

FastTrak100 TX/LP™ Series User Manual
Timing: Shows selection of drive timing (directly related to burst speed) based
on type of drive and cable used.
Optional Enclosure Management for SuperSwapTM Drive Chassis
If using your FastTrak100 with an optional Promise Technology SuperSwapTM hotswap drive chassis, the FastCheck controller window will also display voltage, fan,
and drive temperature status of the SuperSwap unit when a drive icon is selected as
follows below:
Encl. Type: Identifies SuperSwap and other compatible enclosure models.
H/W Conf: Indicates which enclosure subsystems are being monitored.
Fan Status: Shows operating status of SuperSwap fan and approximate RPM
rate.
Temp: Shows internal temperature of enclosure in both ° F and ° C.
Voltage 5V: Shows approximate voltage status of 5V power regulator.
Voltage 12V: Shows approximate voltage status of 12V power regulator.
69
Page 74
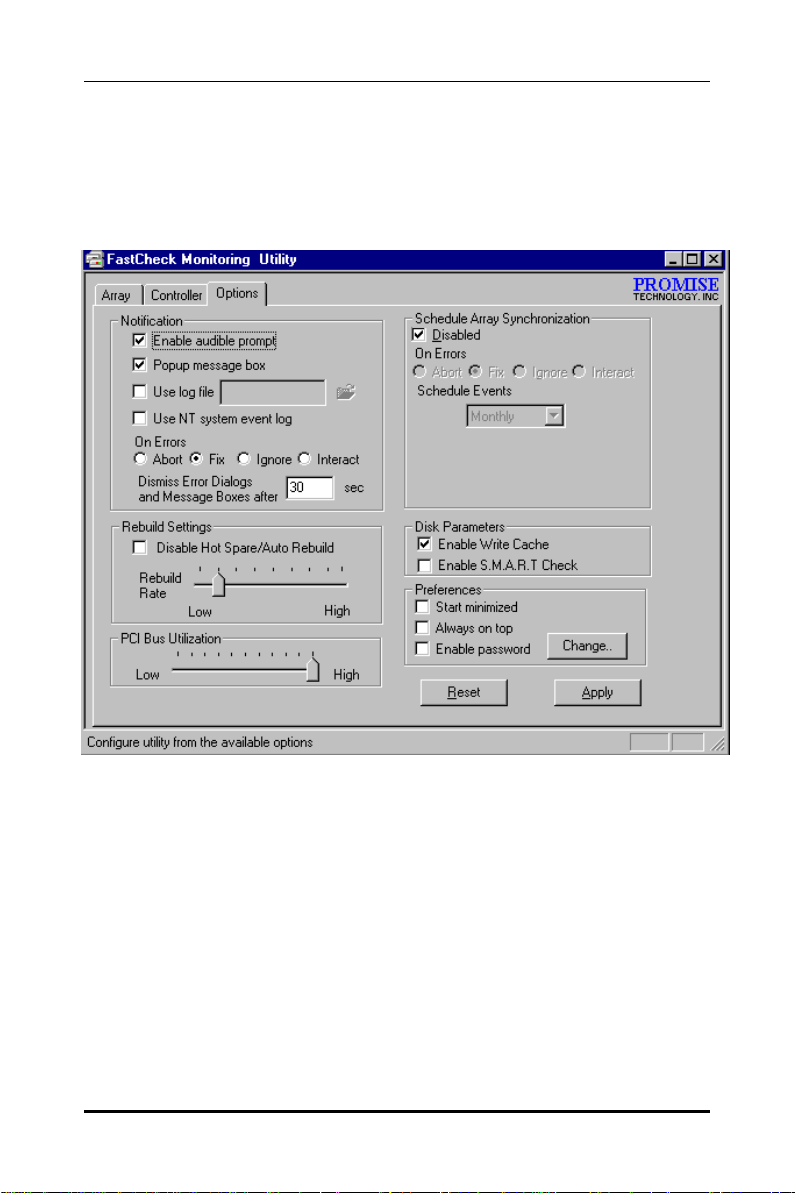
FastTrak100 TX/LP™ Series User Manual
Using Options Window
Clicking on the Options tab reveals the Options Window. Array administrators can
customize the FastCheck Monitoring Utility in four major areas: Notification, Array
Synchronization Scheduling, setting Password, Desktop Appearance. Most options
relate to Mirroring arrays (RAID 1 or RAID 0+1).
70
Page 75
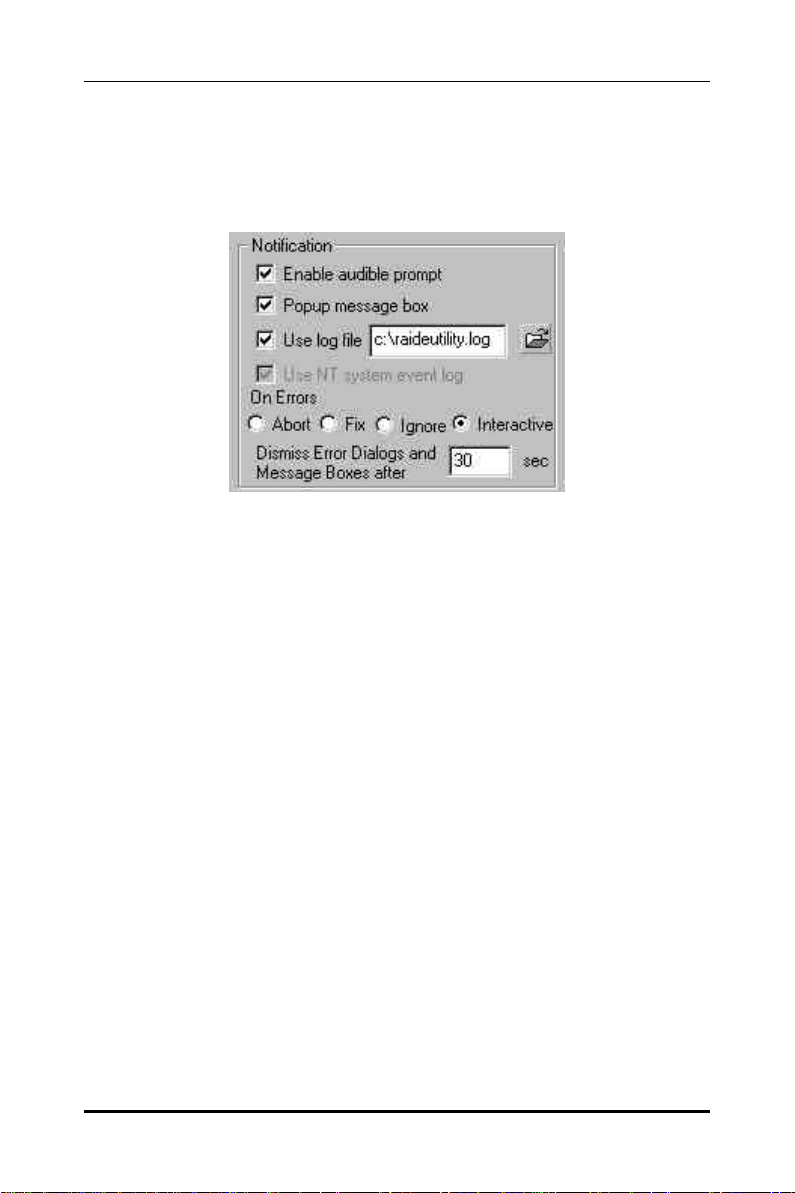
FastTrak100 TX/LP™ Series User Manual
Selecting Notification Options
This section of the Options windows allows users to select how they are notified of
a system event. A System Event includes driver-initiated Rebuilds (automatic rebuild
using a “hot” spare standby drive), user -initiated manual Rebuilds or manual
Synchronization, and Error-Handling reporting for these processes.
Enable audible prompt: Turns on/off an audible alarm of an event (typically a
drive failure, or completion of rebuild or synchronization).
Popup message box: Turns on/off the appearance of an event message box
that would typically indicate a drive failure, or completion of rebuild or
synchronization.
Use log file: Allows writing operating event logs of the array activity (alerts
and status reports) to a given file name and directory. If a file name is used
but the path left blank, the default directory is the same as the FastCheck
Utility (typically C:\Program Files\Promise \FastTrak100).
Use NT system event log: Is grayed out under Windows
95/98/2000/Millennium automatically. Under Windows NT4 and 2000, it
permits user to write array logging to NT’s own event log.
1. To view FastCheck events under Windows NT or 2000, go to
Start/Programs/Administrative Tools/Event Viewer.
2. In the Event Viewer, choose “Log” from the m enu bar, then check
“Application.” Any events generated by FastCheck will appear under the
Source column as “FastCheck.”
On Errors section offers four radio button choices for the user to select what
procedure they would like to perform if an Error is detected during
automatic/manual Rebuilds or manual Synchronization. There are three
types of errors that FastTrak100 detects -- a data mismatch between the
primary and secondary drive, a physical media error on source or target
drive, or a total disk failure. The options for handling Errors are as follows:
71
Page 76

FastTrak100 TX/LP™ Series User Manual
Abort: Stops any Synchronization or Rebuild process if an error is
encountered.
Fix: In most cases, FastTrak100 automatically can correct errors. The
method of correction varies depending on the type of error.
Ignore: FastTrak100 will log the event error and continue the rebuild or
synchronization process. Use this setting if you want to detect the
presence of errors, but do not want to fix these errors at the time. The
user may then decide what to do about the error(s) detected.
WARNING: This may result in mismatched drives under RAID 1 or 0+1.
Interactive: By checking this option, a selection window will appear each
time an error is detected asking the user whether they want to Abort, Fix,
or Ignore the error (see Troubleshooting section).
Dismiss Error Dialogs: Designates the length of time (in seconds) that a
Message box or Error Dialog box appears on screen.
Scheduling Array Synchronization
This section of the Options Window allows a user to schedule when and how often
FastTrak100 will perform synchronization maintenance of a mirrored array.
Disable: Is checked (the default) to turn off automated scheduling of
synchronization. When unchecked, the Scheduling section will be
highlighted (see above).
On Errors section offers four radio button choices for the user to select what
procedure they would like to perform if an Error is detected during a
scheduled Synchronization. There are three types of errors that
FastTrak100 detects -- a data mismatch between the primary and
secondary drive, a physical media error on source or target drive, or a total
disk failure. The options for handling Errors are as follows:
72
Page 77
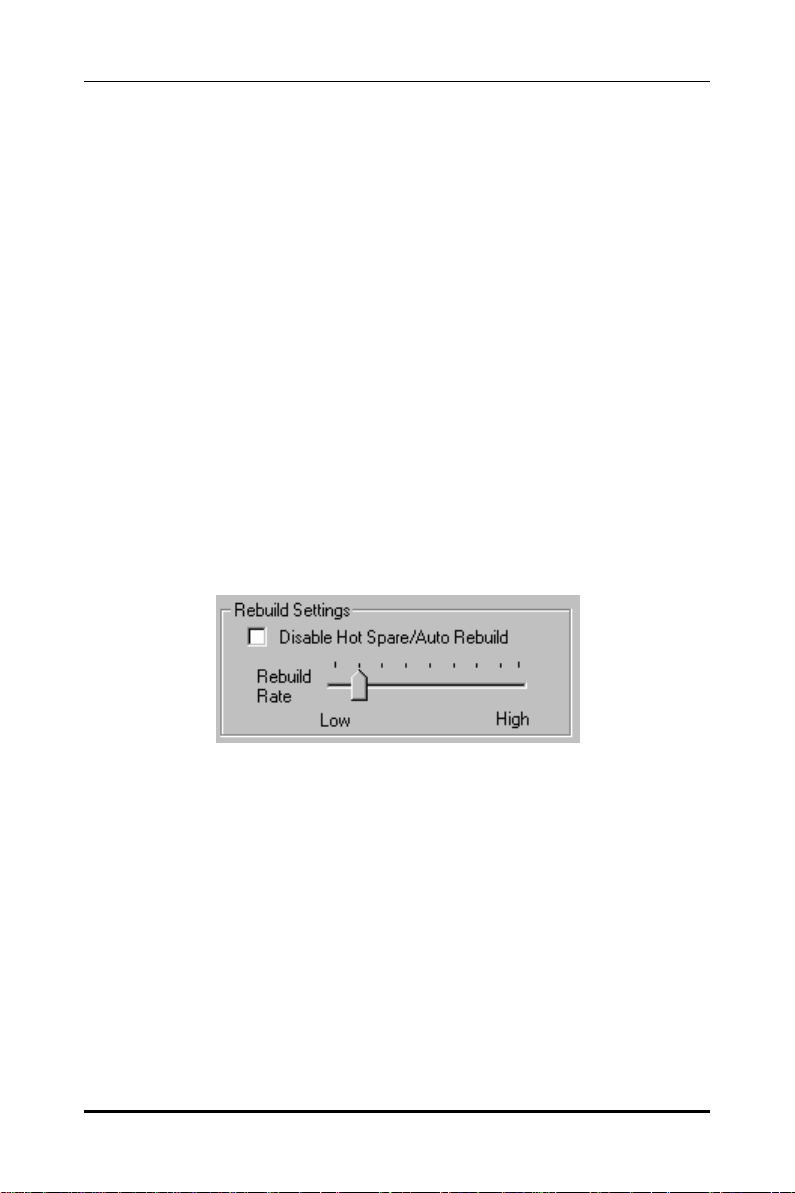
FastTrak100 TX/LP™ Series User Manual
Abort: Stops the Synchronization process if an error is encountered.
Fix: In most cases, FastTrak100 automatically can correct errors. The
method of correction varies depending on the type of error (see
Appendix under Error Correction Methodology).
Ignore: FastTrak100 will log the event error and continue the
synchronization process. (Warning: this may result in mismatched drives
under RAID 1 or 0+1). Use this setting if you want to detect the presence
of errors, but do not want to fix these errors at the time. The user may
then decide what to do about the error(s) detected.
Interactive: By checking this option, a selection window will appear
each time an error is detected asking the user whether they want to
Abort, Fix, or Ignore the error (see Troubleshooting for more details).
Schedule event: Drop down box allows scheduling synchronization by minute,
by hour, by day, by week, or by month. If enabled, the default is By Month.
This allows synchronization to take place during an off-hour when the
system is either not in use or not at peak demand.
Start time designates hr/min/ am/pm
On the designated day of week or by ordinal (1st, 2nd, 3rd....) selection.
Setting Rebuild Options
Disable Hot Spare/Auto Rebuild checkbox turns off the use of a “hot” spare
drive and automatic rebuilding of a mirrored array. The default is unchecked
(or enable Hot Spare/Auto Rebuild).
Rebuild Rate assigns the amount of importance that FastTrak100 gives to
mirroring data from one drive to another in the background. A “high” setting
assigns most of FastTrak100’s resources to the rebuild process at the
expense of responding to ongoing read/write data requests by the
operating system. A “low” setting gives priority to ongoing read/write data
requests by the operating system at the expense of the rebuild process
and will typically result in longer rebuild times. The setting shown above is
the default.
73
Page 78
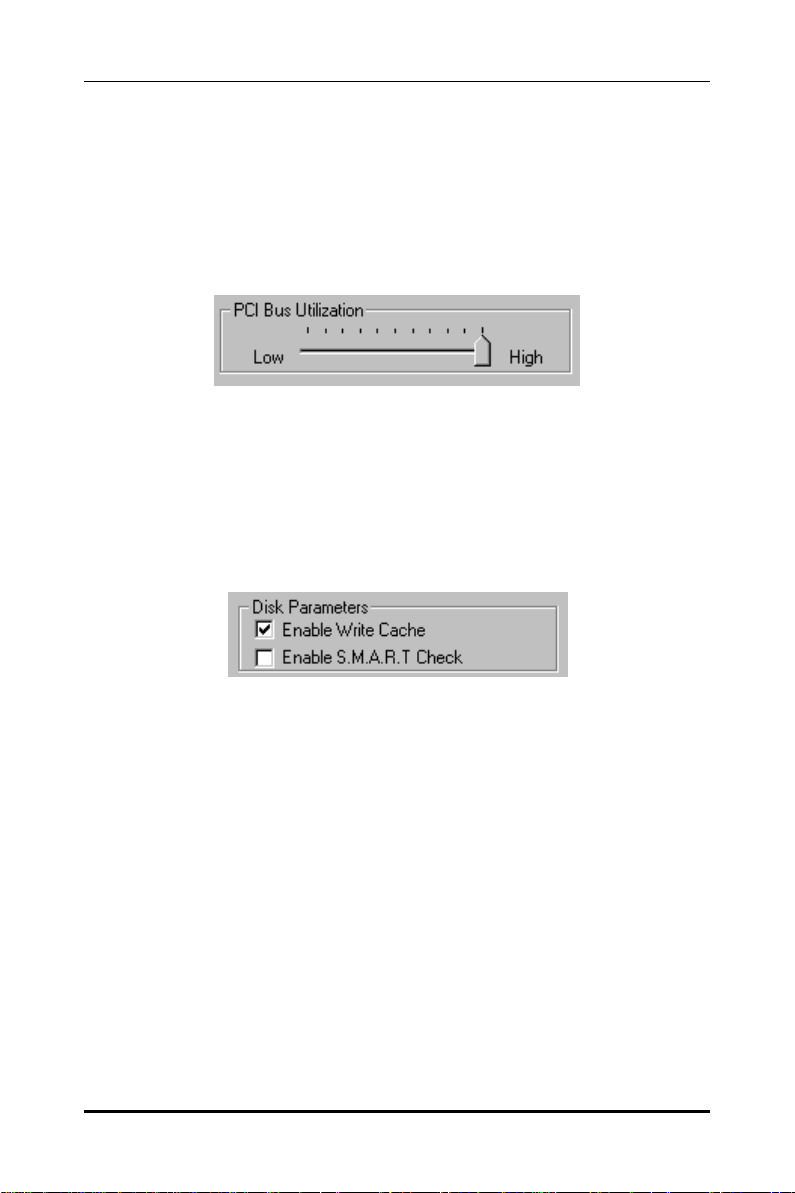
FastTrak100 TX/LP™ Series User Manual
Setting PCI Bus Utilization Option
NOTE: In most cases, a user does not need to change this setting since
FastTrak100’s data handling rarel y conflicts with another PCI device. However,
certain brands of video capture cards can produce a “glitch” on play back of A/V
files that may require adjusting the default setting devices (see Tips for Audio/Video
Editing for more information).
This section of the Options Window allows a user to change how much time the
FastTrak100 holds on to the PCI bus to transfer data.
The default setting of “High” on the slider bar means FastTrak100 holds on to the PCI
bus longer for data transfers to occur. A setting of “Less” reduces the time which
FastTrak100 occupies on the PCI bus and frees that time for use by other PCI devices.
Once a bus setting has been selected, click the Apply button on the Options window
to implement changes immediately.
Setting Disk Parameters Option
Enable Write Cache checkbox allows user to enable/disable write caching for
hard drives that include this performance feature. FastCheck automatically
recognizes such drives and enables the feature as the default setting. For
drives that do not use write caching, this option is automatically grayed out.
Enable S.M.A.R.T. Check checkbox tells FastCheck to regularly monitor each
drive to assure that drive failure prediction is functioning. The default is
unchecked, meaning FastCheck will not monitor this function.
74
Page 79
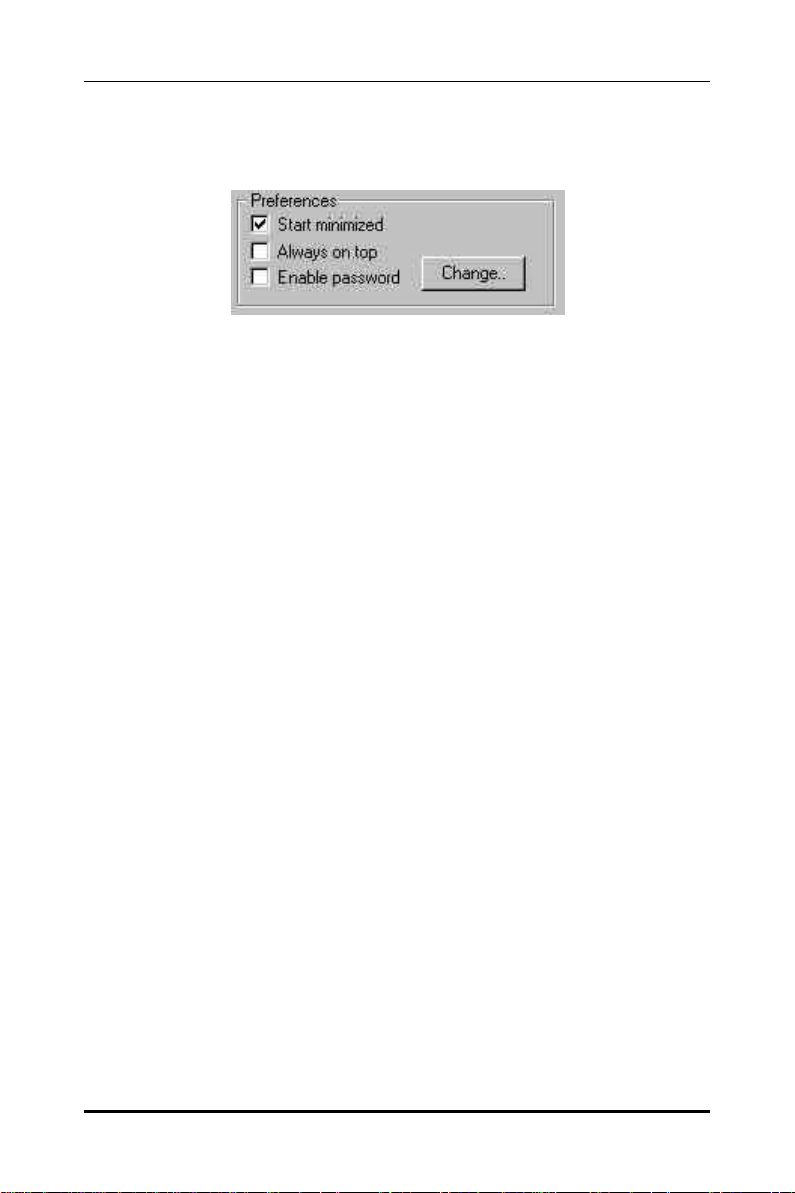
FastTrak100 TX/LP™ Series User Manual
Setting Screen Preferences
This section controls how the FastCheck utility screen is displayed and sets the
security password to protect the administrative settings.
Start Minimized checkbox allows user to have FastCheck appear on the
toolbar only on startup. Click on the icon to see the FastCheck utility screen.
Always on Top checkbox tells the Utility to appear above all programs until
closed or minimized manually.
Enable Password checkbox in the Preferences section turns on/off use of a
Password every time the FastCheck Monitoring Utility icon is selected or the
program is run from the Start menu. Disabling use of a current password
requires password entry (see Creating Password on next page).
75
Page 80

FastTrak100 TX/LP™ Series User Manual
Creating Password
1. To create a password, check the Enable Password checkbox in the
Preferences section. The “Set Password” window will appear.
2. Type the password you want to use. Press the Tab key or click to retype the
same password in the “Confirm New Password” section. Click the O K button.
NOTE: Remember to record the password you use in a secure place in case you
forget it.
3. A confirmation screen will appear saying “Password Checking is Enabled”. Click
the OK button.
4. Once the password feature is enabled, the following menu will appear before
the FastCheck window can be opened.
Changing Password
1. Input the original password you first created to gain access to FastCheck.
2. Click on Options tab, and then click on the Change button in the Password
section. The Set Password screen will appear (see figure in step 3 above).
3. Type the password you want to use. Press the Tab key or click to retype the
same password in the “Confirm New Password” section.
4. Click OK button.
Disabling Password
1. Input the original password you first created to gain access to FastCheck.
2. Click on Options tab.
76
Page 81

FastTrak100 TX/LP™ Series User Manual
3. Uncheck the “Enable Password” checkbox. Click Apply button on Options
window.
77
Page 82

FastTrak100 TX/LP™ Series User Manual
FastTrak DMI Service for Windows NT/2000
The DMI NT Service allows the FastTrak to appear as an instrumented component
under DMI (Desktop Management Interface). The DMI 2.0 Service Provider, Win32sl,
must be installed in order for the FastTrak DMI service to be installed. The ftdmisvc.mif
provides the database (Management Information) for the CI (Component
Instrumentation). For further information on DMI go to the DMTF (Desktop Management
Task Force) web site at www.dmtf.org, or contact your computer vendor.
78
Page 83

FastTrak100 TX/LP™ Series User Manual
Understanding Disk Array Concepts
About FastTrak100 TX/LP Series Disk Array Adapter
FastTrak100 is a high performance Ultra ATA/EIDE RAID controller card that features
concurrent data channel operation and an onboard BIOS. The channels on the
FastTrak100 support concurrent operation that allows for overlapped I/O under multitasking operating systems and sharing the workload between multiple drives.
About Adapter BIOS
The FastTrak100 card contains a BIOS code that extends the standard disk service
routine provided through Int13. The BIOS is bootable for DOS and other operating
systems that rely on the system BIOS for drive operation. When the FastTrak100
BIOS appears during bootup, users can press <F2> to enter the FastBuild
select from menu settings.
FastBuild™ Auto Menu Setup
This setup utility is used to build and manage FastTrak100 disk arrays. The utility is
menu driven and features the <1> Auto Setup option that uses a simple, interactive
setup process. Once the array is built, all the array members store the configuration
information in the drive’s reserved area. See Chapter 4, which provides descriptions
of individual functions.
Reserved Sector
Array configuration data about the drive member and other members in the disk array
are saved on a special location on the disk drives called the reserved sector. If any
member of the array becomes corrupt or lost, the redundant configuration data on the
other members can be used for rebuilds.
Disk array members do not have a “memory” of their drive positions. This allows
drives to be placed on different FastTrak100 connectors or cards within the system
without reconfiguring or rebuilding.
TM
setup to
79
Page 84

FastTrak100 TX/LP™ Series User Manual
Disk Array Terms
Disk Array Description
A “d isk array” is formed from a group of 2 or more disk drives that appear to the
system as a single drive. The advantage of an array is to provide better throughput
performance and/or data fault tolerance. Better performance is accomplished by
sharing the workload among multiple physical drives. Fault tolerance is achieved
through data redundant operation where if one (or more) drive fails or has a sector
failure, a mirrored copy of the data can be found on another drive(s).
For optimal results, select identical Ultra ATA/100 drives to install in disk arrays. The
drives’ matched performance allows the array to function better as a single drive.
Disk Array Member
The individual disk drives in an array are called “members.” Each member of a specific
disk array is coded in their “reserved sector” with configuration information that
identifies the drive as a member. All disk members in a formed disk array are
recognized as a single physical drive to the system.
Disk Array Types
For most installations, the FastBuildTM setup “<1> Auto Setup” option will configure
your system.
There are four disk array types in three categories that can be installed on the
FastTrak100 card. Striping is in the Performance category while Mirroring,
Striping/Mirroring are in the Fault Tolerance category. Spanning (JBOD) is in the
Capacity category.
Disk arrays within the Performance and Fault Tolerance categories conform to the
Redundant Array of Independent Disks technology, or RAID. The RAID levels
supported are 0, 1, and 0+1.
RAID Level
RAID 0 (Striping)
RAID 1 (Mirroring)
RAID 0+1 (Stripe/Mirror)
JBOD (Spanning)
Performance
Highest
Normal
High
Normal
80
Capacity
# Drives x Smallest Size
Smallest Size Drive
2 x Smallest Size Drive
100% of All Drives
# of
Drives
2 to 4
2
4
2 to 4
Page 85

FastTrak100 TX/LP™ Series User Manual
About RAID Levels
Striping (RAID 0)
Reads and writes sectors of data interleaved between multiple drives. When any disk
member fails, it affects the entire array. Performance is better than a single drive
since the workload is balanced between the array members. This array type is for
high performance systems. Identical drives are recommended for performance as
well as data storage efficiency. The disk array data capacity is equal to the number
of drive members times the smallest member capacity. For example, one 1GB and
three 1.2GB drives will form a 4GB (4 x 1GB) disk array.
Stripe Size - a value can be set from 1KB to 1024KB sector size. The size can
directly affect performance. In the FastBuild BIOS, the “Desktop” default is 8KB while
“Server” and “A/V Editing” is 64KB.
81
Page 86

FastTrak100 TX/LP™ Series User Manual
RAID 1 (Mirroring)
Mirroring (RAID 1)
Writes duplicate data on to a pair of drives while reads are performed in parallel. ATA
RAID 1 is fault tolerant because each drive of a mirrored pair is installed on separate
IDE channels. If one of the mirrored drives suffers a mechanical failure (e.g. spindle
failure) or does not respond, the remaining drive will continue to function. This is
called Fault Tolerance. If one drive has a physical sector error, the mirrored drive
will continue to function.
On the next reboot, the FastBuildTM utility will display an error in the array and
recommend to replace the failed drive. Users may choose to continue using their PC,
however Promise recommends replacing the failed drive as soon as possible. See
Chapter 4 for a functional description.
Due to redundancy, the drive capacity of the array is half the total drive capacity. For
example, two 1GB drives that have a combined capacity of 2GB would have 1GB of
usable storage. With drives of different capacities, there may be unused capacity on
the larger drive.
Using a Spare Drive
Under a RAID 1 setup, an extra “hot spare” drive (a third drive on FastTrak100) can
be attached to the FastTrak100 and not assigned to the array. Such a drive will be
activated to replace a failed drive that is part of a mirrored array. A rebuild is
performed automatically in the background to mirror the good drive data on to the
spare.
At a later time, the system can be powered off and the failed drive can be physically
removed and replaced. Spare drives must be the same or larger capacity than the
smallest array member.
82
Page 87

FastTrak100 TX/LP™ Series User Manual
NOTE: Due to IDE limitations when drives are in a Master/Slave configuration, if the
drive that fails is on the same channel as the “spare” drive, there is a possibility that
the “spare” drive will fail to be recognize d by the system. For this reason Promise
recommends using “spare” drives only on the FastTrak100 TX4.
Striping/Mirror (RAID 0+1)
A combination of both above array types. It can increase performance by reading
and writing data in parallel while protecting data with duplication. A minimum of four
drives needs to be installed. With a four-drive disk array, two pairs of drives are
striped. Each pair mirrors the data on the other pair of striped drives. The data
capacity is similar to a standard Mirroring array with half of total capacity dedicated
for redundancy.
About Dual Data Redundancy
One unique (though rarely occurring) feature of RAID 0+1 is dual fault tolerance. In
some cases, two drives can fail simultaneously and still maintain the integrity of data.
There are six combinations in which two drives can fail. FastTrak100 protects the
data array in four of those cases depending on drive type (some drives do not permit
the Slave drive to continue to function if the Master drive fails).
Assume the drives are configured as follows (M = Master, A/B indicates which
striped pair the drive belongs to, # indicates which part of stripe data):
IDE 1 IDE2
M Drive A1 Drive B1
83
Page 88

FastTrak100 TX/LP™ Series User Manual
S Drive B2 Drive A2
84
Page 89
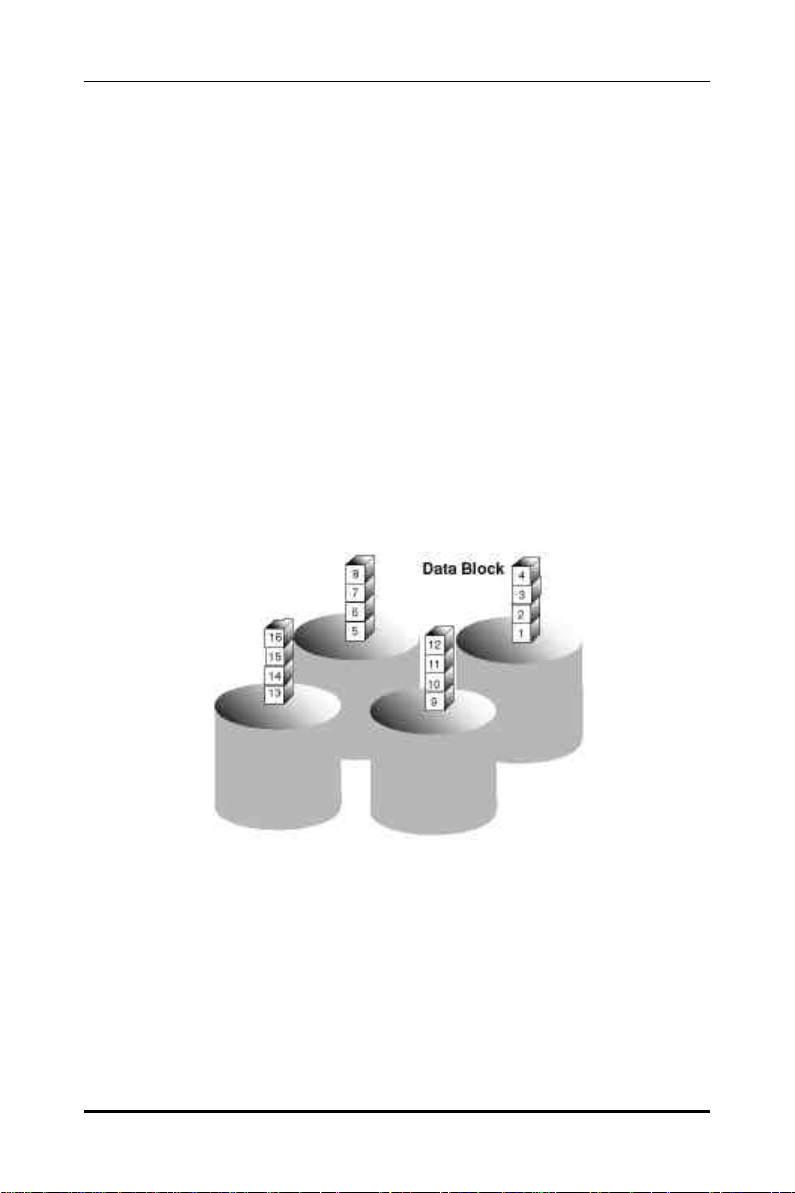
FastTrak100 TX/LP™ Series User Manual
Under RAID 0+1, the array maintains data integrity if any 1, 2 combination survives.
Event Failed Drives Array Status Why?
1 A1/A2 Working B1/B2 retain array integrity
2 B2/B1 Working A1/A2 retain array integrity
3 A1/B2 Working B1/A2 retain array integrity
4 B1/A2 Working A1/B2 retain array integrity
5 A1/B1 Offline B2/A2 contain only half of array
data
6 B2/A2 Offline A1/B1 contain only half of array
data
Spanning (JBOD)
A Spanning disk array (also aptly named as JBOD for “Just a Bunch of Drives”) is
equal to the sum of all drives when the drives used are of different capacities.
Spanning stores data on to a drive until it is full, then proceeds to store files onto the
next drive in the array. There are no additional performance or fault tolerance array
features in this array. When any disk member fails, the failure affects the entire array.
85
Page 90

FastTrak100 TX/LP™ Series User Manual
Troubleshooting & Tips
This section is used to assist with troubleshooting conflicts and FastTrak100
installation problems. Also refer to the “README.TXT” file on the FastTrak100 driver
and utility diskette for more recent information as well as the PromiseOnlineTM
services listed in Appendix A.
The section is divided into the following categories: Motherboard Issues, System
CMOS Issues, Drive Errors, Operating System Errors, and Audio/Video Editing Tips.
Motherboard Issues
Freeing additional IRQ resources
Since the Promise card supports PCI Interrupt sharing, it is possible to use IRQs
already assigned to another PCI card. Interrupt Sharing is not supported with onboard
IDE controllers. If the onboard IDE controller(s) are not used, you may disable the
controllers to free IRQ 14 and/or 15.
Configuring PCI IRQ resources
Setting the IRQ for a particular PCI slot will be different depending on the motherboard
BIOS. This setting is usually made in the PCI Configuration and/or Plug and Play (PnP)
section of the motherboard BIOS setup. There are three common methods that
motherboard BIOS’s handle assignment of IRQs to PCI slots:
1. Specifically assigning an IRQ to a particular slot - You can tell the motherboard to
use IRQ 10 for PCI slot 1, IRQ 11 for PCI slot 2, etc.
2. Listing which IRQs are available to be assigned to the PCI slots - This BIOS has
an option where you specify “1st Available IRQ”, “2nd Available IRQ”, etc. The
BIOS then scans the PCI slots for PCI cards and assigns these IRQs in the order
that it finds the PCI cards.
3. Excluding an IRQ from being used by a PCI slot - If you have an ISA card that is
using an IRQ, change the setting for this particular IRQ from “Available” to “used
by ISA card” so that the motherboard will not assign this IRQ to a PCI slot.
Consult your motherboard manual for information that is specific to your motherboard.
System locks up during bootup or when Windows starts
There may be a possible IRQ conflict with an ISA card. Identify what IRQs are used
by ISA cards, enter the Mainboard PCI Setup, and reserve the IRQ for use with ISA.
PCI slots cannot share IRQs with ISA cards.
Miscellaneous problems such as the FastTrak100 BIOS not appearing
during boot, the FastTrak100 driver not loading, or slow data transfer rates
Move the FastTrak100 to a different PCI slot.
86
Page 91

FastTrak100 TX/LP™ Series User Manual
Intermittent data problems
Overclocking the PCI bus may cause the system to hang or data corruption. If you
experience either of these problems, and are overclocking the PCI bus, set the PCI
bus back to its normal setting to see if this is causing the errors.
System CMOS Issues
Set Mainboard CMOS Boot sequence to boot to FastTrak100
On some Mainboard BIOS, it is necessary to set the Boot sequence to “SCSI, A:, C:”
since the Promise card is identified as a SCSI card.
Mainboard CMOS displays C: or D: drive failure during startup
See Drive-Related Errors section.
Using an Onboard IDE Card with FastTrak100
If an onboard IDE controller is installed with hard disks, enable support in the
Mainboard Standard CMOS Setup for the drives. Note that the onboard IDE hard
drives will then be the bootable hard disk unless the system BIOS has a boot
sequence setting with the option to specify booting to a different device.
Drive-Related Errors
Critical Array Status Error Reported during Boot
If a critical status error message appears on the FastTrak100 BIOS startup screen for
a mirrored array (see below), there is a drive in the array that has failed or is not
responding. FastTrak100 will identify the failed drive by channel number and
Master/Slave designation (if 2 drives exist on the same cable). The mirrored array has
lost its fault tolerance, but will still perform normal drive reads and writes.
Operation aborted because FastBuild encountered an error as follows:
Location: Channel 2 - Master Drive
Array Status: Critical
Please retry using FastCheck utility to recover all data. Reboot the
system by pressing the ENTER key.
Try powering the system off and on to reset the drive. Also confirm that cables are
properly attached and the drive is receiving power. If the drive still appears to have
failed, proceed to “Rebuild Array” option of FastCheck detailed on page 55.
Drive cannot be formed into an array
Drives must support Ultra DMA or Multi-word DMA and be free of media defects to be
added into an array. Promise recommends using new identical drives for each array.
Re-secure data and power cabling while checking for proper alignment. Typically, Pin
1 of the drive is closest to the power connector.
87
Page 92

FastTrak100 TX/LP™ Series User Manual
Possible Master/Slave problems
Master/slave problems may exist between two ATA or IDE drives of different brands
attached to a single cable. For both compatibility and better performance, choose
drives of the same model/brand and install them on separate cables. Refer to the
Drive Setup by Connector table (see page 7) for more recommended drive
placements.
System CMOS displays C: or D: drive failure during Startup
Do not reference C: or D: in the Mainboard Standard CMOS for drives attached to the
FastTrak100 controller. Only enter drive information in the Mainboard CMOS for drives
attached to a conventional add-on or onboard IDE controller.
FDISK reports a much lower drive capacity if a single physical drive or a
striped array exceeds 64GB
Due to a limitation with FDISK, the utility reports only the storage capacity that
exceeds 64GB. This is a cosmetic, not actual, limitation. Simply create a single DOS
drive partition, reboot, and then format the partition. The Format command will
recognize the total capacity of the partition accurately. Windows NT/2000/98 will now
recognize the total capacity of your array.
Unable to partition or format array
There are two possible causes -
A) If the FastTrak100 controller is the bootable device, make sure that the array is
set to be bootable -
1. Enter the FastCheck BIOS utility by pressing CTRL-F when prompted during boot
2. Choose option [3], “Define Array”
3. Highlight the array that you want to boot from using the [↑] Up [↓] Down keys.
4. Press the [Space] bar key.
5. An * asterisk will appear next to the array number indicating it as bootable. The
system will now recognize this array as the first array seen. The system will
then use this bootable array as the (fixed) boot C: drive.
B) The Reserve Sector of one of the drives has become corrupt or bad. Removing
the Reserve Sector will remedy any issue related directly to a Bad Reserve
Sector.
WARNING: Before removing the Reserve Sector of the drive(s), backup
any existing data. Removal of the reserve sector of any drive
permanently deletes all existing data on the hard drive. For Mirrored
arrays (RAID 1), you should remove the Reserve Sector from the
"mirrored" drive first (this will appear during Step 3 below) then rebuild the mirrored
array. Remove the Sector on the Master Drive only as a last resort. For Striped
arrays (RAID 0), removing the Reserve Sector from any of the drives that are striped
will destroy the arrayed data.
88
Page 93

FastTrak100 TX/LP™ Series User Manual
To remove the Reserve Sector, follow these steps:
1. When the FastTrak100 BIOS comes up, press Crtl-F to enter the FastBuild.
2. Press 2 to "View Drive Assignments".
3. Using the arrow keys, highlight the drive where you wish to remove the reserve
sector.
4. Press ALT-F1. The highlighted drive will start blinking on the screen.
5. Press CTRL-TAB. A message will appear that says the reserved sector (which
is where array information is kept) on the disk will be wiped.
6. Press "Y" to confirm.
7. For mirrored arrays, hit the “ESC” key twice to reboot and skip to step 10.
8. For striped arrays, repeat this process for each member of the particular array
that is having a problem.
9. When finished, hit the "ESC" key twice to reboot.
10. After rebooting, use FastBuild to re-create the array. For mirrored arrays, rebuild
the mirrored array. For striped arrays, use FDISK and FORMAT after setting up
the array.
Array Constantly Goes Into Critical or Offline Mode During Reboot
(see “Unable to Partition or Format array” above)
Cannot Rebuild Mirrored (RAID 1) Array
(see “Unable to Partition or Format array” above)
Fatal Errors or Data Corruption Are Constantly Reported When Reading or
Writing to Drive Array
(see “Unable to Partition or Format array” above)
ECC Error Reported on Rebuild
The following screen will appear if a data error is detected on either source or target
drive during Rebuild if you have set the On Errors setting to “Interactive” within
FastCheck’s Options Window (see page 63).
89
Page 94
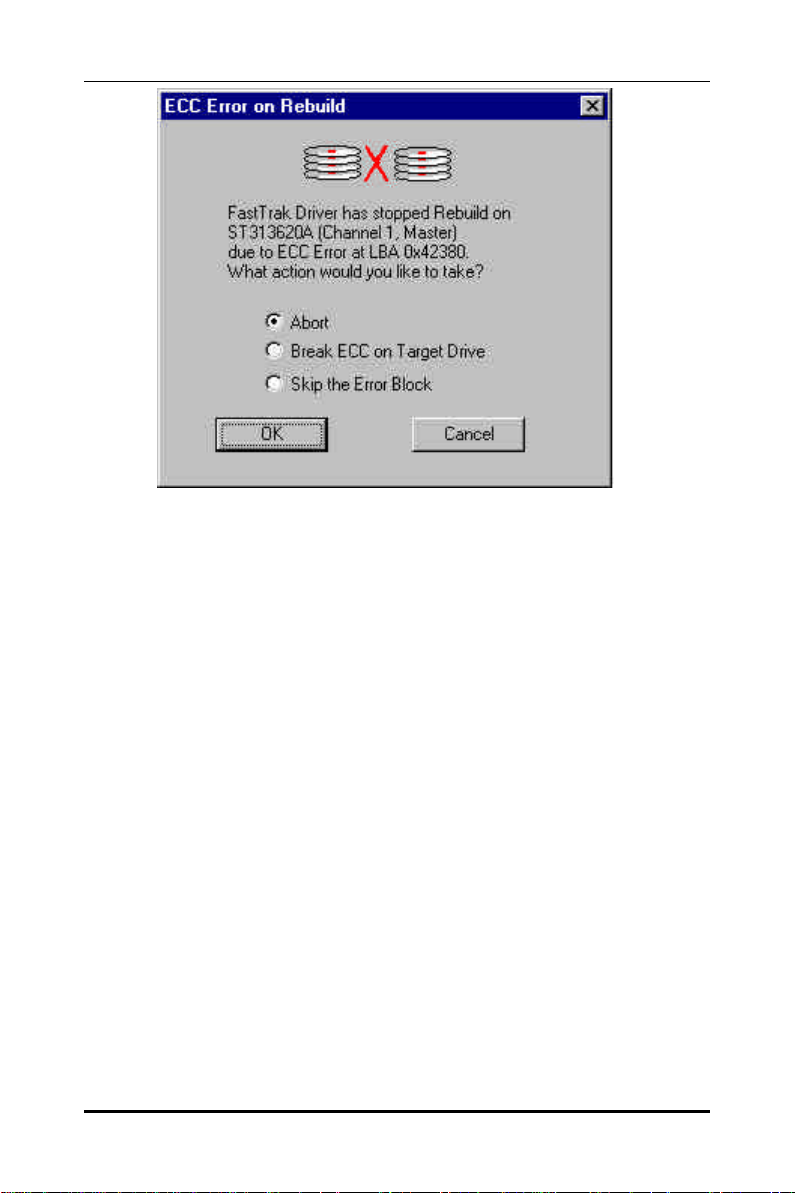
FastTrak100 TX/LP™ Series User Manual
Your choices are as follows:
Abort: Halts the rebuild process. You may elect to retry at a later date.
Break ECC on Target Drive: If the error is detected on the source drive,
“Break ECC on Target Drive” means that FastTrak will copy the bad data
sector on to the target drive to assure that both drives are identical. If the
error is detected on the target drive, FastCheck will copy the data
contained in the good sector of the source drive again to the target drive.
Skip the Error Block: FastTrak100 will log the event error and continue the
rebuild process. Use this setting if you want to detect the presence of
errors, but do not want to fix these errors at the time. You may then
decide what to do about the error(s) detected.
ECC Error Reported on Synchronize
The following screen will appear if a data error is detected on either source or target
drive during Synchronize if you have set the On Errors setting to “Interactive” within
FastCheck’s Option s Window for Scheduled Synchronization (see page 64) or for
Manual Synchronization under Notification options (see page 63).
90
Page 95

FastTrak100 TX/LP™ Series User Manual
Your choices are as follows:
Abort: Halts the synchronization process. You may elect to retry at a later
date.
Fix the Error Block: FastTrak100 will take a good data block from either drive
and copy it to the drive where the error was detected.
Skip the Error Block: FastTrak100 will log the event error and continue the
synchronization process. Use this setting if you want to detect the
presence of errors, but do not want to fix these errors at the time. You
may then decide what to do about the error(s) detected.
91
Page 96

FastTrak100 TX/LP™ Series User Manual
Operating System-Related Issues
Different drive lettering under Windows NT
This may happen when using a SCSI card in addition to the Promise card. Windows
NT does not necessarily load the driver for the boot device controller first. This
results in a drive that in MS-DOS is the C: drive being the D:, or E:, etc. in Windows NT.
Use Windows NT’s Disk Administrator utility to reassign the letters that NT has
assigned to the drives. See your Windows NT documentation for instructions on how
to use Disk Administrator.
The Operating System no longer boots after creating a Mirrored Array
using your existing boot drive using Windows 98/NT4/2000
This is due to Drive Geometry issues. You can verify this if you move the original
drive back to the onboard controller and it boots. Each controller can view a drive
differently. This can be an issue for a new controller that loads the original Master
Boot Record (MBR) and then has a problem translating it or the Operating System boot
record.
For Windows NT or Windows 2000, Promise recommends a “clean” install of the
Operating System. This restores the MBR and OS boot record. You will then need to
repartition and format the drive.
For Windows 98,you can perform the DOS Command “SYS C:” from a bootable floppy
or CD-ROM to restore the operating system boot record and transfer the system files
to the boot drive. If this does not work, the Windows 98 registry may have become
corrupted during the boot process and must be restored. See the Windows
documentation to perform this procedure.
Promise Windows driver does not appear in Device Manager
Windows may already be listing the controller under “Other Devices” instead of “Hard
disk controllers” section. In Device Manager under “Other Devices” to see if it lists a
“PCI Card”, or “RAID Co ntroller”. If so, highlight this listing and click on the “Properties”
button, and then click on the “Driver” tab. Depending on your version of Windows,
choose either “Change Driver” or “Update Driver”. Then follow the on -screen prompts
to complete installation of the driver. If Windows asks if you want to test if the device
can be removed safely click on “CANCEL. Reboot the system to complete installation
of the driver.
“Inaccessible Boot Device” Message Appears During Floppyless Install of
Windows NT or 2000
The "F6" key was not pressed at the appropriate time. Reboot the system, and press
the "F6" key when the message "Setup is inspecting your computer's hardware
configuration…" appears in Windows NT4 or the message "Press F6 if you need to
install third party SCSI or RAID driver" appears in Windows 2000.
92
Page 97

FastTrak100 TX/LP™ Series User Manual
“No Hard Drives Found” Message Appears During CD-ROM Install of
Windows NT or 2000
The "F6" key was not pressed at the appropriate time. Reboot the system, and press
the "F6" key when the message "Setup is inspecting your computer's hardware
configuration…" appears in Windows NT4 or the message "Press F6 if you need to
install third party SCSI or RAID driver" appears in Windows 2000.
Setting of FastTrak DMI Service for Windows NT/2000
The DMI NT Service allows the FastTrak to appear as an instrumented component
under DMI (Desktop Management Interface). The DMI 2.0 Service Provider, Win32sl,
must be installed in order for the FastTrak DMI service to be installed. The ftdmisvc.mif
provides the database (Management Information) for the CI (Component
Instrumentation). For further information on DMI go to the DMTF (Desktop Management
Task Force) web site at www.dmtf.org, or contact your computer vendor.
93
Page 98

FastTrak100 TX/LP™ Series User Manual
Performance Tips
Here are some tips that may optimize performance in a RAID 0 striped array. If you
are using an audio/video-editing card, we also recommend reviewing your card’s
documentation for additional information.
Use FastTrak100 as D: or other non-bootable drive in a Striped Array
For A/V editing, keep the original system boot drive on the standard IDE controller as
C: drive. Partitioning software such as FDISK will see the array as one physical drive,
D: drive (or later). This will prevent file fragmentation and provide better accessibility
to the array.
Re -Configure PCI Latency Setting
The PCI Latency setting appears in some Mainboard BIOS. The setting governs how
much time is allocated to service each PCI slot. Promise recommends a value of 64.
An optimal value is neither too high nor too low and will vary from system to system.
Optimize Array for “Performance”
The Promise FastBuild BIOS Utility autosetup menu allows optimizing the array for A/V
Editing. The default Performance setting (Striping) selects a Stripe Block size of 64.
This larger block size is recommended for the data streaming requirements of A/V
editing. You may select an even larger block size in manual mode (see page 19).
FastTrak (tm) / FastTrak100 (tm) BIOS Version 1.xx (Build xxxx)
(c) 1995-2001 Promise Technology, Inc. All Rights Reserved.
[ Auto Setup Options Menu ]
Optimize Array for: Performance
Typical Application usage: A/V Editing
[ Auto Setup Configuration ]
Mode.................................................Stripe
Stripe Block Size....................................64
Drive used in Array..................................2
Array Disk Capacity.........................13044
[ Keys Available ]
[↑] Up [↓] Down [←, →, Space] Change Option [ESC] Exit [Ctrl-Y] Save
94
Page 99

FastTrak100 TX/LP™ Series User Manual
Change Setting of PCI Bus Utilization
Certain brands of video capture cards can produce a “glitch” on play back of .AVI
files. A setting of “Less” for PCI Bus utilization reduces the time which FastTrak100
occupies on the PCI bus and frees that time for use by other PCI devices and will
remove the “glitch” dropout effect on playback.
Once a bus setting has been selected, click the Apply button to implement changes
immediately. No reboot is required.
95
Page 100

FastTrak100 TX/LP™ Series User Manual
NOTES
96
 Loading...