

Page 1

T€l€charg€ sur www.lampe-videoprojecteur.info
Acer PD125
T a ble of Contents....................................................................................... 1
Usage Notice..............................................................................................2
Precautions......................................................................................................... 2
Introduction................................................................................................ 4
Product Features ................................................................................................ 4
Package Overview ............................................................................................. 5
Product Overview................................................................................................ 6
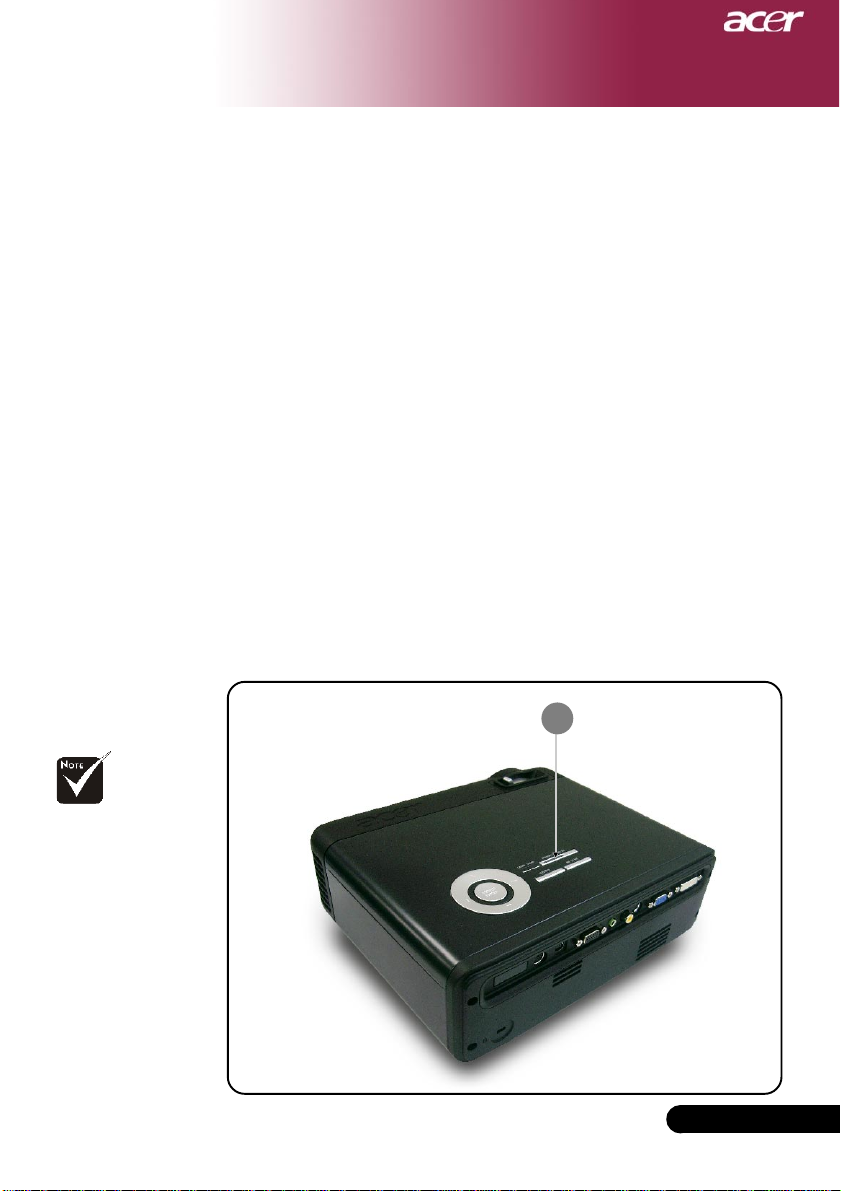
Main Unit........................................................................................................................ 6
Control Panel.................................................................................................................7
Connection Ports .......................................................................................................... 8
Remote Control with Laser Pointer .............................................................................. 9
Installation ............................................................................................... 10
Connecting the Projector.................................................................................. 10
Powering On/Off the Projector .......................................................................... 11
Powering On the Projector ......................................................................................... 11
Powering Off the projector..........................................................................................12
Warning Indicator ....................................................................................................... 12
Adjusting the Projected Image......................................................................... 13
Adjusting the Projector Image Height ........................................................................ 13
Adjusting the Projector Zoom / Focus....................................................................... 14
Adjusting Projected Image Size................................................................................. 14
User Controls............................................................................................ 15
Control Panel & Remote Control ...................................................................... 15
On-Screen Display Menus ............................................................................... 17
How to operate ............................................................................................................ 17
Language(Computer/Video Mode) ............................................................................. 18
Color (Computer/Video Mode) ................................................................................... 19
Image (Computer/Video Mode) .................................................................................. 22
Audio (Computer/Video Mode)................................................................................... 24
Management (Computer/Video Mode) ....................................................................... 25
Appendices .............................................................................................. 28
Troubleshooting
Replacing the lamp .......................................................................................... 32
Specifications ................................................................................................... 33
Compatibility Modes ........................................................................................ 34
............................................................................................... 28
Table of Contents
... English
1
Page 2

Usage Notice
Precautions
Follow all warnings, precautions and maintenance as
recommended in this user’s guide to maximize the life of
your unit.
Warning- Do not look into the projector’s lens when the lamp is
on. The bright light may hurt your eyes.
Warning- To reduce the risk of fire or electric shock, do not
expose this product to rain or moisture.
Warning- Please do not open or disassemble the product as this
may cause electric shock.
Warning- When changing the lamp, please allow unit to cool
down, and follow all changing instructions.
Warning- This product will detect the life of the lamp itself.
Please be sure to change the lamp when it shows
warning messages.
English ...
Warning- Reset the “Lamp Hour Reset” function from the On
Screen Display “Management” menu after replacing the
lamp module (refer to page 26).
Warning- When switching the projector off, please ensure the
projector completes its cooling cycle before
disconnecting power.
Warning- Turn on the projector first and then the signal sources.
Warning- Do not use lens cap when projector is in operation.
Warning- When the lamp reaches the end of its life, it will burn
out and may make a loud popping sound. If this
happens, the projector will not turn back on until the lamp
module has been replaced. To replace the lamp, follow the
procedures listed under “Replacing the Lamp”.
2
Page 3

Usage Notice
Do:
Turn off the product before cleaning.
Use a soft cloth moistened with mild detergent to clean the
display housing.
Disconnect the power plug from AC outlet if the product is not
being used for a long period of time.
Don’t:
Block the slots and openings on the unit provided for
ventilation.
Use abrasive cleaners, waxes or solvents to clean the unit.
Use under the following conditions:
- In extremely hot, cold or humid environments.
- In areas susceptible to excessive dust and dirt.
- Near any appliance that generates a strong magnetic field.
- Place in direct sunlight.
... English
3
Page 4

Introduction
Product Features
This product is an XGA single chip 0.55” DLPTM projector.
Outstanding features include:
T rue XGA, 1024 x 768 a ddressa ble pixels
Single chi p DLPTM technology
NTSC 3.58/NTSC 4.43/P AL/SECAM a nd HDTV
compatible (480i/p, 576i/p, 720p, 1080i)
High-tech DVI connection for digital signal with HDCP
function and supports 480p, 576p, 720p and 1080i
(Optional)
Full function remote control with laser pointer
User friendly multilingual on screen display menu
Advanced digital keystone correction and high
quality full screen image re-scaling
English ...
User friendly control panel
SXGA+, SXGA compression and VGA, SVGA re-sizing
Mac compatible
4
Page 5
Introduction
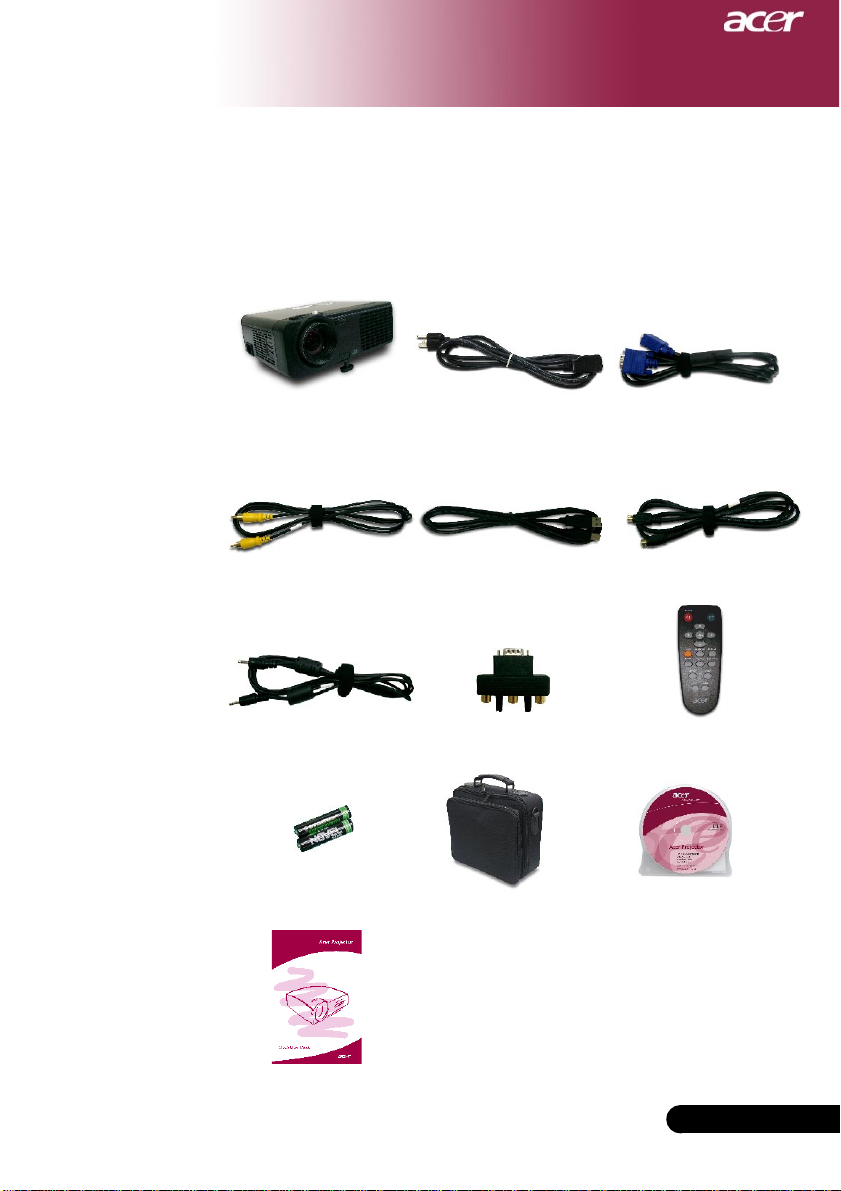
Package Overview
This projector comes with all the items shown below. Check
to make sure your unit is complete. Contact your dealer
immediately if anything is missing.
Projector with lens cap
Composite Video Cable
2.0m
Audio Cable Jack /Jack
1.8m
2 x Battery
Power Cord 1.8m VGA Cable 1.8m
USB Cable 1.8m
VGA to Component/HDTV
Adapter
Carrying Case
S-Video Cable 1.8m
Remote Control with
Laser Pointer
User’s Guide
Quick Start Card
... English
5
Page 6
Introduction
Product Overview
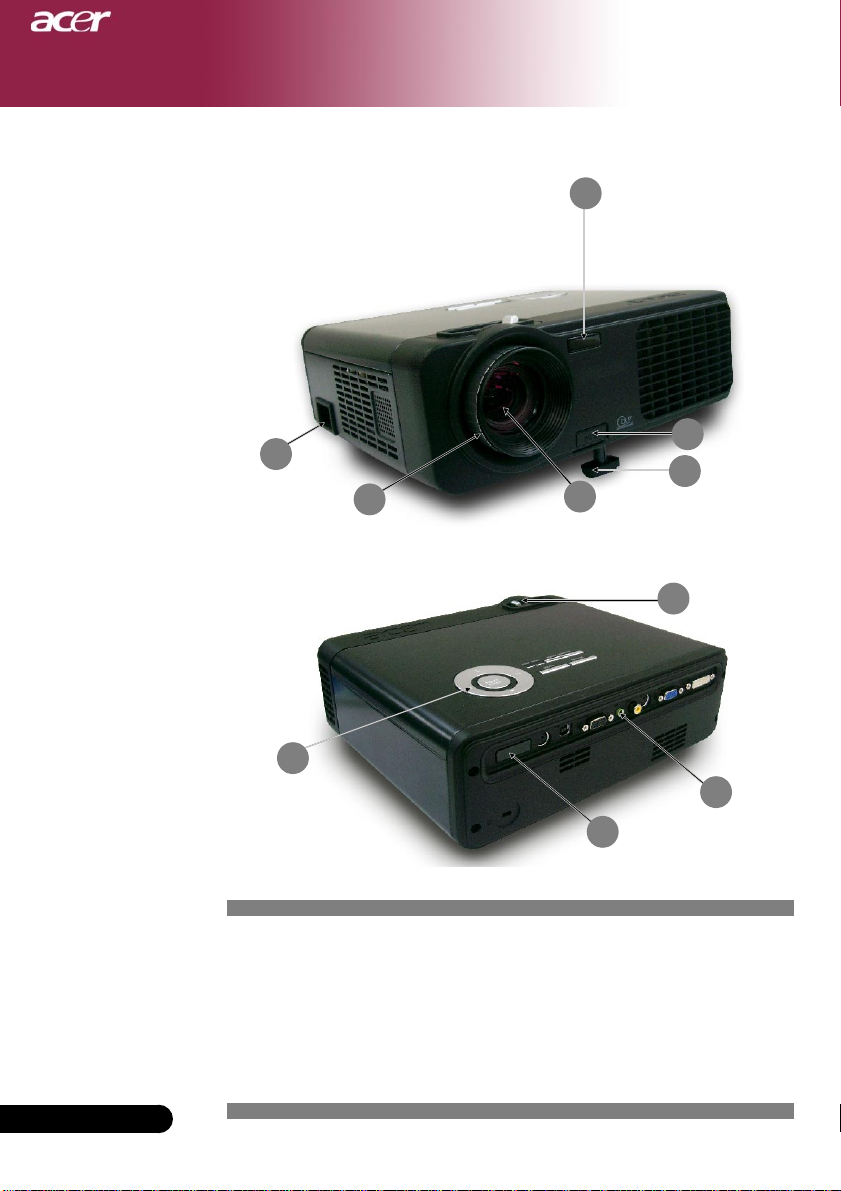
Main Unit
8
9
6
4
5
1
3
2
7
English ...
6
1. Focus Ring
2. Zoom Ring
3. Zoom Lens
4. Elevator Button
5. Elevator Foot
6. Remote Control Receiver
7. Connection Ports
8. Power Socket
9. Control Panel
6
Page 7
Control Panel
Introduction
1 2 3
6
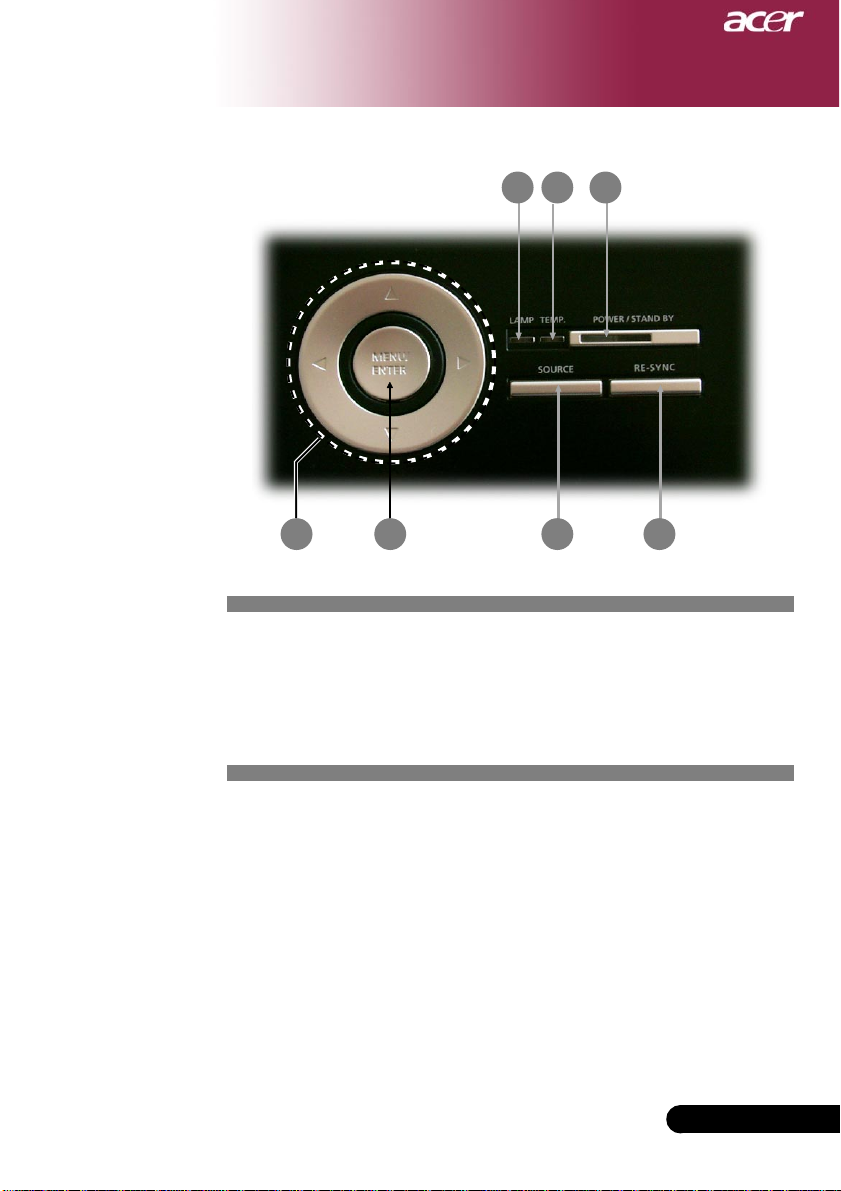
1. Lamp Indicator LED
2. Temp Indicator LED
3. Power/Standby and Indicator LED (Power LED)
4. Source
5. Re-Sync
6. Four Directional Select Keys
7. Menu /Enter
7 4 5
... English
7
Page 8
Introduction
Connection Ports
5
8
6
1
2
7
3
4
9
10
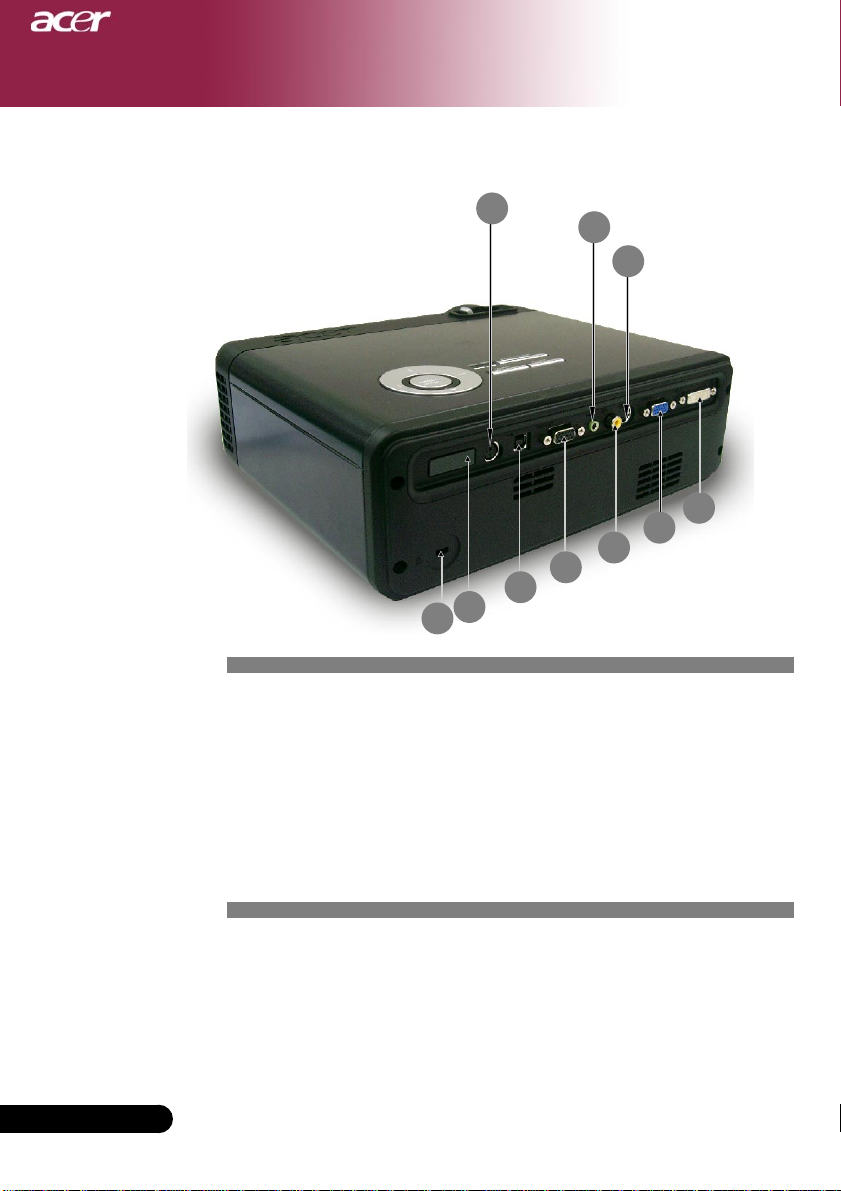
1. DVI-I Input Connector (for Digital singal with HDCP function)
(Optional)
2. PC Analog Signal/HDTV/Component Video Input Connector
3. Monitor Loop-through Output Connector
4. USB Connector
5. RS232 Connector
6. S-Video Input Connector
7. Composite Video Input Connector
8. Audio Input Connector
9. Remote Control Receiver
10. Kensington
TM
Lock Port
English ...
8
Page 9
Introduction
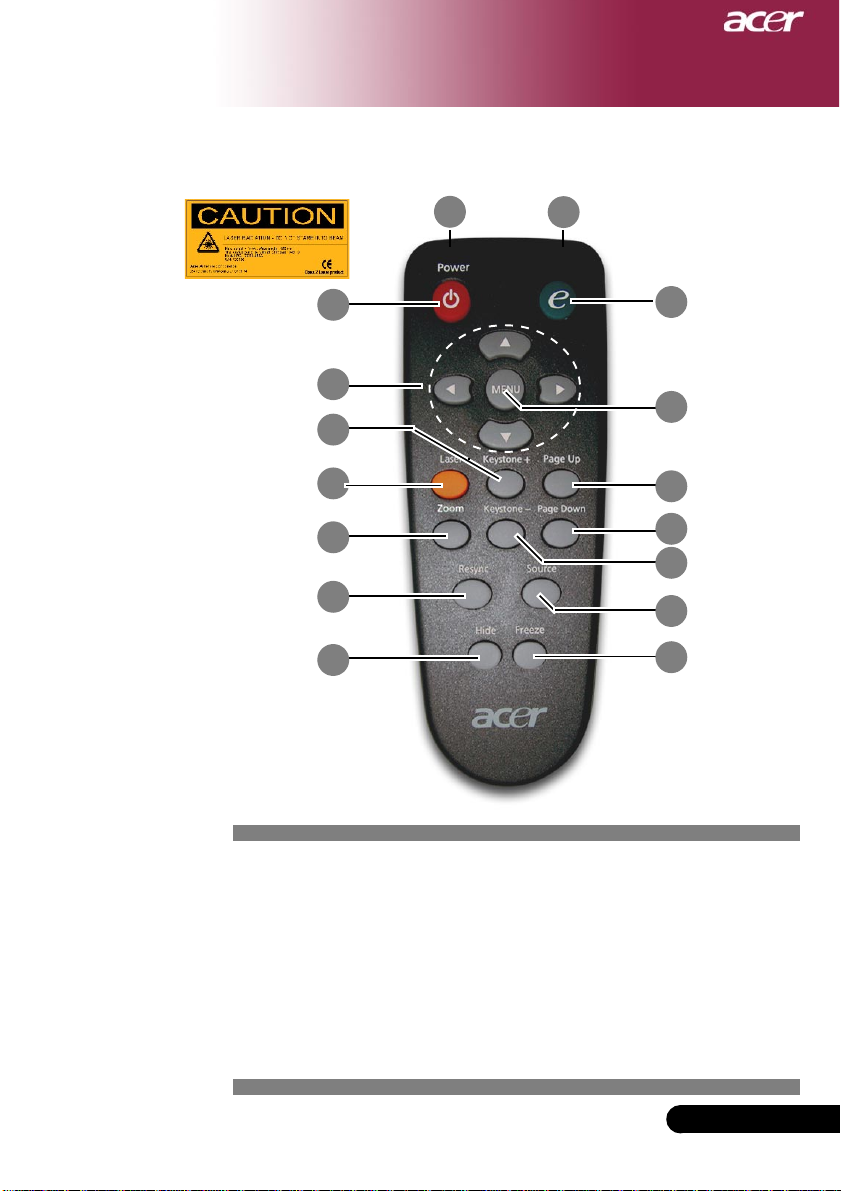
Remote Control with Laser Pointer
2
5
8
6
7
12
13
16
1
3
4
10
11
9
14
15
1. Transmit Indicator Light
2. Power
3. Empowering Key
4. Menu
5. Four Directional Select Keys
6. Laser Button
7. Zoom
8. Keystone +
9. Keystone -
10. Page Up
11. Page Down
12. Re-Sync
13. Hide
14. Source
15. Freeze
16. Laser Pointer
... English
9
Page 10
Installation
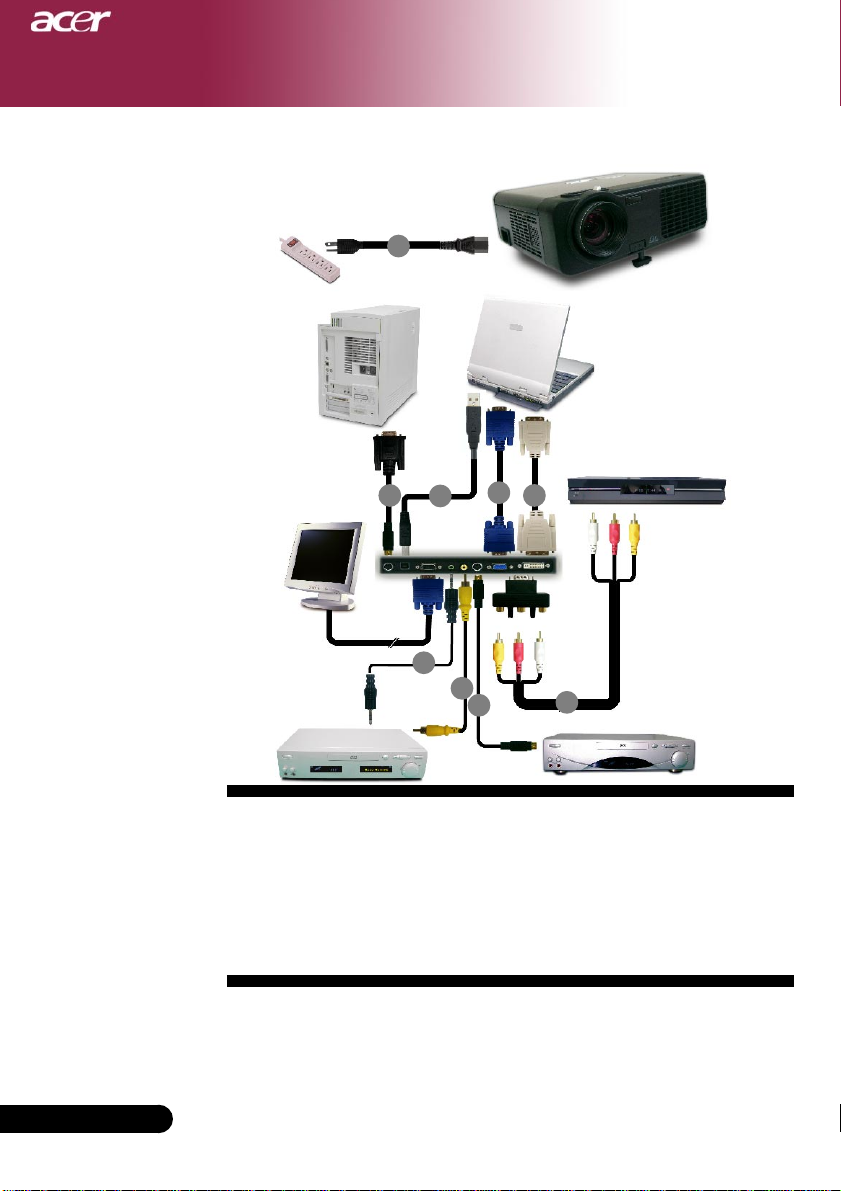
Connecting the Projector
1
USB
DVIRGB
RS232
2
8
4
7
3
Video Output
1..................................................................................................................... Power Cord
2....................................................................................................................... VGA Cable
3.................................................................................................. Composite Video Cable
4........................................................................................................................ USB Cable
5........................................................................... VGA to Component/HDTV Adapter
6.................................................................................................................. S-Video Cable
7.................................................................................................... Audio Cable Jack/Jack
8............................................................................. RS232 Cable (Optional Accessory)
9 ................................................................................... DVI Cabl e (O pti ona l Accessory)
9
6
DVD Player,
Settop Box,
HDTV receiver
5
S-Video Output
To ensur e the projector works well with your computer, please set the
display mode of your graphic card less than or equal to 1024 X 768
resolution. Make sure the timing of the display mode is compatible with the
projector. Refer to the “Compatibility Modes” section on page 34.
English ...
10
Page 11
Installation
Powering On/Off the Projector
Powering On the Projector
1. Remove the lens cap.
2. Ensure that the power cord and signal cable are securely
connected. The Power LED will flash green.
3. Turn on the lamp by pressing “Power/Standby” button on the
control panel.nAnd the Power LED will turn green.
4. Turn on your source (computer, notebook, video player ,etc.). The
projector will detect your source automatically.
If the screen displays “No Signal”, please make sure the signal
cables are securely connected.
If you connect multiple sources at the same time, using the
“Source” button on the remote control or control panel to
switch.
Turn on the projector
first and then the signal
sources.
1
Power/Standby
... English
11
Page 12

Installation
Powering Off the Projector
1. Press the “Power/Standby” button to turn off the projector lamp,
you will see a message “Please press power button again to
complete the shutdown process. Warning: DO NOT unplug while
the projector fan is still running.” displayed on the projector’s
screen. Press the “Power/Standby” button again to confirm,
otherwise the message will disappear after 5 seconds.
2. The cooling fans continue to operate for about 60 seconds for
cooling cycle and the Power LED will keep green. When the
Power LED begins flashing, the projector has entered standby
mode.
If you wish to turn the projector back on, you must wait until the
projector has completed the cooling cycle and has entered
standby mode. Once in standby mode, simply press “Power/
Standby” button to restart the projector.
3. Disconnect the power cord from the electrical outlet and the
projector.
4. Do not turn on the projector immediately following a power off
procedure.
W arning Indicator
English ...
When the “LAMP” indicator lights solid red, the projector will
automatically shut itself down. Please contact your local reseller
or service center.
When the “TEMP” indicator lights solid red for about 20 seconds,
it indicates the projector has been overheated. You will see a
message “Projector Overheated. Lamp will automatically turn off
soon.” on the on-screen display. The projector will automatically
shut itself down.
Under normal conditions, the projector can be switched on again
after it has cooled down. If the problem persists, you should
contact your local dealer or our service center.
When the “TEMP” indicator flashs red for about 10 seconds, you
will see a message “Fan fail. Lamp will automatically turn off
soon.” on the on-screen display. Please contact your local dealer
or our service center.
12
Page 13
Installation
Adjusting the Projected Image
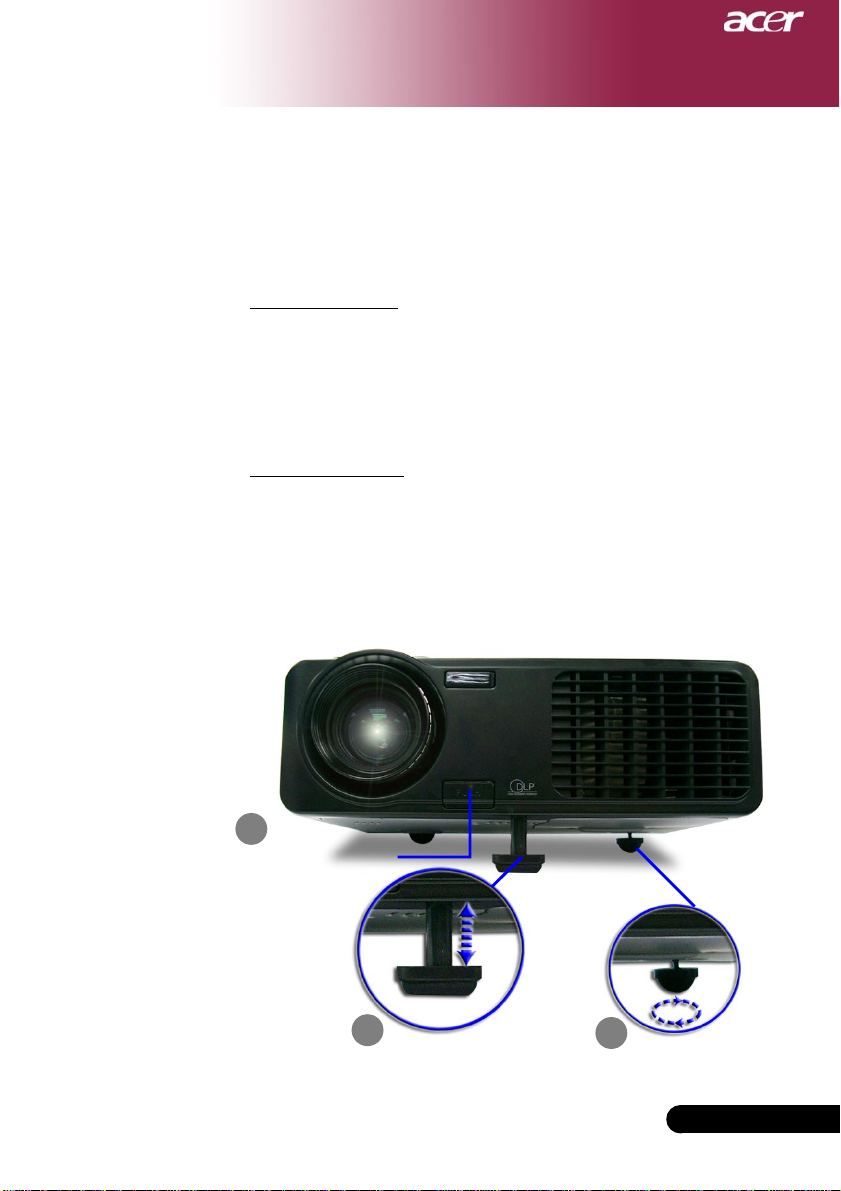
Adjusting the Projector Image Height
The projector is equipped with an elevator foot for adjusting the image height.
To raise the image:
1. Press the elevator button n.
2. Raise the image to the desired height angle o, then relea se
the button to lock the elevator foot into position.
3. Use p to fine-tune the display angle.
To lower the image:
1. Press the elevator button.
2. Lower the image, then release the button to lock the elevator
foot into position.
3. Use p to fine-tune the display angle.
1
Elevator Button
2
Elevator Foot
3
Tilt Adjusting Wheel
... English
13
Page 14
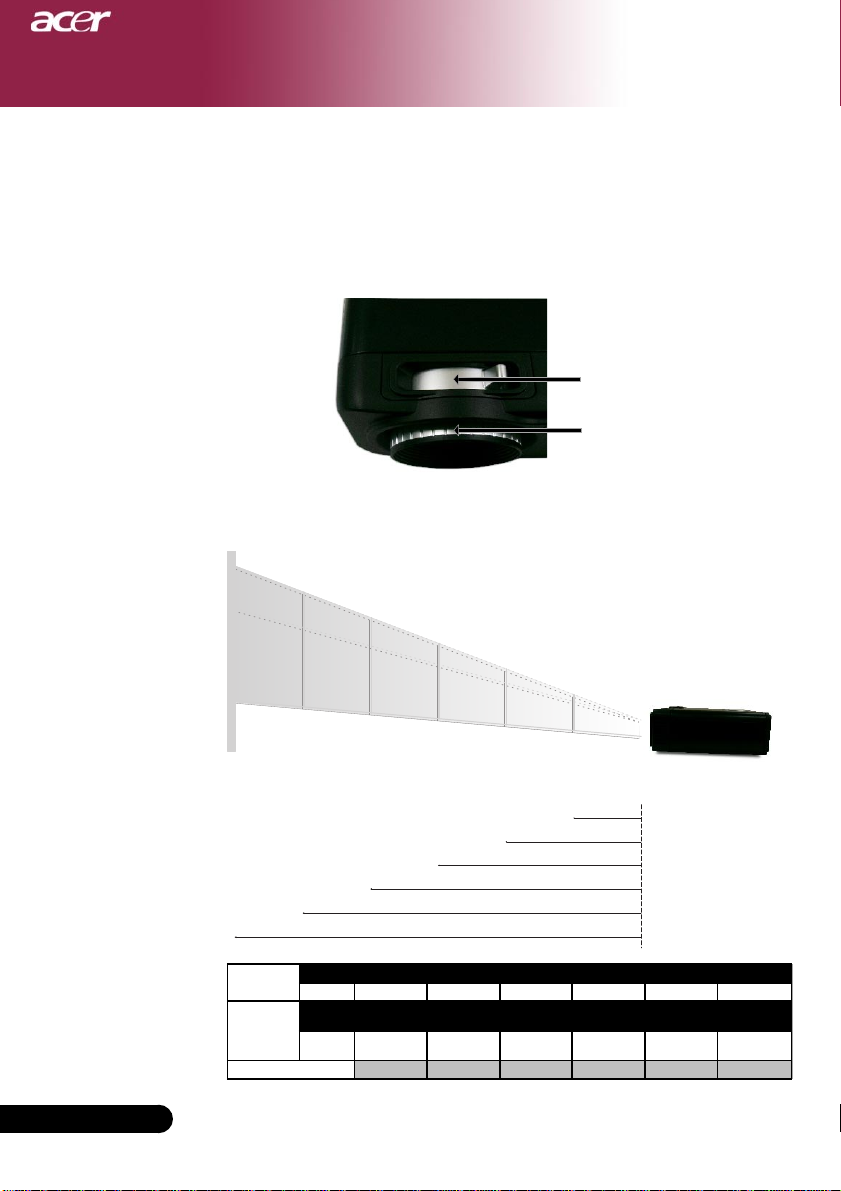
Max. 29.5"(75.0cm) 73.8"(187.5cm) 123.0"(312.5cm) 172.2"(437.5cm) 196.9"(500.0cm) 246.1"(625.0cm)
Min. 24.6"(62.5cm) 61.5"(156.3cm) 102.5"(260.4cm) 143.5"(364.6cm) 164.0"(416.7cm) 205.1"(520.8cm)
Max.(WxH)
23.60" x 17.70"
(60.0 x 45.0cm)
59.04" x 44.28"
(150.0 x 112.5cm)
98.40" x 73.80"
(250.0 x 187.5cm)
137.76" x 103.32"
(350.0 x 262.5cm)
157.52" x 118.14"
(400.0 x 300.0cm)
196.88" x 147.66"
(500.0 x 375.0cm)
Min.(WxH)
19.68" x 14.76"
(50.0 x 37.5cm)
49.20" x 36.90"
(125.0 x 93.8cm)
82.00" x 61.50"
(208.3 x 156.2cm)
114.80" x 86.10"
(291.7 x 218.8cm)
131.20" x 98.40"
(333.4 x 250.0cm)
164.08" x 123.06"
(416.6 x 312.5cm)
3.94'(1.2m) 9.84'(3.0m) 16.40'(5.0m) 22.97'(7.0m) 26.25'(8.0m) 32.81'(10.0m)
Installation
Adjusting the Projector Zoom / Focus
Y ou may turn the zoom ring to zoom in or out. To focus the image, rotate
the focus ring until the image is clear. The projector will focus at distances from 3.9 to 32.8 feet (1.2 to 10.0 meters).
Adjusting Projection Image Size
246.1"(625.0cm)
196.9"(500.0cm)
205.1"
(520.8cm)
164.0"
(416.7cm)
172.2"(437.5cm)
123.0"(312.5cm)
143.5"
(364.6cm)
102.5"
(260.4cm)
73.8"(187.5cm)
61.5"
(156.3cm)
29.5" (75.0cm)
24.6"
(62.5cm)
Zoom Ring
Foctus Ring
Screen
(Diagonal)
Screen Size
14
English ...
Distance
This graph is for user’s reference only.
3.94'
9.84'
16.40'
22.97'
26.25'
32.81'
(1.2m)
(3.0m)
(5.0m)
(7.0m)
(8.0m)
(10.0m)
Page 15
User Controls
Control Panel & Remote Control
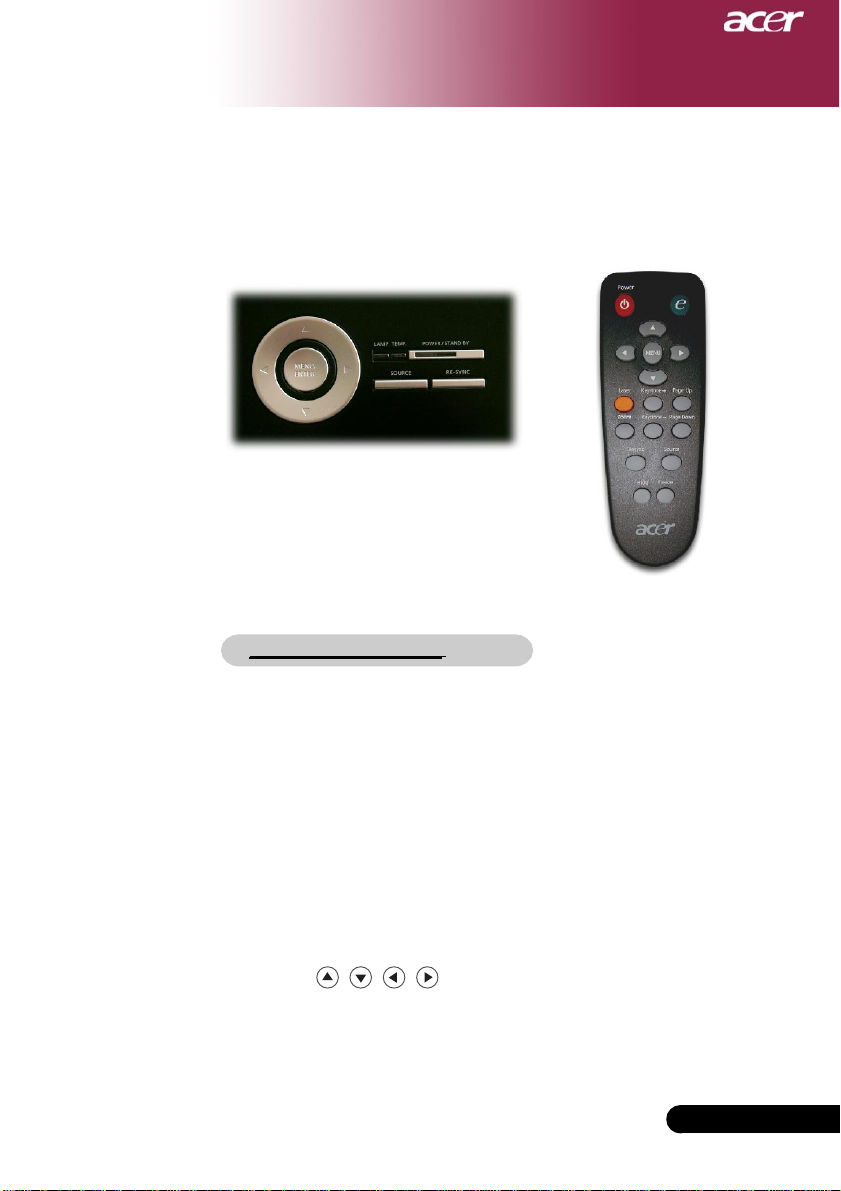
There are two ways for you to control the functions: Remote
Control and Control Panel.
Remote ControlControl Panel
Using the Control Panel
Power/Standby
Refer to the “Power On/Off the Projector” section on pages
4
11-12.
Source
Press “Source” to choose RGB, Component-p, Component-i,
4
S-Video, Composite, DVI-D (Optional), V ideo and HDTV
sources.
Menu / Enter
Press “Menu/Enter” to launch the on screen display (OSD)
4
menu. To exit OSD, press “Menu” again.
Confirm your selection of items.
4
Four Directional Select Keys
Use to select items or make adjustments to
4
your selection.
... English
15
Page 16
User Controls
Using the Remote Control
Power
Refer to the “Power On/Off the Projector” section on pages
4
11-12.
Empowering Key
Display the “Display Mode” submenu of the onscreen display
4
menu to select display mode from PC, Vedio, Theatre and User
directly.
Menu
Press “Menu” to launch the on screen display menu. To exit
4
OSD, press “Menu” again.
Four Directional Select Keys
Use to select items or make adjustments to
4
your selection.
Laser Button
Aim the remote at the viewing screen, press and hold this
4
button to activate the laser pointer.
Zoom
Zoom in / out
4
Keystone + / -
Adjusts image distortion caused by tilting the projector (±16
4
degrees).
Page Up (Computer mode only)
Use this button to page up. This function is only available
4
when the projector is connected to a computer via an USB cable.
Page Down (Computer mode only)
Use this button to page down. This function is only available
4
when the projector is connected to a computer via an USB cable.
Re-Sync
Automatically synchronizes the projector to the input source.
4
Hide
Momentarily turns off the video. Press “Hide” to hide image,
4
press again to restore display of the image.
Source
Press “Source” to choose RGB, Component-p, Component-i,
4
S-Video, Composite Video , DVI-D (Optional)and HDTV
sources.
Freeze
Press “Freeze” to pause the screen image.
4
English ...
16
Page 17
User Controls
On Screen Display Menus
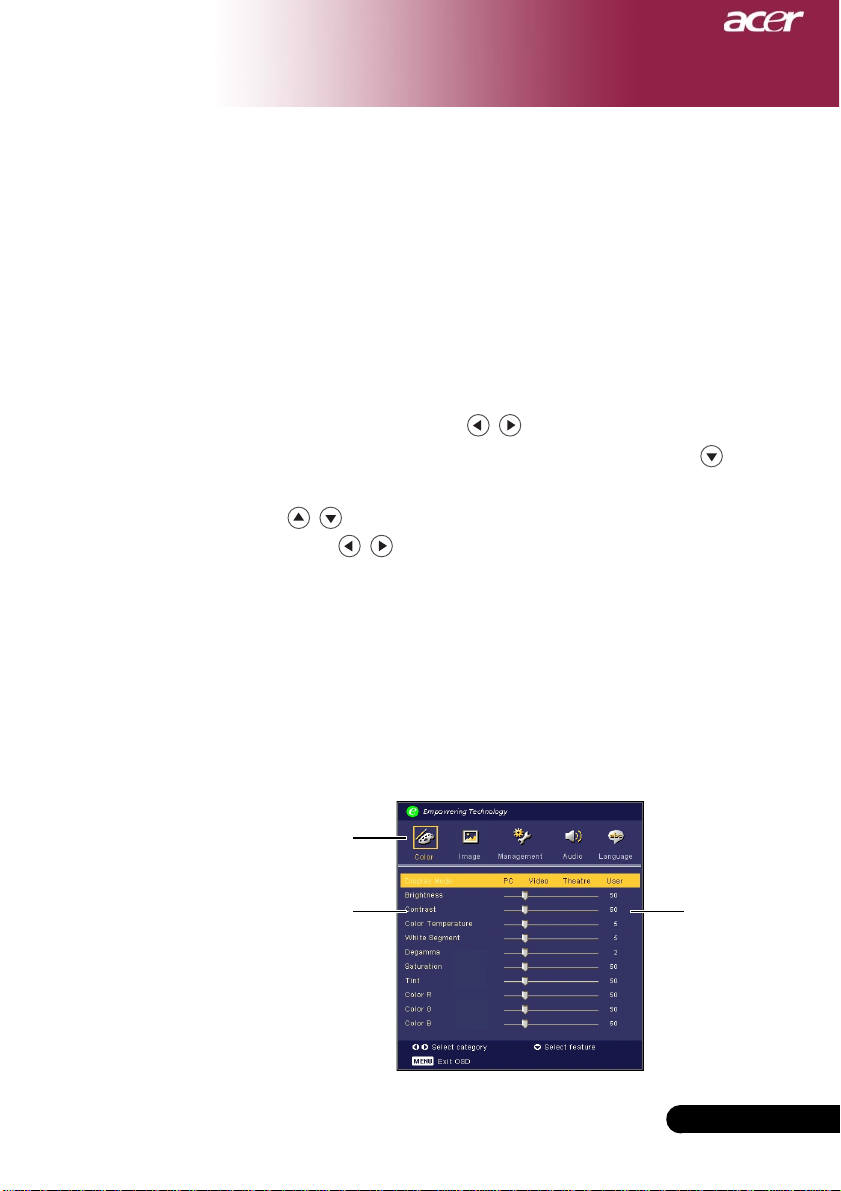
The Projector has multilingual On Screen Display menus
that allow you to make image adjustments and change a
variety of settings. The projector will automatically detect
the source.
How to operate
1. To open the OSD menu, press “Menu” on the Remote
Control or press “Menu/Enter”on the Control Panel.
2. When OSD is displayed, use keys to select any item in the
main menu. After selecting the desired main menu item, press
to enter sub menu for feature setting.
3. Use keys to select the desired item and adjust the
settings by key.
4. Select the next item to be adjusted in the sub menu and adjust as
described above.
5. Press “Menu” on the Remote Control or press “Menu/Enter”on
the Control Panel, the screen will return to the main menu.
6. To exit OSD, press “Menu” on the Remote Control or press
“Menu/Enter”on the Control Panel again. The OSD menu will
close and the projector will automatically save the new settings.
Main Menu
Sub Menu settings
... English
17
Page 18
User Controls
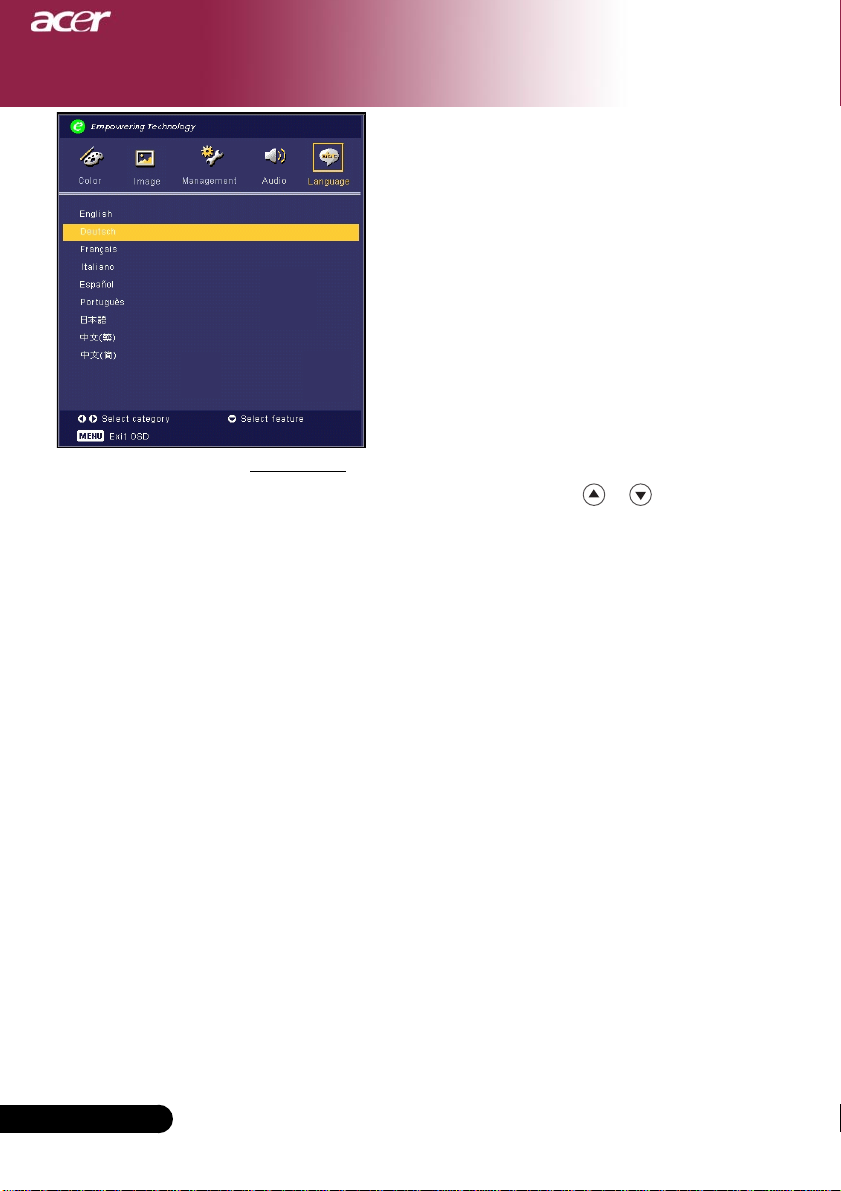
Language
Choose the multilingual OSD menu . Use the or key to select
your prefered language.
Press “Menu” on the Remote Control or press “Menu/Enter”on
the Control Panel to finalize the selection.
Language
(Computer / Video
Mode)
English ...
18
Page 19
User Controls
Color
(Computer / Video
Mode)
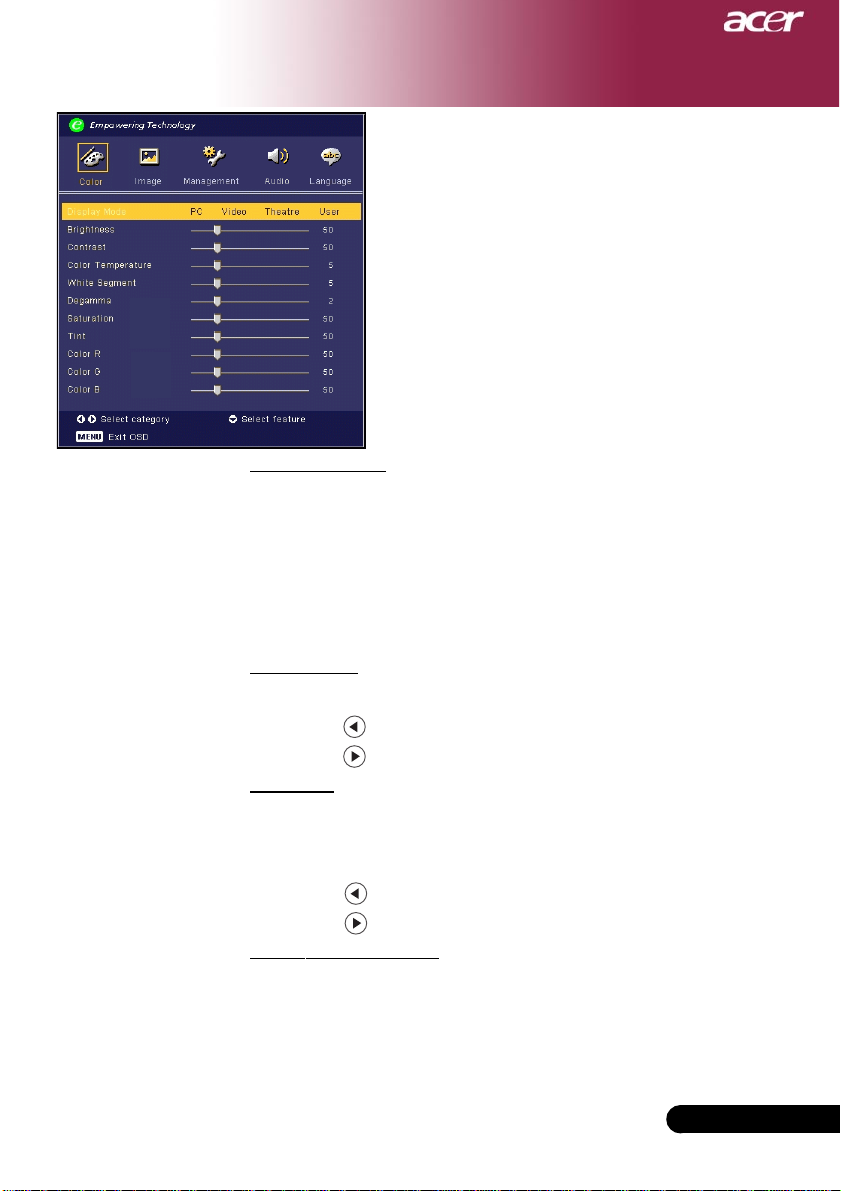
Display Mode
There are many factory presets optimized for various types of
images.
PC : For computer or notebook.
4
Video : For playing video in a bright environment.
4
Theatre : For Home Theatre usage in a dark room.
4
User : Memorize user’s settings.
4
Brightness
Adjust the brightness of the image.
Press the to darken image.
4
Press the to lighten the image.
4
Contrast
The contrast controls the degree of difference between the lightest
and darkest parts of the picture. Adjusting the contrast changes
the amount of black and white in the image.
Press the to decrease the contrast.
4
Press the to increase the contrast.
4
Color Temperature
Adjust the color temperature. At higher temperature, the screen
looks colder; at lower temperature, the screen looks
warmer.
... English
19
Page 20
User Controls
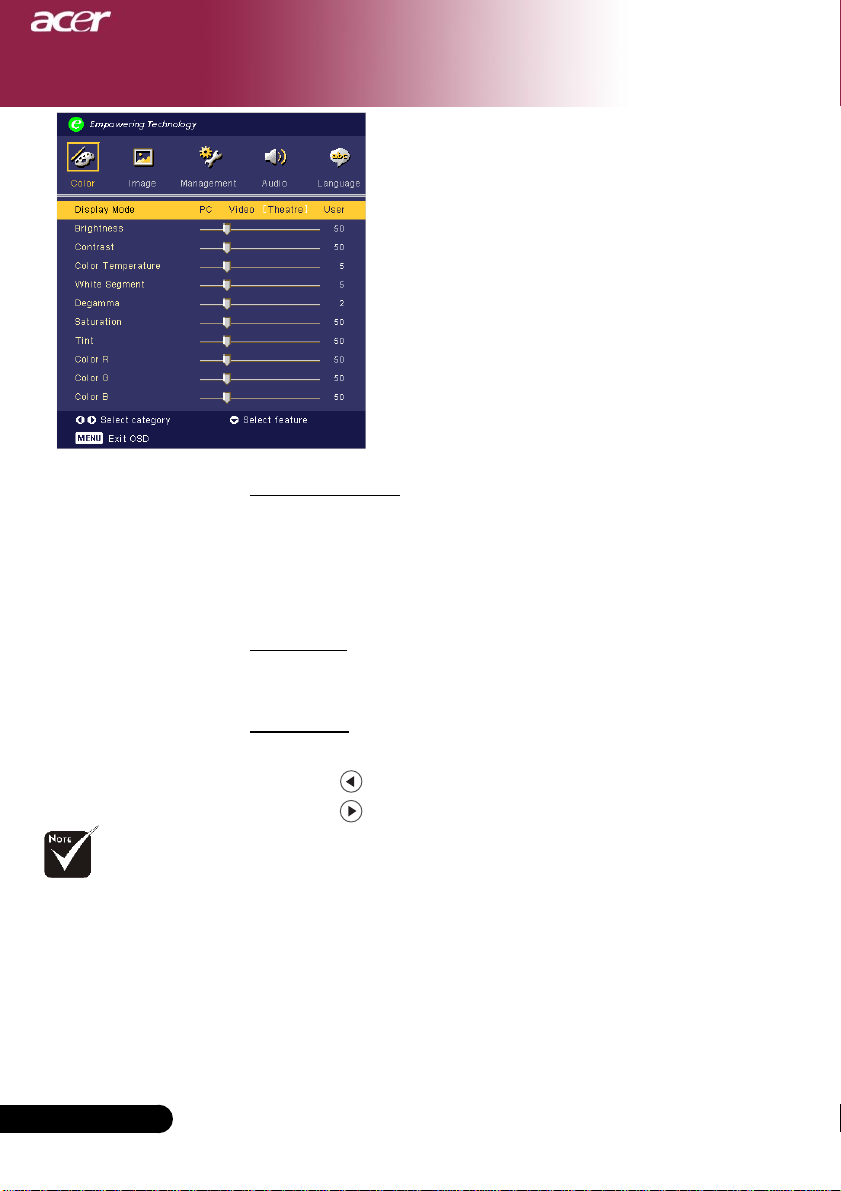
White Segment
Use the white Segment control to set the white peaking level of
DMD chip. 0 stands for minimal segment, and 10 stands for
maximum segment. If you prefer a stronger image, adjust towards
the maximum setting. For a smooth and more natural image, adjust
towards the minimum setting.
Degamma
Effects the represent of dark scenery. With greater gamma value,
dark scenery will look brighter.
Saturation
Adjusts a video image from black and white to fully saturated color.
Press the to decrease the amount of color in the image.
Press the to increase the amount of color in the image.
Color
(Computer / Video
Mode)
“Saturation” and
“Tint” functions are not
supported under
computer mode or DVI
mode.
English ...
20
Page 21
User Controls
Color
(Computer / Video
Mode)
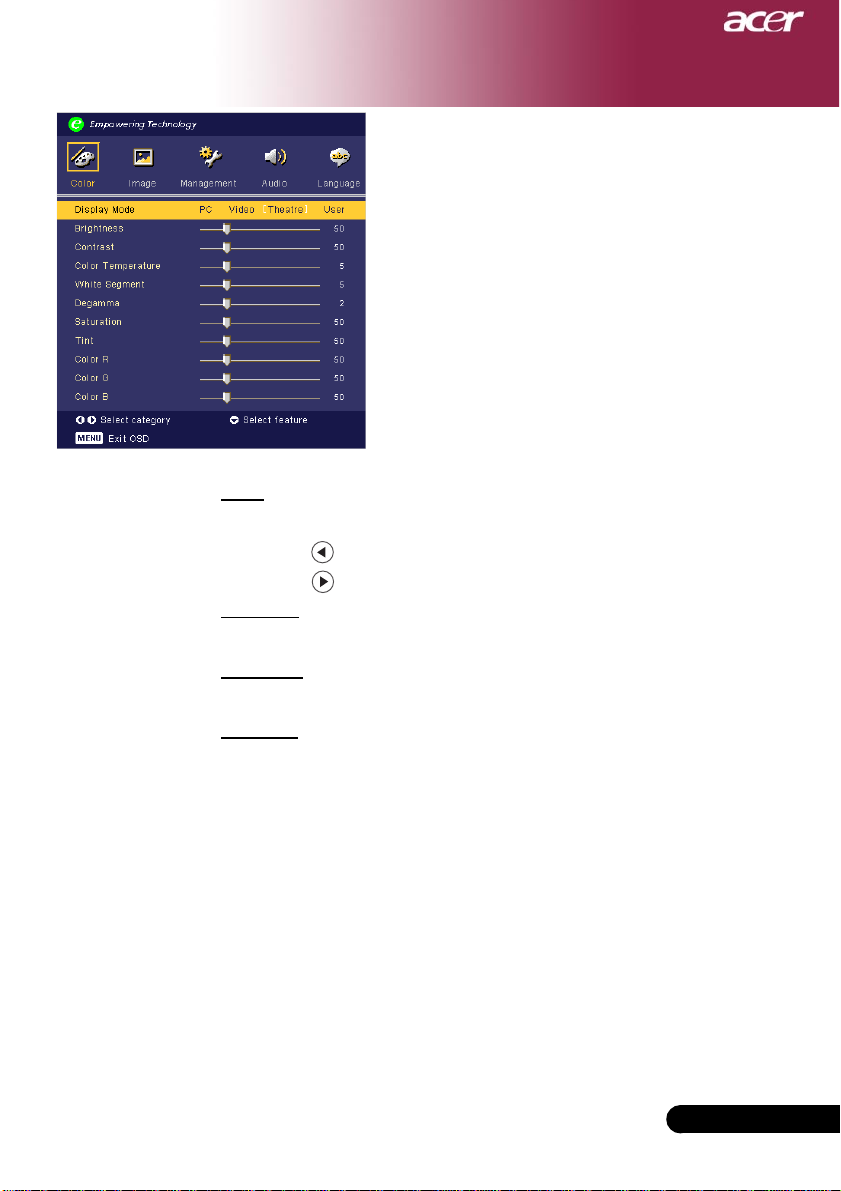
Tint
Adjusts the color bala nce of red and green.
Press the to increase the amount of green in the image.
4
Press the to increase the amount of red in the image.
4
Color R
Adjusts the red color.
Color G
Adjusts the green color.
Color B
Adjusts the blue color.
... English
21
Page 22
User Controls
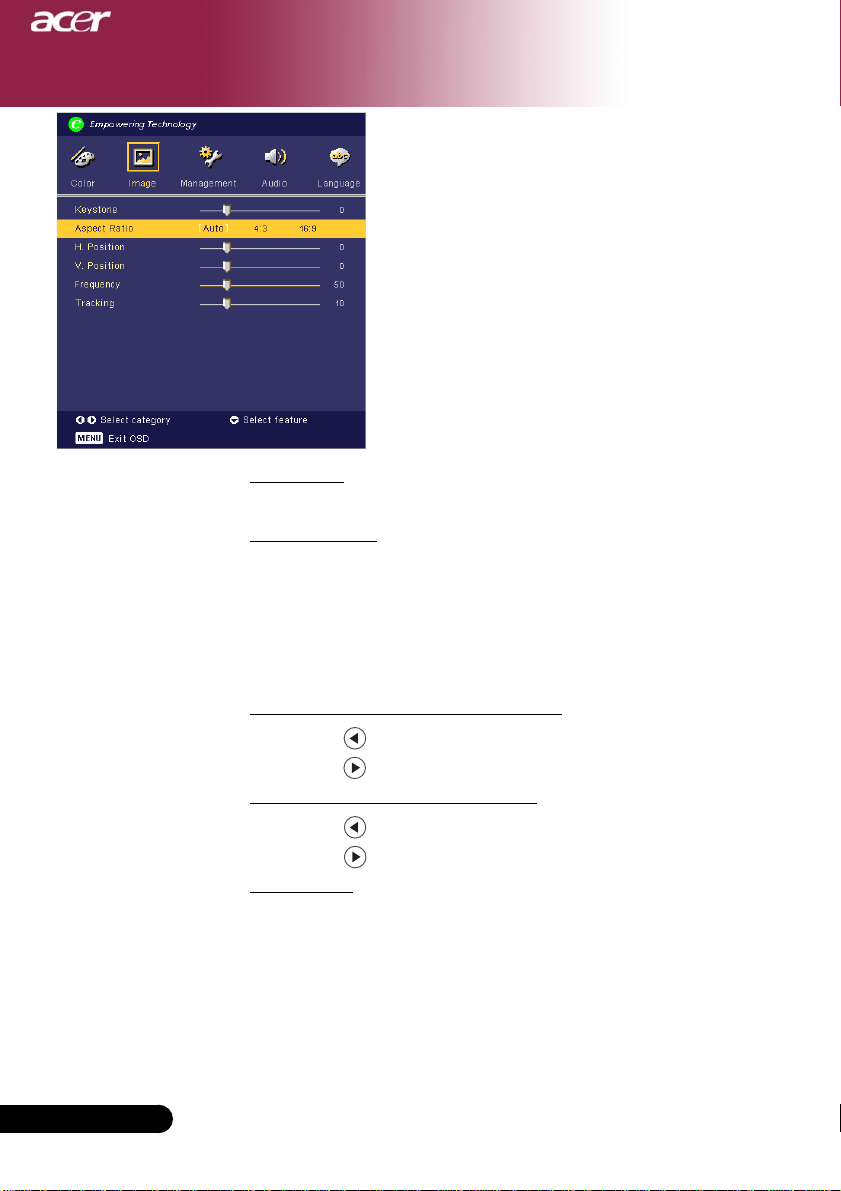
Keystone
Adjust image distortion caused by tilting projection. (±16 degrees)
Aspect Ratio
Use this function to choose your desired aspect ratio.
4:3 : The input source will be scaled to fit the projection screen.
4
16:9 : The input source will be scaled to fit the width of the screen.
4
Auto : Keep the image with original width-higth ratio and maximize the
4
image to fit native horizontal or vertical pixels.
H.Position (Horizontal Position)
Press the to move the image left.
4
Press the to move the image right.
4
V. Position (Vertical Position)
Press the to move the image down.
4
Press the to move the image up.
4
Frequency
“Frequency”changes the display data frequency to match the
frequency of your computer’s graphic card. If you experience a
vertical flickering bar, use this function to make an adjustment.
Image
(Computer / Video
Mode)
English ...
22
Page 23
User Controls
Image
(Computer / Video
Mode)
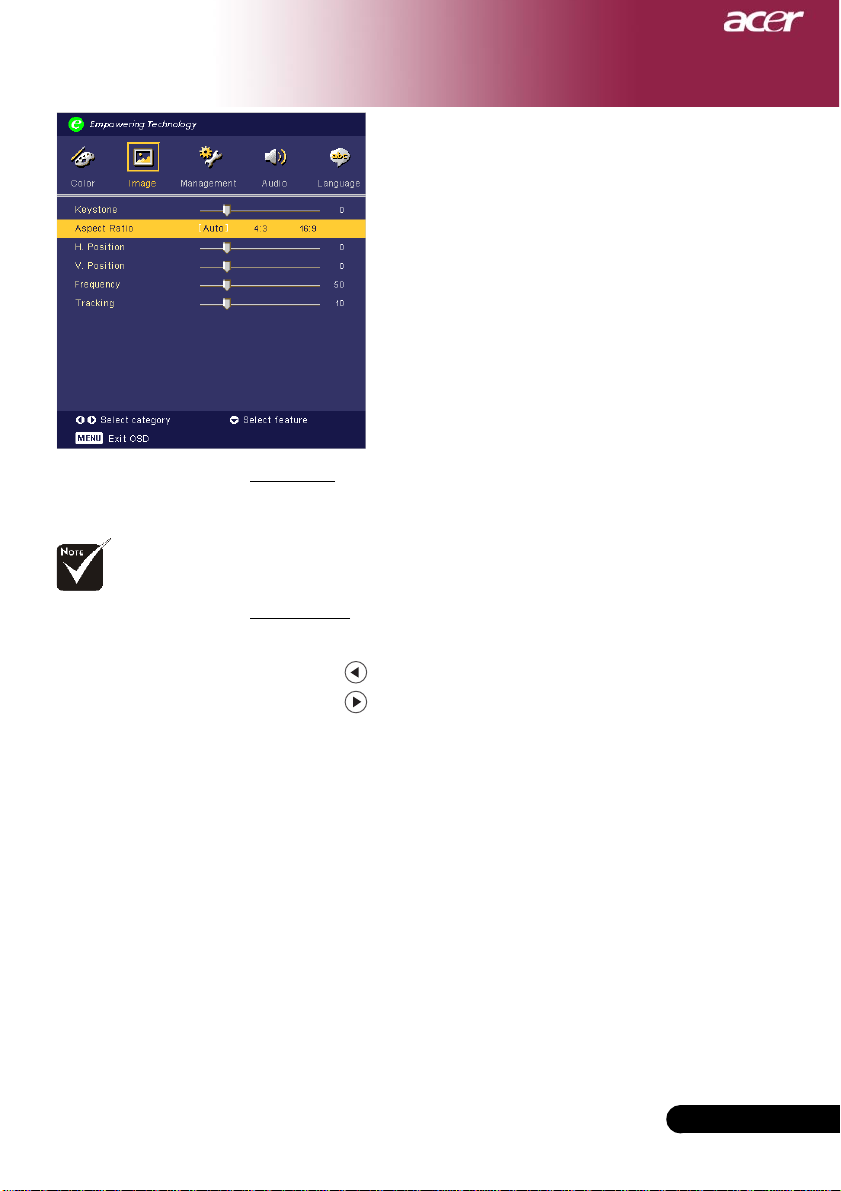
Tracking
“Tracking” synchronizes the signal timing of the display with the
graphic card. If you experience an unstable or flickering image, use
this function to correct it.
“Sharpness” functions
is not supported under
DVI mode.
Sharpness
Adjusts the sharpness of the image.
Press the to decrease the sharpness.
4
Press the to increase the sharpness.
4
... English
23
Page 24
User Controls
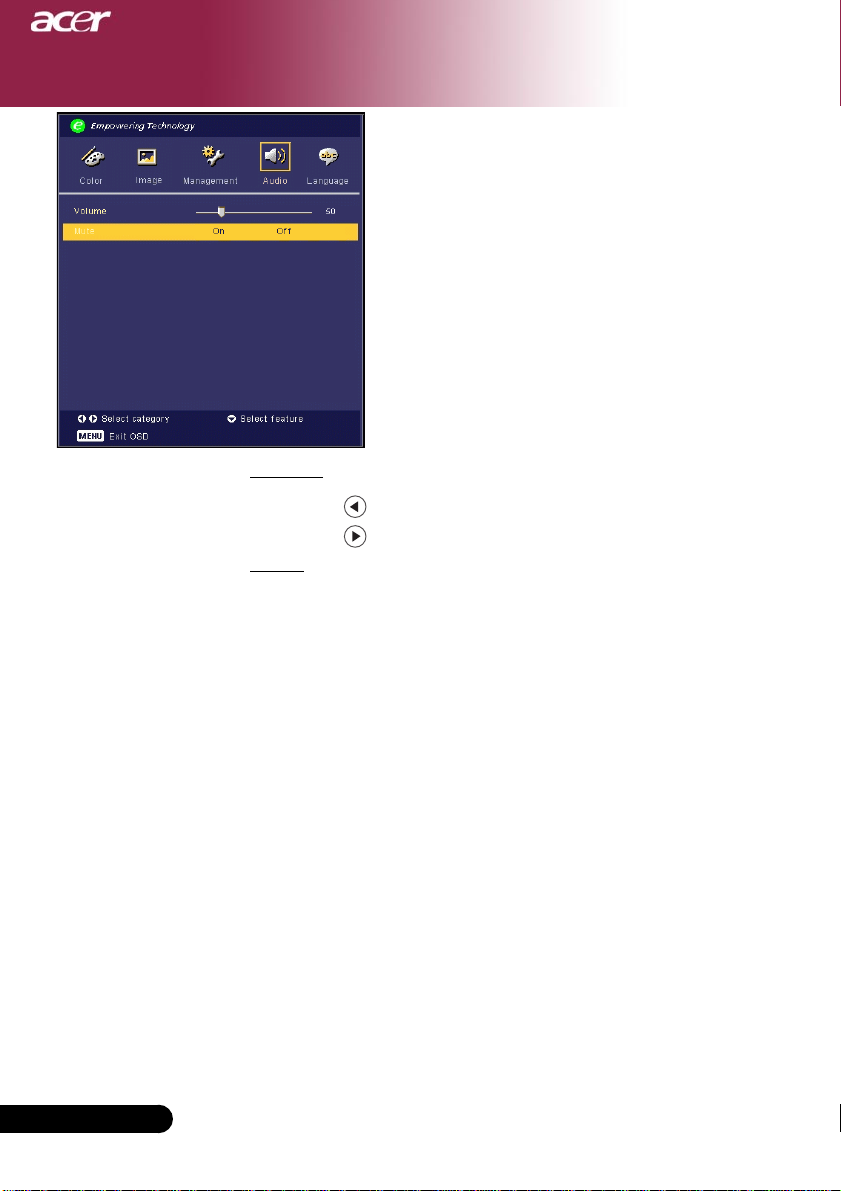
Volume
Press the to decrease the volume.
4
Press the to increase the volume.
4
Mute
Choose the “On” to turn mute on.
4
Choose the “Off” to turn mute off.
4
Audio
(Computer / Video
Mode)
English ...
24
Page 25
User Controls
Management (Computer
/ Video Mode)
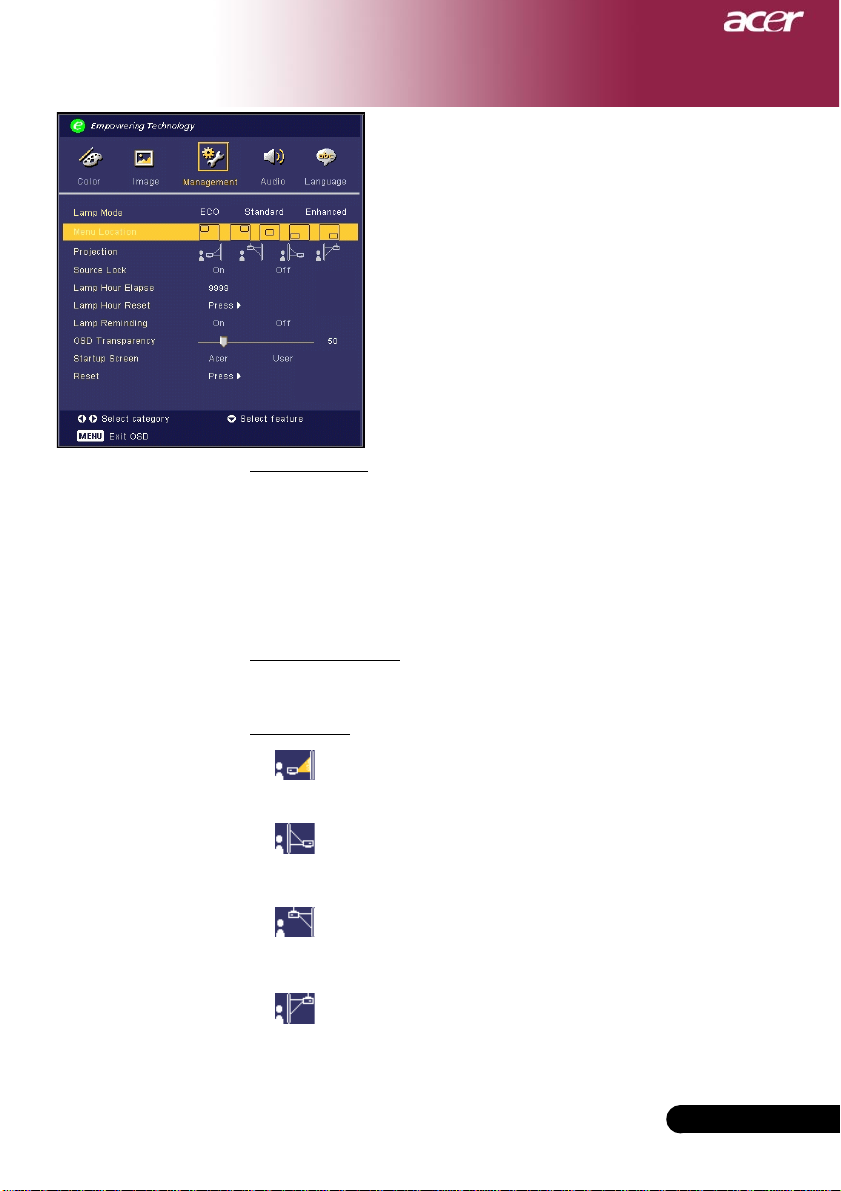
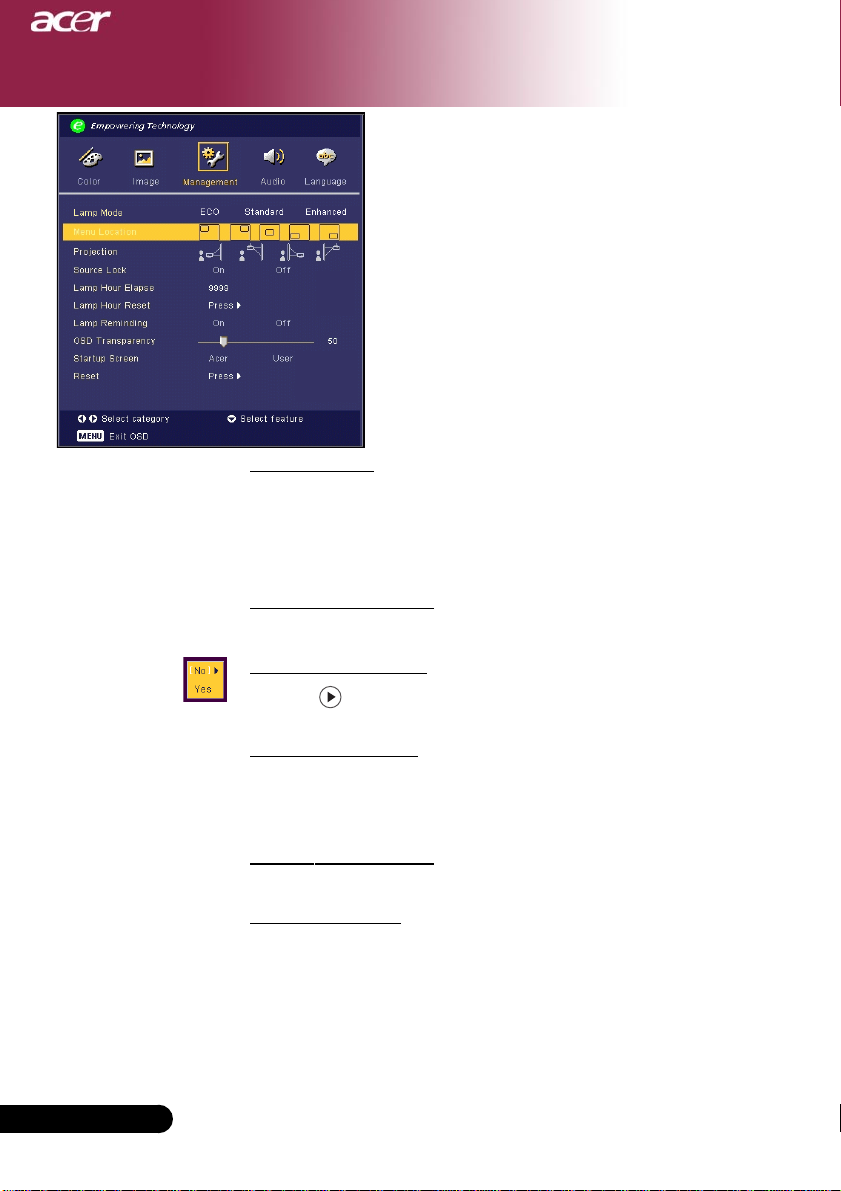
Lamp Mode
ECO : Selecting “ECO” mode to dim the projector Lamp, which lower
4
4
4
Menu Location
power consumption, will extend the lamp life and reduce noise.
Standard : Apply “ Standard “ mode to reurn normal operation.
Enhanced : Choosing “Enhanced ” mode will brighten the projector
Lamp to get a brighter screen.
Choose the Menu location on the display screen.
Projection
4
The factory default setting.
4
When you select this function, the projector reverses the image
so you can project behind a translucent screen.
4
When you select this function, the projector turns the image
upside down for ceiling-mounted projection.
4
When you select this function, the projector reverses and turns
the image upside down at same time. You can project from
behind a translucent screen with ceiling mounted projection.
Front-Desktop
Rear-Desktop
Front-Ceiling
Rear-Ceiling
... English
25
Page 26
English ...
User Controls
Management (Computer
/ Video Mode)
Source Lock
When source lock is turned off, the projector will search for other signals if
the current input signal is lost. When source lock is turned on, it will
“Lock” the current source channel when you press “Source” button on
remote control for next channel.
Lamp Hour Elapse
Displays the lamp’s elapsed operating time (in hours).
Lamp Hour Reset
Press the button after choosing “Yes ”to turn the lamp hour
counter to 0 hours.
Lamp Reminding
Choose this function to show or to hide warning message when the
changing lamp message is displayed. The message will show up 30
hours before end of life.
OSD Transparency
Adjusts the OSD’s transparency.
Start-up Screen
Use this function to slect your desired start-up screen. If you
change the setting from one to another, when you exit the OSD menu, the
new setting will take effect.
4 Acer : The default start-up screen of Acer projector.
4 User : The user customized start-up scren, which is down loaded
from PC to projector via the USB cable and My Start-up Screen utility
(refer to the description of below section).
26
Page 27
User Controls
Management (Computer
/ Video Mode)
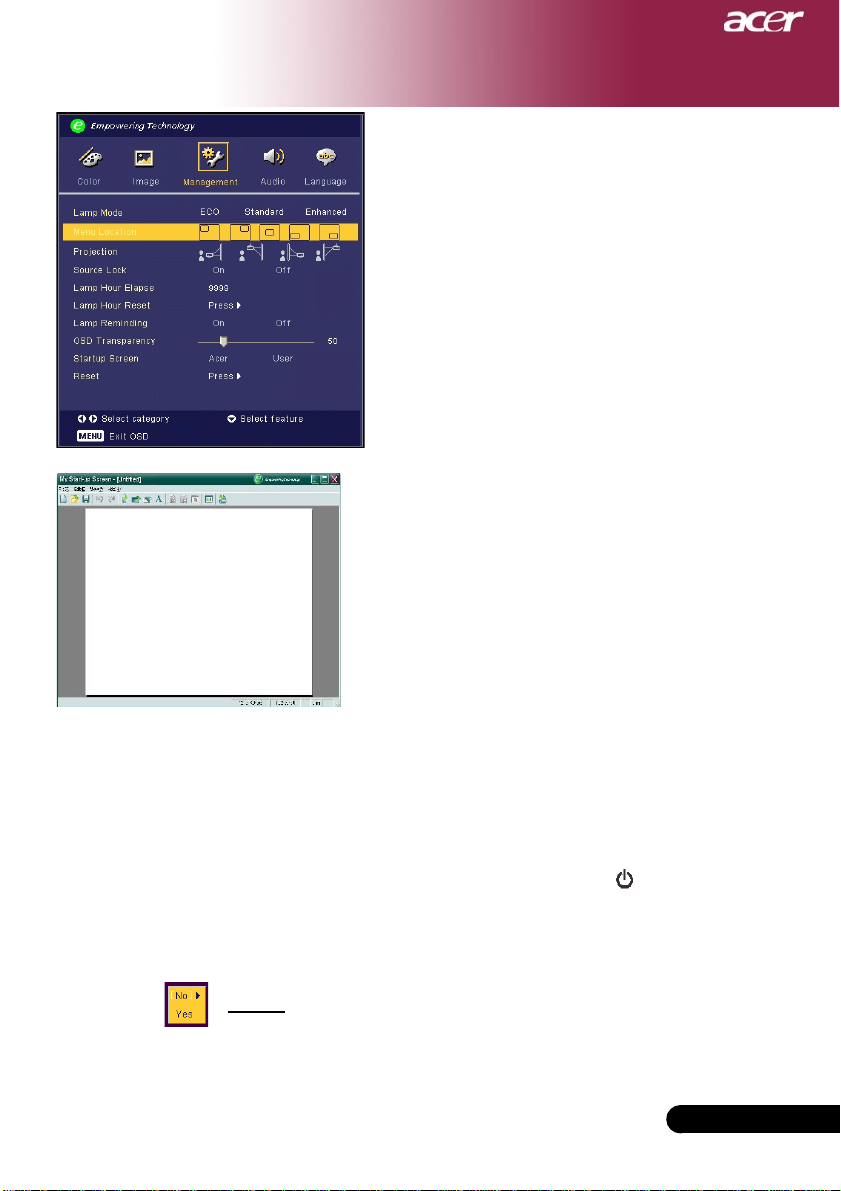
Acer My Start-up Screen is a PC utility for user to
change the default start-up screen of Acer projector
to their desired i mage. You can install My Start-up
Screen from the bundled CD. Connect the projector to
your PC with the bundled USB cable then execute My
Start-up Screen utility to download your desired
image from your PC to projector. Before the download
starts, the projector must enter “Download Mode”
first. Please follow the instruction below to enter “Download Mode”.
1. If the AC power cord of the projector was unplugged, plug the AC
power.
2. If the projector was turned on, press power button twice to turn off the
projector.
3. Make sure all the fan of projector was shut down and the “Power” LED
is blinking.
4. Press and hold “Menu/Enter” button then press “
5. When “Temp” and “Lamp” LEDs turn on again, release both buttons,
projector enters download mode.
6. Please make sure the USB cable has been plugged and connected to your
projector.
“ button.
Reset
Press the button after choosing "Yes" to return the display parameters on all
menus to the factory default settings.
... English
27
Page 28

Appendices
Troubleshooting
If you experience trouble with the projector, refer to
the following information. If the problem persists, please
contact your local reseller or service center.
Problem: No i mage appears on screen.
Ensure all the cables and power connections are correctly and
4
securely connected as described in the “Installation” section.
Ensure the pins of connectors are not crooked or broken.
4
Check if the projection lamp has been securely installed. Please
4
refer to the “Replacing the lamp” section.
Make sure you have removed the lens cap and the projector is
4
switched on.
Ensure that the “Hide” feature is not enabled.
4
Problem: Partial, scrolling or incorrectly displayed image.
Press the “Re-Sync” button on the Remote Control.
4
If you use a PC:
4
If the resolution of your computer is higher than 1024 x 768.
Follow the steps outlined below to reset the resolution.
For Windows 3.x:
1. In the Windows Program Manager, click the “Windows Setup”
icon in the Main group.
2. Verify that your display resolution setting is less than or equal
to 1024 x 768.
For Windows 95, 98, 2000, XP:
1. Open “My Computer” icon, the “Control Panel” folder, and
then double click on the “Display” icon.
2. Select the “Setting” tab.
3. In the “Desktop Area” you will find the resolution setting.
Verify that the resolution setting is less than or equal to 1024 x
768 resolution.
English ...
If the projector is still not projecting the whole image, you will
also need to change the monitor display you are using. Refer to
the following steps.
4. Follow the above steps 1-2. Click on the “Advanced Properties”
button.
5. Select the “Change” button under the “Monitor” tab .
28
Page 29

Appendices
6. Click on “Show all devices”. Then select “Standard monitor
types” under the “Manufacturers” box ; choose the resolution
mode you need under the “Models” box.
7. Verify that the resolution setting of the monitor display is less
than or equal to 1024 x 768.
If you are using a Notebook PC:
4
1. You are required to implement the above steps of resolution
setting of the computer first.
2. Switch the Notebook PC display to the “external display only”
or “CRT only” mode.
If you experience difficulty in changing resolutions or your
4
monitor freezes, restart all the equipment and the projector.
Problem: The screen of the Notebook or PowerBook computer is not
displaying your presentation.
If you are using a Notebook PC:
4
Some Notebook PCs may deactivate their screens when a second
display device is in use. Refer to your computer’s documentation
for information on how to reactivate the monitor display.
If you are using an Apple PowerBook:
4
In Control Panels, open the PowerBook Display to select Video
Mirroring “On”.
Problem: Image is unstable or flickering
Use “Tracking” to correct it. Refer to page 23.
4
Change the monitor color setting from your computer.
4
Problem: Image has vertical flickering bar
Use “Frequency” to make an adjustment. Refer to page 22.
4
Check and reconfigure the display mode of your graphic card to
4
make it compatible with the product. Refer to page 28.
Problem: Image is out of focus
Adjusts the Focus Ring on the projector lens. Refer to page 14.
4
Make sure the projection screen is between the required distance
4
3.9 to 32.8 feet (1.2 to 10.0 meters) from the projector.
... English
29
Page 30
Appendices
Problem: The image is outstretched when displaying 16:9
DVD.
The projector automatically detects 16:9 DVD and adjusts the aspect
ratio by digitizing to full screen with 4:3 default setting.
If the image is still outstretched, you will also need to adjust the aspect ratio
by referring to the following:
Please select 4:3 aspect ratio type on your DVD player if you are
4
playing a 16:9 DVD.
If you can’t select 4:3 aspect ratio type on your DVD player, please
4
select 4:3 aspect ratio in the on screen menu.
Problem: Image is reversed.
Select “Management” from the OSD and adjust the projection
4
direction. See page 25.
Problem: Lamp burns out or makes a popping sound
When the lamp reaches its end of life, it will burn out and may
4
make a loud popping sound. If this happens, the projector will not
turn on until the lamp module has been replaced. To replace
thelamp, follow the procedures in the “Replacing the Lamp”. See
page 32.
English ...
30
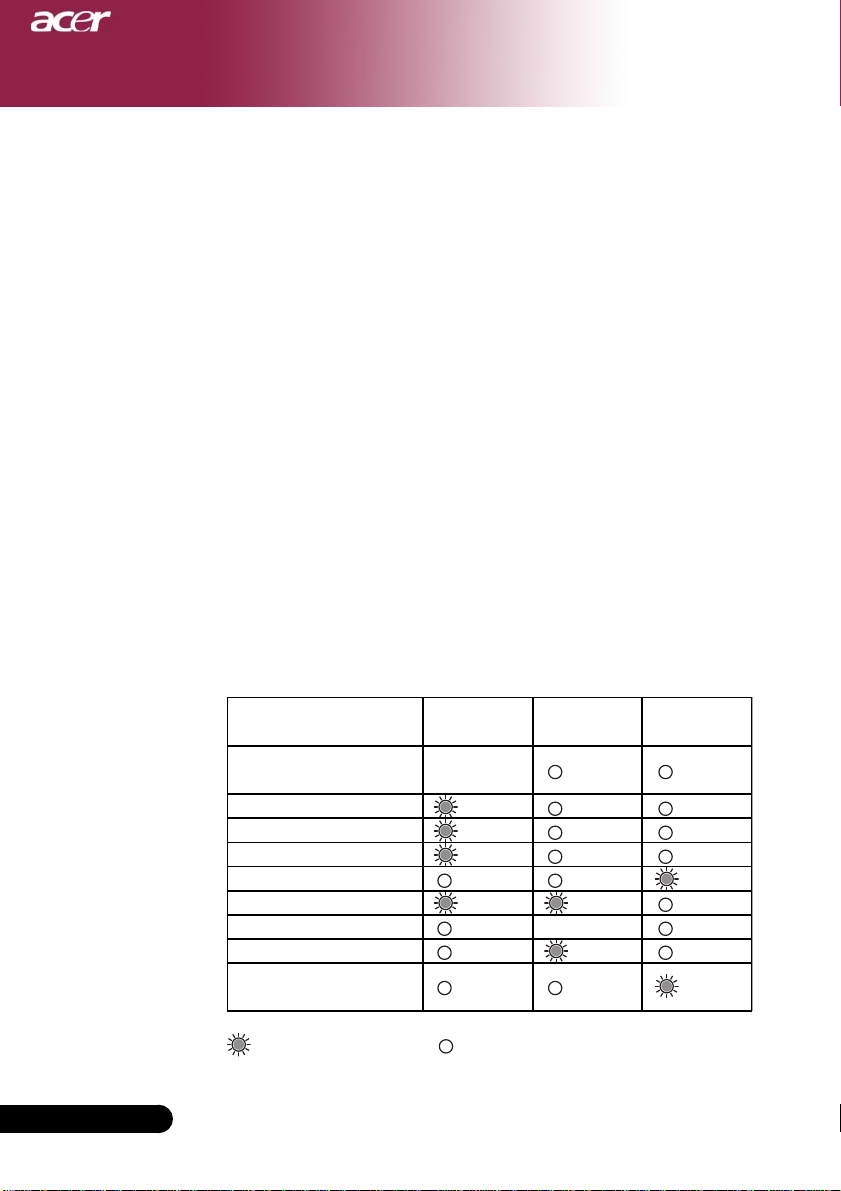
Problem: LED lighting message
Message
Standby State
(Input power cord)
Lamp lighting
Power on
Power off (Cooling)
Error (Lamp fail)
Error (Thermal fail)
Error (Fan lock fail) Flashing
Error (Over Te mp.)
Error
(Lamp Breakdown)
=>Light On =>Light Off
Power LED
Green
Flashing
Temp LED Lamp LED
Page 31

Appendices
Problem: Message Reminders
“Lamp is approaching the end of its useful life in full power operation.
4
Replacement Suggested!” will be shown about 10 seconds when lamp life
is going to deplete.
“Projector Overheated. Lamp will automatically turn off soon.” will be
4
shown when the system temperature is over heat.
“Fan fail. Lamp will automatically turn off soon.” will be shown when the
4
fan is out of order.
... English
31
Page 32
Appendices
Warning: Lamp
compartment is hot!
Allow it to cool down
before changing lamp!
Replacing the lamp
The projector will detect the lamp life itself. It will show you a warning
message “Lamp is approaching the end of its useful life in full power
operation. Replacement Suggested!” When you see this message,
changing the lamp as soon as possible.
Make sure the projector has been cooled down for at least 30 minutes
before changing the lamp.
Warning: To
reduce the risk of
personal injury, do not
drop the lamp module
or touch the lamp bulb.
The bulb may shatter
and cause injury if it is
dropped.
1
3
2
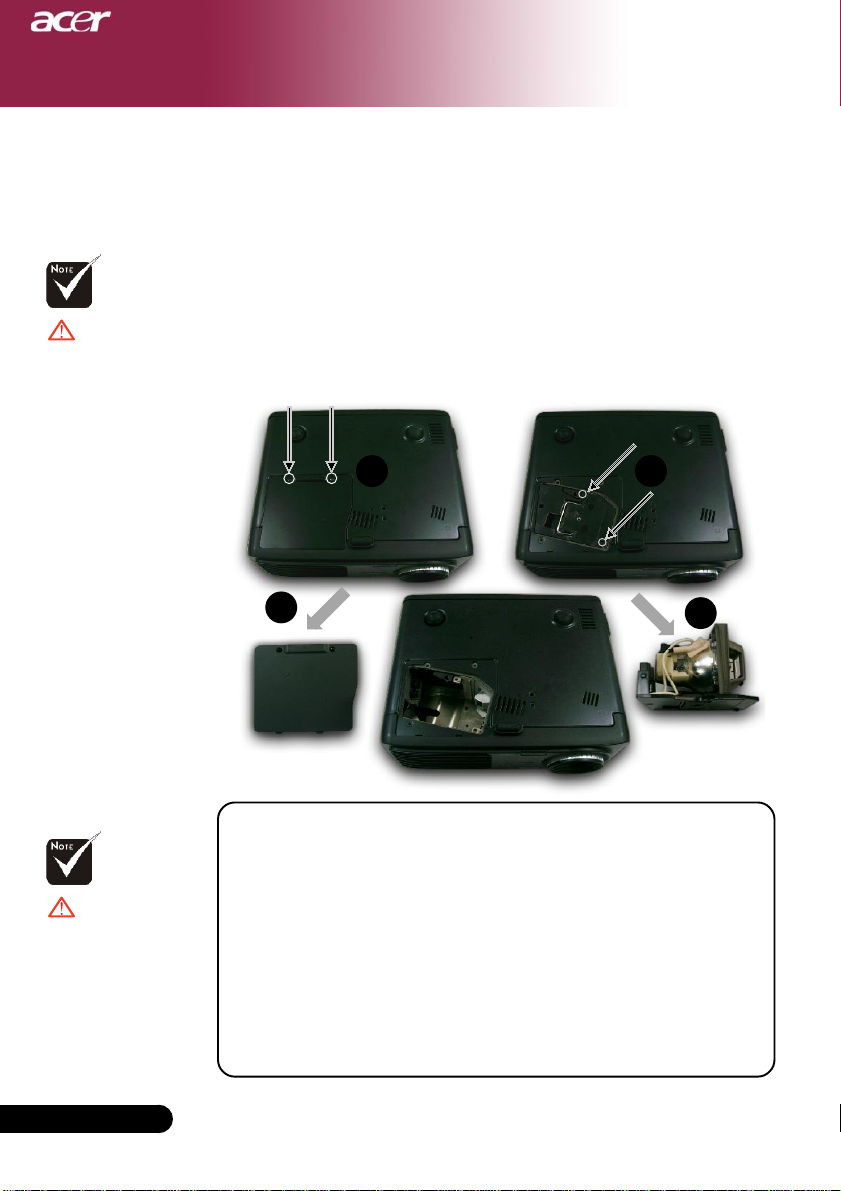
Lamp Changing Procedure:
1. Turn the power off the projector by pressing the Power
button.
2. Allow the projector to cool down at least 30 minutes.
3. Disconnect the power cord.
4. Use a screwdriver to remove the screw from the cover.n
5. Push up and remove the cover.o
6. Remove the 2 screws from the lamp module.p
7. Pull out the lamp module. q
To replace the lamp module, reverse the previous steps.
4
English ...
32
Page 33

Appendices
Specifications
The specs specified below are subject to change without notice. Regarding the final specs, please
refer to Acer accounced marketing specs.
Light V alve - Single Chip DLP
Lamp - 200W User Replaceable Lamp
Number of Pixels - 1024 pixels(H) X 768 lines(V)
Displayable Color - 16.7M colors
Contrast Ratio - 2000:1 (Full On/Full Off)
Uniformity - 85%
Noise Level - 30 dB(A) (standard/enha nced mode)/27 dB(A) (ECO mode)
Projection Lens - F/2.4~2.65 f=28.04~33.59mm with 1.2x Manual zoom lens
Projection Screen Size (Diag.) - 24.6 to 300 inches (0.625 to 7.62 meters) Diagonal
Projection Distance - 3.94 to 40 feet (1.2 to12.2 meters)
Video Compatibility - NTSC3.58/NTSC 4.43/PAL/SECAM and HDTV compatible
- Composite video & S-Video capa bility
H. Frequency - 31.5kHz~100kHz horizontal scan
V. Frequency - 56Hz~85Hz vertical refresh
Power Supply - Universal AC input 100-240V ;Input Frequency 50/60Hz
I/O Connectors - Power: AC power input socket
- VGA Input:
One DVI-I connector for Digital signal with HDCP
(Support for PD125D only)
One 15-pin D-sub for VGA, component and HDTV signal
- VGA Output:
One 15-pin D-sub for VGA output
- Video Input:
One Composite video RCA input
One S-Video input
- USB:One USB connector for remote computer control
- RS232: One RS232 connector for remote project control
- Audio Input: One phone jack for audio input
Weight - 5.4 lbs (2.4kgs)
Dimensions (W x H x D) - 10.9x 4.2 x 9.3 inches (277 x 107 x 237 mm)
Environmental - Operating Temperature: 41~95
Humidity: 80% maximum (Non-condensing)
- Storage Temperature: -4~140oF (-20~60oC)
Humidity: 80% maximum (Non-condensing)
Safety Regulation - FCC Class B, CE Class B, VCCI-II, UL, cUL,
TÜV-GS, C-tick, PSB, PSE, CB Report, CCC
TM
T echnology by Texas Instruments
o
F (5~ 35oC)
... English
33
Page 34
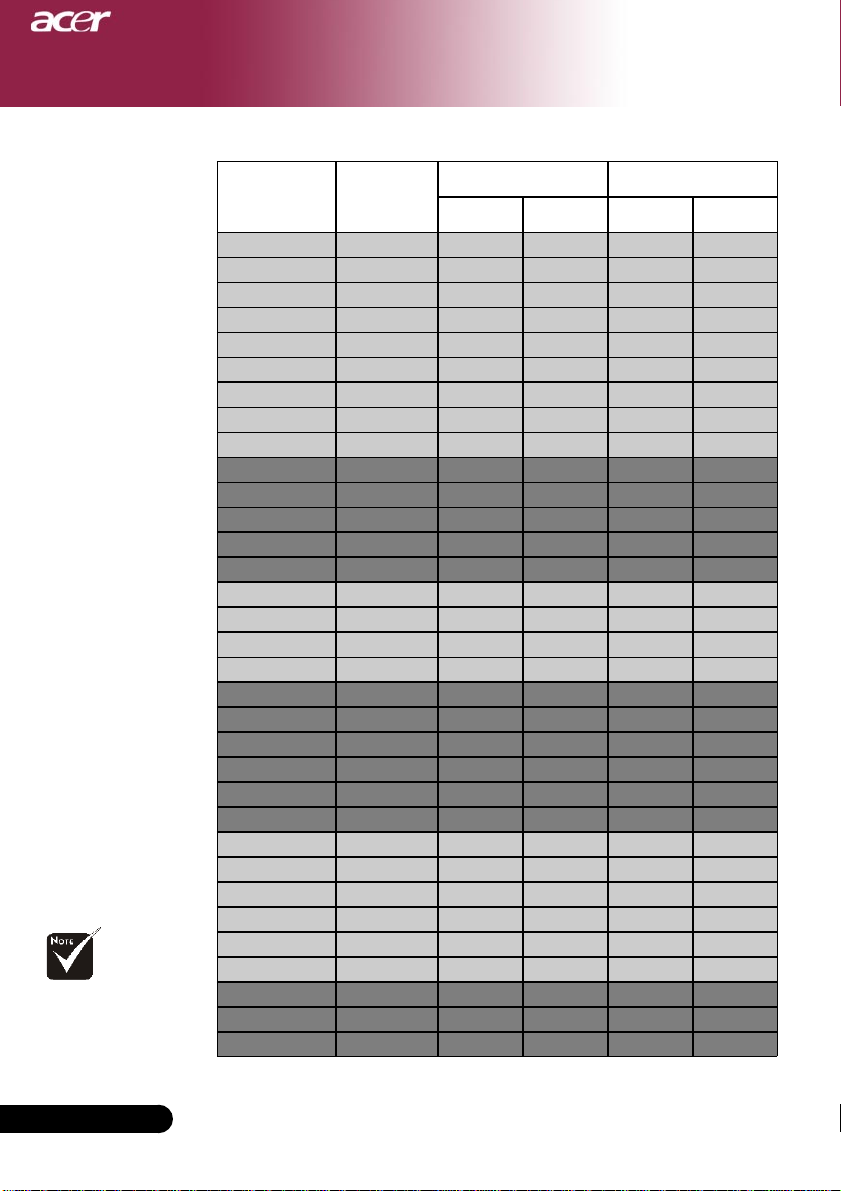
Appendices
VESA VGA 640 x 350 70 31.5 70 31.5
VESA VGA 640 x 350 85 37.9 85 37.9
VESA VGA 640 x 400 85 37.9 -- --
VESA VGA 640 x 480 60 31.5 60 31.5
VESA VGA 640 x 480 72 37.9 72 37.9
VESA VGA 640 x 480 75 37.5 75 37.5
VESA VGA 640 x 480 85 43.3 85 43.3
VESA VGA 720 x 400 70 31.5 70 31.5
VESA VGA 720 x 400 85 37.9 85 37.9
SVGA 800 x 600 56 35.2 56 35.2
SVGA 800 x 600 60 37.9 60 37.9
SVGA 800 x 600 72 48.1 72 48.1
SVGA 800 x 600 75 46.9 75 46.9
SVGA 800 x 600 85 53.7 85 53.7
VESA XGA 1024 x 768 60 48.4 60 48.4
VESA XGA 1024 x 768 70 56.5 70 56.5
VESA XGA 1024 x 768 75 60.0 75 60.0
VESA XGA 1024 x 768 85 68.7 85 68.7
* VESA SXGA 1152 x 864 70 63.8
- -
* VESA SXGA 1152 x 864 75 67.5
- -
* VESA SXGA 1152 x 864 85 77.1
- -
* VESA SXGA 1280 x 1024 60 63.98 60 63.98
* VESA SXGA 1280 x 1024 75 79.98
- -
* VESA SXGA+ 1400 x 1050 60 63.98
- -
MAC LC 13" 640 x 480 66.66 34.98
- -
MAC II 13" 640 x 480 66.68 35
- -
MAC 16" 832 x 624 74.55 49.725
- -
MAC 19" 1024 x 768 75 60.24
- -
* MAC 1152 x 870 75.06 68.68
- -
MAC G4 640 x 480 60 31.35
- -
i Mac DV 1024 x 768 75 60
- -
* i Mac DV 1152 x 870 75 68.49
- -
* i Mac DV 1280 x 960 75 75
- -
Compatibility Modes
Mode
Remark : “*”
compressed computer
image.
English ...
34
Resolution
V.Frequency
(Hz)
(ANALOG)
H.Frequency
(kHz)
(DIGITAL)
V.Frequency
(Hz)
H.Frequency
(kHz)
 Loading...