

Page 1
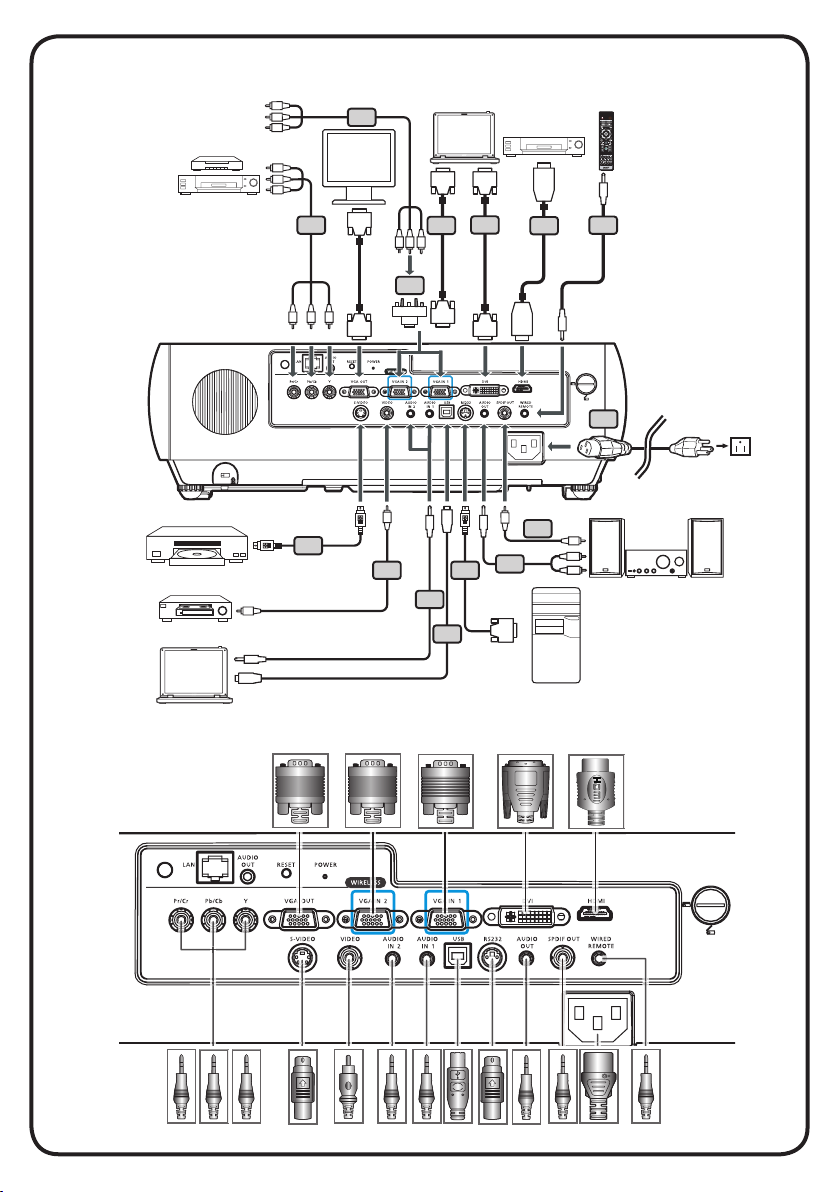
S-Video Output
RS232
DVD player,
Set-top Box,
HDTV receiver
DVD player
VGA, DVI
Video Output
Wired Remote
DVI-D
DVI-D
Y
Y
R B G
RBG
HDTV adapter
D-Sub
D-Sub
R
W
RS232
D-Sub
D-Sub
HDMI
HDMI
USB
USB
RBG
R B G
B
B
1
2
3
4
5
6
7
11
8
9
12
13
14
10
10
molex
E62405SP
R
INSTALLATION
INTERFACE CONNECTOR
Note: Connector interface is subject to model’s specifications
Page 2
English
Suomalainen
Quick Start
INSTALLATION
1. Power Cord
2. VGA Cable
3. Composite Video Cable
4. USB Cable
5. VGA to Component/HDTV Adapter
6. S-Video Cable
7. Audio Cable Jack/Jack
8. DVI Cable
9. HDMI Cable
10. 3 RCA component cable
11. RS232 Cable
12. Audio cable Jack/RCA
13. SPDIF cable
14. Audio cable Jack for wired remote
Note: Connector interface is subject to model’s specifications
INTERFACE CONNECTOR
Connecting to a Computer
1. Ensure the projector and your
computer are turned off.
2. Connect one end of the VGA cable
to the “VGA IN” connector on the
projector; connect the other end to
the VGA connector on the computer
and tighten the screws.
3. Connect one end of the power cord
into the AC power socket on the
projector; connect the other end to an
electrical outlet.
Powering On the Projector
1. Remove the lens cap.
2. Turn on the projector first and then
the computer.
3. Adjust the position, focus and zoom.
4. Run you presentation.
Powering Off the Projector
1. Press the power button twice.
2. Do not remove AC power cord from
outlet until the projector fan shut
down.
Pikakäynnistys
ASENNUS
1. Virtajohto
2. VGA-kaapeli
3. Komposiittivideokaapeli
4. USB-kaapeli
5. VGA-komponentti/HDTV-sovitin
6. S-videokaapeli
7. Audiokaapeliliitin/liitin
8. DVI-kaapeli
9. HDMI-kaapeli
10. 3 RCA-komponenttikaapelia
11. RS232-kaapeli
12. Audiokaapeliliitin/RCA
13. SPDIF-kaapeli
14. Langallisen kaukosäätimen audiokaapeliliitin
Huomautus: Liittimen liitäntä riippuu mallin määrityksistä
LIITÄNNÄN KYTKEMINEN
Liitännän kytkeminen
1. Varmista, että sekä kuvanheitin että
tietokone ovat sammutettu.
2. Kytke VGA-kaapelin pää
kuvanheittimen “VGA IN” -kytkimeen;
kytke sitten toinen pää tietokoneen
VGA-kytkimeen ja kiristä ruuvit.
3. Kytke sähköjohdon pää
kuvanheittimen adapterin
virtakytkimeen; kytke toinen pää
pistokkeeseen.
Kuvanheittimen käynnistäminen
1. Poista objektiivisuojus.
2. Paina ensin kuvanheitin päälle ja
käynnistä sitten tietokone.
3. Säädä paikkaa, tarkenna ja zoomaa.
4. Aloita esitys.
Kuvanheittimen sulkeminen
1. Paina sähkökytkintä kahdesti.
2. Älä poista sähköjohtoa pistokkeesta
ennen kuin kuvaheittimen tuuletin on
pysähtynyt!
 Loading...