

Page 1
INSTALLATION
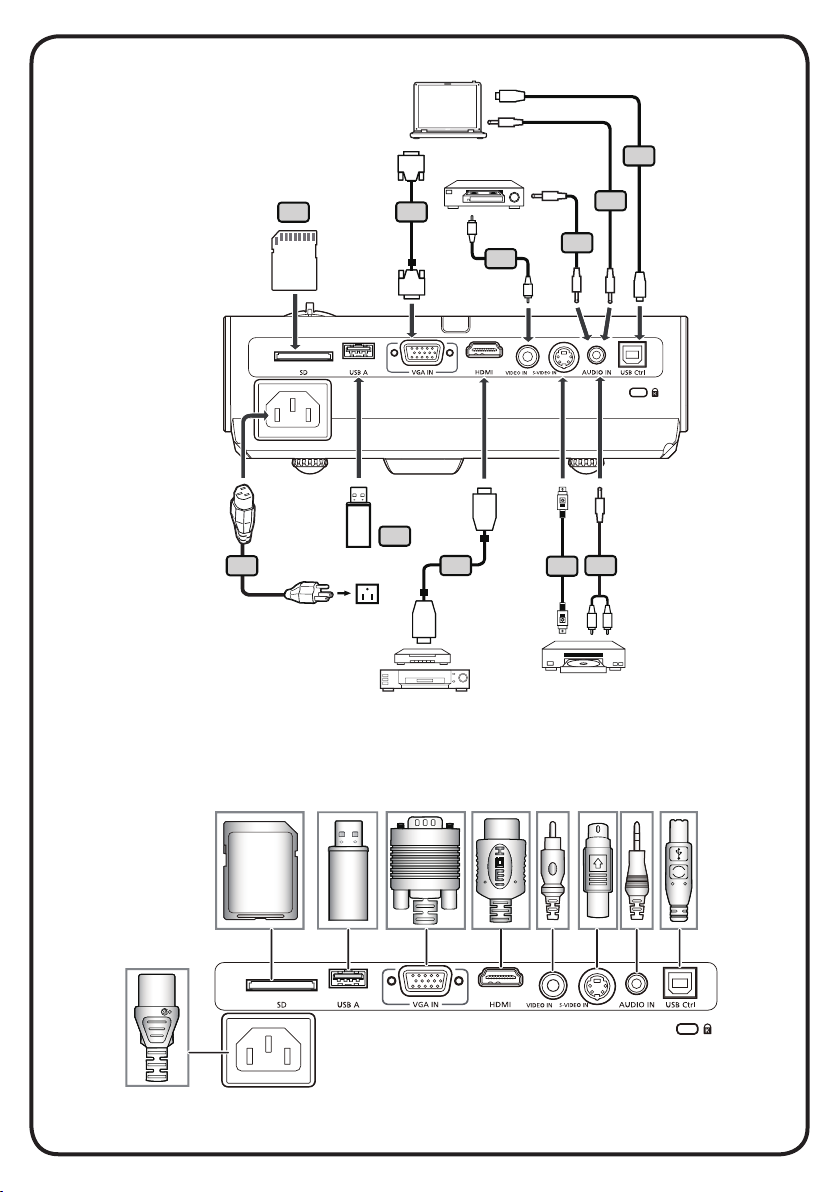
INTERFACE CONNECTOR
Note: Connector interface is subject to model’s specifications
DVD player,
Set-top Box,
HDTV receiver
S-Video Output
Video Output
D-Sub
D-Sub
2
Y
Y
3
4
4
1
HDMI
HDMI
6
7
R
W
8
SD CARD
USB
USB
5
9
10
SD CARD
mol ex
E62405SP
R
Page 2
English
Italiano
Quick Start
INSTALLATION
1. Power Cord
2. VGA Cable
3. Composite Video Cable
4. Audio Cable Jack/Jack
5. USB Cable
6. HDMI Cable
7. S-Video Cable
8. Audio Cable Jack/RCA
9. SD card
10. USB disk/stick
Note: Connector interface is subject to model’s specifications
INTERFACE CONNECTOR
Connecting to a Computer
1. Ensure the projector and your
computer are turned off.
2. Connect one end of the VGA cable
to the “VGA IN” connector on the
projector; connect the other end to
the VGA connector on the computer
and tighten the screws.
3. Connect one end of the power cord
into the AC power socket on the
projector; connect the other end to an
electrical outlet.
Powering On the Projector
1. Remove the lens cap.
2. Turn on the projector first and then
the computer.
3. Adjust the position, focus and zoom.
4. Run you presentation.
Powering Off the Projector
1. Press the power button twice.
2. Do not remove AC power cord from
outlet until the projector fan shut
down.
GUIDA D’INSTALLAZIONE
RAPIDA
INSTALLAZIONE
1. Cavo d’alimentazione
2. Cavo VGA
3. Cavo video composito
4. Cavo audio Jack/Jack
5. Cavo USB
6. Cavo HDMI
7. Cavo S-Video
8. Cavo audio Jack/RCA
9. Scheda SD
10. Disco/Penna USB
Nota: L’interfaccia del connettore è soggetta alle speciche del
modello
CONNETTORE INTERFACCIA
Connessione a un computer
1. Accertarsi che il proiettore e il
computer siano accesi.
2. Collegare un’estremità del cavo
VGA al “VGA IN” per computer del
proiettore, collegare l’altra estremità
al connettore VGA sul computer e
serrare le viti.
3. Collegare un’estremità del cavo di
alimentazione alla presa di corrente
CA del proiettore, collegare l’altra
estremità a una presa a muro.
Accensione del proiettore
1. Rimuovere il coperchio dell’obiettivo.
2. Accendere prima il proiettore e poi il
computer.
3. Regolare la posizione, la messa a
fuoco e lo zoom.
4. Eseguire la presentazion.
Spegnimento del proiettore
1. Premere due volte il pulsante di
accensione.
2. Non rimuovere il cavo di alimentazione
CA dalla presa di corrente finché la
ventola del proiettore non si ferma.
 Loading...