

Page 1

Acer Altos® NAS 700
Solution Guide
Basic Setup
This solution guide will show you how
to set up and configure the Acer Altos
NAS 700 appliance.
Page 2

Abstract
Acer Altos NAS 700 is a Solution based on Acer Storage Center (ASC) Software Version 4.0.
ASC provides vital storage services—virtualization, mirroring, capacity expansion, scalability,
TimeMark/TimeView, and more--through a software-optimized solution that runs on existing
industry standard hardware.
The Acer Altos NAS 700 appliance offers:
NAS capability for file sharing with quota management.
SAN/IP connection for database/application servers
Storage Virtualization
Capacity consolidation & scalability
Mirroring
TimeMark/TimeView
Centralized Backup.
© 2004 Acer Incorporation. All rights reserved.
This paper is for informational purposes only. ACER MAKES NO WARRANTIES,
EXPRESS OR IMPLIED, IN THIS DOCUMENT.
Acer, Acer Altos are registered trademarks or trademarks of Acer Incorporation.
Microsoft, Windows 2003 Enterprise Server, Mylex product, Intel, Gadzoox, and
Qlogic product ranges are either trademarks of Microsoft Corporation or
registered trademarks.
Other product or company names mentioned herein may be the trademarks of
their respective owners.
Page 3

Page 4

CONTENTS
INTRODUCTION.................................................................................... 1
Who should read this Guide 1
Contents of this Guide 1
Course Goals 2
Prerequisites 2
Overview of the ACER Altos NAS 700 Appliance 2
ACER ASC EXPRESS BASICS .............................................................. 3
What is ACER ASC Express ? 3
What is an ASC Network 5
ASC Components 7
ASC Management Console 7
ASC NAS Clients 7
SYSTEM SPECIFICATION ..................................................................... 8
ACER Altos NAS700 Appliance Features 8
ACER ASC Express Features 10
Qlogic 2340 (Optional Fibre Channel HBA Controller) 11
INSTALLATION AND CONFIGURATION ............................................. 12
Installing HBA into the Altos NAS 700 12
Setting up RAID Array and LUNs 12
A) Red Hat Linux 7.3 installation using the Recovery Image 14
Introduction 14
Supported platform 14
How to restore the image 14
Important Notes: 14
B) Red Hat Linux 7.3 manual installation 17
ASC Server installation 24
ASC Management Console installation 34
Installation on Microsoft Windows NT, 2000, XP and 2003. 34
Installation on Linux. 35
ASC SAN Client installation 36
SAN/IP protocol definition 36
iSCSI protocol definition 36
Pre-installation checklist 37
ASC SAN Clients Supported Platform 38
SAN/IP Client 38
iSCSI client 39
SAN/IP Client installation on Windows NT, 2000 and 2003. 40
SAN/IP Client installation on Linux 40
SAN/IP Client installation on NetWare. 41
ASC MANAGEMENT CONSOLE ........................................................ 43
Start the ASC Management Console 43
ASC Management Console User interface 44
Page 5

Server statistics 46
Save & Restore an ASC Server configuration 47
Save configuration 47
Restore configuration 48
Licensing 49
Set Server Properties 50
Manage Administrators accounts & Password 54
Manage accounts 54
Change your administrator password 55
System Maintenance 56
Network configuration 56
Physical resource 59
Prepare devices to become logical resources 60
SCSI aliasing 61
Rename a SCSI device 61
Rescan adapters 62
Import a disk 63
SCSI device throughput 63
Logical Resources 64
Write caching 65
ASC SAN Clients 66
Change the ACSL 67
ASC NAS Clients 68
Console Options 70
To set options for the Console: 70
Create custom menu 71
CONFIGURE ASC SAN RESOURCES ................................................... 73
SAN Resources 73
Virtual Devices 73
SAN Resources virtualization examples 74
Direct devices 75
Service enabled devices 76
Procedure to create SAN resources 77
Prepare devices to become SAN Resources 77
Create a virtual device SAN Resources 78
Create a direct device or service enabled device SAN Resources 82
Assign resources to one or more clients 85
Assign a client to one or more SAN Resources 89
Expand a virtual device 90
Delete a SAN Resource 94
MANAGE ASC SAN CLIENTS ............................................................. 95
Add & configure an ASC client 95
ASC SAN Client on Linux 96
Start/stop the ASC SAN Client processes 96
Page 6

Add/delete/display/rescan ASC Servers 96
Add/delete/expand a virtual drive 98
ASC SAN Client on Windows NT/2000/2003 99
ASC SAN Client Monitor 99
Refresh the Monitor display 100
Stop and start the client 101
Connect/Disconnect a server 101
Add an ASC Server 102
Delete a Server 104
Organize Servers 105
Set dependent services to start after ASC services 106
Register tape devices for use with backup software 107
Register disks for drive priority 107
Filter Event Viewer information and set client options 108
ASC SAN Client on NetWare 110
Start the client 110
Set the client to automatically start after server reboot 110
Stopping and removing the client 110
Disk copies 111
Troubleshooting 111
Uninstall a SAN client 112
MANAGE THE ASC SERVER............................................................. 113
Start the ASC Server 113
Set ASC to start automatically upon bootup 113
Stop the ASC Server 114
Linux ASC servers enabled with NAS 114
Log into the ASC Server 115
Telnet access 115
Check the ASC Server processes 116
Check physical resources 117
NAS CONFIGURATION..................................................................... 118
General NAS configuration sequence 120
Prepare for authentication 121
Active Directory 123
Network Information Service (NIS) 124
Enable NAS 126
Add NFS clients 133
Create a NAS Resource 134
Limit the amount of storage each Windows user can have. 139
Add/share a folder and assign clients 140
Map/mount the share 144
Windows clients 144
NFS clients 145
Audit NAS shares 146
Page 7

To use the auditing feature: 146
NAS properties 147
NAS file information 152
NAS utilities 153
Expand a NAS Resource 153
Access Control Lists (ACLs) 154
Using ACL attributes 154
Requirements 155
Back up/restore extended attributes on Linux 156
Page 8

Page 9

INTRODUCTION
This solution guide discusses the installation, configuration, management
troubleshooting and the benefits provided by the Acer Altos NAS 700 appliance.
The Altos NAS 700 appliance is a highly flexible and scalable Network Attached
Storage solution.
It improves storage utilization compared to D.A.S (direct attached storage).
It offers storage centralized management and reduces the Total cost of
Ownership.
Who should read this Guide
This configuration guide is intended for:
• Acer field site engineers who are installing and configuring Altos NAS 700
Appliances.
• Acer resellers who are providing technical solutions to customers.
• Customers who are implementing these storage systems in their
environment.
Contents of this Guide
This guide’s chapters contain the following information:
1. ACER ASC Express Basics – presents an overview of ASC Software suite.
2. System Specification—presents the detailed specification of Altos
NAS700 as well as Qlogic 23xx Fibre Channel HBA controller.
3. Installation and Configuration—presents step-by-step installation and
configuration instructions for Altos NAS700 including the basic Linux
7.3 installation, the ASC software suite including the ASC server, the
Management console and the ASC SAN clients.
4. Configure ASC SAN resources —presents the procedures to create,
expand, delete and assign the different resources to be used by your
SAN/IP clients.
5. Manage ASC SAN clients—presents the procedures for adding,
installing and managing ASC SAN clients on Microsoft Windows, Red
Hat Linux and Novell NetWare O.S.
6. Manage the ASC Server—presents the procedures to start, stop and log
into the ASC Server.
7. Configure ASC NAS resources present the procedures to create and
assign the different resources to be used by your SAN/IP clients.
8. Troubleshooting—presents the procedures to help you through some
common issues you may encounter when you set up and run the ASC
storage network.
Acer Altos® NAS 700 Solution Guide
1
Page 10

Course Goals
Enable engineers and partners to fully implement an ACER Altos NAS 700
Appliance.
Prerequisites
Learners should meet the following prerequisites before installing a NAS 700
appliance (or equivalent experience):
• Acer Server Product Training (or knowledge about the current Acer
Server product range and technology)
• Acer RAID Workshop (or work experience with Server RAID Adapter
and RAID technology)
• Fibre Channel technology basics
• Linux basic knowledge or experience (Installation and configuration)
Overview of the ACER Altos NAS 700 Appliance
The ACER Altos NAS 700 Appliance is based on the Altos G710 server which
comes with two 36Gb U320 SCSI hard drives. ACER recommends that you
configure a RAID1 in order to offer redundancy for the Operating System.
Final users can use up to 6 additional internal hard disks for their data when
using the second SCSI cage, without requiring external enclosure. So this
configuration can offer a RAID 5 volume up to 730 GB of internal storage.
ACER Altos NAS 700 Appliance prevents soft-errors by using it’s snapshot and
TimeMark features. It increases storage utilization and provides both file and
block level access. It also offers 2 different backup solutions 1. standard Tape
backup and 2. High performing Disk to Disk (D2D) backup for your NAS shares
and SANDisks.
Acer Altos® NAS 700 Solution Guide
2
Page 11

ACER ASC EXPRESS BASICS
What is ACER ASC Express ?
The explosion of data in today’s networked computing environments stresses
the abilities of many Information Technology groups while the demand to
store and access data doubles each year.
Since information, and the storage infrastructure that holds it, are critical to a
company’s success, the management of the storage becomes a serious issue,
where reliability, availability and improved disaster recovery are all key factors.
Documents, databases, web pages, and other sorts of media each have their
own rules for accessibility, retention and backup. Estimates of the cost to
manage storage range from 5 to 10 times the actual cost of the storage
hardware itself.
The Storage Area Network (SAN) is a dedicated network devoted to data
storage and is a solution that meets the storage requirements of many
businesses today. SANs address many of the reliability and availability issues for
data storage. Essentially, SANs apply networking methodologies to the
problems of storage, expanding the management possibilities for storage
ASC (Acer Storage Centre) is the award-winning storage networking
infrastructure software suite that simplifies storage management by delivering
SAN and NAS and enterprise class storage services under a unified management
umbrella across Fibre Channel and IP.
Developed by a team of world-class network and storage management experts,
ASC provides vital storage services through a software-only solution that runs
on top of the ALTOS NAS 700 Appliance.
ASC is a software suite that virtualizes the ‘disk’ hardware into a storage pool,
no matter if they are SCSI, Fibre Channel or iSCSI. ASC provides companies with
immediate total freedom of choice in connectivity and storage hardware
platform.
You can add physical or logical drives or even entire enclosures in this storage
pool. Then ASC allocates storage capacity from this pool by creating arbitrary
virtual drives. These ‘virtual drives’ appear exactly like a real SCSI drive, each
having their own SCSI ID or world-wide-name. The size can be anything you
want and the actual storage space can span across different physical disks. For
example you can create a 100GB virtual drive, with 50GB from an ACER S300
SCSI enclosure, another 25GB from an ACER S205F Fibre Channel enclosure and
the rest from an X SCSI enclosure.
With this sophisticated storage farm, the provision of the storage back to our
servers is done through SAN/IP protocol or iSCSI/IP target mode.
Target Mode is used when a SCSI initiator requests operations to be performed
by a HBA target device.
At the same time, we also offer CIFS and NFS protocols.
This is how ASC achieves both Block (SAN) level and File (NAS) level connectivity
all under a single infrastructure.
Acer Altos® NAS 700 Solution Guide
3
Page 12

ASC offers enterprises an easy way to purchase, implement, and support new
or existing enterprise SANs, while containing the costs associated with the
ownership and management of storage solutions. Building an ASC storage
network puts enterprise class storage services at your fingertips, allowing you
to do more with less.
Provides total freedom in storage connectivity: Fibre Channel, IP/iSCSI, SCSI,
JBOD, RAID, and tape/library. Because ASC scales easily and encompasses all
protocols and standards (current and upcoming), it is not just a tool, but an
entire future-proof system.
• Reduces management costs by leveraging existing IT infrastructures.
• Cuts capital investment by consolidating storage resources for
maximized utilization and efficiency.
• Dramatically lowers storage administration overhead through
centralized, simplified storage management.
• Eliminates requirement for multiple software licenses and individual
management of storage software for each server.
• Maximizes performance for high bandwidth applications.
• Provides total storage security with key-based authentication.
These benefits are all integrated into the ASC Server, an intelligent storage
processor capable of supporting high performance storage I/O in a complex
data management environment. The ASC solution delivers cost-effective, easyto-use, flexible, rapidly deployable solutions for storing, managing, and
migrating data.
ASC also enables service provider businesses, including Internet Service
Providers (ISPs,) Application Service Providers (ASPs,) and Storage Service
Providers (SSPs), to grow and manage their storage resources more easily.
Acer Altos® NAS 700 Solution Guide
4
Page 13
What is an ASC Network
The ASC Storage Network can be either a dedicated storage network, just like
traditional Fibre Channel SANs, or it can be embedded into the existing LAN for
small or low impact applications. Acer recommends that a separate network
segment be dedicated to the Storage Network; this flexibility allows the
building and testing of different topologies, the scaling of the Storage
Network, and the sharing of networking resources to suit the varied
requirements of different computing environment.
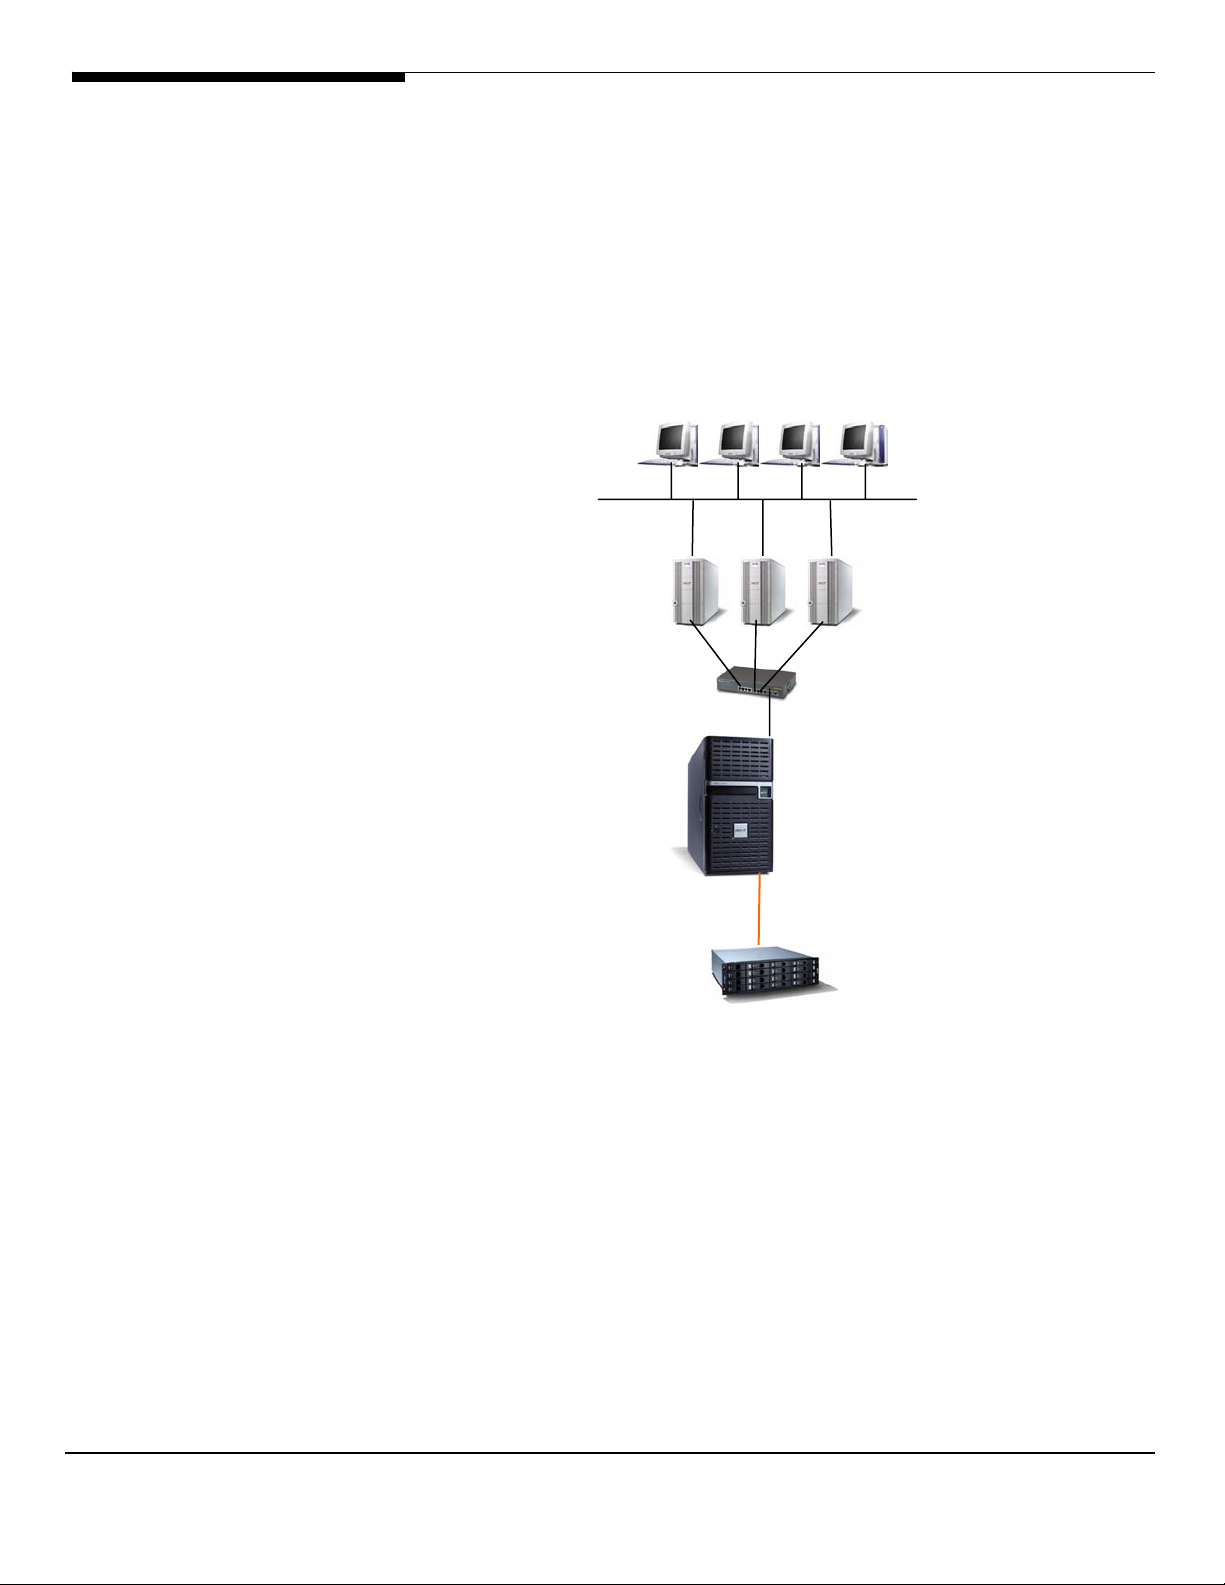
PC Clients
Public LAN
Database/Messaging Application Servers
Ethernet Switch for Storage Network
Altos NAS 700
Altos Storage Sub-system
ASC uses in-Band design.
In-Band is using a group of dedicated appliance boxes located between the
Storage and the Host servers to manage the storage. It uses at least 2 Ports –
One as “Target” to Hosts, and One as Initiator to Arrays. When setting up ASC
ports, Hosts are mapped to Target Ports and Arrays are mapped to Initiator
Ports.
ASC utilizes SCSI, the standard for server class storage devices. ASC supports all
types of SCSI devices, including those running the fastest Ultra 320 SCSI
specification.
SCSI is the standard for server class storage because it is fast, intelligent
(operations can occur independently of activity on the bus,) and expandable
Acer Altos® NAS 700 Solution Guide
5
Page 14

(depending upon specific configurations, typically up to 16 devices per bus).
For maximum throughput, ASC supports multiple SCSI busses and/or adapters.
For SAN/IP Clients (non-Fibre Channel Clients), ASC packages the storage
™
requests into IP packets using Acer’s SAN/IP
protocol. Requests made to the
client’s virtual adapters are converted to SAN/IP packets. The ASC Server
receives the SAN/IP packets and converts them to SCSI commands. The ASC
Server then responds with the storage data, again packaged as SAN/IP packets.
Acer’s SAN/IP handles the entire process with minimal overhead so that the SCSI
devices are operating at maximum throughput, even over the storage network.
An advantage of packaging the storage data into SAN/IP packets is that the
data can be carried over trunked adapters, effectively multiplying the potential
throughput for single and multiple device accesses. This is not possible on busbased interfaces because all of the data must be transmitted on the same bus;
data cannot be split over multiple busses.
Acer Altos® NAS 700 Solution Guide
6
Page 15

ASC Components
The primary components of the ASC Storage Network are the ASC Server,
ASC Console, ASC SAN Clients and the ASC NAS Clients.
These components all sit on the same network segment, the
ASC Server
storage network
The ASC Server is a dedicated network storage server. The ASC Server is
attached to the physical SCSI and/or Fibre Channel storage devices on one or
more SCSI or Fibre Channel busses.
The job of the ASC Server is to communicate data requests between the clients
and the logical (SAN and NAS) resources (logically mapped storage devices on
the storage network) via Fibre Channel or IP.
ASC Management Console
The ASC Management Console is the administration tool for the ASC storage
network. It is a Java application that can be used on a variety of platforms and
allows ASC administrators to create, configure, manage, and monitor the
storage resources and services on the ASC storage network.
.
ASC SAN Clients
ASC SAN Clients are the actual file and application servers. Acer calls them ASC
SAN Clients because they utilize the storage resources via the ASC Server.
There are two types of SAN Clients, SAN/IP and iSCSI and you can have both on
your storage network.
These SAN Clients access their storage resources via software-emulated virtual
adapters for SAN/IP. The storage resources appear as locally attached devices
to the SAN Clients’ operating systems (Windows NT, Windows 2000, Linux, etc.)
even though the SCSI devices are actually located at the ASC Server.
ASC NAS Clients
NAS Clients are the Windows/Unix users and groups that access data and
storage (if authorized) on the storage network via standard operating system
network mapping protocols.
Warning:
Do not confuse ASC NAS clients with a NAS server.
NAS Clients are Users and Groups and not phys cal server o NAS appliancesi r !
Acer Altos® NAS 700 Solution Guide
7
Page 16

SYSTEM SPECIFICATION
In this part, it will cover the detailed specification summary of all important
components that make up the Acer Altos NAS 700 Appliance.
ACER Altos NAS700 Appliance Features
High density computing in a competitive world calls for a server that can keep
up and still stay cool in a rack. It's your life in the business fast lane that insists
on reliability, performance, and space to move.
The Altos NAS 700 appliance is based on the ACER ALTOS G710 server that
offers excellent storage scalability with its 8 slots. For applications needing high
performance and high availability, the Altos NAS 700 Appliance uses an Intel
Xeon processor. High capacity and high-speed network enabled, this is an
appliance to be reckoned with. With the two on board Gigabit LAN adapters it
is also the perfect choice as a network file server.
• Provides high level of business continuity through a set of high availability
®
®
IBM
®
and fault tolerance. The Altos NAS 700 snapshot copy and TimeMark
protects where data from “soft-errors” such as accidental deletion, file
corruptions, and virus attacks. The Altos NAS 700 snapshot copy creates
scheduled or on-demand point-in-time snapshot copies of data volumes-
®
“TimeMark
”. TimeMarks contain only data changes and therefore do not
take up a significant amount of disk storage space. Up to 4 TimeMarks can
be maintained and used for fast backup and data recovery.
• Reduced storage TCO (total cost of ownership) through increased
server/storage resources utilization and simplified storage management.
Through providing simultaneous access to both file and block-level
applications, Acer Altos NAS 700 enables a consolidated storage platform
that can serve storage to any application servers from database, messaging
applications (Microsoft
®
Exchange, Oracle ®, Lotus
®
Notes, Sybase
DB2, SQL servers to web servers and file servers under a central console. As
storage is consolidated and centralized, the capacity can easily be shared
and reallocated among applications servers, minimizing the amount of
unused capacity and the management of the storage resources is greatly
simplified.
• Lower TCO simplified and accelerates backups.
rd
Altos NAS allows existing 3
party backup software to backup remote
server’s disk over IP or FC at speeds up to 2 gigabits per second. Application
servers’ performance is increased through the elimination of overhead
associated with backup/restore operation and any additional processor
load on the application server because all data movements and backup
command are controlled by the Acer Altos NAS with no impact on the
application servers. Furthermore, since only one copy of backup software is
Acer Altos® NAS 700 Solution Guide
8
Page 17

necessary, at the Altos NAS, this centralizes and therefore simplifies the
backup management. It is also cost-effective as there is no need for backup
agent on each application server.
• Tower or 5HE rackable chassis to slip into a rack.
• 8x DIMM slots offer up to 16 GB of registered ECC DDR333 RAM.
• Up to two Intel® 2.8 GHz Xeon™ Processors at 533 MHz FSB with Hyper-
Threading technology for blistering processing power.
• 1+1 redundant, hot-swappable 550 Watts power supplies.
• 2x PCI-Express x4 slots.
• 3x 64-bit PCI-X 100 MHz + 1 PCI 32 bits PCI slots.
• 3 external 5.25 bays.
• Integrated dual U320 Channel LSI1030 controllers.
• LSI MegaRAID 320-1 U320 PCI RAID controller (add on card)
• Dual-channel gigabit-LAN for high-speed connectivity.
• Altos EasyDiagnostic LEDs indicate that you can trust your Altos to keep on
going.
• OS Supports: Red Hat Linux 7.3 with 2.4.21-ipstor kernel.
• Warranty Services: 3 years on-site services next business day response time.
Altos NAS 700 Appliance
Acer Altos® NAS 700 Solution Guide
9
Page 18

ACER ASC Express Features
• Up to 730 GB internal storage / Up to 2 TB with external storage enclosure.
• Mirroring: Protects against device/cabinet/frame level failure for any Acer
Altos NAS 700 managed disk
• Snapshot/Timemark: Max 4 times of incremental backup scheduled through
the day that provide easy data restoration without having to access tape,
with limited utilization of time and space .
• NAS: Provides storage via CIFS and NFS to Microsoft Windows, Linux, UNIX
and Mac* clients, allowing folders and files to be shared by users regardless
of the operating system.
• 5 SAN/IP clients max.
• Max 15 Virtual Resources / 4 TimeMarks per Acer Altos NAS 700 Appliance.
• Snapshot Copy and Synchronous Mirroring capability.
• iSCSI capabilities: Storage for database and messaging application (such as
SQL, Exchange, Oracle) can also be created from a common storage pool
via a common network such as Ethernet.
• Supported platforms for the iSCSI clients are:
Windows XP SP1,
Windows 2000 SP3 and higher,
Windows 2003 Standard & Enterprise.
• Storage Management: Centralized storage services at a single console,
including storage configuration, capacity management, storage
provisioning, reporting and diagnostics.
• Quota Management:
Manages the capacity usage, allows the administrator to set the capacity
limit of each share folder.
Acer Altos® NAS 700 Solution Guide
10
Page 19

Qlogic 2340 (Optional Fibre Channel HBA Controller)
The Qlogic QLA234x controllers bring the latest in Fibre Channel 2 (FC2)
technology, doubling speeds from 1Gbps to 2Gbps.
The Controller provides multipath and failover capability (when using QLA
2340 or two QLA 2342 Controllers). Each Controller provides an LC cable
connector to easily connect to Fibre channel Switches or directly to the Altos
S700F or S205F Storage.
• Single-integrated Fibre Channel controller (LC connector) for added
reliability and optimum performance
• Auto negotiation of Fibre Channel speed bit rate (1 Gbps or 2 Gbps).
• 200 Mbps at half-duplex / 400 Mbps at full-duplex.
• 1 multimode short wave laser LC port.
• Automatic topology detection.
• Concurrent support for SCSI and IP protocols
• Simultaneous initiator and target mode support
• 64bits/133MHz PCI-X specification. (3,3V and 5V bus supported).
• HBA and LUN level failover
• Persistent binding
• LUN Masking
• Local and remote Management
• Load balancing for optimized performance
• Supports Microsoft Cluster Service.
• OS supports:
Windows Server 2003 (32-bit and 64-bit),
Windows NT,
Windows 2000,
Windows XP,
Solaris SPARC,
Linux (32-bit and 64-bit),
Novell NetWare.
QLA2340
Acer Altos® NAS 700 Solution Guide
11
Page 20

INSTALLATION AND CONFIGURATION
General Installation Sequence
1) Install the HBA in your ALTOS NAS 700 appliance
2) Connect your ASC NAS 700 appliance to your storage network
3) Linux 7.3 installation through a:
a. Recovery image
b. Manual installation
4) ASC Server installation
5) ASC Management Console installation
6) ASC SAN Client installation
7) Configure ASC SAN Resources
8) Assign a SAN Resource to one or more client.
Installing HBA into the Altos NAS 700
Before you can start with setting up the ASC Software you may need to add
additional Controllers into your Altos NAS 700. If you are using a Qlogic Fibre
Channel HBA you need to add, open the housing and add the Controller. Also
make sure that your LSI RAID Controller 320-1 is installed correct and the SCSI
Cable from the backplane board is connected to this Controller. There should
be up to 2 x 36GB and 6 x 146 GB Hot Swap Hard Disk installed and the
Backplane is connected to the LSI 320-1 RAID controller.
Acer Altos® NAS 700 Solution Guide
Setting up RAID Array and LUNs
On the first start of the Altos Server G710 press Ctrl-M to get into the
MegaRAID set up utility and create a new Array.
1. Select Configure -> New Configuration (Note: Choosing “New
Configuration” will erase any former configuration, do not select this
option if you simply want to add a new Array group to an existing
configuration)
2. You will see a list of Drives available for your RAID Array, use the arrow
keys to move between them
3. You must select 2 disks with the spacebar key to create one Array and a
logical drive with 8000MB for operating system.
4. Press Enter when you are done with the selection.
5. Finish your physical Array selection and press F10 to create a Logical
12
Page 21

Drive.
6. Choose the RAID Level (in this case RAID 1) and select the size of your
first LUN. We recommend to create a LUN with the size of 8000 MB.
You can also select the full size for your O.S mirror.
Confirm the Logical Drive by using the Enter key
7. Please select now the remaining disk and create a RAID5 logical drive
for your ACER altos NAS 700 Data storage.
8. After you are done do not forget to initialise the Logical Drives. If you
select the Initialise option in the Controller menu it will destroy any
existing data on the Array. This is wanted on the first installation, but
be careful with this on already installed systems.
Acer Altos® NAS 700 Solution Guide
13
Page 22

A) Red Hat Linux 7.3 installation using the Recovery Image
Introduction
ACER provides on the ASC 4.0 Express cdrom, a Norton Ghost image to restore
the Linux 7.3 operating systems necessary to install later ASC 4.0 server on the
ACER Altos NAS 700 Appliance. ACER recommends our solution partners to use
this image to install the Linux Operating system.
The file can be found in the IMAGE folder of the cdrom and is called:
"linux.GHO".
Supported platform
Altos Server G710 (with LSI MegaRAID 320-1/320-2 SCSI RAID Controller)
ACER Recommends to use two 36GB hard drives as a RAID-1
Monitor supporting a resolution of 1024*768
How to restore the image
Create a LUN (size is 8000 MB) under MegaRAID BIOS with the initialization
done.
Boot from ASC 4.0 CD.
Type “cd image”
Type “ghostro.exe" to launch the ACER Backup Tool.
Select "Local", "Disk", "From Image",
Then select the file "LINUX.GHO".
In the Destination Drive Details, make sure the New Size for Part 1 & 2 should
be the same as those in Old Size (Part 3 could be different).
Then press "Yes" to proceed with disk restore.
Important Notes:
When you reboot the server Linux starts the Hardware Configuration Utility
called KUDZU. It will detect the Hardware configuration of your server and will
install the correct drivers for them. You might see messages where it says that a
device is being removed etc but this is because of a change in the configuration
between the ALTOS G710 server used to create the image and your
configuration.
Acer Altos® NAS 700 Solution Guide
14
Page 23
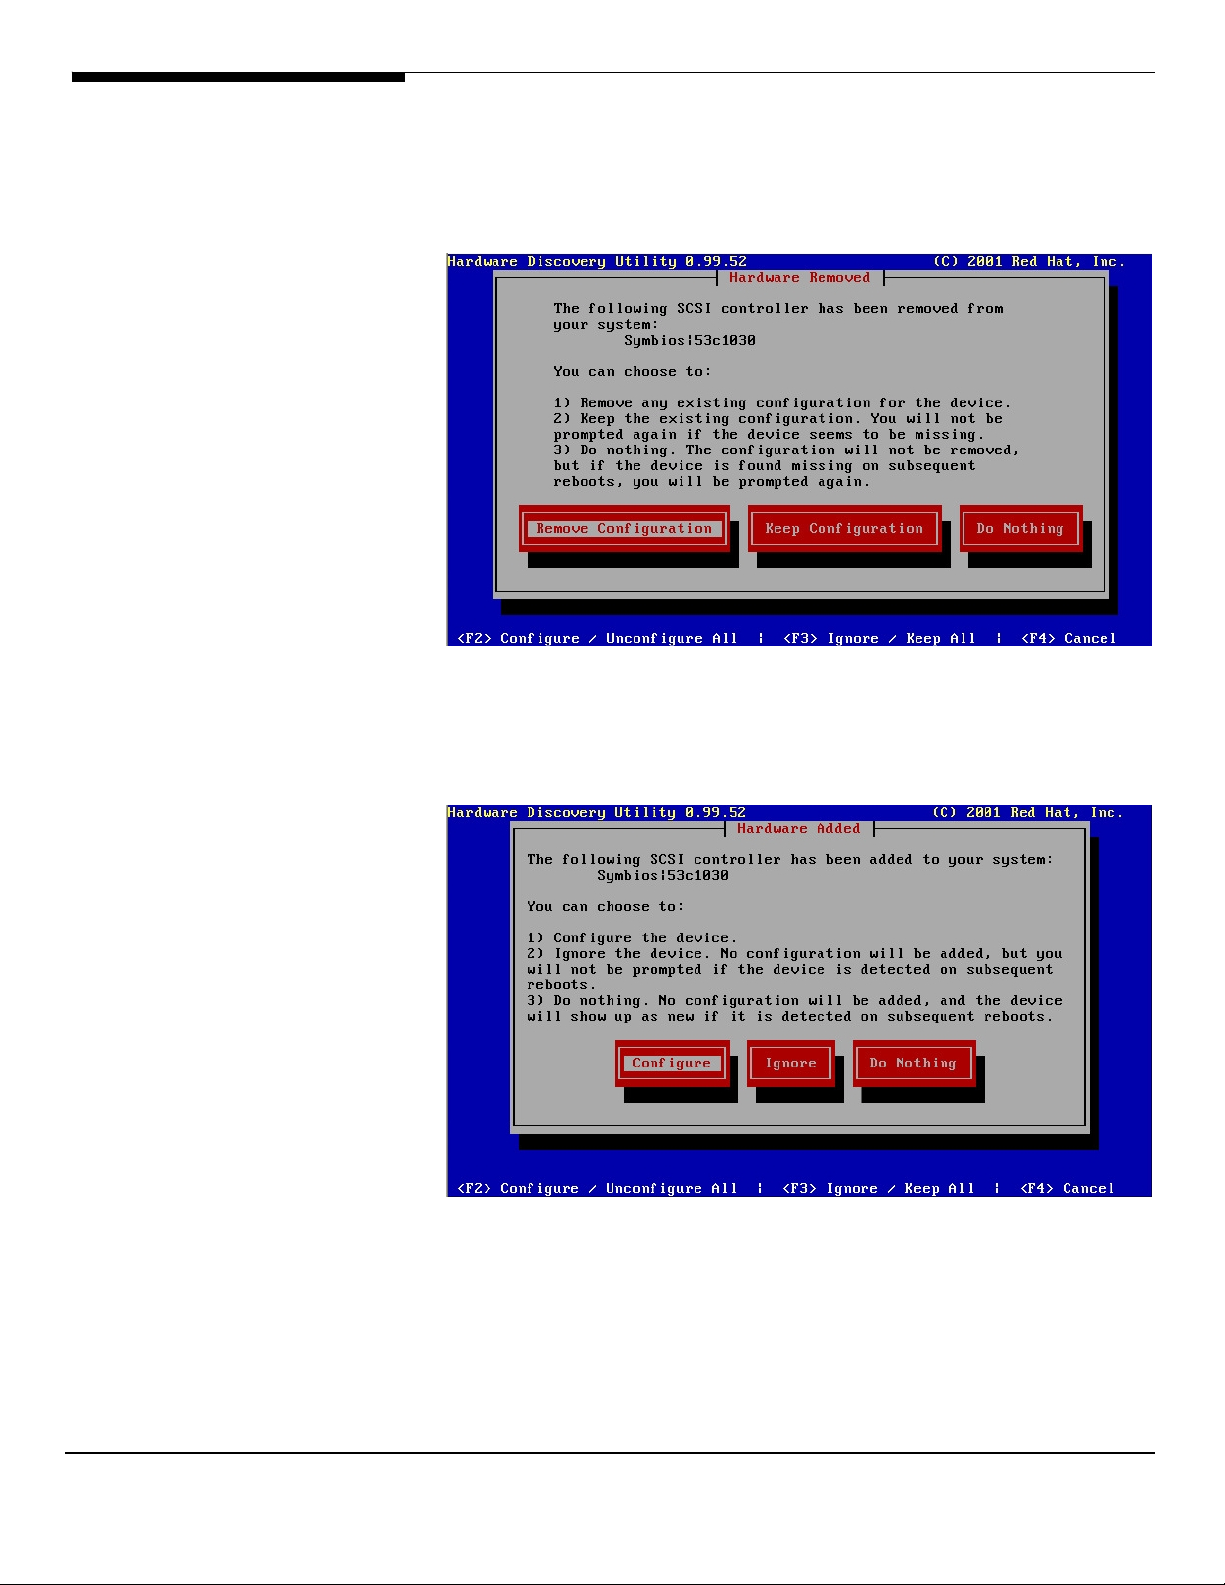
So just click on the REMOVE CONFIGURATION button to remove a device.
Then click on the CONFIGURE button to add a newly detected device.
Acer Altos® NAS 700 Solution Guide
15
Page 24

There’re some specific tasks to do when you add the ATI Rage XL (graphics
adapter):
• Select your Monitor specs (automatic if your monitor is Plug and Play)
• Select the Video Memory: the ATI Rage XL has 8 MB
• Select “No clockchip settings (recommended)”
• Click OK to test your Graphics configuration under X Window.
• If you see a message displayed on screen, just click YES.
Then, select the automatic startup of X Window when asked by the system.
The default password for Linux 7.3 account "root" is "000000" (six zeros).
Please change it with the proper one according to your requirement later.
The Time Zone is default set to Taipei. After restoring, please change to the
proper “Time Zone” with the correct “Zone”.
To do that, on the G.U.I, click Program / System then Date/Time Properties.
Acer Altos® NAS 700 Solution Guide
16
Page 25
B) Red Hat Linux 7.3 manual installation
This section is for information only
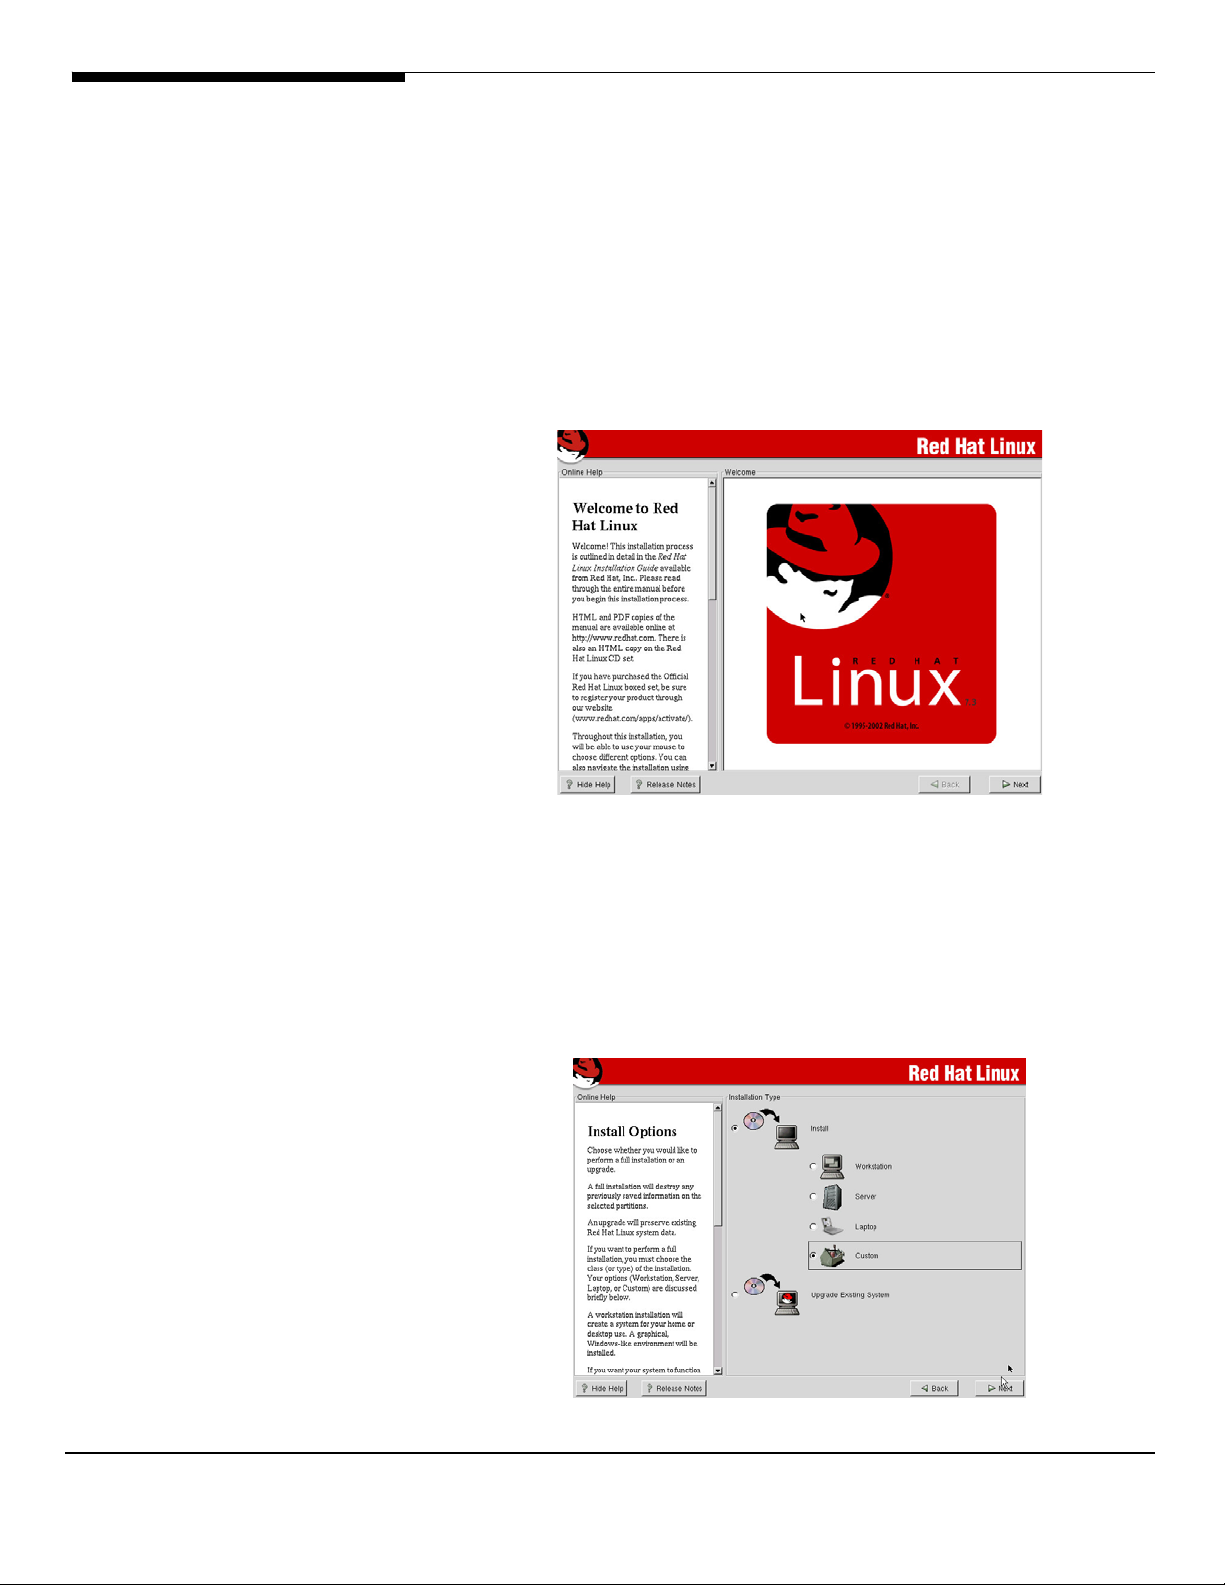
1. Boot from the RedHat Linux CD and hit <Enter> to begin the installation.
2. On the welcome screen, click NEXT to go to the next step.
3. Select the installation language and click NEXT.
4. On this page, select your keyboard language and click NEXT.
5. Select your mouse configuration and click NEXT
6. Select CUSTOM as installation Type and click NEXT.
17
Acer Altos® NAS 700 Solution Guide
Page 26
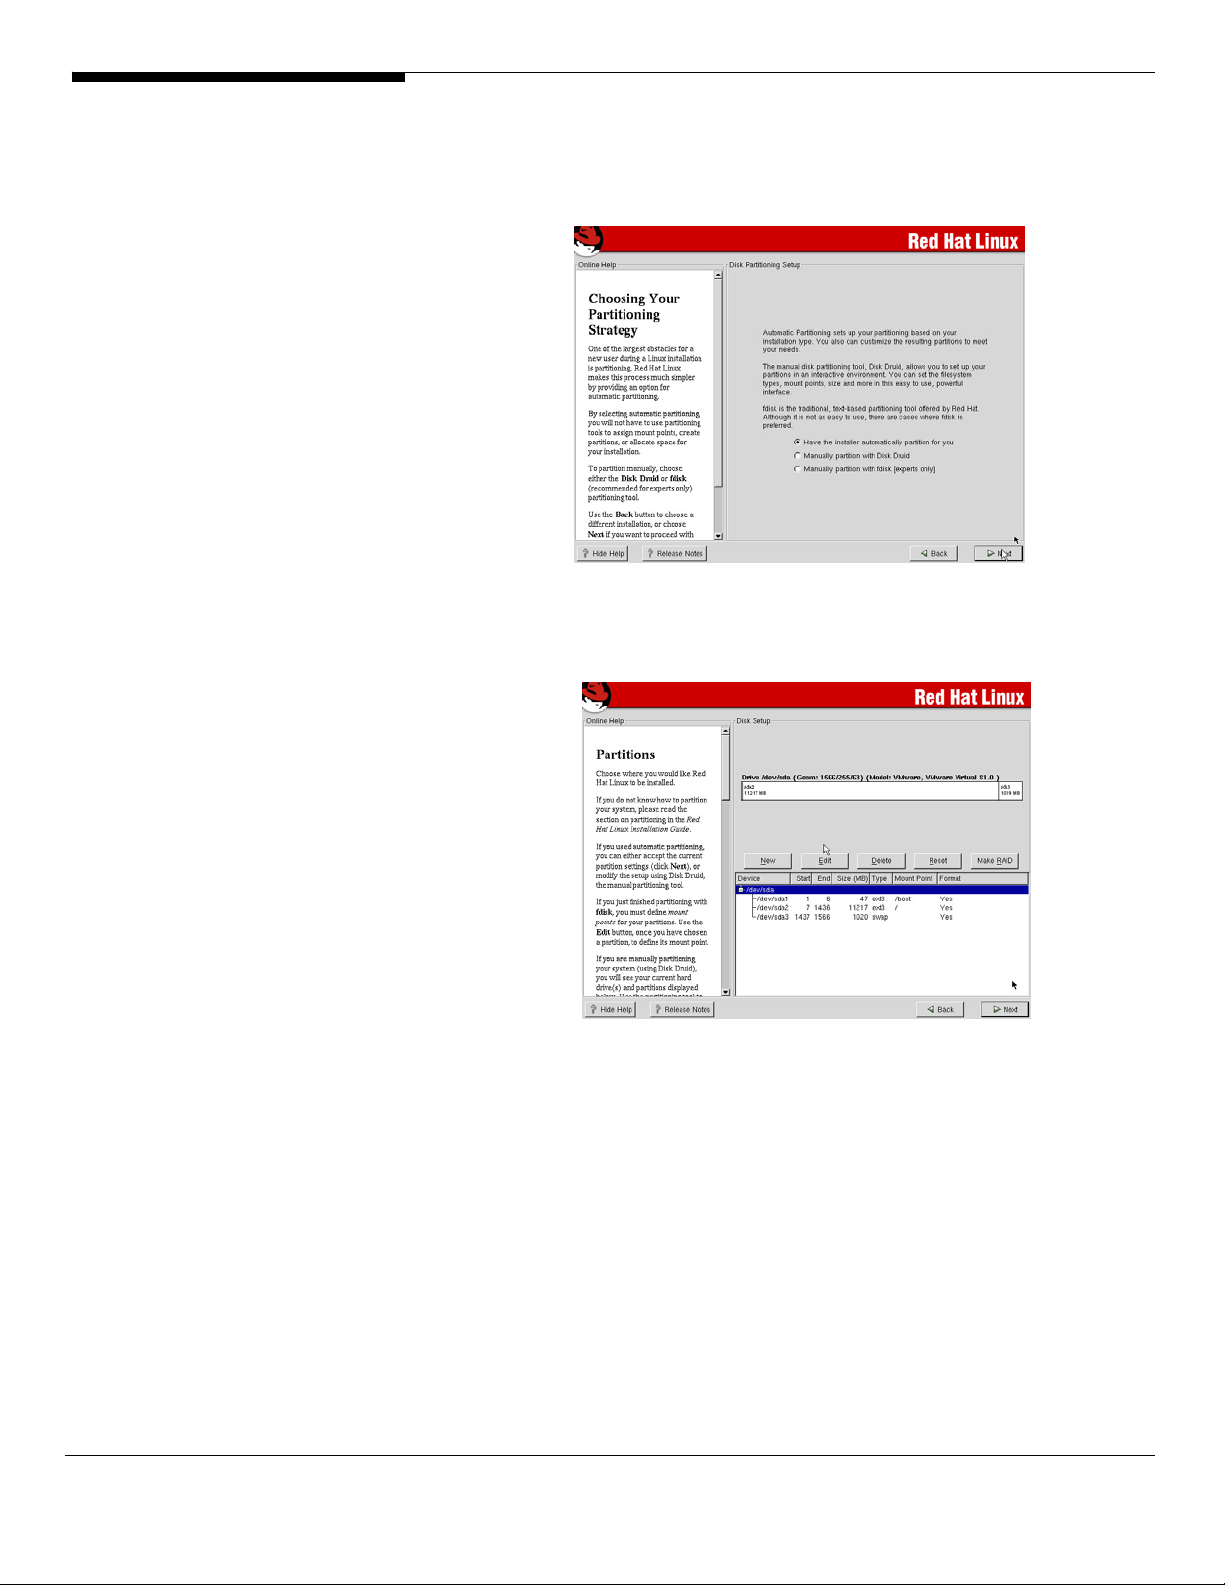
7. Disk Partitioning Setup: Select “Have the installer automatically partition
for you” and click NEXT.
8. Disk Setup.
Verify that the swap partition is smaller than 2000 MB. (Max size for Linux
2.4 kernel). If it’s larger than 2000MB, Select the Swap partition, press
“EDIT” to reduce the value and then click NEXT.
9.
Use GRUB as the boot loader (default setting) and click NEXT to continue.
Acer Altos® NAS 700 Solution Guide
18
Page 27
10. The GRUB password is not mandatory. Leave the field blank if you don’t
want to protect the access to your boot loader. Click NEXT to continue
the installation.
11. On this page you can configure the TCPIP parameters for your 2 built-in
network cards.
ACER recommends to configure and activate on boot only the first
network card called eth0.
You can select to manually enter a static IP address or you can choose to
use a dynamic IP addressing scheme if you already have a DHCP server
installed and running on your network.
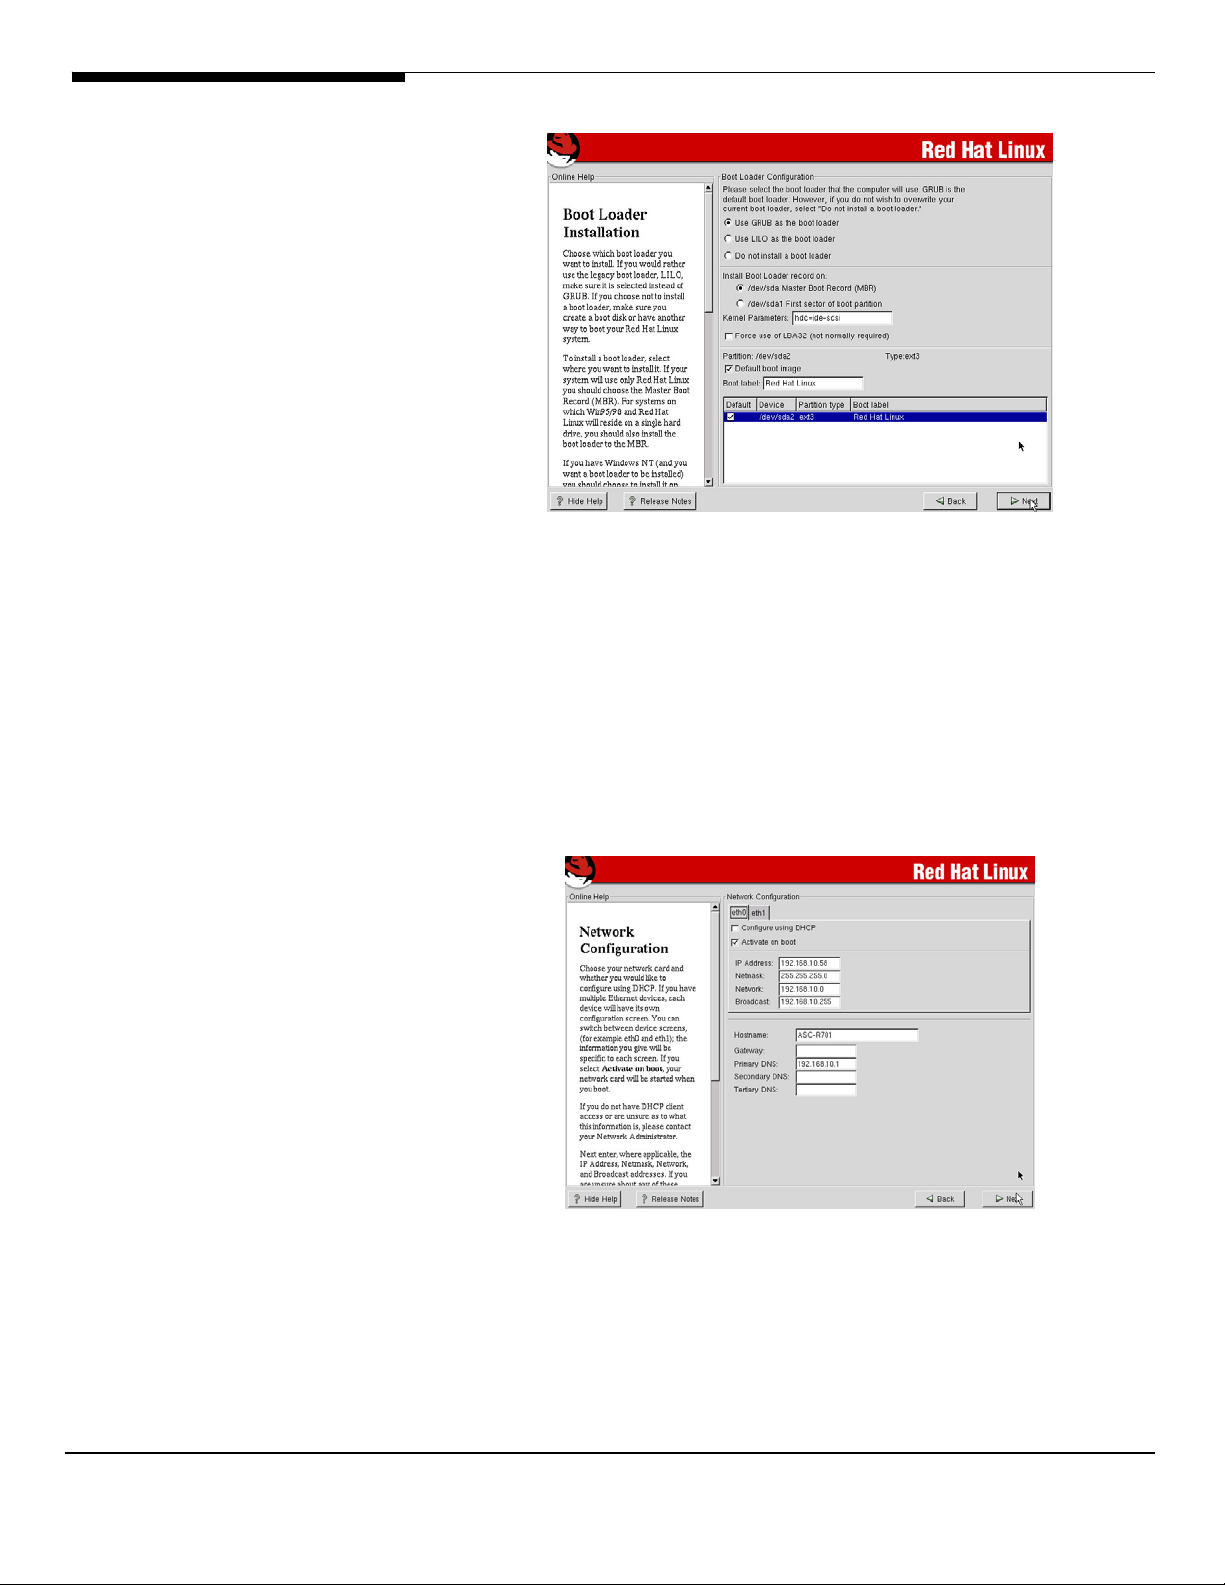
12. Firewall Configuration.
19
Acer Altos® NAS 700 Solution Guide
Page 28
On this page, select No Firewall and click NEXT.
13. Additional Language Support Selection.
Here you can select an additional language support for your Linux
Graphical interface.
ACER recommends to use only English. Click NEXT to continue.
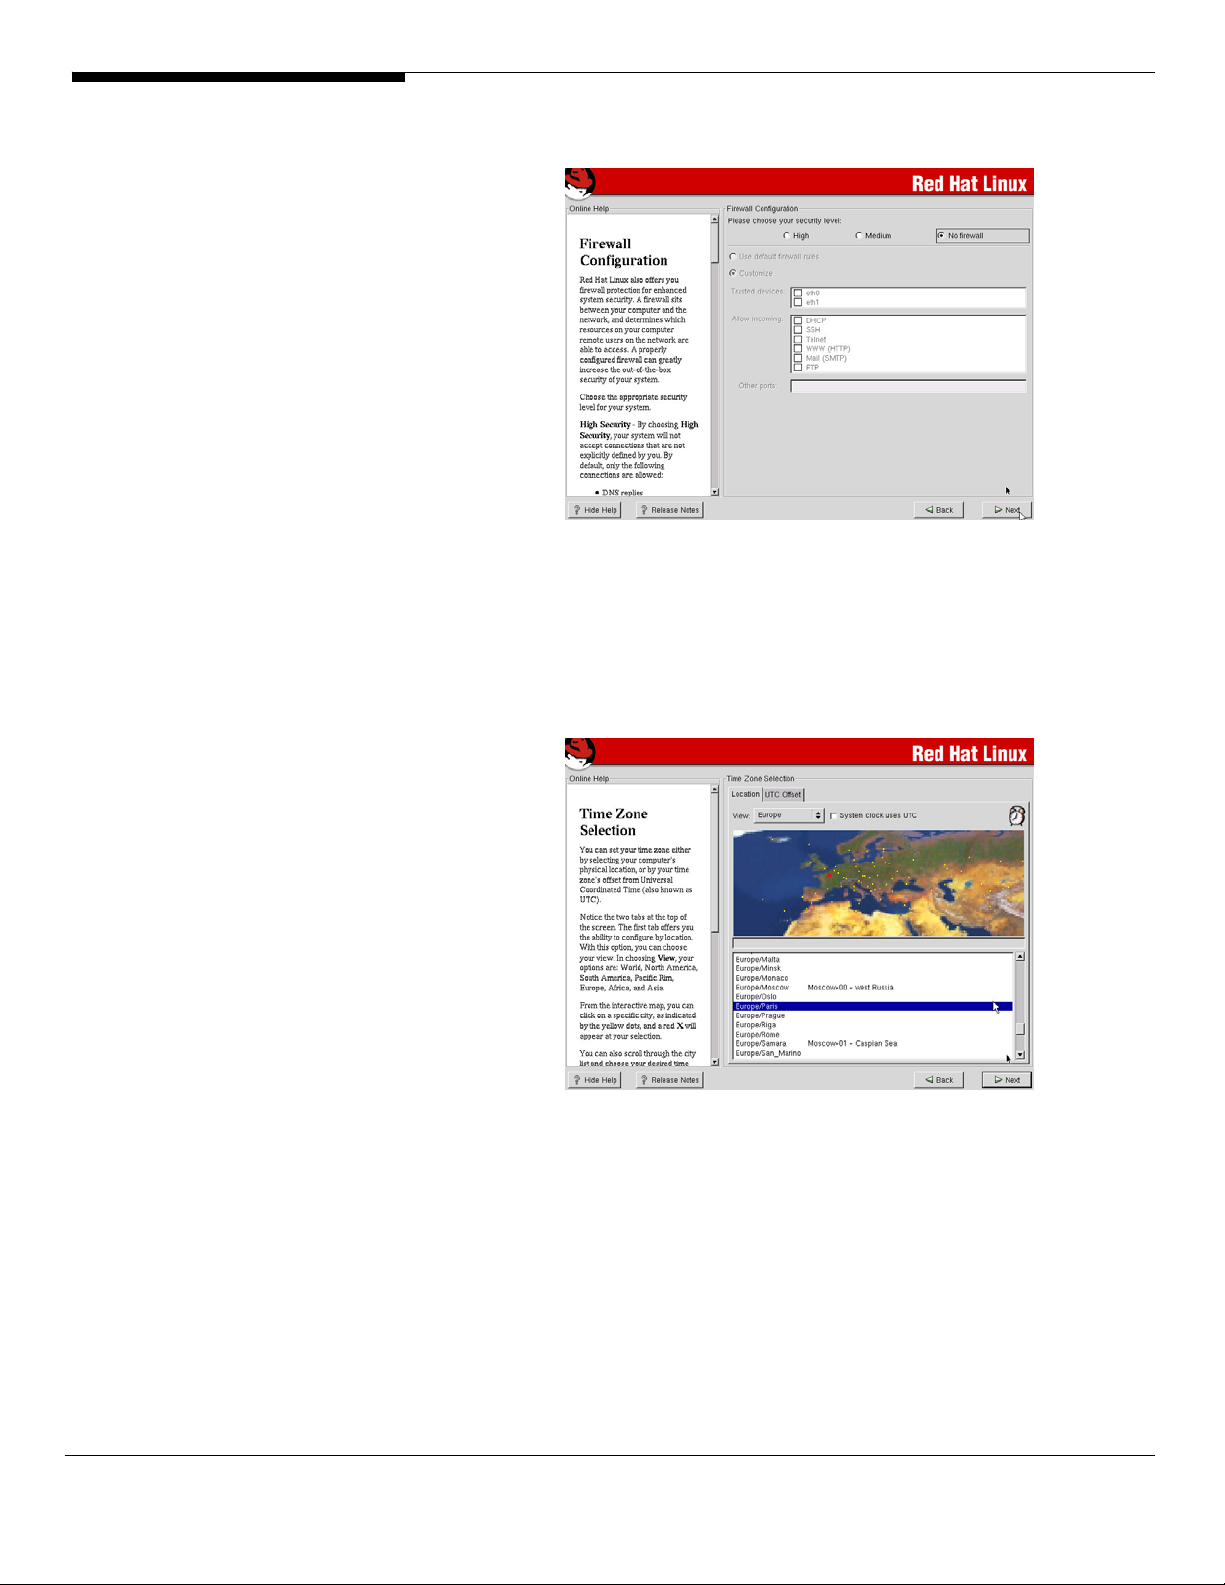
14. Time Zone Selection: select the proper location (instead of UTC offset).
15. Account Configuration.
Setup the root password on this page and you can also add other users.
16. Authentication Configuration.
Just leave the default settings and click NEXT to continue.
Acer Altos® NAS 700 Solution Guide
17. The 8 following packages (total installed size: 1028 MB) are mandatory to
run an ASC Server.
20
Page 29

X Windows system
GNOME
Network Support
NFS File Server
Anonymous FTP Server
Web Server
Networked Managed Workstation
Utilities
Check the “Select individual packages” icon and then click NEXT.
Select Flat view to have a look at the full listing of packages that will be
installed on your server.
In this listing, please verify that the following packages are selected:
Netscape-common
Netscape-communicator
Netscape-navigator
18. In the Video Configuration page, select ATI Rage XL and click NEXT.
19. Press NEXT to start the installation.
21
Acer Altos® NAS 700 Solution Guide
Page 30
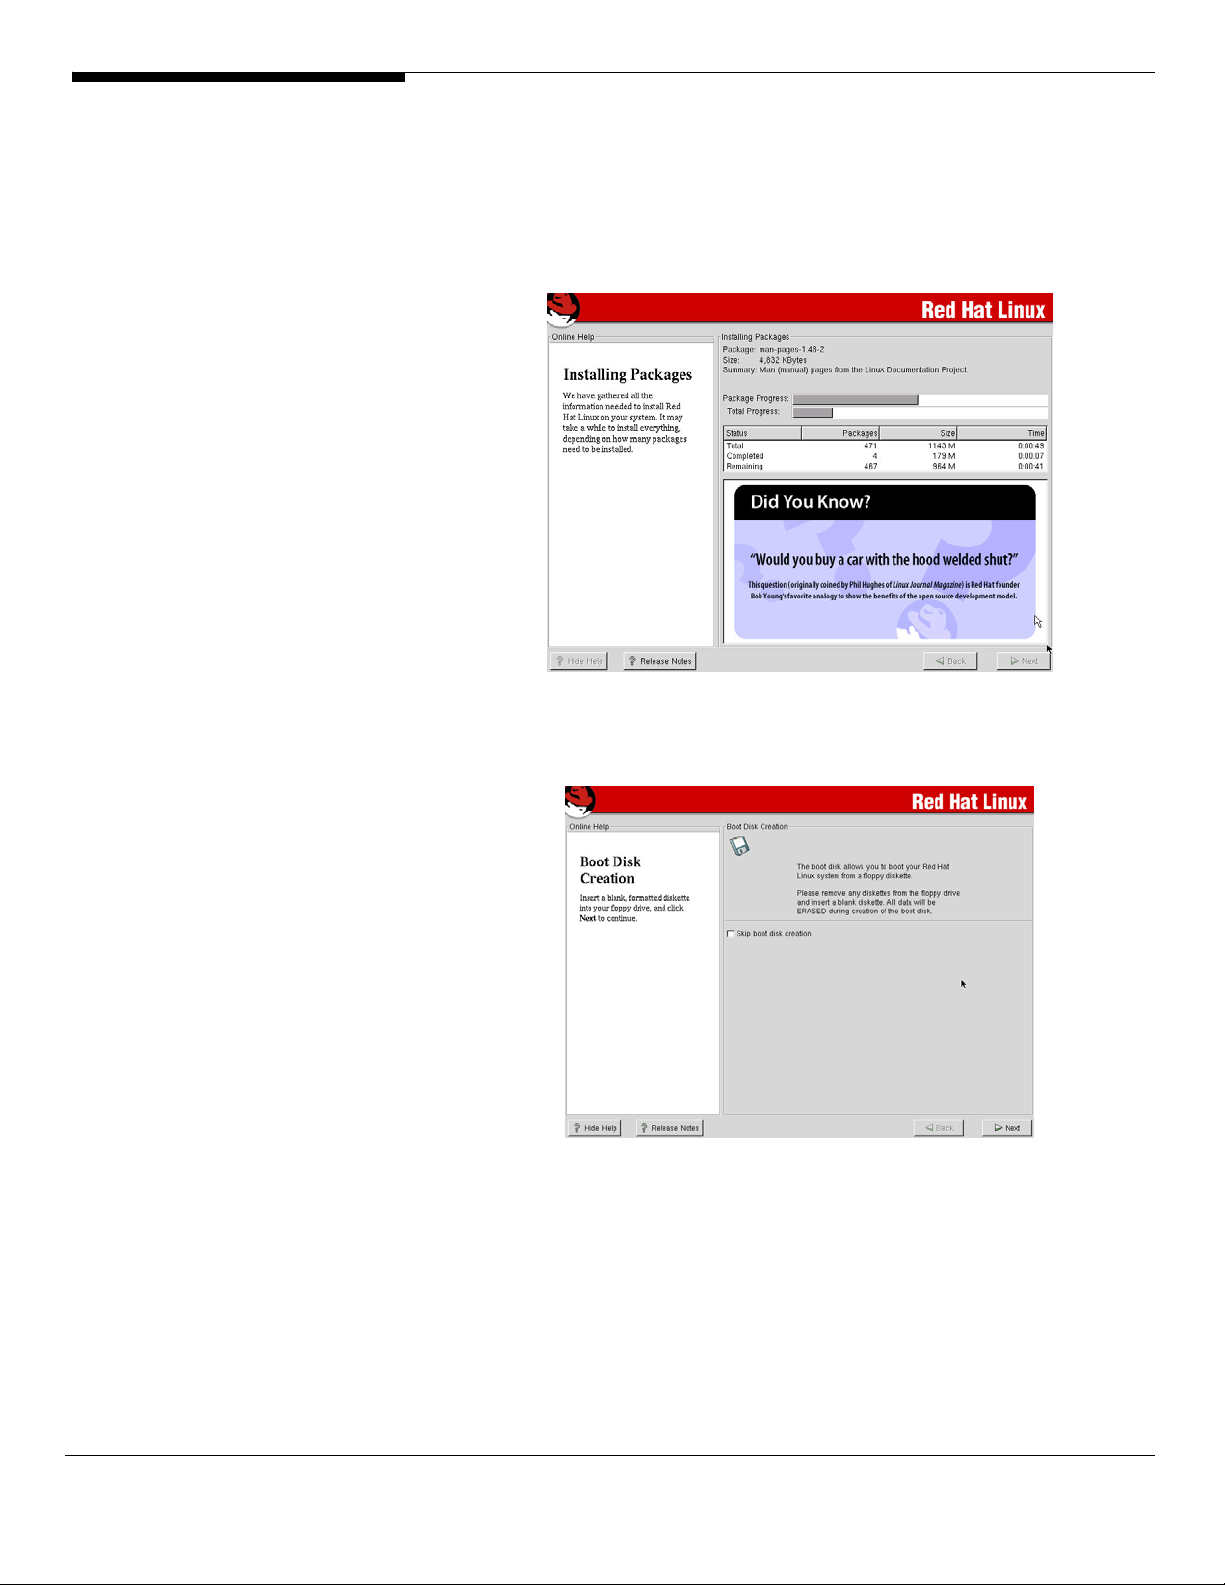
20. On this screen, you can see the installation of the different packages on
your system.
The installer will ask you to insert the second and third CD of your Linux
Red Hat distribution.
21. On the “Boot Disk Creation” mark the Skip boot creation box and click
NEXT to continue the installation.
22. Select your monitor in the manufacturer list or select “Unprobeb
Monitor” if not found. Then click Next.
Acer Altos® NAS 700 Solution Guide
22
Page 31

23. Custom X configuration.
On this screen, configure a standard graphic resolution such as
1024*768 * 16 bits (65536) colors. Click NEXT.
24. Congratulations Screen.
When you reach this screen, the Linux installation is finished.
Click on EXIT to reboot your Server and start Linux 7.3
Acer Altos® NAS 700 Solution Guide
23
Page 32
ASC Server installation
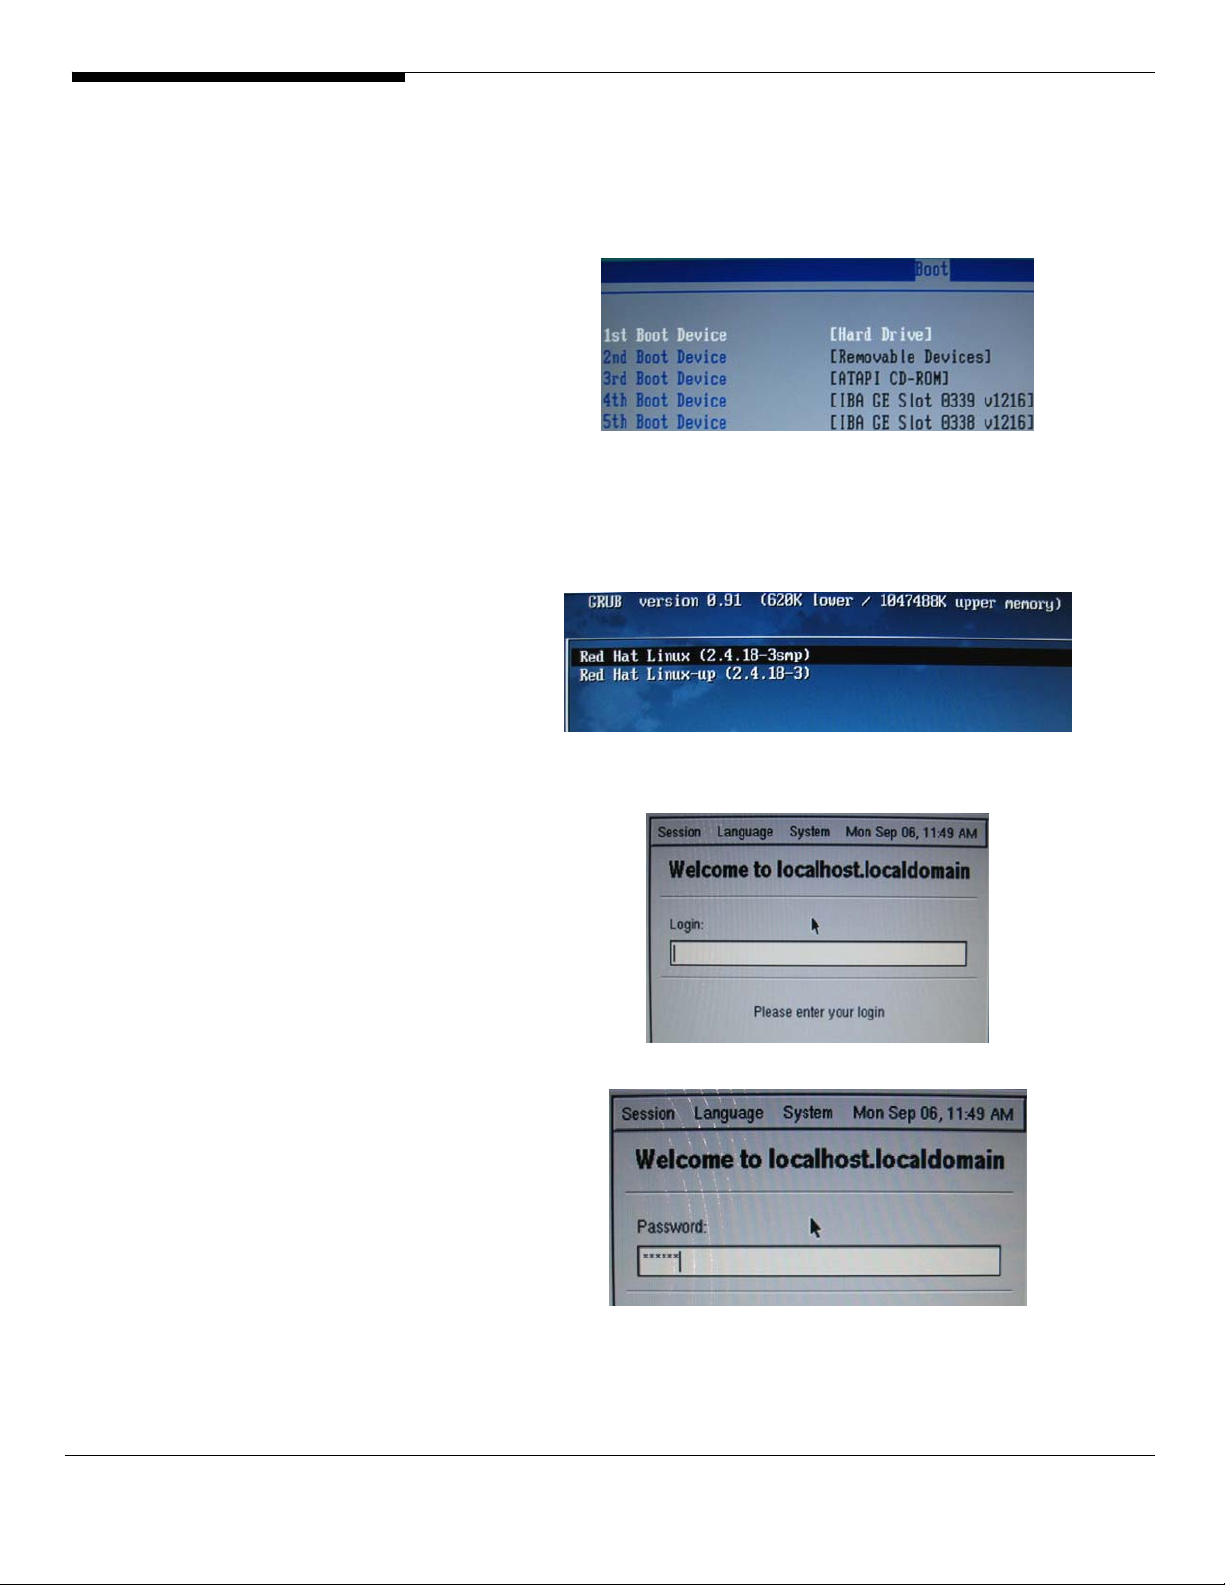
1. After the Linux installation, you must enter into the BIOS by pressing
F2 and check that your boot order is configured as shown in the
picture below:
We recommend to have the Hard Drive selected as 1
st
Boot Device on your
Altos NAS 700.
2. Select “Red Hat Linux (2.4.18-3smp)” to boot Linux.
3. Enter your login and password for your ROOT account
Acer Altos® NAS 700 Solution Guide
Please Note: If login with the ROOT account, you’ll receive a warning
message telling you it’s risky to log onto an X environment with the full
administrative privileges. Just click on the OK button.
24
Page 33
4. Close the START HERE window. Right-click on the desktop and select
NEW TERMINAL.
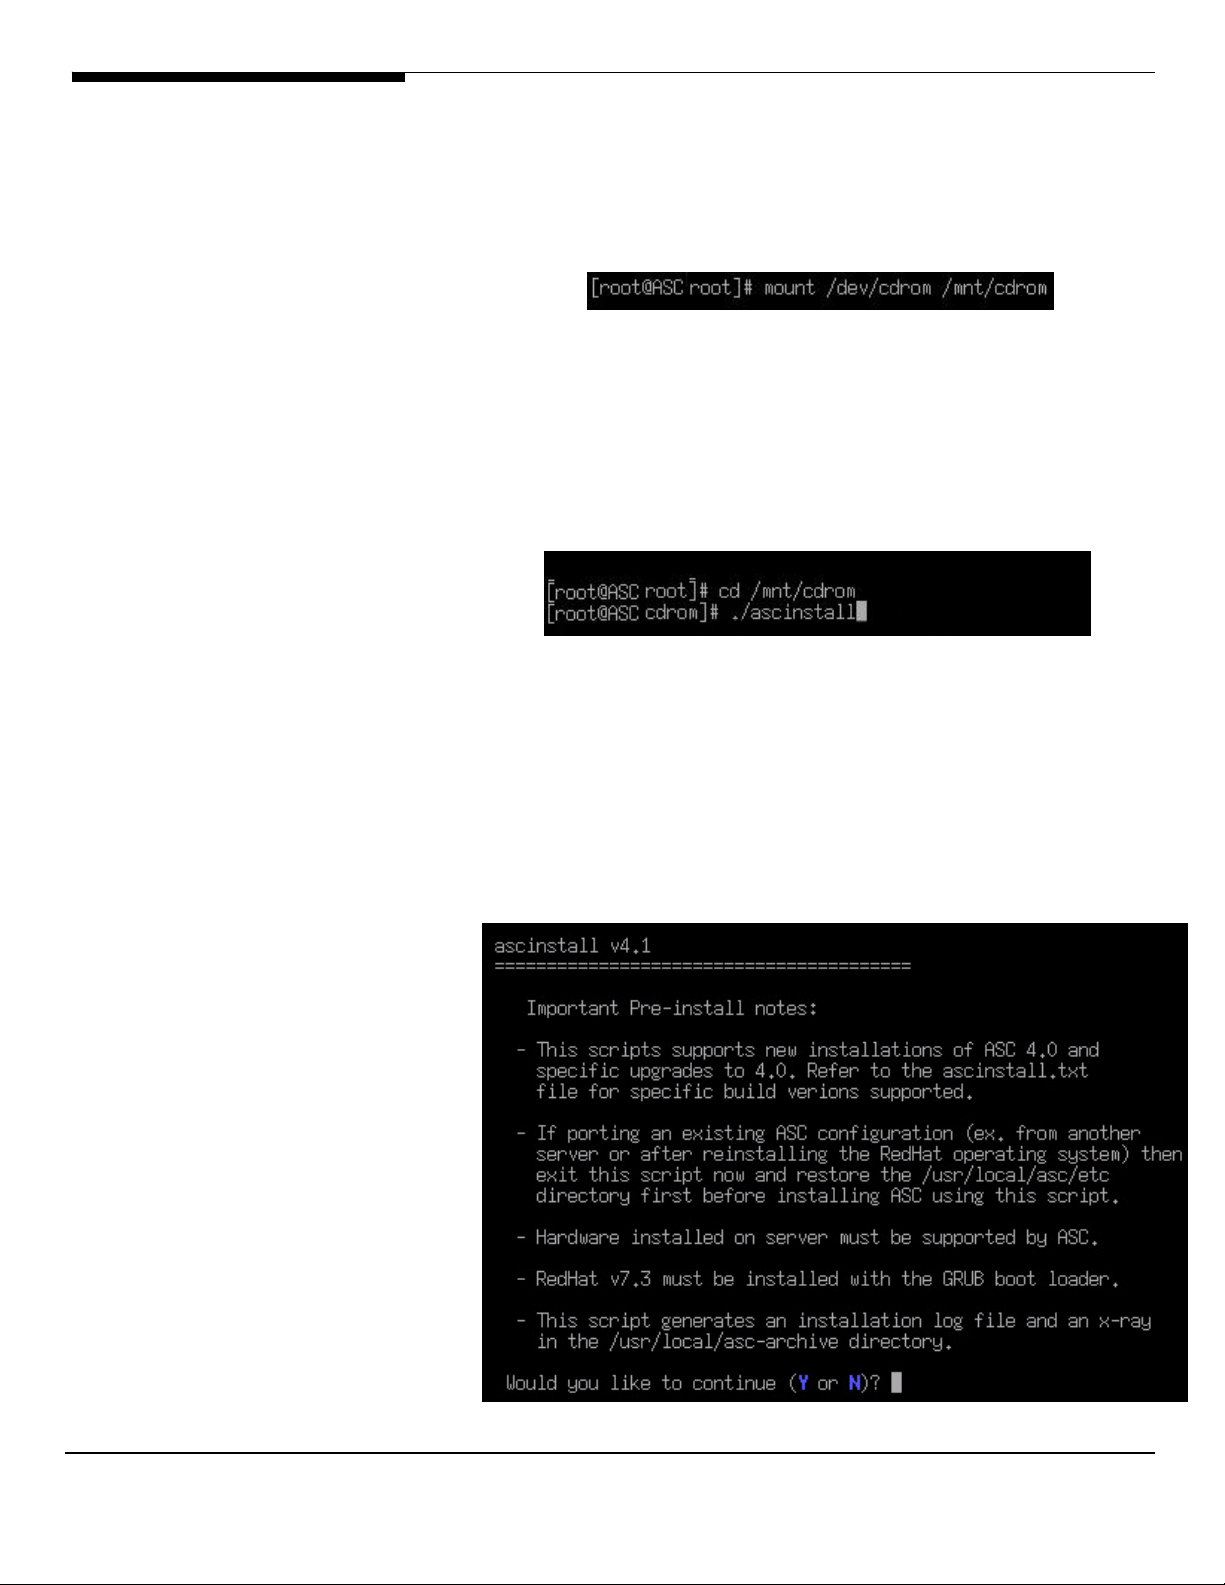
5. In this Terminal window, please type the following command to mount
your ASC cdrom:
A Nautilus window appears listing the content of the ASC 4.0 CD. Just close
it.
6. In the terminal window, type the following command to run the script
that will perform the required updates to your Linux operating system
and launch the ASC 4.0 installer:
The script will modify the following information:
2.4.18 kernel will be updated by the 2.4.21 –ipstor kernel.
Intel onboard NIC drivers will be installed.
Network configuration.
HBA Drivers installation.
7. When you see the first installation page, Press Y to continue the
installation.
25
Acer Altos® NAS 700 Solution Guide
Page 34

8. The script checks to see if ASC is already installed on your machine.
Press Y to continue the ASC installation.
9. Type your company name and press <ENTER>
10. Enter the server name eg. NAS700 and press <ENTER>
Acer Altos® NAS 700 Solution Guide
11. ACER recommends to install the ASC Management Console on the ASC
server. Type Y and press <ENTER>
26
Page 35

12. On this page, the cards located in the ASC Server must be selected to
run the installation of the drivers.
Select 2, 6 and 7.
When the selection is finished, press the F key to continue the installation.
13. If Qlogic HBA is selected on the prvious step, please press 2 and F to
continue the installation.
If not, press 6 and F to continue the installation.
Acer Altos® NAS 700 Solution Guide
27
Page 36

14. Linux supports multiple LUNs on the same SCSI ID. In this menu, select
the number of LUNs you want to use.
The default value is 32.
15. Now, you can setup the maximum number of disks you want to scan.
Acer recommends to use the default settings and press <ENTER>
Acer Altos® NAS 700 Solution Guide
28
Page 37
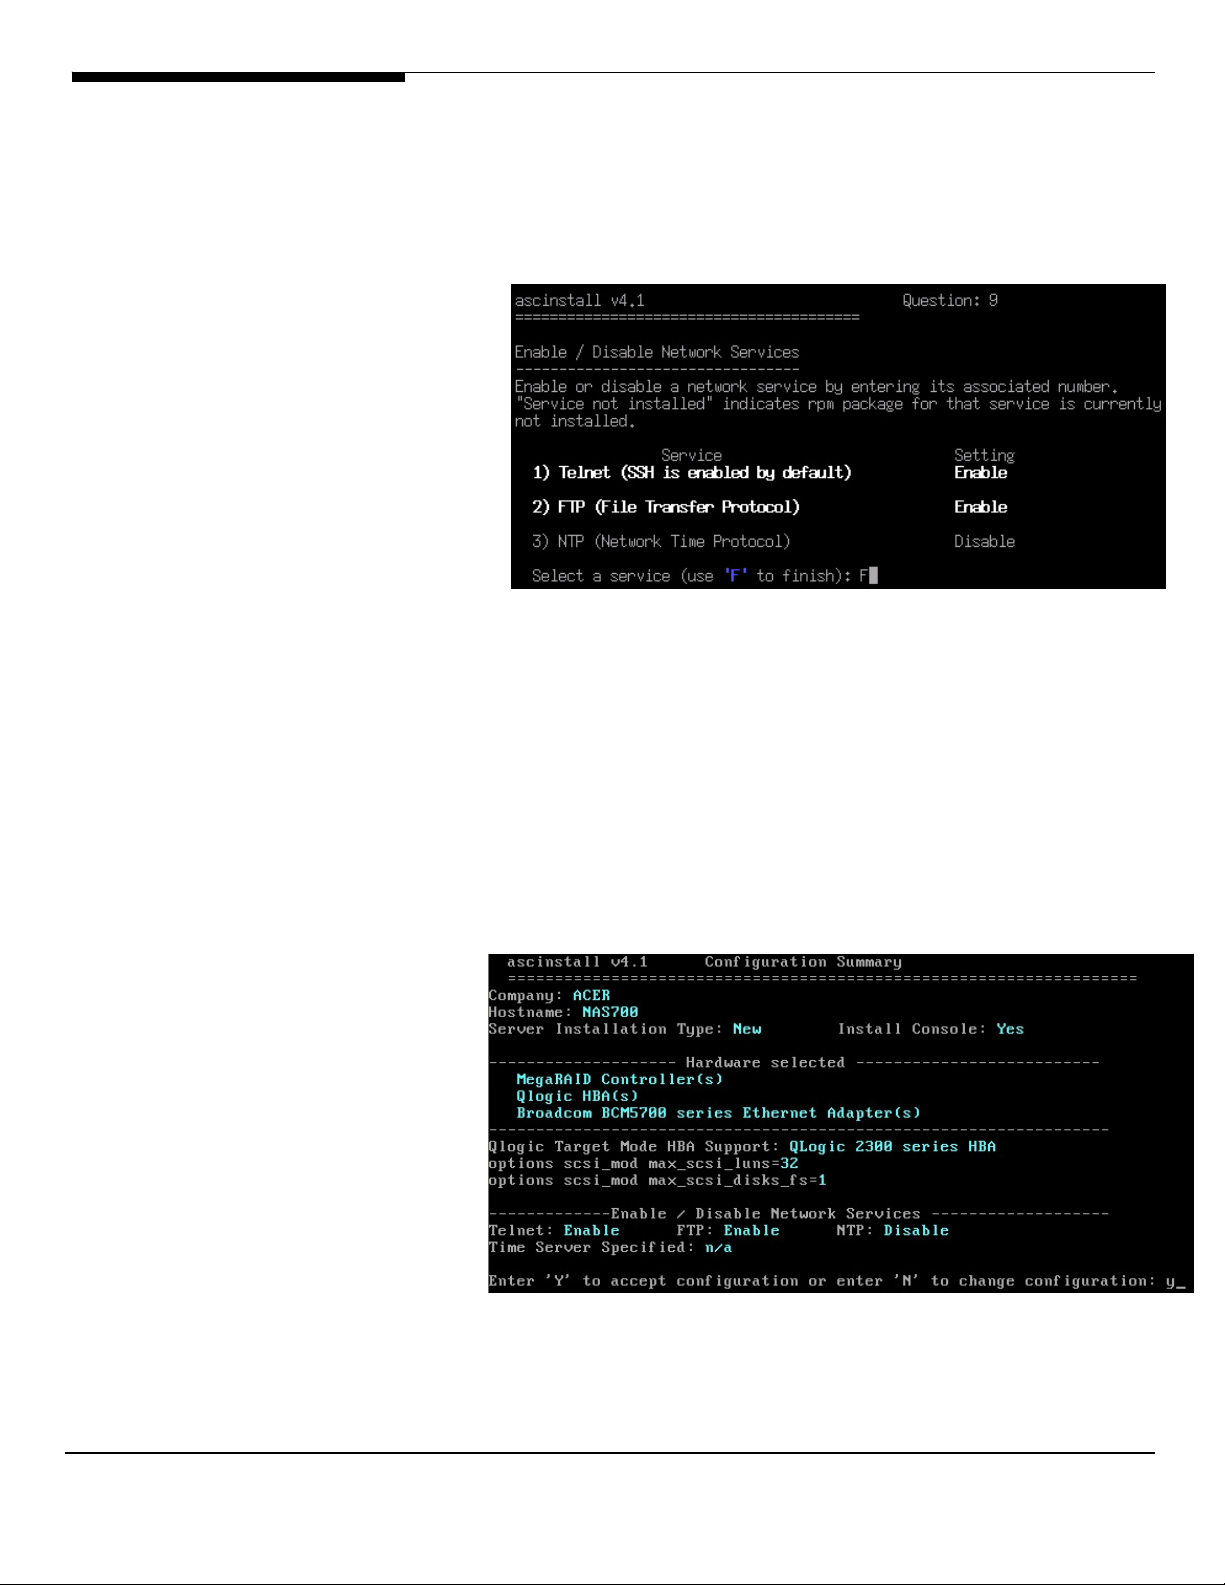
16. The installer offers you the possibility to install several network services
such as Telnet, FTP and NTP.
These components are all enabled by default.
Please deselect “NTP (Network Time Protocol)” by typing 3 and F. Then
press <ENTER>
17. The next screen shows a summary of the configuration that has been
selected before.
Press Y to accept the current configuration.
Acer Altos® NAS 700 Solution Guide
29
Page 38
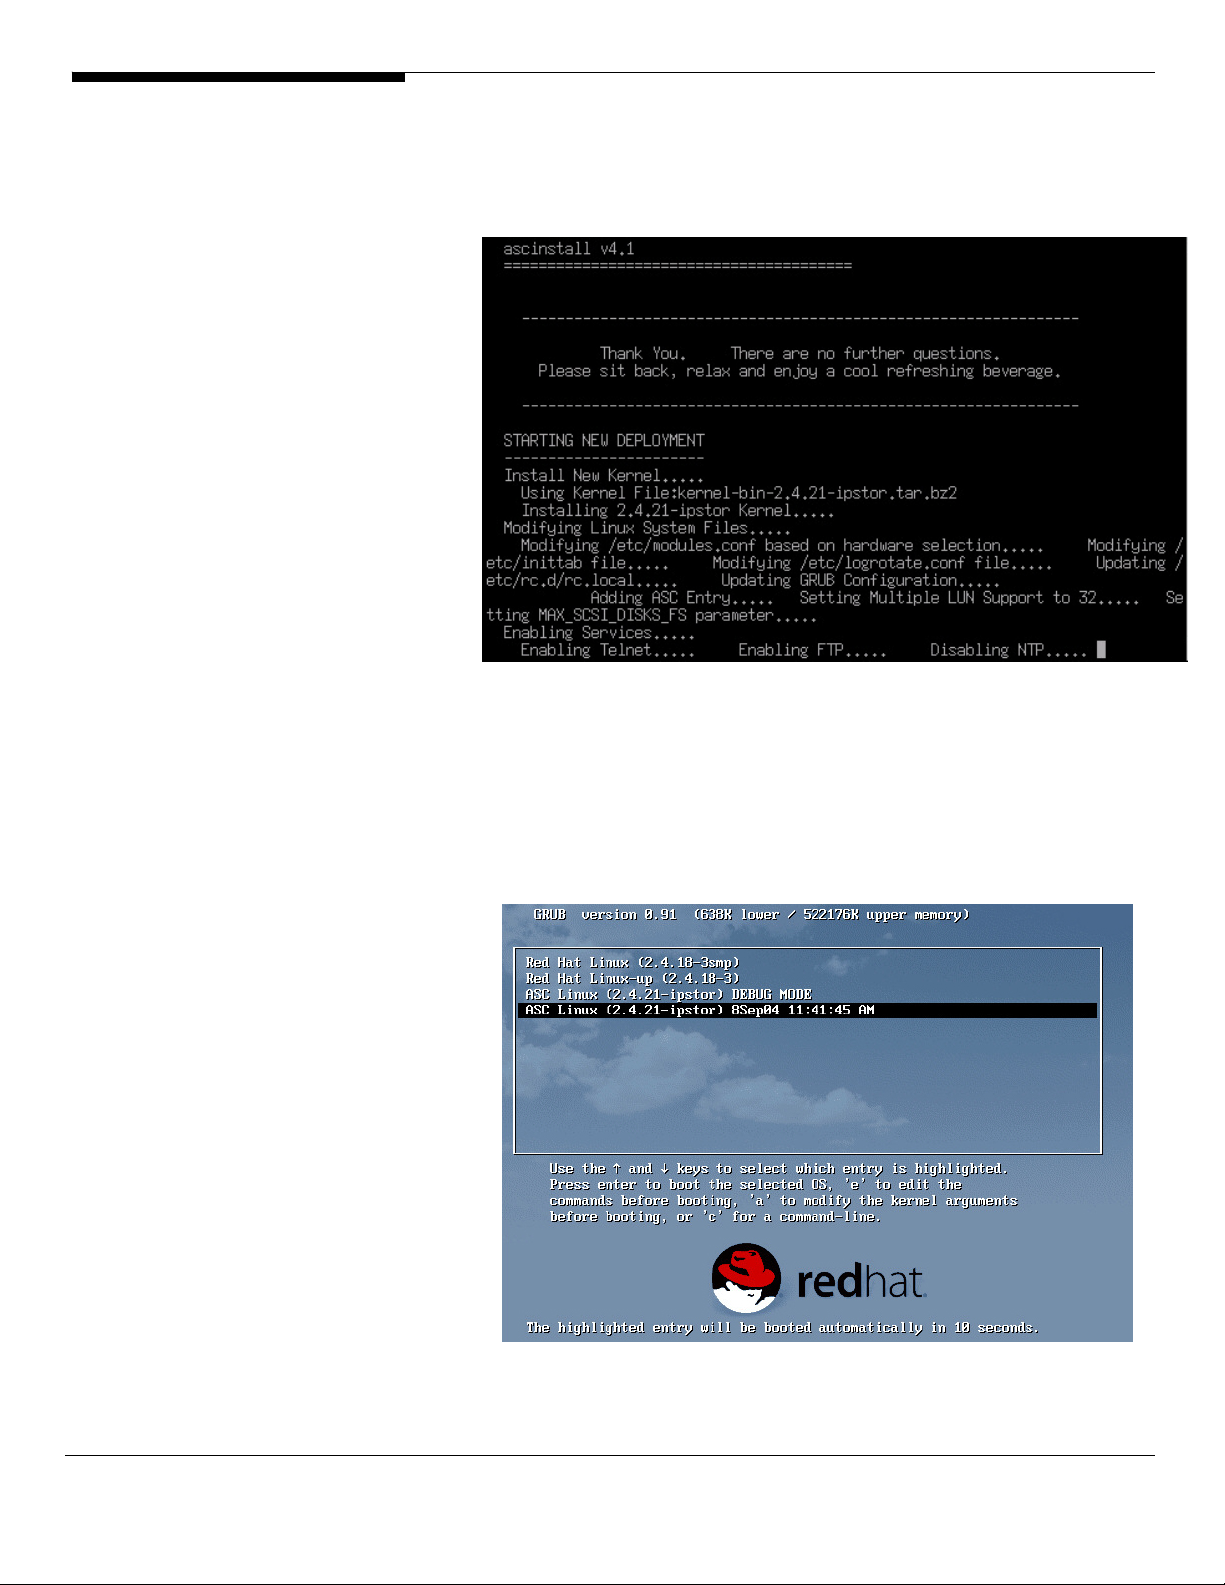
18. A message appears asking the user to wait for a moment during the
automatic installation. No user interaction is required now until
installation is complete.
19. When the script has finished updating the Linux kernel, it reboots your
ASC server and a new boot option is added in your GRUB boot loader.
Acer Altos® NAS 700 Solution Guide
30
Page 39
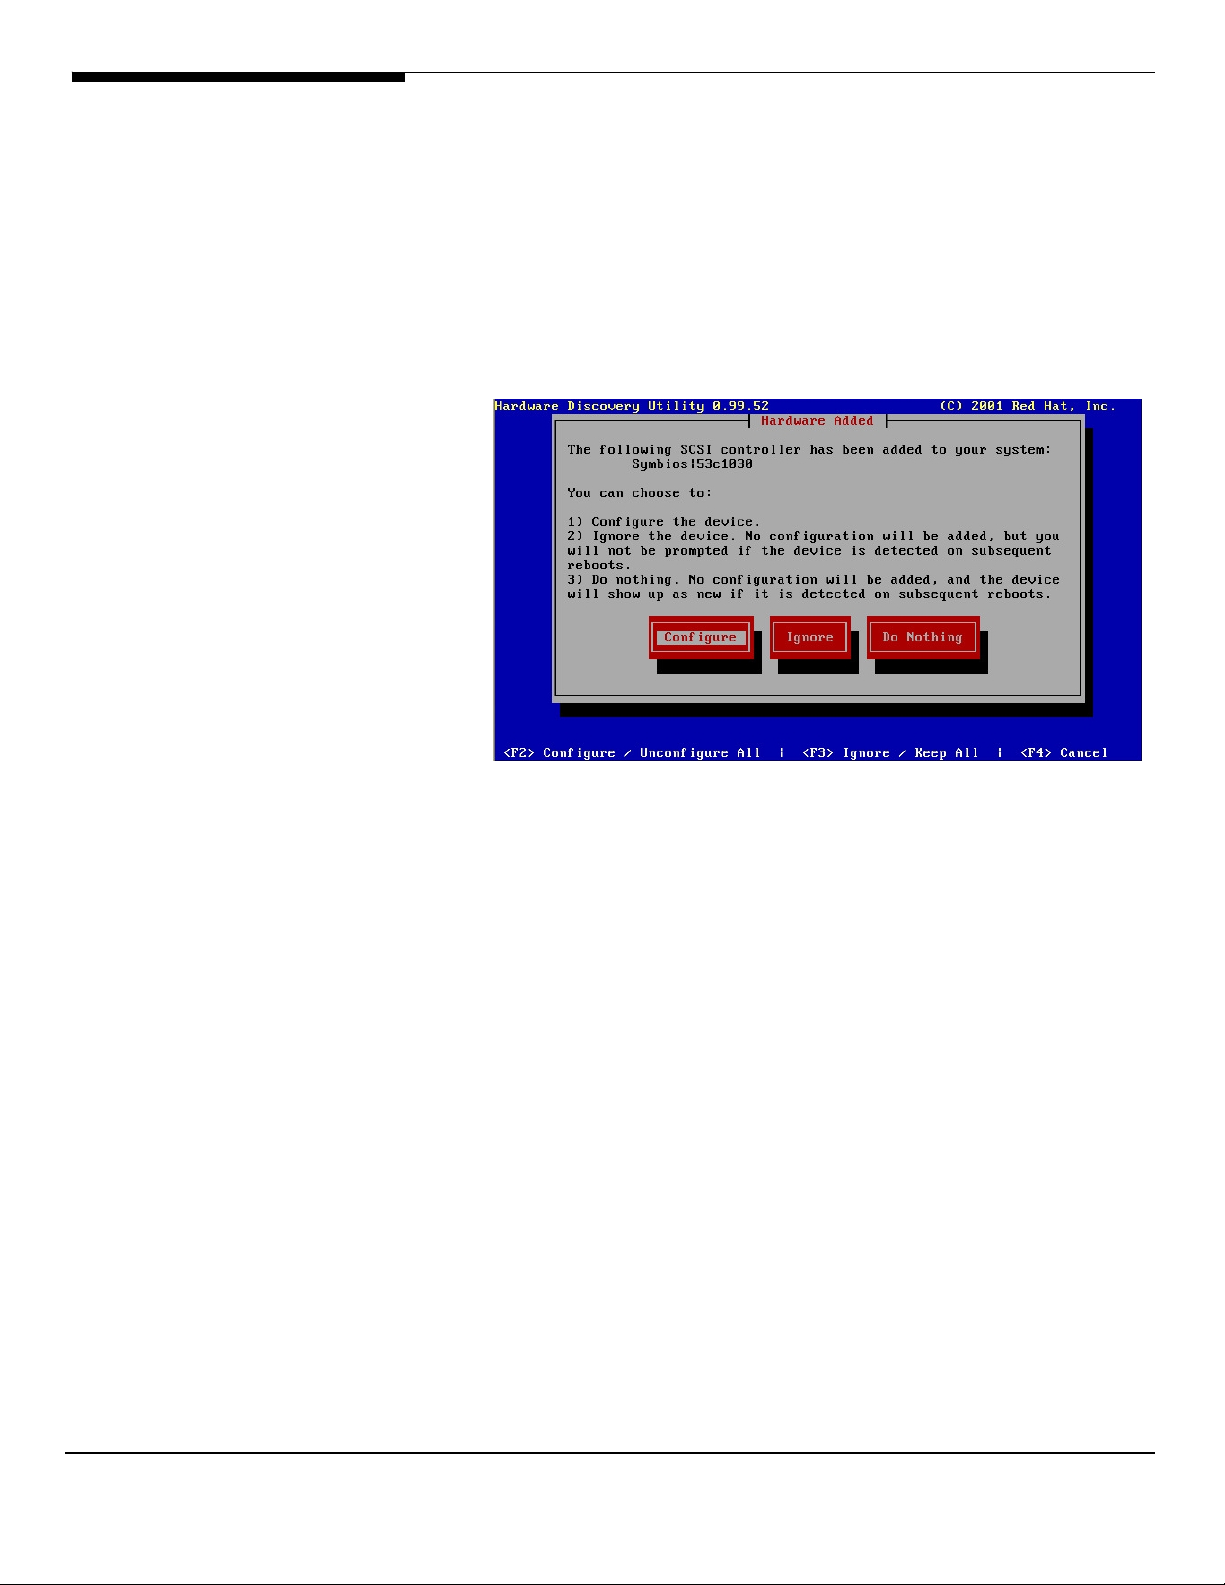
20. When the server boots, the Hardware discovery utility named KUDZU
starts. Press <ENTER> to go to the next screen.
21. KUDZU has detected new installed devices in your ASC server and asks
if you want to configure the new devices or simply ignore them. Here
we can see it has detected a Broadcom BCM5700 network card.
Click on the “CONFIGURE” button.
22. On the next screen, click on “YES” to configure the first network card.
Note: Configure and setup the f r t network adapter called ETH0.
i s
Configure the second network adapter ETH1 but do not se up it at this
momen . This configuration work for teaming and non teaming solut on.
t s i
t
31
Acer Altos® NAS 700 Solution Guide
Page 40

23. On this page, you must enter the TCPIP information for the new
detected network card. You can select between a dynamic (if you
already have a DHCP server running on your network) and a static IP
configuration. For the latter case, you must manually enter all the
information such as :
• IP address of the ASC server,
• Subnet Mask of the ASC server,
• Network Default Gateway,
• IP address of the DNS server
24. After this last configuration step, the script automatically finishes
configuring your machine and starts all the ASC services.
Acer Altos® NAS 700 Solution Guide
32
Page 41

Note: Please make sure you have the CD still in the CD-ROM Drive at this time
to allow the setup process to complete.
Congratulations.
You have successfully completed the installation of ASC Server. You can now
install the ASC Management Console on your Workstation to manage and
configure the ASC server remotely. Please refer to the User Guide chapter 2 for
the installation instructions for the ASC Console.
Acer Altos® NAS 700 Solution Guide
33
Page 42

ASC Management Console installation
The ASC Management Console is the administrative tool that allows ASC
administrators to create, configure, manage, and monitor the storage resources
on the ASC storage network.
The ASC Management Console is a Java application that can be run on many
Windows, Linux, and Solaris platforms that support the Java 2 Runtime
Environment (JRE).
Pre-Requisite.
The computer that runs the Console needs connectivity to the Storage Network
segment. This is because it communicates directly with the server and clients to
administer and monitor their behavior. The Console may be installed on any
number of machines, including the clients themselves, provided that they have
a Graphical User Interface.
Installation on Microsoft Windows NT, 2000, XP and 2003.
The installation CD includes a setup program for installation on Windows
computers. On Windows NT and 2000, you must be a Power User or
Administrator to install the Console.
• Insert the ASC installation CD into your CD-ROM drive.
• Select
• If the CD Browser does not launch, navigate to the \Console\Windows
• To launch the Console, select
Install Products
directory and run
install program.
Console
.
-->
Install ASC Console
.
ISinstall.exe to launch the ASC Management Console
Start
-->
Programs
-->
Acer ASC
-->
ASC
Acer Altos® NAS 700 Solution Guide
34
Page 43

Installation on Linux.
For Linux, you will need to manually install the ASC Console.
To install the Console software, log into your system as the root user.
Mount the ASC installation CD to an available or newly created directory and
copy the files from the /Console/Linux directory on the CD to a temporary
directory.
Type the following command to install the Console software:
The Console will be installed in the following location: /user/local/ascconsole
To launch the Console, execute the following:
35
Acer Altos® NAS 700 Solution Guide
Page 44

ASC SAN Client installation
ASC SAN Clients access their storage resources via software-emulated virtual
adapters (for SAN/IP). The storage resources appear as locally attached devices
to the SAN Clients’ operating systems (Windows NT, Windows 2000, Linux, etc.)
even though the SCSI devices are actually located at the ASC Server.
There’re 3 types of SAN clients:
• SAN/IP SAN Client
• iSCSI SAN Client
• Fibre Channel SAN Client (not supported by ACER ASC Express version)
SAN/IP protocol definition
SAN/IP is a protocol specially developed for ASC in order to access SAN Storage
over IP.
iSCSI protocol definition
ACER recommends to use the SAN/IP protocol instead of iSCSI. It’s an industry
evolving standard storage protocol, recently ratified by the Internet
Engineering Task Force (IETF) that is designed to transport block-level storage
traffic over IP networks.
iSCSI employs Ethernet as the transport for data from servers to storage devices
or SANs. The protocol takes standard SCSI commands into TCP and sends them
over standard Ethernet, a venerable technology familiar to most IT shops. To
create an iSCSI-based SAN, network designers bring together servers equipped
with an iSCSI host bus adapter (HBA) or network interface card (NIC), disk
arrays and tape libraries.
It’s not widely used today due to a limited number of supported platforms
Acer Altos® NAS 700 Solution Guide
36
Page 45

Pre-installation checklist
ASC provides client software for many platforms and protocols. Please check
the following lists for the versions and the patch levels (if applicable) that are
currently supported. While this information is accurate as of the date of its
release, you should check the certification matrix on the Acer website for any
updates.
Notes:
• The ASC Client should not be installed onto a networked drive.
• Client software requires network connectivity to the ASC Server,
preferably on a separate, ASC-only network. This means that normal
LAN traffic does not occur on the adapter(s) dedicated to the ASC
storage network.
The ASC Server grants storage access to the client. In order for a client to be
able to access storage, you must establish a trusted relationship between the
client and server. This prevents other computers from masquerading as the
client and accessing storage that it does not have rights to. In order to establish
a trusted relationship, you must do two things:
• Add the client in the Console and assign storage resources to the client.
• Add the server to the client from the Client Monitor.
For more information, refer to
“Manage ASC SAN Clients” chapter.
‘Add/configure an ASC SAN Client’ in the
37
Acer Altos® NAS 700 Solution Guide
Page 46

ASC SAN Clients Supported Platform
SAN/IP Client
The following platforms are supported for SAN/IP clients:
Platform Supported version
Windows NT 4.0 Enterprise Edition with Service Pack 6a.
Windows 2003 Standard Server and Enterprise Server
Windows 2000 - Professional, Server, Advanced Server, and Datacenter,
including Service Pack 2, 3, or 4.
- Supports Windows 2000 Clustering
Red Hat Linux
Advanced
Server v2.1
Red Hat Linux
v7.3
Red Hat Linux
v7.2
Red Hat Linux
v7.1
- Kernel 2.4.9-e.9smp
- Kernel 2.4.9-e.12smp
- Kernel 2.4.9-e.16smp
- Kernel 2.4.9-e.25smp
- Kernel version 2.4.18-5
- Kernel version 2.4.18-5smp
- Kernel version 2.4.7-10
- Kernel version 2.4.7-10smp
- Kernel version 2.4.7-10enterprise
- Kernel version 2.4.9-31
- Kernel version 2.4.9-31smp
- Kernel version 2.4.9-31enterprise
- Kernel version 2.4.2-2
- Kernel version 2.4.2-2smp
Acer Altos® NAS 700 Solution Guide
- Kernel version 2.4.2-2enterprise
38
Page 47

NetWare NetWare 5.1 with Service Pack 6. Make sure NSS is
running.
NetWare 6.0 with Service Pack 3. Make sure NSS is
running.
You must have a separate Ethernet adapter for storage
that is placed on a dedicated subnet. Although it is OK
to use a 10/100 NIC, it is preferable to use a gigabit NIC.
iSCSI client
The following platforms are supported for SAN/IP clients:
Platform Supported version
Windows 2003 Standard Server and Enterprise Server.
Windows XP With Service Pack 1 or higher.
Windows 2000 With Service Pack 3 or higher.
You should not install any ASC client software on an iSCSI client because it
requires the Microsoft iSCSI initiator which can be downloaded from
Microsoft’s website
(http:/www.microsoft.com/windowsserversystem/storage/iscsi.mspx).
The Microsoft iSCSI Software Initiator package includes both the Microsoft iSCSI
Initiator service and the Microsoft iSCSI Initiator software driver.
Acer Altos® NAS 700 Solution Guide
39
Page 48

SAN/IP Client installation on Windows NT, 2000 and 2003.
You must be an administrator or have administrator privileges in order to
install the client.
• Insert the ASC installation CD into your CD-ROM drive.
• Select
• If the CD browser does not launch, navigate to the \Client\Windows
• Note: During the installation, the Microsoft “Digital Signature Warning”
• After accepting the license agreement, indicate the type of client you are
• When done, click
Note: The client installs a device driver. Therefore a Windows NT computer
must be rebooted before the client can use storage resources. (It is not
necessary to reboot a Windows 2000 computer.)
SAN/IP Client installation on Linux
Note: You should not install the Linux client on an ASC Server machine. The
ASC Server installation includes a local Linux Client to service NAS Resources. If
the Linux Client were to be installed on an existing ASC Server, all access to
NAS Resources would be lost.
Install Products
directory and run
window will appear to indicate that the software has not been certified by
Microsoft. Click
installing, Fibre Channel or SAN/IP.
-->
Install ASC SAN Client
ISinstall.exe
YES
to continue the installation process.
Finish
to launch the client install program.
.
.
Acer Altos® NAS 700 Solution Guide
Prior to installing the ASC SAN Client for Linux, assign SAN Resources to the
client machine. To do this, use the
Console. When you are asked to select the SAN Client, click the
and type in the name of the Linux machine.
The name must match the output of “uname –n” from the client machine.
For more information, refer to
• To install the client software, log into your system as the root user.
• Mount the ASC installation CD and copy the files from the CD to a
temporary directory on the machine.
• The software packages are located in the /client/linux/ directory off the CD.
40
Assign a SAN Resou ce Wizardr
‘Assign a SAN Resource to one or more clients’.
in the
Add
button
Page 49

• Type the following command to install the client software:
rpm -i /mnt/cdrom/Client/Linux/sanclient-4.00-0.883.i386.rpm
• The client will be installed to the following location: /usr/local/sanclient
• Log into the client machine as the root user again so that the changes in
the user profile will take effect.
• Add the ASC Servers that this client will connect to for storage resources by
typing the following command from /usr/local/sanclient/bin:
• Indicate what type of client this is, Fibre Channel or SAN/IP.
• Select
• After this server is added, you can continue adding additional servers.
• To start the Linux client, type the following command from the
SAN/IP Client installation on NetWare.
Installation of the ASC’s NetWare client is done on a Windows NT 4.0 or
Windows 2000 machine running Novell’s client for NetWare.
Before you install the SAN client on the NetWare server, you must log in to the
server and map a drive to SYS:\SYSTEM.
• Run
• Indicate the type of client you are installing, Fibre Channel or SAN/IP.
• When done, click
Add an ASC Server
login ID and password.
/usr/local/sanclient/bin directory:
setup exe
to launch the client install program.
.
Finish
from the menu and enter the ASC Server name,
.
• To authenticate the NetWare client to the ASC Server, type
NetWare console screen.
• Run the command below to add the ASC Server to the ASC Client.
• ISCMD AddServer server=
• When prompted, enter your username and password.
• After using the ASC Management Console to assign devices to the client,
you can start the client by typing the following command from the
NetWare console screen:
41
serverIPAddress
Acer Altos® NAS 700 Solution Guide
SANON
on the
Page 50

• ISCMD Start Server=
serverIPAddress
• When prompted, enter your username and password.
• Type the following to scan and discover the ASC disk:
• If you have not done so before, use NWCONFIG (NetWare 5.1), ConsoleOne
or web portal (NetWare 6.0) to create a NetWare volume on the ASC
SAN/IP device.
• If you have already created a NetWare volume, type the following to
mount the volume:
Acer Altos® NAS 700 Solution Guide
42
Page 51

ASC MANAGEMENT CONSOLE
The ASC Console is the administration tool for the ASC storage network. It is a
Java application that can be used on a variety of platforms and allows ASC
administrators to create, configure, manage, and monitor the storage resources
and services on the ASC storage network as well as run/view reports, enter
licensing information, and add/delete ASC administrators.
Start the ASC Management Console
On Windows, select
On Linux and other UNIX environments, execute the following:
Discover all ASC servers on your storage subnet by selecting
Start
-->
Programs
-->
Acer ASC
-->
ASC Console
Tools
-->
.
Discover
ASC Serve s. r
You can connect to an existing ASC Server, by right-clicking on it and selecting
Connect
..
If you want to connect to a server that is not listed, right-click on the
Servers
and password.
When you connect to a server, you may see a dialog box notifying you of new
devices attached to the server. Here, you will see all devices that are either
unassigned or reserved devices. At this point you can either prepare the device
(reserve it for a virtual, direct, or service enabled device) and/or create a logical
resource.
Note: Multiple administrators can access a server at the same time. Changes to
the server’s configuration are saved on a first-come, first-served basis.
The ASC Management Console remembers the ASC Servers to which the
Console has successfully connected. If you close and restart the Console, the
ASC Servers will still be displayed in the tree but you will not be connected to
them.
If this is the first time you are using the ASC Management Console after
installation, you should add at least one administrator account.
Right-click on the server name and select
administrators.
object and select
Add
, enter the name of the server, the root user’s ID
is
Admin trators
to add ASC
ASC
43
Acer Altos® NAS 700 Solution Guide
Page 52

ASC Management Console User interface
The ASC Management Console displays the configuration for the ASC Servers
on your storage network. The information is organized in a familiar Explorerlike tree view.
The tree allows you to navigate the various ASC Servers and their configuration
objects. You can expand or collapse the display to show only the information
that you wish to view.
• To expand an item that is collapsed, you can click on the
• To collapse an item, click on the
symbol next to the item. Double-
symbol.
clicking on the item will also toggle the expanded/collapsed view of
the item.
You need to connect to a server before you can expand it.
When you highlight any object in the tree, the right-hand pane contains
detailed information about the object. You can select one of the tabs for more
information.
The Console log located at the bottom of the window displays information
about the local version of the Console. The log features a drop-down box that
allows you to see activity from this Console session.
ASC Management Console information displays each object on the ASC
Console’s configuration tree has a corresponding informational display. These
displays show the current configuration of the object and can also show health
and performance statistics.
Acer Altos® NAS 700 Solution Guide
44
Page 53

ASC Server
This display shows the configuration and status of the ASC Server.
Configuration information includes the version of the ASC Server software and
base operating system, the type and number of processors, amount of physical
and swappable memory, supported protocols, and network adapter
information.
Discovery ASC Servers
ASC can automatically discover all ASC Servers on your storage subnet.
• Select Tools --> Discover ASC
• Servers.
• Enter your network criteria.
45
Acer Altos® NAS 700 Solution Guide
Page 54

Server statistics
To display memory and CPU usage for a server, select the
Statistics
tab.
You can turn the statistics on/off by right-clicking on the server and selecting
Statist cs
either
• Open Tools
• Select prompted.
-->
Start
or
Stop
i
.
Acer Altos® NAS 700 Solution Guide
46
Page 55

Save & Restore an ASC Server configuration
ASC provides a convenient way to protect your ASC configuration. This is
useful for disaster recovery purposes, such as when an ASC Server is down but
you have the storage disks and want to use them to build a new ASC Server.
In this case, after importing all disks from the original server, you would restore
your ASC configuration, including SAN and NAS client information and the
names of your resources.
Save configuration
You should save the configuration any time you change your configuration
from the Console, including any time you add/change/delete a client or
resource, assign a client, or make any changes to your mirroring configuration.
If you add a server to a client from the Client Monitor (or via command line for
Unix clients), you should also re-save your configuration.
To do this:
• Highlight an ASC Server in the tree.
File
• Select
• Select a filename and location.
menu -->
Save Configuration.
47
Acer Altos® NAS 700 Solution Guide
Page 56

Restore configuration
You can restore an ASC Server configuration from a file that was created using
Save Configuration
the
not be used in day-to-day operation of the server. Changes made since the
configuration was last saved will not be included in this restored configuration.
Warning: Restoring a configuration will overwrite existing virtual device and
client configurations for that server. ASC partition information will not be
restored. This feature should only be used if your configuration is lost or
corrupted, as lost virtual devices can result in lost data for the clients using
those virtual devices.
To restore the configuration:
• Import the disk(s) that were recovered from the damaged ASC Server
to your new ASC Server.
option. This is for disaster recovery purposes and should
• Refer to
Import a disk for more information.
• Highlight the new ASC Server in the tree.
Note: Do not make any changes to the server before restoring the
configuration. For example, do not enable NAS before restoring, even
if this server previously used NAS.
• Select
menu -->
Restore Configuration.
File
• Confirm and locate the file that was saved.
• The ASC Server will be restarted.
Acer Altos® NAS 700 Solution Guide
48
Page 57

Licensing
When you first install ASC, you are given a 45-day live trial period. After that
period, you must purchase ASC and its options to continue using the product.
To license ASC:
• Obtain your ASC keycode(s) from Acer or its representatives.
• In the Console, right-click on the server and select
License
.
• The
• Press the
License Summary
of the options supported for this server. You can enter keycodes for
your purchased options on the
Add
button on the Keycodes Detail window to enter each
keycode.
49
window is informational only and displays a list
Keycode Detail
window.
Acer Altos® NAS 700 Solution Guide
Page 58

Set Server Properties
To set properties for a specific server:
• Right-click on the server and select
Proper es. ti
Acer Altos® NAS 700 Solution Guide
The tabs you see will depend upon your ASC configuration.
• If you have multiple NICs (network interface cards) in your server, enter
the IP addresses using the
stops responding, the ASC clients will attempt to communicate with
the server using the other IP addresses you have entered in the order
they are listed.
Notes:
- In order for the clients to successfully use an alternate IP address, your subnet
must be set properly so that the subnet itself can redirect traffic to the proper
alternate adapter.
cannot assign two or more NICs within the same subnet.
You
50
Server IP Add esses
tab. If the first IP address
r
Page 59

- The client becomes aware of the multiple IP addresses when it initially
connects to the server. Therefore, if you add additional IP addresses in the
Console while the client is running, you must rescan devices (Windows clients)
or restart the client (Linux/Unix clients) to make the client aware of these IP
addresses.
• On the
Activity Database Maintenance
data should be purged.
tab, indicate how often the SAN
The Activity Log is a database that tracks all system activity, including all data
read, data written, number of read commands, write commands, number of
errors etc. This information is used to generate SAN information for the ASC
reports.
To set limits for NAS information, right-click on
Windows Clients
and select
Propert es. i
Acer Altos® NAS 700 Solution Guide
51
Page 60
• On the
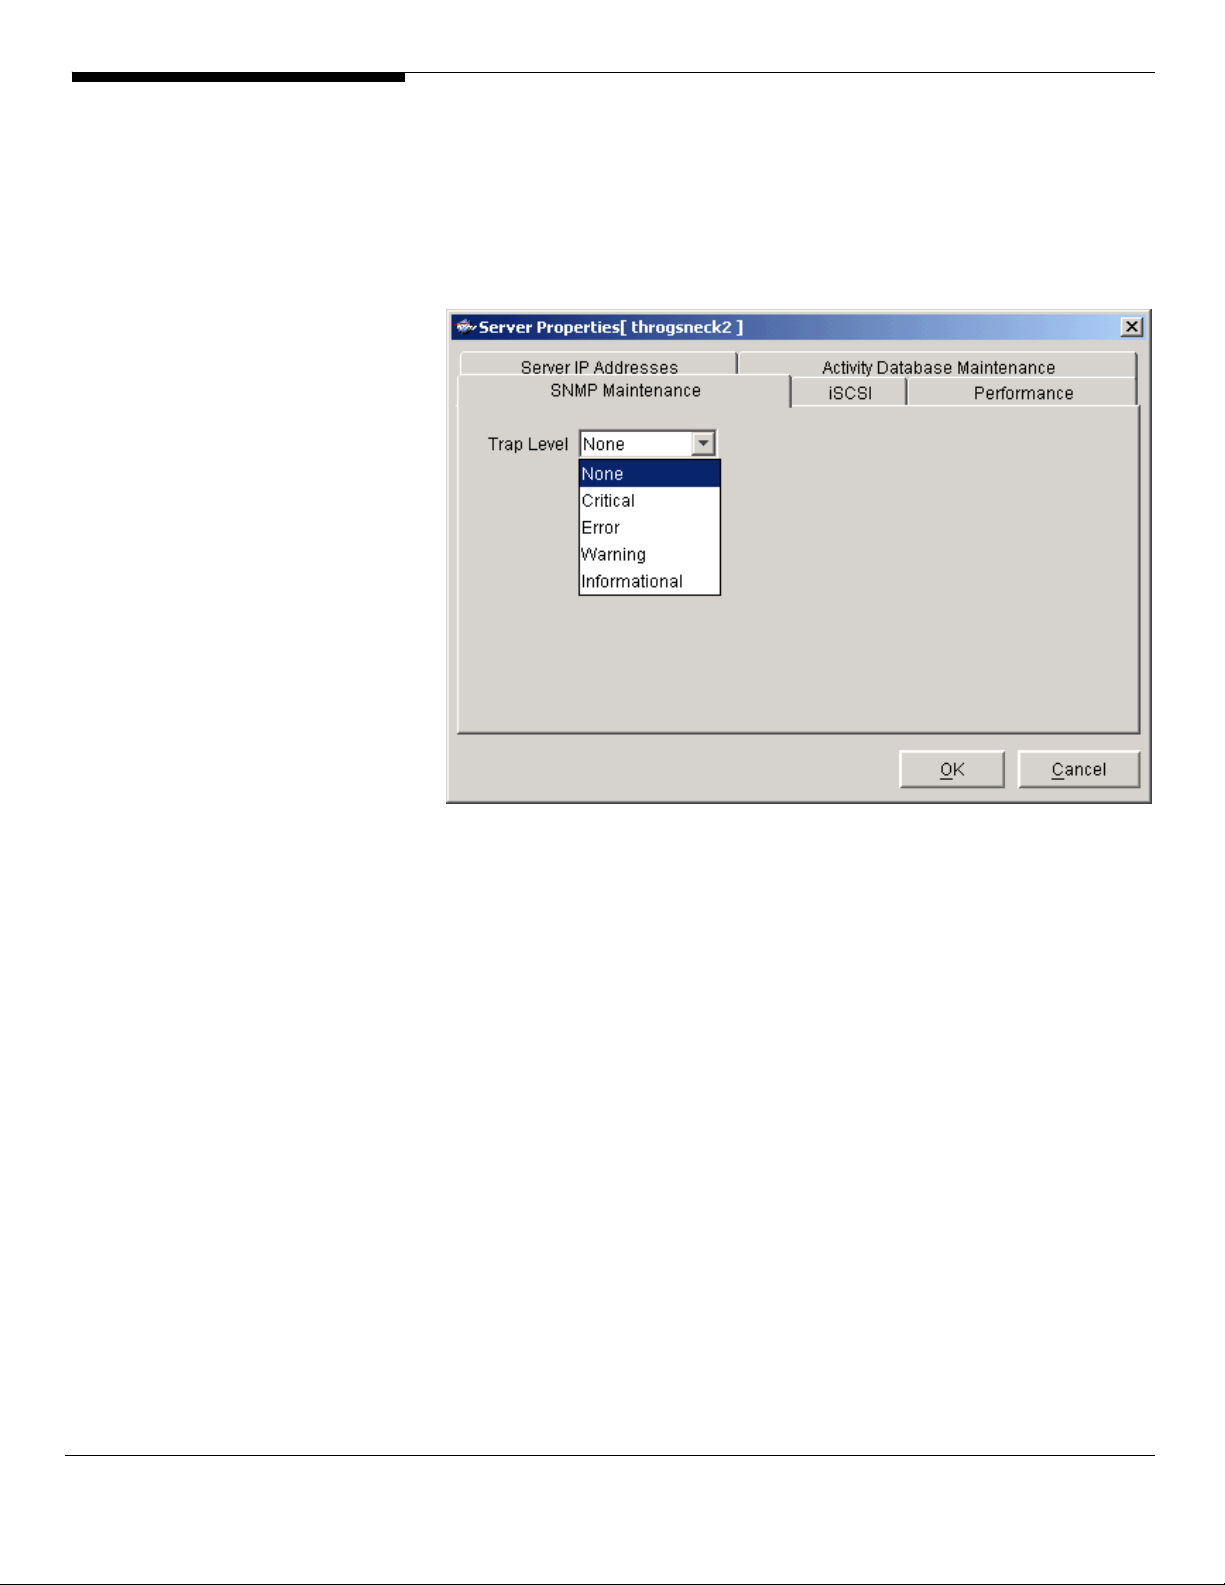
SNMP Maintenance
tab, indicate which types of messages
should be sent as traps to your SNMP manager
Five levels are available:
o None – (Default) No messages will be sent.
o Critical - Only critical errors that stop the system from
operating properly will be sent.
o Error – Errors (failure such as a resource is not available or an
operation has failed) and critical errors will be sent.
o Warning – Warnings (something occurred that may require
maintenance or corrective action), errors, and critical errors will
be sent.
o Informational – Informational messages, errors, warnings, and
critical error messages will be sent.
Acer Altos® NAS 700 Solution Guide
52
Page 61
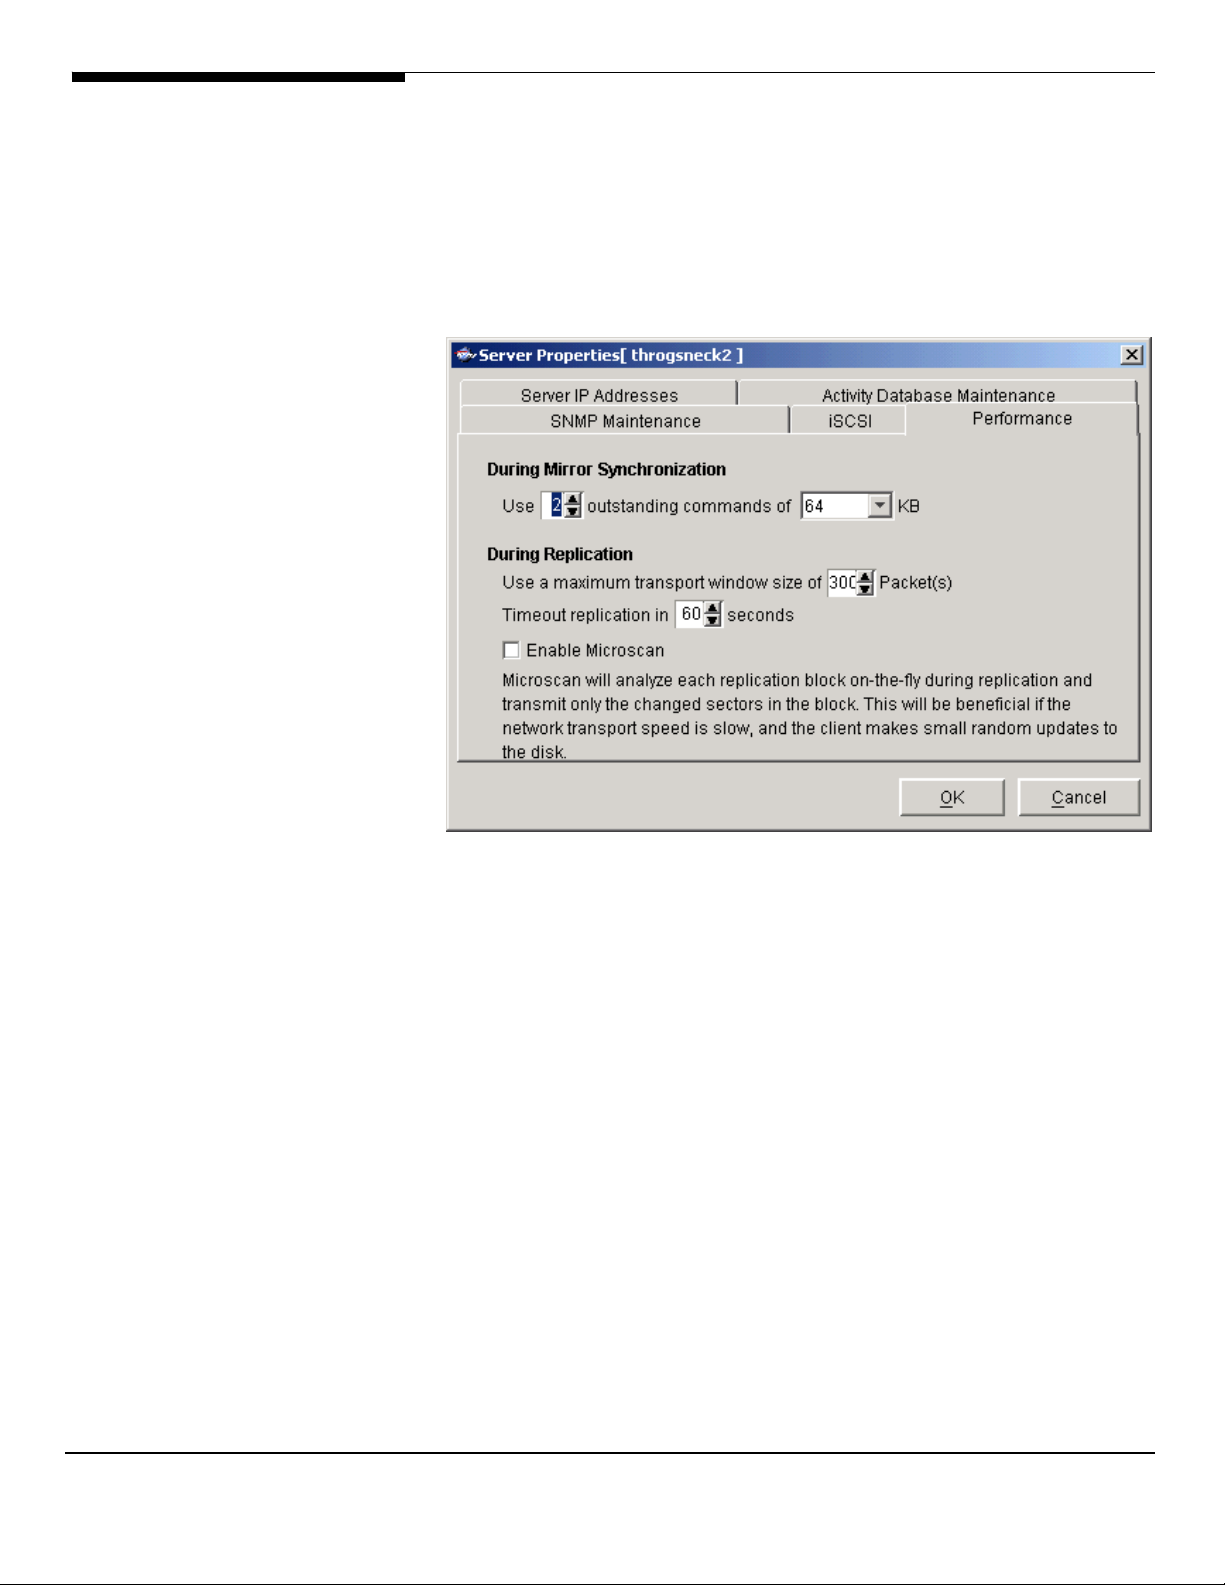
iSCSI
• On the
tab, iSCSI users can change the port number.
The settings on this tab affect system performance during mirror
resynchronization and replication. The defaults should be optimal for most
configurations. You should only need to change the settings for special
situations, such as if your mirror is remotely located.
During mirror resynchron zation: Use [2 outstand ng commands of [64] KB
The number of commands being processed at one time and the I/O size. This
must be a multiple of the sector size.
Use a maximum transport window size of [ 300] packets
window size.
Timeout replication in [60] seconds
Enable Microscan
replication and transmits only the changed sectors in the block. This is
beneficial if the network transport speed is slow and the client makes small
random updates to the disk.
- Microscan analyzes each replication block on-the-fly during
Note: replication is not supported under ASC 4.0 Express
i ] i
- Maximum transport
– indicates when timeout occurs.
.
-
53
Acer Altos® NAS 700 Solution Guide
Page 62

Manage Administrators accounts & Password
Manage accounts
To set properties for a specific server:
• Only the root user can add or delete an ASC administrator or change
an administrator’s password.
• Right-click on the server and select
There are several types of administrators:
-
ASC Admin strators
access.
i
are authorized for ASC client authentication and Console
Administrators
.
Acer Altos® NAS 700 Solution Guide
- ASC Clients
have Console access. For ASC client authentication, the
field must match the host name of the client. For example, if the client’s
hostname is ABC, the
- ASC Read-Only Users
They are not authorized to make changes and they are not authorized for ASC
client authentication.
ASC iSCSI Users
initiator machines). They do not have Console access.
are authorized for ASC client authentication only. They do not
Administrator Name
Administrator Name
are only permitted to view information in the Console.
are used for iSCSI protocol login authentication (from iSCSI
54
field must be ABC.
Page 63

Select the appropriate option.
When you add an administrator, the name must adhere to the naming
convention of the operating system running on your ASC Server. Refer to your
operating system’s documentation for naming restrictions.
You cannot delete the root user or change the root user’s password from this
screen. Use the
Change Pa sword
s
Change your administrator password
This option lets you change your own ASC password if you are currently
connected to a server.
option below.
• Right-click on the server and select
Change Password
• Enter your old password, the new one, and then re-enter it to confirm.
55
Acer Altos® NAS 700 Solution Guide
Page 64

System Maintenance
The ASC Management Console gives you a convenient way to perform system
maintenance for your ASC Server.
Note: The system maintenance options are hardware-dependent. Refer to your
hardware documentation for specific information.
Deactivate system partition
Right-click on a server and select
Partition
existing partition is too small and you want to recreate it. After deactivating
the system partition, the server will be restarted.
Network configuration
to deactivate the system partition. You might want to do this if your
System Maintenance
-->
Deactivate System
• Right-click on a server and select
Configuration
.
System Maintenance
-->
Network
Acer Altos® NAS 700 Solution Guide
56
Page 65

Domain name
Append suffix to DNS lookup
appended to the machine name for name resolution.
DNS
- IP address of your DNS server.
Default gateway
NIC
- List of Ethernet cards in the server.
Enable Telnet
Enable FTP
Allow root to log in to telnet session
Click
Config
- Internal domain name.
- If a domain name is entered, it will be
- IP address of your default gateway.
- Enable/disable the ability to Telnet into the server.
- Enable/disable the ability to FTP into the server.
- Log in to your telnet session using root.
to configure each Ethernet card.
If you select Static, you must add addresses and net masks. Acer recommends
using the Static IP address setting for NAS 700.
MTU
- Set the maximum transfer unit of each IP packet. If your card supports
it, set this value to 9000 for jumbo frames.
Acer Altos® NAS 700 Solution Guide
57
Page 66

Jumbo Frame Definition
In 1998, Alteon Networks, Inc. promoted an initiative to increase the maximum
size of the MAC Client Data field from 1500-bytes to 9000-bytes.
Larger frames would provide a more efficient use of the network bandwidth
while reducing the number of frames that have to be processed.
Software update
Right-click on a server and select
locate a software package that you can update. This option is only valid for
ASC embedded appliances.
Set hostname
Right-click on a server and select
change your hostname. You must restart the server if you change the
hostname.
Restart ASC
Right-click on a server and select
the Server processes.
Restart network
Right-click on a server and select
restart your local network configuration.
Reboot
System Maintenance
System Maintenance
System Maintenance
System Maintenance
-->
Software Update
-->
Set Hostname
-->
Restar ASC
t
-->
t r
Restar Netwo k
to
to restart
to
to
Acer Altos® NAS 700 Solution Guide
Right-click on a server and select
your server.
Halt
Right-click on a server and select
server without restarting it.
58
System Maintenance
System Maintenance
-->
-->
Reboot
Halt
to reboot
to turn off the
Page 67
Physical resource
When you highlight
addresses (comprised of adapter number, channel number, SCSI ID, LUN) of
your devices. The
and the
These devices can include hard disks, tape drives, device libraries, JBOD and
RAID cabinets.
Note that some multi-channel SCSI adapters may appear as multiple adapters.
In addition, depending upon how many paths there are to a device, it is
possible to see the same device listed multiple times before it is virtualized.
Once the device is virtualized, ASC will discover the aliases and will display the
device only once.
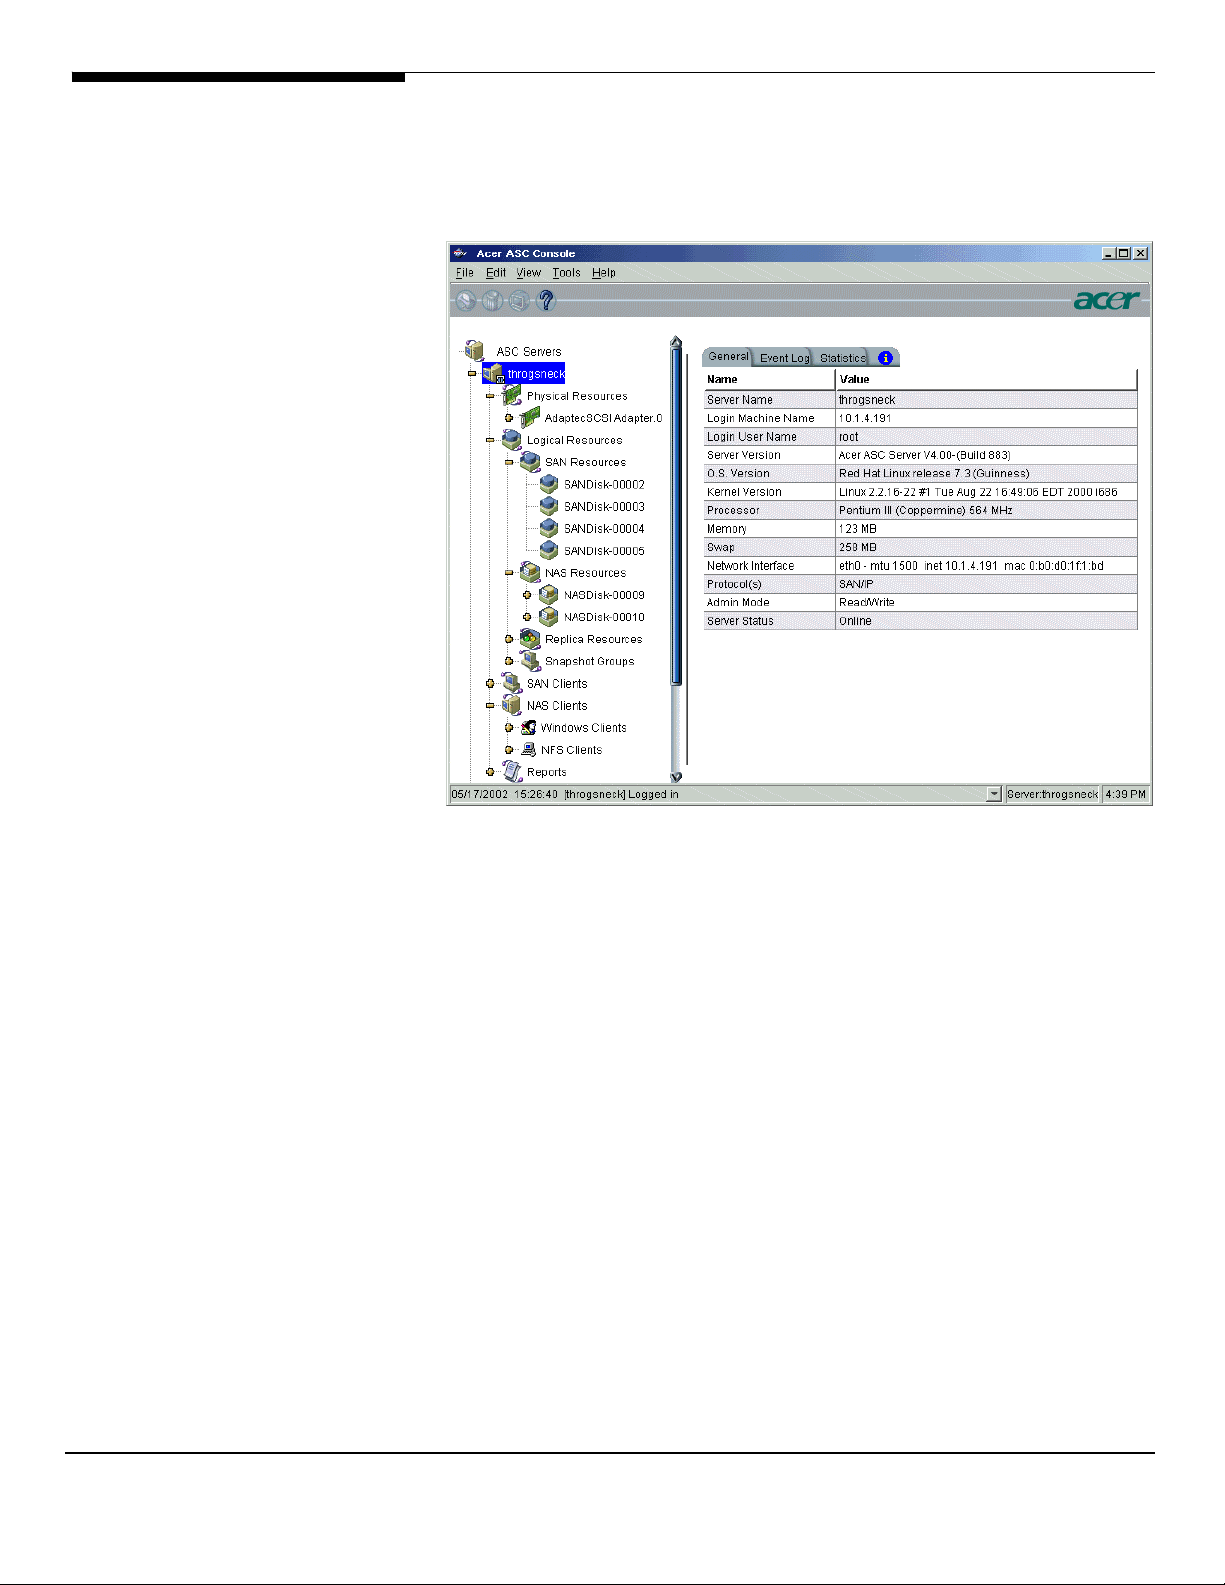
When you highlight a physical device, the
pane describes how the device is being used. Possible values are:
Reserved for virtual device - A hard disk that has not yet been assigned to a
SAN/NAS Resource or Snapshot area.
Used by virtual device(s) - A hard disk that is being used by one or more
SAN/NAS Resources or Snapshot areas.
SCSI Devices
Physical Resources
SCSI adapters
tab displays the actual SCSI devices attached to this server.
tab displays the adapters attached to this server
, the right-hand pane displays the SCSI
Category
field in the right-hand
59
Acer Altos® NAS 700 Solution Guide
Page 68

Reserved for direct device - A SCSI device, such as a hard disk, tape drive or
library that has not yet been assigned as a SAN Resource.
Used in direct device - A directly mapped SCSI device, such as a hard disk, tape
drive or library, that is being used as a direct device SAN Resource.
Reserved for service enabled device - A hard disk with existing data that has
not yet been assigned to a SAN/NAS Resource.
Used by service enabled device - A hard disk with existing data that has been
assigned to a SAN/NAS Resource.
Unassigned - A physical resource that has not been reserved yet.
Not available for ASC - A miscellaneous SCSI device that is not used by ASC
(such as a scanner or CD-ROM).
System - A hard disk where system partitions exist and are mounted (i.e. swap
file, file system installed, etc.).
Reserved for Striped Set - Used in a disk striping configuration.
Prepare devices to become logical resources
You can use one of ASC’s disk preparation options to change the category of a
device. This is important to do if you want to create a logical resource using a
device that is currently
The ASC Server detects new devices when you connect to it. When they are
detected you will see a dialog box notifying you of the new devices. At this
point you can highlight a device and press the
it.
At any time, you can prepare a single unassigned device by doing the
following: Highlight the device, right-click, select
device category. (You can find all unassigned devices under the
Resources Adapters
For multiple unassigned devices, highlight
select
unassign, or import multiple devices at the same time.
/
r
Prepa e Disks
unass gned
node of the tree view.)
. This launches a wizard that allows you to virtualize,
.
i
Prepare Disk
Properties
button to prepare
and select the
Physical
Physical Resources
, right-click and
Acer Altos® NAS 700 Solution Guide
60
Page 69

SCSI aliasing
With ASC, you can eliminate a potential point of failure in your storage
network by providing multiple paths to your storage devices using multiple
Fibre Channel switches and/or multiple adapters and/or storage devices with
multiple controllers. In a multiple path configuration, ASC automatically
detects all paths to the storage devices. If one path fails, ASC automatically
switches to another.
If you have multiple paths to your Fibre Channel hardware, you can use the
Alias
feature to select the primary path and the order for using the other
paths. This can be useful for load balancing purposes as well.
Right-click on a physical device and select
The device must be virtualized and you must have rescanned physical devices at
some point to discover the aliases.
Use the up and down arrows to put the devices in the order you want to use
them.
The secondary paths will only be used in the event of a storage path failure.
Alias
.
Rename a SCSI device
You can rename a SCSI device, by right-clicking on the device and selecting
Rename
.
Type the new name and press
61
Enter
.
Acer Altos® NAS 700 Solution Guide
Page 70

Rescan adapters
To rescan all adapters and search for new devices, right-click on
Resources
(Linux only) If you only want to scan a specific adapter, right-click on that
adapter and select
Set the range of SCSI IDs and LUNs that you want to scan.
and select
Rescan
Rescan
.
.
Physical
For Linux, the
should only use it if all of your devices are numbered sequentially, because
scanning will stop once the last sequential device is found. If you do not select
Sequential
Determine if you want to discover new devices.
If you want ASC to discover new devices as well as rescan existing devices, be
sure to select the
SCSI ID range. It is not needed if you are only rescanning existing devices.
Sequential
, ASC will continue scanning to the ending LUN number specified.
Discover New Devices
option works in conjunction with the LUN range. You
option. If selected, you should enter a
Acer Altos® NAS 700 Solution Guide
62
Page 71

Import a disk
You can import a ‘foreign’ disk into an ASC Server. A foreign disk is a
virtualized physical device containing ASC logical resources previously set up on
a different ASC server. You might need to do this if an ASC Server is damaged
and you want to import the server’s disks to another ASC Server.
When you right-click on a disk that ASC recognizes as ‘foreign’ and select the
Import
option, ASC scans the disk’s partition table. ASC then tries to
reconstruct the virtual drive out of all of the segments.
If the virtual drive was constructed from multiple disks, you can highlight
Physical Resources
that allows you to import multiple disks at the same time.
As each drive is imported, ASC marks the drive ‘offline’ because it has not yet
found all of the segments. Once all of the disks that were part of the virtual
drive have been imported, ASC re-constructs the virtual drive and marks it
‘online’.
Importing a disk preserves the data that was on the disk but does not preserve
the client assignments. Therefore, after importing, you must either reassign
clients to the resource or use the
, right-click and select
Restore configuration option.
Prepare Disks
. This launches a wizard
Note: The GUID (Global Unique Identifier) is the permanent identifier for each
virtual device. When you import a disk, the virtual ID, such as
may be different from the original server. Therefore, you should use the GUID
to identify the disk.
SANDisk-00002
,
SCSI device throughput
To check the throughput for a SCSI device:
Right-click on the device (under
Test
Select
The system will test the device and then display the throughput results on the
screen.
from the menu.
Physical Resources
).
63
Acer Altos® NAS 700 Solution Guide
Page 72
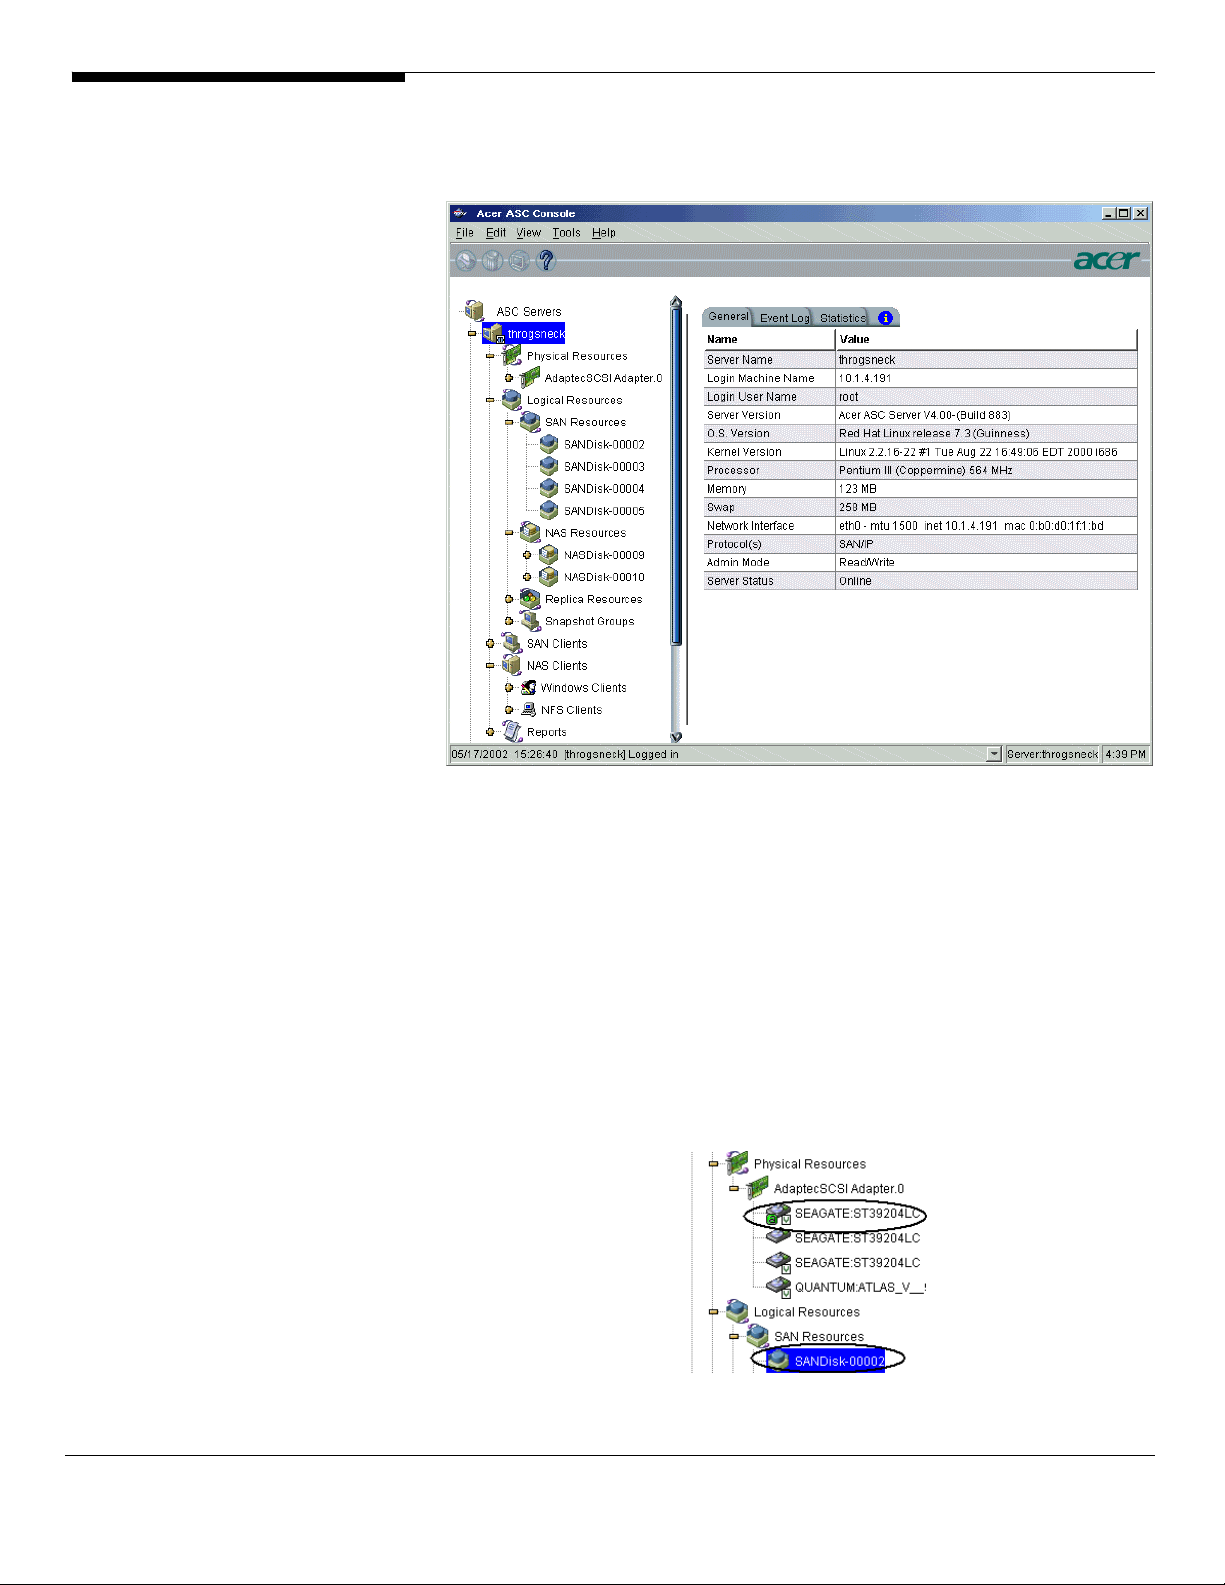
Logical Resources
Logical resources are all of the resources defined on the ASC Server, including
SAN Resources, NAS Resources, Replica Resources, and Snapshot Groups.
SAN and NAS logical resources consist of sets of storage blocks from one or
more physical hard disk drives. This allows the creation of logical resources that
contain a portion of a larger physical disk device or an aggregation of multiple
physical disk devices.
Clients do not gain access to physical resources; they only have access to logical
resources. This means that an administrator must configure each physical
resource to one or more logical resources so that they can be assigned to the
clients.
When you highlight a SAN or NAS Resource, you will see a small icon next to
each device that is being used by the resource.
Acer Altos® NAS 700 Solution Guide
64
Page 73

In addition, when you highlight a SAN or NAS Resource, you will see a
field in the right-hand pane.
The GUID (Global Unique Identifier) is the permanent identifier for this virtual
device. The virtual ID,
GUID, because, in the event of a disaster, this identifier will be important if you
need to rebuild your system and import this disk.
Replica Resources are replica disks that are being used by a remote server.
Snapshot groups are groups of drives (virtual drives and service enabled drives)
that will be grouped together for snapshot synchronization purposes. When
one drive in the group is to be replicated or backed up, the entire group will be
snapped together to maintain a consistent image.
SANDisk-00002
, is not. You should make note of the
GUID
Write caching
You can leverage a third party disk subsystem's built-in caching mechanism to
improve I/O performance. Write caching allows the third party disk subsystem
to utilize its internal cache to accelerate I/O.
To write cache a resource, right-click on it and select
Write Cache
-->
Enable
.
65
Acer Altos® NAS 700 Solution Guide
Page 74

ASC SAN Clients
ASC SAN Clients are the actual file and application servers that utilize the
storage resources via the ASC Server.
These SAN Clients access their storage resources via software-emulated virtual
adapters (for SAN/IP) . The storage resources appear as locally attached devices
to the SAN Clients’ operating systems (Windows NT, Windows 2000, Linux,
Solaris, etc.) even though the SCSI devices are actually located at the ASC
Server.
When you highlight a specific SAN client, the right-hand pane displays the
Client ID, type, and authentication status, as well as information about the
client machine.
Note: From the Console you can add SAN clients so you can start allocating
resources to the clients. This is called the authorization process. However, for
SAN/IP clients, even when the clients are added, you still need to go to the
client host to install the client software and authenticate to the server, using
the proper username/password. That establishes the authentication credential
for all subsequent operation. Until that is done, the console will show that the
client is not authenticated. To authenticate, you must add the server to the
client. For Windows clients, you can use the Add Server option in the SAN
Client Monitor. For Linux, Solaris, AIX, and HP-UX clients, you can execute
./sanclient monitor from /usr/local/sanclient/bin.
Acer Altos® NAS 700 Solution Guide
66
Page 75

The
Resources
client. The adapter, SCSI ID and LUN are relative to this ASC SAN client only;
other clients that may have access to the SAN Resource may have different
adapter SCSI ID and LUN information.
Change the ACSL
You can change the ACSL (adapter, channel, SCSI, LUN) for a SAN Resource
assigned to a SAN client if the device is not currently attached to the client. To
change, right-click on the SAN Resource under the SAN Client object (you
cannot do this from the
enter a new adapter, SCSI ID, or LUN.
Notes for Windows clients:
One SAN Resource for each Windows SAN client must have a LUN of 0.
Otherwise, the operating system will not see the devices assigned to the SAN
client.
tab displays a list of SAN Resources that are allocated to this
SAN Resources
object) and select
Prope t es
r i
. You can
If you reassign a different device with the same LUN, you must restart the SAN
Client Monitor in order to access the newly assigned device.
67
Acer Altos® NAS 700 Solution Guide
Page 76

ASC NAS Clients
ASC NAS Clients are the users and groups that access NAS resources via the ASC
Server. There are two types of NAS clients you will see:
• Windows clients - These clients use the Common Internet File System
(CIFS) protocol to work together and share documents. Because many
operating systems support CIFS, it is possible to have clients using other
operating systems listed as Windows clients.
• NFS clients - These clients are usually Unix clients using the Network
File System (NFS) protocol.
Users
and
You will only see
authentication mode is
you will not see any users listed because there is no authentication server and
any Windows client can access a share (provided he/she knows the password).
If the authentication mode is
authentication server is a Primary Domain Controller (PDC)/Domain Controller.
Groups
Server
or
Domain
Server
under
Windows Clients
. If the authentication mode is
, you will only see groups if the
if the NAS
Share
,
Acer Altos® NAS 700 Solution Guide
To update the list of users/groups, right-click on the
and select
Refresh Windows Clients
68
.
Windows Clients
object
Page 77

Information on the
every few seconds. You can set the interval by right-clicking on the
Clients
object and selecting
Connection(s , Share(s ,
) )
Start Connection Statu Ref e h
and
Locked File(s)
s r s
tabs is updated
Windows
.
Refer to
authentication modes for Windows clients.
‘NAS Configuration’ for more information about NAS and
69
Acer Altos® NAS 700 Solution Guide
Page 78

Console Options
To set options for the Console:
Select
Tools
-->
Console Opt ons. i
Make any necessary changes.
Remember passwo d for session
server, when you attempt to open a second, third, or subsequent server, the
Console will use the credentials that were used for the last successful
connection. If this option is unchecked, you will be prompted to enter a
password for every server you try to open.
r
Automatically time out servers after nn minute(s)
server that has been idle for the number of minutes you specify. If you need to
access the server again, you will have to reconnect to it. The default is 10
minutes.
Update statist cs every nn second(s)
frequency you specify.
Automatically refresh the event log every nn second(s) - The Console will
update the event log by the frequency you specify, only when you are viewing
it.
Console Log Options - The Console log (ipstorconsole.log) is kept on the local
machine and stores information about the local version of the Console. The
Console log is displayed at the very bottom of the Console screen.
i
- If the Console is already connected to a
- The Console will update statistics by the
- The Console will collapse a
Acer Altos® NAS 700 Solution Guide
70
Page 79

The options affect how information for each Console session will be
maintained:
Overwrite log file - Overwrite the information from the last Console session
when you start a new session.
Append to log file - Keep all session information.
Do not write to log file - Do not maintain a Console log.
Create custom menu
You can create a menu in the ASC Management Console from which you can
launch external applications. This can add to the convenience of ASC’s
centralized management paradigm by allowing your administrators to start all
of their applications from a single place. The
Console along with the normal menu (between
To create a custom menu:
Select
Tools
-->
Set up Custom Menu
.
Custom
menu will appear in your
Tools
and
Help
).
Click
Add
and enter the information needed to launch this application.
Acer Altos® NAS 700 Solution Guide
71
Page 80

Menu Label
- The application title that will be displayed in the
Command
- The file (usually an.exe) that launches this application.
Command Argument
you are launching an Internet browser, this could be a URL.
- An argument that will be passed to the application. If
Menu Icon
will be displayed in the
- The graphics file that contains the icon for this application. This
Custom
menu.
Custom
menu.
Acer Altos® NAS 700 Solution Guide
72
Page 81

CONFIGURE ASC SAN RESOURCES
Once you have physically attached your physical SCSI/Fibre Channel devices to
your ASC Server you are ready to create SAN Resources to be used by your ASC
SAN Clients. This configuration can be done entirely from the ASC Console.
Understanding how to create and manage SAN Resources is critical to a
successful ASC storage network. Please read this section carefully before
creating and assigning SAN Resources.
SAN Resources
SAN Resources are logically mapped devices on the ASC Server. They are
comprised of physical storage devices, known as
Physical resources are the actual SCSI and/or Fibre Channel devices attached to
the server. These devices can be hard disks, tape drives, device libraries, JBODs
and RAID cabinets.
Clients do not have access to physical resources; they have access only to SAN
Resources. This means that physical resources must be defined as SAN (or NAS)
Resources first, and then assigned to the clients so they can access them
When a SAN Resource is assigned to a client, a virtual adapter is defined for
that client. The SAN Resource is assigned a virtual SCSI ID on the virtual
adapter. This mimics the configuration of actual SCSI storage devices and
adapters, allowing the operating system and applications to treat them like any
other SCSI device.
Physical Resources
in ASC.
There are three types of SAN Resources: virtual devices, direct devices, and
service enabled devices.
Virtual Devices
ASC has the ability to aggregate multiple physical storage devices (such as
JBODs and RAIDs) of various interface protocols (such as SCSI or Fibre Channel)
into logical
created and provisioned to application servers and end users. This is called
storage pools
storage virtualization
Virtual devices are defined as sets of storage blocks from one or more physical
hard disk drives. This allows the creation of virtual devices that can be a portion
of a larger physical disk drive, or an aggregation of multiple physical disk
drives.
Virtual devices offer the added capability of disk expansion. Additional storage
blocks can be appended to the end of existing virtual devices without erasing
the data on the disk.
Virtual devices can only be assembled from hard disk storage. It does not work
for CD-ROM, tape, libraries, or removable media.
. From these storage pools, virtual devices can be
.
73
Acer Altos® NAS 700 Solution Guide
Page 82

When a virtual device is allocated to an application server, the server thinks
that an actual SCSI storage device has been physically plugged into it.
Virtual devices are assigned to virtual adapter 0 (zero) when mapped to a
client. If there are more than 15 virtual devices, a new adapter will be defined.
Note: We do not recommend storing system files, page files, swap files, etc. on
ASC virtual devices.
SAN Resources virtualization examples
The following diagrams show how physical disks can be mapped into virtual
devices.
SAN
Resources
Physical
Disks
Virtual Device:
SCSI ID = any.
Adapter number does not
need to match.
Sectors are mapped,
combining sectors from multiple
physical disks.
This diagram shows a virtual device being created out of two physical disks.
This allows you to create very large virtual devices for application servers with
large storage requirements. Also, if the storage device needs to grow,
additional physical disks may be added to increase the size of a virtual device.
Note that this will require that the client application server resize the partition
and file system on the virtual device.
Acer Altos® NAS 700 Solution Guide
74
Page 83

This example shows a single physical disk split into two virtual devices. This is
useful when a single large device exists, such as a RAID, which could be shared
among multiple client application servers.
Virtual devices can be created using various combining and splitting methods,
although you will probably not create them in this manner in the beginning.
You may end up with devices like this after growing virtual devices over time.
Direct devices
Direct devices are directly mapped SCSI devices. Direct devices can be created
from hard disks, tape drives, device libraries, JBODs, and RAID cabinets.
Because they are not virtualized, direct devices cannot take advantage of ASC’s
advanced storage management options, such as mirroring or snapshot copy.
Direct devices, such as tape drives, device libraries, JBODs, and RAID cabinets,
can be used to back up data on your storage network.
A characteristic of some application software, such as backup tools and devices,
require that they address the SCSI ID directly. This is true for library devices and
the drives within the library; the software uses the SCSI IDs to address the
library and drives. For this reason, direct devices use fixed SCSI IDs that cannot
be changed.
Designating a hard drive as a direct device can be useful for data migration
into ASC. Data on an existing disk can be brought into ASC as a direct device.
The data can then be copied using Linux’s dd command to a virtualized disk
that does not contain any data or have any clients attached so that it can take
advantage of ASC’s virtualization and advanced storage management options.
Acer Altos® NAS 700 Solution Guide
75
Page 84

Service enabled devices
Service enabled devices are hard drives with existing data that can be accessed
by ASC to make use of all key ASC storage services (mirroring, snapshot, etc.),
without any migration/copying, without any modification of data, and with
minimal downtime. Service enabled devices are used to migrate existing drives
into the SAN.
Because service enabled devices are preserved intact, and existing data is not
moved, the devices are not virtualized and cannot be expanded. Service
enabled devices are all maintained in a one-to-one mapping relationship (one
physical disk equals one logical device). Unlike virtual devices, they cannot be
combined or split into multiple logical devices.
Acer Altos® NAS 700 Solution Guide
76
Page 85

Procedure to create SAN resources
SAN Resources are created in the ASC Console.
Note: After you make any configuration changes, you must restart the client in
order for the changes to take effect. For Windows clients, if you add or delete
SAN Resources you can use the Rescan option in the SAN Client Monitor
instead. For other changes, you will still need to restart the client. After you
create a new virtual device, assign it to a client, and restart the client (or
rescan), you will need to write a signature, create a partition, and format the
drive so that the client can use it.
Prepare devices to become SAN Resources
The ASC Server detects new devices when you connect to it. (You can also
detect new devices by executing the
You can use one of ASC’s disk preparation options to change the category of a
device. This is important to do if you want to create a logical resource using a
unass gned
device that is currently
i
Rescan
.
command.)
• The ASC Server detects new devices when you connect to it (or when
you execute the
see a dialog box notifying you of the new devices. At this point you
can highlight a device and press the
• At any time, you can prepare a single unassigned device by doing the
following: Highlight the device, right-click, select
the device category. (You can find all unassigned devices under the
Rescan
Physical Resources/Adapters
• For multiple unassigned devices, highlight
click and select
virtualize, unassign, or import multiple devices at the same time.
Prepare Disks
command). When they are detected you will
Prepare D sk
node of the tree view.)
i
button to prepare it.
Properties
and select
Physical Resources
. This launches a wizard that allows you to
, right-
Acer Altos® NAS 700 Solution Guide
77
Page 86

Create a virtual device SAN Resources
Note: Each ASC Server supports a
Right-click on
Select
Virtual Device
SAN Resources
.
and select
maximum of 1024 SAN Resources.
New
.
Acer Altos® NAS 700 Solution Guide
78
Page 87

Select how you want to create this virtual device.
Custom
how much space to allocate from each.
lets you select which physical device(s) to use and lets you designate
Express
creates a virtual device using all available devices.
lets you designate how much space to allocate and then automatically
lets you create multiple SAN Resources at one time. These SAN Resources
Batch
will all be the same size.
Acer Altos® NAS 700 Solution Guide
79
Page 88

If you select
Custom
, you will see the following windows:
Select either an entirely unallocated or
partially unallocated device.
Only one device can be selected at a
time from this dialog. To create a virtual
device SAN Resource from multiple
physical devices, you will need to add
the devices one at a time. After
selecting the parameters for the first
device, you will have the option to add
more devices.
Indicate how much space to
allocate from this device.
Click Add More if you
want to add another
physical device to this
SAN Resource.
If you select to add
more devices, you
will go back to the
physical device
selection screen
where you can select
another device.
Acer Altos® NAS 700 Solution Guide
80
Page 89
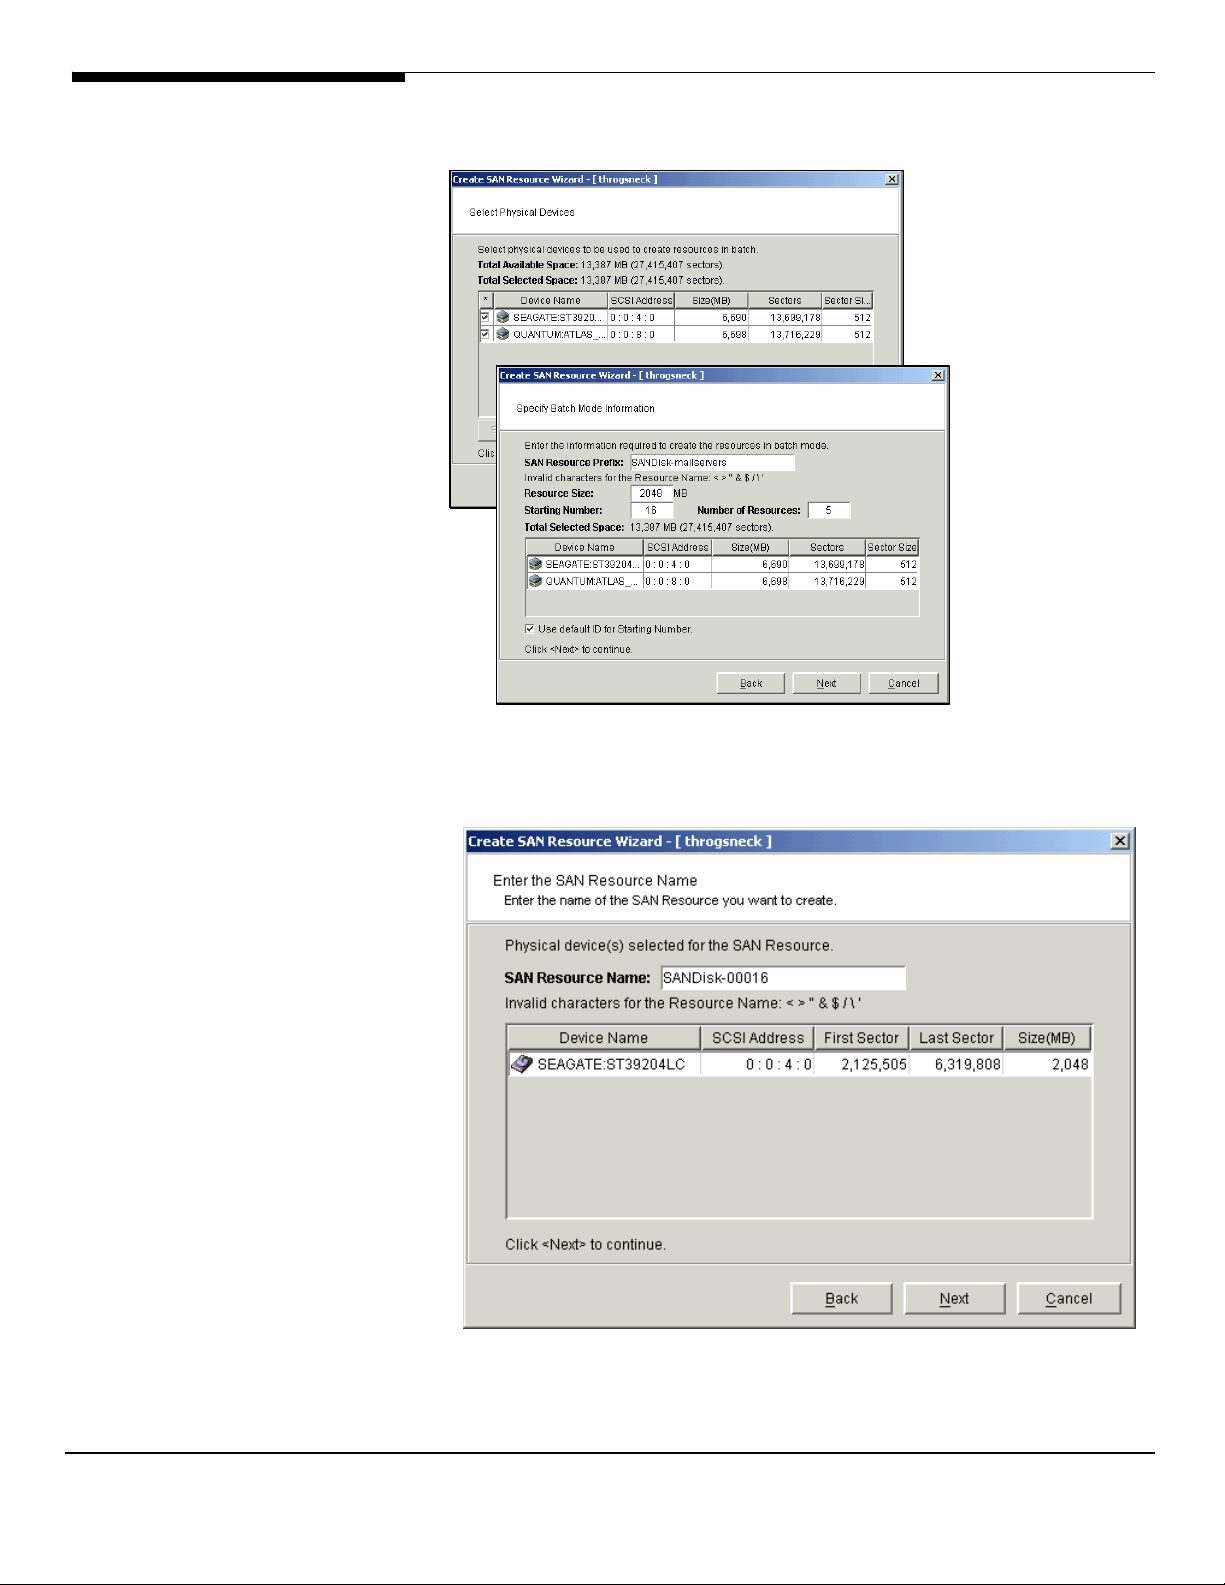
If you select
Batch
, you will see the following window:
Select either an entirely unallocated or
partially unallocated device.
Indicate how to name each
resource. The SAN Resource
Prefix is combined with the
starting number to form the name
of each SAN Resource. You can
uncheck the Use default ID for
Starting Number option to restart
numbering from one.
In the Resource Size field,
indicate how much space to
allocate for each resource.
Indicate how many SAN
Resources to create in the
Number of Resources field.
(
Express
and
Custom
only) Enter a name for the new SAN Resource.
The name is not case sensitive.
81
Acer Altos® NAS 700 Solution Guide
Page 90

Confirm that all information is correct and then click
device SAN Resource.
(
Express
Resource to a client.
If you select Yes, the Assign a SAN Resource Wizard will be launched.
Note: After you assign the SAN Resource to a client, you will need to restart the
client (for Windows clients, you can rescan devices from the SAN Client Monitor
instead). You will also need to write a signature, create a partition, and format
the drive so that the client can use it.
Create a direct device or service enabled device SAN Resources
Simply follow the instructions on the screen and the second Node should join
the Cluster without any further difficulties.
and
Custom
only) Indicate if you would like to assign the new SAN
Finish
to create the virtual
Right-click on
Select
Direct Device or Service Enabled Device
If you are creating a
the physical device’s inquiry string. Preserving it treats the physical device as
SAN Resources
Service Enabled Device
and select
New
.
.
, determine if you want to preserve
Acer Altos® NAS 700 Solution Guide
82
Page 91

the original physical disk instead of treating it as a Acer device. This can be
useful for vendors who only recognize their own storage devices.
Select how you want to create this device.
Custom
Batch
lets you select one physical device(s) to use.
lets you create multiple SAN Resources at one time.
Select the device that you want to make into a direct/service enabled device.
A list of the physical resources that have been reserved for this purpose are
displayed. For direct devices, both hard disk and non-hard disk devices are
shown.
(Service enabled devices only) Select the physical device for the service enabled
device’s virtual header.
Acer Altos® NAS 700 Solution Guide
83
Page 92

Even though service enabled devices are used as is, a virtual header is created
on another physical device to allow ASC’s storage services to be supported.
Enter a name for the new SAN Resource.
Acer Altos® NAS 700 Solution Guide
Note: The name is not case sensitive.
84
Page 93

Confirm that all of the information is correct and then click
SAN Resource.
Indicate if you would like to assign the new SAN Resource to a client.
Yes
, the
If you select
Assign a SAN Resource Wizard
will be launched.
Finish
to create the
Assign resources to one or more clients
Notes:
The wizard can also be launched from the Create SAN Resource wizard.
If this server has multiple protocols enabled, select the type of client to which
you will be assigning this SAN Resource.
85
Acer Altos® NAS 700 Solution Guide
Page 94

Select the SAN Resource to be assigned.
Read/Write
(including
- Only one client can access this SAN Resource at a time. All others
Read Only
) will be denied access. This is the default.
Read/Write Non-Exclusive
read and write access. You should be careful with this option because if you
have multiple clients writing to a device at the same time, you have the
potential to corrupt data. This option should only be used by clustered servers,
because the cluster itself prevents multiple clients from writing at the same
time.
- Two clients can connect at the same time with both
Read Only
option is useful for a read-only disk.
Note: Fibre Channel SAN client is not upported under ASC 4.0 Express.
- This client will have read only access to the SAN Resource. This
s
Acer Altos® NAS 700 Solution Guide
86
Page 95

For SAN/IP clients, you will see the following screen:
If the SAN/IP client that you want to assign to the SAN Resource does not
appear on the list, click the
Add
button.
You can add any application server, even if it is currently offline or has not yet
had ASC Client software installed. However, in order for the server to use the
ASC storage resources, you must install the ASC SAN Client software on the
server and “authorize” the client’s access to the ASC SAN resources.
Note: You must enter the client’s name, not an IP address.
Acer Altos® NAS 700 Solution Guide
87
Page 96

For iSCSI clients, you will see the following screen:
Acer Altos® NAS 700 Solution Guide
88
Page 97

Assign a client to one or more SAN Resources
Notes:
Assign
Right-click on a SAN Client and select
Select the SAN Resource to be assigned.
.
Read/Write
(including
Read/Write Non-Exclusive
read and write access. You should be careful with this option because if you
have multiple clients writing to a device at the same time, you have the
potential to corrupt data. This option should only be used by clustered servers,
because the cluster itself prevents multiple clients from writing at the same
time.
Read Only
option is useful for a read-only disk.
- Only one client can access this SAN Resource at a time. All others
Read Only
- This client will have read only access to the SAN Resource. This
) will be denied access by default.
- Two clients can connect at the same time with both
89
Acer Altos® NAS 700 Solution Guide
Page 98

Expand a virtual device
Once owner and fail back timing.
Since virtual devices do not represent actual physical resources, they can be
expanded as more storage is needed. The virtual device can be increased in size
by adding more blocks of storage from any unallocated space from the same
server.
Note that you will still need to repartition the virtual devices and
adjust/create/resize any file-systems on the partition after the virtual device is
expanded. Since partition and file-system formats are specific to the operating
system that the client is running, the administrator must perform these tasks
directly from the client. You can use tools like:
Partition Mag c
•
•
Windows 2000 Dynamic Disk
• or
to add more drives to expand existing volume on-the-fly in real time (without
application down time).
Notes:
We do not recommend expanding a virtual device (SAN or NAS) while clients
are accessing the drives. However, when expanding an XFS resource, NAS
clients can remain connected.
Veritas Vo ume Manager
,
i
,
l
Acer Altos® NAS 700 Solution Guide
90
Page 99
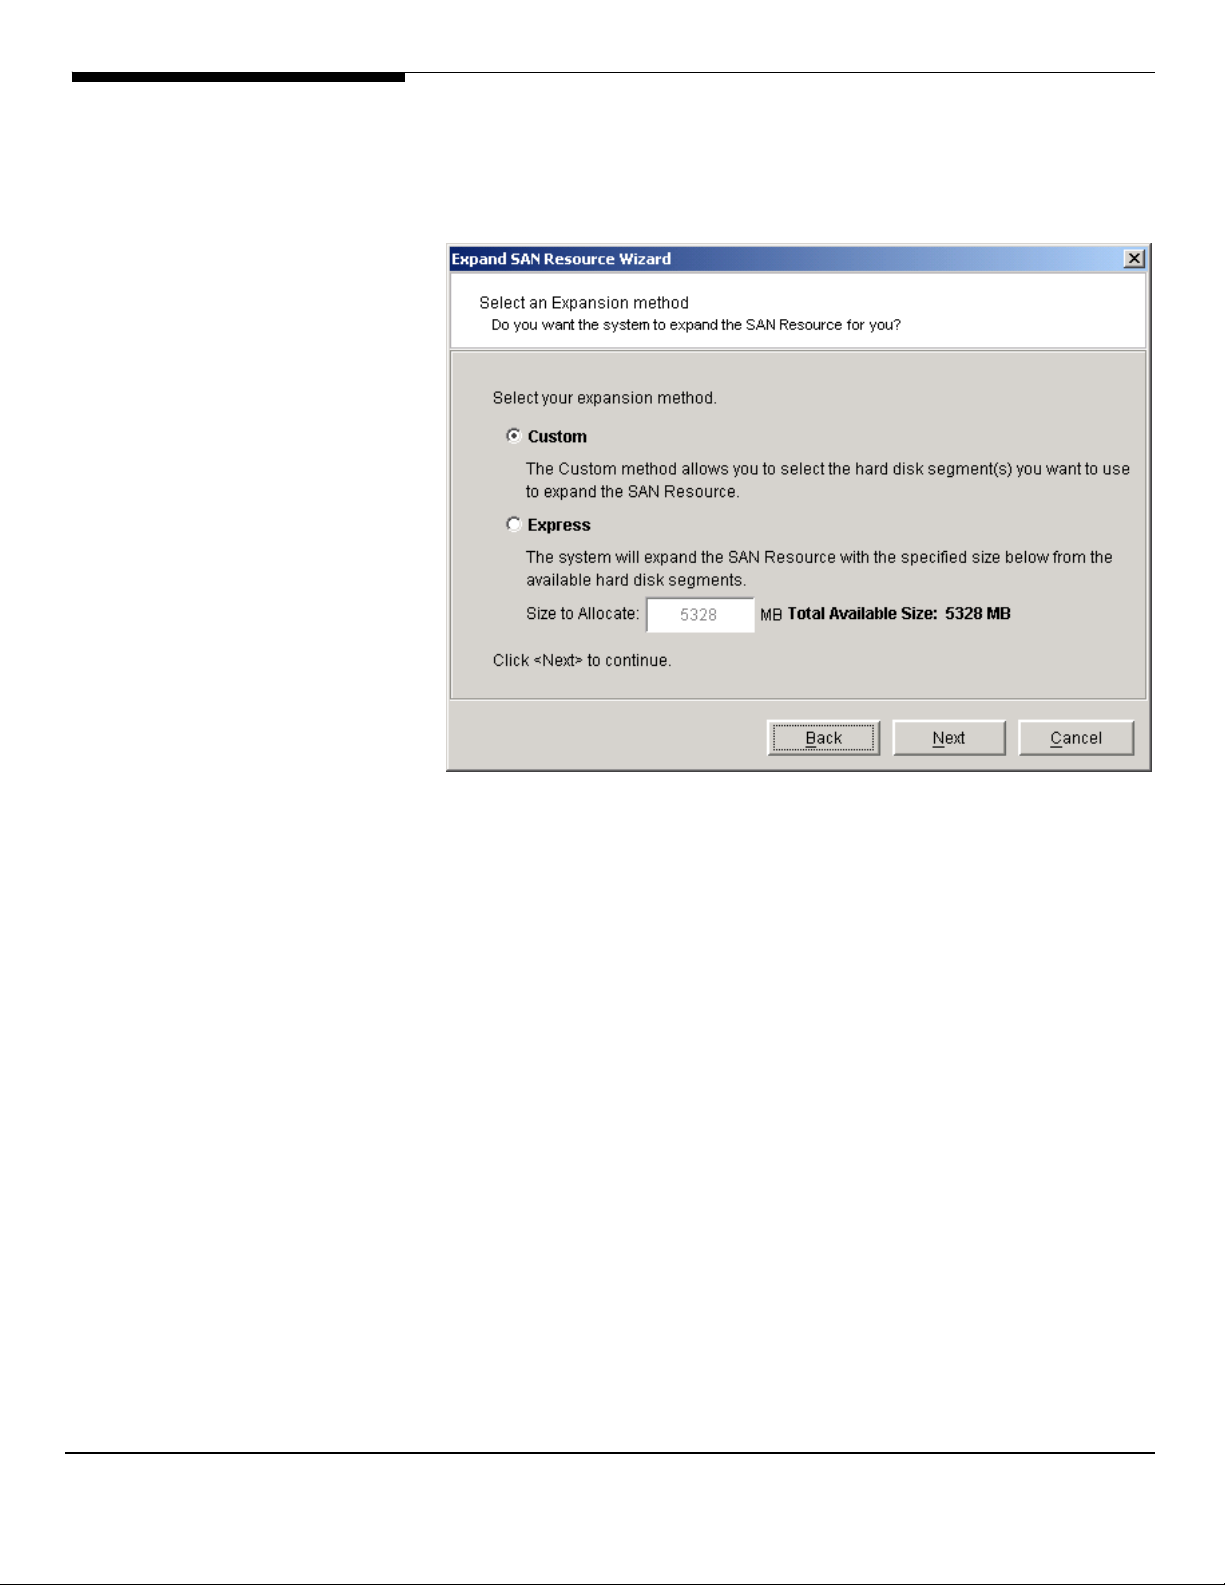
Right-click on a virtual device (SAN or NAS) and select
Select how you want to expand the virtual device.
Expand
.
Custom
how much space to allocate from each.
Express
creates a virtual device using all available devices.
The
this drive is mirrored, this number will be half the full amount because the
mirrored drive will need an equal amount of space.
lets you select which physical device(s) to use and lets you designate
lets you designate how much space to allocate and then automatically
Size to Allocate
is the maximum space available on all available devices. If
91
Acer Altos® NAS 700 Solution Guide
Page 100
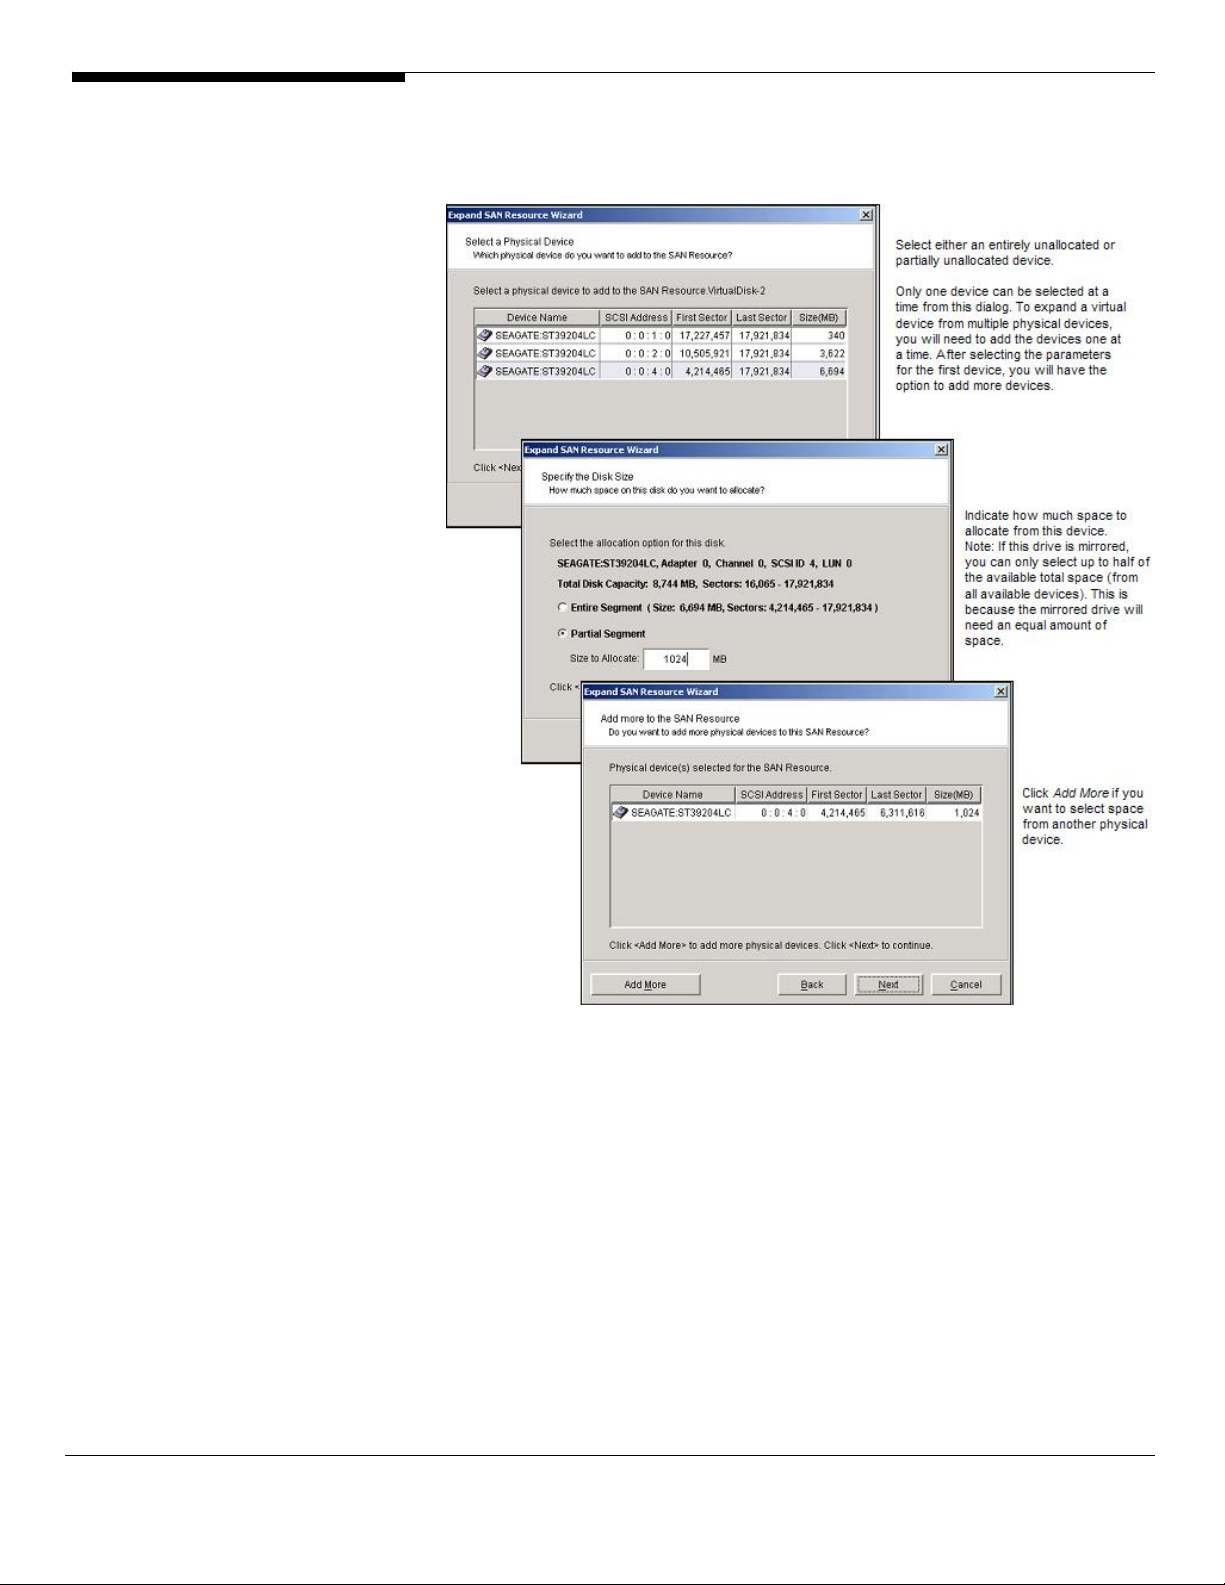
If you select
Custom
, you will see the following windows:
Acer Altos® NAS 700 Solution Guide
Confirm that all information is correct and then click
virtual device.
92
Finish
to expand the
 Loading...