

Page 1
Acer
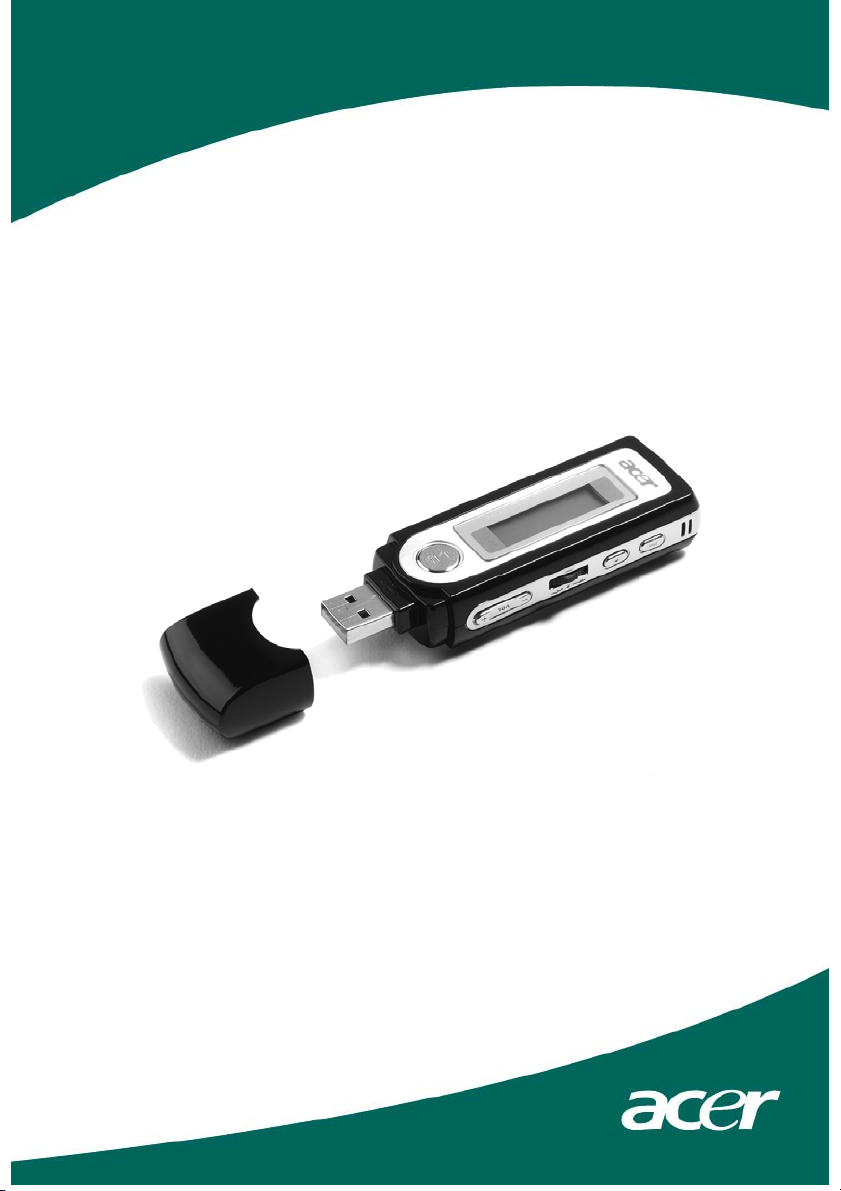
Multi-Functional MP3/Storage Drive
User’s Guide
Page 2

Table of Contents
Chapter 1. Introduction .......................................................................................4
How to Use This Guide ............................................................................... 5
Unpack ......................................................................................................... 7
Chapter 2. Getting Started.................................................................................. 8
Function Keys...............................................................................................8
LCD Display................................................................................................10
Insert a Battery........................................................................................... 11
Battery Consuming Reference ........................................................ 12
Hold Switch................................................................................................ 13
Chapter 3. Basic Usage ...................................................................................... 14
Connecting the MP3/Storage Drive to Your Computer......................... 14
Hardware Installation for Windows 98SE only ....................................... 15
Power On and Off.....................................................................................18
Editing Sound Tracks (Files) ...................................................................... 19
Music Playback .......................................................................................... 21
Music Playback .......................................................................................... 21
Normal Playback .............................................................................. 21
Select the Next or Previous Track (File) ..........................................21
Fast-Forward or Rewind ..................................................................22
Volume Adjusting ............................................................................ 22
Delete a Track (File).......................................................................... 22
Delete All Tracks (Files).................................................................... 23
EQ Settings ................................................................................................25
Repeat Settings.......................................................................................... 26
FM Radio Mode.........................................................................................27
Select FM Radio Mode .................................................................... 27
2
Page 3

Select FM Station.............................................................................28
Storing a Favorite Station................................................................ 28
Selecting the Stored Favorite Station ............................................. 29
Recording Radio Broadcast ............................................................. 29
Play a Recorded FM Voice File ........................................................ 30
Delete a Recorded FM Voice File .................................................... 31
Delete All FM Voice Files ................................................................. 32
Switch between Music Playback or FM mode ........................................ 33
Switch between Music Playback or FM mode ........................................ 33
Switch from Music Playback mode to FM mode........................... 33
Switch from FM mode to Music Playback mode...........................33
Voice Recording......................................................................................... 34
Voice Recording............................................................................... 34
Play a Recorded Voice File............................................................... 36
Delete a Recorded Voice File...........................................................36
Delete All Voice Files........................................................................ 37
Language Learning Function.................................................................... 39
Menu Mode............................................................................................... 40
Other Settings............................................................................................ 45
Backlight........................................................................................... 45
Contrast............................................................................................ 46
Power Off ......................................................................................... 47
Record Rate ...................................................................................... 49
Language.......................................................................................... 50
USB Flash Disk ........................................................................................... 51
USB Flash Disk ........................................................................................... 51
Appendix A. Specifications ................................................................................ 52
3
Page 4

Chapter 1. Introduction
Congratulations on becoming a new user of Acer Multi-functional
MP3/Storage Drive, the finely designed portable digital audio player. Your
new Acer Multi-functional MP3/Storage Drive will improve the convenience
of storing your personal data and the enjoyment of using various audio
functions. We are proud to tell our users that Acer Multi-functional
MP3/Storage Drive is thoroughly tested and backed by our reputation for
unsurpassed dependability and customer satisfaction.
Acer Multi-functional MP3/Storage Drive is a high performance portable
digital audio player that enables users to play MP3 or WMA audio files,
listen in to the FM radio broadcast, and have favorable program recorded in
Acer Multi-functional MP3/Storage Drive’s memory. In addition to the
functions that just now mentioned, Acer Multi-functional MP3/Storage
Drive also works as a portable USB data-storing device that enables users to
store their personal data in the memory of Acer Multi-functional
MP3/Storage Drive. Here are the five main distinguishing features of Acer
Multi-functional MP3/Storage Drive:
Audio Player –supports MP3 and WMA audio files.
FM Radio Broadcasting – provides the function of receiving FM Radio
frequency. Users are able to save ten FM station memory and have
the FM program recorded while listening to the radio.
Voice or Radio Program Recording – provides synchronous recording
function for voice or FM radio program.
4
Page 5

Language Learning Function – enables users to listen to a particular
limited playback repeatedly during normal playback. With this
function, users will be able to pay more concentration on the repeated
playback and to achieve the result of learning language.
USB Flash Disk – allows users to store personal data in Acer
Multi-functional MP3/Storage Drive’s memory.
Thank you for choosing Acer Multi-functional MP3/Storage Drive. We hope
you will continue to turn to us for additional quality products as your
personal needs and interests grow.
How to Use This Guide
This User’s Guide provides instructions and illustrations on how to install
and operate your Acer Multi-functional MP3/Storage Drive. We assume
that those users whose operation system is Windows 98SE are familiar with
their OS, and be capable to follow the step by step instructions to install the
driver of Acer Multi-functional MP3/Storage Drive. If users who are not
able manage the operation system properly, it is suggested to learn more
about Microsoft Windows by referring to your Microsoft Windows manual
before installing the provided driver.
Chapter 1, Introduction, tells you the descriptions of all the accessories of
Acer Multi-functional MP3/Storage Drive. Please check out that if you
have all the accessories included when you open the packing box. If any
item is damaged or missing, please contact the vendor where you
purchased Acer Multi-functional MP3/Storage Drive directly.
5
Page 6

Chapter 2, Getting Started, introduces the function keys on the Drive, and
tells you how to insert an AAA battery into the battery container located on
the back of the Drive.
Chapter 3, Basic Usage, describes how to use your new MP3/Storage Drive
in a various way. It is recommended to read this chapter carefully before
using this MP3/Storage Drive.
Appendix A, Specification, provides the specification of this MP3/Storage
Drive.
6
Page 7
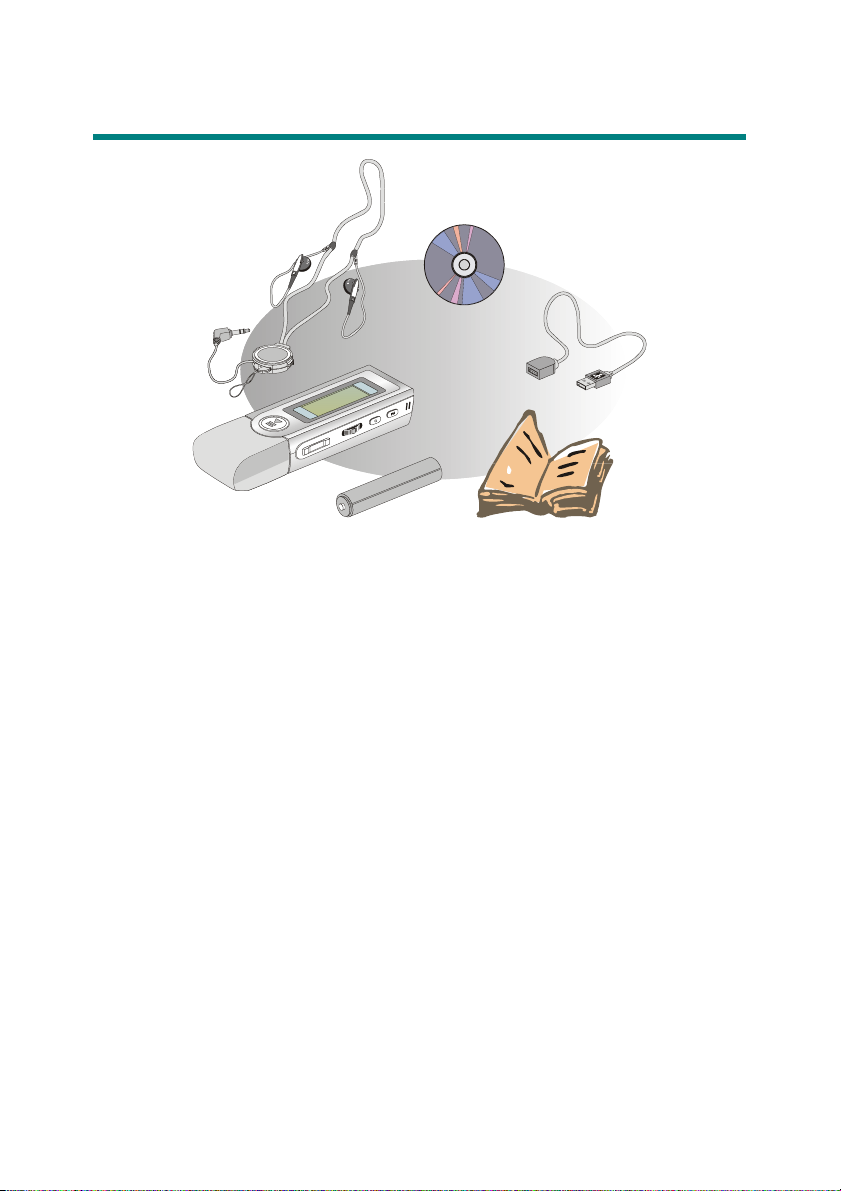
Unpack
2
1
1. Multi-Functional MP3/Storage Drive
2. Earphone with Neck strap
3. Driver Disk
4. USB Cable
5. Quick Guide
6. AAA Battery
3
4
5
6
7
Page 8
Function Keys
3
Chapter 2. Getting Started
21
5
8
11 12
4
1. Battery Slide open to insert an AAA size battery
here.
2. Hold Switch Switch to hold position to prevent any miss
touching while this MP3/Storage Drive is
recording or playing.
3. USB Connector Cap Remove the cap when connecting the
MP3/Storage Drive to the computer.
4. USB Connector Connect one end of the supplied USB
cable.
5. Play/Pause In music playback/Voice mode, press to
play or pause the playback; in FM mode,
press to select the stored favorite stations
one by one.
6
9
10
7
8
Page 9

6. Volume+/- Press +/- button to increase or decrease the
volume level.
7. MENU Press down the button or push it to the
right or to the left to make various
adjustment.
8. Fn Press to select FM station mode.
9. REC Press to start or stop the FM or voice
recording.
10. MIC Microphone
11. Earphone jack Plug the supplied earphone here.
12. MIC jack Plug the external microphone here.
9
Page 10
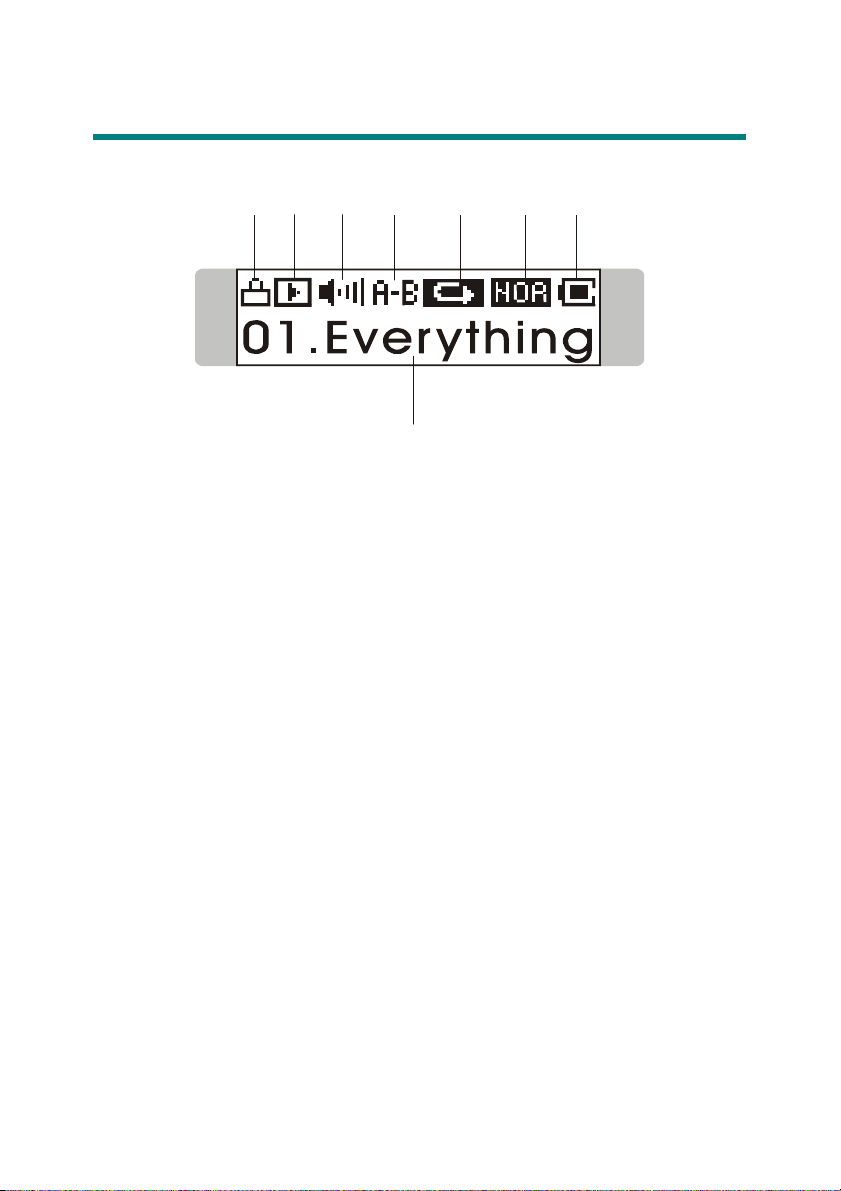
LCD Display
12
1. Hold (Lock) Switch Indicates when the Hold function is
2. Playback Status Displays the music or voice files playback
3. Volume Displays the volume status.
4. A to B Repeat Indicates when A to B Repeat function is
5. Repeat Mode Indicates play mode that includes Normal,
3
4
enabled.
status.
enabled.
Repeat One, Repeat All, Shuffle, and
56
8
7
Shuffle Repeat.
6. Equalizer Indicates the EQ mode settings, which
include Normal, Classical, POP, Rock, and
Jazz.
7. Battery Status Indicates the Battery Status.
8. Playing File Name Displays the current file name that is being
played.
10
Page 11
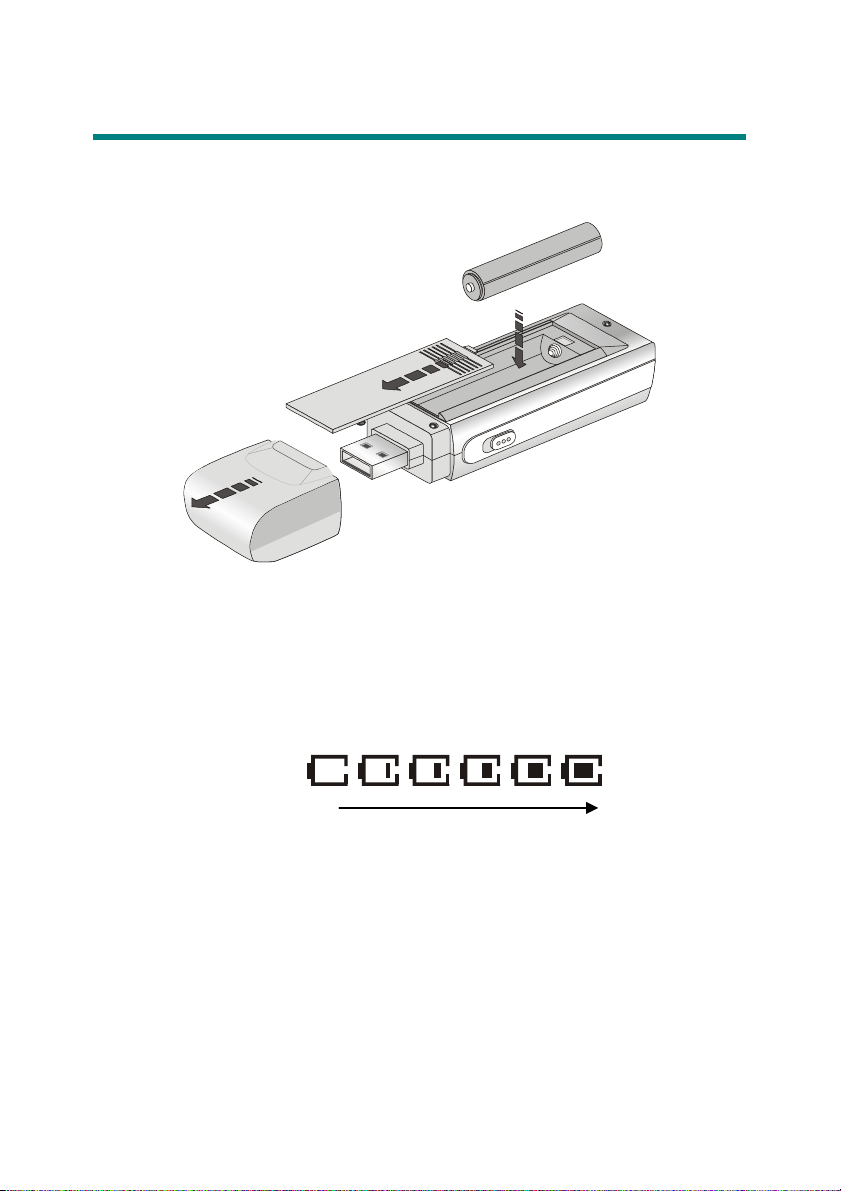
Insert a Battery
1. Remove the USB connector cap
2. Slide open the battery cover.
3. Insert an AAA battery and make sure the battery is inserted into the
correct alignment.
4. Slide back the battery cover.
5. Press the Play/Pause「 」button to check the capacity of the battery.
Battery Status
6. If you cannot read the Battery Status on the Display when the battery is
inserted, please return to step 1 and once again make sure the battery
is inserted into the correct alignment.
Empty Full
11
Page 12

Battery Consuming Reference
Category of Battery Recording Playing
AAA Alkaline
1280mA/hr battery
Max 12 hours for voice
or FM radio recording
Max 12 hours for audio
playback
Note:1. Alkaline battery is recommended when using this Drive.
2. Make sure the battery is taken out if you are not going to use
this drive for a long period of time.
12
Page 13
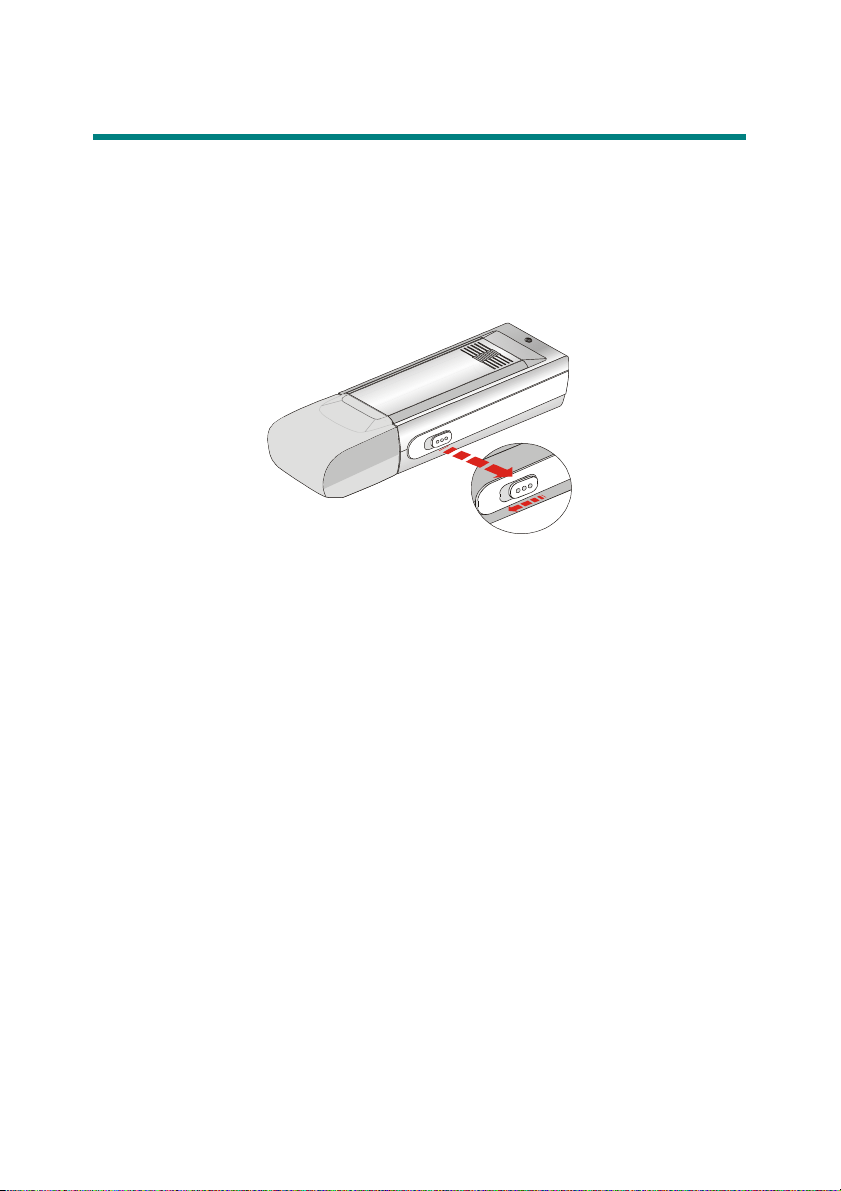
Hold Switch
This MP3/Storage Drive provides a Hold Switch, which is located on the side
of the Drive for preventing any miss touching while the Drive is recording or
playing. Once the hold switch is slide to the lock position, all function keys
on the Drive will be disabled instantly.
13
Page 14
Chapter 3. Basic Usage
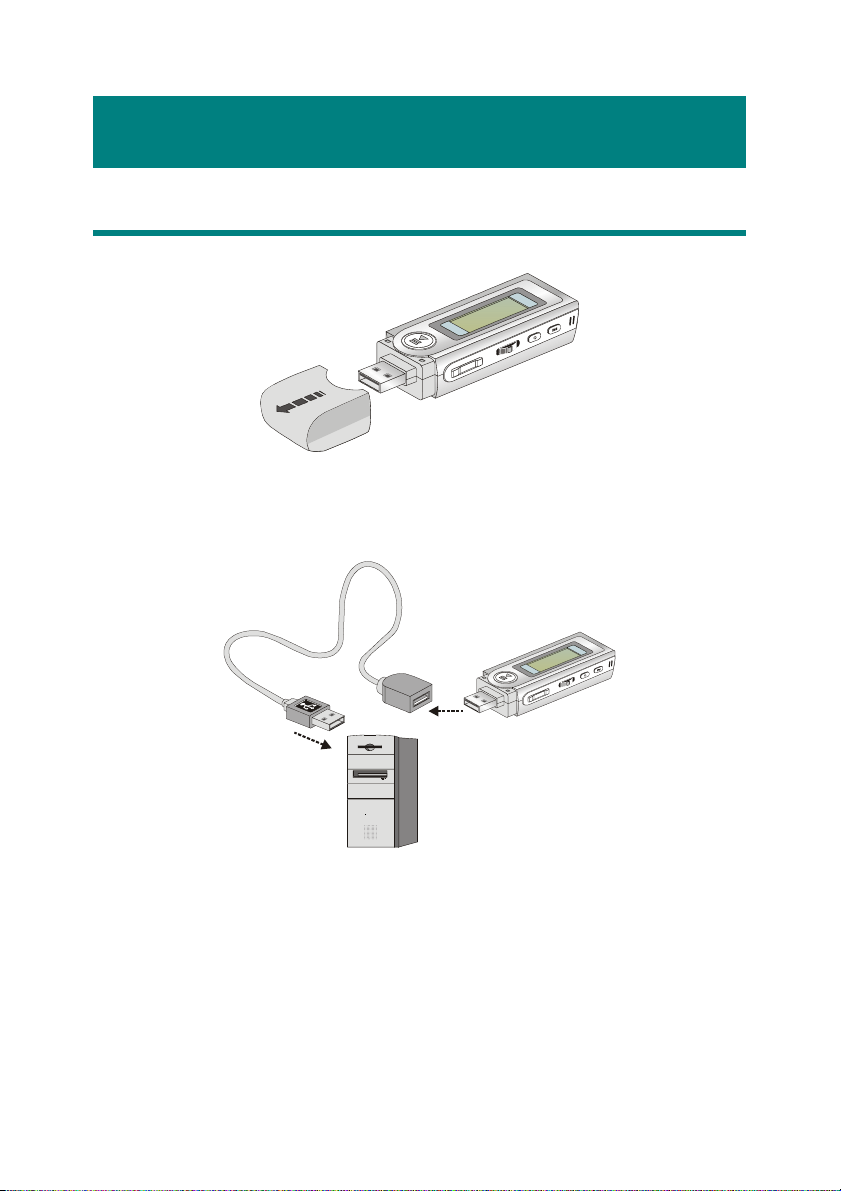
Connecting the MP3/Storage Drive to Your Computer
1. Remove the USB connector cap.
2. Plug one end of the supplied USB cable to your computer, and plug the
other end to the MP3/Storage Drive. Then press the Play/Pause「 」
button to start connection.
3. And the MP3/Storage Drive should be detected by the operation system
automatically.
Note: If the operation system of your computer is Windows 98SE, a
hardware driver for the MP3/Storage Drive will be required.
14
Page 15
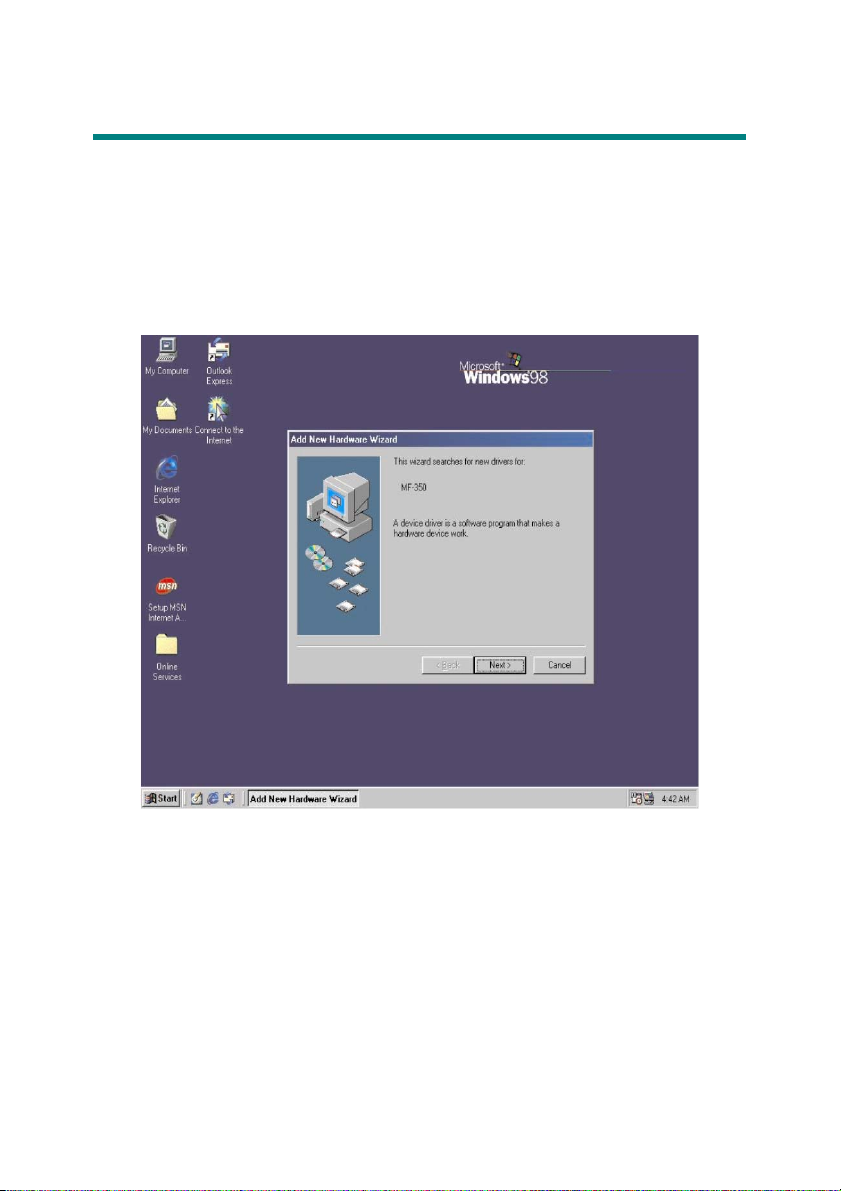
Hardware Installation for Windows 98SE only
For Windows 98SE operation system, it will automatically detect the new
hardware when the MP3/Storage Drive is first connected to your computer.
Please follow the following instructions to install the driver for this
MP3/Storage Drive.
1. Click Next to continue.
15
Page 16
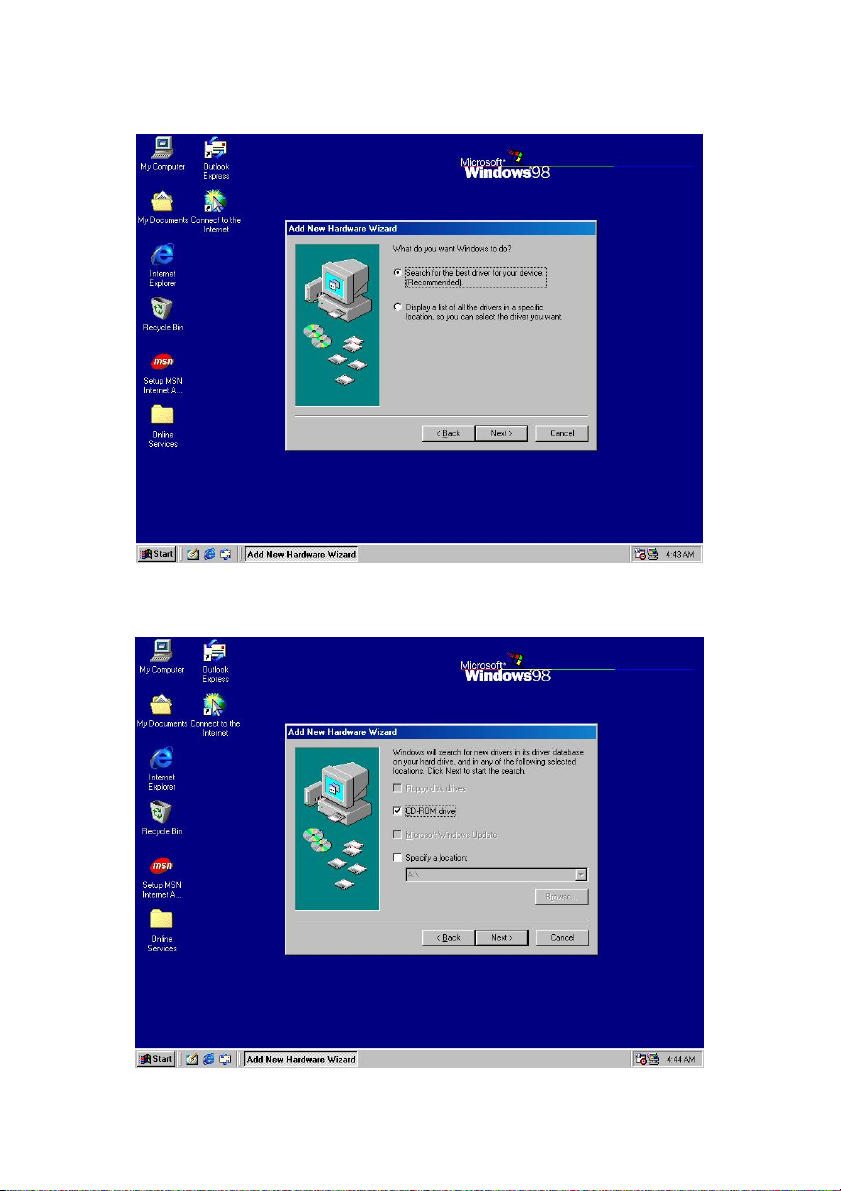
2. Select Search for the best driver for your device to continue.
3. Insert the provided disk, and select CD-ROM to continue.
16
Page 17

4. Click Next to continue.
5. Click Finish, and the driver is installed successful.
17
Page 18

Power On and Off
1. Press the Play/Pause「 」button once to turn the power on.
2. To power off the USB Device, press and hold the Play/Pause「 」
button until the power is switched off. While you are long pressing
the Play/Pause「 」button to power off the MP3/Storage Drive, you
will see a Power Off Status Bar appearing on the Display to show you
the Power Off status, and note that it takes about three to five seconds
to turn the power off.
18
Page 19

Editing Sound Tracks (Files)
1. Press the Play/Pause「 」button to power on the MP3/Storage Drive.
If there is no sound track added in the memory of this drive, you will
read the massage as below on the screen.
2. Remove the USB connector cap, and then plug one end of the supplied
USB cable to your computer, and plug the other end to the
MP3/Storage Drive.
3. Once the MP3/Storage Drive is connected to the computer, press the
Play/Pause「 」button to start connection. You will see the screen
shown as below.
4. Go to Start Î Program ÎWindows Explore ÎMP3/Storage Drive.
5. Select the desired sound tracks (files) from your own folder, and move
them into the MP3/Storage Drive. While the selected sound tracks
(files) is transferring to the MP3/Storage Drive, a message will shown as
below.
19
Page 20

Note: Do not disconnect the MP3/Storage Drive from the computer
while the file transferring is still on going, otherwise it may cause some
system failure.
6. Under the MP3/Storage Drive, you are allowed to add, delete, or edit a
folder as what you will do under a disk as usual. In another word, this
MP3/Storage Drive works as another portable hard disk of yours.
20
Page 21

Music Playback
Normal Playback
1. Press the Play/Pause「 」button to play the current selected file.
2. During playback, press the Play/Pause「 」button again to pause the
playback.
Select the Next or Previous Track (File)
1. During playback, push the Menu button to the right once to skip to the
next track.
2. Or, push the Menu button to the left once to skip back to the previous
track.
Go Back to Table of Content
21
Page 22

Fast-Forward or Rewind
1. During playback, push the Menu button to the right and hold the
position to fast-forward the current track.
2. Or, push the Menu button to the left and hold the position to rewind
the current track.
Volume Adjusting
1. Press the Volume Up or Down button to adjust the playback volume up
or down.
2. You may check the LCD Display to see the Volume status.
Delete a Track (File)
1. Press down the Menu button once, and then push the Menu button to
the right four times, and now you should read the message of DELETE
FILE appearing on the Display.
22
Page 23

2. Press down the Menu button once and then push the Menu button to
select DEL MUSIC.
3. All of the stored file will be displayed by sequence, switch the Menu
button to the right or to the left to select Yes to delete the file shown
on the Display, or select No to skip to the next file, or select EXIT to
leave the current screen.
Delete All Tracks (Files)
1. Press down the Menu button once, and then push the Menu button to
the right four times, and now you should read the message of DELETE
FILE appearing on the Display.
2. Press down the Menu button once and then push the Menu button to
the right twice to select DEL ALL MUSIC.
23
Page 24

3. Once you read DEL ALL MUSIC on the screen, press down the Menu
button, and then select Y to delete all music files. Note that it may
take several seconds to delete all the files.
24
Page 25

EQ Settings
While you are listening to the music, you are allowed to choose a desired EQ
mode to meet your personal need or habit.
1. Press down the Menu button once, and then push the Menu button to
the right three times, and now you should read the message of
SETTINGS appearing on the Display.
2. Press down the Menu button once and you should read the message of
EQ appearing on the Display.
3. Press down the Menu button once, and switch the Menu button to the
right or to the left to choose the EQ mode between NORMAL, ROCK,
JAZZ, CLASSICAL, and POP. The default EQ setting is NORMAL mode.
4. Once a particular EQ mode is selected, the indicator for each different
EQ mode will appear on the top of the Display.
25
Page 26

Repeat Settings
While you are playing music or voice files, you are allowed to select a
desired playback setting from NORMAL, REPEAT ONE, REPEAT ALL, SHUFFLE,
and SHUFFLE REP.
1. Press down the Menu button once, and then push the Menu button to
the right three times, and now you should read the message of
SETTINGS appearing on the Display.
2. Press down the Menu button once and you should read the message of
REPEAT appearing on the Display.
3. Press down the Menu button once, and switch the Menu button to the
right or to the left to choose NORMAL, REPEAT ONE, REPEAT ALL,
SHUFFLE, or SHUFFLE REP.
26
Page 27

FM Radio Mode
Select FM Radio Mode
1. Press and hold the Fn button located on the side of the MP3/Storage
Drive for one second to select FM Mode.
2. Or, you can press down the Menu button once, and then push the
Menu button to the right twice.
3. If you read the message of FM RADIO appearing on the Display, press
down the Menu button once to select FM Radio Mode.
27
Page 28

4. If you do not read the message of FM RADIO on the Display, please
keep pushing the Menu button the to right until FM RADIO appears.
Select FM Station
1. Once the FM Radio Mode is selected, use the Menu button by pushing
it to the right or to the left to select the desired station.
2. While you are searching for the desired station, you will read the
frequency appearing on the Display.
Storing a Favorite Station
With this favorite station memory function, you will be able to store 10
favorite stations named from P01 to P10 into the memory of this
MP3/Storage Drive.
1. To store a favorite Station, select a desired frequency first.
2. Press the Menu button once, and you should read the massage of SAVE
TO P01 appears on the Display.
28
Page 29

3. Switch the Menu button to the right or to the left to select a desired
favorite station number.
4. Now, press the Menu button again to save the selected frequency to
the selected favorite station number.
5. To set another favorite station, repeat step 1 to 4.
Selecting the Stored Favorite Station
1. To select the stored favorite station, press the「 」button
repeatedly.
2. Once the desired stored favorite station appears on the Display, release
the「 」button.
Recording Radio Broadcast
1. Select a desired station frequency.
29
Page 30

2. Press and hold the REC「y」button located next to the Fn button for 2
seconds, and then release the REC「y」button.
3. Once the REC「y」button is long pressed and then released, the selected
station frequency will now start being recorded. On the Display, users
should read that a recording FM file is generated and place under the
folder of [ /VOICE/ ]. The recording file name sequence starts from
[ F001.WAV ], and then [F002.WAV ], and so forth.
4. To stop recording, press the REC「y」button or the Menu button again.
5. The maximum length of the recording depends on how much available
memory space is left while recording.
Play a Recorded FM Voice File
1. To play a recorded FM voice file, press down the Menu button once,
and then push the Menu button to the right once, and now you should
read the message of VOICE appearing on the Display.
30
Page 31

2. Press down the Menu button again, and then use the Menu button to
select a desired recorded FM voice file by pushing the Menu button to
the right or to the left.
3. Once the desired voice file is selected, press the 「 」button to start
playing the file.
4. Note that while you are searching for the desired recorded voice file, all
the recorded FM voice files will be displayed by sequence.
Delete a Recorded FM Voice File
1. To delete a recorded FM voice File, press down the Menu button once,
and then push the Menu button to the right four times, and now you
should read the message of DELETE FILE appearing on the Display.
2. Press down the Menu button once and then push the Menu button to
the right to select DEL VOICE.
31
Page 32

3. All of the recorded FM voice file will be displayed by sequence. Switch
the Menu button to the right or to the left to select Y to erase the file
shown on the Display, or select N to skip to the next file, or select EXIT
to leave the current screen.
Delete All FM Voice Files
1. Press down the Menu button once, and then push the Menu button to
the right four times, and now you should read the message of DELETE
FILE appearing on the Display.
2. Press down the Menu button once and then push the Menu button to
the right twice to select DEL ALL VOICE.
3. Once you read DEL ALL VOICE on the screen, press down the Menu
button, and then select Y to delete all FM voice files. Note that it may
take several seconds to delete all the files.
32
Page 33

Switch between Music Playback or FM mode
Switch from Music Playback mode to FM mode
Press and hold the Fn button located on the side of the MP3/Storage Drive
for one second to select FM Mode.
Go Back to Table of Content
Switch from FM mode to Music Playback mode
Please press Fn button to leave FM mode, and back to Music playback mode
again.
33
Page 34

Voice Recording
This MP3/Storage Drive also works as a synchronizing recorder. You can
use it to record your own voice, an interview or a speech, and so on. To do
the voice Recording, please follow the steps shown below.
Voice Recording
This MP3/Storage Drive provides two methods to proceed voice recording,
follow the instruction below to learn these two methods.
Method I
1. Press the REC「y」button located next to the Fn button to start voice
recording function.
2. On the Display, a recording file should be generated and placed under
the folder of [ /VOICE/ ]. The recording file name sequence starts from
[ V001.WAV ], and then [V002.WAV ], and so forth.
3. To stop recording, simply press down the REC「y」button again, and you
will see the status return to the previous status.
Method II
4. Press down the Menu button once, and then push the Menu button to
the left twice.
5. If you read the message of RECORD appearing on the Display, press
down the Menu button again to start recording.
34
Page 35

6. On the Display, users now should read that a recording file is generated
and place under the folder of [ /VOICE/ ]. The recording file name
sequence starts from [ V001.WAV ], and then [V002.WAV ], and so
forth.
7. To stop recording, simply press down the Menu button or the REC「y」
button again, and you will see the message on the screen return to the
previous status.
8. To exit the RECORD mode, push the Menu button to the right once to
Exit, and then press the Menu button once.
35
Page 36

Play a Recorded Voice File
1. To play a recorded voice file, press down the Menu button once, and
then push the Menu button to the right once, and now you should read
the message of VOICE appearing on the Display.
2. Press down the Menu button again, and then use the Menu button to
select a desired recorded voice file by pushing the Menu button to the
right or to the left.
3. Once the desired voice file is selected, press the 「 」button to start
playing the file.
4. Note that while you are searching for the desired recorded voice file, all
the recorded voice files will be displayed by sequence.
Delete a Recorded Voice File
1. To delete a recorded voice File, press down the Menu button once, and
then push the Menu button to the right four times, and now you
should read the message of DELETE FILE appearing on the Display.
36
Page 37

2. Press down the Menu button once and then push the Menu button to
the right to select DEL VOICE.
3. All of the recorded file will be displayed by sequence. Switch the
Menu button to the right or to the left to select Y to erase the file
shown on the Display, or select N to skip to the next file, or select EXIT
to leave the current screen.
Delete All Voice Files
1. Press down the Menu button once, and then push the Menu button to
the right four times, and now you should read the message of DELETE
FILE appearing on the Display.
2. Press down the Menu button once and then push the Menu button to
the right twice to select DEL ALL VOICE.
37
Page 38

3. Once you read DEL ALL VOICE on the screen, press down the Menu
button, and then select Y to delete all voice files. Note that it may take
several seconds to delete all the files.
38
Page 39

Language Learning Function
This MP3/Storage Drive enables users to listen to a particular limited
playback repeatedly during normal playback. With this function, users will
be able to pay more concentration on the repeated playback and to achieve
the result of learning language. To use this function, follow the instruction
below:
1. During normal playback, find the starting point of the repeating
playback that you wish to set, and press the Fn button once.
2. When you first press the Fn button, you will see the indication of A-
appearing on the screen.
3. Then, find the terminal point of the repeating playback that you wish to
set, and press the Fn button again.
4. When you press the Fn button the second time, you will see the
indication of A-B appearing on the screen, and that means you have set
the repeating playback successfully.
5. Once the indication of A-B appears on the screen, you will now hear the
repeating playback that you set previously again and again.
6. To cancel the repeating playback and return to the normal playback,
press the Fn button again, and the indication of A-B will disappear from
the Display.
39
Page 40

Menu Mode
This MP3/Storage Drive provides a Menu switching button that includes
most function designed for Acer Multi-functional MP3/Storage Drive. With
this Menu switching button, in addition to switch between Music Playback,
FM Radio or Recording mode, EQ setting or any other setting for the
MP3/Storage Drive can be also adjusted quickly and easily.
40
Page 41

Menu Table
MUSIC
VOICE
FM RADIO
SETTINGS
DELETE FILE
EQ NORMAL / ROCK / JAZZ / CLASSICAL / POP
REPEAT NORMAL / REPEAT ONE / REPEAT ALL /
SHUFFLE / SHUFFLE REP
BACKLIGHT DISABLE / 5 SECS / 10SECS / 30 SECS
CONTRAST Adjusting bar
POWER OFF DISABLE / 1 MIN / 2 MINS / 5 MINS /
10 MINS
RECORD RATE 8000Hz / 11025Hz / 16000Hz / 22050Hz /
32000Hz / 44100Hz / 48000Hz / EXIT
LANGUAGE TRAD. CHINESE / ENGLISH
EXIT
DEL MUSIC Delete a Music file each time (.mps / .wav)
DEL VOICE Delete a Voice or FM radio recording file each
time (.wav)
DEL ALL MUSIC Delete all Music file
DEL ALL VOICE Delete all Voice or FM radio recording files
EXIT
ABOUT
RECORD
EXIT
41
Page 42

1. Press down the Menu button once, and then push the Menu button to
the right or to the left to select the desired function.
2. Select MUSIC by pressing down the Menu button once to enter music
playback mode.
3. Select VOICE by pressing down the Menu button and press the Menu
button the right once to enter voice playback mode.
4. Select FM RADIO by pressing down the Menu button to enter FM radio
broadcasting mode.
42
Page 43

5. Select SETTINGS by pressing down the Menu button to enter Setting
mode. In Setting mode, you are able to make adjustment for various
functions.
Note: Adjustment for all items under the menu of settings can be made
during music playback or when music playback is stopped.
6. Select DELETE FILE by pressing down the Menu button to delete music
or voice files.
7. Select ABOUT to read the information of this Acer Multi-functional
MP3/Storage Drive.
8. Select RECORD to start recording through MIC or FM radio station.
43
Page 44

9. Select EXIT to return to Music Playback mode.
44
Page 45

Other Settings
Backlight
Under this Backlight setting, you are able to set a time to turn off the
backlight of the LCD Display automatically.
1. Press down the Menu button once, and then push the Menu button to
the right three times, and now you should read the message of
SETTINGS appearing on the Display.
2. Press down the Menu button again, and then push the Menu button to
the right twice to select BACKLIGHT. Once the massage of
BACKLIGHT appears on the screen, press down the Menu button again.
3. Now push the Menu button to the right or to the left to select a desired
time to turn off the backlight of the LCD Display. If select DISABLE,
and the backlight of the LCD Display will always illuminate.
45
Page 46

4. When a selection is decided, press down the Menu button once to
confirm the selection.
Contrast
Under this Contrast setting, you are able to set the contrast of the LCD
Display.
Under this Backlight setting, you are able to set a time to turn off the
backlight of the LCD Display automatically.
1. Press down the Menu button once, and then push the Menu button to
the right three times, and now you should read the message of
SETTINGS appearing on the Display.
2. Press down the Menu button again, and then push the Menu button to
the right three times to select CONTRAST. Once the massage of
CONTRAST appears on the screen, press down the Menu button again.
46
Page 47
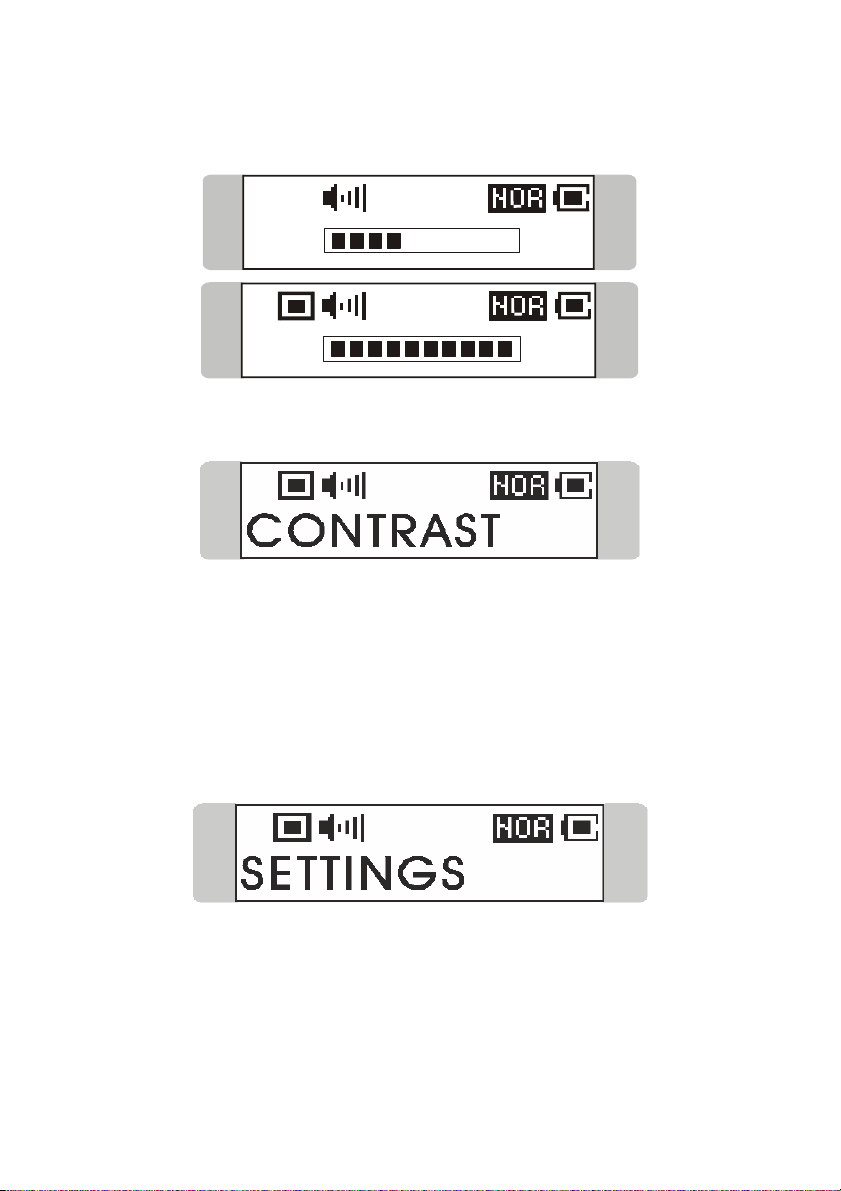
3. Now push the Menu button to the right or to the left to increase or
decrease the Contrast value.
4. When a selection is decided, press down the Menu button once to
confirm the selection.
Power Off
Under this Power Off setting, you are able to set a time to turn off this
MP3/Storage Drive automatically.
1. Press down the Menu button once, and then push the Menu button to
the right three times, and now you should read the message of
SETTINGS appearing on the Display.
47
Page 48

2. Press down the Menu button again, and then push the Menu button to
the right four times to select POWER OFF. Once the massage of
POWER OFF appears on the screen, press down the Menu button again.
3. Now push the Menu button to the right or to the left to select a desired
time to turn off this MP3/Storage Drive. If select DISABLE, and the
power of this MP3/Storage Drive will always stay on.
4. When a selection is decided, press down the Menu button once to
confirm the selection.
48
Page 49

Record Rate
Under this Record Rate setting, you are able to set the Record Rate as your
wish.
1. Press down the Menu button once, and then push the Menu button to
the right three times, and now you should read the message of
SETTINGS appearing on the Display.
2. Press down the Menu button again, and then push the Menu button to
the left three times to select RECORD RATE. Once the massage of
RECORD RATE appears on the screen, press down the Menu button
again.
3. Now push the Menu button to the right or to the left to select a proper
Record Rate.
4. When a selection is decided, press down the Menu button once to
confirm the selection.
49
Page 50

Language
Under this Language setting, you are able to select the language of the
interface as your wish.
1. Press down the Menu button once, and then push the Menu button to
the right three times, and now you should read the message of
SETTINGS appearing on the Display.
2. Press down the Menu button again, and then push the Menu button to
the left twice to select LANGUAGE. Once the massage of LANGUAGE
appears on the screen, press down the Menu button again.
3. Now push the Menu button to the right or to the left to select a desired
language.
4. When a selection is decided, press down the Menu button once to
confirm the selection.
50
Page 51

USB Flash Disk
This MP3/Storage Drive enables users to save personal data (files) in various
formats to its memory. If you like, you can say that this MP3/Storage Drive
works as another hard disk, but a portable, small and exquisite one. To
save data into the memory of this MP3/Storage Drive, simply connect it to
your computer, and use Windows Explorer to manage your data.
Note: Please use the supplied Driver Dick to format this MP3/Storage Drive
in order to ensure the formatting quality.
51
Page 52

Appendix A. Specifications
Acer Multi-functional MP3/Storage Drive
Target Dimension 95.7 (W) x 30(D) x 18.8(H) mm
Target Weight 33 g without battery , 41g with battery
Operation Temperature 0 °C ~ 45°C
Storage Temperature -20°C ~ +70 °C
Audio Spec Output: 60mW rms ( 30mW / channel)
Frequency: 20 to 20K Hz
SNR: >90dB
LCD module Dimension: 29.5(L) x 11(W)mm ( 96 x 25 pixels)
Memory Size 128 MB
I/O Input 1. Stereo Audio- out, 3.5mm
2. Mono MIC - in, 3.5mm
3. USB connector
EMI and Safety BSMI, FCC Class B and CE
Interface Language English/ Traditional Chinese
Earphone with neck strap Stereo Output: 20mW rms (10mW / Channel)
Battery AAA-Alkaline 1280mA/hr
Manual English/ Traditional Chinese
USB Cable 100 cm
52
 Loading...