

Page 1
Installing Acer Aspire 5100 USB Add-on Card
Installing Acer Aspire 5100 USB Add-on Card
Tools used in this guide
Phillips #0 Screwdriver (1)
Spudger (1)
Parts relevant to this guide
Acer Aspire 5100 compatible USB card (1)
This guide will lead you through the steps of removing the USB Add-on Card attached on the
motherboard.
© 2010 iFixit — CC BY-NC-SA www.iFixit.com Page 1 of 11
Page 2
Installing Acer Aspire 5100 USB Add-on Card
Step 1 - Cooling Fan
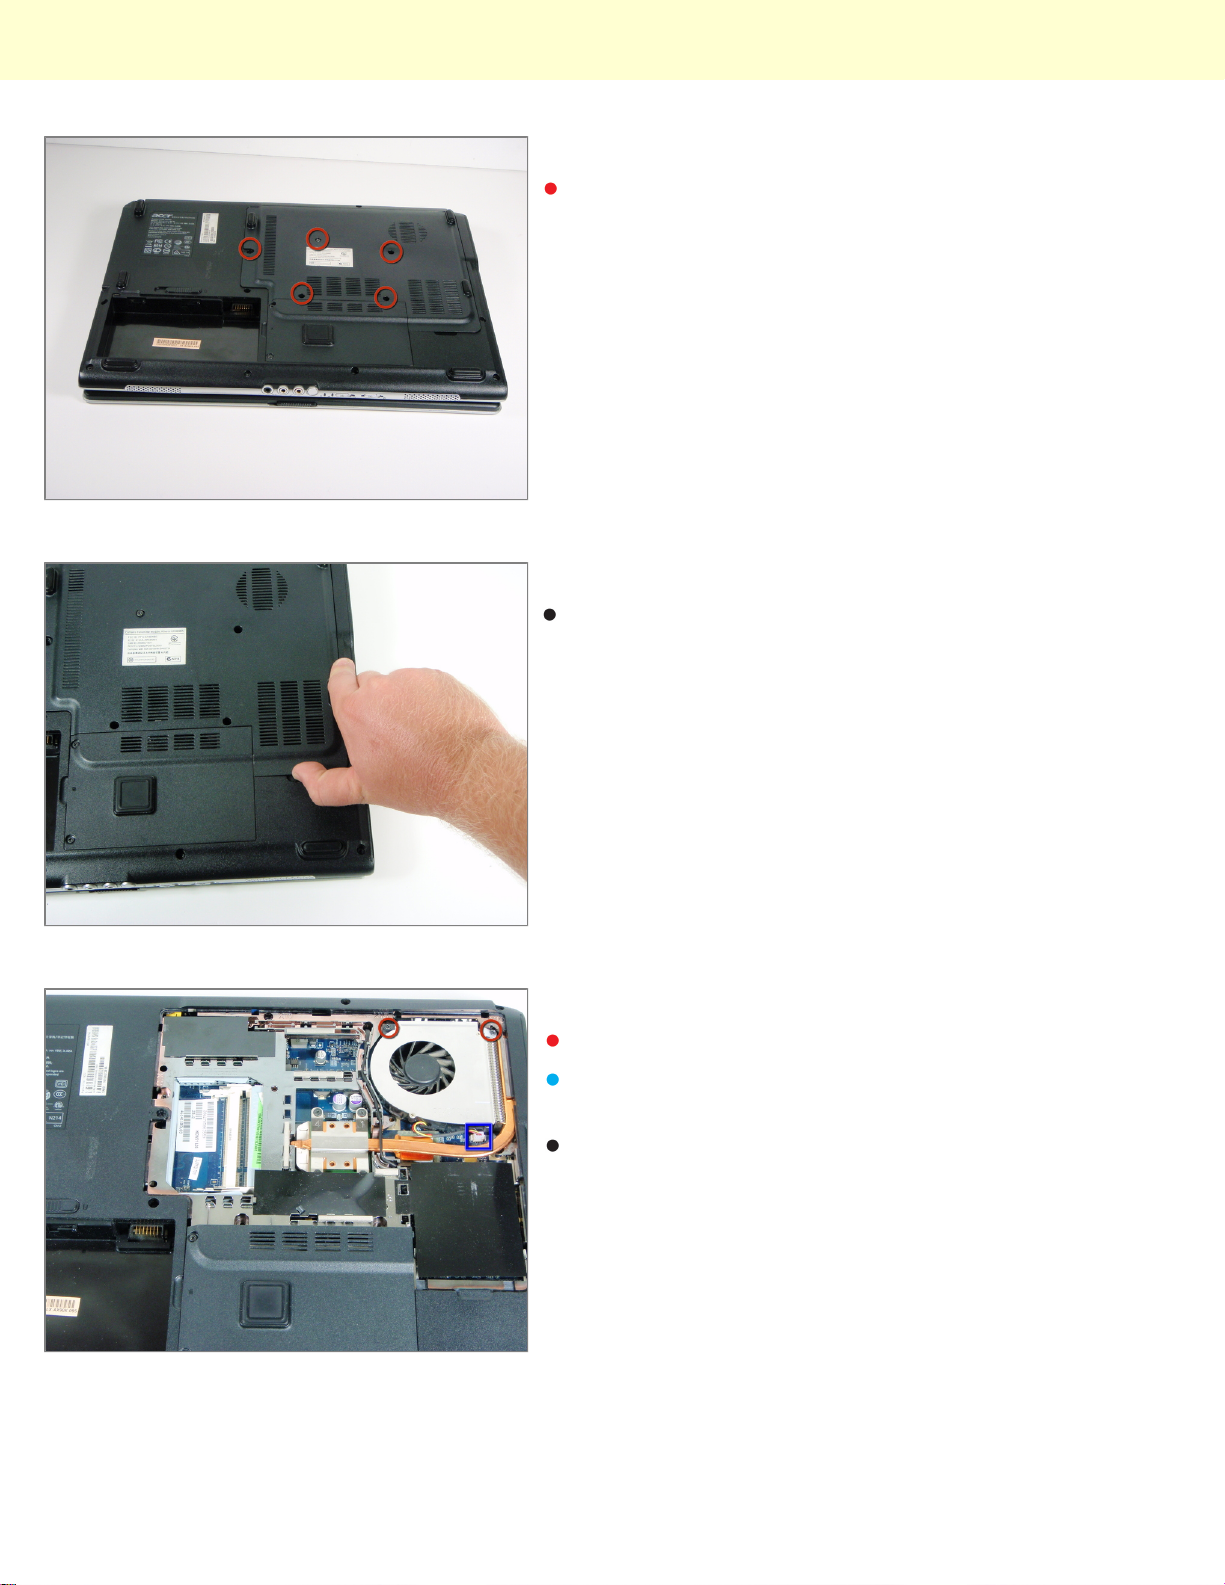
Locate and remove the 5 screws that secure the panel
over the RAM and CPU cover on the upper right hand
side. These can be found in the center towards the
corner opposite the battery compartment.
Step 2
Lift up and remove the RAM and CPU cover.
Step 3
Remove the two Phillips screws securing the fan.
Carefully disconnect the fan cable from the
motherboard.
Lift up and remove the fan.
© 2010 iFixit — CC BY-NC-SA www.iFixit.com Page 2 of 11
Page 3
Installing Acer Aspire 5100 USB Add-on Card
Step 4 - Keyboard
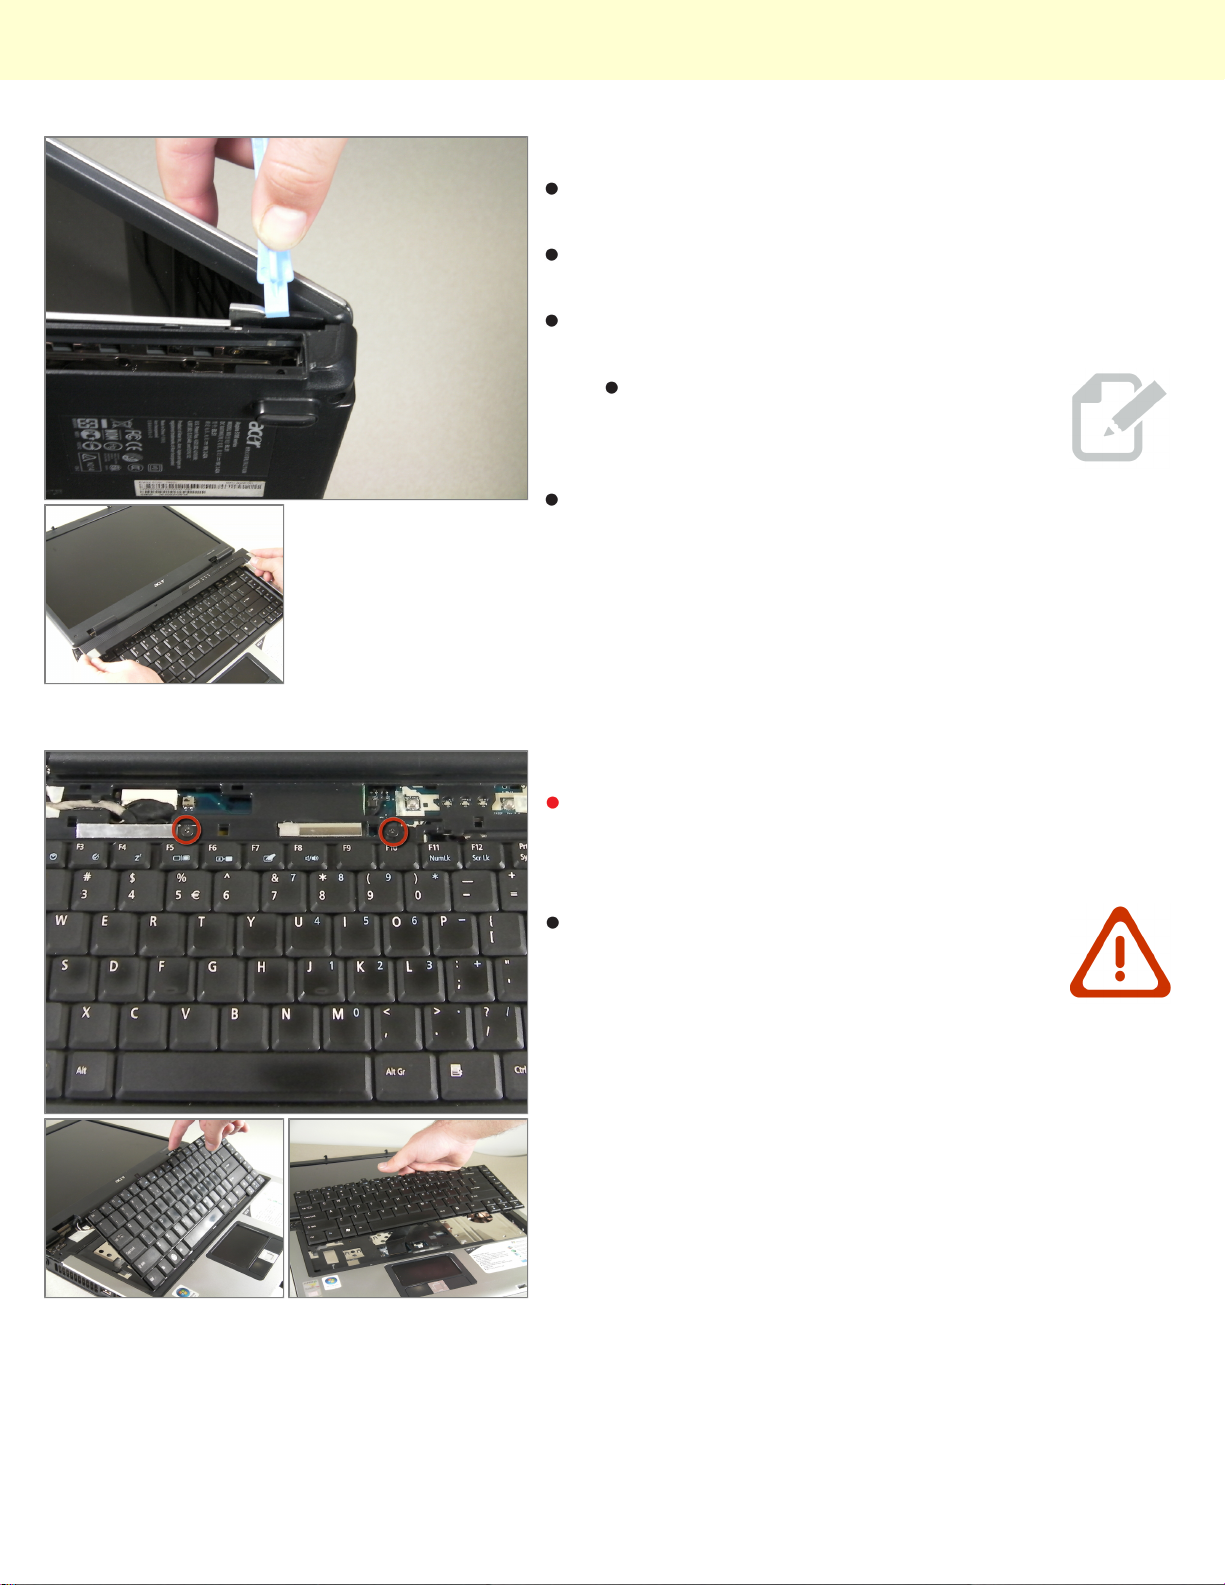
Open and push the screen back all the way until it is
horizontal with the rest of the laptop.
Locate the panel above the keyboard that has the
power button on it.
Remove this panel by using a spudger to pry up the
sides.
You are using the spudger to release
tabs holding the panel in place.
After you have used the spudger to release the tabs, lift
up the panel.
Step 5
Under the panel, locate and remove the two screws
that connect the keyboard to the laptop. One screw is
located above the F5 button, and the other one is
located above the F10 button.
Lift up the keyboard CAREFULLY because
there is a ribbon that connects the keyboard
to the motherboard.
© 2010 iFixit — CC BY-NC-SA www.iFixit.com Page 3 of 11
Page 4
Installing Acer Aspire 5100 USB Add-on Card
Step 6
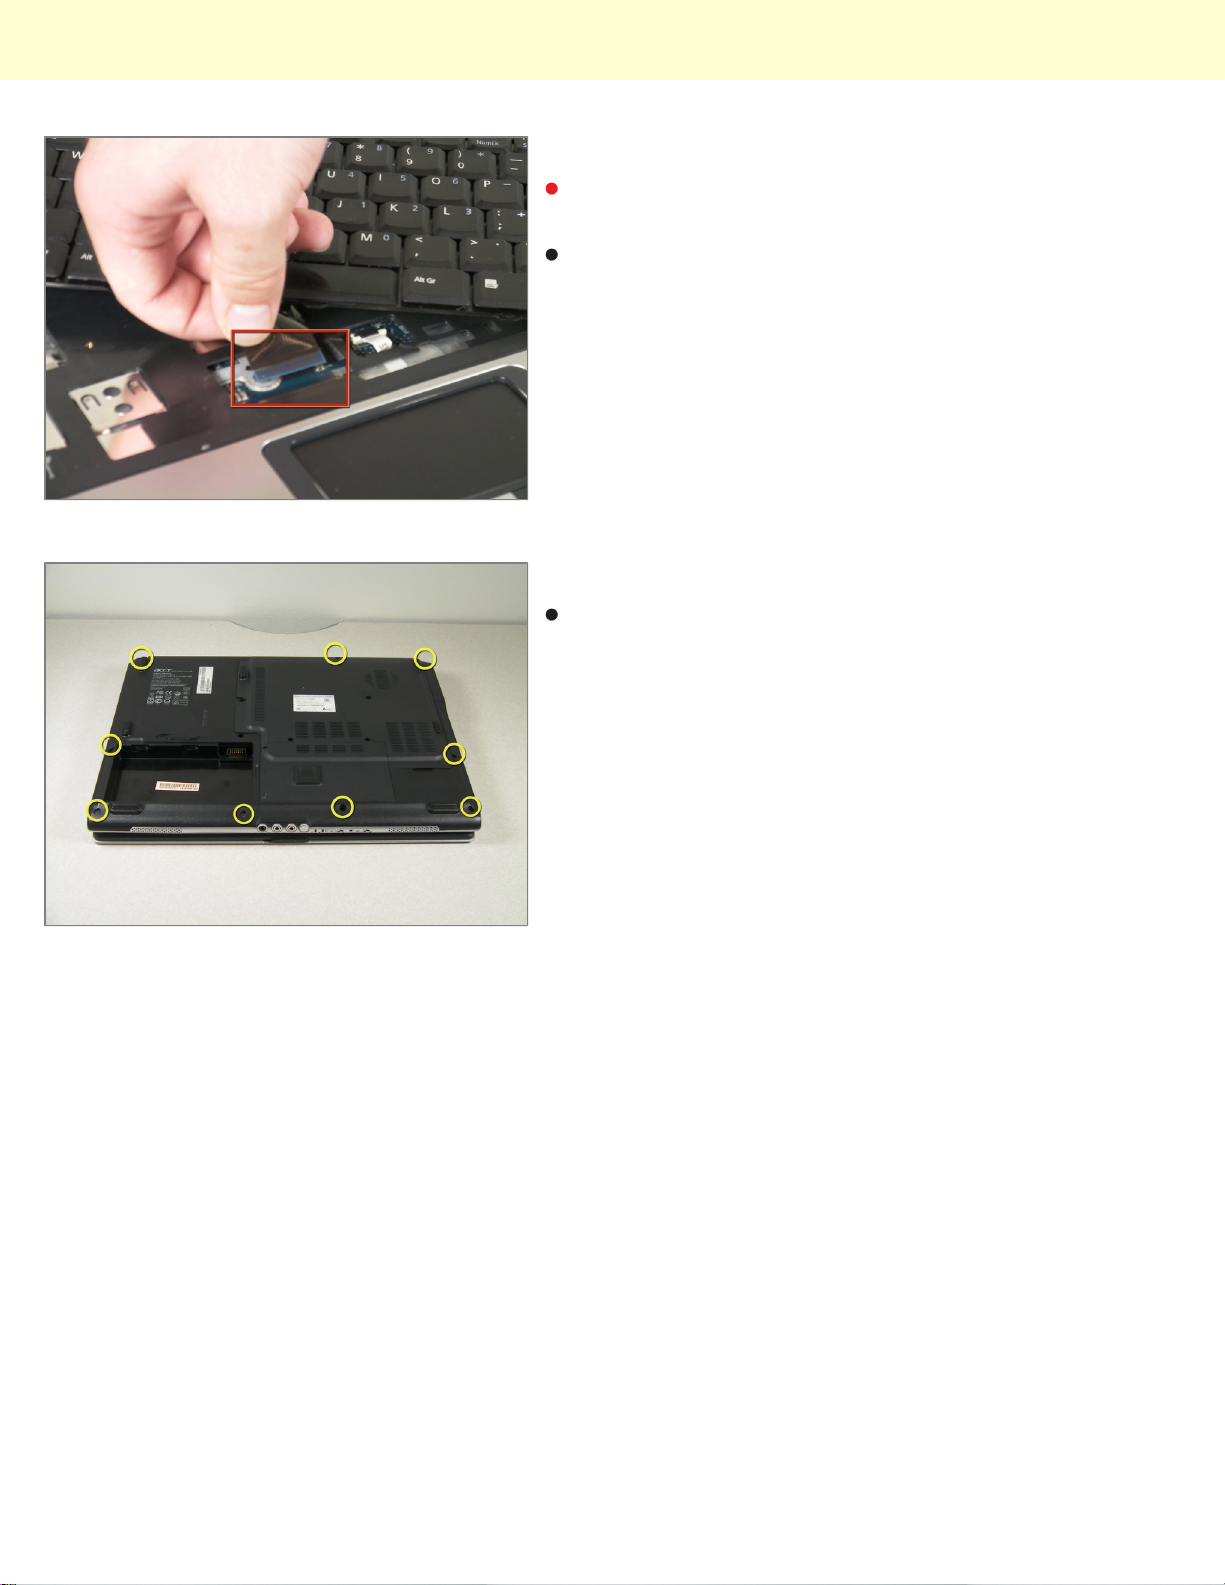
Pull the ribbon, which is located under the keyboard, to
detach it from the motherboard.
Remove the keyboard.
Step 7 - Track Pad
On the back of the laptop, locate and unscrew all nine
of the screws located at the edges.
© 2010 iFixit — CC BY-NC-SA www.iFixit.com Page 4 of 11
Page 5
Installing Acer Aspire 5100 USB Add-on Card
Step 8
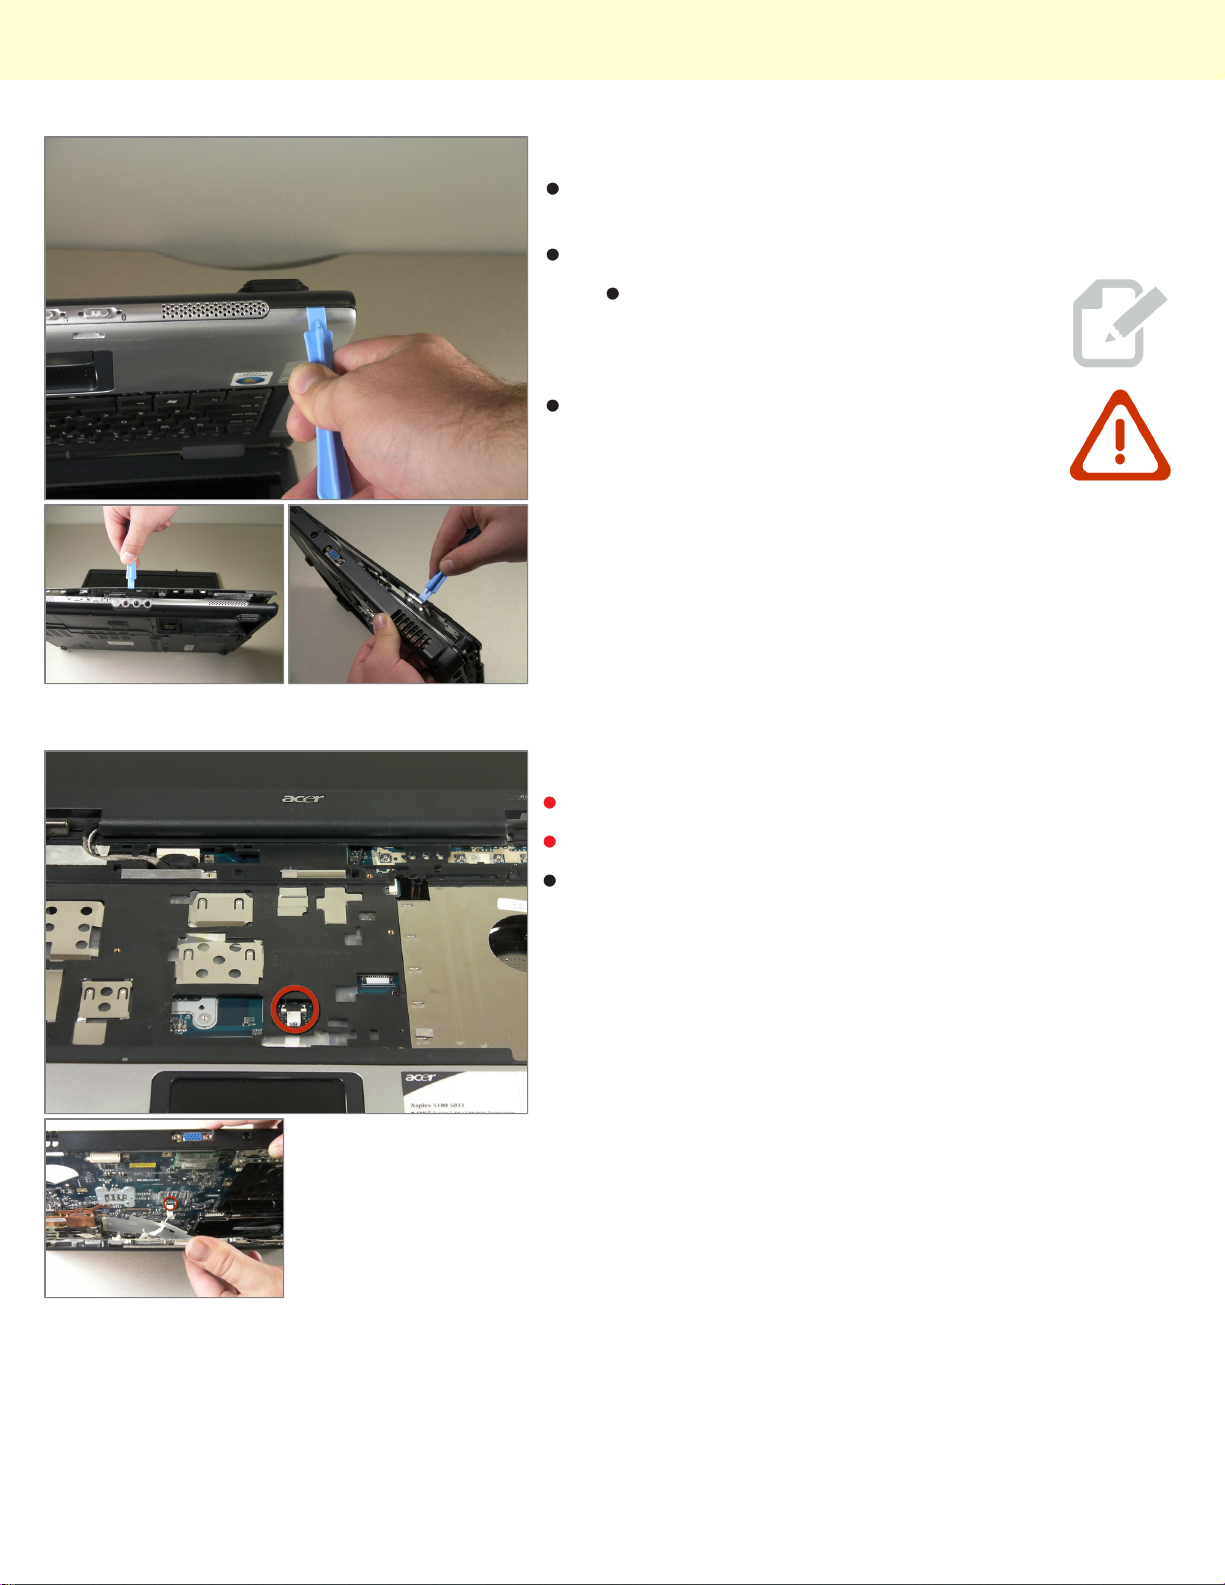
Open the lid of the laptop and locate the cover that
surrounds the keyboard and track pad.
Use the spudger to pry open the sides of this cover.
DO NOT lift cover off after detaching it
because the track pad is connected to the
motherboard.
You are using the spudger to release
tabs holding the cover in place.
Step 9
Slightly lift up the cover to see the ribbon connection.
Pull the ribbon to detach it from the motherboard.
Lift up the cover from the laptop.
© 2010 iFixit — CC BY-NC-SA www.iFixit.com Page 5 of 11
Page 6
Installing Acer Aspire 5100 USB Add-on Card
Step 10
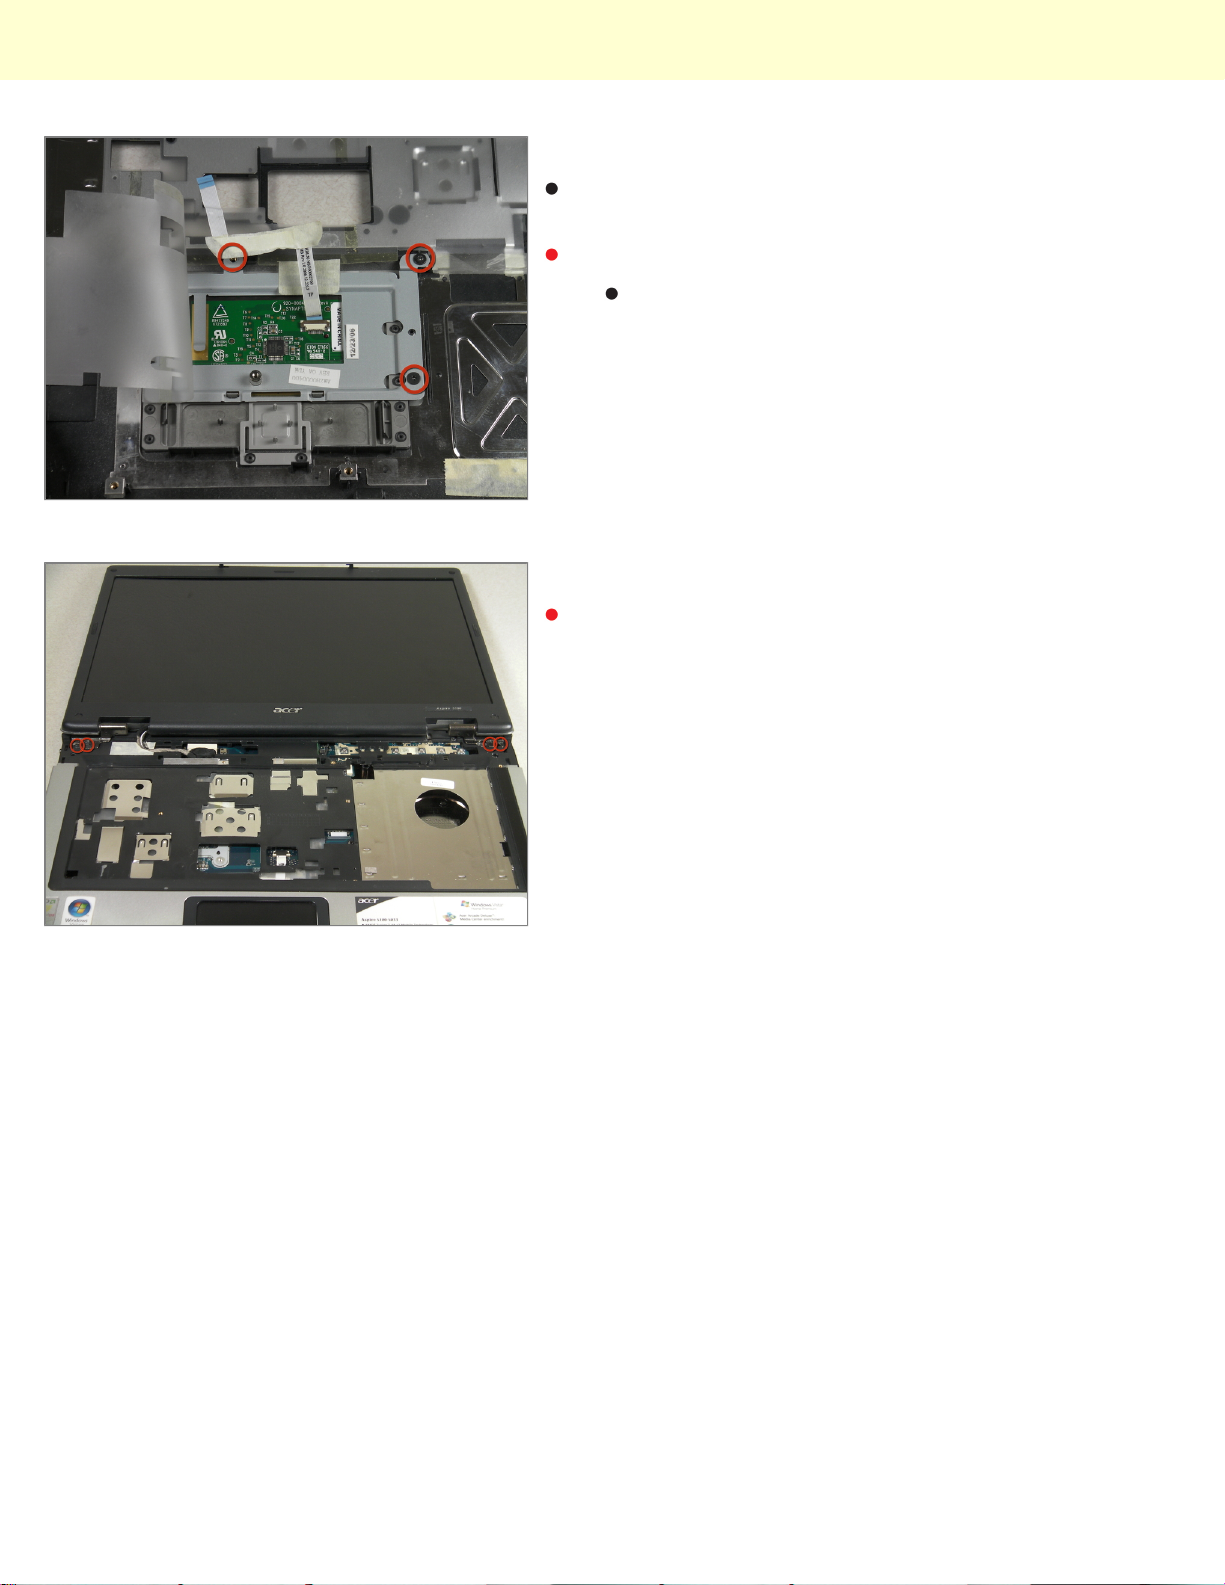
On the cover that was removed, flip it around and
locate where the back of the track pad is.
Remove the three screws located at the corners.
Step 11 - LCD Monitor
Unscrew the 2 screws at each corner located
underneath the LCD screen.
Lift up the bracket that you just unscrewed and
remove track pad.
© 2010 iFixit — CC BY-NC-SA www.iFixit.com Page 6 of 11
Page 7
Installing Acer Aspire 5100 USB Add-on Card
Step 12
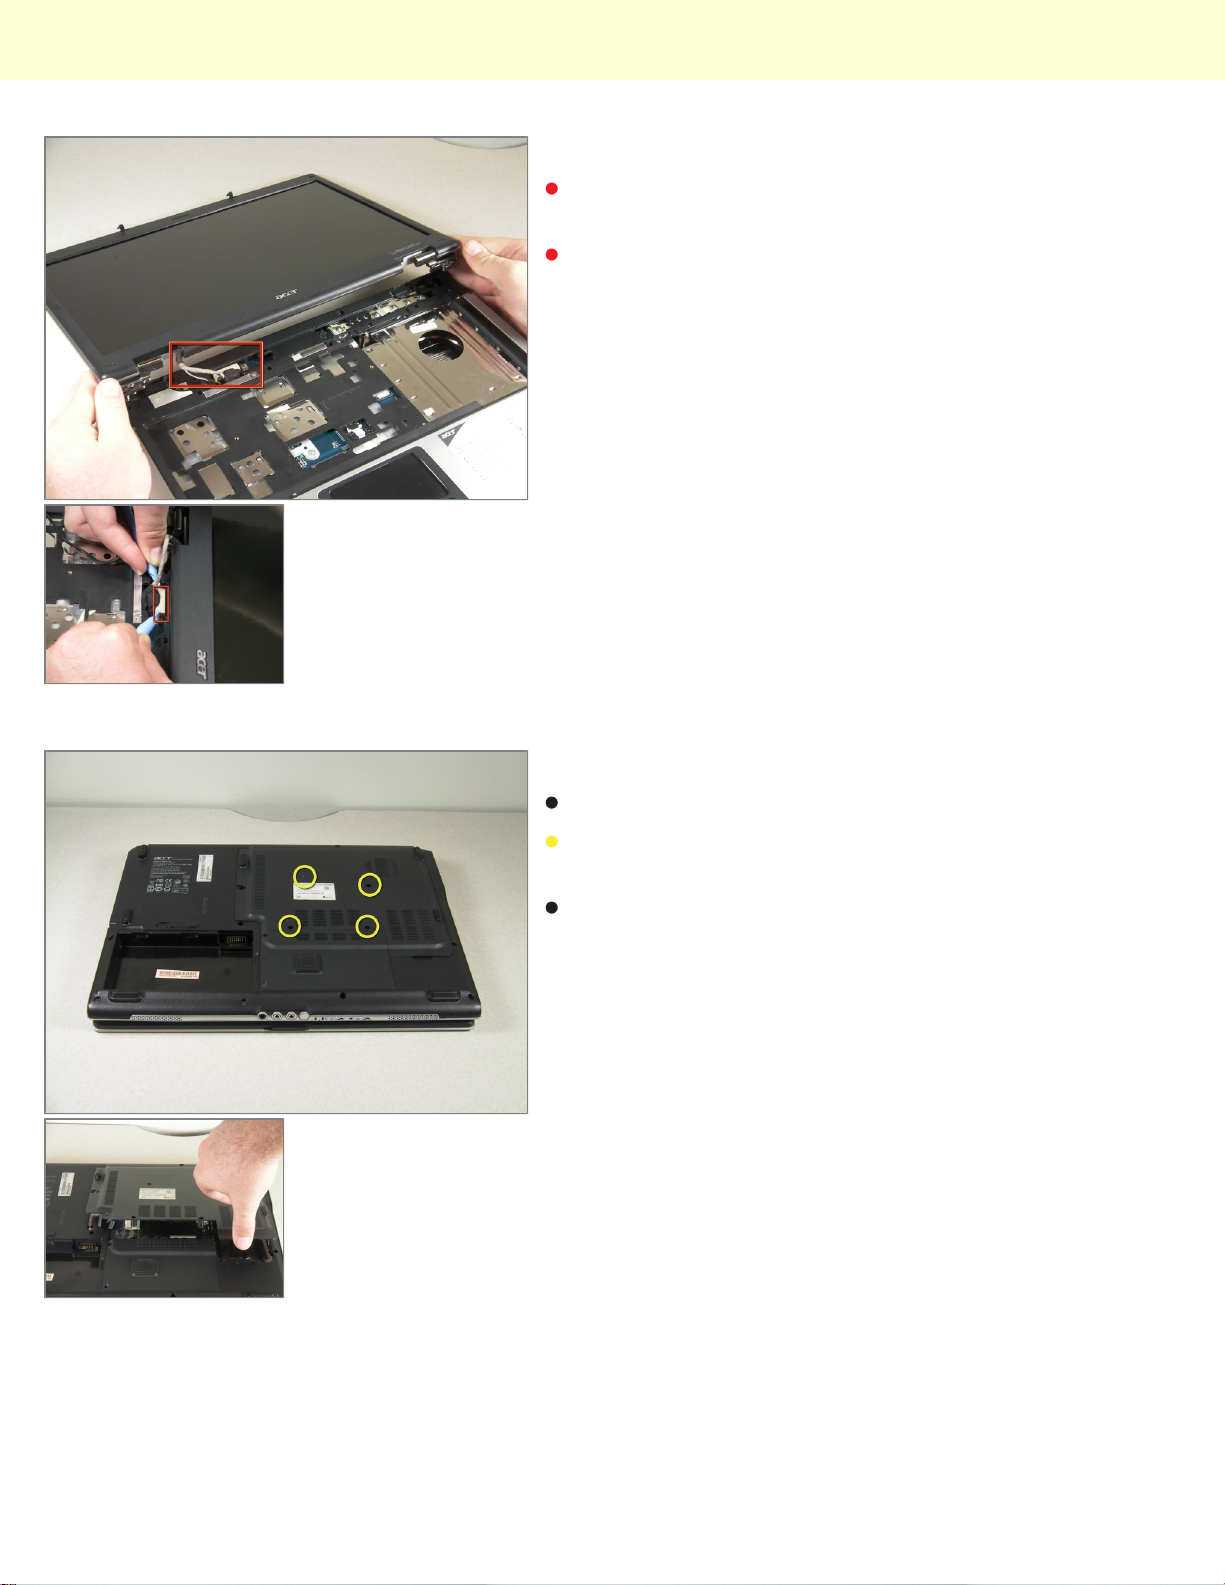
Locate the wire connecting the LCD screen to the
motherboard.
Detach the white rectangle located on the motherboard
at the end of the wire.
Step 13
Place the laptop upside down.
Locate the largest removable panel on the back and
remove the four screws connecting it.
Lift up and remove the panel.
© 2010 iFixit — CC BY-NC-SA www.iFixit.com Page 7 of 11
Page 8
Installing Acer Aspire 5100 USB Add-on Card
Step 14
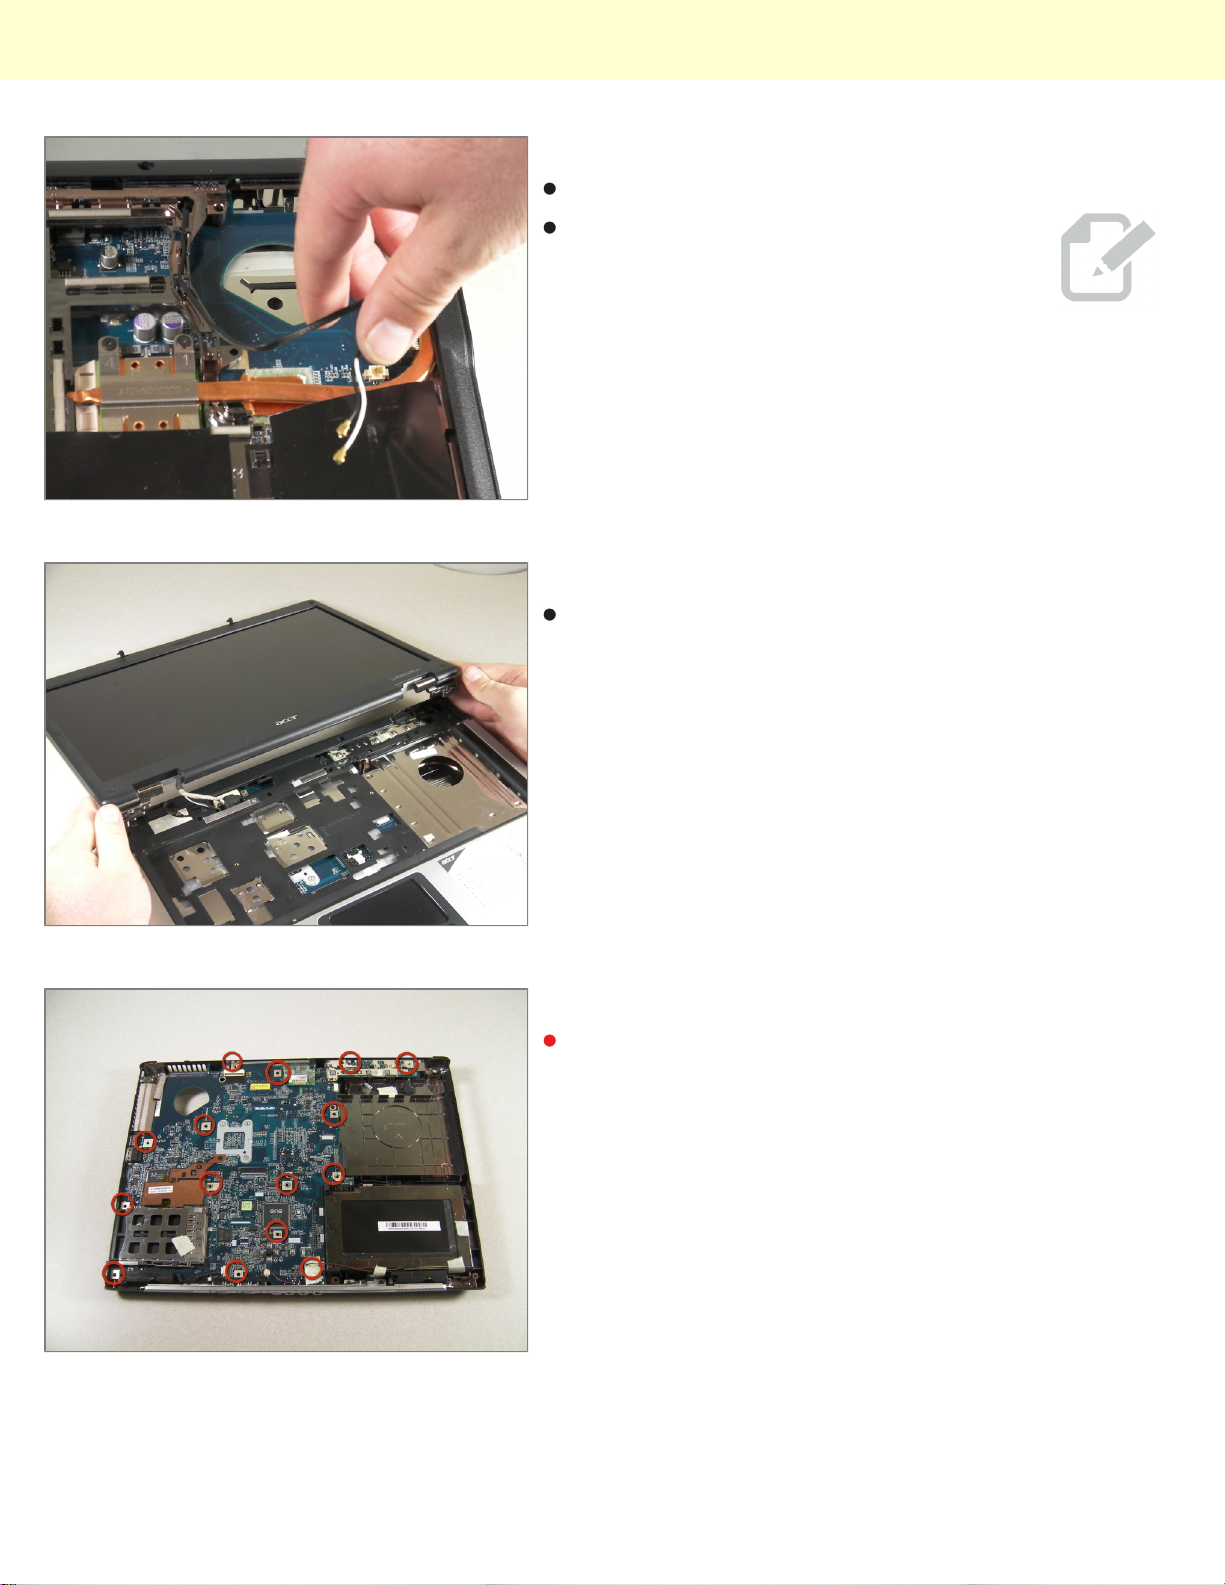
Locate the black and white wire and detach it.
You do not need to remove the cooling fan
Step 15
Lift up the monitor to detach it
Step 16 - Motherboard
Locate and remove the screws on the motherboard.
© 2010 iFixit — CC BY-NC-SA www.iFixit.com Page 8 of 11
Page 9
Installing Acer Aspire 5100 USB Add-on Card
Step 17
Flip the laptop upside down.
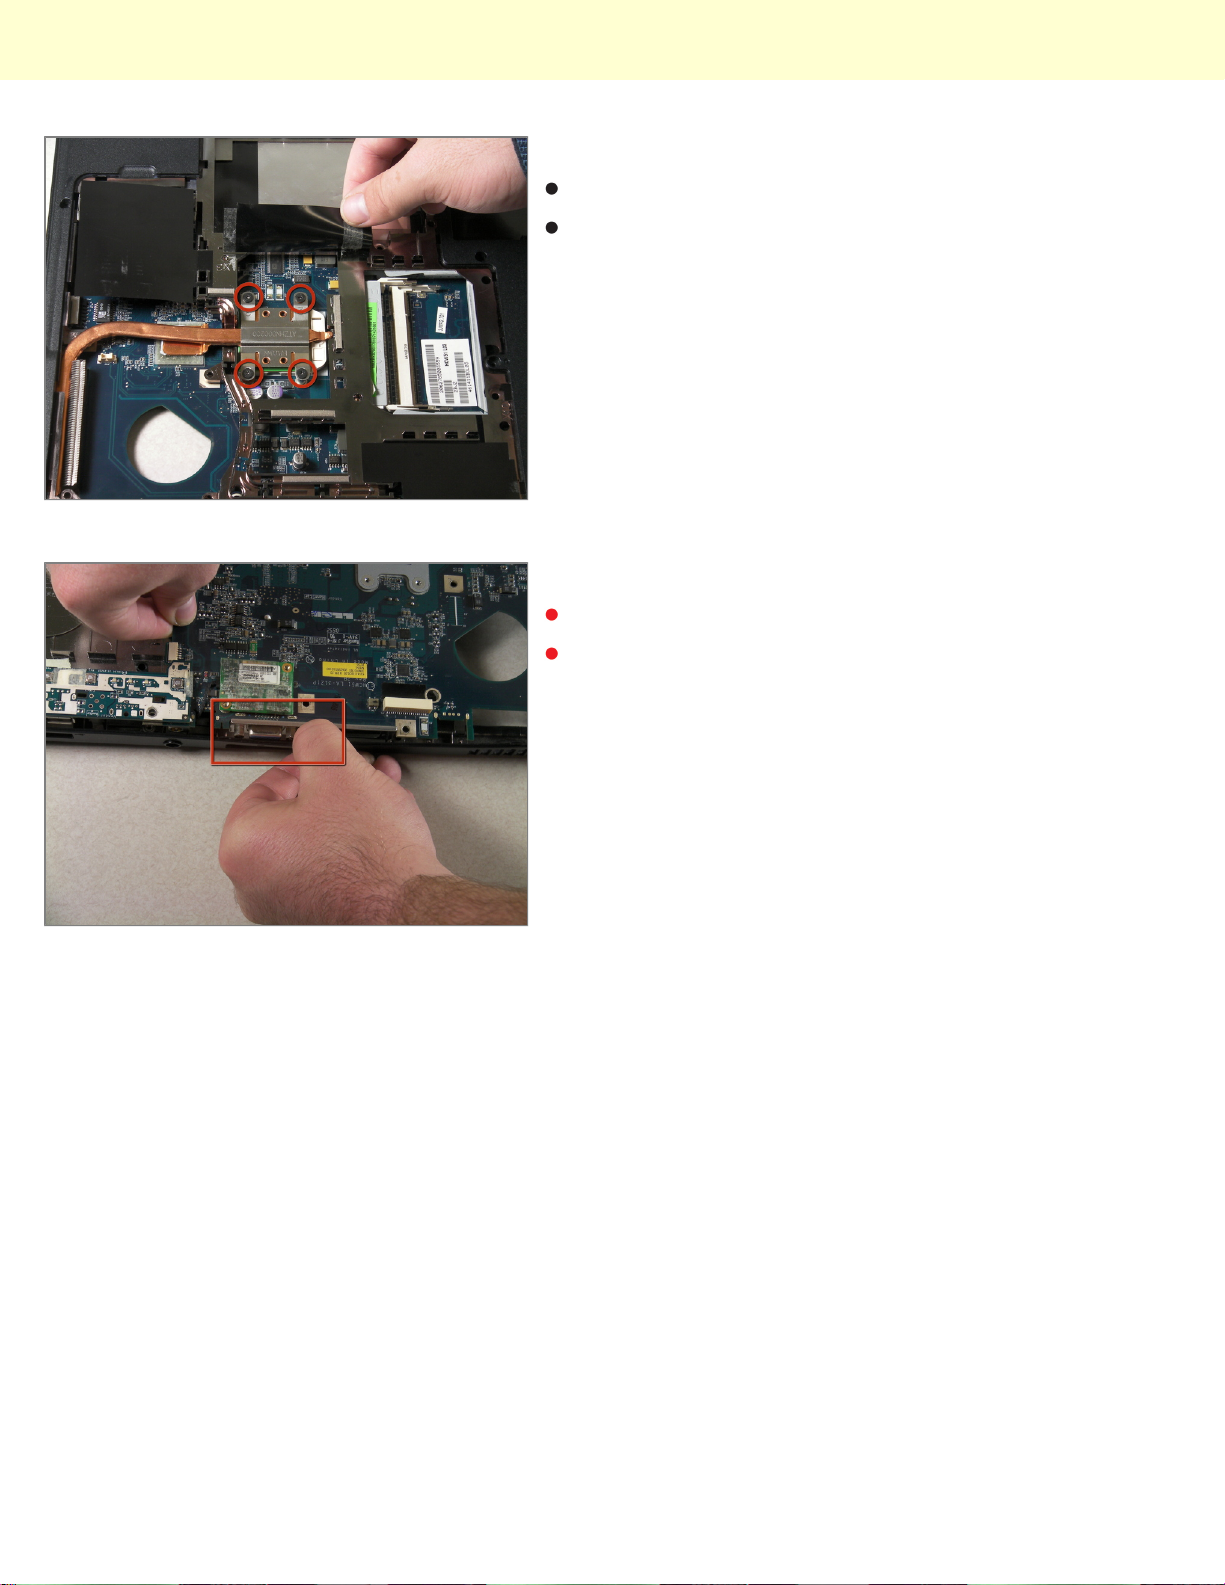
Locate the heat sink, which is the copper "L" shaped
component, and unscrew the four screws that connect
it to the motherboard.
Step 18
Find the VGA connector located next to the USB ports.
Push out the back of the casing by the VGA connector
to be able to get the motherboard out.
© 2010 iFixit — CC BY-NC-SA www.iFixit.com Page 9 of 11
Page 10
Installing Acer Aspire 5100 USB Add-on Card
Step 19
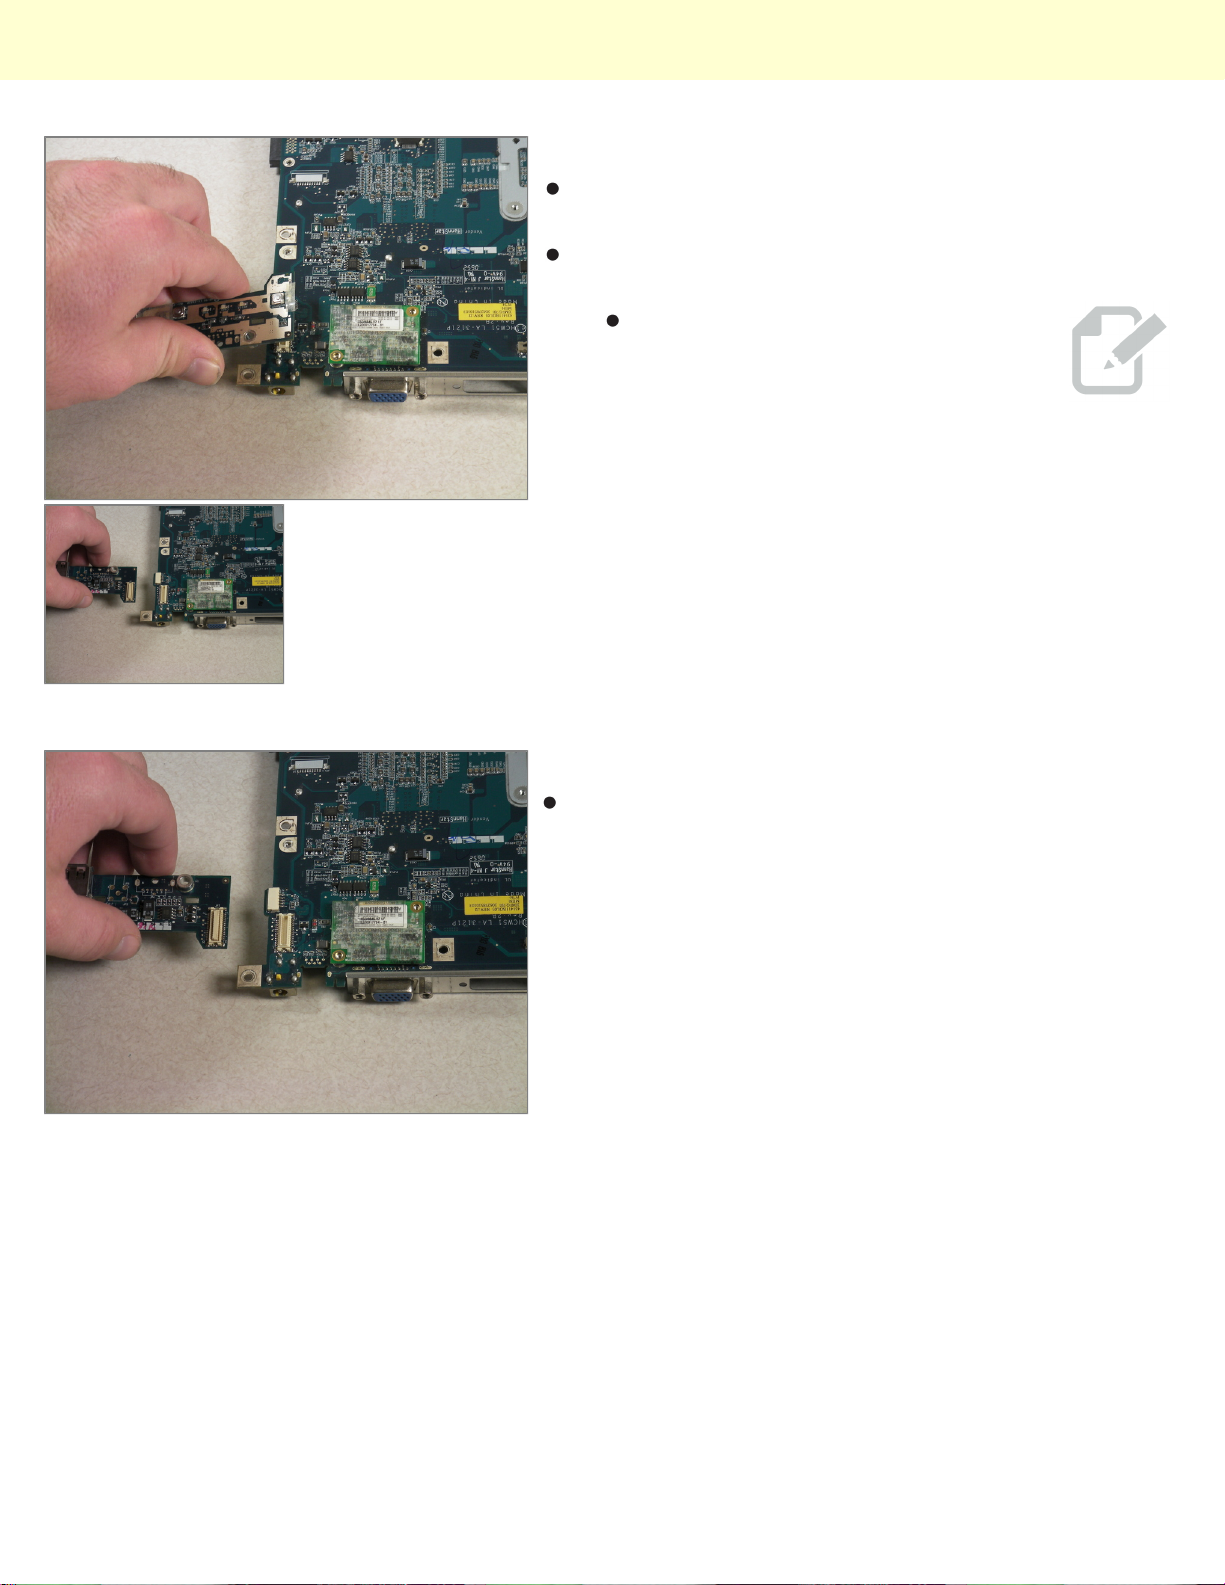
Lift up and remove the motherboard from the laptop
casing.
Remove the USB add-on card to use it with the new
motherboard.
To remove, grab on the sides and lift
upward.
Step 20 - USB Add-on Card
Put in new USB add-on card.
© 2010 iFixit — CC BY-NC-SA www.iFixit.com Page 10 of 11
Page 11

Installing Acer Aspire 5100 USB Add-on Card
To reassemble your device, follow these instructions in reverse order.
This document was last generated on Dec 15, 2010.
© 2010 iFixit — CC BY-NC-SA www.iFixit.com Page 11 of 11
 Loading...