

Page 1

Installing Acer Aspire One ZG5 Display
Installing Acer Aspire One ZG5 Display
Tools used in this guide
Phillips #0 Screwdriver (1)
Phillips #1 Screwdriver (1)
Spudger (1)
After removing the motherboard, it is relatively straight forward to get to the display.
© 2010 iFixit — CC BY-NC-SA www.iFixit.com Page 1 of 18
Page 2
Installing Acer Aspire One ZG5 Display
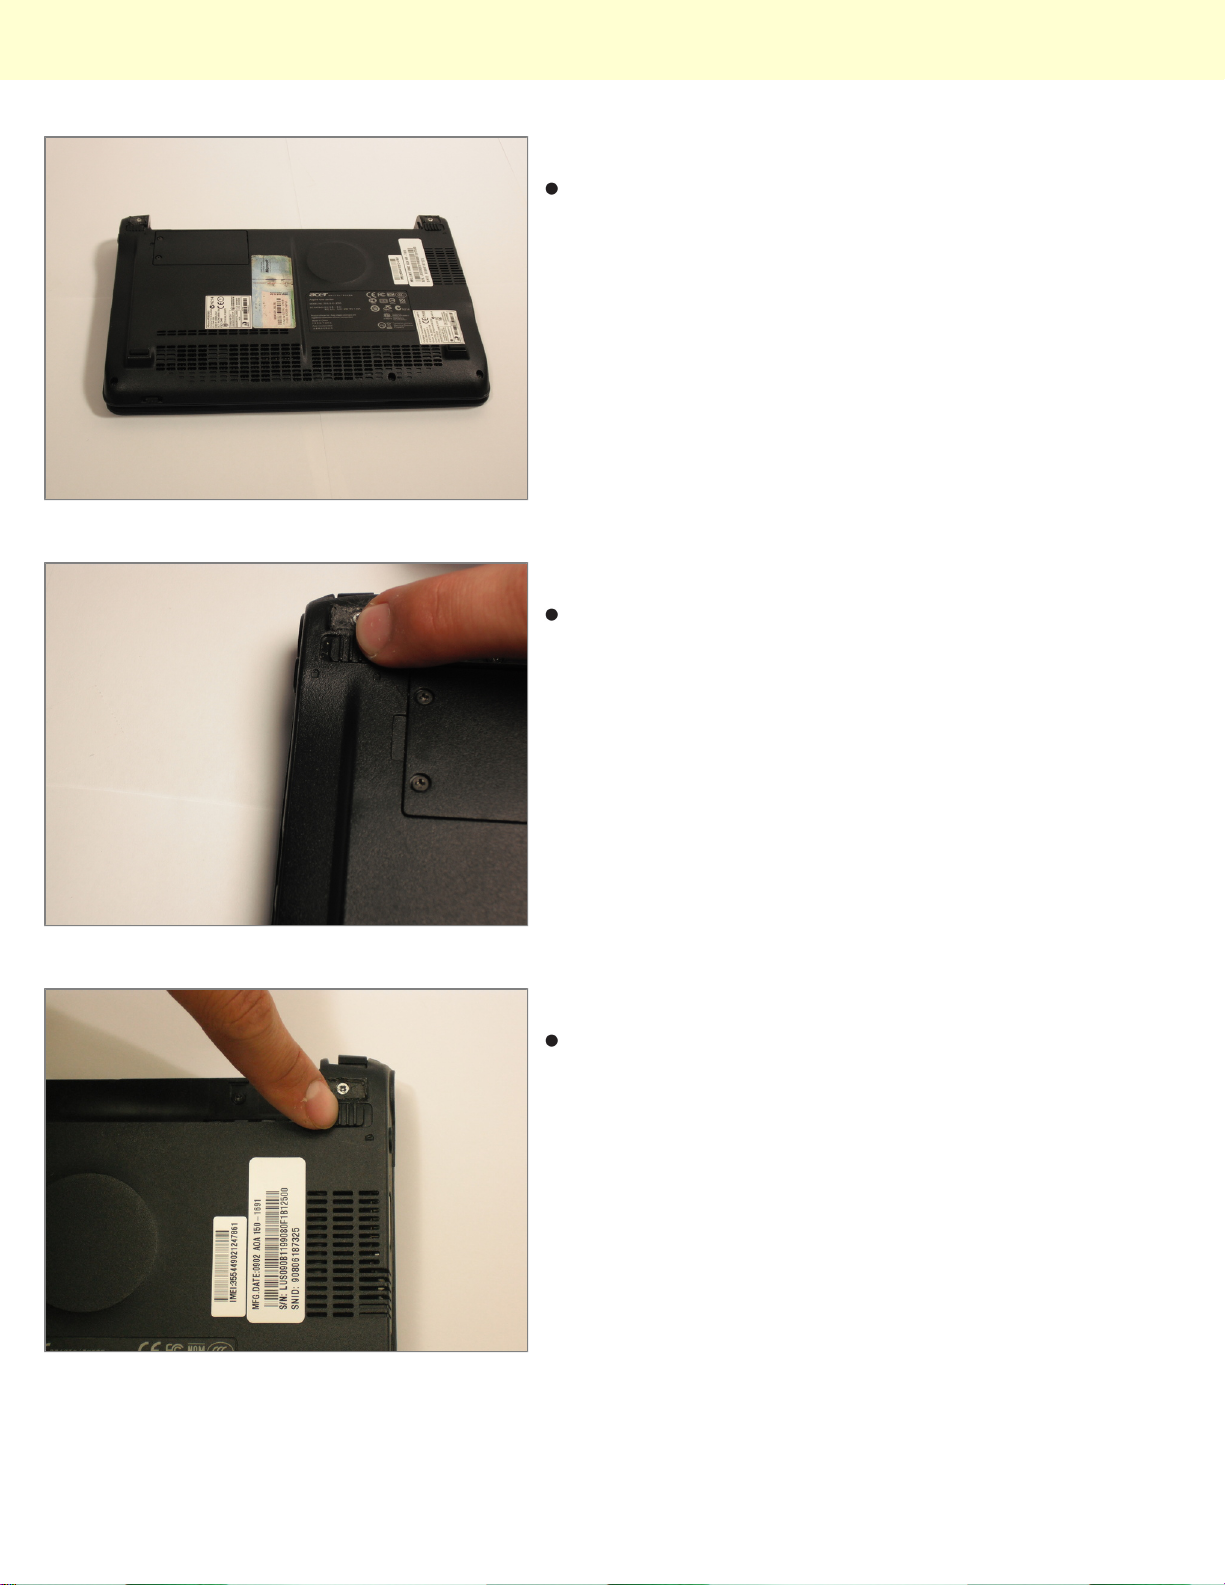
Step 1 - Battery
Turn the netbook upside down with the battery at the
top, away from you.
Step 2
Unlock the battery by sliding the switch located near the
left hinge to the left "unlocked" position.
Step 3
Slide the latch located on the opposite hinge from the
lock while pushing the battery up.
© 2010 iFixit — CC BY-NC-SA www.iFixit.com Page 2 of 18
Page 3
Installing Acer Aspire One ZG5 Display
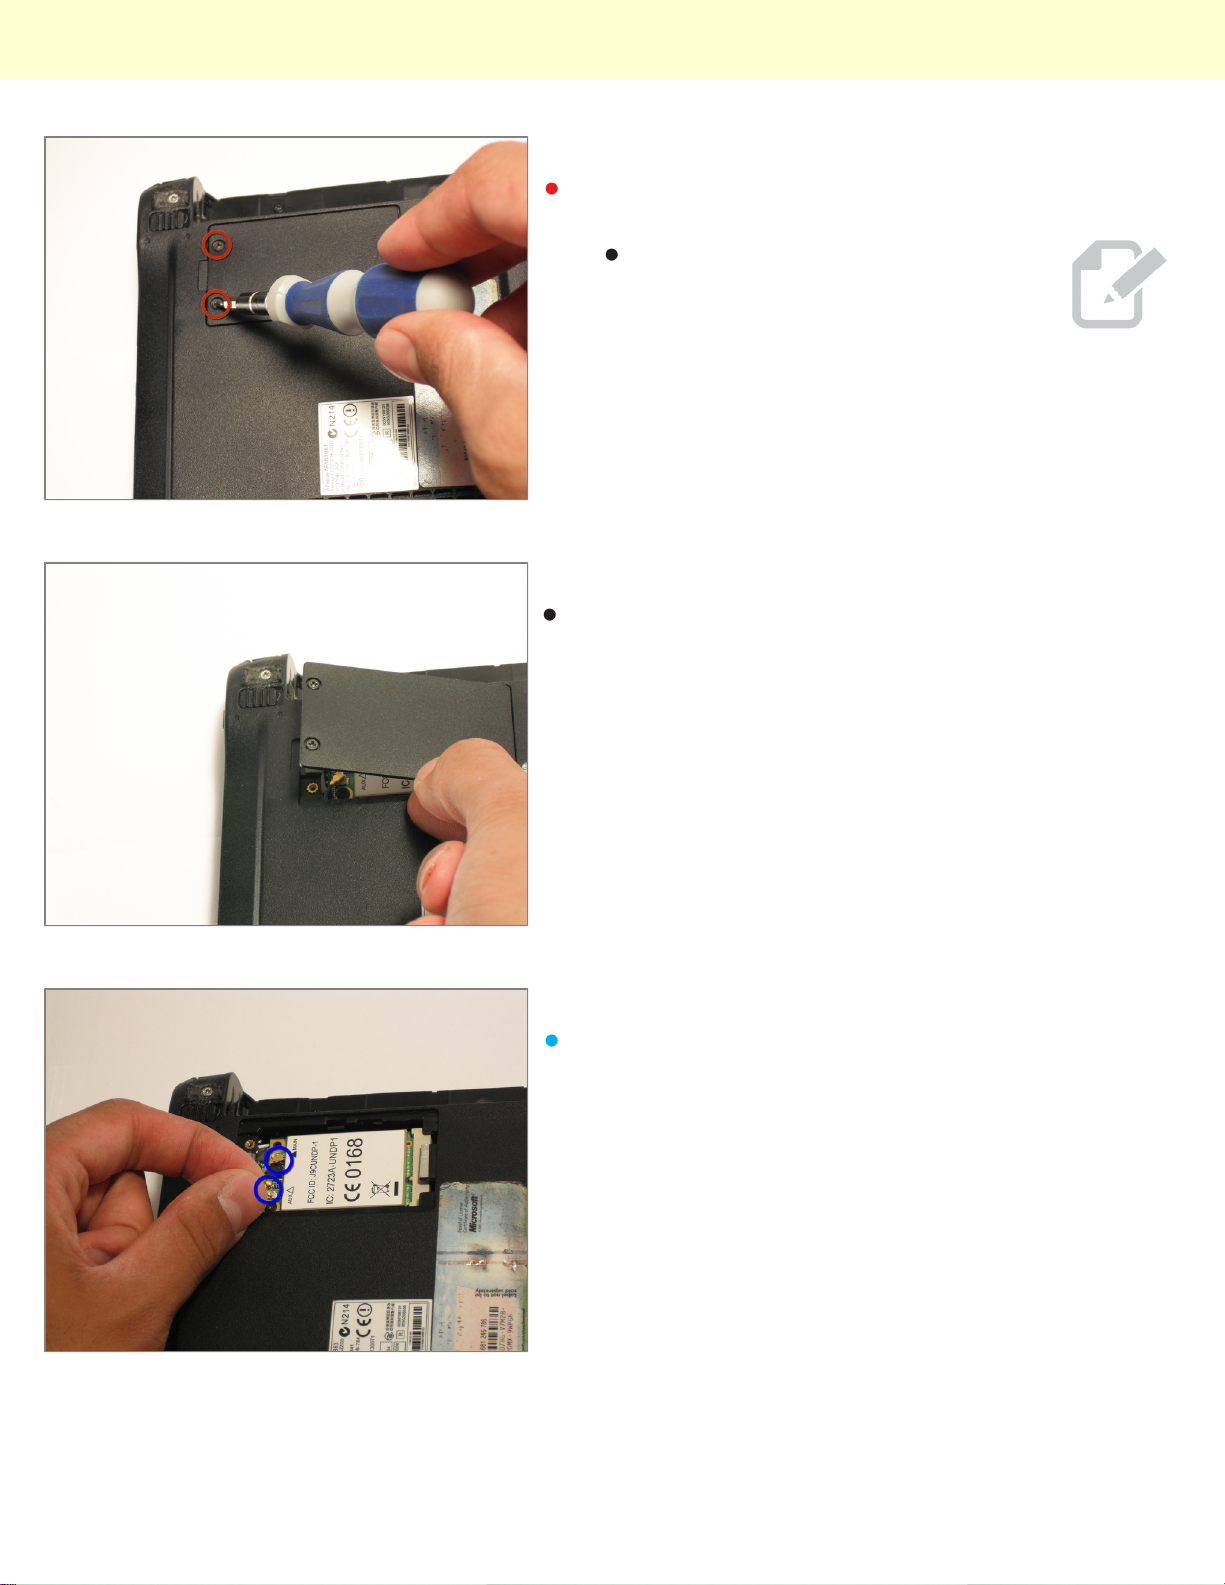
Step 4 - Wireless Card
Remove the two screws on the small panel towards the
top left of the netbook with the Phillips #0 screwdriver.
These screws are built into the panel
so they won't come out freely.
Step 5
Gently lift and remove the plate from the netbook.
Step 6
Disconnect the two antenna wires attached to the left
side of the wireless card.
© 2010 iFixit — CC BY-NC-SA www.iFixit.com Page 3 of 18
Page 4
Installing Acer Aspire One ZG5 Display
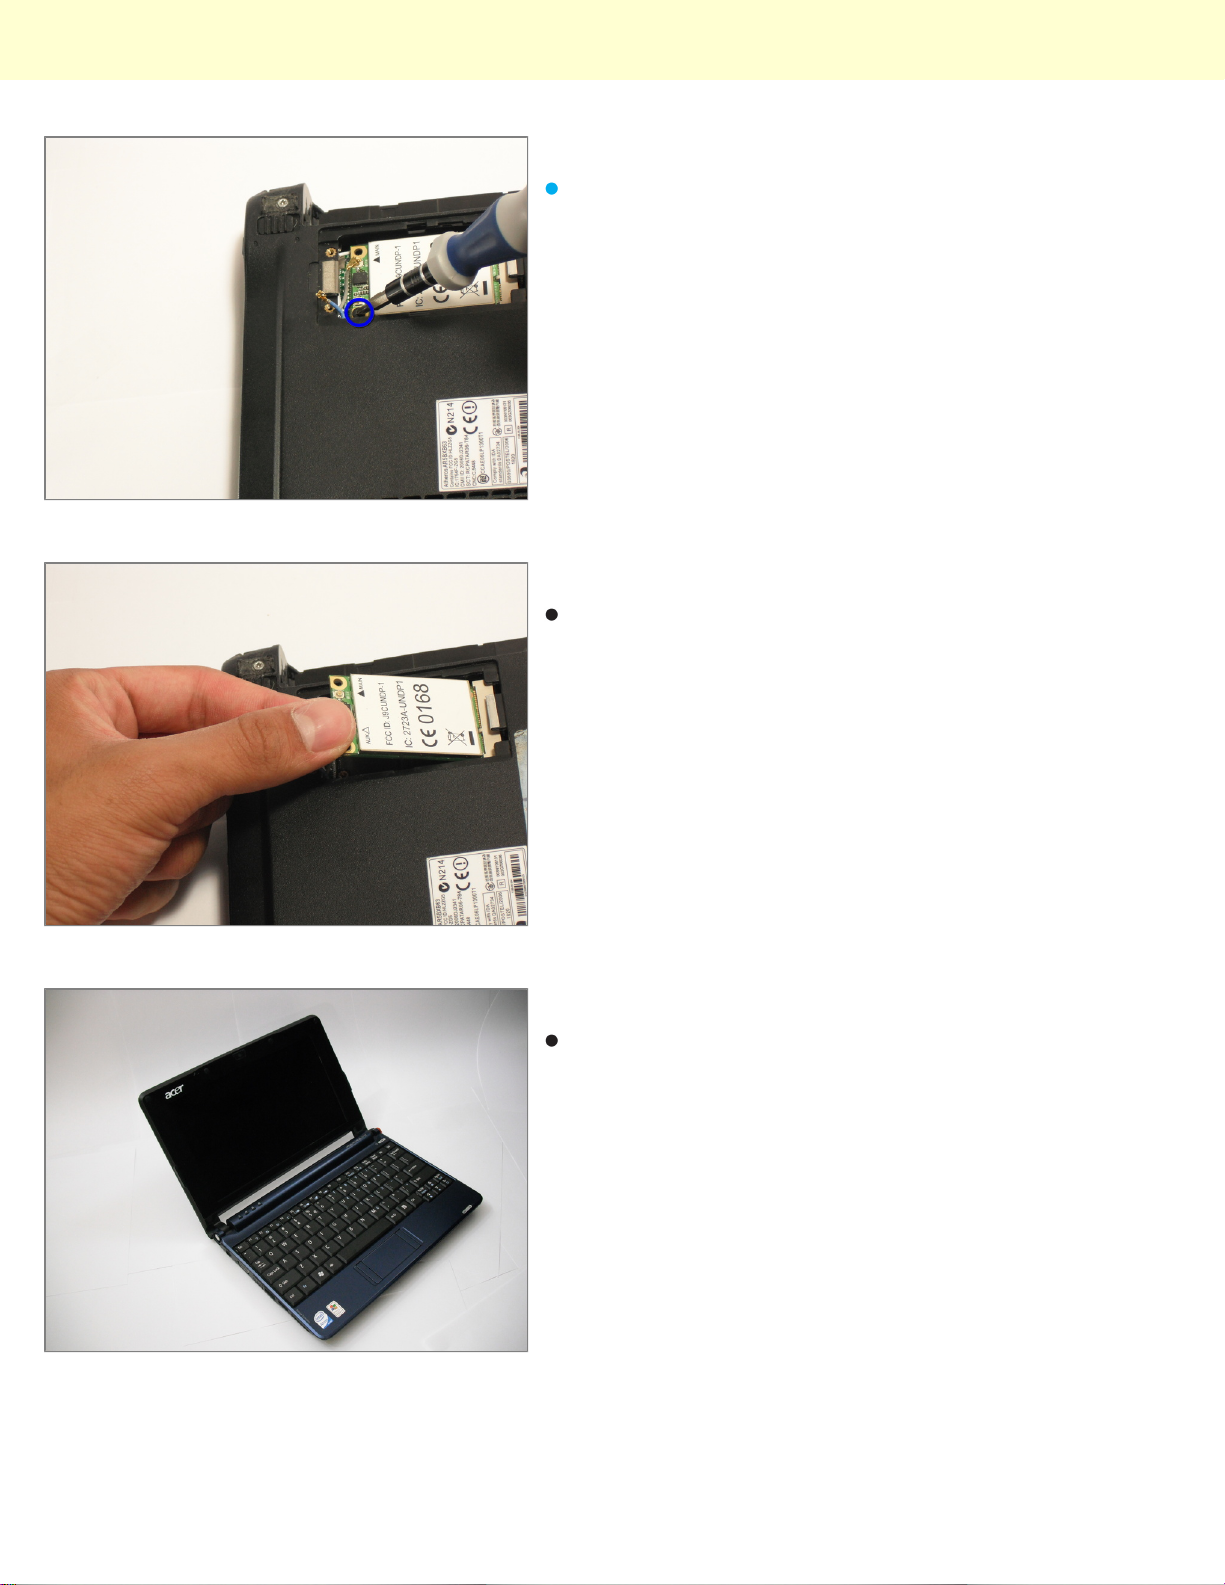
Step 7
Remove the 3.9mm screw located on the bottom left of
the wireless card with Phillips #1 screwdriver.
Step 8
Gently lift the wireless card from its housing starting
with the side where the antenna wires were.
Step 9 - Keyboard
Turn the netbook over and open the display so that the
keyboard is facing you.
© 2010 iFixit — CC BY-NC-SA www.iFixit.com Page 4 of 18
Page 5
Installing Acer Aspire One ZG5 Display
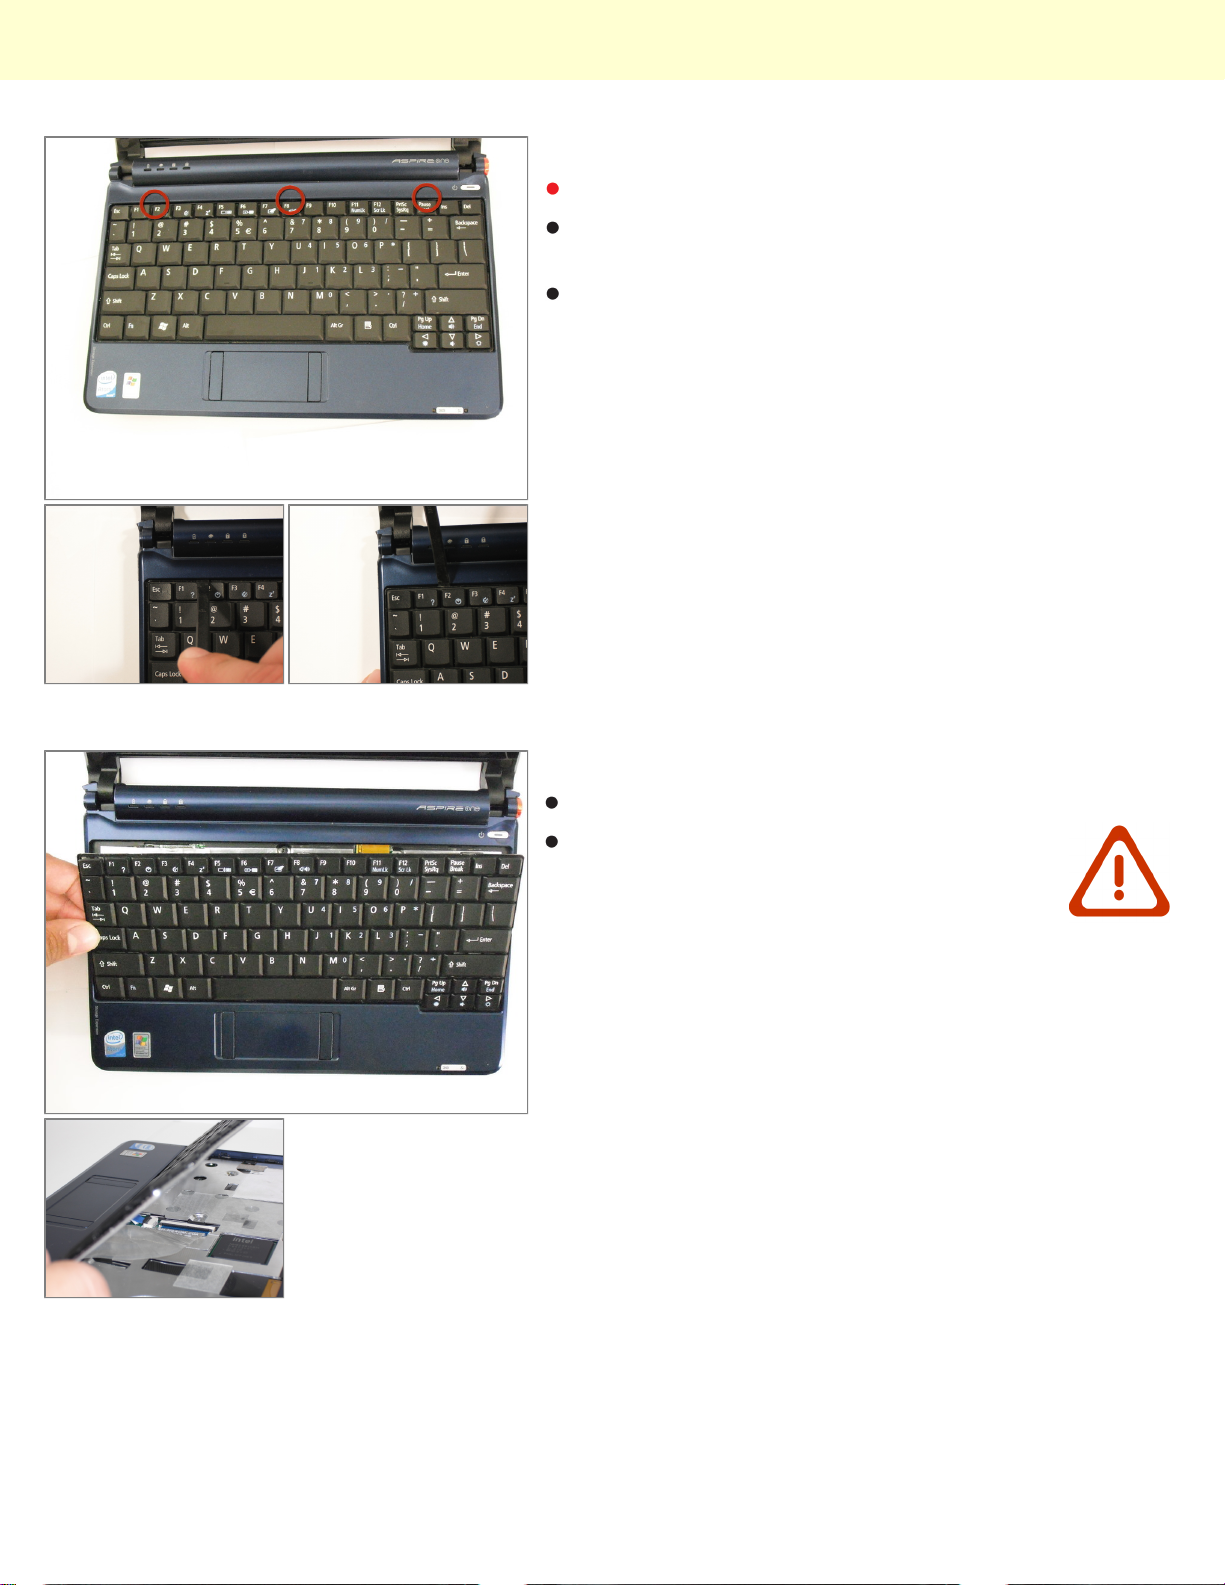
Step 10
There are three tabs located on the top of the keyboard.
Start with the spudger pointing towards the display and
pry up to push each tab off the keyboard.
As you move to the next tab, ensure the previous tab
doesn't reset itself.
Step 11
Lift top of keyboard up.
There is a short ribbon cable connecting the
keyboard to the netbook.
© 2010 iFixit — CC BY-NC-SA www.iFixit.com Page 5 of 18
Page 6
Installing Acer Aspire One ZG5 Display
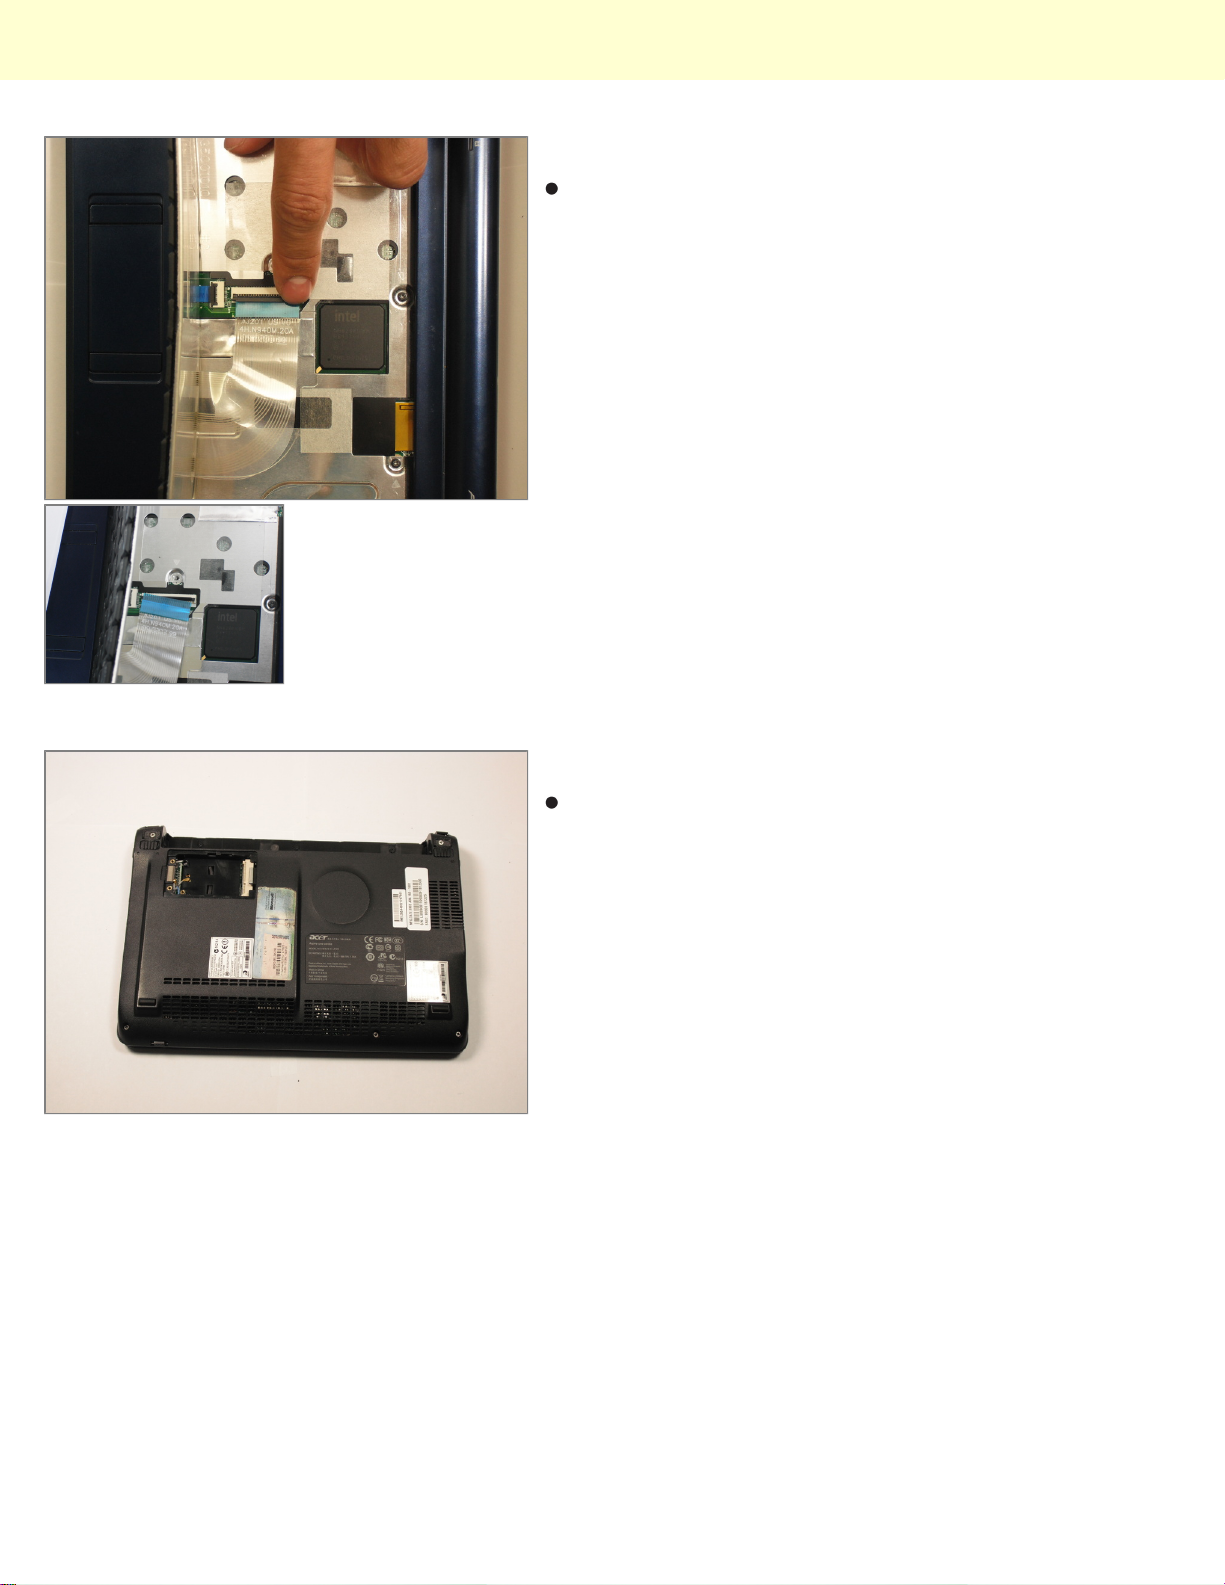
Step 12
Disconnect the ribbon by lifting the black plastic hinge
and removing the clear blue cable.
Step 13 - Top Case
Close display and turn ZG5 over so that the battery
compartment is towards the top.
© 2010 iFixit — CC BY-NC-SA www.iFixit.com Page 6 of 18
Page 7
Installing Acer Aspire One ZG5 Display
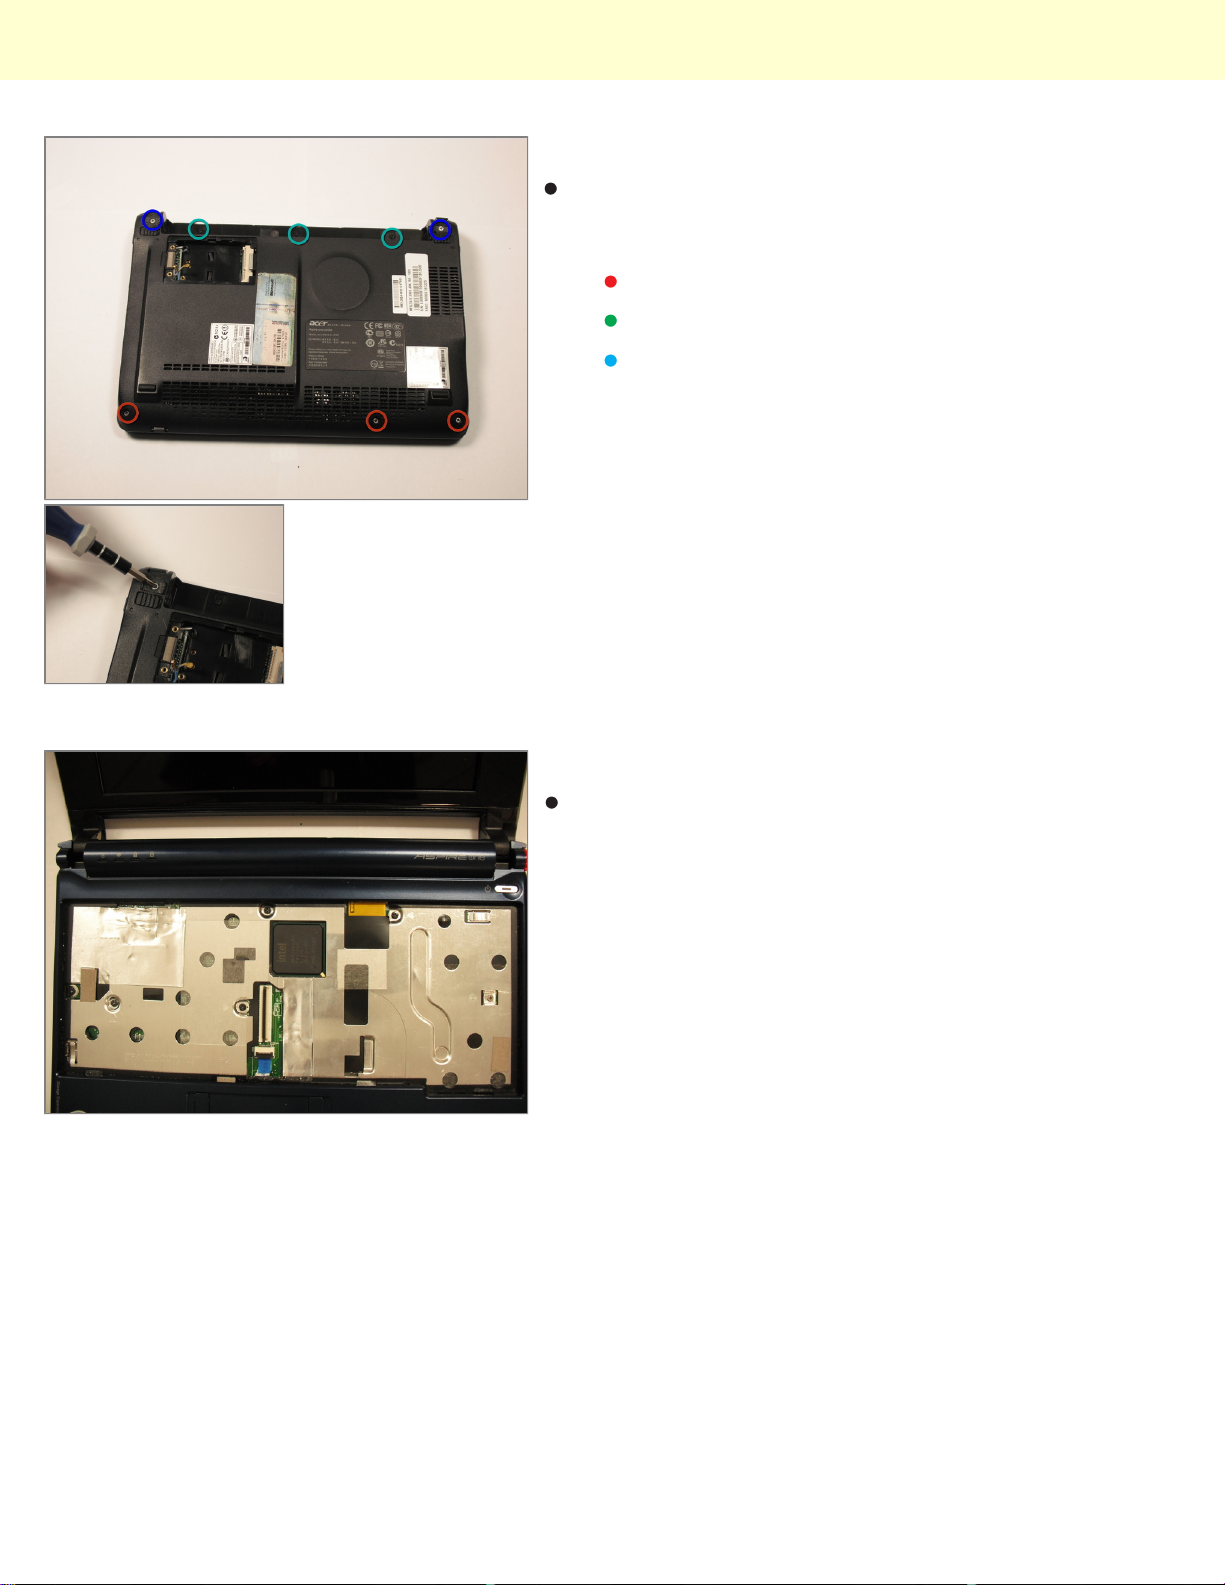
Step 14
Remove three 3.9 screws from the netbook with the
Phillips #1 screwdriver. Remove the rest of the five
screws from the netbook with the Phillips #0 screwdriver
Three 5.8mm screw towards the bottom
Three 3.9mm screw where the battery was
Two 5.8mm screws underneath the rear feet near
the hinges.
Step 15
Turn the netbook back over and open the display with
the keyboard cavity facing you.
© 2010 iFixit — CC BY-NC-SA www.iFixit.com Page 7 of 18
Page 8
Installing Acer Aspire One ZG5 Display
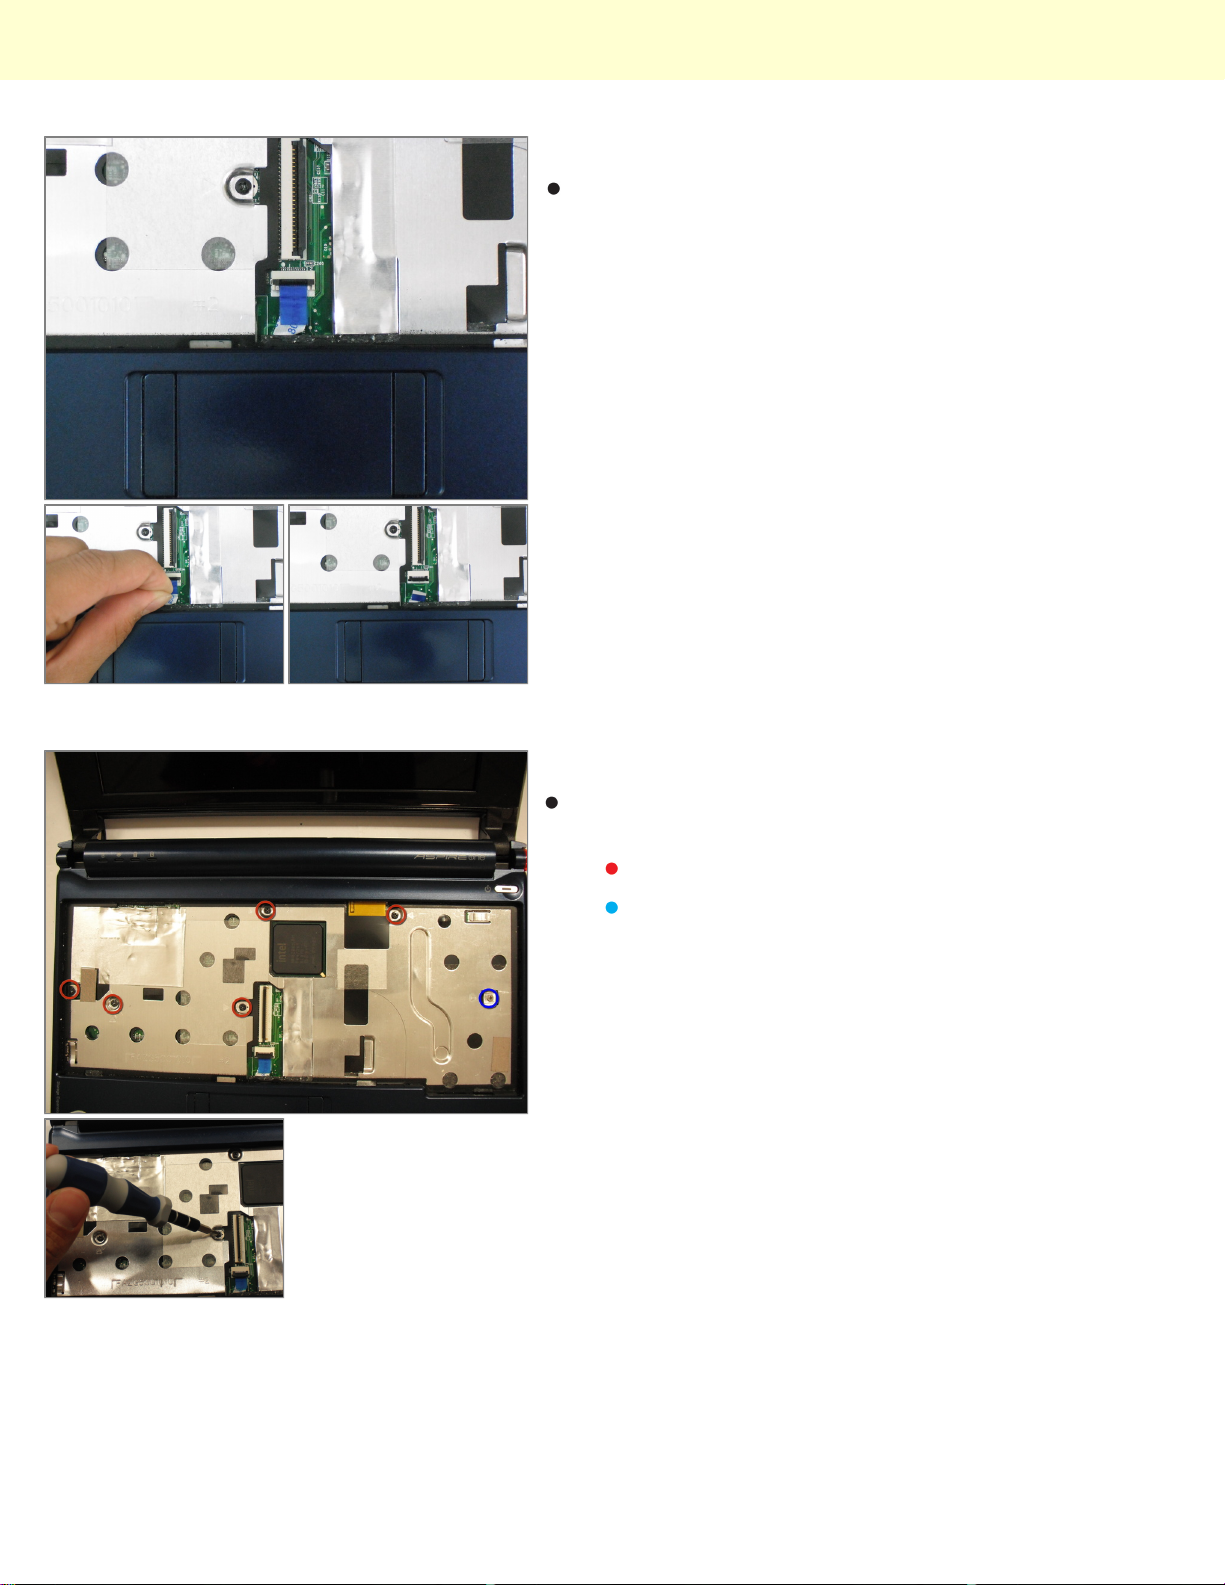
Step 16
Gently remove the trackpad cable with the blue tab
from the motherboard
Step 17
Remove the six screws from the metal casing using
Phillips #0 screwdriver.
Five black 4.7mm screws
One silver 4.3mm screw on right
© 2010 iFixit — CC BY-NC-SA www.iFixit.com Page 8 of 18
Page 9
Installing Acer Aspire One ZG5 Display
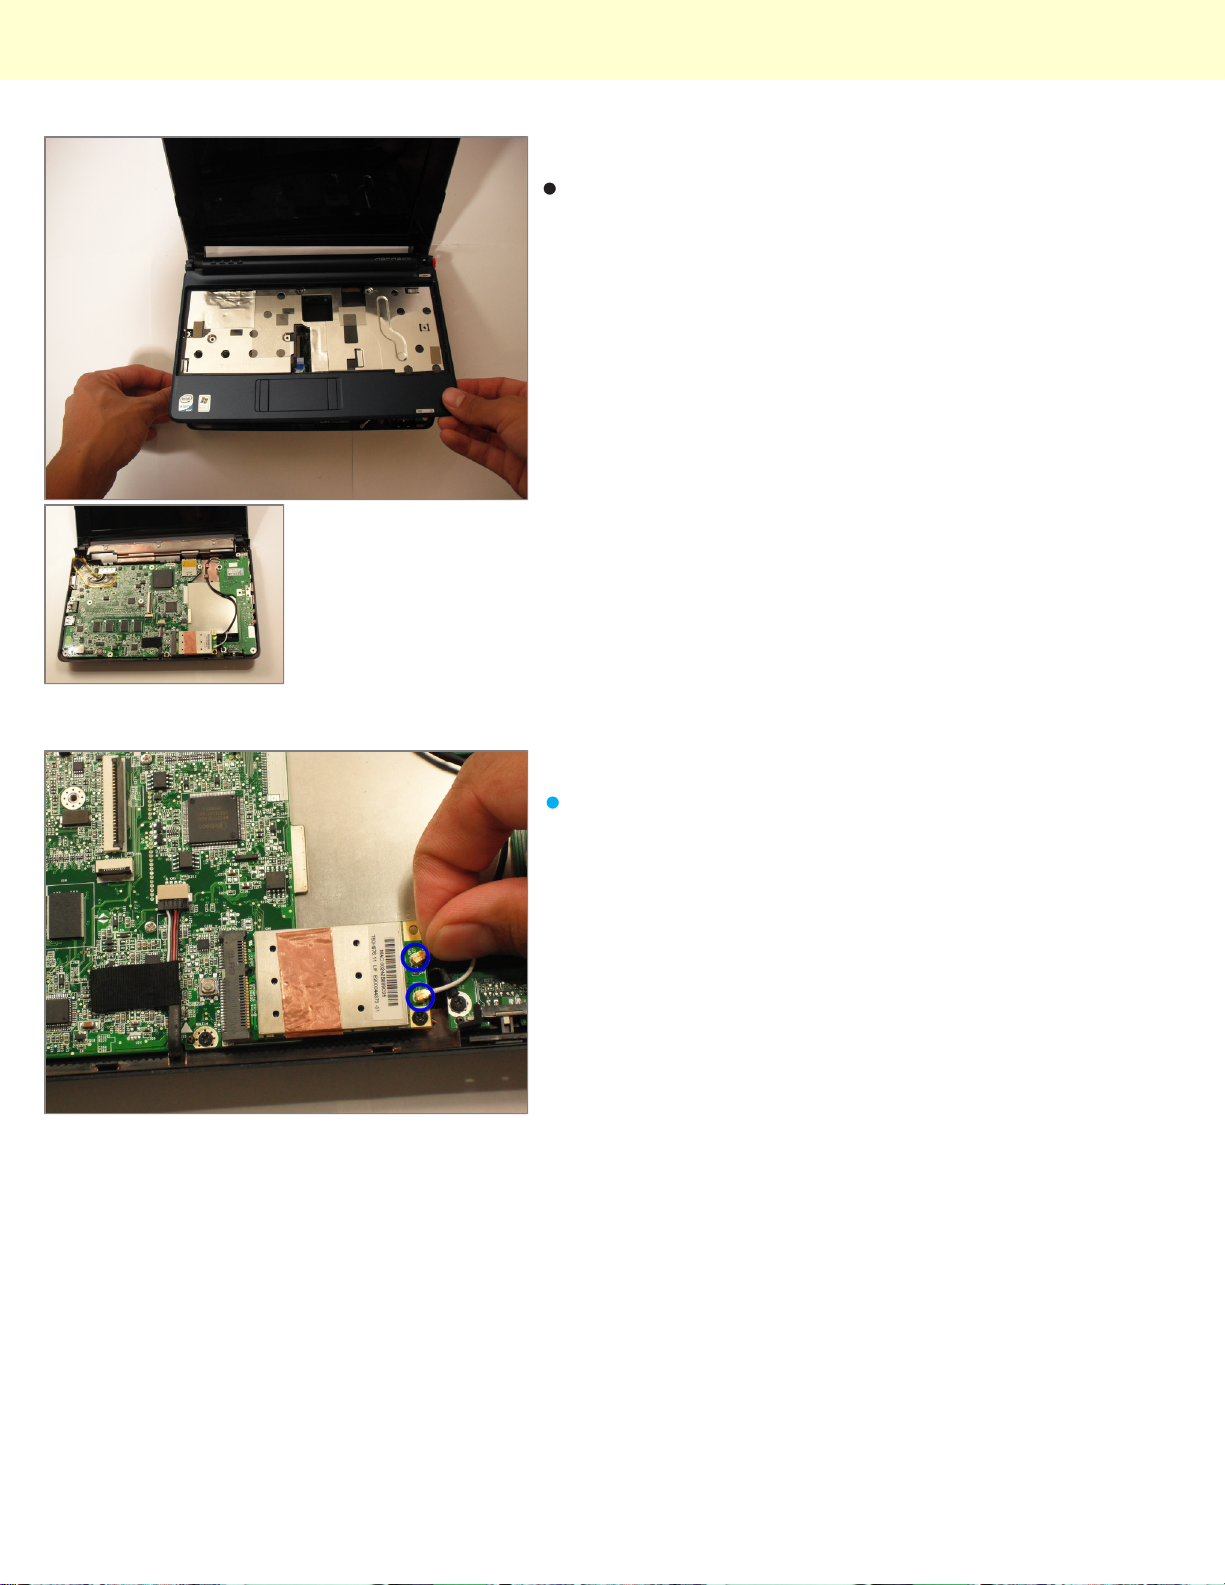
Step 18
Gently lift the top case off.
Step 19 - Internal Wireless Card
Disconnect the two antenna cables located on the right
of the LAN card.
© 2010 iFixit — CC BY-NC-SA www.iFixit.com Page 9 of 18
Page 10
Installing Acer Aspire One ZG5 Display
Step 20
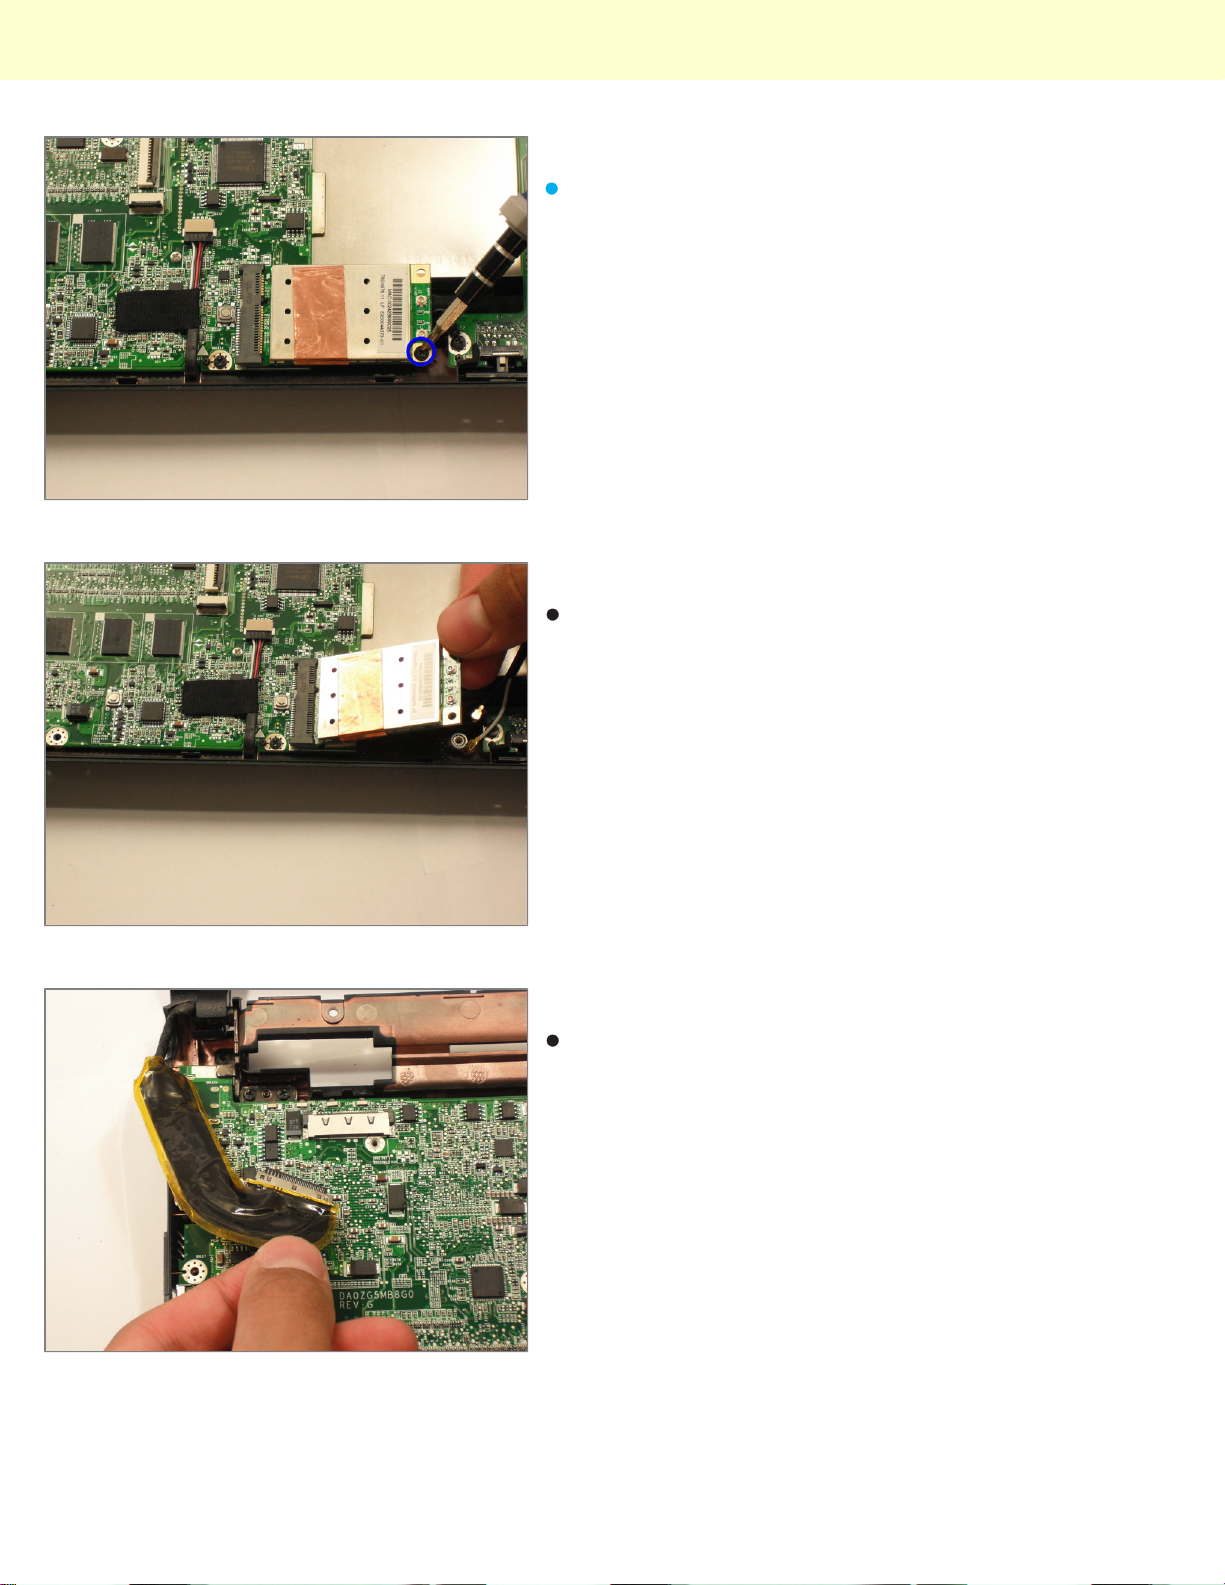
Remove the the 3.9mm screw from the wifi card using
Phillips #1 screwdriver.
Step 21
Gently pull the wifi card to the right and out of its
housing.
Step 22 - Motherboard
Disconnect the display cable located on the top left of
the motherboard.
© 2010 iFixit — CC BY-NC-SA www.iFixit.com Page 10 of 18
Page 11
Installing Acer Aspire One ZG5 Display
Step 23
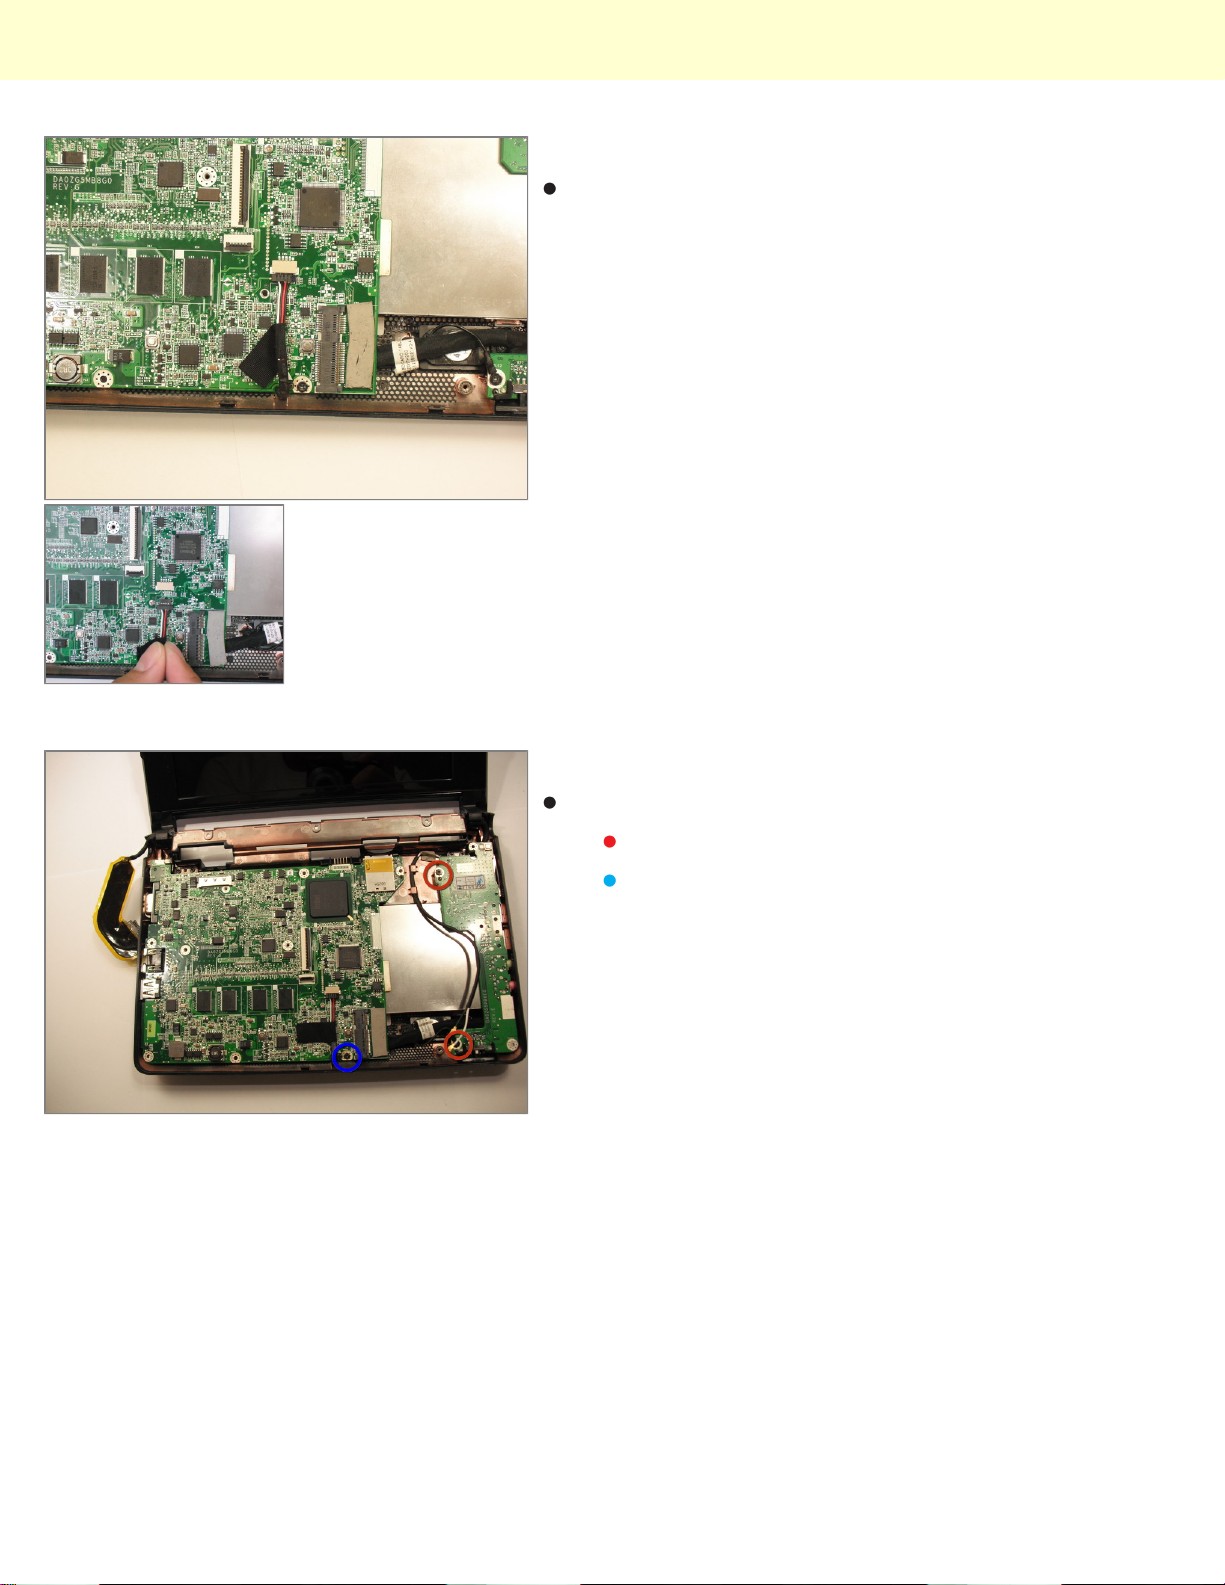
Remove the speaker cable from the motherboard.
Step 24
Remove 3 screws:
Two 3.9mm screws using Phillips #1 screwdriver
One 4.7mm screw using Phillips #0 screwdriver
© 2010 iFixit — CC BY-NC-SA www.iFixit.com Page 11 of 18
Page 12
Installing Acer Aspire One ZG5 Display
Step 25
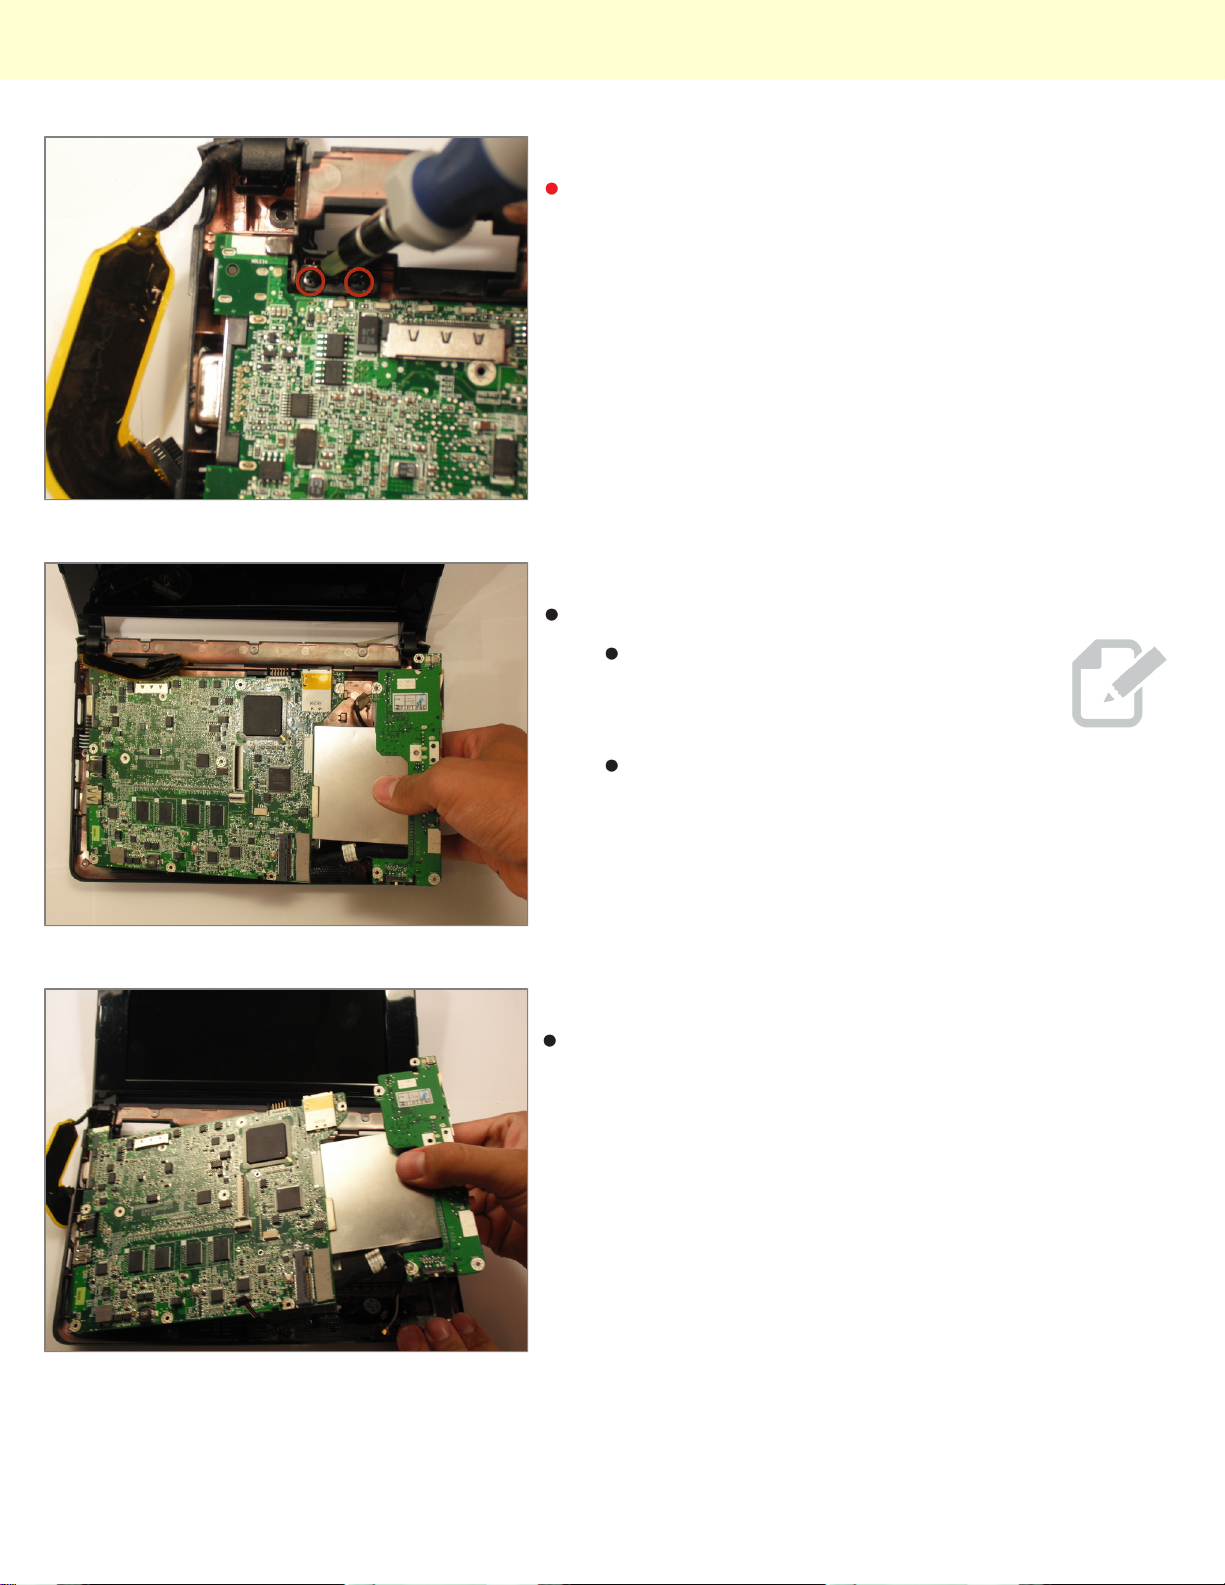
Using a Phillips #1 screwdriver, remove the two 3.9mm
screws holding the display onto the motherboard.
Step 26
Lift out the small logic board on the right of the netbook.
The logic board is attached to the
motherboard by a short cable.
Be aware of the ports on the right side of the logic
board.
Step 27
Pull out the motherboard from its housing.
© 2010 iFixit — CC BY-NC-SA www.iFixit.com Page 12 of 18
Page 13
Installing Acer Aspire One ZG5 Display
Step 28 - Display
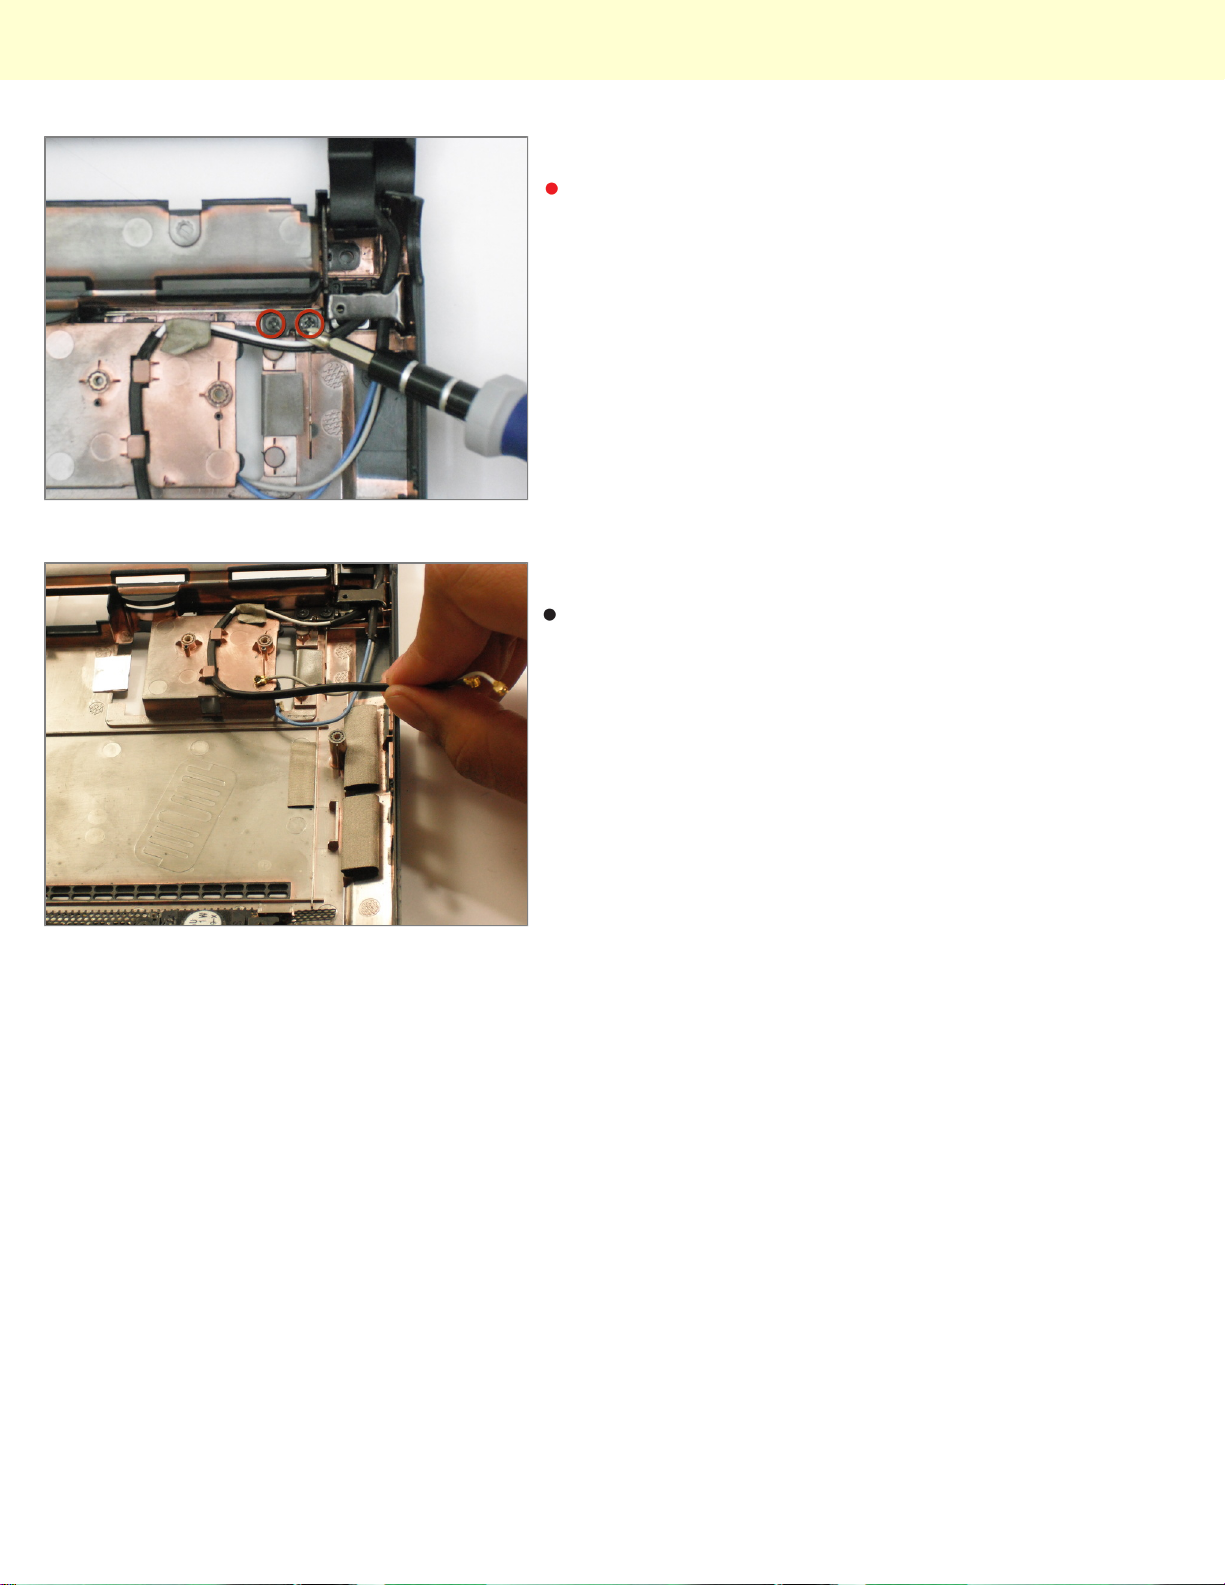
Remove the two 4.7mm screws from the right hinge
using Phillips #0 screwdriver.
Step 29
Free the antenna wires from the lower case.
© 2010 iFixit — CC BY-NC-SA www.iFixit.com Page 13 of 18
Page 14
Installing Acer Aspire One ZG5 Display
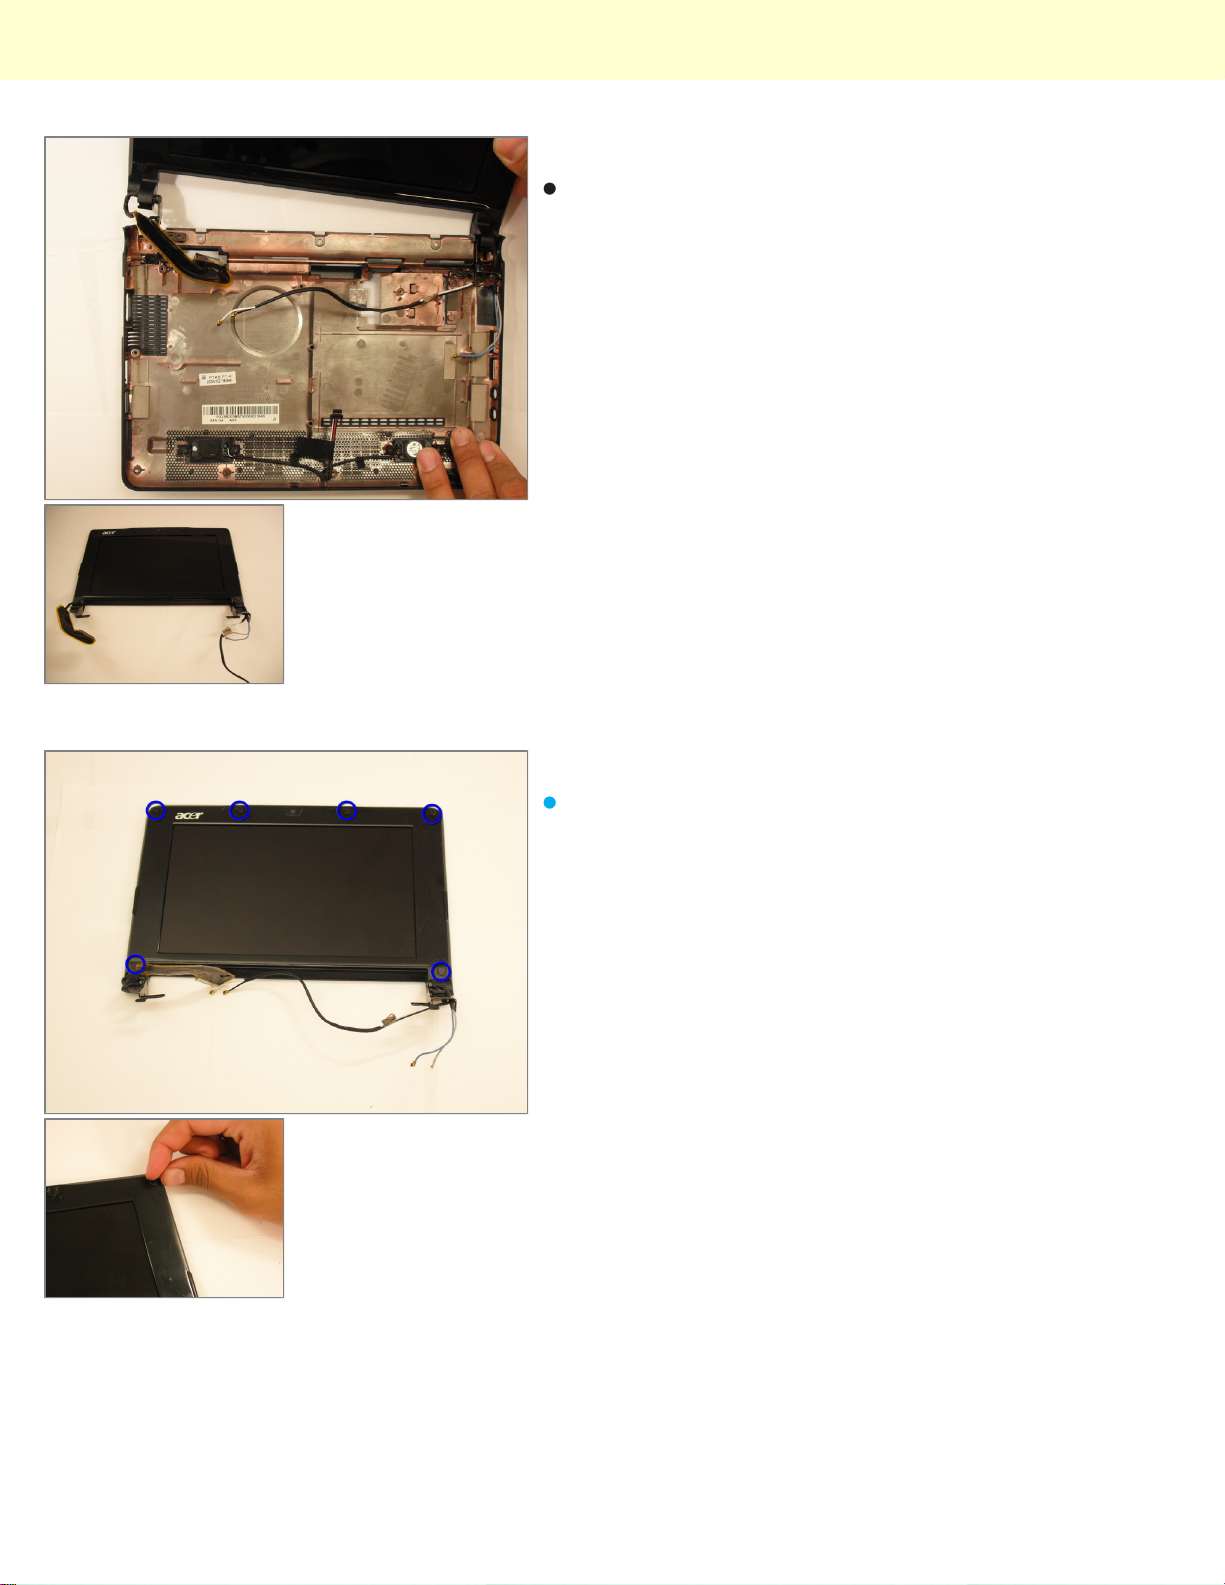
Step 30
Pull the display from the lower case.
Step 31
Remove the 6 sticky pads located around the screen.
© 2010 iFixit — CC BY-NC-SA www.iFixit.com Page 14 of 18
Page 15
Installing Acer Aspire One ZG5 Display
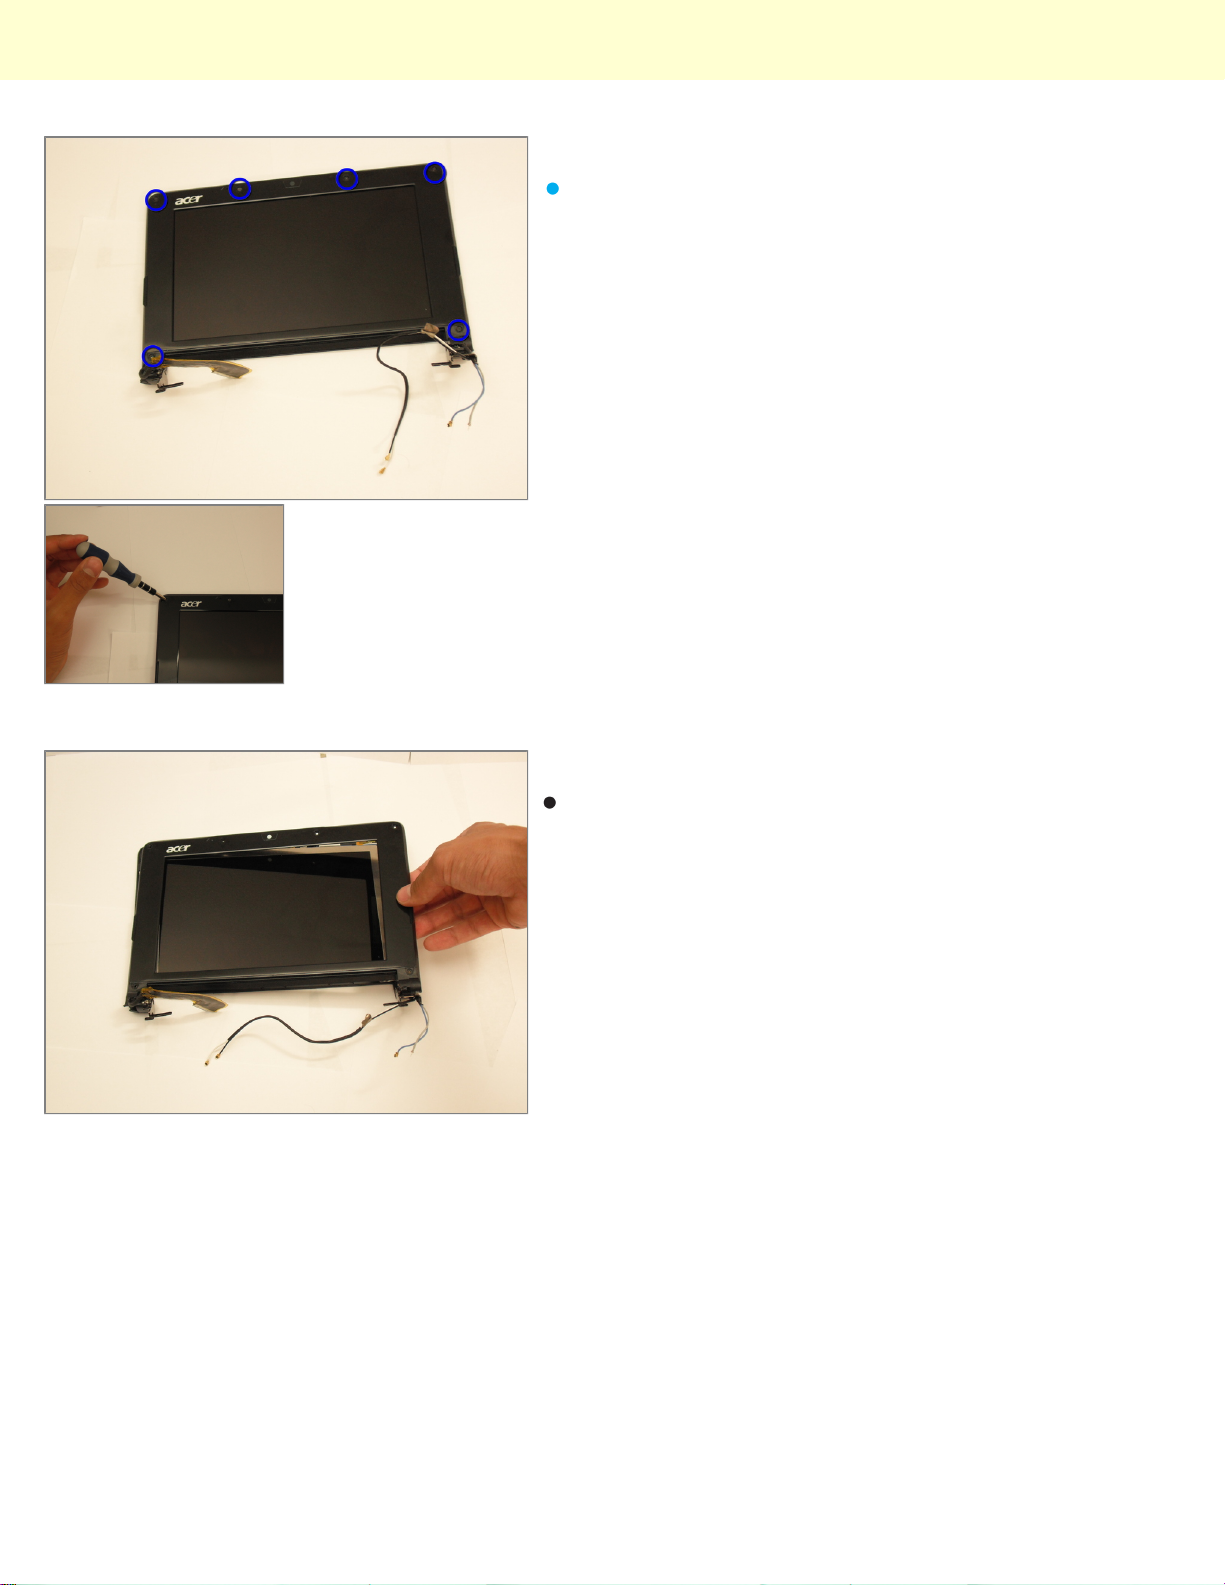
Step 32
Remove the six 5.7mm screws using Phillips #0
screwdriver.
Step 33
Lift up the screen casing.
© 2010 iFixit — CC BY-NC-SA www.iFixit.com Page 15 of 18
Page 16
Installing Acer Aspire One ZG5 Display
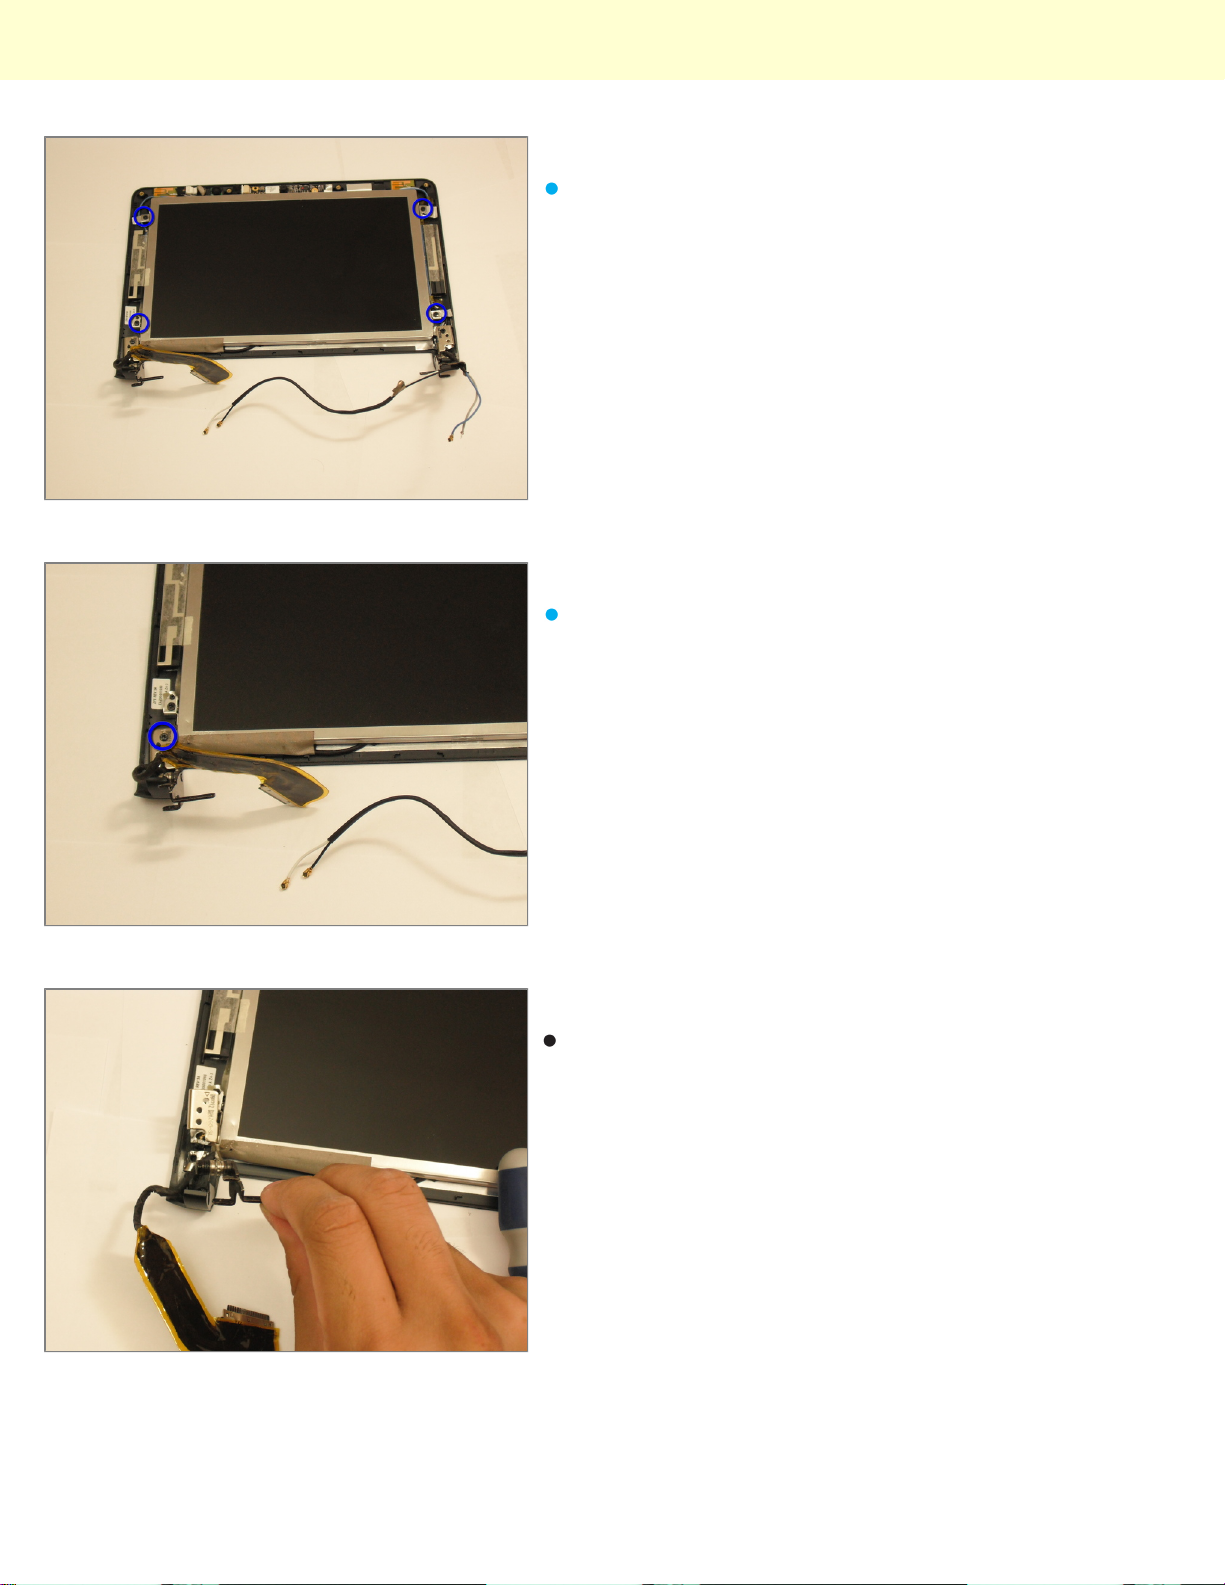
Step 34
Remove the four 4.7mm screws from the two sides of
the display using Phillips #0 screwdriver.
Step 35
Unscrew the 4.7mm screw located on the left side of
the display using Phillips #0 screwdriver.
Step 36
Pull the hinge mechanism off the display.
© 2010 iFixit — CC BY-NC-SA www.iFixit.com Page 16 of 18
Page 17
Installing Acer Aspire One ZG5 Display
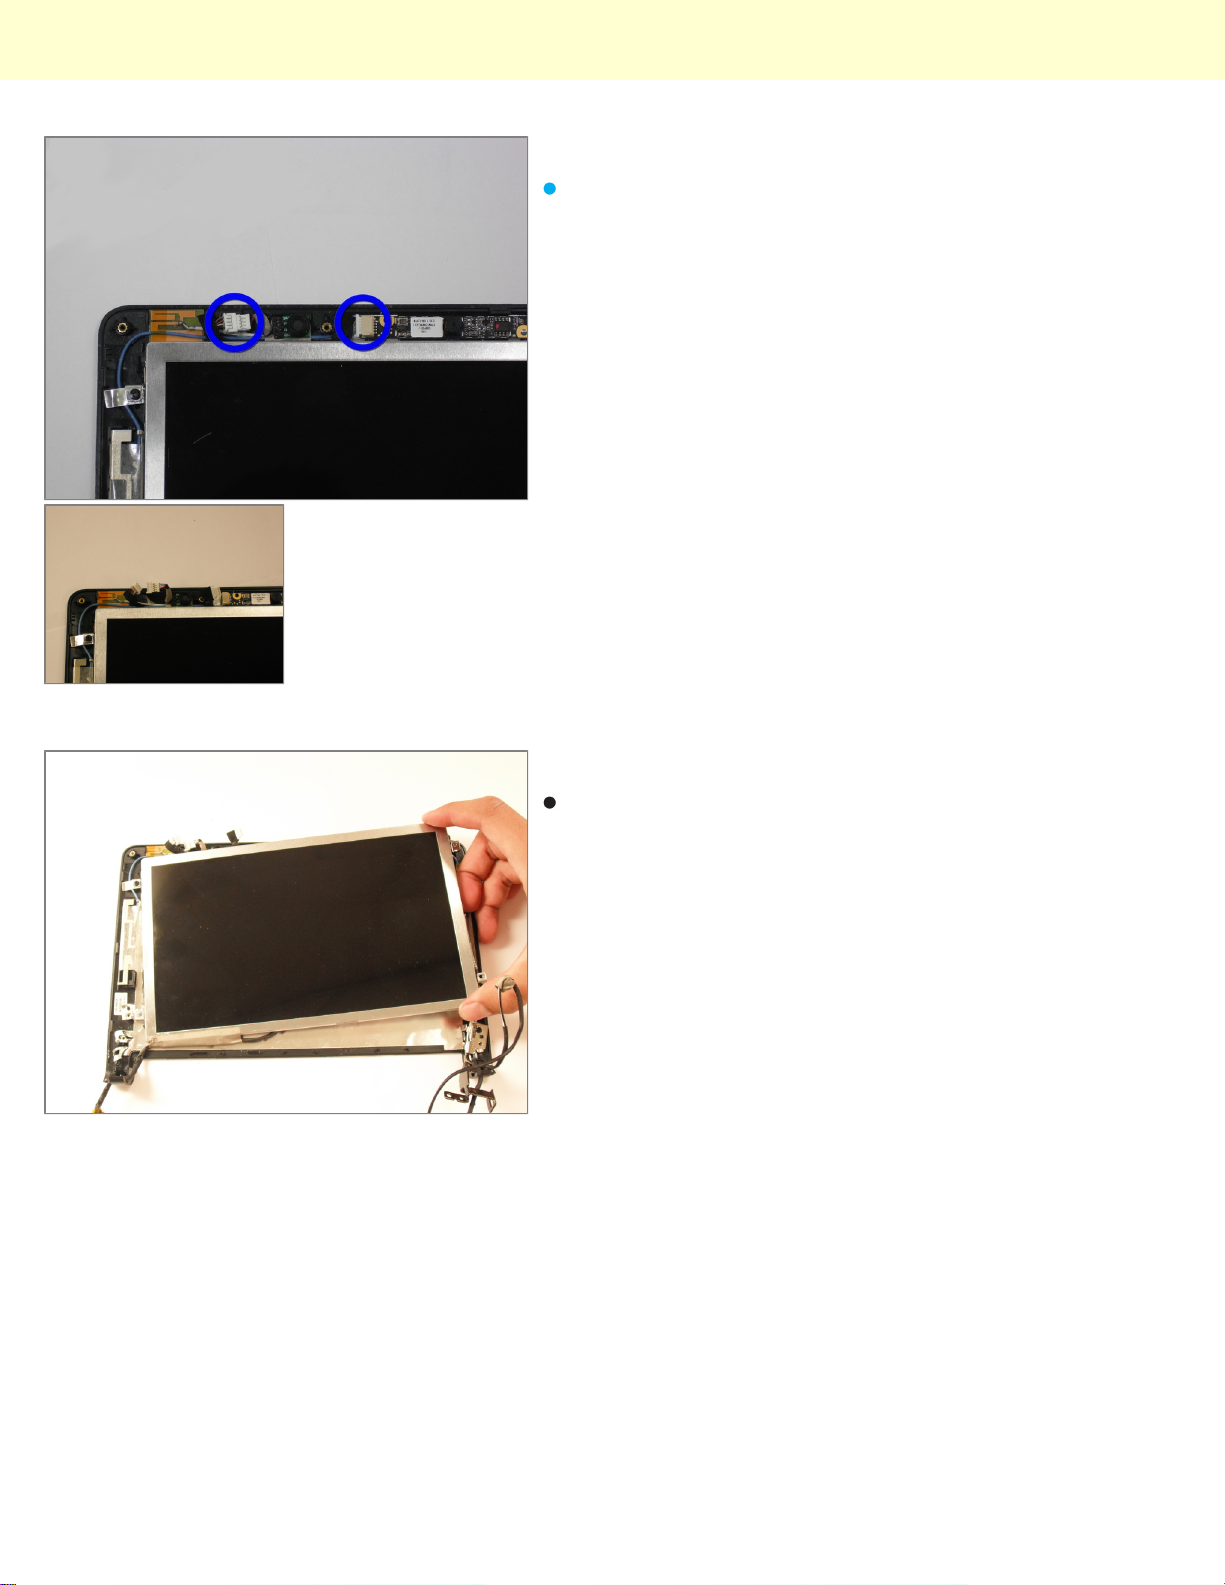
Step 37
Disconnect the 2 cables along the top of the display.
Step 38
Pull the display off.
© 2010 iFixit — CC BY-NC-SA www.iFixit.com Page 17 of 18
Page 18

Installing Acer Aspire One ZG5 Display
To reassemble your device, follow these instructions in reverse order.
This document was last generated on Dec 15, 2010.
© 2010 iFixit — CC BY-NC-SA www.iFixit.com Page 18 of 18
 Loading...