

Page 1

Acer ICONIA
Acer recommends...
Productivity Software
Work Great with Microsoft® Office 2010
with Office 2010.
Photo editing
Facebook, YouTube or Windows Live.
Search & Decide with Bing
more informed decisions.
- Easily edit and print your photos with Windows Live Photo Gallery. Then share them on
-- Find and organize the answers you need using Bing™, so you can make faster,
Quick Guide
- Express your ideas, solve problems and simplify everyday projects
Page 2

© 2010 All Rights Reserved.
Acer ICONIA Quick Guide
Original Issue: 11/2010
Model number: __________________________________
Serial number: ___________________________________
Date of purchase: ________________________________
Place of purchase: ________________________________
Page 3

Your Acer Touchbook tour 1
Top view 2
Closed front view 3
Left view 4
Right view 4
Environment 5
Enabling wireless devices 6
Acer Ring 7
Gesture Editor 9
TouchBrowser 13
Adding a page to your Favorites 16
My Journal 17
Editing pages 18
Web Clip 19
Scrapbook 22
Capture tool 24
Managing images in Scrapbook 27
Exporting Scrapbook pages 28
Device Control 30
Multimedia 31
TouchVideo 31
TouchPhoto 34
TouchMusic 38
SocialJogger 41
Sharing content 43
Settings 44
Virtual Keyboard 45
XT9 predictive text 46
Keyboard toolbars 47
The keyboard button 47
When operating under Windows 48
Before Windows boots 48
Other ways of entering information 48
Handwritten input 49
Keyboard settings 54
Window Manager 56
Closing Window Manager 60
Adjusting display settings 61
Using the Intel Graphics and Media Control Panel 61
Contents
Page 4

Page 5
English
1
Your Acer Touchbook tour
After setting up your computer as illustrated in the setup poster, let us show
you around your new Acer computer.
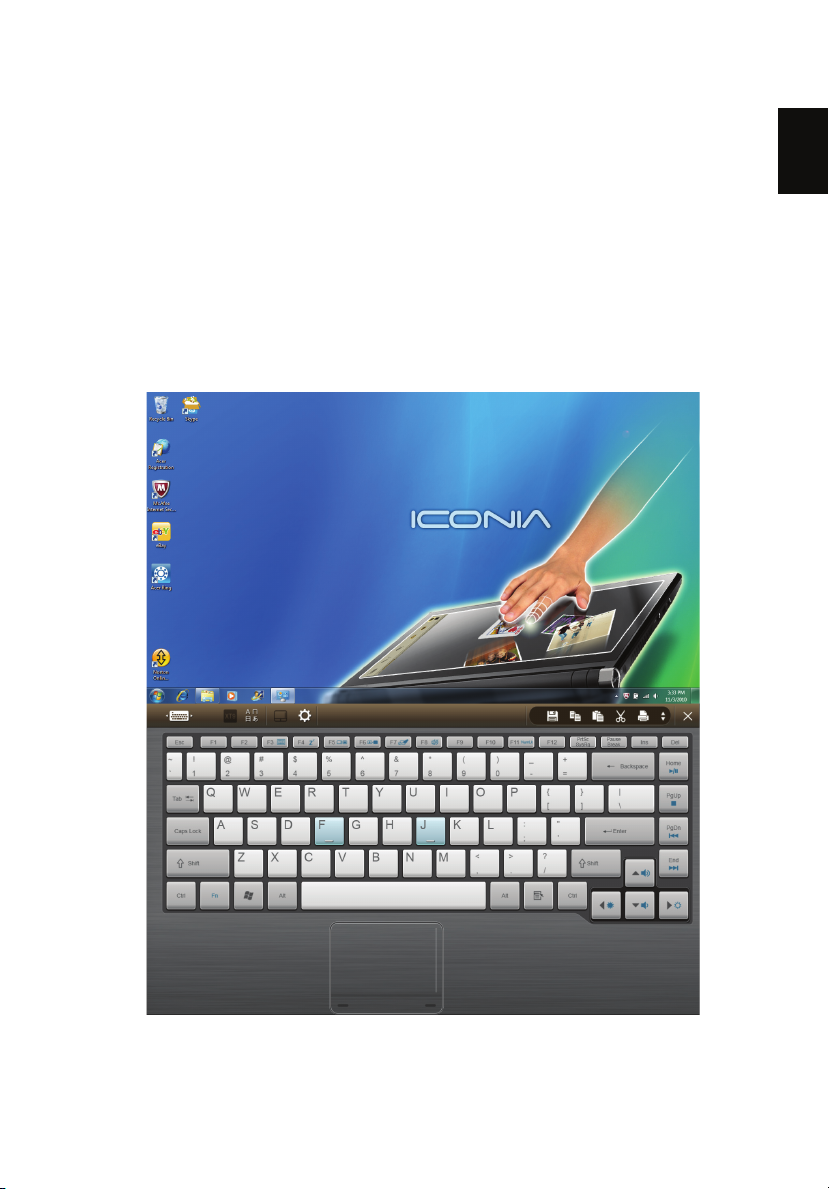
Your new computer is equipped with two multi-touch screens that are used to
control the computer and enter data. The first thing you will notice is that there
is no traditional keyboard or touchpad. These are replaced with a virtual
keyboard and touchpad, so performing tasks will be different from the way you
use a traditional notebook. This User Guide will help you to familiarize yourself
with these unique functions.
After you have turned on your computer, you will see a standard Windows
desktop on the upper screen and a virtual keyboard on the lower screen.
Page 6
Your Acer Touchbook tour 2
English
1
2
3
4
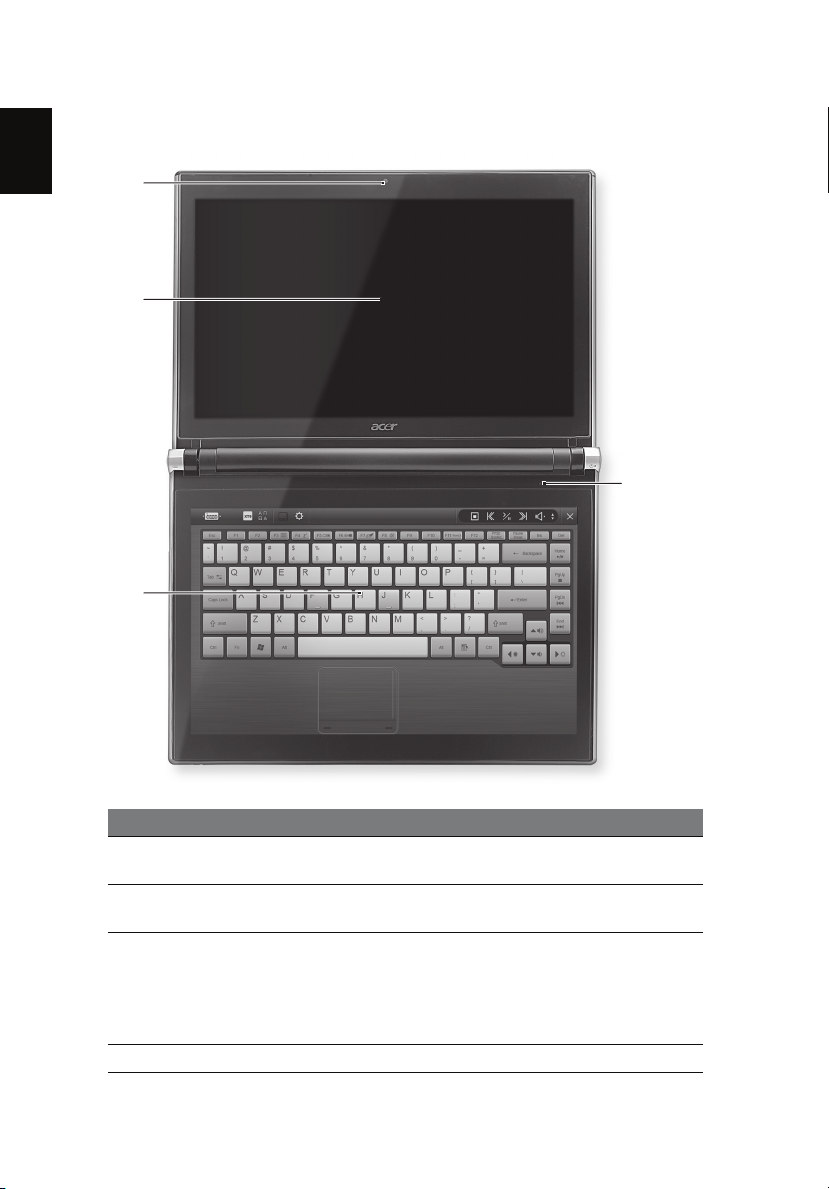
Top view
No. Icon Item Description
1 Acer Crystal Eye
webcam
2 Upper display
screen
3Lower display
screen
4 Microphone Internal microphone for sound recording.
Web camera for video communication.
Also called Liquid-Crystal Display (LCD),
displays computer output.
Also called Liquid-Crystal Display (LCD),
displays computer output.
Shown with Virtual Keyboard open.
Please refer to Virtual Keyboard on page
45.
Page 7
English
Closed front view
1
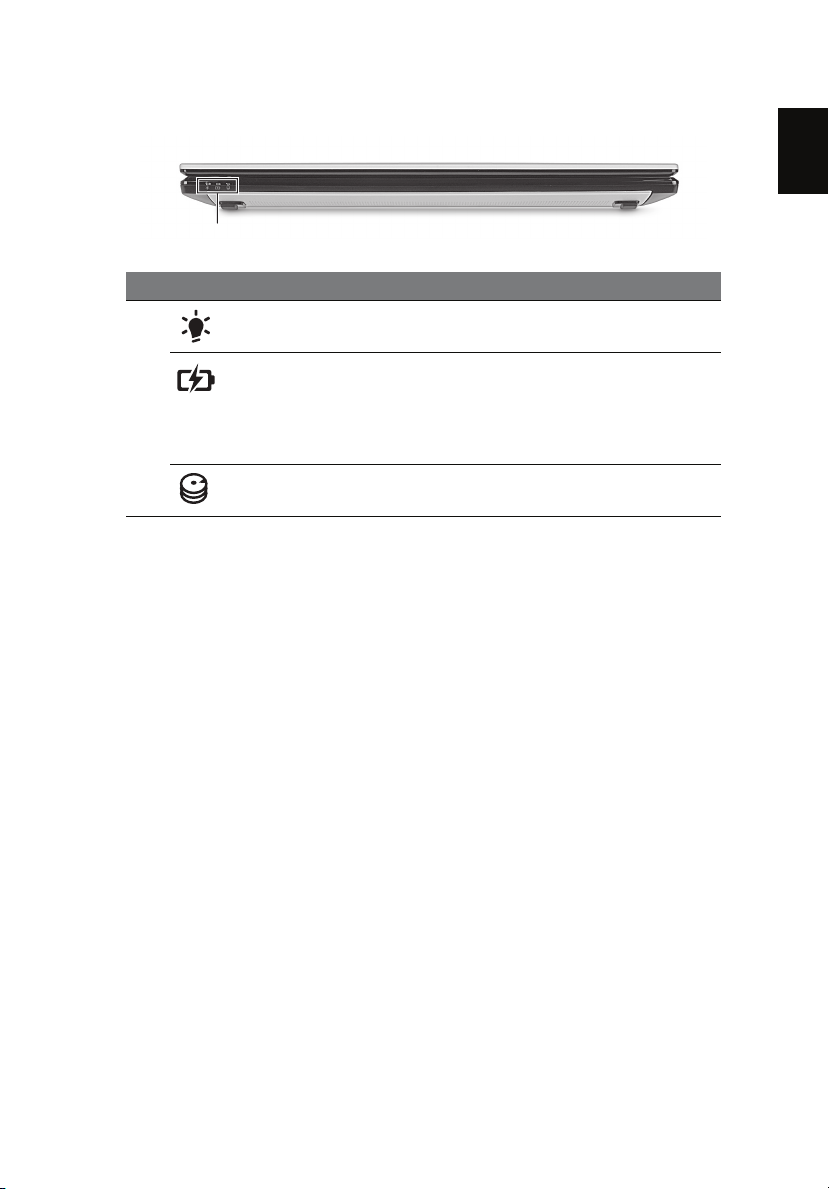
Closed front view
No. Icon Item Description
1 Power indicator Indicates the computer's power status.
Battery indicator Indicates the computer's battery status.
1. Charging: The light shows amber when
the battery is charging.
2. Fully charged: The light shows blue
when in AC mode.
HDD indicator Indicates when the hard disk drive is
active.
3
Page 8
Your Acer Touchbook tour 4
English
2134
213456
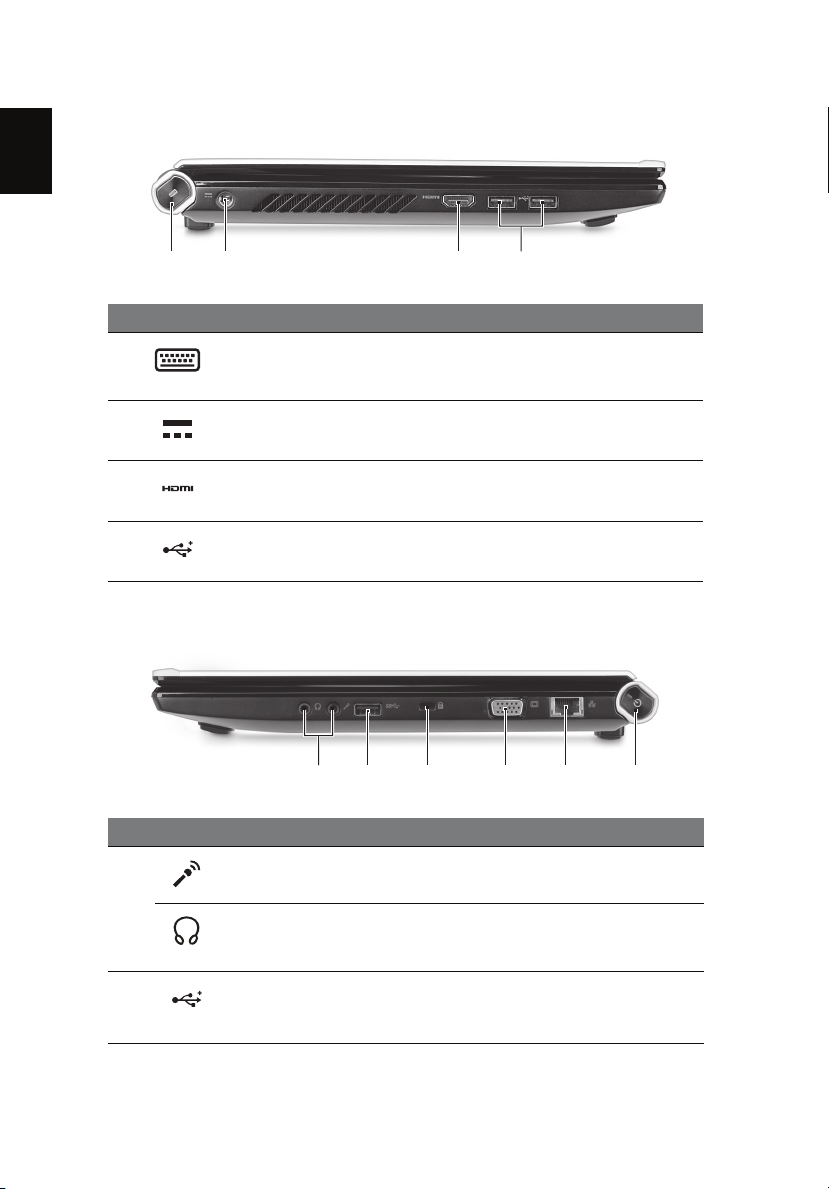
Left view
No. Icon Item Description
1 Keyboard button Press to call up Virtual Keyboard or
perform other functions (please refer to
The keyboard button on page 47).
2 DC-in jack Connects to an AC adapter.
3 HDMI port Supports high-definition digital video
connections.
4 USB 2.0 ports Connect to USB 2.0 devices (e.g., USB
mouse, USB camera).
Right view
No. Icon Item Description
1
2 USB 3.0 port Connect to USB devices.
Microphone jack
Headphones/
speaker/line-out
jack
Accepts inputs from external
microphones.
Connects to audio line-out devices
(e.g., speakers, headphones).
Supports the USB 3.0 (SuperSpeed
USB) specification.
Page 9
English
Environment
No. Icon Item Description
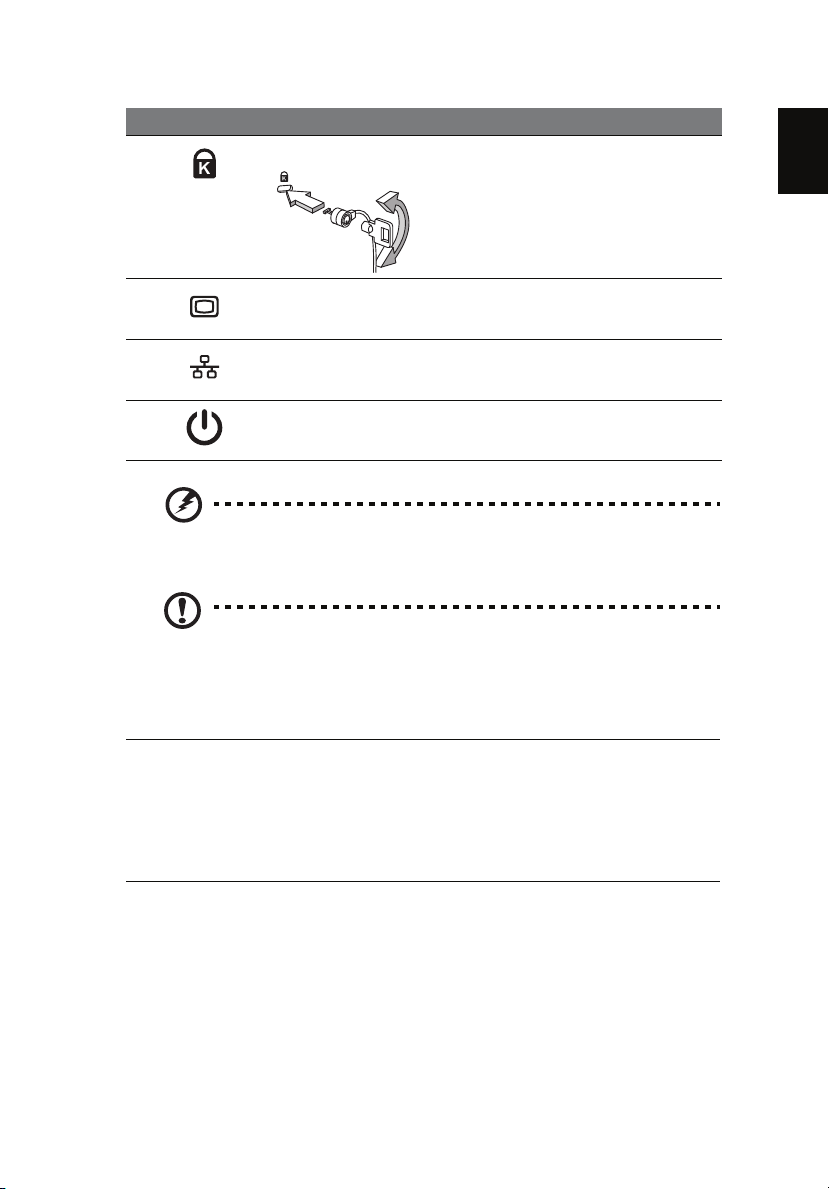
3 Kensington lock slot Connects to a Kensington-compatible
computer security lock.
Note: Wrap the computer security
lock cable around an immovable
object and insert the lock into the
notch; turn the key to secure the lock.
5
4 External display
(VGA) port
5 Ethernet (RJ-45)
port
6 Power button Turns the computer on and off.
WARNING: Do not remove the base cover. Doing so may lead to
injury or damage to your computer, and void your warranty.
Note: To upgrade your computer, please contact an authorized
Acer service center.
Connects to a display device (e.g.,
external monitor, LCD projector).
Connects to an Ethernet 10/100/1000based network.
Environment
• Temperature:
• Operating: 5 °C to 35 °C
• Non-operating: -20 °C to 65 °C
• Humidity (non-condensing):
• Operating: 20% to 80%
• Non-operating: 20% to 80%
Page 10
Enabling wireless devices 6
English
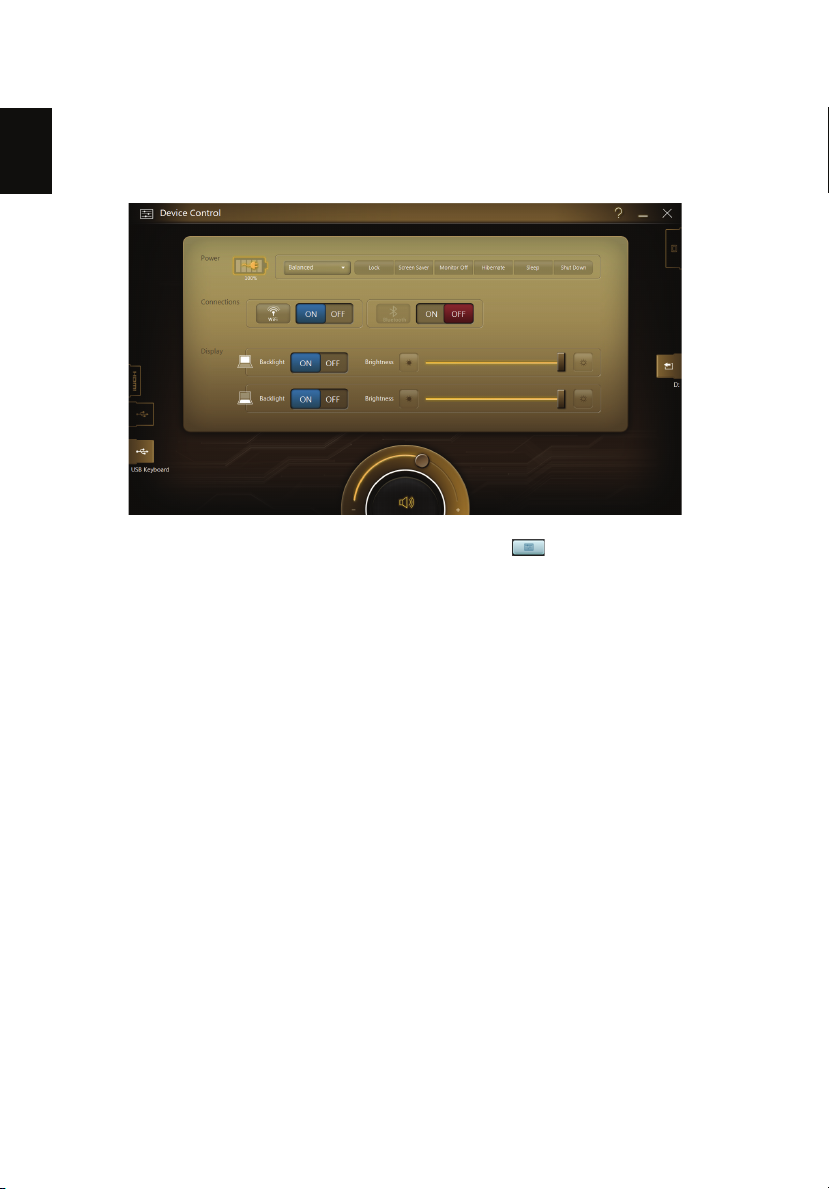
Enabling wireless devices
Device Control allows you to enable and disable the various wireless
connectivity devices on your computer.
Open Device Control from Acer Ring or press <Fn> + < > (the <F3> button)
to open Device Control.
A red button indicates the device is off.
• Tap ON to turn the device on.
A blue button indicates the device is on.
• Tap OFF to turn the device off.
Tap the device name to open the Windows Control Panel to adjust the
advanced settings for each device.
Page 11
English
Acer Ring
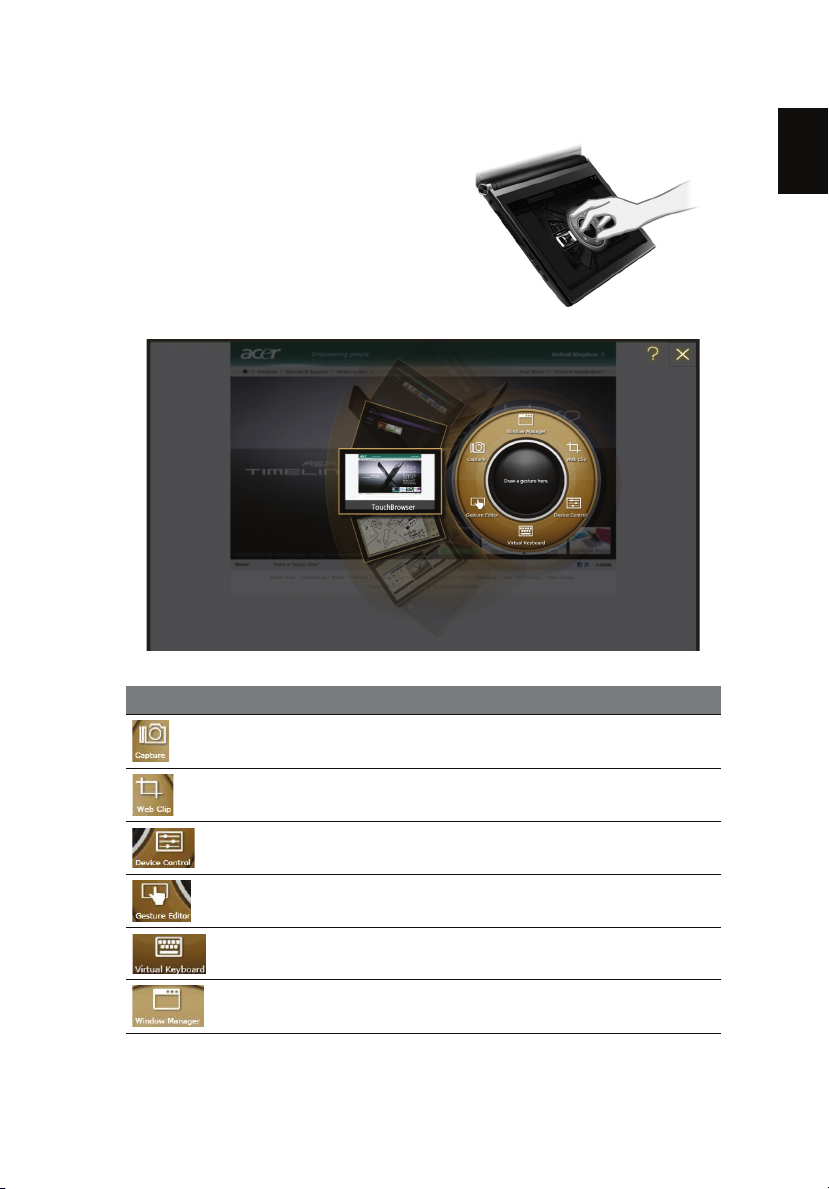
Acer Ring incorporates a number of
useful functions and tools in one easyto-use interface. Tap the lower display
screen with all five fingers at once to
display Acer Ring.
You need to close Virtual Keyboard if
it’s open before trying to open Acer
Ring.
7
Icon Item Description
Capture Capture a part of the screen to Scrapbook, to
Web Clip Select a part of a web page to paste in
Device Control Adjust settings for your computer (please
Gesture Editor Open the Gesture editor (please refer to
Keyboard Open Virtual Keyboard (please refer to Virtual
Window Manager Open Window Manager (please refer to
the clipboard or as an image.
Scrapbook or My Journal.
refer to Device Control on page 30).
Gesture Editor on page 9).
Keyboard on page 45).
Window Manager on page 56).
Page 12
Acer Ring 8
English
On one side of Acer Ring you can see a selection of AppCards. You can scroll
through the applications and tap on a card to open the application.
The AppCards are as follows:
• TouchVideo
• TouchPhoto
• TouchMusic
• TouchBrowser (this is the AppCard that is shown when you open Acer
Ring.)
• Scrapbook
• My Journal
• SocialJogger
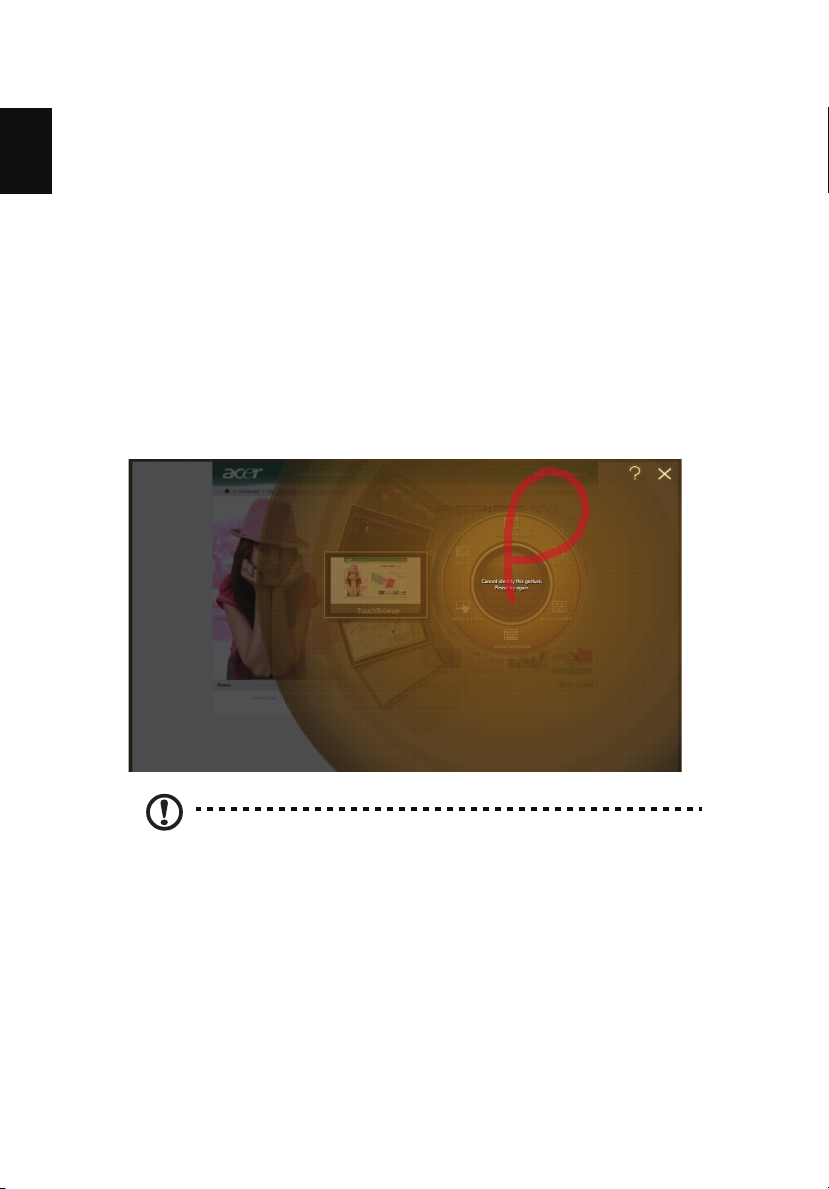
Starting from the area marked Draw a gesture here draw a gesture you have
defined to perform the associated function. Please refer to Gesture Editor on
page 9 for information on defining your own gestures.
Note: As long as the gesture starts within the central ring, you can
extend the gesture beyond the boundaries of the central ring.
Larger gestures increase recognition accuracy.
Page 13
English
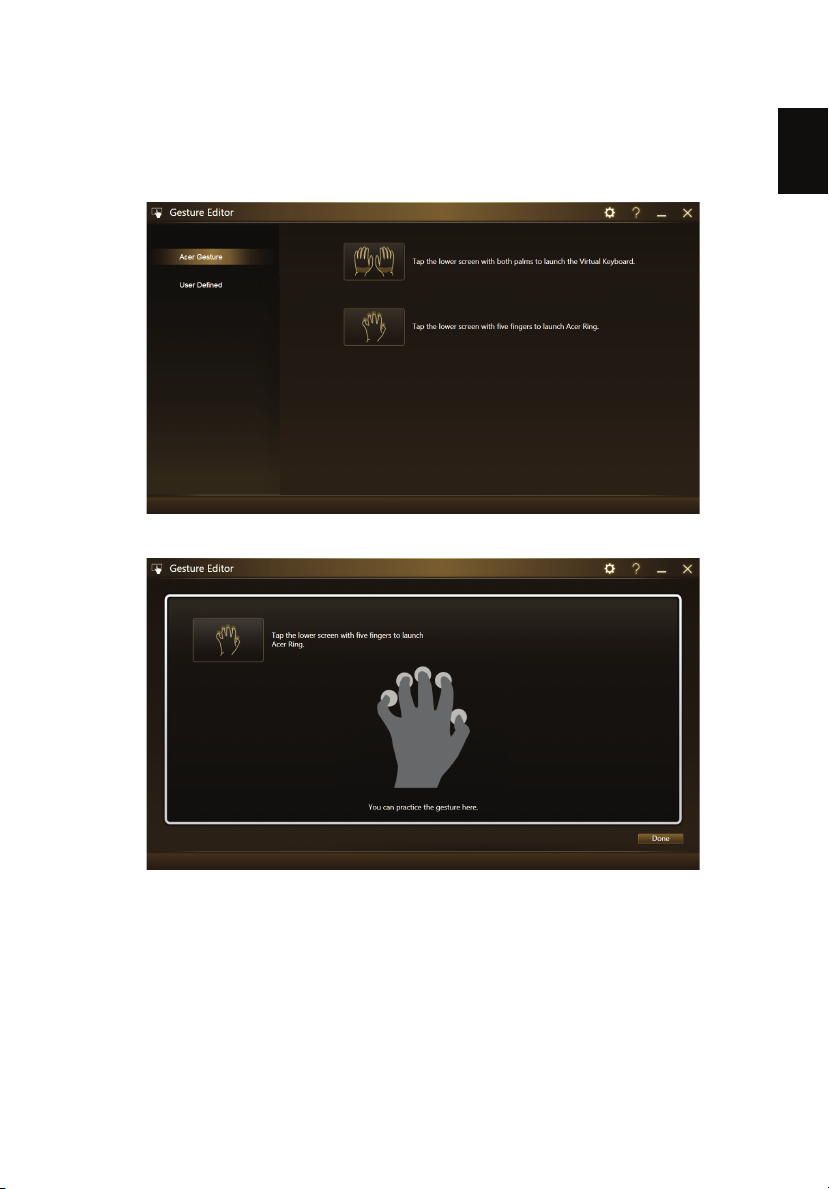
Gesture Editor
You can set personalized gestures to perform functions or launch programs.
Tap Gesture Editor on Acer Ring to see the pre-defined gestures.
9
Tap either of the pre-defined gestures to practice the gesture.
Page 14
Gesture Editor 10
English
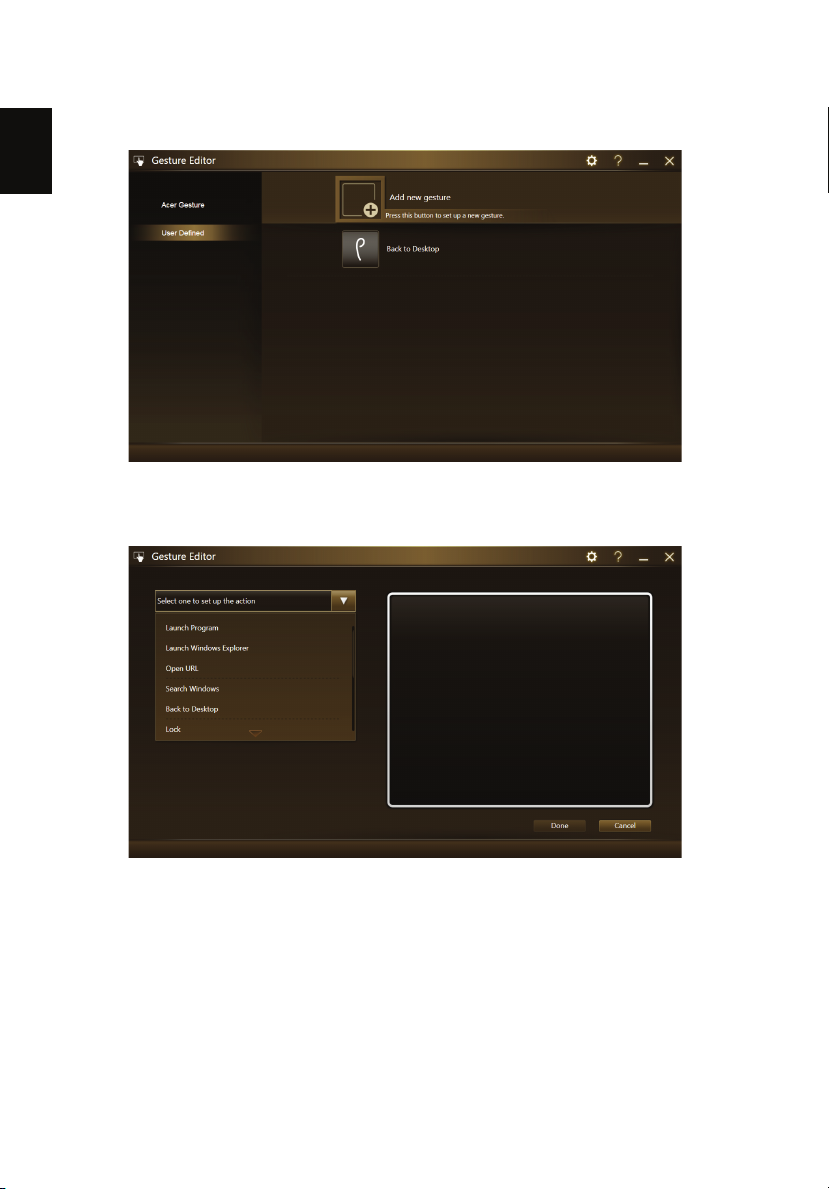
Tap User Defined to define your own gestures. Tap Add New Gesture to add
new gestures.
Select the action you’d like to perform from the drop-down menu on the lefthand side of the screen. Draw the gesture in the area on the right-hand side of
the screen. When prompted, enter the gesture again.
Page 15
English
11
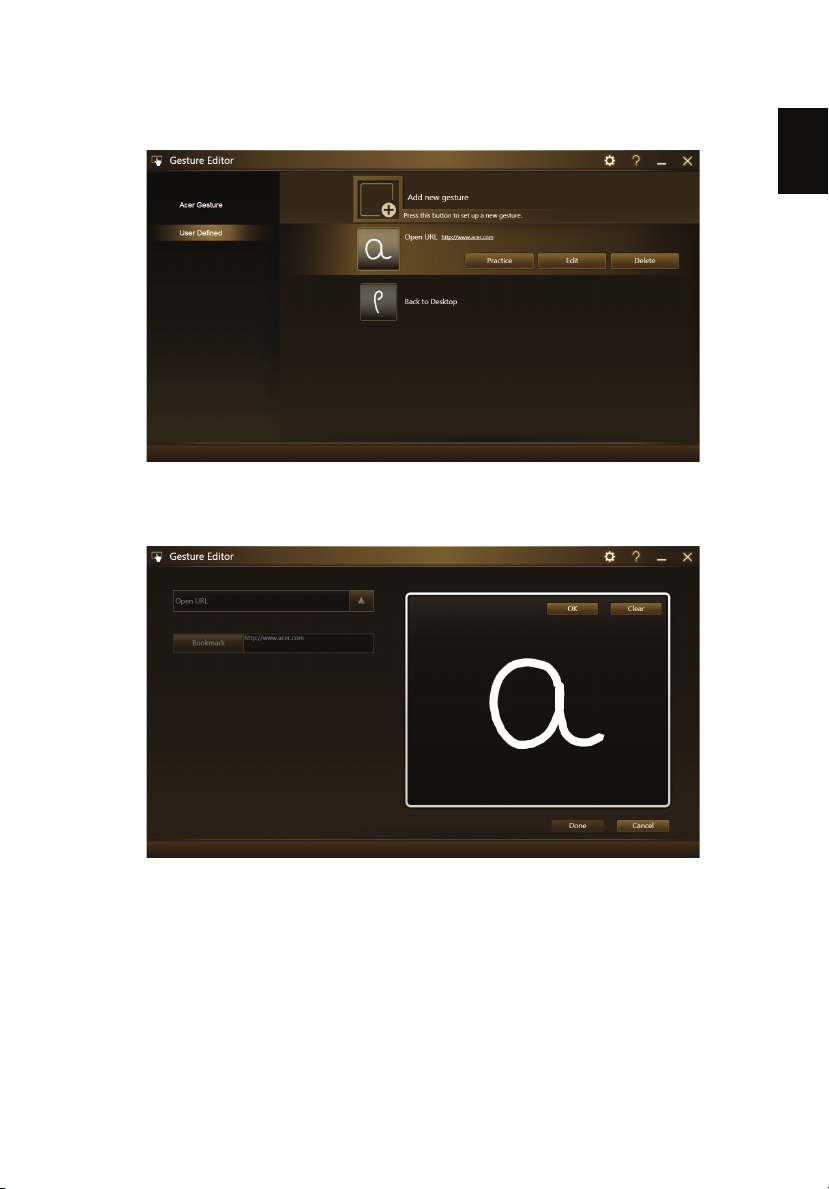
Once you have defined the gesture, you can practice, edit or delete the gesture.
Tap the gesture to select it, then tap the appropriate button.
Tap Edit to edit a gesture. You can change the action from the drop-down
menu in the upper left-hand corner of the edit window. You can edit URLs and
applications directly in the text area.
Page 16
Gesture Editor 12
English
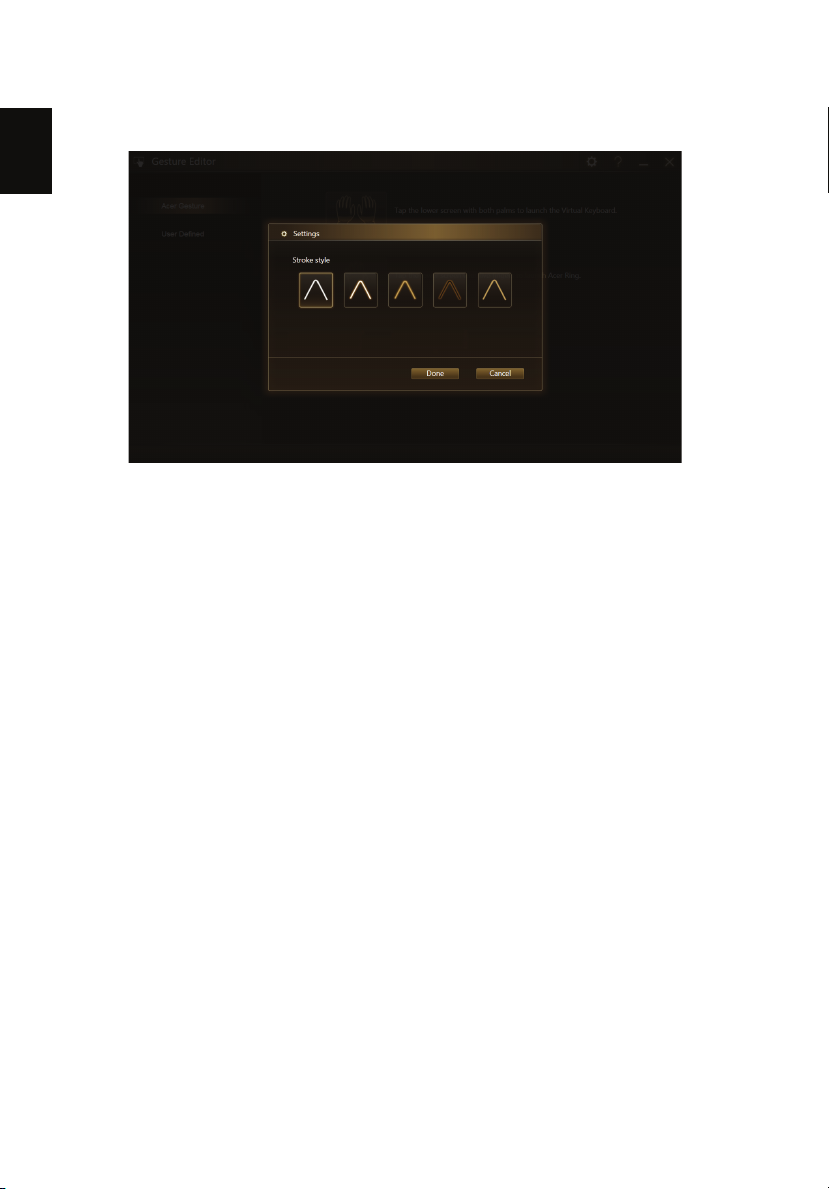
You can also adjust the stroke style from the Settings page. Tap the settings
icon to open the settings page.
Page 17

English
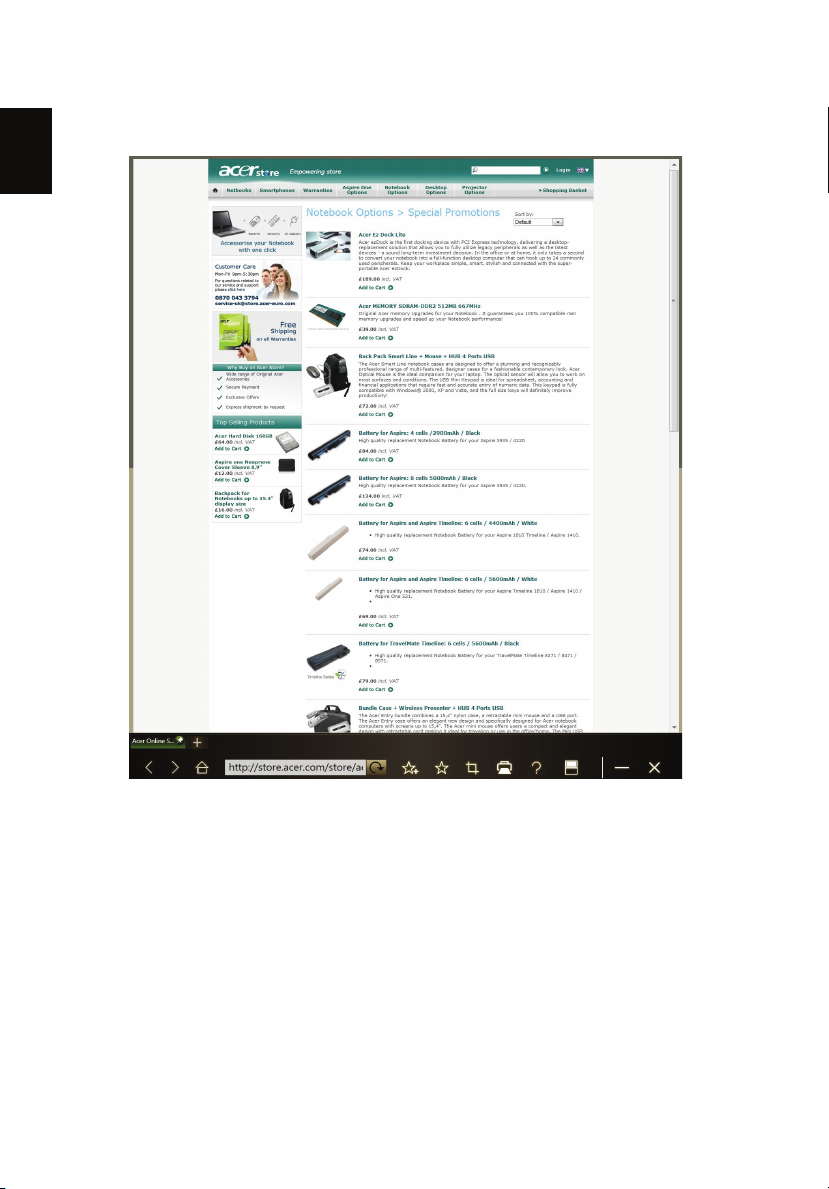
TouchBrowser
TouchBrowser is specifically designed to offer you a more comfortable web
surfing experience when using touch input. Open Acer Ring and tap the
TouchBrowser AppCard to launch the browser.
13
Page 18
TouchBrowser 14
English
The web content will be displayed across both screens. The toolbar at the
bottom of the screens gives you easy control over the open pages.
Page 19
English
1
2
3
4
5
6
78910
12 13
14
11
15
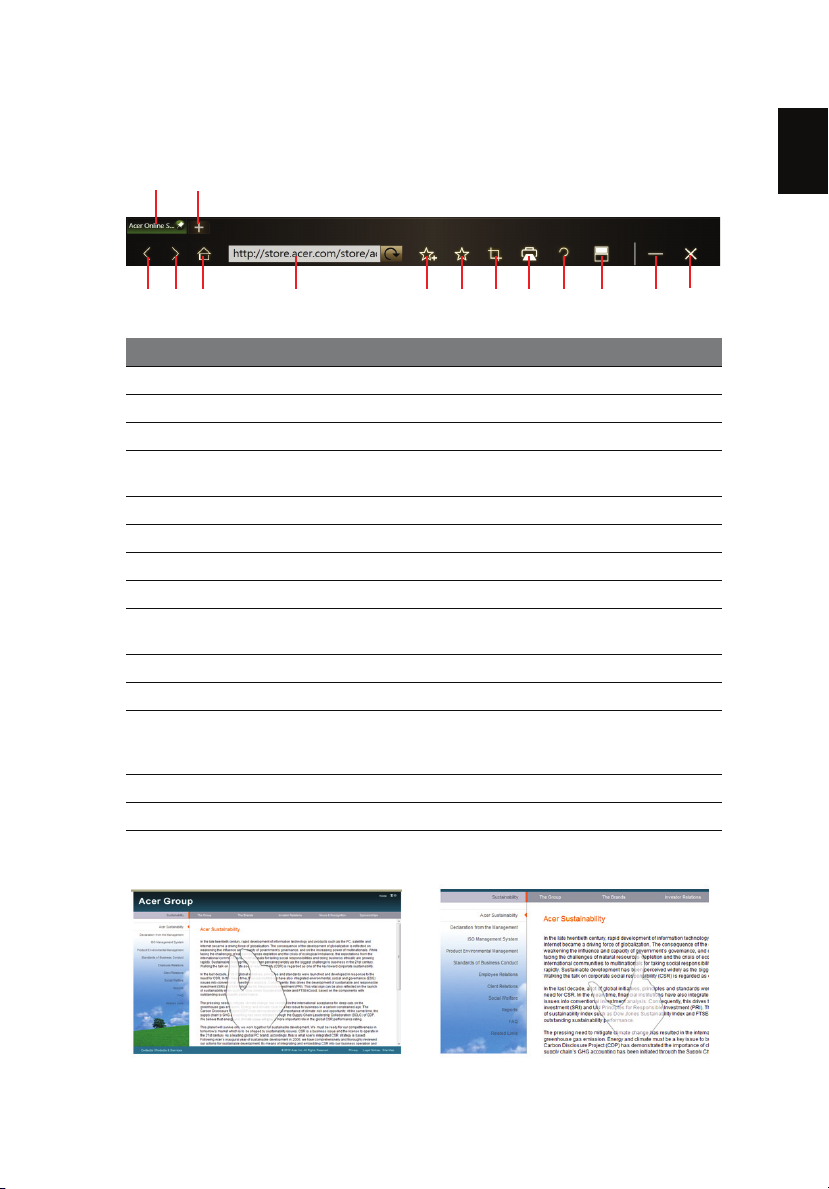
To enter a website address, tap the URL bar. A keyboard icon will display,
allowing you to open a virtual keyboard and enter text, or use handwriting to
enter the URL.
No. Item Description
1 Tabs Shows the pages currently open.
2 Open new tab Tap to open a new tab.
3 Back Go back one page.
4 Forward Go forward to the next page in the browsing
5 Home Open the defined home page.
6 URL bar Shows the address of the current page.
7 Add to favorites Add the current page to your favorites.
8 Favorites Open the list of your favorites / history.
9 Web Clip Crop a part of the web page for use in My
10 Print Print the page.
11 Help View the Help file.
12 Switch mode Switch to browsing on a single screen. If you’re
13 Minimize Minimizes the browser.
14 Close Closes the browser.
history.
Journal or Scrapbook.
in single-screen browsing, tap to return to
browsing on both screens.
You can use a pinch action to zoom in to content on the page.
Page 20
TouchBrowser 16
English
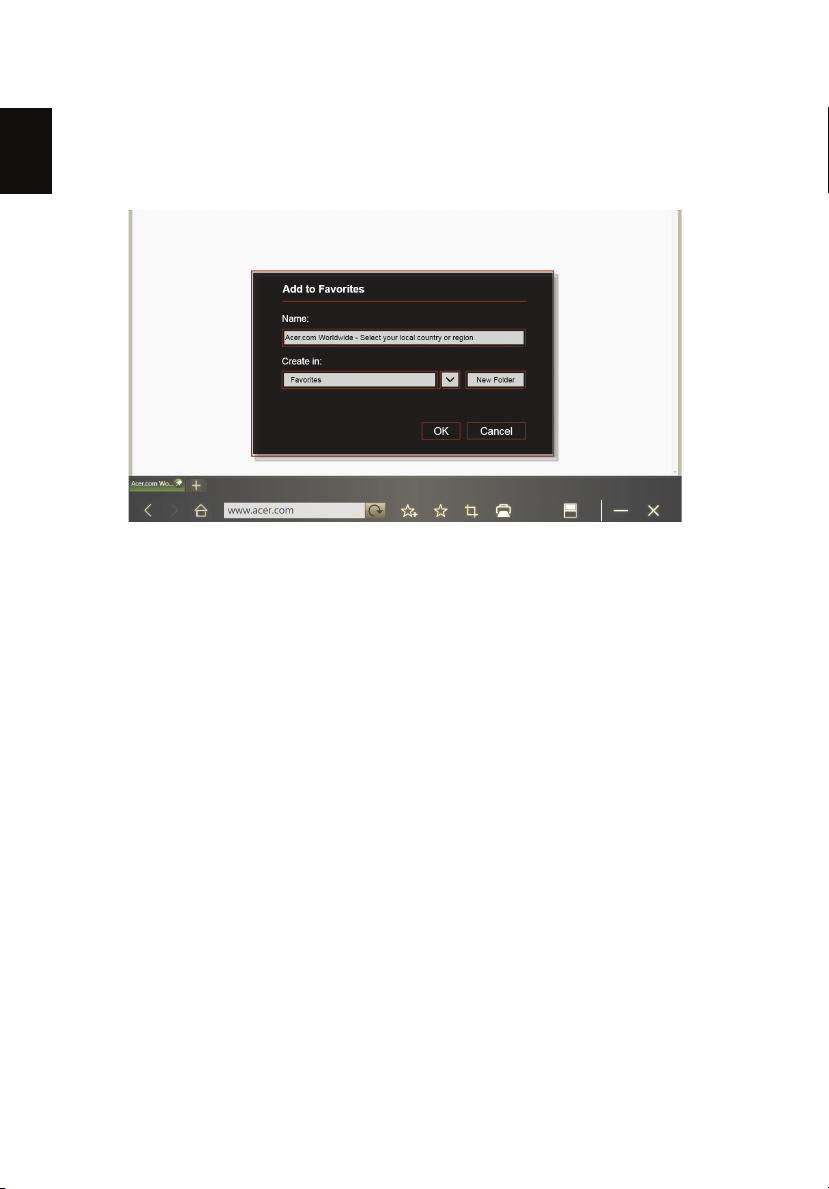
Adding a page to your Favorites
To add a page to your Favorites, tap the Add to Favorites icon, give the page a
name (the page title will be used by default) and select a folder to save the URL
to.
Page 21

English
17
My Journal
My Journal is a handy place for you to keep clippings of websites and other
information you may want to refer to later. You can organize the information
you wish to view from a number of sources on a single, easy-to-view page.
Open Acer Ring and scroll through the AppCards to My Journal. Tap the
AppCard to open the application.
Website content is automatically updated each time you open the journal page.
Page 22

My Journal 18
English
1 2
3
4
5
6
Use the tabs along the top of the screen to switch between your journal pages,
or tap the icons on the toolbar to perform various functions.
No. Item Description
1 Web clip Crop a part of the web page for use in My
2 Edit Edit the content on the journal pages.
3 Help View the help file.
4 Minimize Minimizes My Journal.
5 Close Closes My Journal.
6 Tabs Shows the pages in your journal.
Note: When you have finished editing your clips, tap to
return to viewing mode. If you want to edit a web clip at a later
time, tap the edit icon to enter edit mode.
Journal.
Editing pages
In edit mode, you can resize web clips by dragging the corners of the web clip
to the size you want.
You can also move web clips to other pages by dragging the web clip to the tab
for the page you want to move the clip to.
Tap the name of a tab to open Virtual Keyboard and rename the tab. When you
have finished, tap .
Page 23

English
Web Clip
19
Web Clip
The web clip tool allows you to clip parts of web pages to save them to My
Journal. Once you have a page open in your browser, tap the Web clip icon.
If you’re using Internet Explorer, you will need to tap the Web Clip icon in the
Internet Explorer toolbar.
Page 24

My Journal 20
English
Tap the browser screen to select the area you want to crop; tap and drag on any
of the circles on the corner of the crop window to expand it to include all the
information you want to capture.
When you have finished selecting the area you want to crop, tap the area to
open a menu that will allow you to paste the content into My Journal,
Page 25

English
Web Clip
Scrapbook or Copy it to the clipboard. You can also Save bitmap as... or Discard
the web clip.
Tap a clip to select it, then you can position it on the page and stretch it by
dragging the corners to the desired size.
To delete a web clip, tap the clip in My Journal and tap the trash can icon.
21
Note: If the web clip comes from a site that requires a login, the
clip will be grayed out and a key icon will show to indicate that it
requires a login. Tap the clip to open the login page in My
Journal.
Note: If an Internet connection to the website is unavailable, the
clip will indicate that the connection is unavailable. Tap the clip to
refresh the data.
Page 26

Scrapbook 22
English
Scrapbook
Scrapbook is a convenient place for you to store images, captures from
websites, and other content. Open Acer Ring and scroll through the AppCards
to Scrapbook. Tap the AppCard to open the application.
You can also annotate items or write reminders.
Icon Function
Thumbnails of images in the Windows 7 Pictures library.
Capture tool. Capture a part of the screen to Scrapbook, to
the clipboard, or as an image.
Page 27

English
Icon Function
Tap to edit content on the page; tap again close the
selected tool and return to viewing mode.
Pen tool for drawing or entering handwritten text.
Eraser tool.
Export tool. Export the page to the clipboard for insertion
into other applications, or to save as an image file.
Delete the current page or selected image.
Note: There is no "Undo" function available.
Shows the current page of the total pages and allows you
to flip backwards or forwards through pages.
Add a new page.
View individual pages or thumbnails. Tap a thumbnail to
open the individual page.
Note: You need to tap to resize, rotate or delete images on
Scrapbook pages.
23
Page 28

Scrapbook 24
English
Capture tool
The capture tool allows you to clip parts of displayed content to save them to
Scrapbook. Once you have the content open on the upper screen, tap the
Capture icon in Scrapbook.
Page 29

English
Capture tool
Tap the content you want to copy and select the area you want to crop; tap and
drag on any of the circles on the corner of the crop window to expand it to
include all the information you want to capture.
25
When you have finished selecting the area you want to crop, tap the area to
open a menu that will allow you to save the clip as an image you can drag and
Page 30

Scrapbook 26
English
drop onto the Scrapbook page, save the capture as a Bitmap, or Copy it to the
clipboard.
Page 31

English
Managing images in Scrapbook
The capture will be added to the thumbnails above the scrapbook page. Drag
and drop the capture onto the page.
Tap a clip to select it, then you can position it on the page.
27
Managing images in Scrapbook
Note: You need to tap to resize, rotate or delete images on
Scrapbook pages.
Page 32

Scrapbook 28
English
You can drag and drop images from the thumbnail line at the top of the screen
to the scrapbook page: Enlarge or shrink the picture using pinch actions, or
rotate the picture on the page.
Exporting Scrapbook pages
You can export Scrapbook pages to other applications (such as PowerPoint), or
save it as an image file on your system. Tap the export icon.
Page 33

English
Exporting Scrapbook pages
This will open a tab on the upper screen showing the exported page. Drag and
drop the page into the other application, or to your desktop / file browser to
save it as a file.
29
Page 34

Device Control 30
English
Device Control
Device Control is a convenient way for you to control the brightness of each
screen, turn the backlight on or off for each screen, and adjust the volume to
suit your needs. It also indicates the location of each port on your computer and
allows you to turn your connectivity devices on or off, select a power scheme,
lock your computer, turn it off, or place it in Sleep mode.
If you have any devices plugged into a USB port or the HDMI port, Device
Control will show what type of device is plugged into each port. If you have
inserted a storage device into a USB port, you may tap the USB icon to open a
context menu. Tap Open to view the files in Windows Explorer.
To safely remove the device, select Eject from the menu.
There are also context menus available for the HDMI and VGA connectors.
Page 35

English
TouchVideo
31
Multimedia
TouchVideo
TouchVideo gives you an easy-to-use interface to view video content from your
computer. Tap the TouchVideo AppCard to launch TouchVideo.
The TouchVideo interface will open on the lower screen and show thumbnails
of the video files found in your video library.
Page 36

Multimedia 32
English
Tap Browse Computer to browse your computer for other video files.
Page 37

English
TouchVideo
1
2
3
4
5
6
78 9
Video files will be shown as thumbnails. Tap any thumbnail to start playing the
video on the upper screen.
33
At the bottom of the lower screen a toolbar with video controls will open.
No. Item Description
1 Progress bar Indicates the playback progress.
Page 38

Multimedia 34
English
No. Item Description
2 Stop Stops playback.
3 Previous Jumps to the previous video clip in the folder.
4 Rewind Rewinds video playback.
5 Pause Pauses video playback.
6 Fast forward Plays the video at a faster speed.
7 Next Jumps to the next video clip in the folder.
8 Volume Adjust playback volume.
9 Minimize Minimizes toolbar.
TouchPhoto
TouchPhoto gives you an easy-to-use interface to view image files from your
computer. Tap the TouchPhoto AppCard to launch TouchPhoto.
Page 39

English
TouchPhoto
The interface will open on the lower screen and show thumbnails of the image
files found in your image library.
Tap Browse Computer to browse your computer for other image files.
35
Page 40

Multimedia 36
English
Photos will be shown as thumbnails. Tap any thumbnail to display the photo on
the upper screen.
Page 41

English
TouchPhoto
1
2
3
4
5
67
8
9
At the bottom of the lower screen a toolbar with slideshow and playback
controls will open.
No. Item Description
1 Slideshow Starts playing a slideshow of all the images in
the folder.
2 Stop Stops the slideshow playback.
3 Previous Jumps to the previous photo in the slideshow.
4 Pause Pauses the slideshow.
5 Next Jumps to the next photo in the slideshow.
6 Zoom Adjusts the zoom of the displayed photo
(disabled during slideshows).
7 Rotate left
8 Rotate right
Rotates the selected photo 90
Rotates the selected photo 90
o
to the left.
o
to the right.
9 Minimize Minimizes the toolbar.
37
Page 42

Multimedia 38
English
TouchMusic
TouchMusic gives you an easy-to-use interface to listen to audio content saved
on your computer. Tap the TouchMusic AppCard to launch TouchMusic.
The TouchMusic interface will open on the lower screen and show thumbnails
of the audio files found in your Music library. When available, album artwork
will be displayed for the thumbnails.
Page 43

English
TouchMusic
Tap Browse Computer to browse your computer for other audio files.
Audio files will be shown as thumbnails. Tap any thumbnail to start playing the
audio file.
39
Page 44

Multimedia 40
English
1
2
3
4
5
6
7
89 11
10
At the bottom of the lower screen a toolbar with playback controls will open.
No. Item Description
1 Progress bar Indicates the playback progress.
2 Thumbnail Shows the thumbnail of the album cover, name
3 Stop Stops playback.
4 Previous Jumps to the previous audio file in the folder.
5 Pause Pauses video playback.
6 Next Jumps to the next video clip in the folder.
7 Mute Mutes the sound.
8 Volume slider Adjust playback volume.
9 Shuffle Plays the audio files back in a random order.
10 Repeat Repeats playback of the selected file(s).
11 Minimize Minimizes toolbar.
of album and song title currently being played.
Page 45

English
SocialJogger
Open Acer Ring and tap the SocialJogger AppCard.
41
SocialJogger gives you one-touch access to popular social networking sites:
Facebook, YouTube and Flickr.
Page 46

SocialJogger 42
English
Tap Log In to open the login wizard. You can log into all three supported
services from a single login wizard. If you don’t already have an account with
the supported services, you can create an account from the wizard.
Tap Continue to log into your account(s):
Facebook
Page 47

English
YouTube
Flickr
Sharing content
43
Sharing content
You can upload content to each service by tapping the Share on icon in the
upper right-hand corner of the page. This will open a file browser above the
Page 48

SocialJogger 44
English
three service pages. Drag and drop the content you want to share to the desired
service.
Settings
You can adjust the settings for each service by tapping the Settings icon. This
opens the settings window with a tab for each service.
Page 49

English
Virtual Keyboard
1
2
3
45
6
7
8
Virtual Keyboard functions as a traditional
keyboard and offers additional features.
Place your palms lightly on the lower screen
to display Virtual Keyboard. You may also
press the keyboard button on the left-hand
screen hinge.
To close Virtual Keyboard, tap the X (icon 7
below) in the upper right-hand corner of the
window.
WARNING: Do not press down hard on the screens. Doing so may
damage them.
45
No. Icon Function
1 Switch to between full keyboard mode and
handwritten input.
2 Switch XT9 text input on or off. Please refer to XT9
predictive text on page 46.
3 Change input method (depends on the languages set
up in Windows).
Page 50

Virtual Keyboard 46
English
No. Icon Function
4 Show or hide touchpad. When the touchpad is hidden,
a tab appears on the left of Virtual Keyboard which
allows you to move the keyboard up or down on the
screen.
5 Open the keyboard settings window. Please refer to
Keyboard settings on page 54.
6 Keyboard
toolbars
7 Close Virtual Keyboard.
Two toolbars with handy control functions. Please refer
to Keyboard toolbars on page 47.
8 Virtual
touchpad
A virtual pointing device.
XT9 predictive text
Note: XT9 predictive text is supported on select languages only.
You can use XT9 predictive text input from the onscreen keyboard. As you tap
letters, XT9 predictive text will display a selection of words alongside the text
box that match the letter sequence of the letters tapped or nearby letters. The
word list changes after every key press.
Note: , XT9 and the XT9 logo are registered trademarks of
Nuance Communications, Inc. or its subsidiaries in the United
States of America and/or other countries.
Page 51

English
The keyboard button
47
Turning predictive text on or off
To turn the predictive text function off, tap .
Keyboard toolbars
In the upper left-hand corner of the keyboard there are two toolbars that have
handy control functions. Use the arrows next to the toolbar to switch between
the toolbars.
Media toolbar
This toolbar contains commonly used media controls.
Editing toolbar
This toolbar includes many commonly used functions for editing content,
including copy, cut, paste, and print.
The keyboard button
The keyboard button, located on the left-hand hinge, can be used to perform a
variety of functions.
Page 52

Virtual Keyboard 48
English
When operating under Windows
Its primary function is to open Virtual Keyboard; do this by pressing and
releasing the keyboard button after Windows has fully booted.
If you find that the system fails to respond after connecting or disconnecting an
external display, press and hold the button for four seconds. When you release
the button, the display settings and touch functions will be reset.
Before Windows boots
If your computer experiences an unexpected shutdown, Windows will attempt
to boot in recovery mode. The keyboard button can be used to control the boot
mode. Press and release the button to move the cursor down to select a boot
mode. Press and hold the button for four seconds to perform the Enter
function.
Other ways of entering information
There are also other ways of entering information, depending on your needs.
Your computer has a virtual numeric keypad for entering data or you can use
handwritten text input.
Page 53

English
Other ways of entering information
12
3
4
5
6
Handwritten input
To enter the numeric keypad mode or use handwritten input, tap .
No. Icon Function
1 Switch to full keyboard mode.
49
2 Open a menu showing input options.
3 Switch between freehand input and
individual characters.
4 Open the keyboard settings window. Please
refer to Keyboard settings on page 54.
5 Tap a function to view a short tutorial
6 Close Virtual Keyboard.
animation.
Tap Help to view the Virtual Keyboard help
file.
Page 54

Virtual Keyboard 50
English
Select the area (on the upper screen) in which you wish to enter text. Enter your
text in the yellow area and tap Insert to insert the text on the upper screen.
Handwriting actions
From the toolbar at the top of the page, you can view animations illustrating
the actions mentioned.
Tap the displayed text to space the letters more widely so you can change
individual letters.
Page 55

English
Other ways of entering information
If the computer fails to recognize your handwriting correctly, you can draw a
line through the text you wish to delete.
51
Page 56

Virtual Keyboard 52
English
You can split the letters to add in another letter by drawing a vertical line
between two letters.
Page 57

English
Other ways of entering information
You can also join letters by tapping the two groups of letters you’d like to join.
53
Page 58

Virtual Keyboard 54
English
Keyboard settings
Tap the keyboard settings icon to open the settings window.
Here you can adjust the sounds the keyboard makes when you tap keys.
You can also change the keyboard skin. Tap a skin to select it, then tap Save to
apply the skin and return to the keyboard. You can also adjust keyboard
brightness using the slider.
Page 59

English
Other ways of entering information
Or adjust the startup status and function keys to suit your needs. You can
enable or disable launching the keyboard on startup and set the size you prefer
for the function keys.
The Advanced tab allows you to run the keyboard training wizard, calibrate the
keyboard, or restore default settings.
55
In the handwriting tab you can set the ink thickness, adjust spacing, and restore
the defaults.
Page 60

Window Manager 56
English
Window Manager
Your Windows desktop is extended to the lower screen, allowing you to work
on both screens using the touch functions.
Use Window Manager to control the windows on each screen. To launch
Window Manager, open Acer Ring and select Window Manager (please refer to
Acer Ring on page 7 for more information).
Window Manager gives you a touch-friendly interface for controlling the
various windows on your computer.
Two additional buttons are added to the title bar of any window. They provide
an easy way to move windows from one screen to the other by tapping the
icon on each window.
Page 61

English
Tap to open Window Manager. This gives you additional ways of
controlling and managing your open windows.
57
Window Manager allows you to easily resize windows by tapping and dragging
on the circles on each corner of the window. It also allows you to easily position
a window by tapping and dragging the window. If you want to move the
Page 62

Window Manager 58
English
123
1
2
3
4
6
4
56
78
9
10
11
10
5
window from one screen to the other, you can tap, drag and then flick the
window.
No. Item Description
1 Stretch the active window over both screens.
2 Move the active window to the upper screen.
3 Move the active window to the lower screen.
4 Minimize Minimize the active window
5 Maximize Maximize the active window.
6 Close active window Closes the active window.
Note: This icon will close the active window. Use
the icons numbered 10 to close Window
Manager.
Page 63

English
59
No. Item Description
7 Moves the active window to the left-hand side
8 Moves the active window to the right-hand side
9 Window List Opens the Window List. Tap this icon to view
10 Close Window
Manager
11 Tap and drag the corners to expand the active
of the screen.
of the screen.
thumbnails of the open windows.
You can flip through the thumbnails; tap a
thumbnail to jump to the window.
Closes Window Manager.
Note: There are two icons that have the same
function. Use either icon to close Window
Manager.
window.
Page 64

Window Manager 60
English
Closing Window Manager
Important: To close Window Manager, tap the icons numbered 10
above.
Page 65

English
61
Adjusting display settings
It is important to have the correct display settings on your computer, otherwise
it may not work properly. If you connect an external display, the external
should always be set as the Primary Display.
Note: The <F5> key will change to when you press the
<Fn> key.
Important: The display settings should be adjusted using <Fn> +
< > or the Intel Graphics and Media Control Panel only.
If you have an external display device attached to the HDMI port or VGA port,
you can switch the upper display screen to the external device by pressing <Fn>
+ < > from Virtual Keyboard. If you have more than one device attached,
press the hotkey combination until it activates the desired device.
Using the Intel Graphics and Media Control Panel
To open the Intel Graphics and Media Control Panel, right-click on the icon
in the System Tray and select Graphics Properties... to open the Intel Graphics
and Media Control Panel.
Page 66

Adjusting display settings 62
English
Select Multiple Displays from the menu on the left and select the Second
Display.
In the General Settings window you will need to set the display as follows.
• Display: Built-in Display 2
• Resolution: 1366 x 768
• Color Depth: 32 Bit
• Refresh Rate: 60 Hz
• Rotation: Rotate to 180 Degrees
• Scaling: Scale Full Screen
 Loading...