


UL6500/RL350/LU-U500/SL550/FL-440/
F1P1702/UL5530/RL153/LU-U400/
SL450/FL-423/F1P1706/UL5510/RL150/
LU-U300/SL350/FL-420/F1P1710/
UL6300W/RL320/LU-W500/SL530/
FL-340/FWX1703/UL5330W/RL123/
LU-W400/SL430/FL-323/FWX1707/
UL5310W/RL120/LU-W300/SL330/
FL-320/FWX1711/UL6200/RL310/
LU-X500/SL510/FL-140/FNX1704/
UL5230/RL113/LU-X400/SL410/FL-123/
FNX1708/UL5210/RL110/LU-X300/
SL310/FL-120/FNX1712 Series
Laser Projector
User's Guide

Safety instructions
Read all of these instructions before you operate your projector and save for future
reference.
1. Read instructions
All the safety and operating instructions should be read before the appliance is
operated.
2. Notes and warnings
All notes and warnings in the operating instructions should be adhered to.
3. Cleaning
Unplug the projector from the wall socket before cleaning. Use a damp cloth for
cleaning the projector housing. Do not use liquid or aerosol cleaners.
4. Accessories
Do not place this product on an unstable cart, stand, or table. The product may fall,
causing serious damage to the product.
Keep the plastic packing materials (from the projector, accessories and optional
parts) out of the reach of children as these bags may result in death by suffocation.
Be particularly careful around the small children.
5. Ventilation
The projector is equipped with ventilation holes (intake) and ventilation holes
(exhaust).
Do not block or place anything near these slots, or internal heat build-up may
occur, causing picture degradation or damage to the projector.
6. Power sources
Check that the operating voltage of your unit is identical with the voltage of your
local power supply.
7. Servicing
Do not attempt to service this projector yourself. Refer all servicing to qualified
service personnel.
8. Replacement parts
When replacement parts are required, be sure that the replacement parts are
specified by the manufacture. Unauthorized substitutions may result in fire, electric
shock or other hazards.
9. Moisture Condensation
Never operate this projector immediately after moving it from a cold location to a
warm one. When the projector is exposed to such a change in temperature,
moisture may condense on the lens and the crucial internal parts. To prevent the
unit from possible damage, do not use the projector.
WARNING:
This is a Class A product. In a domestic environment this product may cause radio
interference in which case the user may be required to take adequate measures.
1

Table of Contents
2
Introduction ........................................................................................... 3
Projector feature .................................................................................................................................... 3
Package contents .................................................................................................................................. 4
Product overview ................................................................................................................................... 5
Getting Started ...................................................................................... 9
Connecting the Projector ....................................................................................................................... 9
Powering on/off the projector ............................................................................................................... 10
Adjusting the Projected Image ............................................................................................................. 11
User Controls ...................................................................................... 14
On-screen display menus .................................................................................................................... 14
Menu items .......................................................................................................................................... 15
Setting up the Projector Network Environment .................................................................................... 33
Controlling the Projector via LAN ......................................................................................................... 34
Controlling the Projector Using Crestron RoomView® ........................................................................ 37
Maintenance ........................................................................................ 42
Cleaning the projection window ........................................................................................................... 42
Cleaning the projector housing ............................................................................................................ 42
Specifications ....................................................................................................................................... 43
Dimensions .......................................................................................................................................... 45
Ceiling mount installation ..................................................................................................................... 45
Appendices.......................................................................................... 46
LED indicator messages ...................................................................................................................... 46
Compatibility Chart ............................................................................................................................... 48
Troubleshooting ................................................................................................................................... 49
RS-232C Specifications and Commands............................................................................................. 52

Introduction
Projector feature
The projector offers the following features:
• UL6500/RL350/LU-U500/SL550/FL-440/F1P1702/UL5530/RL153/LU-U400/
SL450/FL-423/F1P1706/UL5510/RL150/LU-U300/SL350/FL-420/F1P1710 series:
Native1920 x 1080 1080p resolution
• UL6300W/RL320/LU-W500/SL530/FL-340/FWX1703/UL5330W/RL123/LU-W400/
SL430/FL-323/FWX1707/UL5310W/RL120/LU-W300/SL330/FL-320/FWX1711
series: Native 1280 x 800 WXGA resolution
• UL6200/RL310/LU-X500/SL510/FL-140/FNX1704/UL5230/RL113/LU-X400/SL410/
FL-123/FNX1708/UL5210/RL110/LU-X300/SL310/FL-120/FNX1712 series: Native
1024 x 768 XGA resolution
• Laser-phosphor light source free from replacement
• Ultra-short throw (UST) projection lens delivers large images from a short projection
distance
• HDMI x 2 inputs
• H./V. Keystone for easy horizontal and vertical keystone correction
• 4 Corner Correction allows you to adjust four corners of the projected image
• Blu-Ray 3D function supported
• 3D Color Management allowing color adjustments to your liking
• Screen Color correction allowing projection on surfaces of several predefined colors
• Network settings allowing for controlling the Projector via LAN
Note
• The information in this manual is subject to change without notices.
• The reproduction, transfer or copy of all or any part of this document is not permitted
without express written consent.
3
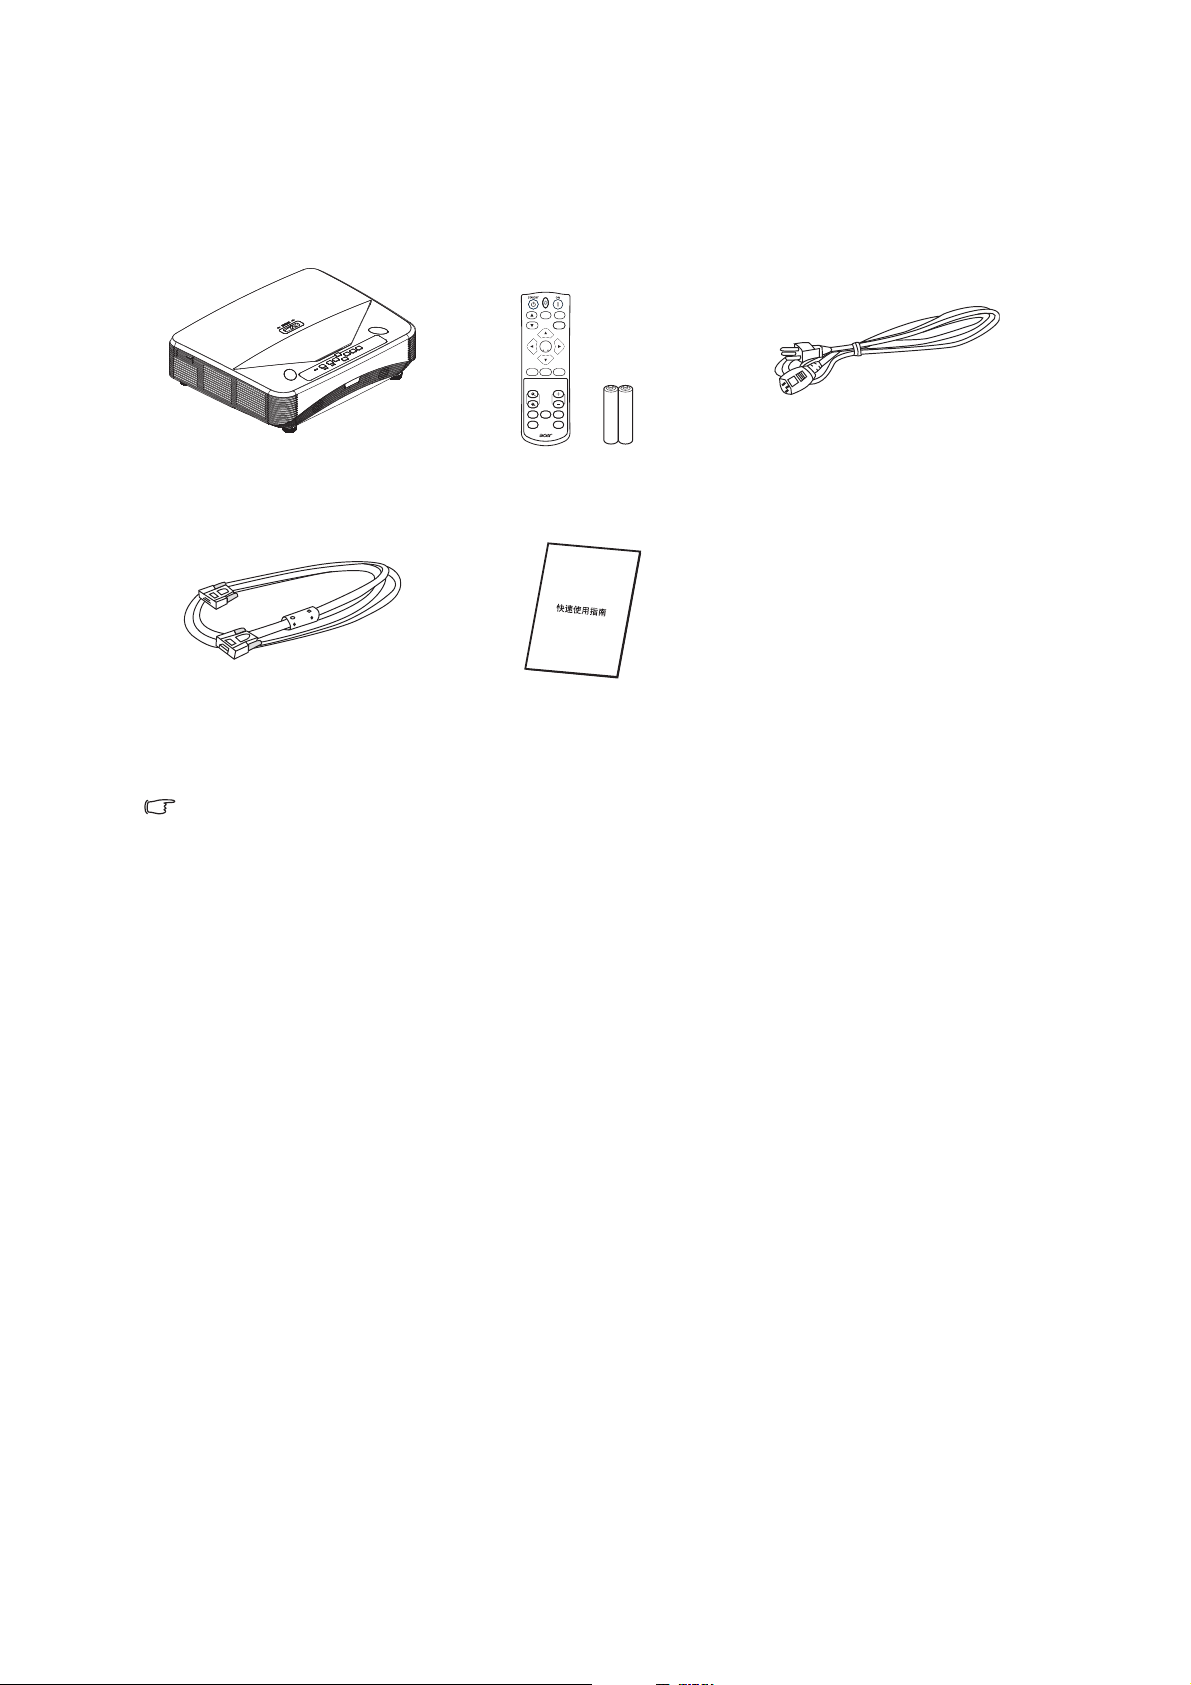
Package contents
When you unpack the projector, make sure you have all these components:
RESYNC RATIO
SOURCE
MENU
ENTER
KEYSTONE
MODE
BACK
ZOOM VOL
FREEZE HIDE
ECO
FUNCTION 3D
Projector
Remote control (IR) &
batteries (AAA *2 PCS)
AC power cord
VGA cable (D-SUB to D-SUB) Quick start guide
Note
• Contact you dealer immediately if any items are missing, appear damaged, or if the unit
does not work
• For maximum protection of the product, please save the original shipping carton and
packing materials and repack your product as it was originally packed at the factory if
you need to ship it.
.
4
Product overview
1
2
3
4
5
1
1
2
4
4
3
3
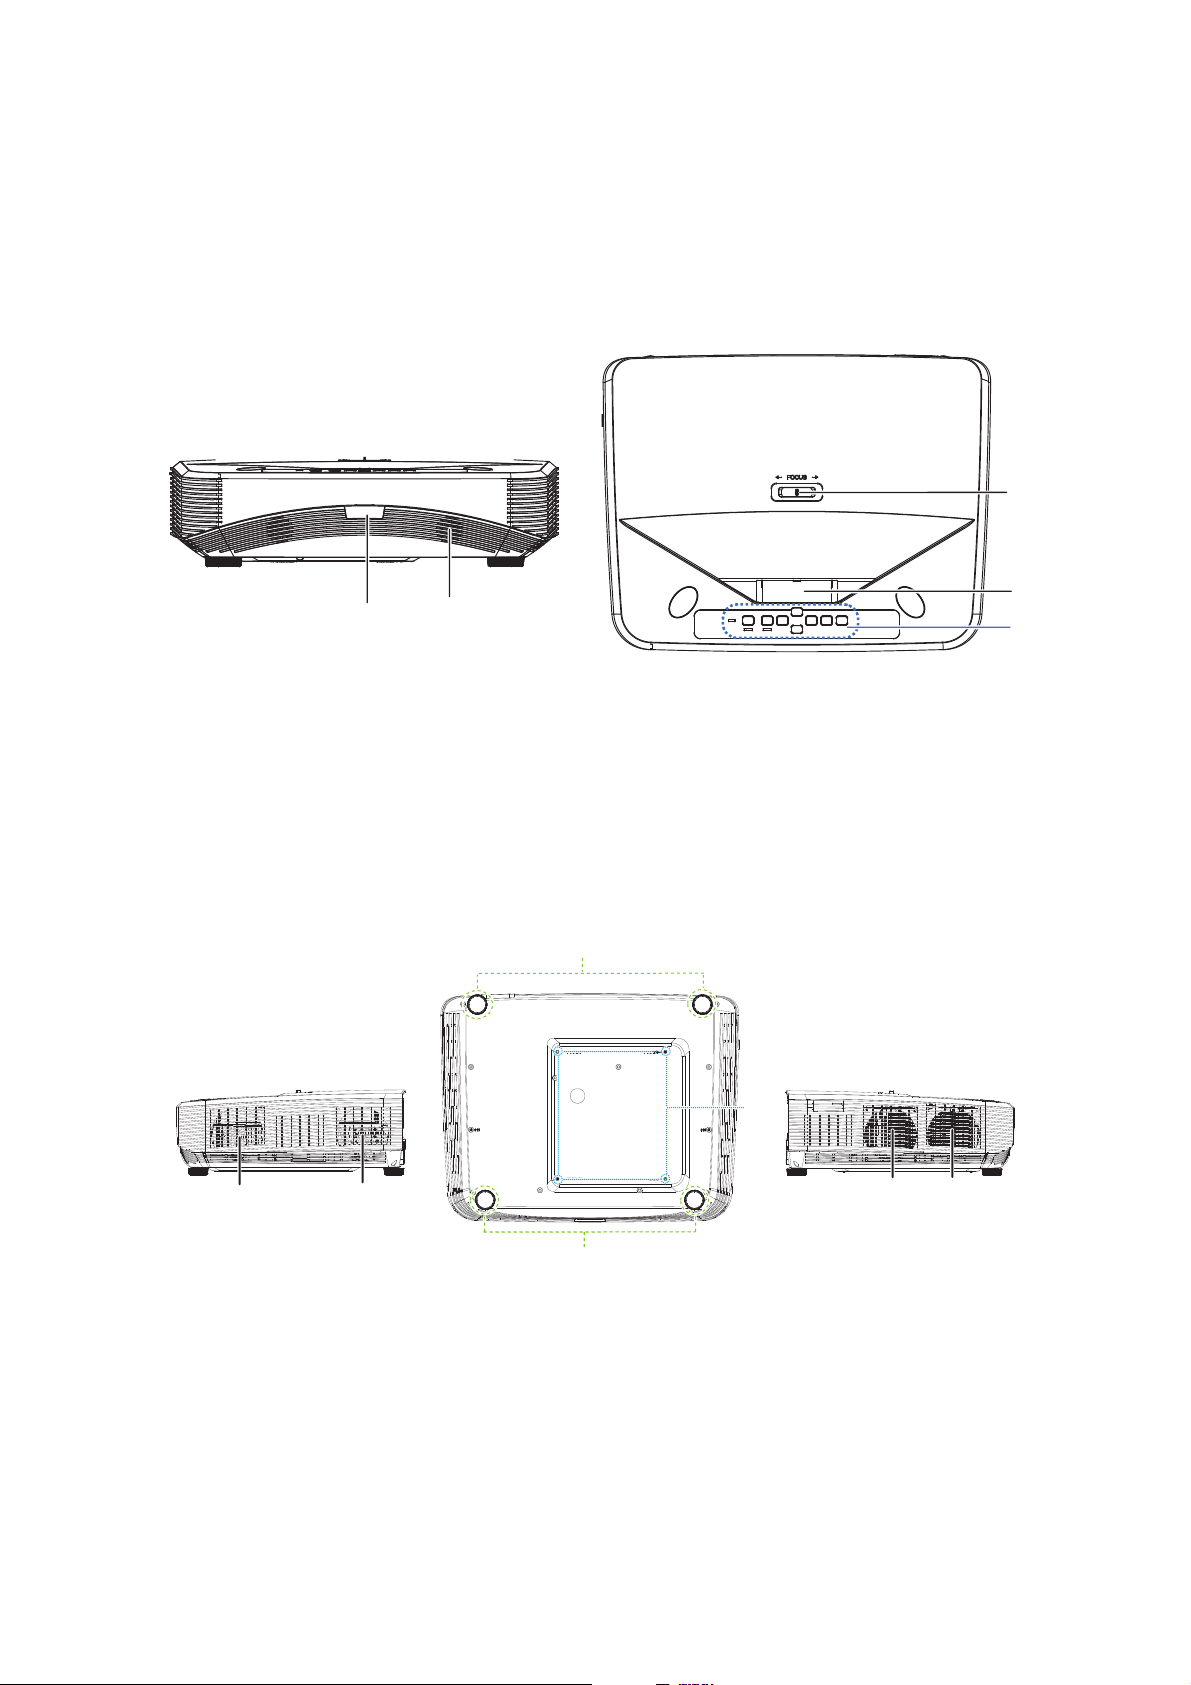
Projector outlook
Front and top
1. Focus switch 2. Projection window
3. Control pane 4. IR remote control sensor
5. Speaker
Bottom and side
1. Adjuster feet 2. Ceiling mount holes
3. Ventilation holes (airflow out) 4. Ventilation holes (airflow in)
5
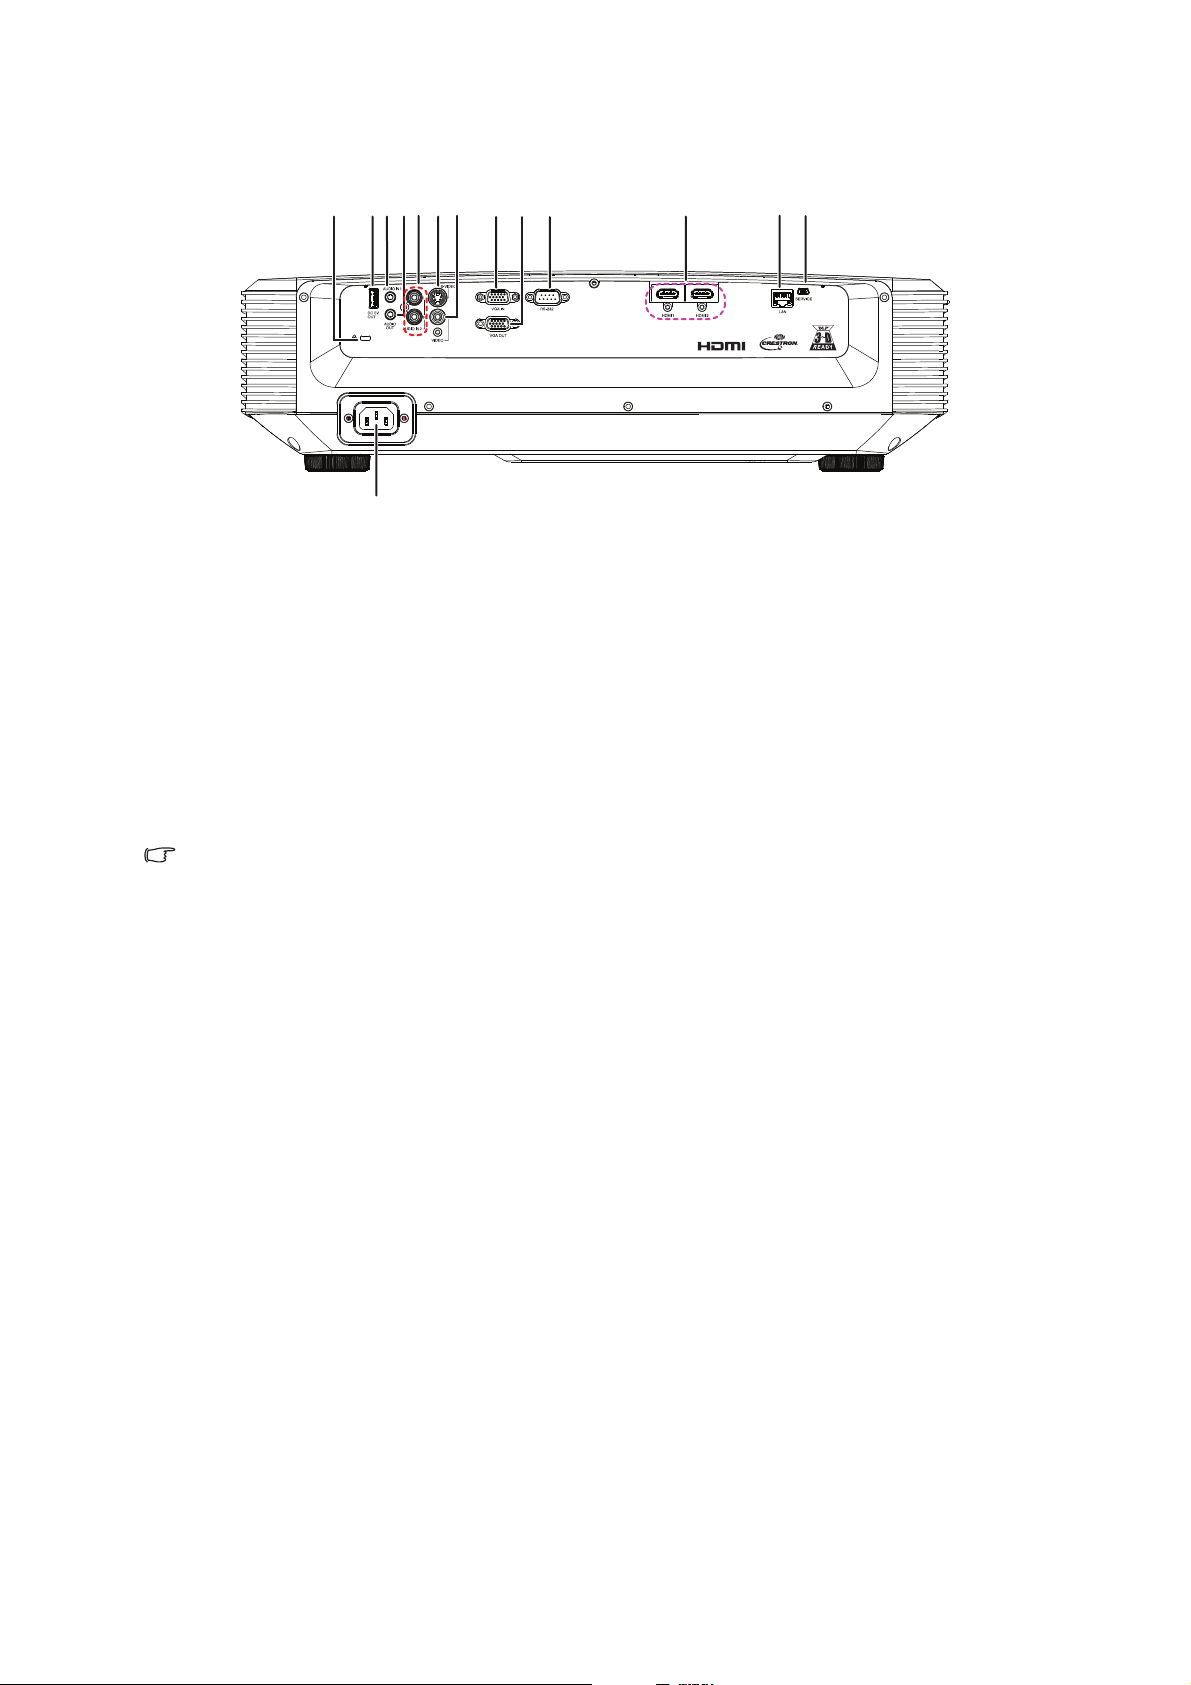
Rear
V
1234
5
6
7
8910
11
12
13
14
1. Kensington anti-theft lock slot 2. 5V output for power charging
3. Audio input jack 4. Audio output jack
5. Audio (L/R) input jack 6. S-Video input jack
7. Video input jack 8. RGB (PC)/Component video (YPbPr)
signal input jack
9. RGB signal output jack 10. RS232 control port
11. HDMI input jack
13. SERVICE jack
12. RJ45 LAN input jack
14. AC power cord inlet
Note
• This projector can be used with a ceiling mount for support. The ceiling mount is not
included in the package.
• Contact your dealer for information to mount the projector on a ceiling.
6
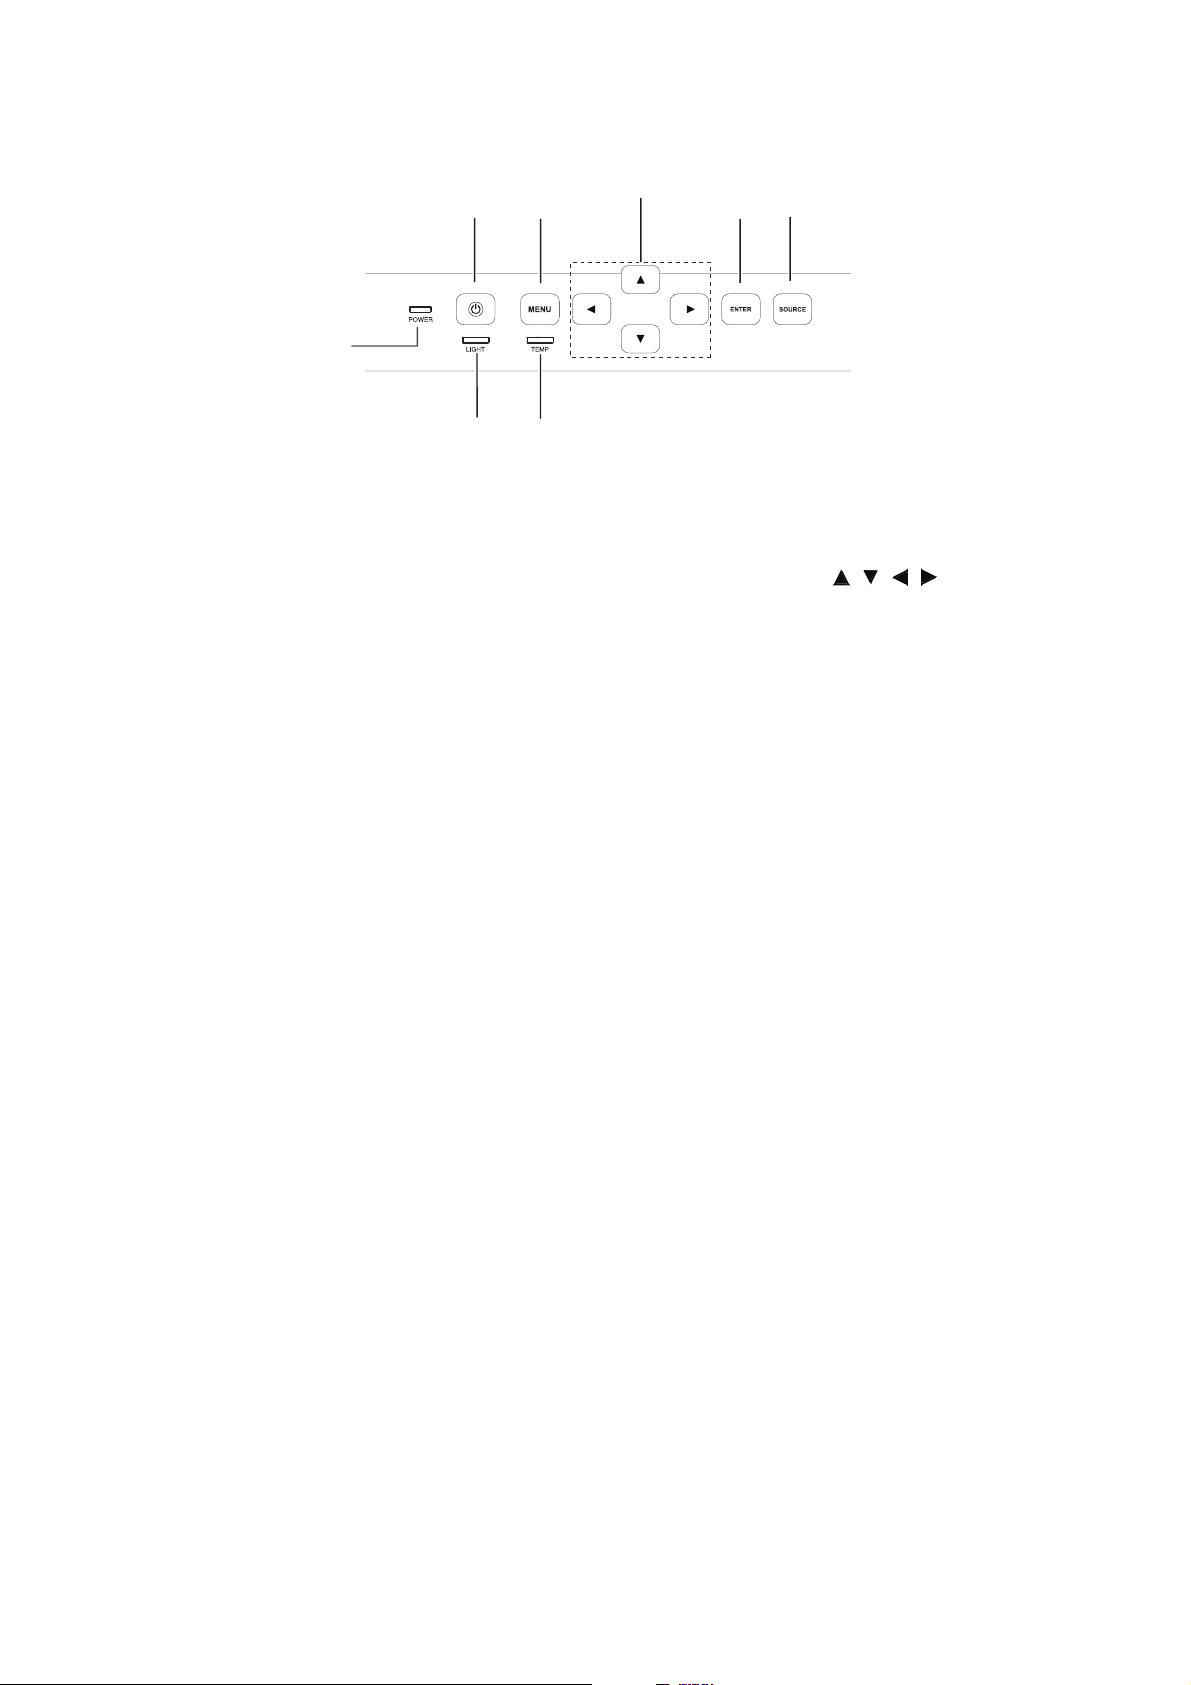
Control panel
2
1
8
3
7
4
6
5
1. Power LED indicator 2. Power button
3. Menu button
4. Adjustment buttons ( / / / )
5. Enter button 6. Source button
7. Temperature LED indicator 8. Light LED indicator
7

Remote control
1
1. ON button
For turning the power on.
3. SOURCE buttons
For switching Input mode.
5. MODE button
2
3
4
5
6
7
8
9
RESYNC RATIO
SOURCE
ENTER
KEYSTONE
MODE
ZOOM VOL
ECO
FREEZE HIDE
FUNCTION 3D
MENU
BACK
10
11
12
13
14
15
16
17
18
2. STANDBY button
For putting the projector into the
Standby mode.
4. Adjustment buttons ( ///)
For selecting and adjusting menu
items.
6. KEYSTONE button
For selecting the appropriate
picture.
7. ZOOM buttons
For enlarging/reducing part of the
image.
9. FUNCTION button
For operating and executing a
function assigned to "FUNCTION
Button".
11. MENU button
For displaying adjustment and
setting screens.
13. ENTER button
For setting items selected or
adjusted on the menu.
15. VOL +/- (Volume) buttons
For adjusting the speaker sound
level.
17. 3D button
For displaying the 3D mode menu
screen.
For entering the Keystone Correction
mode.
8. ECO button
For lowering the noise of the cooling
fan.
10. RATIO button
For switching the picture size
(NORMAL, 16:9, etc.).
12. RESYNC button
For automatically adjusting images
when connected to a computer.
14. BACK button
For returning to the previous menu
screen during menu operation.
16. HIDE button
For temporarily displaying a black
screen and turning off the sound.
18. FREEZE button
For freezing images.
8
Getting Started
V
HDTV adapter
1
2
3
3
4
5
6
7
8 9 9
10
8
11
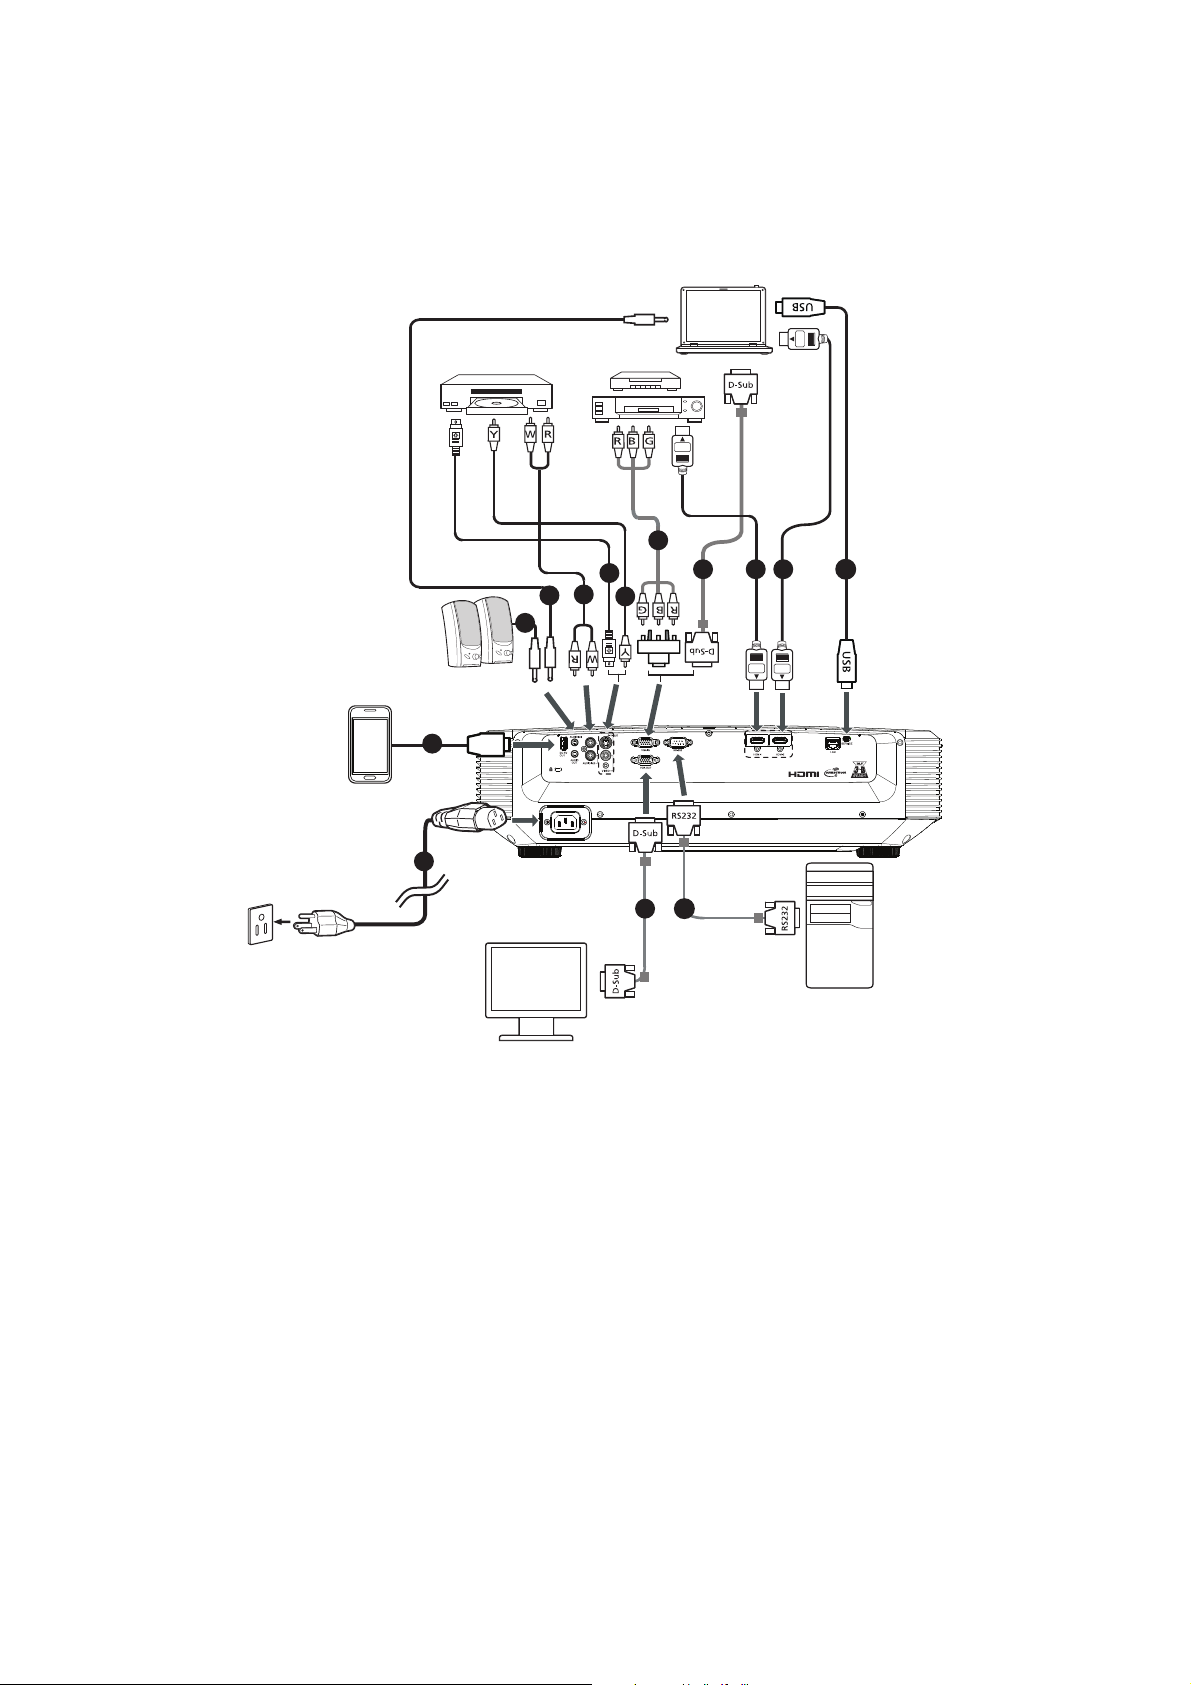
Connecting the Projector
1. Power cord
2. USB cable for charging device
3. 3.5mm Audio cable 4. Audio cable jack/RCA
5. S-Video cable
7. Component Video to VGA (DSub)
adapter cable
9. HDMI cable 10. USB cable
6. Composite video cable
8. VGA cable
11. RS232 cable
9

Powering on/off the projector
Powering on the projector:
Note that the connections to external equipment and power outlet should be done
before performing the operations written below.
Press Power on the projector or ON on the remote control.
• The power indicator illuminates green.
Warning
• Never look into the lens when the light is on. This can damage your eyes.
• This focal point concentrates high temperature. Do not place any object near it to avoid
possible fire hazard.
Powering off the projector:
Press Power on the projector or STANDBY on the remote control, then press
that button again while the confirmation message is displayed, to put the
projector into Standby mode.
• The projector cannot be turned on while cooling.
10
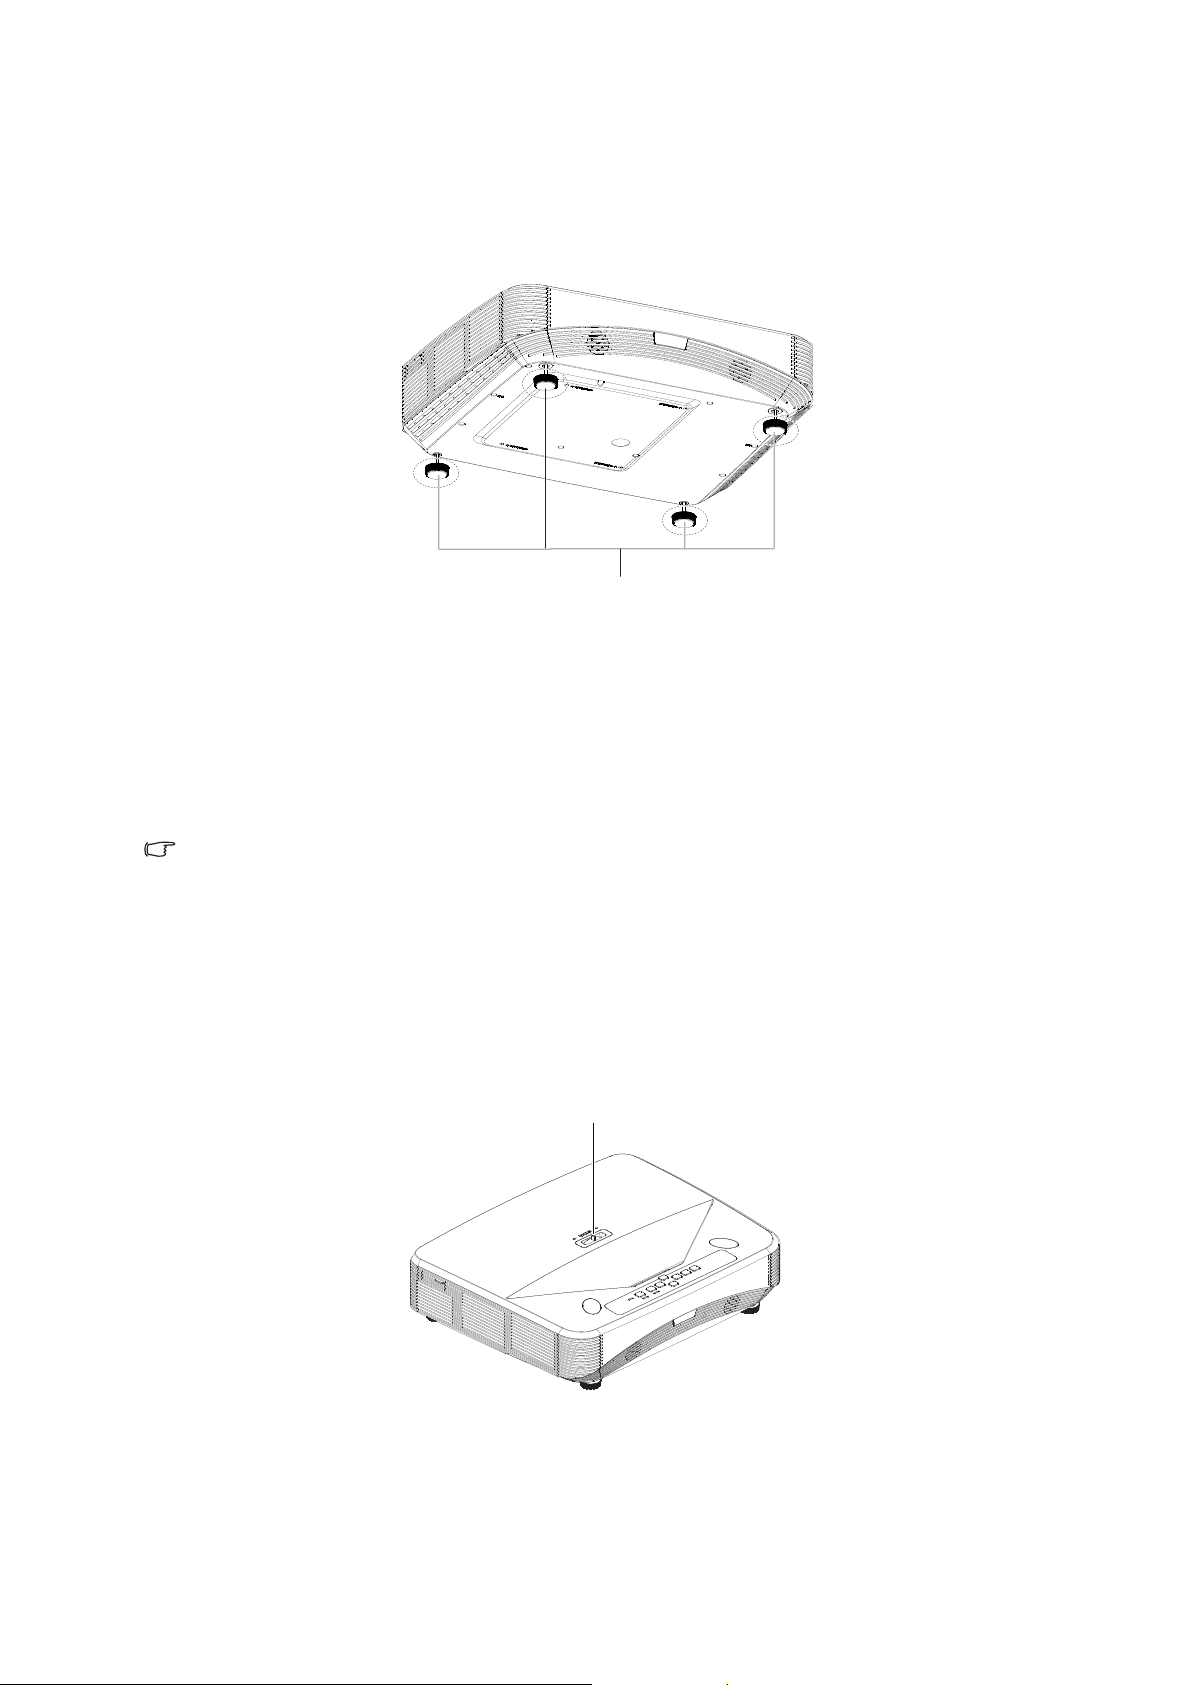
Adjusting the Projected Image
Adjuster feet
Focus ring
Adjusting the Height of Projected Image
The height of the projector can be adjusted using the adjuster feet.
When the screen is above the projector, the projection image can be made higher by
adjusting the projector.
1. Lift the projector to adjust its height.
2. Remove your hands from the adjuster feet of the projector after its height has been
finely adjusted.
Note
• When adjusting the height of the projector, trapezoidal distortion occurs. Follow the
procedures in Keystone Correction to correct
tthe distortion.
Adjusting the Focus
You can adjust the focus with the focus ring on the projector.
Rotate the focus ring to adjust the focus while watching the projected image.
11
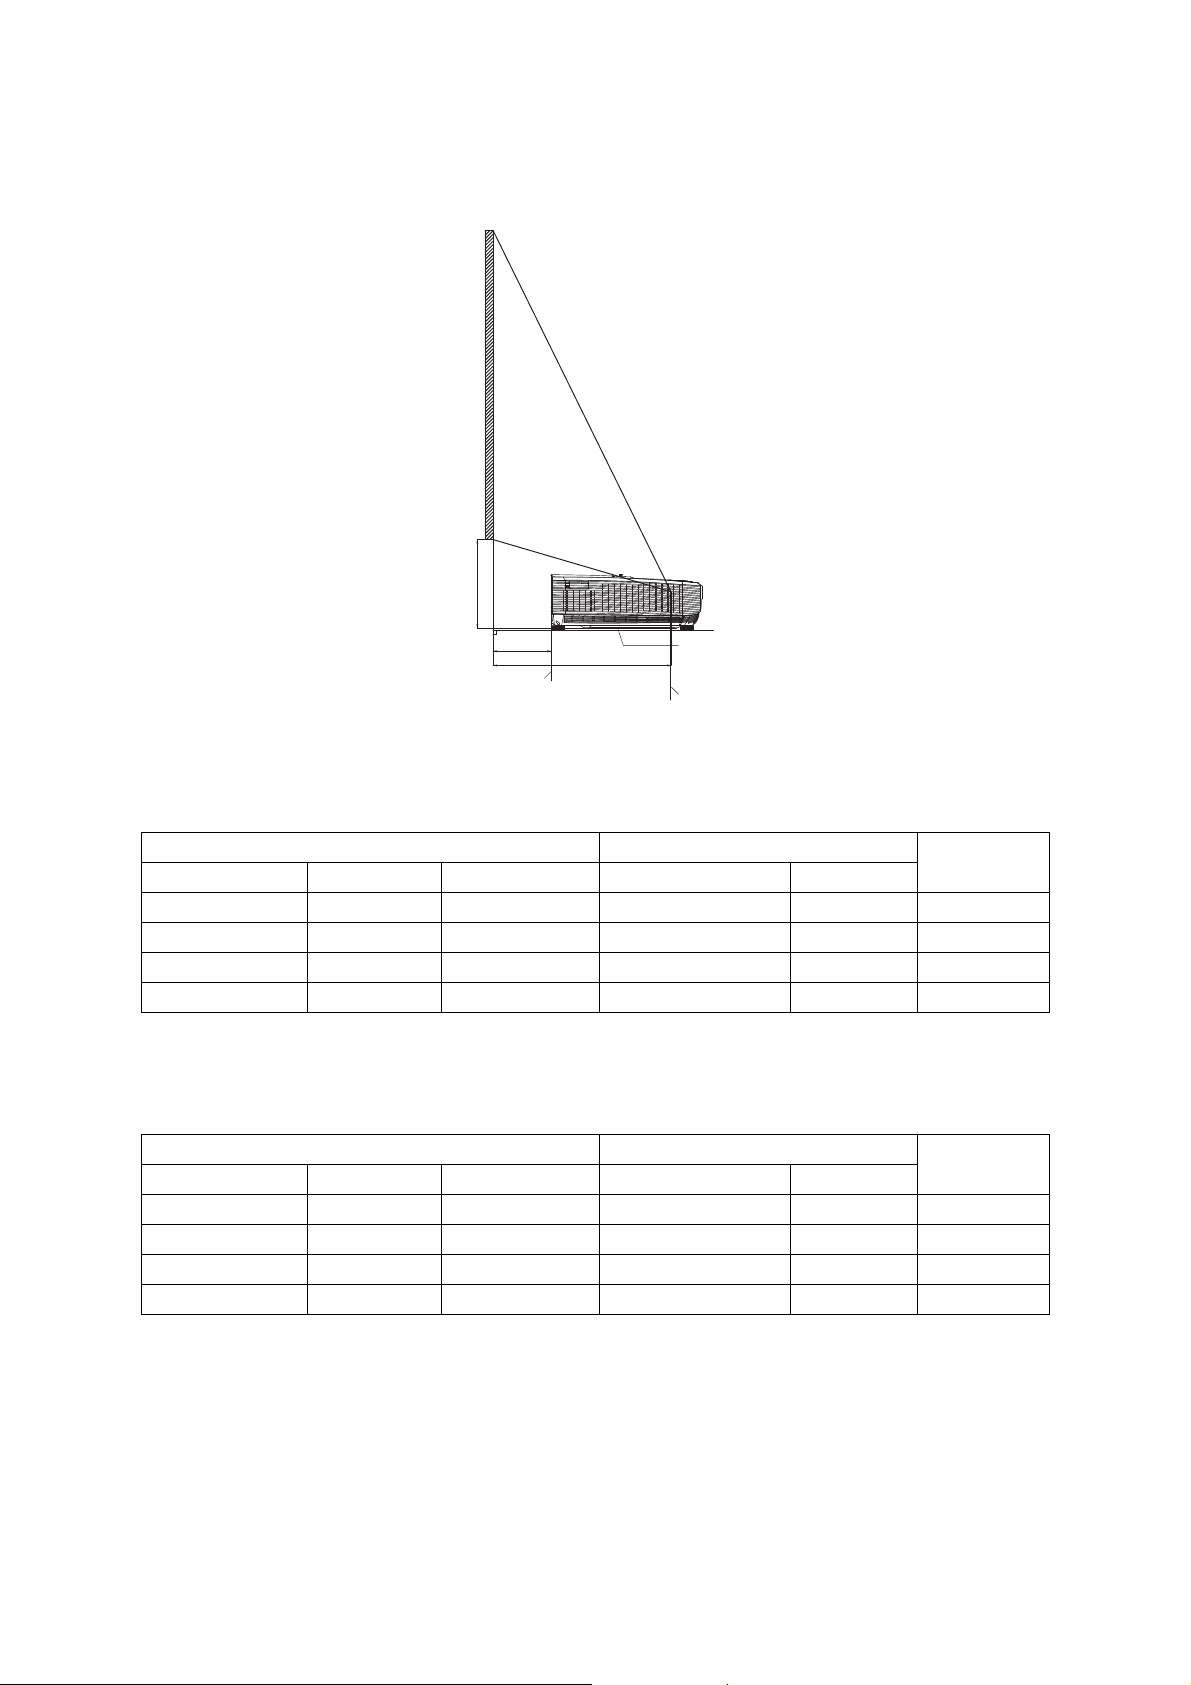
Screen Size and Projection Distance
H
L1
L2
Screen side of
projector
Projector bottom
Center of projection window
• UL6500/RL350/LU-U500/SL550/FL-440/F1P1702/UL5530/RL153/LU-U400/SL450/
FL-423/F1P1706/UL5510/RL150/LU-U300/SL350/FL-420/F1P1710
16:9 Signal Input (Normal Mode)
Picture (Screen) size Projection distance [L]
Diag. [x] Width Height L1 L2
150" (381 cm) 332.1 cm 186.8 cm 44.8 cm 75.8 cm 44.5 cm
120" (305 cm) 265.7 cm 149.4 cm 28.8 cm 59.8 cm 37.5 cm
100" (254 cm) 221.4 cm 124.5 cm 18.2 cm 49.2 cm 32.9 cm
80" (203 cm) 177.1 cm 99.6 cm 7.5 cm 38.5 cm 28.2 cm
H
• UL6300W/RL320/LU-W500/SL530/FL-340/FWX1703/UL5330W/RL123/LU-W400/
SL430/FL-323/FWX1707/UL5310W/RL120/LU-W300/SL330/FL-320/FWX1711
16:10 Signal Input (Normal Mode)
Picture (Screen) size Projection distance [L]
Diag. [x] Width Height L1 L2
150" (381 cm) 323.1 cm 201.9 cm 46.6 cm 77.6 cm 39.8 cm
120" (305 cm) 258.5 cm 161.5 cm 30.2 cm 61.2 cm 33.7 cm
100" (254 cm) 215.4 cm 134.6 cm 19.4 cm 50.4 cm 29.7 cm
80" (203 cm) 172.3 cm 107.7 cm 8.5 cm 39.5 cm 25.7 cm
H
12

• UL6200/RL310/LU-X500/SL510/FL-140/FNX1704/UL5230/RL113/LU-X400/SL410/
FL-123/FNX1708/UL5210/RL110/LU-X300/SL310/FL-120/FNX1712
4:3 Signal Input (Normal Mode)
Picture (Screen) size Projection distance [L]
Diag. [x] Width Height L1 L2
125" (318 cm) 254.0 cm 190.5 cm 45.1 cm 76.1 cm 43.2 cm
100" (254 cm) 203.2 cm 152.4 cm 29.1 cm 60.1 cm 36.5 cm
80" (203 cm) 162.6 cm 121.9 cm 16.3 cm 47.3 cm 31.1 cm
65" (165 cm) 132.1 cm 99.1 cm 6.7 cm 37.7 cm 27.0 cm
H
x : Picture size (diag.) (in/cm)
L1: Projection distance from the screen side of the projector to the screen(cm)
L2: Projection distance from the center of the projection window to the screen (cm)
H: Distance from the projector bottom to the bottom of the image (cm)
13
User Controls
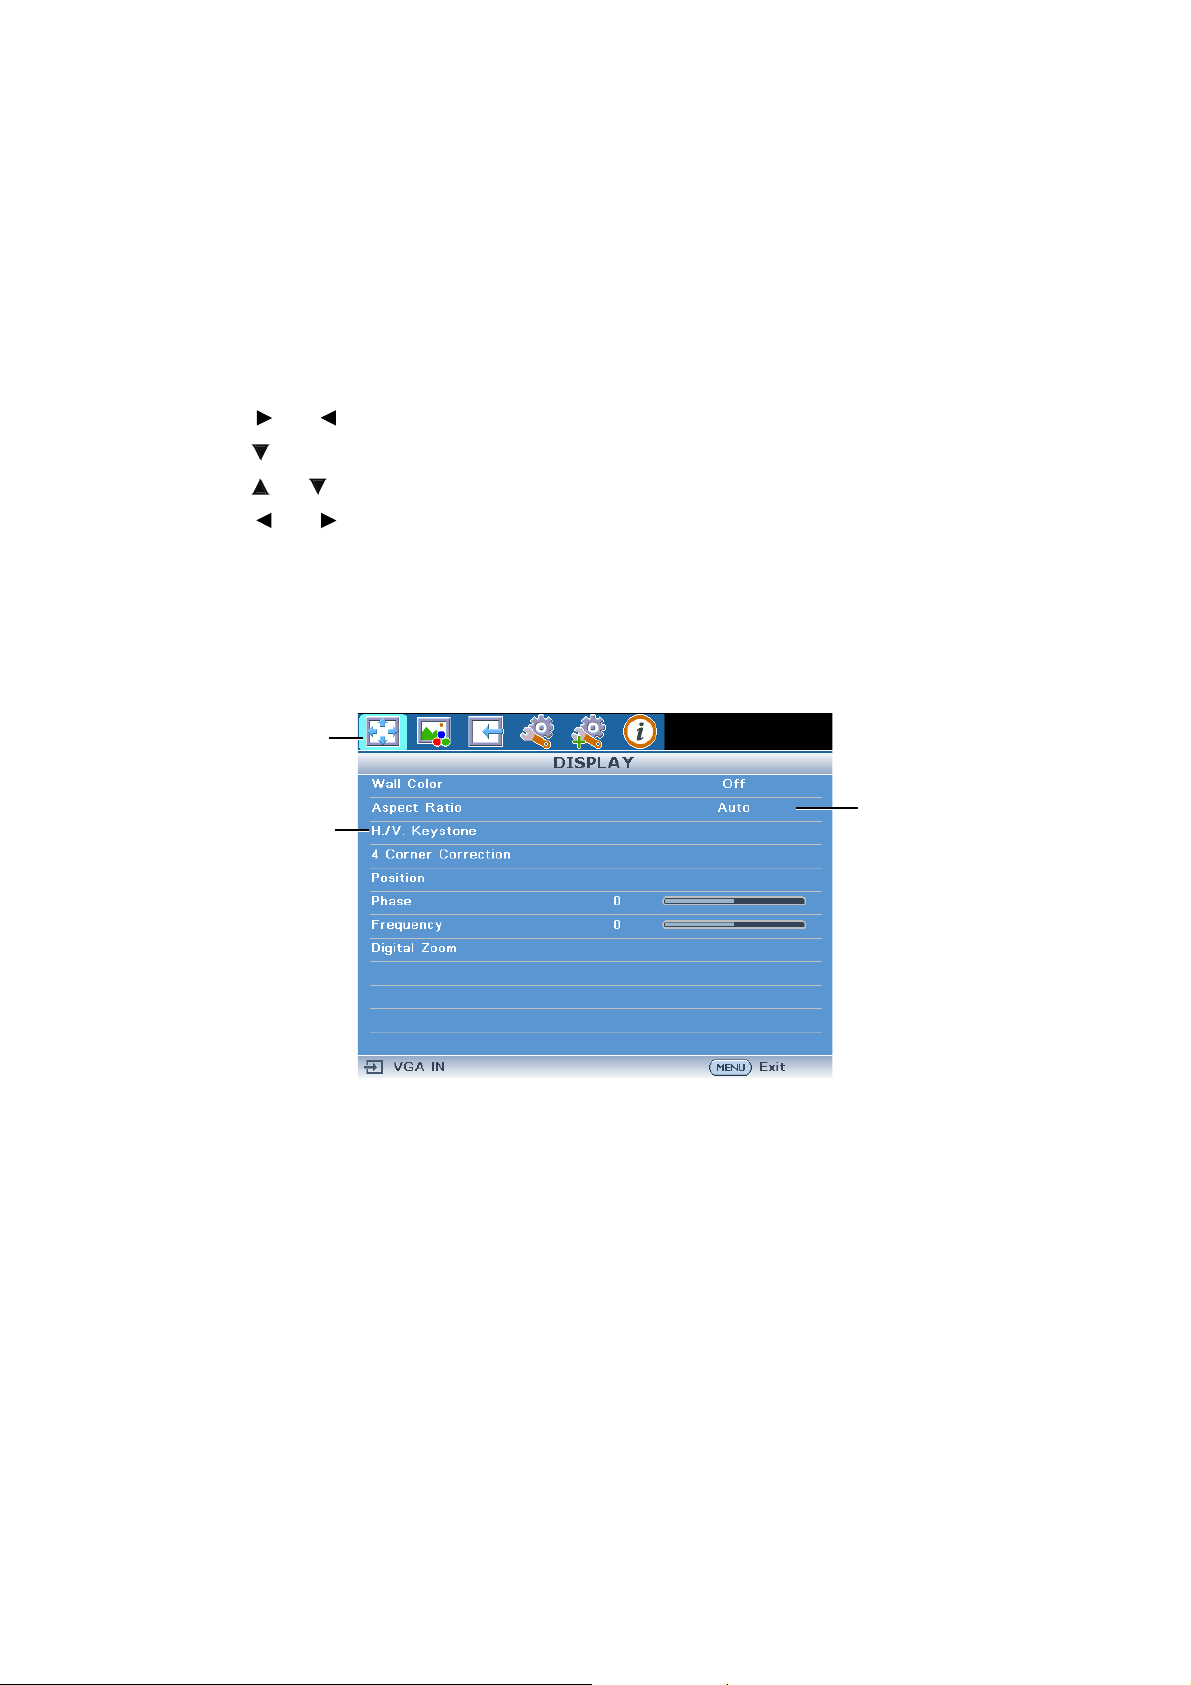
On-screen display menus
The projector has multilingual on-screen display menus that allow you to make image
adjustments and change a variety of settings.
How to operate
1. Press MENU to display the OSD menu.
2. Press or and select main menu item.
3. Press to enter sub menu.
4. Press or to select the item.
5. Press or to select the desired item or adjust the settings.
6. Press MENU, the screen will return to the main menu or go back to the upper level
of the menu.
7. Press MENU to leave and save the settings.
Main menu
Sub menu
Settings
14
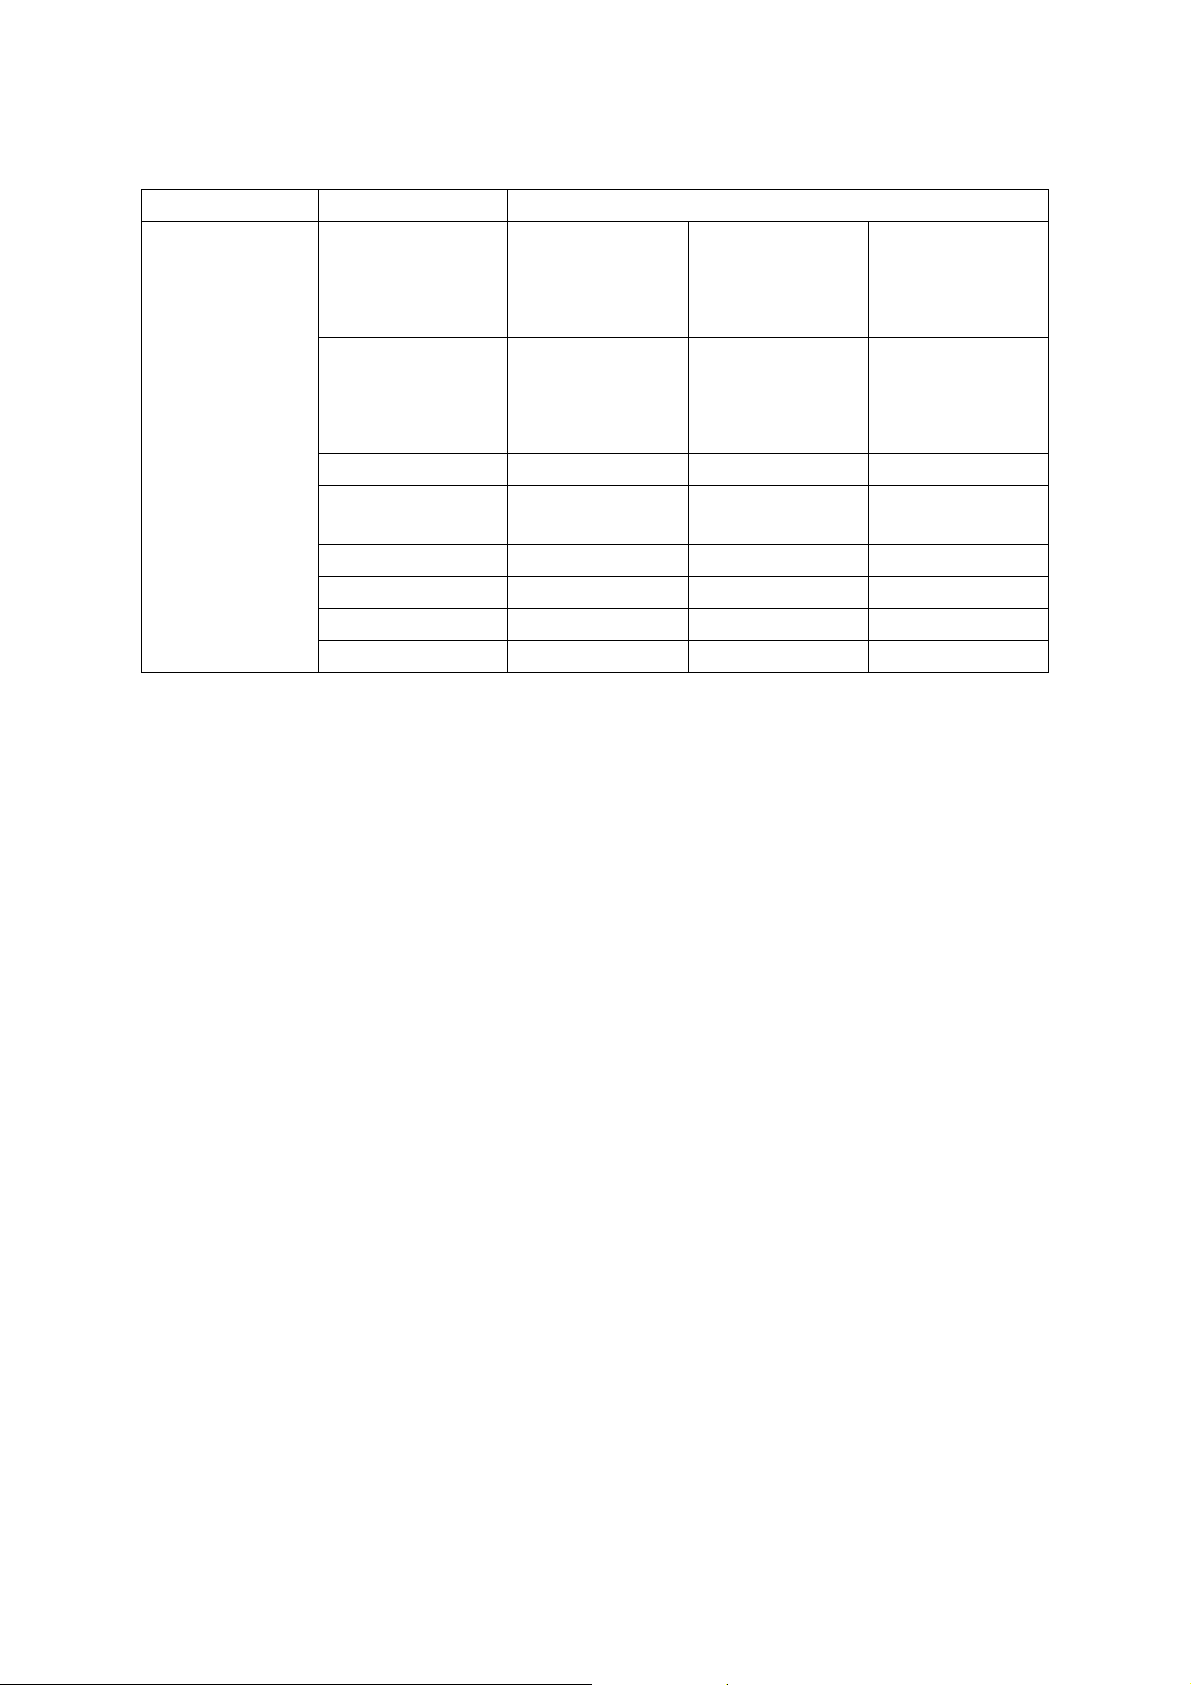
Menu items
Main Menu Sub Menu Settings
Off
Wall Color
Aspect Ratio
DISPLAY
H./V. Keystone
4 Corner
Correction
Position
Phase
Frequency
Digital Zoom
Blackboard
Green
Whiteboard
Auto
4 : 3
16 : 9
16 : 10
15
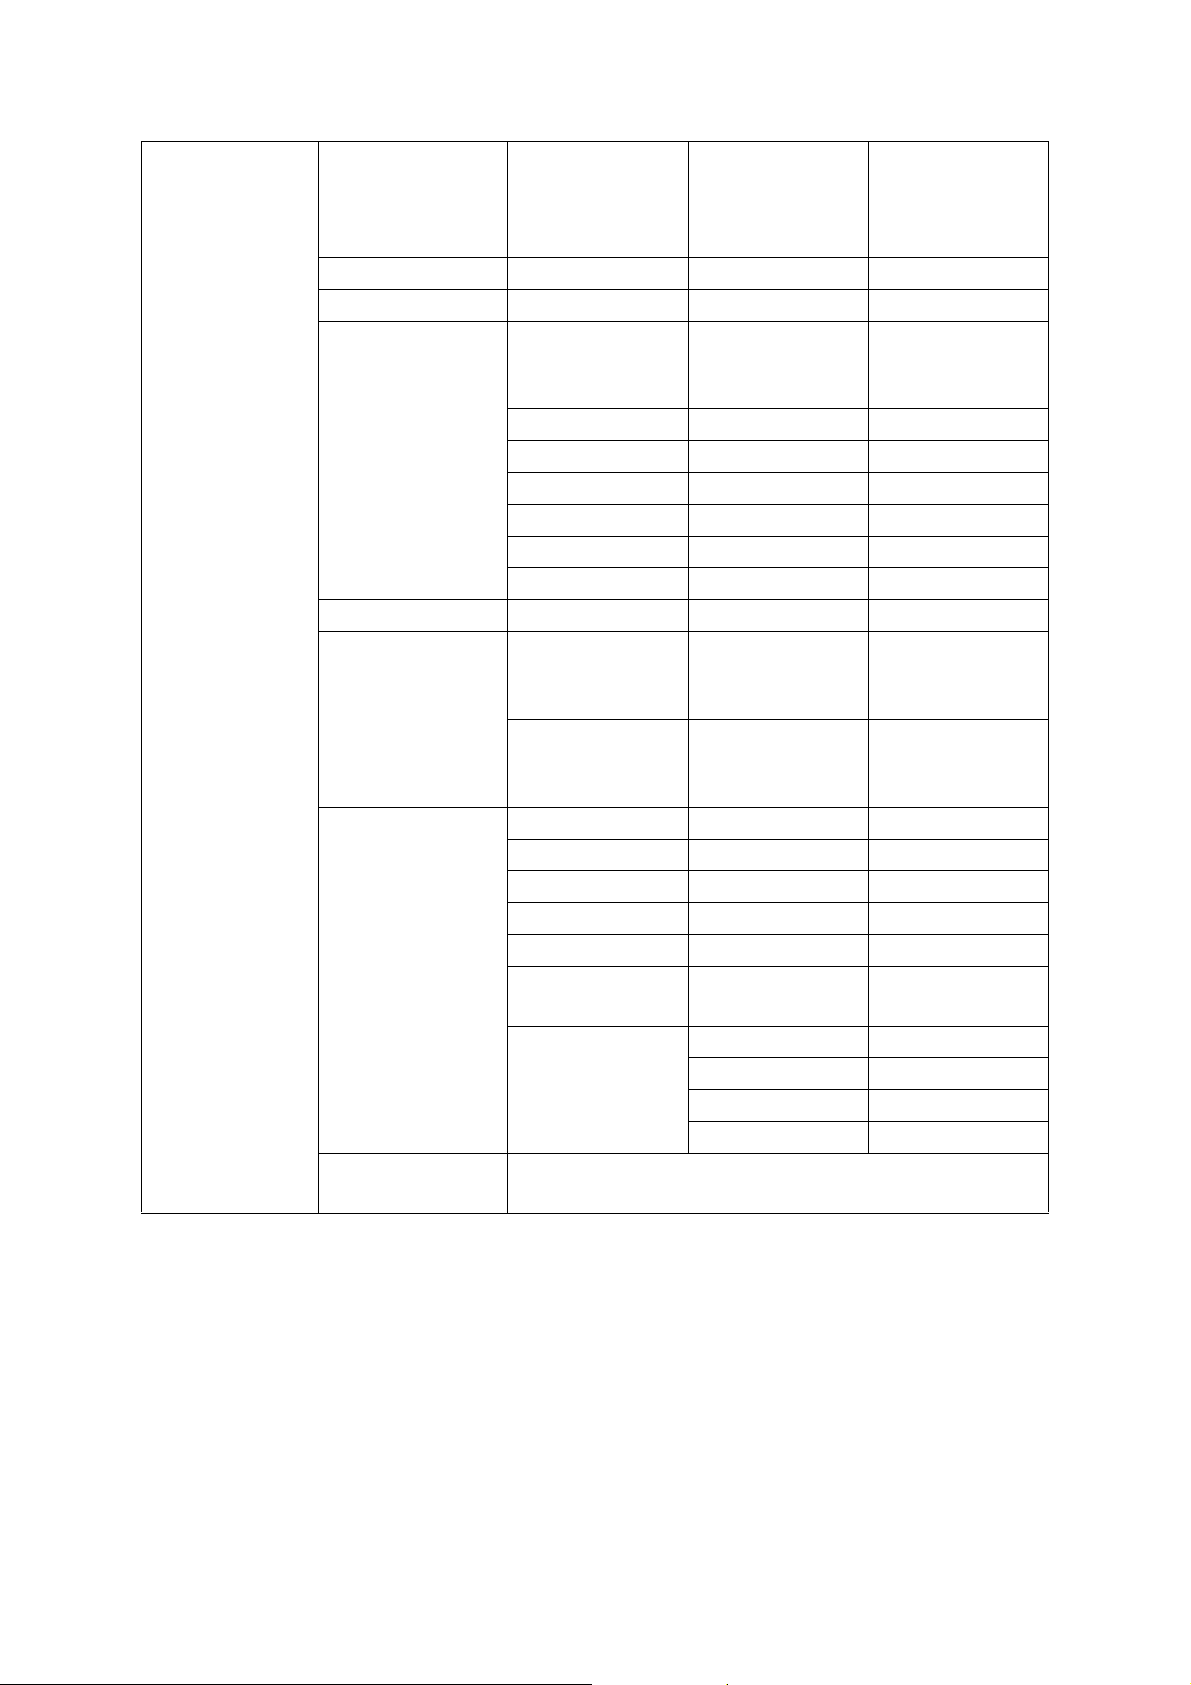
PICTURE
Picture Mode
Brightness
Contrast
Color
Temperature
Overscan
HDMI Settings
Advanced
Reset Picture
Setting
Standard
Presentation
Movie
Bright
Color
Temperature
R Gain
G Gain
B Gain
R Offset
G Offset
B Offset
Signal Type
HDMI Color
Range
Tint
Color
Sharpness
Gamma
BrilliantColor™
Noise
Reduction
3D Color
Management
Normal
Cool
Warm
Auto
RGB
YPbPr
Auto
Full Range
Limited Range
Primary color R/G/B/C/M/Y
Hue
Saturation
Value
16

SOURCE
Source Selection
3D
Manual
Auto
3D Mode
3D L/R Invert
Auto
Off
Top and Bottom
Frame
Sequential
Frame Packing
Side By Side
Disable
Invert
17

SYSTEM
SETUP : Basic
Language
Projection Mode
Menu Settings
Background
FUNCTION
Button
Advanced
English
Deutsch
Español
Nederlands
Français
Italiano
Svenska
Português
Русскоий
polski
Magyar
Türkçe
汉语
한국어
日本語
Front
Rear
Rear Ceiling
Ceiling
Menu display
time
Menu position
Logo
Black
Blue
Information
Projection
Mode
Brightness
Contrast
Test Pattern
Reminder
Message
5 sec
10 sec
15 sec
20 sec
25 sec
30 sec
Center
Upper Left
Upper Right
Lower Right
Lower Left
Off
On
Off
On
18

SYSTEM
SETUP :
Advanced
INFORMATION
High Altitude
Mode
Off
On
Volume
Audio Settings
Power On/Off
Volume
Closed Caption
Enable
Closed Caption
Caption Version
Light Source
Settings
Eco Mode
Light Source
Hours
Disable
Auto Power Off
10Min
20Min
30Min
Quick Cooling
Off
On
Standby Settings LAN Control
DHCP Client
IP Address
Network Settings
Subnet Mask
Default
Gateway
DNS Server
Security
Advanced
Settings
Keylock
All Reset
SOURCE
Picture Mode
Signal Info
Signal Type
Light Source Hours
IP Address
MAC Address
Firmware Version
Off
On
Off
On
CC1
CC2
CC3
CC4
Off
On
Off
On
Off
On
Change
password
Power on Lock
Off
On
Off
On
19

DISPLAY
Vertical Keystone Correction
(Adjustment with / )
Vertical Keystone Correction
(Adjustment with
/ )
Wall Color
This function allows you to project the image to a colored (white or dark green)
surface or wall without using a screen.
• Off£½The Wall Color function is not activated°£
• Blackboard£½Projects images onto a blackboard (dark green).
• Green£½Projects images onto a green wall.
• Whiteboard£½Projects images onto a whiteboard.
Aspect Ratio
Use this function to stretch the image
vertically or horizontally or when the edges of the image cannot be seen.
H./V. Keystone
For correcting an image designating the horizontal or vertical axes.
1. Press KEYSTONE on the remote control Select to
“H./V. Keystone” and then press Enter.
2. Press / to parallelize the left and right sides
of the projected image.
3. Press / to parallelize the upper and lower
sides of the projected image.
4. Press MENU to set the position.
20
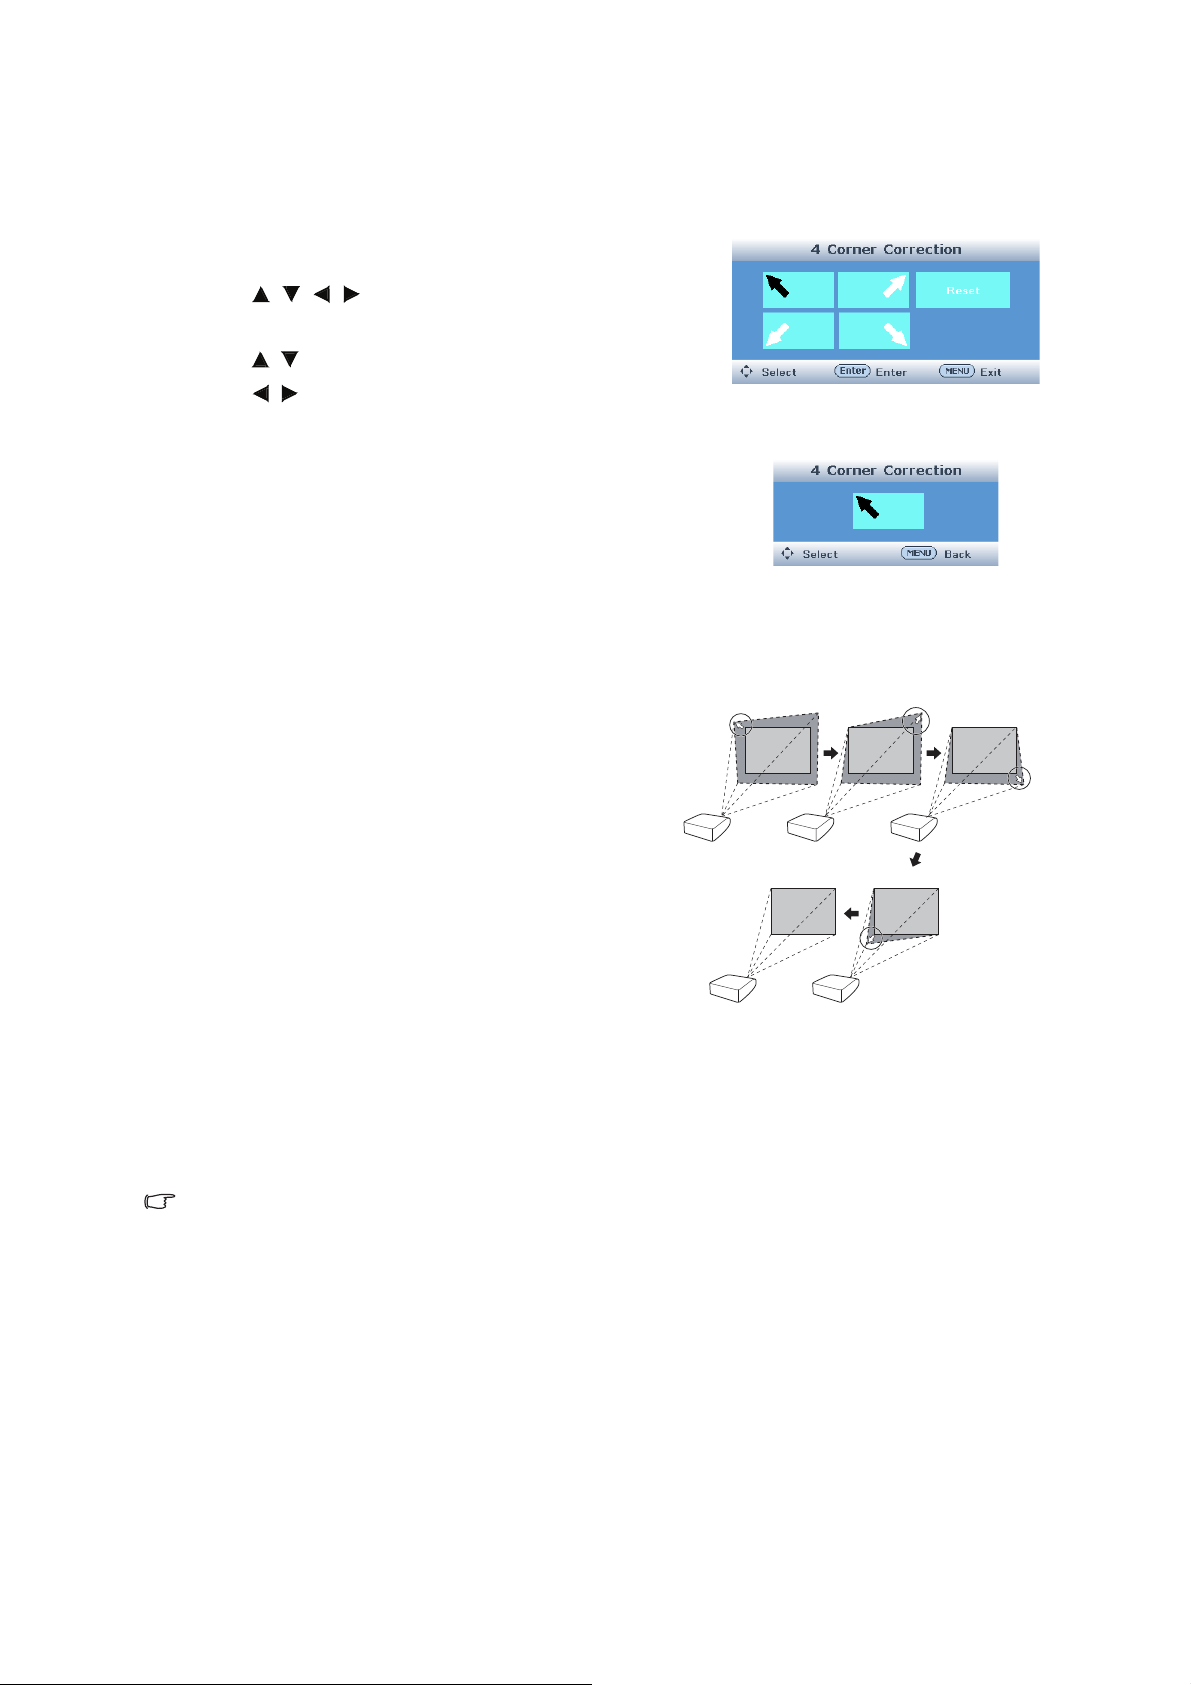
4 Corner Correction
4 Corner Correction
Upper Left Upper Right Lower Right
Lower Left
For correcting an image designating the corner of the projected image.
1. Press KEYSTONE on the remote control. Select
to “4 Corner Correction” and then press Enter.
2. Press /// to select one of the four corners
and then press ENTER.
3. Press / to adjust vertical position.
Press / to adjust horizontal position.
4. Press MENU to select other corners.
5. Repeat the same procedure with the posi-
tions for the corners.
• At this time, pressing BACK on the
projector or on the remote control returns
to the previous screen.
• Press MENU or BACK twice and the
display disappears.
Position
• Horizontal Centers the on-screen image by moving it to the left or right.
• Vertical Centers the on-screen image by moving it up or down.
Note
• The adjustable range of Position (Horizontal or Vertical) may vary
depending on the screen resolution of the computer.
Phase
Adjusts horizontal noise (similar to tracking on your VCR).
Frequency
Adjusts vertical noise.
21

Digital Zoom
MODE
KEYSTONE
BACK
ZOOM VOL
ECO
FREEZE HIDE
FUNCTION 3D
ZOOM buttons
Graphs, tables and other portions of projected images can be enlarged. This is helpful
when providing more detailed explanations.
1. Press ZOOM on the remote control.
• Enlarges the image.
• Pressing or ZOOM enlarges or
reduces the projected image.
2. Press BACK on the remote control to cancel
the operation.
• The magnification then returns to 1.0X.
22

PICTURE
Picture Mode
• Standard: For standard image
• Presentation: Brightens portions of image for more enhanced presentations.
• Movie: Gives natural tint to the projected image.
• Bright: Use in bright places.
Brightness
Press for less brightness, press for more brightness.
Contrast
Press for less contrast, press for more contrast.
Color Temperature
• Cool: For lower color temperature for warmer, reddish incandescent-like images.
• Normal: For normal color temperature.
• Warm: For higher color temperature for cooler, bluish, fluorescent-like images.
• R Gain: Press for less contrast in red color, press for more contrast in red
color
• G Gain: Press for less contrast in green color, press for more contrast in green
color.
• B Gain: Press for less contrast in blue color, press for mores contrast in blue
color.
• R Offset: Press for less brightness in red color, press for more brightness in
red color.
• G Offset: Press for less brightness in green color, press for more brightness in
green color.
• B Offset: Press for less brightness in blue color, press for more brightness in
blue color.
Overscan
This function allows you to adjust the overscan area (display area).
• Off: The whole input area is displayed.
• 1 - 5: The input area is displayed without the screen edges.
Note
• This function is available for the following signals.
With COMPUTER/HDMI 1 or 2 input for component signal:
- 480P, 576P, 720P, 1080I, 1080P With VIDEO or S-VIDEO input:
- All signals
• If noise appears at the screen edges when
value.
HDMI Settings
Signal Type
"
Off is selected, set the function to a larger
23

This function allows you to select the input signal type RGB or Component for HDMI 1
or 2.
• Auto: Input signals are automatically recognized as RGB or component.
• RGB: Set when RGB signals are received.
• YPbPr: Set when Component signals are received.
HDMI Color Range
An optimum picture may not be displayed if an HDMI-capable device°¶s output signal
type and the projector°¶s input signal type do not match.
If this should occur, switch “HDMI Color Range”.
• Auto: In most circumstances, “Auto” should be selected.
• Full Range/Limited Range: When the black levels of the image show banding or
appear faded, select the item that results in the best picture quality.
Advanced
Tint
Press for making skin tones purplish, press for making skin tones greenish.
Color
Press for less color intensity, press for more color intensity.
Note
• Tint and Color are available for VIDEO or S-VIDEO mode.
Sharpness
Press for less sharpness, press for more sharpness.
Gamma
When the darker areas of the image become diffi cult to see because of the image or
the projection environment, you can correct the gamma setting to make the image
brighter and easier to see.
BrilliantColor™
BrilliantColor™ uses Texas Instruments’s BrilliantColor™ technology. The image
becomes brighter while the color reproduction is kept at a high level.
Noise Reduction
Video noise reduction provides high quality images with minimal dot crawl and cross
color noise.
3D Color Management
This function adjusts each of the six main colors that comprise the color wheel,
altering their “Hue”, “Saturation”, or “Value”.
Reset Picture Setting
To reset all adjustment items.
24

SOURCE
Source Selection
• Manual: “Source Selection” is not activated.
• Auto: Automatically searches for and switches to the appropriate Input mode, when
the projector turn on, or no input signal is detected.
3D
3D Mode
• Auto: When a 3D identification signal is detected, the format is selected
automatically.
• Off: 3D Mode is not activated.
• Top and Bottom/Frame Sequential/Frame Packing/Side By Side: Select the same
format type of the received 3D signal.
3D L/R Invert
Selecting “Disable” or “Invert” switches between the image for the left eye and the
image for the right eye, so that you can make the settings for more natural viewing.
25

SYSTEM SETUP : Basic
Language
Select the language used by the on-screen menu.
Projection Mode
• Front: Normal image (Projected from the front of the screen).
• Rear: Reversed image (Projected from the rear of the screen or with a mirror)
• Rear Ceiling: Reversed and inverted image (Projected with a mirror)
• Ceiling: Inverted image (Projected from the front of the screen with an inverted
projector)
Menu Settings
Menu display time
Select “Menu Display Time” in the “Menu Settings” menu and the display time for the
menu screen. The display time range is from 5 to 30 seconds.
Menu position
Select “Menu Position” in the “Menu Settings” menu and the desired position for the
menu screen.
• Center: Displayed on the center of the image.
• Upper Left: Displayed on the upper left of the image.
• Upper Right: Displayed on the upper right of the image.
• Upper Left: Displayed on the upper left of the image.
• Lower Right: Displayed on the lower right of the image.
Background
• Logo: Logo screen
• Black: Black screen
• Blue: Blue screen
FUNCTION Button
You can assign one of the following functions to the FUNCTION button on the remote
control. The assigned function can be performed by just pressing FUNCTION.
• Information: Information menu is displayed.
• Projection Mode: For reversing/inverting Projected Images.
• Brightness: For adjusting the brightness.
• Contrast: For adjusting the contrast.
Advanced
Test P atte rn
• Off: The test pattern is not displayed.
• On: The test pattern is displayed.
Reminder Message
26

• Off: The reminder message (input signal,during input search or etc.information) is
not displayed.
• On: The reminder message is displayed.
27

SYSTEM SETUP : Advanced
High Altitude Mode
This function changes the fan rotation speed.
• Off: Suitable for normal environments.
• On: Set when using the projector at altitudes of approximately 1,500 meters (4,900
feet) or more.When “High Altitude Mode” is set to “On”, the fan rotation speeds up,
and the fan noise becomes louder.
Audio Settings
Volum e
This function allows you to adjust the projector’s volume.
Power On/Off Volume
This function allows you to set the system sound.
• On: A confirmation sound is made when the projector turns on/off.
• Off: No confirmation sound is made.
Closed Caption
• This function is available for NTSC3.58 signal.
• “Closed Caption” is a system which allows conversations, narration, and sound
effects in TV programs (Limited regions) and home videos to be viewed as captions
on the screen.
• Not all programs and videos will offer closed captioning. Please look for the
symbol to ensure that captions will be shown.
Closed Caption Enable
• Off: Closed Caption is not activated.
• On: Closed Caption is activated.
Caption Version
• CC1: Closed Caption mode for CH1 data
• CC2: Closed Caption mode for CH2 data
• CC3: Closed Caption mode for CH3 data
• CC4: Closed Caption mode for CH4 data
Note
• Closed Caption may malfunction (white blocks, strange characters, etc.) if signal
conditions are poor or if there are problems at the broadcast source. This does not
necessarily indicate a problem with the projector.
• If any button is pressed to call up the onscreen display while viewing a Closed Caption
broadcast, the closed captions will disappear.
Light Source Settings
Eco Mode
• Off: 100%
28

• On: Approx. 80%
Note
• When “Eco Mode” is set to “On”, the fan sound and power consumption are lower than
they are when “Off” is selected. (Projection brightness decreases.)
Light Source Hours
You can confirm the cumulative usage time.
Auto Power Off
• Disable: The Auto Power Off function will be disabled.
• 10 Min./20 Min./30 Min.: When no input signal is detected for more than selected
time, the projector will automatically enter Standby mode.
Note
• When the Auto Power Off function is set to other than “Disable”, 30 seconds before the
projector enters Standby mode, the message will appear on the screen
Quick Cooling
This function changes the cooling time.
• Off: The cooling time will be normal time.
• On: The cooling time is reduced.
Standby Settings
This function is setting power consumption reduction in standby mode.
LAN Control
You can be used Network function in Standby mode.
• Off: Network functions are switched off in Standby mode.
• On: Network functions are activated even if the projector is in Standby mode.
Network Settings
Allow you to configure the wired LAN settings. Refer to "Setting up the Projector
Network Environment" on page 33.
DHCP Client
Connect the LAN cable before turning the projector on. If not, the DHCP Client
function does not work.
• On: Obtains configuration parameters for TCP/IP network automatically.
• Off: Sets the TCP/IP manually.
When "DHCP Client" is set to "On", Select "Save Settings", then press ENTER.
IP Address
Factory default setting: 0. 0. 0. 0
Enter an IP address appropriate for the network.
Subnet Mask
Factory default setting: 0. 0. 0. 0
29
Set the subnet mask to the same as that of the computer and equipment on the
network.
Default Gateway
Factory default setting: 0. 0. 0. 0
* When not in use, set to "0. 0. 0. 0".
DNS Server˜
Factory default setting: 0. 0. 0. 0
Enter a DNS Server address appropriate for the network.
Advanced
Security Settings
This function prevents unauthorized use of the projector. Once this function is
activated, users must enter the correct Password each time the projector is turned on.
We suggest you record the Password in a safe place where only authorized users
have access.
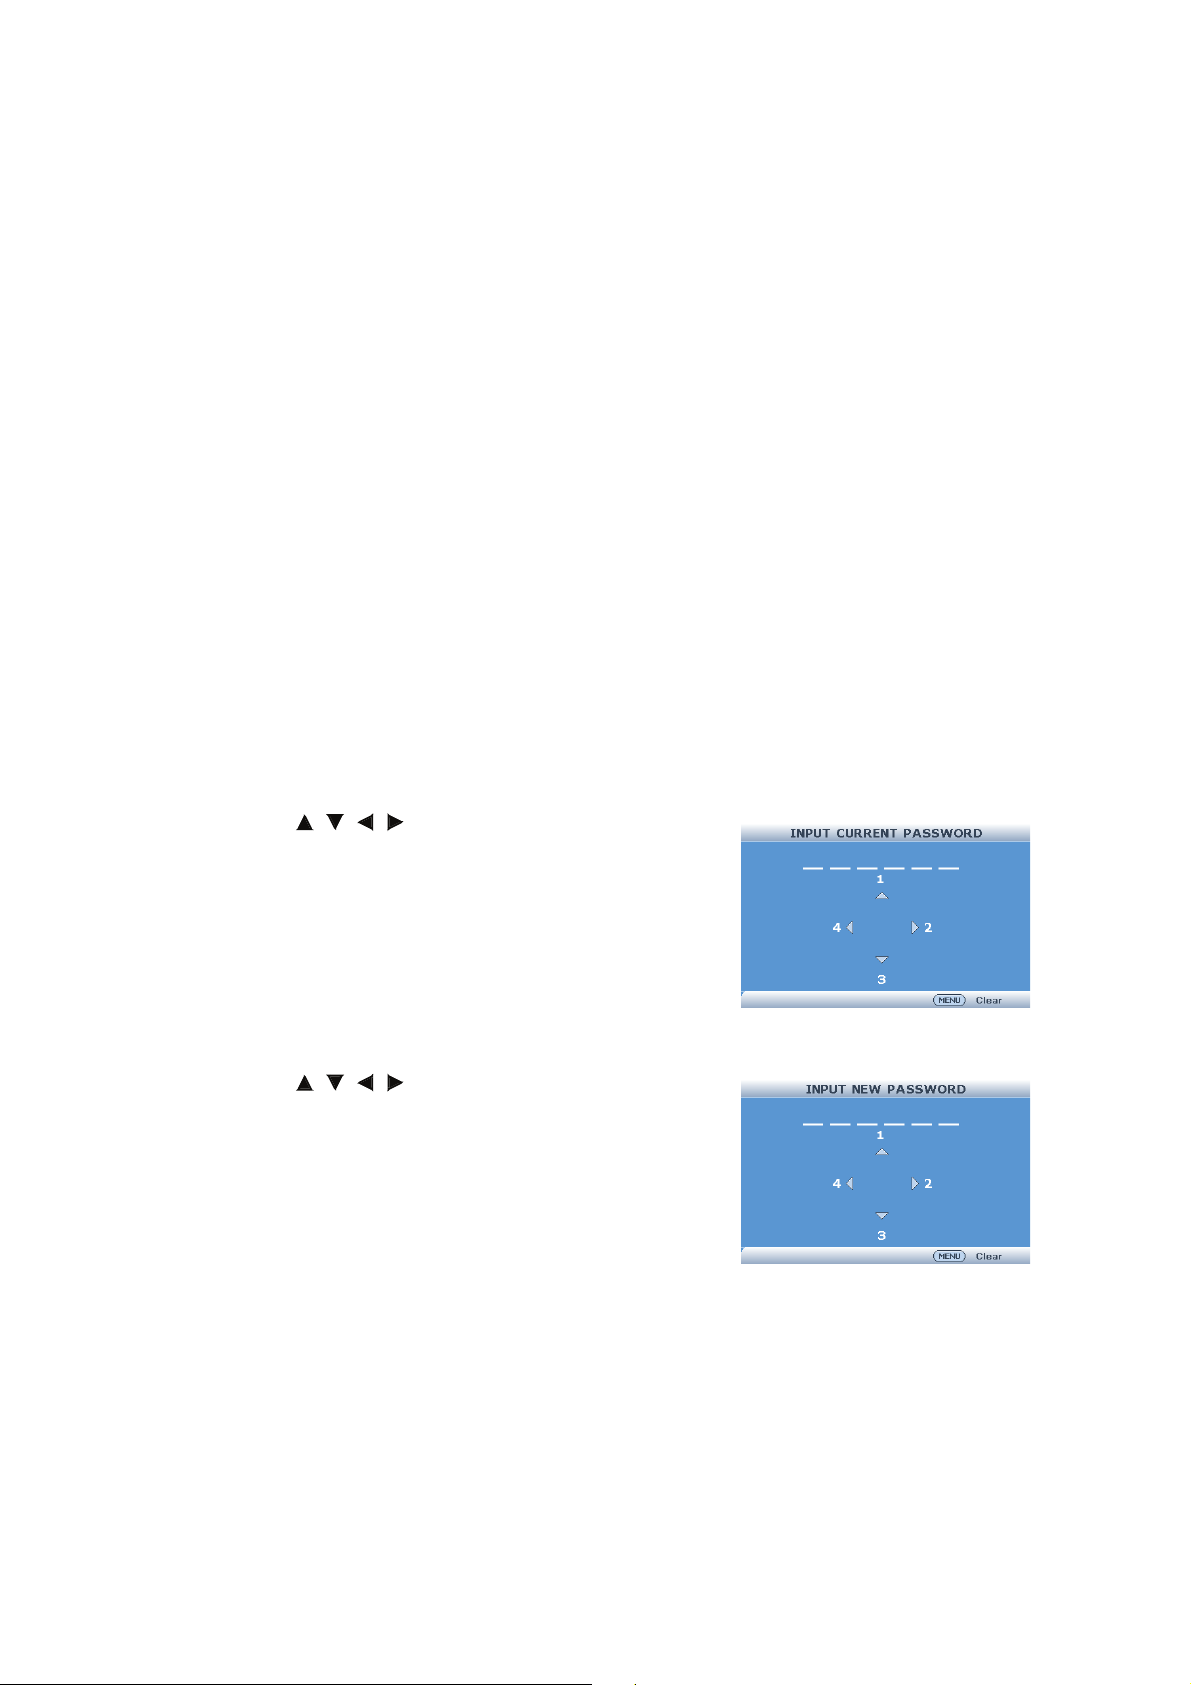
Change password
1. Select "Security Settings" then press ENTER.
2. Select "Change Password" then press ENTER.
The screen for entering the password appears.
3. Press the /// buttons on the remote control or on the projector to enter the preset password in "INPUT CURRENT PASSWORD".
• When setting the password for the first time,
"INPUT CURRENT PASSWORD" input will be
skipped.
• If you input a wrong password, the cursor
returns to the first point of the "INPUT CURRENT PASSWORD".
4. Press the /// buttons on the remote control or on the projector to enter the new password
in "Input New Password".
5. Enter the same password in "VERIFY NEW
PASSW ORD ".
Power on Lock
When "Power on Lock" is set, the Password input
screen appears after the power is turned on. When it appears, enter the right
password to start projection.
• Off: "Power on Lock" is not activated.
• On: "Power on Lock" is activated.
• When setting the Password for the first time, enter the password.
Keylock
30

Use this function to lock the operation buttons on the projector.
Setting with the Menu Screen
• On: All buttons on the projector, except Power, are locked.
• Off: Turns off the Keylock function.
Taking the Keylock Off
Hold down on the projector for about 3 seconds while the projector is being turned
on.
• The Keylock function does not affect the operation with the remote control
buttons.
• You cannot use the Keylock function while the projector is warming up.
All Reset
This function allows you to initialize the settings you have made in the projector.
The following items or menu cannot be initialized.
- Keystone Correction
- Projection Mode
- High Altitude Mode
- Network Settings
- Security Settings
- Light Source Hours
31

INFORMATION
SOURCE
The Input Mode of the projector is displayed.
Picture Mode
The Picture Mode of the projector is displayed.
Signal Info
This function allows you to check the current input signal information.
Signal Type
The Signal Type of the projector is displayed.
Light Source Hours
The Light source usage time of the projector is displayed.
IP Address
The IP address of the projector is displayed.
MAC Address
The MAC address of the projector is displayed.
Firmware Version
The Firmware Version of the projector is displayed.
32

Setting up the Projector Network Environment
LAN cable
(commercially available)
Temporarily
change the
computer's IP
address.
Use Internet Explorer
(version 11 or later) to
make various
projector settings.
This section describes the basic procedure for using the projector via the network. If
the network is already constructed, the projector's network settings may need to be
changed. Please consult your network administrator for assistance with these
settings. You can make network settings both on the projector and on the computer.
The following procedure is for making settings on the computer.
Network settings on the computer
1. Connecting a projector to a computer.
Connect a LAN cable (Category 5, cross-over type) between the computer and
projector.
2. Setting an IP address for the computer.
Adjust the IP settings of the computer to enable one-to-one communications with the
projector.
3. Setting up a network connection for the projector.
Adjust the projector network settings to conform to your network.
Note
• When connecting to a hub, use a straight-though Category 5 (CAT.5) type cable
(commercially available).
• The following browsers are supported.
- Internet Explorer 11 or later
33

Controlling the Projector via LAN
After connecting the projector to your network, enter the projector IP address in
"Address" on Internet Explorer (version 11 or later) using a computer on the network
to start a setup screen that will enable control of the projector via the network.
Controlling the Projector Using Internet Explorer (Version
11 or later)
Complete connections to external equipment
before starting the operation.
Complete the AC cord connection.
1. Start Internet Explorer on the computer.
2. Enter "http://" followed by the projector IP address set by the "/" in "Address", and
then press the "Enter" key.
3. When the screen as shown on the right appears,
enter the following.
• Inital Password : 0000
4. A screen for controlling the projector appears,
ready for performing various status conditions,
control, and settings.
34
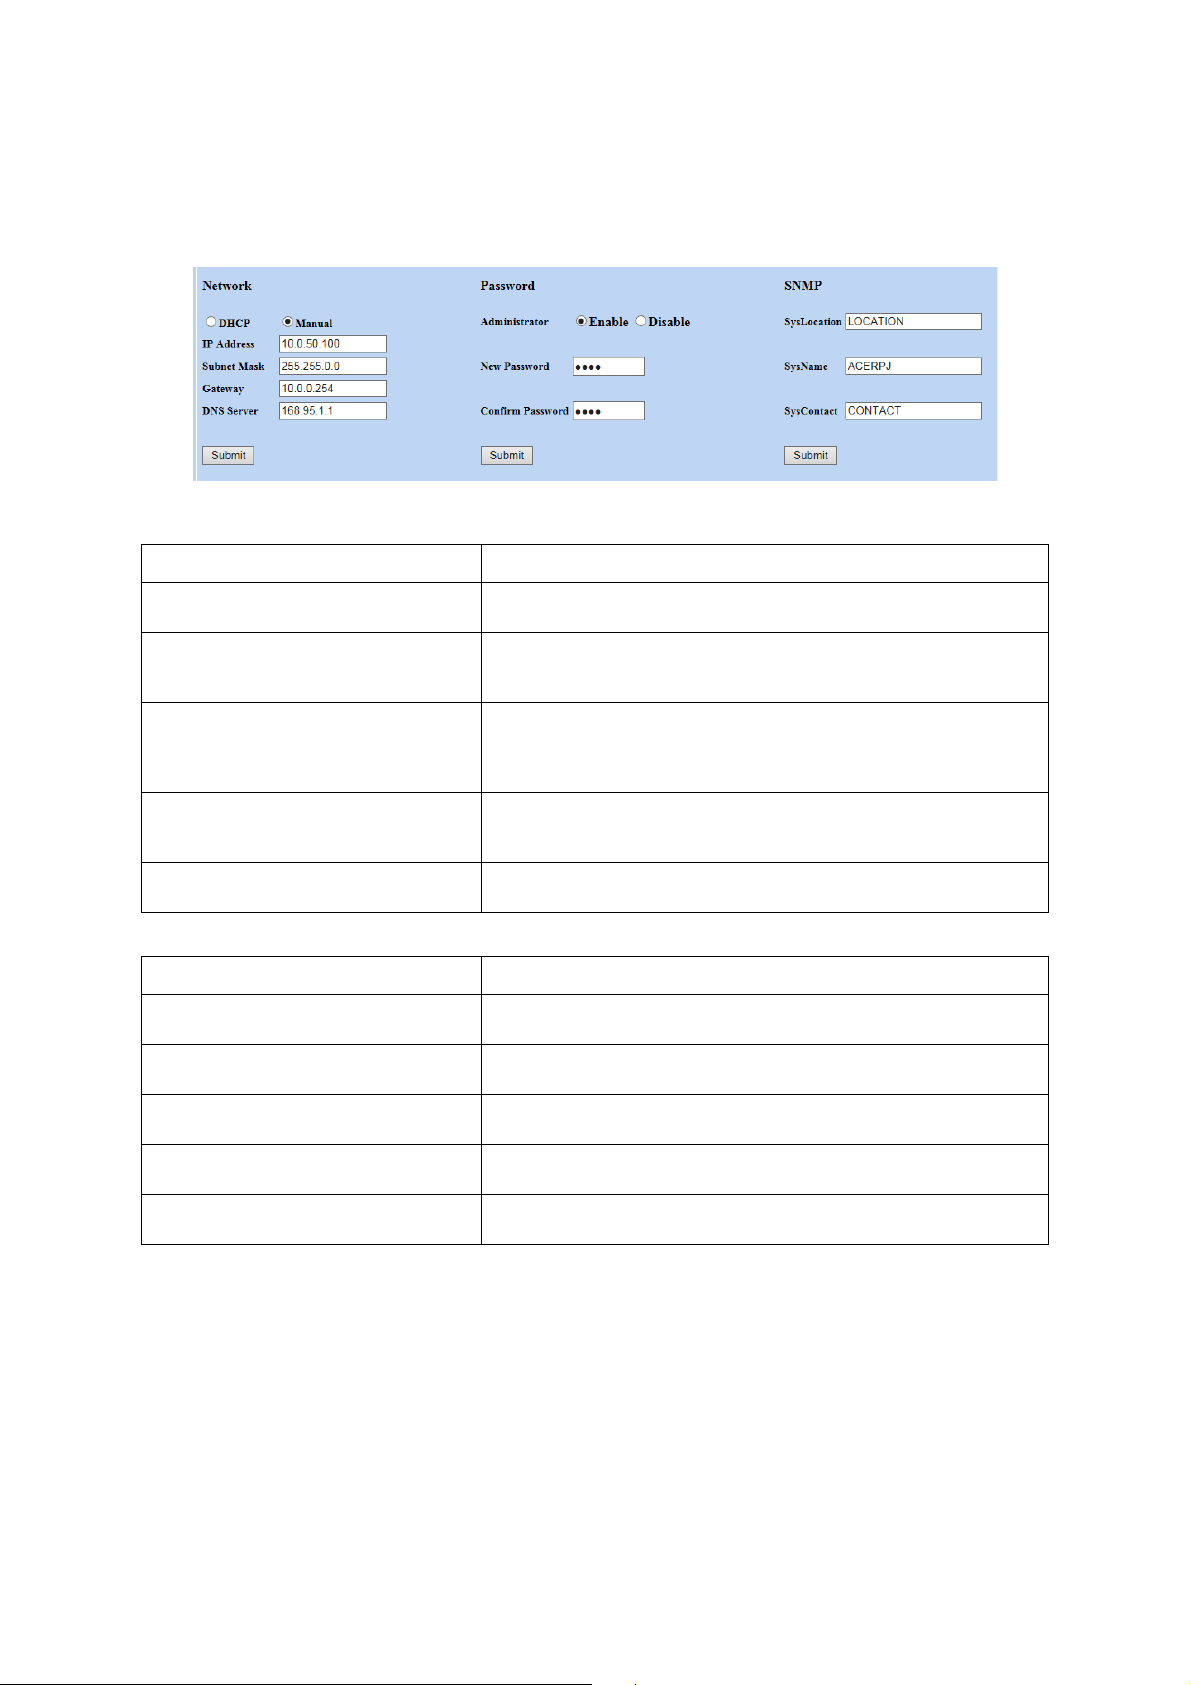
Setting the Network
Network Settings
The Network Setting screen appears, ready for network settings for the projector.
Items Setting example / Remarks
DHCP
IP Address
Subnet Mask
Default Gateway
DNS Server
Select "ON" or "OFF" to determine whether to use DHCP
Client.
You can set this item when "DHCP Client" is set to "OFF".
Factory default setting: 0.0.0.0
Enter an IP address appropriate for the network.
You can set this item when "DHCP Client" is set to "OFF".
Factory default setting: 0.0.0.0
Set the subnet mask to the same as that of the computer and
equipment on the network.
You can set this item when "DHCP Client" is set to "OFF".
Factory default setting: 0.0.0.0
* When not in use, set to "0.0.0.0". 设为 "0.0.0.0"。
Factory default setting: 0.0.0.0
* When not in use, set to "0.0.0.0".
administrator)
Password
SysLocation
SysName
SysContac
Items Setting example / Remarks
Select "Enable" or "Disable" to determine whether to use
security protection.
Setting of password for security protection.
(within 4 characters)
Setting of Location for SNMP.
(within 22 characters)
Setting of Name for SNMP.
(within 22 characters)
Setting of Name for SNMP.
(within 22 characters)
35

Setting for Sending E-mail when an Error Occurs
Email Alert
On this screen, you can make settings for sending e-mail to report when the projector
has generated an error.
Email Setting
Items Description
To
Cc
Subject
From
Set addresses to which error notification e-mail is sent.
(within 40 characters)
Setting of Subject for error e-mail.
(within 40 characters).
Setting of Originator Address for error e-mail.
(within 40 characters).
SMTP Setting
Items Setting example / Remarks
Sever
User Name
Password
Alert Condition
Items Description
Fan Error, Light Source error,
Temperature error
Issue Test Mail
Setting an SMTP server address for email transmission.
(within 30 characters).
e.g.1: 192.168.150.253
e.g.2: smtp123.sharp.co.jp
* When using a domain name, make settings for the DNS
server.
Setting of user name for SMTP server.
(within 40 characters).
Setting of password for SMTP server.
(within 14 characters).
Error e-mail is sent on the error items checked in their check
boxes.
Send test e-mail. This allows you to confirm that the settings for
e-mail transmission are properly set.
36

Controlling the Projector Using Crestron RoomView
®
Regarding Crestron Roomview
Crestron RoomView is the consolidated control systems provided by Crestron
Company, able to control and monitor the multiple of projectors which connected to a
network.
This projector supports the protocol for this control system, so that it supports the
systems offered by Crestron RoomView. For more detail, visit the Crestron website.
(English page only).
http://www.crestron.com
The main features for the Crestron RoomView® are below;
- Control remotely using web browser.
Able to control the projector from a computer as you control with remote control.
- Control, and monitor using application software.
By using the application software (Crestron RoomView Express/Crestron RoomView
Sever Edition) offered by Crestron, you will able to monitor, contact with a helpdesk,
and send a message in emergency. For detail, visit
http://www.crestron.com/getroomview
Note
®
• Only alphabets and the numbers can be entered for the character entry.
Control Using Web Browser
Display the control menu
Be sure to check the following before operation.
• Connect both projector and computer to the network
• Setting up the projector Network Environment
1. Operate the web browser on the computer.
2. Enter IP address of the Projector on the web browser and press ENTER.
3. Click the "Crestron e-Control" button.
• How to use the control menu.
37

How to use the control menu
1
2
3
4
5
1
Operate below functions by clicking on each buttons.
Buttons Functions
Power
Vol – /Vol+
AV Mute
For turning the power on and putting the projector into Standby
mode.
For adjusting the speaker sound level.
For temporarily displaying a black screen and turning off the
sound.
2
Change the input mode by clicking on the source. The input signal which is used
will display in blue.
3
Operate below functions by clicking on each buttons.
Buttons Functions
Contrast Adjusting the contrast.
Brightness Adjusting the brightness.
Sharpness Adjusting the Sharpness.
Freeze Freezing a Moving Image
4
The ///T button will work as same as the ///on the remote control.
For the other buttons, see below.
Buttons Functions
Enter For setting items selected or adjusted on the menu.
Menu For displaying adjustment and setting screens.
Autosync
Resize For switching the picture size (NORMAL, 16:9, etc.).
Return
For automatically adjusting images when connected to a
computer.
For returning to the previous menu screen during menu
operations.
5
Click on each tab to operate below;
Tabs Functions
Help Desk window will be displayed, and able to send/receive a
Contact IT Help
message to the administrator who uses the Crestron
RoomView Express.
38

Info Show the information of the projector which is connected.
Too ls
Change the setting of the projector which is connected. Refer
the next section.
39

How to use the Tool menu
Click on the Tool Tab on the control menu and the below will be displayed.
It can change the settings for the projector which is connected.
3
4
1
Crestron Control
1
2
Settings for the Crestron central control.
2
Projector
Setting for the projector.
Items Functions
Projector Name
Location
Assigned To
DHCP
IP Address Set IP Address for the projector.
Subnet Mask Set subnet mask for the projector.
Default Gateway Set default gateway for the projector.
DNS Server Set DNS Server for the projector.
Send Click to fix what is set on this Projector Menu.
The Projector Name can be changed.
(within 22 characters)
The location name can be changed.
(within 22 characters)
The user of the projector can be changed.
(within 22 characters)
When using DHCP, check on "Enable".
The address settings below will be invalid if checked.
3
User Password
To lock the control menu on the conputer with a password, check on “Enable”.
Setting for the below items;
Items Functions
Enter new password to change the password for the
New Password
Confirm
Send Click to fix what is set on this Admin Password.
menu.
(within 15 characters)
Enter the password you have set on the "New Password". The
error will show if not equal.
40
control

Admin Password
3
To lock the Tool menu with a password, check on “Enable”. Setting for the below
items:
Items Functions
New Password
Confirm
Send Click to fix what is set on this Admin Password.
Enter new password to change the password for the Tool menu.
(within 15 characters)
Enter the password you have set on the "New Password". The
error will show if not equal.
41

Maintenance
The projector needs proper maintenance. You should keep the lens clean as dust, dirt
or spots will project on the screen and diminish image quality. If any other parts need
replacing, contact your dealer or qualified service personnel. When cleaning any part
of the projector, always switch off and unplug the projector first.
Warning
• Never open any of the covers on the projector. Dangerous electrical voltages inside the
projector can cause severe injury. Do not attempt to service this product yourself. Refer
all servicing to qualified service personnel.
Cleaning the projection window
Gently wipe the lens with lens cleaning paper. Do not touch the projection window with
your hands.
Cleaning the projector housing
Gently wipe with a soft cloth. If dirt and stains are not easily removed, use a soft cloth
damped with water, or water and neutral detergent, and wipe dry with a soft, dry cloth
Note
• Turn off the projector and remove the AC power cord from the power outlet before
beginning maintenance work.
• Make sure the lens is cool before cleaning.
• Do not use detergents or chemicals other than those noted above. Do not use benzene
or thinners.
• Do not use chemical sprays.
• Use a soft cloth or lens paper only.
42

Specifications
UL6500/RL350/LU-U500/
SL550/FL-440/F1P1702/
Name of product type
Display system
Display device
Projection lens
Projection distance
Displayable
scanning
frequency
Display
resolution
Input terminal
Output terminal
Control and
communication
terminals
Operating temperature 0°C - 35°C (no condensation)
Power requirement
Effective display
size
Effective pixels
Zoom -
Focus Manual
Light source Laser diode
Screen size 80" - 150" 80" - 150" 65" - 125"
Speakers
Horizontal 15 - 102KHz
Vertical 23 - 120Hz
Computer signal
input
Video signal input
HDMI x2
ter/
Compu
Component
(mini D-sub 15 pin)
S-Video
(mini DIN 4 pin)
Video (RCA) x1
Audio
ø3.5 mm stereo
(
mini jack)
Audio (RCA) x1
Computer/
Component (mini
D-sub 15 pin)
ø3.5 mm
Audio (
stereo mini jack)
USB
(DC5V/1.5A)
RS-232
(D-sub 9pin)
LAN (RJ-45) x1
UL5530/RL153/LU-U400/
SL450/FL-423/F1P1706/
UL5510/RL150/LU-U300/
SL350/FL-420/F1P1710
0.65" x1 ,
Aspect ratio 16:9
2,073,600 pixels
(1,920 x 1,080)
80" (Approx 39cm) ,
100" (Approx 49cm) ,
120" (Approx 60cm) ,
150" (Approx 76cm)
UXGA /WSXGA+ /SXGA+ /SXGA /WXGA+ /WXGA /XGA /SVGA /VGA
1080p / 1080i / 720p / 576p / 576i / 480p / 480i
UL6500/RL350/LU-U500/SL550/FL-440/F1P1702/UL6300W/RL320/LU-W500/SL530/FL-
340/FWX1703/UL6200/RL310/LU-X500/SL510/FL-140/FNX1704:
UL5510/RL150/LU-U300/SL350/FL-420/F1P1710/UL5310W/RL120/LU-W300/SL330/FL-
320/FWX1711/UL5210/RL110/LU-X300/SL310/FL-120/FNX1712:
UL6300W/RL320/LU-W500/
SL530/FL-340/FWX1703/
UL5330W/RL123/LU-W400/
SL430/FL-323/FWX1707/
UL5310W/RL120/LU-W300/
SL330/FL-320/FWX1711
DLP
0.65" x1 ,
Aspect ratio 16:10
1,024,000 pixels
(1,280 x 800)
80" (Approx 40cm) ,
100" (Approx 50cm) ,
120" (Approx 61cm) ,
150" (Approx 78cm) ,
10W × 1
Mac21" / 19" / 16" / 13"
NTSC / PAL / SECAM
x1
x1
x1
x1
x1
x1
x1
AC 100V-240V 50/60Hz 4.7A
AC 100V-240V 50/60Hz 2.5A
®
UL6200/RL310/LU-X500/
SL510/FL-140/FNX1704/
UL5230/RL113/LU-X400/
SL410/FL-123/FNX1708/
UL5210/RL110/LU-X300/
SL310/FL-120/FNX1712
Chip
0.55" x1 ,
Aspect ratio 4:3
786,432 pixels
(1,024 x 768)
65" (Approx 38cm) ,
80" (Approx 47cm) ,
100" (Approx 60cm) ,
125" (Approx 76cm) ,
43

UL6500/RL350/LU-U500/
SL550/FL-440/F1P1702:
Maximum power consumption
Standby mode power consumption
(LAN Control is off.)
Dimensions (W x D x H) W 509 x D 390 x H 138 mm ( excluding protruding parts)
Weight (approx.)
UL5530/RL153/LU-U400/
SL450/FL-423/F1P1706/
UL5510/RL150/LU-U300/
SL350/FL-420/F1P1710:
UL6500/RL350/LU-U500/
SL550/FL-440/F1P1702:
UL5530/RL153/LU-U400/
SL450/FL-423/F1P1706:
UL5510/RL150/LU-U300/
SL350/FL-420/F1P1710:
480W
370W
10kg
8.4kg
8.2kg
UL6300W/RL320/LU-W500/
SL530/FL-340/FWX1703/
UL5330W/RL123/LU-W400/
SL430/FL-323/FWX1707:
250W
UL5310W/RL120/LU-W300/
SL330/FL-320/FWX1711:
280W
< 0.5W
UL5330W/RL123/LU-W400/
SL430/FL-323/FWX1707:
8.4kg
UL5310W/RL120/LU-W300/
SL330/FL-320/FWX1711:
8.2kg
UL6200/RL310/LU-X500/
SL510/FL-140/FNX1704:
480W
UL5230/RL113/LU-X400/
SL410/FL-123/FNX1708:
250W
UL5210/RL110/LU-X300/
SL310/FL-120/FNX1712:
280W
UL6200/RL310/LU-X500/
SL510/FL-140/FNX1704:
10kg
UL5230/RL113/LU-X400/
SL410/FL-123/FNX1708:
8.4kg
UL5210/RL110/LU-X300/
SL310/FL-120/FNX1712:
8.2kg
44

Dimensions
509
390
138
Ceiling mount screws:
Max. M4 x 10
Unit: mm
184.3
217
509 mm (W) x 390 mm (D) x 138 mm (H)
Ceiling mount installation
45

Appendices
LED indicator messages
Orange on Normal (Standby)
Green on Normal (Power on)
Power indicator
Light source indicator
Temperature indicator
Green blinks Normal (Warm up)
Orange blinks Normal (Cooling)
Orange blinks (faster) Abnormal (Refer to the table below)
Off Normal
Red on The light source is shut down abnormally.
Off Normal
Red blinks The internal temperature is abnormally.
Maintenance indicator
Temperature
indicator
Light source
indicator
Normal Abnormal
Off Red blinks The internal
Off Red on The light source
Problem Cause Possible Solution
temperature is
abnormally.
does not
illuminate.
• Temperatures
around the
projector are
high.
• Blocked air
intake
• Cooling fan
breakdown
• Internal circuit
failure
• Clogged air
intake
• Light source
failure
• Use the projector in
an area with a
temperature of
lower than +35°C.
• Relocate the
projector to an area
with proper
ventilation.
• Take the projector
to your nearest
Authorized
Projector Dealer or
Service Center for
repair.
• Disconnect the
power cord from the
AC outlet, and then
connect it again.
46
• Take the projector
to your nearest
Authorized
Projector Dealer or
Service Center for
repair.

Power indicator Green on/
Green blinks
Orange on/
Orange
blinks
Orange
blinks
(faster)
Projector
shutdown
• Cooling fan
stops
• Disconnect the
power cord from the
AC outlet, and then
connect it again.
• Take the projector
to your nearest
Authorized
Projector Dealer or
Service Center for
repair.
47

Compatibility Chart
Computer
Horizontal Frequency: 15-90 kHz,
Vertical Frequency: 50-85 Hz,
Pixel Clock: 12-165 MHz
Verti cal
Mode Resolution
frequency
VGA 640x480
SVGA 800x600
XGA 1024x768
PC
WXGA
WXGA+ 1440x900 60.0 55.90
SXGA
SXGA+ 1400x1050 60.0 65.32
WSXGA+
MAC 13" VGA 640x480 66.6 35.00
MAC 16" SVGA 832x624 74.5 49.70
MAC 19" XGA 1024x768 75.0 60.30
MAC 21" SXGA 1152x870 75.0 68.68
UXGA 1600x1200 60.0 75.00
1280x720 60.0 44.80
1280x768 60.0 47.78
1280x800 60.0 49.60
1360x768 60.0 47.71
1152x864 75.0 67.50
1280x1024
1280x960 60.0 60.00
1680x1050 60.0 65.30
1920x1080 60.0 67.50
Horizontal
frequency
(Hz) (kHz)
60.0 31.47
72.0 37.86
75.0 37.50
85.0 43.27
60.0 37.88
72.0 48.08
75.0 46.88
85.0 53.67
60.0 48.36
70.0 56.48
75.0 60.02
85.0 68.67
60.0 63.98
75.0 79.98
Analog
Support
Digital
Support
Auto
Top And
Bottom
3D Mode
Frame
Sequential
Frame
Packing
Side By
Side
DTV
Mode Signal
480i 720 x 480i 59.9 15.70
576i 720 x 576i 50.0 15.60
480p 720 x 480 59.9 31.50
576p 720 x 576 50.0 31.60
DTV
Signal
720p 1280 x 720
1080i 1920 x 1080i
1080p 1920 x 1080
3D
Mode Signal
Frame
Packing
Top And
Bottom
Side By
Side
720p 1280 x 720
1080p 1920 x 1080 24.0 54.00
720p 1280 x 720
1080p 1920 x 1080 24.0 27.00
1080i 1920 x 1080i
Vert ical
frequency
Verti cal
frequency
Horizontal
frequency
(Hz) (kHz)
60.0 45.00
50.0 37.50
60.0 33.80
50.0 28.10
24.0 27.00
60.0 67.50
50.0 56.30
Horizontal
frequency
(Hz) (kHz)
50.0 75.00
60.0 90.00
50.0 37.50
60.0 45.00
50.0 28.10
60.0 33.80
Analog
Support
Analog
Support
Digital
Support
Digital
Support
Auto
Auto
Top And
Bottom
Top And
Bottom
3D Mode
Frame
Sequential
3D Mode
Frame
Sequential
Frame
Packing
Frame
Packing
Side By
Side
Side By
Side
48

Troubleshooting
Refer to the symptoms and measures listed below before sending the projector for
repairs. If the problem persists, contact your local reseller or service center. Please
refer to "LED Indicator Messages" as well.
# Problem Solution
• Projector power cord is not plugged into the wall outlet.
• Power to the external connected devices is off.
• The selected input mode is wrong.
No picture and no sound or
1
projector does not start.
Sound is heard but no picture
2
appears (or picture is dark).
3 Color is faded or poor.
4 Picture is blurred; noise appears.
• Cables are incorrectly connected to the projector.
• Remote control battery has run out.
• External output has not been set when connecting
notebook computer
• If you turn on the connected device prior to the projector,
pictures are displayed incorrectly.
• Cables are incorrectly connected to the projector.
• "Brightness" is set to minimum position.
• Depending on the computer you are using, an image may
not be projected unless the signal output setting of the
computer is switched to the external output. Refer to the
computer's operation manual for how to switch its signal
output settings.
• Do you use 3D viewing mode ?
• When temperature inside the projector increases, the
cooling fan runs faster. If this state continues, the picture
may become dark.
• Image adjustments are incorrectly set.
• Make adjustments of "Color" and "Tint" in "PICTURE >
Advanced" and lower the "BrilliantColor™" value.
• Adjust the focus.
• The projection distance exceeds the focus range.
• There is fog on the projection window. If the projector is
carried from a cold room into a warm room, or if it is
suddenly heated, condensation may form on the surface
of the projection window and the image will become
blurred. Set up the projector at least one hour before it is
to be used. If condensation should form, remove the
power cord from the wall outlet and wait for it to clear.
(Computer Input only)
• Perform Synchronization Adjustments ("Frequency" and
"Phase" Adjustment)
• Noise may appear depending on the computer.
49
Picture appears but no sound is
5
heard.
6 Data image is not centered.
An unusual sound is occasionally
7
heard from the cabinet.
Maintenance indicator on the
8
projector illuminates or blinks in
red.
Picture is green on HDMI
9
(Component).
Picture is pink (no green) on HDMI
10
(RGB).
11 Picture is too bright and whitish.
12 The cooling fan becomes noisy.
The light source does not light up
13
even after the projector turns on.
The light source suddenly turns off
14
during projection.
15 The image sometimes flickers.
The remote control cannot be
16
used.
3D images flicker when watching
17
in a room.
• Cables are incorrectly connected to the projector.
• Volume is set to minimum.
• When the projector is connected to an external device
and the volume is set to minimum, the sound is not output
even if you turn up the volume of the external device.
• Depending on the computer you are using, the output
resolution signal may be different from the one you have
set. For details, refer to the operation manual of the
computer.
• If the picture is normal, the sound is due to cabinet
shrinkage caused by room temperature changes. This
will not affect operation or performance.
• See "LED indicator messages".
• Change the input signal type setting.
• Image adjustments are incorrectly set.
• When temperature inside the projector increases, the
cooling fan runs faster.
• The light source indicator is illuminating in red.
• Cables are incorrectly connected to the projector or the
connected equipment works improperly.
• Operate the remote control while pointing it at the
projector's remote control sensor.
• The remote control may be too far away from the
projector.
• If direct sunlight or a strong fluorescent lamp is shining on
the projector's remote control sensor, place the projector
where it will not be affected by strong light.
• The batteries may be depleted or inserted incorrectly.
Make sure the batteries are inserted correctly or insert
new ones.
• Images may appear to flicker when fluorescent light or
ambient light enters your vision.
-Turn off the lights.
-Block any ambient light.
50

Ghosting (a double image) occurs
18
without the image appearing in
3D.
• Check that you are using 3D LCD shutter glasses that
support the DLP® Link™ system.
- Be sure to use 3D LCD shutter glasses that support the
®
DLP
Link™ system.
• Check that the shutters on the 3D LCD shutter glasses
are working properly.
- Turn the 3D LCD shutter glasses off and then on again.
- Check the batteries of the 3D LCD shutter glasses.
- Check that the 3D LCD shutter glasses are set to 3D
viewing mode.
Some 3D LCD shutter glasses are equipped with a
special viewing mode (such as "dual view mode") in
addition to the normal 3D viewing mode. See the
operation manual of your 3D LCD shutter glasses.
• Check the settings of the projector.
- Check 3D Mode setting.
- Use "3D Sync Invert" to change the setting.
• Check whether a signal that is not supported is being
input.
- Configure your 3D application at the correct resolution
and refresh rate.
Make sure you are running your 3D application in
resolutions that support 3D. To support 3D, your 3D
application must be configured to run at the correct
settings for this projector.
For details on the supported signals, see "3D Supported
Signals" of the Compatibility Chart.
• If the projector is connected to a computer for 3D image
playback, check that a stereoscopically-enabled
application is being used.
- Use the applicable software.
- Set the applicable software to the field sequential
format.
• Check that there are no obstructions between the screen
and the 3D LCD shutter glasses.
- Remove any obstructions.
Any obstructions may cause the glasses not to function
properly causing the lenses to flicker or turn off. Do not
place your hand or other objects in front of the 3D control
signal sensor on the glasses.
• Check whether there is a source of high intensity lighting
nearby.
- Block the light or turn it off.
High intensity lighting can interfere with communication
between the 3D LCD shutter glasses and the screen
resulting in some flicker.
• Check whether two or more projectors are projecting 3D
images at the same time.
- Use only one projector at a time.
51

A connection for Web Browser
51
96
1.
2.
3.
4.
5.
6.
7.
8.
9
CD
RD
SD
ER
SG
DR
RS
CS
CI
1.
2.
3.
4.
5.
6.
7.
8.
9
CD
RD
SD
ER
SG
DR
RS
CS
CI
Pin No. Pin No. SignalSignal
cannot be made because you
19
have forgotten your user name or
• Initialize the settings.
• After the initialization, carry out setting again.
your password.
• How to start the Internet Explorer in Windows 10.
Can not start the Internet Explorer
20
in Windows 10.
1. Click the search box on the task bar.
2. Enter the "internet explorer" in the search box.
3. Click on the "Internet Explorer" from the search results.
RS-232C Specifications and Commands
Communication conditions
Set the serial port settings of the computer to match that of the table.
Signal format: Conforms to RS-232C
standard.
Baud rate: 9,600 bps Stop bit: 1 bit
Data length: 8 bits Flow control: None
Power
Light
Source
Source
Change
Volume
Parity bit: None
RETURN
CONTROL CONTENTS COMMAND PARAMETER
On POWR___1OK OK
Off POWR___0OK OK
State POWR????1 0
Usage Time (Hour) T L T T _ _ _ 1 (Integer) ERR
VGA IN I R G B _ _ 1 1 OK or ERR ERR
HDMI1 IRGB__31OK or ERR ERR
HDMI2 IRGB__32OK or ERR ERR
S-VIDEO I V E D _ _ 2 1 OK or ERR ERR
VIDEO I V E D _ _ 2 2 OK or ERR ERR
Source Check I C H K ? ? ? ?
Volume up (1 point) V O U D _ _ _ 1 OK or ERR ERR
Volume down (1 point) V O U D _ _ - 1 OK or ERR ERR
State VOUD????(Integer) ERR
52
Power ON
11: COMPUTER
31: HDMI1
32: HDMI2
21: S-VIDEO
22: VIDEO
Standby
mode
ERR

AV Mute
Freeze
On IMBK___1OK or ERR ERR
Off IMBK___0OK or ERR ERR
State I M BK? ? ? ?
On F R E Z _ _ _ 1 OK or ERR ERR
Off FREZ___0OK or ERR ERR
State F R E Z ? ? ? ?
0: Off, 1: On
0: Off, 1: On
ERR
ERR
53
 Loading...