

Extensa
i

Copyright © 1996 Texas Instruments
All Rights Reserved — Printed in Taiwan
Extensa Series Notebook User’s Guide
TI Part No. 9811352-0001
Original Issue: January 1996
Changes may be made periodically to the information
in this publication. Such changes will be incorporated
in new editions of this manual.
Record the serial number, purchase date, and model
number in the space provided below. The serial
number and model number are recorded on the label
affixed to the case. All correspondence concerning
your unit should include the serial number, model
number, and date of purchase.
No part of this publication may be reproduced, stored
in a retrieval system, or transmitted, in any form or by
any means, electronic, mechanical, photocopy,
recording, or otherwise, without the prior written
permission of Texas Instruments.
Extensa Notebook Computer
Model_______Serial No.____________Purchase Date________
Extensa is a trademark of Texas Instruments. The icons in the
Windows Notebook and Startup groups are copyrighted by Texas
Instruments.
TranXit is a trademark of Puma Technology.
IBM, OS/2, AT PS/2, and VGA are trademarks of International
Business Machines Corporation..
Microsoft, MS-DOS, and Windows are registered trademarks and
Windows, Windows 95 and Xenix are trademarks of the Microsoft
Corporation.
Ethernet is a registered trademark of Xerox Corporation.
NetWare is a registered trademark of Novell, Inc.
UNIX is a registered trademark of American Telephone and
Telegraph.
FCC Notice
This device has been tested and found to comply with the limits
for a Class B digital device pursuant to Part 15 of the FCC Rules.
These limits are designed to provide reasonable protection
against harmful interference in a residential installation. This
device generates, uses, and can radiate radio frequency energy
and, if not installed and used in accordance with the
instructions, may cause harmful interference to radio
communications.
However, there is no guarantee that interference will not occur in
a particular installation. If this device does cause harmful
interference to radio or television reception, which can be
determined by turning the device off and on, the user is
encouraged to try to correct the interference by one or more of the
following measures:
Reorient or relocate the receiving antenna
Increase the separation between the device and receiver
Connect the device into an outlet on a circuit different from
that to which the receiver is connected
Consult the dealer or an experienced radio/television
technician for help
Notice: Shield Cables
All connections to other computing devices must be made using
shielded cables to maintain compliance with FCC regulations.
Notice: Peripheral Devices
Only peripherals (input/output devices, terminals, printers, etc.)
certified to comply with the Class B limits may be attached to this
equipment. Operation with non-certified peripherals is likely to
result in interference to radio and TV reception.
Caution
Changes or modifications not expressly approved by the
manufacturer could void the user’s authority, which is granted by
the Federal Communications Commission, to operate this
computer.

Use Conditions
This part complies with Part 15 of the FCC Rules. Operation is
subject to the following two conditions: (1) this device may not
cause harmful interference, and (2) this device must accept any
interference received, including interference that may cause
undesired operation.
Notice: Canadian Users
This Class B digital apparatus meets all requirements of the
Canadian Interference-Causing Equipment Regulations.
Remarque à l’intention des utilisateurs canadiens
Cet appareil numérique de la classe B respected toutes les
exigences du Règlement sur le matériel brouilleur du Canada.

Preface
............................
.............................
........................
................................
.....
................................
.
...............................
................................
.
................................
..
........................
...........................
.............................
................................
.
................................
...
................................
......
................................
.......
................................
..........
................................
....
.............
........................
............................
...........................
..........
................................
.
...............................
......
...........................
Chapter 1 Before You Begin
Contents
Creating Backup Diskettes
Features of the Computer
Environmental Specifications
Using the Computer
Suspend-to-Disk Mode
Securing the Computer
Using the AC Adapter
Chapter 2 Using Your Computer
Starting the Computer
Using the Brightness Control
Using the Contrast Control
Using the Volume Control
Ejecting PCMCIA Cards
Using Indicator Lights
Using the Touchpad
Using Disk Drives
Adding Memory
Using the Keyboard
Using the Internal Numeric Keypad
Using Connectors and Ports
1-2
1-3
1-5
1-6
1-8
1-10
1-11
2-2
2-3
2-4
2-5
2-6
2-7
2-9
2-13
2-15
2-16
2-19
2-21
Chapter 3 Using Battery Power
Guidelines for Battery Use
Switching to Battery Power
Responding to Low Battery Conditions
Recharging the Battery
Conditioning the Battery
Installing and Removing the Battery Pack
Conserving Battery Power
3-2
3-3
3-4
3-6
3-7
3-8
3-10
v

Contents
................................
...................
................................
.......................
................................
...........
................................
..........
..............................
........................
................................
........................
................................
............
................................
...............................
................................
......
............
................................
.........
................................
......
........................
..........
................................
.
................................
....
................................
Chapter 4 Options
AC Adapter
PCMCIA
Numeric Keypad
External Monitor
Using an External Mouse
Using and External Keyboard
Memory
Audio Options
Miscellaneous Options
Chapter 5 Using Software
Using Supplied Software
Getting Online Help
Guidelines for Installing Applications
Using a Password
Chapter 6 Traveling with Your Computer
Tips for the Traveler
What to Take When Traveling
Packing the Computer and Accessories
4-2
4-3
4-5
4-6
4-7
4-8
4-9
4-10
4-11
5-2
5-3
5-4
5-6
6-2
6-4
6-5
Chapter 7 Care and Troubleshooting
Cleaning the Computer
Troubleshooting Tips
Startup Error Messages
Appendix A Where to Get Help
vi
7-2
7-3
7-4

Preface
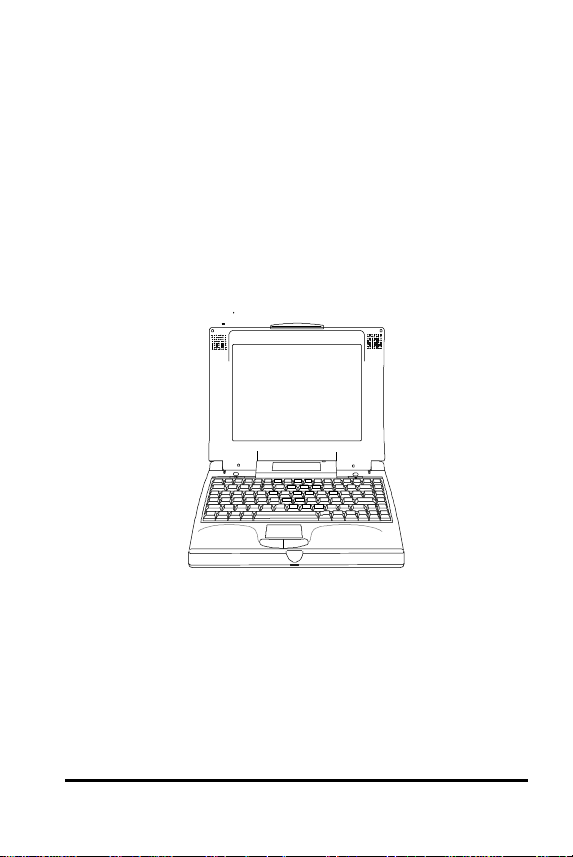
This manual describes features of the Texas
Instruments Extensa notebook computers. The
Extensa series computers are similar in
appearance and incorporate such features as
PCMCIA and internal pointing device.
The following figure displays the Extensa
computer.
Extensa
This manual should answer most of the
questions you have about the day-to-day
operation of your Extensa notebook computer.
Use the
your computer to get your computer running for
the first time.
Quick Start
instructions that came with
vii

Preface
You should also take advantage of the online
help files that are available with almost all of the
programs shipped with your computer.
We hope you enjoy your Extensa computer.
With proper care, your computer will provide
you with years of productive service.
viii

1
...........................
............................
................................
.............................
.......................
................................
.....
................................
.
..............................
................................
Before You Begin
After completing procedures in the Quick Start
instructions, read this chapter to learn about
important functions of your computer. Some,
such as
performed as soon as possible after the purchase
of your computer.
Contents
Creating Backup Diskettes
, should be
Creating Backup Diskettes
Features of the Computer
Standard Features
Optimizing Features
Environmental Specifications
Using the Computer
Suspend-to-Disk Mode
Securing the Computer
Using the AC Adapter
1-2
1-3
1-3
1-4
1-5
1-6
1-8
1-10
1-11
1-1

Creating Backup Diskettes
You should create your backup system diskettes
as soon as possible after purchasing your
notebook. This process requires approximately
thirty 3 1/2-inch, 1.44 MB diskettes. Labels for
the diskettes are included with the manual.
To create backup system diskettes, use the
Create System Disk tool that is part of Windows
95.
1-2

Features of the Computer
Standard Features
The following table displays Extensa standard
features:
8 MB EDO memory
1 MB of video memory
Fast video graphics accelerator
Suspend-to-disk (zero-volt suspend)
function
No-reboot setup function (accessed through
Setup
Dualscan color displays
button only)
Simultaneous display with external CRT
16-bit stereo audio
One type III or two type II/I PCMCIA slots
Parallel port with EPP and ECP
Duracell NiMH battery pack
540-million byte (524 MB) or higher
capacity hard disk with VL Local Bus
Internal 3.5-inch floppy drive
Internal touchpad pointing device
Small, lightweight AC adapter
1-3

Features of the Computer
Customizing Features
The following features allow you to customize
your computer to fit your requirements.
External keyboard port*
External PS/2 mouse port*
External numeric keypad port*
4 MB, 8 MB and 16 MB EDO type small
outline dual inline memory module
(soDIMM) upgrades
* Only one of the keyboard, PS/2 mouse, or
numeric keypad options can be installed at
any given time.
1-4

Environmental Specifications
This section provides information on the
optimum operating environment for your
Extensa notebook computer.
Temperature
Operating: 50° to 95°F
(10° to 35°C)
Storage: -4° to 140°F
(-20° to +60°C)
Relative Humidity (Noncondensing)
Operating: 20% to 80%
Storage: 20% to 80%
Shock
Operating: Maximum 5g pulse in X,
Y, and Z orientations
Storage: Maximum 50g pulse in X,
Y, and Z orientations
Vibration
Operating: Sinusoidal 5 to 26 Hz
limited to 0.015 inch
peak-to-peak maximum
displacement
0.5g, 26 to 250 Hz
Storage: Sinusoidal 5 to 27 Hz
limited to 0.016 inch
peak-to-peak maximum
displacement
2.0g, 27 to 500 Hz
1-5

Using the Computer
Never pick up or carry your unit by the
display.
Never use the computer in harsh
environments where it could be subjected to
rapid temperature changes and excessive
dust.
Never expose the computer to excessive
vibration.
Never expose the hard disk or floppies to
strong magnetic fields, such as those
generated by audio system speakers or
telephone handsets.
Be sure the wall outlet supplies the voltage
required by the AC adapter. Check the
labels on the bottom of the computer case
and on the AC adapter.
1-6
Avoid leaving your computer in storage for
more than two weeks without a charged
battery if the computer is not connected to
the AC adapter. The battery that maintains
the configuration, time, and date will
discharge.
To avoid overheating the computer, never
place anything on top of the computer when
it is recharging or operating.
Before moving an active computer, press the
Suspend to Disk
computer into sleep mode and close the
display (see
Suspend
button to put the
in the next section).

Using the Computer
!
e
or smell anything that indicates overheating
(smoke or a strange smell):
source.
Do not try to force the cover beyond its fully
opened position — about 180 degrees.
Caution: In the rare event that you should se
1. Turn off the power.
2. Disconnect the AC adapter from the power
3. Remove battery pack(s).
4. Contact your Texas Instruments dealer.
1-7

Suspend-to-Disk Mode
-
to-disk mode, the Standby indicator lights up.
When this happens, data remains in memory and
is lost if power is lost. Call your dealer for
assistance.
Suspend
Suspend-to-disk mode (also called zero-volt
suspend mode) saves battery power when you
are not actively using your computer.
In suspend-to-disk mode, the computer saves
the current system state onto your hard disk
and then shuts off.
Press the
Suspend to Disk
button to enter
suspend-to-disk mode. To resume normal
operations, press the
Suspend to Disk
button or
the power switch. Suspend-to-disk mode occurs
automatically if the
STANDBY/SUSPEND AFTER
parameter in Setup is enabled and times out.
Button
Suspend Button
Note:
If the notebook is unable to enter suspend
1-8

Securing the Computer
Your Extensa computer comes with a safety
notch. To physically secure your computer,
complete the following steps:
1.
Wrap the cable of a portable computer
Kensington security lock (not provided)
around a table, desk drawer handle or any
immovable object.
2.
Insert the lock into the notch at the rear of
the computer.
3.
Turn the key to secure the lock.
Notch
Securing the Computer
1-9

Using the AC Adapter
.
e
!
with your computer. Another adapter may
damage your computer.
DC
C
or
A
er
Connector
M
g
onnect
AC
Adapter
C Adapt
Female
ale Plu
AC Adapter
Charges the internal battery pack and
operates the computer on AC power
whether or not a battery pack is installed
The AC adapter can be operated anywher
where the outlet supplies between 100240 volts AC. The AC adapter has a
detachable AC power cord.
Caution: Use only the AC adapter supplied
1-10

Using the AC Adapter
To connect the AC adapter, complete the
following steps:
1.
Turn off the power, or press the
Disk
button to put the computer into
suspend-to-disk mode.
2.
Connect the female connector of the AC cord
to the inlet on the AC adapter.
3.
Plug the DC connector into the matching jack
on the rear panel of the computer.
4.
Plug the male end of the AC cord into a wall
receptacle using the correct voltage.
5.
Turn the computer on.
Suspend to
1-11

Using Your Computer
................................
.
.......................
..........................
............................
................................
................................
..........
................................
..
................................
.....
...................
................................
......
.........................
......................
................................
.........
................................
...
............
................................
.....
................................
.....
.......................
Before beginning this chapter, ensure you have
read and understood Chapter 1. Chapter 2
describes how to start and use your Extensa
computer.
Contents
2
Starting the Computer
Using the Brightness Control
Using the Contrast Control
Using the Volume Control
Ejecting PCMCIA Cards
Ejecting PCMCIA Cards from
Windows 95
Using Indicator Lights
Using the Touchpad
Configuring the Touchpad
Using Disk Drives
Hard Disk Guidelines
Floppy Drive Guidelines
Adding Memory
Using the Keyboard
Using the Internal Numeric Keypad
Num Lock On
2-2
2-3
2-4
2-5
2-6
2-6
2-7
2-9
2-10
2-13
2-13
2-14
2-15
2-16
2-19
2-19
Num Lock Off
Using Connectors and Ports
2-20
2-21
2-1
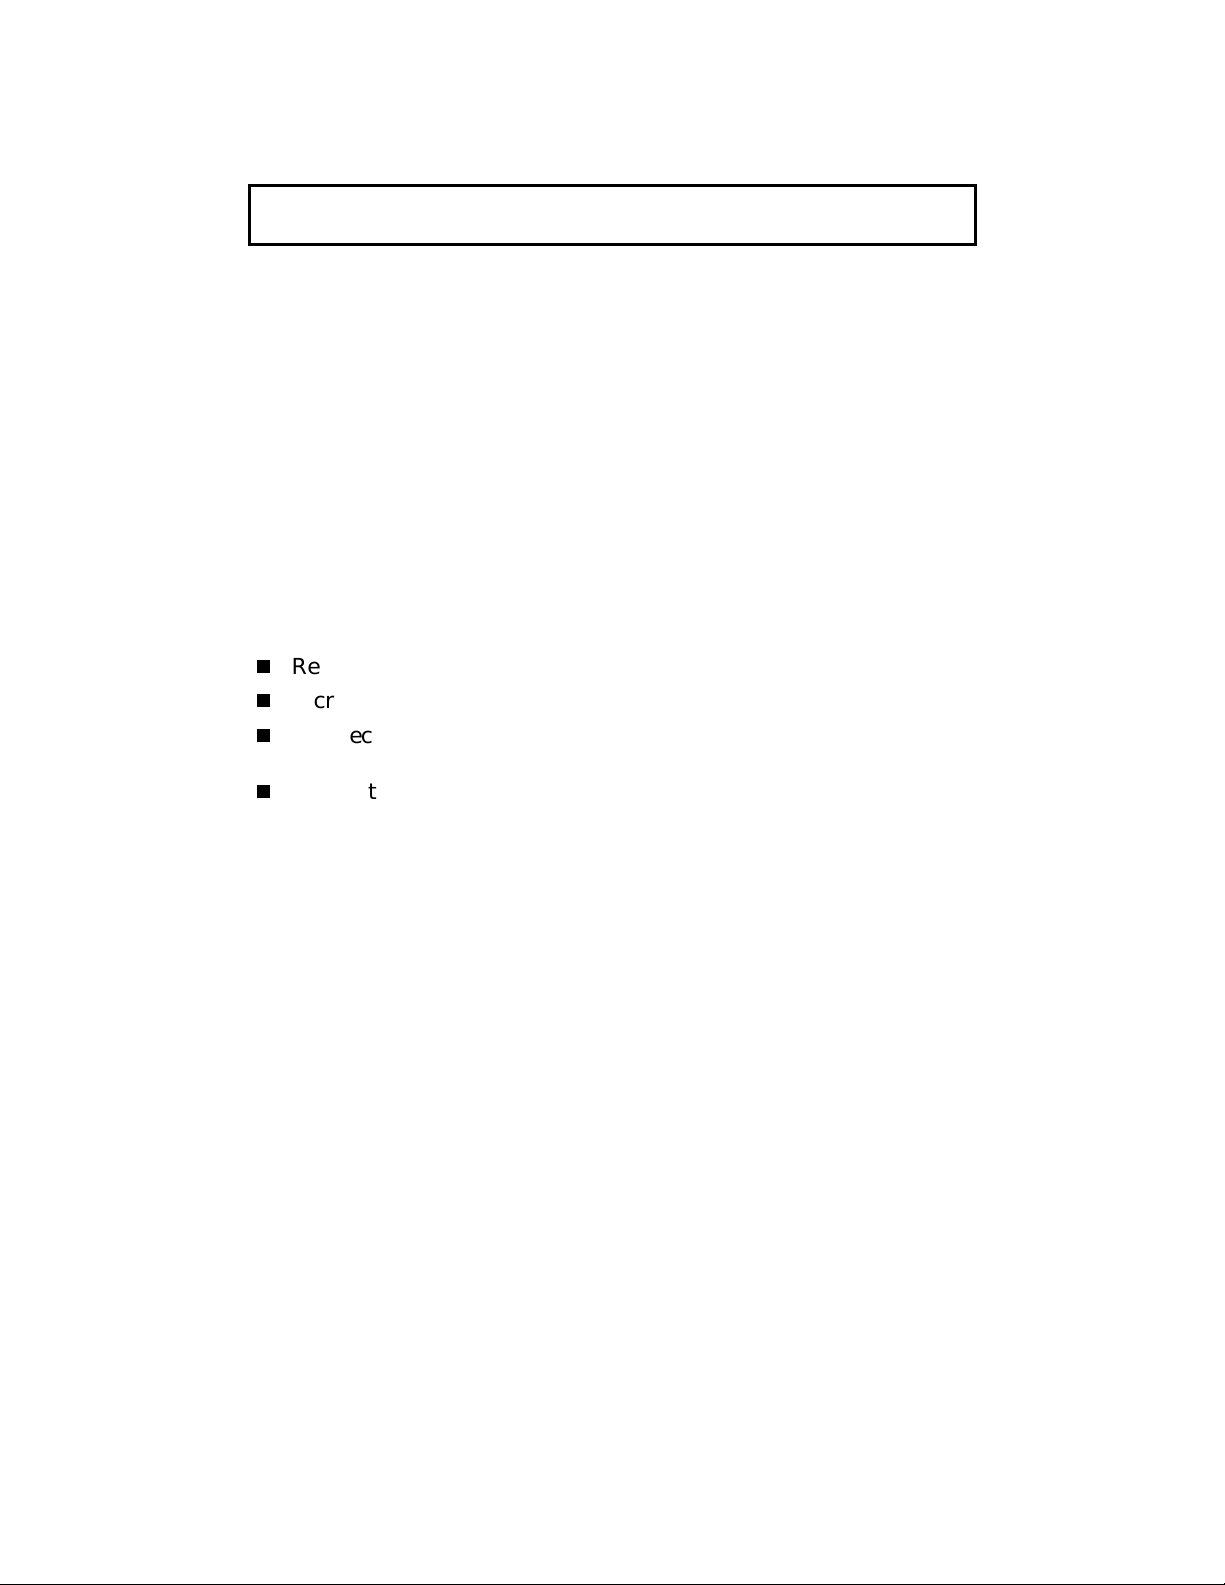
Starting the Computer
r
h
Powe
Switc
Power Switch
Power
Switch
Turns the computer on and off for both
AC and battery operation. When the
power is off, the battery continues to
charge (if a powered AC adapter is
connected to the notebook); however,
all computer functions cease.
2-2

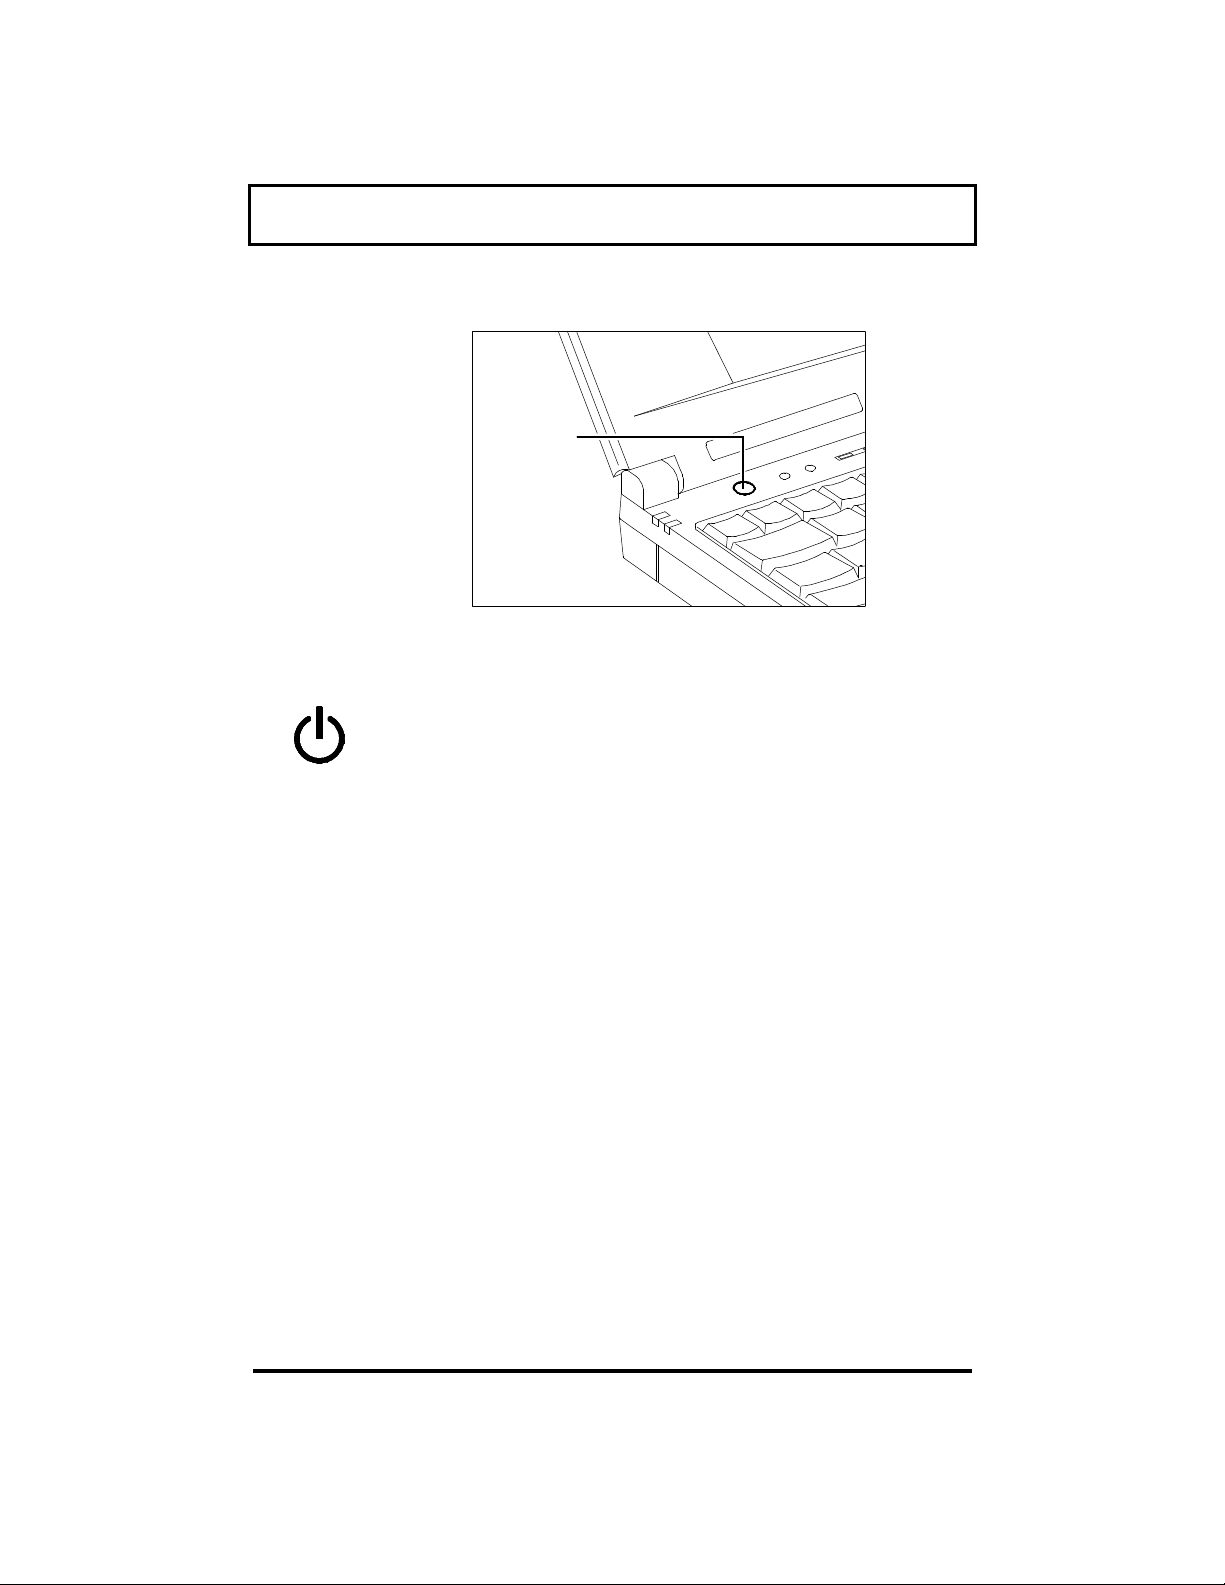
Using the Brightness Control
.
l
Brightness Control
Brightness
Control
Adjusts the brightness level of the
screen.
Press Fn+F2 to display the brightness
control pop-up. Press Fn+→→ and
Fn+←← to increase and decrease the
brightness of the display respectively.
The brighter the screen, the more
power is used during battery operation
Press Fn+Esc to exit the pop-up contro
2-3

Using the Contrast Control
n
l
f
l
Contrast Control
Contrast
Control
(Dual-Sca
Only)
Adjusts the contrast level of the
illuminated screen.
Press Fn+F2 to toggle between the
contrast control and brightness contro
pop-up. Then press Fn+→→ and Fn+
to increase and decrease the contrast o
the display respectively.
The higher the contrast setting, the
more power is used during battery
operation.
Press Fn+Esc to exit the pop-up contro
←←
2-4
Using the Volume Control
l
Volume Control
Volume
Control
Adjusts the volume.
Press Fn+F5 to display the volume
control pop-up. Press Fn+→→ and
Fn+←← to increase and decrease the
volume respectively.
Press Fn+Esc to exit the pop-up contro
2-5
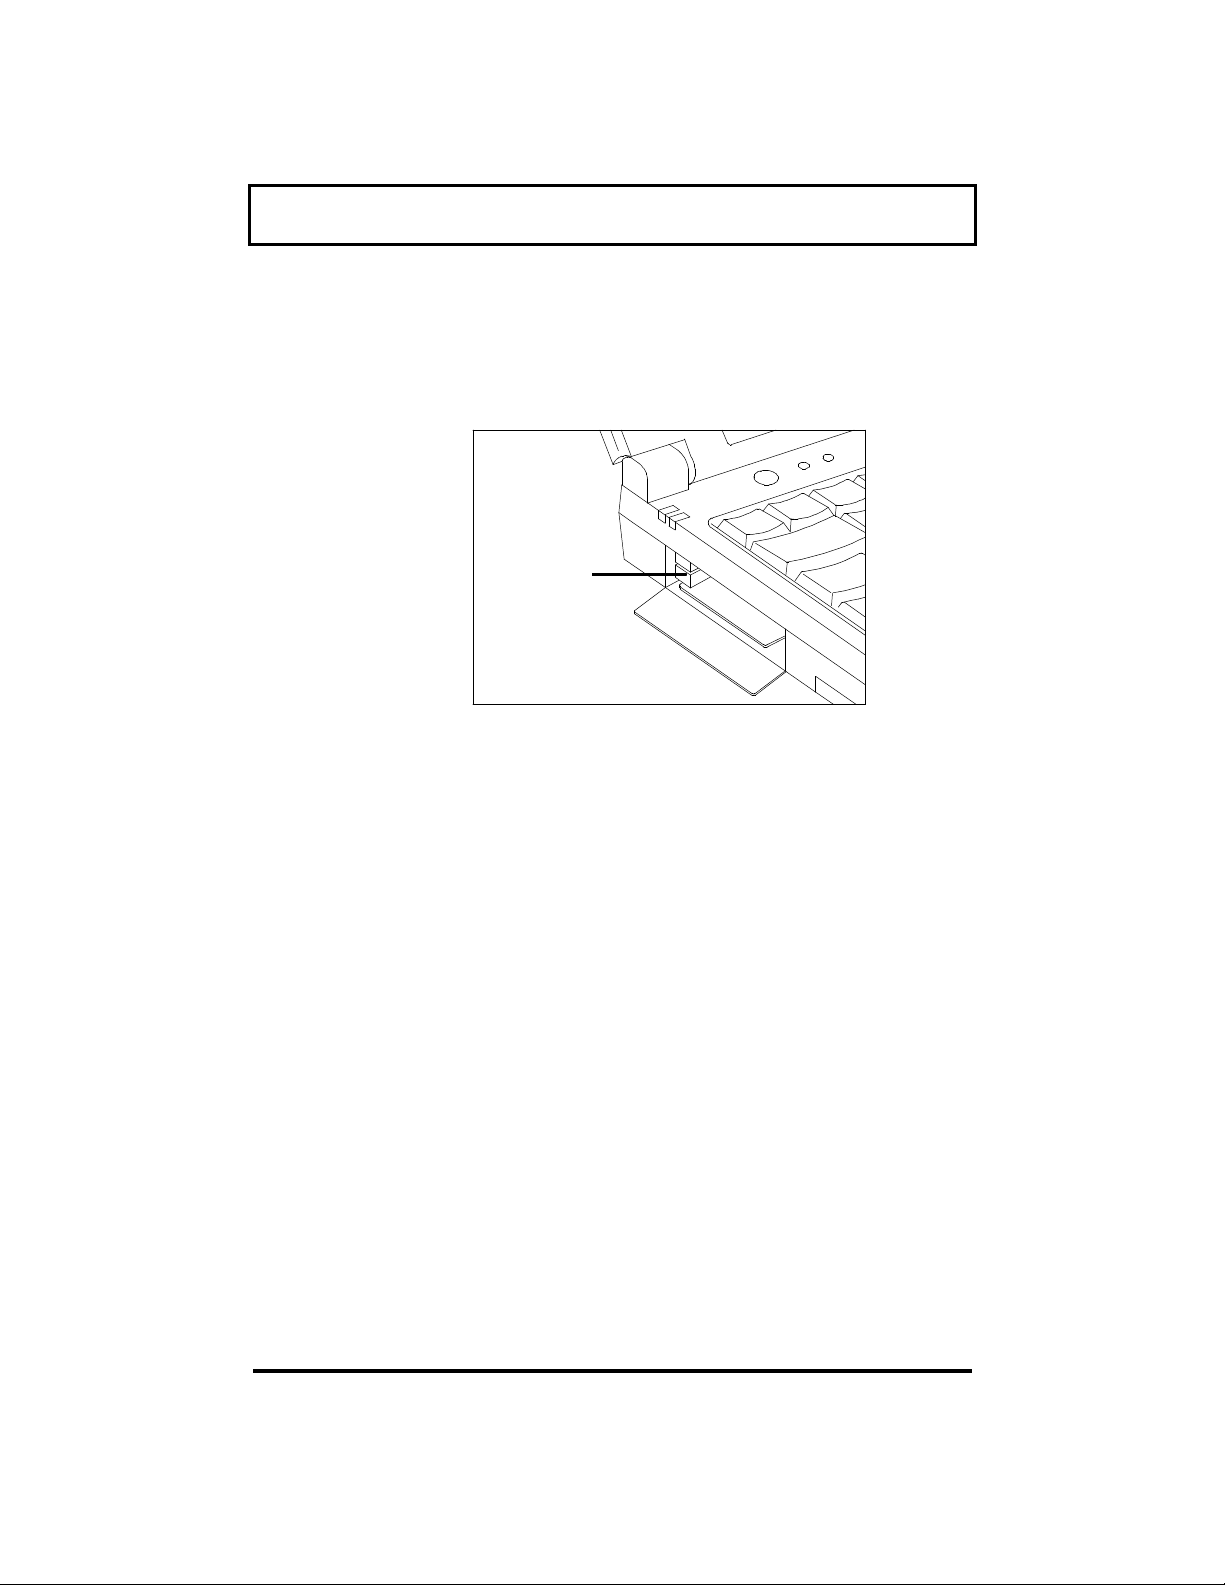
Ejecting PCMCIA Cards
s
The PCMCIA eject buttons are found beside each
slot. Pressing an eject button ejects the PCMCIA
card from the slot.
PCMCIA
Eject Button
PCMCIA Eject Buttons
Ejecting a PCMCIA Card from
Windows 95
Follow these steps to eject a PCMCIA card while
using Windows 95.
1.
Open the Control Panel.
2.
Click on the PCMCIA icon.
3.
Select the card you want to eject.
4.
Click on Stop.
5.
When Windows 95 responds with the
message “You may safely remove this
device.”, press the eject button to eject the
PCMCIA card.
2-6
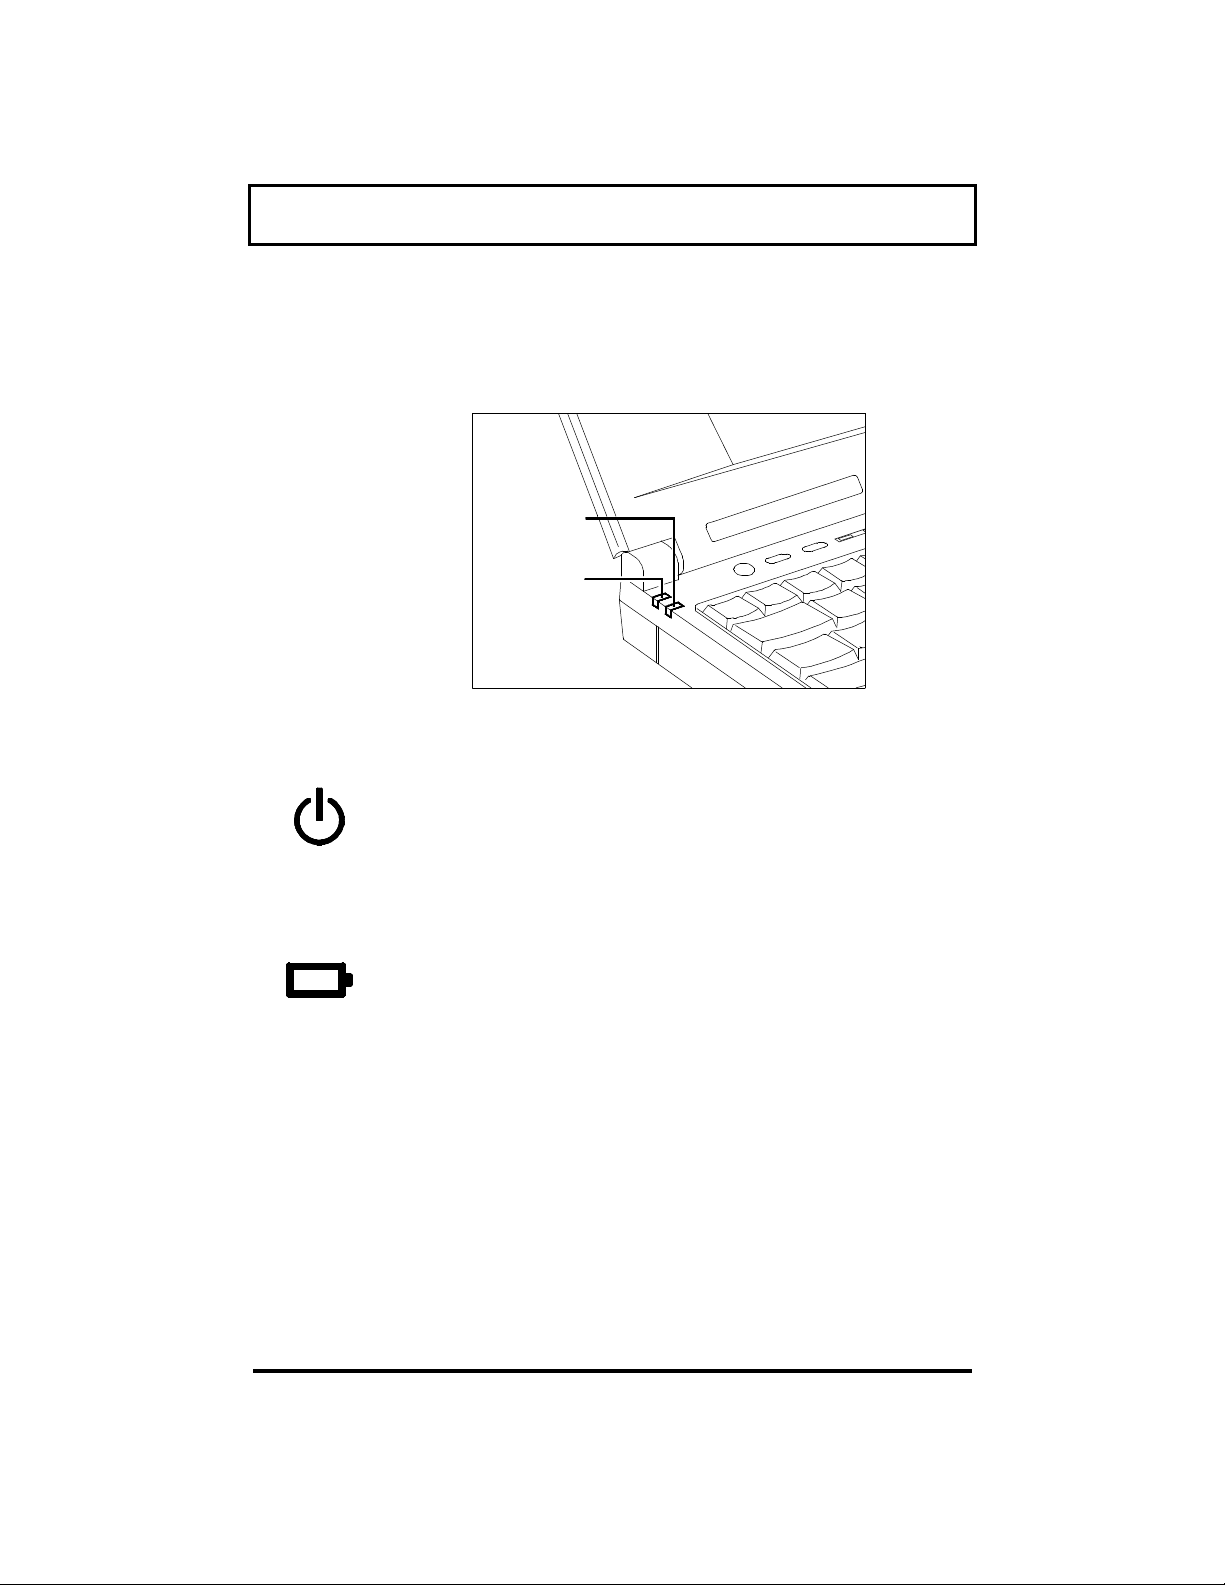
Using Indicator Lights
r
g
r
The computer uses the following indicator lights
to show the status of certain functions.
Battery
Chargin
Indicato
Power
Indicato
Top Indicator Lights
Power
Indicator
Battery
Charging
Indicator
Lights green when power is supplied
to the notebook computer.
Flashes when the battery power is
low.
Lights when the battery is charging.
2-7
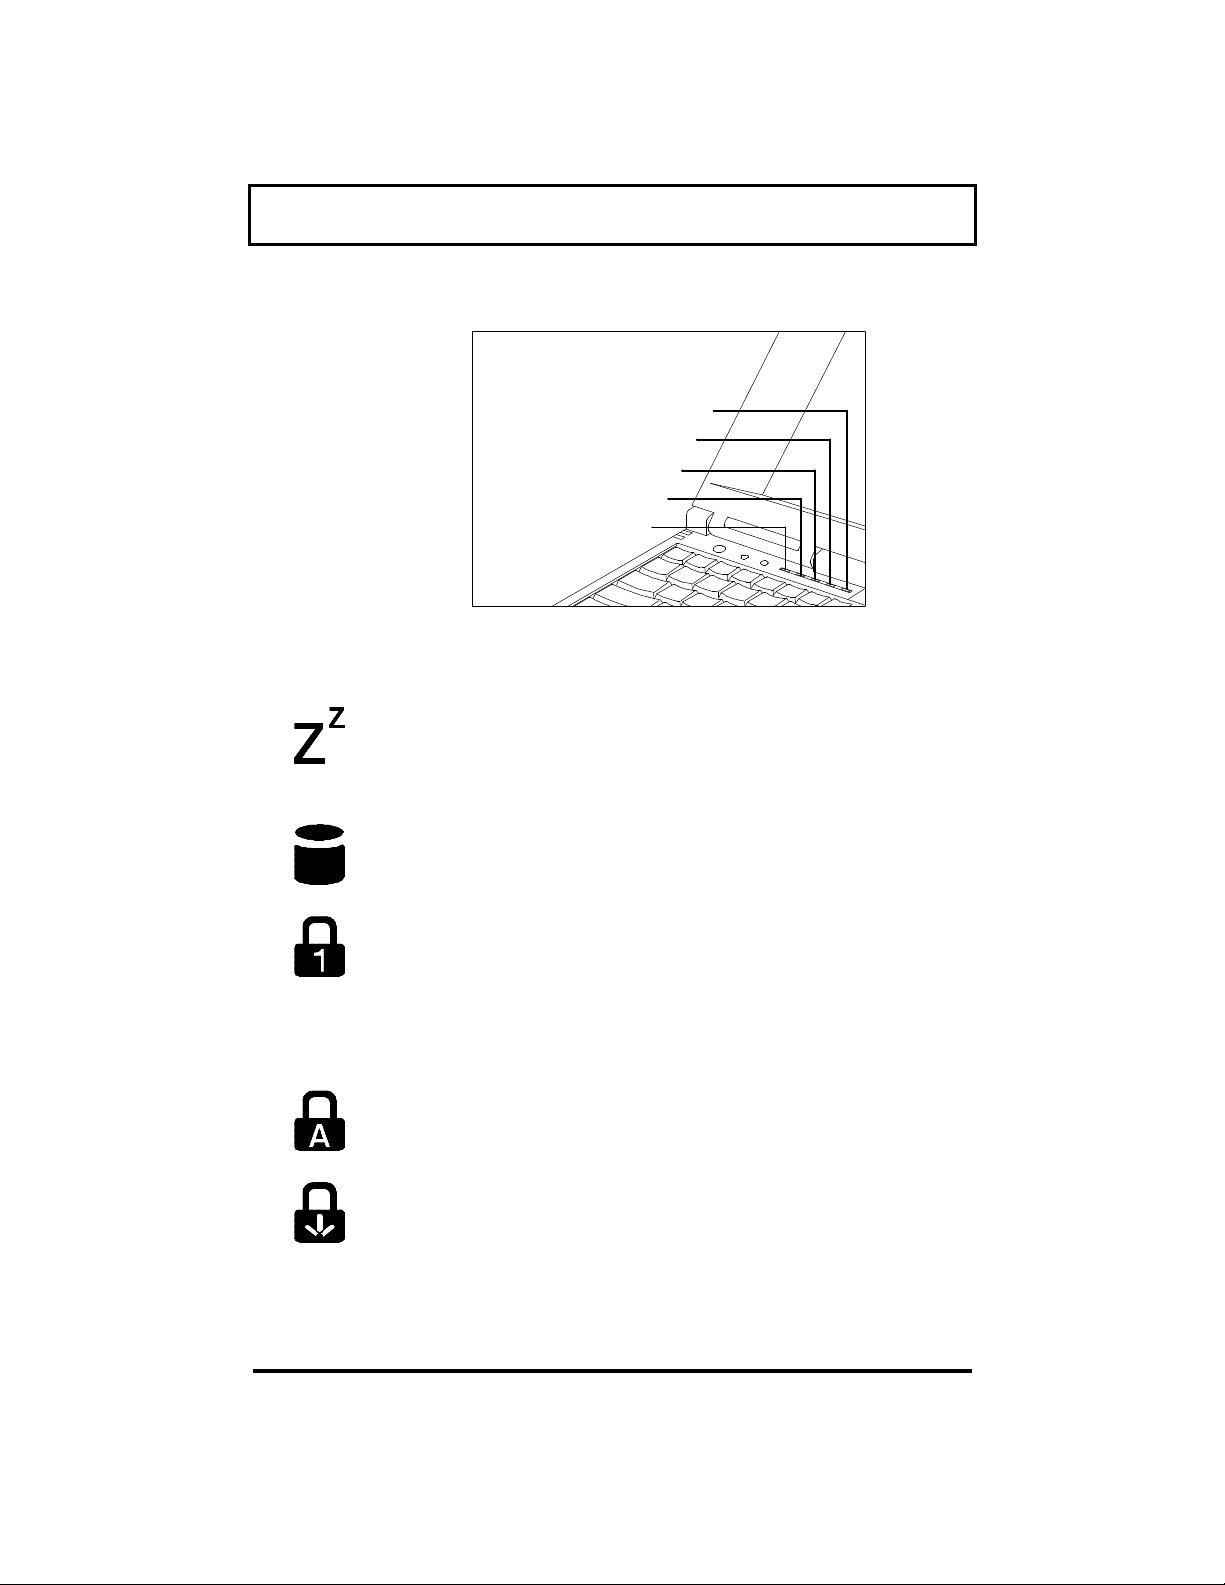
Using Indicator Lights
r
e
s
e
Indicator
r
r
r
r
Scroll Lock Indicato
Caps Lock Indicato
Num Lock Indicato
Hard Disk Indicato
Standby Mod
Front Indicator Lights
Standby
Mode
Indicator
Hard Disk
Indicator
Num Lock
Indicator
Caps Lock
Indicator
Scroll Lock
Indicator
Lights when the computer enters
standby mode.
Lights when the computer writes to o
reads from the hard disk.
Lights when the embedded numeric
keypad is toggled on using the Num
Lock (Fn+Num Lk) key. See
Numeric Keypad
later in this section
Using th
for further details.
Lights when the caps lock function is
toggled on using the Caps Lock key.
Lights when the scroll lock function i
toggled on using the Scrl Lk key.
2-8
 Loading...