

Acer DT.Z0TEK.001 User Manual

USER’S MANUAL
2 -
Note
Important
© 2018. All Rights Reserved.
Acer Chromebox
Covers: CXI3
This revision: May 2018
Sign up for an Acer ID and enjoy great benefits
1. Ensure you are connected to the Internet.
2. Open www.acer.com and select your country.
3. Select Support > REGISTER A PRODUCT.
4. Sign up for an Acer ID or sign in if you already have an Acer ID.
Register your Acer product
After we receive your product registration, you will be sent a confirmation
email with important data. Keep this email in a safe place.
Manage your registered products
Once you have completed the registration process, you can log onto
account.acer.com using your Acer ID and password to see and manage
all your registered products.
It may take a few days for your information to be updated to the database.
This manual contains proprietary information that is protected by
copyright laws. The information contained in this manual is subject to
change without notice. Images provided herein are for reference only
and may contain information or features that do not apply to your
computer. Acer Group shall not be liable for technical or editorial errors
or omissions contained in this manual.
Model number: _________________________________
Serial number: _________________________________
Date of purchase: _______________________________
Place of purchase: ______________________________
Google, Android, Google Play, YouTube and other marks are trademarks of Google LLC.

TABLE OF CONTENTS
Table of contents - 3
Register your Acer product ......................... 2
Manage your registered products ............... 2
Getting started 4
Turn on your Chromebox......................... 4
Select your language settings ................. 4
Connect to a network............................... 4
Accept the Terms of Service....................... 4
First-time sign-in ...................................... 4
Create a new Google™ Account ............... 4
Browse as a guest ...................................... 5
Sign in to your Google Account .................. 5
Your Acer Chromebox tour 6
Front view........................... 6
Rear view................................................. 7
The Chrome OS Desktop 9
Window controls ..................................... 9
Shelf ...................................................... 10
Launcher................................................... 10
Pinned apps.............................................. 10
Status area................................................ 11
Apps & extensions 12
Managing apps ...................................... 12
Installing apps from the Chrome Web
Store ........................................................ 12
Installing apps from the Google Play Store ...
13
Removing apps from Chrome OS............. 13
Pin an app to the shelf .............................. 13
Unpin an app from the shelf...................... 13
Google Drive ......................................... 14
Difference between Drive and Files apps . 14
Creating a new document ......................... 14
Sync files from Downloads to Google
Drive.......................................................... 14
Enable offline access to Google Drive files 15
Gmail .................................................... 16
Composing an email ................................. 16
YouTube ............................................... 16
Playing video or audio files.................... 16
Other Supported File Types .................. 16
Chrome OS tips and tricks 18
Documents............................................. 18
How to create documents ......................... 18
Finding your documents............................ 18
How to share documents with other users 19
How to start a video chat ....................... 19
How to listen to music............................ 20
How to watch videos, TV, or movies...... 20
............................................................... 20
Working with Microsoft Office (Word,
Excel, and Powerpoint) documents ....... 21
Open and edit Microsoft Office files using
Google’s office compatibility mode ........... 21
Convert Microsoft Office files to Google
Drive formats............................................. 21
Export Google Drive documents as
Microsoft Office files.................................. 21
Opening Microsoft Office files using
Microsoft’s Office Online apps from the
Chrome Web Store or Google Play Store. 22
How to use your Chromebox when
there’s no internet .................................. 22
Gmail Offline ............................................. 23
Google Drive ............................................. 23
Settings 25
Changing the language settings ............ 25
Changing the clock settings................... 25
Customizing appearance ....................... 26
Customizing the wallpaper........................ 26
Customizing the theme ............................. 26
Setting up a printer ................................ 27
Updating Chrome OS ............................ 27
Automatic update...................................... 27
Manual update .......................................... 27
Resetting your Chromebox .................... 28
Assembling The VESA Mount 29
Help 33
Online and offline help ........................... 33

4 - Getting started
GETTING STARTED
Turn on your Chromebox
On the Chromebox, the power button is located at the front side of
your product. A "welcome" screen will appear when the Chromebox
first boots up.
Select your language settings
Use the "Select your language" drop-down list to choose your default
language setting. If there is more than one way to type in your
language, you may be prompted to select a keyboard input method as
well.
Connect to a network
Select a network from the "Connect to network" list to connect to the
Internet. If network access is protected, you will need an access
password to connect to it.
Accept the Terms of Service
Once connected to a network, accept the Terms of Service. Your
Chromebox will then download any available system updates, so you
automatically get the latest Chrome OS features.
First-time sign-in
Create a new Google™ Account
You can create a new Google Account if you don’t already have one.
Select Create a Google Account to set up a new account. A Google
Account gives you access to useful web services developed by
Google, such as Gmail, Google Drive, and Google Calendar.

Browse as a guest
Important
You can also use the Chromebox without a Google Account by
selecting Guest mode.
Sign in to your Google Account
If you already have a Google Account, enter your username and
password in the sign-in box that appears and click the Next button.
Getting started - 5
Sign in with your primary Google Account. This account will be set as
the owner and is the only account that will be able to change certain
Chrome settings.
6 - Your Acer Chromebox tour
YOUR ACER CHROMEBOX TOUR
Now that you are done setting it up, let us show you around your new
Acer Chromebox.
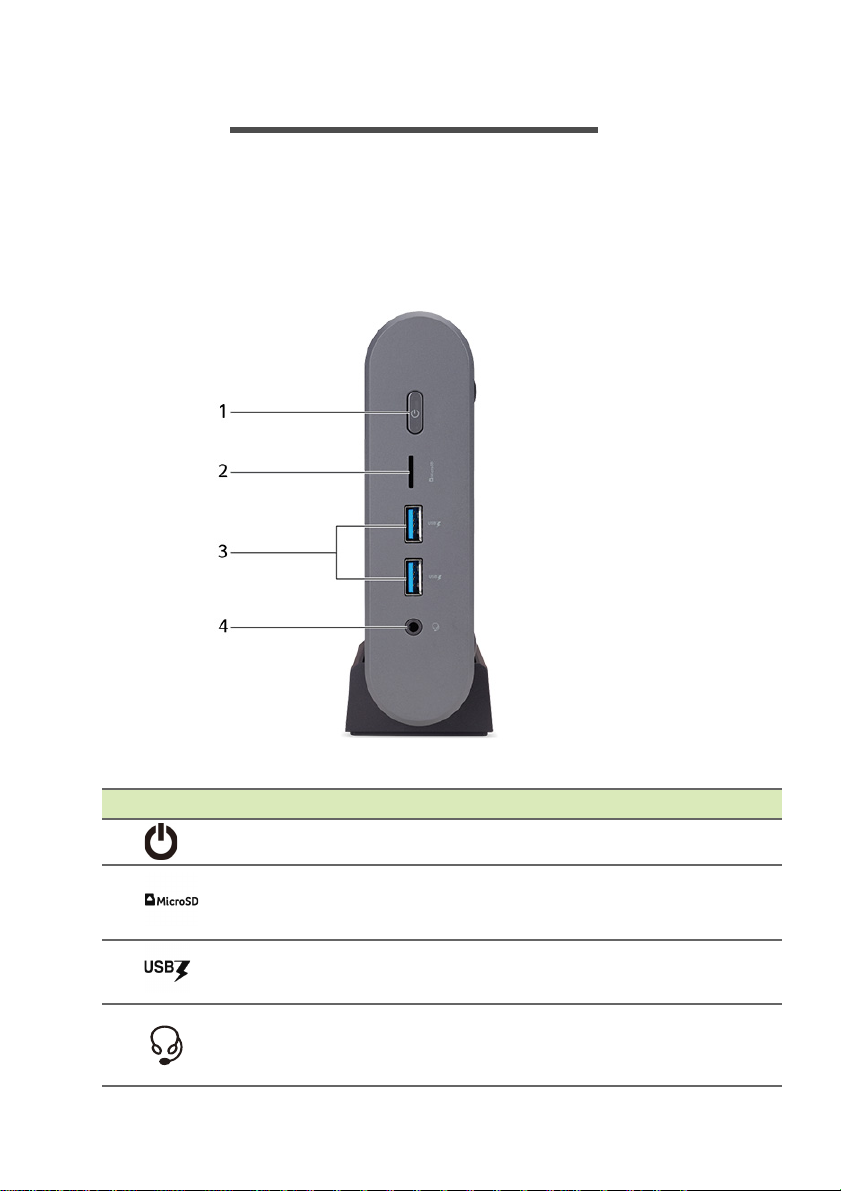
Front view
# Icon Item Description
1 Power button Turns the computer on and off.
2 MicroSD card slot Insert a microSD card into this slot.
3
4
USB port with
power-off charging
Headset/speaker
jack
Connects to USB devices.
Connects to audio devices (e.g.,
speakers, headphones) or a headset
with microphone.
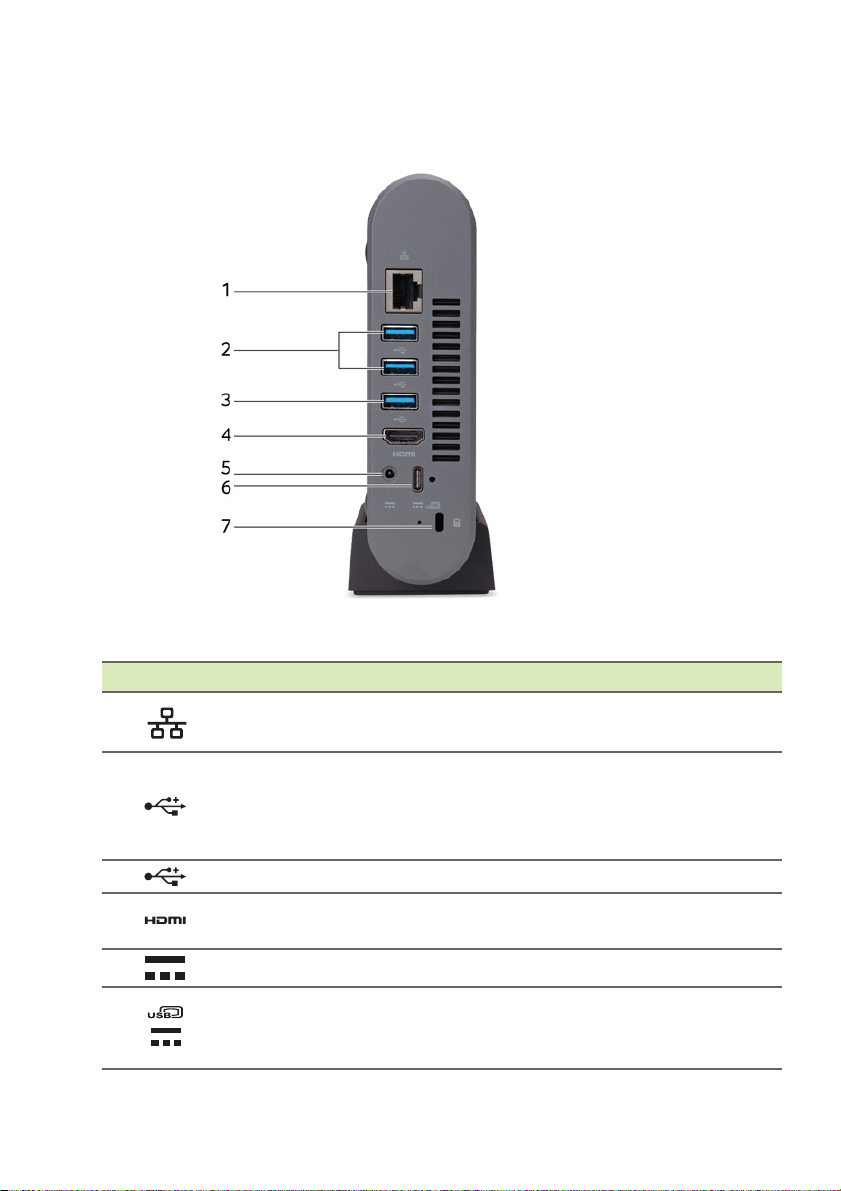
Rear view
Your Acer Chromebox tour - 7
# Icon Item Description
1
Ethernet (RJ-45)
port
Connects to an Ethernet 10/100/
1000-based network.
Connects to USB devices.
2 USB port
If a port is black it is USB 2.0
compatible, if it is blue it is also USB
3.0 compatible.
3 USB port Connects to USB devices.
4 HDMI port
Supports high-definition digital video
connections.
5 DC-in jack Connects to an AC adapter.
6
USB Type-C port
with DC-in
Connects to USB devices with a
USB Type-C connector.
Supports DisplayPort
™
over USB-C™.
8 - Your Acer Chromebox tour
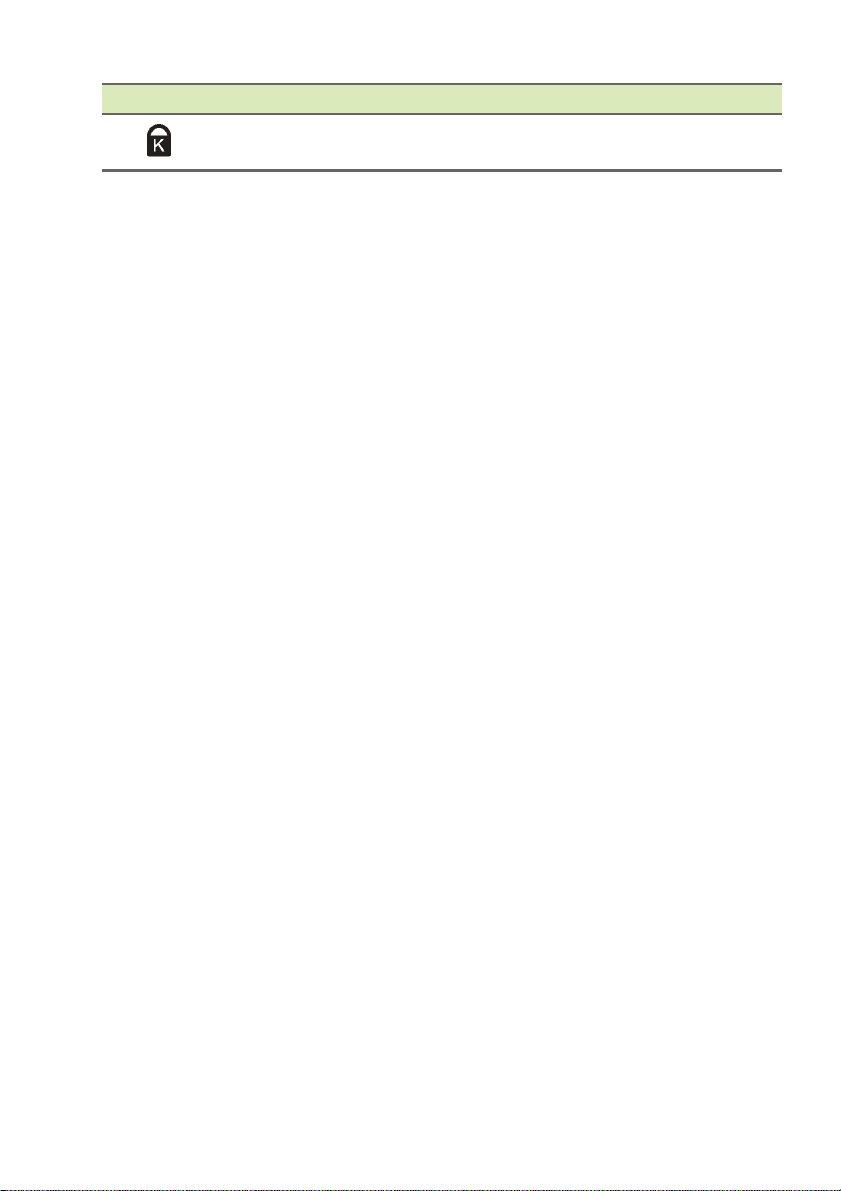
# Icon Item Description
7
Kensington lock
slot
Connects to a Kensingtoncompatible security lock.
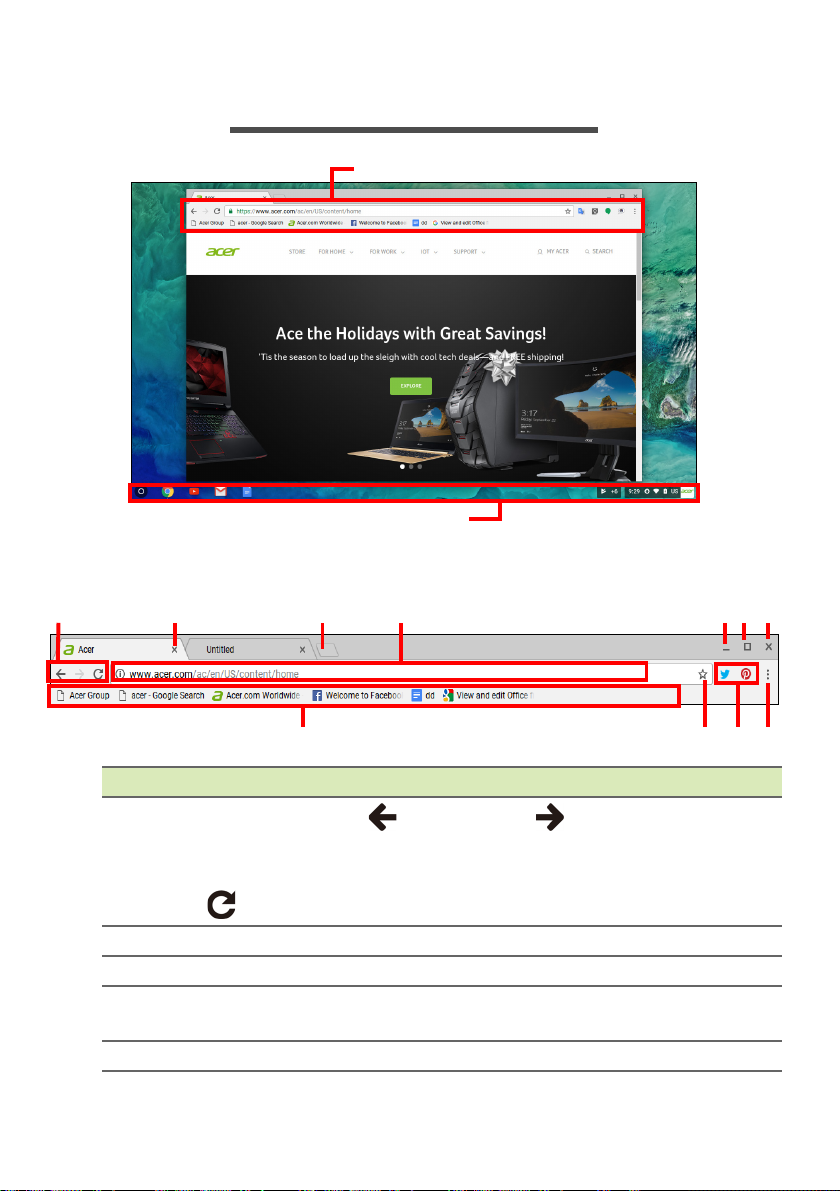
THE CHROME OS DESKTOP
Window controls
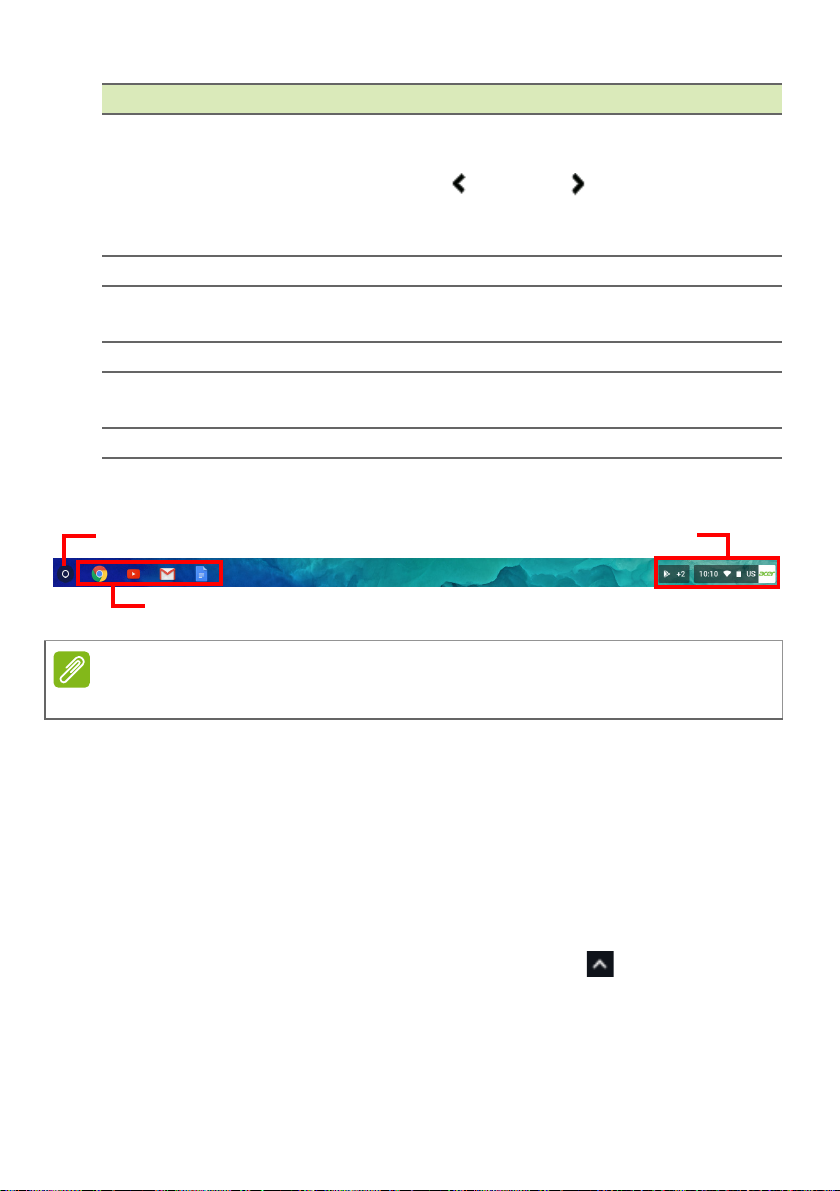
Shelf
1
8
9
10
11
7
6
5
4 3
2
Window controls
The Chrome OS Desktop - 9
Number Description
Goes Backward and Forward in the current web
1
browsing sessions’s history (closing and reopening the
Chrome browser begins a new session). Select to Reload
the current webpage.
2 Closes a tab.
3 Opens a new tab.
4
5 Minimizes the window into the desktop shelf.
Type a web address or perform an internet search in this
search box (also known as the "omnibox").
10 - The Chrome OS Desktop
Note
Status area
Launcher
Apps pinned to shelf
Number Description
6
7 Closes the entire window (tabs and all).
8
9 Select to bookmark (save) a link to the currrent webpage.
10
11 Select to customize and control Google Chrome.
Shelf
Maximizes the window to take up the entire screen. Click
again to return window to previous position. Also, select
and hold to display a left and right arrow next to the
icon. These neatly align the window to take up half the left
side of the screen or the right side, respectively.
Bookmark (save) webpage links to this quick-access area
called the "bookmarks bar".
Select to use any enabled extensions you have installed in
Chrome from this extension list.
Specifications vary. Some icons may not be applicable to your Chromebox.
Launcher
Select the Launcher icon to display the launcher page. This is the
fastest way to search for something. Simply start typing to search the
internet, your bookmarks, any files you have stored in your Google
Drive, and items in the Chrome Web Store.
The Launcher page is also the place to access all your apps. Below
the search box are your frequently-used apps. Simply select one to
open it. To see all apps you have installed, select .
Pinned apps
See Pin an app to the shelf on page 13 and Unpin an app from the
shelf on page 13 for more information.
 Loading...