

Page 1

Page 2

Copyright © 1998 Acer Incorporated
All Rights Reserved — Printed in Taiwan
DockMate V Quick Reference
Part No. 49.46813.001
Original Issue: April 1998
Changes may be made periodically to the information in this
publication. Such changes will be incorporated in new editions of
this manual.
Record the serial number, purchase date, and model number in the
space provided below. The serial number and model number are
recorded on the label affixed to the case. All correspondence
concerning your unit should include the serial number, model
number, and date of purchase.
No part of this publication may be reproduced, stored in a retrieval
system, or transmitted, in any form or by any means, electronic,
mechanical, photocopy, recording, or otherwise, without the prior
written permission of Acer Incorporated.
DockMate V Mini Docking Station
Serial No.____________Purchase Date________
Acer and the Acer logo are registered trademarks of Acer Incorporated and Acer America
Corporation.
Microsoft and Windows are registered trademarks of Microsoft Corporation.
Ethernet is a registered trademark of Xerox Corporation.
Kensington is a registered trademark of Kensington Microware, Inc.
IrDA is a trademark of Infra Red Data Association.
All other brand and product names are the property of their respective owners.
Page 3

Introducing DockMate V
The DockMate V is a full-featured docking base designed specifically
for your notebook computer. It complements your notebook
computer by providing you an easy connect and disconnect solution
to and from external peripheral devices.
This quick reference serves to help you use the DockMate V, the
companion mini docking station for your notebook computer. This
quick reference is divided into easy-to-follow sections. You can also
make quick jumps to topics below:
• To look at DockMate V’s ports ☞ page 2
• To make connections with DockMate V ☞ page 5
• To dock and undock the notebook computer ☞ starts page 5
• To look at some frequently-asked questions ☞ page 10
Introducing DockMate V 1
Page 4
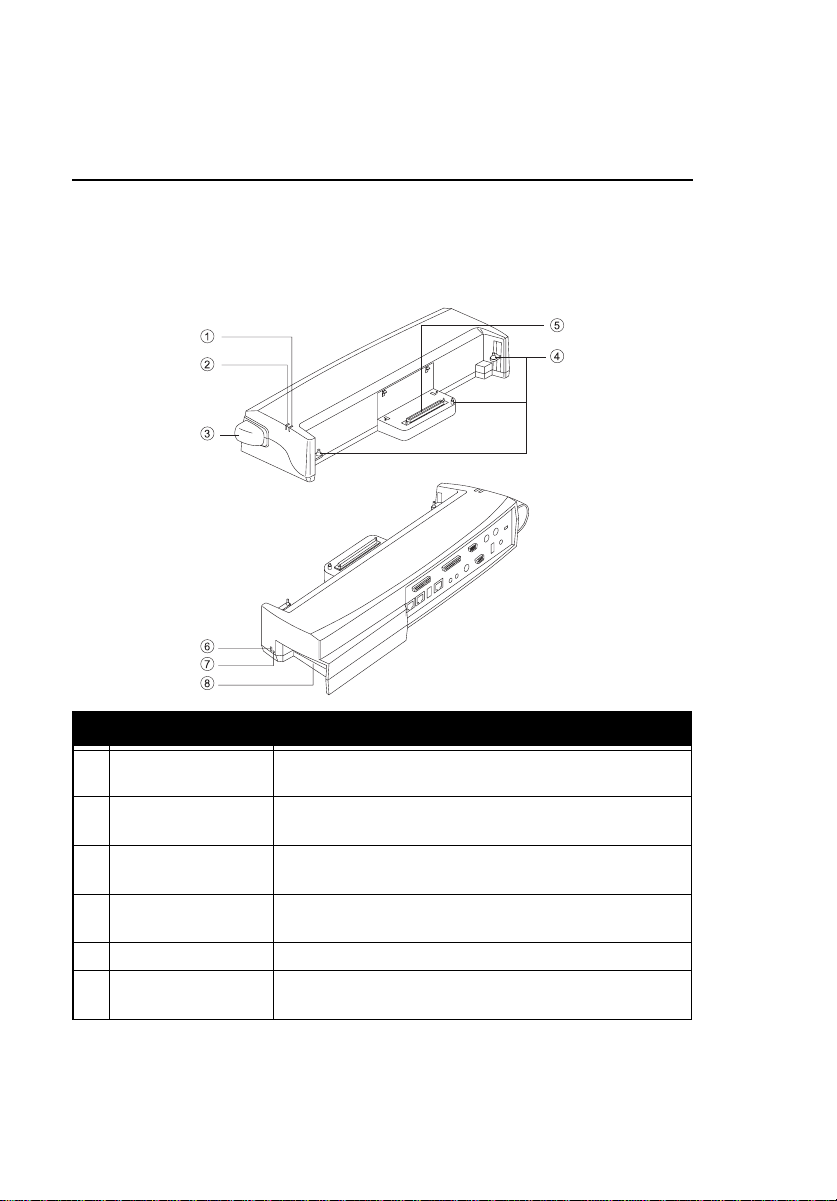
A Tour of DockMate V
DockMate V includes most of the ports on your notebook computer
and adds a few more.
# Item Description
1 Power indicator Lights when power is supplied to DockMate V, i.e.
the AC adapter is connected to DockMate V
2 Lock indicator Lights when the computer is securely docked to
DockMate V and the computer is turned on
3 Dock release lever Pull outward to release the computer from
DockMate V
4 Dock guides Guide pins for docking the computer into
DockMate V
5 Dock connector Connection between the computer and DockMate V
6 Security keylock Connect a computer security lock to secure
DockMate V
2 DockMate V Quick Reference
Page 5
# Item Description
7 Emergency eject Insert a pin here to manually eject the computer
from DockMate V. Use this only if pulling on the
dock release lever does not eject the computer.
8 AcerLink Bay Houses a removable connection module. These
include the following: (1) a module with 2 CardBus
PC Card slots, (2) a high-speed Ethernet-based
network connection module, and (3) a 1394
FireWire high-speed serial connection module. See
“Upgrading DockMate V” on page 8 for details.
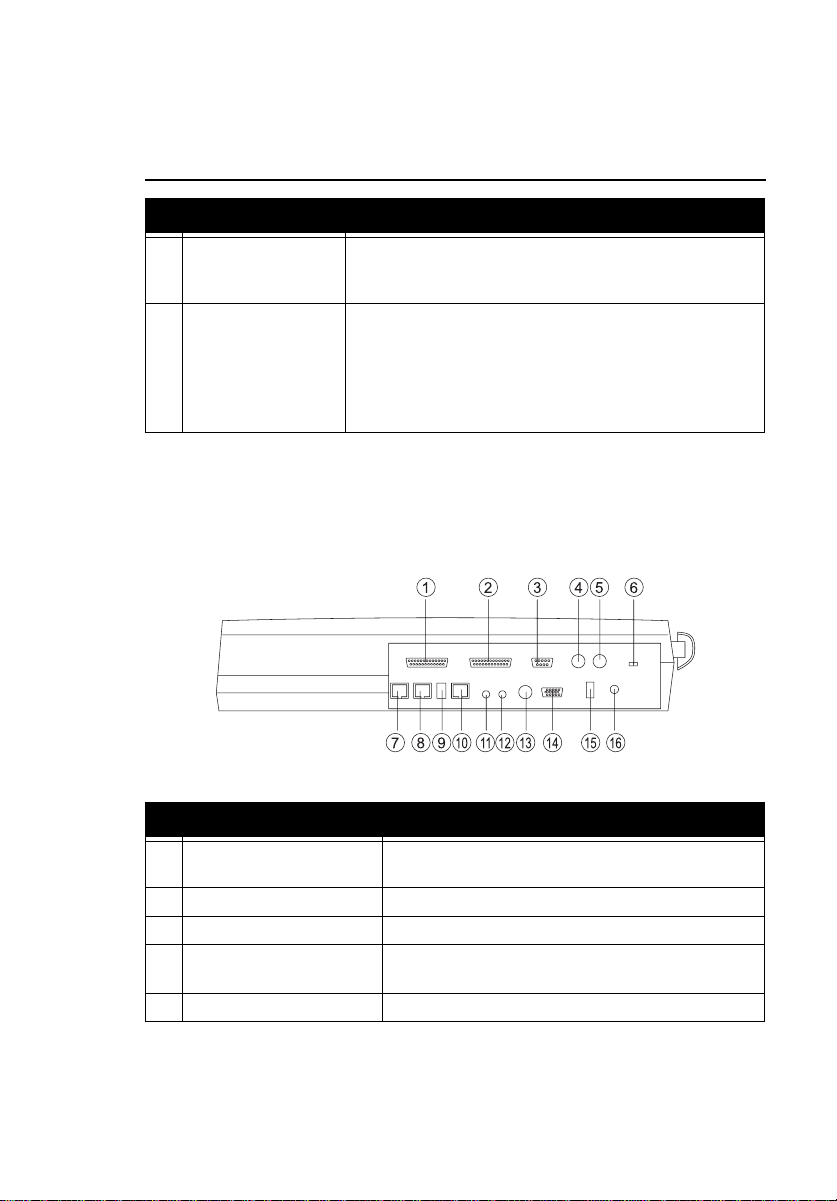
Ports
DockMate V has a host of ports and jacks found at the back of the
unit.
Rear ports and their descriptions are listed below:
# Port Connects to...
1 External floppy drive
port
2 Parallel port Parallel device (e.g., parallel printer)
3 Serial port Serial device (e.g., serial mouse)
4 PS/2 mouse port PS/2-compatible mouse or similar pointing
5 PS/2 keyboard port PS/2-compatible keyboard or keypad
External floppy drive (if your computer has a
removable/swappable floppy drive)
device
A Tour of DockMate V 3
Page 6

# Port Connects to...
6 Parallel port switch Slide this switch to the icon of the desired
peripheral (external floppy drive or printer) to
use that peripheral device.
7 Phone line jack (RJ-11) Phone line
8 Phone set jack (RJ-11) Telephone apparatus
9 FireWire jack (1394) Firewire-compliant device (if your computer
has a built-in FireWire jack)
10 Network jack (RJ-45) Network cable (if your computer has a built-in
network jack)
11 Microphone-in/
line-in jack
12 Speaker/
headphone-out jack
13 S-video jack S-video display device (e.g., television set with
14 External monitor port External monitor or other compatible display
15 USB jack Universal Serial Bus device
16 DC-in jack AC adapter and power outlet
External microphone or audio line-in device
External speakers or headphones
S-video capability)
device
Note: You can only select either the 25-pin FDD port or the
25-pin parallel port. The two ports cannot be used
simultaneously. Set the parallel port switch to the FDD
icon if using a floppy disk drive. Set to the Printer icon
when using a printer.
4 DockMate V Quick Reference
Page 7

Using DockMate V
Before you Begin
Follow these steps:
1. Connect one end of the AC adapter to the DC-in port on DockMate V; then connect the other end to the power outlet.
2. Connect the desired peripherals to the ports on DockMate V.
3. Route the cables and position DockMate V on your desk — there
should be enough space in the front of DockMate V for the computer to easily dock and undock.
Now you are ready to dock and undock the computer.
Docking the Computer
Note: You can dock the computer when the computer is in
Windows 95, turned off, in standby or hibernation modes.
Follow these steps:
1. Position the computer over DockMate V, making sure the docking
guides are aligned.
2. Gently but firmly press the top rear end of the computer down
into DockMate V. You will hear a clicking sound, see the hooks
hook on the rear side, and the lock indicator lights up (when the
computer is on).
Using DockMate V 5
Page 8

Display Closed Display Open
3. After docking, the computer automatically detects the presence of
all peripheral connections on DockMate V and configures itself
accordingly.
Note: When the computer resumes, it will detect the
display adapter, will display unknown monitor and then
scan for additional hardware devices. The energy saving
feature of the monitor in the Control Panel is not meant for
the notebook’s LCD.
Undocking the Computer
Note: You can undock the computer when the computer is
in Windows 95, turned off, or in hibernation mode.
Follow these steps:
1. Click on Start; then click on Eject PC and wait for the docking
change message onscreen. The lock indicator turns off.
If your computer is off or in hibernation mode, skip step 1.
2. Pull the dock release lever outwards to disengage the computer
from DockMate V.
6 DockMate V Quick Reference
Page 9

3. Hold the computer with your palms underneath it and your two
thumbs on DockMate V; then lift up the computer to remove it
from DockMate V.
3
3
2
4. Close the docking connector door on the bottom of the computer.
Note: When docking, DockMate V automatically opens the
docking connector door.
The computer reconfigures itself.
Using DockMate V 7
Page 10

Upgrading DockMate V
The flexible AcerLink bay found on the right side of the mini docking
station houses a removable module. There are three available
modules you can install in the AcerLink bay:
Note: Consult your dealer on the availability of AcerLink
bay modules.
• CardBus PC Card slot module adds 2 additional CardBus slots
• Ethernet module provides high-speed Ethernet-based network
connection
• FireWire module provides high-speed serial connection using the
FireWire 1394 standard.
FireWire 1394
CardBus
Ethernet
8 DockMate V Quick Reference
Page 11

Follow these steps to install an AcerLink bay module:
1. Remove all power sources from DockMate V.
Undock your computer if it is docked to DockMate V. See
“Undocking the Computer” on page 6. If an AC adapter is powering DockMate V, unplug it.
2. Turn DockMate V over on its base and remove the AcerLink bay
security screw.
2
If an AcerLink bay module is currently-installed in DockMate V,
pull it out.
3. Insert an AcerLink bay module into the AcerLink bay.
4
3
4. Tighten the AcerLink bay security screw.
Make the necessary connections to the module. To dock your
computer, see “Docking the Computer” on page 5.
Upgrading DockMate V 9
Page 12

Troubleshooting
Following are common questions and answers related to your use of
DockMate V.
How do I know the computer is successfully docked into DockMate V?
There are two areas you can check:
• Physical Lock. When the docked computer is on, the lock indica-
tor, found on the top of DockMate V, should be lit.
• Logical Lock. The peripherals connected to DockMate V should
function normally with the computer. Press Fn-F2 to access the
Notebook Manager and look at the settings in the Information
Viewer screen — the peripherals connected to DockMate V should
register.
If a peripheral is not functioning normally, try to restart the computer
while it is docked into DockMate V.
Why can’t I pull the dock release lever when the computer is docked?
When a docked computer is on, DockMate V “locks” the dock release
lever to keep the computer securely docked to DockMate V. The lock
indicator lights up in this situation. You can only undock the
computer when the lock indicator is off.
Does my docked computer support Plug and Play?
Yes. After connecting the computer to DockMate V, the system will
detect add-on hardware and load drivers automatically under
Windows 95.
10 DockMate V Quick Reference
Page 13

My computer’s floppy drive can be used externally. How do I use it
when my computer is docked with DockMate V?
Follow these steps to make a quick and easy transition:
1. Unplug the floppy drive from the parallel port.
2. Connect the floppy drive to the FDD (floppy disk drive) port on
DockMate V. Set the parallel port switch to FDD.
3. Dock the computer.
If other peripherals are connected to the computer, you can also make
the easy transition by disconnecting them from the computer, and
then connecting them to DockMate V.
Note: For models with a built-in floppy drive, the floppy
drive port on DockMate V is disabled.
How do I manage four PC Card slots (if the CardBus module is in the
AcerLink Bay)?
With four PC Card slots (two each in DockMate V and your computer),
you have more expansion options — network, modem, ZV MPEG , and
many more.IRQs or Interrupt Requests are limited resources that are
occupied by devices (e.g., network, audio, modem). CardBus devices
have the ability to share IRQs. If you do run out of IRQs, we suggest
you disable devices that you do not need. You can do this through
the System icon in the Control Panel. Refer to your Windows 95
manual for details.
Troubleshooting 11
Page 14

12 DockMate V Quick Reference
 Loading...