

Page 1

DockMate IV
Quick Guide
The DockMate IV is an ergonomic docking base
designed specifically for the TravelMate 7100
series notebook computer.
The following is quick guide is divided into easy-tofollow sections. You can also make quick jumps to
topics below:
To look at DockMate IV’s ports ☞ page 2
To make connections with DockMate IV
☞ page 5
To dock and undock the notebook computer
☞ starts page 6
To look at some frequently-asked questions
☞ page 10
1
Page 2
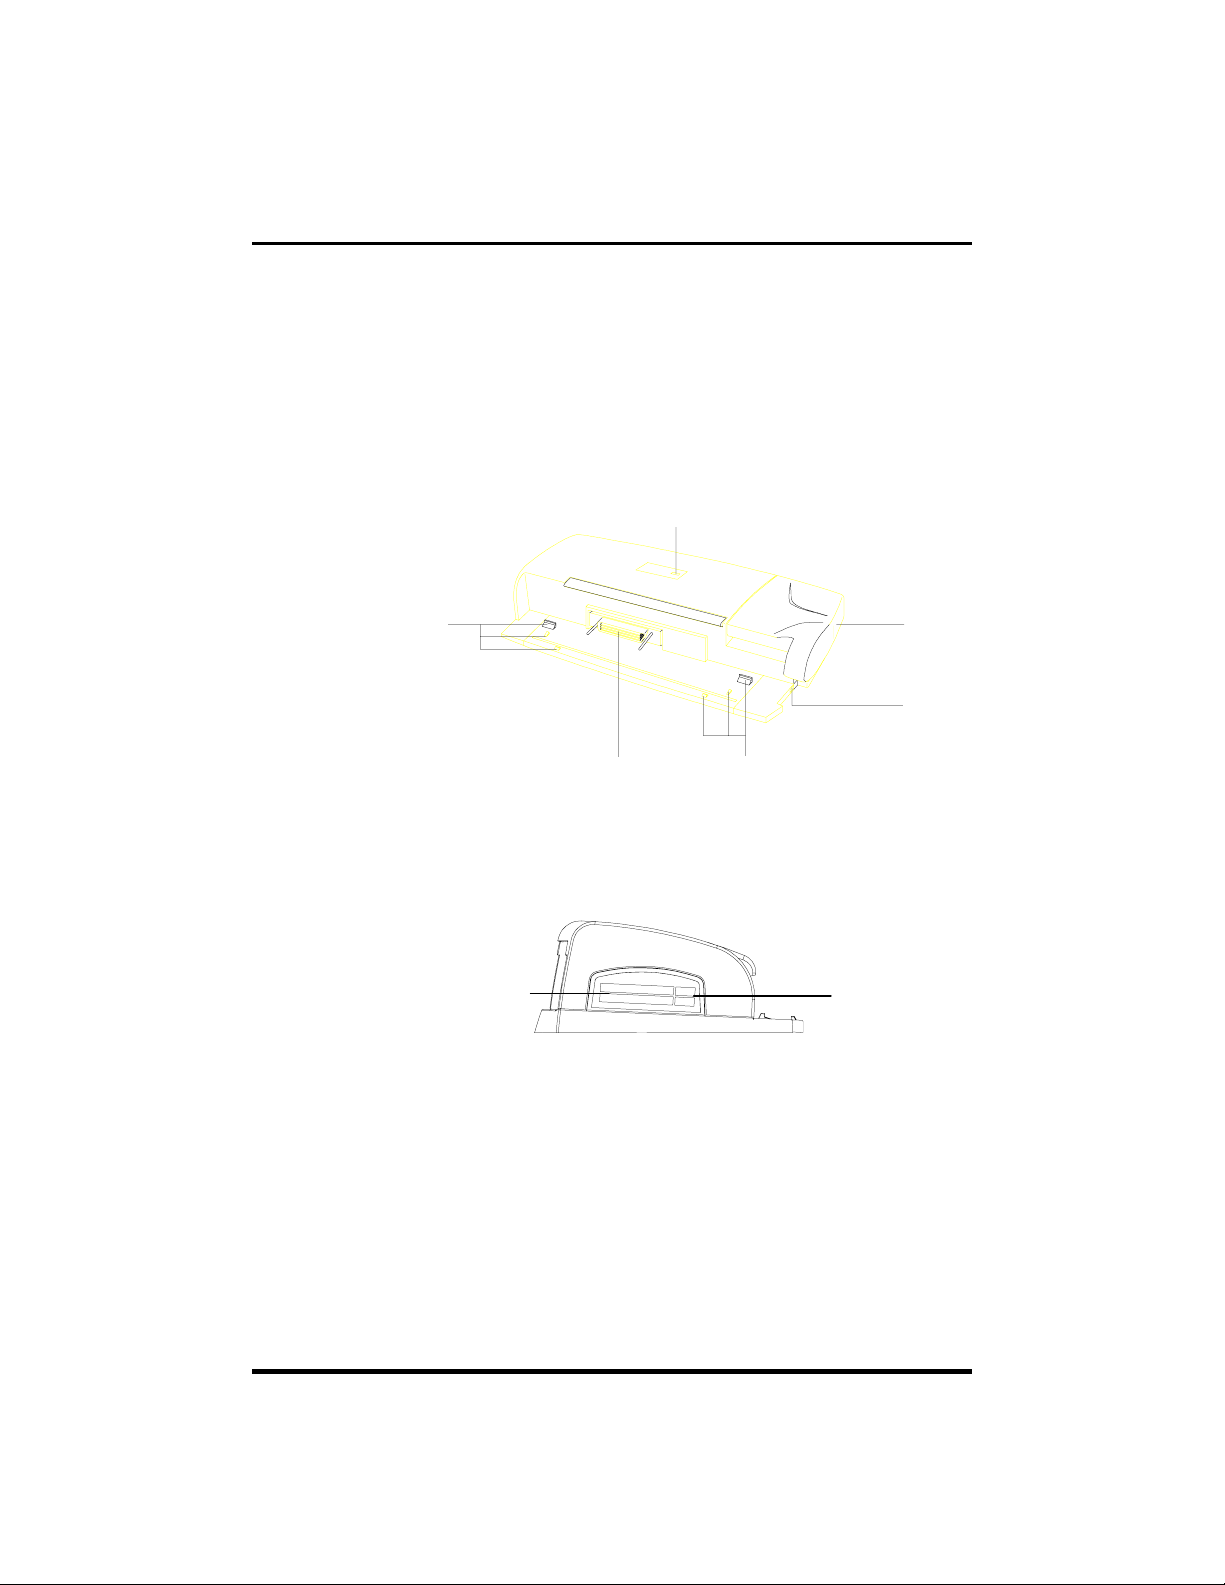
A Look at DockMate IV
buttons
DockMate IV is uniquely-designed and allows you
to connect your notebook computer to all the
peripherals you need, and adds two more CardBus
PC Card slots for even greater flexibility.
Dock
indicator
Dock
guides
Dock
connector
Dock
guides
Dock
lever
Dock
lock
Left Ports
CardBus
PC Card slots
In addition to the two PC Card slots on your
TravelMate, DockMate IV has two more CardBus
PC Card slots.
Eject
2
Page 3
A Look at DockMate IV
9 10 11 12 13
1 2 3 4 5 6 7 8
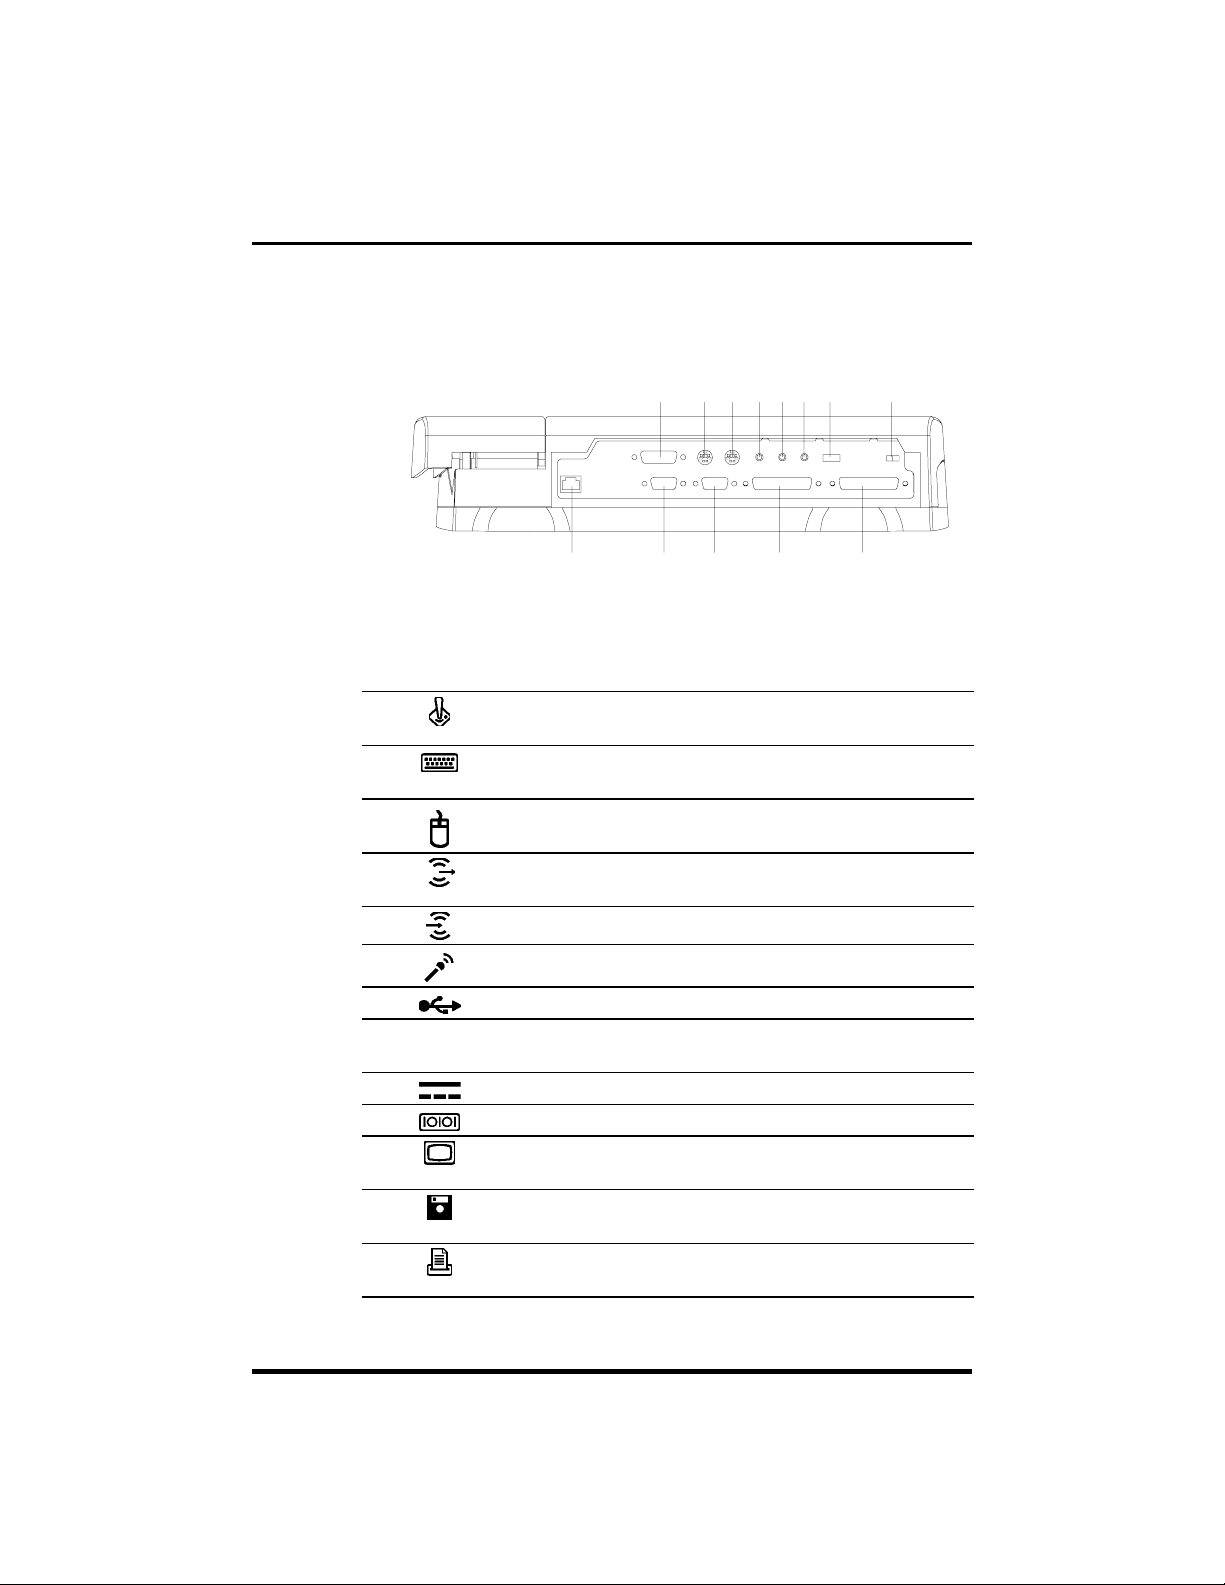
Rear Ports
Rear ports and their descriptions are listed below:
# Icon Port Connects to...
1
2 PS/2 keyboard/
3 PS/2 mouse port PS/2-compatible pointing
4 Speaker-out/
5 Line-in jack Audio line-in device
Joystick/MIDI port Joystick, gamepad or MIDI
device
PS/2-compatible keyboard or
keypad port
headphone jack
keypad
device (e.g., PS/2 mouse)
Amplified speakers or
headphones
6 Microphone-in jack Microphone
7 USB port USB device (e.g., USB mouse)
8 FDD/printer switch Toggles between floppy and
printer ports
9 DC-in port AC adapter and power outlet
10 9-pin serial port Serial device (e.g., serial mouse)
11 15-pin external
CRT port
12 25-pin floppy drive
port
13 25-pin parallel port Parallel device (e.g., parallel
External display device (e.g.,
monitor)
External floppy drive
printer)
3
Page 4

A Look at DockMate IV
Important!
You can only select either the 25-pin FDD port or
the 25-pin parallel port. The two ports cannot be
used simultaneously.
Set the FDD/Printer switch to the FDD icon if
using a floppy disk drive. Set to the Printer icon
when using a printer.
The infrared port is not available when the
notebook is docked.
4
Page 5

Using DockMate IV
DockMate IV Connections
Follow these steps:
1. Connect one end of the AC adapter to the DC-in
port on DockMate IV; then connect the other
end to the power outlet. If you do not connect
the AC adapter, the computer uses power from
the battery pack.
2. Connect the desired peripherals to the ports on
DockMate IV.
5
Page 6

Using DockMate IV
3. Route the cables and position DockMate IV on
your desk — there should be enough space in
the front of DockMate IV for the computer to
easily dock and undock.
Now you are ready to dock and undock the
computer.
Docking the Computer
Follow these steps:
1. Make sure DockMate IV is in a ready-to-dock
position. If not, follow the figure below.
6
Page 7

Using DockMate IV
2. Press Fn-F9 to access the eject menu and
select the Mini Dock option. The computer
enters suspend-to-memory mode (screen
blanks).
Note: If the computer does not enter suspend-tomemory mode after 5 seconds, you can already
dock in your computer. In this situation, you also
do not need to press any key after docking.
3. Slide the mini-port cover on the computer’s port
cover to expose the DockMate IV connector.
4. Place the computer in docking position, taking
note of the two docking guides on DockMate IV.
7
Page 8

Using DockMate IV
Control Panel is not meant for the notebook’s LCD.
5. Press the dock handle towards the back end of
DockMate IV to lock in the computer.
Press any key to wake up the computer. After
docking, the computer automatically detects the
presence of all peripheral connections on
DockMate IV and configures itself accordingly.
Notes:
When the computer resumes, it will detect the
display adapter, will display unknown monitor and
then scan for additional hardware devices.
The energy saving feature of the monitor in the
Undocking the Computer
Follow these steps:
1. Press Fn-F9 to access the eject menu and
select the Mini Dock option.
Note: If the computer does not enter suspend-tomemory mode after 5 seconds, you can already
undock your computer. You also do not need to
press any key after undocking.
8
Page 9

Using DockMate IV
2. Press the dock lock to prepare DockMate IV and
computer for undocking.
The dock lock prevents accidental undocking.
Make sure the dock lock is pushed in place.
3. Press the dock handle towards the front end of
DockMate IV to undock the computer.
Remove the computer from DockMate IV and press
any key to wake up the computer. The computer
reconfigures itself.
9
Page 10

Troubleshooting
Following are common questions and answers
related to your use of DockMate IV.
Question Answer
How do I know
the computer
is successfully
docked into
DockMate IV?
Does my
docked
computer
support Plug
and Play?
After
undocking, my
infrared port
does not
function.
What’s wrong?
There are two areas you can check:
•
Physical Lock. The dock LED, found on the
top of DockMate IV, should be lit, and the
dock lock pops out.
•
Logical Lock. The peripherals connected to
DockMate IV should function normally with
the computer. Press Fn-F2 to enter Setup
and look at the settings in About My
Computer — the peripherals connected to
DockMate IV should register.
If a peripheral is not functioning normally, enter
suspend-to-memory (Fn-Esc), then exit to reconfigure the system.
Yes. After connecting the computer to DockMate
IV, the system will detect the add-on hardware
and load the driver automatically under
Windows 95.
When docked, the computer’s infrared port is
automatically disabled to free up resources for
use by other devices.
After undocking, you can re-enable the infrared
port using the BIOS Utility:
1. Press
2. Press F8; then select System Configuration
and press
3. Press
4. Set the IrDA (FIR) parameter to
exit the BIOS Utility.
Fn-F2
to enter the BIOS Utility.
Enter
.
PgDn
twice to go to page 3.
Enabled
and
10
Page 11

Question Answer
I use my
computer with
an internal
CD-ROM drive
and an
external floppy
drive. How do
I maintain the
same
configuration
when I use
DockMate IV?
How do I
manage four
PC Card slots?
Follow these steps to make a quick and easy
transition:
1. Close the display.
2. Unplug the floppy drive from the parallel
port.
3. Connect the floppy drive to the FDD (floppy
disk drive) port on DockMate IV. Set the
FDD/printer switch to FDD.
4. If you are using AC power, disconnect the AC
adapter from the DC-in port. Then connect
it to the DC-in port on DockMate IV.
5. Dock the computer.
6. Open the display.
If other peripherals are connected to the
computer, you can also make the easy transition
by disconnecting them from the computer (after
closing the display), and connecting them to
DockMate IV (before opening the display).
With four PC Card slots (two each in DockMate
IV and your computer), you have more expansion
options — network, modem, ZV MPEG
many more.
IRQs or Interrupt Requests are limited resources
that are occupied by devices (e.g., network,
audio, modem). CardBus devices have the
ability to share IRQs.
If you do run out of IRQs, we suggest you disable
devices that you do not need. You can do this
through the System icon in the Control Panel.
Refer to your Windows 95 manual for details.
Troubleshooting
1
, and
1
The CardBus PC Card slots on the TravelMate 7100 series notebook computer
support Zoomed Video. DockMate IV does not have ZV suppor t .
11
 Loading...