

Page 1

Acer LCD Monitor
User Guide
Page 2

Copyright © 2019. Acer Incorporated.
All Rights Reserved.
Acer LCD Monitor User Guide
Original Issue: 11/2019
English
Changes may be made periodically to the information in this publication without obligation
to notify any person of such revisions or changes. Such changes will be incorporated in new
editions of this manual or supplementary documents and publications. This company makes
no representations or warranties, either expressed or implied, with respect to the contents
particular purpose.
Record the model number, serial number, purchase date and place of purchase information
in the space provided below. The serial number and model number are recorded on the
serial number, model number and purchase information.
No part of this publication may be reproduced, stored in a retrieval system, or transmitted,
in any form or by any means, electronically, mechanically, by photocopy, recording or
otherwise, without the prior written permission of Acer Incorporated.
Acer LCD Monitor User Guide
Model number: __________________________________
Serial number: ___________________________________
Date of purchase: ________________________________
Place of purchase: ________________________________
Acer and the Acer logo are registered trademarks of Acer Incorporated. Other companies’
their respective companies.
Page 3

Information for your safety and
comfort
Safety instructions
Read these instructions carefully. Keep this document for future reference. Follow all
warnings and instructions marked on the product.
Special notes on LCD monitors
The following are normal with the LCD monitor and do not indicate a problem.
you use.
The LCD screen has 99.99% or more effective pixels. It may include blemishes of 0.01%
or less such as a missing pixel or pixel lit all the time.
Due to the nature of the LCD screen, an afterimage of the previous screen may remain
after switching the image, when the same image is displayed for hours. In this case, the
screen is recovered slowly by changing the image or turning off the power switch for a
few hours.
Cleaning your monitor
Please carefully follow these guidelines when cleaning the monitor:
Always unplug the monitor before cleaning.
Use a soft cloth to wipe the screen and cabinet front and sides.
English
Page 4

Accessibility
Be sure that the power outlet you plug the power cord into is easily accessible and located
as close to the equipment operator as possible. When you need to disconnect power from
the equipment, be sure to unplug the power cord from the electrical outlet.
Safe listening
To protect your hearing, follow these instructions.
English
Gradually increase the volume until you can hear it clearly and comfortably and without
distortion.
After setting the volume level, do not increase it after your ears have adjusted.
Limit the amount of time listening to music at high volume.
Avoid turning up the volume to block out noisy surroundings.
Turn the volume down if you can’t hear people speaking near you.
Warnings
Do not use this product near water.
Do not place this product on an unstable cart, stand or table. If the product falls, it could
be seriously damaged.
Slots and openings are provided for ventilation to ensure reliable operation of the
product and to protect it from overheating. These openings must not be blocked or
covered. The openings should never be blocked by placing the product on a bed, sofa,
rug or other similar surface. This product should never be placed near or over a radiator
or heat register, or in a built-in installation unless proper ventilation is provided.
Never push objects of any kind into this product through cabinet slots as they may touch
Never spill liquid of any kind onto or into the product.
To avoid dmage of internal components and to prevent battery leakage, do not place the
product on a vibrating surface.
Never use it under sporting, exercising, or any vibrating environment which will probably
cause unexpected short current or damage internal devices.
The adapter is only used for this monitor, do not be used for other purposes.
Using electrical power
This product should be operated from the type of power indicated on the marking label.
If you are not sure of the type of power available, consult your dealer or local power
company.
Do not allow anything to rest on the power cord. Do not locate this product where people
will walk on the cord.
Page 5
If an extension cord is used with this product, make sure that the total ampere rating
of the equipment plugged into the extension cord does not exceed the extension cord
ampere rating. Also, make sure that the total rating of all products plugged into the wall
outlet does not exceed the fuse rating.
Do not overload a power outlet, strip or receptacle by plugging in too many devices. The
overall system load must not exceed 80% of the branch circuit rating. If power strips are
used, the load should not exceed 80% of the power strip’s input rating.
This product’s power cord is equipped with a three-wire grounded plug. The plug only
inserting the power cord plug. Do not insert the plug into a non-grounded power outlet.
Contact your electrician for details.
Warning! The grounding pin is a safety feature. Using a power outlet
that is not properly grounded may result in electric shock and/or
injury.
Note: The grounding pin also provides good protection from unexpected
noise produced by other nearby electrical devices that may interfere with
the performance of this product.
Use the product only with the supplied power supply cord set. If you need to replace the
power cord set, make sure that the new power cord meets the following requirements:
English
Product servicing
Do not attempt to service this product yourself, as opening or removing covers may expose
personnel.
when:
the power cord or plug is damaged, cut or frayed
liquid was spilled into the product
the product was exposed to rain or water
the product has been dropped or the case has been damaged
the product exhibits a distinct change in performance, indicating a need for service
the product does not operate normally after following the operating instructions
Page 6
Note: Adjust only those controls that are covered by the operating
instructions, since improper adjustment of other controls may result in
restore the product to normal condition.
English
Potentially explosive environments
Switch off your device in any area with a potentially explosive atmosphere and obey all signs
and instructions. Potentially explosive atmospheres include areas where you would normally
be advised to turn off your vehicle engine. Sparks in such areas could cause an explosion
distribution areas; chemical plants; or where blasting operations are in progress. Areas with
a potentially explosive atmosphere are often, but not always, marked. They include below
as grain, dust or metal powders.
Additional safety information
Your device and its enhancements may contain small parts. Keep them out of the reach of
small children.
Acer is strongly committed to environmental protection and views recycling, in the form
of salvaging and disposal of used equipment, as one of the company’s top priorities in
minimizing the burden placed on the environment.
We at Acer are very conscious of the environmental effects of our business and strive to
identify and provide the best working procedures to reduce the environmental impact of our
products.
For more information and help when recycling, please go to this website:
http://www.acer-group.com/public/Sustainability/sustainability01.htm
www.acer-group.com
products.
Disposal instructions
Do not throw this electronic device into the trash when discarding. To minimize
pollution and ensure utmost protection of the global environment, please recycle.
http://www.acer-group.com/public/Sustainability/
sustainability01.htm
Page 7

LCD pixel statement
The LCD unit is produced with high-precision manufacturing techniques. Nevertheless,
the recorded image and does not constitute a malfunction.
This product has been shipped enabled for power management:
Wake the monitor when it is in Active Off mode,move the mouse or press any keyboard
key.
Tips and information for comfortable use
Computer users may complain of eyestrain and headaches after prolonged use. Users are
also at risk of physical injury after long hours of working in front of a computer. Long work
periods, bad posture, poor work habits, stress, inadequate working conditions, personal
health and other factors greatly increase the risk of physical injury.
Incorrect computer usage may lead to carpal tunnel syndrome, tendonitis, tenosynovitis or
other musculoskeletal disorders. The following symptoms may appear in the hands, wrists,
arms, shoulders, neck or back:
numbness, or a burning or tingling sensation
aching, soreness or tenderness
pain, swelling or throbbing
stiffness or tightness
coldness or weakness
If you have these symptoms, or any other recurring or persistent discomfort and/or pain
related to computer use, consult a physician immediately and inform your company’s health
and safety department.
The following section provides tips for more comfortable computer use.
English
Finding your comfort zone
Find your comfort zone by adjusting the viewing angle of the monitor, using a footrest, or
raising your sitting height to achieve maximum comfort. Observe the following tips:
avoid slouching forward and/or leaning backward
stand up and walk around regularly to remove the strain on your leg muscles
Page 8

Taking care of your vision
Long viewing hours, wearing incorrect glasses or contact lenses, glare, excessive room
lighting, poorly focused screens, very small typefaces and low-contrast displays could stress
your eyes. The following sections provide suggestions on how to reduce eyestrain.
English
Rest your eyes frequently.
Give your eyes regular breaks by looking away from the monitor and focusing on a
istant point.
Blink frequently to keep your eyes from drying out.
Display
Keep your display clean.
Keep your head at a higher level than the top edge of the display so your eyes point
downward when looking at the middle of the display.
Adjust the display brightness and/or contrast to a comfortable level for enhanced text
readability and graphics clarity.
placing your display in such a way that the side faces the window or any light source
minimizing room light by using drapes, shades or blinds
using a task light
changing the display’s viewing angle
using a display visor, such as a piece of cardboard extended from the display’s top
front edge
Avoid adjusting your display to an awkward viewing angle.
Avoid looking at bright light sources, such as open windows, for extended periods of
time.
Developing good work habits
Develop the following work habits to make your computer use more relaxing and productive:
Take short breaks regularly and often.
Perform some stretching exercises.
Breathe fresh air as often as possible.
Page 9
Acer Incorporated
New Taipei City 221, Taiwan
8F, 88, Sec. 1, Xintai 5th Rd., Xizhi
Declaration of Conformity
We,
Acer Incorporated
8F, 88, Sec. 1, Xintai 5th Rd., Xizhi, New Taipei City 221, Taiwan
And,
Acer Italy s.r.l.
Viale delle Industrie 1/A, 20020 Arese (MI), Italy
Tel: +39-02-939-921 ,Fax: +39-02 9399-2913
www.acer.
it
Product: LCD Monitor
Trade Name: Acer
Model Number:
SKU Number:
We, Acer Incorporated, hereby declare under our sole responsibility that the product described above is in
conformity with the relevant Union harmonization legislations as below Directive and following harmonized
standards and/or other relevant standards have been applied:
EMC Directive: 2014/30/EU
EN 55032:2012/AC:2013 Class B
EN 55032:2015+AC 2016 Class B
EN 61000-3-2:2014-3- Class D
LVD Directive: 2014/35/EU
EN 60950-1:2006/A11:2009/A1:2010/A12:2011/A2:2013
RoHS Directive: 2011/65/EU
EN 50581:2012
ErP Directive: 2009/125/EC
Regulation (EC) No. 1275/ 2008; EN 50564:2011
Year to begin affixing CE marking: 2019.
CB282K
CB282K XXXXXX
(“x” = 0~9, a ~ z, A ~ Z, or blank)
EN 55024:2010
EN 61000-3-3:2013
English
_______________________________
RU Jan / Sr. Manager
Acer Incorporated (Taipei, Taiwan)
Dec.15,2019
Date
Page 10
Acer America Corporation
333 West San Carlos St., San Jose
English
Federal Communications Commission
Supplier's Declaration of Conformity
must accept any interference received, including interference that may cause undesired
operation.
The following local Manufacturer /Importer is responsible for this declaration:
Product: LCD Monitor
www.acer.com
Model Number: CB282K
SKU Number:
Name of Responsible Party: Acer America Corporation
Address of Responsible
Party:
Contact Person: Acer Representative
Phone No.: 254-298-4000
Fax No.: 254-298-4147
CB282K xxxxxx
(“x” = 0~9, a ~ z, or A ~ Z)
333 West San Carlos St.
Suite 1500
San Jose, CA 95110
U. S. A.
Page 11
ENERGY STAR®
Acer’s ENERGY STAR qualified products save you money by
reducing energy costs and helps protect the environment without
sacrificing features or performance. Acer is proud to offer our
customers products with the ENERGY STAR mark.
What is ENERGY STAR?
Products that are ENERGY STAR qualified use less energy and prevent
greenhouse gas emissions by meeting strict energy efficiency guidelines
set by the
U.S. Environmental Protection Agency. Acer is committed to offer
products and services worldwide that help customers save money,
conserve energy and improve the quality of our environment. The more
energy we can save through energy efficiency, the more we reduce
greenhouse gases and the risks of climate change. More information
refers to http://www.energystar.gov.
Acer ENERGY STAR qualified products:
•
Produce less heat and reduce cooling loads, and warmer climates.
•
Automatically go into “display sleep” within 5 minutes of inactivity.
•
Wake the monitor when it is in Active Off mode, move the mouse or
press any keyboard key.
ENERGY STAR and the ENERGY STAR mark are registered U.S.
marks
-------------------------------------------------------------------------------------------------------------
Note:
which can be restored by “Factory Reset” function in the OSD menu.
Changing the factory default settings or enabling other features may increase
English
Page 12

Information for your safety and comfort iii
Safety instructions iii
Special notes on LCD monitors iii
Cleaning your monitors iii
Accessibility iv
English
Safe listening iv
Warnings iv
Using electrical power iv
Product servicing v
Potentially explosive environments vi
Additional safety information vi
vi
Disposal instructions vi
LCD pixel statement vii
Tips and information for comfortable use vii
Finding your comfort zone vii
Taking care of your vision viii
Developing good work habits viii
Declaration of Conformity ix
Federal Communications Commission
Declaration of Conformity x
Unpacking 1
2
Screen position adjustment 3
Connecting the adapter and AC Power cord 3
Power saving
Connector pin assignment 4
19-pin color display signal cable 4
20-pin color display signal cable
Standard timing table 6
Contents
Installation 7
Users controls 8
Panel controls 8
Using the Shortcut Menu 9
The Function page 10
Troubleshooting 15
Page 13
Unpacking
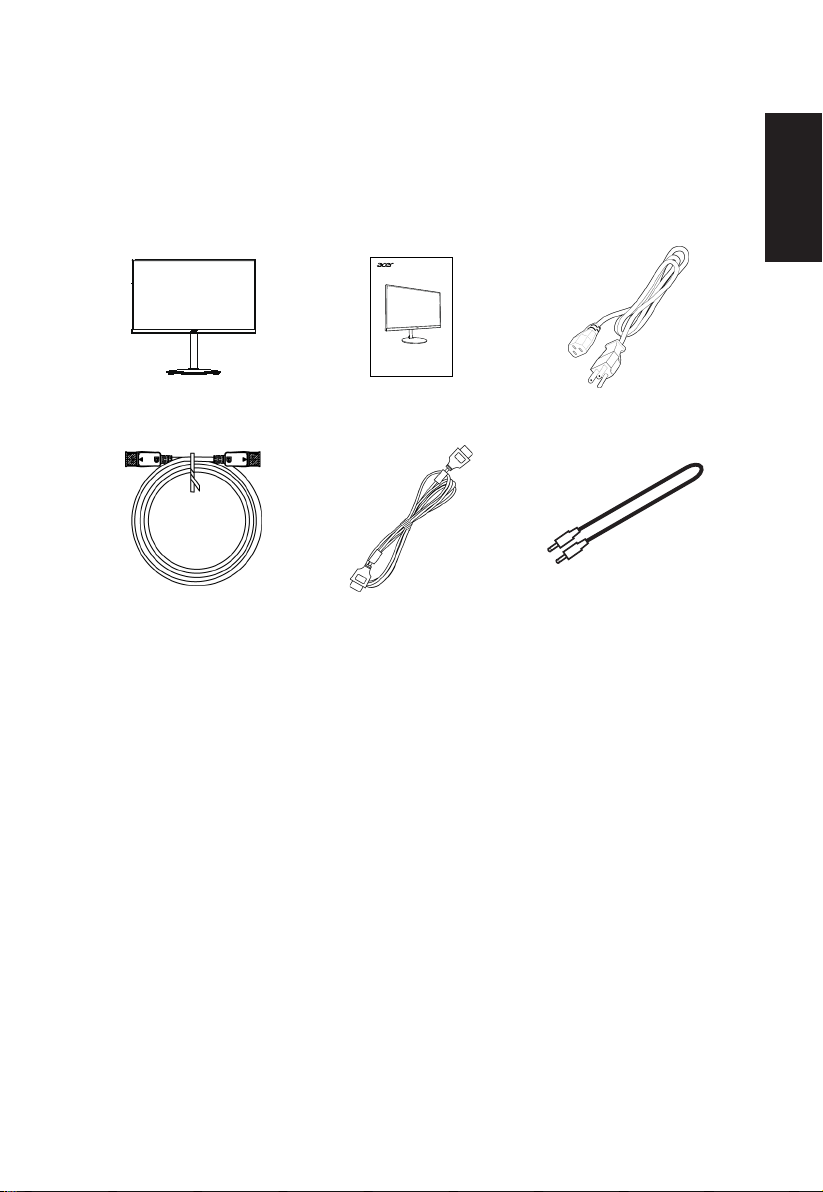
Please check that the following items are present when you unpack the box, and save the
packing materials in case you need to ship or transport the monitor in the future.
LCD monitor Quick start guide *AC Power cord
LCD Monitor CB2 series/CB282K
USER GUIDE
English
*DP Cable
*HDMI2.0 cable
*Audio Cable
Page 14
SCREEN POSITION ADJUSTMENT
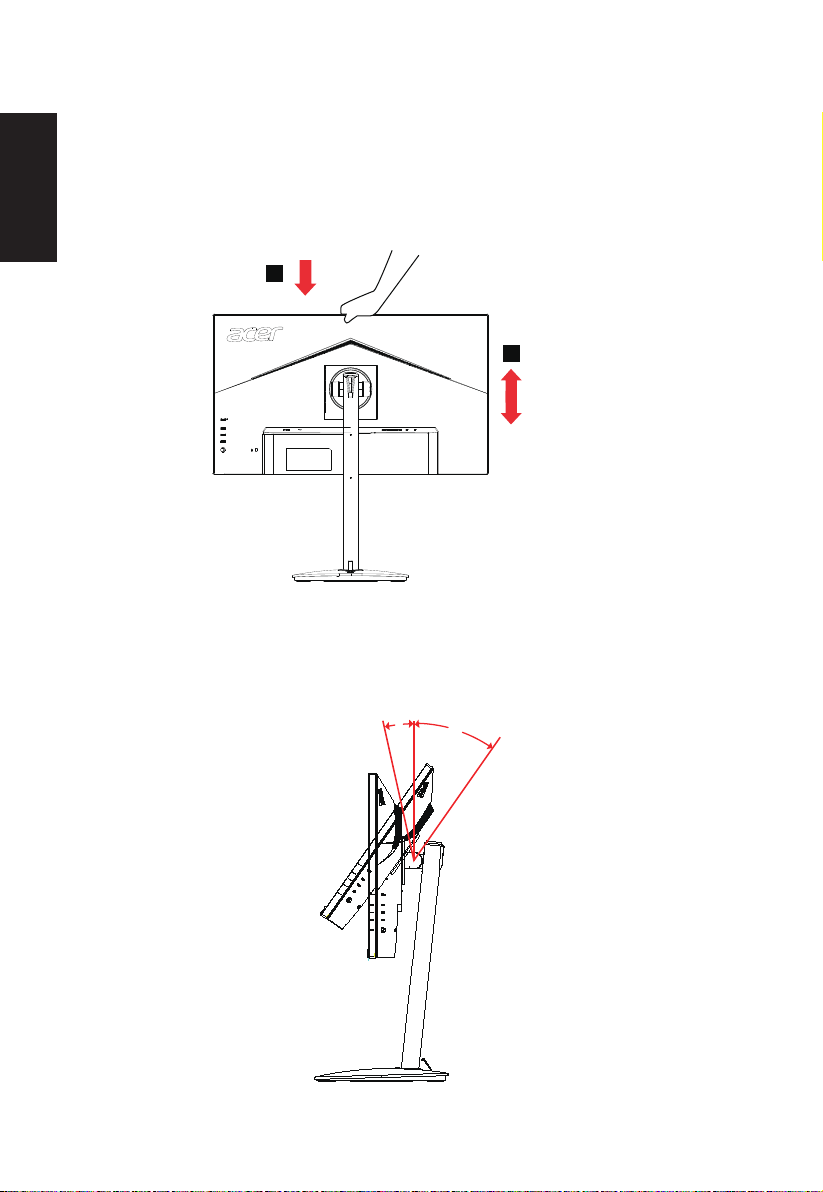
In oder to optimize the best viewing position, you can adjust the height/tilt of the monitor.
• Height Adjustment
After pressing the top of the monitor then you can adjust the height of the monitor.
English
1
2
180mm
• Tilt
Please see the illustration below for an example of the tilt range.
-5°
35°
Page 15
• Swivel
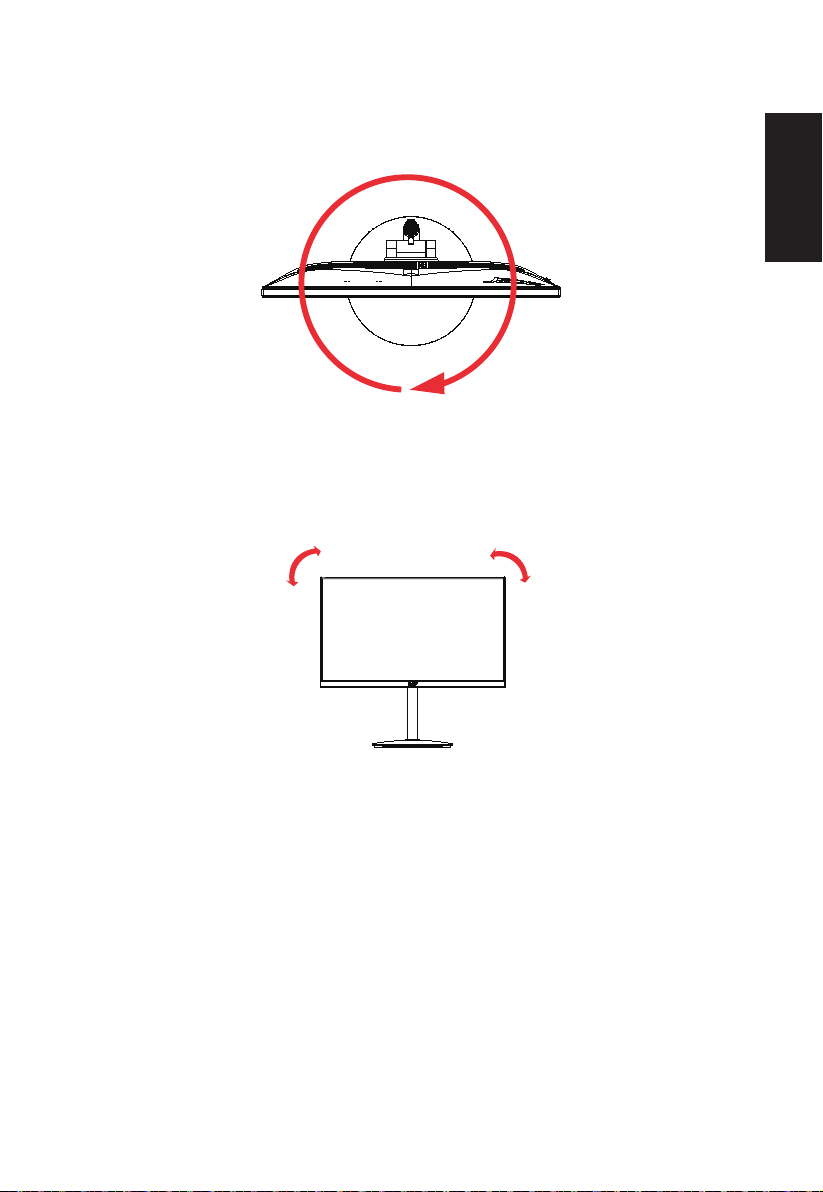
With the built-in pedestal, you can swivel the monitor for the most comfortable viewing
angle.
360°
• Monitor Pivot
Before rotating the display,lift it to the top position and then push it back to the utmost
degree. Rotate clockwise or counter-clockwise until the monitor stops at ±90°.
English
90
o
90
o
Page 16
Connecting the AC Power cord
your area.
English
Plug one end of the AC power cord to the Adapter, and plug the other end into an AC
outlet.
should have the appropriate safety approvals for the country in which the equipment will
be installed.
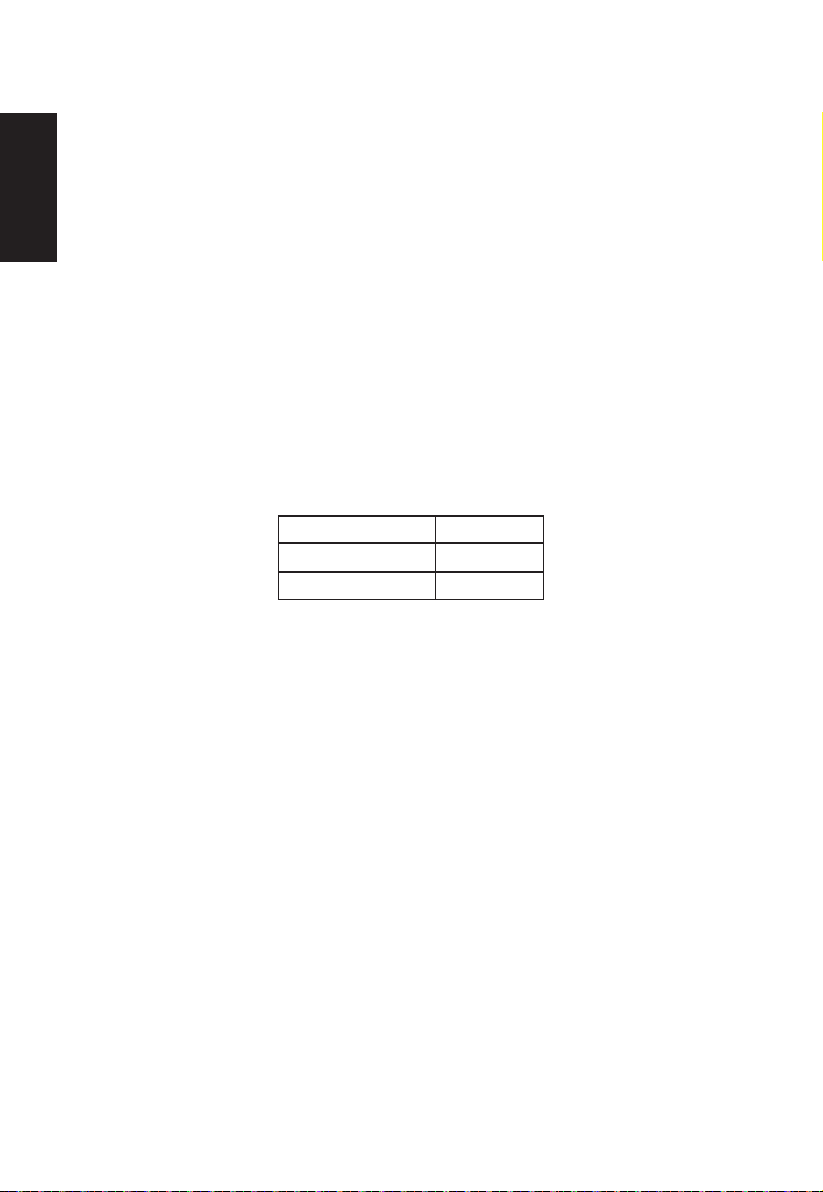
Power saving
The monitor will be driven into "Power Saving" mode by the control signal from the display
State
ON Blue
Power Saving Mode Amber
The power saving states will be kept until a control signal has been detected or the keyboard
or mouse is activated. The recovery time from Active OFF state back to ON state is around
3 seconds.
Page 17
Display Data Channel (DDC)
To make installation easier, so long as your system supports the DDC protocol, the monitor
is able to plug-and-play. The DDC is a communication protocol through which the monitor
automatically informs the host system about its capabilities; for example, supported
resolutions and corresponding timing. The monitor supports the DDC2B standard.
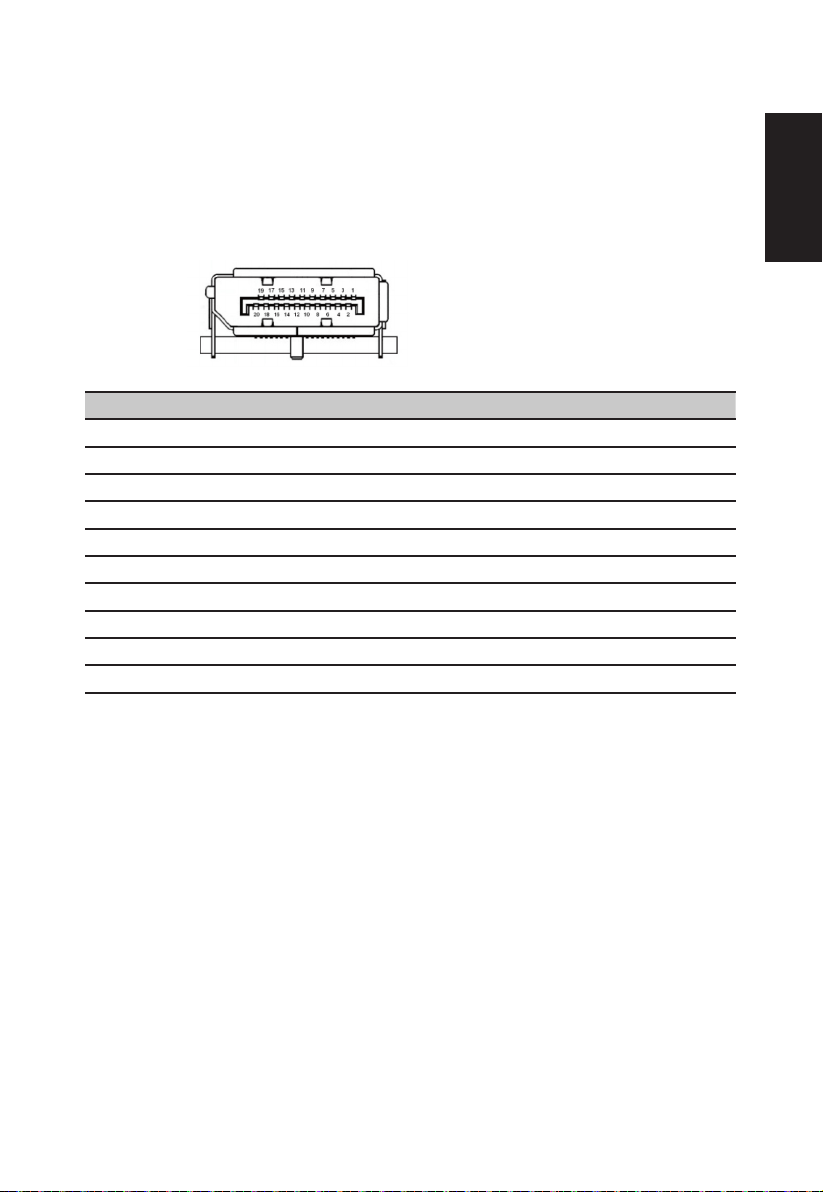
20-pin color display signal cable
PIN No. Description PIN No. Description
1 ML_Lane 0+ 2 GND
3 ML_Lane 0- 4 ML_Lane 1+
GND 6 ML_Lane 1-
ML_Lane 2+ 8 GND
9 ML_Lane 2- 10 ML_Lane 3+
11 GND 12 ML_Lane 3-
13 KONFIG1 14 CONFIG2
AUX CH+ 16 GND
AUX CH- 18 Hot Plug
19 Return 20 DP_PWR
English
Page 18
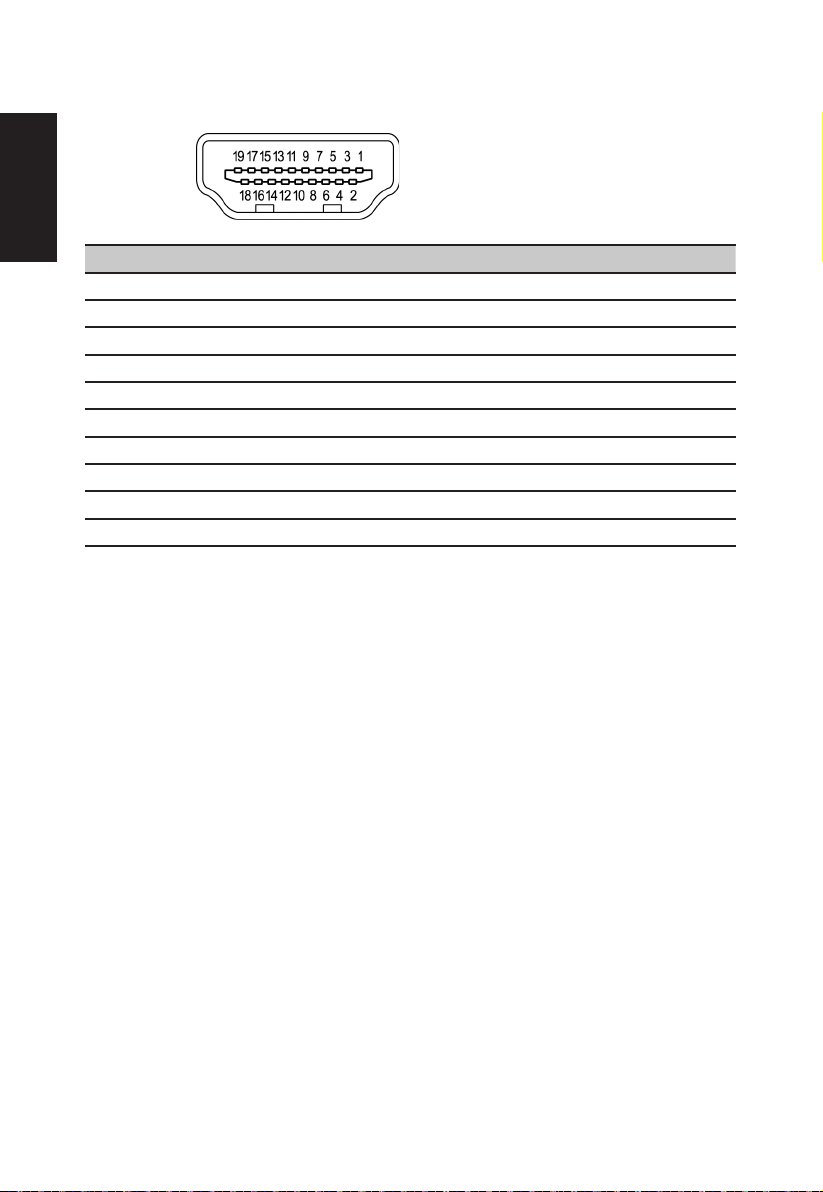
19-pin color display signal cable
English
PIN No. Description PIN No. Description
1 TMDS Data2+ 2 TMDS Data2 Shield
3 TMDS Data2- 4 TMDS Data1+
TMDS Data1 Shield 6 TMDS Data1-
TMDS Data0+ 8 TMDS Data0 Shield
9 TMDS Data0- 10 TMDS Clock+
11 TMDS Clock Shield 12 TMDS Clock13 14
SCL 16 SDA
18
19 Hot Plug Detect
Page 19
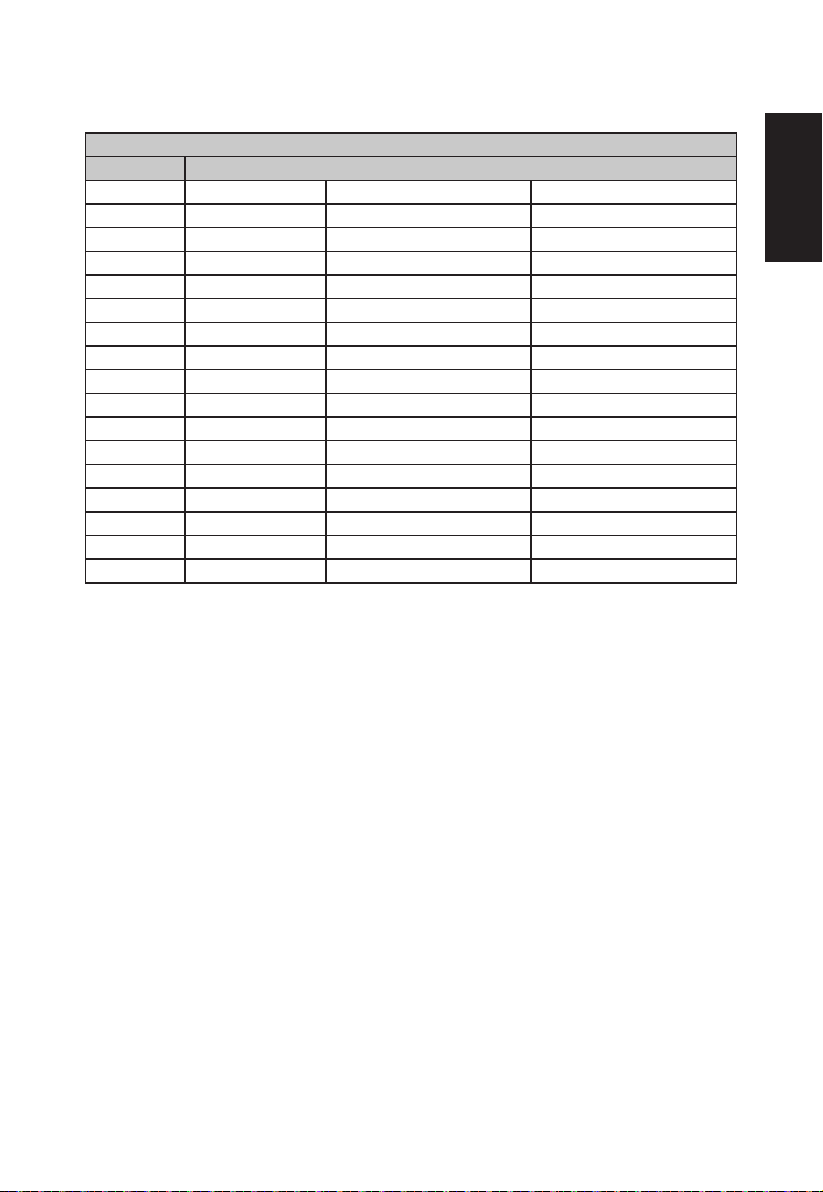
Standard timing table
VESA MODE
MODE Resolution
1 VGA 640x480 60Hz
2 MAC 640x480 66.66Hz
3 VESA 720x400 70Hz
4 SVGA 800x600 56Hz
5 SVGA 800x600 60Hz
6 XGA 1024x768 60Hz
7 XGA 1024x768 70Hz
8
VESA 1152x864 75Hz
9
SXGA 1280x1024 60Hz
10 VESA
11 WXGA
12 WXGA+
13 WSXGA+
14 UXGA
15 QHD
16 UHD
17 UHD
1280x720 60Hz
1280x800 60Hz
1440x900 60Hz
1680x1050 60Hz
1920x1080 60Hz
2560x1440 60Hz
3840x2160 30Hz
3840x2160 60Hz
English
Page 20
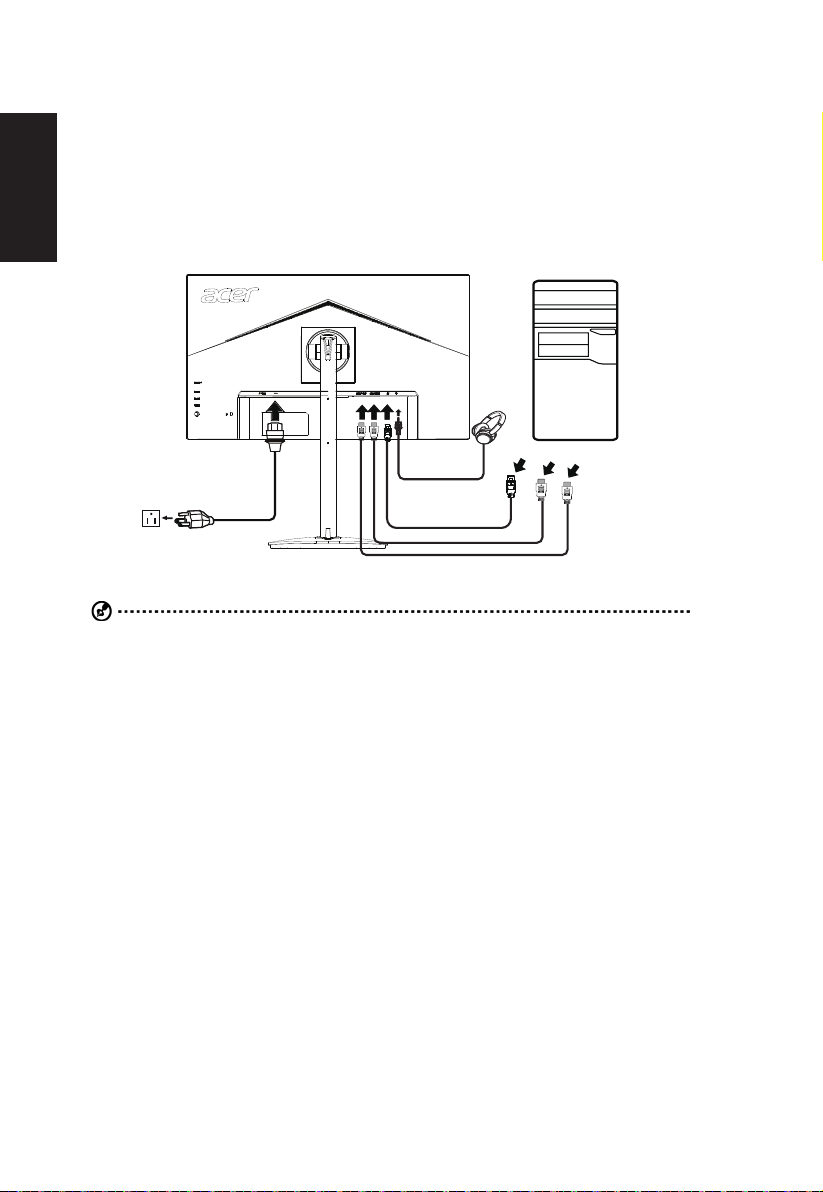
Installation
1. Turn off your computer and unplug your computer's power cord.
2.
thumbscrews on the signal cable connector.
3.
the audio cable.
4. Insert the monitor power cable into the power port at the back of the monitor.
English
Connect the power cord to the monitor, then to a properly grounded AC outlet.
Note: Audio output is only for audio output model. Please check user manual for more instruction.
*For the installation of replaceable parts, please refer to the above installation instructions.
For local service centers and service contacts, please refer to https://www.acer.com/ac/en/US/content/support
Page 21
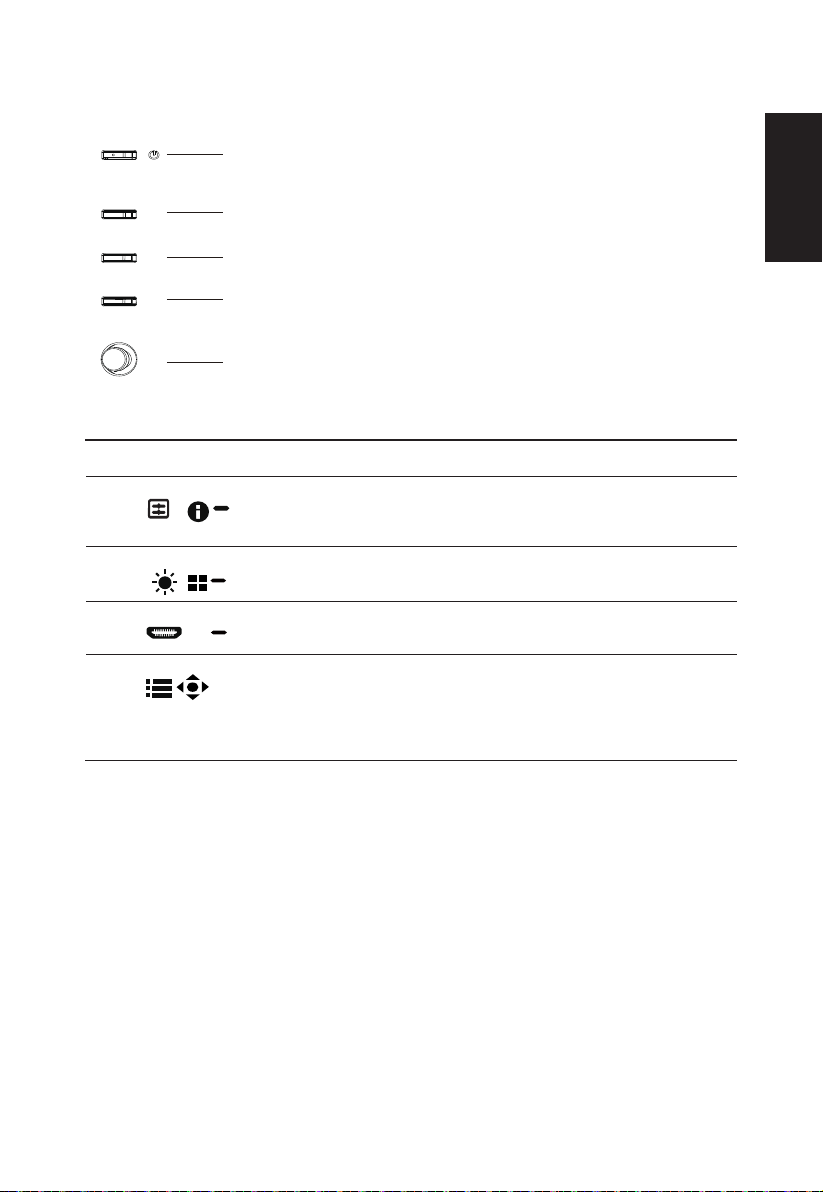
User Controls
1
2
3
4
5
X
External controls
English
1 Power button Turns the monitor on/off.Blue indicates power on. Amber indicates
2 Function key
/
3 Function key
/
4 Function key
/
Function key
/
FreeSync(DP/HDMI):
It can allow a FreeSync supported graphics source to dynamically adjust display refresh rate based on typical content
standby/ power saving mode.
a. Press to view Main page. Press again to enter hotkey1 function.
b. When the Function Menu is active, press this key to view the basic
information for your monitor and current input or reset the custom
color settings to the factory defaults.
a. Press to view Main page.Press again to enter hotkey2 function.
b. When the Function Menu is active, press this button to select
select scenario mode or game mode .
a. Press to view Main page.Press again to enter Input select
function.
b. When the Function Menu is active, this button will quit the OSD.
a. Press to view
the Function Menu.
b. The single toggle button on the backside of the Display bezel
operates like a joystick. To move the cursor, simply toggle the
button in four directions. Press the button to select desired option.
Bright gray indicates operable. Dark gray indicates inoperable.
Main page
.Press again to enter next function in
Page 22
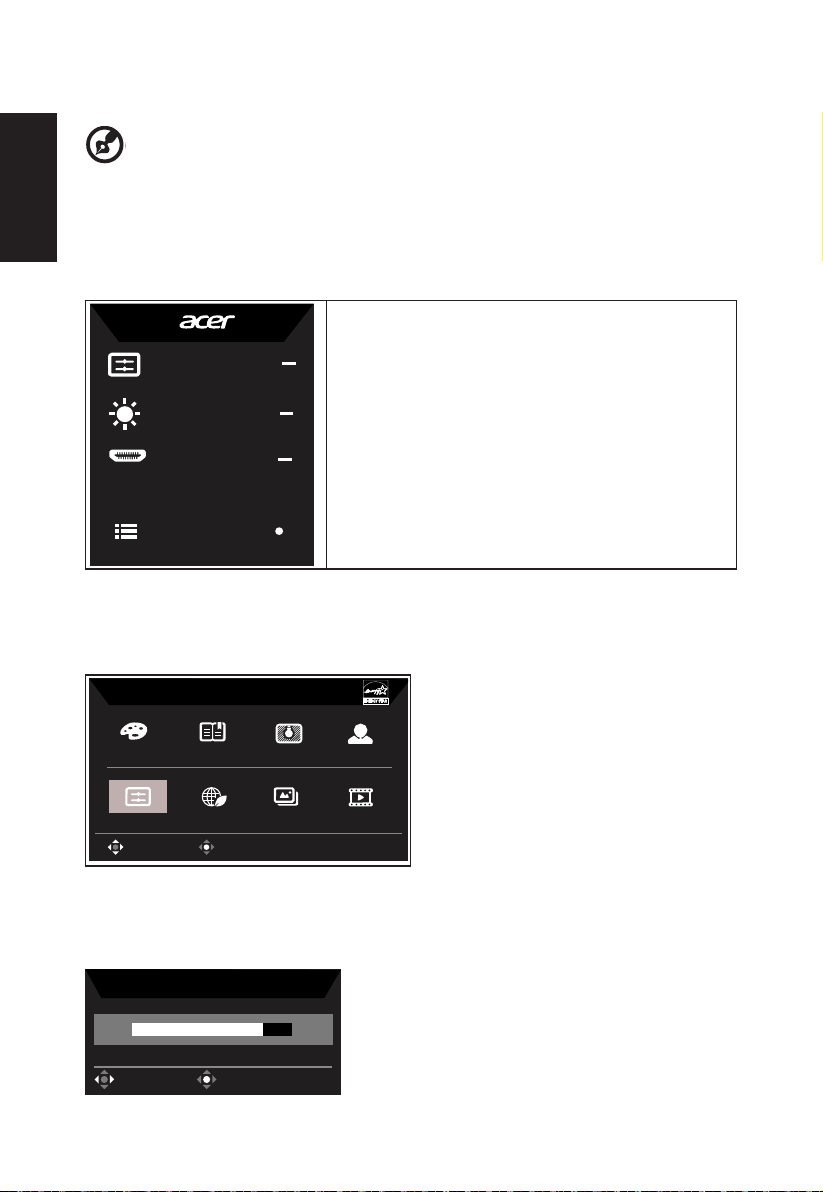
Using the Shortcut Menu
Mode
Standard
Brightness
80
Input
HDMI
Menu
sRGB
Reading
Darkroom
User
Movie
Graphics
ECO
Standard
Modes
OK
Move
-------------------------------------------------------------------------------------------------------------
Note:
may vary.
English
position and general settings. For advanced settings, please refer to following page:
Main page
1. Hot Key1
Contrast, Blue Light, Over Drive
2. Hot Key2
Hot key1 (default: Standard mode)
Gamma, Blue Light, Over Drive
3. Hot Key3
Input Switch Hot Key
4. Main Menu
Hot key2 (default: Brightness)
Open the Brightness control and select your preferred brightness setting . When you are
done, press the joystick to quit current page and store.
Adjust
Brightness
80
OK
Page 23
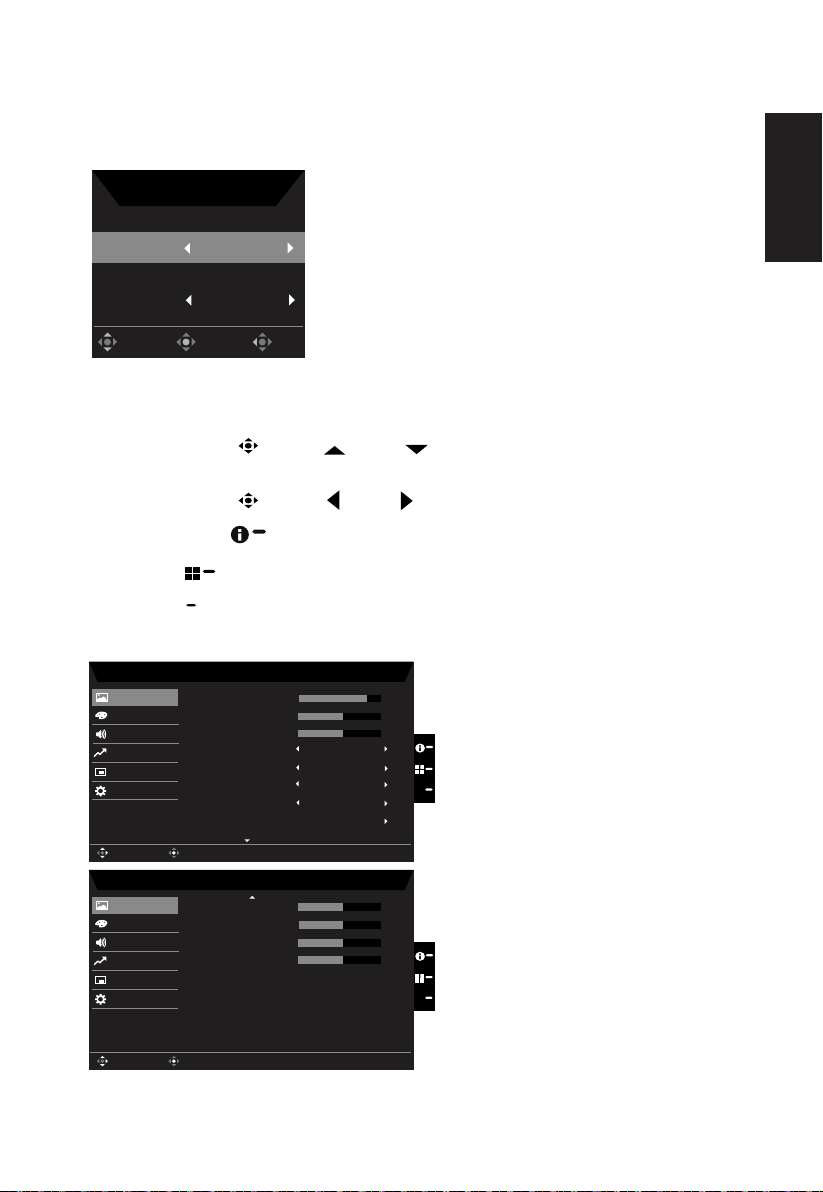
Selecting the input
Input
HDMI
Auto Source
On
OK
Move
Exit
Input
Mode - Standard
80
50
Off
Off
Off
Color
Audio
Performance
OSD
System
Brightness
Contrast
Picture
Enter
Move
Black Boost
X
Blue Light
ACM
Super Sharpness
Auto Config
5
Mode - Standard
50
50
Color
Audio
Performance
OSD
System
V.Posion
Focus
Picture
Enter
Move
Clock
X
50
H.Posion
50
Off
HDR
Open the Input control and select HDMI2.0, DP or Auto Source. When you are done, press
the joystick to exit current page and store.
Main menu
2. Toggle the joystick
to the right to navigate to the element you wish to adjust and press the joystick to enter it.
3. Toggle the joystick
Information Hot Key
Modes Hot Key : To change Modes Hot Key menu.
X : To exit current page and store.
Picture
to the up or down
to the left
or right to adjust the sliding scales.
to select Picture from the OSD. The toggle
: Show Monitor Information and Reset control function.
English
1.
Page 24
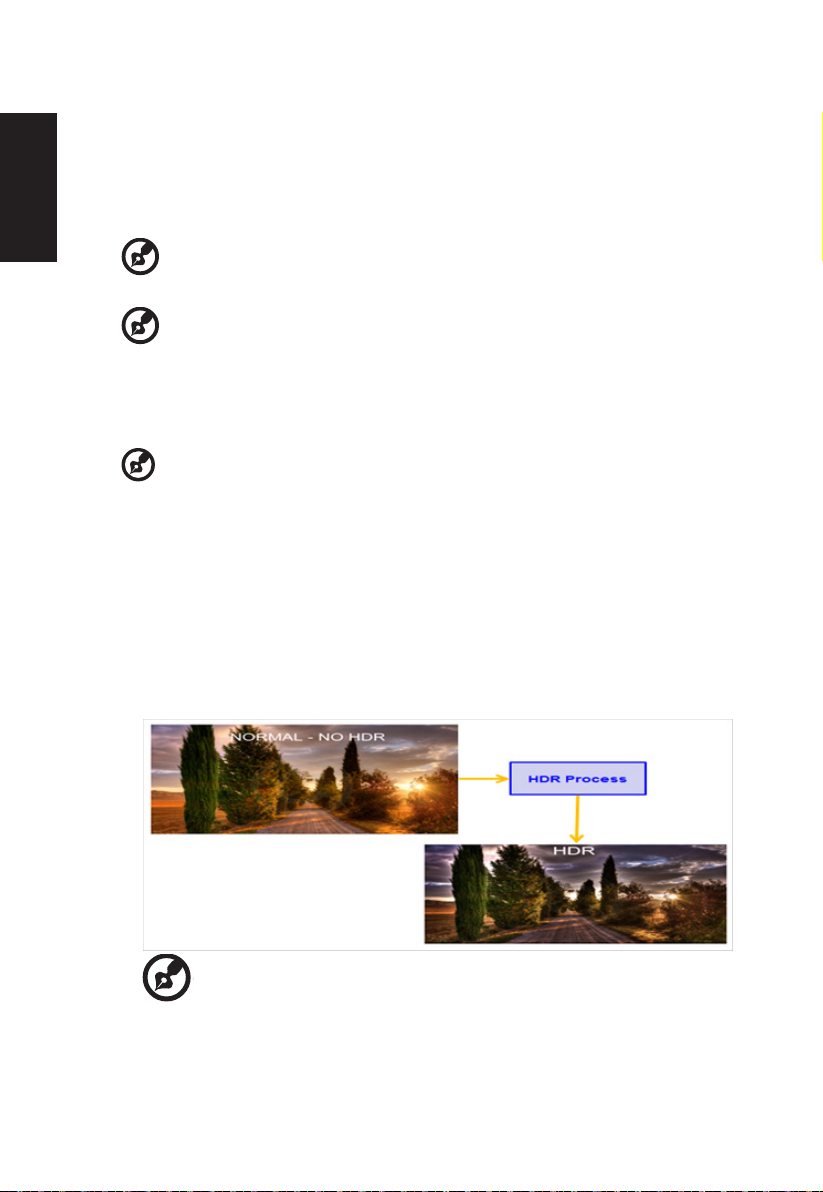
2. Toggle the joystick to the up or down to select Picture from the OSD.Then toggle to the
right to navigate to the element you wish to adjust and press the joystick to enter it.
3. Toggle to the left or right to adjust the sliding scales.
4. The Picture menu can be used to adjust the Brightness, Contrast, Black Boost, Blue
Brightness: Adjust the brightness from 0 to 100.
English
6. Contrast: Adjust the contrast from 0 to 100.
8. Blue Light: Filters out blue light to protect your eyes by adjusting how much blue light is
9. ACM: Turn ACM on or off.
10. Super Sharpness: Turn the Super Sharpness On or Off. Super Sharpness technology
11. HDR:
-----------------------------------------------------------------------------------------------------------
Note: Adjusts the balance between light and dark shades.
-----------------------------------------------------------------------------------------------------------
Note: Sets the degree of difference between light and dark areas.
brightness without changing lighter shades.
-----------------------------------------------------------------------------------------------------------
Note: A higher value allows more blue light to pass through, so in order to
Rheinland's “Low Blue Light Content” standard.
Note: Set to "On", will be based on the current screen to dynamic contrast adjustment.
can simulate high-resolution images by boosting the pixel density of the original source
to make images sharper and clearer.
Can control (off / Auto ) the default is off, set to auto will automatically
detect and deal with HDR signal.
-----------------------------------------------------------------------------------------------------
Note:
When HDR=Auto, the Modes will also be automatically set to “HDR”.
When HDR=Auto, some parameters: (ACM, Gamma, Contrast, Blue
change other adjustable parameters, the “Modes” will not jump to “User”
Mode.
Page 25
Mode - Stamdard
2.2
Warm
Audio
OSD
System
Gamma
Color Temp.
R Gain
G Gain
B Gain
Picture
Color
50
50
50
X
Enter
Move
R Bias
G Bias
50
Performance
B Bias
50
50
Mode - Stamdard
Off
Off
Audio
OSD
System
Modes
sRGB Mode
Grayscale Mode
6-axis Hue
6-axis Saturate
Picture
Color
X
Enter
Move
Performance
Color
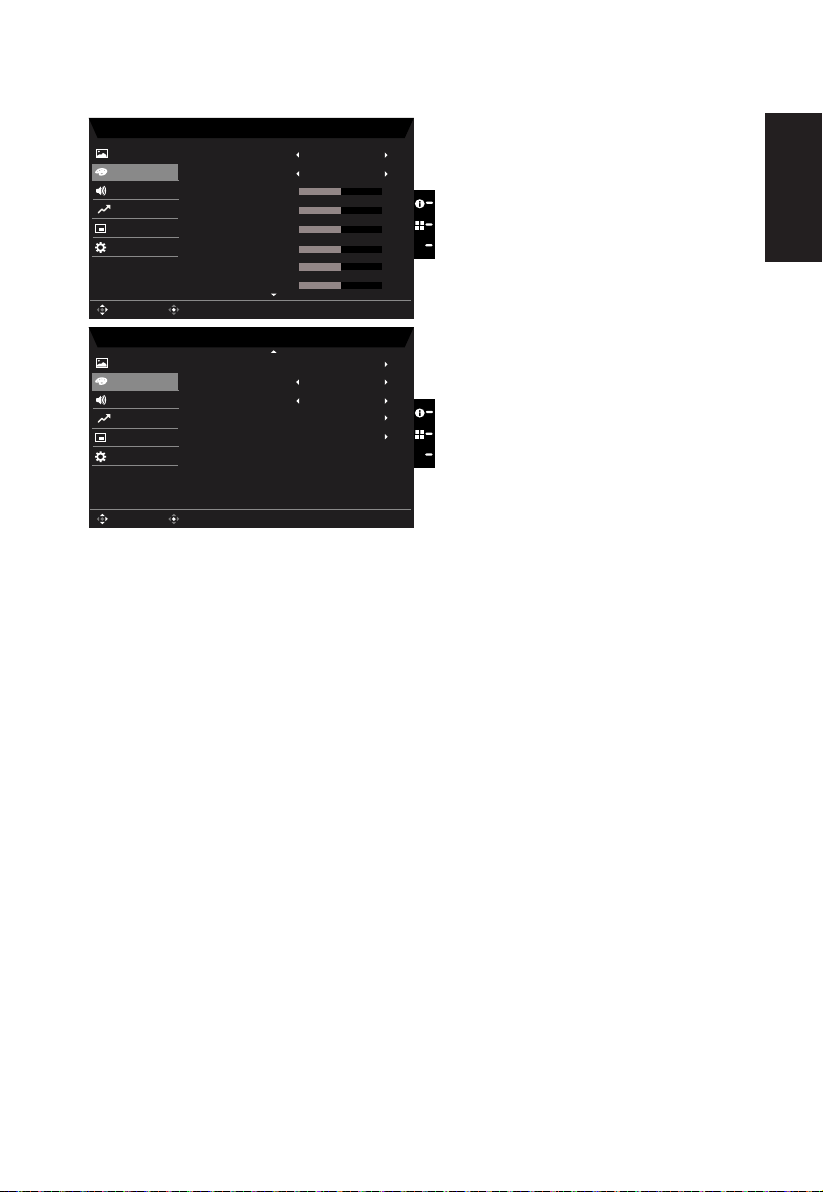
1.
2. Toggle the joystick to the up or down to select Color from the OSD.Then toggle to the
right to navigate to the element you wish to adjust and press the joystick to enter it.
3. Toggle to the left or right to adjust the sliding scales.
4. Gamma mode allows you to adjust the luminance tone.The default value is 2.2 (standard
Color temperature: Default is warm. You can choose Cool, Normal, Warm, Bluelight or
User.
6. Modes:To choose scenario mode.
sRGB: Default is off. You can turn sRGB on or off to better color match with peripheral
devices, such as printers and digital cameras.
8. Grayscale Mode:To choose Grayscale mode.
9. 6-axis Hue: Adjust the red, green, blue, yellow, magenta and cyan hue.
10. 6-axis Saturate: Adjust the red, green, blue, yellow, magenta and cyan saturation.
English
Page 26
Audio
Mode - Stardard
70
Off
OSD
System
Mute
Picture
Color
Volume
Audio
X
Enter
Move
Performance
Mode - Standard
OSD
System
Picture
Color
Over Drive
Audio
Normal
Off
FreeSync
Enter
Move
X
Performance
English
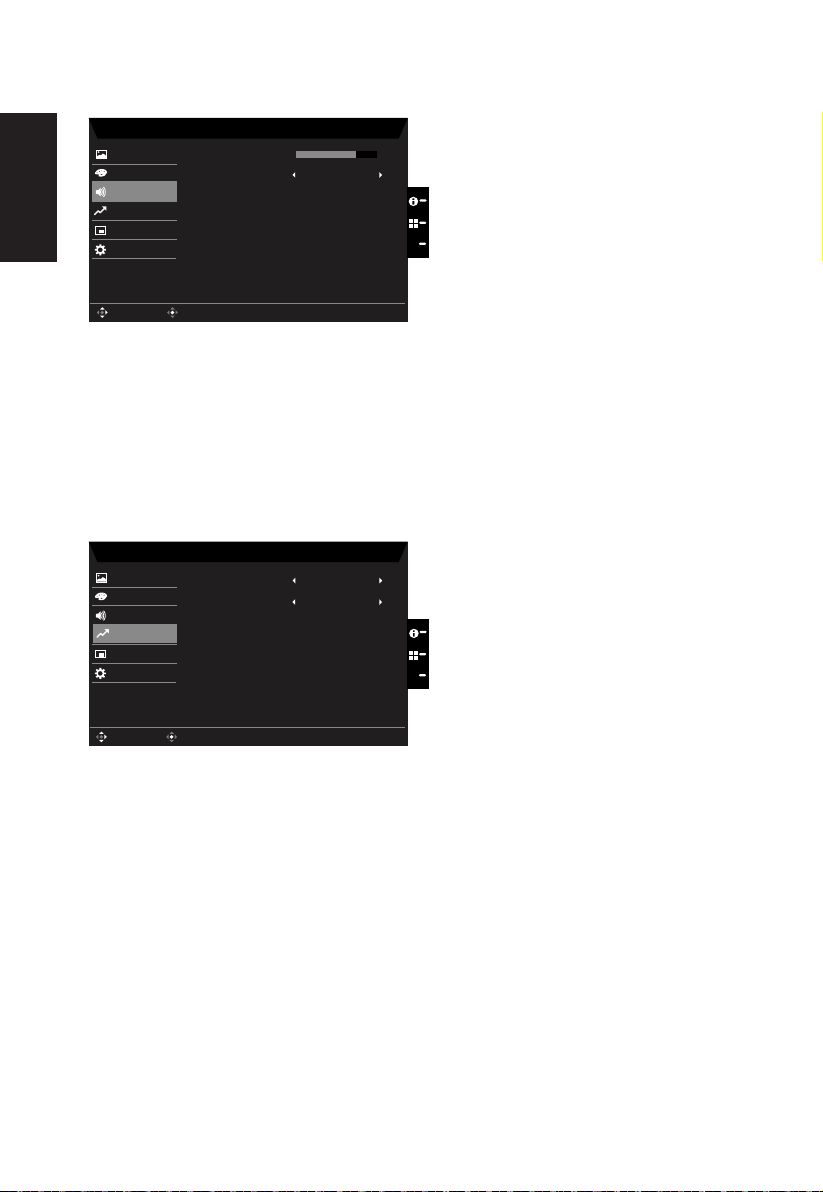
1.
2. Toggle the joystick to the up or down to select Audio from the OSD.Then toggle to the
right to navigate to the element you wish to adjust and press the joystick to enter it.
3. Toggle to the left or right to adjust the sliding scales.
4.
Mute:To choose mute on/off .
Performance
1.
2. Toggle the joystick to the up or down to select Gaming from the OSD.Then toggle to
the right to navigate to the element you wish to adjust and press the joystick to enter it.
3. Toggle to the left or right to control functions.
4.
Freesync:To choose Freesync on/off.
Page 27
OSD
Mode - Standard
10
English
System
OSD Timeout
Picture
Color
Language
Audio
OSD
Off
Off
Transparency
OSD Lock
Enter
Move
X
Performance
Off
Refresh Rate Num
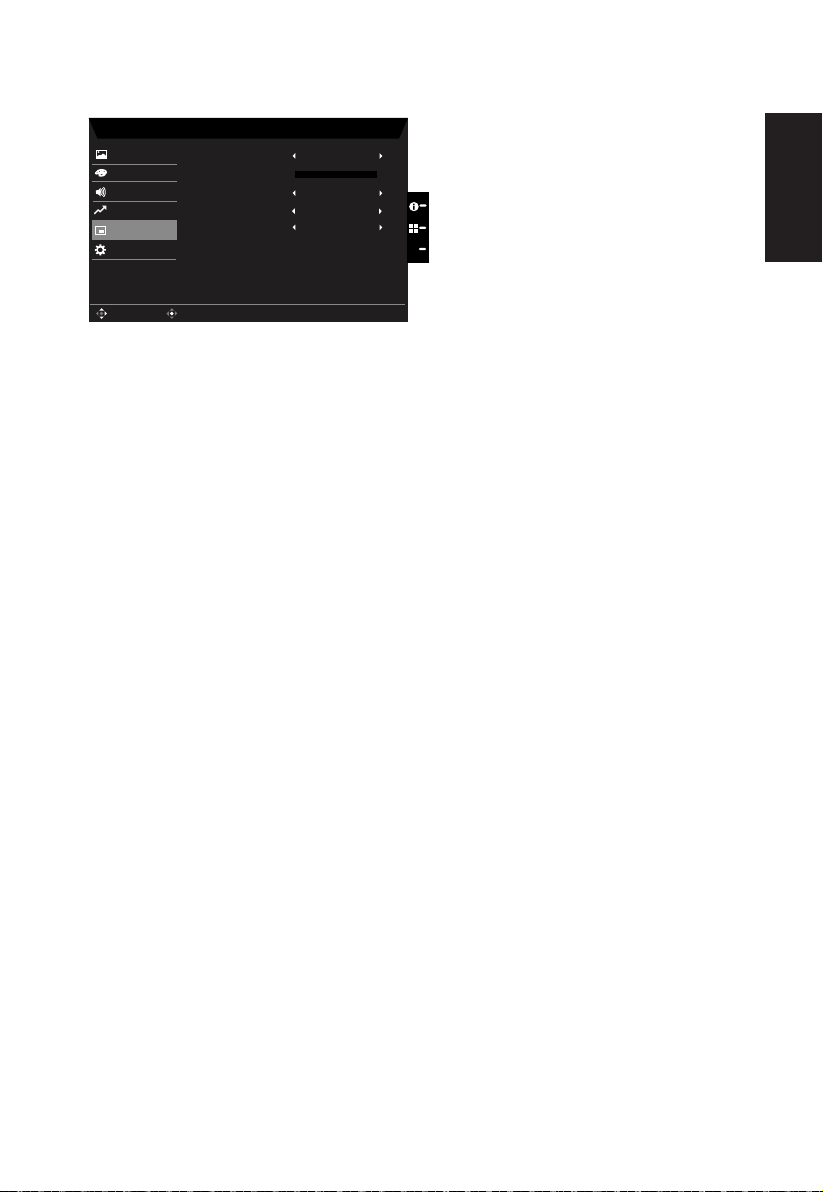
1.
2. Toggle the joystick to the up or down to select OSD from the OSD.Then toggle to the
right to navigate to the element you wish to adjust and press the joystick to enter it.
3. Toggle to the left or right to adjust the sliding scales.
4. Language: Set the OSD menu language.
OSD timeout: Adjust the delay before turning off the OSD menu.
6. Transparency: Select the transparency when using gaming mode. The transparency
Refresh rate num: Display the panel’s current refresh rate on the screen.
Note:
8. OSD Lock: To choose OSD lock on/off.
Note:
OSD Locked:
All Key lock function.
The "OSD Locked" message will be displayed in the middle of the screen.
Press any Key screen to prompt "OSD Locked" message.
OSD Unlocked:
In normal display condition to press the "Navi Key" in the middle of more than 3
seconds to trigger "OSD Unlock".
The "OSD Unlock" message will be displayed in the middle of the screen.
English
Page 28
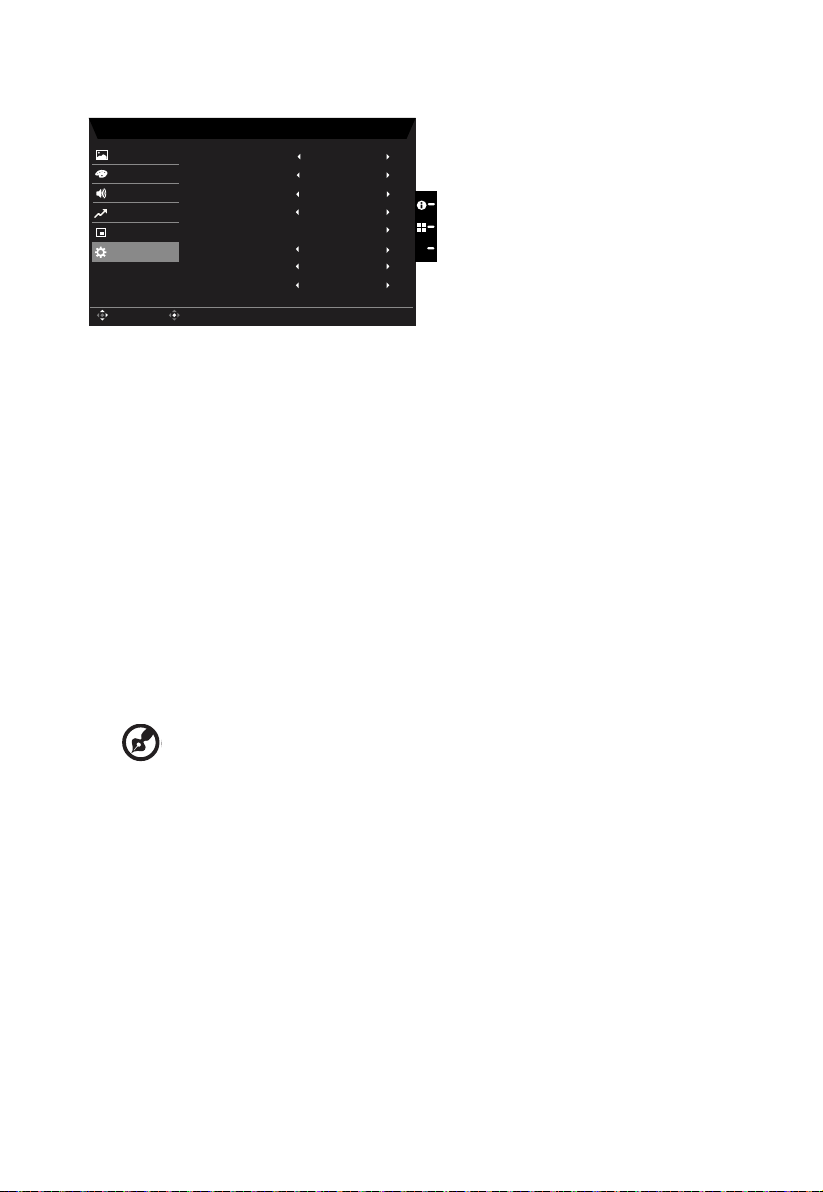
System
Mode - Standard
HDMI
Picture
Color
Input
Audio
OSD
On
Quick Start Mode
Wide Mode
System
Hot Key Assignment
DDC/CI
X
Enter
Move
Normal
Auto Source
Off
Performance
HDMI Black Level
On
Full
DP Format DP 1.2
1.
2. Toggle the joystick to the up or down to select System from the OSD.Then toggle to the
right to navigate to the element you wish to adjust and press the joystick to enter it.
3. Toggle to the left or right to control functions.
4. Input: Select the source from HDMI2.0, DP.
Auto Source: The default is “On”, which can support auto search for signal source in
6. DP Format: Default is DP1.2, can selection support DP1.1,1 or DP1.2 format.
Wide mode: You can select which screen aspect you are using. The options are Aspect
8.
9. DDC/CI: Allows the monitor settings to be set through the software on the PC.
10. HDMI Black level: Select to set HDMI2.0 black level.
11. Quick start mode: Select Off or On. Turn on to speed up boot speed.
order.
Note: Surround application must set Auto Source is “Off”.
and Full.
-----------------------------------------------------------------------------------------------------------
Note: DDC/CI, short for Display Data Channel/Command Interface, which allows
monitor controls to be sent via software.
Page 29
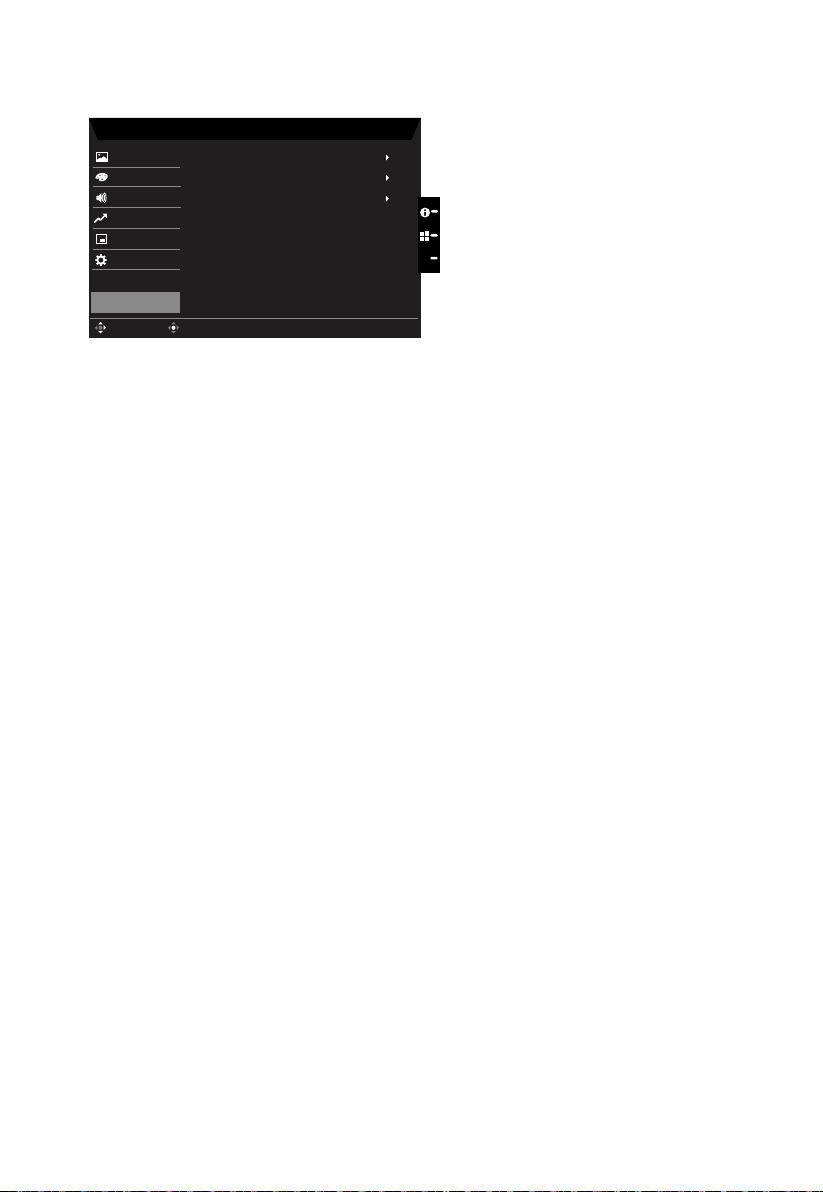
Save Setting to…(User mode only)
Mode - User
System
Mode: Reading
Picture
Color
Mode: sRGB
Audio
OSD
Mode: Darkroom
Enter
Move
X
Save seng to...
Performance
1.
2. Toggle the joystick to the up or down to select "Save Setting to..." from the OSD.Then
toggle to the right to navigate to the element you wish to adjust and press the joystick
to enter it.
3.
you have decided what settings suit you, save them and system will be able to recall
the settings in the future when you turn on gaming mode .
Page 30
Troubleshooting
Before sending your LCD monitor for servicing, please check the troubleshooting list below
to see if you can self-diagnose the problem.
HDMI2.0/DP Mode (Optional)
Problem LED status Remedy
No picture visible Blue Using the OSD menu, adjust brightness and
Off Check the power switch.
Amber Check if the video signal cable is properly
Note: Acer monitor is purposed for video and visual display of information obtained from
electronic devices.
contrast to maximum or reset to their default
setting.
Check if the AC power cord is properly
connected to the monitor.
connected at the back of monitor.
Check if the computer system is switched on
and in power saving/standby mode.
Regulatory Compliance
217186
60950-1
Page 31

English
to adjust Brightness/Contrast of your monitor,please change
OSD mode to Standard mode in the Picture menu. Then you
can manually adjust Brightness/Contrast level. TCO certifies the
Standard mode.
繁體中文 此螢幕的
OSD
度,請在畫面選單將
度/對比度。
TCO
简体中文 此显示器的默认
示器的亮度/对比度,请在“图像”菜单中将
模式。之后您可以手动调整亮度/对比度。
OSD
StandardOSD
.TCOPicture
預設模式為
OSD
OSD
模式。若您想調整螢幕亮度/對比
模式變更為標準模式。接下來您可調整亮
認證標準模式。
模式是
(节能)模式。如果您想调整显
OSD
TCO
认证标准模式。
模式更改为标准
Режимът по подразбиране на екранното меню на този монитор е ECO.
Ако искате да регулирате Brightness (Яркост)/Contrast (Контраст) на
Вашия монитор, променете режима на екранното меню на Standard
mode (Стандартен режим) в меню Picture (Картина). После може ръчно
да регулирате нивата на Brightness (Яркост)/Contrast (Контраст). TCO
сертифицира Standard mode (Стандартен режим).
Čeština Výchozím režimem OSD tohoto monitoru je ECO režim. Pokud chcete nastavit
jas/kontrast monitoru, změňte prosím režim OSD na standardní režim v nabídce
Obraz. Poté ručně upravte úroveň jasu/kontrastu. TCO certifikuje standardní
režim.
Dansk
Skærmmenuens standardindstilling på denne skærm er Energisparingsfunktionen.
Hvis du ønsker at juster skærmens lysstyrke/kontraste, skal du ændre
skærmmenuen til Standard i menuen Billede. Herefter kan du justere lysstyrken/
kontrasten. TCO certicerer Standard-funktionen.
Deutsch
Der Standard-OSD-Modus dieses Monitors ist der Energiesparmodus. Bitte
setzen Sie den OSD-Modus im Bildmenü auf Standardmodus, wenn Sie Helligkeit/
Kontrast Ihres Monitors anpassen möchten. Anschließend können Sie Helligkeit/
Kontrast manuell einstellen. TCO-zertizierter Standardmodus.
Ελληνικά Η λειτουργία προεπιλογής για την εμφάνιση επί της οθόνης (OSD) για αυτή
την οθόνη είναι η ECO mode (ΟΙΚΟΛΟΓΙΚΗ λειτουργία). Αν επιθυμείτε
να προσαρμόσετε την Φωτεινότητα/Αντίθεση της οθόνης σας, παρακαλώ
αλλάξτε τη λειτουργία OSD σε Standard mode (Τυπική λειτουργία) στο μενού
Picture (Εικόνα). Ύστερα μπορείτε να προσαρμόσετε χειροκίνητα το επίπεδο
Φωτεινότητας/Αντίθεσης. Το TCO πιστοποιεί την Standard mode (Τυπική
λειτουργία).
Page 32

Español
ajustar el brillo o el contraste del monitor, cambie el modo OSD
Eesti
Suomi
Français
Hrvatski
Magyar
Bahasa
Indonesia
Monitori ekraanimenüü on valimisi režiimil ECO. Kui soovite muuta monitori
heledust/kontrasti, valige menüüs Picture OSD režiimiks Standard. Seejärel saate
heledust/kontrasti käsitsi reguleerida. TCO sertikaat vastab režiimile Standard.
Tämän näytön oletus-OSD-tila on ECO-tila. Jos haluat säätää näytön Kirkkautta/
Kontrastia,vaihda OSD-tila Vakiotilaksi Kuva-valikossa. Sen jälkeen voit säätää
Kirkkaus-/Kontrastitasoa manuaalisesti. TCO sertioi Vakiotilan.
souhaitez régler la luminosité/contraste de votre moniteur, veuillez
Zadani OSD način rada ovog monitora je ECO način rada. Ako želite prilagoditi
svjetlinu/kontrast monitora, promijenite OSD način rada u izborniku Slika. Nakon
toga ćete moći ručno prilagoditi razinu svjetline/kontrasta. TCO daje certikat za
Standardni način rada.
E monitor alapértelmezett OSD módja az ÖKO mód. Amennyiben módosítani
szeretné a monitor Fényerő/Kontraszt értékét, kérjük, módosítsa az OSD módját
Standard (Szabványos) módra a Picture (Kép) menüben. Ezután lehetővé válik
a Fényerő/Kontraszt szintjének kézi módosítása. A Standard (Szabványos) mód
TCO által hitelesített.
menyesuaikan Kecerahan/Kontras monitor,
ubah mode OSD ke mode Standar di menu Gambar.
Anda dapat menyesuaikan tingkat Kecerahan/Kontras secara
manual. TCO menjamin mode Standar.
Italiano
日本語 このモニターのデフォルト
Se si desidera regolare Luminosità/Contrasto del monitor, cambiare
la modalità OSD in modalità Standard nel menu Immagine. Quindi
ーの輝度/コントラストを調整する場合は、ピクチャメニューで、
OSD
モードを標準モードに変更してください。
を保証します。
OSD
モードはエコモードです。モニタ
TCO
は標準モード
Page 33

Lietuviu
Esant numatytajai OSD režimo nuostatai, šis monitorius veikia ECO (Taupymo)
režimu. Jei norite sureguliuoti monitoriaus „Brightness“ (Šviesumo) / „Contrast“
(Kontrasto) nuostatas, pakeiskite OSD režimą, „Picture“ (Vaizdo) meniu
pasirinkdami „Standard“ (Standartinį) režimą. Tuomet galėsite patys nustatyti
„Brightness“ (Šviesumo) / „Contrast“ (Kontrasto) lygį. TCO sertikuotas režimas
yra „Standard“ (Standartinis) režimas.
Latviski
Nederlands
Norsk
Polski
Português O modo de OSD predenido deste monitor é o modo ECO. Se deseja ajustar o
Română Modul OSD prestabilit al acestui monitor este modul ECO. Dacă doriți să ajustați
Šī monitora noklusējuma OSD režīms ir EKO režīms. Ja vēlaties pielāgot monitora
spilgtumu/kontrastu, mainiet OSD režīmu uz standarta režīmu izvēlnē Picture
(Attēls). Pēc tam varat manuāli pielāgot spilgtuma/kontrasta līmeni. TCO serticē
standarta režīmu.
Als u de helderheid/het contrast van uw monitor wilt aanpassen,
wijzigt u de OSD-modus naar standaard modus in het menu Foto.
Standard skjermmenymodus på denne skjermen er ØKO-modus. Hvis du
vil justere lysstyrke/kontrast på skjermen,må du endre skjermmenymodus til
standardmodus på Bilde-menyen. Deretter kan du justere lysstyrke og kontrast
manuelt. TCO sertiserer standardmodus.
Domyślny tryb OSD tego monitora to tryb ECO. Avy wyregulować jasność/
kontrast monitora, należy zmienić tryb OSD na tryb Standardowy w menu
Obraz. Następnie można ręcznie wyregulować poziom jasności/kontrastu. Tryb
Standardowy ma certykat TCO.
Brilho/Contraste do monitor, altere o modo de OSD para o modo Padrão no menu
Imagem. Em seguida, poderá ajustar o nível de Brilho/Contraste. O modo Padrão
é certicado pela TCO.
Luminozitatea/Contrastul monitorului dvs., vă rugăm să comutați modul OSD
la modul Standard în meniul Imagine. Apoi, puteți ajusta manual nivelul de
Luminozitate/Contrast. TCO certică modul Standard.
Pусский По умолчанию режимом экранного меню данного монитора является
Slovensky
Slovenščina Privzeti način zaslonskega vmesnika tega monitorja je način ECO. Če želite
режим ECO. Для регулировки параметров «Яркость/ Контрастность»
монитора переключите режим экранного меню на «Стандартный» в меню
«Изображение». Тогда вы сможете вручную отрегулировать уровень
«Яркости/ Контрастности». Стандартный режим сертифицирован ТСО.
Režim ECO je v tomto monitore ako štandardný režim OSD. Ak chcete v monitore
nastaviť jas alebo kontrast, v ponuke Obraz zmeňte režim OSD na štandardný
režim. Potom môžete ručne upraviť úroveň jasu a kontrastu. Štandardný režim
overuje TCO.
prilagoditi svetlost/kontrast monitorja,spremenite način zaslonskega vmesnika v
standardni način v meniju »Picture« (Slika). Nato lahko ročno prilagodite raven
svetlosti/kontrasta. Potrdilo za standardni način je izdal TCO.
Page 34

Srpski
Podrazumevani režim prikaza na ekranu ovog monitora je režim ECO. Ako želite
da podesite osvetljenost/kontrast monitora, promenite režim prikaza na ekranu
na Standard (Standardni) u meniju Picture (Slika). Nakon toga možete ručno da
podesite nivo osvetljenosti/kontrasta. TCO sertikuje standardni režim.
Svenska
ไทย โหมด OSD เริ่มต้นของจอภาพนี้คือโหมด ECO
Türkçe Bu monitörün varsayılan OSD modu ECO modudur. Monitörünüzün Parlaklığını/
Українська Режим ЕМ за замовчуванням - це ЕСО. Якщо ви бажаєте регулювати
Português
brasileiro
Standard OSD-läge för denna skärm är ECO-läge. Om du vill justera skärmens
ljusstyrka/kontrast, byt OSD-läge till standardläget i bildmenyn. Då kan du
manuellt justera ljusstyrka/kontrastnivå. TCO certierar standardläget.
หากคุณต้องการปรับความสว่าง/ความคมชัดของจอภาพ
โปรดเปลี่ยนโหมด OSD เป็นโหมดมาตรฐานในเมนูรูปภาพ
จากนั้นคุณสามารถปรับระดับความสว่าง/ความคมชัดได้ด้วยตนเอง TCO
รับรองโหมดมาตรฐาน
Kontrastını ayarlamak istiyorsanız,
lütfen Resim menüsünde OSD modunu Standart moda getiriniz. Ardından,
Parlaklık/Kontrast seviyesini manuel olarak ayarlayabilirsiniz. TCO Standart modu
onaylar.
Яскравість/Контраст монітора, змініть режим ЕМ на Стандартний у меню
Зображення. Тоді ви зможете вручну регулювати рівень Яскравості/
Контрасту. Стандартний режим сертифіковано ТСО.
O modo OSD padrão deste monitor é o modo ECO. Se deseja ajustar o Brilho/
Contraste do seu monitor,
mude o modo OSD para o modo Padrão no menu Imagem. Em seguida, você
pode ajustar manualmente o nível de Brilho/Contraste. O TCO certica o modo
Padrão.
 Loading...