

Page 1

Hey!
Wait
a minute
Did you know your Acer Aspire comes with incredible
multimedia software that was designed to show you all the
cool stuff your computer can do? This book is your handy
desktop reference for your Acer Aspire. For more
information, access the online guide.
(P.S. - If you’re reading this because you’re having trouble with your
computer, check the “Need Help?” section in this book.)
Page 2

Copyright
Acer and the Acer logo are registered trademarks and Aspire is a trademark of Acer Inc. and Acer America
Corporation.
Microsoft Windows and the Windows Logo are registered trademarks of Microsoft Corporation. Intel and
Pentium are registered trademarks of Intel Corp. All other brands/product names are trademarks or registered
trademarks of their respective companies.
© 2002 by Acer Incorporated. All rights reserved.
Printed in China
First printing: April 2002
Page 3

Table
of Contents
Welcome v
Before You Start . . . vi
Safety Instructions vi
Proper Setup and Placement Tips ix
Introducing your Aspire 1
The System 1
Drives on Your Computer 6
The Mouse 13
The Keyboard 16
The Monitor 21
The Speakers 22
Your Data/Fax Modem 23
Connecting an Optional Printer 24
Connecting an Optional Serial Device 25
Connecting an Optional Joystick or MIDI Device 26
Getting the most from your Aspire Audio System 27
Playing an Audio CD 27
Adjusting the Volume 28
iii
Getting the most from your Aspire New Video System (Optional) 30
New TV function 30
Power VCR functions 30
Adding Options to your Aspire 33
Opening/Closing Your Aspire 33
Connecting USB Devices 36
Need Help? 37
Troubleshooting - General 37
Troubleshooting - Feature problems 40
Troubleshooting - Error Messages 45
Additional Acer Services 47
Notices 48
Page 4

iv
Page 5

v
Welcome
purchasing an Aspire computer. You are now the owner of a
multimedia computer system! Already installed on your system and
ready to go are software programs designed to enable you to:
• Create personal documents
• Access the Internet and send and receive emails
• Use your computer as a fax machine
• Play audio CDs while you’re working
and tons more!
Whether you’ve owned a computer before or not, your Aspire was
designed to improve the way you work and to serve your needs now
and into the future.
and
thank you
for
Page 6

vi
Before You Start . . .
Make sure you read this section carefully for proper
placement and important Safety Instructions on the use and
care of your new computer. Please save these instructions
for future reference.
Safety Instructions
•
Follow all warnings and instructions marked on the
product.
•
Unplug this product from the wall outlet before
cleaning. Do not use liquid cleaners or aerosol
cleaners. Use a cloth mildly dampened with water for
cleaning.
•
Do not use this product in or near water.
•
Do not place this product on an unstable cart, stand,
or table. The product may fall, causing serious damage
to the product.
•
Slots and openings in the cabinet and the back or
bottom are provided for ventilation; to ensure reliable
operation of the product and to protect it from
overheating, these openings must not be blocked or
covered. The openings should never be blocked by
placing the product on a bed, sofa, rug, or other similar
surface. This product should never be placed near or
over a radiator or heat register, or in a built-in
installation unless proper ventilation is provided.
•
This product should be operated from the type of
power indicated on the marking label. If you are not
sure of the type of power available, consult your dealer
or local power company.
•
This product is equipped with a 3-wire grounding-type
plug, a plug having a third (grounding) pin. This plug
will only t into a grounding-type power outlet. This is
a safety feature. If you are unable to insert the plug into
the outlet, contact your electrician to replace your
obsolete outlet. Do not defeat the purpose of the
grounding-type plug.
Page 7

Do not allow anything to rest on the power cord.
•
Do not locate this product where persons will walk
on the cord.
If an extension cord is used with this product, make
•
sure that the total ampere rating of the equipment
plugged into the extension cord does not exceed the
extension cord ampere rating. Also, make sure that
the total rating of all products plugged into the wall
outlet does not exceed 15 amperes.
•
Never push objects of any kind into this product
through cabinet slots as they may touch dangerous
voltage points or short out parts that could result in
a re or electric shock.
•
Never spill liquid of any kind on the product.
•
Do not attempt to service this product yourself;
opening or removing covers may expose you to
dangerous voltage points or other risks. Refer all
servicing to qualied service personnel. Service by
persons other than Acer authorized service
providers may void your warranty.
•
Unplug this product from the wall outlet and refer
servicing to qualied service personnel under the
following conditions:
a When the power cord or plug is damaged or frayed.
b If liquid has been spilled into the product.
c If the product has been exposed to rain or water.
d If the product does not operate normally when the
operating instructions are followed. Adjust only
those controls that are covered by the operating
instructions since improper adjustment of other
controls may result in damage and will often require
extensive work by a qualied technician to restore
the product to normal condition.
e If the product has been dropped or the cabinet has
been damaged.
f If the product exhibits a distinct change in
performance, indicating a need for service.
•
Replace battery with the same type as the product’s
battery we recommend. Use of another battery may
present a risk of re or explosion. Refer battery
replacement to qualied service personnel.
vii
Page 8

viii
Warning! Battery may explode if not handled properly.
•
Do not recharge, disassemble or dispose of in re. Keep
away from children and dispose of used battery
promptly.
•
Use only the proper type of power supply cord set
(provided in your keyboard/manual accessories box)
for this unit. It should be a detachable type: UL listed/
CSA certied, type SVT/SJT, rated 6A 125V minimum,
VDE approved or its equivalent. Maximum length is
15 feet (4.6 meters).
•
Always unplug the computer and monitor before
opening the housing or adjusting connections or
cables.
•
Use power strips with surge protection to protect your
computer in the event of a power surge, due to severe
weather such as a thunderstorm.
Page 9

Proper Setup and Placement Tips
It’s important that your computer be set up correctly and
according to your own comfort and ergonomic needs.
The following tips should make your workstation a
comfortable and healthy place:
Monitor Level. Position your computer so that it is at
arm’s length away and the top third of the monitor
viewing area is at eye level. This helps prevent eye and
neck strain. To further reduce eye strain, close your eyes
and refocus on something other than your computer
screen at least twice an hour. Most monitors come
standard with a detachable tilt-and-swivel base and
adjustable, rear-mounted foot, which allow you to
position the monitor exactly where you want it.
Your Seat. If you plan to use your Aspire computer for
extended periods (for example, in a home ofce
environment), select a highly adjustable ofce chair with a
ve-pronged base. The seat and chair back should be
adjustable, while you’re sitting in the chair, for height and
tilt, and forward/backward positioning, and the lumbar
area of the back should be supported by the chair
adjustments or a cushion. Arm rests should conform to
your elbow height and shoulder width and should be
used for support. For maximum comfort, vary positions
frequently throughout the day. Observe good posture
when seated, keep your head centered over your
shoulders and, just like your mother always told you,
don’t slump over your work.
ix
Anti-Glare Coating. Some monitor screens are
constructed with a special anti-glare coating, which
minimizes reections that cause eye strain and
discomfort. To further reduce eye strain, close your eyes
and refocus on something other than your computer
screen at least twice an hour.
Page 10

x
Task Lighting. When room lighting is dimmed, there may
be insufcient light on documents or reference materials for
comfortable reading. A well-lit room or a few directional,
adjustable task lights will allow you to see your monitor
screen and other materials clearly, and with the least
amount of strain.
Hand and Wrist. Keep your wrists straight and your
forearms parallel to the oor while you are typing. If you use
a wrist rest, use it only briey for resting. Do not rest your
hands on the table or on the wrist rest while you are typing.
During long periods of typing, frequent breaks are
recommended.
Page 11

Introducing
your Aspire
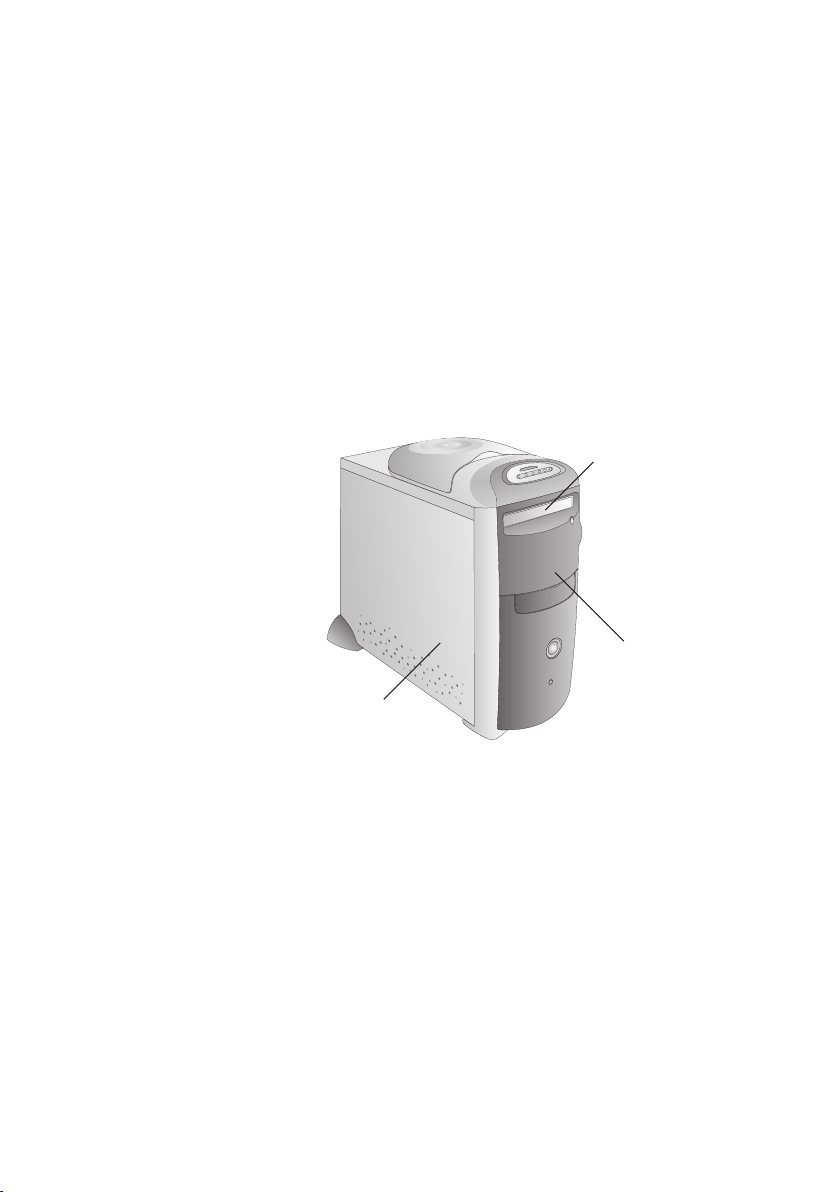
The System
1
No. Description
1 CD/DVD compartment
2 Audio DJ console
3 Speaker/Headphone-out port
4 CD-ROM/DVD-ROM/CD-RW drive
emergency eject hole
5 CD-ROM/DVD-ROM/CD-RW drive
Volume Control button
6 CD-ROM/DVD-ROM/CD-RW drive
Stop/Eject button
7 CD-ROM/DVD-ROM/CD-RW drive
Play/Forward button
Page 12

2
No. Description
8 CD-ROM/DVD-ROM/CD-RW drive
activity indicator
9 3.5-inch oppy drive activity indicator
10 3.5-inch oppy drive
11 3.5-inch oppy drive eject button
12 Power button / LAN, Hard disk,
Power activity indicator
13 Wireless connect button
14 Memory stick slot
15 SD/MMC slot
16 1394 port (optional)
17 Front microphone-in port
18 Speaker/headphone-out port
19 Front USB ports
Page 13
Setting Up Your Aspire
Refer to the Aspire Easy Setup poster included in your
system box for details on how to set up your computer.
Turning on your Aspire
1 Turn on all peripherals connected to your computer
such as the monitor, printer, fax, speakers, etc.
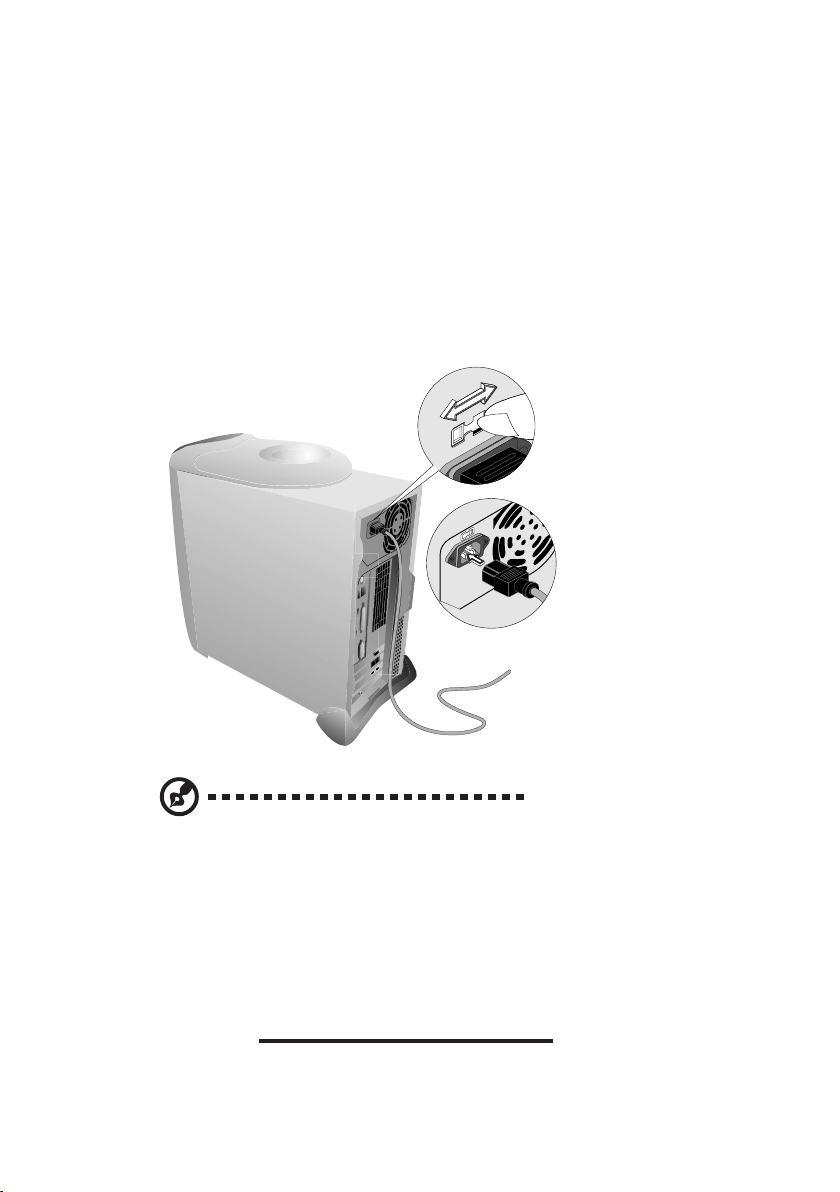
2 On your computer’s rear panel, set the voltage selector
switch 1 to the voltage range applicable in your area (a).
3
Note: For models with no voltage selector switch
and main power switch, proceed to step 3.
1
Applies to selected models only.
Page 14
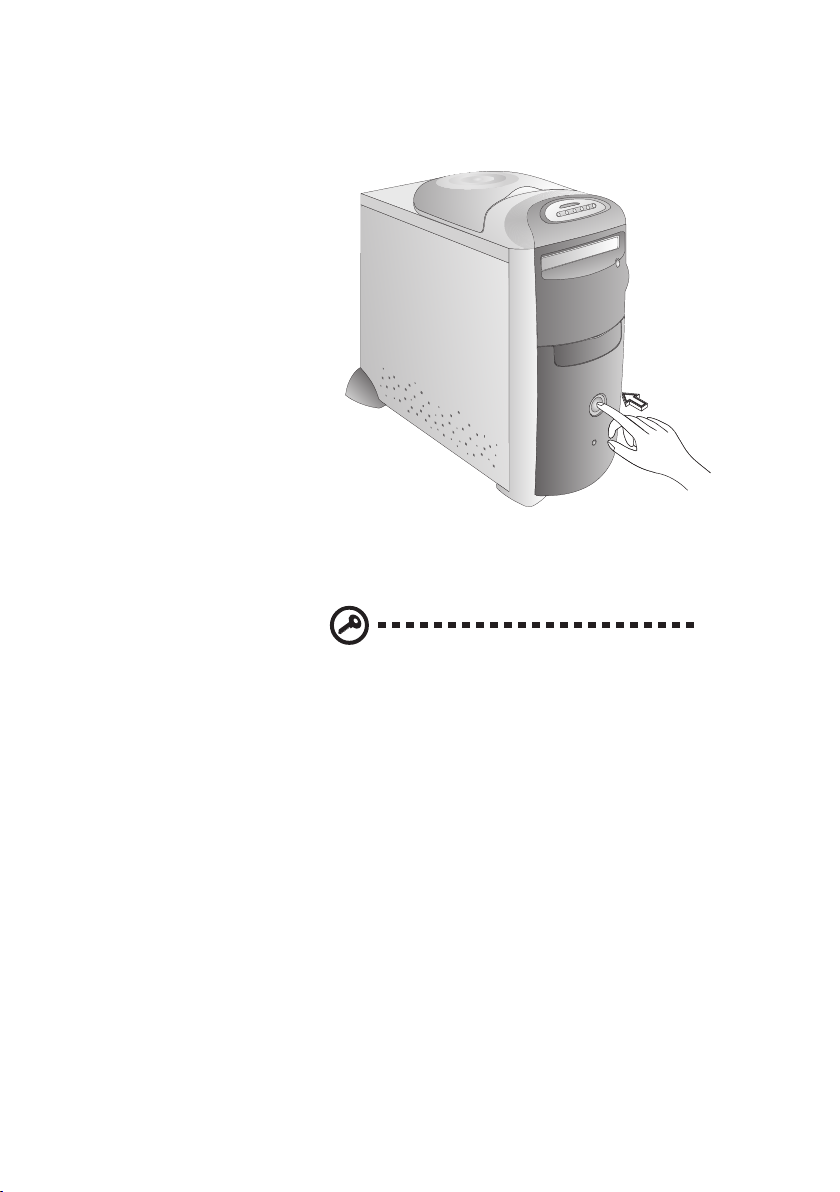
4
3 On the front panel of your computer, press the
power button.
When the computer nishes booting, it is now ready
for use.
Important: Make sure that the power cable is
properly plugged in into an electrical outlet. If you
are using a power strip or an AVR (Auto-Voltage
Regulator), make sure that it is plugged in and
turned on.
Page 15

Turning off your Aspire
Option 1: Quickstart OFF. Your Aspire will continue to run
in the Quickstart OFF condition. It will appear that it is OFF.
When you press the power button to switch your Aspire to
the fully ON condition, it will do so in only a few seconds.
Option 2: Traditional OFF. If you want your Aspire to
completely power OFF (if you need to unplug it):
1 Click on the Start button on the taskbar.
2 Click on Shut Down.
3 Click on Shut Down the Computer and click Yes. Your
computer will guide you through saving any open les
and then will shut down Windows Me. Your computer
will then turn off all computer power automatically.
You will have to manually turn off your monitor after
you see the computer power go off.
5
Page 16
6
Drives on Your Computer
Whether it’s the software program that you bought from
your local computer store or the shopping list you just
typed up using your word processor, all information in a
computer is stored electronically.
To save (write) data or retrieve (read) data, the computer
uses a drive. There are different ways to store data, and each
different type of data storage has a specic drive.
Three different types of drives come with your Aspire
computer:
CD/DVD Drive
Floppy Drive
Hard Drive
Drives on Your Computer
Your xed or hard drive is located inside your computer.
This drive is typically called the C: drive in Windows.
The Floppy Drive
This drive uses removable 3.5-inch oppy disks and is called
the A: drive.
Page 17
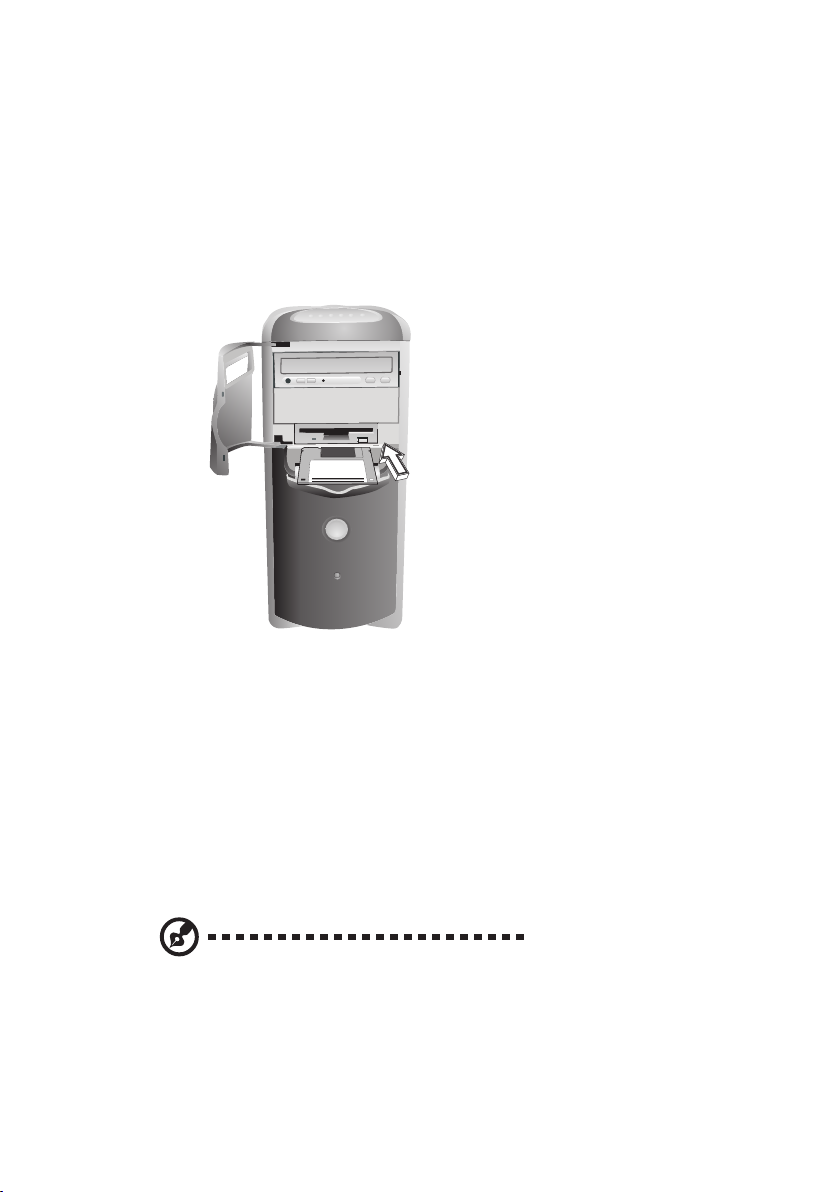
Using Your Floppy Drive
Floppy disks are used for putting data into your computer
or for taking it out.
1 Insert the oppy disk into the drive, as shown.
(The metal circle on the disk’s underside should
be facing down.)
7
2 Push it in gently until it pops into place.
3 Remove the oppy disk by pressing the eject button.
Formatting a Floppy Diskette
A oppy disk is, basically, just a thin piece of magnetic
tape on which data can be stored electronically. Most
oppy disks are protected with a hard plastic case.
Before a oppy can be used, it must be formatted, or
made ready to accept data.
1 Make sure your oppy is not write-protected.
2 Insert the diskette into your oppy drive.
Note: Many stores sell preformatted 3.5-oppy
disks.
Page 18
8
3 Click on the Start button , point to Programs, and
click on Windows Explorer.
4 Point to 3 .5” Floppy (A:) under My Computer.
5 Click on the right mouse button, then select Format.
Cautions: Formatting a disk removes any data that
might have been saved on that disk. Also, be sure to
keep your disks away from heat and other
magnetic items that can damage the disk and the
information on it.
Why Disks? (Or Discs for that matter...)
The advantage of a oppy disk or CD is that it makes data
portable.
Practically all newly purchased software comes in one of
these two formats.
Data is often exchanged between computers on oppy disks.
Be aware that there is an inherent danger of virus infection in
casual swapping or sharing of oppy disks with your friends
and associates. Files, applications or programs downloaded
from the Internet also carry possible danger.
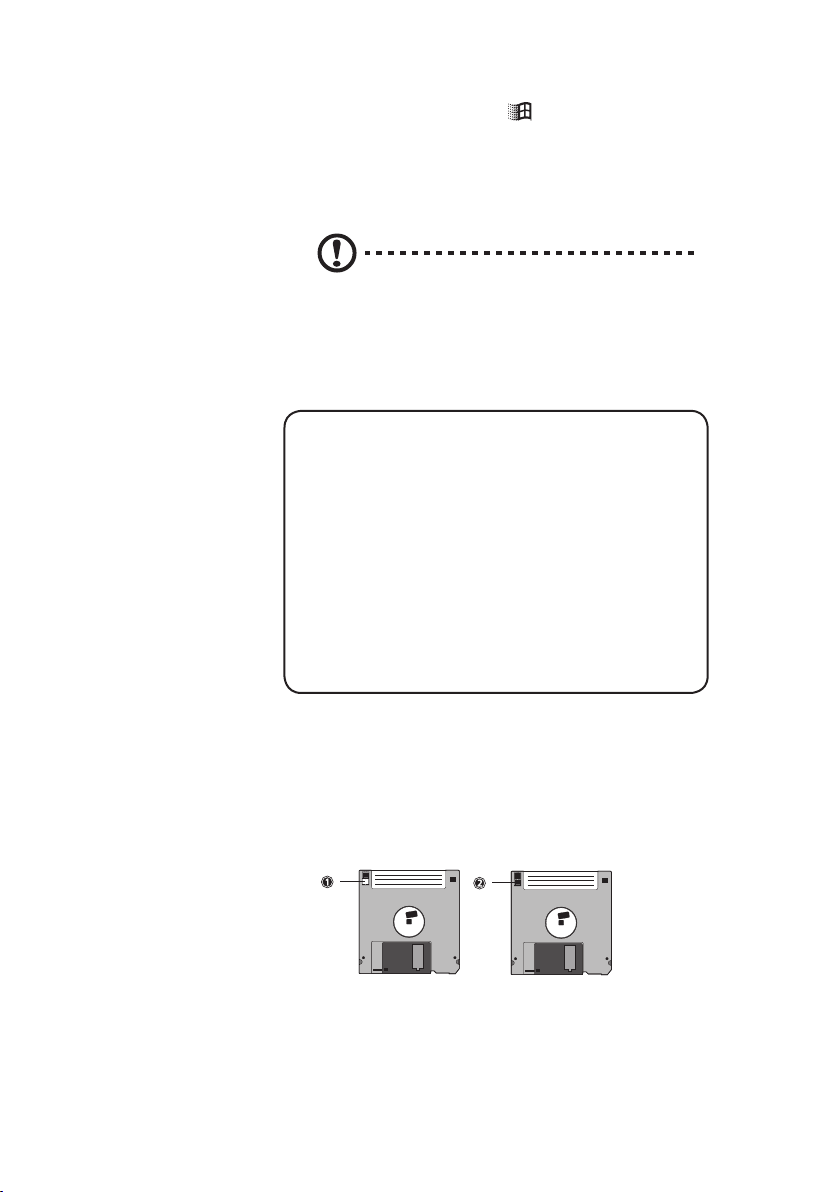
Write Protecting a Floppy Diskette
When the write protect notch is open (1), data cannot be
written to (saved on) the disk. The notch must be closed (2)
for data to be written to (copied on) the disk.
Write protecting diskettes is a good way to keep them safe
from viruses, should you use them in a different computer.
Page 19

The CD-ROM Drive
The CD-ROM drive uses CDs (Compact Discs) instead of
oppy disks, and it is Read Only Memory, which means that
the computer can read data from the disc, but cannot write
anything new on it. It is typically called the D: drive. On
some computers, the CD-ROM may be another drive letter.
Please refer to My Computer for the current drive letter
assignment on your Windows desktop.
The DVD-ROM Drive (option)
The DVD-ROM (Digital Versatile Disc or Digital Video Disc Read Only Memory) is a type of optical media. It can hold
capacities ranging from 4.7 GB to a maximum of 17 GB, and
can support access rates from 600 Kilobytes per second to
1.2 Megabytes per second. It is backward-compatible with
CD-ROMs which means that DVD players can play not
only DVD-ROMs, but CD-ROMs, CD-I discs, video CDs,
and CD-R discs as well. DVD uses MPEG-2 to compress
video data.
Using Your CD/DVD Drive
9
Unlike oppy disks, CD/DVD discs can be used only for
putting data into your computer. Your Aspire computer
can use two types of CD-ROM discs: audio discs and data
discs. Data CDs can hold a lot of information and very
large programs. One CD can hold more information than
is contained on 450 oppy diskettes.
Page 20
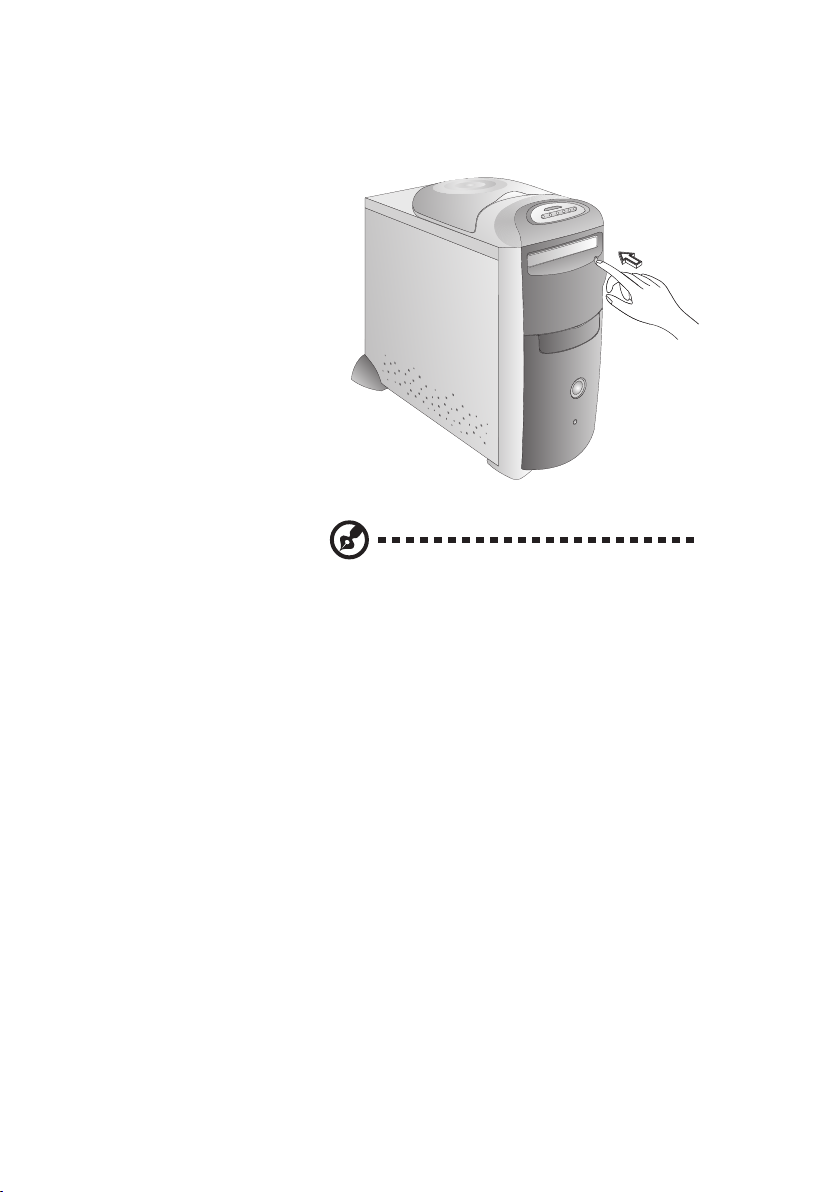
10
1 Press the eject button to manually open or close the
CD tray.
Note: It may take up to 30 seconds for a disc to
stop spinning before the drive opens up. If you
try to run the software when you rst insert the
CD (or DVD) and you get an error message like
Drive Not Ready, wait a few seconds, then try
again.
Page 21
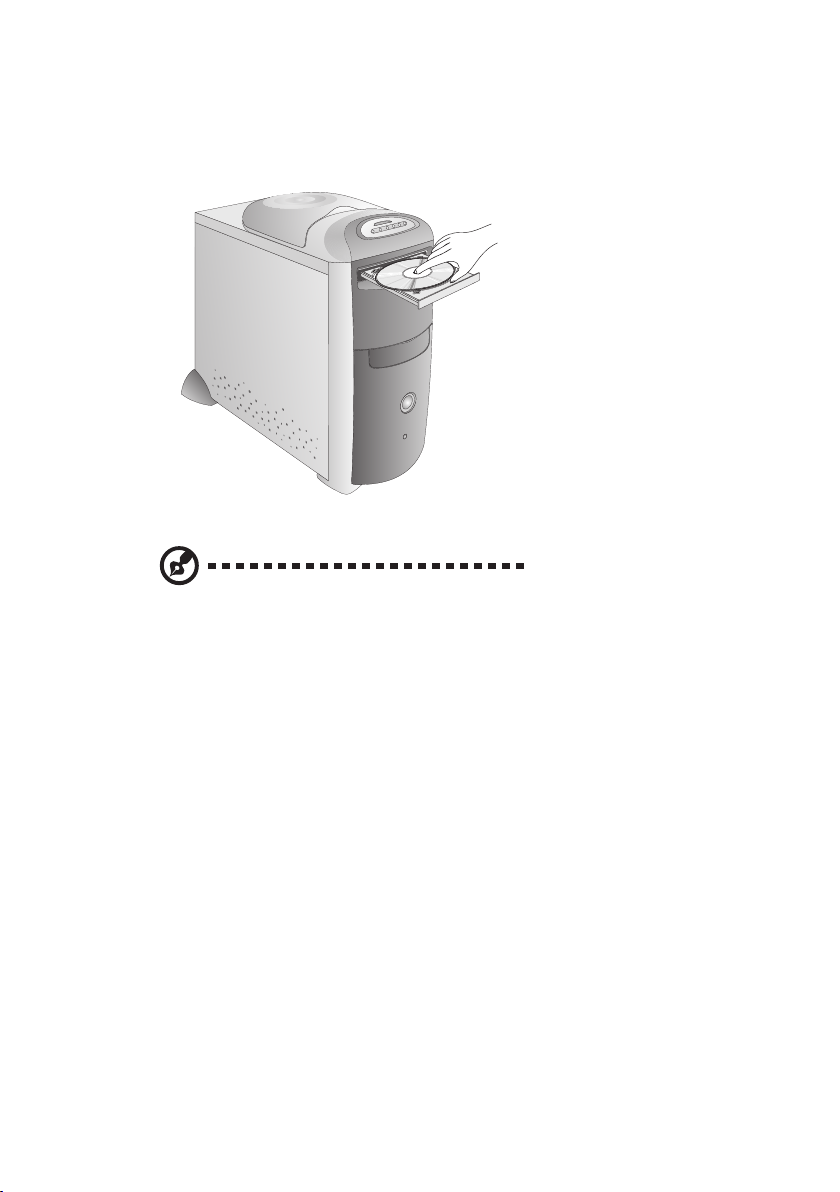
2 To insert a CD or a DVD, place it in the tray with the
title side facing up, then press the CD eject button to
close it.
Note: Your CD/DVD drive will probably emit a
sound like that of a fan. Unless you are having other
problems with your drive, you should not be
concerned.
11
Page 22

12
The CD-RW Drive (option)
The CD-RW (CD Recordable/ReWritable drive allows you to
burn CDs. It can also read CD-ROMs, video CDs, CD-R and
CD-RW. CD Recordable are write-once discs while CD
Rewritable can be rewritten.
Caring for your CDs and DVDs
A CD/DVD has two sides:
• The title side tells you which CD/DVD it is.
• The data side stores all the data.
Remember the following guidelines when handling
your CDs and DVDs:
• CDs and DVDs are fragile, so when handling your CDs or
DVDs, hold them by the edges to avoid leaving smudges
or ngerprints.
• Always keep them in a disc case when not in use to
avoid scratches or other damage. Any kind of dirt or
damage can affect the data on the disc, impair the disc
lens reader on the CD and DVD drives, or stop the
computer from successfully reading the disc.
• To clean your CDs and DVDs, use a clean, dust-free
cloth and wipe in a straight line from the center to the
edge. Continue around the whole disc. (DO NOT wipe
in a circle.) You can also periodically clean your
CD/DVD drive to prevent problems from reading
CDs/DVDs on your computer.
Page 23

The Mouse (Corded and Wireless)
Both corded and wireless mouse have the features
written below.
Features of a mouse
The mouse uses a cursor called a pointer. Pointers come
in many different shapes but are most commonly shaped
like an arrow.
Your mouse has two buttons: a left button and a right
button. Quickly pressing and releasing one of these
buttons is called clicking. Sometimes you will need to
double-click or click the same button twice quickly.
In this manual, click means to position your mouse point
on an icon and to single click the left button. When a
right-click is required, this is stated clearly. Double-click
also refers to the left button.
The ratchet wheel in between the two buttons is added
to provide easier scrolling capability. By simply moving
the wheel with your index nger, you can quicky move
through multiple pages, line, or windows. The wheel may
also function as a third button allowing you to quickly
click or double-click an icon or a selected item.
13
Note: Note: If you are left-handed, please refer to
your Windows Me manual for instructions on
how to set up your mouse for left-handed use.
Page 24

14
Setting up your wireless mouse
Unlike a corded mouse, a wireless mouse needs setting up
before it can work.
1 Before you proceed, make sure your computer is
completely turned off (see page4).
2 Insert batteries in your wireless mouse:
a Turn over your mouse and press the tab on the
bottom to remove the battery compartment cover on
top of your mouse.
b Insert two AAA Alkaline batteries, making sure to
properly orient the positive (+) and negative (-) ends
as specied by the battery compartment labels.
c Close the compartment cover.
Note: When your wireless mouse is running out of
battery, a pop-up window will remind you to
recharge it.
Page 25

Conguring your mouse
You can customize the buttons on your mouse to meet
your need.
1 Turn on your Aspire computer.
2 Click iTouch in the taskbar and a conguration
window will pop up.
3 Select the functions you prefer, following the
instructions.
Resetting your wireless mouse
When the battery is recharged or your cursor doesn’t move
or jerks around the screen, you may need to reset your
mouse. (See Troubleshooting)
1 Press “Connect” button of the receiver on the
front panel.
2 Press “Connect” button of the bottom of your
mouse.
15
Page 26

16
The Keyboard (Corded and Wireless)
The way keys are used varies from program to program. Here
are some of the most common uses which apply to both
corded and wireless keyboards:
No. Component Function
1 Function keys Numbered F1 through F12,
(F1 - F12) each will perform a specic
and well-dened function,
should an application use
them.
2 Caps Lock Locks the capital letters in
place. Pressing it again will
take the Caps Lock off. (A
Caps Lock indicator light
will turn on when the Caps
Lock is on.)
3 Windows logo key Brings up the Windows
Start menu.
4 Application key Displays drop-down menus
from icons (same as right
click) and currently active
applications.
5 Cursor Arrow keys Move the cursor in the
directions that the arrows
point.
Page 27

No. Component Function
6 Palm reset Provides a comfortable
(detachable) place to rest your hands
while typing.
7 Num Lock When the Num Lock/Num
Pad key is on, the keys on
the numeric key pad can be
used for entering numbers.
When it’s off, these keys
become arrow keys, page up
and page down keys as
indicated on the bottom
half of the key.
8 Internet Keys Provides four programmable
keys: My home ,
E-mail , Search ,
Go . You can customize
these keys to launch a
program, a web site, or a menu
of programs, web sites, or
Internet search engines of your
choosing.
9 Scroll Lock When activated, the screen
moves one line up or down
when you press the up arrow
or down arrow respectively.
Take note that Scroll Lock
may not work with some
applications.
17
10 Multimedia Keys Provides standard CD-player
controls for playing music
on PC: Play/Pause ,
Stop , Previous Track ,
Next Track , Mute ,
Volume Up
Volume Down
11 Suspend Provides access to the
Windows Shutdown dialog
box.
, and
.
Page 28

18
Below are other keyboard keys which can help you
perform your tasks:
• Esc key. Exits the current action, screen, or program.
• Tab key. Moves the cursor over a set number of
spaces in word processing software. In other types
of programs, it moves the cursor from one eld (an
area on the screen where data can be entered) to the
next.
• Enter key. Starts a new paragraph in word
processing. In other programs, it accepts data
entered or shows that an action is complete.
• Shift key. Pressing this key while typing a letter or
symbol key will give you the capital letter or symbol
on the top of the key.
• Insert key. When activated, inserts data vs. typing
over/replacing it.
• Delete key. Will delete data that is highlighted or to
the right of the cursor.
• Home key. Takes you to the beginning of a line.
• End key. Takes you to the end of a line.
• Page Up / Page Down keys. Move you up or down
a screen at a time.
• Backspace key. Is similar to the delete key above,
but it will delete one character at a time to the left of
the cursor.
• Alt and Ctrl keys. Have varying functions on their
own or when used with other keys, depending on
the software being used.
Page 29

Setting up your wireless keyboard
Unlike a corded keyboard, a wireless keyboard needs
setting up before it can work.
1 Before you proceed, make sure your computer is
completely turned off (see page4).
2 Insert batteries in your wireless keyboard:
a Turn over your keyboard and squeeze the battery
compartment cover in from the tab to release it.
b Insert two AA Alkaline batteries, making sure to
properly orient the positive (+) and negative (-) ends
as specied by the battery compartment labels.
19
c Close the compartment cover.
Note: When your wireless keyboard is running out
of battery, a pop-up window will remind you to
recharge it.
Page 30

20
Conguring your keyboard
You can customize the keys on your wireless keyboard to meet
your need.
1 Turn on your Aspire computer.
2 Click iTouch in the taskbar and a conguration
window will pop up.
3 Select the functions you prefer, following the
instructions.
Resetting your wireless keyboard
When the battery is recharged or your keyboard doesn’t
work, you may need to reset your keyboard.
(See Troubleshooting)
1 Press “Connect” button of the receiver on the
front panel.
2 Press “Connect” button on the right side of your
keyboard.
Page 31

The Monitor
Connect a monitor by simply plugging the monitor cable
into the monitor/VGA port located on the back of your
computer. Then plug the power cable into a power outlet.
21
Note: Refer to the manual that came with your
Aspire monitor for more information on the
monitor features.
Page 32

22
The Speakers
Your system comes with a set of speakers.Connect it to your
system either through the front or rear audio -out/line -out
port of your computer. Then plug the power cable into the
power cable socket located on the rear panel of your computer
and plug the other end of the power cable into a power outlet.
Note: Please refer to the manual that came with
your speakers for more information.
Page 33

Your Data/Fax Modem
Your data/fax modem makes it possible for you to
communicate electronically around the globe.
Once you’ve plugged your telephone line into your Acer
computer, you can:
23
• Access the Internet
2
• Send and receive faxes
• Send and receive emails
2
Accessing the Internet
Your Aspire computer comes with the ability to link to
the Internet. 3 With the Internet you can visit Acer for
updates, send email to friends and family, book vacations,
read up on the latest blockbuster movie, and much, much
more. All you need is a phone line to hook the modem
up to, and an account with an Internet Service Provider
(ISP).
2
Requires an account with an Internet Service Provider.
3
You may be required to pay toll charges, monthly or
hourly usage fees, and other setup charges. Check with
your Internet Service Provider for details.
Page 34

24
Connecting an Optional Printer
1 Make sure your computer is completely turned off
(see page 4).
2 Connect the printer cable purchased with your printer
from the printer to the printer port on the back of your
computer.
3 Plug your printer power cable into a wall outlet or
power strip.
4 Turn on the printer.
5 Turn on the computer.
Note: For printer driver installation to go
smoothly, it is important to turn on your printer
rst so Windows can recognize that a printer is
connected to the computer.
Page 35

Printer Driver Installation
To print from your Aspire, you need a printer driver - a
program that tells your computer what kind of printer it is
printing to.
Windows has automatic detection for all of the more
popular printers. If your printer is not available in Windows
Me, look in the printer’s user guide for instructions. Please
contact the manufacturer of your printer if you have
problems or questions.
1 Click on the Start button .
2 Point to Setting, thenclick on Printers.
3 Double -click Add Printer.
4 Follow the directions on the screen, and be sure to test
the printer when prompted. You should now be able
to print successfully from your Aspire.
Connecting an Optional Serial Device
1 Before you proceed, make sure your computer is
completely turned off (see page 4).
2 Locate the serial port on the back of your computer.
3 Plug your serial device cable into this port.
25
Page 36

26
Connecting an Optional Joystick or
MIDI Device
1 Before you proceed, make sure your computer is
completely turned off (see page 4).
2 Locate the Game/MIDI port on the back of your
computer.
3 Plug your joystick or MIDI device cable into this port.
Page 37

Getting the Most from your
Aspire Audio Sytem
Playing an Audio CD
Would you like to play a little music while you work? Pop
your favorite audio CD into the CD-ROM drive, wait ten
to twenty seconds and, voila! Music!
Special features of Audio DJ
Audio DJ’s special features make it possible to use your
computer audio system even when your computer is
turned off. Combining audio entertainment functions of a
home electronic appliance, the console is designed to play
music regardless of your computer’s power state.
Besides, the console’s convenient location at the top
makes it easy to control despite that your computer is
on or under the desk.
Using Audio DJ when the computer
is off
27
1 Press any button on the console to start the audio
function.
2 Press Eject
3 To insert a CD, place it in the tray with the title side
facing up, then press the Eject
4 Press PLAY button to start listening music.
Track one will be shown on the panel.
5 Press Previous Track or Next Track buttons
to choose the track number that you want to listen to.
6 Audio DJ will stop automatically when the CD
completes playing.
button to open the CD tray.
button to close it.
Note: Audio DJ will always start from track one
whenever it is stopped or paused.
Page 38

28
Using Audio DJ when the computer
is on
When the computer is on, you can operate Audio DJ by the
buttons on the console or any audio software you have
installed in your computer system. You can refer to the
steps of Using Audio DJ when the computer is off for
controling the console.
Adjusting the Volume
There are several ways you can adjust the volume on your
audio CD:
• Use the Multimedia Keys on your keyboard to control
volume.
• Use the Audio DJ volume up/down buttons on the front
panel to control volume.
• Click on the Volume icon on the task bar at the
bottom of your screen.
A volume control will pop up. Drag
the volume control lever with your
mouse until you nd the level you
want.
• Double-click on the Volume icon to use the
electronic mixing board.
Page 39

The Electronic Mixing Board
Your Aspire computer comes with an electronic mixing
board that enables the experienced audiophile to make the
most of the stereo sound system.
1 Double-click on the Volume icon on the task bar at
the bottom of your screen. The Master Volume
window will open:
2 All of the options on this screen can be adjusted by
dragging the slider bars.
29
Note: The controls were balanced in the factory.
We recommend that you do not change these
settings unless you have some familiarity with
sound mixing.
Page 40

30
Getting the Most from your
New Video System
New TV function(Optional)
Some models include a TV Tuner card, located in one of the
PCI card slots at the back of the computer. The TV Tuner
enables you to connect a standard television cable to your
computer, allowing you to receive a television signal.
In addition to providing channel changing and image control,
the included Power VCR software offers the benet of time
shifting. This means that you can pause viewing when you have
to take a break, leaving the software to continue recording the
television reception. You can then restart your viewing in the
place where you left off, effectively watching the program with
a time delay.
Power VCR functions:
Surf channels
1 Be sure that your TV Tuner card (or capture card) is
installed correctly or your PowerVCR screen will be blank.
2 Click on Surf Channels located in the video display area.
3 Click on Auto Page to allow a continuous refresh of
sixteen new channels.
4 Click Next and Previous Page to preview other channels.
5 Click Auto Scan to scan for available channels.
6 Click Cancel Surng to exit or select one specic channel
by clicking on it to return to the normal display.
Page 41

Record TV programs
1 Be sure that your TV Tuner card (or capture card) is
installed correctly or your PowerVCR screen will be blank.
2 Start PowerVCR. Click the source indicator until the indi
cator reads TV if you have an antenna or CATV if you
have a cable wire.
3 Click the arrow located on the right edge of the
PowerVCR panel to activate the TV Tuner Control.
4 Select a desired channel by using the number pad or left
and right arrows.
5 Click on Return to return to the last channel.
6 Click Auto Scan to scan all the possible channels. To
cancel the scanning, click Cancel once the Auto Scan
dialog box appears and you will be returned to the
original channel.
7 After you have selected the desired channel, click Record.
8 Click Stop when you are nished.
31
9 The playlist will appear for you to save it.
10 To delete all the le(s), click Delete.
11 Click OK when the dialog box appears to conrm your
deletion.
12 Click on Save to... to save it to another folder other than
the default folder.
13 A dialog box will appear for you to save it in another
folder or to rename it. Click Save when you are nished.
Page 42

32
Time-shifting
1 Be sure you are in the Live/Digital Recorder mode.
2 Click System Settings.
3 Click the Recording/Advanced tab and in the Advanced
Options section, click Enable time-shifting playback
when recording.
4 Click OK to exit System Settings.
5 Click Record.
6 Click Time-shifting.
7 The mode will switch to Time-shifting. Click Play to begin
time-shifting playback.
8 To Fast Forward, Rewind, or Pause, click the
corresponding buttons.
9 To return to the recording in progress (i.e. the Live/Digital
Recorder mode), click Stop or Time-shifting again.
Page 43

Adding Options to
your Aspire
You can add hard drives, memory, expansion cards, and
other options to your Aspire computer. For directions on
upgrading and how to disassemble the computer chassis,
refer to the online guide.
You can nd information regarding your motherboard
jumper settings by referring to the panel inside your
Aspire chassis.
Opening/Closing Your Aspire
Caution! Always turn off your computer and
unplug it before opening the case. For more
information on the complete system
shut-down, refer to “Setting up your Aspire” on
page 2.
33
Electrostatic Discharge Precautions
Always observe the following lectrostatic discharge (ESD)
precautions before installing a ystem component:
• ESD can cause permanent damage to your computer.
• Do not remove a component from its antistatic
packaging until you are ready to install it.
• Wear a wrist grounding strap before handling electronic
components. Wrist grounding straps are available at
most electronic component stores.
• At a minimum, keep a hand in contact with the metal
system housing to reduce the ESD effect.
Page 44

34
Removing the Left Panel Cover
1 Turn off your computer and unplug all cables.
2 Place your computer on a at, steady surface.
3 Turn the thumbscrew counterclockwise with your
ngers to release the side panel. Set the screw aside.
You will need them when replacing the side panel.
4 Gently push the computer’s side panel slightly
backward (a), then pull it upward to remove it from
the chassis (b).
Page 45

Replacing the Left Panel Cover
After you install the system components into the
housing, you must replace the left panel cover.
1 Align the side panel to the housing frame (a), gently
push it in (b), then slide it forward into place (c).
2 Use the thumbscrew you have previously removed,
turning it clockwise, to secure the side panel.
35
Page 46

36
Connecting USB Devices
The Universal Serial Bus (USB) on your Aspire allows for easy
and convenient expansion options. With it, installing
devices such as digital cameras, scanners, and joysticks is a
breeze. Two USB connectors are located on the back of your
computer while another two are located inside the
multimedia port bay in front of your computer.
Note: Most USB devices have a built-in USB port
which allows you to daisy-chain other devices.
Page 47

Need
Help?
Acer is dedicated to bringing you a reliable and easy to
maintain computer. We realize, though, that problems
can arise unexpectedly. Please refer to the
troubleshooting tips in this section to help diagnose and
solve your problems.
Troubleshooting - General
Here are some answers to commonly asked questions:
The Start button
The taskbar has either been resized too small or it is in a
hidden location.
To retrieve the taskbar:
1 Press the Start key
2 Press the Esc key to close the Start menu.
(The taskbar is still selected.)
3 Press the Alt + Spacebar keys together and select “size.”
4 Use the Arrow keys to resize the taskbar to the desired
size and press the Enter key when done.
My computer will not shut off completely.
For more information, refer to “Turning off your Aspire”
on page 4.
My CD or DVD does not always work, and it does not
eject all the time.
1 The CD or DVD being used is most likely dirty or
scratched. Clean the CD or DVD.
2 If cleaning the CD or DVD doesn’t correct the problem,
call Acer Technical Support.
is not displayed on screen.
on the keyboard.
37
Page 48

38
My modem connects, but there is no dial tone.
1 Check to see if the phone lines (in and out) are properly
connected. Sometimes the line to the phone and the line
to the wall jacks are reversed. If needed, refer to the Easy
Setup poster that came with your Aspire computer.
2 Ensure that all phones using this line have been hung up.
My modem does not work.
1 Ensure that the line from the wall jack is plugged into the
jack on the back of the computer labeled Line or Wall.
2 Ensure that the line from the wall jack to the computer is
tightly plugged in on each end.
3 If the modem still doesn’t work, disconnect any phones
or other equipment that may be on the same line.
4 If the modem still doesn’t work, temporarily disable any
special services on the line, such as call waiting.
My monitor remains dark when system is turned on
1 Make sure that the monitor power indicator is lit.
2 Check brightness and contrast settings.
3 If the problem still persists, ensure that the monitor is
plugged in and the cable from the monitor to the com
puter is securely attached.
My monitor will not turn on.
1 If the monitor Power button light is not lit, verify that the
monitor is plugged in to a power source.
2 If the monitor Power button light is lit, but is blinking
instead of steady, verify that the monitor video cable is
fully connected to the computer. If needed, refer to the
Easy Setup poster.
3 If the computer Power button light is blinking, press it
once.
4 If necessary, unplug the computer and monitor, then
inspect the monitor cable connector for bent or broken
pins.
Page 49

My sound is bad or uneven or my system has no
sound.
1 Turn up the volume on the keyboard control.
2 In Windows, double-click on the Volume icon
(located near the clock in the taskbar) to verify that the
volume control is up and mute is not turned on, or use
the volume knob on your keyboard.
My system freezes.
If your system hangs up, or freezes for some reason, you
can reboot (restart) the computer by pressing the
Ctrl + Alt + Del keys simultaneously. Follow the onscreen
instructions.
If this does not successfully restart the system, you have
another option:
1 Push the Power button on your computer, holding it in
for approximately four seconds or until your screen goes
dark. This will completely turn off your computer.
2 Push the Power button again to turn the computer back
on.
Note: Whenever you reboot your system, you
will lose any unsaved data.
39
My oppy drive won’t read my disk.
1 Eject the disk from the oppy drive, then reinsert it and
try again.
2 Verify that the disk is correctly formatted. You will lose
any data on this disk if you format it.
3 Verify that the problem is the disk, not the drive, by
checking another oppy that you know is valid.
Page 50

40
Troubleshooting - Feature problems
Wireless Keyboard/Mouse
About Batteries
What type of batteries should I use?
Only alkaline batteries should be used, regardless of brand.
What kind of battery life can I expect?
The battery life of a cordless device depends upon the model
and amount of use. With cordless optical devices, you can
expect the unit to use a set of batteries every two months.
Other cordless devices can use one set of batteries for up to
six months.
I changed my batteries and now my pointer doesn’t
move or my keyboard doesn’t work. What happened?
First, verify you have inserted the batteries with the correct
polarity. Second, and most common, the mouse/keyboard
and receiver may need to be re-synchronized. Therefore, you
can just press the “Connect” button on the front panel
then press the connect button on the bottom of the
mouse/keyboard.
About the Cordless Technology
Do your cordless products use Radio frequency or
Infrared technology?
Our cordless products use radio frequency to communicate.
What frequency or frequencies do your cordless
products use?
Channel 1: 26.995 MHz
Channel 2: 27.045 MHz
Page 51

General Usage Questions
How do I get the cordless mouse or keyboard to
communicate with the receiver?
You can simply press the “connect” button on the front
panel, and then press the connect button on the bottom
of the mouse and keyboard.
What is the range can I expect from my cordless mouse
or keyboard?
In general, the range should be up to 6 feet.
My cursor doesn’t move or jerks around the screen;
what’s wrong?
It is likely the mouse/keyboard and receiver may need to be
re-synchronized. You can just press the “Connect”
button on the front panel then press the connect button on
the bottom of the mouse/keyboard.
Also, any electrical device such as the computer monitor, Zip
drives, speakers, etc., can cause interference with cordless
products. Most likely, this will affect tracking of pointing
devices or the range. Also, using cordless devices on a metal
desk or a desk with a metal frame can cause problems with
pointing device behavior and range. To resolve these types of
issues, try moving your system at least 8 inches away from
other electrical devices. Interference issues can also be
resolved by moving the mouse closer to the system.
41
Page 52

42
Interference Questions
Will my cordless mouse or keyboard interfere with my
cordless phone?
No, cordless devices operate at such a low frequency that
they will not interfere with most cordless devices.
What can cause interference with my cordless product,
and what can I do?
Any electrical device, such as the computer monitor, Zip
drives, speakers, etc., can cause interference with cordless
products. Most likely, this will affect tracking of pointing
devices or the range of the device. Also, using cordless devices
on a metal desk or a desk with a metal frame can cause
problems with pointing device behavior and range. To resolve
these types of issues, try moving your system at least 8 inches
away from other electrical devices. Interference issues can
also be resolved by moving the mouse closer to your system.
Note: You should always get at least a 4 feet range.
If you nd that your cordless device gets less than a
4 feet range, please replace the batteries with a
fresh set, perform the synchronization procedure
for the mouse and/or keyboard and test the range
again. If the range is still below 4 feet, please test
your device on another system, preferably in a
different environment. If the range improves on
another system, then it may be an environmental
variable. Use the suggestions above to resolve the
environmental interference issue. Please refer to
iTouch on-line help for more information.
Page 53

Multi-Cordless User Environment Issues
The following questions and answers apply when multiple
cordless units are being used in close proximity to each other.
How many cordless devices can I use in one area?
Cordless devices have a range of 6 feet, but under certain
conditions, they can exceed that. To avoid possible
interference, try to keep the distance from system to system
at least 10 feet. Also, moving the mouse closer or further
away to your system can also improve transmission and
performance.
There isn’t a specic number of cordless devices that you
can/cannot use in one area, as there are a lot of
environmental variables that will effect the performance of
the cordless device. It is feasible to use many units in one area,
provided you install them incrementally and be aware of the
environmental variables.
When I move my cordless mouse, it moves the cursor on
the system next to me. What should I do?
This is called “Cross talk” and is characterized by one cordless
device controlling the cursor or keyboard input of another
device connected to a different computer. To avoid possible
interference, try to keep the distance between systems at
least 10 feet. Also, moving the mouse closer or further away
to your system can also improve transmission and
performance. If the above fails, try pressing and holding the
“Connect” button on the front panel for 10 seconds.
This will reset the receiver’s connection information and
allow you to do a rst time connection with the receiver and
mouse or keyboard. After holding the Connect button for 10
seconds, then press the Connect/Channel button on the
bottom of the mouse to synchronize it with the receiver.
If you have a cordless keyboard instead of, or in addition to, a
cordless mouse, press the “Connect” button of the
front panel again, then press the “Connect “ button on the
Keyboard.
43
Page 54

44
When I type on my cordless keyboard, the text is
displayed on another keyboard using a cordless desktop
system. What can we do to break the interference?
This also is considered cross talk, and the above solutions
apply. However, one step that should be tried before the
steps mentioned above is to remove the batteries for 15
minutes. Then insert them and boot the computer up. It is
important that during this time, you do not press the
“Connect” button on the front panel or keyboard of
the other cordless desktop system.
When I move my cordless mouse the user next cannot
move the cursor on their system until I stop moving my
mouse. What should I do?
This is called “Jamming” and occurs when one cordless device
is in use and causes another cordless device to stop
functioning until the rst device stops moving. To avoid
possible interference, try to keep the distance between
systems at least 10 feet. Also, moving the mouse closer or
further away to your system can also improve transmission
and performance. If the above fails, try pressing and holding
the “Connect” button on the front panel for 10 seconds.
This will reset the receiver’s connection information and
allow you to do a rst time connection with the receiver and
mouse or keyboard. After holding the Connect button for 10
seconds, then press the “Connect” button on the bottom
of the mouse to synchronize it with the receiver. If you have a
cordless keyboard instead of, or in addition to, a cordless
mouse, press the “Connect” button on the front panel
again, then press the “Connect “ button on the
Keyboard.
I put a CD in my DVD player, and press the “Play/Pause”
key, but nothing happens. Why?
In order to use the multimedia keys for your DVD player, you
must launch the DVD player rst.
Page 55

Troubleshooting - Error Messages
I keep getting one of the following error messages:
Equipment Conguration Error
This error occurs when the CMOS settings have been
changed to a conguration that prevents successful
boot-up. Press the Ctrl + Alt + Esc keys, after the beep
during the boot process, then select Restore Default Settings
to restore the original CMOS values.
CMOS Battery Error
Call Acer Technical Support.
CMOS Checksum Error
Press the Ctrl + Alt + Esc keys, after the beep during the
boot process, then select Restore Default Settings to restore
the original CMOS values. If the error message continues,
call Acer Technical Support.
Diskette Drive Controller Error or Not Installed
45
Call Acer Technical Support.
Diskette Drive Error
Diskette may be defective. Verify with a known good
diskette.
Diskette Drive A: Type Mismatch
Press the Ctrl + Alt + Esc keys, after the beep during the
boot process, then select Restore Default Settings.
Hard disk Controller Error
Call Acer Technical Support.
Page 56

46
Hard disk 0 Error
Call Acer Technical Support.
Hard disk 1 Error
Call Acer Technical Support.
Keyboard Error, No Keyboard Connected or Keyboard
Interface Error
Check that the keyboard is securely plugged into the
correct port on the back of the computer.
Page 57

Additional Acer Services
About the Aspire Web Site
The Acer Internet site http://www.acer.com/ 4 has answers
for the most frequently asked support questions and offers a
searchable database of extensive technical information, new
product data and upgrade information. Use it:
• When you can’t nd the information you need in your
manual or online help, and before you call Technical
Support.
• When you want to nd upgrade information or bug
xes.
• When you’re curious about Acer!
Acer Technical Support
During the warranty period, should you have a problem
with your system or if you think something isn’t working,
contact Acer Technical Support at
http://www.acersupport.com/. Acer Technical Support
provides help for warranty related issues, such as a hardware
problem.
47
Before you contact Acer, please take a few minutes to write
down a description of the problem. This will help us provide
you with better quality support.
4
Requires an account with an Internet Service Provider.
Page 58

48
Notices
Disclaimer of Warranties
Acer makes no representation or warranties, either expressed or
implied, with respect to the contents hereof and specically
disclaims the implied warranties of merchantability or tness for
a particular purpose. Any software described in this manual is
sold or licensed “as is.“ Should the programs prove defective
following their purchase, the buyer (and not this company, its
distributor or its dealer) assumes the entire cost of all necessary
servicing, repair, and any incidental or consequential damages
resulting from any defect in the software. Further, Acer reserves
the right to revise this publication and to make changes from
time to time in the contents hereof without obligation to notify
any person of such revision or changes.
Disclaimer
Not all features described in this handbook will be available on
all models. Acer is continually updating its products to meet
customer needs and hardware and software specications may
vary from time to time. Please refer to your box label for the
specications for your particular system.
Join Us to Fight Against Piracy
The Acer Group has been implementing a policy to respect and
protect legitimate intellectual property rights. Acer rmly
believes that only when each and every one of us abides by such
policy can this industry provide quality service to the general
public. Acer has become a member of the Technology
Committee of the Pacic Basin Economic Council, which is
encouraging the protection and enforcement of legitimate
intellectual property rights worldwide. Moreover, in order to
ensure quality service to all our customers, Acer includes an
operating system in Acer computer systems which is duly
licensed by the legitimate proprietors and produced with quality.
Acer commits itself and urges all its customers to join the ght
against intellectual property piracy wherever it may occur. Acer
will pursue the enforcement of intellectual property rights and
strive to ght against piracy.
Page 59

Standard End User License Agreement
THIS END USER LICENSE AGREEMENT SHALL APPLY IN THE
ABSENCE OF A SEPARATE LICENSE AGREEMENT FROM THE
SOFTWARE PUBLISHER. OTHERWISE, THE SEPARATE LICENSE
FROM THE PUBLISHER WILL APPLY.
NOTE TO END USER: CAREFULLY READ THE FOLLOWING LEGAL
AGREEMENT. USE OF THE SOFTWARE SUITES PROVIDED WITH
YOUR ACER COMPUTER OR OTHER SOFTWARE PRELOADED
WITH YOUR ACER COMPUTER (THE “SOFTWARE“) WILL
CONSTITUTE YOUR ACCEPTANCE OF THESE TERMS (UNLESS
SEPARATE TERMS ARE PROVIDED BY THE SOFTWARE PUBLISHER,
IN WHICH CASE THOSE TERMS WILL APPLY). IF YOU DO NOT
AGREE WITH THE TERMS OF THIS AGREEMENT, PROMPTLY
RETURN THE SOFTWARE PACKAGE OR THE SOFTWARE
UNOPENED TO THE LOCATION WHERE YOU OBTAINED THEM.
1 License Grant. The Publisher of each of the Software (the
“Software Publisher”) grants to you a personal,
non-transferable and non-exclusive right to use the copy of
the Software provided with this license. You agree you will
not copy the Software except as necessary to use in on a single
computer system at one location. You agree that you may not
copy the written materials accompanying the Software.
Modifying , translating, renting, copying, transferring or
assigning all or part of the Software, or any rights granted
hereunder, to any other persons and removing any proprietary
notices, labels or marks from the Software is strictly
prohibited. Futhermore, you hereby agree not to create
derivative works based on the Software.
2 Copyright. You acknowledge that no title to the intellectual
property in the Software is transferred to you. You further
acknowledge that title and full ownership rights to the
Software will remain the exclusive property of the Software
Publisher or its suppliers, and you will not acquire any rights
to the Software except as expressly set forth above. All copies
of the Software will contain the same proprietary notices as
contained in or on the Software.
3 Reverse Engineering. You agree that you will not attempt,
and if you are a corporation, you will use your best efforts to
prevent your employees and contractors from attempting, to
reverse compile, modify, translate or disassemble the Software
in whole or in part. Any failure to comply with the above or
any other terms and conditions contained herein will result in
the automatic termination of this license and the reversion of
the rights granted hereunder to the Software Publisher.
49
Page 60

50
4 Customer Remedies. The Software Publisher’s entire
liability and your only remedy shall be, at the Software
Publishers’ option, to (a) attempt to correct the errors
believed to be causing the defect, (b) replace the Software
with functionally equivalent software or (c) refund the
purchase price of the Software; provided however, that you
must return all copies of the Software and accompanying
documentation.
5 No Liability for Consequential Damages. IN NO EVENT
SHALL SOFTWARE PUBLISHER OR ACER BE LIABLE TO
YOU FOR ANY CONSEQUENTIAL , SPECIAL, INCIDENTAL
OR INDIRECT DAMAGES OF ANY KIND ARISING OUT OF
THE USE OF THE SOFTWARE EVEN IF THE POSSIBILITY OF
SUCH DAMAGES HAVE BEEN ADVISED.
Some jurisdictions do not allow the exclusions of implied
warranties of limitations on how long an implied
warranties may last, or the exclusion or limitation of
incidental or consequential damages, so such limitations or
exclusions may not apply to you. This Limited Warranty
gives you specic rights and you may also have other rights
which vary from jurisdiction to jurisdiction.
6 Restricted Rights Legend. In the case where the Software
is license to a U.S. Government agency, you agree that the
Software is commercial computer software and, together
with related materials, are subject to the restrictions on
U.S. Government use, duplications or disclosure as set forth
in subparagraph (c)(1)(ii) of the Rights in Technical Data
and Computer Software clause at DFARS 252.227-7013,
subparagraph (g)(3)(i) of FAR 52.227-14, Alternate III, or
other applicable regulations concerning Restricted Rights.
7 Miscellaneous. You agree not to export or
re-export the Software without the appropriate United
States or foreign government licenses. This Agreement will
be governed by the laws of the state of California, as they
apply to agreements between California residents, without
giving effect to choice of law provisions. This is the entire
agreement and supersedes any prior agreement, whether
written or oral, relating to the subject matter of this
Agreement.
Page 61

System Warranty Information
For Limited Product Warranty information, please refer to the
following pages.
The Acer warranty does not cover the following
• Acer products purchased from any source other than Acer or
its authorized resellers
• All software and hardware not factory pre-installed
• Questions regarding all software, including factory
pre-installed software
• Online services, including the Internet
• Damage from misuse, abuse, or neglect
• Coverage for anyone who purchases, leases, or otherwise
obtains an Acer computer from the original owner
• Improper installation or use of third-party hardware products
• Modication of the Acer computer
• Product that requires periodic replacement, such as notebook
batteries, etc.
• Damage or loss of any programs, data, or removable storage
media
• Any consequential damages including lost prots or business
51
Limited Product Warranty
Acer, in an effort to provide computers of the highest quality and
reliability, subjects all its computers and components to extensive
testing and inspection procedures. Acer’s manufacturing facilities
have been certied to ISO-9000 international quality standards.
Before a component can be eligible for installation in an Acer
computer offered for sale, it must rst pass stringent quality,
inspection and testing procedures. Be assured that this Product and
its components have met Acer’s highest quality, testing and
inspection procedures for new products and are fully backed by
Acer’s limited warranty.
A. Acer Limited Warranty
Acer warrants the Product you have purchased from Acer or from
an Acer Authorized Reseller to be free from defects in materials or
workmanship under normal use during the warranty period
applicable to the Product. The warranty period commences on the
date of purchase. Your original purchase invoice (sales receipt),
showing the date of purchase of the Product, is your proof of the
date of purchase. This warranty extends only to you, the original
Purchaser. It is not transferable to anyone who subsequently
Page 62

52
purchases, leases or otherwise obtains the Product from you. It
excludes expendable parts.
During the warranty period, Acer will, at no additional charge,
repair or replace defective hardware with factory-renished parts
or products. All exchanged parts and Products replaced under
this warranty will become the property of Acer.
In the event the Product exhibits a defect in material or
workmanship within the warranty period, Acer will provide the
warranty services applicable to the Product.
B. Registration
To register, please call the available customer technical support
center in your country. Refer to Shop Acer for a complete list of
contact information.
If your product comes with a warranty registration card, please
refer to the instructions on the card.
C. Warranty Limitation; Exclusions; Exclusive Remedies
This Limited Warranty does not extend to any Product not
purchased from Acer or from an Acer Authorized Reseller. The
product (“Product“) you have purchased may include one or
more components previously installed in a product that was
returned after sale and possible use. This Limited Warranty also
does not extend to any Product that has been damaged or
rendered defective (a) as a result of use of the Product other than
for its normal intended use, failure to use the Product in
accordance with the User’s Manual that accompanies the
Product, or other misuse, abuse or negligence to the Product; (b)
by the use of parts not manufactured or sold by Acer; (c) by
modication of the Product; (d) as a result of service by anyone
other than Acer or an Acer Authorized Service Provider; or (e)
improper transportation or packing when returning the Product
to Acer or an Acer Authorized Service Provider; (f) improper
installation of third-party products (e.g. memory cards).
This Limited Warranty does not extend to expendable parts.
Expendable parts are those items that during the normal course
of product usage will require periodic replacement, e.g., printer
cartridges, notebook batteries, etc.
Add-on Components (HDD, CD-ROM, Sound Cards, etc.)
purchased from Acer and not installed in an Acer system are
covered by a limited warranty as dened on the Warranty Card
which comes with the component. For components purchased
from Acer or an Acer Authorized Reseller and installed in an Acer
system which are dened as “Supported“ on Acer’s Qualied
Vendor List, Acer will provide warranty technical support and
Page 63

part replacement service for the duration of the system warranty.
The warranty service provided on these supported components will
be equal to the warranty service in effect on the system on which
the components are installed. Proof of purchase from Acer for all
components is required. You may verify what components are
dened as “Supported“ on the Acer Qualied Vendor List by
contacting your Acer Authorized Reseller or Distributor or by
calling Acer Technical Support.
Acer is not responsible for damage to or loss of any programs, data
or removable storage media. You are responsible for saving (backing
up) any programs, data or removable storage media.
EXCEPT FOR THE WARRANTIES SET FORTH HEREIN, ACER
DISCLAIMS ALL OTHER WARRANTIES, EXPRESSED OR IMPLIED
OR STATUTORY, INCLUDING BUT NOT LIMITED TO THE IMPLIED
WARRANTIES OF MERCHANTABILITY OR FITNESS FOR A
PARTICULAR PURPOSE. ANY IMPLIED WARRANTIES THAT MAY
BE IMPOSED BY APPLICABLE LAW ARE LIMITED TO THE TERMS
OF THIS LIMITED WARRANTY. IN NO EVENT SHALL ACER BE
LIABLE FOR ANY INCIDENTAL, SPECIAL OR CONSEQUENTIAL
DAMAGES, INCLUDING BUT NOT LIMITED TO LOSS OF
BUSINESS, PROFITS, DATA OR USE, WHETHER IN AN ACTION IN
CONTRACT OR TORT OR BASED ON A WARRANTY, ARISING
OUT OF OR IN CONNECTION WITH THE USE OR PERFORMANCE
OF THE PRODUCT OR ANY ACER-SUPPLIED SOFTWARE THAT
ACCOMPANIES THE PRODUCT, EVEN IF ACER HAS BEEN ADVISED
OF THE POSSIBILITY OF SUCH DAMAGES. YOU AGREE THAT
REPAIR, REPLACEMENT OR REFUND, AS APPLICABLE, UNDER THE
WARRANTY SERVICES DESCRIBED HEREIN IS YOUR SOLE AND
EXCLUSIVE REMEDY WITH RESPECT TO ANY BREACH OF THE
ACER LIMITED WARRANTY SET FORTH HEREIN.
53
Page 64

54
FCC Statement
FCC Class B Radio Frequency Interference
Statement
Note: This equipment has been tested and found to comply
with the limits for a Class B digital device, pursuant to Part 15 of
FCC Rules. These limits are designed to provide reasonable
protection against harmful interference in a residential
installation. This equipment generates, uses, and can radiate
radio frequency energy and, if not installed and used in
accordance with the instructions, may cause harmful
interference to radio communications. However, there is no
guarantee that interference will not occur in a particular
installation. If this equipment does cause harmful interference to
radio or television reception, which can be determined by
turning the equipment off and on, the user is encouraged to try
to correct the interference by one or more of the following
measures:
1 Reorient or relocate the receiving antenna.
2 Increase the separation between the equipment and
receiver.
3 Connect the equipment into an outlet on a circuit different
from that to which the receiver is connected.
4 Consult the dealer or an experienced radio/television
technician for help.
Notice 1:
The changes or modications not expressly approved by the
party responsible for compliance could void the user’s authority
to operate the equipment.
Notice 2:
Shielded interface cables, if any, must be used in order to comply
with the emission limits.
Fax/Modem and FCC Compliance
This equipment complies with Part 68 of the FCC Rules. On this
equipment is a label that contains, among other information, the
FCC registration number for this equipment. You must, upon
request, provide this information along with the Ringer
Equivalence Number (REN) of 0.8, to your telephone company.
Page 65

If your telephone equipment causes harm to the telephone
network, the Telephone Company may discontinue your service
temporarily. If possible, they will notify in advance. But, if advance
notice isn’t practical, you will be notied as soon as possible. You
will be informed of your right to le a complaint with the FCC.
Your telephone company may make changes in its facilities,
equipment, operations, or procedures that could affect proper
operation of your equipment. If they do, you will be notied in
advance to give you an opportunity to maintain uninterrupted
telephone service.
The FCC prohibits this equipment to be connected to party lines or
coin-telephone service.
In the event that this equipment should fail to operate properly,
disconnect the equipment from the phone line to determine if it is
causing the problem. If the problem is with the equipment,
discontinue use and contact your dealer or vendor.
The FCC also requires the transmitter of a FAX transmission be
properly identied (per FCC Rules Part 68, Sec. 68.381 (c) (3)).
55
Page 66

56
Acer Year 2000 Compliance Statement
This product is Year 2000-compliant and carries the “NSTL
Hardware Tested Year 2000 Compliant” logo. This product has
been tested both by Acer’s internal test labs and NSTL using
NSTL’s YMARK2000 certication test. These tests certify that the
product will successfully make the year 2000 transition.
For more details, check the Acer Year 2000 Resource Center at
http://global.acer.com/service/pcy2000.html.
CD and DVD Drive Safety Warning
DANGER Invisible radiation when open. Avoid exposure to
beam.
VORSICHT Unsichtabre laserstrahlung wenn geöffnet. Nicht in
den strahl sehen.
ATTENTION Radiation du faisceau laser invisible. En cas
d’ouverture. Eviter toute exposition aux rayons.
VARO Avattaessa olet alttiina näkzmättömälle lasersäteilylle älä
katso säteeseen.
VARNING! Osynling lasersträlning när denna del är öppnad.
Stirra ej in i strälen.
ADVARSEL Lasersträling ved äbning. Se ikke ind i strälen.
CLASS 1 LASER PRODUCT
APPAREIL A LASER DE CLASSE 1
LASER KLASSE 1
LOUKAN 1 LASERLAITE
PRODUIT LASER
CATEGORIE 1
Page 67

Caution on Lithium Batteries
CAUTION Danger of explosion if battery is incorrectly replaced.
Replace only with the same or equivalent type recommended by
the manufacturer. Discard used batteries according to the
manufacturer’s instructions.
ADVARSEL! Lithiumbatteri-Eksplosionsfare ved fejlagtig
håndtering. Udskiftning m kun ske med batteri af samme fabrikat
og type. Léver det brugte batteri tilbage til leverandøren.
ADVARSEL Eksplosjonsfare ved feilaktig skifte av batteri. Benytt
samme batteritype eller en tilsvarende type anbefalt av
apparatfabrikanten. Brukte batterier kasseres i henhold til
fabrikantens instruksjoner.
VARNING Explosionsfara vid felaktigt batteribyte. Anvãnd samma
batterityp eller en ekvivalent typ som rekommenderas av
apparattillverkaren. Kassera anvnt batteri enligt fabrikantens
instruktion.
VAROITUS Päristo voi räjähtää, jos se on virheellisesti asennettu.
Vaihda paristo ainoastaan laitevalmistajan suosittelemaan tyyppiin.
Hävitä käytetty paristo valmistajan ohjeiden mukaisesti.
VORSICHT! Explosionsgefahr bei unsachgemäßen Austausch der
Batterie Ersatz nur durch denselben oder einem vom Hersteller
empfohlenem hnlichen Typ. Entsorgung gebrauchter Batterien
nach Angaben des Herstellers.
57
Page 68

58
 Loading...