


My
Guide
…th e print ed comp anion
to th e way mo re fun and
handy on-screen experience of
M y Aspire Guide
Introd ucing
the not nearly as exciting
ink on paper version of…

Did you know your Acer Aspire comes wit h incredible
mult im edia soft ware that was desigend t o show you all
the cool stuff your com puter can do? This boo k can be a
handy desktop reference, but you’ll receive m uch more indept h information and inst ruct ion by firing up My Aspire
Guide soft ware. (It’s located on your Windows 98 deskt op
and in t he Tools ‘N Stuff folder in Ace.) We’re prett y sure
you’ll have mo re fun with the soft w are, t oo.
(P.S. - If you’re reading th is because you’re having trouble w ith your compu ter,
check th e Troubleshooting section in My A spire Gu ide softw are or the “N eed
Help?” section in t his book.)
Hey!
Wait
a m inut e!

Tab le of Contents
iii
ii
Copyright
Acer and the Acer logo are registered t rademarks and Aspire is a trademark of
Acer Inc. an d Acer America Corp oration .
M icrosoft W ind ows and t he W indows Logo are registered t rademarks of
M icrosoft Corporatio n. Intel and Pentium are regist ered t rademarks of Int el
Corp. All ot her brands/prod uct names are t rademarks or registered trademarks
of t heir resp ective com panies.
© 1999 by Acer Incorporated. All right s reserved.
Print ed in Taiwan
First printing January 1999
Table of
Cont ent s
Welcom e . . . . . . . . . . . . . . . . . . . . . . . . . . . . . . . . . . . . . . . . . . . . . . . . . 1
Before You St art . . . . . . . . . . . . . . . . . . . . . . . . . . . . . . . . . . . . . . . . . . . 2
Safet y Instruct ions . . . . . . . . . . . . . . . . . . . . . . . . . . . . . . . . . . . . . . . . . 2
Proper Set up and Placement Tips . . . . . . . . . . . . . . . . . . . . . . . . . . 4
An Introduction to Your Aspire . . . . . . . . . . . . . . . . . . . . . . . . . . 5
The System: Aspire Microt ower . . . . . . . . . . . . . . . . . . . . . . . . . . . . 5
Sett ing Up Your Aspire . . . . . . . . . . . . . . . . . . . . . . . . . . . . . . . . . . . . 6
Turning Your A spire On and Off . . . . . . . . . . . . . . . . . . . . . . . . . . . 6
The M ouse . . . . . . . . . . . . . . . . . . . . . . . . . . . . . . . . . . . . . . . . . . . . . . . 9
The Keyboard . . . . . . . . . . . . . . . . . . . . . . . . . . . . . . . . . . . . . . . . . . . . 10
The M onit or . . . . . . . . . . . . . . . . . . . . . . . . . . . . . . . . . . . . . . . . . . . . . 12
The Speakers . . . . . . . . . . . . . . . . . . . . . . . . . . . . . . . . . . . . . . . . . . . . . 12
Drives on Your Computer . . . . . . . . . . . . . . . . . . . . . . . . . . . . . . . . 13
Using Your Flo ppy Drive . . . . . . . . . . . . . . . . . . . . . . . . . . . . . . . . . . 15
Fo rm att ing a Floppy Diskette . . . . . . . . . . . . . . . . . . . . . . . . . . . . . 16
Using Your CD-ROM / DVD-ROM Drive . . . . . . . . . . . . . . . . . . . 17
Your Data/Fax M odem . . . . . . . . . . . . . . . . . . . . . . . . . . . . . . . . . . . 18
Accessing the Internet . . . . . . . . . . . . . . . . . . . . . . . . . . . . . . . . . . . . 18
Connecting an Optional Printer . . . . . . . . . . . . . . . . . . . . . . . . . . 19
Print er Driver Inst allation . . . . . . . . . . . . . . . . . . . . . . . . . . . . . . . . . 19
Connecting an Optional Serial Device . . . . . . . . . . . . . . . . . . . . . 20
Connecting an Optional Joyst ick or M IDI Device . . . . . . . . . . 21
Gett ing the Most from Your Acer Audio Syst em . . . . . . . . 22
Playing an Audio CD . . . . . . . . . . . . . . . . . . . . . . . . . . . . . . . . . . . . . 22
Adjusting the Volum e . . . . . . . . . . . . . . . . . . . . . . . . . . . . . . . . . . . . 22
The Electro nic M ixing Board . . . . . . . . . . . . . . . . . . . . . . . . . . . . . . 23
Adding Options to Your Aspire . . . . . . . . . . . . . . . . . . . . . . . . . 24
Connecting USB Devices . . . . . . . . . . . . . . . . . . . . . . . . . . . . . . . . . . 24
Op ening/ Closing Your Aspire Microt ower . . . . . . . . . . . . . . . . . 24

iv
Welcom e
1
Need Help?. . . . . . . . . . . . . . . . . . . . . . . . . . . . . . . . . . . . . . . . . . . . . . 27
M y Asp ire Guide–Software . . . . . . . . . . . . . . . . . . . . . . . . . . . . . . . 27
Troubleshoot ing–General . . . . . . . . . . . . . . . . . . . . . . . . . . . . . . . . 34
Troubleshoot ing–Error M essages . . . . . . . . . . . . . . . . . . . . . . . . . 37
Addit ional Acer Services . . . . . . . . . . . . . . . . . . . . . . . . . . . . . . . . . . 39
Disclaimer of Warranties . . . . . . . . . . . . . . . . . . . . . . . . . . . . . . . . . . 40
Standard End User License Agreement . . . . . . . . . . . . . . . . . . . . 40
Syst em Warranty Information . . . . . . . . . . . . . . . . . . . . . . . . . . . . 43
Limit ed Product Warranty . . . . . . . . . . . . . . . . . . . . . . . . . . . . . . . . 44
FCC Statement . . . . . . . . . . . . . . . . . . . . . . . . . . . . . . . . . . . . . . . . . . . 46
Acer Year 2000 Com pliance Statement . . . . . . . . . . . . . . . . . . . . 47
CD-ROM Safet y W arning . . . . . . . . . . . . . . . . . . . . . . . . . . . . . . . . . 47
Caution on Lithium Batt eries . . . . . . . . . . . . . . . . . . . . . . . . . . . . . 48
Welcome and thank you for
purchasing an Aspire computer. You are now t he owner of a
mult im edia comput er system! Already inst alled on your syst em
and ready to go are so ft w are programs designed to enable you
to:
Create personal documents
Access the Int ernet and send and receive e-mail
Use your com puter as a fax machine
Play audio CDs while you’re working
and tons more!
Whether you’ve owned a computer before or not , your Aspire
was designed to im prove the way you work and to serve your
needs now and into t he fut ure.

3
2
Before Yo u St art ...
• Never spill liquid of any kind on the product .
• Do not attempt to service this product yourself; opening or
removing covers may exp ose you to dangerous volt age point s
or other risks. Refer all servicing to qualified service personnel.
Service by perso ns ot her than Acer authorized service providers
may void your warrant y.
• Unplug this prod uct from the wall out let and refer servicing
to qualified service personnel under the follo wing conditions:
a • When the pow er cord or plug is damaged or frayed.
b • If liquid has been spilled int o the prod uct .
c • If the product has been exposed t o rain or water.
d • If the prod uct does not operate norm ally when the
operating instruct ions are follow ed. Adjust only those cont rols
that are covered by the operating inst ruct ions since improper
adjustment of ot her cont rols may result in damage and will
oft en require extensive work by a qualified t echnician to
restore the product to no rm al condit ion.
e • If the product has been dropped or the cabinet has been
damaged.
f • If the product exhibit s a dist inct change in performance,
indicating a need for service.
• Replace bat tery with the same type as the product ’s battery
we recom mend. Use of another batt ery may present a risk of
fire or explosion. Refer batt ery replacement to qualified service
personnel.
• Warning! Battery may explode if not handled properly. Do
not recharge, disassem ble or dispose of in fire. Keep away from
children and dispose of used battery pro mpt ly.
• Use only t he proper t ype of power supply cord set (provided
in your keyboard/ manual accessories box) for t his unit . It
should be a detachable type: UL listed/CSA certified, t ype
SVT/ SJT, rat ed 6A 125V minimum , VDE approved or it s equivalent. M aximum length is 15 feet (4.6 meters).
• Always unplug the computer and monito r before opening
the housing or adjusting connections or cables.
• Use power st rips with surge protection to prot ect your com -
puter in t he event of a power surge, due to severe weather
such as a thunderstorm.
Before You Start . . .
M ake sure you read this section carefully for proper placem ent
and import ant Safet y Instructions on the use and care of your
new com puter. Please save these instruct ions for future reference.
Safety Instructions
• Follow all warnings and inst ruct ions marked on the product .
• Unplug this prod uct from the wall out let before cleaning. Do
not use liquid cleaners or aeroso l cleaners. Use a clot h m ildly
damp ened wit h water for cleaning.
• Do not use t his product in or near water.
• Do not place this product on an unstable cart , st and, or table.
The product m ay fall, causing serious damage to t he product.
• Slot s and openings in t he cabinet and t he back or bottom are
provided for vent ilatio n; to ensure reliable operat io n of the
product and to protect it from overheat ing, these openings
must not be blocked or covered. The openings should never
be blocked by placing the product on a bed, sofa, rug, or other
similar surface. This product should never be placed near or
over a radiato r or heat register, or in a built-in inst allation unless
proper ventilation is provided.
• This product should be operated from the type of power indi-
cated on t he marking label. If you are not sure of the type of
power available, consult your dealer or local power company.
• This product is equip ped wit h a 3-wire grounding-t ype plug,
a plug having a third (grounding) pin. This plug will only fit int o
a grounding-type pow er out let. This is a safet y feature. If you
are unable to insert the plug into the out let, cont act your electrician to replace your obsolete out let. Do not defeat the purpose of t he grounding-type plug.
• Do not allow anything to rest on t he power cord. Do not
locate this product where persons will walk on the cord.
• If an extension cord is used with this product, make sure that
the total am pere rating of t he equipm ent plugged int o the
extensio n cord does not exceed the extensio n cord ampere
rating. Also, make sure that the tot al rating of all product s
plugged int o the wall outlet does not exceed 15 am p eres.
• Never push objects of any kind into t his product through
cabinet slots as t hey may touch dangerous volt age point s or
short out parts t hat could result in a fire or electric shock.
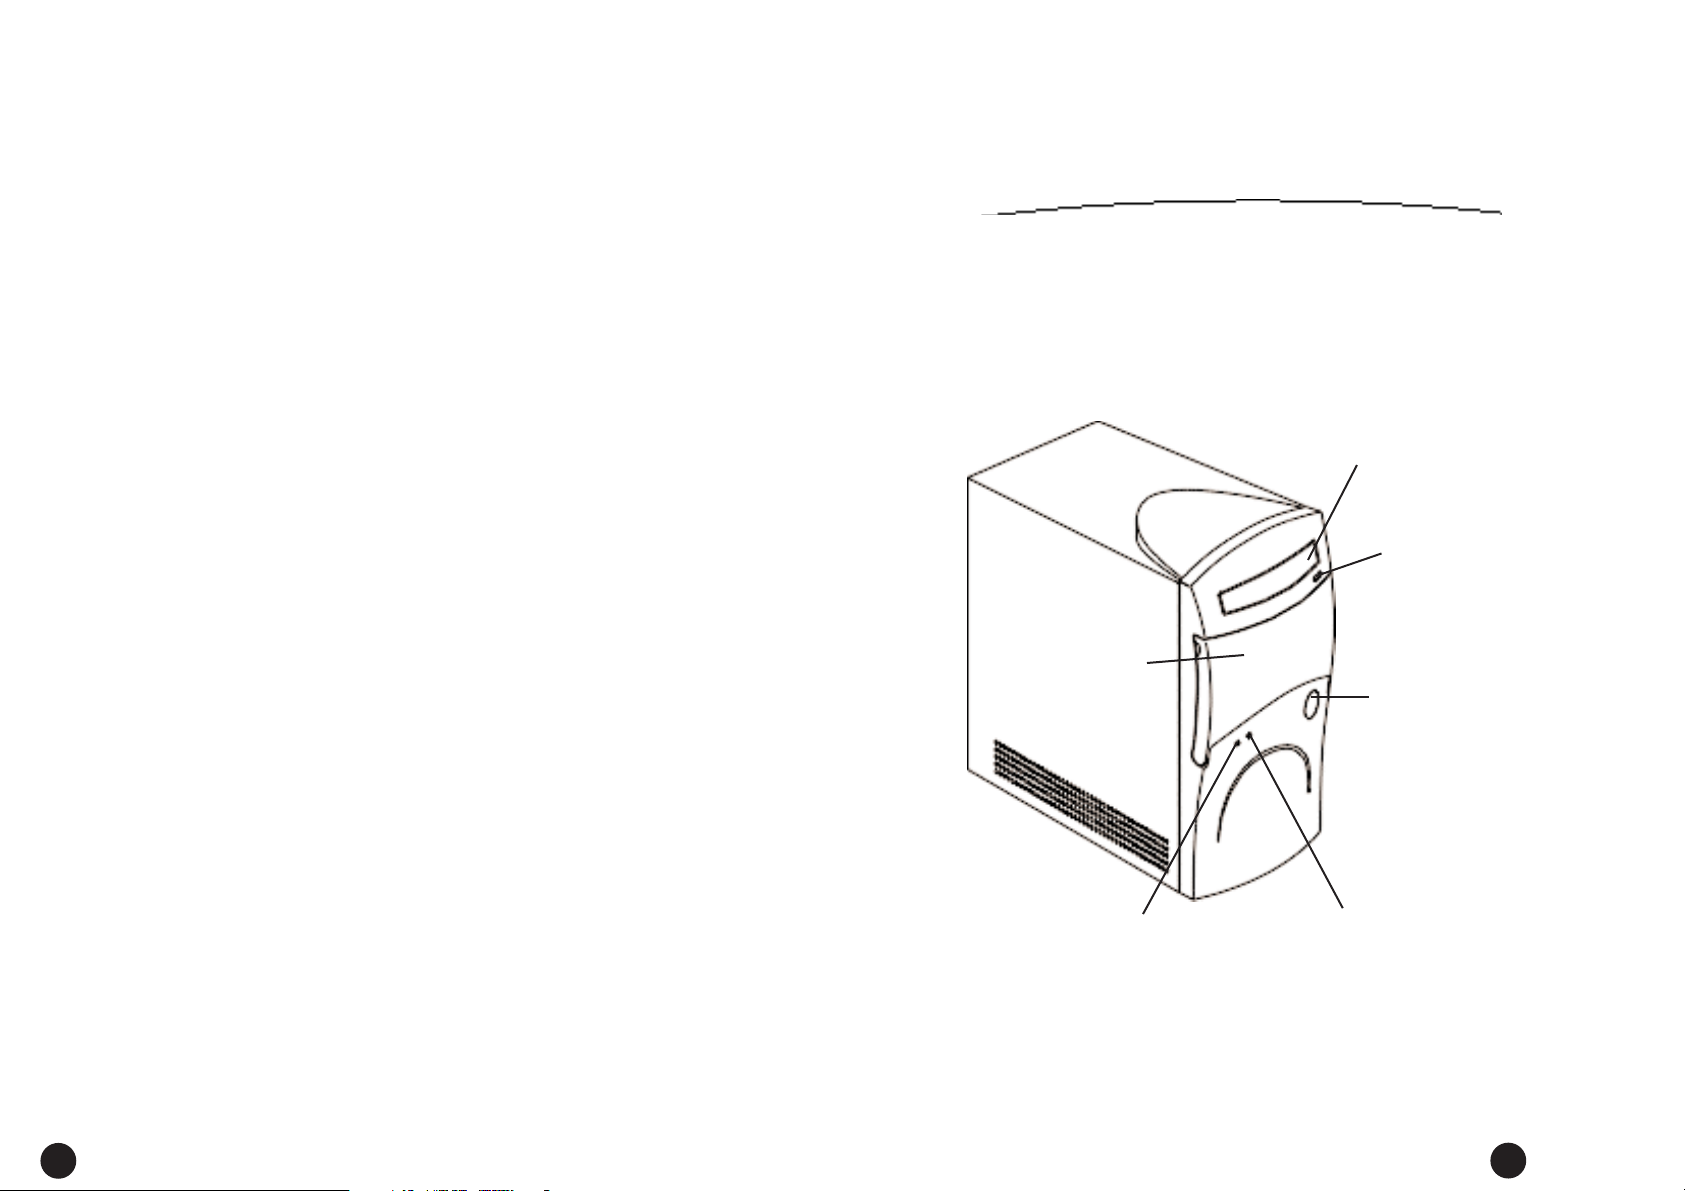
An Int roduct ion t o Your A spire
5
4
Aspire
An In t roduct ion to Your
The System: Aspire Microtower
CD-ROM /
DVD-ROM Drive
CD-ROM /
DVD-ROM
Eject But to n
Expansion Bay
Door
Pow er/
Quickst art
Button
Power Indicato r Light
Act ivity Indicator
Light
Proper Setup and Placement Tips
It’s im portant t hat your com put er be set up correct ly and
according to your own comfo rt and ergonomic need s. The
following tips should make your workst ation a com fort able
and healthy place:
M onitor Level. Position your com put er so that it is at arm’s
length aw ay and the top t hird of the monitor viewing area is
at eye level. This helps prevent eye and neck st rain. To furt her
reduce eye st rain, close your eyes and refocus on so mething
ot her than your comp ut er screen at least twice an hour. M ost
monito rs come standard wit h a detachable tilt -and-swivel base
and adjust able, rear-mounted foot , which allow you to position
the monit or exact ly where you want it .
Your Seat. If you plan to use your Acer comput er for extended
periods (for exam ple, in a hom e office environment ), select a
highly adjustable office chair with a five-pronged base. The seat
and chair back should be adjustable, while you’re sit ting in the
chair, for height and tilt , and forward/ backward positio ning, and
the lumbar area of the back should be supp orted by the chair
adjustments or a cushion. Arm rest s should conform to your
elbow height and shoulder width and should be used for support . For maximum comfort , vary positions frequently throughout the day. Use good post ure when seated, keep your head
centered over your shoulders and, just like your m other always
told you, don’t slump over your work.
Ant i-Glare Coating. Some monit or screens are construct ed
wit h a sp ecial ant i-glare coating, which minimizes ref lections t hat
cause eye st rain and discomfo rt . To further reduce eye st rain,
close your eyes and refocus on so mething other than your com put er screen at least twice an hour .
Task Lighting. W hen roo m lighting is dimmed, t here may
be insufficient light on do cum ents or reference m aterials for
comfortable reading. A well-lit room or a few directional,
adjustable task lights will allow you to see your monit or screen
and ot her materials clearly, and with the least amount of st rain.
Hand and Wrist . Keep your wrists st raight and your forearms
parallel to the floo r while you are typing. If you use a wrist rest ,
use it only briefly for rest ing. Do not rest your hands on the
table or on t he wrist rest while you are typing. During long
periods of typing, frequent breaks are recomm ended.
An Int roduct ion t o Your A spire
7
6
1 • Press and release the monit or power but t o n if it is not on
or blinking already.
2 • Press and release the comp ut er power but t on (Q uickst art
or t raditional st art ).
The monit or will begin displaying images after 5-10 second s. The power button lights on the comput er and monit o r will be on.
Not e: If you previously used Q uickstart OFFwh en you were done using your Aspire,
your comp ut er will return exactly where it was in just a couple of seconds. If you
previously shut dow n W indows 98, your comput er will take 2-3 minutes to start.
Setting Up Your Aspire
Refer t o the Aspire Easy Setup Post er included in your syst em
box for details on how to set up your comp ut er.
Turning Your Aspire On and Off
You have two options for turning your Aspire on and off. Your
Aspire was designed for you wit h convenience in mind. The
Quickstart opt ion allows your com put er to instantly t urn on
and off, without waiting for a long st art-up time. If you like the
tradit ional approach bett er, you can use it instead.
Turning on your Aspire
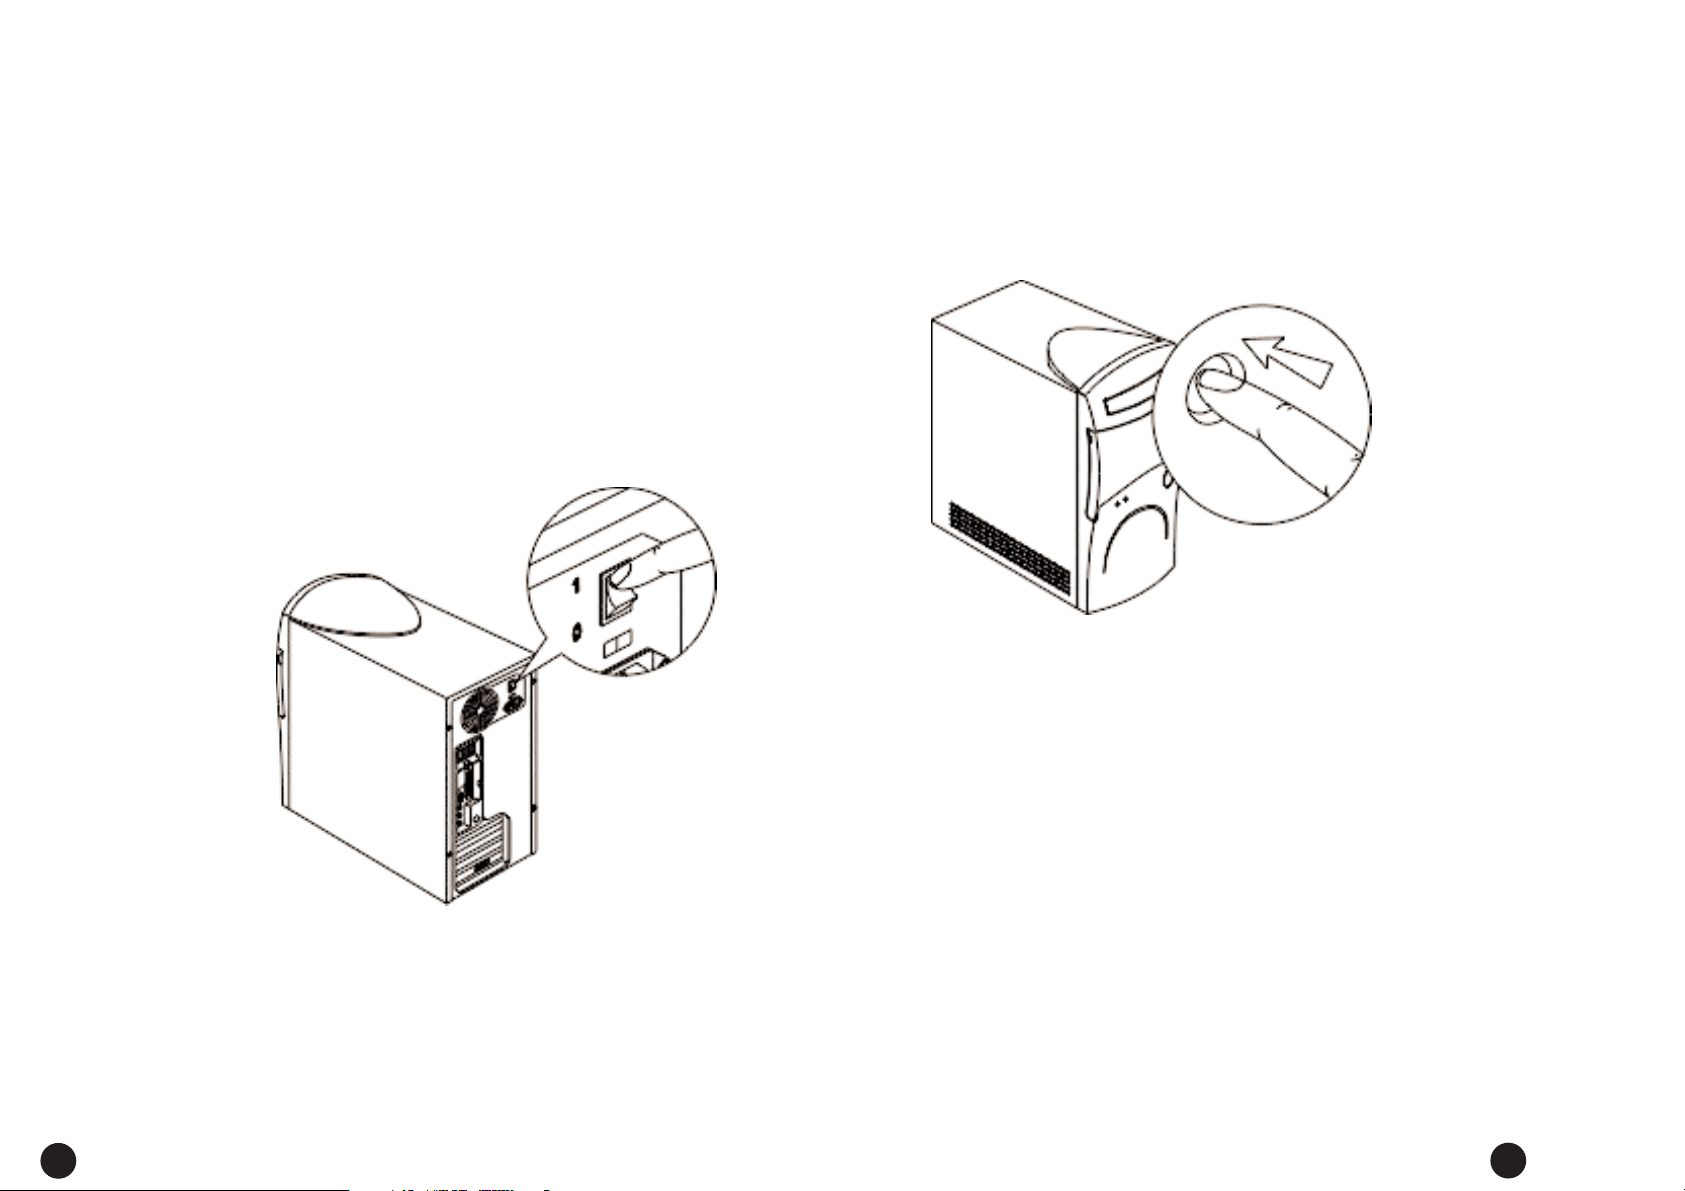
Not e: M ake sure that the AC mast er pow er switch located on the
back of your system is in the ON posit ion. Leave it O N at all times
unless th e system is being serviced.
An Int roduct ion t o Your A spire
9
8
The Mouse
The mouse uses a curso r called a pointer. Point ers come in
many different shapes but are most com m only shaped like an
arrow.
Your m ouse has two but t ons: a left but t on and a right button.
Quickly pressing and releasing one of t hese but to ns is called
clicking. Som etimes you will need to double-click–or click the
same but to n t w ice quickly.
In this manual, click means to position your m ouse point on
an icon and to single click the left button. When a right click is
required, this is stated clearly. Double-click also refers t o the
left but t on.
The ratchet wheel in between the two but t ons is added to
provide easier scrolling capabilit y. By sim ply moving the wheel
wit h your index finger, you can quicky move through m ultiple
pages, line, or windows. The wheel m ay also funct ion as a
third but t on allowing you to quickly click or double-click an
icon or a selected item
Not e: If you are left-handed, please refer to your W indows 98 manual
for inst ruct ions on ho w t o set up your mo use for left-handed use.
Right but t on
Left but t on
Point er movement on th e
screen is controlled by the
mo vement o f a small ball
on t he bott om of the
mo use.
Using a mou se pad under
your m ou se will help to
keep t he internal part s of
th e mou se clean. A dirt y
mo use result s in jerky
point er movement and dif-
ficult y get ting th e point er
where you want it o n
screen .
To clean your mouse:
1 • Tur n the mou se upside
dow n.
2 • Remove the ring hold ing
th e ball in place b y tur ning
it count erclockwise.
3 • Using a lint-free clot h or a
cotto n swab dipped in rub-
bing alcohol, clean all mov-
ing part s.
4 • Inser t t he ball back into
th e mouse, m aking su re to
tu rn t he ring clockw ise.
Caring for
your M ouse
Turning off your Aspire
Option 1: Quickst art O FF • Your Aspire will continue to run
in t he Quickstart O FF condit ion. It will ap pear t hat it is OFF.
When you press the power but ton to swit ch your Aspire to
the fully ON condit ion, it will do it in only a few seconds.
Option 2: Traditional OFF • If you want your Aspire to com-
pletely pow er OFF (if you need to unplug it):
1 • Click on the Windows St art but t on on the taskbar.
2 • Click on Shut Down.
3 • Click on Shut Down the Com puter and click Yes. Your
computer will guide you t hrough saving any open files and
then will shut down Windows 98. Your com puter will then
turn off all comput er power automatically. Yo u will have to
manually turn off your monitor after you see the comput er
power go off.
Refer t o M y Aspire Guide soft ware for more in-dept h opt ions
and recom m endations for Quickstart and t raditional on/off
modes.
Ratchet wheel

An Int roduct ion t o Your A spire
11
10
End key • takes you to t he end of a line.
Page Up / Page Down keys • move you up or down a screen
at a time.
Backspace key • is similar to t he delete key above, but it will
delete one character at a tim e to the left of the cursor.
Alt and Ctrl keys • have varying funct ions on their own or
when used with ot her keys, depending on the soft ware being
used.
Num Lock key and numeric key pad • when t he Num
Lock/Num Pad key is on, t he keys on t he numeric key pad can
be used for entering numbers. When it ’s off, these keys become
arrow keys, page up and page down keys– as ind icated on the
bottom half of t he key.
Sleep • put s your comp ut er into sleep mod e.
Volume Control / M ute • cont rols the speaker volume. Press
to mut e.
Web Connection • st arts up the Internet brow ser.
• brings up t he Windows 98 START m enu.
• displays drop-down menus from icons (same as right click)
and currently act ive applications.
Home
End
Page Up
Page Dow n
Backspace
Alt
Alt
Ctrl
Ctrl
Num Lock/
Num Pad
Sleep
Web
Connect ion
Volum e
Cont rol/
M ute
The Keyboard
The way keys are used varies from program to program. Here
are some of t he most commo n uses:
Esc key • exits the current action, screen, or program.
Tab key • moves the cursor over a set number of spaces in
word processing so ft w are. In other types of programs, it m oves
the curso r from one field (an area on t he screen where data
can be ent ered) to t he next.
Enter key • st art s a new paragraph in word processing. In other
programs, it accept s data entered or shows that an action is
com p lete.
Shift key • p ressing this key while typing a let t er or symbol key
will give you the capit al letter or sym bol on the to p of the key.
Caps Lock key • locks t he capit al letters in place. Pressing it
again will t ake the Caps Lock off. (A Caps Lock indicator light
will turn on when the Caps Lock is on.)
Function keys • num bered F1 t hrough F12, each will perform a
sp ecific and well-defined function, should an ap plication use
them.
Cursor Arrow keys • mo ve the cursor in the directions that
the arrow s point .
Insert key • when activated, insert s data vs. typing over/
replacing it.
Delet e key • will delet e data that is highlight ed or t o the right
of t he cursor.
Home key • takes you t o the beginning of a line.
Esc
Ent er
Tab
Caps
Lock
Shift
Fu nct io n
Cursor Arrow s
Insert
Delete
 Loading...