

Page 1

My
Guide
…the printed companion
to the way more fun and
handy onscreen experience of
My Asp i re Gu i d e
Introducing
the not nearly as exciting
ink on paper version of…
Page 2

Did you know your Acer Aspire comes with incredible
multimedia software that was desigend to show you all
the cool stuff your computer can do? This book can be a
handy desktop reference, but you’ll receive much more indepth information and instruction by firing up My Aspire
Guide software. (It’s located on your Windows 98 desktop
and in the Tools ‘N Stuff folder in Ace.) We’re pretty sure
you’ll have more fun with the software, too.
(P.S. - If you’re reading this because you’re having trouble with your computer,
check the Troubleshooting section in My Aspire Guide software or the “Need
Help?” section in this book.)
Hey !
Wait
a minute!
Page 3

Table of Contents
v
iv
Copyright
Acer and the Acer logo are registered trademarks and Aspire is a trademark of
Acer Inc. and Acer America Corporation.
Microsoft Windows and the Windows Logo are registered trademarks of
Microsoft Corporation. Intel and Pentium are registered trademarks of Intel
Corp. All other brands/product names are trademarks or registered trademarks
of their respective companies.
© 1998 by Acer Incroporated. All rights reserved.
Printed in Taiwan
First printing December 1998
Table of
Contents
Welcome 1
Before You Start 2
Safety Instructions 2
Proper Setup and Placement Tips 4
An Introduction to Your Aspire 5
The System: Aspire Microtower 5
Setting Up Your Aspire 6
Turning Your Aspire On and Off 6
The Mouse 9
The Keyboard 10
The Monitor 12
The Speakers 12
Drives on Your Computer 13
Using Your Floppy Drive 15
Formatting a Floppy Diskette 16
Using Your CD-ROM/DVD-ROM Drive 17
Your Data/Fax Modem 18
Accessing the Internet 18
Connecting an Optional Printer 19
Printer Driver Installation 19
Connecting an Optional Serial Device 20
Connecting an Optional Joystick or MIDIDevice 21
Getting the Most from Your Aspire Audio System 22
Playing an Audio CD 22
Adjusting the Volume 22
The Electronic Mixing Board 23
Adding Options to Your Aspire 24
Opening/Closing Your Aspire Microtower 24
Need Help? 27
My Aspire Guide - Software 27
Troubleshooting–General 34
Page 4

Welcome
1
vi
Welcome
and
thank you
for
purchasing an Aspire computer. You are now the owner of a
multimedia computer system! Already installed on your system and ready to go are software programs designed to
enable you to:
Create personal documents
Access the Internet and send and receive e-mail
Use your computer as a fax machine
Play audio CDs while you’re working
and tons more!
Whether you’ve owned a computer before or not, your Aspire
was designed to improve the way you work and to serve your
needs now and into the future.
Troubleshooting–Error Messages 37
Additional Acer Services 39
Disclaimer of Warranties 41
Standard End User License Agreement 41
System Warranty I nfor mati on 43
Limited Product Warranty 44
Garantie Limitée Sur Les Produits 48
FCC Statement 53
Acer Year 2000 Compliance Statement 54
CD-ROMSafety Warning 54
Caution on Lithium Batteries 55
Page 5

3
2
Before You Start...
• Never spill liquid of any kind on the product.
• Do not attempt to service this product yourself; opening or
removing covers may expose you to dangerous voltage points
or other risks. Refer all servicing to qualified service personnel.
Service by persons other than Acer authorized service providers
may void your warranty.
• Unplug this product from the wall outlet and refer servicing
to qualified service personnel under the following conditions:
a • When the power cord or plug is damaged or frayed.
b • If liquid has been spilled into the product.
c • If the product has been exposed to rain or water.
d • If the product does not operate normally when the oper-
ating instructions are followed. Adjust only those controls that
are covered by the operating instructions since improper
adjustment of other controls may result in damage and will
often require extensive work by a qualified technician to
restore the product to normal condition.
e • If the product has been dropped or the cabinet has been
damaged.
f • If the product exhibits a distinct change in performance,
indicating a need for service.
• Replace battery with the same type as the product’s battery
we recommend. Use of another battery may present a risk of
fire or explosion. Refer battery replacement to qualified service
personnel.
• Warning! Battery may explode if not handled properly. Do
not recharge, disassemble or dispose of in fire. Keep away from
children and dispose of used battery promptly.
• Use only the proper type of power supply cord set (provided
in your keyboard/manual accessories box) for this unit. It
should be a detachable type: UL listed/CSA certified, type
SVT/SJT, rated 6A 125V minimum, VDE approved or its equivalent. Maximum length is 15 feet (4.6 meters).
• Always unplug the computer and monitor before opening
the housing or adjusting connections or cables.
• Use power strips with surge protection to protect your computer in the event of a power surge, due to severe weather
such as a thunderstorm.
Before You Star t . . .
Make sure you read this section carefully for proper placement
and important Safety Instructions on the use and care of your
new computer. Please save these instructions for future reference.
Safety Instructions
• Follow all warnings and instructions marked on the product.
• Unplug this product from the wall outlet before cleaning. Do
not use liquid cleaners or aerosol cleaners. Use a cloth mildly
dampened with water for cleaning.
• Do not use this product in or near water.
• Do not place this product on an unstable cart, stand, or table.
The product may fall, causing serious damage to the product.
• Slots and openings in the cabinet and the back or bottom are
provided for ventilation; to ensure reliable operation of the
product and to protect it from overheating, these openings
must not be blocked or covered. The openings should never
be blocked by placing the product on a bed, sofa, rug , or other
similar surface. This product should never be placed near or
over a radiator or heat register, or in a built-in installation unless
proper ventilation is provided.
• This product should be operated from the type of power indicated on the marking label. If you are not sure of the type of
power available, consult your dealer or local power company.
• This product is equipped with a 3-wire grounding-type plug,
a plug having a third (grounding) pin. This plug will only fit into
a grounding-type power outlet. This is a safety feature. If you
are unable to insert the plug into the outlet, contact your electrician to replace your obsolete outlet. Do not defeat the purpose of the grounding-type plug.
• Do not allow anything to rest on the power cord. Do not
locate this product where persons will walk on the cord.
• If an extension cord is used with this product, make sure that
the total ampere rating of the equipment plugged into the
extension cord does not exceed the extension cord ampere rating. Also, make sure that the total rating of all products
plugged into the wall outlet does not exceed 15 amperes.
• Never push objects of any kind into this product through
cabinet slots as they may touch dangerous voltage points or
short out parts that could result in a fire or electric shock.
Page 6

An Introduction to Your Aspire
5
4
Power/Quickstart
Button
CD-ROM/
DVD-ROM Drive
Aspire
An introduction to Your
The System: Aspire Microtower
CD-ROM
Eject Button
Expansion
Bay Door
Proper Setup and Placement Tips
It’s important that your computer be set up correctly and
according to your own comfort and ergonomic needs. The
following tips should make your workstation a comfortable
and healthy place:
Monitor Level. Position your computer so that it is at arm’s
length away and the top third of the monitor viewing area is
at eye level. This helps prevent eye and neck strain. To fur ther
reduce eye strain, close your eyes and refocus on something
other than your computer screen at least twice an hour. Most
monitors come standard with a detachable tilt-and-swivel base
and adjustable, rear-mounted foot, which allow you to position
the monitor exactly where you want it.
Your S eat. If you plan to use your Acer computer for extended
periods (for example, in a home office environment.), select a
highly adjustable office chair with a five-pronged base. The seat
and chair back should be adjustable, while you’re sitting in the
chair, for height and tilt, and forward/backward positioning, and
the lumbar area of the back should be supported by the chair
adjustments or a cushion. Arm rests should conform to your
elbow height and shoulder width and should be used for support. For maximum comfort, vary positions f requently throughout the day. Use good posture when seated, keep your head
centered over your shoulders and, just like your mother always
told you, don’t slump over your work.
Anti-Glare Coating. Some monitor screens are constructed
with a special anti-glare coating, which minimizes reflections that
cause eye strain and discomfort. To fur ther reduce eye strain,
close your eyes and refocus on something other than your computer screen at least twice an hour .
Ta sk Lighting . When room lighting is dimmed, there may
be insufficient light on documents or reference materials for
comfortable reading. A well-lit room or a few dire ctional,
adjustable task lights will allow you to see your monitor screen
and other materials clearly, and with the least amount of strain.
Hand and Wrist. Keep your wrists straight and your forearms
parallel to the floor while you are typing. If you use a wrist rest,
use it only briefly for resting. Do not rest your hands on the
table or on the wrist rest while you are typing. During long
periods of typing, frequent breaks are recommended.
Power Indicator
Light
Activity
Indicator Light
Page 7
An Introduction to Your Aspire
7
6
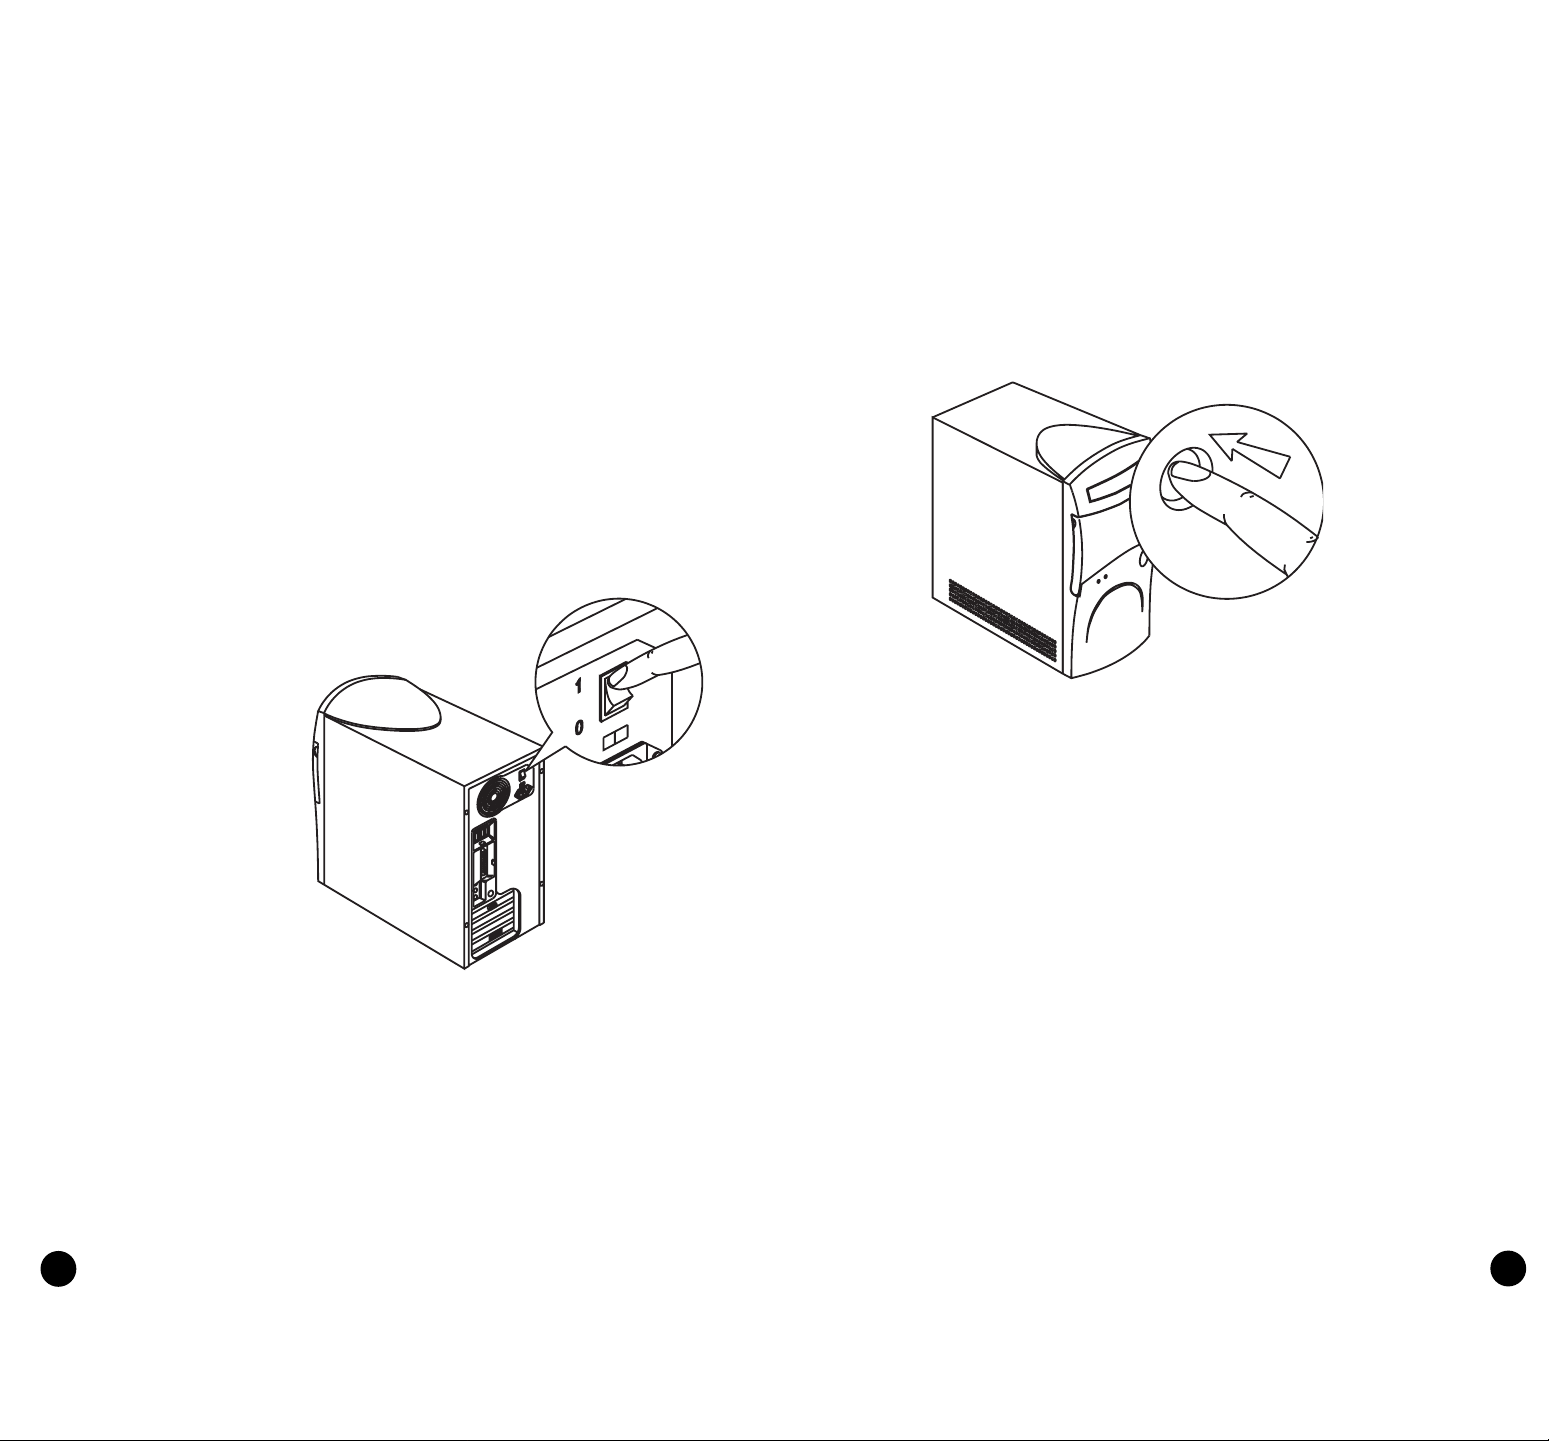
1 • Press and release the monitor power button if it not on or
blinking already.
2 • Press and release the computer power button (Quickstart
or traditional start).
The monitor will begin displaying images after 5-10 seconds.
The power indicator lights on the computer and monitor will
be on.
Note: If you previously used Quickstart OFF when you were done
using your Aspire, your computer will return to exactly where it was in
just a couple seconds. If you previously shut down Windows 98, your
computer will take 2-3 minutes to start.
Setting Up your Aspire
Refer to the Aspire Easy Setup Poster included in your system
box for details on how to set up your computer.
Turning your A spire on and of f
You have two options for turning your Aspire on and off. Your
Aspire was designed for you with convenience in mind. The
Quickstart option allows your computer to instantly turn on
and off, without waiting for a long start-up time. If you like the
traditional approach better, you can use it instead.
Tur ning on your Aspire
Note: Make sure that the AC ma ster power switch located on the
back of your system is in the ONposition. Leave it ONat all times
unless the system is being serviced.
Page 8
An Introduction to Your Aspire
9
8
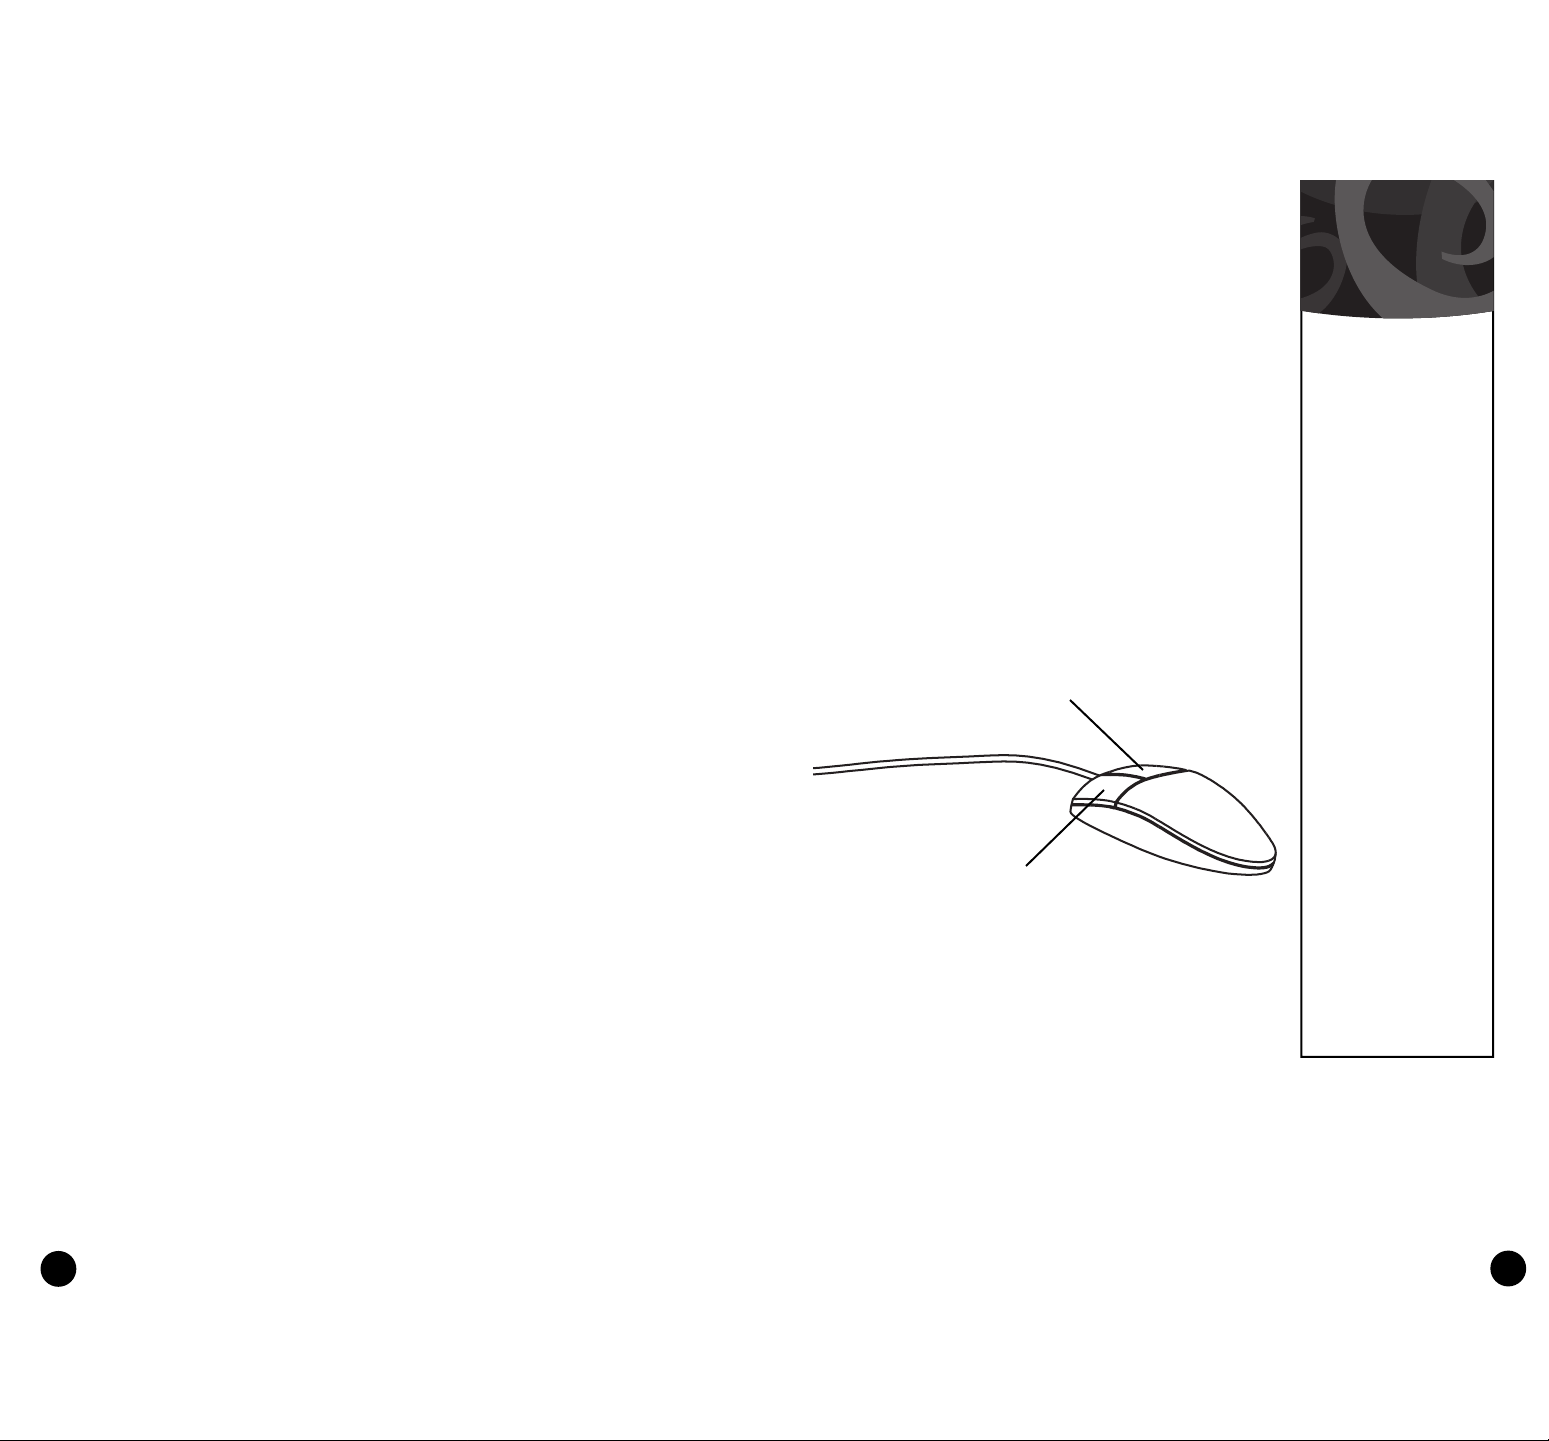
The Mouse
The mouse uses a cursor called a pointer. Pointers come in
many different shapes but are most commonly shaped like an
arrow.
Your mou se has t wo buttons: a left button and a right button.
Quickly pressing and releasing one of these buttons is called
clicking. Sometimes you will need to double-click–or click the
same button twice quickly.
In this manual, click means to position your mouse point on an
icon and to single click the left button. When a right click is
required, this is stated clearly. D ouble-click also refers to the left
button.
Note: If you are left-handed, please refer to your Windows 98 manual
for instructions on how to set up your mouse for left-handed use.
Right button
Left button
Pointer movement on the
screen is controlle d by the
movement of a small ball
on the bottom of the
mouse.
Using a mouse pad under
your mouse will help to
keep the internal parts of
the mouse clean. A dirty
mouse results in jerky
pointer movement and difficulty getting the pointer
where you want it on
screen.
To clean your mouse:
1 • Turn the mouse upside
down.
2 • Remove the ring holding
the ball in place by turning
it counter-clockwise.
3 • Using a lint-free cloth or a
cotton swab dipped in rubbing alcohol, clean all moving parts.
4 • Insert the ball back into
the mouse, making sure to
turn the ring clockwise.
Caring for
your Mouse
Turning off your Aspire
Option 1: Quickstart OFF • Your Aspire will continue to run
in the Quickstart OFF condition. It will appear that it is OFF.
When you press the power button to switch your Aspire into
the fully ON condition, it will do it in only a few seconds.
Option 2: Traditional OFF • If you want your Aspire to completely power OFF (if you need to unplug it):
1 • Click on the Windows Start button on the taskbar.
2 • Click on Shutdown.
3 • Click on Shutdown the Computer and click Yes. Your com-
puter will guide you through saving any open files and then will
shutdown Windows 98. Your computer will then turn off all
computer power automatically. You will have to manually turn
off your monitor after you see the computer power go off.
Refer to My Aspire Guide software for more in-depth options
and recommendations for Quickstart and traditional on/off
modes.
Page 9
An Introduction to Your Aspire
11
10
Home key • takes you to the beginning of a line.
End key • takes you to the end of a line.
Page Up / Page Down keys • move you up or down a screen
at a time.
Backspace key • is similar to the delete key above, but it will
delete one character at a time to the left of the cursor.
Alt and Ctrl keys • These keys have varying functions on their
own or when used with other keys, depending on the software
being used.
Num Lock key and numeric key pad • When the Num
Lock/Num Pad key is on, the keys on the numeric key pad can
be used for entering numbers. When it’s off, these keys become
arrow keys, page up and page down keys–as indicated on the
bottom half of the key.
Sleep • puts your computer into sleep mode.
Volume Control /Mute • controls the speaker volume. Press
to mute.
Web Connection • start s up the Internet browser.
• brings up the Windows 98 START menu.
.• displays drop-down menus from icons (same as right click)
and currently active applications.
Home
End
Page Up
Page Down
Backspace
Alt
Alt
Ctrl
Ctrl
Num Lock/
Num Pad
Sleep
Web
Connection
Volume
Control/
Mute
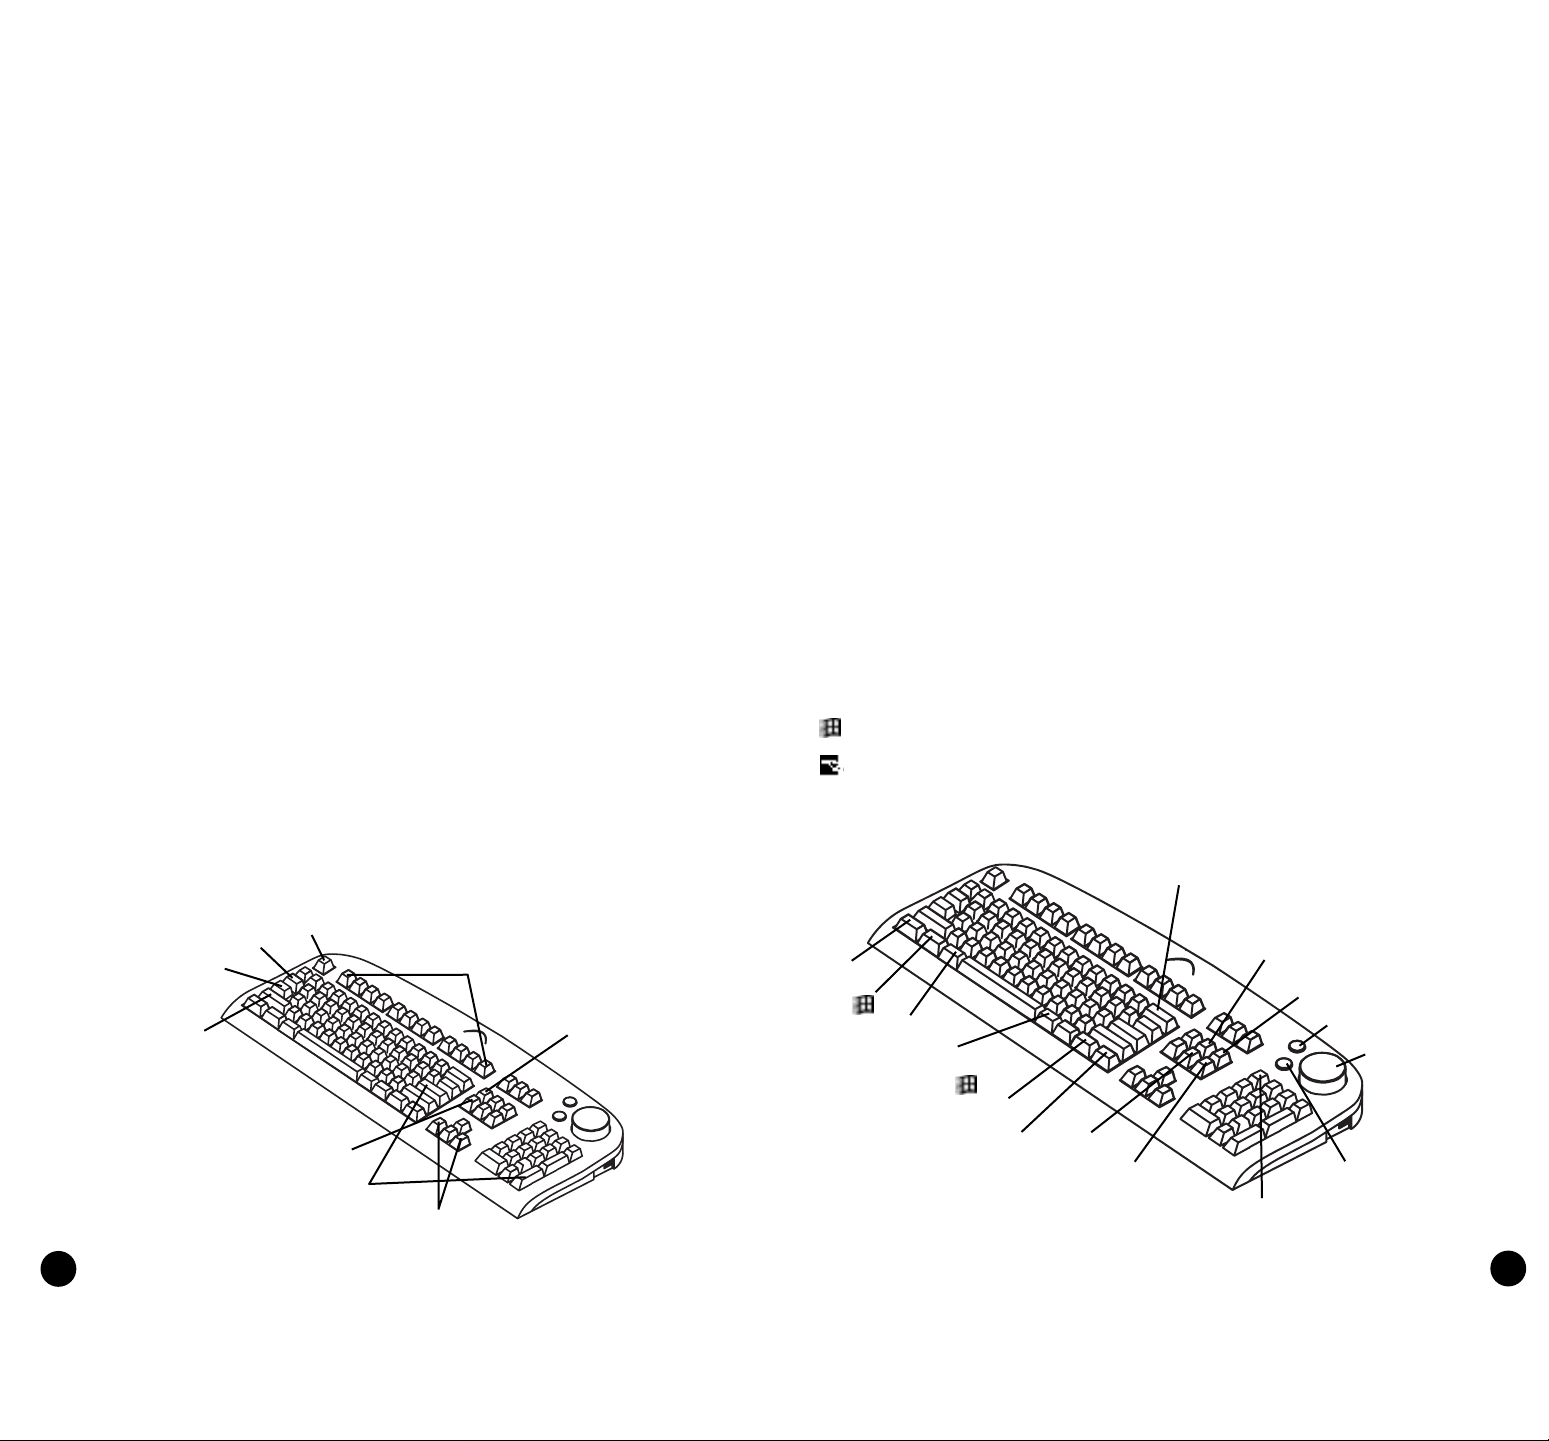
The Keyboard
The way keys are used varies from program to prog ram. Here
are some of the most common uses:
Esc key • exits the current action, screen, or program.
Tab key • moves the cursor over a set number of spaces in
word processing software. In other types of programs, it moves
the cursor from one field (an area on the screen where data
can be entered) to the next.
Enter key • starts a new paragraph in word processing. In other
programs, it accepts data entered or shows that an action is
complete.
Shift key • Pressing this key while typing a letter or symbol key
will give you the capital letter or symbol on the top of the key.
Caps Lock key • locks the capital letters in place. Pressing it
again will take the Caps Lock off. (A Caps Lock indicator light
will turn on when the Caps Lock is on.)
Function keys • numbered F1 through F12, each will perform a
specific and well-defined function, should an application use
them.
Cursor Arrow keys • move the cursor in the directions that
the arrows point.
Insert key • when activated will insert data vs. typing
over/replacing it.
Delete key • will delete data that is highlighted or to the right
of the cursor.
Esc
Enter
Tab
Caps
Lock
Shift
Function
Cursor Arrows
Insert
Delete
Page 10
An Introduction to Your Aspire
13
12
The Monitor
Refer to the manual that came with your Aspire monitor for
more information on the monitor features.
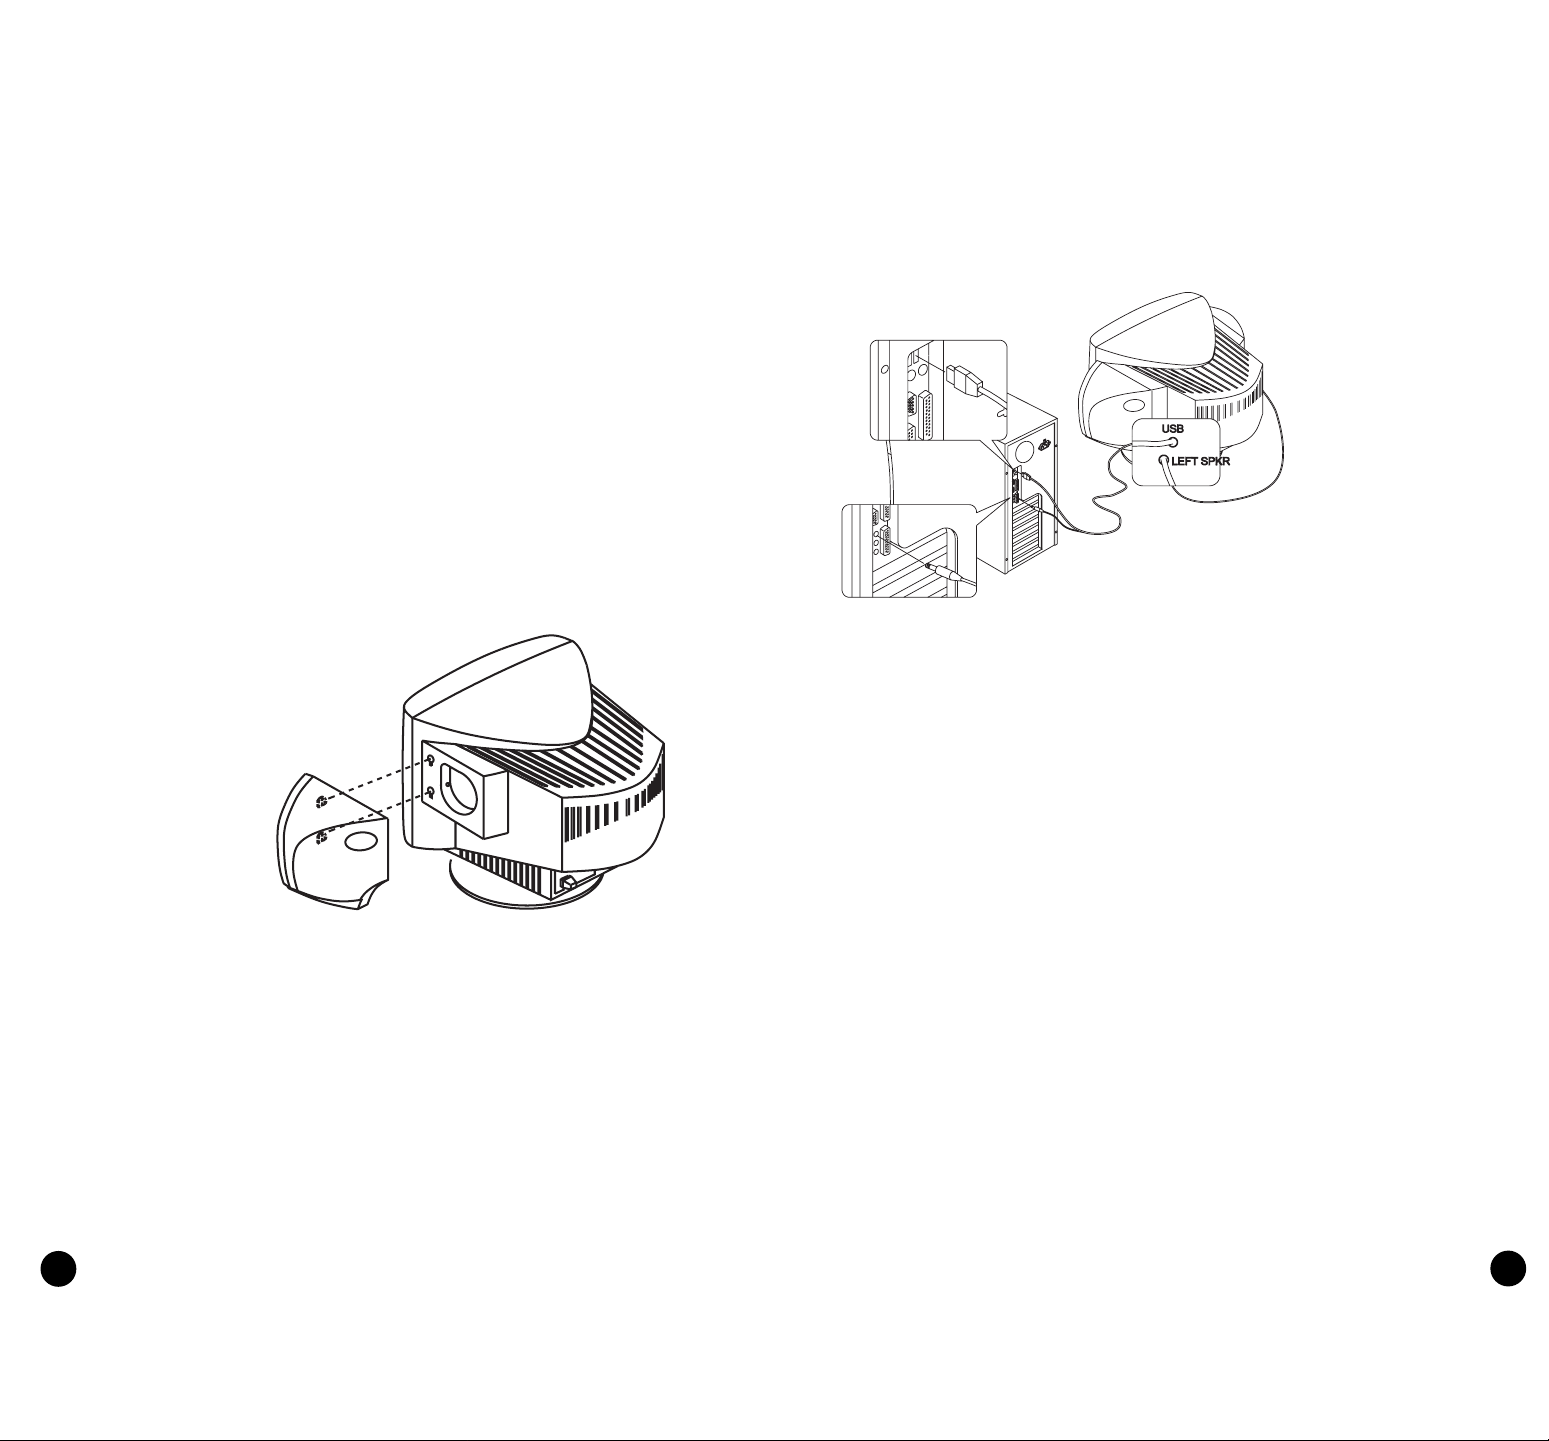
The Sp e a ke r s
Your system comes with uniquely-designed speakers that can
be attached to the monitor.
To connect the speakers to the monitor:
1 • Locate the left and right speaker brackets that came with
your speaker package.
2 • Locate the brackets on the sides of your Aspire monitor.
3 • Align and insert the holdfasts on the speakers into the key
holes. Then slide the speakers down to secure them to the
brackets. See the following figure:
Connect the speakers to your system as shown in the following
figure:
Unlike ordinary speakers, the speakers that came with your
Aspire system do not use a power adapter. Instead, they share
power with your system via the USB interf ace.
Drives on Your Computer
Whether it’s the software program that you bought from your
local computer store or the shopping list you just typed up
using your word processor, all information in a computer is
stored electronically.
To s ave (write) data or retrieve (read) data, the computer uses
a drive. There are different ways to store data, and every different type of data storage has a specific drive.
Three different types of drives come with your Acer computer:
The Hard Drive
Your f ixed or hard drive is located inside your computer. This
drive is typically called the C: drive in Windows 98.
The Floppy Drive
This drive uses removable 3.5-inch floppy disks and is called the
A: drive.
Page 11

An Introduction to Your Aspire
15
14
Using Your Floppy Drive
Floppy disks are used for putting data into your computer or
for taking it out.
1 • Insert the floppy disk into the drive, as shown. (The metal
circle on the disk’s underside should be facing down.)
2 • Push it gently until it pops into place.
3 • Remove the floppy disk by pressing the eject button.
The advantage of a floppy
disk or CD is that it makes
data portable.
Practically all newly purchased software comes in
one of these two formats.
Data is often exchanged
between computers on
floppy disks. B e aware that
there is an inherent danger
of virus infection in casual
swapping or sharing of
floppy disks with your
friends and associates. Files ,
applications or programs
downloaded from the
Internet also carry possible
danger. Refer to My Aspire
Guide or page 25 for more
informati on.
Why Disks?
(Or Discs, For
that Matter...)
The CD-ROM Drive
The CD ROM drive uses CDs (Compact Discs) instead of floppy disks, and it is Read Only Memory, which means that the
computer can read data from the disc, but cannot write anything new on it. It is typically called the D: drive. On some
computers, the CD-ROM may be another drive letter. Please
refer to My Computer for the current drive letter assignment
on your Windows 98 desktop.
The DVD-ROMDrive
The DVD-ROM(Digital Versatile Disc or Digital Video Disc
Read Only Memory) is a new type of CD-ROM. It can hold
capacities ranging from 4.7 GB to a maximum of 17 GB, and
can support access rates from 600 Kilobytes per second to 1.2
Megabytes per second. It is backward-compatible with CDROMs which means that DVD players can play not only DVDROMs, but old CD-ROMs, CD-I disks, video CDs, and CD-R
disks as well. DVD uses MPEG-2 to compress video data.
Note: All of the information you save on your hard drive takes up
space, so you will want to clean it up periodically to maintain the best
performance.
Refer to My Aspire Guide for more information on scanning and analyzing the information on your hard drive.
CD-ROM/
DVD-ROM Drive
Floppy Drive
and
Hard Drive
Page 12

An Introduction to Your Aspire
17
16
Using Your CD-ROM/DVD-ROM Drive
Unlike floppy disks, CD-ROM/DVD-ROM discs can be used
only for putting data into your computer. Your Acer computer
can use two types of CD-ROM discs: audio discs and data
discs.
Data CDs can hold a lot of information and very large programs. One CD can hold more information than is contained
on 450 floppy diskettes.
Press the eject button to manually open or close the CD tray.
To insert a CD or a DVD, place it in the tray with the title side
facing up, then press the CD eject button to close it.
Note: It may take up to 30 seconds for a disc to stop spinning before
the drive opens up. If you try to run the software when you first
insert the CD (or DVD) and you get an error message like Drive Not
Ready, wait a few seconds, then try again.
A CD or DVD has two
sides:
• The title side tells you
which CD/DVD it is.
• The data side stores all the
data.
CDs and DVDs are fragile,
so when handling your CDs
or DVDs, hold them by the
edges to avoid leaving
smudges or fingerprints.
Always keep them in a disc
case when not in use to
avoid scratches or other
damage. Any kind of dirt or
damage can affect the data
on the disc, impair the CD
lens reader on the CDROM/DVD-ROM drive, or
stop the computer from successfully reading the disc.
To clean your CDs or
DVDs, use a clean, dustfree cloth and wipe in a
straight line from the center to the edge. Continue
around the whole disc.
(DONOT wipe in a circle.)
You can also periodically
clean your CD-ROM/DVDROM drive to prevent
problems from reading
discs on your computer.
For more information, refer
to the Cleaning Kit that
came with your system.
Caring for
your CDs
Note: Your CD-ROM/DVD-ROM drive will probably emit a sound
like that of a fan. Unless you are having other problems with your
drive, you should not be concerned.
Formatting a Floppy Diske tte
A floppy disk is, basically, just a thin piece of magnetic tape on
which data can be stored electronically. Most floppy disks are
protected with a hard plastic case.
Before a floppy can be used, it must be formatted, or made
ready to accept data.
Note: Many stores sell pre-formatted 3.5” floppy disks.
1 • Make sure your floppy is not write-protected. (See sidebar
for instructions).
2 • Insert the diskette into your floppy drive.
3 • Click on the Start button, point to Programs, and click
on Windows Explorer.
4 • Point to 3.5-inch Floppy (A:) under My Computer.
5 • Click on the right mouse button, then select Format.
6 • Click on Start.
Cautions:
• Formatting a disk removes any data that might have been
saved on that disk.
• Be sure to keep your disks away from heat and other magnetic items that can damage the disk and the information on
it.
When the write p rotec t
notch is open, data cannot
be written to (saved on)
the disk. The notch must
be closed for d ata to b e
written to (copied on) the
disk.
Write protecting diskettes
is a good way to keep
them safe f rom vir u se s,
should you use them in a
different computer.
Write-Protect Tab
(can be saved on)
Write-Protect Tab
(cannot be saved on)
Write Protecting
a Floppy Diskette
Page 13

Printer Driver Installation
To print f rom your Aspire, you need a printer driver–a program
that tells your computer what kind of printer it is printing to.
Windows 98 has automatic detection for all of the more popular printers. If your printer is not available in Windows 98, look
in the printer’s user guide for instructions. Please contact the
manufacturer of your printer if you have problems or questions.
1 • Click on the Start button.
2 • Point to Settings, then click on Printers.
3 • Select Add Printer, and double-click.
4 • Follow the directions on the screen, and be sure to test the
printer when prompted.
You should now b e able to print successfully from your Aspire.
An Introduction to Your Aspire
19
18
.
Connecting an Optional Printer
1 • Make sure your computer is completely turned off (see p. 6).
2 • Plug the printer cable you purchased with your printer from
the printer to the printer port on the back of your computer.
3 • Plug your printer power cable into a wall outlet or power
strip.
4 • Tur n on the printer.
5 • Tur n on the computer.
Note: For printer driver installation to go smoothly, it is important to
turn on your printer first so Windows 98 can recognize that a printer
is connected to the computer.
Your Data/Fax Modem
Your d ata/fa x modem makes it possible for you to communicate electronically around the globe.
Once you’ve plugged your telephone line into your Acer computer, you c an:
• Access th e I nte r net *
• Send and receive faxes
• Send and receive e-mail*
Accessing the Internet
Your A spire computer comes with the ability to link to the
Internet.** With the Internet you can visit Acer for updates,
send e-mail to friends and family, book vacations, read up on
the latest blockbuster movie, and much, much more. All you
need is a phone line to hook the modem up to, and an
account with an Internet Service Provider, such as GTE,
America Online, AT&T, or Prodigy.
* Requires an account with an Internet service provider.
** You may be required to pay toll charges, monthly or hourly usage fees, and
other setup charges.
Check with the Internet Service Provider for details.
Page 14

An Introduction to Your Aspire
21
20
Connecting an Optional Serial Device
1 • Before you proceed, make sure your computer is completely
turned off (see p. 6).
2 • On the back of your computer, remove the screw that
holds the rear panel cover.
3 • Lift the rear panel cover to detach it from your computer.
Connecting an Optional Joystick or MIDI
Device
1 • Before you proceed, make sure your computer is completely
turned off (see p. 6).
2 • Remove the rear panel cover (see steps 2 and 3 of the previous section).
3 • Locate the Game/MIDIport on the back of your computer.
4 • Plug your joystick or MIDI device cable into this port.
4 • Locate the two serial ports on the back of your computer.
5 • Plug your serial device cable into either of these two ports.
Page 15

23
22
Getting the Most from Your Aspire Audio System
The Electronic Mixing Board
Your A spire computer comes with an electronic mixing board
that enables the experienced audiophile to make the most of
the stereo sound system.
1 • Double-click on the Volumeicon on the task bar at the
bottom of your screen. The Speaker Mixer window will open:
Refer to My Aspire Guide software to set defaults.
2 • All of the options on this screen can be adjusted by drag-
ging the slider bars.
Note: The controls were balanced in the factory. We recommend that
you do not change these settings unless you have some familiarity with
sound mixing. If you do change them and want to return to the factory
settings, follow the procedure below:
Restore Original Mixer Settings
1 • Launch My Aspire Guide.
2 • Select Service Center from the menu.
3 • Select Maintenance Tools.
4 • Select the Restore Original Mixer Setting option.
5 • Select OK to reset mixer to factory default settings.
6 • Choose the reboot Windows option to complete the
modifications.
7 • Check to see if your problem has been resolved.
2 • Click on the Volume icon on the task bar at the
bottom of your screen.
A volume control will pop up. Drag the volume
control lever with your mouse until you find the
level you want.
3 • Double-click on the Volume icon to use the electronic
mixing board.
Playing an Audio CD
Would you like to play a little music while you work? Pop your
favorite audio CD into the CD-ROM drive, wait ten to twenty
seconds and, voila! Music!
When the Windows 98 CD Player is running, the program icon
will display on the task bar at the bottom of the screen:
Adjusting the Volume
There are thre e ways you can adjust the volume on your
audio CD:
1 • Tur n the volume knob on your keyboard to increase or
decrease the volume. Press the knob to mute.
Audio System
Getting the Mostfrom YourAspire
Page 16

25
24
3 • Push the cover slightly backward as shown in the following
figure.
4 • Lift up the cover.
Note: For directions on upgrading and assembly/disassembly of the
computer chassis, please refer to My Aspire Guide software.
Replacing the Cover
After you install the system components into the housing, you
must replace the cover panel.
1 • Position the top cover on the housing, aligning the sides
with the rails.
2 • Slide the cover forward until it fits into place.
Always observe the following electrostatic discharge (ESD) precautions
before installing a system
component:
• ESD can cause permanent
damage to your computer.
• Do not remove a component from its antistatic
packaging until you are
ready to install it.
• Wear a wrist grounding
strap before handling electronic components. Wrist
grounding straps are available at most ele ct roni c
component stores.
• At a minimum, keep a
hand in contact with the
metal system housing to
reduce the ESD effect.
Electrostatic
Discharge
Precautions
Adding Options to you Aspire
You can add hard drives , memor y, expansion cards, and other
options to your Acer Aspire. For directions on upgrading/disassembly of the computer chassis, please refer to My Aspire
Guide videos and software.
You can f ind information regarding your motherboard jumper
settings by referring to the panel inside your Aspire chassis.
Note: You c an go onto the Internet and visit the following websites
for upgrades and accessories specific to your Aspire:
http://www.shopacer.com
http://www.aspire.acer.com
http://www.acer.chumbo.com
Opening/Closing Your A spire Microtower
Caution! Always turn off your computer and unplug it before
opening the case. For more information on the complete system shut-down, refer to “Turning Your Aspire On and Off” on
page 6.
Removing the Cover
1 • Place the system on a flat steady surface.
2 • Remove the four screws from the rear panel. Set the screws
aside. You will need them when replacing the cover.
Adding Opt ions
to YourAspire
The Universal Serial Bus
(USB) on you Aspire
allows for easy and convenient expansion options.
With it, installing devices
such as digital cameras,
scanners, and joystick s is a
breeze.
Pleas e refe r to My A s pi re
Guide software for complete descriptions and
question-and-answer troubleshooting information
regarding USB devices.
Connecting
USB Devices
Page 17

27
26
Need Help?
Acer is dedicated to bringing you a reliable and easy to maintain computer. We realize, though, that problems can arise
unexpectedly. Therefore, your Aspire computer comes preinstalled with a suite of tools to provide easy maintenance and
help when using your computer. My Aspire Guide is a handy
online technical reference guide including pictures and videos.
My Aspire Guide integrates all of your computer’s diagnostic
and maintenance to o ls. The S er v ice Center is w here y ou go to
prevent or correct problems that may occur.
My Aspire Guide–Soft ware
My Aspire Guide comprises the following areas:
• Welcome gives you a brief introduction about the My Aspire
Guide software.
• Service Center provides tools that will help you prevent or
correct problems that may occur while using your computer.
• Maintenance provides routine maintenance tools and information on how to take care of common computer components .
• How To... tells you how to install components and software
on your computer, as well as how to customize it.
• Software Training gives step-by-step instructions on how to
properly run the software installed in your computer to take
full advantage of its features.
• Troubleshooting gives advice on how to solve common
problems that may occur on your computer.
• Customer Services gives information on where and how to
get help from Acer and other vendors of your computer.
• Glossary contains the definitions of the technical terms used
in the My Aspire Guide software.
Help?
Need
3 • Secure the cover with the appropriate screws.
Page 18

Need Help?
29
28
Maintenance Tools Menu
When you enter the Maintenance Tools Menu, you will have
the following options to select from:
• Defragment Hard Drive
This is a Windows 98 option designed to help keep data stored
on the hard drive in an optimal configuration for performance
and reliability. We recommend this program be run 1-2 times
per year.
1 • Select the Defragment Hard Drive menu item.
2 • Choose the default drive “C:” to run the test.
Note: We recommend that you turn off the screensaver or any other
programs that use the hard drive while scanning the hard drive. If any
program attempts to access the hard drive, the scan or defrag will
restart.
• Scan Hard Drive for Errors
This is a Windows 98 option for finding and correcting errors
on your hard drive. You should run this program every 2-3
months to avoid loss of data due to problems with the storage
of information.
1 • Select the Scan Hard Drive for Errors option.
2 • Click on Start to run the Standard Scan.
3 • This test will take a while to complete. Throughout the
scan, you may be asked if you wish to correct any errors that
have been located. We recommended that you allow the program to fix these problems. In some cases, you may be warned
that you could lose data. This is normal, and most data that is
corrupted may not be needed. Each error needs to be treated
on a case-by-case basis .
4 • Once the program has been completed, you will be asked if
you wish to scan another drive. Under the Standard Scan, this
will not be necessary, and you may exit the program.
Service Center
The Service Center contains four main segments:
• Diagnostics provides utilities to assist you in testing your
computer and its components to ensure that everything is
functioning correctly.
• Maintenance provides tools to keep your computer running
smoothly and operating at optimal performance.
• Repair provides tools to fix monitor problems that may
occur on your computer.
• Support on the Web provides ways to get help from Acer or
other vendors of your computer.
Diagnostics Tools Menu
The Diagnostics Tools Menu has the following options to
choose from:
• Reg is try Repai r
A number of Windows problems are caused by incorrect or
corrupted registry entries. Use this tool to verify your registry
health, fix problems or to make a backup copy.
1 • Select the Registry Repair option.
2 • Follow the onscreen directions and tips.
3 • Wait for the results to be displayed.
• Hardware Diagnostics
The Hardware Diagnostics option contains tests that you can
run to verify the functionality of your computer’s hardware
components. If you suspect that you may have a hardware
component failure, you will need to run this program prior to
contacting Acer Technical Support.
1 • Select the Hardware Diagnostics option.
2 • Follow the directions on the screen.
Page 19

Need Help?
31
30
• Aspire Time Machine
If your system was in good health yesterday, or last week, use
this tool to take your system’s critical files back to that time.
• If you are running Windows, do the following:
1 • Select the Time Machine option.
2 • Follow the onscreen directions and tips.
3 • Wait for the results to be displayed.
• If you are running DOS, do the following:
1 • Boot from Acer System Recovery CD.
2 • Select the Time Machine option.
3 • Select the date you want to restore your system to.
4 • Follow the onscreen instructions and tips.
5 • Wait for the results to be displayed.
• Acer System Recovery CD
The Acer System Recovery CD includes a set of programs
designed to restore your computer to its original factory software configuration. You should back up your data prior to
using these utilities. The Acer System Recovery CD has three different types of repair options. Choose the option you need
carefully because some may delete all of your personal files.
Aspire Time Machine
If your system was in good health yesterday, or last week, use
this tool to take your system’s critical files back to that time.
Follow the same procedures listed above.
Rebuild the Drive
• Non-Destructive:
If your problems are not resolved by Quick Fix,
select this option to restore Windows 98. You will not lose any
personal files, but applications that were installed after you
purchased your computer may not function correctly. You may
need to reinstall these applications.
• Full-Rebuild:
If you continue to have problems after trying the
other options, you may need to rebuild the hard drive back to
its original factory configuration. This option will partition, format and reload the hard drive. All personal files will be lost. Be
sure to back up your files before you run this option.
• Maintenance Wizard
The Windows 98 Maintenance Wizard allows you to configure
multiple common housekeeping chores for your computer to
run automatically. These include Disk Def ragmentation, Scan
Disk and Disk Clean-Up (this removes unwanted and unused
files from your hard drive).
1 • Select the Maintenance Wizard option.
2 • You will be of fered the choice of Express or Custom set-up.
Choose Express until you have a clear understanding of what
each of the various tools does.
3 • Follow the step-by-step directions to set up your own
maintenance schedule.
• PCcillin Scan
This anti-virus program is designed to scan and clean computer
viruses from your hard drive, floppy drive and computer. A
manual scan on the hard drive should be performed on a regular basis to ensure the integrity of your computer data. In addition, it is important to update your virus scanning software on
a regular basis. Fixes for newly discovered viruses may not be
included in the original software provided with your system.
Please contact the vendor of your anti-virus software for
updates and pricing.
1 • Select the Start menu. Go to Programs and find the antivirus program that came with your system.
2 • From the main virus check menu, you are given additional
options. In most cases , you will want to scan your main hard
drive.
3 • Select the drives, directory, or files you want to scan.
4 • Once you have made your choices, you may select the scan
option to begin the virus check. If the PCcillin scan finds any
infected files, it will list several options for you to follow.
Repair Tools M enu
• Install Software
This option enables you to install software titles and selected
software drivers on your system by simply loading the Acer
System Recovery CD in the CD-ROM drive. Installation is done
automatically.
Page 20

Need Help?
33
32
• ScanDisk checks your hard disk for possible errors.
• Disk Defragmenter rearranges f il es and space to enable pro-
grams to run faster.
• Disk Cleanup searches your hard disk for unwanted program
files that you can delete.
• Maintenance Wizard lets you schedule utilities to run on a
regular basis.
• CD-ROMCleaning gives tips on how to clean your CD-ROM
drive.
• Floppy Drive Cleaning gives tips on how to clean your floppy
drive.
• Mouse Cleaning gives tips on how to clean your mouse.
How To...
This section contains information on how to upgrade and customize your computer according to your needs and preferences. It is divided into two segments: Hardware and Software
Questions. Related information follows each segment. Simply
click on the desired task to perform and follow the onscreen
instructions.
Software Training
There are several software packages preloaded on your computer. To take full advantage of the software, you need to know
how to use it. This section of the My Aspire Guide not only
gives you step-by-step instructions on how to do common and
useful task s, but also makes learning fun and easy.
1 • Before you start, make sure you have closed any open applications and saved your files.
2 • Select the Acer CPR option.
3 • You will be prompted to insert the Acer Software Library
CD into the CD-ROM. The tray will open automatically.
4 • When you have inserted the CD, click OK to close the tray.
5 • The computer will shut down Windows 98.
6 • After the computer has rebooted, you will have multiple
options. Choose Rebuild Hard Drive.
7 • A new menu will appear. You will have two options to
select from: Quick Fix or Rebuild the Drive. Choose the option
that best describes your problem. During this process, you may
be prompted for information about your computer, such a s a
“DS” number. This information is on a label, usually located on
the side of your computer or inside the front panel door.
Support on the Web
Acer has placed a self-help center on the World Wide Web.
This offering is designed to give you the opportunity to solve
your computer problems and learn more about the Acer computer. This site is available 24 hours a day and provides the latest information on your computer.
1 • Make sure you have set up an account with your own
Internet Service Provider.
2 • Select the Acer Support on the Web option.
3 • Once you have selected this option, your Internet Browser
will automatically launch. If you are not already connected to the
Internet, a dialog box will display and you will be asked to establish a dial-in connection to your Internet Service Provider.
4 • Once your Internet connection has been established, you will
have access to a library of information about your computer.
A list of who to contact for technical support is also provided
on the web. This information is very helpful, especially when you
are experiencing major problems with your computer.
Maintenance
The Maintenance area contains the following options:
Page 21

Need Help?
35
34
My modem connects, but there’s no dial tone.
1 • Check to see if the phone lines (in and out) are properly
connected–sometimes the line to the phone and the line to
the wall jacks are reversed. If needed, refer to the Easy Setup
poster that came with your Acer computer.
2 • Ensure that all phones using this line have been hung up.
My modem does not work.
1 • Ensure that the line from the wall jack is plugged into the
jack on the back of the computer labeled Line or Wall.
2 • Ensure that the line from the wall jack to the computer is
tightly plugged in on each end.
3 • If the modem still doesn’t work, disconnect any phones or
other equipment that may be on the same line.
4 • If the modem still doesn’t work, temporarily disable any
special services on the line, such as call waiting.
My monitor remains dark when the system is turned on.
1 • Make sure that the monitor power indicator is lit.
2 • Check brightness and contrast settings.
3 • If the problem persists, ensure that the monitor is plugged
in and the cable from the monitor to the computer is securely
attached.
My monitor will not turn on.
1 • If the monitor Power button light is not lit, verify that the
monitor is plugged into a power source.
2 • If the monitor Power button light is lit, but is blinking instead
of steady, verify that the monitor video cable is fully connected
to the computer. If needed, refer to the Easy Setup poster.
3 • If the computer Power button light is blinking, press it once.
4 • If necessary, unplug the computer and monitor, then
inspect the monitor cable connector for bent or broken pins.
Troubleshooting–General
Refer to My Aspire Guide software for complete troubleshooting information on your system.
Here are some answers to commonly asked questions:
The Start button is not displayed on screen.
The taskbar has either been resized too small or it is in a hidden location.
To retrieve the ta skbar :
1 • Press the Start key on the keyboard.
2 • Press the Esc key to close the start menu. (The taskbar is
still selected.)
3 • Press the Alt + Spacebar keys together and select “size.”
4 • Use the Arrow keys to resize the taskbar to the desired size
and press the Enter key when done.
My computer will not shut off completely.
For more information and recommendations regarding the use
of Quickstart and Traditional power on/off, refer to My Aspire
Guide software.
My CD-ROM does not always work, and it does not eject
all the time.
1 • The CD being used is most likely dirty or scratched. Clean
the CD.
2 • If cleaning the CD doesn’t correct the problem, refer to My
Aspire Guide.
My keyboard doesn’t work.
1 • Press the Caps Lockkey several times to see if the keyboard
LED light turns on and off.
2 • If it does not, make sure the keyboard cable is securely
plugged into the back of your computer.
3 • If the problem persists, refer to the Acer Service Center and
choose Diagnostic Tools Menu, Hardware Diagnostics.
Page 22

Need Help?
37
36
Troubleshooting–Error Messa ges
I keep getting one of the following error messages:
Equipment Configuration Error
This error occurs when the CMOS settings (see glossary on My
Aspire Guide software) have been changed to a configuration
that prevents successful boot-up. Press the Ctrl +Alt + Esc
keys, after the beep during boot process, then select Restore
Default Settings to restore original CMOS values.
Non-system disk
Check and make sure that you do not have a disk in your floppy drive. If you do, remove it. If you still get this error, do a CPR
Quick Fix Boot to fix the start up files on your hard drive.
CMOS Battery Error
Call Acer Technical Support.
CMOS Checksum Error
Press the Ctrl + Alt + Esc keys, after the beep during the boot
process, then select Restore Default Settings to restore original
CMOS values. If the error message continues, call Acer
Te chnical Support .
Diskette Drive Controller Error or Not Installed
Call Acer Technical Support.
Diskette Drive Error
Diskette may be defective. Verify with a known good diskette.
Diskette Drive A: Type Mismatch
Press the Ctrl + Alt + Esc keys, after the beep during boot
process, then select Restore Default Settings.
Hard disk Controller Error
Refer to Acer Service Center and run the Hardware Diagnostics.
Hard disk 0 Error
Refer to the Acer Service Center and cho os e M ai ntenance
Tools Menu, scan Hard Drive for Errors. Please contact Acer
technical support for more help.
My mouse movement is erratic.
Clean your mouse:
1 • Tur n the mouse upside down.
2 • Remove the ring holding the ball in place by turning it
counter-clo ckwise.
3 • Use a lint-free cloth or a cotton swab dipped in rubbing
alcohol to clean all moving parts.
4 • Insert the ball back into the mouse and replace the ring,
making sure to turn the ring clockwise until it is securely back
in place.
My sound is bad or uneven, or my system has no sound.
1 • Tur n up the volume on the keyboard control. .
2 • In Windows 98, double-click on the Volume icon (located
near the clock in the taskbar) to verify that the volume control
is up and mute is not turned on, or use the volume knob on
your keyboard.
My system freezes.
If your system hangs up, or freezes for some reason, you can reboot (restart) the computer by pressing the Ctrl+Alt+Del keys
simultaneously. Follow instructions on the screen.
If this does not successfully restart the system, you have another option:
1 • Push the Po wer button on your computer, holding it in for
approximately four seconds or until your screen goes dark. This
will completely turn off your computer.
2 • Push the Power button again to turn the computer back on.
Note: Whenever you reboot your system, you will lose any unsaved
data.
My floppy drive won’t read my disk.
1 • Eject the disk from the floppy drive, then reinsert it and try
again.
2 • Verify that the disk is correctly formatted. You will lose any
data on this disk if you format it.
3 • Verify that the problem is the disk, not the drive, by check-
ing another floppy that you know is valid.
Page 23

Need Help?
39
38
Additional Acer Services
About the Aspire Web Site*
This Internet site has answers for the most frequently asked
support questions and offers a searchable database of extensive
technical information, new product data and upgrade information. Use it:
• When you can’t find the information you need in your manual or online help, and before you call Technical Support.
• When you want to find upgrade information or bug fixes.
• When you’re curious about Acer!
For assistance:
Internet Address: http://www.aspire.acer.com
Taiwan: http://www.sertek.com.tw
* requires an account with an Internet Service Provider.
Acer Technical Suppor t
During the warranty period, should you have a problem with
your system or if you think something isn’t working, contact
Te chnical Support . Acer Technical Support provides help for
warranty related issues, such as a hardware problem.
Before you contact Acer, please take 10 minutes to run the
Hardware Diagnostics. This will help us provide you with better
quality support.
You can run the Hardware Diagnostics directly from the Acer
Service Center or proceed with these five steps:
1 • With your computer powere d on, place the Acer System
Recovery CD in the CD-ROM drive.
2 • Go to the Start Menu, and select Shutdown to restart the
computer.
3 • After the computer has rebooted, select Diagnostics.
4 • Select “Q” for Quick Test. This test will take about 10 minutes.
5 • Record all results.
These simple steps will help the Acer technician to better
determine the cause of your problem. Make sure you have
your computer serial number and part number before you call.
Hard disk 1 Error
Refer to Acer Service Center and choose Maintenance Tools
Menu, scan Hard Drive for Errors.
Keyboard Error, No Keyboard Connected or Keyboard
Interface Error
Check that the keyboard is securely plugged into the correct
port on the back of the computer.
Page 24

Need Help?
41
40
Disclaimer of Warranties
Acer makes no representation or warranties , either expressed or implied, with
respect to the contents hereof and specifically disclaims the implied warranties of merchantability or fitness for a particular purpose. Any software
described in this manual is sold or licensed “as is.” Should the programs prove
defective following their purchase, the buyer (and not this company, its distributor or its dealer) assumes the entire cost of all necessary servicing , repair,
and any incidental or consequential damages resulting from any defect in the
software. Further, Acer reserves the right to revise this publication and to
make changes from time to time in the contents hereof without obligation to
notify any person of such revision or changes.
Disclaimer
Not all features described in this handbook will be available on all models.
Acer is continually updating its products to meet customer needs and hardware and software specifications may vary from time to time. Please refer to
your box label for the specifications for your particular system.
Join Us to Fight Against Piracy
The Acer Group has been implementing a policy to respect and protect legitimate intellectual property rights. Acer firmly believes that only when each and
every one of us abides by such policy can this industry provide quality service
to the general public. Acer has become a member of the Technology
Committee of the Pacific Basin Economic Council, which is encouraging the
protection and enforcement of legitimate intellectual property rights worldwide. Moreover, in order to ensure quality service to all our customers, Acer
includes an operating system in Acer computer systems which is duly licensed
by the legitimate proprietors and produced with quality. Acer commits itself
and urges all its customers to join the fight against intellectual property piracy
wherever it may occur. Acer will pursue the enforcement of intellectual property rights and strive to fight against piracy.
STANDARD END USER LICENSE AGREEMENT
THIS END USER LICENSE AGREEMENT SHALL APPLY IN THE ABSENCE OF
A SEPARATE LICENSE AGREEMENT FROM THE SOFTWARE PUBLISHER.
OTHERWISE, THE SEPARATE LICENSE FROM THE PUBLISHER WILL APPLY.
NOTE TO END USER: CAREFULLY READ THE FOLLOWING LEGAL AGREEMENT. USE OF THE SOFTWARE SUITES PROVIDED WITH YOUR ACER
COMPUTER OR OTHER SOFTWARE PRELOADED WITH YOUR ACER
COMPUTER (THE “SOFTWARE”) WILL CONSTITUTE YOUR ACCEPTANCE
OF THESE TERMS (UNLESS SEPARATE TERMS ARE PROVIDED BY THE
SOFTWARE PUBLISHER, IN WHICH CASE THOSE TERMS WILL APPLY). IF
YOU DO NOT AGREE WITH THE TERMS OF THIS AGREEMENT, PROMPTLY RETURN THE SOFTWARE PACKAGE OR THE SOFTWARE UNOPENED
TO THE LOCATION WHERE YOU OBTAINED IT.
1 • License Grant. The Publisher of each of the Software (the “Software
Publisher”) grants to you a personal, non-transferable and non-exclusive right
to use the copy of the Software provided with this license. You agree you will
not copy the Software except as necessary to use it on a single computer system at one location. You agree that you may not copy the written materials
accompanying the Software. Modifying, translating, renting, copying, transfer-
For assistance, call:
US: 1-800-910-2237 (toll free)
6am - 10pm PST, 7 days a week*.
Taiwan: 632-080-021147 (toll free)
9am - 5pm, Monday through Friday
* Hours subject to change.
For more information on how to get help from Acer Technical
Support, please refer to My Aspire Guide software.
Page 25

Need Help?
43
42
7 • Restricted Rights Legend. In the case where the Software is license to a
U.S. Government agency, you agree that the Software is commercial computer
software and, together with related materials, are subject to the restrictions on
U.S. Government use, duplications or disclosure as set forth in subparagraph
(c)(1)(ii) of the Rights in Technical Data and Computer Software clause at
DFARS 252.227-7013, subparagraph (g)(3)(i) of FAR 52.227-14, Alternate III, or
other applicable regulations concerning Restricted Rights.
8 • Miscellaneous. You agree not to export or re-export the Software without
the appropriate United States or foreign government licenses. This Agreement
will be governed by the laws of the State of California, as they apply to agreements between California residents, without giving effect to choice of law provisions. This is the entire agreement and supersedes any prior agreement, whether
written or oral, relating to the subject matter of this Agreement.
AcerCare - Warranty Upgrades and Extensions
Upgrade or extend the standard warranty that covers your Acer computer.
For assistance, call:
US: 1-800-223-7703
Taiwan: 632-080-021147
Check the warranty information included in the handbook and the Acer
Information Center s of tware install ed on yo ur sy stem fo r d eta ils.
Shop Acer
Find out about accessories and upgrades that you can purchase for your computer.
For assistance, call:
US 1-800-381-2237
Taiwan 632-080-021147
Internet Addresses: http://www.shopacer.com
http://www.aspire.acer.com
http://www.acer.chumbo.com
System Warranty Information
For Limited Product Warranty information, please refer to the following pages.
For other service options, refer to the Acer Information Center software
installed on your computer.
The Acer warranty does not cover the following:
• Acer products purchased from any source other than Acer or its authorized
resellers
• All software and hardware not factory pre-installed
• Questions regarding all software, including factory pre-installed software
• Online services, including the Internet
• Damage from misuse, abuse, or neglect
• Coverage for anyone who purchases, leases , or otherwise obtains an Acer
computer from the original owner
ring or assigning all or part of the Software, or any rights granted hereunder, to
any other persons and removing any proprietary notices, labels or marks from
the Software is strictly prohibited. Futhermore, you hereby agree not to create
derivative works based on the Software.
2 • Copyright. You acknowledge that no title to the intellectual property in
the Software is transferred to you. You further acknowledge that title and full
ownership rights to the Software will remain the exclusive property of the
Software Publisher or its suppliers, and you will not acquire any rights to the
Software except as expressly set forth above. All copies of the Software will
contain the same proprietary notices as contained in or on the Software.
3 • Reverse Engineering. You agree that you will not attempt, and if you are a
corporation, you will use your best efforts to prevent your employees and contractors from attempting, to reverse compile, modify, translate or disassemble
the Software in whole or in part. Any failure to comply with the above or any
other terms and conditions contained herein will result in the automatic termination of this license and the reversion of the rights granted hereunder to the
Software Publisher.
4 • Limited Warranty. The Software Publisher warrants that the media on
which the Software is furnished is free from any physical defects under normal
use for a period of 90 days from the date of purchase (“Limited Warranty”).
Any other software and any hardware furnished with or accompanying the
Software is not warranted by the Software Publisher. Neither the Software
Publisher nor Acer warrants that the functions contained in the Software will
meet your requirements or that the operation of the Software will be uninterrupted or error-free.
EXCEPT FOR THE FOREGOING LIMITED WARRANTY, THE SOFTWARE IS
PROVIDED “AS IS.” THE SOFTWARE PUBLISHER AND ACER DISCLAIMS AND
MAKES NO EXPRESS OR IMPLIED WARRANTIES AND SPECIFICALLY DISCLAIMS THE WARRANTIES OF MERCHANTABILITY, FITNESS FOR A PARTICULAR PURPOSE AND NONINFRINGEMENT OF THIRD PARTY RIGHTS. THE
ENTIRE RISK AS TO THE QUALITY AND PERFORMANCE OF THE SOFTWARE IS WITH YOU.
5 • Customer Remedies. The Softw are Publisher’s entire liability and your only
remedy shall be, at the Software Publishers’ option, to (a) attempt to correct
the errors believed to be causing the defect, (b) replace the Software with
functionally equivalent software or (c) refund the purchase price of the
Software; provided however, that you must return all copies of the Software
and accompanying documentation.
6 • No Liability for Consequential Damages. IN NO EVENT SHALL THE
SOFTWARE PUBLISHER OR ACER BE LIABLE TO YOU FOR ANY CONSEQUENTIAL, SPECIAL, INCIDENTAL OR INDIRECT DAMAGES OF ANY KIND
ARISING OUT OF THE USE OF THE SOFTWARE EVEN IF THE POSSIBILITY OF
SUCH DAMAGES HAVE BEEN ADVISED.
Some jurisdictions do not allow the exclusions of implied warranties of limitations on how long implied warranties may last, or the exclusion or limitation of
incidental or consequential damages, so such limitations or exclusions may not
apply to you. This Limited Warranty gives you specific rights and you may also
have other rights which vary from jurisdiction to jurisdiction.
Page 26

Need Help?
45
44
defective (a) as a result of use of the Product other than for its normal intended use, failure to use the Product in accordance with the User’s Manual that
accompanies the Product, or other misuse, abuse or negligence to the Product;
(b) by the use of parts not manufactured or sold by Acer; (c) by modication
of the Product; (d) as a result of service by anyone other than Acer or an Acer
Authorized Service Provider; or (e) improper transportation or packing when
returning the Product to Acer or an Acer Authorized Service Provider; (f)
improper installation of third-party products (e.g. memory cards).
This Limited Warranty does not extend to expendable parts. Expendable parts
are those items that during the normal course of product usage will require
periodic replacement, e.g., printer cartridges, notebook batteries, etc.
Regarding Acer-supplied sof tw are that accompanies the Product, Acer warrants
the “hard copy” media, e.g., diskettes, CD-ROMs upon which this software is
delivered to be “free from defects and workmanship” for a period of 30 days
after the date of purchase by the end user. In the event that you receive defective media, Acer will replace the defective media at no charge to you. Media is
not covered if abused, neglected or damaged by the user. It is the responsibility
of the user to back up all software supplied on the hard drive.
Except for this media warranty, this software is provided “As Is” and Acer disclaims any and all warranties, expressed or implied, including but not limited to
any implied warranty of non-infringement of third-party rights, merchantability
or fitness for a particular purpose. Acer does not warrant that the operation of
this software will be uninterrupted or error-free, or that this software will meet
your requirements.
Add-on Components (HDD, CD-ROM, Sound Cards, etc.) purchased from
Acer and not installed in an Acer system are covered by a limited warranty as
defined on the Warranty Card which comes with the component. For components purchased from Acer or an Acer Authorized Reseller and installed in an
Acer system which are defined as “Supported” on Acer”s Qualified Vendor List,
Acer will provide warranty technical support and part replacement service for
the duration of the system warranty. The warranty service provided on these
supported components will be equal to the warranty service in effect on the
system on which the components are installed. Proof of purchase from Acer
for all components is required. You may verify what components are defined as
“Supported” on the Acer Qualified Vendor List by contacting your Acer
Authorized Reseller or Distributor or by calling Acer Technical Suppor t.
Acer is not responsible for damage to or loss of any programs, data or removable storage media. You are responsible for saving (backing up) any programs,
data or removable storage media.
EXCEPT FOR THE WARRANTIES SET FORTH HEREIN, ACER DISCLAIMS ALL
OTHER WARRANTIES, EXPRE SSED OR IMPLIED OR STATUTORY, INCLUDING
BUT NOT LIMITED TO THE IMPLIED WARR ANTIE S OF MERCHANTABILITY
OR FITNESS FOR A PARTICULAR PURPOSE. ANY IMPLIED WARRANTIES
THAT MAY BE IMPOSED BY APPLICABLE LAW ARE LIMITED TO THE TERMS
OF THIS LIMITED WARRANTY. IN NO EVENT SHALL ACER BE LIABLE FOR
ANY INCIDENTAL, SPECIAL OR CONSEQUENTIAL DAMAGES, INCLUDING
BUT NOT LIMITED TO LOSS OF BUSINESS, PROFITS, DATA OR USE,
WHETHER IN AN ACTION IN CONTRACT OR BASED ON A WARRANTY,
• Improper installation or use of third-party hardware products
• Modification of the Acer computer
• Product that requires periodic replacement, such as notebook batteries, etc.
• Damage or loss of any programs, data, or removable storage media
• Any consequential damages including lost profits or business
Limited Product Warranty
Acer, in an effort to provide computers of the highest quality and reliability,
subjects all its computers and components to extensive testing and inspection
procedures. Acer”s manufacturing facilities have been certified to ISO-9000
international quality standards. Before a component can be eligible for installation in an Acer computer offered for sale, it must first pass stringent quality,
inspection and testing procedures. Be assured that this Product and its components have met Acer”s highest quality, testing and inspection procedures for
new products and are fully backed by Acer”s limited warranty.
A • Acer Limited Warranty
Acer warrants the Product you have purchased from Acer or from an Acer
Authorized Reseller to be free from defects in materials or workmanship under
normal use during the warranty period applicable to the Product as defined in
the Warranty Reference Table. The warranty period commences on the date of
purchase. Yo ur original purchase invoice (sales receipt), showing the date of
purchase of the Product, is your proof of the date of purchase. This warranty
extends only to you, the original Purchaser. It is not transferable to anyone who
subsequently purchases, leases or otherwise obtains the Product from you. It
excludes expendable parts.
During the warranty period, Acer will, at no additional charge, repair or replace
defective hardware with factory-refinished parts or products. All exchanged parts
and Products replaced under this warranty will become the property of Acer.
In the event the Product exhibits a defect in material or workmanship within
the warranty period, Acer will provide the warranty services applicable to the
Product as defined in the Warranty Reference Table.
B • Registration
To ensure timely response to a service request, please complete the Acer
Warranty Registration card or online registration and return the registration to
Acer within ten (10) days after date of purchase. For Products in which the registration form has been preloaded onto your computer system, please return
the registration electronically. To register other products, please complete the
enclosed registration card.
C • Warranty Limitation; Exclusions; Exclusive Remedies
This Limited Warranty does not extend to any Product not purchased from
Acer or from an Acer Authorized Reseller. The product (“Product”) you have
purchased may include one or more components previously installed in a
product that was returned after sale and possible use. This Limited War ranty
also does not extend to any Product that has been damaged or rendered
Page 27

Need Help?
47
46
diagnostic procedures. At Acer”s discretion, if necessary, an Acer third party will
be dispatched to your site to perform repair services as directed by Acer.
5 • You must provide Acer or the Acer Authorized Service Provider with proof
of the place and date of purchase.
* Does not apply worldwide
E • Obtaining Replacement Warranty Service *
If you purchased Product that is covered by replacement warranty service (as
defined in the Warranty Reference Table) in the United States or Canada, you
are entitled to replacement repair service during the warranty period subject to
the following terms and conditions:
1 • Replacement service is available only for Product purchased and located in
the United States or Ca nad a .
2 • Before contacting Acer, please run the Hardware Diagnostics. This will help
us provide you with better quality support.
3 • Acer will attempt to resolve warranty issues over the telephone. If telephone
resolution is not possible, Acer will require your assistance in performing routine
diagnostic procedures. At Acer’s discretion, if necessary, a replacement Product
(which may be a factory-refinished product but which will be covered by the
remainder of your original warranty period) will be shipped to your site with
freight prepaid by Acer. You will be required to return the original Product and
identify it with the Return Materials Authorization (RMA) number issued by Acer.
4 • Acer will make commercially reasonable efforts to provide you second-business-day replacement of the Product, provided the order is received by Acer
prior to 2:00 p.m. Pacific Time.
5 • You are required to return the original Product within ten (10) days of
receipt of the replacement Product. Prior to shipment of the replacement
Product, you must provide a credit card as security.
6 • If you desire to have your Product repaired rather than replaced (i.e.
,exchanged), you may request Acer to perform an equipment repair. You must
contact the Acer Customer Service Center at 1-800-938-2237 between 6 a.m.
and 10 p.m. Pacific Time.
* Does not apply worldwide
F • Obtaining Carry-In or Mail-In Warranty Ser vice *
If you purchased Product that is covered by Carry-In or Mail-In warranty service (as defined in the Warranty Reference Table) in the continental United
States, Canada, Alaska , Hawaii or Puerto Rico, you are entitled to Carry-In or
Mail-In service during the warranty period subject to the following terms and
conditions:
1 • Carry-In or Mail-In repair service is available for Product purchased and
located in the continental United States, Canada or in limited areas of Alaska,
Hawaii or Puerto Rico.
2 • Before contacting Acer, please run the Hardware Diagnostics. This will help
us provide you with better quality support.
3 • Acer will attempt to resolve warranty issues over the telephone. If telephone resolution is not possible, Acer will require your assistance in performing
ARISING OUT OF OR IN CONNECTION WITH THE USE OR PERFORMANCE
OF THE PRODUCT OR ANY ACER-SUPPLIED SOFTWARE THAT ACCOMPANIES THE PRODUCT, EVEN IF ACER HA S BEEN ADVISED OF THE POSSIBILITY
OF SUCH DAMAGES. YOU AGREE THAT REPAIR, REPLACEMENT OR
REFUND, AS APPLICABLE, UNDER THE WARRANTY SERVICES DESCRIBED
HEREIN IS YOUR SOLE AND EXCLUSIVE REMEDY WITH RESPECT TO ANY
BREACH OF THE ACER LIMITED WARRANTY SET FORTH HEREIN.
Some states or provinces do not allow the exclusion or limitation of incidental
or consequential damages for consumer products, and some states or
provinces do not allow limitations on how long an implied warranty lasts. In
such states and provinces, the exclusions or limitations of this Limited
Warranty may not apply to you.
This Limited Warranty gives you specific legal rights. You may also have other
rights that vary from state to state. You are advised to consult applicable state
and provincial laws for a full determination of your rights.
D • Obtaining On-Site Warranty Service *
If you purchased Product that is covered by on-site warranty service (as
defined in the Warranty Reference Table) in the continental United States,
Canada, Hawaii, Alaska, or Puerto Rico and the Product is located in the continental United States, Canada, or limited areas of Hawaii, Alaska or Puerto Rico,
you are entitled to on-site repair service during the warranty period subject to
the following terms and conditions:
1 • In limited areas of Hawaii, Alaska, Puerto Rico, or Canada response times may
vary considerably depending on the availability of third party service providers on
these locations. For Product locations not covered by on-site service, Carry-In or
Mail-In warranty service is provided. Response is defined as telephone contact
between the Acer Authorized Service Provider and the end user for the purpose
of identifying the repair issue and establishing a repair appointment.
2 • On-site service is available only for Product located within 100 miles (in U.S.)
or 160 km (in Canada) of the location of a third party authorized by Acer to
perform on-site service (“Acer Service Center”). See the Warranty Reference
Table and 4 below.
3 • Before contacting Acer, please run the Hardware Diagnostics. This will help
us provide you with better quality support. You can run the Hardware
Diagnostics d irec tly from the Acer Ser vi ce Center or proce ed a s fol lows :
a • With your computer powered on, place the Aspire Software Library and
Recovery CDs in the CD-ROM drive.
b • Go to the Start Menu, and select Shutdown to restart the computer.
c • After the computer has rebooted, select Diagnostics.
d • Select “Q” for Quick Test. This test will take approximately 10 minutes.
e • Record all results.
These simple steps will help the technician better determine the cause of your
problem. You must contact the Acer Technical Support at 1-800-938-2237
between 6 a.m. and 10 p.m. Pacific Time.
4 • Acer will attempt to resolve warranty issues over the telephone. If telephone
resolution is not possible, Acer will require your assistance in performing routine
Page 28

Need Help?
49
48
pièces ou tous produits échangés conformément à la garantie deviennent la
propriété de Acer.
n cas de défectuosités du Produit en matériau et fabrication pendant la
période de garantie stipulée par la garantie, Acer offrira les services de garantie
applicables au Produit tel que définis dans le tableau de référence de garantie.
B • Enregistrement
Afin d’obtenir rapidement une réponse à votre demande de service, veuillez
remplir la carte d’enregistrement de garantie de Acer ou selon le cas, vous
enregistrez en ligne et renvoyer l’enregistrement à Acer dans les dix (10) jours
après la date d’achat. Pour les produits dont le formulaire d’enregistrement a
été préchargé sur votre système, veuillez effectuer l’enregistrement électroniquement. Pour enregistrer d’autres produits, veuillez remplir la carte d’enregistrement incluse.
C • Limites de la garantie; Exclusions; Solutions exclusives
Cette garantie limitée ne couvre pas les autres produits qui ne seraient pas vendus par Acer ou un revendeur agréé. Elle ne couvre pas non plus les produits
qui auraient été endommagés ou rendus défectueux (a) suite à une utilisation
anormale du P rodu it qui ser ait cont r aire à l ’intenti on init ial e d’u sa ge, au no n
respect des instructions stipulées dans le Guide d’utilisateur du Produit ou tout
abus ou négligence subie par le Produit; (b) suite à l’utilisation de pièces qui ne
seraient pas fabriquées ou vendus par Acer; (c) suite à des modifications
apportées au Produit; (d) suite à une réparation qui n’aurait pas été ef fectuée
par Acer ou un fournisseur de services agréé par Acer; ou (e) transport ou
emballage inapproprié lors du renvoi du Produit à Acer ou un fournisseur de
services agréé; (f) installation inadéquate de produits tiers (par exemple les
cartes de mémoire).
Cette garantie limitée ne couvre pas les pièces consomptibles qui sont les
éléments nécessitant d’être remplacés lors d’une utilisation normale du Produit
tels que les cartouches d’imprimantes, les batteries de notebook etc.
En ce qui concerne le logiciel fourni par Acer et qui est joint au Produit, Acer
garantit que le support de copie, tel que disquettes, CD-ROM sur lequel le logiciel est livré ne comporte aucun vice de matériaux et de fabrication pendant
une période de 30 jours après la date d’achat par l’utilisateur. Au cas où un support défectueux vous soit livré, Acer s’engage à remplacer gratuitement le support. Ce support n’est pas garanti s’il est mal utilisé, négligé ou endommagé par
l’utilisateur. Il incombe à l’utilisateur la responsabilité d’effectuer des sauvegardes
de tous les logiciels installés sur le disque dur. Mise à part, la garantie relative au
support, ce logiciel est fourni tel quel et Acer décline toutes garanties, expresses
ou implicites y compris mais non limitées aux garanties implicites de commercialisation, adaptation à des fins particulières et en absence de contrefaçon. Acer
ne garantit ni le fonctionnement sans incident ou sans interruption du logiciel,
ni l’à-propos du produit pour répondre à vos besoins en matière de fonctions.
Les composants ajoutés (HDD, CD-ROM, cartes de son etc.) achetés auprès de
Acer et qui ne seraient pas installés dans un système Acer sont couverts par
une garantie limitée telle que stipulée sur la carte de garantie jointe aux composants. Pour les composants achetés auprès de Acer ou d’un revendeur agréé
par Acer et installés dans un système Acer et qui sont définis en tant que
“supportés” sur la liste des fournisseurs Acer qualifiés, Acer garantit une assistance technique et l’échange de pièces pour la période de la garantie du
routine diagnostic procedures. Acer will then issue you a Return Materials
Authorization (RMA) Number to be used as a means of identifying the
Product returned.
4 • Carry-In service may take place at any of the Acer Authorized Service
Centers or Acer America Service Depots. Mail-In service must take place by
returning the Product to Acer at the Temple, Texas, or Toronto, Ontario, service depots. You must prepay any shipping charges, export taxes, cu stom
duties and taxes or any other charges associated with transportation of the
Product. In addition, you are responsible for insuring any Product shipped or
returned. You assume the risk of loss during shipment.
5 • Use the original shipping and packing materials and include a description of
the Product symptom. The Return Materials Authorization (RMA) Number
must be placed on the exterior shipping container.
6 • You must provide Acer with proof of the place and date of purchase.
* Does not apply worldwide
G • Additional Information
You may request additional information on how to obtain warranty services by
contacting any Acer Authorized Service Provider. Please refer to Acer
Information Center installed on your PC for a complete list of Acer Authorized
Service Providers.
Garantie Limitée Sur Les Produits
Acer dans l’effort de fournir des ordinateurs de qualité et de performance
supérieures, soumet tous ses ordinateurs et les composants à des procédures
d’essais et d’inspection approfondis. Les installations de fabrication de Acer ont
obtenu le certificat de normes de qualité internationale ISO-9000. Le produit
(“Produit”) que vous venez d’acheter peut comporter un ou plusieurs composants provenant d’un produit qui aurait été retourné après la vente et
éventuellement utilisé. Avant qu’un composant ne puisse Ítre réutilisé dans un
ordinateur ACER qui sera mis en vente, il doit Ítre soumis à des procédures
d’essais, d’inspection et de qualité rigoureuses. Nous tenons à réitérer le fait que
ce Produit et ses composants sont conformes aux normes établies par les
procédures d’essais, d’inspection et de qualité de Acer gérant tous nouveaux
produits et qu’ils sont donc entièrement endossés par la garantie limitée de
Acer.
A • Garantie limitée de Acer
Acer garantit que le produit que vous venez d’acheter auprès de Acer ou d’un
revendeur agréé par Acer aux Etats-Unis ou au Canada ne comporte aucun
vice de matériau ou de main d’oeuvre sous des conditions normales d’usage
pendant la période de la garantie relative au Produit telle que définie dans le
tableau de référence de garantie. La période de garantie entre en vigueur à
compter de la date d’achat. Votre facture initiale (ou reçu) d’achat indiquant la
date de l’achat du Produit est la preuve de la date de l’achat. Cette garantie ne
concerne que vous, l’Acheteur initial et n’est transférable à quiconque qui
achèterait, louerait ou obtiendrait le Produit de quelque façon que ce soit et
exclut les pièces consomptibles.
Au cours de la garantie, Acer se chargera gratuitement de réparer ou remplacer
le matériel défectueux par des pièces ou produits remis en état à l’usine. Toutes
Page 29

Need Help?
51
50
entre le fournisseur de services agréé par Acer et l’utilisateur à des fins d’identification du problème et de prise de rendez-vous pour réparer le Produit.
Le service sur site n’est disponible que pour les Produits se trouvant dans les
100 miles (aux E.-U) ou 160 km (au Canada) du lieu d’un tiers agréé par Acer
pour exécuter le service sur site (“Centre de services Acer”). Reportez-vous aux
informations de la section 4 ci-dessous et au tableau de référence de garantie.
Avant de contacter Acer, veuillez effectuer le diagnostic du matériel afin de
nous permettre de vous offrir une meilleure assistance. Vous pouvez exécuter
ce diagnostic du matériel directement à partir du centre de services Acer ou en
procédant comme suit :
a • L’ordinateur en marche, placez le CD de récupération et de bibliothèques
logicielles de Acer dans le lecteur de CD.
b • Allez au menu Démarrer et sélectionnez ArrÍter pour relancer l’ordinateur.
c • Après avoir réinitialisé l’ordinateur, sélectionnez Diagnostics .
d • Sélectionnez “Q” pour le test rapide qui s’effectuera en 10 minutes environ.
e • Inscrivez tous les résultats que vous confierez au technicien pour lui perme-
ttre de mieux comprendre la cause de votre problème.
Contactez le service d’assistance technique au 1-800-938-2237 entre 6 heures et
22 heures (heures normales du Pacifique).
Acer s’engage dans la mesure du possible à résoudre par téléphone toutes
questions relatives à la garantie. Si ce n’est pa s possible, Acer requiert alors votre
assistance pour l’exécution de diagnostics de routine. Acer décidera ensuite s’il
est nécessaire d’envoyer un technicien tiers de Acer sur votre site afin
d’effectuer les réparations telles que stipulées par Acer.
Vous devez fournir à Acer ou au fournisseur de services agréé la preuve du lieu
et de la date d’achat.
E • Obtention d’un service de garantie d’échange
Si vous achetez un Produit et s’il est couvert par le service de garantie
d’échange (tel que défini dans le tableau de référence de garantie) aux EtatsUnis et au Canada, vous pouvez bénéficier du service d’échange pendant la
période de garantie selon les modalités suivantes :
1 • Le service d’échange n’est disponible que pour le Produit acheté et se trouvant aux Etats-Unis ou au Canada.
2 • Avant de contacter Acer, veuillez exécuter les diagnostics du matériel afin
d’aider le service d’assistance à répondre à vos questions.
3 • Acer essaiera de résoudre les questions de garantie par téléphone. Si la
résolution par téléphone est impossible, Acer demandera votre assistance pour
exécuter les procédures de diagnostic. Au besoin, Acer décidera d’échanger le
Produit (qui peut Ítre un produit réparé à l’usine mais couvert par la période
restante de la garantie initiale) qui sera expédié à votre site avec les frais de
transport à la charge de Acer. Vous devrez demander l’autorisation de retourner
le Produit initial et l’identifier avec un numéro RMA (autorisation de renvoi de
matériel) émis par Acer.
4 • Acer essaiera dans la mesure du possible d’échanger le Produit pour le
système. Le service de garantie fourni sur ces composants supportés sera équivalent à la garantie en vigueur sur le système sur lequel les composants sont
installés. La preuve d’achat de Acer pour tous les composants est requise. Vous
ouvez vérifier les composants définis en tant que “supportés” sur la liste des
fournisseurs Acer qualifiés en contactant un revendeur ou un distributeur agréé
par Acer ou en appelant le services d’assistance technique de Acer.
Acer ne saurait être tenu responsable pour les dommages ou pertes de programmes, données , suppor ts de stockage amovibles. Vous êtes responsable de
sauvegarder tous programmes, données ou support de stockage amovibles.
HORMIS LES GARANTIES S TIPULÉE S CI-CONTRE , ACER DÉCLINE TOUTES
AUTRES GARANTIES QU’ELLES SOIENT E XPRESSE S OU IMPL ICITE S OU
STATUTAIRES Y COMPRIS MAIS NON LIMITÉES AUX GARANTIES IMPLICITES
DE COMMERCIALISATION OU ADAPTATION À DES FINS PARTICULIÉRES.
TOUTES GARANTIES IMPLICITES QUI SERAIENT IMPOSÉES PAR LA LOI
SONT LIMITÉES AUX TERMES DE CETTE GARANTIE LIMITÉE. EN AUCUN
CAS, ACER NE SERAIT TRE TENU RE SPONSABLE DES D OMMAGES ACCESSOIRES, SPÉCIAUX OU INDIRECTS, Y COMPRIS MAIS NON LIMITÉES À LA
PERTE D’AFFAIRES, DE VOS PROFITS, DONNÉES OU D E L’INCAPACITÉ
D’UTILISATION, QUE CE SOIT UNE CAUSE D’ACTION STIPULÉE DANS LE
CONTRAT OU DROIT CIVIL OU BASÉE SUR UNE GARANTIE, RÉSULTANT
DIRECTEMENT OU CONNEXE À L’UTILISAT ION OU LA PERFORMANCE DU
PRODUIT OU DE TOUS LOGICIELS FOURNIS PAR ACER JOINTS AU PRODUIT,
M ME SI ACER AURAIT ÉTÉ PRÉVENU QUE DE TELS DOMMAGES PUISSENT
SE PRODUIRE. VOUS ACCEPTEZ D E FAIRE RÉPARER, REMPLACER OU REMBOURSER SELON LES CLAUSES DES SERVICES DE LA GAR ANTIE DÉCR ITS
DANS CE DOCUMENT QUI SONT LES SOLUTIONS EXCLUSIVES CONFORMÉMENT À TOUTE RUPTURE DE LA GARANTIE LIMITÉE DE ACER STIPULÉE DANS LES DOCUMENTS CI-JOINTS.
Certains états ou provinces n’autorisent pas l’exclusion ou la limite des dommages accessoires ou indirects pour les produits de consommateurs et certains
états ou provinces ne permettent pas de limite quant à la durée d’une garantie
implicite. Dans de tels états ou provinces, les limites ou exclusions de cette
garantie ne vous concernent donc pas.
Cette garantie vous confère des droits spécifiques reconnus par la loi et il se
peut que vous disposiez d’autres droits variant d’un état à l’autre. Il est recommandé de consulter les lois applicables de l’état ou de la province afin de déterminer précisément ceux dont vous bénéficiez.
D • L’obtention d’un service de garantie sur site
Si vous achetez un Produit et s’il est couvert par une garantie sur site (telle que
définie dans le tableau de référence de garantie) sur la zone continentale des
Etats-Unis, du Canada, de Hawaii, de l’Alaska et de Puerto Rico et si le produit se
trouve sur la zone continentale des Etats-Unis, du Canada ou des zones
délimitées de Hawaii, Alaska ou Puerto Rico, vous pouvez bénéficier de réparations sur site pendant la période de garantie soumise aux clauses et termes suivants :
Dans les zones délimitées de Hawaii, Alaska, Puerto Rico ou du Canada, les
temps de réponses peuvent varier considérablement selon la disponibilité des
fournisseurs de services tiers desservant les lieux. Pour les endroits qui ne
seraient pas couverts par un service sur site, un service de garantie en atelier ou
par envoi postal est fourni. La réponse est définie comme contact téléphonique
Page 30

Need Help?
53
52
FCC Statement
FCC Class B Radio Frequency Interference Statement
Note: This equipment has been tested and found to comply with the limits for a
Class B digital device, pursuant to Part 15 of FCC Rules. These limits are designed
to provide reasonable protection against harmful interference in a residential
installation. This equipment generates, uses, and can radiate radio f requency
energy and, if not installed and used in accordance with the instructions, may
cause harmful interference to radio communications. However, there is no guarantee that interference will not occur in a particular installation. If this equipment
does cause harmful interference to radio or television reception, which can be
determined by turning the equipment off and on, the user is encouraged to try
to correct the interference by one or more of the following measures:
1 • Reorient or relocate the receiving antenna.
2 • Increase the separation between the equipment and receiver.
3 • Connect the equipment into an outlet on a circuit different from that to
which the receiver is connected.
4 • Consult the dealer or an experienced radio/television technician for help.
Notice 1:
The changes or modifications not expressly approved by the party responsible
for compliance could void the user’s authority to operate the equipment.
Notice 2:
Shielded interface cables, if any, must be used in order to comply with the
emission limits.
Fax/Modem and FCC Compliance
This equipment complies with Part 68 of the FCC Rules. On this equipment is a
label that contains, among other information, the FCC registration number for
this equipment. You must , upon request, provide this information along with
the Ringer Equivalence Number (REN) of 0.8, to your telephone company.
If your telephone equipment causes harm to the telephone network, the
Telephone Company may discontinue your service temporarily. If possible, they
will notify in advance. But, if advance notice isn’t practical, you will be notified
as soon as possible. You will be informed of your right to file a complaint with
the FCC.
Your telephone company may make changes in its facilities, equipment, operations, or procedures that could affect proper operation of your equipment. If
they do, you will be notified in advance to give you an opportunity to maintain uninterrupted telephone service.
The FCC prohibits this equipment to be connected to party lines or coin-telephone service.
In the event that this equipment should fail to operate properly, disconnect
the equipment from the phone line to determine if it is causing the problem. If
the problem is with the equipment, discontinue use and contact your dealer or
vendor.
The FCC also requires the transmitter of a FAX transmission be properly identified (per FCC Rules Part 68, Sec. 68.381 (c) (3)).
deuxième jour ouvrable pourvu que la commande soit reÁue par Acer avant
14 hr (Heure normale du Pacifique).
• Vous devez retourner le Produit initial dans les dix (10) jours suivant la réception du Produit d’échange. Avant l’expédition du Produit d’échange, vous devez
par mesure de sécurité fournir le numéro de votre carte de crédit.
Si vous souhaitez faire réparer votre Produit au lieu de l’échanger, vous pouvez
demander à Acer d’effectuer ladite réparation. Contactez dans ce cas, le centre
de services clients Acer au numéro suivant 1-800-938-2237 entre 6 et 22 hr
(heures normales du Pacifique).
F • Obtention des services de garantie en atelier ou par
envoi postal
Si vous achetez un Produit couvert par les services de garantie en atelier ou par
envoi postal (tels que définis dans le tableau de référence de garantie) dans la
zone continentale des Etats-Unis, du Canada, de l’Alaska, de Hawaii et de
Puerto Rico, vous Ítes en droit de bénéficier du service en atelier ou par envoi
postal pendant la période de garantie conformément aux modalités suivantes :
1 • Le service de réparation en atelier ou par courrier est disponible pour le
Produit acheté et se trouvant sur la zone continentale des Etats-Unis, du
Canada ou des zones délimitées de Hawaii, Alaska ou Puerto Rico.
2 • Avant de contacter Acer, veuillez exécuter le programme de diagnostics du
matériel afin de nous aider à répondre à vos problèmes.
3 • Acer s’engage dans la mesure du possible à résoudre par téléphone toutes
questions relatives à la garantie. Si ce n’est pas p ossible, Acer requiert alors votre
assistance pour l’exécution de diagnostics de routine. Acer émettra ensuite un
numéro RMA (autorisation de renvoi de matériel) afin d’identifier distinctement le produit retourné.
4 • Les services en atelier peuvent s’effectuer auprès de n’importe quel centre de
service agréé par Acer ou dépÙt de service de Acer America. Le retour par
courrier doit s’effectuer en retournant le Produit à Acer à Temple en Texas ou à
Toronto au Canada (dépôts de services). Les frais d’expédition, taxes d’exportation, frais douaniers et autres frais relevant du transport du Produit sont à votre
charge. En outre, vous êtes responsable de l’assurance du Produit expédié ou
retourné. Vous assumez le risque de perte pendant l’expédition.
5 • Utilisez les matériaux d’emballage et d’expédition originaux et joignez une
description des symptômes du Produit. Le numéro du RMA (autorisation de
renvoi de matériel) doit être apposé sur le conteneur d’expédition.
6 • Vous devez fournir à Acer la preuve du lieu et de la date de l’achat du
Produit.
G. • Informations supplémentaires
Vous pouvez obtenir de plus amples informations sur les services de garantie en
contactant un fournisseur de service agréé par Acer. Vous pouvez contacter
Acer directement pour tous renseignements supplémentaires ainsi que pour
obtenir l’adresse du fournisseur le plus proche de chez vous en écrivant à :
Customer Service Center
Acer America Corporation
P. O. Box 6137
Temple, TX 76503
Page 31

Need Help?
55
54
Caution on Lithium Batteries
CAUTI ON Danger of explosion if battery is incorrectly replaced. Replace only
with the same or equivalent type recommended by the manufacturer. Discard
used batteries according to the manufacturer’s instructions.
ADVARSE L! Lithiumbatteri - Eksplosionsfare ved fejlagtig håndtering.
Udskiftning må kun ske med batteri af samme fabrikat og type. Léver det
brugte batteri tilbage til leverandøren.
ADVARSEL Eksplosjonsfare ved feilaktig skifte av batteri. Benytt samme betteritype eller en tilsvarende type anbefalt av apparatfabrikanten. Brukte batterier kasseres i henhold til fabrikantens instruksjoner.
VARNING Eksplosionsfara vid felaktigt batteribyte. Anvand samma batterityp
eller en ekvivalent typ som rekommenderas av apparattillverkaren. Kassera
anvant batteri enlig t fa br ik anta ntens inst r ukt io n.
VAROITUS Päristo voi räjähtää, jos se on virheellisesti asennettu. Vaihda paristo ainoastaan laitevalmistajan suossittelamaan tzzppiin. Hävitä käytetty paristo
valmistajan ohjeiden mukaisesti.
VORSICHT! Explosionsgefahr bei unsachegemäßen Austausch der Batterie
Ersatz nur duch denselben oder einem vom Hersteller emphfohlenem
ähnlichen Typ. Entsorgung gebrauchter Betterien nach Angaben des Herstellers.
Acer Year 2000 Compliance Statement
This product is Year 2000-compliant and carries the “NSTL Hardware Tested
Year 2000 Compliant” logo. This product has been tested both by Acer’s internal test labs and NSTLusing NSTL’s YM ARK2000 certific ation test. These tests
certify that the product will successfully make the year 2000 transition.
For more details, check the Acer Year 2000 Resource Center at
http://www.acer.com/year2000
CD-ROM Safety Warning
DANGER Invisible radiation when open. Avoid exposure to beam.
VORSICHT Unsichtabre laserstrahlung wenn geöffnet. Nicht in den strahl
sehen.
ATTENTI O N Radiation du faisceau laser invisible. En cas d’ouverture. Eviter
toute exposition aux rayons.
VARO Avattaessa olet alttiina näkzmättömälle lasersäteilylle älä katso
säteeseen.
VARNING! Osynling lasersträlning när denna del är öppnad. Stirra ej in i
strälen.
ADVARSEL La sersträling ved äbning . Se ikke ind i strälen.
CLASS 1 LASER PRODUCT
APPAREIL A LASER DE CLASSE 1
LASER KLASSE 1
LOUKAN 1 LASERLAITE
PRODUIT LASER
CATEGORIE 1
Page 32

Take a moment now and note the following imp or tant
information about your system:
Part Number - PN
DS#
Date of purchase
You may be asked this information when you do the
following:
1. First start your computer
2. Call Acer Technical Support
3. CPR your system
4. Visit Acer website support area
5. Order parts, accessories, and upgrades
Note: system part number and DS# are located on the side of your
computer or inside the front panel. Before you call Acer Technical
Support, make sure to run The Aspire Recovery and Diagnostics CD.
PN/ XXXXXXXXX
Barcode goes
here
 Loading...