

Page 1

Acer
Aspire iDea 500/510 Series
Service Guide
Service guide files and updates are
available on the ACER/CSD web. For
more information, please refer to http://
csd.acer.com.tw
PRINTED IN TAIWAN
Page 2

Revision History
Please refer to the table below for the updates of Desktop Aspire iDea 500/510 service guide.
Date Chapter Updates
October 30, 2006 first release
II
Page 3

Copyright
Copyright© 2006 by Acer Incorporated. All rights reserved. No part of this publication may be
reproduced, transmitted, transcribed, stored in a retrieval system, or translated into any language or
computer language, in any form or by any means, electronic, mechanical, magnetic, optical, chemical,
manual or otherwise, without the prior written permission of Acer Incorporated.
III
Page 4

Disclaimer
The information in this guide is subject to change without notice.
Acer Incorporated makes no representations or warranties, either expressed or implied, with respect to
the contents hereof and specifically disclaims any warranties of merchantability or fitness for any
particular purpose. Any Acer Incorporated software described in this manual is sold or licensed “as is”.
Should the programs prove defective following their purchase, the buyer (and not Acer Incorporated,
its distributor, or its dealer) assumes the entire cost of all necessary servicing, repair, and any
incidental or consequential damages resulting from any defect in the software.
Acer is a registered trademark of Acer Incorporated.
Other brand and product names are trademarks and/or registered trademarks of their respective
holders.
IV
Page 5

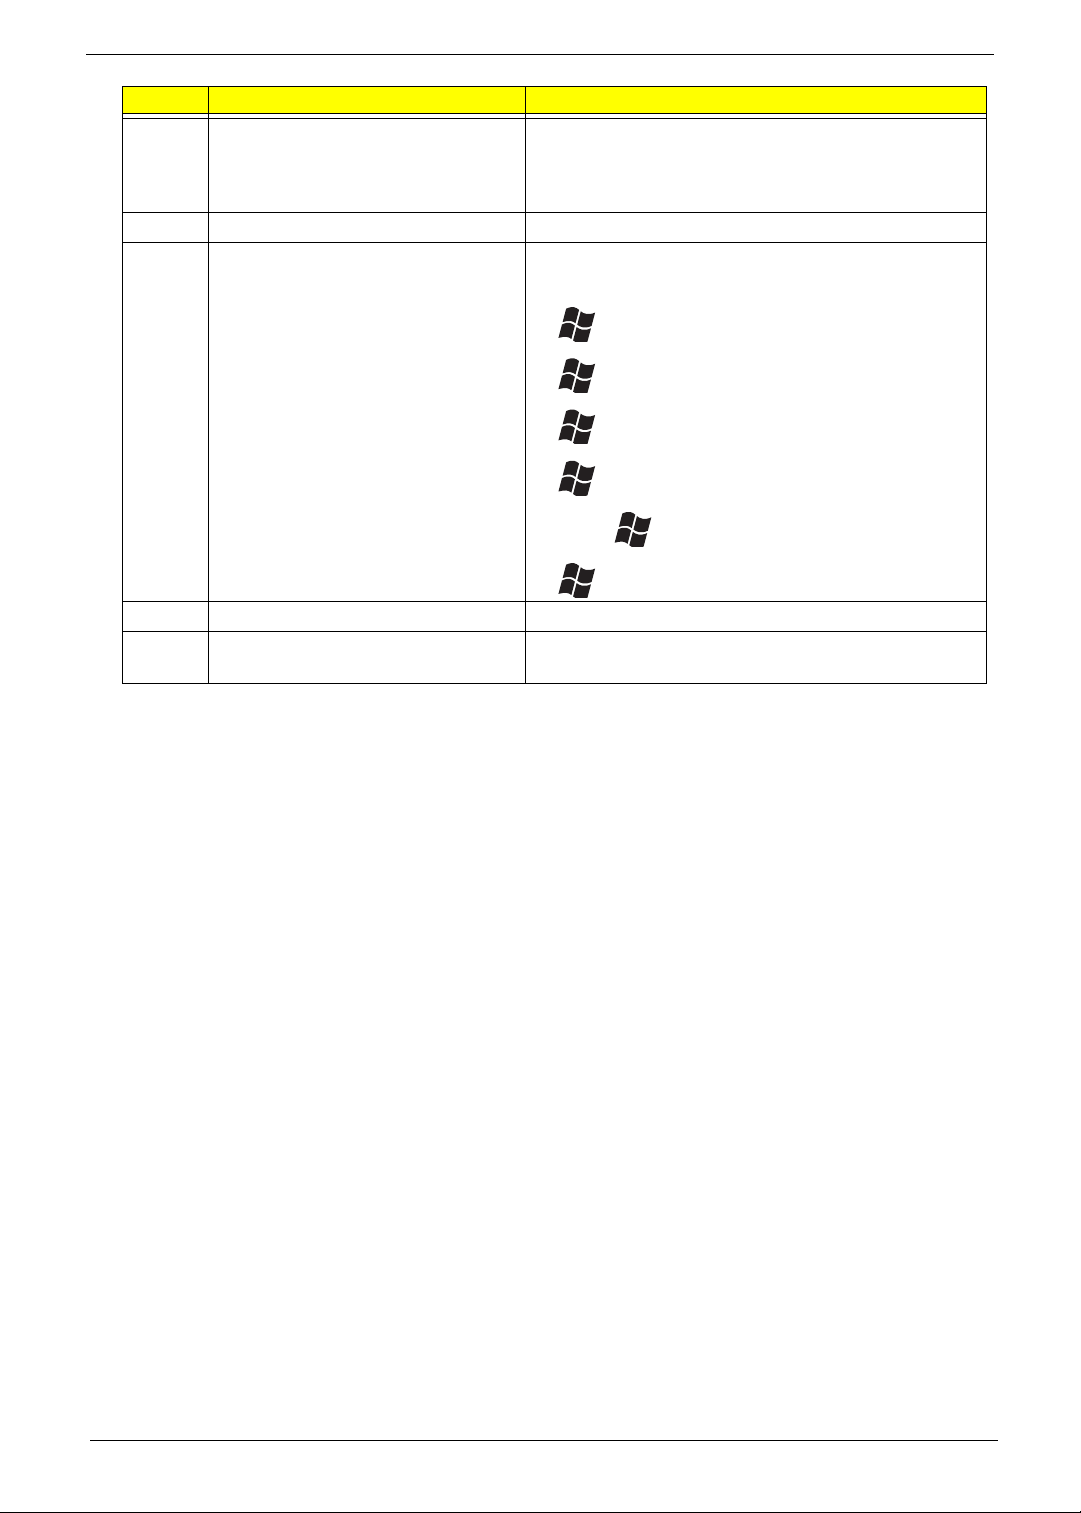
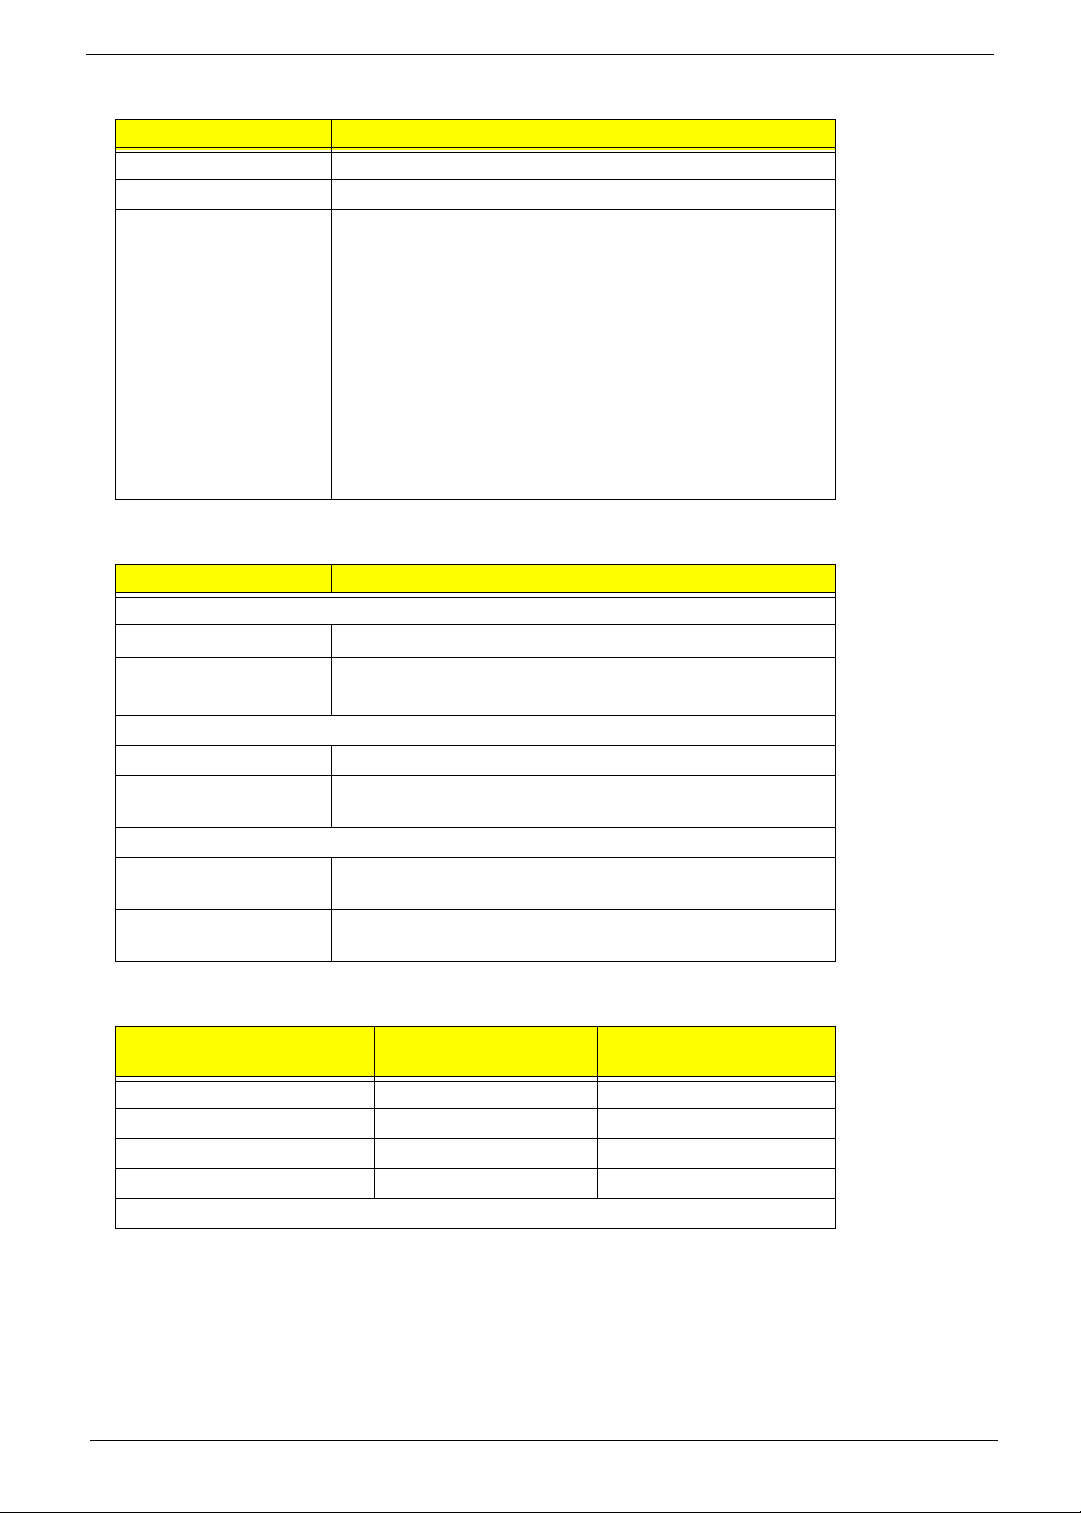
Conventions
The following conventions are used in this manual:
SCREEN MESSAGES Denotes actual messages that appear on screen.
NOTE Gives bits and pieces of additional information related to the
current topic.
WARNING Alerts you to any damage that might result from doing or not
doing specific actions.
CAUTION Gives precautionary measures to avoid possible hardware
or software problems.
IMPORTANT Reminds you to do specific actions relevant to the
accomplishment of procedures.
V
Page 6

Preface
Before using this information and the product it supports, please read the following general information.
1. This Service Guide provides you with all technical information relating to the BASIC
CONFIGURATION decided for Acer's “global” product offering. To better fit local market
requirements and enhance product competitiveness, your regional office MAY have decided to
extend the functionality of a machine (e.g. add-on card, modem, or extra memory capability). These
LOCALIZED FEATURES will NOT be covered in this generic service guide. In such cases, please
contact your regional offices or the responsible personnel/channel to provide you with further
technical details.
2. Please note WHEN ORDERING FRU PARTS, you should check the most up-to-date information
available on your regional web or channel. For whatever reason, if a part number change is made, it
will not be noted in the printed Service Guide. For ACER-AUTHORIZED SERVICE PROVIDERS,
your Acer office may have a DIFFERENT part number code to those given in the FRU list of this
printed Service Guide. You MUST use the list provided by your regional Acer office to order FRU
parts for repair and service of customer machines.
VI
Page 7

Table of Contents
Chapter 1 System Specification 1
Specification . . . . . . . . . . . . . . . . . . . . . . . . . . . . . . . .1
Operating System . . . . . . . . . . . . . . . . . . . . . . . . . . . . . . 1
Platform . . . . . . . . . . . . . . . . . . . . . . . . . . . . . . . . . . . . . . 1
System Memory . . . . . . . . . . . . . . . . . . . . . . . . . . . . . . . 1
Storage Subsystem . . . . . . . . . . . . . . . . . . . . . . . . . . . . . 1
Audio . . . . . . . . . . . . . . . . . . . . . . . . . . . . . . . . . . . . . . . . 1
Communication and Receiver . . . . . . . . . . . . . . . . . . . . . 1
TV Tuner Subsystem . . . . . . . . . . . . . . . . . . . . . . . . . . . 2
Display Subsystem . . . . . . . . . . . . . . . . . . . . . . . . . . . . . 2
DV Camcorder Processing . . . . . . . . . . . . . . . . . . . . . . . 2
Front Panel Indicators and Buttons . . . . . . . . . . . . . . . . . 2
I/O Interface . . . . . . . . . . . . . . . . . . . . . . . . . . . . . . . . . . 2
Power Subsystem . . . . . . . . . . . . . . . . . . . . . . . . . . . . . . 3
Acoustic Estimation . . . . . . . . . . . . . . . . . . . . . . . . . . . . . 3
Dimension and Weight . . . . . . . . . . . . . . . . . . . . . . . . . . 4
Block Diagram . . . . . . . . . . . . . . . . . . . . . . . . . . . . . . .5
Main Board Placement . . . . . . . . . . . . . . . . . . . . . . . .6
Front Panel View . . . . . . . . . . . . . . . . . . . . . . . . . . . . .9
Rear Panel View . . . . . . . . . . . . . . . . . . . . . . . . . . . .11
Remote Control . . . . . . . . . . . . . . . . . . . . . . . . . . . . .12
Using the Remote Control . . . . . . . . . . . . . . . . . . . . . . . 13
Wireless Keyboard . . . . . . . . . . . . . . . . . . . . . . . . . .14
Setting up the System . . . . . . . . . . . . . . . . . . . . . . . .16
Connecting the Power Cable . . . . . . . . . . . . . . . . . . . . 16
Connecting Display Devices . . . . . . . . . . . . . . . . . . . . . 17
Connecting to a TV Antenna or Cable . . . . . . . . . . . . . 20
Connecting an FM Radio Antenna . . . . . . . . . . . . . . . . 20
Connecting Audio Devices . . . . . . . . . . . . . . . . . . . . . . 21
Configuring Audio Output Settings . . . . . . . . . . . . . . . . 22
Setting up the Wireless Devices . . . . . . . . . . . . . . . . . . 22
Windows XP Media Center . . . . . . . . . . . . . . . . . . . .24
Opening Media Center . . . . . . . . . . . . . . . . . . . . . . . . . 24
Media Center Home Page . . . . . . . . . . . . . . . . . . . . . . 24
Configuring Your Set-Top Box . . . . . . . . . . . . . . . . . . . 25
Closing Media Center . . . . . . . . . . . . . . . . . . . . . . . . . . 25
Acer eRecovery Management . . . . . . . . . . . . . . . . . .26
Launching Acer eRecovery Management . . . . . . . . . . . 26
Copying the Factory Default Settings Image . . . . . . . . 26
Creating System Backups . . . . . . . . . . . . . . . . . . . . . . . 26
Creating an Incremental Backup . . . . . . . . . . . . . . . . . . 27
TOC VII
Page 8

Copying to Disks . . . . . . . . . . . . . . . . . . . . . . . . . . . . . . 27
Restoring the System . . . . . . . . . . . . . . . . . . . . . . . . . . 27
Other System Restore Modes . . . . . . . . . . . . . . . . . . . . 28
Acer ePerformance Management . . . . . . . . . . . . . . .30
Acer ePerformance Management Main Page . . . . . . . . 30
Hardware Specification and Configuration . . . . . . . .31
Power Management Function (ACPI Support Function)
. . . . . . . . . . . . . . . . . . . . . . . . . . . . . . . . . . . . . . . . . .36
Device Standby Mode . . . . . . . . . . . . . . . . . . . . . . . . . . 36
Global Standby Mode . . . . . . . . . . . . . . . . . . . . . . . . . . 36
Suspend Mode . . . . . . . . . . . . . . . . . . . . . . . . . . . . . . . 36
ACPI . . . . . . . . . . . . . . . . . . . . . . . . . . . . . . . . . . . . . . . 36
Chapter 2 Setup Utility 37
About the Setup Utility . . . . . . . . . . . . . . . . . . . . . . . .37
The Standard Configuration . . . . . . . . . . . . . . . . . . . . . 37
Entering the Setup Utility . . . . . . . . . . . . . . . . . . . . . . . 38
Product Information . . . . . . . . . . . . . . . . . . . . . . . . . .39
Standard CMOS Features . . . . . . . . . . . . . . . . . . . . .40
Advanced BIOS Features . . . . . . . . . . . . . . . . . . . . .41
Advanced Chipset Features . . . . . . . . . . . . . . . . . . .43
Integrated Peripherals . . . . . . . . . . . . . . . . . . . . . . . .44
Power Management Setup . . . . . . . . . . . . . . . . . . . . 46
PnP/PCI Configuration . . . . . . . . . . . . . . . . . . . . . . .48
PC Health Status . . . . . . . . . . . . . . . . . . . . . . . . . . . .50
Frequency/Voltage Control . . . . . . . . . . . . . . . . . . . .51
Load Default Settings . . . . . . . . . . . . . . . . . . . . . . . .52
Set Supervisor/User Password . . . . . . . . . . . . . . . . .53
Save and Exit Setup . . . . . . . . . . . . . . . . . . . . . . . . . . . 54
Exit without Saving . . . . . . . . . . . . . . . . . . . . . . . . . . . . 54
Chapter 3 Machine Disassembly and Replacement 55
General Information . . . . . . . . . . . . . . . . . . . . . . . . .55
Before You Begin . . . . . . . . . . . . . . . . . . . . . . . . . . . . . 55
Disassembly Procedure . . . . . . . . . . . . . . . . . . . . . .56
Removing the Memory . . . . . . . . . . . . . . . . . . . . . . . . . 56
Removing the Upper Case . . . . . . . . . . . . . . . . . . . . . . 56
Removing the ODD Module . . . . . . . . . . . . . . . . . . . . . 57
Removing the HDD Module . . . . . . . . . . . . . . . . . . . . . 58
Removing the System Power Supply . . . . . . . . . . . . . . 58
Removing the RCA Board . . . . . . . . . . . . . . . . . . . . . . . 59
Removing the Add-on Cards . . . . . . . . . . . . . . . . . . . . . 60
VIII TOC
Page 9

Removing the MXM Card . . . . . . . . . . . . . . . . . . . . . . . 62
Removing the VFD Board . . . . . . . . . . . . . . . . . . . . . . . 63
Removing the Wireless Keyboard Module and the Bluetooth Module
. . . . . . . . . . . . . . . . . . . . . . . . . . . . . . . . . . . . . . . . . . . . 64
Removing the CPU Fan . . . . . . . . . . . . . . . . . . . . . . . . 64
Removing the Card Reader Board . . . . . . . . . . . . . . . . 65
Removing the Main Board and the Split Board . . . . . . . 66
Chapter 4 Troubleshooting 67
Chapter 5 Jumper and Connector Information 68
Introduction of Connectors . . . . . . . . . . . . . . . . . . . .68
Upper Side of Main Board . . . . . . . . . . . . . . . . . . . . . . . 68
Lower Side of Main Board . . . . . . . . . . . . . . . . . . . . . . . 69
Jumper Setting and Power button . . . . . . . . . . . . . . . . . 70
Chapter 6 FRU (Field Replaceable Unit) List 71
Parts . . . . . . . . . . . . . . . . . . . . . . . . . . . . . . . . . . . . .72
TOC IX
Page 10

System Specification
Specification
Operating System
• Microsoft
Platform
• Intel
1.66/1.83/2.0/2.16/2.83GHz, FSB 667MHz)
• Intel
System Memory
• 256, 512 or 1024MB of DDR2 533/667MHz memory
• Dual channel
• Upgradeable to 2GB using two soDIMM modules
®
Windows® XP Media Center Edition 2005 Rollup 2 (Emerald)
®
Core Duo processor (Merom dual core) T5500/T5600/T7200/T7400/T7600 (2MB/4MB L2 cache,
®
i945GT + ICH7M-DH chipset
Chapter 1
Storage Subsystem
• 250/320/400/500GB 3.5” hard disk drive, SATA-II with NCQ
• Slot-loading optical drive: DVD Dual or DVD Super Multi
• Two card reader slots, XD/ SD/ MMC/ MS/ MS PRO/ MD/ CF-I/ CF-II/ MD support
• Playback media support: CD, VCD, SVCD, CD-R/RW, DVD, DVD-DL, DVD-R, DVD-RW, DVD-R DL,
DVD+R, DVD+RW, DVD+R DL (DVD-RAM support if with DVD Super Multi)
• Recording media support: CD-R/RW, DVD-R, DVD-RW, DVD-R DL, DVD+R, DVD+RW, DVD+R DL
(DVD-RAM support if with DVD Super Multi)
Audio
• Controller: Realtek ALC888DD
®
• HD Audio, Dolby
• 7.1-CH analog output with S/PDIF support for digital output
• Dolby
• DTS Neo PC virtual surround to analog and digital output support
• Audio digital to analog converter: 24bit/193KHz (10 DACs in total)
• Audio playback file format support: CD-Audio (cda), Windows Media (asf/ asx/ wax/ wm/ wma/ wmd),
®
Digital surround 5.1-CH decoding and DTS digital output support
Windows audio format (wav/ wmp/ wmx/ wvx) and MP3 (mp3/ m3u)
Digital Live and DTS connect support
Communication and Receiver
• LAN controller: Intel
• WLAN: 802.11b/g mini-PCI card with external antenna
• WPAN: internal USB Bluetooth module
• IR: internal beam-bag MCE compliant RC6 receiver with dual IR emitters
®
82573L (Vidalia), GbE Ethernet; Wake-on-LAN ready
Chapter 1 1
Page 11

• Wireless keyboard: internal 2.4GHz RF wireless keyboard receiver with auto-pairing technology
TV Tuner Subsystem
• Support up to two hybrid mini-PCI TV tuner cards for simultaneous TV viewing and recording (2x Analog
or 2x DVB-T
• 3D Y-C comb filter support
• World wide tuner all PAL/SECAM and NTSC TV format support
• MPEG2 file format real time recording to HDD (200GB free space provides total 160 hours recording with
fair quality setting: 71 hours recording with the best quality setting) support
• Time shifting support
• Up to three sets of S-A/V input selection support
Display Subsystem
• Add-on MXM card of nVidia GeForce Go 7600 (NB7P-GS, P478, G73M with HDMI version)
• High definition display support
• Component TV output (YPbPr): 480p/ 720p/ 1080i/ 1080p
• Progressive VGA-output: 32bit/400MHz digital to analog converter, up to QXGA (2048 x 1536)
• DVI output (with HDCP support): 640 x 480, 800 x 600, 1024 x 768, 1152 x 864, 1280 x 600, 1280 x 720,
1280 x 768, 1280 x 960, 1280 x 1024, 1440 x 900, 1440 x 1050, 1600 x 900, 1600 x 1200, 1680 x 1050,
1920 x 1080, 1920 x 1200
• HDMI output (with HDCP support): 480p/ 720p/ 1080i/ 1080p
• Video playback file format support: Windows media (asf/ wmv), Windows video format (avi), movie file
(mpeg/ mpg/ mpe/ m1v/ mpv2/ mpa) and Windows Metafile (wmf)
• Picture playback file format support: jpeg/ jpg/ tif/ gif/ bmp/ wmf/ png
DV Camcorder Processing
• Transfer DV camcorder content into a DVD-Video disk (with direct mode and editing mode) support
• Transfer DV camcorder content into MPEG2 video file(s) on HDD
Front Panel Indicators and Buttons
• Front panel VFD for MCE status and media title display
• Media control keys: Stop, Play/Pause, Previous/REW, Next/FF and Rec
• MCE Navigation buttons: Up, Down, Left, Right, OK, Back
• Power button with power status LED
• Normal working: blue
• Away mode: amber-blinking
• S3: amber
• S4/S5: off
I/O Interface
Rear I/O
• Audio/Video output
• One coaxial S/PDIF and 1 optical S/PDIF
• One set of 7.1-channel (RCA)
• One HDMI: HDCP support
2 Chapter 1
Page 12

• One DVI-I: HDCP support, using DVI to VGA adapter for VGA output
• One set of component (Y Pb Pr) (RCA)
• One S-Video out
• One Composite video out (RCA)
• Audio/Video input
• Two S-Video in (non-EMEA SKU)
• Two Composite in (RCA, non-EMEA SKU)
• Two Stereo in (RCA, non-EMEA SKU)
• SCART ports (EMEA SKU only)
• One SCART-in for S-Video, CVBS, Stereo input
• One SCART-in/out for system’s CVBS, Stereo output and 2
TV tuner SKU)
• Other I/O ports
• One RJ-45 GbE LAN port with LED indicators
• One IEEE 1394a (6-pin)
• Two USB 2.0 ports
• Two IR blaster
• One TV antenna/cable input
• One TV antenna/cable output
• One FM antenna input
• One WLAN external antenna
• One AC inlet
• On MXM slot (optional)
nd
S-Video, CVBS, Stereo input (for dual
Front I/O
• Audio/Video input/output
• One 1/4-inch earphone output
• One 1/4-inch microphone input
• One S-Video in
• One Composite in (RCA)
• One Stereo in (RCA)
• Other I/O ports
• One 4-pin IEEE 1394
• One CF socket for CF-I, CF-II and Micro Drive
• One multi socket for SD/MMC/MS/MS PRO
• Two USB 2.0 ports
• MB expansion slots
• Two memory soDIMM sockets
• Three mini-PCI slots
Power Subsystem
• FSP 120W AC internal power supply unit (FSP120-40GLS)
Acoustic Estimation
• 23 dBA (idle, 1M), 28 dBA (MCE heavy load, 1M)
Chapter 1 3
Page 13

Dimension and Weight
• 430 (W) x 335 (D) x 70 (H) mm with bezel, feet and WLAN antenna
• Weight: 5.5 Kg
4 Chapter 1
Page 14
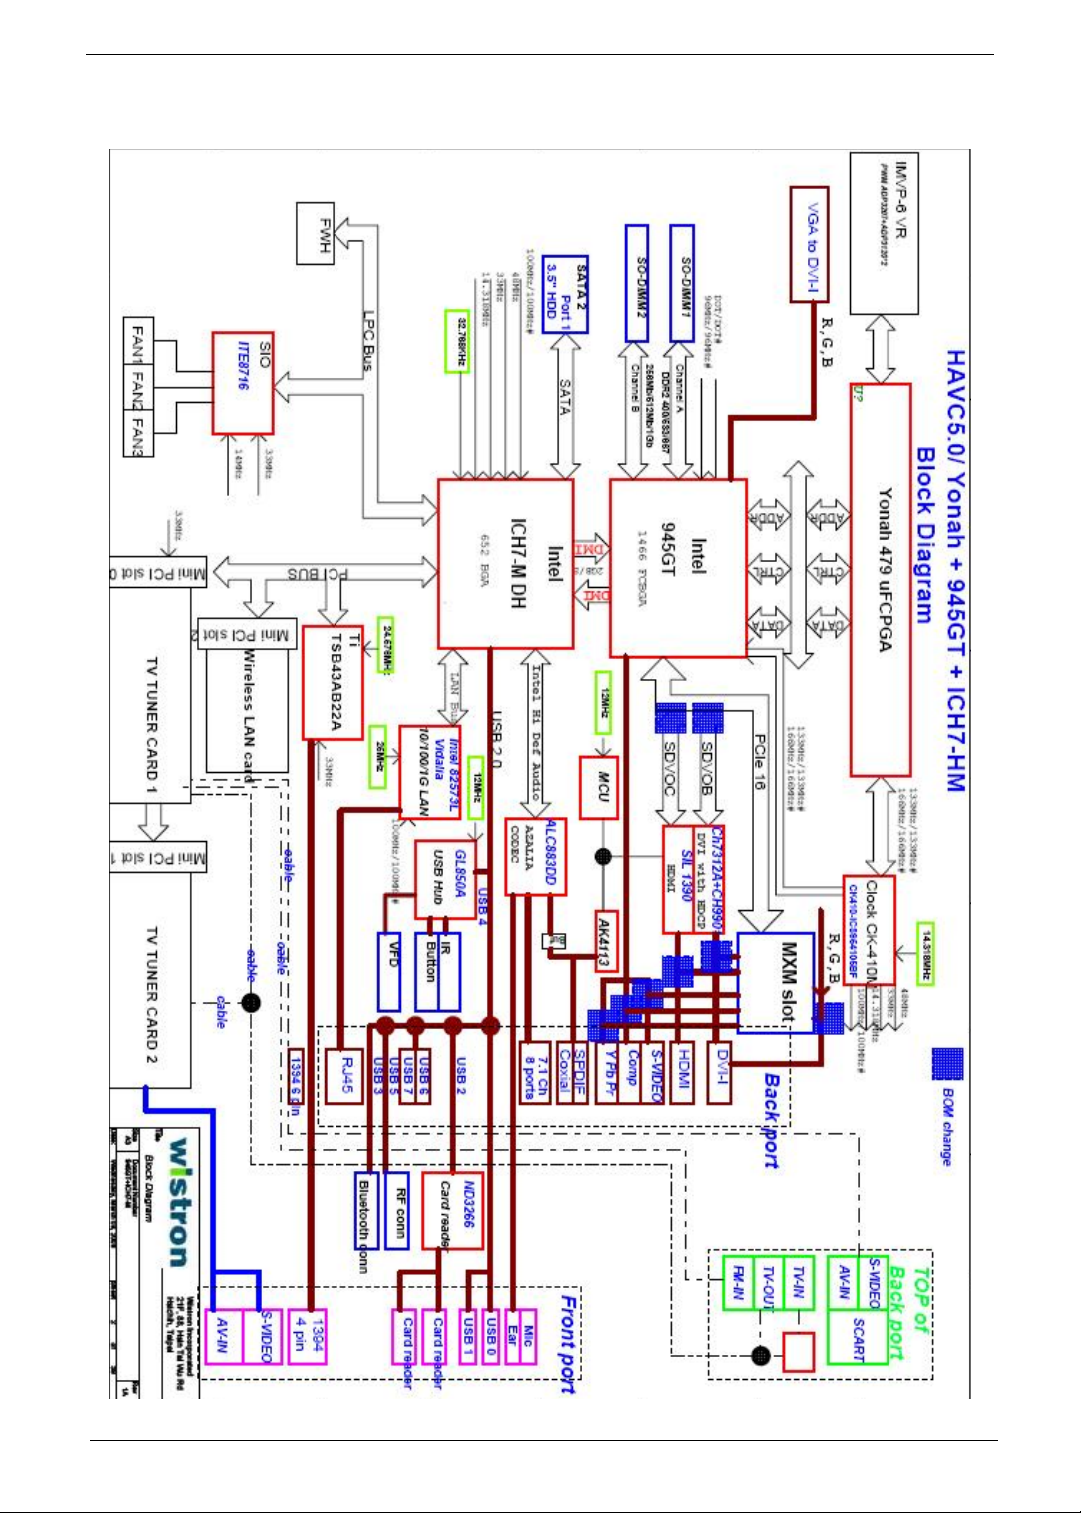
Block Diagram
Chapter 1 5
Page 15
Main Board Placement
6 Chapter 1
Page 16
Chapter 1 7
Page 17

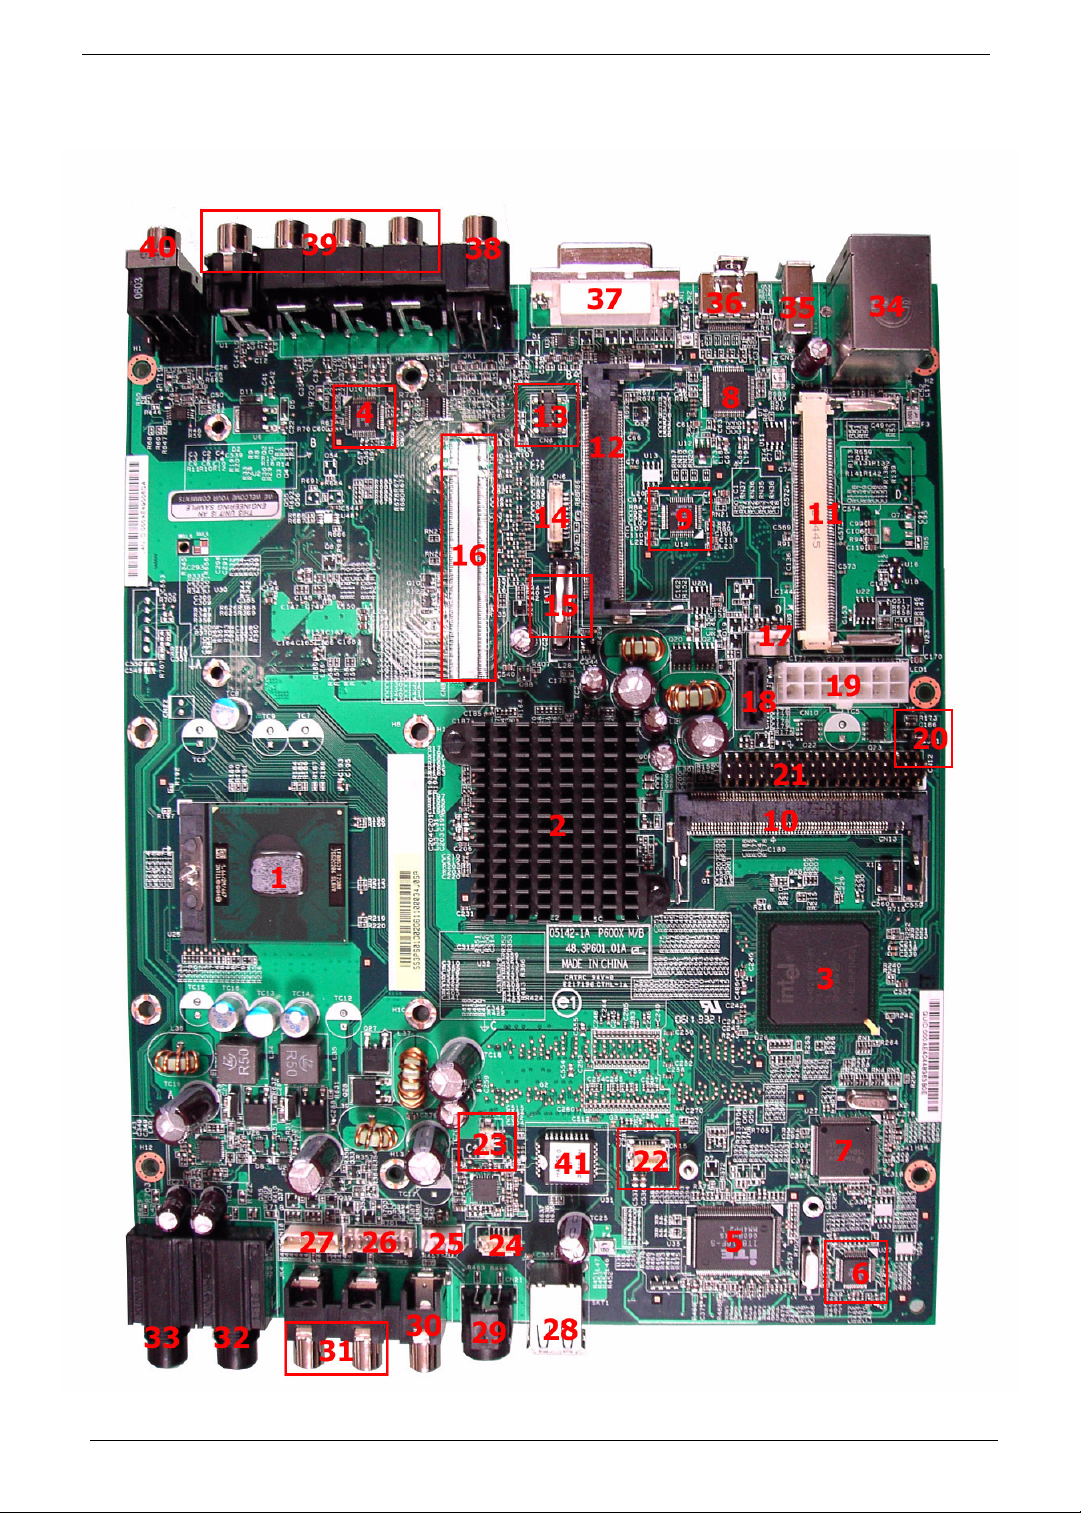
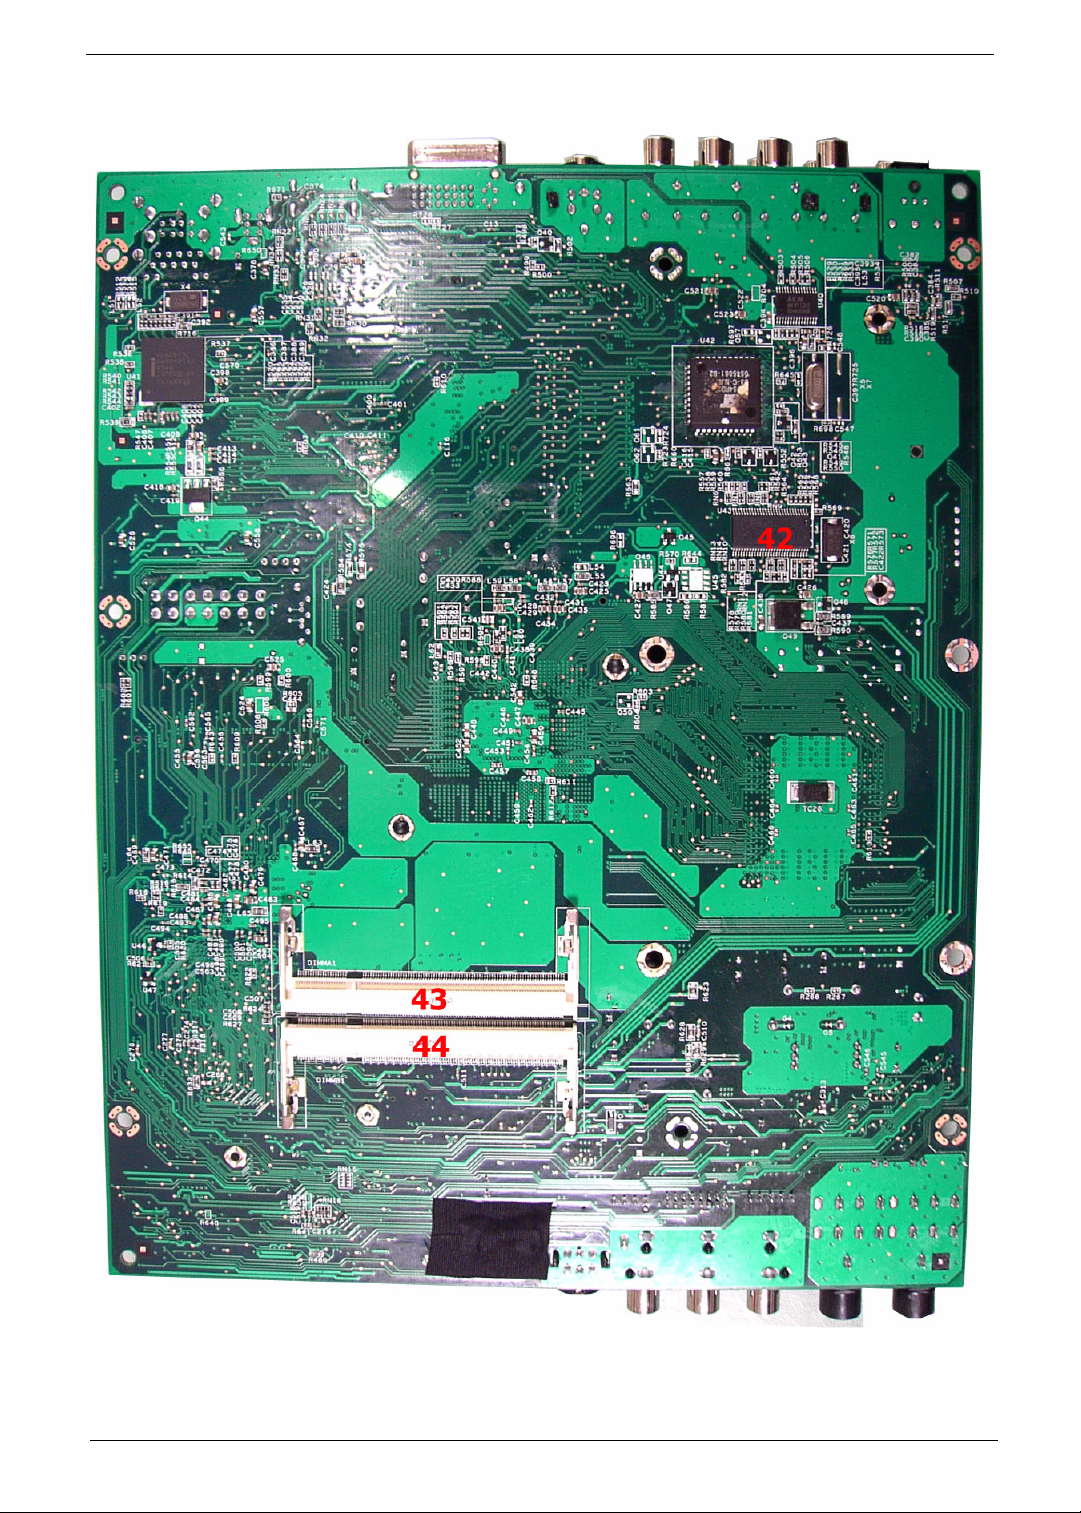
No. Description No. Description
1 CPU socket 2 North bridge
3 South bridge 4 Azalia codec: Realtek ALC883DD
5 Super I/O controller: ITE8716F 6 USB hub: GL850A
7 IEEE 1394: Ti TSB43AB22A 8 Transmitter for HDMI: Silicon Image
1390
9 Transmitter for DVI-I: Chrontel 7313A 10 Mini PCI 1 slot for TV tuner card 1
11 Mini PCI 2 slot for TV tuner card 2 12 Mini PCI 3 slot for WLAN card
13 YPbPr to main board connector 14 SCART to main board connector
15 Battery 16 MXM connector (optional)
17 System fan connector 18 SATA connector
19 14-pin power connector 20 Jumper connector
21 PATA connector 22 Card reader connector
23 Bluetooth connector 24 IR connector
25 CPU fan connector 26 VFD board connector
27 Power button connector 28 USB 2.0 ports
29 S-Video input jack 30 Video input jack
31 Audio input jack 32 1/4” microphone jack
33 1/4” headphone jack 34 RJ-45 port and two USB 2.0 ports
35 6-pin IEEE1394 port 36 USB 2.0 port
37 DVI-I connector 38 Video output jack and S-Video output
jack
39 Multi-channel speaker audio output
connectors
41 BIOS chip: PMC PM49FL004T 42 Clock generator
43 soDIMM slot 44 soDIMM slot
40 Coaxial digital audio output jack
8 Chapter 1
Page 18
Front Panel View
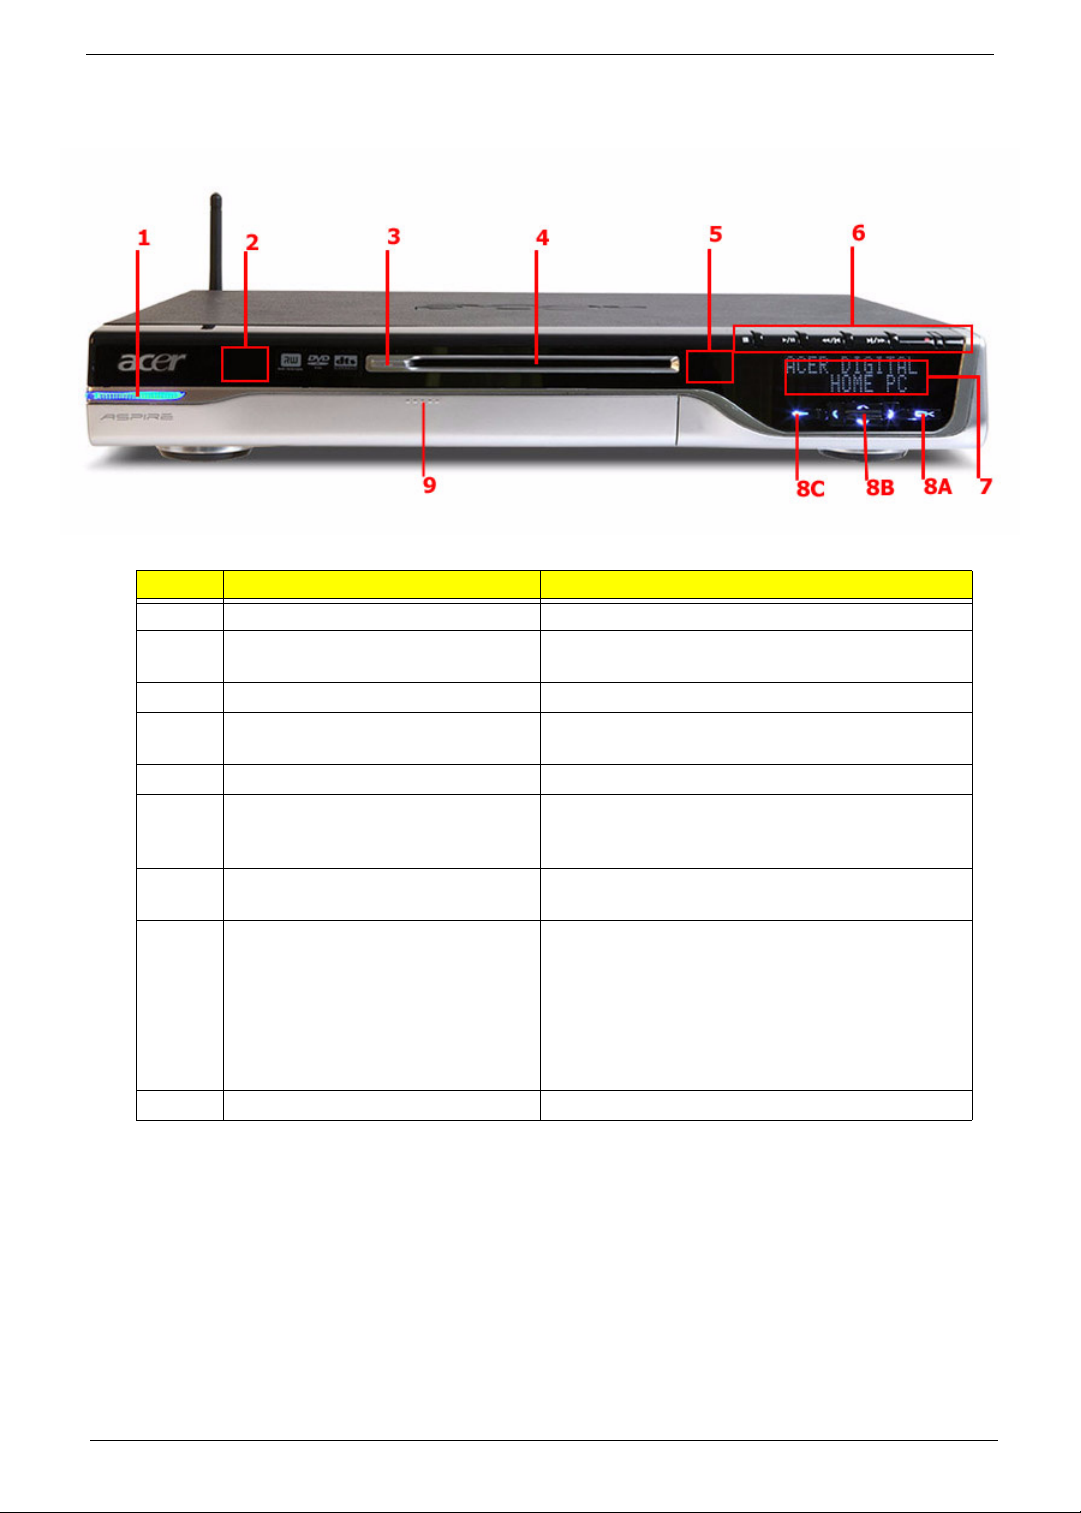
No. Component Description
1 Power button Press to power on or power off the system.
2 RF (radio frequency) receiver Receives radio frequency from wireless touchpad
3 Drive eject button Ejects the optical disk.
4 Multi writable DVD drive Use to access and record data on compact disks
5 IR (Infrared) receiver Receives IR signals from the remote control.
6 Playback controls Lets you conveniently play, record, pause, stop,
7VFD
(Vacuum Fluorescent display)
8 MCE (Media Center Edition)
navigation buttons
9 I/O ports cover release button Press to open the I/O ports cover.
keyboard.
(CDs) and digital video disks (DVDs)
forward, rewind, skip, or replay a song, slide show,
movie or TV program.
Displays the current Media Center status, current
system date and time, or media title display.
• 8A: Press the Back button to return to the
previous view.
• 8B: Press the Left, Right, Up, or Down arrow
buttons to navigate through the Media Center
menu options.
• 8C: Press the OK button to access the Media
Center menu options and confirm your selection.
Chapter 1 9
Page 19
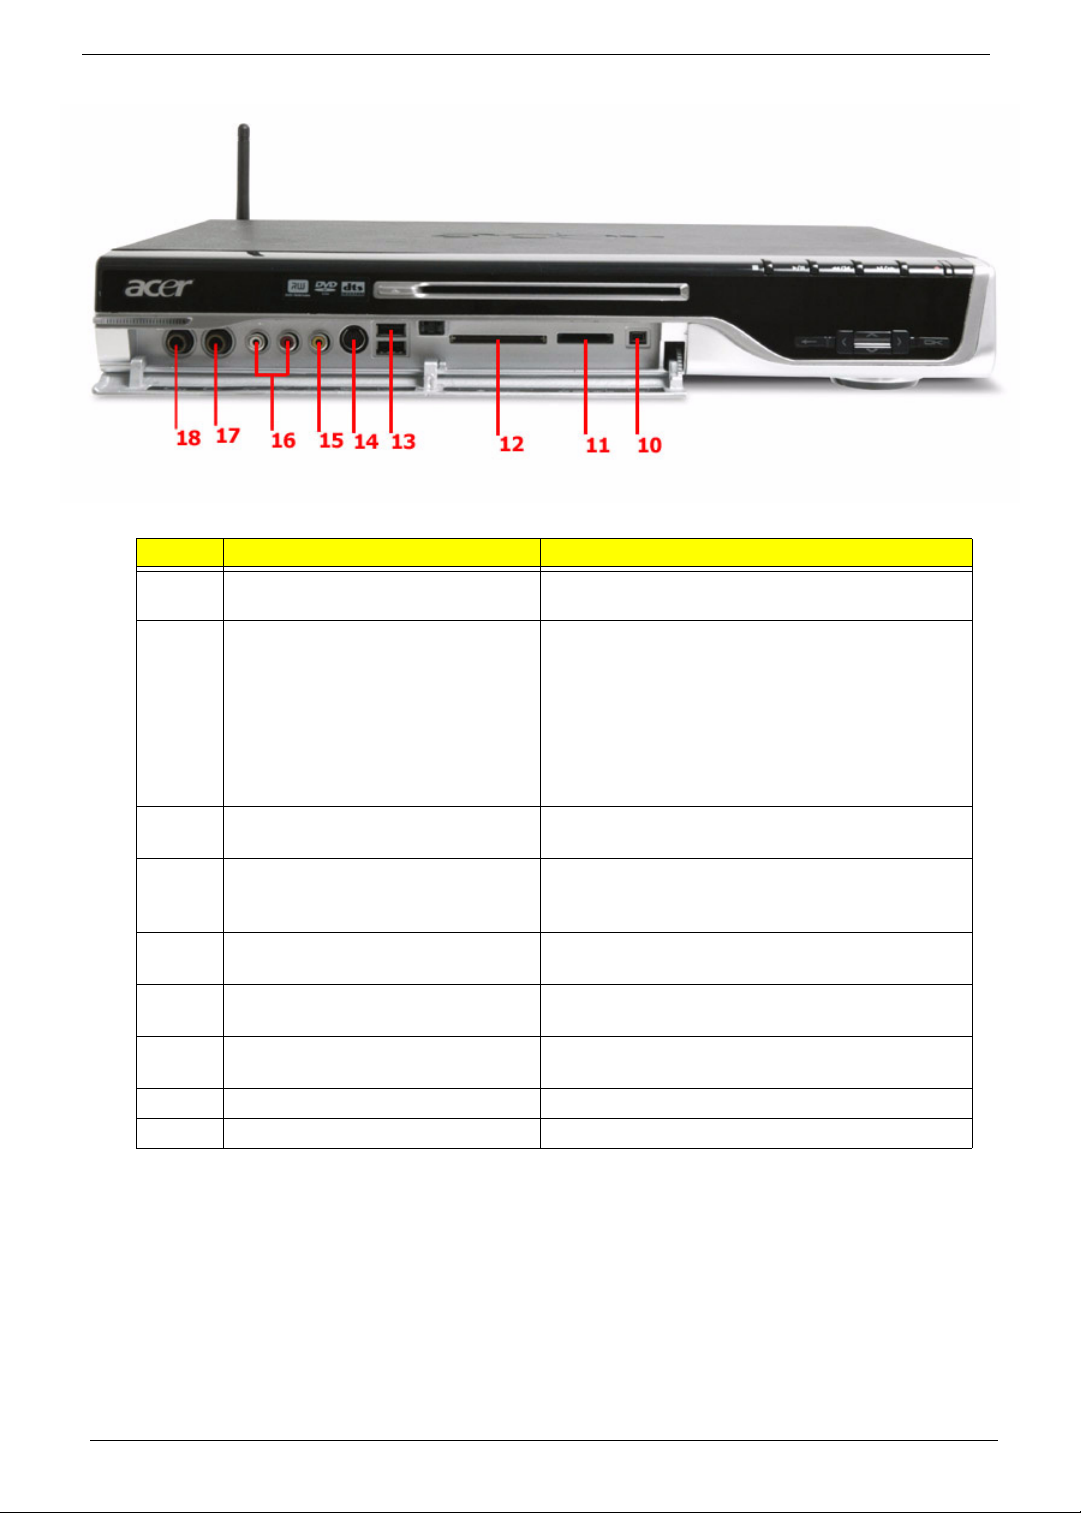
No. Component Description
10 4-pin IEEE 1394 port Connects to an IEEE 1394 device
(e.g., digital video camcorder).
11 XD/SD/MMC/MS/MS PRO slot Accepts an XD (eXtreme Digital), SD (Secure
Digital), MMC (MultiMediaCard), MS (Memory
Stick) or MS PRO (Memory Stick PRO) card.
Warning!
If you want to read contents from
small form factor memory cards, such as
mini-SD, RS-MMC, or MS PRO, you should
use a suitable adaptor.
12 CF-I/CF-II/MD slot Accepts a CF (Compact Flash) Type I, CF Type II
or Microdrive.
13 USB 2.0 ports Connects to USB peripherals devices
(e.g., USB mouse, USB printer, USB combo drive,
digital cameras).
14 S-Video input jack Connects to a video recorder, camcorder, or a
device with S-Video output signal.
15 Video input jack Connects to a video recorder, camcorder, game
console or a device with video output signal.
16 Audio input jack Connects t a video recorder, camcorder, audio
casette player or stereo walkman.
17 1/4” microphone jack Connects to a microphone.
18 1/4” headphone Connects to a headphone.
10 Chapter 1
Page 20
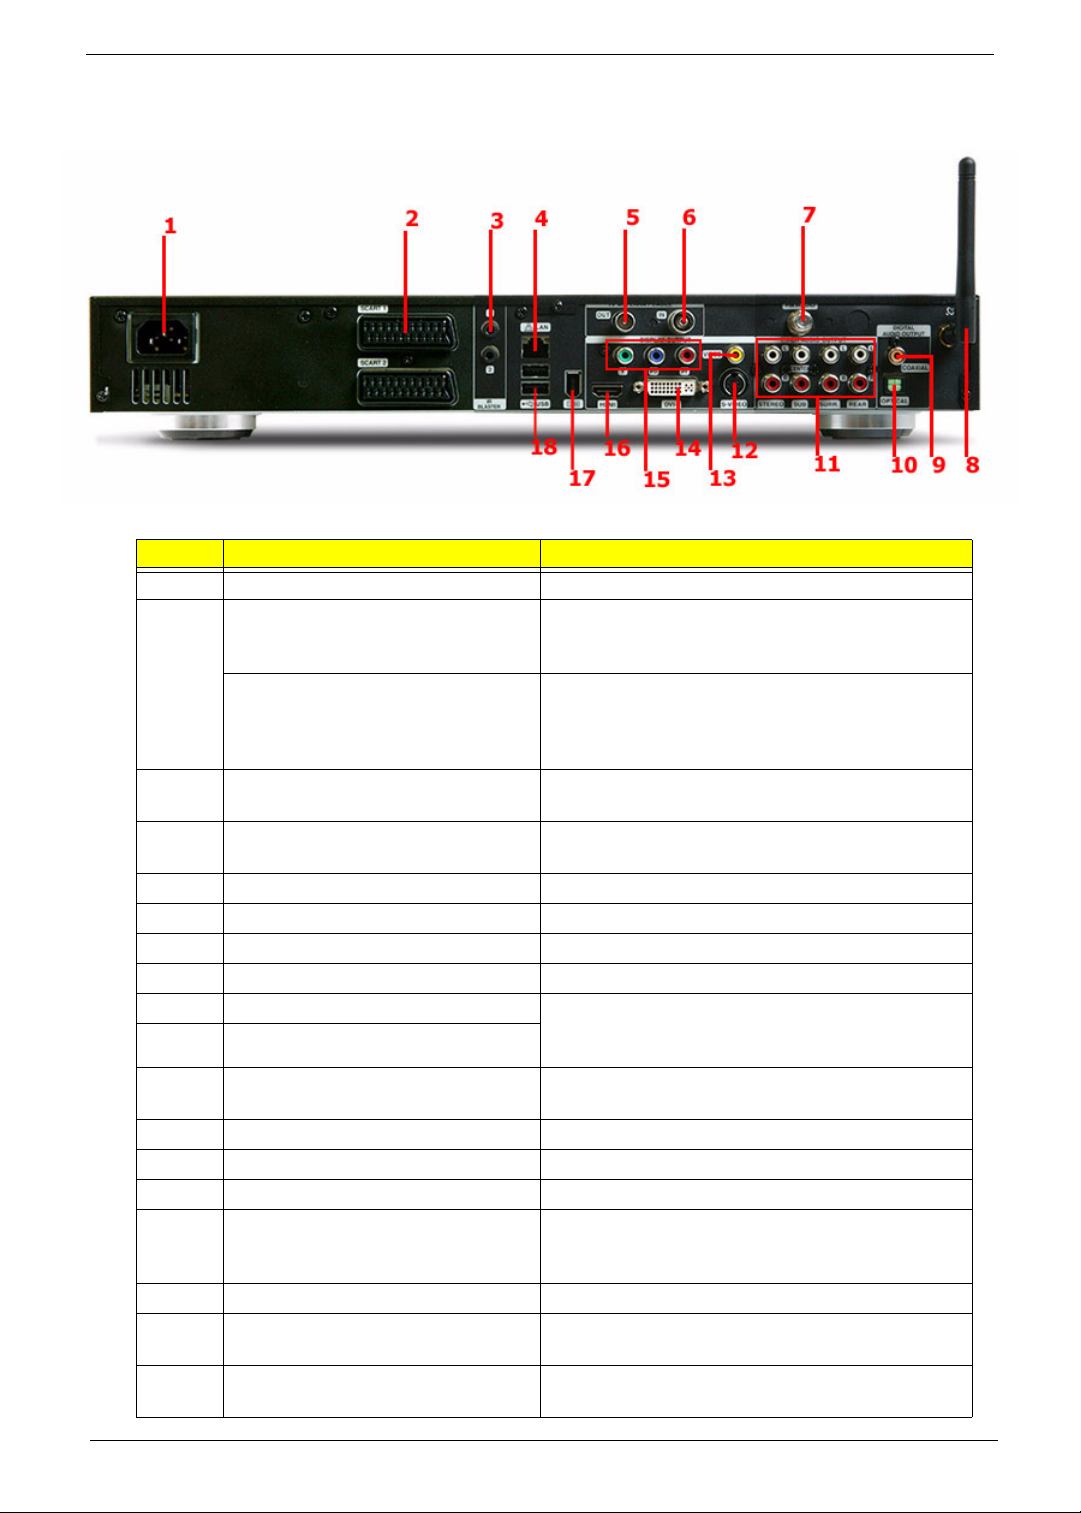
Rear Panel View
No. Component Description
1 Power connector Plug the power cable into this connector.
2 SCART input connector Connects to a set-top box or another A/V device.
SCART input/output connector Connects to a TV or a set-top box. The SCART
3 IR blaster ports Connects an IR blaster to the set-top-box’s IR
4 LAN port Connects to an Ethernet 10/100/1000MB based
5 TV antenna/cable output jack Connects to a television.
6 TV antenna/cable input jack Connects to an antenna or cable TV.
7 FM radio input jack Connects to an external FM radio antenna.
8 WLAN antenna connector Connects to a wireless LAN antenna.
9 Coaxial digital audio output jack Connects to a digital device, such as MiniDisc
10 Optical digital audio output jack
11 Multi-channel speaker audio output
connectors
12 Video output jack Connects to a TV with video output.
13 S-Video output jack Connects to a TV with S-Video input.
14 Component video output jack Connects to a TV with YPbPr input.
15 DVI-I connector Connects to a TV or LCD with DVI input or use the
16 HDMI Connects to a TV with HDMI input.
17 6-pin IEEE 1394 port Connects to an IEEE 1394 device (e.g., digital
18 USB 2.0 ports Connects to USB peripherals devices (e.g., USB
The SCART input connector supports Video, SVideo and Audio (L and R) input signals.
input/output connector supports Video, S-Video,
Audio (L and R) input and Composite Video and
Audio (L and R) output signals.
sensor window.
network
recorders, home theater receivers, or A/V
receivers.
Connects to an amplifier which has multi-channel
audio system.
DVI-to-VGA adapter to connect a TV or monitor
with VGA (D-Sub) input.
video camcorder, hard disk, scanners).
mouse, USB printer, USB drive).
Chapter 1 11
Page 21
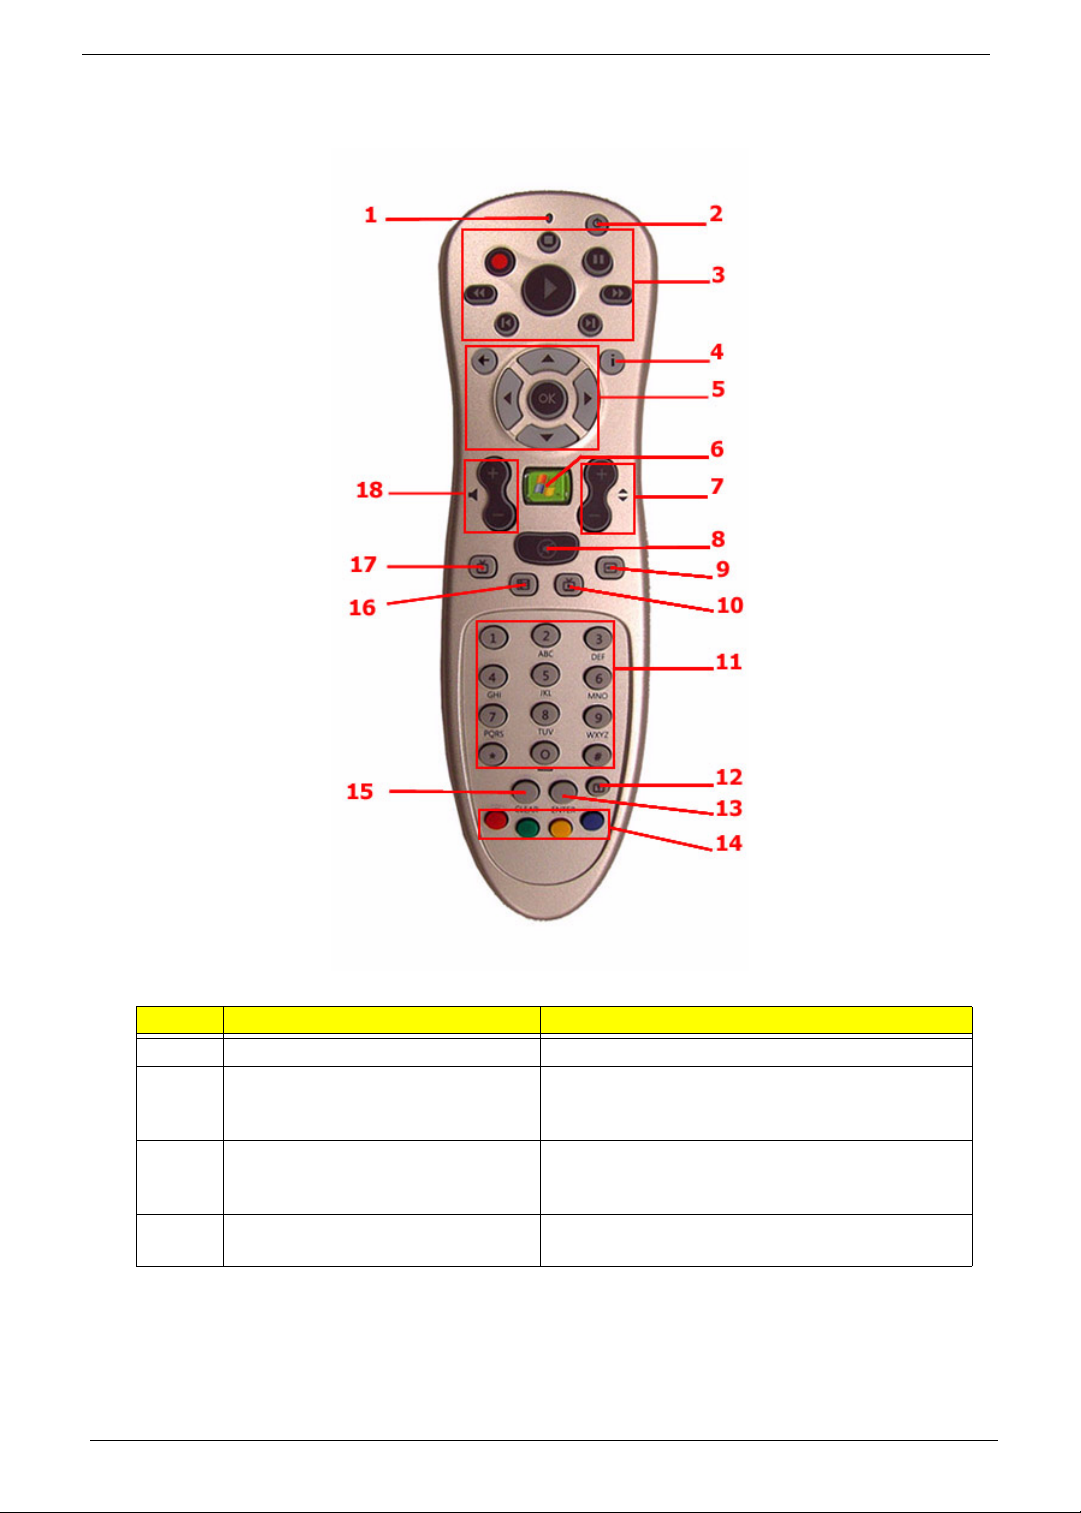
Remote Control
No. Component Description
1 Power LED Indicates that a command button is pressed.
2 Sleep Press to turn system to standby (sleep) mode.
While in standby (sleep) mode, press the button
again to wake up or activate the system.
3 Playback controls Lets you play, record, pause, stop, forward,
rewind, skip or replay a song, slide show, movie or
a TV program.
4 More Info Displays more information regarding the active TV
program, video, album, or pictures.
12 Chapter 1
Page 22

No. Component Description
5 Navigation buttons The following navigation buttons let you access all
Media Center pages:
• Arrow buttons: navigates through the menu
options.
• OK: selects an option in the Media Center menus
and confirm your selection.
• Back: Moves back to the previous screen.
6 Start Press the Start button to launch the Media Center
Home Page.
7 Channel/Page Moves pages up and down or changes the
channels on the My TV page.
8 Mute Turns the system sound off and on.
9 DVD menu When a DVD video is playing, press this button to
display the DVD disc’s main menu.
10 Live TV Displays a full screen view of a live TV program.
11 Numeric buttons Switches channels or inputs alphanumeric
characters in the Media Center text box.
12 Teletext Turns Teletext on and off.
13 Enter Press to confirm your input or selection.
14 Teletext hotkeys When setting up programs in the TV menu, the
following colored buttons have the following
function:
• Red: navigate to the previous page
• Green: move to the next page
• Yellow and blue: select, insert, and return to the
Teletext menu.
15 Clear Press to erase the character you entered.
16 Guide Opens the TV Program Guide to display available
channels and programs that you can watch and
recorded.
Note: Available in selected country and
regions.
17 Recorded TV Displays the Recorded TV page.
18 Volume control Increases or decreases the volume.
Note: The Teletext function is only available when the TV channel is broadcasting the Teletext programme.
Teletext is a type of information service provided by the television broadcast companies. Teletext allows you to
view the information of a video or program on your display device (i.e., news, weather, stock market, travel,
etc.).
Note: Remote control appearance (shape and buttons) may vary with region and retail configuration.
Using the Remote Control
The Media Center remote control complements the wireless keyboard. It includes control buttons that is commonly
found on a DVD player, VCR or TV. Use the remote control to open the Media Center Edition program and
navigate through menus and commands; to listen to music, watch TV and DVDs, and view pictures and slide
shows.
1. Use the remote control to point towards the system’s IR receiver. Refer to “Front View” for the location of the IR
receiver.
2. Press the button to launch or return to the Media Centre Home Page.
Chapter 1 13
Page 23
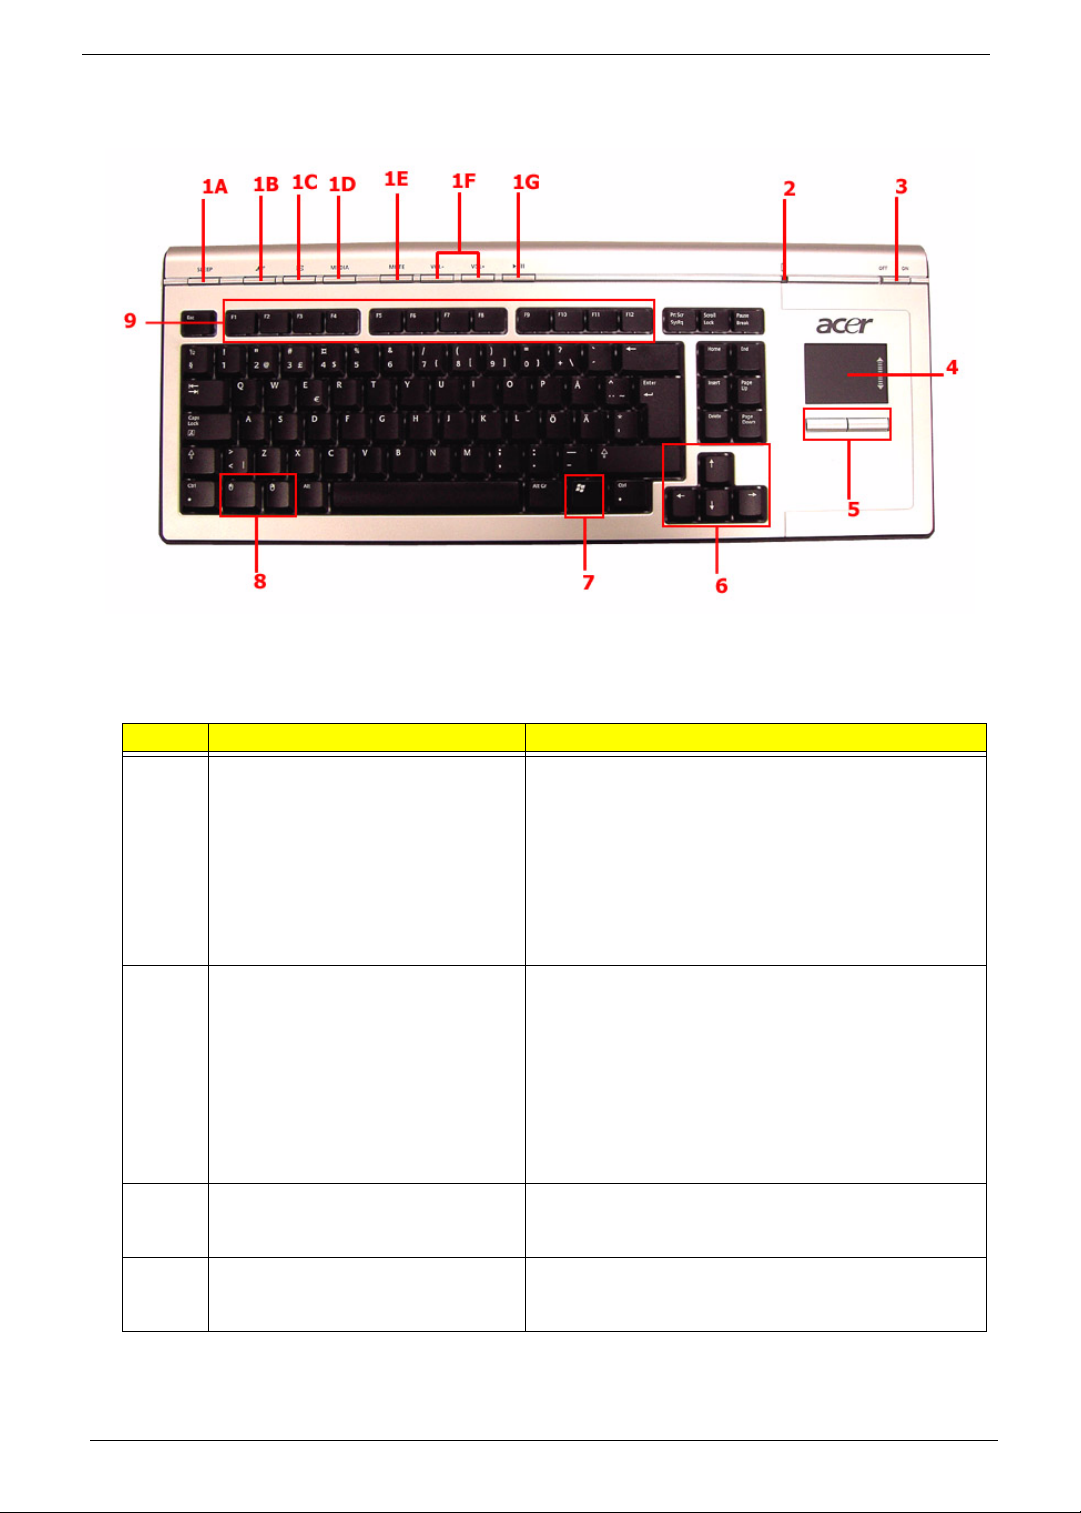
Wireless Keyboard
The wireless keyboard with built-in touch pad combines mouse control with touch typing. It has full-sized keys that
include shortcut keys, status LED, power switch, touch pad, left and right buttons, arrow keys, one Windows key,
left and right mouse keys, and 12 function keys.
No. Component Description
1 Shortcut keys Use the shortcut keys to do the following:
• A Puts system to standby (sleep) mode.
• B Launches Internet Explorer.
• C Launches Microsoft Outlook Express.
• D Launches Media player.
• E Toggles the Media player sound on or off.
• F Increases or decreases volume.
• G Plays or pauses the Media player.
2 Status LED Displays the following functions:
• Green LED indicates the keyboard is turned on. The
LED will flash for three seconds to confirm it is
powering on, then stops flashing.
• Flashing Green LED indicates the keyboard is
synchronized to the system.
• Red LED indicates battery level is low. The LED will
turn green then flash red for two seconds to indicate
keyboard’s battery level is low.
3 Power switch Turns the keyboard on and off. Slide to the right to turn
on the keyboard or slide to the left to power off the
keyboard.
4 Touch pad Pointing device that senses movement on its surface.
Move your finger on the surface of the touch pad to
move the cursor.
14 Chapter 1
Page 24
No. Component Description
5 Left and right buttons Press the left and right buttons to select and execute
functions. These two buttons are similar to the left and
right buttons on a mouse. Tapping on the touch pad
produces similar results to clicking the left button.
6 Arrow keys Moves the pointer around the Media Center menus.
7 Windows logo key Start button. Combinations with this key perform
special functions, such as:
• + Tab: Activate the next Taskbar button.
• + E: Explore My Computer.
• + F: Find Document.
• + M: Minimize All.
• Shift + + M: Undo Minimize All.
• + R: Display Run dialog box.
8 Left and right mouse keys Press to simulate left and right mouse clicks.
9 Function keys (F1 to F12) The function keys lets you perform specific functions,
depending on the application that uses them.
Note: The keyboard may vary depending on region.
Chapter 1 15
Page 25
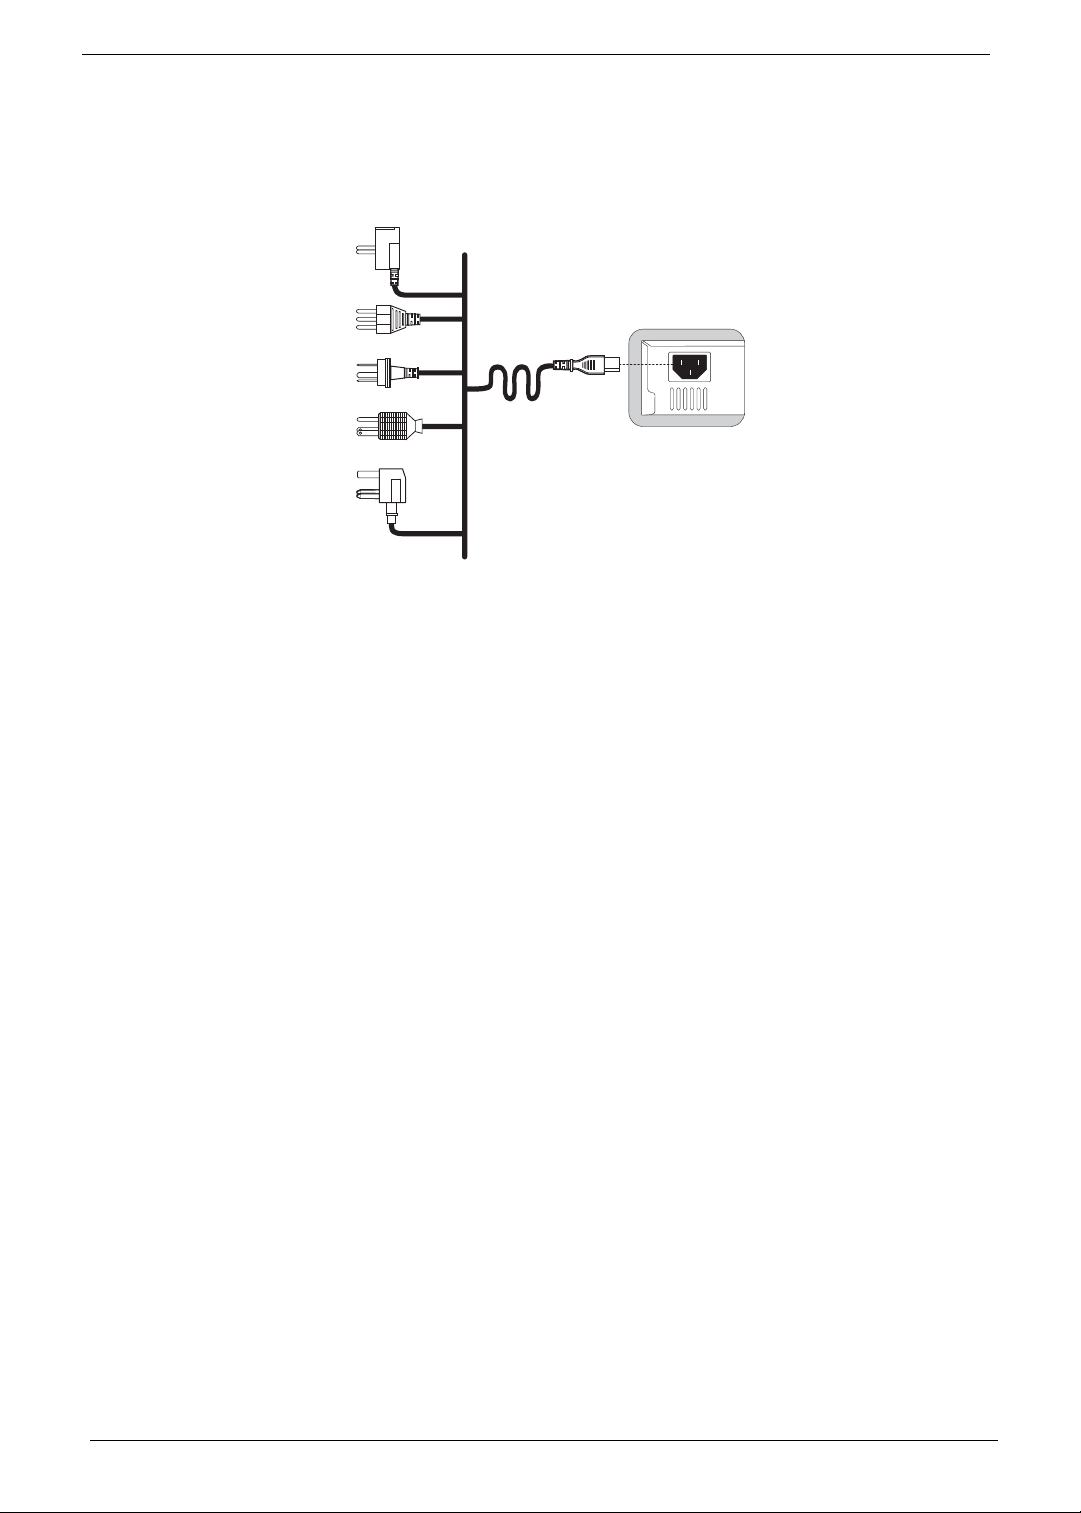
Setting up the System
Connecting the Power Cable
Note: Please use the corresponding power cord for your region.
16 Chapter 1
Page 26
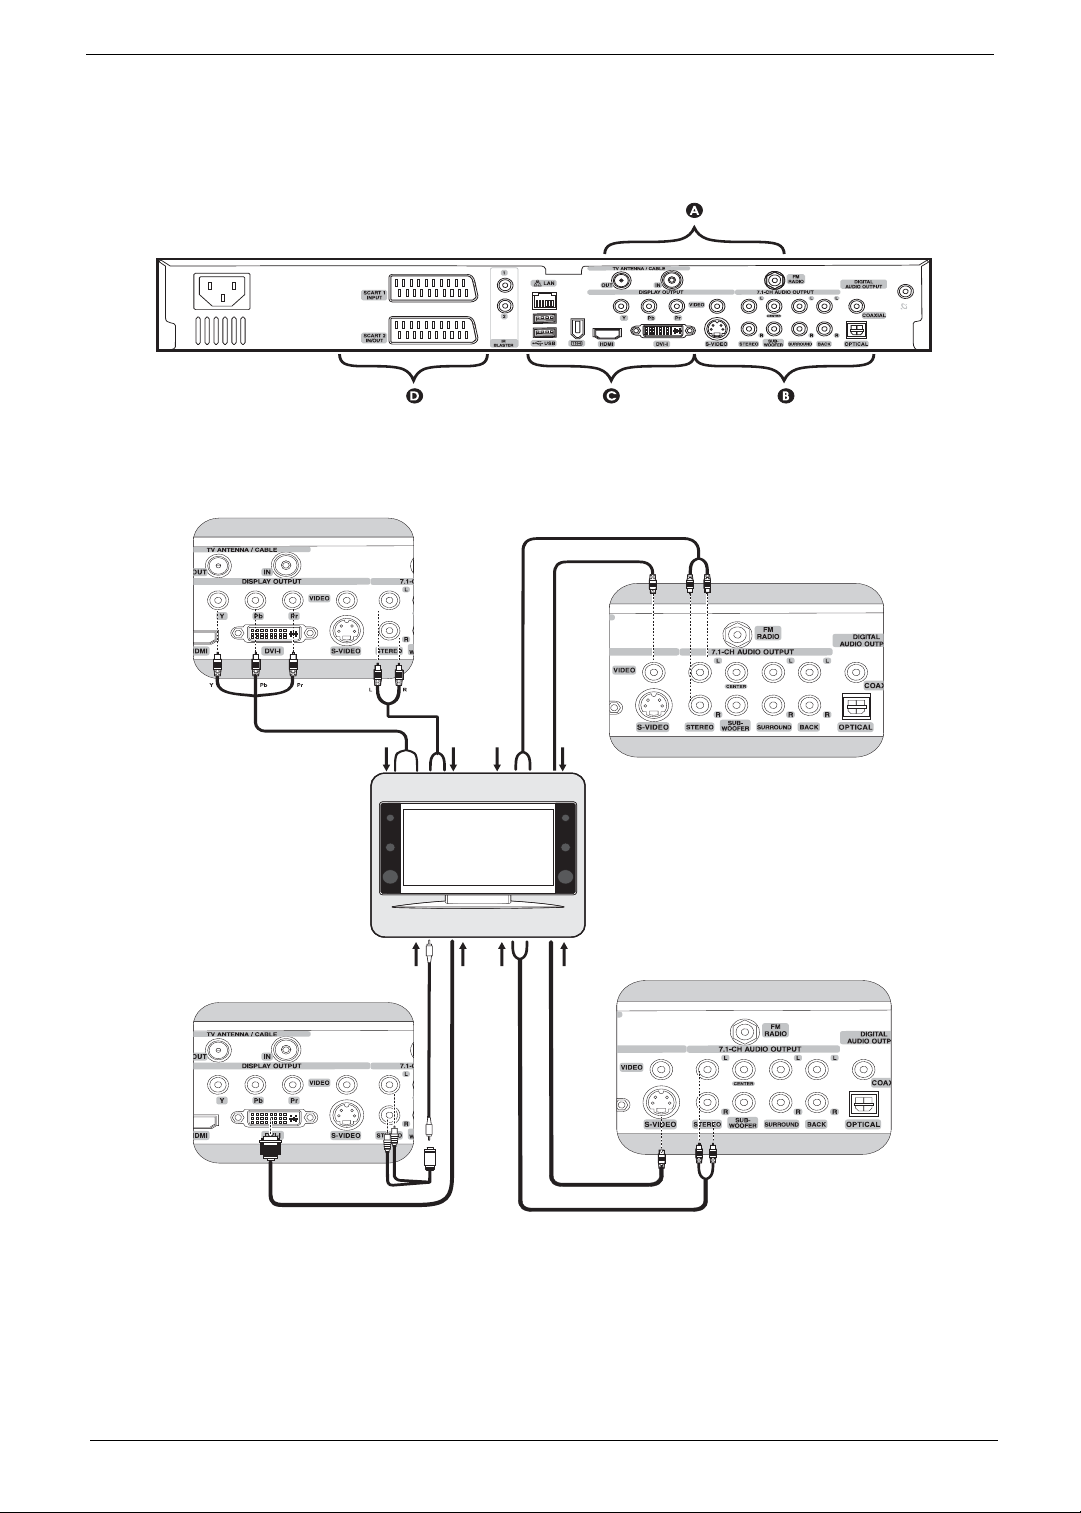
Connecting Display Devices
Please refer to the illustrations below for the possible and recommended connection type for setting up your
display device.
Component (YPbPr) + stereo audio Video + stereo audio
A
B
B
A
DVI + stereo audio* S-video + stereo audio
Note: *Please use an extension cable to connect the Y cable to the display device’s speaker input.
Chapter 1 17
Page 27
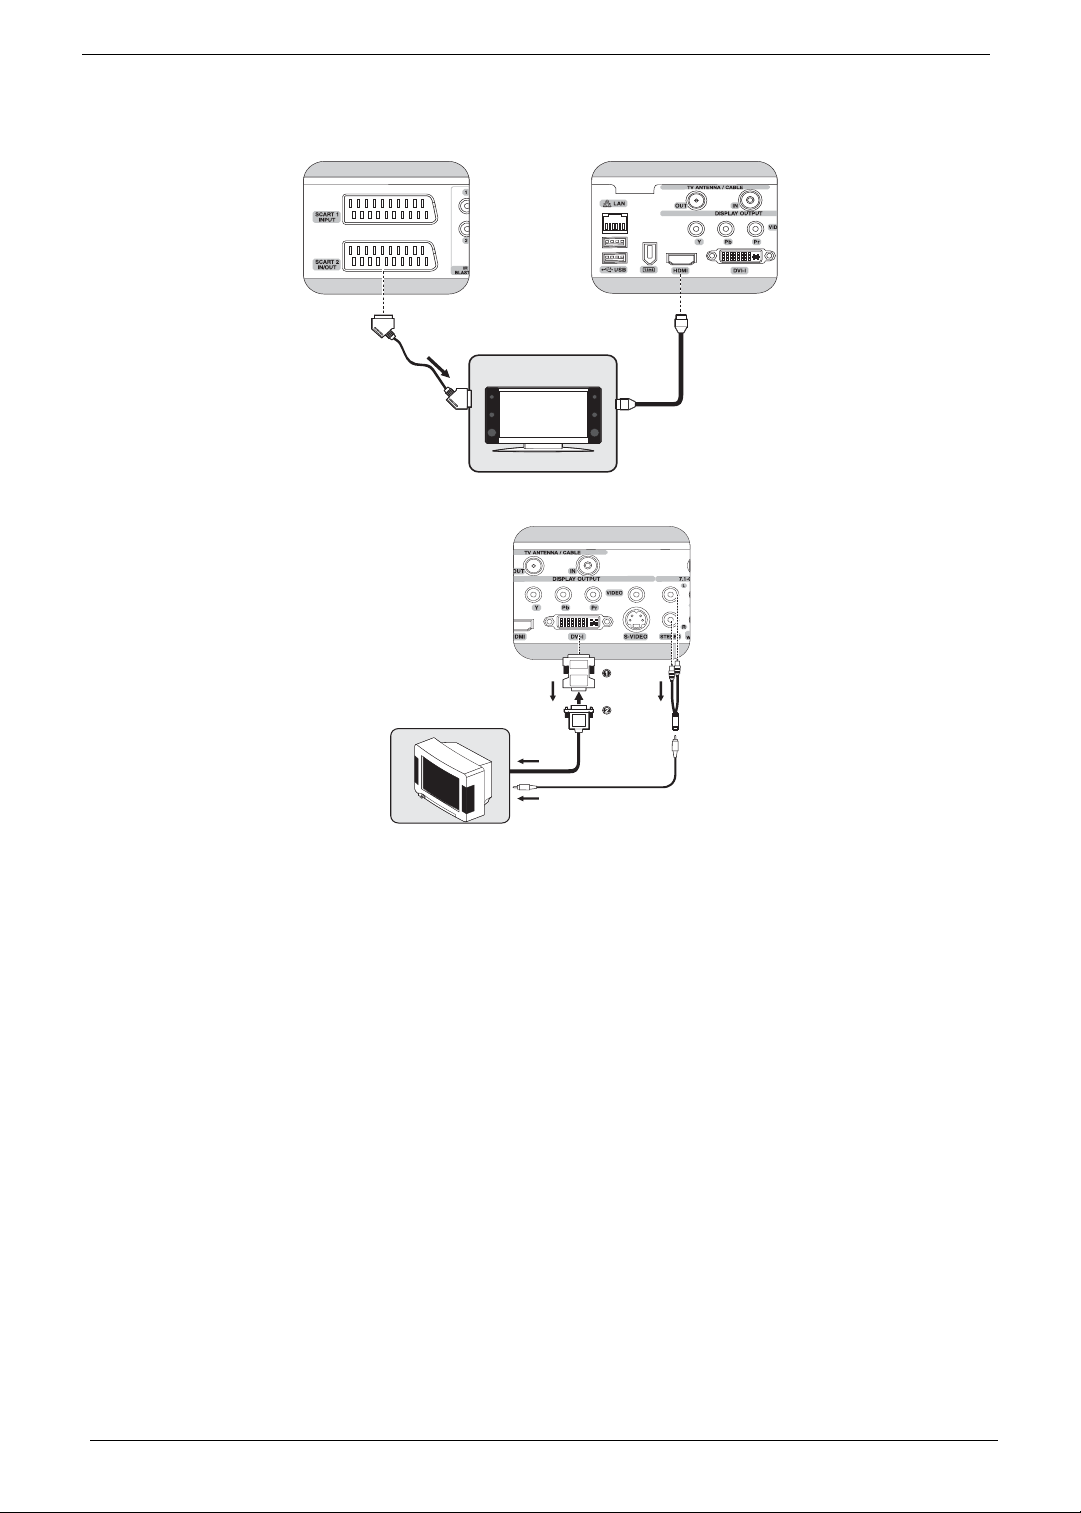
SCART* HDMI
D
DVI to VGA using converter + stereo audio
C
A
Note: Overscaling is a normal behavior on most TVs. We recommend using a TV that supports VGA or DVI
connector, or enabling the dot-by-dot feature on your TV when connected with HDMI.
18 Chapter 1
Page 28

The table below identifies the possible and recommended connection type for the display device.
Display device type Possible connection
HD-ready devices:
Plasma TV, LCD TV,
Projection TV (with DVI
or HDMI input)
• DVI
• HDMI
• VGA
• Component (YPbPr)
• S-Video
• Video
HD-ready devices:
Plasma TV, LCD TV,
Projection TV (without
DVI or HDMI input)
• VGA
• Component (YPbPr)
• S-Video
• Video
Traditional SDTV • SCART
• S-Video
• Video
LCD or CRT monitor • DVI
• VGA
Suggested connection
Video + Audio
• DVI
• HDMI
• Y cable
2
1
• DVI for video • Multi-channel analog
or digital audio to A/V
receiver
• VGA
• Y cable
1
• Component • Stereo cable for audio
• VGA for video • Multi-channel analog
or digital audio to A/V
receiver
• Component (YPbPr) • Multi-channel analog
or digital audio to A/V
receiver
• SCART
• S-Video with stereo
cable
• Using S-Video’s
stereo cable
• A/V cable
• DVI
• Y cable
1
• DVI • Multi-channel analog
or digital audio to A/V
receiver
• VGA
• Y cable
1
Note: 1 Use an extension cable to connect the Y cable to the display device’s speaker input.
2 After connecting a device using HDMI, you can manually adjust the TV’s resolution to 720p or 1080p mode.
To manually adjust your TV resolution mode, first exit Media Center (see “Closing Media Center”). Use the
wireless touch pad to click on the 720p or 1080p icon on Windows desktop. To change to the display mode,
click Yes to confirm. Finally, open the Media Center (see “Opening Media Center”).
Chapter 1 19
Page 29

Connecting to a TV Antenna or Cable
A
Connecting an FM Radio Antenna
A
Selecting an A/V Input Source
After connecting a display device to the system, you can run Media Center to setup the display device’s input
signal.
1. Open Media Center. See “Opening Media Center”.
2. Select My TV > More TV.
3. AV-input Source Selection will show on the right side of the screen, choose an input source from the following
options:
• AV1 / S C A R T1 - Video
• AV1/SCART1 - S-Video
• AV2 - Vi d e o
• AV2 - S-Vi d e o
• AV3 / S C A R T2 - Video
• AV3/SCART2 - S-Video
20 Chapter 1
Page 30

Connecting Audio Devices
The following illustrations show the different audio devices you can connect to the Aspire iDea.
Two Speakers
Stereo front L + R
B
5.1 Audio System and 7.1 Audio System
5.1 audio system 7.1 audio system
B
Digital
Analog
Note: After you connect a 5.1 or 7.1 audio system, you must configure Media Center for multi-channel audio
output. For more information, please refer to “To configure Media Center from multi-channel audio output:” on
page 46 of user manual.
The table below identifies the hardware and software configuration for setting up and adjusting CD- or DVD-audio
playback.
Sound track type
Audio CD (with stereo
sound track)
Hardware
connection
Audio (stereo) Two speakers Configure the Realtek HD
Digital S/PDIF
Analog
Audio output
setting (DVD)
B
Digital
Remark
Audio in Media Center. Set up
audio output for two speakers.
Chapter 1 21
Page 31

Sound track type
DVD (with Dolby Digital
AC-3 sound track)
DVD (with DTS sound
track)
Hardware
connection
7.1 or 5.1 channel
audio
Digital output S/PDIF To take advantage of Dolby
2 channel stereo
analog output
Digital out S/PDIF To take advantage of DTS
Audio output
setting (DVD)
Eight or six
speakers
Two speakers Configure the Realtek HD
Configure the Realtek HD
Audio in Media Center. Set up
audio output for eight or six
speakers.
Digital sound track, you need
a Dolby Digital-equipped A/V
receiver and speaker system
with 5.1, 6.1 or 7.1 channels.
Audio in Media Center. Set up
audio output for two speakers.
sound track, you need a DTSequipped A/V receiver and
speaker system with 5.1, 6.1
or 7.1 channels.
Remark
Configuring Audio Output Settings
After connecting Aspire iDea to your audio system, you can run Realtek HD Audio to set up and adjust the audio.
1. Open Media Center.
2. Select More Programs > Realtek HD Audio.
3. Select Speaker configuration.
4. For analog audio output, select the option describing the number of speakers connected to your system. For
example, select 2 speakers if you have 2 speakers, 8 speakers if you have a 7.1 audio system and 6 speakers
if you have a 5.1 audio system.
5. For digital audio output, the system default is to output audio source to both analog and digital. No special
setting is needed.
6. To setup special surround sound effect, with the Realtek HD Audio, you can use the Dolby Digital Live or DTS
connect to simulate 2-channel (stereo) sound into surround-sound effect.
• Select Dolby and enable Dolby Digital Live. Dolby Digital Live encodes audio signals into a Dolby Digital
5.1 bitstream for multi-channel playback through surround sound system.
• Select DTS and enable DTS Neo: PC or DTS interactive. DTS consists of DTS interactive and Neo: PC,
for both multi-channel and stereo content. DTS interactive encodes audio signals into a DTS-compatible
bitstream for multi-channel playback through a surround sound system. Neo: PC transforms stereo
content, such as MP3, WMA, or CD audio, into 7.1-channel surround sound.
7. Press the OK button on the remote control or exit Media Center More Programs menu.
Setting up the Wireless Devices
Installing the Batteries in the Remote Control
1. Remove the battery cover from the rear side of remote control.
2. Insert two AA batteries into the battery compartment.
3. Then attach the battery cover to the remote control.
Installing the Batteries in the Wireless Keyboard
1. Remove the battery cover from the bottom side of keyboard.
2. Insert two AA batteries into the battery compartment.
3. Then attach the battery cover to the keyboard.
22 Chapter 1
Page 32

Installing the WLAN Antenna
1. Install antenna to the system by fastening the threaded end of the antenna into the WLAN antenna connector
on the rear side of the system (1).
2. Rotate the antenna clockwise until it gets tight.
3. Flip up the antenna (2).
Synchronizing the Keyboard
On the bottom side of the keyboard, press and hold the Reset button until you see the green LED turns off. The
keyboard’s LED flashes green to indicate the keyboard is ready synchronize to the system and stops flashing
indicating a successful sync.
Chapter 1 23
Page 33

Windows XP Media Center
Opening Media Center
After turning on the system, system will launch Media Center. When working within a Windows XP program, you
can revert to Media Center by doing any of the following:
1. Press on the remote control.
2. Press the Stop and Play/Pause buttons simultaneously on the front panel.
3. On the Windows task bar, click Start > All Programs > Accessories > Media Center, then click Media
Center.
4. On the Windows task bar, click Start > Media Center.
Media Center Home Page
The Media Center Home Page displays whenever you open the Media Center. Use the navigation or shortcut
buttons on the remote control or the arrow keys on the keyboard to select an option in the Start Menu.
Item Description
Play DVD Plays your favorite DVDs.
Online Spotlight Finds digital media content available for Media Center on the
Internet, giving you access to the latest music, movies, trailers and
news updates.
My Videos Plays home videos or downloaded videos from the Internet.
My Pictures Finds or sorts pictures stored in your system or view photos as a
slide show.
My TV Lets you watch or record live TV shows. Also allows you to pause
and rewind up to 30 minutes of a live TV show.
My Music Lets you browse, organize and play audio files or audio CDs.
Radio Lets you listen to live radio programs. Also allows you to pause and
rewind up to 30 minutes of live radio.
More Programs Access the PSD, PnR, and other Media Center-enhanced programs
available in your system. For more information, please refer to “Using
accessory programs” of User’s Manual.
Settings Access several settings that control how Media Center plays and
records TV programs, plays DVDs, displays pictures, plays sound
and displays Media Center pages.
24 Chapter 1
Page 34

Configuring Your Set-Top Box
To configure Media Center to properly recognize a set-top box:
1. On the Media Center Home Page, select Setting.
2. Select TV > Set up TV signal in Media Center.
3. On the TV signal screen, select Next.
4. Select Yes to confirm region detected by Media Center.
5. Choose your TV signal, then select Next.
6. If you have a set-top-box, select Yes > Next, then proceed to step 7. If not select No > Next.
7. Select the number of tuners you want to configure, then select Next.
8. Select the type of cable connected to the set-top box, then select Next.
9. Set up your remote control to work with your set-top box, then select Next.
10. Choose your TV signal, then select Next.
11. Choose Yes if you have a set-top box remote control, then select Next.
12. Choose the number of digits for the highest channel number you receive on your system, then select Next.
13. Specify how you change channels, then select Next.
14. Select your set-top box brand, then select Next.
15. Choose a remote control code, then select Next.
16. Use the numeric buttons on the remote control to try changing channels, then select Next.
17. Select a remote control IR signal speed, then choose the number of digits you receive in you TV signal, then
select Next.
18. Select Next to confirm signal speed.
19. After you finished setting up your TV signal, you will be prompted to set up your program guide.
Closing Media Center
1. Press on the remote control to enter the Media Center Home Page.
2. Use the remote control to navigate to the Shut Down button on the upper left corner of the screen, then press
OK. The Media Center shutdown window will appear and the optional items are Close Media Center, Log Off,
Shut Down, Restart and Stand by.
Warning!
cable will cause irrecoverable errors to your system.
3. Select the desired item and press OK.
Never unplug the power cable when the system is in standby mode. Unplugging the power
Chapter 1 25
Page 35

Acer eRecovery Management
Warning!Always close the Media Center Edition before launching Acer eRecovery Management.
Acer eRecovery Management provides fast, reliable and safe method of restoring your computer to its factory
default settings or user-defined system configuration from an image stored in a hidden hard disk drive partition,
secondary partition or optical disks. Acer eRecovery Management also features an easy-to-use utility that backs
up system settings, applications and data to the hard disk drive to the optical disks.
Launching Acer eRecovery Management
You can launch Acer eRecovery Management in three ways:
1. Click Start > All Programs > Acer Empowering Technology > Acer eRecovery Management.
2. Press <Alt> + <F10> on the keyboard.
3. Click on the Acer eRecovery Management icon in the Empowering Technology tool bar on the desktop.
Then Acer eRecovery Management main page will appear.
Note: During initial launch, the Acer eRecovery Management prompts you to create a password for your
backup files. Follow screen instructions to continue.
Copying the Factory Default Settings Image
1. On initial launch, the utility prompts you to copy the factory default settings image saved in a hidden hard disk
partition to an optical disk.
2. Insert the optical disk to the optical drive, then click OK to start burning. This function is disabled when the
factory default setting image is copied, or when you check the Don’t remind me again option.
Creating System Backups
Creating a Full Backup
You can create a full backup image of the current system configuration including all applications, drivers and data.
Create a full backup before installing new hardware or software applications to protect your system and data.
Warning!
By default, the utility saves the backup image into the secondary hard disk drive partition. If there is insufficient
space, the option is grayed out and a warning will appear. Backing up the image into the HDD ensures easy
system recovery, without the need for optical disks.
1. Click the Backup button at the bottom of the window, then click Create.
26 Chapter 1
Creating a full backup erases the previous backup file in the hard disk drive.
Page 36

2. Select Full backup (slow), then click Next.
3. Enter a description of the backup image, then click Next.
4. When prompted, close all running applications, select Yes, then click Next. The backup process starts. A
message will appear when the backup process is finished, or when it fails.
Creating an Incremental Backup
Instead of a full system backup, you can create an incremental backup image of the current system configuration
to save space. Regular incremental backups are recommended to protect your system and data, especially before
installing a new hardware component or software application. You can create multiple incremental backup points
on top of one another.
1. Click the Backup button at the bottom of the window, then click Create.
2. Select Incremental backup (fast), then click Next.
3. Follow step 3 to step 4 of the previous section.
Deleting a User-Created Backup Point
You can delete a previously created backup image to free some HDD space. A confirmation message appears
when you select this option. Click Ye s to delete the backup image.
4. In the Acer eRecovery window, select Recovery actions and click Next.
5. Select the desired restore action and follow the instructions on screen to complete the restore process.
Copying to Disks
The Burn Disk function allows you to copy factory default settings images, backup images, current system
configuration or application backups to a CD/DVD.
Using the Burn Disk Utility
1. Click the Burn Disk button.
2. Select an option from the Burn Disk window.
Burning a Backup Disk using Factory Default
The utility creates a backup disk containing the factory default settings. Select this option if you disabled copying
the factory default settings image when you first launch the Acer eRecovery Management.
Burning a Backup Disk using User’s Backup
The utility copies the user’s backup image to the optical disk. You can restore the system to the desired backup
point using this disk.
Copying Current System Configuration to Disk
The utility copies the current system configuration to the optical disk. This option creates a temporary backup point
with the current system configuration without replacing the previous full backup point.
Burning an Application Backup Disk
The utility backs up all applications and drivers to the optical disk.
Restoring the System
The Restore function allows you to restore the system configuration using the factory default settings images,
backup images, current system configuration or application backups copied in the CDs/DVDs.
Chapter 1 27
Page 37

Restoring System to Factory Default
Select to restore the computer to its original state. All previously installed programs and saved data will be lost.
When selected, the computer reboots and restores the system from the image in the hidden hard disk drive
partition.
Restoring System from User’s Backup
This allows you to restore the system using the most recent backup image you created. When selected, the
backup image information will appear below the option.
Recovering System from CD/DVD
This allows you to restore the system using the backup image on the optical disk. When selected, the computer
reboots from the optical drive. The utility prompts you to insert the backup disk, if not loaded in the optical drive.
Reinstalling Applications/Drivers
This allows you to reinstall a damaged application or device driver. Acer eRecovery Management extracts the data
from the hidden hard disk drive partition. This process may take a few minutes and may disable the keyboard and
mouse to ensure system stability.
Other System Restore Modes
You may also restore the system from the WinPE environment or through the hidden partition main page.
Restoring the System from WinPE Environment
If the system fails to boot, you can restore the system from WinPE environment. The system boots from the hidden
hard disk drive partition to start recovery.
Note: You are prompted to enter the password before system restore starts. Failure to enter the correct
password three times reboots the computer to the operating system.
Hidden Partition Main Page
Press <Alt> + <F10> on the keyboard or the Stop and Record buttons on the front panel during POST to boot the
system from the hidden hard disk drive partition and access the hidden partition main page.
Note: You must enter the password to access the hidden partition main page.
The hidden partition main page offers three options to restore the system: restore to factory default settings,
restore from user’s backup, or restore from backup CD/DVD.
Restoring System to Factory Default Settings
1. Select this option, then enter the password. The utility restores the system from the factory default settings
image in the hidden hard disk drive partition.
2. When prompted, confirm system recovery. A message appears to tell you that you will lose all data on the
drive. The utility then restores the system to its original state.
Restoring System to User’s Backup
1. Select this option, then enter the password. The utility restores the system from the user’s backup image in the
second hard drive partition.
2. When prompted, confirm system recovery. A message will appear to inform you that you will lose all data on
the primary partition. The utility then restores the system to the most recent user backup.
Restoring System from CD/DVD
1. Select this option, then enter the password. The utility restores the system from the user’s backup image in the
second hard drive partition.
28 Chapter 1
Page 38

2. When prompted, confirm system recovery. A message will appear to tell you that you will lose all data on the
primary partition. The utility then restores the system to the most recent user backup.
Restoring System from CD/DVD
1. When selected, insert the first backup disk to the optical drive.
2. Confirm system recovery when prompted. A message will appear to tell you that you will lose all data on the
primary partition. The utility then restores the system from the backup image in the CD/DVD.
3. Insert the other disks when prompted.
Note: If you are restoring the system to its factory default settings saved in CDs/DVDs, Acer eRecovery
Management prompts you to insert disk 2 to start.
Chapter 1 29
Page 39

Acer ePerformance Management
Note: Always close the Media Center Edition program before launching Acer ePerformance Management.
Acer ePerformance Management offers you a simple-to-use tool to maximize your PC’s performance.
Acer ePerformance Management enables you to optimize your PC’s memory, check memory usage to see if an
upgrade is needed, optimize your HDD, and perform other functions to enhance the computer’s bootup, shutdown
and network performance.
You can launch Acer ePerformance Management in two ways:
1. On the Windows task bar, click Start > (All) Programs > Empowering Technology > Acer ePerformance
Management.
2. Click on the Acer ePerformance Management icon n the Empowering Technology tool bar from your desktop
which can be shown by pressing the Empowering Key.
This will open the Acer ePerformance Management main page.
Acer ePerformance Management Main Page
The Acer ePerformance Management main page allows you to Execute Express Optimization to quickly
optimize your system.
Click Show at the bottom of the page to display the advanced optimization options: Memory, Disk and Speed.
Memory Optimization
Here, you can view your system’s current memory usage. You can also optimize the memory usage by clicking
Optimize.
Memory Usage Check
When using your computer, you can check to see if a memory upgrade is advised by clicking Check. For the most
accurate results, check memory usage when your computer is in a normal working setting - checking just after
bootup, for example, will not yield an accurate report.
Speed Optimization
The five functions listed under Speed Optimization improve the overall performance of your computer.
1. Turbo St a r t u p streamlines the startup process for faster booting.
2. Turbo Shutdown streamlines the shutdown process.
3. Performance Enhancement improves general performance.
4. Disk Defragmentation defragments the HDD while your computer is idle.
5. Network Booster improves network performance.
30 Chapter 1
Page 40

Hardware Specification and Configuration
Major Chips
Item Specification
System Core Logic • Intel 945GT
• Intel ICH7M-DH
Super I/O Controller ITE8716F
LAN Controller Intel 82573L
Memory Controller Intel 945GT
IDE Controller Intel ICH7M-DH
Audio Controller Realtek ALC883DD
Graphics • Chip: Intel Gen 3.5 Integrated Graphic Engine
• Transmitter for DVI-I (HDCP): Chrontel 7313A
• Transmitter for HDMI: Silicon Image 1390
Card Reader controller ND3266
IEEE 1394 controller Ti TSB43AB22A
USB 2.0 ICH7M-DH
USB HUB GL850A
System BIOS PMC PM49FL004T
Clock generator ICS 580148
Processor
Item Specification
Type
Package 479 uFCPGA
Core Speed / Host Bus Speed
®
Yonah dual core processor
Intel
T 533 MT/s
T 667 MT/s
BIOS
Item Specification
BIOS code programmer Award
BIOS version R01-A1
BIOS ROM size 4MB
BIOS ROM package 32-pin PLCC package
Support protocol PCIX 1.0, PCI 2.2, APM 1.2, VESA/DPMS (VBE/PM
V1.1), SMBIOS 2.3, E-IDE 1.1, ACPI 1.0b, ESCD
1.03, PnP 1.0a, Bootable CD-ROM 1.0, UHCI 1.0,
ANSI ATA 3.0 ATAPI
Boot from CD-ROM feature Yes
LS-120 drive support Yes
BIOS boot block feature Yes
BIOS password control Yes
Chapter 1 31
Page 41

BIOS Hotkey
Hotkey Function Description
DEL Access to BIOS Setup Utility Press while the system is
booting to enter BIOS Setup
Utility.
AC’97 Audio Codec ALC883DD
Item Description
Feature
T High performance DACs with 95Db S/N ratio
T Meets performance requirements for audio on PC2001
systems
T Eight channels of DAC support 16/20/24bit PCM format
for 7.1 audio solution
T 48-pin LQFP package
Wake-Up Event Specification
Devices
S1
(Idle)
(Suspend to RAM)
S3
S4
(Suspend to Disk)
Power Button Enabled Enabled Enabled Enabled
USB Keyboard Enabled Enabled Disabled Enabled
WOL (wake on LAN) Disabled Disabled Disabled Disabled
RTC (real time clock) Disabled N/A Disabled Disabled
System Memory
Item Specification
Feature
T Dual channel support
T Maximum memory size Two GB
T Two soDIMM sockets
T 256/512MB or One GB support per slot
T Memory voltage support: 1.8V
T 533/667MHz unbuffered module
T Error correction code (ECC) feature: yes
T Memory module combinations: You can install memory
modules in any combination as long as they match the
above specification.
LAN Interface
Item Specification
Feature
T Intel 82573L (Vidalia) PCI-E x1 GbE LAN controller
T Controller resident bus: PCI bus
T One RJ-45 on board
T Enabled or Disabled by BIOS setup
S5
(Shut down)
32 Chapter 1
Page 42

IDE Interface
Item Specification
Controller Intel ICH7M-DH with PATA and SATA controller
40-pin PATA slot
SATA IDE slot
LS-120 support Yes
Bootable CD-ROM
support
Function control Enabled or Disabled by BIOS setup
T Quantity: one
T Device type support: HDD / CD-ROM / CD-RW / DVD-
ROM / Combo, DVD burner
T Transfer rate support: PIO 0/1/2/3/4
T ATA mode: 33/66/100
T Quantity: one
T Max. data rate will be 3.0 Gb/sec.
Yes
Chapter 1 33
Page 43

ODD Interface
Item Specification
Vendor and Model name Panasonic UJ-845
Performance Specification
Transfer rate (MB/s.)
READ WRITE
DVD-ROM (single layer) 3.3X to 8X CAV
4.3 MB/s. to 10.5 MB/s.
DVD-ROM (dual layer) 2.5X to 6X CAV
3.3 MB/s. to 7.9 MB/s.
DVD-R 4.7GB 2.5X to 6X CAV
3.3 MB/s. to 7.9 MB/s.
DVD-R 3.95GB 2.5X to 6X CAV
3.3 MB/s. to 7.9 MB/s.
DVD-RW 4.7GB 2.5X to 6X CAV
3.3 MB/s. to 7.9 MB/s.
DVD-RAM 4.7GB 3X to 5X Z-CLV
3.9 MB/s. to 6.5 MB/s.
+R (single layer) 2.5X to 6X CAV
3.3 MB/s. to 7.9 MB/s.
+R (dual layer) 2.5X to 6X CAV
3.3 MB/s. to 7.9 MB/s.
+RW 2.5X to 6X CAV
3.3 MB/s. to 7.9 MB/s.
CD-ROM 10.3X to 24X CAV
1550 KB/s. to 3600 KB/s.
CD-R 10.3X to 24X CAV
1550 KB/s. to 3600 KB/s.
CD-RW 10.3X to 24X CAV
1550 KB/s. to 3600 KB/s.
DVD-Video 4X CAV -
CD-DA (Audio Play) 12X CAV -
CD-DA (Read) 20X CAV -
Video-CD 20X CAV -
Applicable disc format
READ WRITE
• CD-Audio, CD-ROM, CDROM XA, CD-I, CD-I
Ready, Cd-I Bridge, CDR, CD-RW, Photo CD,
Video CD, Enhanced
Music CD, CD-TEXT
• DVD-5, DVD-9, DVD-10,
DVD-18, DVD-R
(3.95GB/4.7GB), DVDRW, DVD-RAM (4.7GB),
+R, +RW
-
-
2X to 8X Z-CLV
2.6 MB/s. to 10.5 MB/s.
-
2X to 4X Z-CLV
2.6 MB/s. to 5.3 MB/s.
3X to 5X Z-CLV
3.9 MB/s. to 6.5 MB/s.
2.4X to 8X Z-CLV
3.2 MB/s. to 10.5 MB/s.
2.4X CLV
3.2 MB/s.
2.4X to 4X Z-CLV
3.2 MB/s. to 5.3 MB/s.
-
8X to 24X Z-CLV
1200 KB/s. to 3600 KB/s.
10X CLV
1500 KB/s.
• DVD-RAM, DVD-R
4.7GB, DVD-RW, +R,
+RW
• CD-R, CD-RW
34 Chapter 1
Page 44
USB Interface
Item Specification
Controller Intel ICH7M-DH
Universal HCI USB 2.0
Location and quantity From ICH7M-DH:
• Two-port stack USB connector on rear side
• Two-port stack USB port connector on front panel
• One USB port for Card reader (ND3266)
• One USB port for RF connector
• One USB port for bluetooth connector
• One USB port for USB hub (GL850A)
From USB hub GL850A
• One USB port for VFD display (WT6563F)
• One USB port for IR control
• One USB port for button control
Environment Requirements
Item Specification
Temperature
Operating
Non-operating
Humidity
Operating 20% to 80% RH, non-condensing
Non-operating 20% to 80% RH, non-condensing (unpacked)
Vibration
Operating 5 ~ 500Hz, 2.20g RMS random, 10 minutes per axis in all
Non-operating 5 ~ 500Hz, 1.09g RMS random, one hour per axis in all
o
C ~ +35oC
+10
o
C ~ +60oC (storage packed),
-20
o
C ~ +60oC (unpacked)
-10
20% to 80% RH, non-condensing (Storage package)
three axes
three axes
Drop Test
Package Gross Weight
(KG/lbs)
0 ~ 9.1 (0 ~ 20) 76/30 10
9.1 ~ 18.2 (20 ~ 40) 61/24 10
18.2 ~ 27.3 (40 ~ 60) 46/18 10
27.3 ~ 45.4 (60 ~ 100) 31/12 10
10 drops: one corner, three edges, six surfaces
Note: The protection ability of package and cushion must be capable of withstanding, with no physical or
functional damage, mechanical impact from height-specified drops.
Chapter 1 35
Drop Height
(cm/inch)
No. of Drop
Page 45

Power Management Function (ACPI Support Function)
Device Standby Mode
• Independent power management timer for hard disk drive devices (zero to 15 minutes, time step = one
minute).
• Hard disk drive goes into Standby mode (for ATA standard interface).
• Disable V-sync to control the VESA DPMS monitor.
• Resume method: device activated (keyboard for DOS, keyboard & mouse for Windows).
• Resume recovery time: three to five seconds.
Global Standby Mode
• Global power management timer (two to 120 minutes, time step = 10 minutes).
• Hard disk drive goes into Standby mode (for ATA standard interface).
• Disable H-sync and V-sync signals to control the VESA DPMS monitor.
• Resume method: return to original state by pushing external switch button, modem ring in, keyboard and
mouse for APM mode.
• Resume recovery time: seven to 10 seconds.
Suspend Mode
• Independent power management timer (two to 120 minutes, time step = 10 minutes) or pushing external
switch button.
• CPU goes into SMM.
• CPU asserts STPCLK# and goes into the Stop Grant state.
• LED on the panel turns amber colour.
• Hard disk drive goes into SLEEP mode (for ATA standard interface).
• Disable H-sync and V-sync signals to control the VESA DPMS monitor.
• Ultra I/O and VGA chip go into power saving mode.
• Resume method: return to original state by pushing external switch button, modem ring in, keyboard and
mouse for APM mode.
• Return to original state by pushing external switch button, modem ring in and USB keyboard for ACPI
mode.
ACPI
• ACPI specification 1.0b
• S0, S1, S3 and S5 sleep state support
• Onboard device power management support
• Onboard device configuration support
36 Chapter 1
Page 46

Chapter 2
Setup Utility
About the Setup Utility
The computer uses the Phoenix-Award BIOS (Basic Input and Output System) with support for Windows Plug and
Play. The CMOS chip on the main board contains the ROM setup instructions for configuring the main board BIOS.
The BIOS Setup Utility displays the system’s configuration status and provides you with options to set system
parameters. The parameters are stored in Battery-backed-up CMOS RAM that saves this information when the
power is turned off. When the system is turned back on, the system is configured with the values you have stored
in CMOS.
The settings made in the Setup Utility affect how the computer performs. Before using the Setup Utility, ensure that
you understand the Setup Utility options.
The Standard Configuration
A standard configuration has already been set in the Setup Utility. However, it is recommended that you read this
chapter in case you need to make any changes in the future.
This Setup Utility should be used:
• when changing the system configuration
• when a configuration error is detected and you are prompted to make changes to the Setup Utility
• when trying to resolve IRQ conflicts
• when making changes to the Power Management configuration
• when changing the password or making other changes to the Security Setup
Chapter 2 37
Page 47

Entering the Setup Utility
When you power on the system, BIOS enters the Power-On Self Test (POST) routines. POST is a series of built-in
diagnostics performed by the BIOS. After the POST routines are completed, the following message will appear:
Press DEL to enter SETUP
Press the delete key to enter the BIOS Setup Utility.
BIOS Navigation Keys
The BIOS navigation keys are listed below.
Key Function
ESC Exits the current menu
IKLJ
+/-/PU/PD Modifies the selected field’s values
F10 Saves the current configuration and exits setup
F1 Displays a screen that describes all key functions
F5 Loads previously saved values to CMOS
F6 Loads a minimum configuration for troubleshooting
F7 Loads an optimum set of values for peak
38 Chapter 2
Scrolls through the items on a menu
performance
Page 48

Product Information
This option displays product information about your system. You can press <Esc> to return to the main menu
setting page.
Chapter 2 39
Page 49

Standard CMOS Features
This option displays basic information about the system.
Date and Time
The Date and Time items show the current date and time set on the computer. If you are running a Windows OS,
these items are automatically updated whenever you make changes to the Windows Date and Time Properties
utility.
IDE Devices
Your computer has one IDE channel and one SATA connector supporting one SATA drive. SATA refers to Serial
ATA (Advanced Technology Attachment), the standard interface for the IDE hard drives which are currently used in
most PCs.
40 Chapter 2
Page 50

Advanced BIOS Features
This option defines advanced information about your system.
Hard Disk Boot Priority
Scroll to this item and press <Enter> to view the following screen.
First / Second / Third Boot Device
Use this three items to select the priority and order of the devices that your system searches for an operating
system at start-up time.
Boot Up NumLock Status
This item defines if the keyboard NumLock key is active when your system is booted.
Typematic Rate Setting
If this item is enabled, you can use the following two items to set the typematic rate and the typematic delay
settings for your keyboard.
• Typematic Rate (Char/Sec): Use this item to define how many characters per second are generated by a
held-down key.
• Typematic Delay (Msec): Use this item to define how many milliseconds must elapse before a held-down
key begins generating repeat characters.
Chapter 2 41
Page 51

Security Option
If you have installed password protection, this item defines if the password is required at system start up, or if it is
only required when a user tries to enter the Setup Utility.
Silent Boot
This item enables or disables the Silent Boot function.
Small Logo (EPA) Show
This item enables or disables the display of the EPA logo during boot.
Configuration Table
This item enables or disables the Configuration Table in BIOS setting.
42 Chapter 2
Page 52

Advanced Chipset Features
These items define critical timing parameters of the main board. You should set these items for their default values
unless you are very familiar with the technical specification of your system hardware. If you change the values
incorrectly, you may introduce fatal errors or recurring instability into your system.
PEG / OnChip VGA Control
This item allows you to choose the primary display card.
Onchip Frame Buffer Size
This allows you to set the VGA frame buffer size.
DVMT Mode
DVMT is Dynamic Video Memory Technology. This item helps you select video mode.
Chapter 2 43
Page 53

Integrated Peripherals
These options display items that define the operation of peripheral components on the system’s input/output ports.
USB Controller
You can enable or disable the onboard USB controller. We recommend users to keep the default value. Disabling
it might cause the USB devices not to work properly.
USB 2.0 Controller
This item enables or disables the onboard USB 2.0.
USB Keyboard Support
You can enable this item if you want to use a keyboard connected through the USB port in a legacy operating
system (such as DOS) that does not support Plug and Play.
Azalia/AC97 Audio Select
It serves to enable or disable the onboard Azalia/AC97 audio function. You can disable this item if you are going to
install a PCI audio add-on card.
Onboard LAN Boot ROM
This item allows you to enable or disable the onboard LAN Boot ROM function.
44 Chapter 2
Page 54

Onboard LAN Controller
This item allows users to enable or disable the onboard LAN Controller function.
Onboard 1394 Controller
This item allows users to enable or disable the onboard 1394 Controller function.
Chapter 2 45
Page 55

Power Management Setup
The system has various power-saving modes including powering down the hard disk, turning off the video,
suspending to RAM, and software power down that allows the system to be automatically resumed by certain
events.
The power-saving modes can be controlled by time-outs. If the system is inactive for a while, the time-outs begin
counting. If the inactivity continues so that the time-out period elapses, the system enters a power-saving mode. If
any item in the list of Reload Global Timer Events is Enabled, then any activity on that item will reset the time-out
counters to zero.
If the system is suspended or has been powered down by software, it can be resumed by a wake up call that is
generated by incoming traffic to a modern, a LAN card, a PCI card, or a fixed alarm on the system real-time clock.
ACPI Function
This item allows users to enable or disable the ACPI power management function.
ACPI Suspend Type
You can use this item to define how your system suspends. In the default, S3 (STR), the suspend mode is a
suspend to RAM, i.e., the system shuts down with the exception of a refresh current to the system memory.
Soft-Off by PWR-BTTN
Under ACPI (Advanced Configuration and Power Management Interface) you can create a software power down.
In a software power down, the system can be resumed by Wake Up Alarms. This item lets you install a software
power down that is controlled by the power button on your system. If the item is set for Instant-Off, then the power
46 Chapter 2
Page 56

button causes a software power down. If the item is set for Delay four Sec., then you have to hold the power button
down for four seconds to cause a software power down.
Energy Lake Function
This item enables or disables the Energy Lake Function.
Resume by PCI PME
This item specifies whether the system will be awakened from power-saving modes when activity or input signal of
the specified hardware peripheral or component is detected.
Wake Up On LAN
When it is set for Enabled, you can remotely wake up a PC in Soft-Off condition via a LAN card that supports the
wake up function.
Resume by Alarm
When it is set for Enabled, additional fields become available and you can set the date, hour, minute and second to
turn on your system. When it is set for zero in the column of date, the alarm will power on your system every day at
the specified time.
Power On After Power Fail
This item enables your computer to automatically restart or return to its last operating status after power returns
from power failure.
Chapter 2 47
Page 57

PnP/PCI Configuration
It configures how PnP (Plug and Play) and PCI expansion cards operate in your system. Both the ISA and PCI
buses on the main board use system IRQs (interrupt requests) and DMAs (direct memory access). You must set
up the IRQ and DMA assignments correctly through the PnP/PCI Configurations Setup Utility for the main board to
work properly. Selecting PnP/PCI Configurations on the main program screen displays the menu below.
Reset Configuration Date
If you enable this item and restart the system, any Plug and Play configuration data stored in the BIOS Setup will
be cleared from memory.
Resources Controlled By Auto
You should set this item for the default Auto (ESCD). Under this setting, the system dynamically allocates
resources to Plug and Play devices as they are required. If you can not get a legacy ISA expansion card to work
properly, you might be able to solve the problem by changing this item to Manual, and then opening up the IRQ
Resources submenu.
• IRQ Resource: In the IRQ Resource submenu, if you assign an IRQ to Legacy ISA, the Interrupt Request
Line is reserved for a legacy ISA expansion card. Press <Esc> to close the IRQ Resource submenu. In
the Memory Resources submenu, use the first item Reserved Memory Base to set the start address of the
memory you want to reserve for the ISA expansion card. Use the section item Reserve Memory Length to
set the amount of reserved memory. Press <Esc> to close the Memory Resources submenu.
48 Chapter 2
Page 58

PCI/VGA Palette Snoop
This item is designed to overcome problems that can be caused by some non-standard VGA cards. This board
includes a built-in VGA system that does not require palette snooping so you must leave this item disabled.
INT Pin 1-8 Assignment
It identifies the interrupt request (IRQ) line assigned to a device connected to the PCI interface of your system.
Maximum Payload Size
This item specifies the maximum TLP payload size for the PCE Express devices. The unit is byte.
Chapter 2 49
Page 59

PC Health Status
On the main board that supports hardware monitoring, you can monitor the parameters of critical voltage,
temperature and fan speed.
CPU and System Smart Fan Control
This item incorporates linear control metrics to provide optimal cooling. Under normal condition, Smart Fan keeps
the fan speed low, minimizing acoustic noise. When the load increases, Smart Fan increases the fan speed to
provide optimal cooling.
Shutdown Temperature
You can set the maximum temperature of the system. When the system reaches that temperature, it will be
powered down.
50 Chapter 2
Page 60

Frequency/Voltage Control
It enables you to set the clock speed and system bus for your system. The clock speed and system bus are
determined by the processor you have installed in your system.
CPU Speed
This item displays the current CPU speed. Users can not make any changes.
Auto Detect PCI Clk
When it is enabled, BIOS will disable the clock signal of free DIMM and PCI slots.
Spread Spectrum
If you enable spread spectrum, it can significantly reduce the EMI (Electro-Magnetic Interference) generated by
the system.
Chapter 2 51
Page 61

Load Default Settings
This option opens a dialog box that lets you install optimized defaults for all appropriate items in the Setup Utility.
Press <OK> and then <Enter> to install the defaults. Press <Cancel> and then <Enter> to not install the defaults. If
you only want to install setup defaults for a specific option, select and display that option, and then press <F9>.
52 Chapter 2
Page 62

Set Supervisor/User Password
When this function is selected, the following message appears at the center of the screen to assist you in creating
a password.
Enter Password
Type the password, up to eight characters, and press <Enter>. The password typed now will clear any previously
entered password from CMOS memory. You will be asked to confirm the password. Type the password again and
press <Enter>. You can press <Esc> to abort the selection.
To disable password, just press <Enter> when you are prompted to enter password. A message will confirm the
password being disabled. Once the password is disabled, the system will boot and you can enter BIOS Setup
freely.
Password Disabled
If you have selected “System” in “Security Option” of “BIOS Features Setup” menu, you will be prompted for the
password every time the system reboots or any time you try to enter BIOS Setup.
If you have selected “Setup” at “Security Option” of “BIOS Features Setup” menu, you will be prompted for the
password only when you enter BIOS Setup.
Supervisor Password has higher priority than User Password. You can use Supervisor Password when booting the
system or entering BIOS Setup to modify all settings. Also you can use User Password when booting the system
or entering BIOS Setup but can not modify any setting if Supervisor Password is enabled.
Chapter 2 53
Page 63

Save and Exit Setup
You can highlight this item and press <Enter> to save the changes that you have made in the Setup Utility and exit
the Setup Utility. When the Save and Exit dialog box appears, press <OK> to save and exit, or press <Cancel> to
return to the main menu.
Exit without Saving
You can highlight this item and press <Enter> to discard any changes that you have made in the Setup Utility and
exit the Setup Utility. When the Exit without Saving dialog box appears, press <OK> to discard changes and exit,
or press <Cancel> to return to the main menu.
Note: If you have made settings that you do not want to save, choose the “Discard Changes and Exit” and
press <OK> to discard any changes you have made.
54 Chapter 2
Page 64

Chapter 3
Machine Disassembly and Replacement
General Information
This chapter contains step-by-step procedures on how to disassemble the Acer Aspire iDea desktop for
maintenance and troubleshooting.
To disassemble the computer, you need the tools below:
• Wrist ground strap and conductive mat for preventing electrostatic discharge
• Small Philips screw driver
• Plastic flat head screw driver
Note: The screws for the different components vary in size. During the disassembly process, group the
screws with the corresponding components to avoid mismatch when putting back the components. When you
remove the stripe cover, please be careful not to scrape the cover.
Before You Begin
Before proceeding with the disassembly procedure, you have to make sure that:
1. The system and all peripherals are powered off.
2. The AC adaptor and all power and signal cables from the system are unplugged.
Note: There are several types of screws used to secure the main unit. The screws vary in length. Group the
same type of screws together during the disassembly procedure. Please also remember the screw location for
each screw type. If you fasten the screws on the wrong location, the long screws may cause irrecoverable
damage to the parts.
Chapter 3 55
Page 65

Disassembly Procedure
This section tells you how to disassemble the system when you need to perform system maintenance or
troubleshooting.
Note: Before you begin, make sure you have turned off the system and remove all peripherals connected to it.
Removing the Memory
1. Release the screw holding the memory module cover on the bottom side.
2. Pull the latches as the arrows indicate and the memory will pop-up. Then remove the memory.
3. You can skip this step because the removal of memory is not a necessary step for disassembly of other parts.
Removing the Upper Case
1. Release the three screws securing the upper case and pull the upper case as the arrows indicate to remove it.
56 Chapter 3
Page 66

Removing the ODD Module
1. Pull and disconnect the IDE cable.
2. Release the three screws holding the ODD module bracket then remove the ODD module.
3. Release the two screws holding the IDE board then remove the IDE board.
4. Release the three screws securing the ODD module bracket then remove the bracket.
Chapter 3 57
Page 67

Removing the HDD Module
1. Release the four screws securing the HDD module and detach the HDD module.
2. Disconnect the serial ATA cable and the power cable and remove the HDD module.
3. Release the four screws securing the HDD module brackets and remove the brackets.
Removing the System Power Supply
1. Pull and disconnect the power cable and the fan cable.
2. Release the four screws securing the system power supply and remove the system power supply.
58 Chapter 3
Page 68

Removing the RCA Board
1. When you do the assembly, please refer to this picture for connecting the three RCA board cables properly.
2. Carefully disconnect the three RCA board cables.
3. Release the three screws holding the RCA board and detach the RCA board.
4. Release the two screws on the RCA board and remove the RCA board bracket.
Chapter 3 59
Page 69

Removing the Add-on Cards
1. When you do the assembly, please refer to this picture for connecting the add-on cards cables properly.
60 Chapter 3
Page 70

2. Pull the latches of TV card 1 as shown and the card will pop up. Slightly detach the TV card 1 from the slot and
disconnect the card cable.
3. Repeat the step 2 to detach the TV card 2 and disconnect the card cable.
4. Repeat the step 2 to detach the wireless LAN card and disconnect the card cable.
Chapter 3 61
Page 71

Removing the MXM Card
1. Disconnec the MXM card fan cable and the MXM card heat sensor cable.
2. Release the four screws holding the MXM card fan module then remove the MXM card fan module.
3. Release the two screws fastening the MXM card and the MXM card will pop up.
4. Then pull out the MXM card at 45
o
degree as the arrow indicates.
62 Chapter 3
Page 72

Removing the VFD Board
1. On the main board, there are five connectors as shown. They are A) power launch cable connector, B) VFD
board cable connector, C) CPU fan cable connector, D) wireless keyboard module cable connector and E)
bluetooth module cable connector.
2. To remove the front panel, at least you have to disconnect B) VFD board cable and release the screw securing
the VFD board cable.
3. Unlatch the five latches holding the front panel as shown. Then carefully detach the front panel from the main
unit and pull out the VFD board cable at the same time.
4. Disconnect the VFD board cable.
5. Release the four screws and you have access to the VFD board.
Chapter 3 63
Page 73

Removing the Wireless Keyboard Module and the Bluetooth Module
1. As long as remove the front panel, you can approach the wireless keyboard module and the bluetooth module.
Please refer to the anterior page for the removal of front panel.
2. Disconnect D) wireless keyboard module cable and E) bluetooth module cable.
3. Release the four screws securing the wireless keyboard module and the bluetooth module and carefully
remove the wireless keyboard module and the bluetooth module. You can abort the disassembly procedures at
this step if you are not going to remove the main board.
4. If you want to remove the main board next, please remove the bracket at this step. After the completion of step
3, please release the two screws holding the bracket and remove the bracket.
Removing the CPU Fan
1. Disconnect C) CPU fan cable.
2. Release the four screws fastening the CPU fan and remove the CPU fan.
64 Chapter 3
Page 74

Removing the Card Reader Board
1. Release the screw securing the card reader as shown.
2. Carefully detach the card reader from the main board.
3. When you do the assembly, please attach the card reader board on the main board properly.
Chapter 3 65
Page 75

Removing the Main Board and the Split Board
1. Release those screws marked in yellow.
2. While you release those screws, please hold the back side of the I/O jacks as shown.
3. After releasing those screws, 1) slide the main board to the front panel side and 2) lift the main board as
shown. Then detach the main board from the lower case.
4. Detach the split board from the main board as shown.
66 Chapter 3
Page 76

Chapter 4
Troubleshooting
Please refer to generic troubleshooting guide in the service guide database for information with respect to
following topics:
• Power-On Self-Test (POST)
• POST Check Points
• POST Error Messages List
• Error Symptoms List
Chapter 4 67
Page 77
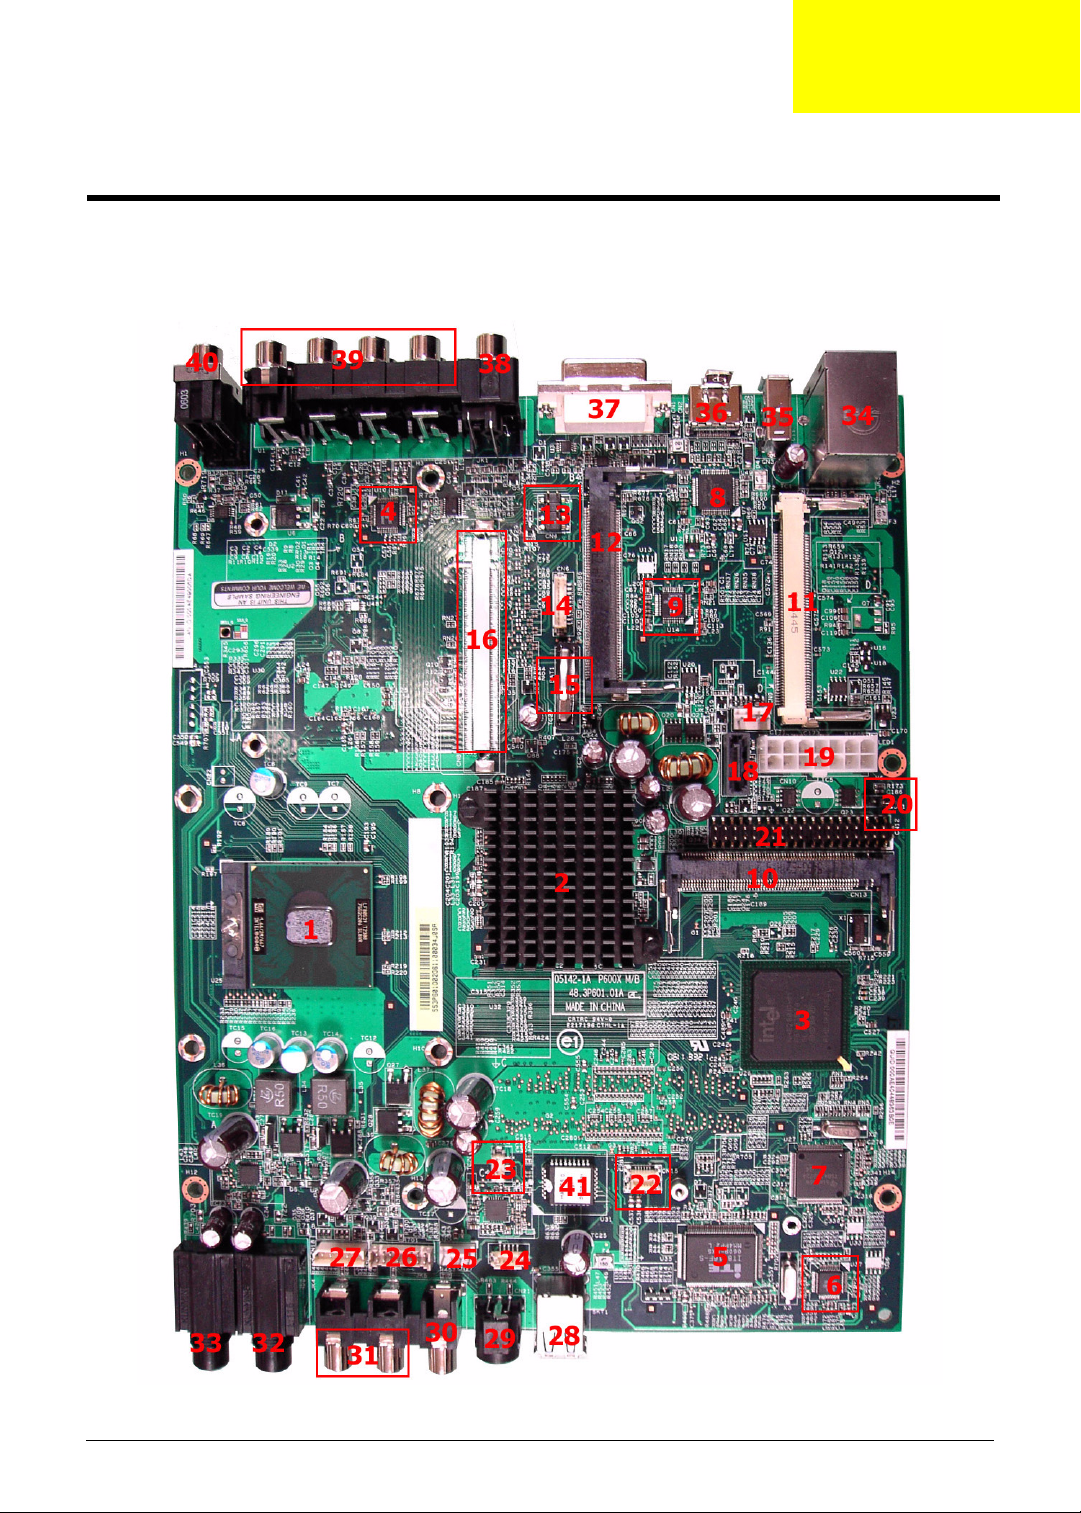
Jumper and Connector Information
Introduction of Connectors
Upper Side of Main Board
Chapter 5
Chapter 5 68
Page 78

Lower Side of Main Board
No. Description No. Description
1 CPU socket 2 North bridge
3 South bridge 4 Azalia codec: Realtek ALC883DD
5 Super I/O controller: ITE8716F 6 USB hub: GL850A
7 IEEE 1394: Ti TSB43AB22A 8 Transmitter for HDMI: Silicon Image
1390
9 Transmitter for DVI-I: Chrontel 7313A 10 Mini PCI 1 slot for TV tuner card 1
69 Chapter 5
Page 79

No. Description No. Description
11 Mini PCI 2 slot for TV tuner card 2 12 Mini PCI 3 slot for WLAN card
13 YPbPr to main board connector 14 SCART to main board connector
15 Battery 16 MXM connector (optional)
17 System fan connector 18 SATA connector
19 14-pin power connector 20 Jumper connector
21 PATA connector 22 Card reader connector
23 Bluetooth connector 24 IR connector
25 CPU fan connector 26 VFD board connector
27 Power button connector 28 USB 2.0 ports
29 S-Video input jack 30 Video input jack
31 Audio input jack 32 1/4” microphone jack
33 1/4” headphone jack 34 RJ-45 port and two USB 2.0 ports
35 6-pin IEEE1394 port 36 USB 2.0 port
37 DVI-I connector 38 Video output jack and S-Video output
jack
39 Multi-channel speaker audio output
connectors
41 BIOS chip: PMC PM49FL004T 42 Clock generator
43 soDIMM slot 44 soDIMM slot
40 Coaxial digital audio output jack
Jumper Setting and Power button
No. Item Description
20 Jumper
27 Power button
1-2 power button
3-5 power LED
NORMAL (default)1-2
CLR CMOS2-3
5432 1
Chapter 5 70
Page 80

Chapter 6
FRU (Field Replaceable Unit) List
This chapter offers the FRU (Field Replaceable Unit) list in global configuration of Aspire iDea 500/510 desktop.
Refer to this chapter whenever ordering the parts to repair or for RMA (Return Merchandise Authorization).
Please note that when ordering FRU parts, you should check the most up-to-date information available on your
regional web or channel. For whatever reasons a part number is changed, it will NOT be noted on the printed
service guide. For Acer authorized service providers, your Acer office may have a different part number code from
those given in the FRU list of this printed service guide. You MUST use the local FRU list provided by your regional
Acer office to order FRU parts for service.
Note: To scrap or to return the defective parts, you should follow the local government ordinance or
regulations on how to dispose them properly, or follow the rules set by your regional Acer office on how to
return it.
Chapter 6 71
Page 81

Parts
CATEGORY PART NAME DESCRIPTION ACER PART NO.
REMOTE CONTROL
N/A REMOTE CONTROLER
RC1534509/00B PAL FOR
EUROPE
N/A REMOTE CONTROLER
RC1534031/00B NTSC FOR
TWN
BOARD
WIRELESS LAN BOARD
802.11BG FOXCONN
BCM4318
REMOTE CTRL
RC1534509/00B PAL
REMOTE CTRL
RC1534031/00B
NTSC
WLAN 802.11BG FOX
BCM4318 MURA
RT.MCE08.001
RT.MCE08.003
54.A74V1.002
TV TUNER BOARD TV TUNER MINIPCI
MPC-718 (353)
CARD READER BOARD P600X/HAVC5.0
CARD READER BD
SPLITTER BOARD PAL P600X/HAVC5.0
SPLITTER PAL BD
IDE BOARD P600X/HAVC5.0 IDE
BD
N/A RF RECEIVER BOARD 2.4G RF RECEIVER BD
832015-0001 2.4
SCART BOARD P600X/HAVC5.0
SCART BD
TU.S5000.001
55.S50V1.003
55.S50V1.004
55.S50V1.005
RV.RAN01.001
55.S50V1.002
N/A VGA BOARD NVIDIA M760GO VGA CARD NVIDIA
M760GO
CABLE
N/A CONNECTOR 24+5ML/15FML CONN 24+5ML/15FML
PI12.A22C32
72 Chapter 6
55.S6201.001
20.S50V1.001
Page 82

CATEGORY PART NAME DESCRIPTION ACER PART NO.
N/A POWER CORD SVT 10A125V
USA
N/A POWER CORD 10A 250V
EUROPE
N/A POWER CORD 13A 250V UK CORD H05VV-F
N/A POWER CORD 250V 10A
1800MM SWISS
N/A POWER CORD 250V 10A
1800MM DENMARK
N/A HDD CABLE SATA 200MM C.A.SATA 200MM
N/A FRONT BEZEL ASSY FRONT BEZEL
O PT I CA L C AB L E C. A . O D D H D3 0 4 5 0 .S 5 0 V 1. 0 0 3
N / A V F D - A C A B L E C . A . V F D - A H D 3 0 4 5 0 . S 6 2 0 1 . 0 0 2
TV-S CABLE 8PIN C.A. TV-S 8PIN HD304 50.S50V1.005
CORD SVT
18AWG*3C
10A125V(USA)
CORD H05VV-F 10A/
250V(EUROPE)
5A250V (UK)
CORD 250V 10A
1800MM SWISS
CORD 250V 10A
1800MM DENMARK
HD304
OSCAR PLUS
27.01818.071
27.02718.401
27.02718.381
27.01518.251
27.01518.201
50.S6201.001
60.S6201.001
TV-S IR CABLE 10PIN C.A. TV-S IR 10PIN
CABLE
SCART CABLE OUT C.A. SCART OUT
HD304
SPLITTER CABLE L C.A. SPLITTER L
HD304
SPLITTER CABLE S C.A. SPLITTER S
HD304
N/A FM CABLE EUR C.A. FM EUR HD304 50.S50V1.010
N/A R F CA BLE C .A . R F H D3 04 50. S50 V1 .0 11
N/A DVT CABLE 1800MM C.A. DVT TO DVI
1800MM HD304
N/A HDMI CABLE19PIN
2CONNECTOR180MM
N/A RCA CABLE TO SPEAKER C.A. RCA TO
N/A SVIDO 2CONNECTOR
1800MM
N/A IR CABLE 1800MM C.A. IR 1800MM
C.A. HDMI 19P 2C
1800MM HD304
SPEAKER/F 140MM
C.A. SVIDEO 2C
1800MM HD304
HD304
50.S50V1.006
50.S50V1.007
50.S50V1.008
50.S50V1.009
50.S50V1.012
50.S50V1.013
50.S50V1.015
50.S50V1.016
50.S50V1.017
Chapter 6 73
Page 83

CATEGORY PART NAME DESCRIPTION ACER PART NO.
N/A SCART CABLE 2CONNECTOR
1800MM
N/A RCA CABLE 2TO2 1800MM C.A. RCA 2 TO 2
N/A RCA CABLE 1800MM C.A. RCA 3 TO 3
N/A FM ANTENNA PAL 1800MM CA FM
N/A RCA CABLE ORANGE C.A. RCA ORANGE
CASE / COVER / BRACKET ASSEMBLY
HDD BRACKET BRKT HDD HD304 33.S50V1.001
OPTICAL BRACKET BRKT ODD HD304 33.S50V1.002
C.A. SCART 2C
1800MM HD304
1800MM HD304
1800MM HD304
ANTENNA(PAL)1800M
M HD304
HD304
50.S50V1.018
50.S50V1.019
50.S50V1.020
50.S50V1.021
50.S6201.003
N/A FRONT IO BRACKET BRKT FRONT IO
HD304
SCART-RCA BRACKET BRKT SCART-RCA BD
HD304
N/A TV PAL BRACKET BRKT TV PAL SECC
T0.8 HD302
CONVERT BOARD HOLDER HLDR ODD SPACE
FOR HD304
ASSEMBLY HOUSE WITH
POWER SWITCH CABLE
FRONT BEZEL ASSY FRONTBEZEL
COMMUNICATION MODULE
N/A EXTERNAL ANTENNA SET ANTENNA HD304 2 7 . S 5 0 V 1 . 0 0 1
N/A ANTENNA CABLE C.A. ANTENNA HD304 27.S50V1.002
PROCESSOR
N/A CPU MEROM T5500
1.66GMHZ INTEL
ASSY chassis EUR
HD304
HD304
IC CPU MEROM
T5500 1.66G PGA B
33.S50V1.003
33.S50V1.004
33.S50V1.005
42.S50V1.001
60.S50V1.001
PZ.S5003.001
KC.55001.DTP
74 Chapter 6
Page 84

CATEGORY PART NAME DESCRIPTION ACER PART NO.
N/A CPU DC YONAH T2300
1.66GMHZ INTEL
N/A CPU DC YONAH T2600
2.17GMHZ INTEL
N/A CPU DC YONAH T2500
2GMHZ INTEL
N/A CPU DC YONAH T2400
1.83GMHZ INTEL
N/A CPU MEROM T7600
2.33GMHZ INTEL
N/A CPU MEROM T7400
2.16GMHZ INTEL
N/A CPU MEROM T7200 2.0GMHZ
INTEL
N/A CPU MEROM T5600
1.83GMHZ INTEL
DVD-RW DRIVE
N/A DVD-RW DRIVE PANASONIC
UJ-85J-BAA P600 SLOT
DVD-RW DRIVE 8X SUPERMULT PANASONIC UJ-845
IC CPU DC YONAH
T2300 1.66G PGA
IC CPU DC YONAH
T2600 2.17G PGA
IC CPU DC YONAH
T2500 2G PGA
IC CPU DC YONAH
T2400 1.83G PGA
IC CPU MEROM
T7600 2.33G PGA B
IC CPU MEROM T
7400 2.16G PGA B
IC CPU MEROM
T7200 2.0G PGA B
IC CPU MEROM
T5600 1.83G PGA B
S-MUL SLOT PAN/UJ85J-BAA P600
SUPER-MUL PAN/UJ845 SLOT HAVC
KC.23001.DTP
KC.26001.DTP
KC.25001.DTP
KC.24001.DTP
KC.76001.DTP
KC.74001.DTP
KC.72001.DTP
KC.56001.DTP
KU.00807.040
KU.00807.042
HDD / HARD DISK DRIVE
N/A HDD 500G SEATAGE
ST3500841AS
HDD 250G WD WD2500JS22NCB1
HEATSINK
THERMAL PLATE ASSY THERMAL
HEATSINK ASSY FSINK YONAH
N/A HEATSINK MSM HAVC5_0 ASSY FHINK MXM
HDD SATA2 500GB
SE ST3500841AS
HDD 250GB WD
WD2500JS-22NCB1
PLATE HD304
31W HAVC5_0
HAVC5_0
KH.50001.001
KH.25008.015
33.S50V1.006
34.S50V1.001
HI.S500C.002
Chapter 6 75
Page 85

CATEGORY PART NAME DESCRIPTION ACER PART NO.
KEYBOARD
N/A WIRELESS KEYBOARD
LOGITECH 967879-2125
TURKIS
N/A WIRELESS KEYBOARD
LOGITECH 967879-2217
ARABIC
N/A WIRELESS KEYBOARD
LOGITECH 967879-2213
ARABIC
N/A WIRELESS KEYBOARD
LOGITECH 967879-2100 US-IL
N/A WIRELESS KEYBOARD
LOGITECH 967879-2128
CZECH
N/A WIRELESS KEYBOARD
LOGITECH 967879-2101
FRENCH
N/A WIRELESS KEYBOARD
LOGITECH 967879-2102
GERMAN
N/A WIRELESS KEYBOARD
LOGITECH 967879-2104
SPANISH
N/A WIRELESS KEYBOARD
LOGITECH 967879-2115
GREEK
N/A WIRELESS KEYBOARD
LOGITECH 967879-2123
BELGIUM
N/A WIRELESS KEYBOARD
LOGITECH 967879-2103
ITALIAN
N/A WIRELESS KEYBOARD
LOGITECH 967879-2107
DANISH
N/A WIRELESS KEYBOARD
LOGITECH 967879-2108
NORWAY
N/A WIRELESS KEYBOARD
LOGITECH 967879-2110
PORTUGESE
N/A WIRELESS KEYBOARD
LOGITECH 967879-2106
SWEDISH
N/A WIRELESS KEYBOARD
LOGITECH 967879-2131
SWISS
N/A WIRELESS KEYBOARD
LOGITECH 967879-2112
RUSSIA
WIRELESS KB
967879-2125 TURKIS
WIRELESS KB
967879-2217 ARABIC
WIRELESS KB
967879-2213 ARABIC
WIRELESS KB
967879-2100 US-I L
WIRELESS KB
967879-2128 CZECH
WIRELESS KB
967879-2101 FRENCH
WIRELESS KB
967879-2102
GERMAN
WIRELESS KB
967879-2104
SPANISH
WIRELESS KB
967879-2115 GREEK
WIRELESS KB
967879-2123
BELGIUM
WIRELESS KB
967879-2103 ITALIAN
WIRELESS KB
967879-2107 DANISH
WIRELESS KB
967879-2108
NORWAY
WIRELESS KB
967879-2110
PORTUGESE
WIRELESS KB
967879-2106
SWEDISH
WIRELESS KB
967879-2131 SWISS
WIRELESS KB
967879-2112 RUSSIA
KB.RF404.020
KB.RF404.010
KB.RF404.011
KB.RF404.006
KB.RF404.017
KB.RF404.003
KB.RF404.005
KB.RF404.012
KB.RF404.018
KB.RF404.009
KB.RF404.004
KB.RF404.014
KB.RF404.021
KB.RF404.019
KB.RF404.013
KB.RF404.007
KB.RF404.015
76 Chapter 6
Page 86

CATEGORY PART NAME DESCRIPTION ACER PART NO.
N/A WIRELESS KEYBOARD
LOGITECH 967879-2120 UK
LOG
N/A WIRELESS KEYBOARD
LOGITECH 967879-2403 US
LOG
N/A WIRELESS KEYBOARD
LOGITECH 967879-2105
DUTCH
N/A WIRELESS KEYBOARD
LOGITECH 967879-2109
FINNISH
N/A WIRELESS KEYBOARD
LOGITECH 967879-2121 T-CN
N/A WIRELESS KEYBOARD
LOGITECH 967879-2124 THAI
MAIN BOARD
MAINBOARD P600X 945GT W/
O CPU & MEMORY
WIRELESS KB
967879-2120 UK LOG
WIRELESS KB
967879-2403 US LOG
WIRELESS KB
967879-2105 DUTCH
WIRELESS KB
967879-2109 FINNISH
WIRELESS KB
967879-2121 T-CN
WIRELESS KB
967879-2124 THAI
P600X 945GT/ICH7-M
NVIDIA MBD
KB.RF404.002
KB.RF404.001
KB.RF404.008
KB.RF404.016
KB.RF404.022
KB.RF404.023
MB.S5009.002A
MEMORY
SDIMM 256MB DDRII533
NANYA NT256T64UH4A1FN37B
SDIMM 256MB DDRII533
SAMSUNG M470T3354CZ3CD5
SDIMM 256MB DDRII667
NANYA NT256T64UH4A1FN3C
SDIMM 512MB DDRII533
ELPIDA GU33512AGEPN612C
SDIMM 512MB DDRII533
NANYA NT512T64UH8A1FN37B
SDIMM 512MB DDRII533
SAMSUNG M470T6554CZ3CD5
SDIMM 512MB DDRII667
NANYA NT512T64UH8A1FN3C
SDIMM 1GB DDRII533 ELPIDA
GU331G0AGEPN6E2C LF
DIMM 256M
NT256T64UH4A1FN37B
SODIMM 256M
M470T3354CZ3-CD5
SODIMM 256M
NT256T64UH4A1FN3C
SODIMM 512M
GU33512AGEPN612C
SODIMM512M
NT512T64UH8A1FN37B
SODIMM 512M
M470T6554CZ3-CD5
SODIMM512M
NT512T64UH8A1FN3C
SODIMM 1G
GU331G0AGEPN6E2
C
KN.25603.029
KN.2560B.017
KN.25603.027
KN.51209.005
KN.51203.023
KN.5120B.015
KN.51203.025
KN.1GB09.004
Chapter 6 77
Page 87

CATEGORY PART NAME DESCRIPTION ACER PART NO.
SDIMM 1GB DDRII533
SAMSUNG M470T2953CZ3CD5
SDIMM 1GB DDRII667 ELPIDA
GU331G0AJEPN6E2C
SDIMM 1GB DDRII667
SAMSUNG M470T2953CZ3CE6
POWER SUPPLY
POWER POWERSUPPLY
120W SPI FSP120-40GLS
REV:1.6
SCREW
N/A SCREWS SCRW HEX I#4-40/
N/A SCREWS SCRW PAN M #6-32
N/A SCREWS SCRW PAN M3 L5
N / A S C R E W S S C R W P A N M 2 * 2 . 5 8 6 . 1 A 5 2 2 . 2 R 5
N/A SCREWS SCRW MACH PAN
N/A SCREWS SCREW FLAT #6-
N/A SCREWS SCRW PAN T M3 L5
N/A SCREWS SCRW M3-P0.5 L5.0
SODIMM 1G
M470T2953CZ3-CD5
SODIMM 1G
GU331G0AJEPN6E2C
SODIMM 1G
M470T2953CZ3-CE6
SPS 120W SPI
FSP120-40GLS
REV:1.6
O#4-40 L5.5 NI
L5 BZN
BZN
M2*6L NI
32*3/16 NI
BZN
BZN
KN.1GB0B.004
KN.1GB09.005
KN.1GB0B.005
PY.12008.002
34.00015.071
86.00E66.D60
86.1A324.5R0
86.1A522.6R0
86.5A5B6.012
86.VA324.5R0
86.HA324.5R0
78 Chapter 6
 Loading...