

Page 1

BARCELONA
BARCELONA
BARCELONA
BARCELONA
GSM/GPRS
GSM/GPRS
GSM/GPRS
GSM/GPRS
Digital
Digital
Digital
Digital Mobile
Mobile
Mobile
Mobile Phone
Phone
Phone
Phone User
User
User
User
’
s
Guide
’
s
Guide
’
’
s
s Guide
Guide
Page 2

CONTENTS
CONTENTS
CONTENTS
CONTENTS
1.
THE
1.
1.
1. THE
BASICS
THE
BASICS
THE BASICS
BASICS
.
.
.
.
.
.
.
.
.
.
.
.
.
.
.
.
.
.
.
.
.
.
.
.
.
.
.
.
.
.
.
.
.
.
.
.
.
.
.
.
.
.
.
.
.
.
.
.
.
.
.
.
.
.
.
.
.
.
.
.
.
.
.
.
.
.
.
.
.
.
.
.
.
.
.
.
.
.
.
.
.
.
.
.
.
.
.
.
.
.
.
.
.
.
.
.
.
.
.
.
.
.
.
.
.
.
.
.
.
.
.
.
.
.
.
.
. .
. .
. .
. .
. .
. .
. .
. .
. .
. .
. .
. .
. .
. .
. .
. .
. .
. .
. .
. .
. .
. .
. .
. .
. .
. .
. .
. .
. .
. .
. .
. .
. .
. .
. .
. .
. .
. .
. .
.
. .
. .
. .
. .
. .
. .
. .
. .
. .
. .
. .
. .
. .
.
.
.
.
.
.
.
.
.
.
.
.
.
.
. .
. .
. .
. .
. .
. .
. .
. .
. .
. .
. .
. .
. .
1.1. I NTRODUCTION . . . . . . . . . . . . . . . . . . . . . . . . . . . . . . . . . . . . . . . . . . . . . . . . . . . . . . . . . . . . . . . . . . . . . 6
1.2. S ECURITY G UIDE . . . . . . . . . . . . . . . . . . . . . . . . . . . . . . . . . . . . . . . . . . . . . . . . . . . . . . . . . . . . . . . . . . 7
1.3. F OR Y OUR S AFETY . . . . . . . . . . . . . . . . . . . . . . . . . . . . . . . . . . . . . . . . . . . . . . . . . . . . . . . . . . . . . . . 8
2.
BEFORE
2.
BEFORE
2.
2. BEFORE
BEFORE USE
USE
USE
.
.
.
.
.
.
.
.
.
.
.
.
.
.
.
.
.
.
.
.
.
.
.
.
.
.
.
.
.
.
.
.
.
.
.
.
.
.
.
.
.
.
.
.
.
.
.
.
.
.
.
.
.
.
.
.
.
.
.
.
.
.
.
.
.
.
.
.
.
.
.
.
.
.
.
.
.
.
.
.
.
.
.
.
.
.
.
.
.
.
.
.
.
.
.
.
.
.
.
.
.
.
.
.
.
.
.
.
.
.
.
USE
.
. .
. .
. .
. .
. .
. .
. .
. .
. .
. .
. .
. .
. .
. .
. .
. .
. .
. .
. .
. .
. .
. .
. .
. .
. .
. .
. .
. .
. .
. .
. .
. .
. .
. .
. .
. .
. .
.
. .
. .
. .
. .
. .
. .
. .
. .
. .
. .
. .
. .
. .
.
.
.
.
.
.
.
.
.
.
.
.
.
.
. .
. .
. .
. .
. .
. .
. .
. .
. .
. .
. .
. .
. .
2.1. C OMPONENTS N AME AND E XPLANA TION . . . . . . . . . . . . . . . . . . . . . . . . . . . . 17
2.1.1. Technical Specification . . . . . . . . . . . . . . . . . . . . . . . . . . . . . . . . . . . . . . . . . . . 18
2.1.2. Introduction to Icons in standby . . . . . . . . . . . . . . . . . . . . . . . . . . . . 19
2.2. K EY FUNCTION . . . . . . . . . . . . . . . . . . . . . . . . . . . . . . . . . . . . . . . . . . . . . . . . . . . . . . . . . . . . . . . . . . . . 20
2.3. I NST ALL OF SIM CARD ,
T-
FLASH CARD . . . . . . . . . . . . . . . . . . . . . . . . . . . . . . 21
2.3.1. SIM car d . . . . . . . . . . . . . . . . . . . . . . . . . . . . . . . . . . . . . . . . . . . . . . . . . . . . . . . . . . . . . . . . . . . . 21
2.3.2. Install and Remove the SIM . . . . . . . . . . . . . . . . . . . . . . . . . . . . . . . . . . 22
2.3.3. T-flash card . . . . . . . . . . . . . . . . . . . . . . . . . . . . . . . . . . . . . . . . . . . . . . . . . . . . . . . . . . . . . . . 23
2.4. B
A TTERY
. . . . . . . . . . . . . . . . . . . . . . . . . . . . . . . . . . . . . . . . . . . . . . . . . . . . . . . . . . . . . . . . . . . . . . . . . . . . . 24
2.4.1. Installation the Battery . . . . . . . . . . . . . . . . . . . . . . . . . . . . . . . . . . . . . . . . . . . . 24
2.4.2. Battery charging . . . . . . . . . . . . . . . . . . . . . . . . . . . . . . . . . . . . . . . . . . . . . . . . . . . . . . 26
2.5. S ECURITY C ODE . . . . . . . . . . . . . . . . . . . . . . . . . . . . . . . . . . . . . . . . . . . . . . . . . . . . . . . . . . . . . . . . . . 27
6
.
.
.
.
. .
. .
.
.
.
.
. .
. .
6
.
.
.
.
.
.
.
.
.
.
.
.
.
.
.
.
.
.
.
.
.
.
6
6
. .
. .
. .
. .
. .
. .
. .
. .
. .
. .
.
17
17
.
.
.
.
.
.
.
.
.
.
.
.
.
.
.
.
.
.
17
17
. .
. .
. .
. .
. .
. .
. .
. .
.
3.
QUICK
3.
QUICK
3.
3. QUICK
QUICK START
3.1. F
START
START
START
EA TURE
.
.
.
.
.
.
.
.
.
.
.
.
.
.
.
.
.
.
.
.
.
.
.
.
.
.
.
.
.
.
.
.
.
.
.
.
.
.
.
.
.
.
.
.
.
.
.
.
.
.
.
.
.
.
.
.
.
.
.
.
.
.
.
.
.
.
.
.
.
.
.
.
.
.
.
.
.
.
.
.
.
.
.
.
.
.
.
.
.
.
.
.
.
.
.
.
.
.
.
.
.
.
. .
. .
. .
. .
. .
. .
. .
. .
. .
. .
. .
. .
. .
. .
. .
. .
. .
. .
. .
. .
. .
. .
. .
. .
. .
. .
. .
. .
. .
. .
. .
. .
FUNCTION . . . . . . . . . . . . . . . . . . . . . . . . . . . . . . . . . . . . . . . . . . . . . . . . . . . . . . . . . . . . 28
.
. .
. .
. .
. .
. .
. .
. .
. .
. .
. .
. .
. .
. .
.
.
.
.
.
.
.
.
.
.
.
.
.
.
. .
. .
. .
. .
. .
. .
. .
. .
. .
. .
. .
. .
. .
3.2. D IALING . . . . . . . . . . . . . . . . . . . . . . . . . . . . . . . . . . . . . . . . . . . . . . . . . . . . . . . . . . . . . . . . . . . . . . . . . . . . . . 31
3.3. R EJECT
A
CALL . . . . . . . . . . . . . . . . . . . . . . . . . . . . . . . . . . . . . . . . . . . . . . . . . . . . . . . . . . . . . . . . . . . . 31
28
.
.
.
.
.
.
.
.
. .
. .
. .
. .
28
.
.
.
.
.
.
.
.
.
.
.
.
.
.
.
.
.
.
.
.
.
.
28
28
. .
. .
. .
. .
. .
. .
. .
. .
. .
. .
.
Page 3

3.4. A NSWER
3.5. E NDING
A
C ALL . . . . . . . . . . . . . . . . . . . . . . . . . . . . . . . . . . . . . . . . . . . . . . . . . . . . . . . . . . . . . . . . . 31
A
C ALL . . . . . . . . . . . . . . . . . . . . . . . . . . . . . . . . . . . . . . . . . . . . . . . . . . . . . . . . . . . . . . . . . . 32
3.6. E MERGENCY C ALLS . . . . . . . . . . . . . . . . . . . . . . . . . . . . . . . . . . . . . . . . . . . . . . . . . . . . . . . . . . . . 32
3.7. C ALL H I STORY . . . . . . . . . . . . . . . . . . . . . . . . . . . . . . . . . . . . . . . . . . . . . . . . . . . . . . . . . . . . . . . . . . . . 32
3.8. C ALL DIVERT . . . . . . . . . . . . . . . . . . . . . . . . . . . . . . . . . . . . . . . . . . . . . . . . . . . . . . . . . . . . . . . . . . . . . . 32
3.9. C ALL W AITING . . . . . . . . . . . . . . . . . . . . . . . . . . . . . . . . . . . . . . . . . . . . . . . . . . . . . . . . . . . . . . . . . . . . . 33
3.10. C ALL BARRING . . . . . . . . . . . . . . . . . . . . . . . . . . . . . . . . . . . . . . . . . . . . . . . . . . . . . . . . . . . . . . . . . . . . 33
3.11. P OWER OFF . . . . . . . . . . . . . . . . . . . . . . . . . . . . . . . . . . . . . . . . . . . . . . . . . . . . . . . . . . . . . . . . . . . . . . . . . 33
4.
FUNCTION
4.
FUNCTION
4.
4. FUNCTION
FUNCTION MENU
MENU
MENU
MENU
.
.
.
.
.
.
.
.
.
.
.
.
.
.
.
.
.
.
.
.
.
.
.
.
.
.
.
.
.
.
.
.
.
.
.
.
.
.
.
.
.
.
.
.
.
.
.
.
.
.
.
.
.
.
.
.
.
.
.
.
.
.
.
.
.
.
.
.
.
.
.
.
.
.
.
.
.
.
.
.
.
.
.
.
.
.
.
.
.
.
. .
. .
. .
. .
. .
. .
. .
. .
. .
. .
. .
. .
. .
. .
. .
. .
. .
. .
. .
. .
. .
. .
. .
. .
. .
. .
.
. .
. .
. .
. .
. .
. .
. .
. .
. .
. .
. .
. .
. .
.
.
.
.
.
.
.
.
.
.
.
.
.
.
. .
. .
. .
. .
. .
. .
. .
. .
. .
. .
. .
. .
. .
4.1. C ALENDAR . . . . . . . . . . . . . . . . . . . . . . . . . . . . . . . . . . . . . . . . . . . . . . . . . . . . . . . . . . . . . . . . . . . . . . . . . . 33
4.2. P HONE B OOK . . . . . . . . . . . . . . . . . . . . . . . . . . . . . . . . . . . . . . . . . . . . . . . . . . . . . . . . . . . . . . . . . . . . . . 34
4.3. A UDIO PLAYER . . . . . . . . . . . . . . . . . . . . . . . . . . . . . . . . . . . . . . . . . . . . . . . . . . . . . . . . . . . . . . . . . . . . 36
4.4. S ER VICES . . . . . . . . . . . . . . . . . . . . . . . . . . . . . . . . . . . . . . . . . . . . . . . . . . . . . . . . . . . . . . . . . . . . . . . . . . . . . 37
4.4.1. User STK . . . . . . . . . . . . . . . . . . . . . . . . . . . . . . . . . . . . . . . . . . . . . . . . . . . . . . . . . . . . . . . . . . . 37
4.4.2. Internet service . . . . . . . . . . . . . . . . . . . . . . . . . . . . . . . . . . . . . . . . . . . . . . . . . . . . . . . . 37
4.4.3. Data account . . . . . . . . . . . . . . . . . . . . . . . . . . . . . . . . . . . . . . . . . . . . . . . . . . . . . . . . . . . . 38
4.5. M ESSAGING . . . . . . . . . . . . . . . . . . . . . . . . . . . . . . . . . . . . . . . . . . . . . . . . . . . . . . . . . . . . . . . . . . . . . . . . . 40
4.5.1. Write Message . . . . . . . . . . . . . . . . . . . . . . . . . . . . . . . . . . . . . . . . . . . . . . . . . . . . . . . . . 40
4.5.2. Inbox . . . . . . . . . . . . . . . . . . . . . . . . . . . . . . . . . . . . . . . . . . . . . . . . . . . . . . . . . . . . . . . . . . . . . . . . . . 41
4.5.3. Drafts . . . . . . . . . . . . . . . . . . . . . . . . . . . . . . . . . . . . . . . . . . . . . . . . . . . . . . . . . . . . . . . . . . . . . . . . . 41
4.5.4. Outbox . . . . . . . . . . . . . . . . . . . . . . . . . . . . . . . . . . . . . . . . . . . . . . . . . . . . . . . . . . . . . . . . . . . . . . . 42
4.5.5. MMS . . . . . . . . . . . . . . . . . . . . . . . . . . . . . . . . . . . . . . . . . . . . . . . . . . . . . . . . . . . . . . . . . . . . . . . . . . 42
4.5.6. Broadcast Message . . . . . . . . . . . . . . . . . . . . . . . . . . . . . . . . . . . . . . . . . . . . . . . . 44
4.5.7. Templates . . . . . . . . . . . . . . . . . . . . . . . . . . . . . . . . . . . . . . . . . . . . . . . . . . . . . . . . . . . . . . . . . 45
4.5.8. SMS Settings . . . . . . . . . . . . . . . . . . . . . . . . . . . . . . . . . . . . . . . . . . . . . . . . . . . . . . . . . . . 45
33
.
.
.
.
.
.
.
.
. .
. .
. .
. .
33
.
.
.
.
.
.
.
.
.
.
.
.
.
.
.
.
.
.
.
.
.
.
33
33
. .
. .
. .
. .
. .
. .
. .
. .
. .
. .
.
Page 4

4.6. C AMERA . . . . . . . . . . . . . . . . . . . . . . . . . . . . . . . . . . . . . . . . . . . . . . . . . . . . . . . . . . . . . . . . . . . . . . . . . . . . . . 46
4.7. WLAN. . . . . . . . . . . . . . . . . . . . . . . . . . . . . . . . . . . . . . . . . . . . . . . . . . . . . . . . . . . . . . . . . . . . . . . . . . . . . . . . 47
4.7.1. Enable WLAN . . . . . . . . . . . . . . . . . . . . . . . . . . . . . . . . . . . . . . . . . . . . . . . . . . . . . . . . . . 47
4.7.2. WLAN status . . . . . . . . . . . . . . . . . . . . . . . . . . . . . . . . . . . . . . . . . . . . . . . . . . . . . . . . . . . . 47
4.7.3. Search for networks . . . . . . . . . . . . . . . . . . . . . . . . . . . . . . . . . . . . . . . . . . . . . . . . 47
4.7.4. Access point settings . . . . . . . . . . . . . . . . . . . . . . . . . . . . . . . . . . . . . . . . . . . . . . 47
4.8. O RGANIZER . . . . . . . . . . . . . . . . . . . . . . . . . . . . . . . . . . . . . . . . . . . . . . . . . . . . . . . . . . . . . . . . . . . . . . . . . 48
4.9. V IDEO PLA YER . . . . . . . . . . . . . . . . . . . . . . . . . . . . . . . . . . . . . . . . . . . . . . . . . . . . . . . . . . . . . . . . . . . . 48
4.10. S ETTINGS . . . . . . . . . . . . . . . . . . . . . . . . . . . . . . . . . . . . . . . . . . . . . . . . . . . . . . . . . . . . . . . . . . . . . . . . . . . . 48
4.10.1. Breanthing setting . . . . . . . . . . . . . . . . . . . . . . . . . . . . . . . . . . . . . . . . . . . . . . . . . . . 48
4.10.2. Dual SIM Settings . . . . . . . . . . . . . . . . . . . . . . . . . . . . . . . . . . . . . . . . . . . . . . . . . . . . 48
4.10.3. Pen calibration . . . . . . . . . . . . . . . . . . . . . . . . . . . . . . . . . . . . . . . . . . . . . . . . . . . . . . . . . 49
4.10.4. Phone settings . . . . . . . . . . . . . . . . . . . . . . . . . . . . . . . . . . . . . . . . . . . . . . . . . . . . . . . . . 49
4.10.5. Network Settings . . . . . . . . . . . . . . . . . . . . . . . . . . . . . . . . . . . . . . . . . . . . . . . . . . . . . 50
4.10.6. Security Settings . . . . . . . . . . . . . . . . . . . . . . . . . . . . . . . . . . . . . . . . . . . . . . . . . . . . . . 50
4.10.7. Restore Factory Setting . . . . . . . . . . . . . . . . . . . . . . . . . . . . . . . . . . . . . . . . . . 53
4.10.8. Sound effects . . . . . . . . . . . . . . . . . . . . . . . . . . . . . . . . . . . . . . . . . . . . . . . . . . . . . . . . . . . 53
4.10.9. T-sensor Settings . . . . . . . . . . . . . . . . . . . . . . . . . . . . . . . . . . . . . . . . . . . . . . . . . . . . . 53
4.11. G AMES . . . . . . . . . . . . . . . . . . . . . . . . . . . . . . . . . . . . . . . . . . . . . . . . . . . . . . . . . . . . . . . . . . . . . . . . . . . . . . . . 53
4.12. F
ILE
MANAGER . . . . . . . . . . . . . . . . . . . . . . . . . . . . . . . . . . . . . . . . . . . . . . . . . . . . . . . . . . . . . . . . . . . . 53
4.13. A LARM . . . . . . . . . . . . . . . . . . . . . . . . . . . . . . . . . . . . . . . . . . . . . . . . . . . . . . . . . . . . . . . . . . . . . . . . . . . . . . . . 54
4.14. I MAGE VIEWER . . . . . . . . . . . . . . . . . . . . . . . . . . . . . . . . . . . . . . . . . . . . . . . . . . . . . . . . . . . . . . . . . . . . 54
4.15. S OUND RECORDER . . . . . . . . . . . . . . . . . . . . . . . . . . . . . . . . . . . . . . . . . . . . . . . . . . . . . . . . . . . . . . . 54
4.16.
JAVA
. . . . . . . . . . . . . . . . . . . . . . . . . . . . . . . . . . . . . . . . . . . . . . . . . . . . . . . . . . . . . . . . . . . . . . . . . . . . . . . . . . . 55
4.17. B LUETOOTH . . . . . . . . . . . . . . . . . . . . . . . . . . . . . . . . . . . . . . . . . . . . . . . . . . . . . . . . . . . . . . . . . . . . . . . . 55
4.18. U SER P ROFILES . . . . . . . . . . . . . . . . . . . . . . . . . . . . . . . . . . . . . . . . . . . . . . . . . . . . . . . . . . . . . . . . . . . 57
Page 5

4.19. C ALL CENTER . . . . . . . . . . . . . . . . . . . . . . . . . . . . . . . . . . . . . . . . . . . . . . . . . . . . . . . . . . . . . . . . . . . . . . 58
Call History . . . . . . . . . . . . . . . . . . . . . . . . . . . . . . . . . . . . . . . . . . . . . . . . . . . . . . . . . . . . . . . . . . . . . . . . . . . . . . . . 58
Call Settings . . . . . . . . . . . . . . . . . . . . . . . . . . . . . . . . . . . . . . . . . . . . . . . . . . . . . . . . . . . . . . . . . . . . . . . . . . . . . . 59
4.20. E BOOK R EADER . . . . . . . . . . . . . . . . . . . . . . . . . . . . . . . . . . . . . . . . . . . . . . . . . . . . . . . . . . . . . . . . . . . 59
4.21. C ALCULA TOR . . . . . . . . . . . . . . . . . . . . . . . . . . . . . . . . . . . . . . . . . . . . . . . . . . . . . . . . . . . . . . . . . . . . . . 60
4.22. FM RADIO . . . . . . . . . . . . . . . . . . . . . . . . . . . . . . . . . . . . . . . . . . . . . . . . . . . . . . . . . . . . . . . . . . . . . . . . . . . 60
4.23. V IDEO RECORDER . . . . . . . . . . . . . . . . . . . . . . . . . . . . . . . . . . . . . . . . . . . . . . . . . . . . . . . . . . . . . . . 61
4.24. W ORLD CLOCK . . . . . . . . . . . . . . . . . . . . . . . . . . . . . . . . . . . . . . . . . . . . . . . . . . . . . . . . . . . . . . . . . . . . 62
4.25. TV (OPTIONAL) . . . . . . . . . . . . . . . . . . . . . . . . . . . . . . . . . . . . . . . . . . . . . . . . . . . . . . . . . . . . . . . . 62
5.
APPENDIX
5.
APPENDIX
5.
5. APPENDIX
APPENDIX
.
.
.
.
.
.
.
.
.
.
.
.
.
.
.
.
.
.
.
.
.
.
.
.
.
.
.
.
.
.
.
.
.
.
.
.
.
.
.
.
.
.
.
.
.
.
.
.
.
.
.
.
.
.
.
.
.
.
.
.
.
.
.
.
.
.
.
.
.
.
.
.
.
.
.
.
.
.
.
.
.
.
.
.
.
.
.
.
.
.
.
.
.
.
.
.
.
.
.
.
.
.
.
.
.
.
.
.
.
.
.
.
.
.
.
.
. .
. .
. .
. .
. .
. .
. .
. .
. .
. .
. .
. .
. .
. .
. .
. .
. .
. .
. .
. .
. .
. .
. .
. .
. .
. .
. .
. .
. .
. .
. .
. .
. .
. .
. .
. .
. .
. .
. .
.
. .
. .
. .
. .
. .
. .
. .
. .
. .
. .
. .
. .
. .
.
.
.
.
.
.
.
.
.
.
.
.
.
.
. .
. .
. .
. .
. .
. .
. .
. .
. .
. .
. .
. .
. .
63
.
.
.
.
.
.
.
.
. .
. .
. .
. .
63
.
.
.
.
.
.
.
.
.
.
.
.
.
.
.
.
.
.
.
.
.
.
63
63
. .
. .
. .
. .
. .
. .
. .
. .
. .
. .
.
Page 6

1.
The
Basics
The
Basics
The Basics
Basics
1.1.
Introduction
1.1.
Introduction
1.1.
1.1. Introduction
Introduction
1.
1.
1. The
Thank you for choosing the Mobile phone GSM/GPRS
digital mobile phone . After reading this guide you will be
able to fully master the use of your mobile phone and
appreciate all its functions and ease of use.
The mobile phone is designed for use on the
GSM/GPRS networks. Not only does the Mobile phone
provide you with basic calling functions, but also with many
practical functions such as double SIM cards mode, smart
input method, a name card style phonebook, 64 chord rings ,
SMS, MMS, camera and video, MP3 and movie player,
recorder, clock/alarm, calculator , automatic power On /
power Off , calendar, world clock, GPRS surfing , STK,
Keypad lock to improve the time you spend working and
playing. Moreover, the Mobile phone uses a personalized
man-machine interface and the perfect functional design will
satisfy all your needs.
Page 7

The colour screen mobile phone is compatible with
GSM/GPRS technology and has been approved by
certification authorities both domestically and abroad.
Our company reserves the right to revise this manual
content without prior notice.
1.2.
Security
1.2.
Security
1.2.
1.2. Security
Security Guide
If your mobile phone is lost or stolen, please contact the
Guide
Guide
Guide
telecommunications authorities or a sales agent
immediately to have a hold on the phone and the SIM
card. This will prevent economic loss caused by
unauthorized calls made from your mobile phone.
When you contact the telecommunications authorities or
a sales agent, they will need to know the IMEI number of
your mobile phone (remove battery to expose number
located on the label on back of phone). Please copy this
number and keep in a safe place for future use.
In order to avoid the misuse of your mobile phone
please take the following preventative measures:
Set the PIN number of your mobile phone’s SIM
card and change this number immediately if it
becomes known to a third party.
Please keep the phone out of sight when leaving
it in a vehicle. It is best to carry the phone with
you, or locked in the trunk.
Page 8

1.3.
For
Your
1.3.
For
1.3.
1.3. For
For Your
Safety
Your
Safety
Your Safety
Safety
For the efficient and safe operation of your wireless
handheld mobile telephone, observe these guidelines.
General
General
General
General attention
attention
attention
attention
Do not switch the phone ON when wireless phone
use is prohibited or when it may cause interference
or danger. Switch the phone OFF near medical
equipment, in aircraft and at the refueling point. Do
not use your mobile phone near low signal or
precision electronic equipment. Radio wave
interference may cause the malfunctioning of such
electronic equipment and other problems.
Check the laws and regulations on the use of
wireless telephone in the areas where you drive.
Always obey traffic rules. Also, if using your phone
while driving, giving full attention to driving. Driving
safely is your first responsibility. Use hands-free
operation, if available. Pull off the road and park
before making or answering a call if driving
conditions so require.
Follow any restrictions. Do not use the phone where
blasting is in progress.
Use only in the normal position as explained in the
Page 9

product documentation. Especial the position where
kids could not access.
Use only approved enhancements and batteries. Do
not connect incompatible products.
Please do not use your mobile phone near low signal
or precision electronic equipment. Radio wave
interference may cause the malfunctioning of such
electronic equipment and other problems. Special
Tips must be paid near the following equipment:
hearing ai ds, pacemakers and other electronic
medical equipment, smoke detectors, automatic
doors and other automatic control installations.
find out the effect of mobile phones on a pacemaker
or other piece of electronic medical equipment
please contact the man ufacturers or local sales
agents of the equipment.
To
avoid the mobile phone malfunctioning, or
catching fire, please do not violently impact, jolt or
throw your mobile phone.
Please do not place the batteries, mobile phone or
charger in a microwave oven or high-pressure
equipment. Otherwise it could lead to unexpected
accidents such as damage to the circuitry or fire.
Please do not use your mobile phone near
flammable or volatile gases, otherwise it could cause
malfunctioning or fire.
To
Page 10

Please do not subject your mobile phone to high
temperatures, high humidity or dusty places;
otherwise this may lead to the malfunction of your
mobile phone.
To
avoid your mobile phone falling and
malfunctioning or being damaged, please do not
place your phone on uneven or unstable surfaces.
Phone
Phone
Phone
Phone Safety
Safety
Safety
Safety
D o not disassemble or modify the mobile phone, as
it will lead to damage to the phone such as battery
leakage or circuitry failure.
Please do not subject the LCD to impact or use the
screen to strike things, as this will damage the LCD
board and cause leakage of the liquid crystal. There
is a risk of blindness if the liquid crystal substance
gets into the eyes. If this occurs rinse ey es
immediately with clear water (under no
circumstances rub your eyes) and go immediately
to a hospital for treatment.
Under very rare circumstances using the mobile
phone in certain model cars may negatively effect
the internal electronic equipment. In order to assure
your safety under such circumstances please do not
use the mobile phone.
If your car is equipped with an airbag, do not place
your phone on top of it or within the contact area of
Page 11

the airbag in order to avoid seriously harming the
driver or passenger when the airbag inflates.
Please do not use needles, pen tips, or other sharp
objects on the keypad as this may damage the
mobile phone or cause it to malfunction.
Avoid letting the phone come into close contact with
magnetic objects such as magnetic cards as the
radiation waves of the mobile phone may erase the
information stored on floppy disks,pay cards and
credit cards.
Please keep small metal objects, such as
thumbtacks, far away from the receiver. When the
receiver is in use it becomes magnetic and may
attract these small metal objects and thus these
may cause injury or damage the mobile phone.
Avoid having the mobile phone come into contact
with water or other liquids. If liquids enter the phone,
this could cause a short circuit, battery leak or other
malfunction.
As much as possible, please use the mobile phone
in a place away from landline telephones,
televisions, radios, and automated office equipment
in order to avoid affecting both the equipment and
the mobile phone.
Battery
Battery
Battery
Battery Safety
Safety
Safety
Safety
Do not disassemble or modify the battery, as this
Page 12

will cause the battery to leak, overheat, crack and
catch fire.
Do not dispose of old batteries with everyday
domestic garbage. Please dispose of old batteries at
the directed places with specific rules for their
disposal.
Please do not put/throw batteries into a fire, as this
will cause the battery to catch fire and explode.
When installing the battery, do not use force or
pressure, as this will cause the battery to leak,
overheat, crack and catch fire.
Please do not use wires, needles or other metal
objects to short-circuit the battery. Also, do not put
the battery near necklaces or other metal objects, as
this will cause the battery to leak, overheat, crack
and catch fire.
Please do not solder the contact points of the
battery, as this will cause the battery to leak,
overheat, crack and catch fire.
If the liquid in the batteries goes into the eyes, there
is a risk of blindness. If this occurs do not rub the
eyes, but immediately rinse eyes with clear water
and go to the hospital for treatment.
Please do not use or place the batteries near high
temperature places such as near a fire or heating
vessel, as this will cause the battery to leak,
Page 13

overheat, crack and catch fire.
If the battery overheats
,
changes colour, or
becomes distorted during use, charging, or storage,
please stop using and replace it with a new battery.
If the liquid from the battery comes in contact with
skin or clothing this could cause burning of the skin.
Immediately use clear water to rinse and seek
medical Tips if necessary.
If the battery leaks or gives off a strange odour,
please remove the battery from the vicinity of the
open fire to avoid a fire or explosion.
Please do not let the battery become wet as this will
cause the battery to overheat, smoke and corrode.
Please do not use or place batteries in places of
high temperature such as in direct sunlight, as this
will cause the battery to leak and overheat, lower
performance, and shorten the battery’s life.
Please do not continuously charge for more than
24 hours.
Charger
Charger
Charger
Charger Safety
Safety
Safety
Safety
Please use AC 220 volts. The use of any other
voltage will cause battery leakage, fire and cause
damage to the mobile phone and charger.
It is forbidden to short circuit the charger, as this will
cause electrical shock, smoking and damage to the
charger.
Page 14

Please do not use the charger if the power cord is
damaged, as this will cause fire or electrical shock.
Please immediately clean any dust gathered on the
electrical outlet.
Please do not place vessels with water near the
charger in order to avoid water splashing onto the
charger and causing an electrical shortage, leakage
or other malfunction.
If the charger comes in contact with water or other
liquid the power must immediately be switched off
to avoid an electrical short or shock, fire or
malfunction of the charger.
Please do not disassemble or modify the charger,
as it will lead to bodily harm, electrical shock, fire or
damage to the charger.
Please do not use the charger in the bathroom or
other excessively moist areas, as this will cause
electrical shock, fire or damage to the charger.
Please do not touch the charger with wet hands, as
this will cause electrical shock.
Do not modify or place heavy objects on the power
cord, as this will cause electrical shock or fire.
Before cleaning or carrying out maintenance please
unplug the charger from the electrical outlet.
When unplugging charger, do not pull on the cord,
but rather hold on to the body of the charger, as
Page 15

pulling on the cord will damage the cord and lead to
electrical shock or fire.
Cleaning
Cleaning
Cleaning
Cleaning and
and
Maintenance
and
Maintenance
and Maintenance
Maintenance
The mobile phone, battery and charger are not
water resistant. Please do not use them in the
bathroom or other excessively moist areas and
likewise avoid allowing them to get wet in the rain.
Use a soft, dry cloth to clean the mobile phone,
battery and charger.
Please do not use alcohol, thinner, benzene or other
solvents to wipe the mobile phone.
A
dirty outlet will cause poor electrical contact, lose
of power and even inability to recharge. Please
clean regularly.
General
General
General
General Matters
Phone :
Matters
Matters
Matters
:
:
:
Please use the mobile phone in the environment
with a temperature between 5 ℃ ~ 40 ℃ and a
humidity between 35% ~ 85%.
As much as possible, please use the mobile phone
in a place away from landline telephones,
televisions, radios, and automated office equipment
in order to avoid affecting both the equipment and
the mobile phone
Battery :
Please place the battery in a cool, shady and well-
Page 16

ventilated place out of direct sunlight
The life of all mobile phone batteries is limited. The
usable time of batteries decreases with frequent
charging. When charging becomes ineffective this
means that the battery is at the end of its life and
the battery should be replaced with a new one of the
designated type.
Do not dispose of old batteries with everyday
domestic garbage. Please dispose of old batteries
at the directed places with specific rules for their
disposal.
Charger:
Please do not charge in the following places :1, in
sunlight ;2, the outside temperature lower than 5 ℃
or higher than 40 ℃ ;3, moist or humid places, dusty
places or places with excessive vibration (this will
cause malfunctioning);4, near televisions, radios,
electronic products.
Page 17
2.1.
Components
2.1.
Components
2.1.
2.1. Components
Components Name
2.
2.
2.
2. Before
Name
Name
Name and
Before
Before
Before Use
and
and
and Explanation
Use
Use
Use
Explanation
Explanation
Explanation
Page 18

2.1.1.
2.1.1.
2.1.1.
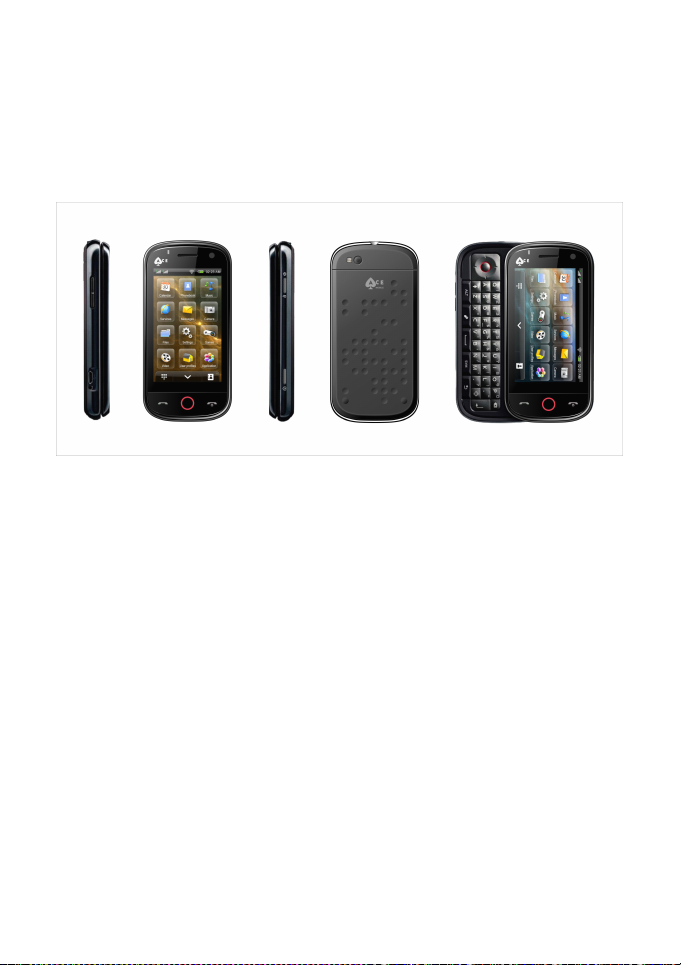
2.1.1. Technical
Handset
Handset
Handset
Handset
Technical
Technical
Technical Specification
Specification
Specification
Specification
Model Barcelona
Dimensions (w × h × t) 113*55. 4 *15.9
Weight 142g(include the battery)
Lithium
Lithium
Lithium
Lithium Battery
Battery
Battery
Battery
Model Barcelona
Nominal voltage 3.7V
Maximum Charge Voltage 4.2V
Capacity 1000mAh
Travel
Travel
Travel
Travel charger
charger
charger
charger
Model Barcelona
Input 5V
Page 19
2.1.2.
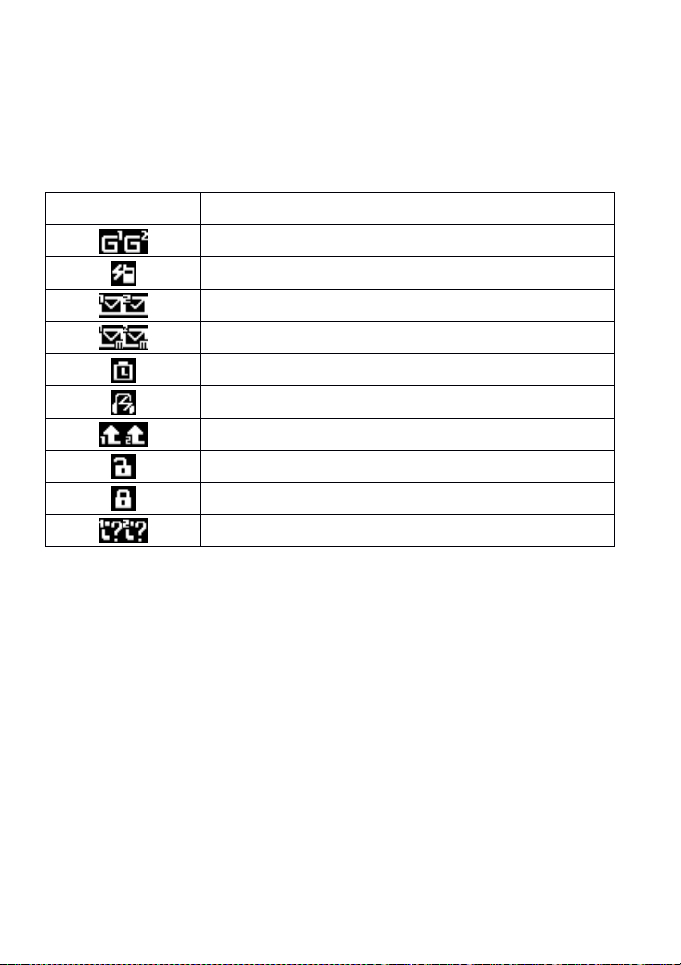
Icon
Icon
Icon
Icon
Description
Description
Description
Description
The device is being used in a GPRS network.
Vibrator indicator
SMS indicator
MMS indicator
Alarm indicator
Earphone indicator
Divert all calls
The device keypad is unlocked
The device keypad is locked
You
have missed calls
2.1.2.
2.1.2.
2.1.2. Introduction
Introduction
Introduction
Introduction to
to
Icons
to
Icons
to Icons
Icons in
in
standby
in
standby
in standby
standby
Page 20

2.2.
Key
2.2.
2.2.
2.2. Key
1.
1.
1.
1. Direction
right .
( 2
( 3
( 4
down .
2.
2.
2.
2. Number
3.
3.
3.
3. Send
4.
4.
4.
4. End
function
Key
function
Key function
function
Direction
Direction
Direction key:
1
1
( 1
1 ) Right
2
2
2 ) Left
3
3
3 ) Up
4
4
4 ) Down
Number
Number
Number keys
number keys from 2-9 can be set for one-key dialling.
Send
Send
Send key:
see the record of all calls made.
End
End
End key:
key:
key:
key:
Right
Right
Right key:
Left
Left
Left key:
Up
Up
Up key:
Down
Down
Down key:
key:
key:
key:
key:
key:
key:
key:
key:
key: move the cursor with the direction of
key:
key:
key: move the cursor with the direction of left .
key:
key:
key: move the cursor with the direction of up .
key:
key:
key: move the cursor with the direction of
keys
:
keys
:
keys :
:
T
o enter numbers and letters; the
To
dial and pickup calls; on standby mode, to
To
end a call or reject incoming calls. Under
Page 21

most circumstances pressing this key will put the mobile
phone into standby mode.
5.
CapsLock:
5.
CapsLock:
5.
5. CapsLock:
CapsLock: Can switch Capital or Lowcase.
6.
ALT
6.
6.
6.
7.
7.
7.
7. Input
8.
8.
8.
8. Symbol:
9.
9.
9.
9. Right
10.
10.
10.
10. Delete
11.
11.
11.
11. Power
12.
12.
12.
12. S
to pressing and thereafter releasing a
refers to pressing a key and keeping it depressed for 2
seconds or longer.
Key:
ALT
Key:
ALT
ALT
Key:
Key: This key can switch the input mode,input the
character (Upside of the keypad silk-screen).
Input
Method:
Input
Method:
Input Method:
Method: When editing ,can switch the Input
Method.
Symbol:
Symbol:
Symbol: When editing ,can show the symbols.
Right
soft
Right
Right soft
Delete
Delete
Delete Key:
Power
Power
Power Key:
S
ide
S
ide
S ide
ide key:
submenu ,and you can control the volume .
!
Tip:
!
Tip:
!
! Tip:
Tip: In this handbook, the phrase “ press the key ” refers
key:
soft
key:
soft key:
key: Back a Menu .
Key:
Key:
Key: When editing ,can delete the characters.
Key:
Key:
Key: Hold down this key to power On/Off.
key:
key:
key:You can enter the picutre capturing
key,
“ Hold down a key ”
2.3.
2.3.
2.3.
2.3. I
2.3.1.
2.3.1.
2.3.1.
2.3.1. SIM
Before
Before
Before
Before using
SIM
card
SIM
card
SIM
SIM card
card into
I
nstall
I
nstall
I nstall
nstall of
SIM
SIM
SIM car
of
SIM
of
SIM
of SIM
SIM card,
car
d
car
d
car d
d
using
using
using your
into
the
into
the
into the
the phone.
card,
T-flash
card,
T-flash
card, T-flash
T-flash card
your
mobile
your
mobile
your mobile
mobile phone
phone.
phone.
phone. The
The
The
The SIM
card
card
card
phone
phone
phone you
SIM
card
SIM
card
SIM card
card is
you
must
you
must
you must
must insert
is
your
is
your
is your
your key
insert
insert
insert a
key
key
key to
a
a
a
to
to
to
Page 22

entering
entering
entering
entering the
provided
provided
provided
provided by
card is all the data related to establishing a connection with
the network, together with the names and numbers in your
phonebook and messages.
from your mobile phone and i nserted in any other
GSM/GPRS mobile phone to be read (a new mobile phone
will automatically read the SIM card).
the
digital
the
digital
the digital
digital GSM/GPRS
by
network
by
network
by network
network provider.
The information recorded on the metal area of the SIM
GSM/GPRS
GSM/GPRS
GSM/GPRS network.
provider.
provider.
provider.
network.
network.
network. The
Your
SIM card can be removed
The
The
The SIM
SIM
SIM
SIM card
card
card
card is
is
is
is
2.3.2.
2.3.2.
2.3.2.
2.3.2. Install
inserting into the phone you must carefully remove it.
Install
Install
Install and
The SIM card is usually located in a plastic card. Before
Turn off the phone; remove the battery and unplug other
external power sources.
Insert the SIM card into the SIM slot as shown in the
following picture.
When you need to remove the SIM card, remove the
SIM card as shown in the following picture.
and
Remove
and
Remove
and Remove
Remove the
the
the
the SIM
SIM
SIM
SIM
Page 23

2.3.3.
2.3.3.
2.3.3.
2.3.3. T-flash
downward and insert it.
T-flash
T-flash
T-flash card
Remove the battery, while the T-flash card metal surface
card
card
card
Page 24

Tip:
Tip:
Tip:
Tip: If
2.4.
2.4.
2.4.
2.4. Battery
If
you
If
you
If you
please
please
please
please check
properly
properly
properly
properly or
connection
connection
connection
connection between
not.
not.
not.
not.
Battery
Battery
Battery
have
have
you have
have some
check
check
check whether
some
some
some problem
whether
whether
whether the
or
not
or
not
or not
not and
between
between
between the
problem
problem
problem with
the
T-
the
T-
the
T-
T-
and
whether
and
whether
and whether
whether there
the
T-card
the
T-card
the T-card
T-card and
with
the
with
the
with the
the T-flash
flash
flash
flash
flash card
there
there
there is
and
and
and the
T-flash
T-flash
T-flash card,
card
is
card
is
card is
is installed
is
is
is a
the
the
the socket
card,
card,
card,
installed
installed
installed
a
good
a
good
a good
good
socket
socket
socket or
or
or
or
2.4.1.
2.4.1.
2.4.1.
2.4.1. Installation
Installation
Installation
Installation the
Push the battery cover down and take it off;
A lign it with metallic contact of the battery compartment.
Clasp bottom of the battery into the battery compartment .
Push the battery cover up until the battery in completely
the
Battery
the
Battery
the Battery
Battery
Page 25

inserted into the battery compartment.
Tip:
Tip:
Tip:
Tip: Please
battery
battery
battery
battery connector
Please
Please
Please do
connector
connector
connector in
do
do
do it
it
properly
it
properly
it properly
properly avoiding
in
the
in
the
in the
the PCB.
avoiding
avoiding
avoiding the
PCB.
PCB.
PCB.
the
damage
the
damage
the damage
damage to
to
to
to the
the
the
the
Page 26

2.4.2.
2.4.2.
2.4.2.
2.4.2. Battery
Battery
Battery
Battery charging
charging
charging
charging
Plug the charger co nnector into the side of the phone
Plug the charger into the electrical outlet. At this time the
charge level icon will repeatedly flash at the top right corner
of the mobile phone’s screen; When the battery level icon
indicates that the battery is full and does not flash anymore
this means that the battery is fully charged. When charging is
complete, unplug the charge connector from the electrical
,
Page 27

outlet and the mobile phone.
If the mobile phone automatically shuts down, or
Battery
indicates that the “ Battery
charge the battery. If the battery has not been entirely used
up before charging, the mobile phone will automatically
decrease the recharging period.
Tip:
Please
Tip:
Please
Tip:
Tip: Please
Please use
handset
handset
handset
handset can
can
can
can work
Battery
Battery is
use
the
use
the
use the
the appointed
work
properly.
work
properly.
work properly.
properly.
is
low
is
low
is low
low ” you should immediately
appointed
appointed
appointed charger
charger
charger
charger to
to
make
to
make
to make
make sure
sure
sure
sure the
the
the
the
Security
2.5.
Security
2.5.
2.5.
2.5. Security
Security Code
PIN
code
PIN
illegal usage of your SIM card. If you successively enter your
PIN number three times incorrectly, your SIM card will be
locked and your phone will ask for PUK number. At this time,
you need to enter the PUK number to unlock the SIM card.
The PIN number and PUK number may have been prov ided
to you together with the SIM card by your service provider. If
you do not have
to enter the PIN2 number. If you do not have
contact your network provider. If you successively enter your
PIN2 number three times incorrectly, this function will be
unable to use, and you need PUK2 number to unlock. For
code
PIN
PIN code
code
PIN (Personal Identification Number) code is to avoid
PIN2
code
PIN2
code
PIN2
PIN2 code
code
On/Off
On/Off
To
On/Off
On/Off the some function (eg. Call counter), you need
Code
Code
Code
it,
please contact your network provider.
it,
please
Page 28

details, please contact your network provider.
PUK
code
PUK
code
PUK
PUK code
code
When you want to change the locked PIN code, you
need to input the PUK
PUK
PUK
PUK code. PUK
PUK
PUK
PUK code may have been
provided to you together with the SIM card. If you do not
have
it,
please contact your network provider. If you
successively enter your PUK number ten times incorrectly,
your SIM card will be not useful. Please contact your network
provider for new SIM card.
You
can not change the PUK
code. If you lost the code, please contact your network
provider.
PUK2
PUK2
PUK2
PUK2 code
PIN2
When you want to change the locked PIN2
PUK2
need to input the PUK2
PUK2
PUK2
PUK2
PUK2 number ten times incorrectly, you will not use the
PUK2
PUK2 code. If you successively enter your
PIN2
PIN2 code, you
relative function. Please contact your network provider for
new SIM card.
You
can not change the PUK code. If you lost
the code, please contact your network provider.
3.
Quick
3.
Quick
3.
3. Quick
Quick Start
3.1.
Feature
3.1.
Feature
3.1.
3.1. Feature
Feature function
Your
function
function
function
mobile phone has various rich practical convenient
functions besides basic voice call.
Brief introduction is as follows:
Start
Start
Start
Page 29

Shortcuts
Shortcuts
Shortcuts
Shortcuts
Long press the main menu icons can be set as
shortcuts .
In the standby interface, long press Cancel
shortcuts
Phone
Phone
Phone
Phone book
book
book
book
To
search for a desired phonebook entry quickly by
name;
Every local phonebook entry can include three
telephone numbers;
To
save a phone book entry to
SIM card or mobile phone freely;
To
edit, send a short message to some telephone
number of the phonebook entry, copy the phone
book entry between SIM card and mobile phone, set
one key dial-up, blacklist and group;
To
set the personalized ring for each group and
group filter.
Messages
Messages
Messages
Messages
To
save, forward, delete, edit, reply the EMS and
use template message;
The max size of one MMS is 100KB ; The MMS
contains multimedia contents (including images,
video, sound and text).
You
can customize the MMS
and check the messages status in the SIM card and
handset.
You
can also select where you prefer to
save those messa ges.
Page 30

Call
History
Call
about call history are available:
History
Call
Call History
History :
Your
mobile phone support the following functions
To
save all information about your calls.
To
dial the number in call Log.
To
save the number in call history to phone book or
add to blacklist.
To
delete one record and delete all records about
call.
To
save automatically and check SMS account.
To
save automatically and check GPRS account.
Setting
Setting
Setting
Setting :
settings according to your usage custom: Phone
settings,
settings,
settings,
settings, Network
on. In every menu you can make settings that configure
your usage preferences for your mobile phone, for
example date and time, auto on/off, speed dial, call
barring, phone lock and so on.
Multimedia
Multimedia
Multimedia
Multimedia :
as: Camera, Video recorder, Video player, Audio player,
sound recorder ,File manager and so on.
Java
Java
Java
Java
program on your phone .
User
User
User
User Profile:
different profiles for you to set your mobile phone’s ring
tone, according to case and environments.
You
may make the following personalized
Network
Network
Network settings,
:
:
:
Your
:You
can install Java program and run these
Profile:
Profile:
Profile:
settings,
settings,
settings, Security
phone supports these functions such
Your
mobile phone provides many
Security
Security
Security settings
settings
settings
settings and so
Phone
Phone
Phone
Page 31

Organizer
Organizer
Organizer
Organizer : The mobile phone supports: alarm, Calendar
,To do, World clock and so on.
Wap
Service
Wap
3.2.
3.2.
3.2.
3.2. Dialing
number-inputting interface, then you can make a call.
the call menu, In the call menu you can perform the following
operations: hold,end, new call, phonebook, Messaging and
so on.
Service
Wap
Wap Service
Service :
Application Protocol (WAP) service.
many different WAP services.
Extras
Extras
Extras
Extras : The mobile phone supports: Calculator, Blue
tooth, Currency Converter and so on.
Shortcuts
Shortcuts
Shortcuts
Shortcuts :
relative
Input
Input
Input
Input method
methods for you to choose from like English, Number,
Symbols for your convenience.
On standby mode, press the keypad to enter the
During a call, press the left
Dialing
Dialing
Dialing
key.
method
method
method :
Your
mobile phone supports Wireless
You
:
:
:
You
can set different shortcuts for some
Your
phone provides various input
left
soft
key
left
soft
left soft
soft key
Option
key
Option
key “ Option
Option ” to enter
can access
3.3.
Reject
3.3.
Reject
3.3.
3.3. Reject
Reject a
To
reject an incoming call, press the End
a
call
a
call
a call
call
End
key.
End
key.
End key.
key.
Page 32

3.4.
Answer
3.4.
Answer
3.4.
3.4. Answer
Answer a
When you have an incoming call, the phone will give
corresponding information.(eg: vibrate, ring, etc). If the
network support, the handset will show the name or
number of the caller. And then you can pick up the call by
pressing the dial
3.5.
Ending
3.5.
Ending
3.5.
3.5. Ending
Ending a
During a call, press the End
3.6.
Emergency
3.6.
Emergency
3.6.
3.6. Emergency
Emergency Calls
Without a SIM card, you can also transmit emergency
calls. Different network operator have different number,
please ask your network operator for the detail.
3.7.
C
3.7.
3.7.
3.7. C
recently missed, received, refused and dialled calls.
Tips:
Tips:
Tips:
Tips: The
will
will
will
will be
all
C
all
C all
all History
Your
The
The
The incoming
be
saved
be
saved
be saved
saved in
a
Call
a
Call
a Call
Call
key.
a
Call
a
Call
a Call
Call
End
key
End
key
End key
key to end a call.
Calls
Calls
Calls
History
History
History
mobile phone can store records of the most
incoming
incoming
incoming calls
in
in
in the
calls
calls
calls form
the
refused
the
refused
the refused
refused call.
form
number
form
number
form number
number in
call.
call.
call.
in
the
in
the
in the
the blacklist
blacklist
blacklist
blacklist
3.8.
Call
3.8.
3.8.
3.8. Call
divert
Call
divert
Call divert
divert
In call diversion, the network service permits you to
Page 33

divert the calls, under certain preset situations, certain
incoming calls to a telephone number designated by you.
You
can set and cancel the incoming call diversion function of
your mobile phone. This service requires network support.
Please contact your network provider to activate this service.
3.9.
Call
3.9.
3.9.
3.9. Call
waiting
Call
waiting
Call waiting
waiting
If Call waiting is activated, you can a nswer the second
call during the first call.
3.10.
Call
3.10.
3.10.
3.10. Call
barring
Call
barring
Call barring
barring
Enter the “ Call Barring ” submenu to set any of the
following call barring groups to increase the security of your
phone from unauthorised usage. (Outgoing Calls, Incoming
calls, incoming calls when roam, outgoing calls when roam,
outgoing calls when international roam) Some network
providers may not be able to provide Network Call Barring
service. For details, please contact your network provider .
3.11.
Power
3.11.
Power
3.11.
3.11. Power
Power off
off
off
off
On the standby mode, hold down the Power key to
power off your phone.
Page 34

4.
Function
4.
Function
4.
4. Function
Function Menu
4.1.
Calendar
4.1.
Calendar
4.1.
4.1. Calendar
Calendar
Enter calendar submenu, the calendar will display on the
screen and the current date marked with the special color
background frame.
change date; contents of the journey will correspondingly
renewed.
Task
list
Option
Option
or Option
Option,you can add new journey. Enter Option
and select scroll to assign date and add new record.
The journey can manage various missions in the
work and life expediently, arranging and recording
the item that you will do in the future.
Jump to date : Select Scroll to the assign date.
Input the date, press [OK]
displayed. There are different backgrounds for each
month.
:To
You
can press navigation
Task
Task
enter Task
Task list
Menu
Menu
Menu
navigation
navigation
navigation keys
list
list
list submenu, select Adding
[OK]
[OK]
[OK],the assign date will be
keys
keys
keys to
Adding
Adding
Adding
Option
Option
Option
To
4.2.
Phone
4.2.
Phone
4.2.
4.2. Phone
Phone Book
You
information such as names, groups, telephone numbers,
personalized ring tones, pictures for incoming calls, Chat,
email, and name card notes of important people. All you need
Book
Book
Book
can use the phonebook function to save name card
Page 35

right
soft
key
right
to do is to press the right
enter the phonebook function.
Note
Note
Note
Note : Different SIM cards store different amounts of
numbers according to their memory size.
P
hone
B
P
hone
In P
P hone
hone B
Add new Contact and Contact list
Add
new
Add
new
Add
Add new
new Contact
You
can save the number in the “ SIM
Press the LeftSoftKey
Select
Select
Select
Select , Caller
the Phonebook settings
Caller
Caller
Caller groups
Preferred
Preferred
Preferred
Preferred storage
number.
Speed
Speed
Speed
Speed dial
On/Off,and you can set the number of the speed dial .
My
My
My
My number
Extra
Extra
Extra
Extra Number
card.
Memory
Memory
Memory
Memory status
and numbers are stored in the phone book (SIM
card and phone memories) or how much free space
is remained.
Copy
Copy
Copy
Copy contacts
Phone or Phone to SIM.
entry in a different storage.
Move
Move
Move
Move contacts
ook
B
ook
B ook
ook,you can see these functions such as:
Contact
Contact
Contact
number
number
number
To
LeftSoftKey
LeftSoftKey
LeftSoftKey ” Options
groups
groups
groups and PhoneBook
storage
storage
storage Default or select when save
dial
dial
dial
Number
Number
Number Extra Number saved in the SIM
You
can view and edit it.
status
status
status
contacts
contacts
contacts
contacts
contacts
contacts
soft
right soft
soft key
add a new record to the phonebook.
Options
Options
Options ” you can see:
PhoneBook
PhoneBook
PhoneBook settings,
You
can select this function
You
can edit your information.
You
To
To
move entry from SIM to Phone
Phone
key
Phone
key,“ Phone
Phone Book
SIM
Card
SIM
Card
SIM Card
Card ” or the “ Phone
can check how many names
copy the entry from SIM to
You
Book
Book
Book ”,directly
settings,
settings,
settings, Enter
will have the same
Phone
Phone
Phone ” .
Page 36

4.3.
Audio
4.3.
Audio
4.3.
4.3. Audio
Audio player
or Phone to SIM.
Delete
Delete
Delete
Delete S elect from
delete all the entries in the mobile phone or SIM
card phonebook.
delete phonebook in turn.
Caller
Caller
Caller
Caller group
groups. Select the group in the list.
the caller
picture, movie connecting edit.
group
group
group s
caller
caller
caller group
player
player
player
group
group
group details
s
s
s
You
from
SIM
or
from
from
SIM
SIM or
or
or from
To
from SIM
You
can also select one
telephone supports five caller
details
details
details,i ncluding name, ring tone,
phone
from
phone
from phone
phone to
one
by
one
by
one by
by one
view and edit
one
one
one to
Audio
Enter the “ Audio
MP3 player .
In the audio player menu, press ” List
playing list, and press the “
following operations to every audio file:
Play
Play
Play
Play
To
Details
Details
Details
Details
Add
to
Add
to
Add
Add to
to ringtones
midi list of profile.
R
efresh
R
efresh
R
R efresh
efresh list
Settings
Settings
Settings
Settings
player.
List
List
List
List auto
Repeat
Repeat
Repeat
Repeat Three options for your choice: Off
Audio
Audio player
play the current audio file.
To
view the details of the current music file.
ringtones
ringtones
ringtones
list
list
list
To
set the relative spec for the audio
auto
auto
auto Gen
player
player
player ” submenu to open the
“
Options
“
Options
“ Options
Options ”
To
add the current music file into
Gen
Gen
Gen
List
List
List ” to enter the audio
”
”
” to carry out the
Off
Off
Off
,
Page 37

BT
stereo
BT
stereo
BT
BT stereo
stereo headset
4.4.
4.4.
4.4.
4.4. Services
headset
headset
headset On/Off
Services
Services
Services
Single
Single
Single
Single,All
Shuffle
Shuffle
Shuffle
Shuffle For the play order, On
random, Off
Background
Background
Background
Background play
All
All
All .
On
On
On to play at
Off
Off
Off to play with the playing order.
play
play
play When you set this function
On, you can play audio file in many menu
B
T
Stereo
B
T
Stereo
B
B T
T Stereo
Stereo output
output
output
output Set On/Off
On/Off
On/Off
On/Off to export Blue
tooth 3D Stereo.
On/Off
On/Off
On/Off the BT earphone output.
4.4.1.
4.4.1.
4.4.1.
4.4.1. User
User
User
User STK
STK
STK
STK
STK is the value added service supplied by the service
provider.
Your
phone support STK function, you need support
of your network operator For more information, please
contact the network operator.
4.4.2.
4.4.2.
4.4.2.
4.4.2. Internet
protocol (WAP) service.
Internet
Internet
Internet service
Your
mobile phone supports wireless application
service
service
service
You
can access many different WAP
services such as news, weather reports, flight information
and so on. These services are especially designed for mobile
phones and maintained by WAP service providers.
Note:
Note:
Note:
Note: GPRS service the support from the network
Page 38

provider Only in the area of the network covering, you can
use the GPRS service.
Homepage
Homepage
Homepage
Homepage The homepage of internet which you
have preset the website of wap. If you have not set
the homepage, the handset will use the default
website of the factory.
Book
Book
phone and you can connect to the website directly.
Recent
Recent
explorer.
Offline
Offline
Input
Input
inputting the URL.
Service
Service
service provider.
Settings
Settings
marks
Book
Book marks
Recent
Recent pages
Offline
Offline pages
Input
Input address
Service
Service inbox
Settings
Settings
marks
marks
pages
pages
address
address
address
P
rofile
P
rofile
P
P rofile
rofile
Browser
Browser
Browser
Browser options
browsering the internet including waiting time,
show the picture.
Service
Service
Service
Service messages
deactivate the service messages.
Clear
Clear
Clear
Clear cache
Clear
Clear
Clear
Clear cookies
of the internet.
You
can make bookmark data in your
pages
pages
pages
pages
inbox
inbox
inbox
To
cache
cache
cache
cookies
cookies
cookies
To
view the page history of the
To
view the page in offline mode.
You
can go to the site directly by
You
can read the message from the
modify some settings of online function.
To
select the settings of service.
options
options
options
messages
messages
messages settings
To
set the specifications when
settings
settings
settings
To
clear the cache of the explorer.
To
delete the personal information
To
activate or
Page 39

4.4.3.
4.4.3.
4.4.3.
4.4.3. Data
Data
Data
Data account
account
account
account
GSM
data
GSM
data
GSM
GSM data
data
In this menu, you can set and edit the data account
items as following:
Account
Account
Account
Account name
Data Account.
Number
Number
Number
Number The dial connecting number of the
current data account.
User
User
User
User name
Password
Password
Password
Password Default is wap.
Line
Line
Line
Line T ype
Analogue
Analogue
Analogue
Analogue and ISDN.
Speed
Speed
Speed
Speed
transmission among 4.8Kbps, 9.6Kbps,
14.4Kbps.
DNS
DNS
DNS
DNS Address of DNS in WAP .
GPRS
GPRS
GPRS
GPRS
This menu display the current WAP GPRS data
account list, you can set and edit the data account
items as following:
Account
Account
Account
Account Name
account.
APN
APN
APN
APN : Default is “ blank ” .
User
User
User
User name
value is null.
name
name
name
name
name
name Default is wap.
Type
Type
Type
To
Name
Name
Name :
name
name
name : The ID of APN server, default
To
edit the name of the
To
select the type of data between
ISDN.
ISDN.
ISDN.
select the rate of WAP data
To
edit the name of the data
Page 40

Password
Password
Password
Password : The key to APN Server, default
value is null.
Auth.
Auth.
Normal & Secure to authorize your ID in WAP
by pressing the left/right key.
DNS
DNS
Type
Auth.
Type
Auth. Type
DNS
DNS :
Type : T
:
:
: Address of DNS in WAP .
To
select from the two items of
4.5.
4.5.
4.5.
4.5. Messaging
4.5.1.
4.5.1.
4.5.1.
4.5.1. Write
message.
to
to
to
to ” , then you can edit the recipients and you can select Send
By
By
By
By SIM1/SIM2
Messaging
Messaging
Messaging
Write
Message
Write
Message
Write Message
Message
Write
Enter the “ Write
Send
Send
Send
Send to
use this option to select the number you want to
send .
Input
Input
Input
Input method
Insert
Insert
Insert
Insert template
template.
Advanced
Advanced
Advanced
Advanced
Bookmark
Bookmark
Bookmark
Bookmark and set the Text
Save
Save
Save
Save to
may send it later.
After finishing your SMS message you can select “ Sent
SIM1/SIM2
SIM1/SIM2
SIM1/SIM2 .
Write
Write Message
to
to
to After finishing your SMS message, you can
method
method
method
template
template
template
to
to
to Drafts
Message
Message
Message ” submenu and edit a SMS
To
change the current input method.
To
edit the new message with
Object
To
insert Object
Drafts
Drafts
Drafts Saves the message to Drafts .
Object
Object , Number
Text
Text
Text fomart
Number
Number
Number , Name
fomart
fomart
fomart .
Name
Name
Name or
Send
Send
Send
Sent
Sent
Sent
You
Page 41

Note: In some city and area, the massage centre do
not support massage longer than 160 English letters.
4.5.2.
4.5.2.
4.5.2.
4.5.2. Inbox
MMS are saved in the “ Inbox ” folder. Enter the “ Inbox
submenu.
messages in the “ Inbox
the message you wish to read. By pressing the “ Options
you can carry out the following operations on the current
message:
Inbox
Inbox
Inbox
The new incoming messages including the SMS and
Inbox
Inbox
Inbox ”
Your
mobile phone will display a list of the
Inbox
Inbox
Inbox ” . Press the Direction
Reply
Reply
Reply
Reply
Call
Call
Call
Call sender
Forward
Forward
Forward
Forward
other person.
Delete
Delete
Delete
Delete
Delete
Delete
Delete
Delete all
Advanced
Advanced
Advanced
Advanced
the message and you can Copy or Move the
message.
sender
sender
sender
all
all
all
To
reply to the sender.
To
call the sender.
T
o forward the current message to
To
delete the viewed message.
To
delete all messages.
You
can use number,URL or USSD in
Direction
Direction
Direction key
key
key
key to scroll to
Options
Options
Options ”
,
4.5.3.
4.5.3.
4.5.3.
4.5.3. Drafts
message. By pressing “ Drafts
Drafts
Drafts
Drafts
Drafts
Enter the “ Drafts
Drafts
Drafts ” submenu. Press “ OK ” to read the
Drafts
Drafts
Drafts ”,you can carry out the
Page 42

following operations on the current message:
Send
Send
Send
Send
Edit
Edit
Edit
Edit
Delete
Delete
Delete
Delete
Delete
Delete
Delete
Delete all
outbox.
Advanced
Advanced
Advanced
Advanced
the message and you can Copy or Move the
message.
T
o send the current message.
T
o edit the message.
T
o delete the current message.
all
all
all
T
o delete all of the message in the
You
can use number,URL or USSD in
4.5.4.
4.5.4.
4.5.4.
4.5.4. Outbox
message. By pressing “ Options
following operations on the current message:
Outbox
Outbox
Outbox
Outbox
Enter the “ Outbox
Forward
Forward
Forward
Forward
other person.
Delete
Delete
Delete
Delete
Delete
Delete
Delete
Delete all
outbox.
Advanced
Advanced
Advanced
Advanced
the message and you can Copy or Move the
message.
Outbox
Outbox ” submenu. Press “ OK ” to read the
Options
Options
Options ”,you can carry out the
T
o forward the current message to
T
o delete the current message.
all
all
all
T
o delete all of the message in the
You
can use number,URL or USSD in
Page 43

4.5.5.
4.5.5.
4.5.5.
4.5.5. MMS
MMS
MMS
MMS
Write
message
Write
message
Write
Write message
message create a MMS message and the options
receiver
are as follow: receiver
Inbox
Inbox
Inbox
Inbox New received MMS is saved in the “
Reply
Reply
Reply
Reply
Call
Call
Call
Call sender
Forward
Forward
Forward
Forward
other recipients.
Delete
Delete
Delete
Delete
Delete
Delete
Delete
Delete All
Advanced
Advanced
Advanced
Advanced
the MMS and you can Copy or Move the MMS.
Outbox
Outbox
Outbox
Outbox Unsuccessfully sent MMS are saved in the
Outbox
Outbox
“ Outbox
Outbox ” folder.
View
View
View
View
message.
Send
Send
Send
Send
Delete
Delete
Delete
Delete
Delete
Delete
Delete
Delete All
Save
Save
Save
Save as
Properties
Properties
Properties
Properties
current MMS .
Use
Use
Use
Use details
Drafts
Drafts
Drafts
Drafts after edited, the MMS that are not ready to send
out and is saved in this folder.
receiver
receiver,CC
To
reply MMS to the sender
sender
sender
sender
To
To
delete the current.
All
All
All
To
T
o browse the contents of the current
To
send the saved MMS.
To
delete the current MMS.
All
All
All
To
as
template
as
template
as template
template Save the message as a template .
details
details
details Use sender’s number.
CC
BCC
CC
CC
,
To
call the sender.
edit the current MMS and send to the
delete all MMS in the Inbox
You
can use number,URL or USSD in
delete all MMS in the Outbox
To
view detailed information of the
subject,
BCC
subject,
BCC
BCC,subject,
subject, content.
content.
“
Inbox
“
Inbox
“ Inbox
Inbox ”
Inbox
Inbox
Inbox .
Outbox
Outbox
Outbox .
content.
content.
”
”
” folder .
Page 44

View
View
View
View
message.
Send
Send
Send
Send
Delete
Delete
Delete
Delete
Delete
Delete
Delete
Delete All
Save
Save
Save
Save as
Properties
Properties
Properties
Properties
current MMS .
Use
Use
Use
Use details
Templates
Templates
Templates
Templates Enter the MMS list, you can edit or delete
the default template.
M
MS
M
MS
M
M MS
MS settings
before you use the MMS functions.
P
P
P
P rofile
Send
Send
Send
Send
report
report
report
report ,read
Retrieve
Retrieve
Retrieve
Retrieve
process of receiving such as: home network,
roaming, read report, delivery report, etc.
Filter
Filter
Filter
Filter Set to filter message.
Memory
Memory
Memory
Memory status
T
o browse the contents of the current
To
send the saved MMS.
To
delete the current MMS.
All
All
All
To
delete all MMS in the Drafts
as
template
as
template
as template
template Save the message as a template .
To
view detailed information of the
details
details
details Use sender’s number.
settings
settings
settings
rofile
rofile
rofile s
You
must make the necessary settings
s
s
s Select the service provider.
validity
To
,read
,read
,read report,
validity
set validity
validity period,
report,
report,
report, slide
To
set the relative specification during the
status
status
status Check the statue of the MMS.
period,
period,
period, priority
slide
slide
slide timing,
Drafts
Drafts
Drafts .
priority
priority
priority ,
timing,
timing,
timing, deliver
deliver
deliver
deliver time.
,
delivery
,
delivery
, delivery
delivery
time.
time.
time.
4.5.6.
4.5.6.
4.5.6.
4.5.6. Broadcast
Broadcast
Broadcast
Broadcast Message
Receive
Receive
Receive
Receive mode
mode, select “ off ” to reject receive broadcast
Message
Message
Message
mode
mode
mode
You
can select “ on ” to enter receive
Page 45

messages
Read
Read
Read
Read message
messages.
Languages
Languages
Languages
Languages change the language
Channel
Channel
Channel
Channel setting
messages.
Note:
Note:
Note:
Note: The network operators must support the “ Broadcast
Message ” function for it to be available.
message
message
message read the received Broadcast
setting
setting
setting set the channel of broadcast
4.5.7.
4.5.7.
4.5.7.
4.5.7. Template
template.
4.5.8.
4.5.8.
4.5.8.
4.5.8. SMS
Template
Template
Template s
Enter the massage list, you can edit or delete the default
SMS
SMS
SMS Settings
Enter the “ Message
Profile
Profile
Profile
Profile setting
messages, after entering the relative profile, you can
set the relative options such as: name, number of
message center, available time and message style.
Common
Common
Common
Common setting
path
path
path
path /Save
Memory
Memory
Memory
Memory status
and phone message inbox.
Preferred
Preferred
Preferred
Preferred storage
s
s
s
Settings
Settings
Settings
Message
Message
Message setting
setting
setting
setting
setting
setting
setting
/Save
sent
/Save
sent
/Save sent
sent message
status
status
status
storage
storage
storage Two places to storage: phone or
setting
setting
setting ” submenu;
To
select a suitable profile for the
delivery
To
message
message
message On or Off.
To
check the status of the SIM card
delivery
set delivery
delivery report
report
report
report / reply
reply
reply
reply
Page 46

SIM card.
Tip:
The
Tip:
The
* Tip:
Tip: The
The function
operator.
operator.
operator.
operator.
4.6.
Camera
4.6.
Camera
4.6.
4.6. Camera
Camera
function
function
function needs
needs
needs
needs support
support
support
support from
from
from
from you
you
network
you
network
you network
network
This mobile phone is equipped with a high resolution
camera which you can use to take pictures at anytime or
place and then save them on your mobile phone. During the
Option
view-finding mode, press the “ Option
Option
Option ”,to carry out the
following operations:
Photos
Photos
Photos
Photos
Camera
Camera
Camera
Camera Settings
Contrast
Contrast
Contrast
Contrast,Anti-flicker
settings .
Image
Image
Image
Image settings
quality
quality
quality
quality adjustment.
White
White
White
White balance
Scene
Scene
Scene
Scene Mode
mode
mode
mode
mode .
Effect
Effect
Effect
Effect Settings
S
torage
S
torage
S
S torage
torage Two places to storage: Memory card.
Restore
Restore
Restore
Restore Default
default settings
Default
Default
Default Press [OK]
To
display the file list.
Settings
Settings
Settings
Anti-flicker
Anti-flicker
Anti-flicker,Delay
.
.
. Select [OK]
settings
settings
settings Including Photo
balance
balance
balance
Mode
Mode
Mode
Settings
Settings
Settings
To
adjust Shutter
Delay
Delay
Delay Timer
[OK]
[OK]
[OK] to activate the settings.
Photo
Photo
Photo size
T
o set the balance of light.
To
set the profile as auto
To
set special shot effect.
[OK]
[OK]
[OK] and select Yes
Shutter
Shutter
Shutter Sound
Timer
Timer
Timer,Cont
Yes
Yes
Yes to return to
Sound
Sound
Sound,EV
Cont
Cont
Cont .
size
size
size and photo
auto
auto
auto or night
EV
EV
.
shot
.
shot
. shot
shot
photo
photo
photo
night
night
night
EV
,
Page 47

4.7.
WLAN
4.7.
WLAN
4.7.
4.7. WLAN
WLAN .
.
.
.
4.7.1.
4.7.1.
4.7.1.
4.7.1. Enable
Disable or enable the wlan. If you want to use wifi internet,
please enable the wlan.
4.7.2.
4.7.2.
4.7.2.
4.7.2. WLAN
Here you can see MAC address of the phone.
4.7.3.
4.7.3.
4.7.3.
4.7.3. Search
Here you can search and see within a certain range from the
mobile wireless network signal . Connect to a wireless
network and enter the corresponding key and then you can
start surfing the Web .
4.7.4.
4.7.4.
4.7.4.
4.7.4. Access
Here you can set up a wireless network access point, after
which you can not duplicate each time to connect network for
surf ing the web.
Concrete steps :
1.
1.
1.
1. S elect a defined access point in the available networks .
2.
2.
2.
2. Select WEB In the encryption
3.
3.
3.
3. Select "Hexadecimal ” in the WEB
Enable
Enable
Enable WLAN
WLAN
WLAN
WLAN status
Search
Search
Search for
Access
Access
Access point
WLAN
WLAN
WLAN
status
status
status
for
for
for networks
point
point
point settings
networks
networks
networks
settings
settings
settings
encryption
encryption
encryption mode
mode
mode
mode .
WEB
WEB
WEB key
key
format
key
format
key format
format .
Page 48

4.
4.
4.
4. Input the wireless network key in the WEB
5.
5.
5.
5. Other menu you can set the default .
4.8.
4.8.
Organizer
Organizer
4.8.
4.8.
Organizer
Organizer
T
asks
T
asks
T
T asks
asks
to enter task list submenu, select Add or Option, you can add
new journey. Enter Option and select scroll to assign date and
add new record. The journey can manage various missions in
the work and life expediently, arranging and recording the item
that you will do in the future .
4.9.
Video
4.9.
Video
4.9.
4.9. Video
Video player
player
player
player
WEB
WEB
WEB key
key
key
key .
Video
Select “ Video
film list stored in the move player, press the left
perform the Play,
operation, “
storage position. .
4.10.
Settings
4.10.
Settings
4.10.
4.10. Settings
Settings
4.10.1.
4.10.1.
4.10.1.
4.10.1. Breanthing
4.10.2.
4.10.2.
4.10.2.
4.10.2. Dual
Breanthing
Breanthing
Breanthing setting
Dual
Dual
Dual SIM
Dual
Dual
Dual
Dual SIM
Video
Video player
Play,
Play,
Play, Send
“
Sort
“
Sort
“ Sort
Sort by
SIM
SIM
SIM Setting
SIM
SIM
SIM open
player
player
Send
Send
Send ,
by
”
by
”
by ”
” operation on the list and view the file
setting
setting
setting
Setting
Setting
Setting s
open
open
open SIM1 and SIM2 are all power on.
”
player ”
”
” submenu to view the short
,
Rename,
,
Rename,
, Rename,
Rename, Delete,
s
s
s
left
left
left soft
Delete,
Delete,
Delete, Delete
Delete
Delete
Delete All
soft
soft
soft key
All
All
All Files
key
key
key to
Files
Files
Files
Page 49

Only
SIM1
Only
SIM1
Only
Only SIM1
SIM1 open
power off.
Only
SIM2
Only
SIM2
Only
Only SIM2
SIM2 open
power on.
Flight
Flight
Flight
Flight mode
mode
mode
mode SIM1 and SIM2 are all power off.
open
open
open SIM1 is power on,but SIM2 is
open
open
open SIM1 is power off,but SIM2 is
4.10.3.
4.10.3.
4.10.3.
4.10.3. Pen
screen, click the arrowhead center in the screen to calibrate it
so that it can become accurate.
4.10.4.
4.10.4.
4.10.4.
4.10.4. Phone
times to set for the phone to auto power on/off according
to the setting type .
Pen
calibration
Pen
calibration
Pen calibration
calibration
As per the calibration instructions displayed by the
Phone
Phone
Phone set
set
tings
set
tings
set tings
tings
Time
and
Time
Time
Time and
setting , time setting and time format setting .
Schedule
Schedule
Schedule
Schedule Power
different
Language
Language
Language
Language You can set a desired language to be
displayed on your phone .
Pref
.
Pref
.
Pref
Pref .
. Input
your preferred input method as default.
Display
Display
Display
Display Here you can set: Wallpaper,
Date
and
Date
and Date
Date Including default city time zone
Power
Power
Power ON/OFF
Input
Methods
Input
Methods
Input Methods
Methods This menu allows you to set
ON/OFF
ON/OFF
ON/OFF There are four
Page 50

Screensaver, power on/off Display, Show Date and
Time .
Greeting
Greeting
Greeting
Greeting Text
Auto
Auto
Auto
Auto update
update the date and time automatically.
Misc
Misc
Misc
Misc setting
and time.
Text
Text
Text To edit power on greeting words .
update
update
update of
setting
setting
setting Set the LCD
of
date
of
date
of date
date and
and
time
and
time
and time
time Set On/Off to
LCD
backlight
LCD
backlight
LCD backlight
backlight brightness
4.10.5.
4.10.5.
4.10.5.
4.10.5. Network
4.10.6.
4.10.6.
4.10.6.
4.10.6. Security
menu. These security settings will help you keep privacy and
to prevent other people from using the phone without your
permission.
can prevent the illegal use of your SIM card.
Network
Network
Network Set
Network
Network
Network
Network Selection
enables you to:select a network automatic or
manually. .
Prefer
Prefer
Prefer
Prefer ences
Security
Security
Security Set
Security
Security
Security
Security settings
SIM
SIM
SIM
SIM Lock
Enter the sub menus in “
SIM Lock is done by the PIN number, The PIN number
If the SIM Lock feature is Off
Set
tings
Set
tings
Set tings
tings
Selection
Selection
Selection The Network Selection feature
ences
ences
ences Support selection preferred networks.
Set
tings
Set
tings
Set tings
tings
settings
settings
settings
Lock
Lock
Lock
“
Security
“
Security
“ Security
Security Setup
Off
Off
Off select On
Setup
”
Setup
Setup ”
On
On
On to enter the PIN
Settings
”
Settings
” in “ Settings
Settings ”
Page 51

number to lock the SIM Card, the phone will remind you to
Off
enter the PIN number when power on. Select Off
PIN number guard.
!Note:
!Note:
!Note:
!Note: If you successively enter your PIN number three
times incorrectly, your SIM card will be locked. At this time
you need the PUK number to unlock the SIM card. The PIN
number and PUK number may have been provided to you
together with the SIM card. If you do not have
contact your network provider. The default PIN number is
usually 1234. Please change into your own password as
soon as possible.
Fixed
Fixed
Fixed
Fixed Dial
If your SIM Card supports the function, you can fix the dial
numbers. When the Fixed Dial mode is enabled, the person
can just call the phone numbers stored in the Fixed Dial List.
Enter the Fixed Dial submenu to carry out the following
settings:
- Mode:
- Fixed
Barred
Barred
Barred
Barred dial
Change
Change
Change
Change password
You
can change PIN/PIN2 code.
!
Note:
!
Note:
!
! Note:
Note:
number. If you do not have
provider. If you successively enter your PIN2 number three
To
Dial
Dial
Dial
Mode:
Mode:
Mode: Enter the PIN2 to enable Fixed Dial List.
Fixed
Fixed
Fixed Dial
Dial
List
Dial
List
Dial List
List :to Add
dial
dial
dial
password
password
password
On/Off
On/Off
On/Off
On/Off the function you need to enter the PIN2
Add
Add
Add Fixed Dial number
it,
please contact your network
Off
Off to cancel
it,
please
Page 52

times incorrectly, this function will be unable to use, and you
need PUK2 number to unlock. The Barred Dial number will be
not displayed in the phonebook when the function is
activated.
Phone
Phone
Phone
Phone Lock
Lock
Lock
Lock
The Phone Lock can prevent the illegal use of your phone .
Enter the phone lock submenu, to carry out the follow
settings:
On
Select On
On
On to enter the correct number to activate
this function. User must enter the password each
time they power On the phone.
Off
Select Off
!
Note:Password[
!
Note:Password[
!
! Note:Password[
Note:Password[ 1122
Auto
Auto
Auto
Auto Keypad
Off
Off to cancel the function.
1122
]
1122
]
1122 ]
]
Keypad
Keypad
Keypad Lock
Lock
Lock
Lock
To
prevent unwanted key press ,
you can use this function to lock the keypad. If you
do not carry out any operation in the pre- set time,
the keypad will be locked automatically.
Change
Change
Change
Change Password
Password
Password
Password
To
reset the code including the
PIN,PIN2 and the handset code.
Note
Note
Note
Note : Some function needs the support from your network
operator.
Page 53

4.10.7.
4.10.7.
4.10.7.
4.10.7. Restore
Restore
Restore
Restore Factory
The default value of Restore Factory Setting is: 1122 .
Factory
Factory
Factory Setting
Setting
Setting
Setting
4.10.8.
4.10.8.
4.10.8.
4.10.8. Sound
can choose from 8 modes in the menu.
Restore
Restore
Restore
Restore Factory
4.10.9.
4.10.9.
4.10.9.
4.10.9. T
4.11.
4.11.
4.11.
4.11. Games
4.12.
4.12.
4.12.
4.12. File
carry out the following operation:
Sound
Sound
Sound effects
To
set the balance of the sound in the music player, you
T
T
T -sensor
To
set the application of the
Games
Games
Games
P lease refer the game help
File
File
File manager
Enter the File manager menu; Press the “
effects
effects
effects
Factory
Factory
Factory Default.
-sensor
-sensor
-sensor Settings
manager
manager
manager
Open
Open
Open
Open
New
New
New
New Select [OK]
Default.
Default.
Default.
Settings
Settings
Settings
To
display the files in the root.
[OK]
[OK]
[OK] to create a new folder, and edit
T
-sensor:
You
can select the
“
option
“
option
“ option
option ”
”
”
” to
Page 54

the name.
Format
Format
Format
Format To format the Flash Card and delete the data stored .
4.13.
Alarm
4.13.
Alarm
4.13.
4.13. Alarm
Alarm
You
can save many alarms. Select one alarm in the
Alarm menu, you can edit and set it.
4.14.
Image
4.14.
Image
4.14.
4.14. Image
Image viewer
viewer
viewer
viewer
Enter the “ Image
4.15.
Sound
4.15.
Sound
4.15.
4.15. Sound
Sound recorder
Image
Image
Image viewer
recorder
recorder
recorder
viewer
viewer
viewer ” submenu.
In this submenu, you can record the sound, press the
“ option ” to carry out the following options:
Record
Record
Record
Record
Play
Play
Play
Play
Append
Append
Append
Append
Rename
Rename
Rename
Rename Edit the name of current sound record file.
Delete
Delete
Delete
Delete Delete the selected file.
Delete
Delete
Delete
Delete All
Settings
Settings
Settings
Settings Set the File format
Forward
Forward
Forward
Forward To forward the selected sound recorder to User Profile
and SMS.
To
record one new sound.
To
play the selected record.
To
append new record to the selected file
All
All
All Delete all files of the list.
Page 55

4.16.
JAVA
4.16.
JAVA
4.16.
4.16. JAVA
JAVA
Java provides an operating platform for java program .
4.17.
Bluetooth
4.17.
Bluetooth
4.17.
4.17. Bluetooth
Bluetooth
In the Bluetooth submenu, the following options for you to
carry out the relative setting of the Bluetooth service:
Power
Power
Power
Power Press the left soft key to on/off the
Bluetooth function.
Inquiry
Inquiry
Inquiry
Inquiry Audio
Audio
Audio
Audio device
device
device
device Press the left soft key to
search the Bluetooth earphone,. If there are some active
BT earphone nearby, the handset will find the apparatus.
Press the left soft key to “ connect ”,after inputting the
relative code (normally the default earphone code
is:0 000, the details please check the user manual of BT
earphone), you can connect the handset with the
apparatus successfully and make a call with BT
earphone.
My
device
My
device
My
My device
device Press the left soft key “ OK ” to enter the “ my
device ” submenu, the display will show the apparatus
which have been connected with the handset. Select
one apparatus and press the left soft key “ Options ” to
carry out the following operations:
Connect
Connect
Connect
Connect
To
connect the apparatus with
handset and you can also connect the service of
service recorder.
Page 56

Disconnect
Disconnect
Disconnect
Disconnect
apparatus.
Re
name
Re
Settings
Settings
Settings
Settings
About
About
About
About
Bluetooth apparatus add and supported service.
Files
Files
Files
Files transmission:
name
Re
Re name
name
Delete
Delete
Delete
Delete
Delete
Delete
Delete
Delete All
Service
Service
Service
Service list
apparatus.
Inquiry
Inquiry
Inquiry
Inquiry new
apparatus.
Visibility
Visibility
Visibility
Visibility Press the left soft key to on/off this
function.
Change
Change
Change
Change Device
handset in Bluetooth connection.
Authentication
Authentication
Authentication
Authentication Press the left soft key to on/off
this function. When you set it on, it allows others
Bluetooth apparatus connect the device.
Audio
Audio
Audio
Audio Path
“ Leave in Phone ” and “ Forward to BT headset ” .
FTP
FTP
FTP
FTP settings
the submenu: “ Share Folder ” : Memory card or
Handset/File Manager/folder. “ Access right ” : freely
save & read or read only.
transmission:
transmission:
transmission: The sender and receiver’s BT is
To
rename the apparatus.
All
All
All
list
list
list
new
new
new device
Device
Device
Device Name
Path
Path
Path
settings
settings
settings Press the left soft key “ OK ” to enter
To
show the name of Bluetooth apparatus,
To
disconnect the connecting
To
delete the current record.
To
delete all records.
To
show the service record of current
device
device
device
Name
Name
Name
To
search new Bluetooth
You
To
select the audio path from
can rename the
Page 57

active( the apparatus settings should be visible). When you
open the selected file, and select options/transmit/forward to
BT,
then input the connected code to transmit. (the default
connecting code is 0000).
Playing
Playing
Playing
Playing Music:
the handset with BT earphone. In my
please select the Connect
service
service
service
service to the BT earphone and make sure the connection
between handset and BT earphone is properly. Then you can
listen to the music from the BT earphone. If you want listen to
the music from the handset, in my
select the Disconnect
control
control
control
control service
4.18.
4.18.
4.18.
4.18. User
Music:
Music:
Music: When you active the music player and connect
my
apparatus
my
apparatus
my apparatus
apparatus submenu,
Connect
Connect
Connect to forward
Disconnect
Disconnect
Disconnect to di sconnect the
service
service
service .
User
User
User profiles
.
.
.
profiles
profiles
profiles
forward
forward
forward the
my
my
my apparatus
the
music
the
music
the music
music player
apparatus
apparatus
apparatus submenu, please
the
music
the
music
the music
music player
player
player
player remote
player
player
player
remote
remote
remote
our mobile phone provides many different profiles for
you to set your mobile phone’s ring tone, according to case
and environments.
Genneral
Genneral
Genneral
Genneral
Activate
Activate
Activate
Activate
Customize
Customize
Customize
Customize T o modify the setting options of the
General profiles such as: Ring
Type,
Type,
Type,
Type, Ring
To
activate the General profile.
Ring
Type,
Ring
Type,
Ring Type,
Type, Extra
Extra
Tone,
Extra
Tone,
Extra Tone,
Tone, Answer
Ring
tone,
Ring
tone,
Ring tone,
tone, Volume,
Answer
Answer
Answer Mode.
Volume,
Volume,
Volume, Alert
Mode.
Mode.
Mode.
Alert
Alert
Alert
Meeting
Meeting
Meeting
Meeting
Page 58

General
The operations is the same as the General
Outdoor
Outdoor
Outdoor
Outdoor
The operations is the same as the General
Indoor
Indoor
Indoor
Indoor
The operations is the same as the General
Headset
Headset
Headset
Headset
General
General option.
General
General
General option.
General
General
General option.
You can activate this mode when you insert one headset.
General
The operation of this menu is the same as the General
General
General
option.
Bluetooth
Bluetooth
Bluetooth
Bluetooth
The operation will activate the BT earphone and activate the
handset BT.
4.19.
Call
4.19.
4.19.
4.19. Call
Call
Call
Call
Call History
center
Call
center
Call center
center
History
History
History
You can view info related to call records, including: Missed
Calls , Dialed Calls , Received Calls , Delete Call Log , Call
Time , Call Cost , SMS Counter , GPRS Counter
Page 59

Call
Settings
Call
Settings
Call
Call Settings
Settings
For a general setting,such as:SIM1 , SIM2 call
setting(including Call ID ,C all waiting,C all divert,C all
barring),Auto redial,IP Dial, Call time display, Call time
reminder,Auto quick end.
4.20.
Ebook
4.20.
Ebook
4.20.
4.20. Ebook
Ebook reader
reader
reader
reader
Support View UCS2, UTF8, GB2312, English text
encoding four documents.
Entering E-book reader,press left key ” option ” ,can show the
option menu,includeing the following
Open
E-Book
Open
E-Book
Open
Open E-Book
E-Book Access e-books, in the options
menu, can Find,Jump To, Go to Bookmark, Add
bookmark, Remove Bookmark, Book Info, Settings,
Apply Global Settings, Help and Close.
Update
Update
Update
Update (CleanUp Bookshelf) Refresh e-books
Global
Global
Global
Global Setting
Book
Book
Book
Book Info
Setting
Setting
Setting s
Info
Info
Info S how the text ’ s name,size and text
s
s
s
format information
Delete
Delete
Delete
Delete D elete this text.
Delete
Delete
Delete
Delete all
Sort
Sort
Sort
Sort by
all
Files
all
Files
all Files
Files D elete all the text in this path
by
by
by C hoose name,type,time,size and none to
sort.
Apply
Apply
Apply
Apply Global
Global
Global
Global Settings
Settings
Settings
Settings Carry out the system
Page 60

default.
Help
Help
Help
Help View the setting of keyboard quick function
4.21.
Calculator
4.21.
Calculator
4.21.
4.21. Calculator
Calculator
Your
mobile phone provides a calculator with 4 basic
functions to facilitate simple calculations.
Calculator
Enter the “ Calculator
Calculator
Calculator ” submenu to display the operation
interface of the calculator:
Use the Number
Number
Number
Number keys
keys
keys
keys from 0
0
0
0 to 9
9
9
9 to enter the
numbers you wish to enter.
right
soft
Press the right
right
right soft
latest entry or result, press the right
BACK
BACK
“ BACK
BACK ”,to exit the calculator, press the left
soft
key
soft
soft
soft key
Tip:
Tip:
! Tip:
Tip: The precision of this calculator is limited so that rounding
errors may occur, especially in the case of indivisibility
4.22.
FM
4.22.
4.22.
4.22. FM
radio
FM
radio
FM radio
radio
ok
key
ok
key,“ ok
ok ” to calculate the result.
key,
soft
key,
soft key,
key, you can delete the
right
right
right soft
soft
soft
soft key
key
key
key
,
left
left
left
This FM Radio one also features a radio.
You
can
search radio programs or to do it manually. Press the left soft
key to view the following operations:
- channel list
Here you will find the frequency of the program; you can
edit and delete the program.
- manual
Page 61

You
can manually input the frequency of the program
you like.
- Auto search
You
can save the search channels.
- Settings
You
can select different setting for the FM function such
as: background
Tip:
The
Tip:
Tip:
Tip: The
shielded
shielded
shielded
shielded environment.
the
the
the
the following
the
the
the
the earphone
4.23.
4.23.
4.23.
4.23. Video
performance
The
performance
The performance
performance might
environment.
environment.
following
following
following ways:
earphone
earphone
earphone line;
Video
Video
Video recorder
play,
profile, handset speaker, etc.
might
be
might
be
might be
be affected
However
environment. However
ways:
ways:
ways: Take
line;
line;
line; Search
recorder
recorder
recorder
However
However you
Take
the
Take
the
Take the
the phone
Search
Search
Search the
the
the
the programs
affected
affected
affected indoor
you
you
you could
phone
phone
phone near
programs
programs
programs manually.
indoor
indoor
indoor or
could
could
could make
near
a
near
a
near a
a window;
manually.
manually.
manually.
make
make
make it
window;
window;
window; Adjust
or
or
or in
it
it
it better
in
a
in
a
in a
a
better
better
better by
Adjust
Adjust
Adjust
During the view-finding mode, adjust the lens to allow
what is being photographed to appear in the viewfinder.
Press the red button to activate the video recorder.
Press the “ Options ”,you can perform the following
operations:
To
player
To
To
To
player
player
player :
To
enter the video player submenu and
-
play the video file taken by the camera.
Video
Video
- Video
Video Recorder
Recorder
Recorder
Recorder Setting
Setting
Setting
Setting :
To
set some spec of the
video recorder.
Video
Video
- Video
Video setting
Time
Time
Time
Time limit,
setting
setting
setting : Includes Video
limit,
limit,
limit, Record
Record
Record
Record audio
audio
audio
audio and Encode
Video
Video
Video quality,
quality,
quality,
quality, Size
Encode
Encode
Encode format
Size
limit,
Size
limit,
Size limit,
limit,
format
format
format
by
by
by
Page 62

adjustment.
Effect
Effect
- Effect
Effect setting:
Preferred
Preferred
- Preferred
Preferred storage
setting:
setting:
setting:
To
set special shot effect.
storage
storage
storage : Phone memory or T-flash card
memory.
Restore
Restore
- Restore
Restore Default:
Default:
Default:
Default: Press [OK]
[OK]
[OK]
[OK] and select Yes
Yes
Yes
Yes to
return to default settings.
Tip:
Tip:
Tip:
Tip: In the video finding interface, press the relative number
key, you can adjust the relative spec of the video effect.
4.24.
World
4.24.
World
4.24.
4.24. World
World clock
Enter the “ World clock ” submenu, where you will initially see the
world clock-browsing interface. Use the option
Daylight
Daylight
“ Daylight
Daylight saving
4.25.
TV(Optional)
4.25.
TV(Optional)
4.25.
4.25. TV(Optional)
TV(Optional)
clock
clock
clock
saving
saving
saving time
time
time
time for
for
foreign
for
foreign
for foreign
foreign city
option
option
option to select the
city
city
city ” on or off
This phone Built-in analog TV module, you can be
anywhere in the signal coverage of the area to enjoy your
favorite TV shows. Enter the options menu to choose from
the following:
Channel
Channel
Channel
Channel list
list
list
list Shows that the channel has to search
the list Can rename, and delete the selected broadcast
channel
Channel
Channel
Channel
Channel Search
Search
Search
Search In different regions could use the
search function to the television more clearly.
Search
Search
Search
Search Area
Area
Area
Area In different cities and countries,
Page 63

please select the appropriate channel to conduct the
search area.
Noise
Noise
Noise
Noise Setting
Setting
Setting
Setting Can be turned on or off to eliminate
noise function, the function to open after the signal
abated in the region to eliminate some of the players
appearing in snow point.
Display
Display
Display
Display Settings
Settings
Settings
Settings Adjustable output television
screen brightness and color.
Restore
Restore
Restore
Restore Display
Display
Display
Display Settings
Settings
Settings
Settings Restore the default display
settings .
5.
Appendix
5.
Appendix
5.
5. Appendix
Appendix
In simple terms, the function of internet video camera
is to achieve the function of chatting through the camera of
the phone and internet connection of PC.
The PC-configuration requirements for the function of
internet video
1. The PC operating system is Windows XP SP2 or
more advanced editions.
2. The chatting tools like MSN and QQ should be
installed to support the video chatting function.
3. Internet connection should be in good condition.
Page 64

Steps of operation of internet video camera.
1. Press the Cancel key to switch on the phone.
2. Connect the phone with a PC which is running by a
USB data line.
3. In the interface of USB settings, select "internet
video camera", press the left soft key "OK" to make
the phone enter the internet camera state.
4. Ensure that the connection of the PC is in good
condition.
5. Start chatting with others through QQ, MSN or other
chatting tools.
Features of internet video camera:
1. Support the plug-and-play function.
2. Automatic exposure.
3. Automatic gain control.
4. The video effect can be improved through adjusting
the contents of the options of internet video camera
on the PC, such as: brightness, contrast, color tone,
saturation, sharpness, gamma, white balance,
backlight contrast, etc.
NOTE:
NOTE:
NOTE:
NOTE: In the course of video chatting, the actual
refresh rate is influenced by the speed of internet, it is not
the problem of the phone.
 Loading...