

Page 1

ACE AL5500
plus
Alkoholtester
Kurzanleitung
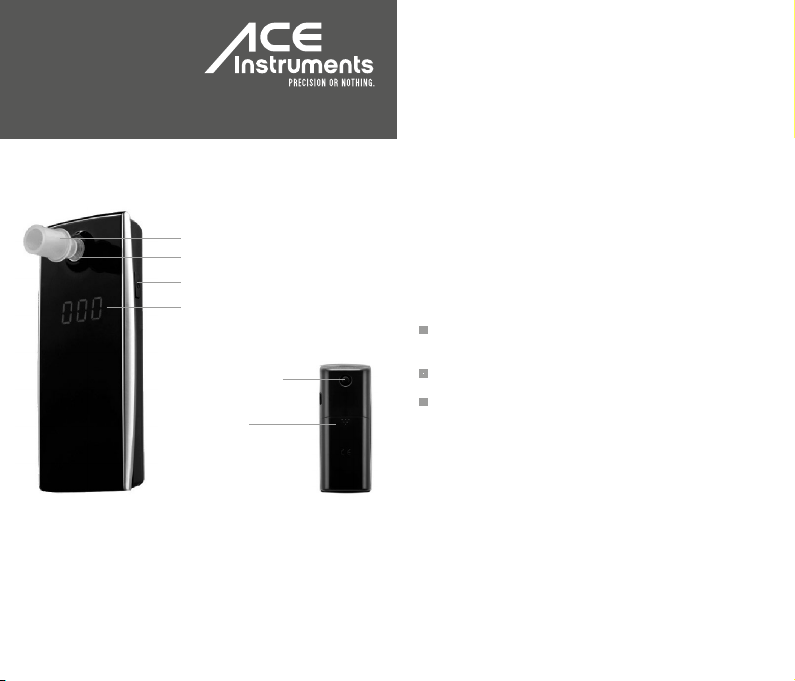
Bezeichnung der einzelnen Bestandteile:
1. Wenn Sie das Gerät zum ersten Mal benutzen, dann schie-
ben Sie den Batteriefachdeckel an der Rückseite des Gerätes
nach unten und entfernen Sie den Trennstreifen, der die Batterien vor der Auslieferung vor automatischer Entladung schützt.
Schließen Sie das Batteriefach anschließend wieder.
2. Stecken Sie ein Mundstück (beste Genauigkeit) oder einen
Strohhalm (gute Genauigkeit) in die Sensor-/Mundstücköffnung vorne am Alkoholtester. Vergewissern Sie sich, dass das
Mundstück/der Strohhalm fest sitzt. Verwenden Sie für jede
Testperson ein neues Mundstück/einen neuen Strohhalm.
www.ace-instruments.net
Mundstück und Öffnung zum
Anbringen der Mundstücke
Sensoröffnung
Startknopf
Digitale LED-Anzeige
(3 Stellen, davon 2 Dezimalstellen)
Luftauslass
(immer freihalten)
BatteriefachAbdeckung
3. Drücken Sie den Startknopf* und dann Gerät beginnt sich
aufzuwärmen. Dazu startet ein Countdown, der am Display zu
sehen ist. Wenn der Countdown „0“ erreicht hat, dann können
Sie mit dem Test beginnen, pusten Sie dazu konstant in das
Mundstück.
4. Während des Pustens ist ein Piepton zu hören, pusten Sie
ohne Unterbrechung bis Sie einen doppelten Piepton hören,
die Atemprobe ist dann beendet. Tipp: Pusten Sie in das Mundstück als ob Sie pfeifen würden. Bei zu geringer Atemprobe
zeigt das Gerät am Display „Flo“ an. Schalten Sie das Gerät in
diesem Fall aus und wiederholen Sie den Test.
5. Wenn die Atemprobe erfolgreich war, dann bewegt sich die
Ziffer „0“ am Display von links nach rechts und währenddessen
wertet das Gerät die Atemprobe aus. Dann wird das Testergebnis zirka 10 Sekunden lang blinkend am Display angezeigt.
Das Testergebnis erscheint 3-stellig (mit 2 Dezimalstellen) in
Promille (der Wert kann 1:1 interpretiert werden). Das Testergebnis hat eine Toleranz von +/- 0,10 Promille beim Referenzwert
von 0,50 Promille.
6. Sie können das Gerät manuell ausschalten, indem Sie den
Startknopf konstant drücken, Sie sehen dabei “Out” am Display.
Das Gerät schaltet sich jedoch auch automatisch aus und
zwar zirka 15 Sekunden, nachdem das blinkende Testergebnis
angezeigt wurde.
Bitte beachten Sie:
Warten Sie nach dem letzten Schluck Alkohol mindestens
15 Minuten bis zum Atemtest, ansonsten verfälscht Restalkohol
in Ihrer Mundhöhle das Ergebnis.
Aus hygienischen Gründen und zur Gewährleistung eines
zuverlässigen Messergebnisses sollten Sie für jeden Test ein
neues Mundstück verwenden.
Die voreingestellte Messeinheit für den Gebrauch in der EU
ist Promille (g/L), für UK ist es mg/L und für die USA ist die
Messeinheit % BAC.
*Wenn Sie den Startknopf konstant drücken, dann erscheint
die Anzahl aller Tests, die bisher mit dem Gerät durchgeführt
wurden (nach einer Kalibrierung beginnt die Zählung wieder
bei 0) und außerdem wird das Ergebnis des zuletzt mit dem
Gerät durchgeführten Tests kurz angezeigt.
Für Details lesen Sie bitte die Bedienungsanleitung!
Page 2
ACE AL5500
plus
Breathalyzer
Quick Start Guide
Label of individual components:
1. If you use the breathalyzer for the first time, then push the
battery compartment cover on the back downwards. Remove
the small paper inside the battery compartment (this paper
prevents the 2 inserted batteries from discharging). Close the
battery compartment cover again.
2. Insert a mouthpiece (best accuracy) or a straw (good
accuracy) into the sensor / mouth opening on the front of the
breathalyzer. Make sure that the mouthpiece / straw is firmly
seated. Use a new mouthpiece / new straw for each test person.
www.ace-instruments.net
Mouthpiece and Mouthpiece Slot
Sensor opening
Power button
Digital LED Display
(3 digits with 2 decimals)
Air outlet
(always keep this
part unblocked)
Battery
compartment
cover
3. Push the power button*. The device warms up and therefor a
countdown starts. Wait until you can see “0” on the display.
As soon as you can see “0”, start blowing into the mouthpiece.
4. The device will start beeping as soon as you start blowing,
keep blowing steadily until you hear a quick double beep tone.
Tip: Blow like you would whistle (without a break). If the breath
sample was too weak then you can see „Flo“ on the display.
Please put off the device and start it again for a new test.
5. After a successful breath sample you will see the digit „0“
moving left to right in the display as the device analyzes the
breath sample. The test result is displayed after a few seconds
(blinking 10 times). It shows a 3 digit readout (with 2 decimals)
of your blood alcohol level in per mill. You can interprete the
test result 1:1. The test result has got a tolerance of +/- 0,10 per
mill with reference to 0,50 per mill.
6. You can put the device off by pushing the power button until
you see “Out” on the display, but the device also puts itself off
automatically approx. 15 seconds after showing the blinking
test result.
Please note:
Wait at least 15 minutes after finishing your last drink otherwise residues of alcohol in your mouth influence the
test result.
From hygiene reasons and for accurate measurement
results always use a new mouthpiece for each test.
The default measurement setting for EU is per mill,
for UK it is mg/L and for the USA it is % BAC.
*If you constantely keep pushing the power button, you can
see the number of all tests conducted with the device (starting
with zero after a calibration) and also the last result of measurement where alcohol was detected.
Please read the manual for further details!
 Loading...