

Page 1

A
A
C
C
D
Seeee
D
S
(April 25, 2001)
Usseerr
U
G
G
uii
u
dee
d
Page 2

Table of Contents
INTRODUCTION 7
The World of Digital Image Management............................................................................ 7
About ACD Systems...........................................................................................................7
Capabilities of ACDSee........................................................................................................ 8
Features Specific to ACDSee v3.1 ........................................................................................ 8
New Features to ACDSee v3.1 (Update) ...............................................................................9
Uses for ACDSee.................................................................................................................. 9
The Main Windows............................................................................................................ 13
GETTING STARTE D 14
Installation Steps ............................................................................................................... 14
Staying “InTouch”............................................................................................................. 17
Starting ACDSee................................................................................................................ 18
Getting Help...................................................................................................................... 19
BROWSE MODE 21
The Browse Window.......................................................................................................... 21
Browser Panes................................................................................................................... 22
Toolbar and Command Extensions ..................................................................................... 23
Path Box.......................................................................................................................... 24
Folder Tree Pane............................................................................................................... 25
File List Pane ................................................................................................................... 25
From any File List View....................................................................................................27
Favorites List Pane............................................................................................................ 28
Preview Pane.................................................................................................................... 31
File Info Pane................................................................................................................... 31
Status Bar......................................................................................................................... 32
Plug-ins Pane.................................................................................................................... 33
VIEW MODE 34
The View Window ............................................................................................................. 34
2
Page 3

Viewer Layout................................................................................................................... 35
Toolbar ............................................................................................................................ 35
View Area........................................................................................................................ 35
Status Bar......................................................................................................................... 36
Navigation........................................................................................................................ 37
Returning to the Browse Window ...................................................................................... 37
Image Sequences................................................................................................................ 38
Manipulating Image Sequences.......................................................................................... 38
Slide Shows........................................................................................................................ 40
Starting a Slide Show from Browse Mode .......................................................................... 40
Starting a Slide Show from View Mode ..............................................................................41
Slide Show Commands and Features.................................................................................. 41
Sync To Folder................................................................................................................. 42
Zooming............................................................................................................................. 43
Panning/Scrolling .............................................................................................................. 44
PHOTO ENHANCEMENT 46
The Photo Enhancer.......................................................................................................... 46
Starting the Photo Enhancer.............................................................................................. 47
Configuring the Photo Editor ............................................................................................. 47
Enhancement Functions..................................................................................................... 48
Multiple levels of undo / redo ............................................................................................ 48
Cropping, Resizing and Rotating........................................................................................ 49
Adjusting Color Levels ..................................................................................................... 50
Applying Image Filters...................................................................................................... 51
Red-eye Reduction............................................................................................................ 51
Image Effects................................................................................................................... 52
ACDSEE FEATURES 54
Acquiring and Printing Images.......................................................................................... 54
Acquiring Images ............................................................................................................. 54
Printing Images................................................................................................................. 55
Digital Camera Support ..................................................................................................... 56
Camera Configuration .......................................................................................................57
Taking Pictures................................................................................................................. 57
Browsing the Camera........................................................................................................ 58
Transferring Images from the Camera ................................................................................ 58
Plug-ins .............................................................................................................................. 58
3
Page 4

Types of Plug-ins.............................................................................................................. 59
Plug-in Settings ................................................................................................................ 60
SendPix Plug-in................................................................................................................ 61
HTML Album Generator................................................................................................... 61
E-mail Plug-in ..................................................................................................................62
Contact Sheet and Print Contact Sheet................................................................................ 63
Adjust Levels Plug-in........................................................................................................ 64
JPEG Transform ...............................................................................................................65
Wallpaper.......................................................................................................................... 65
Thumbnails........................................................................................................................ 66
Thumbnail Caching ...........................................................................................................66
Database Maintenance....................................................................................................... 67
Rebuild thumbnails ........................................................................................................... 68
FILES AND FOLDERS 69
Timestamp Command ....................................................................................................... 69
Deleting Files ................................................................................................................... 69
The Favorites List............................................................................................................. 69
Finding Image Files ........................................................................................................... 70
Search Scope.................................................................................................................... 70
Search Criteria .................................................................................................................. 70
Displaying Search Results................................................................................................. 71
Modifying Files and Folders .............................................................................................. 71
Renaming Files and Folders............................................................................................... 71
Renaming a Series ............................................................................................................ 71
Describing Files ................................................................................................................72
Copying and Moving Files/Folders..................................................................................... 73
Copy to/Move to ...............................................................................................................73
Copy, Cut and Paste Files ..................................................................................................74
Drag and Drop.................................................................................................................. 74
Generating File Listings ..................................................................................................... 75
Launching Document Files................................................................................................ 76
Converting Images to Another Format .............................................................................. 76
TIPS, TRICKS, AND CUSTOMIZATION 78
Optimizing Image Display Quality..................................................................................... 78
Viewing Multiple Images Simultaneously .......................................................................... 79
Viewing from a Single Window......................................................................................... 80
Customizing ACDSee .........................................................................................................80
4
Page 5

Customizing Using Options ............................................................................................... 80
Customizing the ACDSee Browser Layout (v3.1 and above) ............................................... 81
Running ACDSee Automatically from Other Programs....................................................... 82
Setting the View Window Size and Position ....................................................................... 83
QUESTIONS AND ANSWERS 84
Questions Related to E-mail Plug-in ..................................................................................88
Appendix 1: Updates, Support, Feedback, and License Information ................................. 89
Getting Program Updates.................................................................................................. 89
Technical Support and Feedback........................................................................................ 89
Licensing Information .......................................................................................................89
Contacting ACD Systems Ltd............................................................................................ 92
Mail and Fax Information.................................................................................................. 92
Appendix 2: Patterns and Wildcards ................................................................................ 94
Appendix 3: System Administrator Options ..................................................................... 95
Appendix 4: Digital Camera Support...............................................................................100
Appendix 5: Image Formats Supported ...........................................................................101
Read Support .................................................................................................................. 101
Write Support.................................................................................................................103
Browse Mode Shortcuts ....................................................................................................104
View Mode Shortcuts........................................................................................................106
PICAVIEW 108
Features.........................................................................................................................108
IMAGEFOX 110
Features.........................................................................................................................110
5
Page 6

Acknowledgments
The color quantization/dithering features and JPEG decoder of ACDSee were made possible by
code produced by the Independent JPEG Group.
ACDSee’s TIFF support was made possible by code in Sam Leffler's TIFF library, v 3.4 beta.
Thanks to beta testers who helped ensure that ACDSee was ready for public release.
Thank you to all other users who have contributed to ACDSee by communicating problems,
suggestions, designs and artwork.
Thanks to all users who supported the development of this software by registering and
recommending it to their friends and colleagues.
Finally, thanks to all employees of ACD Systems who contributed to the making of this manual:
first and foremost David Hooper (the original author); technical support, the testing crew and
members of the project management team for review and feedback; and the technical writing
team for bringing a lot of information together in a coordinated effort.
The Technical Writing team:
Todd Turik Cassandra Mate
Tim Bradshaw Karen Reid
6
Page 7

The World of Digital Image Management
ACD Systems is a world leader in digital image management software for businesses,
governments, educators, and individual consumers. ACDSee represents the cutting-edge of
digital imaging technology and is the fastest and most powerful image viewer available for
Windows®. Its easy-to-use interface, integrated design and convenient features let you
manipulate and enhance images with professional-quality results. Welcome to the world of
digital image management!
About ACD Systems
ACD Systems originally developed its software as a commercial application for tracking
automobile parts and accessories, thus ACD stands for Automatically Catalogues and Delivers.
Although ACD Systems no longer produces parts-tracking software, such applications require
great speed, organization and reliability. These characteristics remain central to the robust and
efficient software for Digital Imaging and Network Messaging produced by ACD Systems
today.
ACD Systems designs, develops, and markets software for digital imaging and corporate
communications. Digital Imaging and Network Messaging are two of the fastest growing
niches in the marketplace today. Due to the enthusiastic reception of our products since 1993,
ACD Systems is enjoying rapid growth and prosperity in the software industry. We continue to
be a strong, dynamic and competitive company on the cutting edge of technology, and our
success in electronic sales over the Internet has allowed ACD Systems to establish significant
worldwide market penetration.
In continuing to provide proven software technology in an extensible platform model, ACD
Systems has established an excellent market position, worldwide distribution and a global user
base. All of our products are designed to be fast, intuitive and value -priced. Our product line
includes ACDSee (for PC and Mac), FotoCanvas, FotoAngelo, FotoVac, ImageFox, PicaView,
PhotoSeePro, ImageShark, Express Messaging Server and Express Communicator. ACDSee,
our flagship software, is the world’s most popular image viewer, browser, enhancer,
management and sharing tool. It is a consistent award winner and for 3 consecutive years (and
still counting), has been named to Stroud’s Download Hall of Fame.
Our customers have come to trust and depend on our products, as well as appreciate the
technical support they know is available to them.
7
Page 8

For more information on the exciting products offered by ACD Systems – check our web site at
www.ACDSYSTEMS.com
Capabilities of ACDSee
ACDSee lets you do more with images than ever before. You can organize your photo
collection into tidy categories in separate folders, and add notes, author identification, keywords
and dates to each. ACDSee allows you to view, organize, enhance, and print your images.
ACDSee, however, does not stop there. You can print multiple thumbnail images in order to
view large portions of your collection at a glance. You can create slideshows for things like
trips and special events. You can take pictures with a digital camera, view them instantly, and
download them onto your computer. You can even send photos to your friends via email, and
generate web page photo albums to share your images with the world on the Internet.
To help you become more familiar with the application, ACDSee provides tool tips and contextsensitive help in most dialog boxes, as well as on-line help files. Extensive customization
options are als o available so you can further increase the speed of your operations by
configuring ACDSee to work the way you want.
In addition to all of this, ACDSee is both flexible and expandable, as it supports over 40
multimedia file formats, and allows for plug-in architecture that lets you add even more
program functionality.
Features Specific to ACDSee v3.1
There are features to ACDSee 3.1 that allow more advanced customization as well as increased
functionality.
Customizable Browser layout: From the [View | Layout scheme…] command, you can
save your favorite Browser pane/toolbar configurations.
Customizable toolbar: Any toolbar can be customized by clicking it with the alternate
mouse button and choosing from the options provided. Toolbar configurations can be
saved using the [View | Layout scheme…] menu command.
E-mail plug -in: To send pictures to your friends, family, colleagues or clients without
having to use an external e-mail application.
Contact sheet plug-in: To create and print a contact sheet of thumbnail images.
Adjust levels plug -in: Batch level adjustment of images is now available.
Audio clips: ACDSee v3.1 can play audio clips embedded in images.
Improved crop feature: The crop feature in the Photo Enhancer has been improved.
Group archives: You now have the option to group archives with folders in the File list.
Other improvements include: exception handling for plug-ins to prevent a plug-in crash
from crashing ACDSee, automatic connection to the InTouch server in the background,
8
Page 9

buttons to view and delete InTouch messages, and faster startup (especially in Windows
2000).
New Features to ACDSee v3.1 (Update)
All of the above features are a part of ACDSee v3.1 Update as well as those listed below.
These new features have been included to provide functionality that is more extensive, further
customization, and faster performance.
If you are running ACDSee v3.0 or v3.1, we highly recommend getting the free
update available on our web site. See Getting Program Updates.
Red-eye reduction: get rid of the “red-eye” effect that occurs with flash photography.
A shortcut Edit button: quickly access Photo Enhancer through the Edit button in the
Browser and Viewer toolbar. This button also includes a fully configurable drop-down
list of your favorite image editor programs. This list is customizable so you can
configure any image editor to be included in the list and be accessed from ACDSee.
Pane extension plug-in support: (to be made available through downloads and in future
releases of the application). This feature allows pane extension plug-ins to run right
inside the Browser window.
Tip of the Day: provides you with a helpful tip at startup.
The [Change Timestamp…] tool improvement: this now allows you to set the
timestamp on a file or group of files to any date and time.
Toolbar Chevrons : enhanced toolbars allow access to buttons that are obscured when
the window size is reduced (Chevrons).
The [Rename Series…] tool: now allows you to change a gr oup of filenames to upper or
lower case. This provides a quick and efficient way to change multiple files at once.
Other improvements include: up to 3x faster JPEG encoding and decoding speed;
support for viewing TIFF Exif metadata, including embedded aud io; faster thumbnail
extraction for Exif files; and you can now configure the ACDSee Browser to start in a
user-specified folder.
Uses for ACDSee
ACDSee is popular among consumers in a home setting because it is easy to use. However,
through its speed, functionality and flexibility, it has also proven itself not only helpful, but in
many cases indispensable to professional users in the course of their daily work. The following
examples reveal some of the ways in which ACDSee is used in the professional world.
Medicine
In order to increase diagnostic efficiency, Radiologists are moving toward digital imaging
systems that use ACDSee to manage thousands of X-Ray, CAT scan and MRI images recorded
in computer file format.
9
Page 10

Medical equipment developers use ACDSee to develop visual inventories of their equipment
and to create presentation slideshows to effectively market their products.
Ophthalmologists use ACDSee to manage retinal-scan archives, track patients’ eye
development and add case -specific descriptions for future reference.
Dentistry
Dentists have found ACDSee to be an excellent tool for tracking changes in dental structure
during orthodontic procedures.
Law Enforcement
Digital cameras are used routinely by the police to record crime scene de tails, and ACDSee is
often the platform of choice to acquire the digital-camera images, file them effectively, analyze
them, and present them for review.
Police often find that individuals engaged in creating and distributing illegal forms of
pornography attempt to hide images on their computers using non-image file-extensions. When
investigating such activities, police use ACDSee to scan computer systems for these types of
files, as it quickly recognizes them as images, even though they do not have image file extensions.
In forensics, micrographs from different sources and with different file extensions are often
created in the investigation of evidence. These images are easily viewed with ACDSee, as the
program recognizes the various image formats quickly, thereby eliminating the need for several
programs specific to viewing different image formats.
The Military
ACDSee is used by the military for both engineering and intelligence gathering purposes, as it is
highly capable of managing image databases f or such things as ship reconstructions and aerial
photography.
Academia and Research
• In Astronomy, ACDSee is used to catalogue interstellar images from telescopes.
• In Biology, ACDSee is used in combination with digital cameras to take time-lapse
photographs automatically for studying developmental cycles in organisms.
• In Meteorology, satellite images are presented in slide shows to track weather patterns.
• In Histology and Microscopy, electron micrographs and other micro-images are tracked
in the program’s powerful database.
10
Page 11

Manufacturing
ACDSee is often used by manufacturers to compile visual records of equipment product lines
and related items, and to manage invoices by scanning them and organizing them into easily
searchable folders.
Manufacturers also use ACDSee to track product performance – analyzing regular wear and
tear, as well as subsequent damage patterns in the case of failures.
For many manufacturers, ACDSee is the platform of choice because of its fast, thumbnail
browsing of images and its ability to create and print thumbnail contact sheets.
Photography
ACDSee’s intuitive interface allows professional photographers to access and organize photos
quickly and easily. In only a few moments, pictures captured on a digital camera are acquired
and saved in a designated directory, dramatically reducing the downtime associated with the use
of conventional cameras.
Photos are instantly viewed in either full view or thumbnail mode prior to the creation of a
contact sheet. The acquisition of photos can be significantly improved with the use of a
supported ACDSee camera plug-in. ACDSee is used to acquire old photos easily through a
scanner.
Retail
Retailers use ACDSee to create and manage large, graphical archives of inventory and product
lines, as images are stored easily and accessed quickly.
Advertising
Advertisers often use ACDSee’s Photo Enhancer to alter images for advertisements, and they
often rely on ACDSee’s powerful filing system to manage promotional images and banner ads
for the Wor ld Wide Web.
Graphic Design
Graphic designers use ACDSee to manage the many images they create in different proprietary
programs.
Entertainment Industry
Many game -development companies use ACDSee for its ability access images developed by
artists in other proprietary software.
11
Page 12

ACDSee’s Slide show is also an excellent tool for displaying storyboards during the
development of things like animated sequences, and images are made readily accessible to all
team members from a single folder.
Training and Development
Many companies use ACDSee to develop training seminars using the Slide show feature, or to
catalogue images used in safety manuals and other publications.
Engineering and Architecture
Engineers and architects often use digital cameras during project development for initial survey
photos, project model renderings, project site construction and highlighting specific
architectural features. ACDSee allows companies to place all their images in a single folder,
sequence them, and present them in slid e shows.
Multimedia Developers
Multimedia developers use ACDSee to increase file sampling efficiency, as visual and audio
files (including movies) can all be quickly reviewed in the File List pane with the simple click
of a button.
Web Developers
Web developers use ACDSee to manage and view thousands of banner ads for web sites with its
powerful filing system.
Artists
Many artists use ACDSee to manage digital images of their work and post the images to their
online galleries.
Publishing
Using ACDSee, ma ny publishers organize and view complex files (such as Multipage TIFFs),
easily. The ability to view groups of zipped image files allows publishers to reduce the amount
of disk space designated for image storage.
12
Page 13

The Main Windows
The View
Window
lets you view a selected
ACDSee is a program composed of three main windows, which work to manage, view and
manipulate your images.
The Browse Window presents an Explorer-like
interface that lets you locate and manage images
stored in your file system. By de fault, this
window comes up when you start ACDSee. You
can open more than one Browser at a time by
going to [File | New Window].
Several customization features allow you to
choose the windowpanes, the toolbars, and the
shortcut buttons you wish to use.
sequence of images, one at a time. Slide show,
zoom, and some file management features are also
available in this window. To switch between the
Browse window and the View window, doubleclick an image file in the Browser, or select an
image and press the <Enter> key.
Clicking the Browse button, double-clicking
the image, or pressing <Enter> will return you to
Browse mode.
The Photo Enhancer lets you touch up your
photographs, or alter them dramatically, with a
wide range of easy-to-use tools.
Clicking the Enhance button or selecting the
[Tools | Edit…] command, will begin a photo
enhancement session. You can have as many
Photo Enhancer windows open simultaneously as
you like.
13
Page 14

You can select the image association defaults during the installation but only if
This chapter guides you through the installation process step by step, and provides you with all
the information you need about minimum system requirements, starting the program after
installation, launching from other applications, uninstalling the program, and keeping informed
through the InTouch service.
The following steps include both installation from the ACDSee stand-alone application as well
as from ACDSee 3.1 PowerPack – a combination of digital imaging tools that includes ACDSee
v3.1 (Update), FotoAngelo, and FotoCanvas.
If you are running ACDSee v3.0 or v3.1, it is highly recommended to get the
free update available on our web site. See Getting Program Updates.
Minimum system requirements:
Ø Microsoft Windows 95 / 98 / NT 4.0 / 2000 / ME
Ø Intel 486DX with 32 MB RAM
Ø 20 MB free disk space
Ø A 256 color (or higher) video display
Ø Internet Explorer 4.0 or later
Users manipulating very large images, or an extensive number of images, will
enjoy better performance by using a system that exceeds these requirements.
Installation Steps
Before beginning your installation, make sure your License number is accessible. It will also
help to decide beforehand what image association defaults you wish to choose. Image
association defaults are useful in that they let you decide which image types will use ACDSee
as the default viewer. These image types will then be viewed by ACDSee automatically whe n
opened from outside the application (e.g., from Windows Explorer).
you choose a Typical installation or a Custom installation. With the Custom
14
Page 15

installation, select the [Unused] option in the [Shell integration setup] page.
After the installation you can change these default settings by going to the
[Tools | File Associations…] menu command.
To install ACDSee:
Once you have downloaded the necessary files off the Inte rnet, or after placing the ACDSee
standalone CD in your CD-ROM drive, use this document to follow along with the installation
steps that will appear on your screen.
1. Using the primary mouse button, double click the executable file.
2. A Welcome window will appear – click Next.
3. Read the License Agreement window and select [I agree to the terms of the agreement], if
you agree to the terms. See Appendix 1 for more information relating to licensing.
4. Choose one of the three types of installations . How ACDSee is installed will vary based on
which option you choose.
Typical Installation: This will install ACDSee using the most common options:
Ø ACDSee will be installed in “D:\Program Files\ACD Systems\” (if “D” is the
disk drive you are installing to).
Ø It will not be set as the default application for opening any file types.
Ø All plug-ins will be installed.
Ø Shortcut icons will be placed on the desktop and in the Start menu.
Follow step number 5 below to fill in license information. Once this is done, you will be
taken to step 10.
Compact Installation: This installation has the same steps as the Typical installation;
however, it uses the least disk drive space by installing ACDSee with the minimum
required options. This means the plug-ins that allow support for many image formats,
digital cameras, archive files, and command extensions will not be installed. Only the
plug-in that supports BMP, EMF, GIF, JPEG, PCX, PNG, TGA, TIFF, and WMF images
will be installed. All the other options are the same as in the Typical installation. Follow
steps 6, 7a, 10, and 11.
Custom Installation : This lets you choose the options for installing ACDSee
(recommended for advanced users). Follow steps numbered 5 through 11 below.
5. Fill in the license information, including:
a. License number (the 18-digit code supplied at purchase)
15
Page 16

b. Your name/company name and e-mail address (this information is optional for
ACDSee v3.1 and above).
IMPORTANT: The License number must be entered exactly as provided by ACD
Systems. Do not add dashes or extra spaces.
6. Select the destination directory using the Browse button, or choose the default destination
(recommended) by clicking Next.
7. If installing the standalone ACDSee, in the window that opens, select yes to install a free
tria l of PowerPack or select no to continue to Step 9. If you select yes, in the next
window, clear the checkbox of any applications that you do not want to install and click
Next.
7a. If installing ACDSee from ACDSee PowerPack , you will be prompted to choose the
additional applications you would like to install with ACDSee.
8. In the pages that follow, choose the image format support plug-ins, the archive format
support plug-ins, the camera support plug-ins, the command extension plug-ins, and the
shortcut icons you’d like installed. Alternatively, to keep the settings as they are, click
the Next button.
9. The “Shell Integration setup” window allows you to configure ACDSee as the default
application that opens supported image and archive formats. There are three options to
choose from:
Unused: Set ACDSee to be the default application for all supported file types
that currently do not have a default application specified for them.
All: Make ACDSee the default application for all supported file types.
Let me choose: This displays a list of supported file types and allows you to
choose the types that will use ACDSee as the default application (this list appears
at the end of the installation).
10. A window appears stating that the program is ready to install. Click Next.
11. When setup is complete – click Finish. We recommend you reboot your system if you
are running Win 95 or 98.
Please retain the information in the confirmation e-mail for re-installation or
reference by ACDSee technical support staff. There is a charge for resending
your License number.
Silent install
ACDSee 3.1 has included a silent installation feature. This is particularly useful when
purchasing a site license and installing or upgrading on several computers.
16
Page 17

To run an install in silent mode, the /s command-line switch should be employed.
e.g., acdsee310b0828_full_upgrade.exe /s
A special “setup.ini” file allows certain setup options to be customized for the install. This file
is required only for the silent installation of ACDSee v3.1and above (the full version); in all
other cases, it is optional. There are instructions within the setup.ini file itself describing how to
customize the settings.
Uninstalling ACDSee:
1. Open the Windows Control Panel.
2. Double-click [Add/Remove Programs].
3. Find ACDSee in the list, and double-click it.
4. Follow the instructions in the Uninstall Wizard.
Staying “InTouch”
The ACDSeeInTouch Service provides you with information about software upgrades, plug-ins,
technical support, and other products through regular messages. InTouch also provides links to
sites where you can get more details on these topics.
You can take advantage of InTouch in several ways. After installing ACDSee, the InTouch
service window appears. Follow the InTouch wiza rd instructions to set up the service to suit
your preferences. You can set the InTouch window to appear every time you run ACDSee, or
to appear automatically at intervals of your choice (the default is 7 days). You can also adjust
the settings so the service has to be activated manually using the [Internet | ACDInTouch] menu
command.
If at any time after installation you wish to change the way InTouch is set up, select [Internet |
ACDInTouch service] from the menu, then click the Settings button and choose your new
preferences.
What data is transmitted?
Whenever you connect to the ACDInTouch service, information is automatically transferred
from your computer to an ACDInTouch server. This information is largely not personally
identifiable, and consists of the following:
Ø the ACD product you are using (product ID, version, and license number if it is
licensed software)
Ø the operating system (version, language, time zone)
Ø and, optionally, information about you (name, company, and e-mail)
17
Page 18

Name, company, and e-mail information is optional. You can leave these fields
blank and ACDInTouch service will still be operational.
In addition, if you are running our software in Sponsored mode, statistical information about
how often you viewed and clicked on the advertisements is transmitted so that we can bill our
sponsors accordingly. Of course, as with all two-way Internet communications (as when using
your web browser), your IP address is also implicitly transmitted. The ACDInTouch server will
also perform a reverse lookup of your hostname in the DNS. All ACDInTouch servers are
directly or indirectly controlled by ACD Systems.
What about personally identifiable information?
Again, we will not collect any personally identifiable information about you (such as your
name, address, telephone number, social security number, billing and shipping information,
credit card information or e-mail address) unless you provide it to us voluntarily. If you opt not
to provide us with personally identifiable information, no material consequences will result,
although you may be unable to participate in certain promotions that depend on this
information.
Is the information I provide secure?
ACD Systems is committed to keeping secure the data you provide us and will take reasonable
precautions to protect your personally identifiable information from misuse. Agents or
contractors of ACD Systems who have access to your personally identifiable information in
connection with providing services for ACD Systems are required to keep the information
confidential and are not permitted to use this information for any other purpose than to carry out
the services they are performing for ACD Systems.
Starting ACDSee
It is possible to start the program in a number of different ways and from various applications.
In Browse mode
To start ACDSee in Browse mode, click [ACDSee Browser] in the Start Menu. You can
browse your system from the image Browse window that appears.
In View mode
ACDSee will start in View mode with a blank screen if you follow either of the methods below.
You can drop files for viewing in the window that appears, or add images for viewing using the
[File | Open…] command. You can switch to Browse mode at any time using the [File |
Browse] command.
To start ACDSee v3.1 in View mode:
1. With the alternate mouse button, click the ACDSee Icon on your desktop
18
Page 19

2. On the bottom of the context menu that appears, select [Properties | Shortcut] and
go to the [Target:] text box about halfway down.
3. In this box, a path points to where ACDSee is installed.
i.e., "C:\Program Files\ACD Systems \ACDSee Full Version\ACDSee.exe"
4. At the end of the path, after the quotation mark, add a [space], then forward slash
[/], and the letter [v].
i.e., "C:\Program Files\ ACD Systems\ACDSee Full Version\ACDSee.exe" /v.
When you launch ACDSee it starts from the Viewer. There will be no images displayed, only a
blank background, but it will be possible to use the [File | Open…] command or drag and drop
features to begin viewing images. See Adding images to the sequence for more.
From Explorer
To start ACDSee’s Browser in a particular folder of Explorer, click the folder with the alternate
mouse button and select [Browse with ACDSee] from the context menu. To print an image
from Explorer using ACDSee, click the alternate mouse button on the image file and select
[Print with ACDSee] from the context menu.
If no [Browse with ACDSee] command appears, start ACDSee in Browse
mode, select [Tools | File Associations...] from the menu, click the “Context
menu” tab and check the [Browse with ACDSee] box. Likewise, if no [Print
with ACDSee] command appears, start ACDSee in Browse mode, select [Tools
| File Associations...] from the menu and check the relevant file types, then click
the Context menu tab and check the [Print with ACDSee] shell command item.
Launching from another application
You can also start ACDSee from Explorer by double-clicking on an image file. Certain other
programs, such as Internet applications, can also run ACDSee automatically for you as you
receive images. By default, a new ACDSee instance (i.e., window) is started for each image
viewed. You can have all images appear in the same window by changing the [Miscellaneous |
Startup files] option (this will reduce system overhead).
If double-clicking an image file does not bring up ACDSee, start ACDSee in
Browse mode and select [Tools | File Associations...] from the menu. Check
the relevant file types and click OK.
Getting Help
When running the program it is possible to take advantage of the help tools that are offered.
These include the main help file, context sensitive help, and “mouse-overs.”
19
Page 20
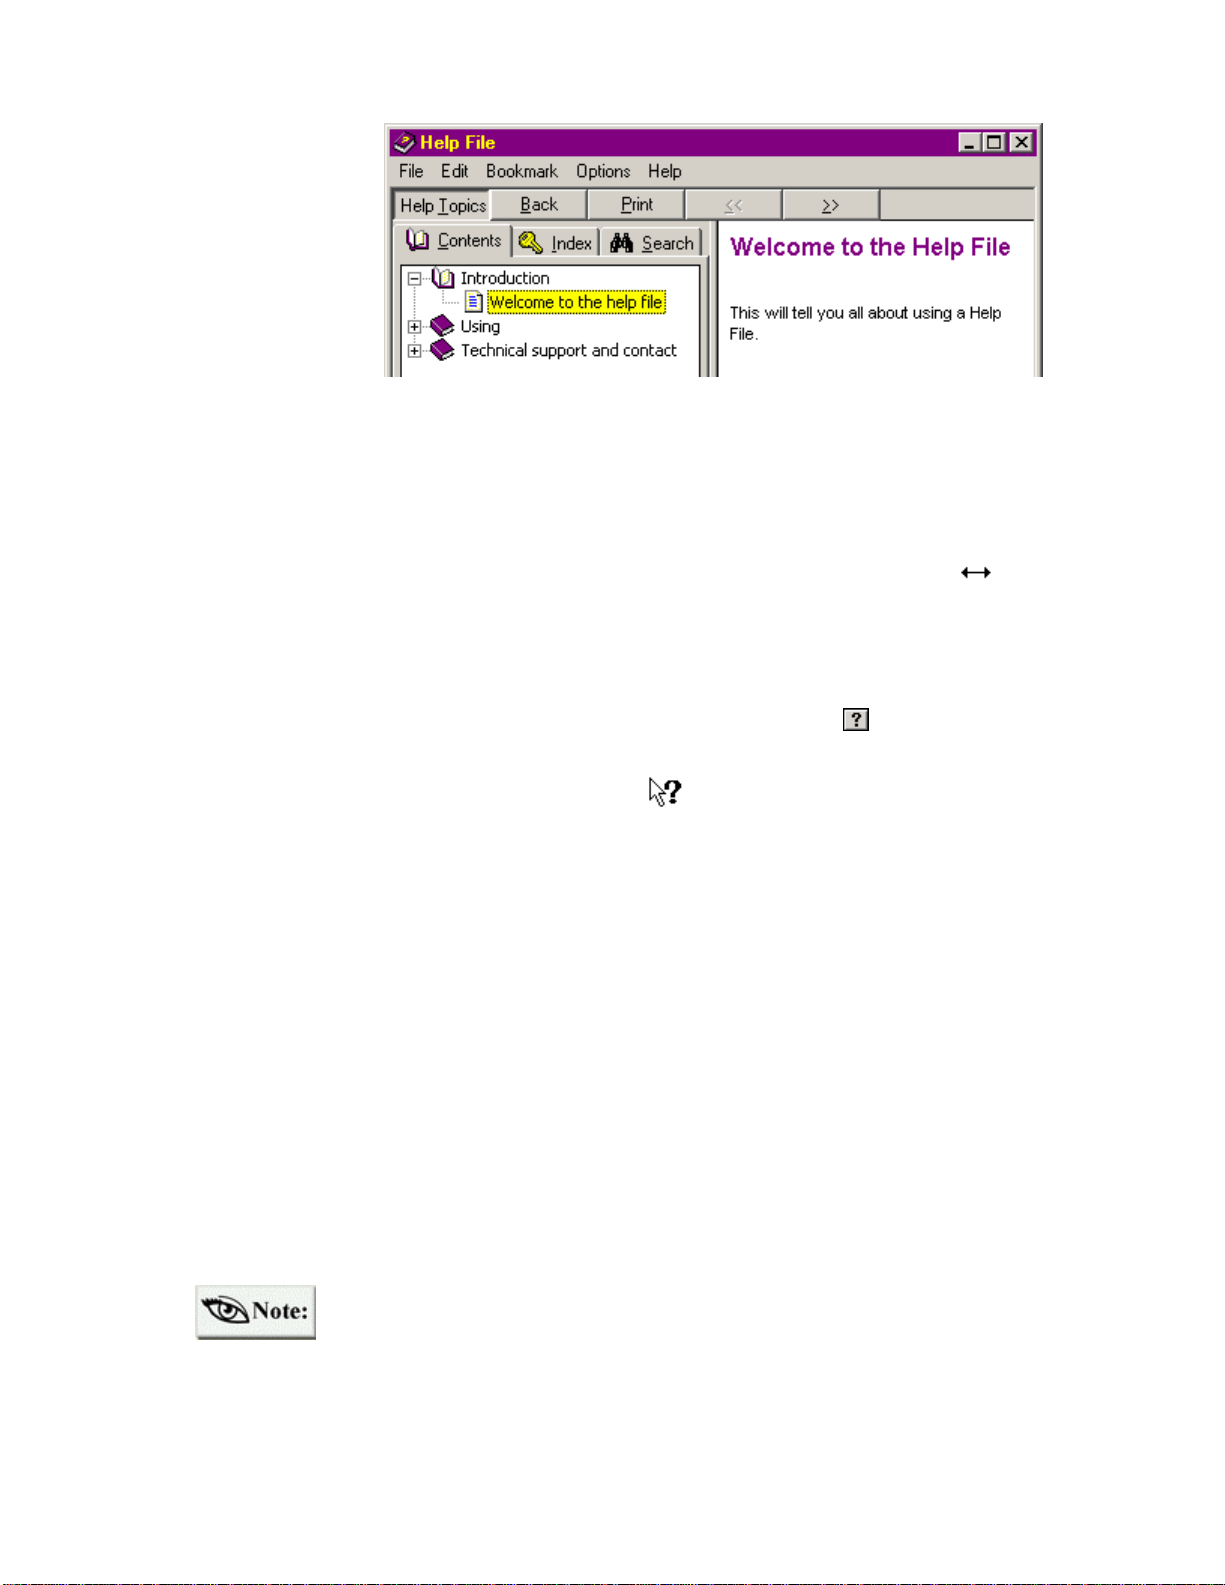
The main help file
It is possible to
access the main
help file (as seen
here) by pressing
F1 on your
keyboard or by
going to the
[Help] menu.
There are two ways to customize the window.
Table of Contents (TOC): open or close the TOC, which can be seen in the left frame, by
clicking on the Help Topics button.
Window size: the dialog size can be expanded and reduced as needed. When you move the
mouse pointer to the frame of the dialog, it will change into a horizontal arrow: .
When this happens, press down on the primary mouse button and drag the frame.
Context sensitive help
With certain application windows, you have the option of clicking on the button located in
the top-right corner of the window.
This will change your mouse to the [What’s this?] pointer. Place the pointer on the area in
question to access a brief explanation of the field. Alternately, you can access the same
information by clicking an area with the alternate mouse button. However, this method will not
work with text boxes (those that can be edited).
Mouse overs:
Hovering the mouse pointer over certain objects provides information about that item. For
example, when hovering over top a shortcut button in the toolbar, the name of the button
appears.
Print and browse capabilities
It is possible to print any page of the help file using the Print button located in the top menu bar.
The browse buttons are also located to the right of the Print button and allow you to move
through the help file in sequence.
There are also separate help files for certain ACDSee plug-ins.
See Plug-in help files.
20
Page 21

Organizing your images into readily identifiable folders and archives is easy, and numerous
options for finding images and browsing through your collection are available. The following
list provides a detailed overview of what you can do with ACDSee’s image Browser.
High-speed preview: view images without interrupting exploration.
Multimedia files : associated AVI, MP3, MPG, and WAV sound files play automatically
when images are selected.
Favorites list: move or copy files to a personalized list of frequently used folders; add
shortcuts to commonly used applications.
File descriptions : annotate files with descriptive phrases.
Customize file details : configure how and what information about your files is
displayed.
Multiple search options : search for images by filename, description, date, author, notes,
and keywords.
Properties dialog : image, database, and metadata information are displayed in
properties dialog boxes, as well as author identification, keywords, and date information.
Thumbnails mode : view image thumbnails instead of normal file icons.
Resizable, moveable, tear-away panes : let you customize your layout.
Visual overwrite confirmation : source and destination images are shown side by side
when copying or moving, before being overwritten.
The Browse Window
The main Browse Window is the heart of the organizational system for your files, folders, and
archives. It has a familiar look and feel and provides you with much of the functionality of
Windows Explorer®. In addition to letting you manage your files smoothly and easily, the
Browser lets you perform various manipulation commands on image files.
21
Page 22

As seen above, the Browser is divided in to a number of different panes. You can open or close
the individual panes – go to [View | Browser Panes] and check or uncheck the ones you prefer.
A pane can be closed quickly by clicking the x button in the top, right-hand corner.
The Browser panes are resizable: hovering the mouse over a frame of a pane will change to
either 1 or o . Holding down the mouse button allows you to move the frame bar to
resize the window. The surrounding windows will also be resized.
To move or tear away the pane, hold down the mouse button on the pane bar, then
move the pane to a different area in the Browser – a shadow image appears to assist you. You
may also tear away a pane to a separate window by moving the pane outside the Browse
window.
Browser Panes
The Brow ser panes are listed below and explained in more detail in the upcoming pages.
Toolbar: provides buttons to activate commands.
Command Extensions : displays the buttons for plug-in extensions.
Path Box : specifies the path of the current folder.
22
Page 23

Folder Tree: displays the folder hierarchy of your file system.
File List: displays the files within the current folder.
Favorites List: provides quick access to files, folders and applications.
Preview Area: displays the currently selected image.
File Info : displays metadata for the currently selected image.
Status Bar: displays status information and properties for selected files.
Plug-ins Pane : displays a feature panel for selected ACD plug-ins.
Context menus are available by clicking with the alternate mouse button on the
File list, Folder tree, Favorites list, File list column header, preview area, and
status bar.
You can get the Windows Shell context menu for an item(s) instead of
ACDSee’s context menu by holding down <Shift> or <Ctrl> while pressing the
alternate mouse button.
Toolbar and Command Extensions
The shortcut toolbar, located at the top of the Browse window, consists of a number of function
buttons identified by icons.
Ø Click the corresponding button to activate a command.
Ø Rest the mouse pointer over the button to get the button’s function.
Ø Choose the [View | Browser panes | Toolbar] menu command to show or hide the
toolbar.
Ø Alternate mouse click the toolbar for a context menu.
One option when alternate mouse clicking in the toolbar is selecting the [Button Labels]
command. A list of options is displayed allowing you to customize the shortcut buttons. In the
image above, the [Labels below] option has been selected for the lower toolbar, while the [No
labels] option has been selected for the upper toolbar. Another choice is to have [Labels on
right].
By alternate mouse clicking on the toolbar, you can also choose the [Customize…] option. This
brings up the following dialog box.
23
Page 24

You can add available toolbar items from the list on the left or remove items on your toolbar
from the list on the right.
If you click an item, or an empty area, in any ACDSee window with the
alternate mouse button, a context menu appears allowing quick access to
relevant commands.
Chevrons for the toolbar
When there are too many icons for the
viewable area, a chevron appears: >>
Click on the chevron to expand the toolbar
and reveal the hidden options.
Path Box
The path box, located above the File list, specifies the folder being browsed. It als o has a dropdown list of recently browsed folders. Browse any folder by selecting it from the list.
Ø Type a path and press <Enter> to
browse the specified folder.
Ø Press <F4> to open or close the drop-
down list.
Ø Press <Esc> to cancel the path
selection process and return to the
current path.
Ø Show or hide the path box with the [View | Browser panes | Path Box] command.
24
Page 25

Folder Tree Pane
The Folder tree, on the left side of the Browse window, displays the folders in your file system.
Ø Select a folder to bring up its contents
in the File list to the right.
Ø Folders with subfolders have a [+] next
to them. Click the [+] to reveal
subfolders, or select the folder and
press <Cursor Right> or <NumPad +>.
A [-] appears next to expanded folders.
Ø To completely expand a folder and all
of its subfolders, select it and press
<Shift> and <NumPad *>.
Ø Collapse a folder and hide its
subfolders by clicking the [-], or select
the folder and pressing <Cursor Left>
or <NumPad ->.
Ø You can drag and drop a folder within the Folder pane, to copy or move it to
another location.
Ø A context menu appears when you click a folder with the alternate mouse button.
If you also hold down <Shift> or <Ctrl>, the Shell’s context menu appears.
Ø You can show or hide the Folder tree with the [View | Browser panes | Folder
Tree] menu command.
Ø You can enable or disable the display of archives in the Folder tree using the
[Tools | Options | Browser | Show archives in Folder tree] option.
File List Pane
The File list displays information about the files in the folder currently being browsed. There
are several ways to view the files within this Browser pane. The two most often used are
Thumbnails mode and Details mode.
By clicking the Views button, you can toggle through different File list views.
25
Page 26

It is also possible to click the drop
down arrow to the right of the icon
and select the view.
The cutout image below shows the Thumbnails view. This mode offers a visual representation
of the available files.
Details mode columns
In Details mode, file information is presented in report format, with each file occupying one
row, as seen below. This mode of viewing your images is very informative. Image files
currently associated with ACDSee are displayed in a color -coded format with the associated
image icon.
Showing/hiding columns
In Details view, several columns of information are shown. You can have individual columns
displayed or kept hidden. There are three ways to do this:
Context menu: Click the alternate mouse button in the column he aders area (at the
top of the File list), for a context menu that lets you make columns visible or
invisible.
Menu: Select [View | Show Columns] from the menu, and then the column you wish
to show or hide.
Shortcut keys: While holding down <Ctrl>, press <2> through <6> on the numeric
keypad (with <Num Lock> on), to toggle the display’s size, type, date, image
dimensions and description columns, respectively.
26
Page 27

The show/hide state of each column is preserved between sessions.
Changing the order of File list columns
Several columns of information are shown in the Browser’s Details File list. You can
customize the order in which the columns are shown.
To customize column order:
1. Click the column’s header with the primary mouse button.
2. Drag it into the desired position. A colored vertical line identifies the position
where the column will be inserted.
The column order is automatically preserved between sessions.
Changing how files are sorted
You can specify the file information criterion for sorting, and the sorting direction (forward /
backward) as found in the Browse window.
Clicking on the column headers
In Details view, you can sort the file of a particular column by clicking on the corresponding
header button above the File list. Clicking on the same column repeatedly alternates between
forward and reverse sorting. An up arrow (forward sort) or down arrow (reverse sort) appears
next to the column header currently being sorted.
Menu: Select the desired sort method from the [View | Arrange Icons] menu.
Context menu: Click the background of the File list with the alternate mouse button
for a context menu. Then select the desired sort method from the [Arrange Icons]
sub-menu.
Shortcut Keys: Press <0> through <6> on the numeric keypad (with <Num Lock>
on) to sort by file extension, name, size, type, date, image dimensions or description,
respectively. Press <Num -> and <Num +> to set the sort direction.
The sorting method is automatically preserved across sessions.
From any File List View:
The following three items (selecting files, setting File list options, and bringing up the context
menu), can be implemented from any File list view.
27
Page 28

Selecting files
Click a file with the primary mouse button to select it, or move the focus to the item using the
arrow keys. To select additional files, hold down <Ctrl> and click a file. Alternatively, with
<Ctrl> held down, move the focus to a file using the arrow keys and press <Space> to select or
deselect it.
To select a range of files, choose the first item in the range with your mouse; then select the last
item in the range while holding down <Shift>. To select all files, use the [Edit | Select all] files
menu command.
Options
You can set File list options by selecting [Tools | Options] from the menu and clicking on the
File list tab. From here, you can choose what source disks are scanned, what items are shown in
your File list, and how they appear.
Context menu
A context menu appears when you click an item in the File list with the alternate mouse button.
You can display a context menu for several items by selecting them and clicking on one with
the alternate mouse button.
If you hold down <Shift> or <Ctrl> when you click the alternate mouse button, a Shell context
menu (similar to that ava ilable with Windows Explorer) appears.
A different context menu appears if you click the background of the File list, instead of on an
item.
Favorites List Pane
The Favorites list pane, which appears at the bottom of the Browse window, displays a list of
shortcuts to items you wish to access frequently. You can show or hide the Favorites list pane
with the [View | Browser panes | Favorites] menu command.
28
Page 29

To add an item to the Favorites list pane:
1. Select the item in the Browser File list or Explorer.
2. Next, click the Favorites button and select [Add
to Favorites…].
Or, from the ACDSee Browser:
Ø Click an item with the alternate mouse button and
Ø Select an item and then go to [File | Add to
Ø Drag and drop the item to an empty area in the
Opening items in the Favorites list
choose [Add to Favorites…],
Favorites…], or
Favorites list pane
It is possible to double-click the shortcut item, or click the item with the alternate mouse button
and select [Browse] or [Open] from the context menu.
Dropping files onto items in the Favorites list
Begin by selecting the file and drag it onto an item (must be a non-image target) using the
primary mouse button. If the target destination is a folder, this action will move the file to the
specified folder.
To copy the file, hold down the <Ctrl> button during the drag and drop procedure. To create a
shortcut, hold down <Ctrl> and <Shift> at the same time. The mouse pointer will change shape
during these operations.
It is also possible to drag the item using the alternate mouse button. This brings up a context
menu that allows you to select [Move], [Copy], [Create Shortcuts Here], or [Cancel].
See the Applications section below on how to drag and drop files on to an application shortcut.
Renaming and deleting items in the Favorites List
Begin by selecting the item. Press <F2> to rename or the <Delete> key to delete. Or, click the
item with the alternate mouse button and select [Rename] or [Delete] from the context menu.
29
Page 30

By creating shortcuts, you can mor e easily and quickly access files, folders, archives and
features. Here’s how:
Folders and archives
After creating a folder shortcut (as directed above), you can drag and drop files from
other areas right onto the shortcut icon to move them to a new destination (this is not
supported with archives).
You can browse the target folder/archive by alternate mouse clicking the shortcut icon
and selecting [Browse].
You can start a slide show of the target folder or archive by alternate mouse clicking on
the icon and selecting [Slide Show] or [Slide Show Recursive].
Search the target folder or archive for images by alternate mouse clicking on the icon or
using the menu command or shortcut button.
Application shortcuts
You can drag and drop application shortcuts directly onto the Preview pane. When you
double-click the application shortcut, it will be launched.
You can also drag and drop a file onto the application shortcut to open the file in the
target application. For example, dragging and dropping the file onto an MSPaint shortcut
will launch the application with the image opened.
Place the ACDSee shortcut from the desktop into the Favorites list pane. When
you drag and drop files on this shortcut the ACDSee Viewer automatically
opens and the Browser remains open.
Files
You can drag and drop specific files from the File list to create shortcuts to them. When
you double-click the shortcut icon the target file will open with the associated default
application (e.g., an internet browser).
To change the view style for the Favorites list use the [View | Favorites list]
menu, or click the background of the Favorites list with the alternate mouse
button to get a context menu.
30
Page 31

Preview Pane
Ø Pressing <NumPad *> toggles the preview size between automatic and full size.
Ø If the [Auto-preview] option is on, a preview of the selected image appears
When this pane is visible, a
preview of the currently selected
image can be shown.
Ø You can adjust the relative
amount of room available to
the preview area by dragging
the splitter bars.
Ø You can configure the
position of the preview area
and the size of the preview
image using commands in
the [View | Preview] menu.
automatically. Otherwise, you must invoke the [View | Preview] command each
time you want to see a preview of the selected image.
Ø If you double -click the preview, the image is shown in View mode.
Ø If you click with the alternate mouse button in the preview area or on the preview
image itself, a context menu appears.
File Info Pane
The Info pane displays metadata for the currently selected image. Metadata typically describes
how, when, and by whom a particular set of data was collected. It also includes how the data is
formatted.
31
Page 32

Within this manual, the term “metadata” is used to
describe two sets of information:
1. The information that is associated with a digital
camera image and can be viewed in the Browser File
Info pane, as seen to the left.
If the digital image is modified
(resized, cropped, etc) and then saved,
the digital camera metadata will be
removed.∗
2. Any database information that is included in the file properties of an image (description,
author, notes, date, and keywords). This information is displayed only in the file properties and
not in the Info pane.
Status Bar
The status bar, located at the bottom of the Browse window, displays status information and
properties for the selected file(s).
Folder summary info: Shows the total number and size of items in the File list; the size,
date, and time of last modification for individual files; and the time of last modification
for folders. With multiple items selected, it shows the total number and size of the
selected files.
Selected file info: Shows the following information when a single item is selected:
File: size, date, and time of last modification.
Folder: time of last modification.
The following information is shown when more than one item is selected:
Total number and size of the selected files.
Filename and icon: Shows the filename and small icon of the focused item. If the item
is a shortcut, its target path is also shown.
Image properties: If the focused item is an image, its dimensions and format are shown
as: <#pages>@<width>x<height>x<#colors> <format>
∗
Digital camera metadata will not be removed if using the JPEG transform feature (See p. 65).
32
Page 33

File description: If the currently focused item has a file description, it is shown.
Processing progress: If background processing is underway, the percentage of
completion is displayed. You can stop and start background processing by doubleclicking on the status bar.
For a context menu, alternate mous e click the status bar. To show or hide the
status bar, use the [View | Browser panes | Status Bar] menu command.
Plug- ins Pane
The Plug-ins pane, located at the bottom of the Browser, displays selected ACDSee plug-ins.
These plug-ins have been designe d and developed to extend the user interface functionality and
will be available in upcoming releases of ACDSee and at our web site. They can be created and
distributed by ACD Systems, or developed by a third party company.
To access the Plug-ins pane, go to [View | Browser panes | Plug-ins pane]. With the pane open,
you will be able to click on any tab in the pane in order to activate a particular plug-in.
Plug-in information can be found here:
http://www.ACDSYSTEMS.com/english/products/plug-ins/
The Plug-ins pane contains room for growth so stay tuned to future ACDSee releases for
updates.
33
Page 34
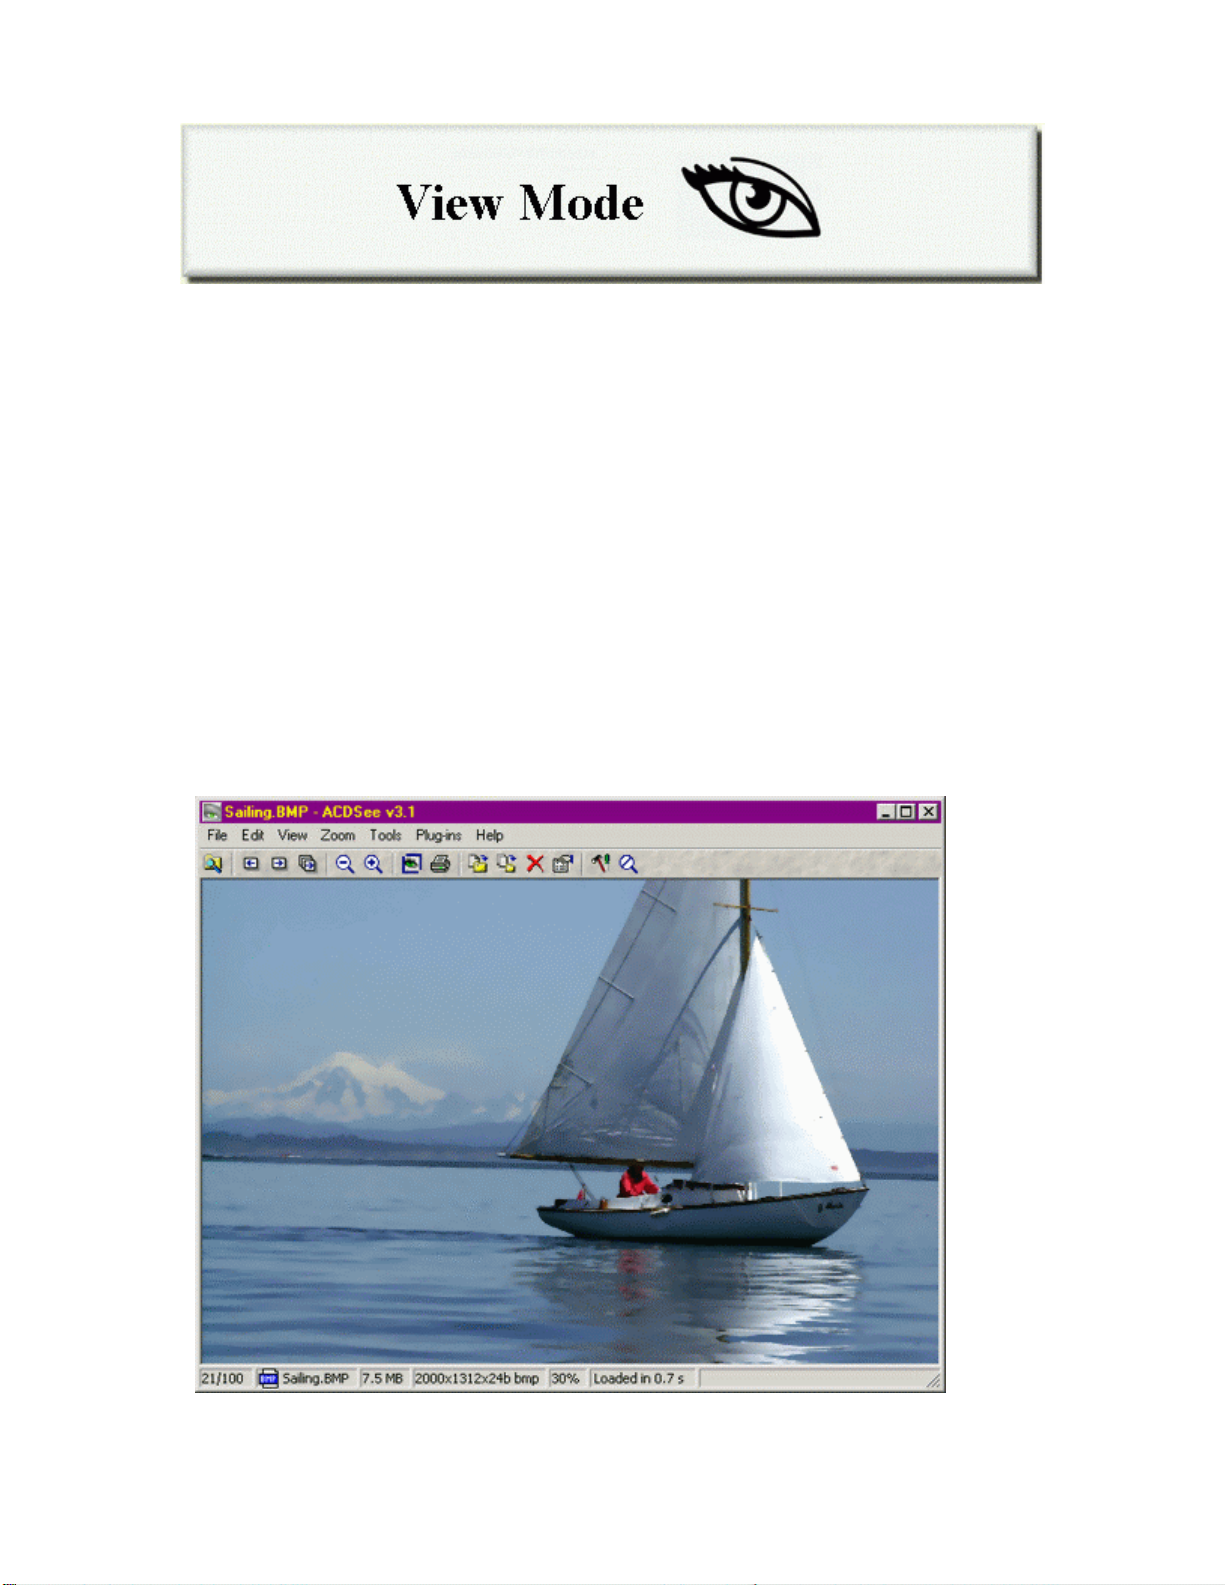
ACDSee’s image Viewer is unsurpassed in its ability to decode and display images quickly. To
ensure your viewing experience will be fast, flexible and very high quality the following
features have been incorporated in the program.
Speed: an efficient incremental decoder helps display images faster than any other
imaging software.
No waiting : a multithreaded program design means you can use other functions while
processing images.
Gamma correction: compensates for monitor non-linearity.
Less memory: less memory is required to manipulate images than with other viewing
applications.
High quality output: single and two-pass dithering algorithms optimize your display’s
capabilities.
The View Window
34
Page 35

Once you have selected and opened an image (or sequence of images), using the Browser or
Windows Explorer, ACDSee’s View window is activated. This window shows your images
one at a time, in full resolution, and lets you perform various functions important to viewing
your images the way you want – while still giving you access to much of the file management
functionality available in Browse mode.
Viewer Layout
The components of the Viewer are listed below and explained in more detail in the upcoming
pages.
Toolbar: provides buttons to activate commands.
View area: shows the current image.
Status bar: displays status information and properties for selected files.
Toolbar
The toolbar, located at the top of the View window below the menu bar, consists of a number of
buttons identified by icons.
Ø To activate a command, click the corresponding button.
Ø To get a title or short description of the button, rest the mouse pointer over the
button.
Ø You can show or hide the toolbar bar with the [View | Toolbar] menu command.
Ø The toolbar is normally hidden in full-screen mode. You can toggle the toolbar
on and off by pressing <T>.
Toolbars have chevrons when there are too many icons to fit in the viewable area. See
Chevrons for the toolbar for further information.
View Area
The View area is the actual image that appears within the Viewer and there are a few options
relating to viewing as stated here.
Scrolling
If the image is larger than the window, the mouse pointer appears as a hand instead of an arrow.
You can then scroll (pan) the image by dragging it with the primary mouse button. You can
also scroll using the cursor keys (arrow keys).
35
Page 36

Selection
You can select an area of the image by holding down <Shift> and dragging with the primary
mouse button (if the image is not scrollable, you do not need to hold down <Shift>). You can
then zoom into the selection by clicking in it with the primary mouse button.
Viewing images in full-screen mode
In full-screen mode, the window borders, menu bar, status bar and toolbar are hidden and the
window is expanded to fill the screen so that only the image is visible on your monitor.
Procedure:
1. Bring up the image in View mode.
2. Press <Ctrl+F>.
3. Although the toolbar buttons are hidden, you can still access commands via
shortcut keys or by using the alternate mouse button.
4. To return to normal mode, press <Ctrl+F> again.
You can toggle between full-screen and normal modes using the mouse by
clicking the middle button, or by holding down the primary button while
clicking the alternate button.
In full-screen mode, press the <B>, <T>, and <M> keys to show the status bar,
toolbar, and menu bar, respectively.
Context menu
If you click in the View area with the secondary mouse button, a context menu appears. If you
hold down <Shift> and click with the secondary mouse button, the Shell context menu for the
current image appears.
Status Bar
The status bar, located at the bottom of the View window, displays status information, image
sequence information, and properties for the current image.
Ø You can show or hide the status bar with the [View | Status Bar] menu command.
Ø The status bar is normally hidden in full-screen mode. You can toggle the status
bar on and off by pressing <B>.
Image sequence information: The current image’s sequence number and the
number of images in the sequence are indicated as <Img#>/<Num. Images>.
Page information: For multipage images, the current page and total number of
pages in the image are indicated as <Page#>/<Num. pages>.
36
Page 37

Navigation
Filename and icon: The filename and small icon of the current image is shown.
Image properties: The dimensions and format of the current image are shown as
<width>x<height>x<#co lors> <format>.
Zoom level: The current zoom level is indicated as a percentage. When [Zoom |
Lock] is active, an asterisk [*] appears to the level of the zoom level.
Decoding progress/time: If the current image is decoding, the progress is indicated
by an expanding pop-out bar and the word "Loading…" appears. Once complete, the
elapsed decoding time appears. If the read-ahead image is being decoded, its
progress is indicated by an expanding pop-out bar.
File description: If the current image has a file description, it is shown.
Ø Use the previous and next buttons to navigate images in the list, if there
is more than one image in the image sequence.
Ø You can also use the <Page Up>, <Page Down>, <Home> and <End> keys to
navigate.
Ø If you have a mouse with a scroll wheel, turn the wheel to flip through the
images in the list. If you press <Ctrl> and use the scroll button, the zoom level
changes.
Ø For images containing multiple pages, the first page is shown initially.
Ø To view other pages, use the previous page and next page buttons.
(These buttons are only visible when viewing multipage images.) With a scroll
mouse, turn the wheel and press <Shift> to change the current page of a
multipage image.
Returning to the Browse Window
There are several ways to return to the Browse window:
<Esc>
<Enter>
Double-click image
[File | Browse] Command
Returns to the Browse window without changing the
selection or focus.
Switches to the Browse window and selects the
current image, but does not change the current folder.
<Shift + Enter>
<Shift> + Double-click image
<Shift> + Browse Command.
37
Switches to the Browse window, changes into the
folder containing the current image, and selects the
current image.
Page 38

Image Sequences
Image sequences are an excellent way to view a selection of images and are particularly useful
when creating a presentation of images with the Slide show feature. The image sequence files
that you can generate allow you to re-open the sequence on another occasion to see the images
again.
An image sequence specifically refers to the order that images are available for viewing. The
sequence can be re -ordered from the View window (images can be removed or added), and then
saved as a text file.
If images are removed or deleted, then the image sequence will be displayed but
the missing image will not appear (a blank background is displayed).
When multiple images are opened, the Viewer displays them one at a time. The image
sequence can be seen at the bottom left corner of the View window status bar. For example,
when 16 images are selected and opened the file number at the bottom will read “1/16” meaning
the first image of 16 is being displayed. It is possible to view these images using the [View |
Image | Next], [View | Image | Previous] commands.
Manipulating Image Sequences
Operations on image sequence include creating sequences, adding (and removing) images in the
sequence, rearranging the images, and saving the sequence to a file.
Creating an image sequence
By default, all images within a folder are viewed when you double-click a single image in the
Browser File list. This option can be changed by canceling the selection in the [Tools | Options
| Viewer | View all images in folder].
It is possible to select more than one image by holding down <Ctrl> while clicking on other
files. To highlight a range of files, select the first item and then click the last item in the range
while holding down the<Shift> key. To select all of the files, use the [Edit | Select All Files]
menu command. When you select more than one image from the Browser File list and press
<Enter> or go to [File | Open], you have created an image sequence.
Adding images to the sequence
Add additional images to the sequence from a variety of locations by using any of the following
methods:
Ø Select the [File | Open…] command and locate the file.
Ø Drag image files from Explorer or a second instance of ACDSee – from Browse
mode – and drop them into the Viewer. The [Dropped files] option found in
38
Page 39

[Tools | Options | Miscellaneous] must be set to [Add images to list].
Ø Copy files to the clipboard in Explorer or a second instance of the ACDSee
Browser and paste them into the Viewer using the [Edit | Paste files] command.
When using the copy function, the ima ge is copied to the currently selected
folder.
Removing images from the sequence
Remove an image from the sequence as follows:
Ø To remove the current image from the sequence, use the [File | Close] command.
Ø To empty the sequence completely, use the [File | Close All] command.
Ø To copy the current image file to the clipboard and remove it from the list, use
the [Edit | Cut file] command.
Rearranging images in the sequence
Change the position of an image in the sequence as follows:
1. Use the [Edit | Cut File] command to remove the image file and copy it to the clipboard.
2. Use the [Edit | Paste] command to insert the image whe re you want it.
Saving the image sequence to a file
You can save the current image sequence to a file using the [File | Save Sequence As…]
command.
Recalling image sequences
From the Viewer you can open image sequences (stored as .AIS files), using the [File | Open…]
command. You must change the [Files of type:] selection in the Open files dialog box to
[Image sequences] or [All image files].
You can also open an image sequence by double-clicking on the file in Explorer, or ACDSee’s
Browser, and draggin g and dropping the .AIS file into the View area, or by copying it to the
clipboard and pasting it in.
When opening the image sequence from the Browser and then returning to
Browse mode afterwards (by pressing <Enter> for example), ACDSee browses
the folder where the .AIS file resides. To browse the folder containing the
image, hold down <Shift> while either double-clicking, or pressing <Enter>.
The image(s) will now be highlighted.
39
Page 40

Editing an image sequence file
An image sequence file is a text file containing the paths of the images in the sequence – each
line of the text file contains the path of one image. To do this, from the Browser, select the file
and edit it with Notepad by selecting the [Tools | Shell | Edit] command, or by dragging the file
onto a Notepad window.
Creating an empty image sequence file
You can create a new, empty image sequence file in Explorer. Using the alternate mouse
button, click the background area of the Explorer File list (the right pane area), and select [New
| ACDSee Image Sequence] from the context menu.
Slide Shows
Whether you want to entertain your family and friends, or make a powerful impression at an
important business meeting, a slide show is often the most effective way to present your
experiences and ideas. ACDSee lets you show any sequence of images as a slide show.
In Slide show mode, you can predetermine the amount of time each image is shown, before
going on to the next. In this way, you can give yourself time to explain each image to your
audience. You might also predetermine the preview time to allow each image to play an
embedded audio clip.
Starting a Slide Show from Browse Mode
You can run a slide show directly from the Browser.
1. Select one folder in the Folder tree, or one or more folders in the File list. To select a
group of images in the File list, hold down <Ctrl> and select other files. To highlight a
range of files, select the first item, hold down the <Shift> key and then select the last item
in the range.
2. Next, choose either [Tools | Slide Show] or [Tools | Slide Show Recursive]. Slide show
commands are also available in context menus for folders in the Folder tree, File list and
Favorites list.
To include images in subfolders use the [Slide Show recursive] command. These commands
are also available from the context menus for folders in the Folder tree, File list and Favorites
list (i.e., select the item with the alternate mouse button).
Hidden files and folders are included in the slide show only if the [Tools |
Options | File List | Show hidden files] option is enabled.
Slide show Browser commands
The [Tools | Slide Show] command functions in a number of ways.
40
Page 41

Ø When a folder(s) is selected, the slide show displays all the images in that
folder(s).
Ø If more than one image is selected, then only the selected images are shown.
Ø If there is only one image selected, or no images selected, then all images in the
current folder are shown.
The [Slide Show Recursive] command behaves similarly, but this command searches all
subfolders as well as the selected folder.
View all option
Checking the [Tools | Options… | Viewer | View all images in folder] option adds all the images
in the folder containing the current image (this option is turned on by default).
Starting a Slide Show from View Mode
Ensure that there is more than one image is in the current image sequence as described above.
When the images are opened in the Viewer, click the Slide show shortcut button to start the
slide show or use the [Tools | Slide Show | Run] command. Invoking these commands again
stops the slide show.
The slide show automatically stops when you use the [Previous], and [Next] menu commands,
or when you minimize the View window.
You can specify the slide show order, time -delay, and other options in the [Slide Show] page of
the Options dialog.
See also: Sync To Folder.
Slide Show Commands and Features
When an image sequence is opened in the Viewer, the window status bar indicates the number
of images in the list and the sequence number of the current image.
Adding files while in View mode
While in View mode, you can add images to the image sequence using the following methods:
Ø Select [File | Open...] from the menu and choose the file you wish to add to the
sequence.
Ø You may drag an image file into the sequence from the File list of Windows
41
Page 42

Explorer or the Browser of a second instance of ACDSee. The [Dropped files]
option found in [Tools | Options | Miscellaneous] must be set to [Add images to
list].
Ø With the [Startup files] option found in [Tools | Options | Miscellaneous] set to
[Add images to list], launch an image file from another application.
Starting and stopping the slide show
Ø You may have to press to start the slide show, depending on how you set the
[Tools | Options | Slide Show | Auto-start] option.
Ø To stop the slide show, press .
Ø The slide show will automatically stop when you use and , or when you
minimize the window.
Sync To Folder
The [Tools | Sync To Folder…] command, available only from View mode, synchronizes the
image sequence with the contents of a designated folder. After clicking on this menu command,
the Sync To Folder window appears. In the folder section of the window, you can select a
folder by typing in the path or using the Browse button.
Initially, all images in the designated folder enter the image sequence. Then, as image files in
this folder are added or removed, they are automatically added or removed from the image
sequence, respectively.
Sync to the folder is activ e only while the image sequence is open. Once you
close and save the image sequence, the Sync To Folder feature is disabled.
Example uses:
Ø If you synchronize to the attachments folder of your newsreader, ACDSee will
automatically display images as they are decoded.
Ø Used in conjunction with the Slide show feature, ACDSee can display a looped
slide show whose contents can change over time, simply by adding and removing
images from the designated folder.
New images options:
There are three options to configure in the Sync To Folder window.
42
Page 43

Use the [Show new image(s) immediately] option to view new images as soon as they appear in
the folder. Otherwise, new images attach to the end of the image sequence, but the currently
viewed image remains.
Use the [Ignore open files] option to avoid adding a new file to the current image sequence until
the other application (e.g., newsreader), has completed transferring the file.
Use the [Sort by name] option to keep the File list sorted by filename.
You can have ACD See synchronize to a folder on startup by using the /sync
command line switch.
Zooming
One of the most fundamental aspects of image viewing of any kind is the ability to change the
size of the image being viewed. ACDSee’s zoom features give you the power to choose the size
and detail level at which you view your images, and give you the ability to preserve those
choices throughout your viewing session.
Changing the zoom level
Zoom in and Zoom out shortcut buttons are available in the Viewer toolbar.
Ø Zoom in enlarges the image. This action can also be performed with the [Zoom |
More] command.
Ø Zoom out (or the [Zoom | Less] command), reduces the image.
Ø The [Zoom | Actual size] command returns the image to normal size.
Ø The [Zoom | Best fit] command automatically sizes the image to fit the window
or screen.
Zoom selection
You can select a rectangular region of the image by clicking and dragging with the primary
mouse button. If the image is larger than the View area, you must hold down <Shift> to make a
selection. Clicking inside the selection with the primary mouse button will zoom the image so
that the selection takes up the entire available View area. The selected region is then
deselected.
Zoom locking
Normally, the zoom level returns to the default level each time you view an image. However,
you can lock the zoom level using the [Zoom | Lock] command so that the zoom level does not
change when viewing subsequent images.
43
Page 44

Auto zoom/shrink
The [Auto-shrink to fit] and [Auto-zoom to fit] commands specify that ACDSee should
automatically shrink or enlarge each image to fit the window or screen when it is displayed.
Ø If the [Tools | Options | Viewer | Change window size to fit image] option is
active, images are shrunk or enlarged to fit the screen. Otherwise, images are
shrunk or enlarged to fit the window.
Ø If [Auto-shrink to fit] alone is active, then large images are reduced, but small
images are not enlarged. Conversely, if [Auto-zoom to fit] alone is active, small
images are enlarged, but images are never shown below normal size.
Panning/Scrolling
Oversized images are often used in fields like advertising, geography, engineering and
architecture. In the case of oversized images, ACDSee’s panning and scrolling capabilities let
you view any section of your image in full detail. If an image is larger in one or both
dimensions than the View area, it can be panned and scrolled so you can view its various
sections. In this instance, the mouse pointer changes to a hand shape.
Using the mouse
Pan and scroll with the mouse by dragging the image with the primary mouse button held down.
Using the keyboard
The arrow keys can be used to scroll in the respective directions. Hold down <Shift> to
decrease scroll speed and <Ctrl> to increase scroll speed.
Selection
You can select a rectangular portion of the image by holding down <Shift> and dragging with
the primary mouse button down to define the selection. The current selection is indicated by a
dotted outline around the region.
Ø If the image is not scrollable, you do not need to hold down <Shift> to make a
selection.
Ø While defining a selection, you can cancel by pressing <Esc>.
Ø To deselect the current selection, click with the primary mouse button outside the
selected region, or use the [Edit | Select none] menu command.
44
Page 45

Once you select, you can:
Ø Zoom the selected region by clicking inside the region with the primary mouse
button.
Ø Print the selected region.
Ø Copy the selected region to the clipboard.
Ø Set the selected region as desktop wallpaper.
45
Page 46

The Photo Enhancer
The Photo Enhancer is the toolbox that allows you to touch up your images in minute detail, or
alter them dramatically with easy-to-use enhancement features. Several features, such as
cropping, despeckle, and auto-levels, are ideal for taking digital camera images or scanned
photos and turning them into professional quality pictures. Digital image enhancement not only
allows you to customize images, but also lets you correct flaws such as scratches, dust, and poor
lighting conditions.
To insure that the image adjustment meets with your satisfaction, many of the enhancement
functions provide a preview of the image. With many of the photo enhancement features, a
before-and-after preview is available. It is also easy to reverse any unwanted changes by using
the undo function.
46
Page 47

Starting the Photo Enhancer
Select an image and click the Photo Enhancer shortcut button from either the Browse
window or the View window. You can also use the [Tools | Edit…] command.
Configuring the Photo Editor
The Configure Editors list allows you to configure any photo editor to work with ACDSee. A
default can be assigned to the [Edit…] button so that you have quick and easy access.
To add photo editors to your photo editor list:
1. Click on the drop down
arrow attached to the
[Edit…] button.
2. Select [Configure
Editors…] from the
menu. The [Configure
Photo Editors] dialog
will appear.
3. In the dialog seen here on the
left, click on the [Add…]
button. A standard browse
dialog will appe ar.
4. In the browse dialog, search for
the desired photo editor
executable file, select it, and
then click on the [Open] button.
A dialog will open prompting a
confirmation of the photo editor
To select the default photo ed itor:
1. Follow the first two steps above and select the desired photo editor from the list.
2. Click the [Set As Default] button.
The default editor will now be highlighted in bold text. The next time you
select the [Edit…] button or [Tools | Edit…], this editor will be used.
application that was chosen.
47
Page 48
Enhancement Functions
The Photo Enhancer lets you express your creativity by altering the appearance of your photos.
Its easy-to-use enhancement features let you touch up your photos in minute detail, or radically
change their look and feel.
Multiple levels of undo / redo: The undo and redo functions are layered,
allowing you to make a series of changes and then flip between them, instead
of starting over each time.
Crop: Selects a specific region of an image to be saved and manipulated.
Resize: Adjusts the size of the image in either pixels or percentage of image size.
Rotate: Spins your images around quickly, without losing their quality.
Flip: Mirrors the image along the vertical or horizontal plane of the image.
Color balance: Adjusts the hue, saturation, and lightness of the image.
Levels: Adjusts the contrast and brightness, as well as whitepoint / blackpoint and
gamma levels of your images manually, using the levels function.
Auto-levels: Automatically adjusts the brightness, contrast and color balance of a
photo to a default standard.
Blur: Reduces the amount of detail shown in an image by increasing the blur level.
Sharpen: Increase the amount of detail of an image by adjusting the sharpness level.
Despeckle: Creates a smoother looking presentation by removing unwanted noise
from an image.
Red-eye Reduction: Removes the unwanted red-eye effect from images.
Sepia: Gives a photo a dated or old -fashioned look. Sepia is a term that describes
dated photos that consist of shades of reddish brown.
Colorize: Alters an image to reflect an adjustable monochrome format.
Negative: Creates a negative representation of an image.
Emboss: Gives an image the three-dimension look of a brass plaque, or a logo on
quality paper.
Multiple levels of undo / redo
Use the Undo button or select the [Edit | Undo] command to reverse unwanted changes.
48
Page 49

To redo changes, use the Redo button or select [Edit | Redo].
Saving changes to an image will overwrite the original image unless you
go to [File | Save as…] and save the file under a different name.
Cropping, Resizing and Rotating
Cropping, resizing and rotating tools are helpful when you need to touch up images – especially
after downloading photos from your digital camera, or when scanning.
Cropping
Cropping reduces the visible area of an image. To crop an image, frame the area you want
and double-click it; the resulting image consists only of the area within the cropping frame.
To crop an image follow these steps:
1. Choose [Edit | Crop Tool] or click the Crop button .
2. Select the area in the image that you want to save by clicking on the upper-left
section of the intended area and dragging and dropping to the bottom right. The
selected area will now be outlined.
3. Double-click in the area, and the outer section is cropped off.
Resizing
To resize an image, bring it up in Photo Enhancer as described above, then:
1. Select [Edit | Resize…] or click the Resize button .
2. Enter a new pixel width or height.
3. Click OK to accept the changes.
When the [Maintain aspect ratio of:] option is on, changing one dimension
automatically changes the other, thereby maintaining the ratio of the original
image.
Rotating
Turns images in 90 or 180-degree increments around a center point. To rotate an image,
click the rotate button and choose the type of rotation you prefer.
49
Page 50
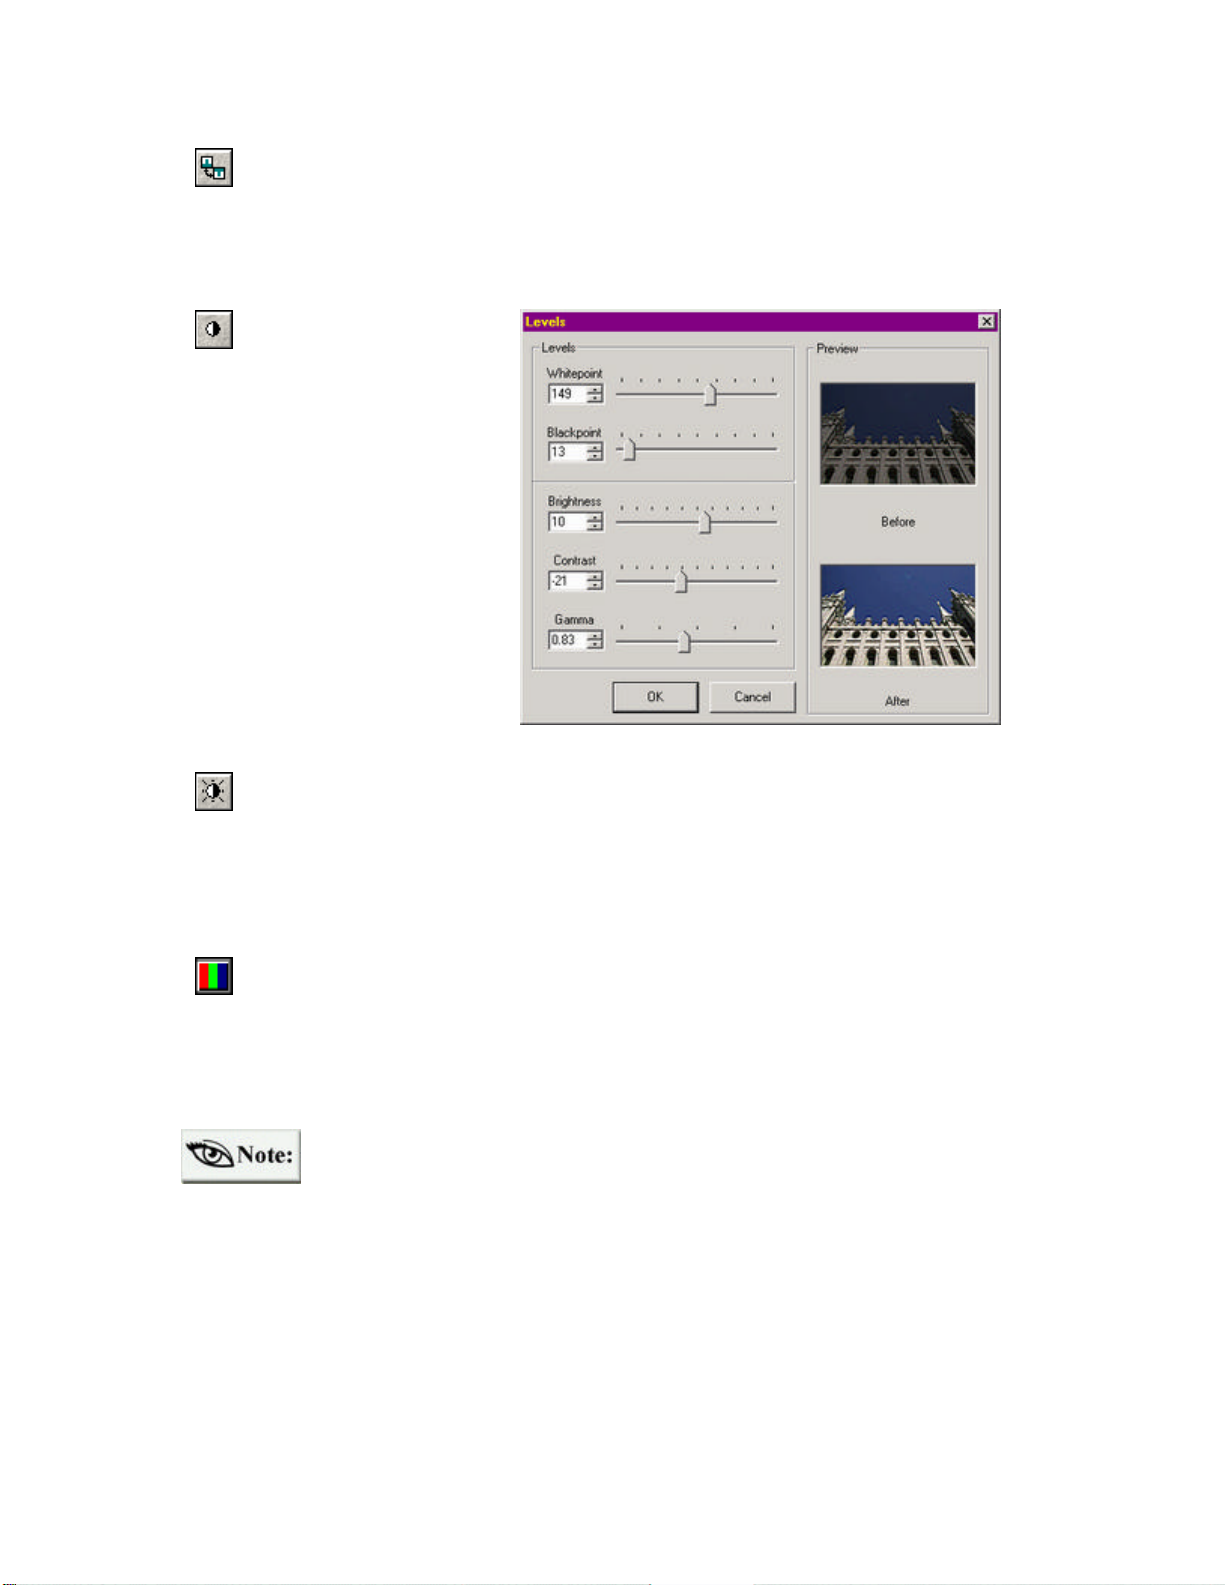
Flipping
Mirrors an image 180 degrees along the vertical or horizontal axis. To flip an image, click
the flip shortcut and choose one of the two options.
Adjusting Color Levels
Levels
Click the Levels button to
bring up the Levels
adjustment window. The
Levels sliders let you adjust
the brightness, contrast, and
mid-tones in an image. By
adjusting the mid -tones, you
can change the brightness
values of the mid -range gray
tones without dramatically
altering the shadows and
highlights.
Auto Levels
Click the Auto-levels button to automatically adjust the brightness, contrast and color balance of
an image. There is no before and after preview with this feature. However, you can undo the
action by clicking the undo button.
Color Balance
Color balance is used to adjust the colors of a full-color image. Click the color balance button
to bring up the color balance window. There are also sliders available to adjust the hue,
saturation and lightness, and a before and after preview of your image is given.
To apply color adjustments and image filters, the image must be set to true color
(24bpp). It is possible, however, to adjust levels and auto levels with 256 grays
(8bpp) images. Check the color setting by going to the Color menu.
Regardless of the color setting – from 16 grays (4bpp) to true color – all image effects are
available for use, including Sepia, Colorize, Negative, and Emboss. Sepia and Colorize will not
be available for black and white images (1bpp).
50
Page 51
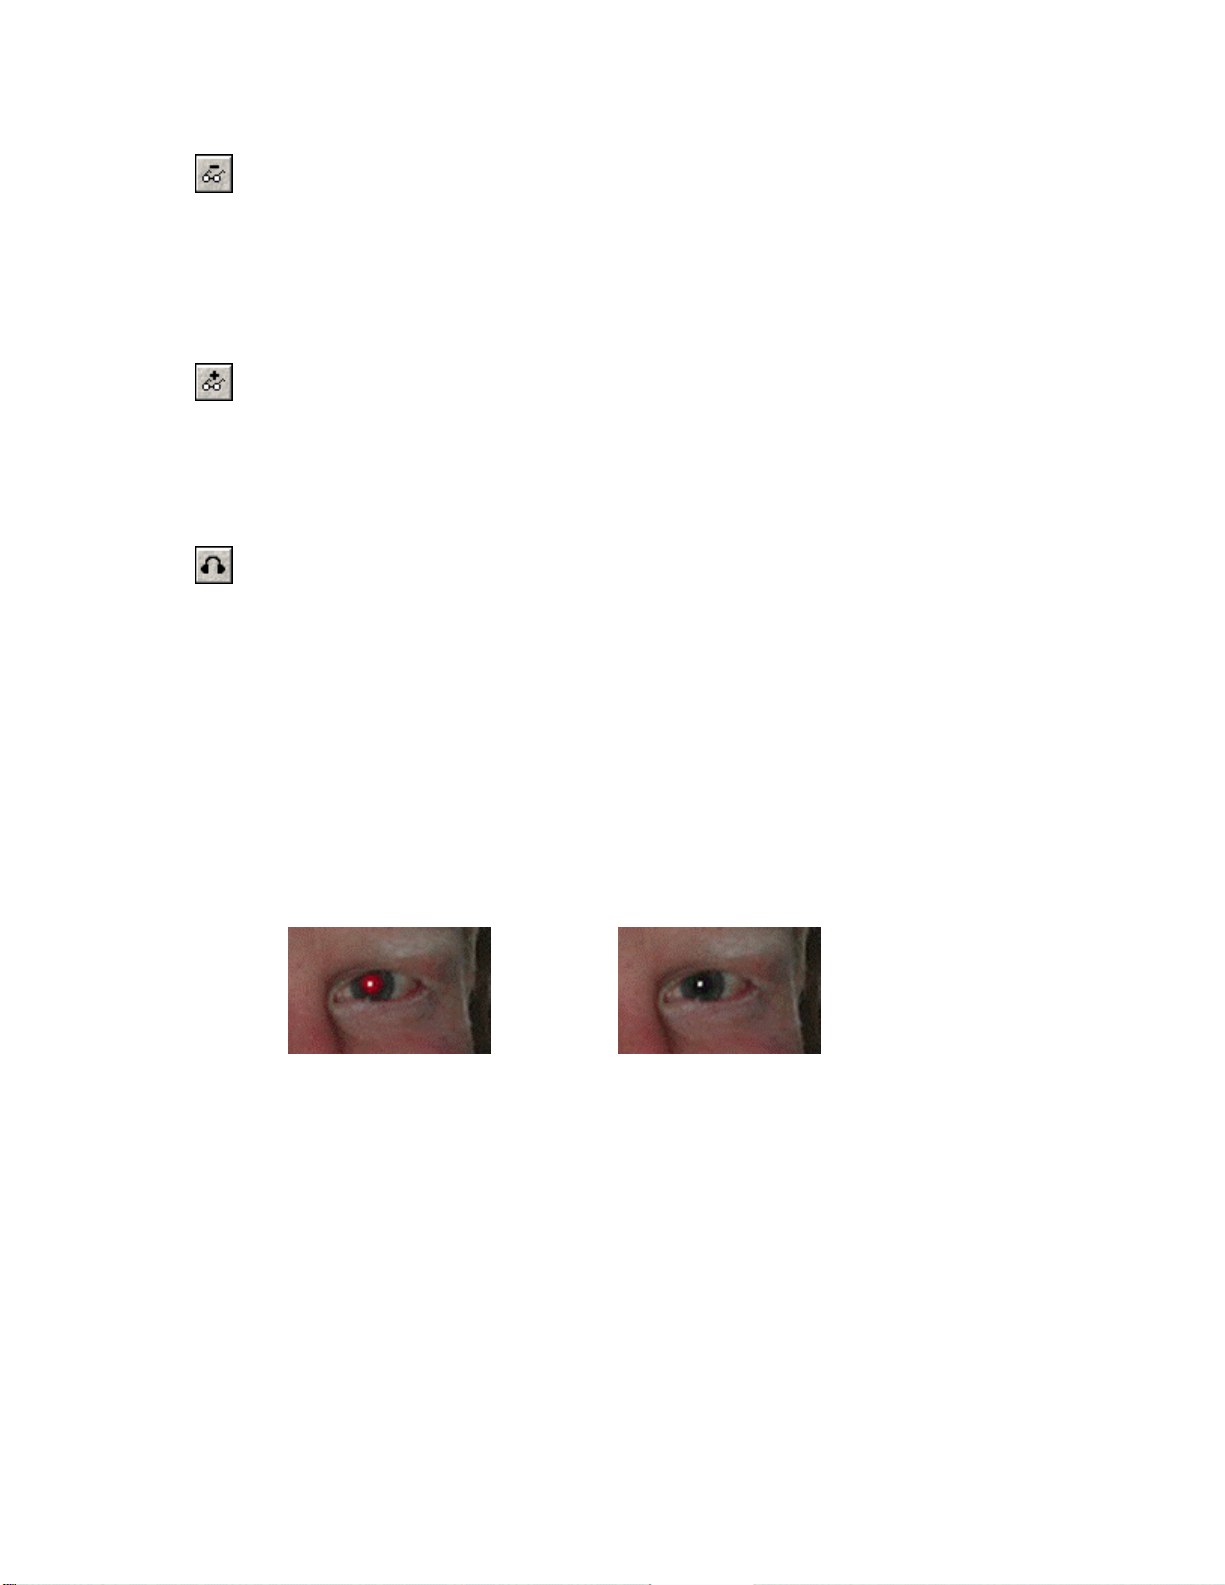
Applying Image Filters
Blur
The blur filter softens images by smoothing color transitions. This is achieved by averaging the
pixels next to the hard edges of defined lines and shaded areas in an image. Click the blur
button to bring up the blur window. Use the slider to alter the degree of blurriness applied to
your image – a before and after preview is available for this function.
Sharpen
The Sharpen filter focuses blurry images by increasing the contrast of adjacent pixels. Click the
sharpen button to bring up the associated window and sharpen your image. A preview is
available with this function also.
Despeckle
Detects the edges in an image (areas where significant color changes occur), and blurs all of the
selection except those edges. This blurring removes image noise (graininess, scratches, and
dust), while preserving detail. Click the despeckle button to initiate this effect – there is no
before and after image preview available for this function.
Red- eye Reduction
"Red-eye" is a problem that frequently occurs with flash photography especially when taking
pictures in dark surroundings. The red-eye reduction facilities of Photo Enhancer allow you to
remove the red-eye effect as can be seen in this example below:
As can be seen in the example above, the red pixels of the image are removed while still
preserving the bright "glint" in the pupil area. This commonly occurs due to reflections from a
light source and gives the image a realistic appearance.
The steps involved in automatic red-eye reduction are as follows:
1. Select the image from ACDSee Browser and select [Tools | Edit] or press the
Edi t shortcut button.
2. Go to the [Filter] menu and choose [Red-eye reduction…]
3. In the Red-Eye Reduction dialog, as seen below, choose the eye color.
4. Next, with the Select button pressed, click and drag a selected area (an eye that is
red) in the "Afte r" view.
51
Page 52

5. Click the [Auto Zoom] button and the window will now look like this:
In the above example, the red-eye effect has been reduced but it is possible to customize the
effect further. Here are the options:
Reselect the area: Click on the selected area in the "After" view and reshape this
area or drag it so that only the iris is within the circle or ellipse.
Zoom: Click the [Auto Zoom] button to enlarge the area again. You can also press
the [Zoom Out] and [Zoom In] buttons.
Scroll: Click this button to move the image (the cursor turns to a hand icon).
Amount: To take out more of the red pixels, drag the bar in the [Amount] area to the
right or increase the corresponding number values to the right (the range is from 0 to
255; 0 being no change and 255 being maximum reduction).
Eye Color: Select any of the radio buttons next to the colors available or choose the
[Custom…] button and select a customized color.
Image Effects
Sepia
Sepia is a term used to describe dated photos that have turne d to shades of reddish brown. To
give your images a dated look, click the sepia button – no before and after preview is available
with this function.
52
Page 53

Colorize
Colorize is used to create an adjustable monochrome image. Click the colorize button to bring
up the colorize window, then adjust the hue and saturation levels with the sliders – a before and
after preview is available.
Negative
The Negative command inverts an image. Use this command to make a positive, black-andwhite image negative, or to make a positive from a scanned black-and-white negative. Click the
negative button to initiate this effect – no preview is available with this effect.
Emboss
Emboss makes images
appear raised or stamped by
converting their fill-color to
gray and tracing the edges
with the original fill-color.
Click the emboss button to
bring up the associated
window. The sliders let you
adjust the azimuth, elevation
and weight of an image, and
a before and after preview is
available.
53
Page 54

The bulk of this chapter deals with how ACDSee incorporates new functionality by utilizing
plug-in technology. Plug-ins are software extensions that enhance the core program feature set.
Other areas covered in this chapter include, rotating JPEG images, creating wallpaper for the
desktop, and information pertaining to the storage of thumbnail images and database
maintenance. To begin, we will describe the steps involved in acquiring and printing images
followed by digital camera support.
Acquiring and Printing Images
Acquiring Imag es
ACDSee supports the industry standard TWAIN interface for transferring images from digital
imaging hardware. Typically, this hardware is either a scanner or digital camera.
Acquire setup command
Use the [File | Acquire setup...] command to bring up the Acquire Setup dialog box as seen
below. Select your acquire source and customize settings as described here:
1. Select the TWAIN source
for your device from the list.
(If your device is not on the
list, consult your device
manual for TWAIN driver
availability and installation
procedures.)
2. Configure the format for
saving acquired images. JPEG
gives the smallest file size at
the expense of some image
quality, while BMP preserves
quality, but results in larger
file sizes. TIFF format allows
a range of choices for storing
images; however, not all
applications support every
sub-format.
54
Page 55

3. Use the Filename template to specify filenames for acquired images. Insert one or more #
symbols and ACDSee will automatically generate index numbers.
To automatically display the Acquire setup dialog every time you acquire an
image, check the [Miscellaneous | Show acquire setup before acquiring] option.
Acquire command
The [File | Acquire…] command starts the device's source manager and allows images to be
transferred. Images are placed in whatever directory was active when invoking the acquire
command. They appear in the File list as each transfer completes.
Printing Images
It is possible to print images from either the Browser, the Viewer, or from the Explorer window.
Printing in Browse mode
1. Select one or more image files.
2. Choose the [File | Print…] menu command.
3. Follow the instructions in the Print and Print Setup dialog boxes and the selected images
will be printed – one per page.
In the Print dialog box, several settings can be configured. To get a better idea
of these settings, we recommend using the Context sensitive help feature.
To print multiple images on a single page:
1. Select more than one image. See Selecting files.
2. Choose the [File | Print…] menu command.
3. Select your printer and click the Print button.
4. In the Size section of the Print Setup dialog box, choose [Thumbnails] from the
drop-down list of the Print Setup dialog.
5. Change the width and the height of the thumbnail as desired. A preview will
display how the page will look.
6. Press the OK button.
ACDSee v3.1 includes a Contact Sheet plug-in – along with it’s own help file – that
makes printing multiple images even easier.
1. Select more than one image.
2. Choose the [Print Contact Sheet] shortcut button in the toolbar.
3. Make necessary setting changes and press the OK button.
55
Page 56

Printing in View mode
1. Select the [File | Print…] command, or the [File | Print all…] command.
2. Follow the instructions in the Print and Print Setup dialog boxes. The current image will
be printed.
By default, the image is printed at approximately the same size as it appears on the screen (this
may depend on the size of your monitor, and your screen settings). You can alter the size of the
printout by adjusting the zoom level prior to printing. However, the size on paper may be off by
a constant factor depending on the monitor size and settings used.
If you want to print only part of an image, select the region prior to invoking the [Print]
command.
If an image contains more than one page (for example a multipage TIFF image), you can
specify in the Print dialog box which pages should be printe d. When printing from Browse
mode, the entire multipage image is printed by default. However, when printing from View
mode only the current page is printed by default.
Printing From Explorer:
1. Click the image file with the alternate mouse button.
2. Select [Print with ACDSee] from the context menu.
If there is no [Print with ACDSee] command in the context menu, select [Tools
| File Associations...] from the menu. Check the relevant file types, then go to
the Context menu tab and check the [Print with ACDSee] shell command item.
Digital Camera Support
The International Data Corporation (IDC) estimates that worldwide sales of digital cameras will
exceed US$4.3 billion and that by 2004, digital camera sales will total more than 41 million
units. This staggering growth will come thanks to falling digital camera prices, increased ease
of use, and the absence of processing costs.
There are many digital cameras on the market today, and ACDSee integrates with them to
acquire, browse, and transfer photos to your computer. Once you have connected a camera to
your system, ACDSee makes the rest of the process easy. After configuring the camera you are
ready to do any of the following:
Ø Take pictures with ACDSee.
Ø Browse images on the camera.
Ø Transfer images to your system.
56
Page 57

Camera Configuration
To configure ACDSee to work with your digital camera, select [Tools | Digital Camera |
Camera configuration]. Select your camera model from the list and click Properties to specify
connection settings and options. After you have set the camera properties, click OK to set the
camera as the current camera.
If your camera does not appear in the list, you may be able to download a camera plug-in for it.
Check our web site to see the list of available camera plug-ins:
http://www.ACDSYSTEMS.com/english/products/plug-ins/
Even if a plug-in for your camera is not available, you can still access it using the acquire
feature.
Taking Pictures
Use the [Tools | Digital
Camera | Take pictures]
command to take a single
picture, or a series of
pictures at regular
intervals.
You can take a sequence
of timed pictures by
setting the [Take picture]
interval to your desired
setting. This interval
setting can range from 1
second to 99 hours
between pictures.
Each picture in the timed sequence can be given its own specific file name. The file name
template allows you to specify a template to use when generating file names for pictures
downloaded to your computer. You can use the following codes to generate file names:
{caption} A unique name the user can specify.
e.g., Holidays
&d Date on which the picture was taken.
e.g., 2000-07-13
&nnn Sequence number of the picture.
One digit is used for each ‘n’.
e.g., 001, 002, etc.
&t Time at which the picture was taken.
e.g., 17.47.42
The button also provides you with access to the above codes.
57
Page 58

You can specify that each picture be transferred into a folder on your disk drive after it is taken,
or you can leave the pictures on the camera and transfer them later. To specify the target folder
for transferring pictures, check the box [Download and remove each picture after it’s taken].
Only the disk drive space you have available limits the number of photos you can take and
transfer to your computer.
Browsing the Camera
ACDSee can browse the images on the camera just like images on your disk drive. To do this,
select [Tools | Digital Camera | Browse] from the menu. You can also view and start a slide
show of images directly from the camera. However, due to the limited bandwidth of the
connection, it is recommended that you transfer the images to you disk drive before viewing.
Transferring Images from the Camera
The [Tools | Digital Camera | Transfer all] command can be used to transfer all images on the
camera into the current folder rapidly. The images are automatically removed from the camera
after transferring successfully.
Plug-ins
A plug-in is an application extension – much like a Windows DLL (Dynamic Link Library) –
that allows program functionality to be added to ACDSee without changing the main
application code. Many plug-ins allow additional file format support, while others pertain to
feature enhancement.
ACDSee v3.1 (Update) supports the following plug-ins:
Ø HTML Album Generator
Ø SendPix
Ø JPEG Transform
Ø Adjust Levels
Ø Create and Print a Contact Sheet
Ø E-mail images
ACD Systems creates and distributes many of the plug-ins for ACDSee, but plug-ins can also be
produced by third-party companies. Adding additional plug-ins is as easy as going to our web
site at: http://www.ACDSYSTEMS.com/english/products/plug-ins/ and downloading the
plug-in of choice. All plug-ins obtained from ACDSee’s web site are automatically placed in
the appropriate directory when the downloaded file is executed (.exe). Due to ACDSee’s
popularity, many more plug-ins are anticipated.
58
Page 59

Plug-in help files
Several plug-ins are included with ACDSee and many of these have associated help files,
including: HTML Album Generator, Create and Print a Contact Sheet, and the E-mail plug-in.
When a plug-in is activated, the corresponding dialog box appears. In each dialog box, a Help
button is available to activate the associated help files.
Types of Plug- ins
ACDSee supports several types of plug-ins.
Image decoding plug-ins
This type of plug-in allows ACDSee to decode a file format into an image that can be displayed,
printed, converted, etc. A single plug-in can support several different image formats. ACDSee
comes standard with plug-ins that support the most popular image formats. Additional image
formats are supported by after-market plug-ins.
Image encoding plug-ins
This type of plug-in allows ACDSee to encode a file format. It is used by the File conversion
feature and the [Save As…] command in the View and Photo Enhancer windows. ACDSee
comes standard with plug-ins that support the most popular image formats. Additional image
formats can be supported by adding additional plug-ins.
Archive handling plug-ins
This type of plug-in allows ACDSee to read the contents of archive files and browse them like a
normal folder. A single plug-in can support several different archive formats. ACDSee comes
standard with plug-ins that support the popular ZIP and LZH archive formats. Additional
archive formats can be supported by adding additional plug-ins.
Digital camera plug-ins
This type of plug-in allows ACDSee to access a digital camera. A single plug-in can support
several different cameras. Select the [Plug-ins | Settings | Camera] menu command to view the
available plug-ins. Use the Properties button to access camera settings. To ensure a particular
plug-in is enabled place a check in the box beside the camera plug-in.
The retail version of ACDSee includes plug-ins that support several different digital cameras.
See Appendix 4: Digital Camera Support for the list of cameras that are supported. You can
download additional camera plug-ins from our web site.
http://www.ACDSYSTEMS.com/english/products/plug-ins/
59
Page 60

Command extension plug-ins
This type of plug-in adds commands to ACDSee’s [Plug-ins] menu that operate on the currently
selected images. Examples of these plug-ins includes HTML Album Generator,SendPix, Email, Adjust Levels and Contact Sheet plug-ins to generate thumbnails and HTML albums plugins. Additional commands can be added by adding additional plug-ins.
Important: We cannot ensure quality of plug-ins that are not certified by ACD Systems.
Just like any other piece of software, in using a plug-in you are trusting that it is
free from viruses and that the company that produced the plug-in is trustworthy.
Plug- in Settings
You can configure plug-in settings using the [Plug-ins | Settings...] command. The following
settings can be changed:
Plug-in folder
By default, ACDSee locates plug-ins in the directory C:\Program Files\ACD Systems \ PlugIns.
You can change the plug-in folder by clicking on the Browse button. The change will not take
effect until you restart ACDSee.
Plug-in activation
By default, all plug-ins are enabl ed. You can disable a plug-in (for example, if it is causing a
problem) by turning off the check box next to the plug-in in the list.
Plug-in priorities
Sometimes, more than one plug-in supports a given file type. In this instance, ACDSee uses the
plug-in priorities to determine which plug-in will handle the file. The high-priority plug-ins are
tried first, followed by the low -priority plug-ins. You can use the [Move up] and [Move down]
buttons to change the relative plug-in priority. Plug-ins higher in the list have a high priority.
It is recommended that you give Susie plug-ins the lowest priority to prevent them from being
used instead of the ACD plug-in, because they do not have the features and speed of native
ACD plug-ins. Alternatively, you can disable specific Susie plug-ins that overlap ACD plug-ins
in their format support.
A plug-in that claims to handle a given file extension is always given higher
priority than plug-ins that do not.
Plug-in specific settings
Some plug-ins, such as Kodak Photo CD and Susie, let you set options specific to themselves.
To do this, select the plug-in from the list and click the [Properties...] button. Then configure
the plug-in specific options.
60
Page 61

SendPix Plug- in
The SendPix plug-in that comes with ACDSee, lets you resample images into a web-friendly
resolution. As part of this process, the images are stored on ACD System servers. To send
images, type in the recipient's e-mail address and include a message about the images you wish
them to view. The recipient is provided with a URL (Uniform/Universal Resource Locator)
where they can view the images using a web browser: there is no need for the recipient to have
specific software to view the images. A thumbnail contact sheet of the images can be viewed
quickly without downloading all the images and then some or all of the images can be saved on
the recipient's computer.
To send images using SendPix:
1. Select the pictures you want to send.
In the Browser File list, select an image by clicking on it with the primary mouse
button. To select additional files, hold down <Ctrl> while clicking on other files.
To highlight a range of files, select the first item and then click the last item in
the range while holding down <Shift> key. To select all items use the [Edit |
Select All Files] menu command.
2. Select the [Plug-ins | SendPix] menu command or press the toolbar
button.
3. In the dialog box that appears, type your e-mail address in the [From:] field, the
recipient's e-mail address in the [To:] field, and a message about the photos.
4. Click OK to confirm and the images will be transmitted to the SendPix server for
delivery.
SendPix will only support image files – when non-images are selected SendPix
becomes disabled. With video files, a thumbnail image of the file is sent, but
the entire file is not included. This is also true for the E-mail plug-in. The
SendPix server holds images for a period of one month. Only those individuals
with the correct URL can view the images on the server.
HTML Album Generator
HTML Album Generator is ideal for web site developers who want to quickly and easily create
HTML photo albums. These albums can be used as web pages to be viewed with Internet
Explorer or Netscape.
To create an album, follow these steps:
1. In ACDSee v3.1 and above, select the images that you would like to appear in
the album.
61
Page 62

2. Select [HTML Album Generator] from the Plug-ins menu or the toolbar
button.
3. In the [Page Settings | Title] box enter a title for the album.
4. Click OK and the album will be created and then displayed.
The HTML Album Generator plug-in comes equipped with it’s own help file and contextsensitive help. For more information on how to use these, see Getting Help.
E-mail Plug-in
The E-mail plug-in
allows you to send
images by e-mail
directly from ACDSee
version 3.1 without
using any external
application.
Before e-mail can
be sent for the first
time, the e-mail
plug-in must be
configured.
To send e-mail, follow these steps:
1. In ACDSee, select the images you wish to send.
2. Select [Send images by e-mail] from the Plug-ins menu or the toolbar
button.
3. In the [From:] drop down list, select your e-mail account.
4. In the [To:] edit box type the recipient(s) e-mail address(es). A comma should
separate multiple e-mail addresses. There is a [Cc:] edit box available as well.
By clicking the address book button to the right of the [To:] or [Cc:] edit boxes,
you can choose from a saved list of e-mail addresses that were previously used.
5. Type a subject in the [Subject:] edit box.
6. Type the message text in the [Message:] edit box.
7. Make sure you are connected to the Internet and then click the Send button.
62
Page 63

The first time the E-mail plug-in is run it will attempt to automatically configure itself by
importing the email settings from Outlook®,
Outlook Express®, Eudora® or Netscape®. If you
use a different program to send e-mail, you must configure the e-mail plug-in manually.
1. If the Options dialog box is not a lready displayed, click the [Options…] button.
2. Click the [Add…] button to add a new e -mail account.
3. In the [Full Name:] edit box type your full name (e.g., John Smith).
4. In the [E-mail Address:] edit box type your e-mail address (e.g.,
jsmith@ispname.com).
5. In the [SMTP Server]: edit box, type the name of your SMTP (Simple Mail
Transfer Protocol) Mail Server (e.g., mail.ispname.com). If you do not know the
name of your SMTP mail server, contact your network administrator or your
Internet Service Provider.
6. Click OK to finish adding the new account.
7. Click OK to complete the configuration.
Consult the online E-mail plug-in help file for the Advanced Options default settings. See the
Question and Answer section on page 88 for specific troubleshooting with the E-mail plug-in.
Contact Sheet and Print Contact Sheet
The Contact Sheet and Print Contact Sheet plug-ins pertain to contact sheet development and
printing plug-ins for ACDSee (v3.1 and above specifically). Contact sheets are excellent for
cataloguing large image banks. The Contact Sheet plug-in allows highly customizable image
contact sheets, and HTML image maps to be created, while the Print Contact Sheet Plug-in was
designed for printing contact sheets.
To create contact sheets, follow these steps:
1. In ACDSee v3.1 and above, select the images you would like to appear.
2. Select [Create a contact sheet] or [Create
and print a contact sheet] from the Plug-ins
menu or the corresponding toolbar buttons.
3. In the Contact Sheet dialog, as seen below, make the necessary configurations in
the tabbed pages.
4. Make sure to specify the output path of where you would like the contact sheet to
be saved (or, for Print Contact Sheet, the destination printer), and click OK.
or
63
Page 64

Tabbed pages include:
Page tab allows you to set
layout specific options.
Thumbnails tab allows you
to set thumbnail specific
options.
Labels tab allows you to add
labels to your contact sheet.
Output tab (for Contact
Sheet plug-in only) a llows
you to specify output options
for your contact sheet.
There are also options to add frames, bevel edges, drop shadows, background color, labels and
mattes to your thumbnail images. The preview area will refresh to display any new settings
applied (the preview is to scale). There is a check box option that allows you to create an
HTML image map that corresponds to your contact sheet created. Use the context-sensitive
help and the online help file for more information on all these options.
Adjust Levels Plug-in
The Adjust Levels plug-in in ACDSee v3.1 and above, allows you to adjust the brightness,
contrast, whitepoint / blackpoint, and gamma settings of one or more images. Using this plug-in
you will be able to select a group of images and adjust all of them as a batch.
By clicking the [Level
settings…] button, it is
possible to adjust the
brightness, contrast and other
values of your image.
If you are working with JPEG,
PNG, TGA, and TIFF images
the [Format settings…] button
will be available. This button
allows you to change settings
such as the compression of the
image.
It is important to keep in mind
that changing the compression
can affect image quality.
64
Page 65

JPEG Transform
ACDSee offers a lossless JPEG rotation command which allows you to rotate a JPEG image, or
group of JPEG images without decompressing, and recompressing and re-quantizing the JPEG
information. This means that no quality is lost in the transformation.
Odd-sized images will be cropped to the nearest multiple of 8 or 16 (in each
dimension).
1. Begin by highlighting one or more JPEG images in the Browser.
JPEG Transform is not available for any other image format. For example, if
the images selected include a GIF image then the JPEG Transform option will
be disabled.
2. Select [Tools | JPEG Transform…] and
the dialog seen here will appear:
3. Choose one of the five rotation options
available. Choose the [Apply to all]
option if wanting to apply the
transformation to all the images.
Wallpaper
4. Press OK.
If you select more than one
image, the [Apply to all]
check box will be available. If you do not
select this option then when you press OK,
the next image will appear in the Lossless
JPEG Transformation dialog and you can
select a different rotation for each image.
The actual rotations take place as a batch
operation after all rotations are specified.
The Wallpaper commands let you set the wallpaper
shown on the Windows desktop to any image. The
selected image is first converted to BMP format and then
saved as "ACD Wallpaper.bmp" in the Windows
folder. ACDSee then changes the wallpaper settings in
Control Panel to display this image.
65
Page 66

Tiled, Centered and Restore
Ø With the wallpaper shortcut added to the toolbar, press the drop-down arrow next
the wallpaper icon and choose between Centered, Tiled, and Restore (as seen
above). Alternatively, go to [Tools | Set Wallpaper | Restore].
Ø Holding down <Shift> when you click the wallpaper shortcut button is another
way to have the wallpaper tiled (rather than centered). Or, select the
corresponding command from the [Tools | Set Wallpaper] menu.
If the image is larger than the screen, it will be shrunk to fit. In View mode,
you can set the desktop wallpaper to part of an image by selecting the region of
interest before invoking the wallpaper command.
Thumbnails
When browsing, you can view images as thumbnails by selecting [View | Thumbnails] from the
menu. ACDSee generates and displays a thumbnail for each of the images in the current folder.
You can set the size of the thumbnail using preferences on the Thumbnails options page.
Thumbnail Caching
Because thumbnail generation can be a time-consuming process, ACDSee provides a thumbnail
caching feature. Whenever a thumbnail is generated for a source image, it is saved in a central
database file. The next time ACDSee requires the thumbnail for that image, it can read the
thumbnail directly from the database file rather than decoding the source image again. This
greatly enhances the speed at which ACDSee gathers thumbnails.
See Customizing Using Options .
You can choose to compress the thumbnails stored in the cache by going to [Tools | Options |
Miscellaneous]. This saves disk space, but it often requires more time to read the thumbnails
back in. In addition, if you choose a compression option other than [None] or [Lossless], the
thumbnails’ quality is noticeably degraded. By default, ACDSee stores thumbnails with no
compression.
ACDSee also caches thumbnails for image files on read-only and removable disks. ACDSee
uses the volume label of a removable disk to identify it. Therefore, you can have several disks
of images, possibly with the same names, and ACDSee still caches the images on each disk
correctly and without conflict.
If you modify an image whose thumbnail is cached, ACDSee automatically detects the change
and regenerates the thumbnail the next time it is displayed. When you delete image files with
ACDSee, the corresponding thumbnails are removed from the database to reclaim the space
used.
66
Page 67
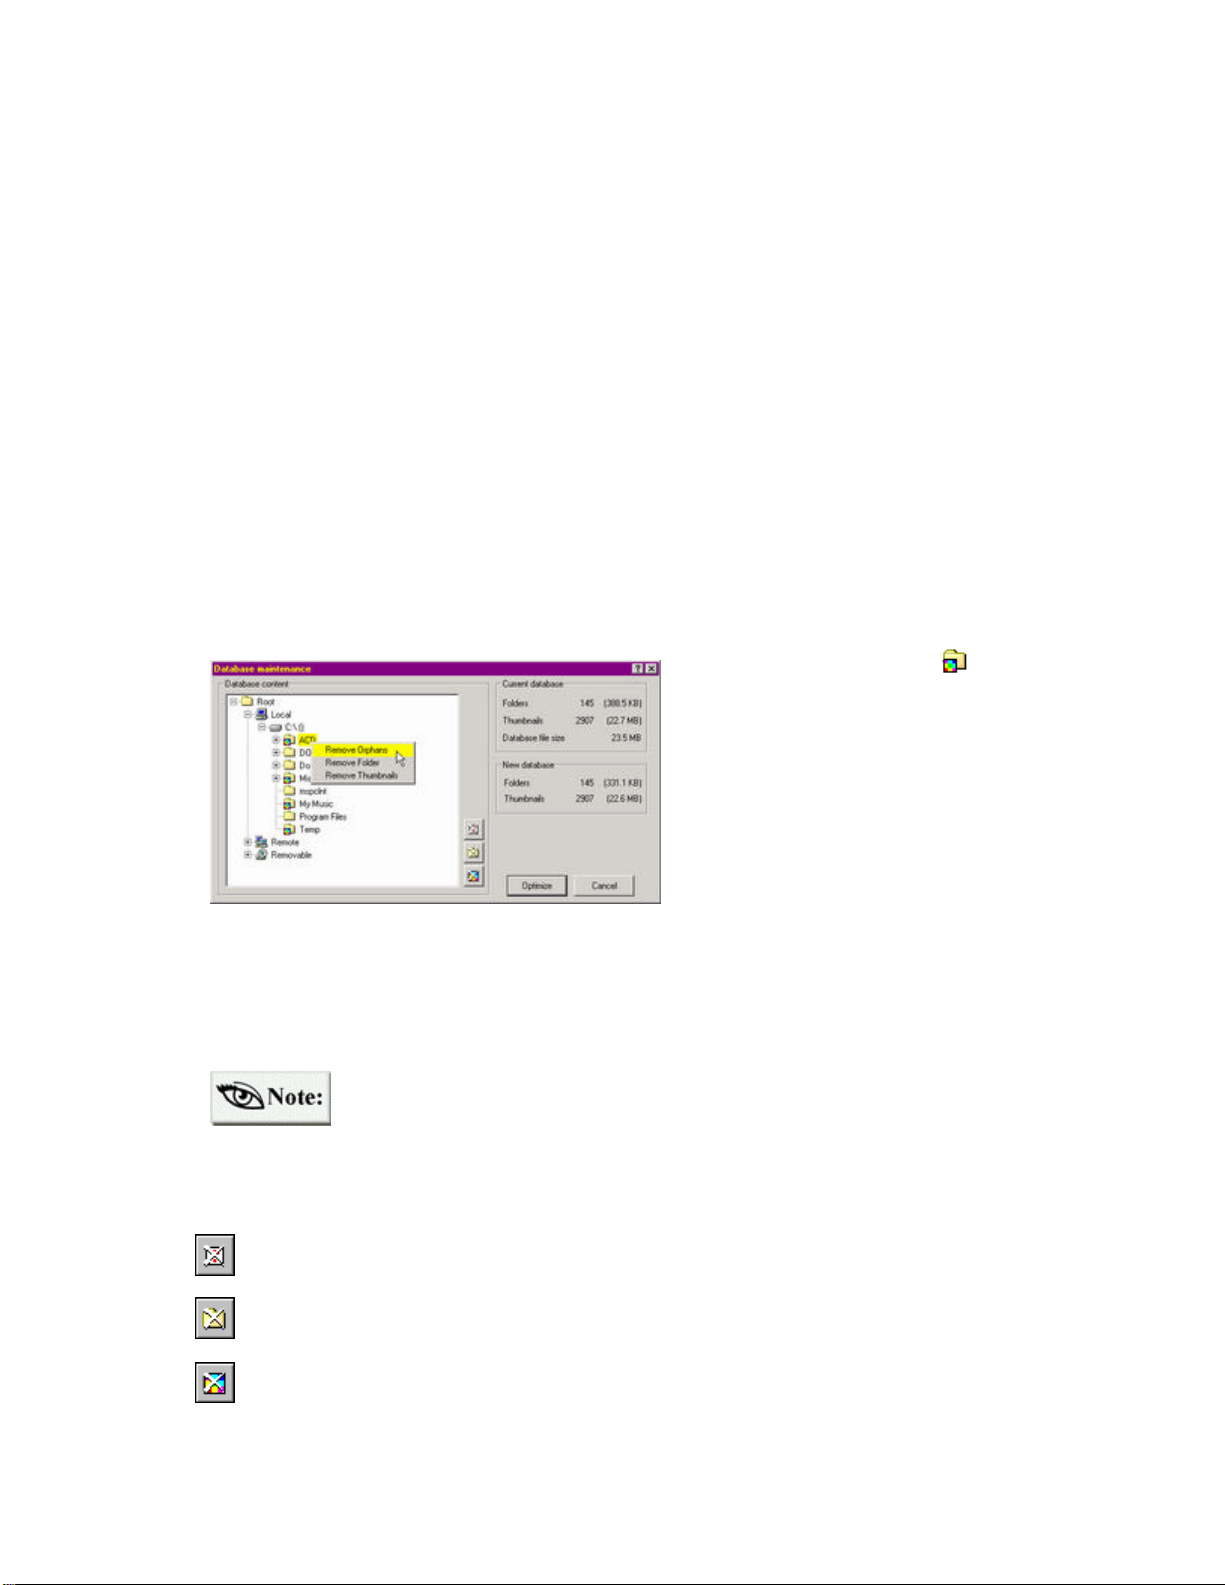
However, if you delete, move or rename image files with Explorer, the thumbnails are not
removed and space is wasted. To alleviate this problem and keep your database working
efficiently, use the [Database | Maintenance…] command to delete old thumbnails, defragment
and optimize the database file.
Database Maintenance
It is good practice to clean up the database periodically. In this way, database items that
correspond to deleted images can be removed. This frees up disk drive space. It is important to
note that if you are removing cached thumbnails of images that still reside on your system, then
these thumbnails will be cached again after you view the images with ACDSee – unless [Tools |
Options | Miscellaneous | Store thumbnails] is cleared. If you delete database information
(metadata), it will be removed permanently.
To optimize the database follow these steps:
1. From the Browser, select [Database | Maintenance…] and the dialog box, as seen
below, will appear. The Database content pane on the left, displays all
directories in which optimization is possible.
2. Select a marked folder or a
directory (i.e., one that contains
database information). When
selecting a parent folder, all
subfolders will also be included.
3. Choose from one of the three
buttons as described below, or
right click on the folder and
choose a command.
4. Click the Optimize button.
After clicking the Optimize button, there will be a progress bar to show the process taking place
and approximate time involved. The total disk space that is saved from the optimization is
shown.
If you make a change to the database using steps 1 to 3 above, the change is
not finalized until clicking the Optimize button. If you close the dialog box,
the changes will not take effect.
The maintenance options are as follows:
Removes all information for files and folders that do not exist on your system. These
are referred to as “Orphans.”
Removes all information (metadata and cached thumbnails), within the selected item;
this removes the “Folder” from the database.
Removes all cached “Thumbnails” within the selected item.
67
Page 68

Cached information pertains to all metadata included with an image (i.e., the
image property information), with the exception of digital camera information
and image description.
If you have two or more drives (i.e., C: drive and D: drive), and you are
concerned about disk drive space, it is possible to move the image database to
the drive that has more available space. To do so, go to [Tools | Options |
Miscellaneous] and change the location of the image database by choosing the
Browse button. You will also have to manually move the *.dtf and *.ddf files
to the new location as well.
Rebuild thumbnails
There are situat ions that may develop where your image will not be synchronized with the
thumbnail image that is displayed in the File list. When this occurs, you can select the
thumbnails and then use the [Database | Rebuild Thumbnails] command. This method is a
selective thumbnail rebuild in contrast to deleting the cached folder or directory in the database
maintenance procedure.
68
Page 69

File management is one of the essential features to ACDSee. This section deals with many of
the elements related to file and folder management.
Timestamp Command
You can change the last-modified timestamp of a file or group of files by selecting the files and
invoking the [Tools | Change Timestamp…] command. You can set the last-modified
timestamp either to the creation timestamp (date and time when the file was created), to the
current system time, or to a specified date and time.
Deleting Files
Delete a file, folder or shortcut by selecting it and using the [Edit | Delete] command. The
Filing tab of the Options dialog lets you spe cify whether to use the recycle bin when deleting
files, and whether to ask for confirmation before deleting. You can bypass confirmation by
holding down <Ctrl> when invoking the Delete command. You can also bypass the recycle bin
by holding down <Shift> when invoking the Delete command.
The Favorites List
You can add applications to the Favorites list in order to access them quickly from within
ACDSee. To open a file with a specific application in the list, just drag the file and drop it on
the application shortcut.
For more information, see Favorites List Pane .
69
Page 70

Finding Image Files
The [Tools | Find Images…]
command – accessible from the
Browser – can be used to search for
image files that match filename or
description keywords.
Search Scope
The scope of the search is limited to
the selected folders, or, if no folders
are selected, the current folder. The
command can also be invoked from
the context menu of a file folder or
file folder shortcut. If a single
folder is selected, the scope can be
modified by typing a new path into
the [Look in:] box.
The check boxes entitled [Include subfolders] and [Follow shortcut links], allow the search to
be recursive. (i.e., to include subfolders as well).
Hidden files and folders are included in the search only if the [Tools | Options… | File List |
Show hidden files] option is enabled.
Search Criteria
Filename patterns
One or more filename patterns can be entered in the Filename box to limit the search to files
with matching names. A match occurs if a filename matches any of the given patterns. If a
pattern does not specify a file extension, any file extension will be used in the match.
Descriptions, Notes, and Keywords
Descriptions, Notes, and Keywords or any portions of these categories can be entered in the text
box. The appropriate check boxes must be selected below the text box. Words are separated by
spaces and phrases (quotation marks are optional). A match occurs if the text matches any
portion of the description, notes, or keywords.
If you enter both a filename pattern and description text, then an image must meet both criteria
to be a match.
70
Page 71

Author and Date
It is possible to search by author name in the text box provided. A section for the date is also
included to search by time parameters – [File timestamp] or [Date in database].
Displaying Search Results
To start a search, click the Find button, or use the [Tools | Find Images…] command.
Enter the search criteria and press the [Find Now] button. When the search is complete, the
number of matching images found is displayed. The matching images can then be displayed in
the File list of the Browser by clicking on the View button. If the [Auto-view results] option is
checked, then any matc hes found will automatically be viewed after the search is finished.
Matching images are shown in Browse mode and can be seen in the File list section. To return
to normal Browse mode functions, click a folder in the Folder tree, or select [Go | Back], or
click the Back button located in the toolbar. After doing so, it is possible to perform a new
search by making another selection.
Modifying Files and Folders
Renaming Files and Folders
You can rename files and folders in the File list, Folder tree and Favorites list.
To rename a file or folder:
1. Select the item.
2. Select [Edit | Rename] from the menu.
3. Type the new name.
4. Press <Enter>.
You can also rename an item by selecting it, waiting a moment, and clicking on the name with
the primary mouse button. However, there is a Browser option to turn off this feature.
You cannot rename any file on a read-only file system such as the CD -ROM.
With ACDSee v3.1 you can rename a drive.
Renaming a Series
You can rename a group of files according to a numbered series and change filenames and file
extensions to upper and/or lower case.
For example:
Original names: BeaconHill1.jpg, BeaconHill2.jpg, Empress2.jpg
New names: Victoria1_BeaconHill1.jpg,
Victoria2_BeaconHill2.jpg,
Victoria3_ Empress2.jpg
71
Page 72

1. Select the files.
2. From the menu, select [Tools | Rename
Series…].
3. Select the [Specify a template to use for
renaming files.] checkbox.
4. Enter a template name in the [Template:]
field (this could be a word that is related to
the series of images you want to rename).
5. Specify the starting index.
6. In the [Filename Case] field, highlight the
desired option.
7. A table at the bottom of the dialog box
indicates the filename changes that will take
place.
8. Click OK.
Initially, the template and sta rting index are formed based on the first selected filename.
If you double-click on a filename in the left column, the current template and starting number
will be reset based on the selected filename.
If you do not want to rename according to a template , deselect the [Specify a template to use for
renaming files.] checkbox. Doing this causes all fields, except for the [Filename Case] field, to
become inactive.
Describing Files
To ensure efficient navigation and personalization of your collection, ACDSe e lets you attach
descriptions to files and folders to remind you of the context of an image, or image sequence.
File descriptions are used by some other application programs (such as JPSoft’s 4DOS/4NT),
but they are not supported directly by Windows. The file descriptions you create are stored in
hidden files called descript.ion, such files exists for each folder. If you copy, move or rename
files using ACDSee, your file descriptions will remain.
Copying Descript.ion files to CD’s
To copy images and their corresponding descriptions to recordable CD’s, ensure the [Tools |
Options… | File List | Show hidden files] option is checked. With this option checked, it is
possible to view and copy the descript.ion files in the File list. To do this in Thumbnails view,
the [Tools | Options… | Thumbnails | All files (not just images)] option must be checked. With
these options checked, you can drag and drop images along with their descriptions to the target
location.
72
Page 73

Using ACDSee’s [Tools | Find Images…] command, you can search through your file
descriptions for matching words and phrases in order to locate images.
File description features
Ø Each file description can be up to 3800 characters long.
Ø Carriage returns and line feeds are not allowed in file descriptions.
Ø The file description for the currently selected file appears in the rightmost pane
of the status bar.
Ø In Browse mode file descriptions also appear in the rightmost column in Details
view and can be used to sort the files.
IMPORTANT: Copying, moving or renaming files using other programs, such as
Explorer or the MS-DOS command prompt, will cause file descriptions to be lost!
To set/change a file description:
1. Select the file you want to describe.
2. Select [Edit | Describe…] from the menu.
3. Enter the new file description.
Ø When the File list is in Details view mode, you can also double -click a file
description to edit it. However, there is a Browser option to disable this feature.
Ø Files that reside on read-only file drives such as CD-ROM cannot be described.
To describe a group of files using the same file description:
1. Select the files you want to describe.
2. Select [Edit | Describe…] from the menu.
3. Check [Apply to all] at the bottom of the dialog box.
4. Enter the new file description.
Copying and Moving Files/Folders
Copy to/Move to
The [Edit | Copy To…] and [Edit | Move To…] commands let you copy or move one or more
files to a different folder. Upon invoking the command, a dialog box appears allowing you to
specify the target folder. A list of the most recently used target folders is shown to increase
73
Page 74

efficiency. In the event of a filename collision, you can specify what action should be taken,
when copying or moving a single file, specify a different filename.
Copy, Cut and Paste Files
The Copy, Cut and Paste commands can be used to copy and move files between folders.
To copy one or more files:
1. Select one or more items and then select [Edit | Copy] from the menu.
2. Browse to the folder where you want to place the selected file (or files).
3. Select [Edit | Paste].
To move one or more files:
1. Select one or more items and then select [Edit | Cut] from the menu.
2. Browse to the folder where you want to place the selected file (or files).
3. Select [Edit | Paste].
You can also copy, cut and paste files between ACDSee and Explorer. However, if you paste
files into Explorer, the file descriptions are not preserved.
The Filing tab of the Options dialog contains several options that determine what ACDSee does
when there is a filena me collision. This occurs in situations where a file in the target folder has
the same name as one of the files being copied or moved.
Drag and Drop
You can select one or more items in the Browser File list or Folder tree, and then drag and drop
it somewhere else.
To copy files or folders:
1. Select one or more items.
2. Drag the selection with the alternate mouse button and drop it onto a folder or
shortcut to folder in the File list, Folder tree or Favorites list.
3. Select [Copy here] from the context menu.
You can also drag the selection with the primary mouse button. If you drop the selection into a
folder on the same disk partition (e.g., from C: drive to C: drive), the files are moved by default.
If you drop the selection into a folder on a different disk partition (e.g., from C: drive to D:
drive), the files are copied. The mouse pointer shows a plus sign if the files will be copied.
You can force the files to be moved by pressing <Shift>, and force them to be copied by
pressing <Ctrl>.
74
Page 75

The Filing tab of the Options dialog contains several options that determine what ACDSee does
when there is a filename collision. This occurs in situations where a file in the target folder has
the same name as one of the files being copied or moved.
To create shortcuts to files or folders:
1. Select one or more items.
2. Drag the selection with the alternate mouse button and drop it onto a folder or
shortcut to folder in the File list, Folder tree or Favorites list.
3. Select [Create shortcut(s) here] from the context menu.
If you want to create shortcuts in the Favorites list, drag the files or folders using the primary
mouse button and drop them onto the background of the Favorites list.
To open files with an application in the Favorites list:
1. Select one or more items.
2. Drag the selection with the primary mouse button and drop it onto the application
shortcut.
Special drag & drop features
Ø When dragging an object within ACDSee, position the mouse near one of the
borders of the target window in order to scroll in the corresponding direction.
The scroll speed is proportional to the distance from the border.
Ø If you are dragging items into the Folder tree, expand or collapse the currently
highlighted folder by either pressing <Space> or the other mouse button (e.g.,
click with the right mouse button if you are dragging with the left).
Generating File Listings
The [Tools | Generate File Listing] command lets you get a textual listing of the contents of the
current folder. You can then print, save or edit the listing.
The information included in the listing is the same information displayed in Details view mode.
The sort order of the listing, the columns shown and the order of the columns matches the
respective settings of the File list. To find out how to show/hide, sort and change the order of
columns, see File List Pane .
The generated File list text is saved to a file in the designated TEMP directory and opened using
the default text editor (normally Notepad).
75
Page 76

Launching Document Files
When you double-click a file that ACDSee does not recognize as an image, ACDSee launches
the associated default application. The same thing happens when you double-click a file in
Explorer.
The open and edit file actions
ACDSee lets you set two actions for each file type. The open action is normally the default
action used by Explorer and other programs. The additional edit action lets you set up a
secondary command. This feature is designed to let you invoke a different application for
editing images, but you can use it however you like.
Setting the open and edit actions for a file type:
1. In Browse or View mode, select a file representing the type.
2. Select [Tools | Shell | Open with...] or [Tools | Shell | Edit with...]. In the
window that appears, select an application to handle the action.
3. Check the box at the bottom of the dialog box to make the association permanent,
or clear the box to launch the file with the given application without saving the
new association.
4. Click OK.
When you initially set up ACDSee as the default application for file types,
either during setup or with the [Tools | File Associations...] menu command,
ACDSee automatically sets the previously associated applications as the
applications for the corresponding edit actions.
Converting Images to Another Format
The [Tools | Convert…]
command brings up the
format conversion window.
Choose from the options
provided to convert the
selected image to another
format (this method is only
available in Browse mode).
Some formats have encoding
options that can be adjusted
by clicking on the format
settings button in the format
conversion window.
76
Page 77

To convert an image from View mode, use the [File | Save As...] command. The desired output
format can be selected from the file type drop-down list. The converted image is written to a
file with the same name as the original but with an extension matching the selected format.
Should the output file already exist, the action taken is determined by the selection made in the
[Overwrite existing:] list options. If the [Remove/replace original] box is checked, the source
file is deleted after a successful conversion.
Converting image in Browse mode
1. Select one or more images in the Browse mode.
2. Select the [Tools | Convert…] command from the menu or alternate click with the mouse
and select [Convert…]
3. Choose the desired output format.
4. Some formats let you specify additional options.
5. Change the [Overwrite existing] and [Remove/replace original] options as desired.
6. Click OK.
In View mode
1. View the image you wish to convert.
2. Select [File | Save as…] from the menu.
3. Select the desired output format and options.
4. Enter the output filename.
5. Click Save.
If you select part of the image before saving, the saved image will be cropped to the selection.
77
Page 78
In this section, we highlight various tips of operating ACDSee as well as customization features.
There are a number of tips associated with viewing such as adjusting your display quality and
viewing multiple images. This will be our starting place.
Optimizing Image Display Quality
Gamma correction
Ideally, every monitor would display an image the same way. Unfortunately, this is not the
case. Each make of monitor applies its own characteristic nonlinear transfer function to the
pixels of an image when displaying it. For this reason ACDSee allows you to specify a gamma
correction value. A gamma value of 1.0 is normal, with no correction. Lower gamma values
darken the image, while highe r gamma values lighten the image. The gamma correction option
is located on the [Tools | Options…] display page.
No gamma correction is applied when you print or copy an image.
Color quantization and dithering
If you have a 256 or 32k/64k (high color) display, 24 and 32 bit images with 16 million colors
must be processed by ACDSee before being displayed (in order to reduce the number of colors
used). This two-stage process is called quantization and dithering. By selecting different
quantization and dithering methods, you can choose to have a higher image quality and a slower
decoding speed. That is, higher quality output will cost you some extra decoding time.
True color displays (16 million colors)
For true color displays, ACDSee always gives you the highest quality output possible. No
quantization or dithering is required.
High color displays (32768 or 65536 colors)
For high color displays, the available quantization and dithering methods are:
No dithering Fastest, high quality output
Ordered A little slower, very high quality output (default)
For many images, there is very little visible difference between these two methods. The
superior output of the ordered dithering method is most noticeable in computer-generated
78
Page 79

images. However, this option is recommended for general use since the difference in speed is
hardly noticeable.
8-bit color Displays (256 colors)
For 256 color displays, the available quantization and dithering methods are:
1-pass ordered Fastest, reasonable quality output (default)
1-pass Floyd-Steinberg Somewhat slower, reasonable quality output
2-pass Floyd-Steinberg Much slower, good quality output
In 2-pass Floyd-Steinberg dithering, the image is decoded in two passes. In the first pass,
ACDSee decodes the image and determines the optimal color palette. While this is being
performed, the image is displayed using the 1-pass ordered method. In the second pass,
ACDSee dithers the image using the optimal palette. After the second pass completes, the
image is redrawn using the optimal palette. This method normally produces high quality output
but takes longer than the single pass methods.
Viewing Multiple Images Simultaneously
Normally, the Browse window closes when you switch to View mode. You can keep the
Browse window open while you open and view an image by holding down <Shift>.
In Browse mode:
1. Select an image.
2. Hold down <Shift> while doing one of the following:
Ø press <Enter>
Ø or, alternate mouse click and choose View
Ø or, select [File | Open]
Or:
1. Add an ACDSee application shortcut into the Favorites list by dragging and
dropping the shortcut icon on the desktop into the Favorites pane.
2. Drag and drop the desired image files onto the ACDSee shortcut.
A new copy of ACDSee is started in View mode and the image is loaded. It is now possible to
go back to the Browse window, select a different file, and repeat either method above.
Both methods let you modify whether subsequent images are opened in a new Viewer or in the
same Viewer. Go to [Tools | Options | Miscellaneous] and in the [Startup files] section choose
one of the options listed there.
79
Page 80

If you make this change in the Options settings, you must restart ACDSee for
the change to take place.
Viewing from a Single Window
Normally, ACDSee starts a new program instance and View window each time an external
application calls it to view an image, so if an external application calls ACDSee several times,
several View windows are generated. To reduce system overhead, you can instead configure
ACDSee to use the same window for all images.
Here’s how to configure it:
1. Click Options.
2. Select [Tools | Options | Miscellaneous | Replace images in list] or [Add images
to list].
The [Replace images in list] command closes all images in the current sequence and replaces
them with the new image (or images). [Add images to list] adds newly opened files to the
image sequence, allowing you to navigate back to previously viewed images.
See Image Sequences for more.
Customizing ACDSee
In order to achieve the greatest level of user satisfaction and operational efficiency, ACDSee
has been developed so that you can customize many of its aspects to match your personal
preferences or to better suit specific tasks.
Customizing Using Options
The Options window lets you change a wide variety of functions and features, so you can
choose how you want to view and manipulate images.
80
Page 81

To customize functions and
features:
1. Click the Options
shortcut button.
2. Click the tabbed page you
wish to modify.
3. Choose your preferences.
4. Click OK to apply your
changes temporarily, or
select [Save settings] to
apply them permanently.
Changes made to the Startup files section of the Miscellaneous page require a
restart of the program in order to take effect. In addition, some settings can be
changed using commands under the View menu. Most of these settings are
automatically saved for future sessions.
As there are many settings to configure, we recommend using the button to
bring up context-sensitive help. See Context sensitive help for more.
Customizing the ACDSee Browser Layout (v3.1 and above)
It is possible to change the panes that are displayed in the Browse win dow and then save these
changes. In this way, you can choose from several Browser configurations.
To add a new pane:
Ø Click the [View | Browser panes] command and choose one of the options.
Active panes are indicated with a checkmark.
To remove a pane:
Ø Click [View | Browser panes] command and uncheck the option.
Or
Ø Click the button at the top right of the pane inside the Browser.
You can also move an entire pane to a new area of the Browser by dragging and
dropping. Click the topmost bar, then drag and drop the pane.
81
Page 82

To save changes to the Browser configuration:
1. Select the [View | Layout scheme…] command.
2. Click the [Save as…] button and type in a name. The pane layout and the
shortcut buttons in the toolbar will be saved.
To revert to a saved configuration:
1. Open the dialog box as described above.
2. Select a saved layout and click OK.
It is also possible to customize the Browser toolbar.
See Toolbar and Command Extensions.
The File list pane cannot be moved.
Running ACDSee Automatically from Other Programs
It is often convenient to use ACDSee as a helper application for viewing images from other
programs. When you installed ACDSee (from the Typical or Custom installation – as described
in the Installation Steps), you were presented with a list of file types, which could be assigned
to ACDSee to give it helper functionality. This list was automatically registered for you, so you
could use ACDSee smoothly from other programs. However, other programs sometimes
remove the default file associations installed with ACDSee.
To restore ACDSee as the associated application:
1. Select [Tools | File Associations...].
2. Place checkmarks beside the file types you want associated with ACDSee.
3. Click OK.
To assign an unlisted file type to ACDSee:
1. In Browse mode, select a file corresponding to the type.
2. Select [Tools | Shell | Open with...] from the menu. The Open With window
appears.
3. Select ACDSee from the list.
4. Check the box at the bottom of the window that says: "Always use this program
to Open this type of file."
5. Click OK.
82
Page 83

Setting the View Window Size and Position
By default, the viewing window is automatically sized to fit the image displayed, and it is
positioned in the center of the screen.
To position the window somewhere else:
1. Position the window where you want it.
2. Select [View | Save window pos.] from the menu.
To set a specific size and position:
1. Click Options for the dialog box.
2. Clear the [Viewer | Change window size to fit image] option.
3. Click [Save settings].
4. Position the window where you want it.
5. Select [View | Save window pos.] from the menu.
To set full-screen mode as the default:
1. Click Options for the dialog box.
2. Check the [Viewer | Full-screen] option.
3. Click [Save defaults].
83
Page 84

Below are some of the frequently asked questio ns that apply to ACDSee and the E-mail plug-in.
If your have a question that is not answered here it is suggested that you go to our Web site
where there are more FAQ’s listed and updated on a regular basis:
http://www.ACDSYSTEMS.com/english/support/faq-library.htm
How do I navigate between the ACDSee Viewer and the ACDSee Browser?
By default, when you launch ACDSee you bring up the Browser. Here you will see a Folder
tree on the left hand side and your image files on the right hand side.
To switch to the Viewer double-click the image file (or, select it and press [Enter] on your
keyboard). The image will open in the Viewer. To return to the Browser double-click the
image or pr ess the [Enter] key.
How do I open ACDSee in a specific folder?
1. With the alternate mouse button, single-click the ACDSee Icon on the desktop (a
context menu will appear).
2. Click the [Properties] command at the bottom of the list. Then click the
[Shortcut] tab of the dialog box that appears.
3. About halfway down there will be a box labeled [Target:]. In this box a path will
be pointing to where you have ACDSee installed... "C:\Program
Files\...\ACDSee.exe"
4. At the end of this add a space and [open ("Drive:\Folder")],
i.e., To open a folder called "Images" on your "C:\" drive, the path would look
something like this: "C:\Program Files\...\ACDSee.exe" [open ("C:\Images\")]
The above path will not work if there are spaces in the folder name s.
Why won’t ACDSee view the GIF files I save from my AOL browser?
Even though the file extension says *.GIF, it is not really a *.GIF. AOL uses its own proprietary
format for this type of image. The file is actually an *.ART file. ACDSee does not support
*.ART files. When you save *.GIF images from your AOL browser do not compress the file.
Please consult AOL for more information regarding this (this applies to ACDSee v3.0 not
version 3.1 and above).
84
Page 85

When I double-click an image file, it opens into software other than ACDSee.
How can I get ACDSee to open my image files?
The problem is related to incorrect settings in the File Association registry. Do not use
Windows Explorer to associate files with your ACDSee – it will not work correctly!
1. To set file associations in ACDSee, run the ACDSee Browser and click [Tools |
File Associations…],
2. In the menu, check the boxes for the file associations you wish to be opened by
ACDSee.
3. Click OK to Exit ACDSee.
Next time you double-click an image file with the types you have set, ACDSee will be the
default viewer for them.
How can I get specific image types to open directly with software other than
ACDSee?
Step 1:
1. Run the ACDSee Browser and click [Tools | File Associations…].
2. In the menu, clear the boxes for the file associations you wish not to be opened
with ACDSee.
3. Click OK and exit ACDSee.
Step 2:
1. Find an image file (of the type you have deselected in ACDSee) in Windows
Explorer. Select the image by single-clicking the image with the primary mouse
button.
2. Click the file with the alternate mouse button. A context menu will appear, select
the [Open with…] option. (Win 95 does not have the [Open with…] option.)
3. Here you will be given a choice of the software installed on your computer.
4. Select the appropriate program to open the file.
5. Add a check to the box [Always use this program to open this file] to make it
permanent.
6. Click OK
If I add images to a folder that ACDSee is currently browsing, they don't show up
unless I refresh the screen. How do I get the new files to show up in ACDSee
Automatically?
You must enable auto-refresh.
1. To enable auto refresh launch the ACDSee Browser, go to [Tools | Options | File
List].
85
Page 86

2. Check [Enable auto-refresh]
3. Choose from the drop-down menu how you want the new images integrated with
the existing ones.
How do I print a contact sheet containing multiple thumbnail images?
1. Select a number of images in the ACDSee Browser, click [File | Print].
2. Select the printer you wish to use and click OK. The ACDSee Print window will
now open.
3. On the left hand side, under "Size" use the drop down menu and select
Thumbnails.
4. To adjust the size of the thumbnails use the size adjustment controls directly
under the drop down menu.
5. Once all the adjustments are finished, click OK to print.
Why do my thumbnails look different from the actual images?
On some systems that contain a large quantity of images, the thumbnail cache may become
corrupt. Thumbnails for images may not appear the same as the actual image.
To correct this:
1. Launch the ACDSee Browser and go to [Tools | Options | Miscellaneous].
2. At the bottom is a check box labeled [Store Thumbnails] – make sure it is
checked. Also, set the Thumbnail compression to High (from the drop down
list).
3. You will now need to reset the thumbnails in the database. Go to [Database |
Maintenance], click the bottom of the three vertical buttons .
4. Click Optimize.
5. Click Close.
Why do some of my *.GIF files appear all black?
Some GIF editors encode the image improperly, or the background color is set incorrectly.
ACDSee correctly displays the image transparently over the specified background color, which
results in a black image.
Some other software (most notably web browsers), override the background color specified in
the GIF with their own background color; which is also correct (in this case it usually happens
to produce the desired effect, unless the web page background happens to be black).
86
Page 87

Why do my larger-than-screen-size images appear to smudge or smear when I
scroll them in the Viewer?
This is a video card driver issue. Please visit the manufacture of your video card's web site and
see if there are updated drivers available (there almost always are...even if you recently
purchased and installed your video card).
I have moved my Folder tree or Preview area off the screen and can't retrieve it.
How do I fix this?
With ACDSee v3.1, from the Browser, go to [View | Layouts schemes...] and double-click
[Default layout]. This will reset your Browser panes to default.
Can I rotate images?
There are two methods of rotating images in ACDSee. Lossless rotation of images is available
with JPEGs only.
1. Select the JPEG image (or images) you wish to rotate in the Browser.
2. Select the [Tools | JPEG Transform] menu command.
3. The next window will give you a thumbnail of the image you selected, and choices of
rotation options.
4. Select the rotation option you wish and click OK.
To rotate other image types:
1. Single-click the image in Browse mode.
2. Select the [Tools | Edit...] menu command. This will launch the Photo Enhancer.
3. Select [Edit | Rotate] then click the desired rotation.
4. Save the file.
How do I prevent ACDSee from previewing my video and audio files?
Step 1:
1. In the ACDSee Browser go to [Tools | Options | Browser].
2. Clear [Preview audio/video clips].
3. Click OK.
Step 2:
1. In the ACDSee Browser go to [Plug-ins | Settings].
2. Clear the ID_AVI.apl and ID_MPEG.apl options.
3. Click OK.
87
Page 88

Questions Related to E- mail Plug-in:
How can I get the e-mail plug-in to work with AOL?
You can’t. AOL does not support third party e-mail programs ; send your pictures with SendPix
instead.
What should I do before sending an animated image?
Clear the [Convert images to JPEG format before sending] option on the [Advanced Options]
tab.
I’m get the error “550 relaying to name@host.com prohibited by administrator.”
What do I do?
You are trying to access a mail server that you are not allowed to use. Contact you network
administrator or Internet service provider for the correct SMTP mail server.
What do I do when I get the error “Unable to connect to mail server?”
You have entered an invalid mail server name or you are not connected to the Internet.
88
Page 89

Appendix 1: Updates, Support, Feedback, and License Information
Getting Program Updates
You can download software updates from:
http://www.ACDSYSTEMS.com/english/downloads/
If you are running ACDSee v3.0 or 3.1 then it is possible to get a free update by following these
steps:
1. If you have Internet access, click the link above. You can access the same page by going
to our main page (at: http://www.ACDSYSTEMS.com), holding your mouse over the
word “Support” and clicking on Product Updates.
2. Under “Download software updates…” select Updates for ACDSee 3.0/3.1
3. Click either the North America or Europe download site to download the update
appli cation to your computer.
4. After download is complete, double click acdsee31updater.exe to automatically update
your software.
Technical Support and Feedback
Those who have purchased FotoCanvas will receive ongoing, preferred treatment by our
technical support team, should the need arise! If you have any technical related questions or
general feedback, please contact us by e-mail at acdtech@acdsystems.com
If you do not have e-mail access, you may telephone us at 1 (250) 544-6701. Our office hours
are Monday to Friday, 6 AM to 6 PM PST.
Your feedback is important to us in order to get an idea of how to make FotoCanvas a better
product for you. Many features and portions of the interface continue to be influenced by
comments from users. So, if you ha ve a grand idea for a new feature, or a better way of doing
something, please drop us a note.
Licensing Information
1. License – By receiving and/or using this ACD Systems Ltd. ("ACD") software (the
"Software"), you accept the following User Agreement. Subject to the terms of this Agreement,
ACD grants to you a limited, non-exclusive, non-transferable license, without right to sublicense, to use this software in accordance with this Agreement and any other written agreement
with ACD. This agreement is a binding legal agreement between ACD and the purchasers, users
or evaluators of ACD software and products. If you do not agree to be bound by this agreement,
remove this software from your computer now and, if applicable, return to us by mail any
copies of this software in your possession.
89
Page 90

2. Distribution – This software shall not be copied, distributed, transferred or sub-licensed in
whole or in part except that you may make one copy for archive purposes only. For information
about redistribution of this pr oduct...
WWW: http://www.ACDSYSTEMS.com
E-mail: channelsales@acdnet.com
Fax: 1 (866) 544-0291 (toll free)
3. User Agreement
3.1 Use –Your license to use this software is limited to the number of licenses purchased by
you. For more information about purchasing additional licenses of this software please e-mail
at: customerservice@acdsystems.com
You shall not allow others to use, copy or evaluate copies of this software. Others may obtain a
copy of this software from: http://www.ACDSYSTEMS.com
3.2 Use Res trictions – You shall use this software in compliance with all applicable laws
and not for any unlawful purpose. Without limiting the foregoing, use, display or distribution
of ACD software together with material that is pornographic, racist, vulgar, obs cene,
defamatory, libelous, abusive, promoting hatred, discriminating or displaying prejudice based
on religion, ethnic heritage, race, sexual orientation or age is strictly prohibited.
Each licensed copy of the ACD software may be used on one single computer location by one
user. "Use" of the software means that you have loaded, installed, or run the software on to a
computer. If you install the software onto a multi-user platform or network, each and every
individual user of the software must be licensed separately or be covered by a site license.
You may make one copy of the licensed software for backup purposes, providing you only have
one copy installed on one computer being used by one person (or number of users covered in a
site license purchase). Other users may not use your copy of this program. If any person other
than yourself uses ACD software registered in your name, regardless of whether it is at the same
time or different times, then this agreement is being violated!
The sale of and or distribution of copies of this software are strictly forbidden without the prior
written consent of ACD. It is a violation of this agreement to sell, loan, rent, lease, borrow, or
transfer the use of copies of ACD software products.
3.3 Copyright Restriction – You shall not, and shall not attempt to, modify, reverse
engineer, disassemble or decompile this software.
ACD's name and logo or graphics file that represents our software shall not be used in any way
to promote products developed with our software. ACD retains sole and exclusive ownership of
all right, title and interest in and to the software and all Intellectual Property rights relating
90
Page 91

thereto. Copyright law and international copyright treaty provisions protect all parts of ACD
software and pr oducts. No program, code, part, image, audio sample, or text may be copied or
used in any way by the user except as intended within the bounds of the single user program.
All rights not expressly granted hereunder are reserved for ACD.
3.4 Limitation of Responsibility – You will indemnify, hold harmless, and defend ACD
against any and all claims, proceedings, demand and costs resulting from or in any way
connected with your use of ACD software.
In no event will ACD be liable for any consequential, incidental, indirect, special or punitive
damages whatsoever (including, without limitation, damages for loss of profits, loss of use,
business interruption, loss of information or data, or pecuniary loss), in connection with or
arising out of or related to this Agreement, this software or the use or inability to us this
software or the furnishing, performance or use of any other matters hereunder whether based
upon contract, tort or any other theory including negligence. Our entire liability, without
exception, is limited to the customers' reimbursement of the purchase price of the software
(maximum being the lesser of the amount paid by you and the suggested retail price as listed by
ACD) in exchange for the return of the product, all copies, registration papers and manuals, and
all materials that constitute a transfer of ownership from the customer back to ACD.
3.5 Warranties – Except as expressly stated in writing, ACD makes no representation or
warranties in respect of this software and expressly excludes all other warranties, express or
implied, oral or written, including, without limitation, any implied warranties of merchantable
quality or fitness for a particular purpose.
3.6 Governing Law – This Agreement shall be governed by the laws of the Province of
British Columbia and the laws of Canada applicable therein. You hereby irrevocably attorn and
submit to the non-exclusive jurisdiction of the courts of Victoria, British Columbia, and any
competent Courts of Appeal there from.
91
Page 92

Contacting ACD Systems Ltd.
Web: http://www.ACDSYSTEMS.com
Customer Service and Orders
North America 24 hours a day, 7 days a week
E-mail: customerservice@acdsystems.com
Phone toll free: 1 (866) 244-2237 (ACDS)
International
Corporate Site Sales
E-mail: sitesales@acdsystems.com
Phone toll free: 1 (800) 579-5309
Or: 1 (250) 544-6700
Channel Sales: OEM, VAR, Retail & Distributor
E-mail: channelsales@acdnet.com
Phone toll free: 1 (800) 563-7138
Or: 1 (250) 544-6700
Mon to Fri, 6am to 6pm PST: 1 (250) 544-6700
Mon to Fri, 8 am to 5 pm PST
Mon to Fri, 8 am to 5 pm PST
Mail and Fax Information
Customer Service and Orders
North America
International
Mail: ACD Systems Ltd
PO Box 36
Saanichton, BC
V8M 2C3, Canada
92
Fax: 1 (817) 265-6877
Mail: ACD Systems INC
2201 North Collins, Suite #100
Arlington, TX 76011, USA
Fax: 1 (250) 544-0291
Page 93

Corporate Site Sales
Mon to Fri, 8 am to 5 pm PST
Fax: 1 (800) 819-2207 or 1(250) 544-0290
Channel Sales: OEM, VAR, Retail & Distributor
Mon to Fri, 8 am to 5 pm PST
Fax: 1 (866) 544-0291 or 1 (250) 544-0291
93
Page 94

Appendix 2: Patterns and Wildcards
Patterns
With the [Find] command, patterns can be used to search for files with names matching specific
criteria. A pattern can be as simple as a portion of a filename you are searching for, or it may
include wildcards.
Ø Pattern matching is not case-sensitive.
Ø Separate multiple patterns with spaces or semicolons [;]
Ø If you want to match a pattern containing a space or semicolon, enclose the
pattern in quotes.
Wildcards
A pattern may include any of the following wildcards:
? Match any single character in the filename
e.g., ca?.jpg will match cat.jpg, cap.jpg, and car.jpg, but not cats.jpg
* Match zero or more characters in the filename
e.g., cat* will matc h cat.jpg, cats.jpg, and cathy.jpg
[…] Match any of the enclosed characters
e.g., ca[tr] will match cat.jpg or car.jpg, but not cap.jpg
[!…] Match any character not enclosed
e.g., cat[!0] will match cata.jpg and catb.jpg, but not cat0.jpg
[…-…]
\ Escape a wildcard character
Match any character in the specified range
e.g., cat[a-f0-9] will match cata.jpg, catb.jpg, …, catf.jpg and cat0.jpg,
cat1.jpg, …, cat9.jpg
e.g., cat\[?\] will match cat[1] .jpg, cat[2] .jpg, etc…
If you do not include the wildc ard * in your pattern, the pattern will be matched
as a substring.
e.g., cat would match cat, cathy and bobcat, and is equivalent to the
pattern *cat*
94
Page 95

Appendix 3: System Administrator Options
Controlling the User Interface
ACDSee allows customization of several flags that control aspects of the View mode user
interface.
DisableBrowser Prevent user from using Browse mode
DisableOpen Prevent user from using the Open and Remove commands
DisableFileOps Prevent user from using Copy to, Move to, Delete, Rename
and Describe commands
DisableWallpaper Prevent user from using Wallpaper commands
DisablePrint Prevent user from using Print commands
DisableOptions Prevent user from using Options command
DisableOptionsSave Prevent changes made to options from being saved
ACDSee does not provide a way to change these options. The procedure outlined below
changes these options directly by modifying the corresponding entries in the system registry.
1. Start NotePad.
2. Type the text below into notepad.
3. For each item you wish to disable, change the "00" to "01".
4. Save the file as options.reg
5. Open Explorer, alternate mouse click the saved options.reg file, and select [Merge] from
the context menu.
– begin here –
REGEDIT4
[HKEY_CURRENT_USER \Software\ACD Systems\ACDSee]
"DisableBrowser"=hex:00
"DisableOpen"=hex:00
"DisableFileOps "=hex:00
"DisableWallpaper"=hex:00
"DisablePrint"=hex:00
"DisableOptions"=hex:00
"DisableOptionsSave"=hex:00
– end here –
95
Page 96

Command Line Arguments
ACDSee offers the ability to use command line functionality for launching the program,
browsing, printing images, viewing a slide show, and more.
Default behavior (no arguments)
When no command line arguments are given, ACDSee starts in Browse mode in the default
folder.
Specifying images to view: You can supply one or more image files as the command line
argument to ACDSee. You can even use wildcards:
e.g., acdsee c:\images\*.jpg start ACDSee and have it view all the .JPG files in the
c:\images folder.
If any filename includes spaces, you must enclose it in quotation marks:
e.g., acdsee "Metal Links.bmp"
e.g., acdsee "C:\My Pictures\Spot.psd" D:\Downloads\*.jpg
Browsing a particular folder or archive
You may specify a particular folder or archive to Browse as the command-line argument:
e.g., acdsee c:\images\ would start the ACDSee Browser in the c:\images folder.
Starting in View mode (with no images)
You can start ACDSee in View mode without an image by specifying the /v command line
switch:
e.g., acdsee /v
ACDSee ignores all other command-line arguments when the /v switch is present.
Printing
You can use ACDSee to print one or more images and exit by specifying the /p command line
switch:
e.g., acdsee /p "C: \My Pictures\Spot.psd" "D:\Downloads\*.jpg"
You can bypass the pr inter selection and print setup dialog boxes that normally appear by
adding an exclamation mark (!) to the /p switch.
e.g., acdsee /p! "Gloxina.jpg"
Slide show
Use the /ss command-line switch to specify that ACDSee should start a slide show on startup.
96
Page 97

Use the /seq:forward, /seq:reverse or /seq:random to specify the order of the slide show.
e.g., acdsee /ss /seq:random "d: \images\*.jpg"
Full-screen mode
Use the /fullscreen command-line switch to specify that ACDSee should start in full-screen
mode.
Synchronize to folder
Use the /sync <folder> command-line switch to specify that ACDSee should synchronize to the
specified folder.
Shell Commands
Windows lets you associate a number of actions for each file type. The default action is usually
open, which is normally invoked when you double-click an image in Explorer. ACDSee also
supports most actions, including open.
To invoke a shell action
In Browse mode, click the file with the alternate mouse button and select [Shell <action>] from
the context menu. To invoke the open action, select [Tools | Shell | Open] from the main menu
in either Browse or View mode. Similarly, to invoke the edit action, select [Tools | Shell | Edit]
from the menu.
To set or modify the Open and Edit actions
If the open or edit action is invoked, but the file selected is not defined, ACDSee displays a
dialog box that lets you select the application to handle the action. It is possible to bring up this
dialog to change the application for an existing action by selecting the [Tools | Shell | Open]
with or [Tools | Shell | Edit] with command.
You can also set these and other actions by using the [View | Folder Options…] command of
Explorer and clicking on the File Types tab.
DDE Interface
ACDSee is a DDE server application. The only supported DDE command is "open,’ which is
used by the Windows shell to open image files using ACDSee.
Syntax:
Server cmd-line: ACDSee.exe /v
Service: ACDSee
Topic: System
97
Page 98

Command: [open[-add | -noadd][-viewall | -noviewall]("<image-file-1>", "<image-file-2>", …)]
add option
-add Add the specified images to the current image sequence
-noadd Replace the current image sequence with the specified images
<default> Add or replace according to setting of [Miscellaneous | Startup] option.
viewall option
-viewall Add all images in the folder(s) containing the specified image(s) to the image sequence.
-noviewall Only add the specified images to the image sequence.
<default> View all according to setting of [Viewer | View all images in folder] option.
Command examples:
[open-add("c:\images\apple.jpg", "c:\images\quince.jpg")]
[open-noadd-viewall("c:\images\animals\dog.jpg")]
[open-noadd("c:\images\animals\*.jpg")]
[open-noadd("c:\images\animals.ais")]
Sample:
The following C sample illustrates how a client can use the "open" command with ACDSee.
#include <ddeml.h>
/**********
*DDEView *
***********/
static HDDEDATA CALLBACK DdeCallback(UINT, UINT, HCONV, HSZ, HSZ, HDDEDATA, DWORD, DWORD)
{
return (HDDEDATA)NULL;
}
int DDEView(const char* pszAppPath, // path to acdsee.exe (can just use
// "ACDSee.exe" if ACDSee is installed // correctly)
const char* pszFiles, // path to image file(s) – each file must be
// enclosed in quotes and separated by a space
int fAdd, // 0=>replace, 1=>add, -1=>according to options
// setting
int fViewAll) // 0=>view all in folder, 1=>only this,
// -1=>options setting
{
DWORD idDDE=0;
UINT err = DdeInitialize(&idDDE, (PFNCALLBACK) DdeCallback,
APPCLASS_STANDARD | APPCMD_CLIENTONLY, 0);
if (err == DMLERR_NO_ERROR)
{
HSZ hszDDEService, hszDDETopic;
HCONV hconv;
hszDDEService = DdeCreateStringHandle(idDDE, "ACDSee", CP_WINANSI);
hszDDETopic = DdeCreateStringHandle(idDDE, "System", CP_WINANSI);
98
Page 99

hconv = DdeConnect(idDDE, hszDDEService, hszDDETopic, NULL);
if (!hconv && DdeGetLastError(idDDE)==DMLERR_NO_CONV_ESTABLISHED)
{
int rc = (int)ShellExecute(NULL, NULL, pszAppPath,
"/v", "", SW_SHOWDEFAULT);
if (rc <= 32) return rc;
// try to connect to server every 50 ms for up to 1 second
// (give server a chance to start up)
for (int i=0 ; i<20 && !hconv ; i++)
{
hconv = DdeConnect(idDDE, hszDDEService, hszDDETopic, NULL);
if (!hconv) err = DdeGetLastError(idDDE);
Sleep(50);
}
}
if (hconv)
{
char* pszCmd;
char szVerb[80] = "open";
if (fAdd != -1) lstrcat(szVerb, fAdd ? "-add" : "-noadd");
if (fViewAll != -1) lstrcat(szVerb, fViewAll ? "-viewall" : "-noviewall");
pszCmd = (char*)malloc(lstrlen(szVerb) + lstrlen(pszFiles) + 5);
// wsprintf does not work with >1024 character strings
wsprintf(pszCmd, "[%s(", szVerb);
lstrcat(pszCmd, pszFiles);
lstrcat(pszCmd, ")]");
DdeClientTransaction((BYTE*)pszCmd, lstrlen(pszCmd)+1, hconv, 0, 0,
XTYP_EXECUTE, TIMEOUT_ASYNC, NULL);
err = DdeGetLastError(idDDE);
free(pszCmd);
}
DdeFreeStringHandle(idDDE, hszDDEService);
DdeFreeStringHandle(idDDE, hszDDETopic);
DdeUninitialize(idDDE);
}
return err;
}
void main()
{
DDEView("ACDSee.exe", "\"c:\\images\\cat.jpg\", \"c:\\images\\dog.jpg\"", 0, 0);
}
99
Page 100

Appendix 4: Digital Camera Support
Hewlett Packard PhotoSmart c20
Kodak DC 40
Kodak DC 120 Zoom
Kodak DC 200 Zoom
Kodak DC 210 Zoom
Kodak DC 215 Zoom
Kodak DC 220 Zoom
Kodak DC 240 Zoom
Kodak DC 260 Zoom
Kodak DC 265 Zoom
Kodak DC 280 Zoom
Olympus D-600L
Agfa ePhoto 780
Agfa ePhoto 780c
Agfa ePhoto CL30
Agfa ePhoto CL30 clik!
Agfa ePhoto CL50
Epson PhotoPC
Epson PhotoPC 500
Epson PhotoPC 550
Epson PhotoPC 600
Sanyo DSC-X300
Sanyo VPC-G200
Sanyo VPC-G200EX
Sierra Imaging SD640
Toshiba PDR -2
All FlashPoint Digita enabled digital cameras
Hewlett Packard PhotoSmart c200
Nikon Coolpix 900
If you are running ACDSee v3.0 or v3.1 you will not have the entire camera
support listed above. It is highly recommended to get the free update available
on our web site. See Getting Program Updates.
100
 Loading...