

Page 1

Getting Started Guide
The easy way to organize and share your photos.
Page 2

ACD Systems International Inc. 2010 All rights reserved.
Notice of Liability
The inf ormation in thi s document is dis tributed on a n “As Is” ba sis, without a ny representati on or warrant y of
any kind whether expr ess or implied , including any i mplied warra nty of merchan tability, titl e or tness for a
part icular purpos e or use. While e very precau tion was taken in the preparat ion of this doc ument, neithe r the
author nor ACD Systems sha ll have any liabili ty to any pers on or entity w ith respect t o any loss or damag e
caused or alleged to ha ve been cause d directly or indirectly i n connectio n with the use or i nability to us e the
instru ctions conta ined in this doc ument. ACD System s reserves th e right to make cha nges to this doc ument
withou t notice.
Copyright and Trademark Notices
ACDSee Ph oto Manager sof tware and d ocumentatio n was designed , programme d and is Copyrigh t © 2010
ACD Systems International I nc. All rights reserved wo rldwide. Unau thorized dup lication str ictly prohib ited.
ACD, ACDSee a nd ACDSee logo a re trademark s of ACD Systems In ternational In c. and may be reg istered in
Canada , the United State s, European Unio n, Japan or cer tain other jur isdictions .
Adobe, A crobat, Photosh op, PostScri pt and XMP are eit her registere d trademark s or trademar ks of Adobe
Systems I ncorporated i n the United State s and/or other co untries.
Apple, M acintosh and Qui ckTime are tra demarks of A pple Inc., re gistered in the U. S. and other co untries.
Paint Sho p Pro is a tradema rk or registere d trademark o f Corel Corpor ation and/or it s subsidiaries in Canada,
the Unite d States and/or ot her countries .
Direc tX, Internet E xplorer, Micro soft Wind ows, Windows l ogo, Windows Media, Windo ws Vista and W indows
Vista S tart butto n are either reg istered trade marks or tra demarks of M icrosoft Co rporation in t he United
States an d/or other countr ies.
All othe r marks, prod ucts and com pany names are th e propert y of their respe ctive owne rs.
Third Party Software Licenses
This So ftware als o contains sof tware of ACD Sys tems and its supp liers which ar e used in accordan ce with the
notices reproduced be low:
This So ftware cont ains Method an d System for Cal endar-Based I mage Asset Or ganization, P atent No. US
7,398,479 B2
This pro duct includ es DNG technol ogy under lice nse by Adobe Sys tems Incorpor ated. More info rmation may
be foun d at: http://ww w.adobe.co m/product s/dng/main.htm l. All rights res erved.
XMP Toolk it 4.1.1 is copyrig ht © 1999 - 20 07, Adobe Syste ms Incorporate d All rights re served. TH IS
SOFT WARE IS PROVIDED B Y THE COPYRIGHT HOLDERS AND CON TRIBUTORS “AS IS” AN D ANY EXPRESS O R
IMPLIED WAR RANTIES, IN CLUDING, BUT N OT LIMITED TO, THE IMPLIED WARRANT IES OF MERCHAN TABILIT Y
AND FIT NESS FOR A PARTICUL AR PURPOSE ARE D ISCLAIMED. IN NO E VENT SHALL TH E COPYRIGHT
OWNER OR CO NTRIBUTORS BE LIABLE FOR ANY DIRECT, INDIRE CT, INCIDENTAL, SPECI AL, EXEMPLAR Y, OR
CONSEQUEN TIAL DAMAGES (IN CLUDING, BUT NOT LIMITED TO, PROC UREMENT OF SUBS TITUTE GO ODS OR
SERVICE S; LOSS OF USE, DATA, OR PROFIT S; OR BUSINESS INT ERRUPTION) H OWEVER CAUSED AN D ON ANY
THEORY O F LIABILIT Y, WHETH ER IN CONTRAC T, STRIC T LIABILIT Y, OR TORT ( INCLUDING NEGLI GENCE OR
OTHERW ISE) ARISING IN ANY WAY OUT OF THE USE OF THIS SOFT WARE, EVEN IF ADVISED OF THE PO SSIBILITY
OF SUCH DAM AGE.
Xalan an d Xerces librarie s are licensed un der the Apach e License, Versio n 2.0 (the “Lice nse”) You may not us e
this le e xcept in complia nce with the Lice nse. You may obtain a c opy of the Licens e at http://ww w.apache.
org/li censes/LICEN SE-2.0. Unl ess required by applicable l aw or agreed to in writing, sof tware dist ributed
under th e License is dis tributed on an “AS IS” BASIS, WITHO UT WARRANTIE S OR CONDITIO NS OF ANY KIND,
either e xpress or imp lied. See the L icense for the s pecic langu age governing permissions an d limitations
under th e License.
U.S. Gov ernment Rest ricted Right s. The Sof tware is provi ded with Res tricted Rig hts. Use, dupli cation, or
disclos ure by the Gover nment is subjec t to restric tions as set for th in subpara graph (c) (1) (ii) of The R ights in
Technical Data and Compute r Softwar e clause at DFARS 252. 227-7013 or subparag raphs (c) (1) and (2) of the
Commerc ial Computer Sof tware Res tricted Rig hts at 48 CFR 52.2 27-19, as appl icable. Manuf acturer is Ch ilkat
Soft ware, Inc., 1719 E Forest Ave , Wheaton, Illin ois 60187 USA.
This So ftware is ba sed in part o n the work of th e Independen t JPEG Group.
Page 3

TIFF sup port based on LibTIFF, Copyright © 1988 -1997 Sam Leer, Cop yright © 1991-1997 Silico n Graphics, In c.
This not ice must appea r in all copies of t he Softwa re and related do cumentation . The names of S am Leer
and Silic on Graphics m ay not be used in a ny advertisin g or publicit y relating to th e softwar e without the
speci c, prior wri tten permissi on of Sam Leer and Silicon Grap hics. THE SO FTWARE IS PROV IDED “AS-IS” AND
WITH OUT WARRANT Y OF ANY KIND, EX PRESS, IMPLIED OR OTHERWISE, INCLU DING WITHOU T LIMITATION,
ANY WARRA NTY OF MERCH ANTABILITY OR FITNESS FOR A PART ICULAR PURPOSE . IN NO EVENT SH ALL SAM
LEFFLER OR S ILICON GRAPHIC S BE LIABLE FOR AN Y SPECIAL, INCID ENTAL, INDIREC T OR CONSEQUENTIA L
DAMAGES O F ANY KIND, OR ANY DA MAGES WHATSOEV ER RESULTING FROM LOSS OF USE, DATA OR PROFI TS,
WHET HER OR NOT ADVISED O F THE POSSIBILI TY OF DAMAGE, A ND ON ANY THEORY OF LIABILIT Y, ARISING
OUT OF O R IN CONNECTIO N WITH THE USE O R PERFORMANCE O F THIS SOFT WARE.
MPEG 1 Cod ec is copyright MainConcept 20 08. The MainC oncept logo an d the ‘Codec By ’ logo are reg istered
trade marks and Mai nConcept is a tra demark of Main Concept AG or any of its subsidiari es.
CD/DVD re cording sof tware develo ped under lic ense from Padus , Inc. – http: //www.p adus.com Copy right
1996-2007 Pad us, Inc. All Righ ts Reserve d.
This so ftware cont ains portio ns of imaging co de owned and co pyrighted by Pe gasus Imaging Co rp., Tampa
FL, ALL R IGHTS RESERV ED.
Page 4

Page 5

Contents
Welcome to ACDSee 12 1
About ACDSee 12 2
ACDSee 12 modes 2
Manage 5
Overview 6
Browse 6
Folders, Calendar, and Favorites 7
Filter, Group, Sort, View, Select 8
Database 9
Properties 9
Import 10
Organize 12
Categorize 12
Tag 13
Rate 14
Search 14
View 17
Overview 18
Full screen 18
Zoom 19
Organize 20
Edit 21
Overview 22
Save, Done, Cancel 22
Selections 23
Exposure 24
Sharpen 25
Crop 26
Repair 28
Text 29
Special effects 30
Restore originals 31
Contents | v
Page 6

Online 33
Overview 34
Create an ACDSeeOnline.com account 34
Login 34
Upload images 35
Share 36
What’s next? 39
vi | ACDS ee 12 Gettin g Starte d Guide
Page 7

Welcome to ACDSee12
Congratulations on choosing ACDSeePhoto Manager 12, the industryleading photo management software. ACDSee12 is fast, powerful, and
so easy to use that it is essential for managing, viewing, editing, and
sharing your digital photos.
Page 8
About ACDSee 12
ACDSee12 provides a wealth of tools to help you manage, view, edit, and share
your images.
▪▪ Browse and organize images on your computer, or impor t photos from a
camera, memory card, or other device.
▪▪ View the images and tag the ones that need further editing.
▪▪ Use the Edit tools to enhance the images, x exposure and lighting, or add
borders, text, or other special eects.
▪▪ Share your images with an ACDSeeOnline.com account.
The purpose of this guide is to introduce you to just a few of these basic features to
get you started. For information about all the ACDSee12 features and tools, see the
ACDSee12 Help le. Simply press F1 at any time while you are using ACDSee12.
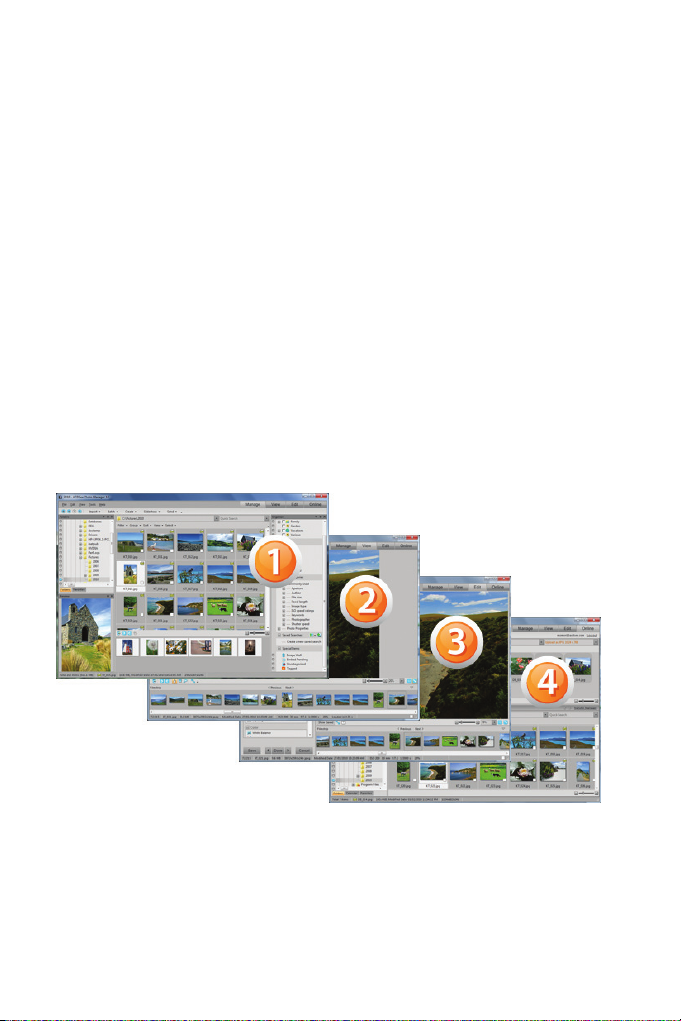
ACDSee 12 modes
ACDSee12 provides four modes—Manage, View, Edit, Online—to group the tools
that you commonly use during each step of your photography workow.
2 | ACDSe e 12 Getting St arted Guide
Page 9

Manage
Manage mode is the main browsing and managing component of ACDSee12. In
Manage mode, you can nd, move, preview, and lter les located on your hard
drive or removable storage device. You can also organize your les by adding
categories, keywords, and other metadata to make your les easier to search.
There is no need to import your les into the program because ACDSee12 catalogs
your les as you browse through them, adding le properties and metadata to the
ACDSee12 database automatically.
However, you can use ACDSee12 to import les from a camera or other device
onto your computer. When you use the Import tools you can create folders, rename
les, add organizing information, and create backups as you import the les.
View
In View mode you can display images one at a time, zoom in and out, and see
images in full screen. You can also view image properties, display parts of an image
at varying magnications, as well as add organizing information or tag your images
for further editing.
You can open View mode by double-clicking a le in Manage mode, and then
use the lmstrip to ip quickly between all of the images in a folder or a group of
selected les.
Edit
In Edit mode you can x and enhance images. You can make adjustments to the
entire image, such as cropping, rotating, applying color or lighting adjustments,
sharpening, and reducing noise, or use Selections to adjust selected areas. And you
can add borders, text, and other special eects.
Online
Online mode provides an easy way to upload images to ACDSeeOnline.com, an
image sharing and storage service located online at:
www.acdseeonline.com
In Online mode, you can select the images on your computer and then drag and
drop them directly into your ACDSeeOnline.com account. From there you can share
images with people you know, or you can make images public so that anyone can
see them.
Welcome to AC DSee 12 | 3
Page 10

4 | ACDSe e 12 Getting St arted Guide
Page 11

Manage
In Manage mode, you can browse the les on your hard drive or
removable storage device, import images from a camera or other device,
organize images using categories, ratings, and other le properties, and
tag images for further editing.
Page 12
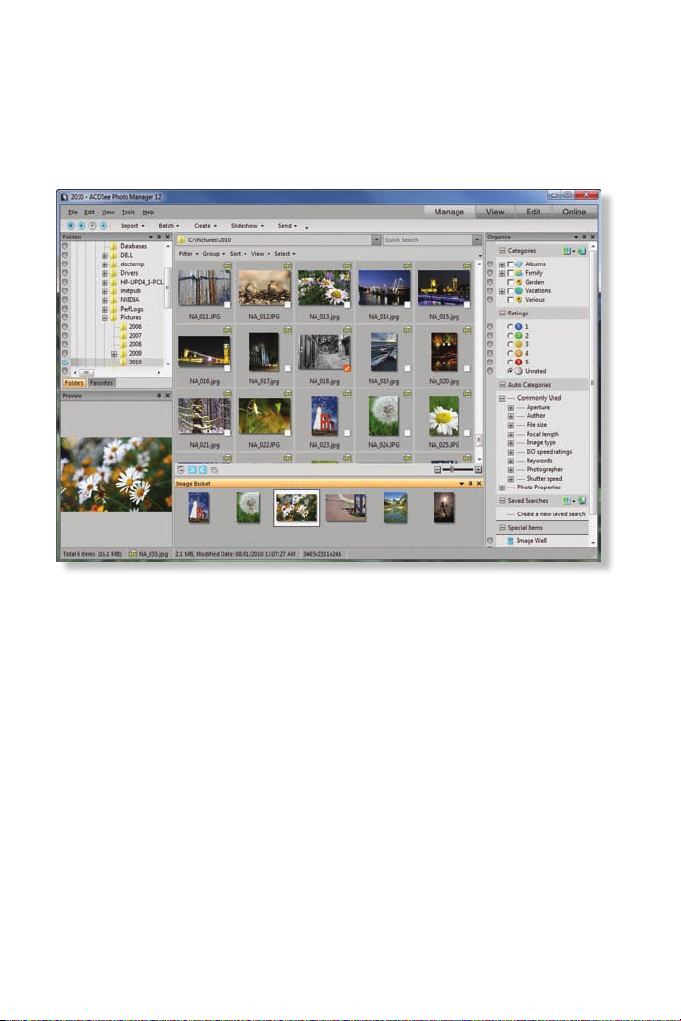
Overview
Manage mode, the default view in ACDSee12, is where you can browse and
organize your les and images. You can perform sophisticated searches and
ltering operations, and view thumbnail previews of images.
Browse
ACDSee12 gives you the ability to browse the les on your hard drive or a
removable storage device. There is no need to import les into ACDSee12—simply
navigate to the les you want to view.
6 | ACDSe e 12 Getting St arted Guide
Page 13
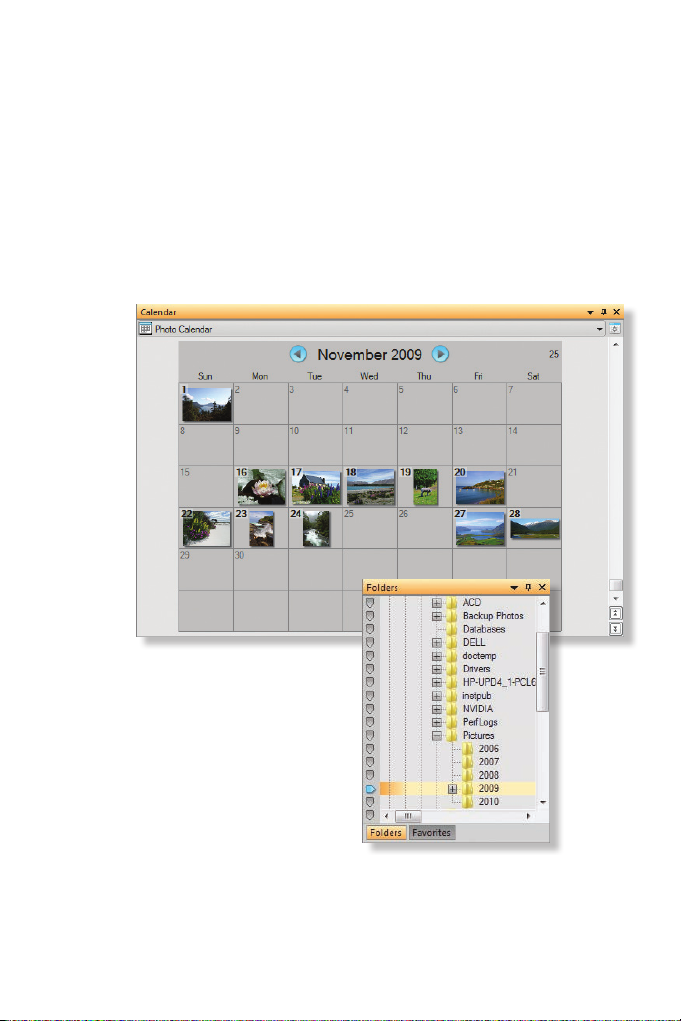
Folders, Calendar, and Favorites
The easiest way to browse your les, is to use the Folders pane, much like you
would use the folder tree in Windows Explorer. Double-click folders to expand
them, or use the + and - icons to expand or collapse folders. The les and subfolders in the selected folder are displayed in the File List pane, the central section
of the ACDSee12 window.
If you have images or folders that you frequently need to nd, you can add them to
your favorites, and then use the Favorites pane to quickly nd them again.
Once you have browsed your les and ACDSee12 has added them to the database,
you can use the Calendar pane to easily nd les or images by date.
Manage | 7
Page 14
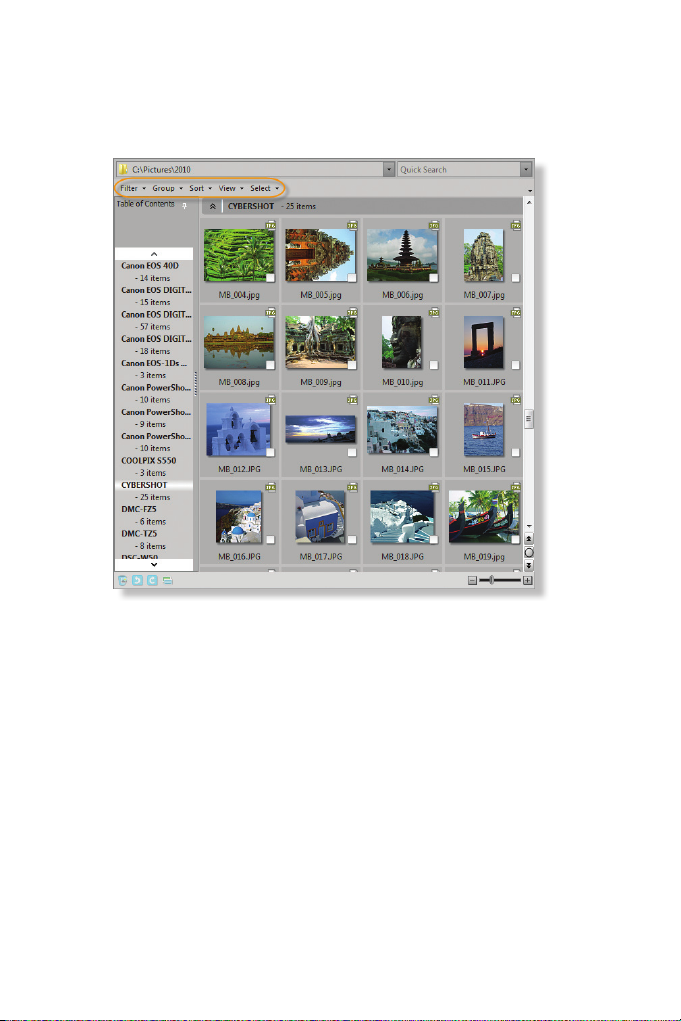
Filter, Group, Sort, View, Select
When you are looking at a set of les, you can adjust the view using the drop-down
lists in the File List toolbar.
8 | ACDSe e 12 Getting St arted Guide
Page 15
Database
If you are a new ACDSee user, you may not know that ACDSee12 uses a database
to record information about your images. As you browse your images, ACDSee12
catalogs them and saves any le properties or metadata that they contain, such as
the le name and date, and the type of camera and camera settings used.
Then, when you organize your images using ACDSee12, the custom metadata is
also added to the database. The more information you add, the more easily you can
search your les and nd the exact image you are looking for.
If you want to move or copy an image to a dierent computer or to a removable
storage device, you can embed the custom metadata in the image le or you can
export the database information. See the ACDSee12 Help for details.
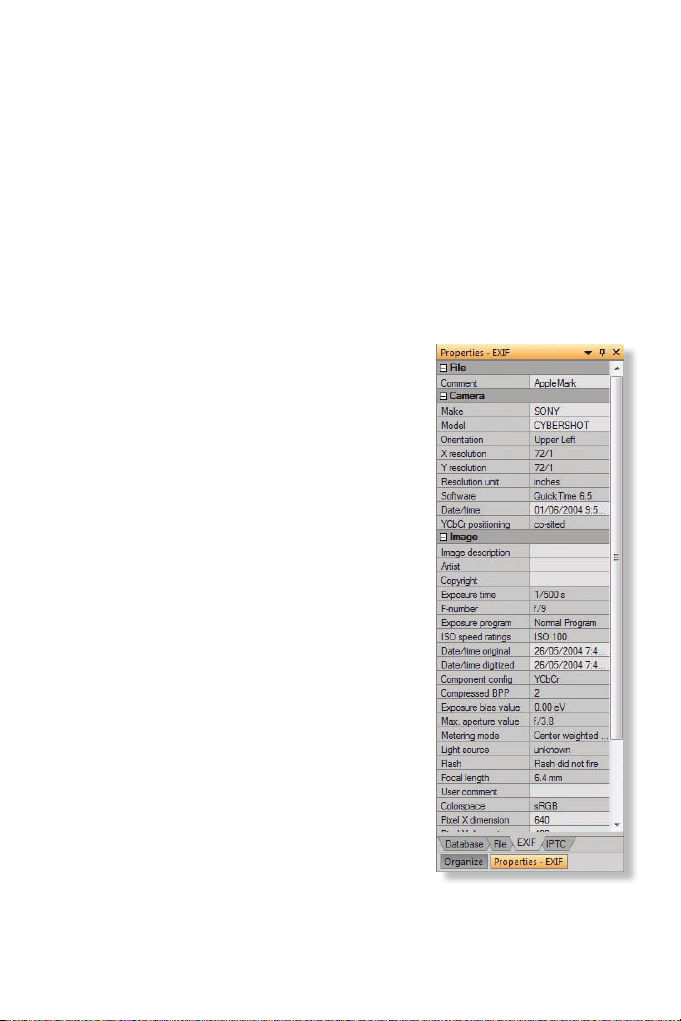
Properties
You can use the Properties pane to view the
information about your images, including
information in the database, and File, EXIF, and IPTC
metadata. You can also enter additional information
in this pane.
To open the Properties pane:
Click View | Properties.
Manage | 9
Page 16

Import
If your images are still on your camera or removable storage device and you
want to move them to your computer, you can use ACDSee12 to import them. In
ACDSee12, importing refers to the process of copying or transferring images from
your camera or removable storage device to your computer.
As well as importing your les, the Import wizard lets you:
▪▪ Create and name one or more folders.
▪▪ Create a duplicate set of folders and photos as a backup copy.
▪▪ Rename each le using a renaming template.
▪▪ Automatically rotate the les if your camera provides the necessary
information.
▪▪ Add les to one or more categories.
▪▪ Add author, notes, and keywords as well as EXIF and IPTC data, including
copyright information.
You can save all these impor t settings and use them repeatedly or save dierent
sets of import settings for dierent tasks.
To import photos using the Import dialog box:
1▪ Connect the camera to the computer.
2▪ Turn on the camera.
3▪ When the Device Detector prompts you, select Import les with ACDSee
to launch the Import dialog box.
If the camera is already connected to the computer, and you do not see the
Device Detector, you can open the Import dialog box in ACDSee12 by clicking
File | Import | From Device.
10 | ACDSe e 12 Getting Started Gu ide
Page 17
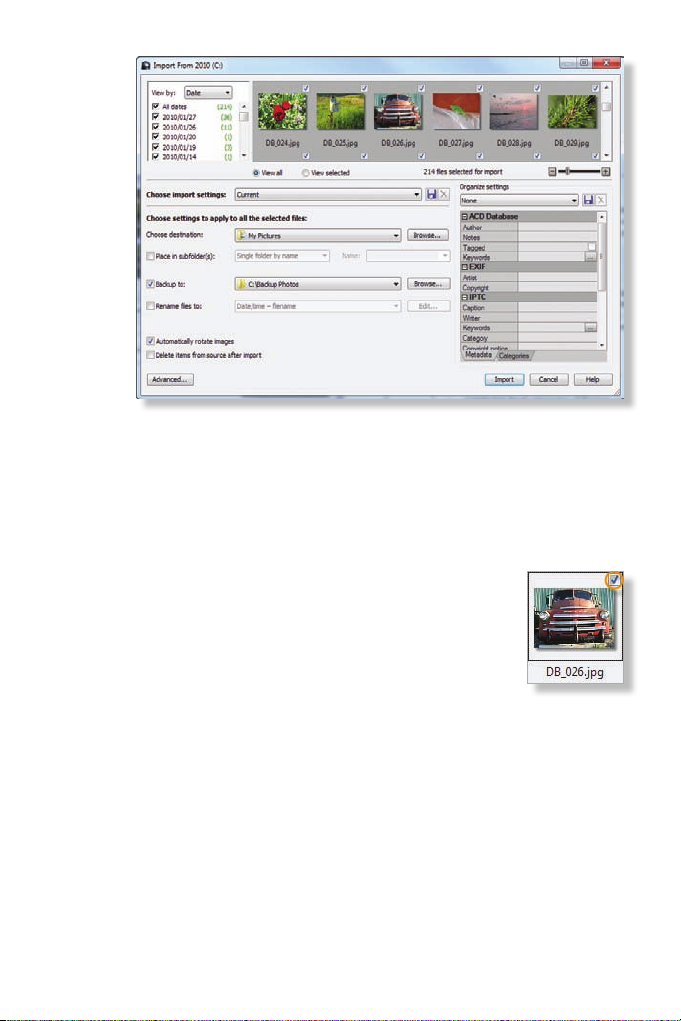
4▪ When the Import dialog box opens, select the images you want to import:
▪▪ If you want to lter the images on the device, select Date or File Type.
▪▪ Select or clear the check boxes in the left pane by date or le type. For
example, if you want to import just the photos you took last weekend,
select the check boxes for those dates.
▪▪ If you want to view just the images you have selected, click the View
selected radio button.
▪▪ You can also select the photos you want to import
individually or in groups in the preview pane. Select
or clear the check boxes by clicking the small square
in the top right corner of each thumbnail.
5▪ When you have nished choosing images, select your
import options, including a destination where you want
to save the images, backup location, renaming and
rotation options.
6▪ You can also choose or enter organize settings, including categories,
keywords, and other metadata.
7▪ When you are ready to import, click Import.
Manage | 11
Page 18
Organize
You can organize your images in Manage mode or View mode, adding categories
and ratings, or tagging images to apply organize settings to more than one image
at a time. Once you have organized your images, you will be able to quickly nd just
the image you are looking for.
Categorize
Categories can organize and group your images so that you do not need to create
extra copies or move les into dierent folders. Categories also make it possible
to nd images with similar subject matter with a single click. A single image can
belong to many categories.
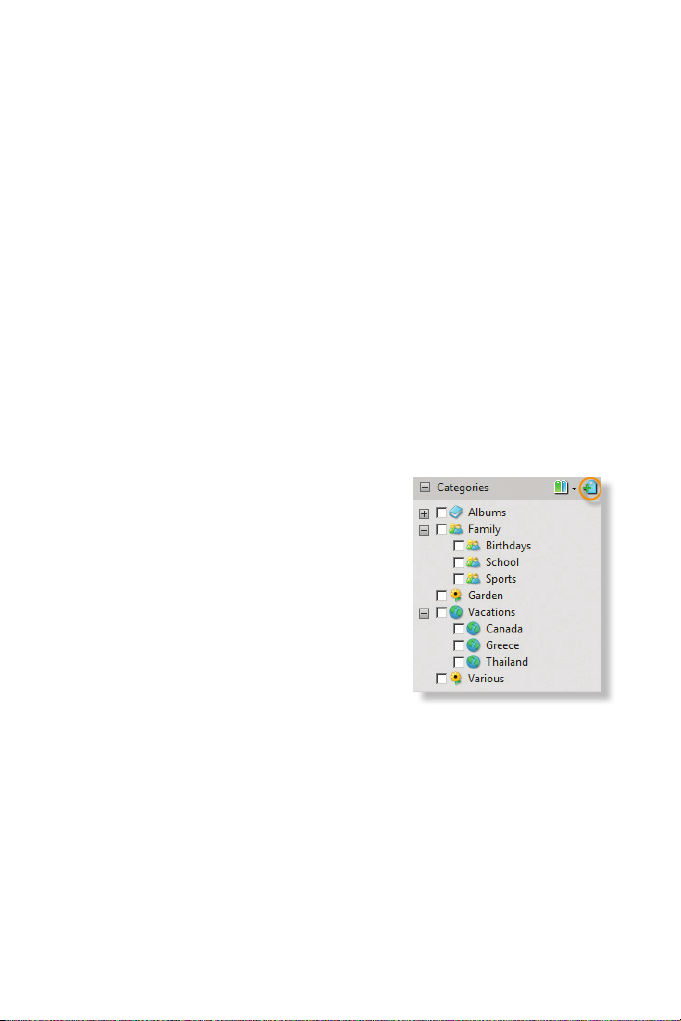
How you arrange your categories depends on your preferences. One possible
strategy is to create top-level categories of themes, such as Family, Garden, or
Vacations. Then create sub-categories below that. For example, under Family, create
sub-categories such as Birthdays, School, and Sports. Some images might t more
than one category or sub-category. Unlike a folder system, you do not need to
make extra copies of an image, you just assign it to multiple categories.
To create a new category:
1▪ In the Organize pane, do one of the
following:
▪▪ To make a new top-level category,
click the New Category button. In
the Create Category dialog box, select
Create a new, top-level category.
▪▪ Right-click the name of an existing
category, and select New Category. In
the Create Category dialog box, select
Create a sub-category within the
current selection.
2▪ In the Name text box, type a name for the new category.
3▪ Click OK to create the category.
To assign images to a category:
1▪ Select one or more images in the File List.
2▪ Do one of the following:
▪▪ Select the check box next to the category in the Organize pane.
▪▪ Drag the images from the File List and drop them onto the category
name in the Organize pane.
12 | ACDSee 12 Getting Star ted Guide
Page 19

To view images in a category:
In the Organize pane, click the name of a category.
To remove images from a category:
1▪ In the File List, select the images you want to remove from a category.
2▪ Clear the check box for the category.
Tag
It is easy to take hundreds of photos while you are on vacation or at a sports event.
After you have transferred the photos to your computer, you will want to review
them and select the best photos. Tagging is a fast and easy way to identify your
best photos or to separate them for editing or review.
The tagging check box is at the bottom right corner of each thumbnail. Click
the check box to tag or untag photos. Photos remain tagged until you clear the
checkmark from the check box.
You can display all your tagged photos with one click. Tagging, like categories and
ratings, is a way to set aside, organize, and group your photos without moving the
les into dierent folders.
To tag an image:
▪▪ In Manage mode, select the check box in the bottom
right corner of the thumbnail.
▪▪ Use the keyboard shortcut: \ (Backslash)
To view tagged images:
In Manage mode, in the Organize pane, click Tagged in
the Special Items section.
Manage | 13
Page 20
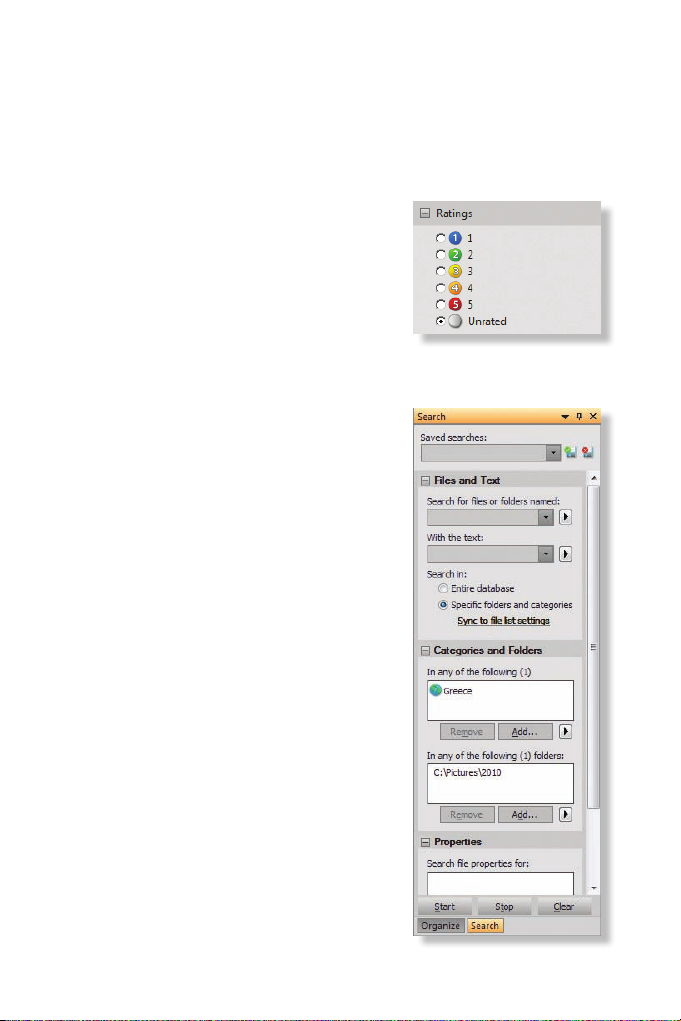
Rate
You can also rate your images so that you can easily nd the best ones when you
need to gather images for a special project. You can either select single images to
rate, or tag a group of images that you want to rate.
To rate a photo:
1▪ Select one or more images in the File List.
2▪ Do one of the following:
▪▪ Select the radio button next to the
numbered rating in the Organize pane.
▪▪ Drag the images from the File List and
drop them onto the numbered rating
in the Organize pane.
▪▪ Use the keyboard shortcut:
CTRL + 0 to 5.
Search
ACDSee12 also provides a sophisticated search
tool to help you nd the les you are looking
for. You can perform a simple search, entering a
single search parameter, or narrow your criteria by
specifying folders or categories to search within.
If you nd yourself performing the same search
more than once, you can save the search to reuse
the next time.
To perform a quick search:
Enter a search term in the Quick Search box at
the top of the File List.
To open the Search pane:
Click View | Search.
14 | ACDSee 12 Getting Started Gui de
Page 21
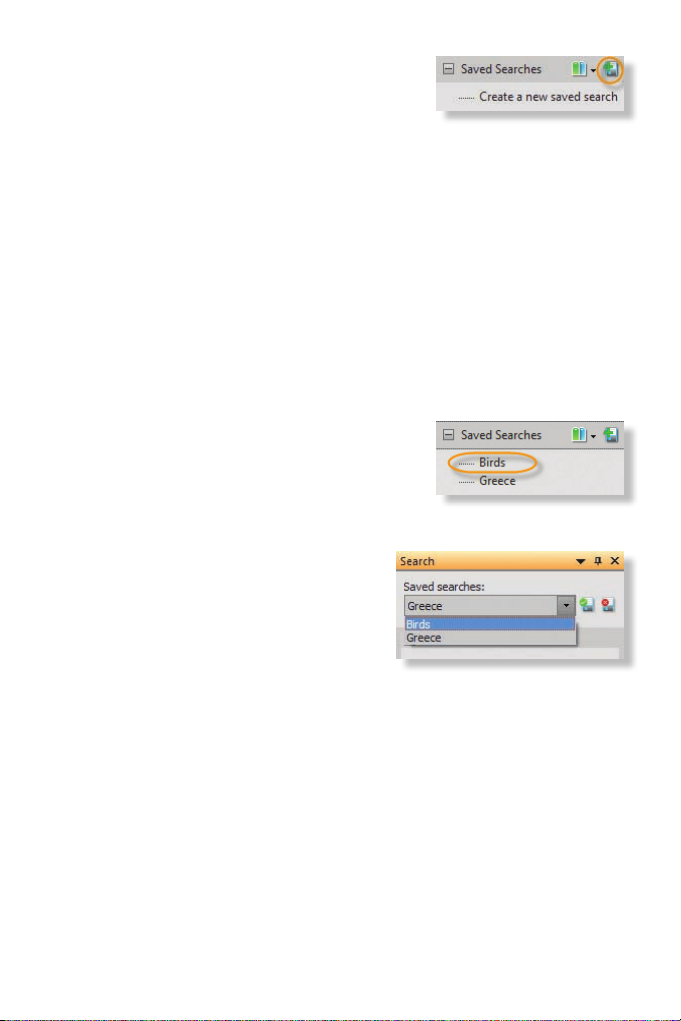
To create a new saved search:
1▪ In the Organize pane, do one of the
following:
▪▪ Click Create a new saved search.
▪▪ Click the New saved search icon.
2▪ Create your search criteria. Do one or more of the following:
▪▪ If you want to search based on a le or folder name, enter details in
the Files and Text area.
▪▪ If you want to search based on categories or folders, click the Specic
folders and categories radio button in the Files and Text area, and
then enter the details below in the Categories and Folders area.
▪▪ If you want to search the le metadata, click Add in the Properties
area. Click the check boxes for the information you want to search, and
then click OK.
3▪ Save the search. Click the Save icon, select Save As, enter a name for the
saved search, then click OK.
To re-use a saved search:
Do one of the following:
▪▪ On the Organize pane, click the saved
search.
▪▪ On the Search pane, select a search from the Saved searches
drop-down list.
Your search is re-run and all of your
matching images are displayed in the
File List.
Manage | 15
Page 22

16 | ACDSee 12 Getting Started Gui de
Page 23

View
If you want to view your images in full screen, or zoom in to see the
details of an image, you can switch to View mode. Use the Properties
pane to organize your images.
Page 24

Overview
If you like to view your images at full size or magnify part of the image to see the
details, you can use View mode. A lmstrip at the bottom of the screen lets you
quickly move to the image you want to view, and then you can use full screen,
zoom in on your image, or organize your images by tagging them, or applying
ratings or categories.
Full screen
At times you might want to view your images without the distraction of the
window borders, menus, toolbars and lmstrip. In full screen you can use the entire
screen to view your images.
To toggle full screen on or off:
In View mode, do one of the following:
▪▪ Click View | Full Screen.
▪▪ Press the F key.
18 | ACDSee 12 Getting Started Gui de
Page 25

Use the mouse wheel or keyboard shortcuts to view the next or previous image.
Zoom
In View mode you can view images at full size, or you can use the zoom tools to
zoom in and out on your images.
To zoom in or out on an image:
▪▪ Click Tools | Zoom, and then select one of the Zoom menu options.
View | 19
Page 26

Organize
You can organize your images in View mode using the same tools that are available
in Manage mode, including categories, tags and ratings.
To rate, tag, or categorize images:
1▪ Click View | Properties to open the
Properties pane.
2▪ Use the lmstrip to scroll through your
images.
3▪ When you see an image you want to rate,
tag, or categorize, do one or more of the
following:
▪▪ To apply a rating, click a numbered
rating in the Properties pane.
▪▪ To apply a tag, select the Tagged
check box.
▪▪ To apply categories, select the check
box next to one or more categories.
20 | ACDSee 12 Getting Started G uide
Page 27

Edit
Use Edit mode to adjust your images—x lighting and exposure, crop
and rotate, or use selections to make adjustments to selected parts of
an image. Or get creative by adding special eects, text, and borders.
Page 28

Overview
Using the Edit tools, you can make global adjustments or corrections to your image.
As you make adjustments, you can see a preview of your image in the right pane.
You can also ne tune particular areas of an image by selecting an area and then
adjusting the exposure and lighting. Or you can add special eects, borders, a
watermark, or text to the image.
A few of these tools are described on the following pages. Be sure to explore
ACDSee12 to nd all the tools that are available, and review the ACDSee12 Help for
additional instructions.
Save, Done, Cancel
Before you begin editing an image, it is important to understand how your image
is saved. When you edit an image in ACDSee12, the original image is automatically
saved in an Originals folder so that you can always go back to the image that you
started with. That means that you can edit the image in ACDSee12 and save it with
the same lename, or you can save the edited image with a new lename. It’s up
to you.
In Edit mode, at the bottom of the Editing Tools pane, there are three buttons:
The following table describes what you can do from each button.
Button Description
Done Prompts you to save the image with the edits, and then
< > Prompts you to save the image, and then opens the next or
Save Save as: Saves a copy of the image with the edits. Use
Cancel Cancels the edits on the image.
returns to the previous mode.
previous image in the lmstrip.
this option if you want to save the image with a dierent
lename or in a dierent location.
Save: Saves the image with the edits with the same
lename in the same location.
Copy to clipboard: Copies the image with the edits to the
clipboard so that you can paste it into another program.
22 | ACDS ee 12 Gettin g Started Guide
Page 29

Selections
Use selections to isolate an area of an image and then apply edits or lters to only
that area.
There are two ways of using selections in ACDSee12:
▪▪ Open an Edit tool, such as Color Balance, and then while you are using
the tool, click Create Selection in the top image toolbar to make the
selection. When you have nished making the selection, you are returned
to the Color Balance pane to make your adjustments to the selected area.
▪▪ Open the Selections tool and make a selection rst, and then use an Edit
tool, such as Color Balance, to adjust the selected area of the image.
In the example, the Magic Wand was used to select the red-colored walls,
and then using the Color Balance tool, the saturation, hue, and lightness were
adjusted so that the walls appear to be a more vibrant red.
Edit | 23
Page 30

To use the Selections tool:
1▪ In Edit mode, select one of the Edit tools.
For example, in the Color group, click Color Balance.
2▪ Click Create Selection in the top image toolbar.
3▪ Use one of the selection tools to select an area of the image.
4▪ When you have nished making your selection, click Done.
The selection remains active.
5▪ Use the Edit tool, such as Color Balance, to edit the selected area of the
image.
Exposure
Exposure is the amount of time that your digital camera’s sensor is exposed to light.
Depending on your camera settings and the light at the time you shot the photo,
some of your images may appear under or overexposed, or too light or dark. In
ACDSee12 you can x these problems by adjusting an image’s exposure.
To adjust the exposure:
1▪ In Edit mode, in the Exposure/Lighting group, click Exposure.
2▪ To adjust the exposure, do one or more of the following:
▪▪ Auto: Click the button to automatically adjust the exposure.
▪▪ Exposure: Drag the slider to increase or decrease the exposure.
▪▪ Contrast: Drag the slider to adjust the amount of contrast between
the light and dark areas of the image.
▪▪ Fill Light: Drag the slider to adjust the amount of light in the darkest
areas of the image.
▪▪ Exposure warning: Click the button to highlight overexposed and
underexposed areas of the image. Overexposed pixels turn red and
underexposed pixels turn green.
3▪ Click Done to apply your changes and return to Edit mode.
24 | ACDSe e 12 Getting St arted Guide
Page 31
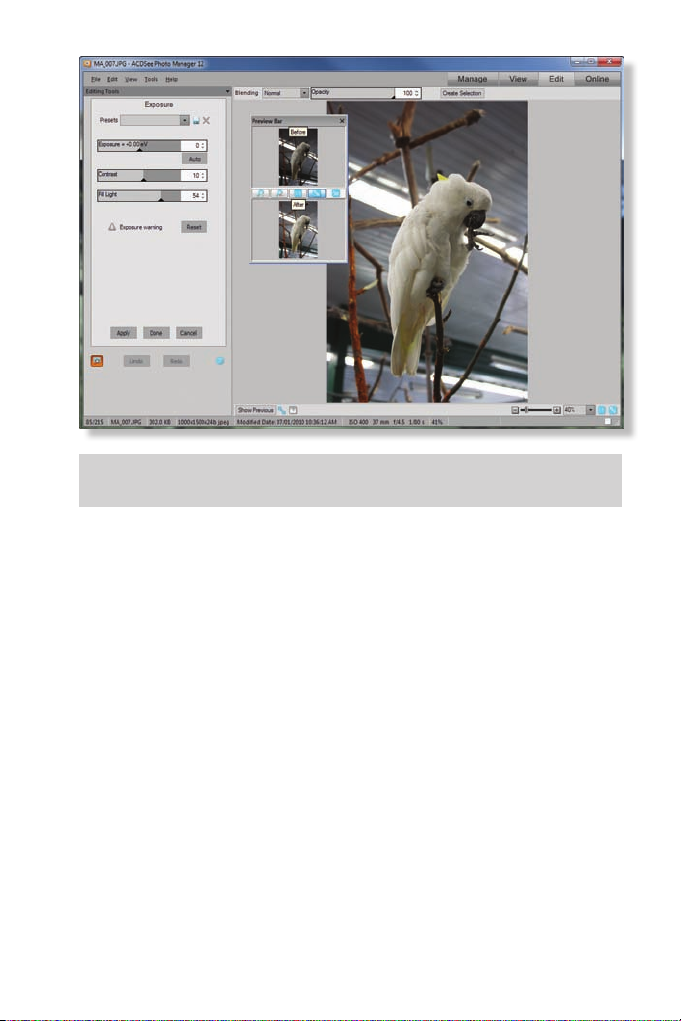
Click the Preview button to the left of the Undo button to see your image
before and after adjusting the exposure.
Sharpen
To make an image appear less blurry, you can increase the sharpness of edges by
enhancing the contrast of pixels at the edges.
To sharpen an image:
1▪ In Edit mode, in the Detail group, click Sharpen.
2▪ To adjust the sharpness, do one or more of the following:
▪▪ Amount: Drag the slider to specify the amount of light added or
removed from an edge. Higher values produce darker edges.
▪▪ Radius: Drag the slider to specify the number of pixels to adjust
around the edges. Higher values increase the number of sharpened
pixels.
▪▪ Threshold: Drag the slider to specif y the dierence in lightness
between two adjacent pixels before they are sharpened. Higher values
increase the dierence required.
3▪ Click Done to apply your changes and close the tool.
Edit | 25
Page 32
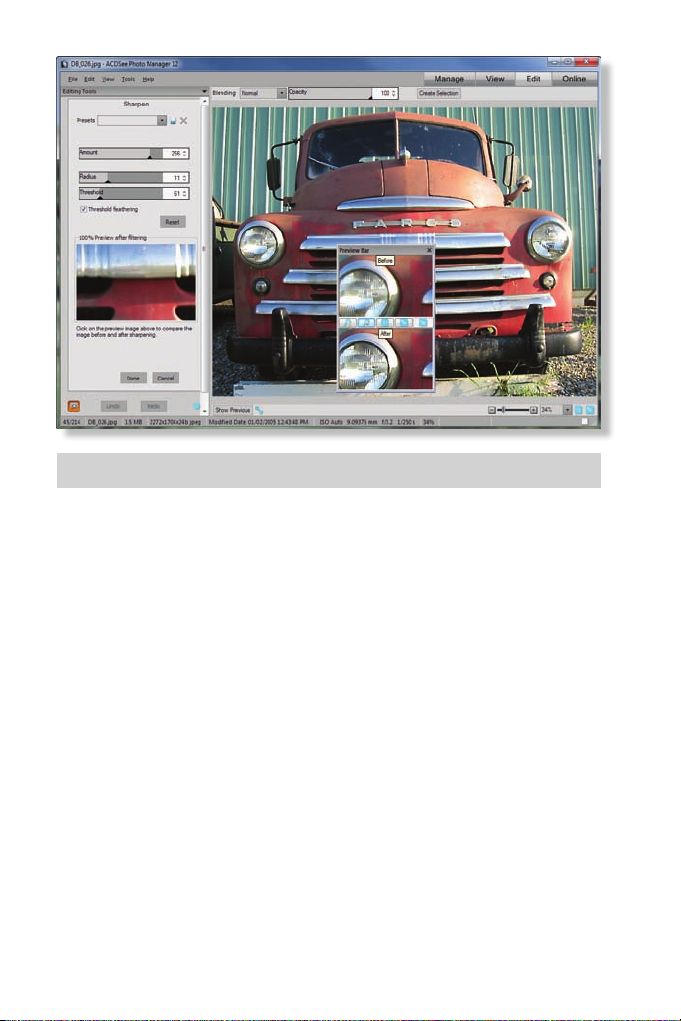
In the image above, sharpening exposes the headlight details.
Crop
If you want to remove unwanted parts of an image or reduce the canvas size
to a particular size, you can crop the image. For example, if you have too much
background, you can crop an image to focus on the interesting details.
To crop an image:
1▪ In Edit mode, in the Geometry group, click Crop.
A crop box appears in the center of the image.
2▪ To move the crop box, click inside the box and drag the box to position it
over the area you want to keep.
3▪ To resize the crop box, do one of the following:
▪▪ Drag a side or corner of the crop box.
▪▪ In the Editing Tools pane, select an exact width and height for the
crop area.
26 | ACDSe e 12 Getting Started G uide
Page 33

4▪ To estimate the le size of the cropped image, click Estimate new le
size.
5▪ To darken or lighten the area outside the crop box, adjust the Darken
outside crop area slider.
6▪ Click Done to apply your changes and close the tool.
If you want to make the crop area a standard photo size, you can constrain the
proportions of the crop box. Click the Constrain cropping proportion check
box and select a size in the drop-down list.
Edit | 27
Page 34
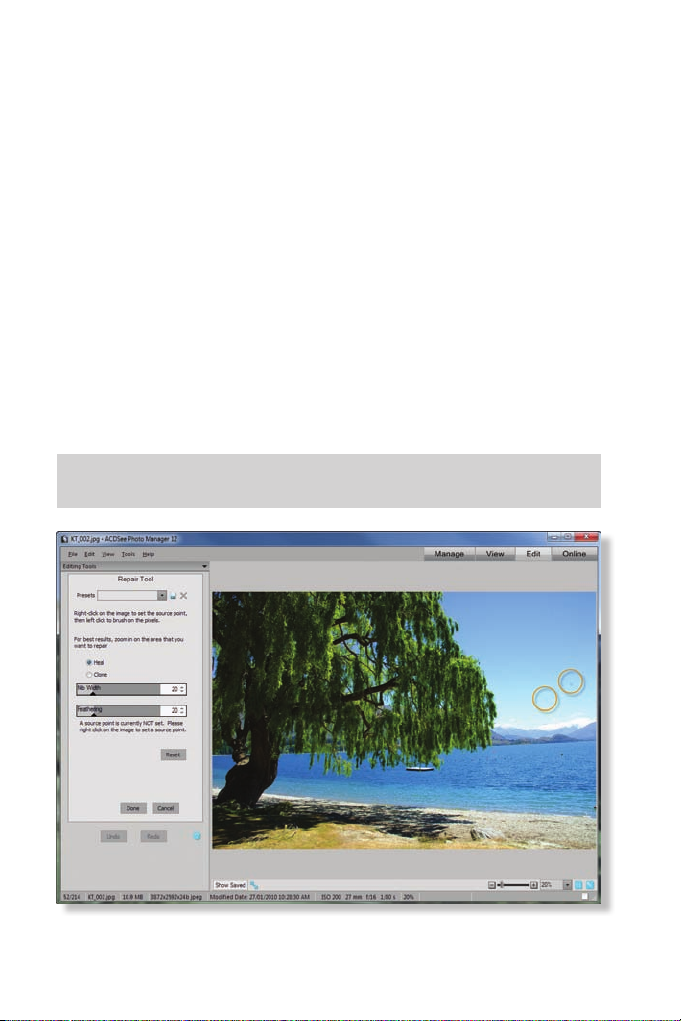
Repair
You can use the Repair tool to remove aws such as:
▪▪ Skin blemishes
▪▪ Telephone wires and other unwanted objects
▪▪ Flash ares from snowakes or windows
▪▪ Lens scratches and water drops
The Repair tool provides two brushes for removing aws:
▪▪ Heal: Use the Heal brush to copy pixels from one area of the image to
another. ACDSee12 analyzes the pixels in the source and target areas, and
then blends the pixels of both areas for the best match of the surrounding
area. The Heal brush works particularly well with images that involve
complicated textures such as skin or fur.
▪▪ Clone: Use the Clone brush to copy the exact pixels from one area of an
image to another, creating an identical image area. The Clone brush is
more eective for images that have strong, simple textures or uniform
colors, because it is more dicult to identify the copied pixels in the
nished photo.
In the example, there are two patches of reected light. We could use the Heal
or Clone brush to remove these reections to improve the image.
28 | ACDS ee 12 Getting Started Guide
Page 35
To remove aws from an image:
1▪ In Edit mode, in the Repair group, click Repair Tool.
2▪ Drag the Zoom slider to zoom in on the area you want to repair.
3▪ Select Heal or Clone.
4▪ Do one or both of the following:
▪▪ Drag the Nib Width slider to set the width of the brush.
▪▪ Drag the Feathering slider to set the amount of feather on the edge
to prevent sharp transitions between the original and the healed part
of the photo.
5▪ Right-click the image to set a source location.
Pixels will be copied from this location and used in the target location.
6▪ Click and drag over the area that you want to cover.
If you selected the healing brush, ACDSee12 analyzes and replaces the
pixels when you release the mouse button.
7▪ Click Done to apply your changes and close the tool.
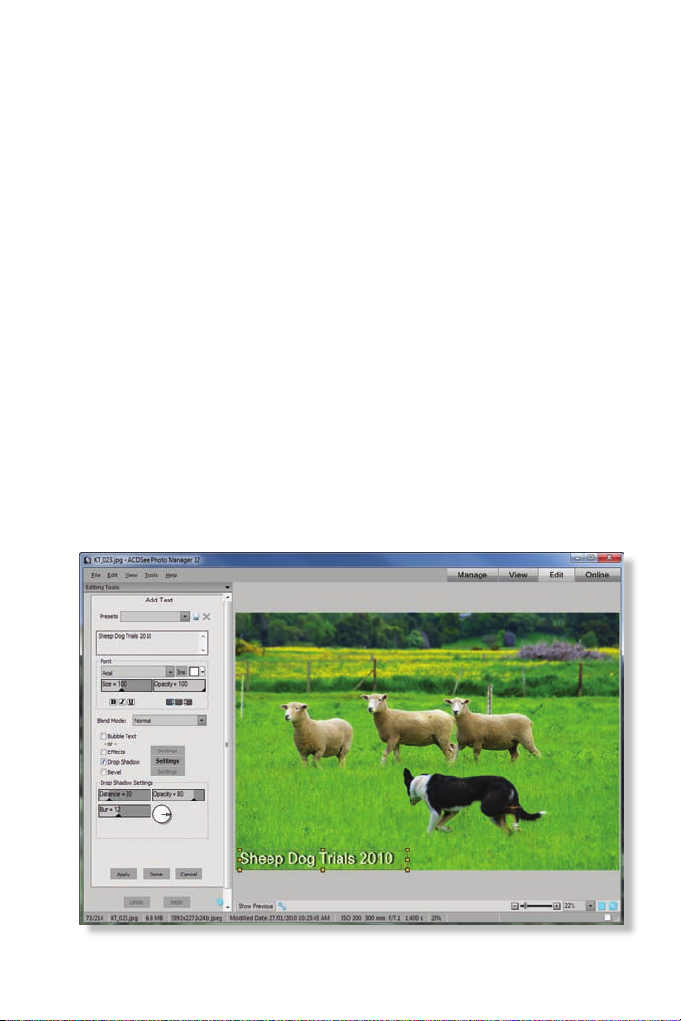
Text
You can use the Text tool to add a caption to a photo. You can move the text to any
position on the photo.
Edit | 29
Page 36

To add text to an image:
1▪ In Edit mode, in the Add group, click Text.
A text box appears in the center of the image.
2▪ In the Add Text pane, type a caption.
3▪ Adjust the font attributes and other text eects.
4▪ Click and drag the text box to position it anywhere on your image.
5▪ Do one of the following:
▪▪ Click Apply to add the text to your image, and keep the Add Text tool
open.
▪▪ Click Done to add the text to your image, and return to Edit mode.
See the ACDSee12 Help to learn how to save your options as a preset for future
use.
Special effects
In ACDSee12 you can use all sorts of special eects to enhance your images. The
special eects browser shows you thumbnail previews of all the eects on your
image so that you can easily choose the right eect for your project.
To add a special effect:
1▪ In Edit mode, in the Add group, click Special Eect.
2▪ To select an eect, click one of the thumbnails.
For example, click the Oil Paint thumbnail.
3▪ In the Editing Tools pane, adjust the sliders or other tools.
4▪ Click Done to apply the special eect to your image.
5▪ Do one of the following:
▪▪ Select another special eect to apply to your image.
▪▪ Click Exit to return to Edit mode.
30 | ACDS ee 12 Getting Started Guide
Page 37

Restore originals
When you edit an image, ACDSee12 automatically saves a copy of the original
image in the Originals folder. This means you can always restore an edited image to
the original.
To restore an original image in Manage or View mode:
1▪ In Manage or View mode, select one or more images.
2▪ Click Tools | Restore to Original.
To restore an original image in Edit mode:
1▪ In Edit mode, select an image.
2▪ Click File | Restore to Original.
Edit | 31
Page 38

32 | ACDSe e 12 Getting Started G uide
Page 39

Online
Online mode provides an easy way to upload images to
ACDSeeOnline.com to share with your contacts or the public.
In Online mode, you can select the images on your computer and then
drag and drop them directly into your ACDSeeOnline.com account.
Page 40

Overview
ACDSeeOnline.com is an image sharing and storage service located online at:
www.acdseeonline.com
Using Online mode, you can upload and browse through your online images
directly from inside ACDSee12. Simply create an ACDSeeOnline.com account, log
in, and then begin uploading your images.
Create an ACDSeeOnline.com account
Before you can upload images to ACDSeeOnline.com, you must create an account.
Once you have an account you can update your prole, view statistics, manage
your contacts, and manage your shared photos.
To create an ACDSeeOnline.com account:
1▪ In Online mode, click Create Your Account.
2▪ Enter your information.
3▪ Click Create My Account.
Login
After you have created your ACDSeeOnline.com account, you need to login to the
account before you can upload images.
To login to ACDSee Online:
1▪ In Online mode, click Login.
2▪ Enter your email address and password.
3▪ If you want ACDSee12 to stay logged into your ACDSeeOnline.com
account, select Stay logged in.
4▪ Click Login.
34 | ACDS ee 12 Gettin g Starte d Guide
Page 41

Upload images
After you have logged into ACDSeeOnline.com, you can begin uploading images
to your ACDSeeOnline.com account. It’s as easy as dragging and dropping images
from ACDSee12 into ACDSeeOnline.com.
ACDSee Online converts all images to JPEG when they are uploaded from
ACDSee12.
To upload your images:
1▪ In Online mode, if you are not already logged in, login to your
ACDSeeOnline.com account.
2▪ Click Transfer.
The ACDSee12 window splits in two—the bottom section of the window
displays images on your computer, and the top section displays your
images online.
3▪ Select a resolution from the drop-down list in the top right corner.
4▪ To select images to upload, do one or more of the following:
▪▪ Drag an image from the bottom section of the window (your
computer) to the top section of the window (online) to upload it to
your ACDSeeOnline.com account.
To select multiple images, press SHIFT or CTRL as you click images, or
click and drag your cursor across a group of images.
▪▪ Drag a folder of images from the bottom section of the window to the
top section.
You can upload a folder with sub-folders. Online mode respects a folder
hierarchy when you upload a folder of images to your ACDSeeOnline.com
account.
Online | 35
Page 42

Share
ACDSeeOnline.com lets you easily share your images in a number of ways, by
making folders public, by sending images to other web applications such as
Facebook, or by sharing images directly with your family and friends.
Check out all the latest sharing features of ACDSeeOnline.com by logging into
ACDSeeOnline.com from Online mode or visit the ACDSeeOnline.com web site.
To share images:
1▪ In Online mode, click ACDSeeOnline.com.
2▪ Click Manage.
3▪ Open the folder that contains the images you want to share.
4▪ Select the images you want to share.
5▪ Click Share.
36 | ACDS ee 12 Getting Started Guide
Page 43
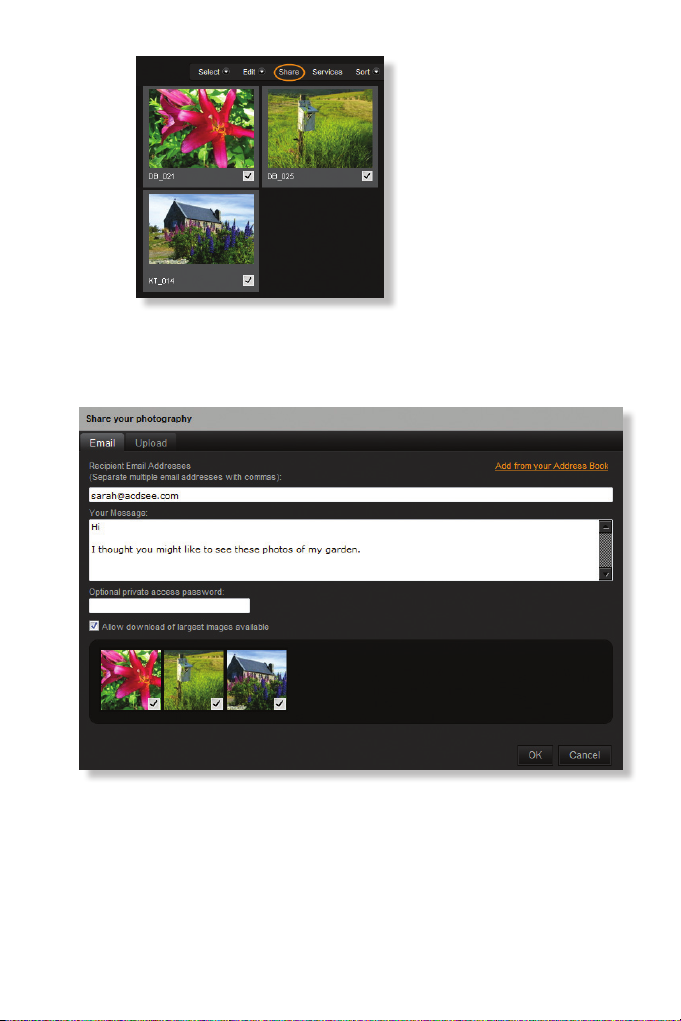
6▪ Enter the email addresses of people you want to share the images with, a
message, and an optional password.
7▪ Click OK.
Online | 37
Page 44

38 | ACDS ee 12 Getting Started Guide
Page 45

What’s next?
Page 46

Explore
ACDSee12 is packed with many more useful features and tools—more than we can
cover in this simple guide. Hopefully, these instructions have given you some ideas
on how the program can help you manage your collection of photos or other les.
We encourage you to explore the rest of ACDSee12, and to experiment with some
of the features for yourself. If you get stuck, or need more information about a
particular tool or feature, try one of the following options:
Consult the Help le
The ACDSee12 Help provides explanations and steps for using all of the ACDSee12
features. It also contains lists of shortcut keys, detailed descriptions of the modes,
and more information about how to import, organize, repair, manage, and maintain
your growing collection. Press the F1 key while using ACDSee12 at any time to
open the Help le.
ACDSeeOnline.com also provides help, so that wherever you are, in Online mode
or visiting ACDSeeOnline.com on the web, you can nd the help you need. In
ACDSee12, click Help| ACDSeeOnline.com Help. Or on the ACDSeeOnline.com
web site, click Help.
Product Support and Resources
If you have an Internet connection, you can access the latest information instantly
by clicking Help | Product Suppor t and Resources. You will nd a PDF of this
guide, tutorials, and any updates to the software.
Community
Visit the ACDSee Community by clicking Help | ACDSee Community. Here you
can nd our forums, chat to other ACDSee12 users, and sign up for our free email
newsletters to get digital photography tips and tricks, and other useful information.
Web site
On the Web site, www.acdsee.com, you can nd more information about
ACDSee12, and articles about other products and digital photography in general.
Contacting ACD Systems
When you buy ACDSee12, you are automatically eligible for ongoing service by our
technical support team. If you have any technical or product-related questions, or
just general feedback you would like to share, please visit our Web site at:
www.acdsee.com/support
40 | ACDSee 12 Getting Starte d Guide
Page 47

Page 48

Serial number
© 2006-2010 ACD Systems International Inc. All Rights Reserved Worldwide.
 Loading...