

Page 1

SERVICE MANUAL
SERIAL NUMBERS 25384 AND UP
ACCUTEMP PRODUCTS, INC.
8415 NORTH CLINTON PARK - FORT WAYNE, IN 46825 - 800.480.0415 - www.accutemp.net
Page 2

2
MP5006-1001 Rev A
TABLE OF CONTENTS
CONNECTIONLESS MODELS
Introduction____________________________________________________ 4
Sequence of Operation___________________________________________ 4
Trouble Shooting Guide__________________________________________ 5-7
Removal and Installation – 6 Pan Models
Removal from Stand________________________________________ 8
Removal of Legs___________________________________________ 8
Gast Vacuum Pump________________________________________ 8
Thermostat________________________________________________ 9
Temperature Probe_________________________________________ 9
Timer_____________________________________________________ 9
Vacuum and Temperature Gauges_____________________________ 10
Contactor__________________________________________________ 10
Vacuum Hoses and Tees_____________________________________ 10
Solid State Relays___________________________________________ 11
Lamps_____________________________________________________11
Fuses_____________________________________________________ 11
Water Sensor Control Board__________________________________ 12
Water Sensors______________________________________________ 12
Control Relays______________________________________________12
Fast Cook / Thermostat Toggle Switch__________________________ 12
On/Off Switches_____________________________________________13
Cord and Plug Assy._________________________________________ 13
Drain Valve_________________________________________________13
Gutters____________________________________________________ 13
Pressure Switch____________________________________________ 14
Dual Pressure Switch________________________________________ 14
Firebar Heater Replacement___________________________________14-15
Cast Heater________________________________________________ 15
Door Removal______________________________________________ 16
Inner Door Removal_________________________________________ 16
Floating Inner Door Removal__________________________________ 16
Gasket Replacement_________________________________________16
Inner Door Valve Cup Replacement_____________________________16
Door Latch Replacement______________________________________17
Removal and Installation – 3 Pan Model
Light Board_________________________________________________17
Page 3

3
MP5006-1001 Rev A
AUTOFILL MODELS
Introduction & Sequence of Events– 3 & 6 Pan Models________________ 18
Trouble Shooting Guide___________________________________________ 19
Removal and Installation
Water Fill / Sensor Control Board______________________________ 20
Water Fill Valve_____________________________________________ 20
Overfill Sensor Switch_______________________________________ 21
Schematics – 6 Pan Models________________________________________ 22-28
Schematics – 3 Pan Models________________________________________ 29-35
Parts___________________________________________________________ 36 - 39
Page 4

4
MP5006-1001 Rev A
INTRODUCTION-CONNECTIONLESS 3 & 6 PAN MODELS
The AccuTemp Steam ‘N’ Hold steamer takes time-proven method of cooking with steam
and adds the advantage of control. This is accomplished by reducing the internal
atmospheric pressure of the Steam ‘N’ Hold cooking chamber, thereby lowering the
temperature at which water begins to boil. This allows the operator to control the temperature
of the steam for cooking. Controlling the steam temperature gives the operator the ability to
cook the food to the desired temperature without over-cooking, resulting in a more tender,
juicier, nutritious product with less shrinkage than was previously possible. Once the cooking
time expires, the steamer automatically enters the “Hold” mode. In this mode, the thermostat
regulates the internal temperature, but vacuum is released, returning the cooking chamber to
normal atmospheric pressure. At this time, steam is no longer generated and the cooking
chamber is held at the desired temperature at a relative humidity of 100%. This eliminates
food from drying out by suppressing the evaporation of the products’ natural moisture. As a
result, most food products can be held in a ready to serve state for several hours after
cooking, with no appreciable loss in taste, appearance or consistency.
SEQUENCE OF OPERATION
MAIN ON / OFF SWITCHES
Power is supplied through the power cord to the main contactor. Power comes off the back
side of the contactor to the water board. While power is supplied to the water board, current
is conducted thru the water sensors in the cooking chamber which must sense that water is
in the unit to allow it to come on. The over-temp and water board are in series. Both must be
satisfied before the unit can turn on. When the ON button is pressed it completes the circuit.
The main contactor will pull in and will send power to the solid state heater relays at the
same time latching the CR1 and CR2 control relays. Power is also sent to the timer and
thermostat. The timer has 3 settings: HOLD, TIME and CONTINUOUS. When the timer is
engaged power will be sent to the control relay on the top of the pump and the pump will
start.
Page 5

5
MP5006-1001 Rev A
TROUBLE SHOOTING GUIDE
STEAMER TROUBLE SHOOTING GUIDE
SYMPTOM
POSSIBLE CAUSE
EVALUATION
Unit will not power up
No water in the steamer
Fill with up to 3 gallons of water. Make sure
the water level is above the sensors.
Water Sensors
Scrub and clean with a scotch brite pad.
Incoming power supply
Check breakers, reset if required. Check the
power plug to be sure it is firmly in the
receptacle. Measure incoming power, call
the Power Co., if necessary.
Steamer fuses
Check and or replace
Fuse holder
Check and or replace
On switch and contacts
Check for continuity
Control Relays
Check continuity of the coil. Check for
power to relay coil. Visually check for
contact pull in and contact condition. Check
for voltage across relay terminals.
Water Board
Check to see if the LED on the water board
is on when the unit is powered up. Clean the
sensors and re-inspect. Check for incoming
power and check to make sure the ground is
correct. If the LED light does not come on,
replace the board. Boards with a 10 second
delay is just the opposite
Hi Limit
NOTE
: Serial No. 3865 to 19117 have a
resetable Hi-Limit.
Unplug
the unit and
locate the access panel on the rear of the
unit. Push the button in until it clicks. If this
fails to start the unit after plugging back in,
check the control relay and/or the off
contact. These units also have a auto- reset
hi-limit (purple and brown wires). If this is
open while the unit goes to low water it
needs to be replaced.
Unit is cooking slow
Low vacuum pressure, Vacuum
pump.
Remove the top left pan rail in the steaming
chamber. There will be 1 or two holes. If
there are two holes, the one towards the
front is for the pressure switch and does not
need to be plugged. There may be a third
hole located on the lower left side of the
chamber and this must be plugged in
addition to the top hole. From a cold start,
plug all the holes with your fingers, turn the
unit on and observe the reading on the
vacuum gauge. The correct reading should
be between 20 to 25 inches of pressure.
0 to 5 inches of pressure denotes a faulty
pump.
Check all the hoses and connections for any
leaks. If the pump does not run at all, give
the fan blade a push start through the grill. If
the pump starts, it has a bad run capacitor.
Replace as needed.
Page 6

6
MP5006-1001 Rev A
Unit is cooking slow (cont)
Pressure switch
In the FAST cook mode, the pressure switch
will close once the steam chamber reaches
the thermostat setting. As the temperature
rises, the vacuum pressure falls. Once the
unit reaches 210 to 212 degrees, the
pressure will be at zero. Cycle times when
the unit is calling for heat should be around
8 to 10 seconds on and 60 to 90 seconds
off. Replace the pressure switch if the cycle
times are off or if you can suck air through
the switch.
Unit is cooking slow (cont)
Door Gasket
Check for cuts or cracks. Replace as
needed
Door Alignment
With the unit on and the pump running,
perform the Dollar Bill test on the door.
Close the door on a Dollar Bill. (all four
sides of the door) There should be
resistance when pulling the bill out. If the
bills comes out easily, remove the hinge
covers. Loosen all of the screws, turn the
thermostat to150 degrees, enable the timer,
shut the door and turn the unit on so it
creates a vacuum and draws the door in
and then retighten the screws.
Door Sealing
If the door alignment process does not fix
the problem, remove the inner door and
place it on a flat surface and check for any
warpage. Also check that the suctions cups
are sealing. If they have turned gray or
white then replace. Use one of the pan rails
as a straight edge. Straighten and re-bend
the inner door until it is flat and re-install
using the door alignment procedure.
Quick Release Door
On the inner door, check that the four
suction cups are sealing and that the spring
is functioning properly. Replace as needed.
Unit is over-temping
Solid State Relay
Check the cycle times as stated above.
Check the voltage between T1 and L1. If the
LED light is on, there should be 0 voltage. If
the unit does not cycle, and the LED stays
on, replace the relay.
Over-temp
Ohm out the Hi-limit to see if it is good.
Clean the sensors and check the water
board. If the low water light comes on while
the unit is heating up, refer to the Hi-limit
procedure.
Thermocouple (type J)
Check that the thermocouple is wired
correctly to the thermostat. White is positive
(Terminal 6) and Red is negative (terminal
7). Reversing the terminals will result in a
run-away condition. See attached chart for
DC-milli volt readings.
Page 7
7
MP5006-1001 Rev A
Unit is over-temping (cont)
Thermostat
When a unit is at an altitude of 2,500ft+
water boils at this altitude at about 207
degree's. In thermostat mode unit starts
blowing steam out the door just after heat
light goes out. (It will do this because of
extra heat in the element when it shuts off
at about 205 degree's, drift point is at least 2
degree's). If you have the tech set
thermostat at 190 degree's and put in fast
cook it will run at the point customer wants
to cook at
Thermostat
Check resistance between terminals 4 & 5.
AC thermostats should read line voltage and
DC thermostats should be between 3 to 34
DC volts.
Thermocouple (type J)
See above
Unit is not coming up to
proper temperature
Heating elements
Check for resistance between the two
outside double white wires on the terminal
block. On 17kW units check to terminals 1 &
6, 2 & 5, and 3 & 4 on the terminal block.
See attached chart for resistance readings.
TYPE J THERMOCOUPLE READINGS - THERMOELECTRIC VOLTAGE IN DC MILLIVOLTS
F°0123456789
10
70
1.076
1.105
1.134
1.162
1.191
1.22
1.249
1.277
1.306
1.335
1.364
80
1.364
1.392
1.421
1.45
1.479
1.508
1.537
1.566
1.594
1.623
1.652
90
1.652
1.681
1.71
1.739
1.768
1.797
1.826
1.855
1.884
1.913
1.942
100
1.942
1.972
2.001
2.03
2.059
2.088
2.117
2.146
2.175
2.205
2.234
110
2.234
2.263
2.292
2.322
2.351
2.38
2.409
2.439
2.468
2.497
2.527
120
2.527
2.556
2.585
2.615
2.644
2.673
2.703
2.732
2.762
2.791
2.821
130
2.821
2.85
2.88
2.909
2.938
2.968
2.997
3.027
3.057
3.086
3.116
140
3.116
3.145
3.175
3.204
3.234
3.264
3.293
3.323
3.353
3.382
3.412
150
3.412
3.442
3.471
3.501
3.531
3.56
3.59
3.62
3.65
3.679
3.709
160
3.709
3.739
3.769
3.798
3.828
3.858
3.888
3.918
3.948
3.977
4.007
170
4.007
4.037
4.067
4.097
4.127
4.157
4.187
4.217
4.246
4.276
4.306
180
4.306
4.336
4.366
4.396
4.426
4.456
4.486
4.516
4.546
4.576
4.606
190
4.606
4.636
4.666
4.696
4.726
4.757
4.787
4.817
4.847
4.877
4.907
200
4.907
4.937
4.967
4.997
5.028
5.058
5.088
5.118
5.148
5.178
5.209
210
5.209
5.239
5.269
5.299
5.329
5.36
5.39
5.42
5.45
5.48
5.511
Page 8
8
MP5006-1001 Rev A
REMOVAL AND INSTALLATION 6 PAN MODEL
REMOVAL FROM STAND
Using a 7/16” wrench, remove the 4 ¼’-20 x ½” bolts and lock washers located on the
mounting brackets going into the bottom of the unit. When reinstalling, make sure the “L”
brackets that hold the drip pan are facing inward.
REMOVAL OF LEGS
Units with legs use the same “L” brackets used on the stand but are held on by 8 ¼”-20 X ½”
bolts and lock washers. Use a 7/16” wrench to remove these to access the bottom panel.
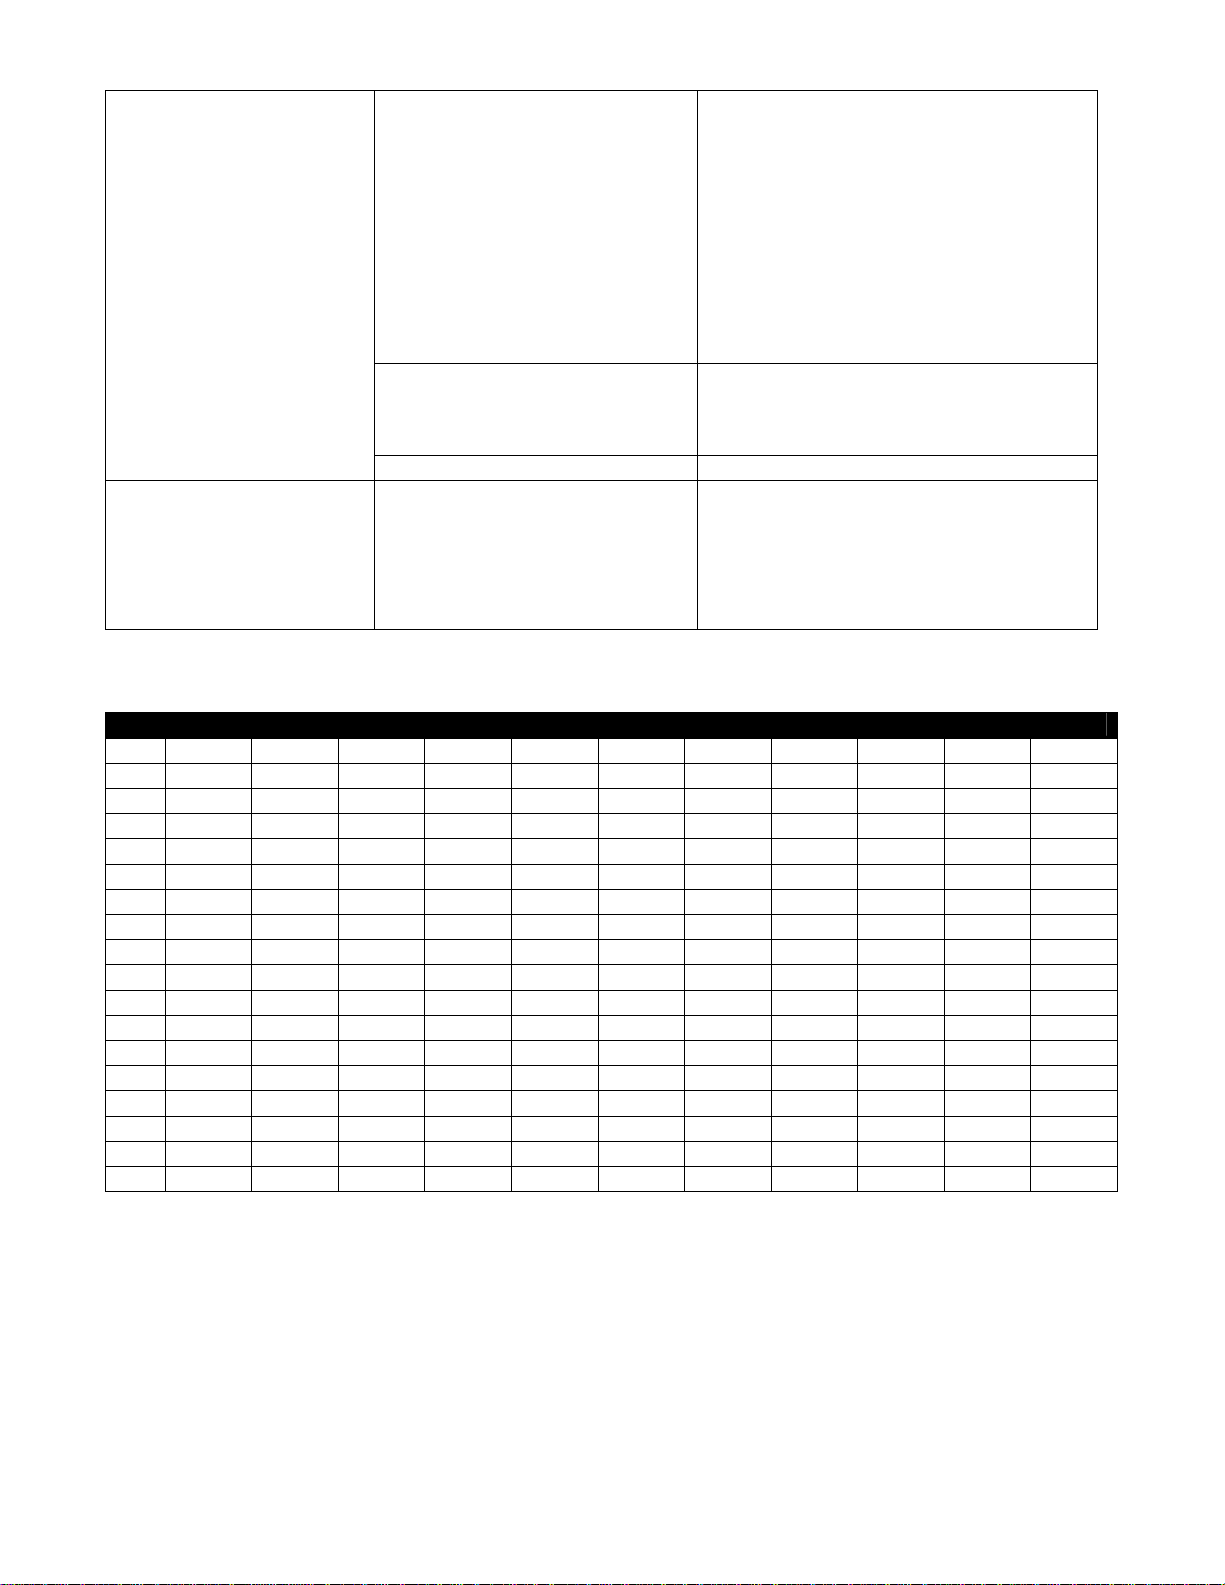
GAST VACUUM PUMP
1. Unplug the unit.
2. Remove the sheet metal screws on the left side panel of the unit.
3. Disconnect the wires to the relay and mark the locations.
4. Remove the hoses from the pump head.
5. Remove the two 3/8” nuts holding the muffler on and pull out of the way.
6. Remove the bolts on the pump bracket and pull the whole assembly out.
7. Remove the 4 Phillips screws washers and spacers on the bracket.
8. Remove the brass fittings on the head of the pump.
9. Reassemble in reverse order.
Page 9
9
MP5006-1001 Rev A
THERMOSTAT
1. Unplug the unit
2. Remove the sheet metal screws on the left side panel of the unit.
3. Remove the knob and the seal nut with a ½” nut driver on the front of the unit.
4. Disconnect the wires and mark the pin locations.
5. Reassemble in reverse order.
Note: AC thermostats have 6 pins and DC thermostats have 7 pins.
TEMPERATURE PROBE
1. Unplug the unit.
2. Remove the sheet metal screws on the left side panel of the unit.
3. Remove the white wire from terminal # 6 and the red wire from terminal # 7.
4. Follow the red and white wire down to the bottom of the unit.
5. Peel the insulation aside and remove the retaining nut with a 3/8” nut driver.
6. Reassemble in reverse order.
TIMER
1. Unplug the unit
2. Remove the sheet metal screws on the left side panel of the unit.
3. Remove the knob and retaining nut with a ½” nut driver on the front of the unit.
4. Disconnect the wires and mark the pin locations.
5. Reassemble in reverse order.
Note: Don’t remove jumper wires.
AC Thermostat
DC Thermostat
Page 10

10
MP5006-1001 Rev A
VACUUM AND TEMPERATURE GAUGES
1. Unplug the unit
2. Remove the sheet metal screws on the left side panel of the unit.
3. On the vacuum gauge, remove the hose form the inlet connection.
4. Remove the two 10/24 nuts.
5. On the temperature gauge, remove the retaining nut on the inlet connection.
6. Follow the capillary leads down to where the probe is mounted to the unit.
7. Remove the two 3/8” nuts.
8. Reassemble in reverse order.
CONTACTOR
1. Unplug the unit.
2. Remove the sheet metal screws on the left side panel of the unit.
3. Remove the red, black and white leads on both sides of the contactor.
4. Remove coil wires.
5. Remove the 6/32” nyloc nuts that secure the contactor.
6. Reassemble in reverse order.
VACUUM HOSES AND TEES
1. Unplug the unit.
2. Remove the sheet metal screws on the left side panel of the unit.
3. Check all hoses and Tees for cracks or leakage.
4. Remove clamps and replace.
Page 11
11
MP5006-1001 Rev A
SOLID STATE RELAYS
1. Unplug the unit.
2. Remove the sheet metal screws on the left side panel of the unit.
3. Remove the wires attached to the relay and mark their locations.
4. Remove the two mounting screws.
5. Reassemble in reverse order.
Note. Relays not mounted on a heat sink should use a heat pad or thermal paste.
LAMPS
1. Unplug the unit
2. Remove the sheet metal screws on the left side panel of the unit.
3. Remove the two wires on the lamp terminals.
4. With a pair of pliers, depress the locking ears on the switch and push the lamp thru
the front.
5. Push new lamp in the mounting hole. Make sure locking ears engage.
6. Reattach the wires.
FUSES
1. Unplug the unit
2. Remove the sheet metal screws on the left side panel of the unit.
3. Pry the fuses out of the fuse block with a pocket screw driver.
Page 12
12
MP5006-1001 Rev A
WATER SENSOR CONTROL BOARD
1. Unplug the unit
2. Remove the sheet metal screws on the left side panel of the unit
3. Disconnect the wires and mark the pin locations.
4. Remove the nylon mounting pins.
5. Reassemble in reverse order.
WATER SENSORS
1. Unplug the unit.
2. Remove the sheet metal screws on the left side panel of the unit.
3. Open the door and drain all the water from the chamber.
4. Remove the 8/32” hex nut from the back side of the sensor with an 11/32” wrench and
remove the sensor lead.
5. Use a ¾” wrench to remove the nut on the sensor.
6. Push the sensor thru the hole from the backside.
7. Reassemble in reverse order.
Note: Do not exceed 15 inch pounds when tightening the sensor mounting nut.
CONTROL RELAYS
1. Unplug the unit
.
2. Remove the sheet metal screws on the left side panel of the unit.
3. Disconnect the wires and mark the pin connections.
4. Remove the 6/32” nyloc nuts.
5. Reassemble in reverse order.
Page 13

13
MP5006-1001 Rev A
FAST COOK / THERMOSTAT TOGGLE SWITCH
1. Unplug the unit
2. Remove the sheet metal screws on the left side panel of the unit.
3. Remove the retaining nut with an open end 1/2” wrench.
4. Disconnect the wires.
5. Reassemble in reverse order.
ON/OFF SWITCHES
1. Unplug the unit
2. Remove the sheet metal screws on the left side panel of the unit.
3. On the inside of the unit, push the tension spring on the locking ring and then pull the
switch out from the front.
4. Reassemble in reverse order
CORD AND PLUG ASSY
1. Unplug the unit.
2. Remove the sheet metal screws on the left side panel of the unit.
3. Disconnect the red, black and white leads form the contactor.
4. Remove the strain relief retaining nut on the inside of the unit and pull the cord out.
5. Reassemble in reverse order.
DRAIN VALVE
1. Unplug the unit.
2. Drain all of the water from the chamber.
3. Turn the unit upside down and remove the legs and bottom panel.
4. Use a strap wrench to remove the valve.
5. Reassemble in reverse order.
GUTTERS
1. Remove the sheet metal screws on the bottom front of the unit. Two on the right and
two on the left.
2. There are right and left oriented gutters. The right gutter will have a hole *5/8” from the
left side and the left gutter will have a 5/8” from the right side. Gutters need to angle
down towards the drip pan.
Page 14

14
MP5006-1001 Rev A
PRESSURE SWITCH
1. Unplug the unit.
2. Remove the sheet metal screws on the left side panel of the unit.
3. Remove the wires from the top and bottom leads of the switch.
4. Use Teflon tape on the barrel of the new switch and reinstall.
DUAL PRESSURE SWITCH
1. Unplug the unit.
2. Remove the sheet metal screws on the left side panel of the unit.
3. Remove the wires from the top and bottom leads off of the switches.
4. Remove the brass elbow attached to the “J” tube going into the chamber. Make sure it
is not plugged up.
5. Use Teflon tape on the barrel of the new switch and reinstall.
Note: The 5” W/C pressure switch is rated at 1/3 HP and the 60” WC switch is rated
at ½ HP.
FIREBAR HEATER REPLACEMENT
1. Turn unit up side down.
2. Remove legs and bottom panel.
3. Remove all brackets, nuts, washers, spacers, over-temp nuts, over-temp plate, overtemp, center heater mount, element and the isolator plate.
4. Remove any old anti-seize from the isolator plate and clean thoroughly.
5. Apply new anti-seize to both sides of the isolator plate. ( silver grade rated @ 1600 to
1800 degrees F)
6. Apply anti-seize to both sides of the new element.
Keep 2” away from the wire
leads.
7. Re-install in order: isolator plate, element, center heater mount, over-temp, over-temp
plate and nuts, spacers, Belleville washers
( dome side up),
plain washers,
new
lock nuts. ( torque to 30 inch pounds)
, and front and back “Z” brackets. Tighten in a
circular pattern from the inside to the outside.
8. Reinstall bottom plate and legs.
P/N AT1E-2647-2
60” W/C
P/N AT1E-2647-1
5” W/C
Page 15

15
MP5006-1001 Rev A
CAST HEATER REPLACEMENT
1. Turn unit upside down
2. Remove legs and bottom panel.
3. Remove all nuts, Belleville washers, fender washers, heater mount bracket, and
heater element.
4. Thoroughly clean old thermal paste from the studs and bottom of the unit.
5. Apply thermal paste to bottom side of the new element and install over studs.
6. Apply thermal paste to the screw-in over-temp and install.
7. Install in order: heater mount bracket, fender washers, Belleville washers
(dome side
up) and new lock nut. ( torque to 25 inch pounds)
Page 16

16
MP5006-1001 Rev A
DOOR REMOVAL
1. Leave the door shut.
2. Remove the hinge covers.
3. Remove the Phillips head screws going into the cabinet and remove door.
INNER DOOR REMOVAL
1. Remove hinge covers.
2. Remove the long top screw in the top hinge and the long bottom screw in the bottom
hinge (if equipped)
3. Insert a flat head screw driver into the slot located on the bottom of the outer door and
pry the inner door out.
FLOATING INNER DOOR REMOVAL ( SERIAL NUMBERS 29783 AND ABOVE)
1. Remove the long top screw in top hinge and the long bottom screw in the bottom
hinge (if equipped).
2. Pull inner door out. Angle the rod that is inserted in the spring on the bottom side of
the handle out last.
GASKET REPLACEMENT
1. Remove the inner door as stated above.
2. Make sure the gasket is untangled, then starting at a corner, stretch the gasket to the
opposite corner. Repeat this sequence on the other corners until all four corners are
seated. Push the gasket along the edges to firmly seat onto the inner door.
INNER DOOR VALVE CUP REPLACEMENT
1. Remove inner door as stated above.
2. Locate the valve plate assembly and remove the 10/24 nyloc nut and discard.
Remove cone spring.
3. Remove the valve plate assembly from the inner door.
4. Remove the (4) 8-32 nyloc nuts holding the seals and discard both.
5. On each valve, first place a flat washer and then a “wave” washer on the threaded
stem of the seal.
6. Place each seal assembly back into the valve plate and fasten with the 8/32 nyloc
nuts. Tighten down until the space between the seal and the valve plate is about the
thickness of the flat washer. Make sure each seal is free to pivot and rotate.
7. Reinstall the valve plate and cone spring. Tighten the nyloc nut so that one or two
threads protrude through the nylon material
8. Reinstall inner door.
Page 17

17
MP5006-1001 Rev A
DOOR LATCH REPLACEMENT
1. Remove the inner door as stated above.
2. Use a Phillips screw driver and a 3/8” nut driver to remove the handle from the outer
door
3. Reinstall the new handle.
REMOVAL AND INSTALLATION - 3 PAN MODEL
LIGHT BOARD
1. Remove the cover panel to gain access to the components.
2. Remove the mounting nuts and molex connections on the board.
3. Reinstall in reverse order.
ALL OTHER COMPONENTS, REFER TO THE 6 PAN SECTION
Page 18

18
MP5006-1001 Rev A
INTRODUCTION & SEQUENCE OF EVENTS
AUTOFILL – 3 & 6 PAN MODELS
Simple connection to water source via a garden hose style connection.
Electronic water level control for normal operation.
A master control valve
Multiple level safety controls, electronic and mechanical float.
Operates on city water supply and water pressures (40-60psi)
Easy to clean and care for.
Theory of operation
The Steamer is connected to the facility water supply via a washing machine or garden hose
type supply line from a water spigot or from a nearby sink faucet.
First time fill
1. With the water supply turned on, press the “
ON”
button. The Steamer will power up with the
pump operating.
2. The water fill valve will turn on, via the K5 relay on the water sense PCB. The status LED
on the water sensing PCB will flash rapidly about 2-3 times a second.
3. Water Fill/Sensor PCB mounted K2 relay (low water level sensing) is bypassed to allow for
first time filling of thereservoir.
4. The thermostat will be turned off, via Water Fill/Sensor PCB mounted K1 relay and CR4
bypass relay, for the first fill to preventdamage to the heater elements.
5. Water will rise to the low level probe and reset the low level circuit of the water control
board and reset relay CR4.
6. When the water level reaches the High Level Probe, a 30 second delay is initiated to
allow for wave action and rapid boiling inside to subside. Wave action and rapid boiling
would cause a lower than desired amount of water to be injected in the reservoir by
tripping the control too soon.
7. When the 30 seconds and water level have been satisfied, the water level control
board shuts off the water level control relay and the by pass relay. The status LED
will change to a slower flash rate of about 1 time per second.
8. The heater is turned on and normal operation begins.
Normal operation (the Steamer water reservoir has water in it).
1. On a full reservoir, the Steamer will heat up as normal for normal operation.
2. As the water is used up and the water level drops below the High-Level Probe, the water
valve is turned on with no delay period.
3. After the water has reached the high water level probe and stays in constant
contact, a thirty-second timing sequence is started. (Thisis done to prevent short
cycling of the water valve increasing the life and thereliability of the water level control
valve.)
Page 19

19
MP5006-1001 Rev A
4. When the thirty seconds have been satisfied, the water level control board shuts
off the water level control K2 relay.
5. This process is repeated until the Steamer is shut off.
TROUBLE SHOOTING GUIDE
1. No water pressure.
On a first time fill the unit will not fill up with water and the Steamer will not turn
the heaters on to prevent damage.
Check water pressure
Check for dirty inlet screen.
Check for dirty probes.
Check for power to control board
Check for operation of the control valves
2. During operation of the Steamer, after successful initial water fill.
The steamer shuts down after the water level drops below the low water sensor and a 10
second delay has passed for wave and boiling action
Check the conditions listed above for reasons of non-operation
3. Water level sensing fails
If the water level control valve becomes stuck on, a mechanical float will shut
down the whole Steamer and the water supply by turning off the master watercontrol
valve.
4. If the water level sensing control board becomes faulty the mechanical float will shut
down the Steamer.
5. If the float has been removed
The Steamer will not start up until the float is re-installed.
Cleaning the chamber is still easy by just lifting out the mechanical float and wipingdown
as normal each night.
Page 20

20
MP5006-1001 Rev A
REMOVAL AND INSTALLATION
WATER FILL / SENSOR CONTROL BOARD
1. Unplug the unit
2. Remove the sheet metal screws on the left side panel of the unit
3. Disconnect the wires and mark the pin locations.
4. Remove the nylon mounting pins.
5. Reassemble in reverse order.
WATER FILL VALVE
1. Unplug the unit.
2. Serial numbers 27604 and below have two plastic bodied water valves. These are
discontinued and are being replaced with a heavier duty brass valve.
3. Remove the plastic body water valves and all of the plastic water lines.
4. Remove the water line brass fitting from the water inlet fitting.
5. Install the brass water valve kit into the water inlet fitting which is mounted on the back
wall of the steamer enclosure, using thread sealant.
6. Connect the brass water valve kit water line to the steam chamber water inlet fitting.
7. Connect the blue and white control harness (part of the brass valve kit) to the blue and
white connectors originally connected to the plastic water valve terminals.
8. Neatly bundle the non-connected ends of the yellow and white harnesses that were
originally connected to the plastic water valves together with the remaining existing
loose wire harnesses and wire tie them together.
9. Reconnect the steamer to the power outlet and slowly turn on the water supply while
checking for leaks.
Page 21

21
MP5006-1001 Rev A
OVERFILL SENSOR SWITCH
1. Unplug the unit
2. Remove the left side panel.
3. Remove leads J7 & J8 from the water board
4. Turn the unit up side down.
5. Remove the brass nut for the weep hole drain line.
6. Remove the legs and bottom panel.
7. Remove the retaining screw from the switch mounting tab and remove the switch.
8. Reinstall in reverse order.
Note: Make sure the wires are not close to the heater element.
DRAIN SYSTEM
1. Remove the drain pan which is inserted in the pan rails on the bottom of the unit.
2. Remove the hose clamps from the drain hose connections.
Page 22

22
MP5006-1001 Rev A
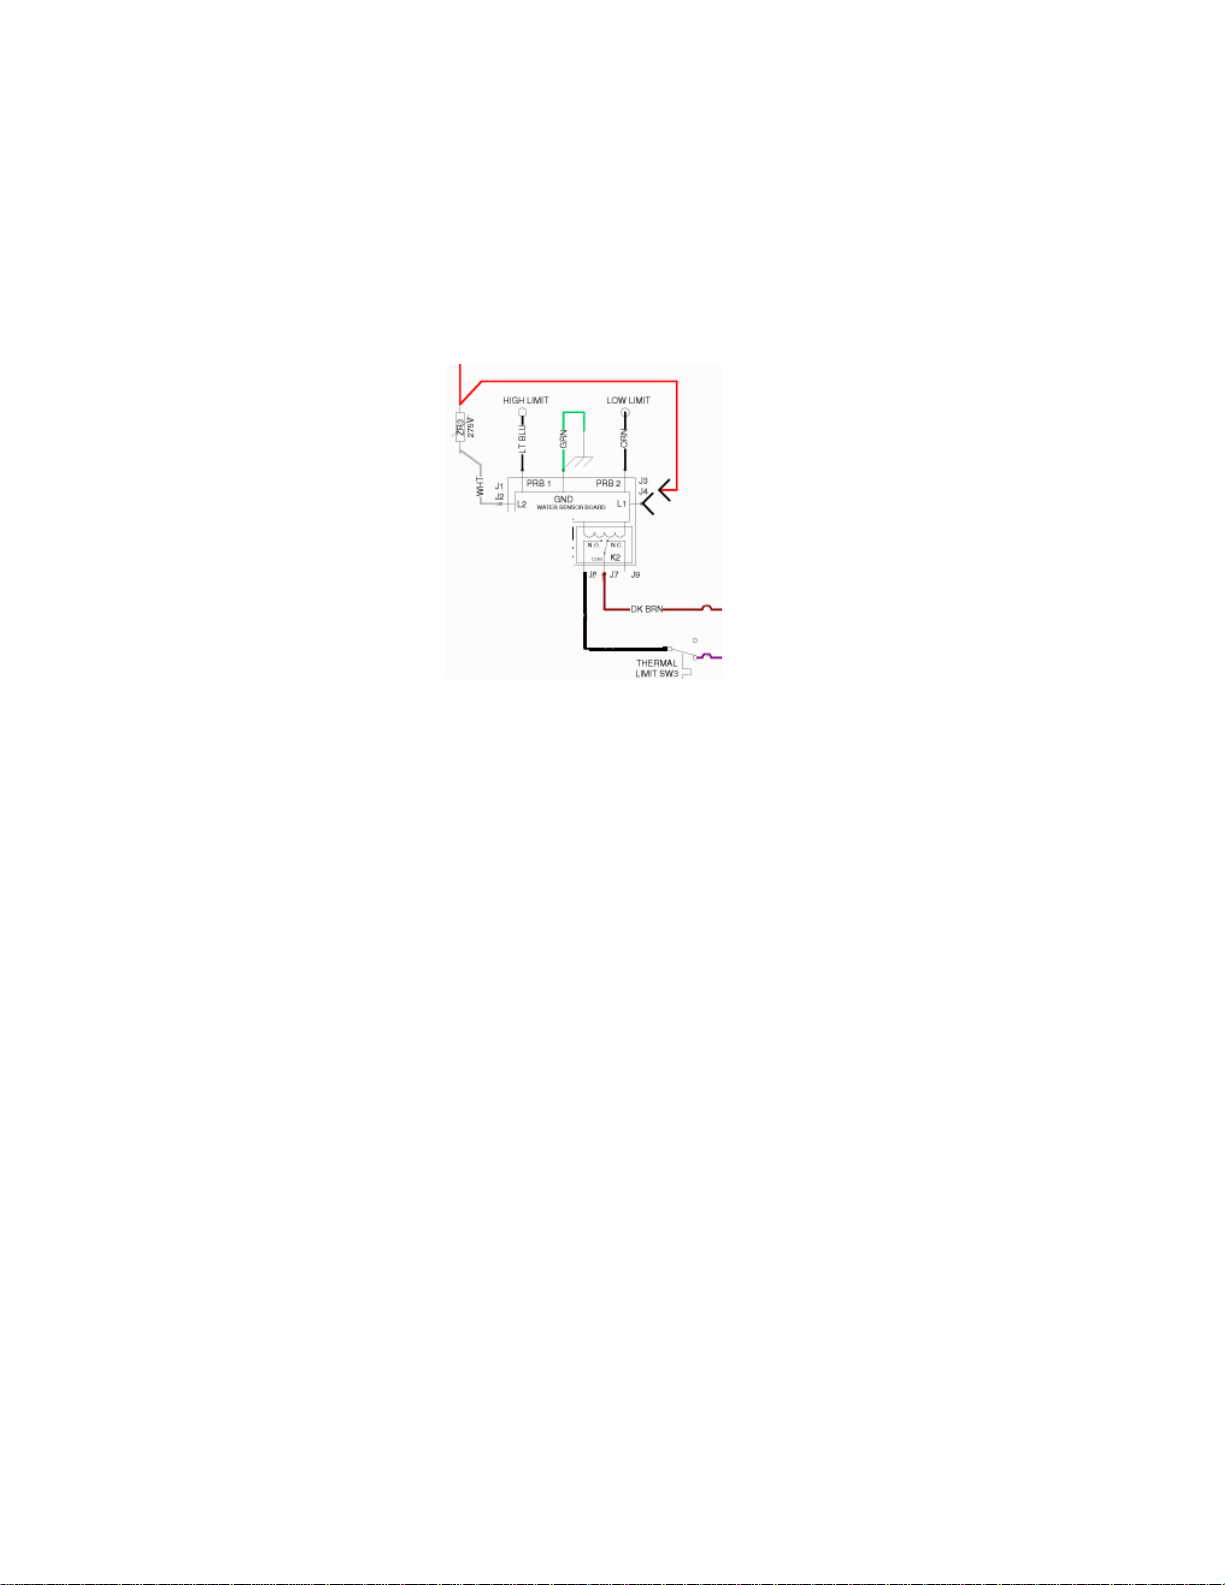
SCHEMATIC – 6 PAN – 208V & 240V – SINGLE PHASE
Page 23

23
MP5006-1001 Rev A
SCHEMATIC – 6 PAN – 208V & 240V – THREE PHASE
Page 24

24
MP5006-1001 Rev A
SCHEMATIC – 6 PAN – 380V-415V- 3 PHASE
Page 25

25
MP5006-1001 Rev A
SCHEMATIC – 6 PAN – 440V-480V – 3 PHASE
Page 26

26
MP5006-1001 Rev A
SCHEMATIC – 6 PAN – 208V – 3 PHASE – 17kW
Page 27

27
MP5006-1001 Rev A
SCHEMATIC – 6 PAN – 230V – 1 PHASE – CE
Page 28

28
MP5006-1001 Rev A
SCHEMATIC – 6 PAN – 380V -415V – 3 PHASE - CE
Page 29

29
MP5006-1001 Rev A
SCHEMATIC – 3 PAN – 208V – 240V – 1 PHASE
Page 30

30
MP5006-1001 Rev A
SCHEMATIC – 3 PAN – 208V – 240V – 3 PHASE
Page 31

31
MP5006-1001 Rev A
SCHEMATIC – 3 PAN – 380V – 415V – 3 PHASE
Page 32

32
MP5006-1001 Rev A
SCHEMATIC – 3 PAN – 440V – 480V – 3 PHASE
Page 33

33
MP5006-1001 Rev A
SCHEMATIC – 3 PAN – 208V – 3 PHASE – 17kW
Page 34

34
MP5006-1001 Rev A
SCHEMATIC – 3 PAN – 230V – 1 PHASE
Page 35

35
MP5006-1001 Rev A
SCHEMATIC – 3 PAN – 380V – 415V – 3 PHASE – CE
Page 36

36
MP5006-1001 Rev A
PARTS
Part #
Description -
Prices are subject to change without notice
Buzzers
AT0E-2807-1
Buzzer, Timer/Low Water
Door - Quick Release Door - Current Production
AT1A-2912-1
QR Door Replacement - Right Hinged, (Floating Inner door)
AT1A-2912-3
QR Door Replacement - Left Hand (Floating Inner door)
AT1A-2426-5
Floating Inner Door - Right hand
AT1A-2426-6
Floating Inner door - Left Hand
AT1A-2427-1
Valve Bracket Assy- (w/cups & rod)
AT1A-2426-1
Inner Door Assy, Right 6 pan
AT1A-2426-3
Inner Door Assy, Left 6 pan
AT1A-2644-2
Quick Release Door handle
RAT1K-1830
QRD Valve Plate Seal Kit
AT1H-2046-1
QRD, Spring Compression
AT1M-3045-1
QRD Valve Cover
AT1M-3046-1
QRD Latch Backer Plate -RH
AT1M-3046-2
QRD Latch Backer Plate -LH
AT1M-3466-1
Bracket, Right steamer door
AT1M-3466-2
Bracket, Left steamer door
AT1H-2058-3
Door Hinge (Pair)
Door - Standard Door
AT1H-3609-1
Door Latch, Ceramic Magnet, Chrome -Standard & Evolution
AT1M-2689-1
Plate, Hinge Backer
Door Gasket
AT1G-2633-1
Gasket, Door S6 - Six Pan
Fittings/Scre
ws
AT0F-206141060
Screw, 10-24 x 3/4 slot flat, (hinge plate)
AT0F-2061-
41140
Screw, 10-24 x 1 3/4 fhms (qrd handle)
AT0F-2061-
41160
Screw, Slot Flat 10-24X2
AT0F-2691-
41011
Nyloc Nut, Serrated hex #10-24
AT0F-1046-
31030
Screw, Phillips Truss #8-32x3/8, Control panel
AT0F-3371-1
Nut, Rotary Shaft Seal, (for thermostats)
AT0P-2849-2
Street Elbow 1/8"x1/8" Extra Long
AT0P-2849-3
Street Elbow 1/8"x1/8"
AT0P-2987-2
Nylon Tee - Barbed 1/2 x 1/2 x 1/2
AT0P-3430-1
Garden Hose fitting- Autofill
AT1P-222P-88
Adapter 1/2"x1/2"
AT1P-
CMASSY
Copper Manifold Assembly-External Muffler
AT1P-2239
Ball Valve (drain)
Fuses
AT0E-3162-1
Fuse, Slo-Blo 1/2 Amp
AT0E-2731-1
Fuse, Slo-Blo 3 Amp
AT1E-FU5
Fuse, 5 Amp
ATR-FU30
Fuse, 30A 250V, Time Delay
AT1E-FB2P
Fuse Block, Two Position 250V
Gauges
AT1A-3303-1
Thermometer, Assembly 2"
AT1A-THME
Thermometer, Assembly 1-1/2"
AT0H-2614-1
Vacuum Gauge 2"
AT-VG
Vacuum Gauge 1-1/2"
Page 37

37
MP5006-1001 Rev A
AT0H-3544-1
Lens, 2" gauge
Heaters
AT1A-3530-1
Cast Heater Kit; 208v 6kw, 230/7.3, 240/8, 380/6.7, 400/7.4,
415/8, 440/9, 480/10.7
AT1A-3530-2
Cast Heater Kit; 240k/6kw
AT1A-3530-3
Cast Heater Kit; 208v/8kw, 240/10.7, 380/9, 400/10, 415/10.7,
480/14
AT1A-3530-4
Cast Heater Kit; 208v/12.0kw, 240/16, 380/13, 400/14.8, 415/16,
440/18
AT1A-3530-6
Cast Heater Kit; 208v 10.0kw
AT1A-3530-7
Cast Heater Kit; 208v 17.0kw
Hoses
AT0P-2714-1
Hose Clamp 1/4
AT0P-2714-2
Hose Clamp 1/2
AT1P-255532000
1/4" Silicone Hose - per ft'
AT1P-2555-
62000
1/2" Silicone Hose - per ft'
AT1P-2558-1
Hose 1/2 - 14"
AT1P-2558-2
Hose 1/4" Cut to Length 9'
AT1P-2558-3
Hose 1/4" x 15"
AT1P-2558-4
Hose, 1/4" X 22" (drain valve)
Lamps
AT0E-1800-5
Pilot Lamp Unit, 208/240V (Red)
AT0E-1800-4
Pilot Lamp Unit, 208/240V (Green)
AT0E-1800-6
Pilot Lamp Unit, 208/240V (Amber)
AT0E-1800-9
Pilot Lamp Unit, 208/240V (Clear)
Legs
AT1H-FTA
Foot Adjustment (Cookers)
AT1A-3030-1
Leg Assembly Kit, Steamer
AT0H-3040-1
Rubber Foot Tip (Cooker)
AT0H-2479-7
Stand Caster, Non-Break
AT0H-2479-8
Stand Caster, Break
Misc.
Electronic
AT0E-2717-1
MOV Transient Suppressor, 275V
Misc.
Hardware
AT1M-2573-1
Drip Edge, Left
AT1M-2573-2
Drip Edge, Right
AT1M-2590-1
Bracket, Interior Tray Left
AT1M-2590-2
Bracket, Interior Tray Right
Overlay Graphics
AT1L-2804-1
Overlay, 300 90m timer 2"
AT1L-2804-2
Overlay, 100- 90M Timer 2"
AT1L-2804-3
Overlay, 400 180M Timer 2"
AT1L-OPSUM
Operator Summary (D Model)
Overtemps
AT1E-OTT
Overtemp
ATR-OT
Overtemp w/pigtail
AT1E-OTHLX
Overtemp Switch, Ultimate
AT1A-2613-1
Overtemp (Super Duty) 6 pan
AT1E-2653-3
Overtemp switch, Cast htr-watts
up to incl/14KW
AT1E-2653-4
Overtemp switch, Cast htr-watts
over 14KW
PCB
AT1E-2593-1
Light Control Board (3 PAN Only))
Plugs/Power Cords
AT0E-1051-5
L16-20P Steamer plug
AT1E-
Plug, Power Cord 250V/30A, Locking
Page 38

38
MP5006-1001 Rev A
PSC310-PG
AT1EPSC310-SR
Strain Relief, Power Supply Cord
Relays
AT0E-2059-3
Solid State Relay, (D & A2450)
AT0E-2996-1
Heat Pad - SSR (if no heatsink comp)
AT0E-1587-1
Contactor, 208/240 3pole
AT0E-2825-2
Control Relay, 240V 3PDT
AT0E-2825
-4
Control Relay, 208/240V 3PDT ( Replaces -1 or -2)
AT2E-1220
Relay, Mercury Disp 240V (12KW)
AT0A-2876-2
Relay, Mercury Disp. 208V SP-1269-2
Shell
AT1M-2979-1
Shell Exterior
AT0F-277731030
Truss Screws#8 x 3/8 SS
AT1M-2981-2
Left Side Panel
Solenoids
AT1ESOL208
Solenoid, (Air) 208V Coil
AT1E-
SOL240
Solenoid, (Air) 240V Coil
ATR-S208C
208V Replacement Coil
ATR-S240C
240V Replacement Coil
ATR-SKIT
Solenoid Rebuild Kit
ATR-SKIT2
Sol. Rebuild Kit-new style D803045
Switches
AT0E-2874-2
Switch, Toggle
AT1E-2647-1
Pressure Switch - Single Pressure Switch
AT1E-2647-2
Pressure Switch - Dual Pressure Switch -Above 14KW units
only
AT0E-3337-1
On Pushbutton, Steamer - must use new assy, not
interchangeable with old style
AT0E-3337-2
Off Pushbutton, Steamer -(Must use all new assy)
AT0E-3338-1
On Contact, Steamer
AT0E-3338-2
Off Contact, Steamer
AT0E-3339-1
Pushbutton Lock Ring
Timers
ATR-TI60
Timer, 60 Minute (Cooker Ready)
AT0E-2297-2
Timer, 180 Minute (Cooker Ready)
AT0E-2297-1
Timer, 90 Minute (Cooker Ready)
ATR-WH-C
Conversion Wire Harness (Crammer)
AT0H-1455-2
Thermostat/Timer Repl. Knob-soft grip
Thermocoupl
es
AT0E-3661-1
Thermocouple
Thermostats
AT0E-2559-1
DC Thermostat, Calibrated (100-200 F)
AT0E-2559-2
AC Thermostat, Calibrated (100-200 F)
Transformers
AT0E-2662-1
Transformer
Terminal
Block
AT0E-1134-2
Terminal Block, 2 Position
AT1EH-TB3
Terminal Block, 3 Position, 8000W
AT0E-1134-5
Terminal Block, 5 Position
Vacuum
Pumps
AT1E-2991-1
Vacuum Pump, Gast (new style)
RK935
Gast vacuum pump rebuild kit
AT1E-2703-1
Vacuum Pump, Thomas
Page 39

39
MP5006-1001 Rev A
ATR-CAP
Capacitor - Thomas Pump Only
ATR-VP2RA
Thomas Rod & Diaphragm Assy
ATR-THA2
Thomas Head
ATR-VPLV
Vacuum Pump, Leaf Valves (Pair) Thomas Pump Only
ATR-VPHS
Vacuum Pump Head Replmnt. Screws
Valves
ATR-BVRK
Auto Fill Brass Valve Replace
AT0P-3268-1
Water Fill Solenoid 208V - Autofill only
Water Sensor
AT1E-2652
Probe Water Sensor
AT1E-2654-1
PCB, Water Board Sensor
AT0E-3230-1
PCB, Autofill Water Board Sensor
AT0P-3509-1
Water Valve Control, Autofill only
AT0E-3234-1
Sensor Magnetic Reed Switch-Autofill
 Loading...