

Accusplit AL1590 User Manual
ACCUSPLIT®
ACCUSPLI T ALLIANCE
ACTIVIT Y
PEDOMET ER
1590
TW15G
CAL
DIST
STEP
S
C
A
N
RESET
SET
MODE
(2S)
ALLIANCE 1590
ACTIVITY PEDOMETER
OPERATING INSTRUCTIONS
Congratulations on taking the rst step to wellness with your
purchase of an ACCUSPLIT pedometer. It’s easy to set up your
new pedometer. Just follow the steps below, and start walking!
SETTING UP YOUR PEDOMETER
To record your distance and calories
accurately, you will need to set your stride
length and body weight.
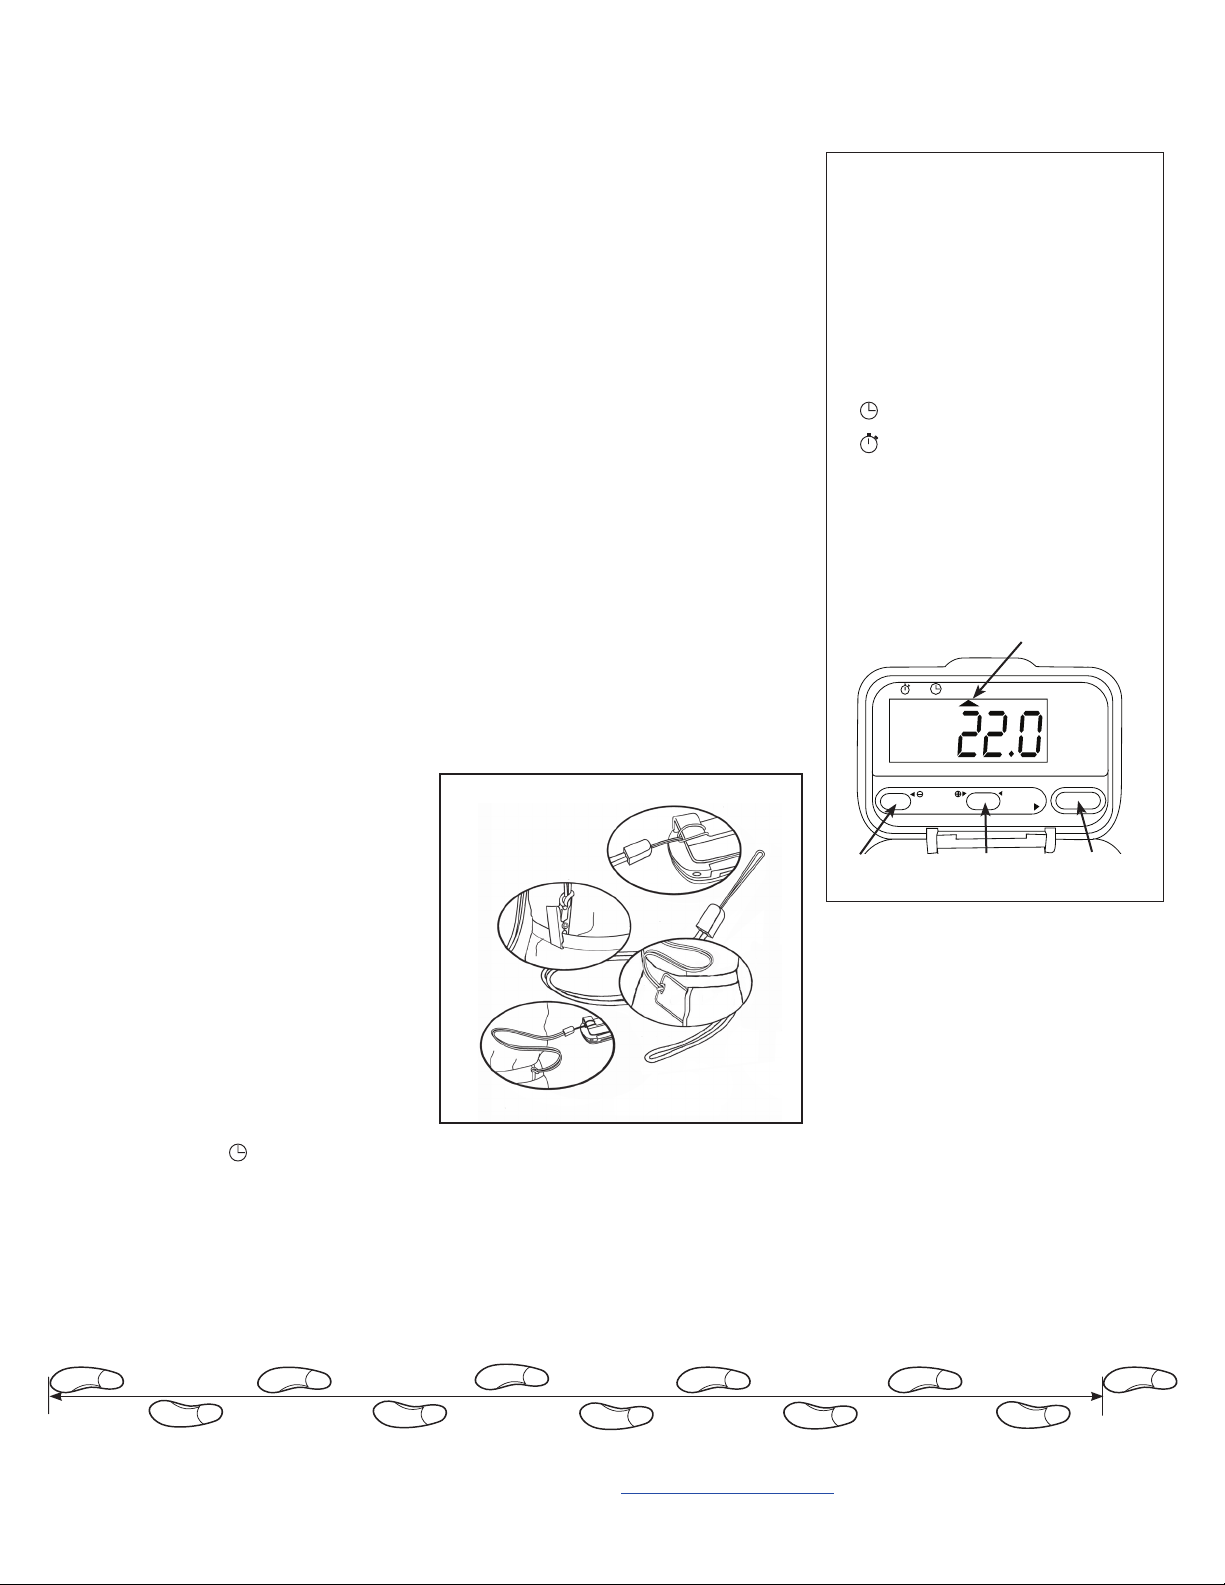
Finding Your Stride Length: Your stride
length is the length of one of your steps,
measured from “toe to toe.” To measure,
walk 10 steps with your normal stride and
measure the TOTAL DISTANCE from the
toe of your starting step to the toe of your
10th step (see diagram below). Divide the
TOTAL DISTANCE by 10. This is your stride
length. Example: If you walk 22 feet, your
stride length is 2.2 feet.
Setting Your Stride Length: Press the
black MODE button until arrow at the top
of display points to “DIST.” Press the gray
SET button once to enter setting mode.
Display will shift to show stride (for example,
“F 1.95” means stride is set to 1.95 feet).
Press the gray SET button to increase stride
length. Press the yellow RESET button to
decrease stride length. Press the black
MODE button to exit setting mode.
Setting Your Weight: Press the black
MODE button until arrow at the top of the
display points to “CAL.” Press the gray SET
button once to enter setting mode. Display
will shift to show weight in pounds. For
example, “L 165” means weight is set to 165
lbs. Press the gray SET button to increase
weight setting. Press the yellow RESET
button to decrease weight setting. Press
black MODE button to exit weight setting
mode.
Setting the Clock: Press the black MODE
button until the arrow on the top of display
points to clock icon . Press the gray SET
button once to enter clock setting mode,
clock readout will ash. Press the yellow
RESET button to advance hours. Press the
gray SET button to advance minutes. Press
black MODE button to exit clock setting
mode.
Note: display will show “A” for AM and
“P” for PM.
WEARING YOUR PEDOMETER
While gently holding the belt clip open, slide
the pedometer onto your belt or the top edge
of your pants or skirt. It should t snugly and
level, above one knee.
Note: The pedometer should be as vertical
as possible. Walkers with larger stomachs
may nd it helpful to wear the pedometer
farther back on the body, toward one hip.
The cover must be closed for the
pedometer to work. To avoid losing or
dropping your pedometer, use the included
leash and clip to fasten the pedometer
securely to your clothing.
Attaching the Leash: Attach the pedometer
to the leash by looping the leash around
the pedometer belt clip. Next, clasp the
waistband of your clothing with the attached
clip. You can also use a safety pin to fasten
the leash to your clothing, or loop the leash
through your belt or belt loop.
First, loop the
pedometer clip
Next, loop the metal
clip, then clasp clothing
badge holder, then
Or, loop a belt or belt loop
Or, loop a
put into pocket
(Badge holder
not included)
VIEWING YOUR RESULTS
Once you put on your pedometer with the
cover closed, it will automatically begin to
record your steps, distance, calories burned,
and activity time. Repeatedly press the
black MODE button to cycle through the
pedometer modes:
STEPS → DISTANCE → CALORIES →
TIME OF DAY → ACTIVITY TIMER →
SCAN → STEPS
DISPLAY MODES
• STEP: STEP mode shows your
step count since last reset, up
to 1,000,000 steps.
• DIST: DISTANCE mode shows
distance walked or jogged since
last reset.
• CAL: CALORIE mode shows
calories burned through step
activity since last reset.
•
: CLOCK mode shows time of day.
•
: ACTIVITY TIMER MODE
shows total activity time in minutes
and seconds since last reset. The
timer runs automatically whenever
steps are being recorded.
• SCAN MODE: Rotates between
showing steps, distance, calories
and activity time.
Current mode
arrow indicator
Yellow:
RESET
Gray:
SET
Black:
MODE
AUTO MOVEMENT SENSOR
1. To lter out random movements, the
unit remains in standby mode until
5 continuous steps are registered.
Only then are the 5 steps calculated
in, and an Active indicator “
▲”
appears on the upper left of display.
2. When regular walk/run movement
stops, after 2 seconds the timer
pauses and the unit switches to
standby status (Active indicator “
▲”
disappears).
RESETTING YOUR PEDOMETER
Most people prefer to reset step, distance,
and calorie counts daily. To reset: From
STEP, DISTANCE, or CALORIE mode,
press and hold the yellow RESET button
for at least 2 seconds.
10 steps
800-965-2008 • 925-226-0888 • FAX 925-463-0147 • www.ACCUSPLIT.com • support@ACCUSPLIT.com
ACCUSPLIT, Inc. • 2290M Ringwood Ave. • San Jose, CA 95131
960-046
ACCUSPLIT®
ALLIANCE 1590
REPLACING THE BATTERY
When the display starts to dim or goes blank, it is time to
replace the battery. Your pedometer uses one Type LR44
1.5 volt alkaline battery.
To replace:
1. Insert a coin into the slot on the bottom of the case,
and twist counterclockwise to loosen the case front. Lift
case front away.
2. Using a pen or other thin object, push battery sideways
out of its holder. Replace it with a new battery. The
battery’s positive (+) terminal should be FACE UP while
you put it into the pedometer.
3. Align case front over the pedometer and press gently
to snap cover back into place, starting with top.
EXCLUSIVE DISTANCE ACCURACY TIP
Maximize the accuracy of your distance measurement by:
• Walking a measured 0.5 or 1.0 mile/km. (We recommend
that you use a
high school).
• Compare the DISTANCE recorded to the measured
distance. If the pedometer shows you walked LESS than you
actually did, reset your STEP LENGTH to a longer setting. If
the pedometer shows you walked MORE than you actually
did, reset the STEP LENGTH to a shorter setting.
1
⁄4-mile/400 meter track like those found at a
REGISTER NOW Please return your
AL1590 Registration to the Repair
Center address in the warranty, and
we will let you know about future
products.
NO-PROOF-OF-PURCHASE LIMITED WARRANTY
See label inside the lid of your pedometer
• RESET display to zero.
• Walk the track again to test the adjustment, and re-adjust
accordingly.
• Once adjusted DO NOT ALLOW ANYONE ELSE TO CHANGE
THE SETTING because the Activity Pedometer is now set for
your style.
• You are now ready to walk any route, change that route freely
and still get an accurate measurement of distance for your
tness or recreation program.
Email (preferred)
User
Eat Right! Walk More! Live Well! The ACCUSPLIT Lifestyle
 Loading...