

Accusplit AE190XLG, 190XLG User Manual
ACCUSPLIT®EAGLE
ACCUSPLIT
EAGLE
D
ig
iw
alkerXL.co
m
S
T
E
P TIME DIST
CAL
SE
T
4728
MOD
E
RESET
S3–
S1, S2, S4
S
3+
19
0
XL
G
0 2
0
%
40
%
60
%
8
0
%
1
00
%
190
JW200
ACCUSPLIT, Inc.
3090 Independence Drive, Suite 148
Livermore, CA 94551 USA
AE190XLG
PEDOMETER
800-935-1996 • 925-290-1900 • FAX 925-290-1930
www.ACCUSPLIT.com • support@ACCUSPLIT.com
Eat Right! Walk More! Live Well!
e ACCUSPLIT Lifestyle
Functions
• Step counter.
• Automatic Activity Timer.
• Distance in mi or km.
• Calories, based on high-accuracy proprietary formula.
• Trip and Total memories for Steps, Distance, Calories, and
Activity Time.
• Goal tracking for Steps, Distance, Calories, and
Activity Time.
• Clock.
For complete Function Specifications, go to page 37.
2
2 3
970-081
Sept 07
Operating Instructions
Key Features
• Built around the Japanese-made JW200 PedometerEngine™
Step Sensor, the current gold standard for accuracy.
• Extra Large Digits.
• The ACCUSPLIT exclusive case makes this the slimmest
available pedometer built around the JW200 Step Sensor.
• Chromed, Spring Steel clip resists breakage.
• Case includes two leash slots, for attaching safety leash
on either side. Made from tough polycarbonate plastic.
• Total Steps Memory counts to 10,000,000 steps!
• Step filter, can be set from 0-5 steps to further increase
accuracy.
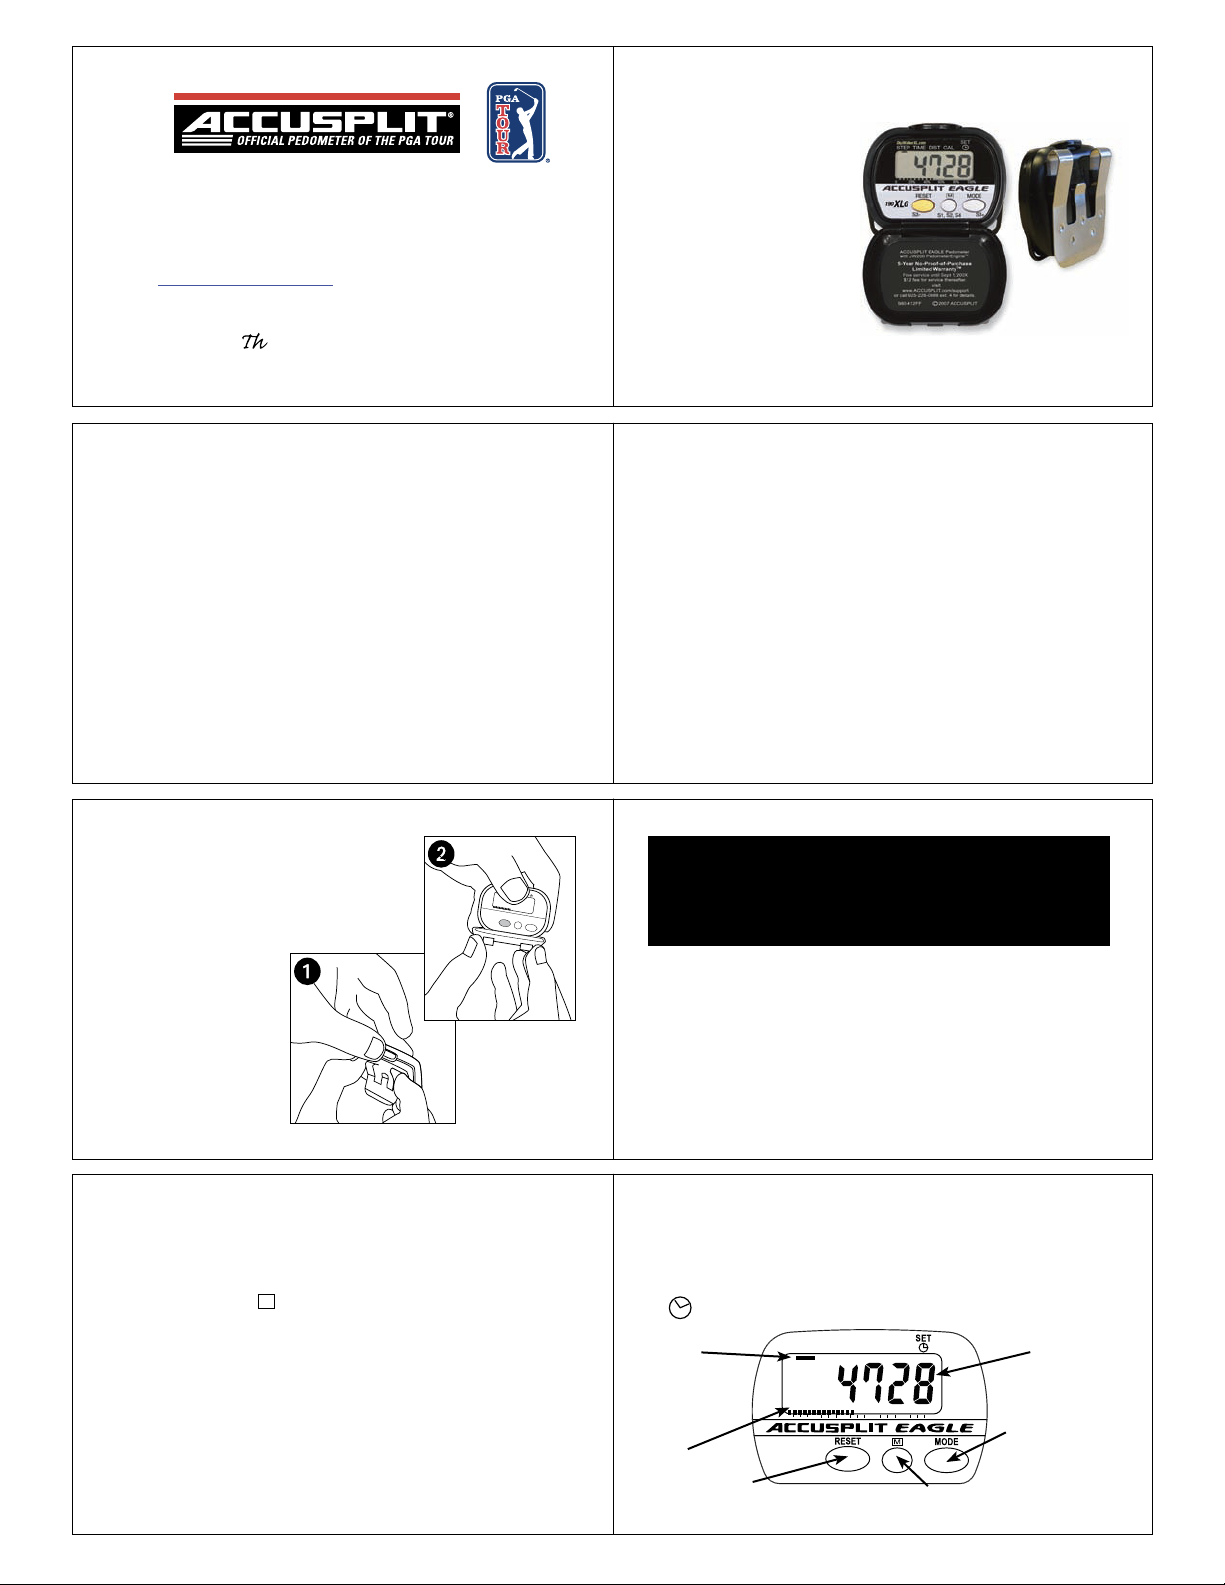
HOW TO OPEN YOUR PEDOMETER
See diagrams at right.
The cover must be closed for the
pedometer to work.
USE IT NOW!
Your pedometer is preset with standardized settings
that allow you to use it now! You can customize the
settings later. Skip to pages 22-31 to use it now!
SETTING UP YOUR PEDOMETER
It’s a good idea to set up your pedometer before first using
it. To record your distance and calories accurately, you will
need to set your stride length and body weight. You may also
wish to set the clock to the correct time of day. Also, you can
change the daily Goal setting from Set mode.
4 5
Getting Acquainted
• Press the MODE button to cycle through the display
modes (Steps, Activity Time, …).
See page 25 and Specifications for details.
M
• Press MEMORY
button to switch back and forth
between Trip and Total memory displays.
See pages 27–30 for a complete explanation.
• The RESET button sets your counts back to zero.
See page 31 for details.
MODES
• STEP: STEP mode shows step count.
• TIME: AUTO ACTIVITY TIMER MODE shows total
activity time in min and sec.
6 7
See page 9 when you are ready to set up your unit.
• DIST: DISTANCE mode shows distance traveled (mi/km).
• CAL: CALORIE mode shows calories burned.
All of the above also display progress towards user-defined
goal.
•
: CLOCK mode shows time of day.
DIGI-WAL KERXL.COM
Mode
indicator
Goal
Display
STEP TIME DIST C AL
0 100%
G
XL
S3- S3+S1,S2,S4
80604020
MY
MEMORY
MEMORY ButtonRESET Button (yellow)
Steps
Counted
MODE Button
Choosing Step, Time, Distance, and Calorie Goals: This
STEP TIME DIST C AL
80604020
0 100%
DIGI-WAL KERXL.COM
190
XL
G
S3- S3+S1,S2,S4
JW200
MY
MEMORY
G
unit can store your personal goals for steps, activity time,
distance, and calories burned during step activity. The default
values are 3,500 steps, 30 minutes of activity time, 1 mile, and
100 calories. These are modest daily goals created with the
assumption that you will reset the unit daily. Most wellness
experts recommend that healthy people should work towards
10,000 steps, one hour of activity time, and 300 calories each
day. As your activity level increases, you can change to more
aggressive goals at any time. Choose goals to fit your current
activity level.
8
SETTING PROCEDURE
ACCUSPLIT products use a common setting procedure
known as “S1- S2-S3-S4.” Here’s how it works:
Press S1 for 2 seconds: Enter the SET mode
Press S2: Change the field to be set
Press S3: Change the field value
Press S4 for 2 seconds: Exit the SET mode
You can enter and exit Set mode from any of the regular
display screens. Once in Set mode, you can cycle through all
of these settings by pressing S2 repeatedly:
Set Step Goal g Set Activity Time Goal g Set Distance
Goal g Set Stride Length g Set Calorie Goal g Set Weight g
Set Clock Hours g Set Clock Minutes g Set Step Goal
9
We recommend that you adjust the settings all at once, using
the procedure below.
Steps
flash
while
setting
Step
“G” for
Goal
Goal
Setting
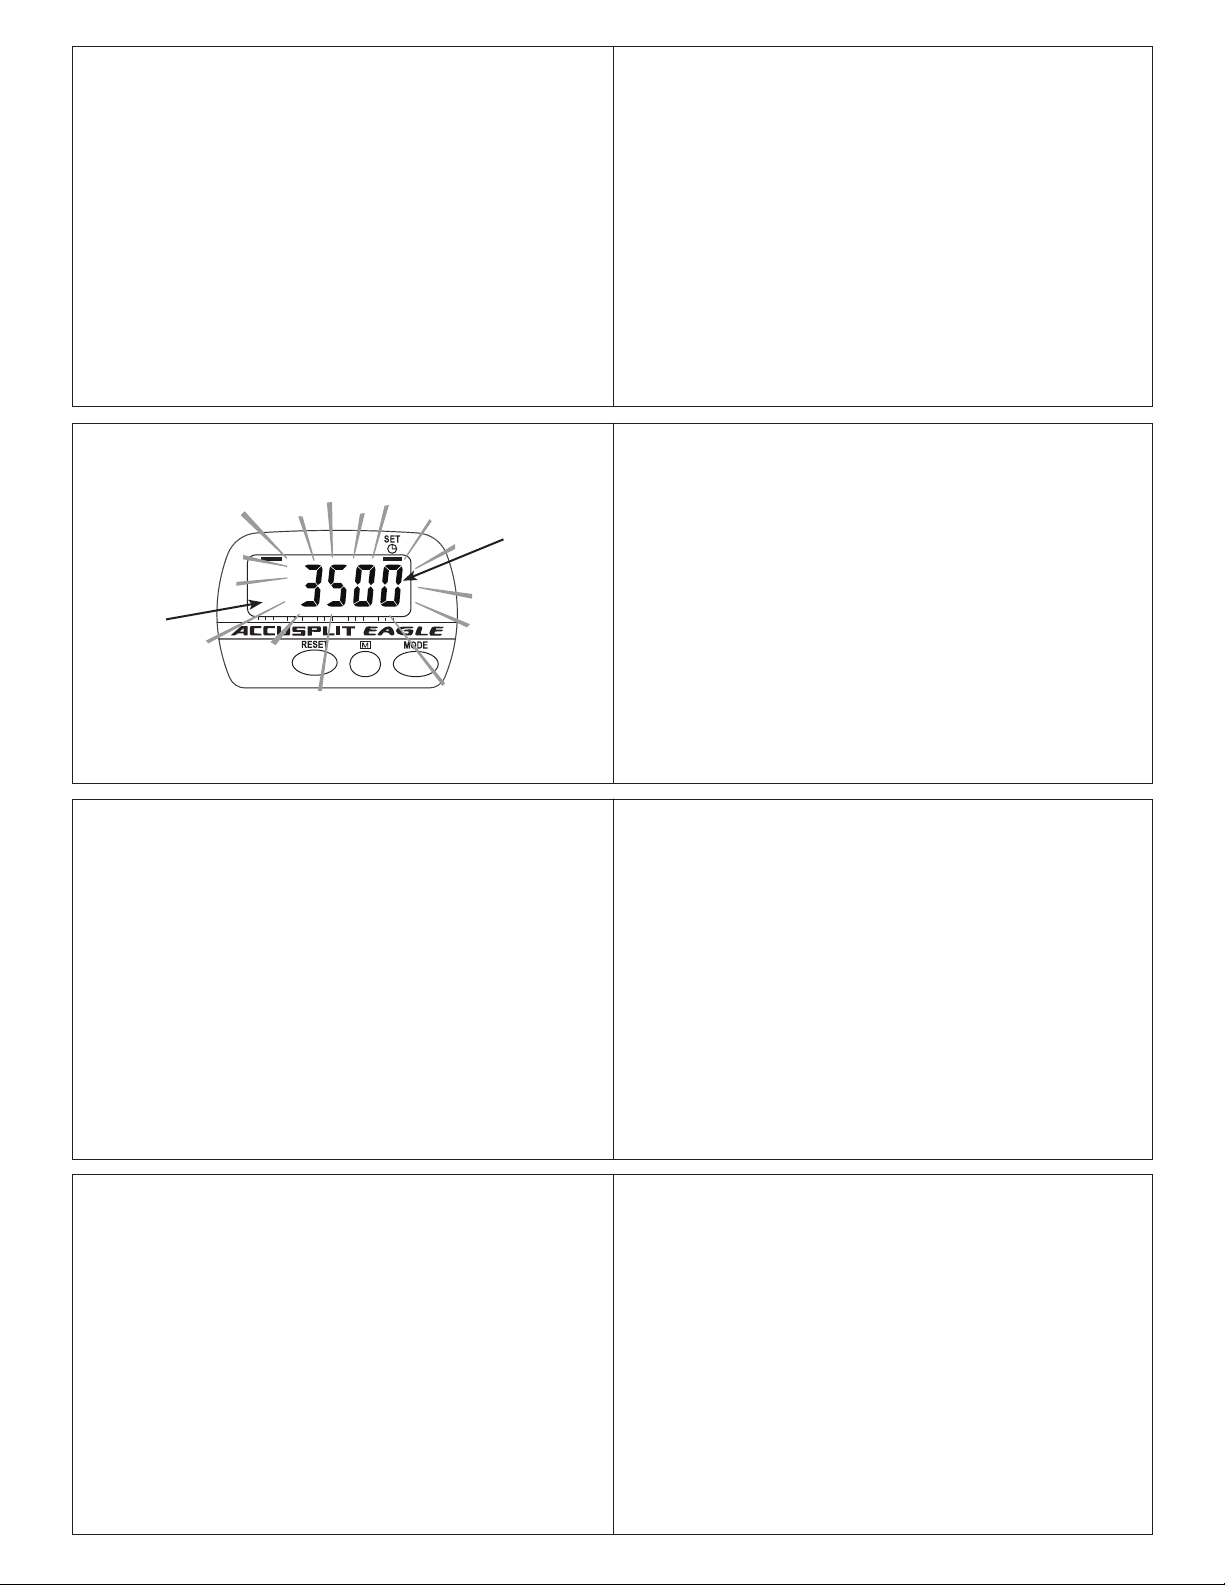
Setting Step Goal Mode
10
3. Press the S3 + (MODE) button to increase the Step Goal
value. Press the S3 - (RESET) button to decrease the Step
Goal. Hold the buttons down to change values quickly.
4. Press the S2 (MEMORY) button to select the next setting
(adjust the Activity Time Goal).
Entering set mode and setting Step Goal
1. Repeatedly press the MODE button until the pedometer
displays the current step count. (The display will show
a line underneath the word “STEP” on the label.)
2. Press and hold the S1 (MEMORY) button for 2 seconds.
The step count display will start to flash, showing that
you’ve entered SET mode. The indicator bar will still be
underneath the word “STEP” on the label. You’ll also
notice the “G” indicator has come on, indicating that you
are ready to set your Step Goal.
11
Setting Activity Time Goal
1. (Continuing from above) - After pressing S2 (MEMORY),
you will see the indicator bar shift to be underneath
“TIME” on the label. The “G” indicator will be on. The
display will show a flashing time, which is your Activity
Time Goal set point.
2. As before, press the S3 + (MODE) button to increase the
Activity Time Goal, and press the S3 - (RESET) button to
decrease the Activity Time Goal. Hold the buttons down to
change values quickly.
3. Press the S2 (MEMORY) button to adjust your Distance
Goal.
12
Setting Distance Goal
1. (Continuing from above) - After pressing S2 (MEMORY),
you will see the indicator bar shift to be underneath “DIST”
on the label. The “G” indicator will be on. The display will
show a flashing number, which is your Distance Goal set
point (in miles).
2. As before, press the S3 + (MODE) button to increase
the Distance Goal, and press the S3 - (RESET) button
to decrease the Distance Goal. Hold the buttons down to
change values quickly.
3. Press the S2 (MEMORY) button to adjust your Stride
Length.
13
Setting Stride Length
1. (Continuing from above) - After pressing S2 (MEMORY),
you will see the “G” indicator go out, and the “in”
indicator come on. The display will show a flashing
number, which is your Stride Length set point (in inches).
2. As before, press the S3 + (MODE) button to increase the
Stride Length (in increments of ¼ inch), and press the
S3 - (RESET) button to decrease the Stride Length. Hold
the buttons down to change values quickly.
3. Press the S2 (MEMORY) button to adjust your Calorie Goal.
1514
 Loading...