

Accuphase DP-77 Owners Manual
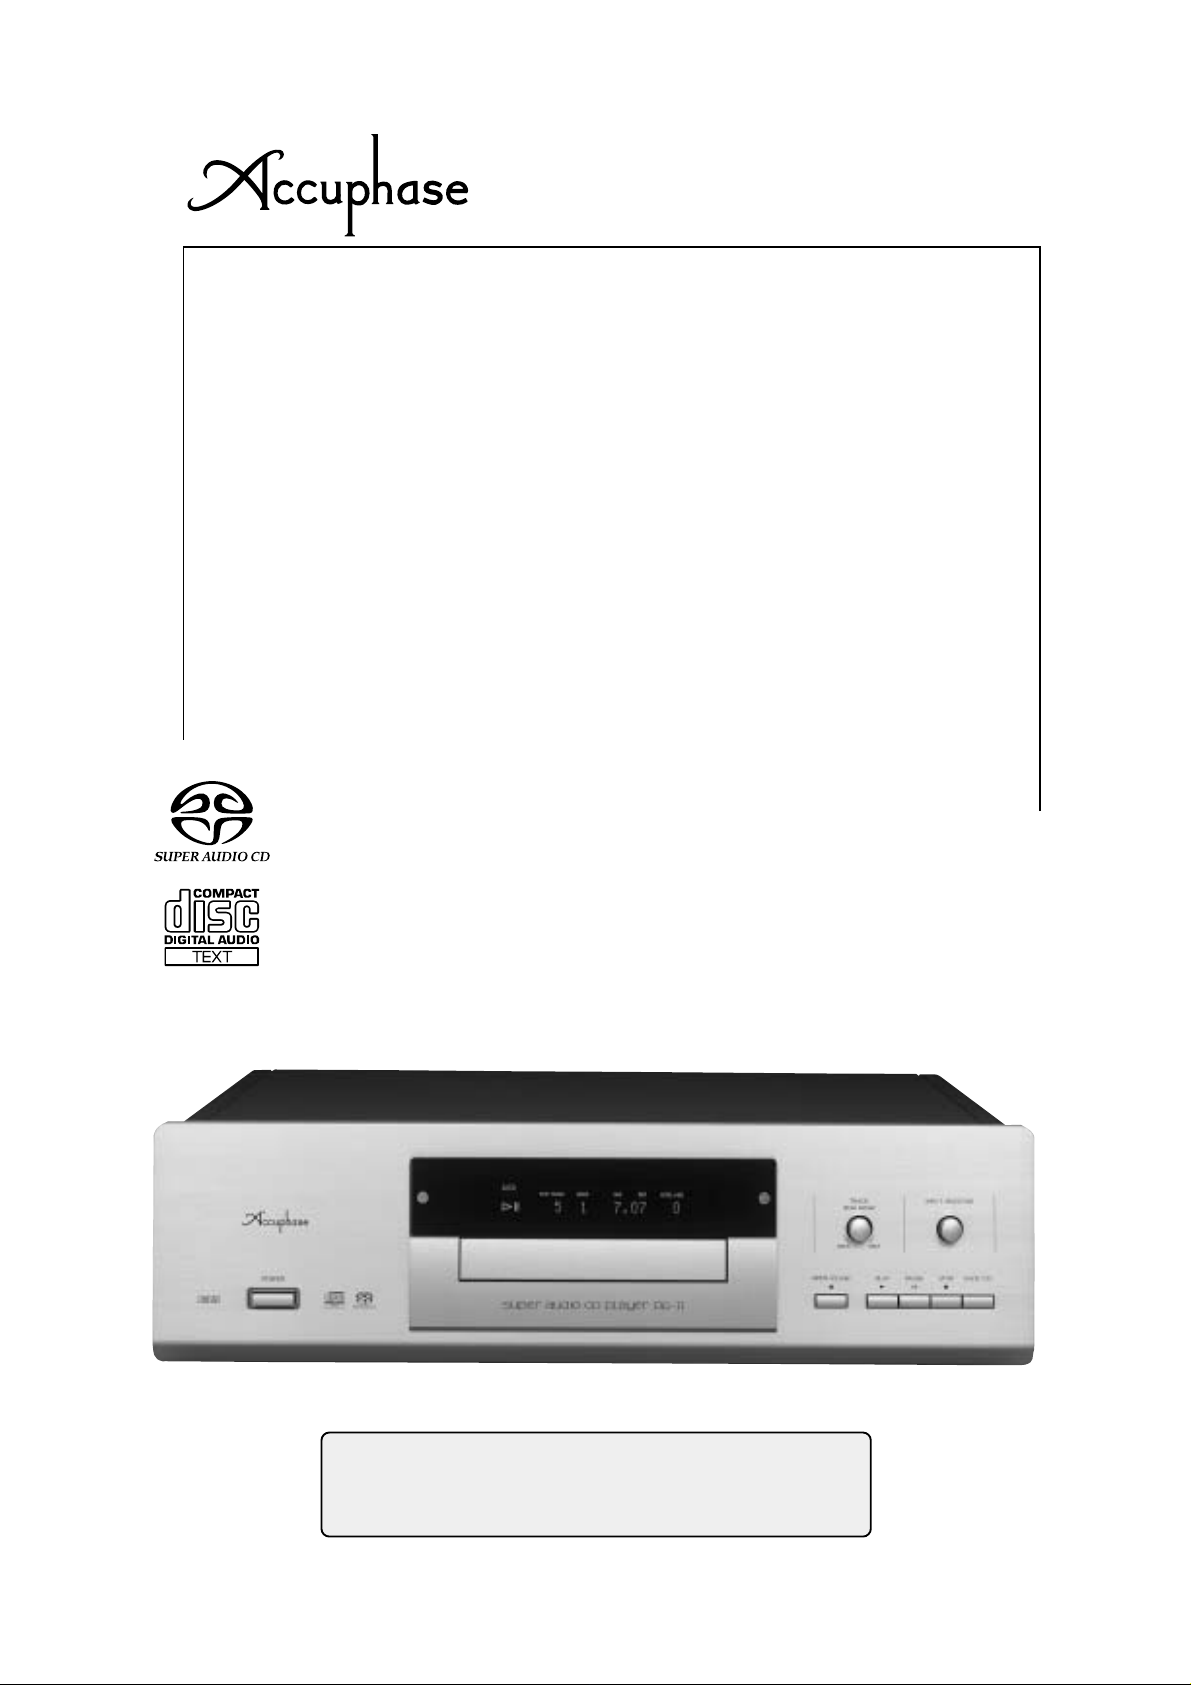
SUPER
AUDIO CD
PLA YER
INSTRUCTION
DP
-
77
MANUAL
Please read this manual and the separate Important
Safety Instructions thoroughly before use, and retain
these documents for future reference.
Thank you for purchasing this
Accuphase product, which is another
manifestation of our efforts to create
the highest quality audio components.
The strictest control was exercised
throughout our entire manufacturing
process in producing this component−
from basic research, the selection of
each part, assembly, testing, data
recording, up to packing and shipping−
so that we supply the product with every
confidence that it will provide full satisfaction and pride in ownership.
We are pleased to heartily welcome
you to the fast-growing Accuphase circle
of distinguished audio enthusiasts and
devotees of true sound.
About the mark
This mark indicates an important instruction that
must be observed to prevent the possibility of
death or injury to persons or severe damage to
the unit. To ensure safe use of the product, make
sure that such instructions are fully understood
and observed.
WARNING:
Disregarding instructions bearing this
mark incurs the risk of death or
severe injury.
CAUTION:
Disregarding instructions bearing this
mark incurs the risk of light injury to
persons or damage to the product.
CONTENTS
1. Naming of Parts
Front Panel, Rear Panel 1
Display / Remote Commander
2. WARNINGS 3
Before Use / Supplied Accessories 3
PRECAUTIONS / Usage Precautions
Connection Precautions
Recording With the DP-77
Compatible Disc Types
3. Connection Diagram 6
4. Parts and Functions
5. Operation
Use as a Regular SACD/CD Player 10 - 19
Basic Playback Steps 10
Function Mode Selection 11
Display brightness/Power-on play
()
Auto-pause/Return settings to factory defaults
Display
Display During Play
Display in Stop Mode
Display Mode Selection
Text Information Display
Various Play Functions
Pausing Play
Standby
Starting Play From a Specific Track
Searching for a Location Within a Track
Repeat Play 16, 17
Shuffle Play
Program Play
Using the DP-77 as a Transport
Connection to the DC-330
Digital Connection of the DP-77 to the DC-330 or DF-35
Connection to the DC-101
Using the DP-77 as a Digital Processor
Input of SACD/CD, MD, DAT or Other Digital Signals
Recording/Playback With a Digital Recorder
DG-28/DG-38 Connection
Digital Connection Example
Analog Connection Example
6.
Useful Options for the DP-77
Option Board Installation 33
7. Remote Control
Guaranteed Specifications
8.
9. Performance Graphs
Block Diagram
10.
11.
Troubleshooting
7 - 9
12
12
12
13
14
14
14
15
17
18, 19
20, 21
20
21
21
22
23
24
25 - 27
25, 26
27
28 - 32
34
35
36
37
38
2
4
5
5
5
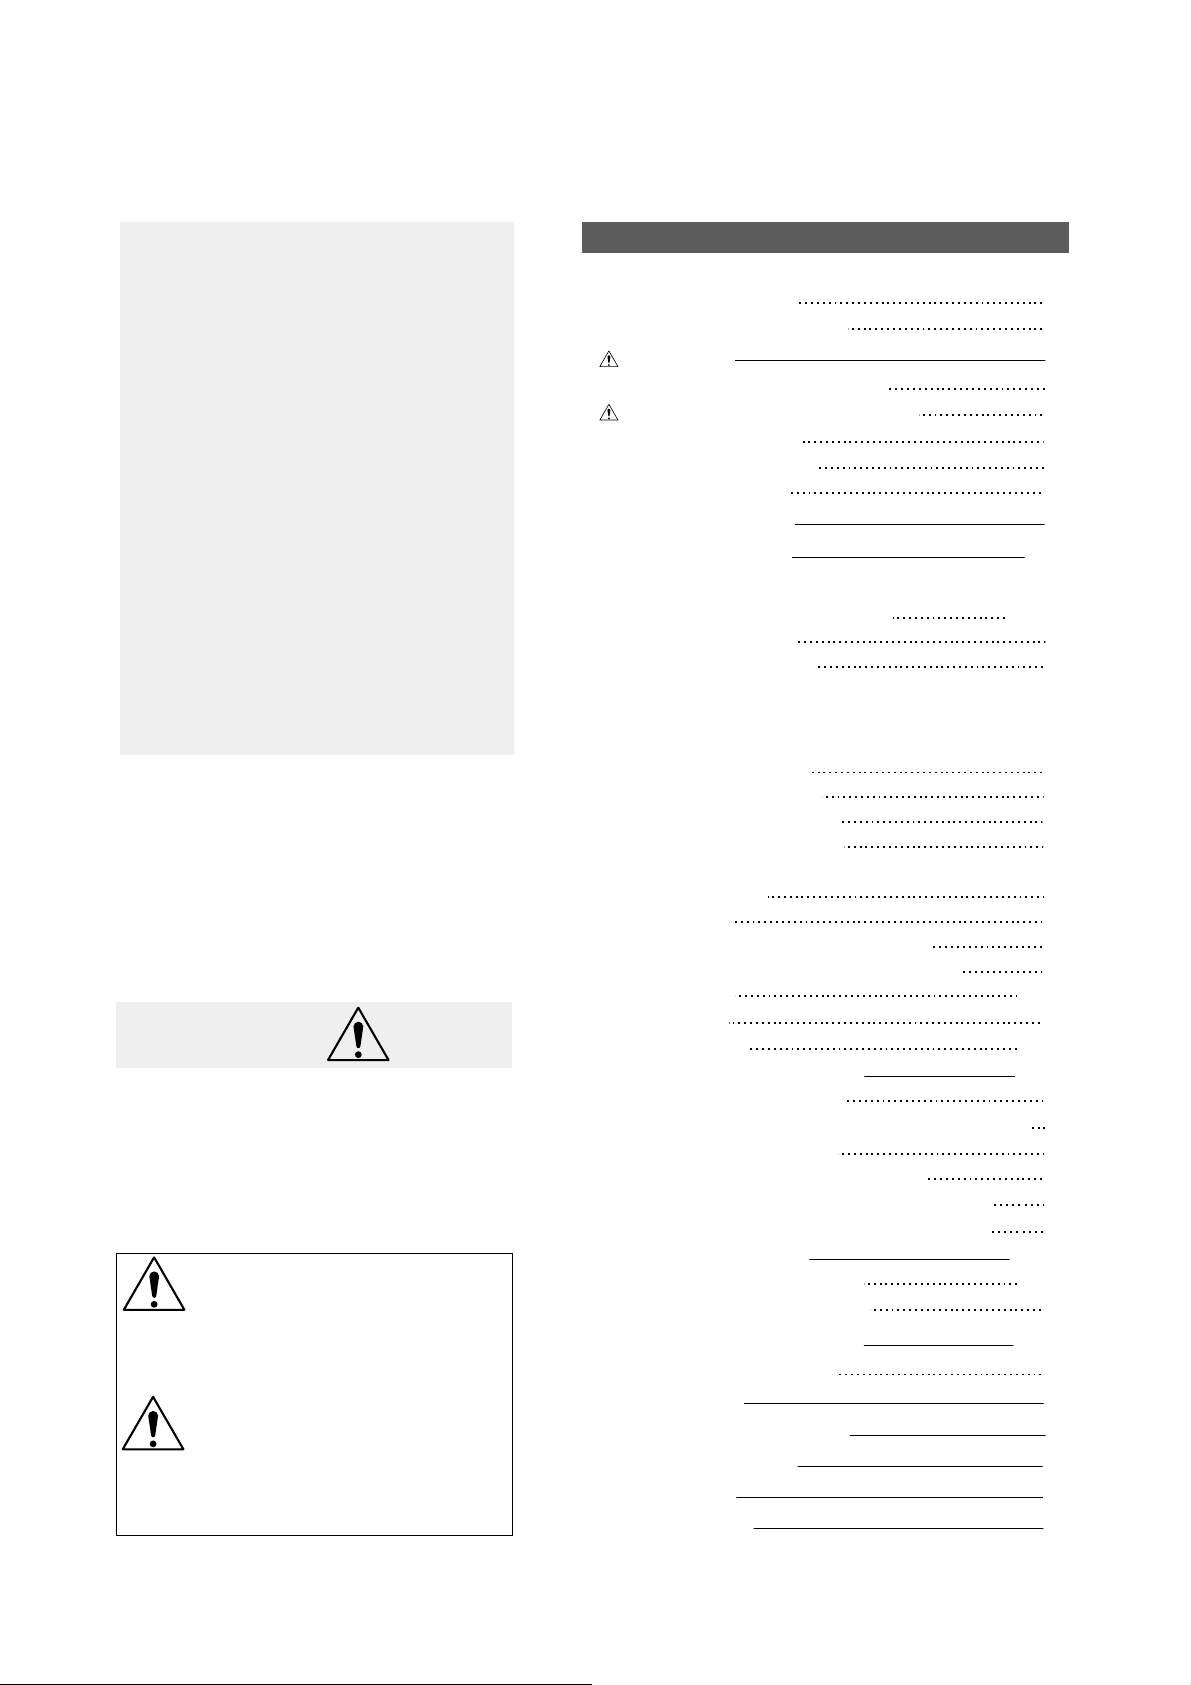
1. Naming of Parts
:
For detailed explanations, please refer to the pages given in brackets.
FRONT PANEL
8
Remote sensor
(page 7, 34)
1
POWER
switch
(page 7)
REAR PANEL
9
Display
(page 2, 7, 12)
2
Disc tray
(page 7)
10
3
OPEN/CLOSE
button for disc tray
(page 7, 10)
TRACK
search knob
[PUSH: ENTER]
(page 7, 11)
4
PLAY button
(page 7, 10)
5
(page 7, 10)
11
INPUT SELECTOR
(page 7, 22)
PAUSE button
7
SACD/CD button
(page 7, 10)
6
■
STOP button
(page 7, 10)
[press for 2 seconds
setting mode]
(page 11)
12
OPTION board slots 1, 2
(page 8)
13
DIGITAL INPUTS
(page 8, 22, 23)
※
14
TRANSPORT OUTPUTS
(page 8, 20)
16
AC inlet
(page 8)
This product is available in versions for 120/230 V AC.
Make sure that the voltage shown on the rear panel
matches the AC line voltage in your area.
15
ANALOG OUTPUTS
(page 8)
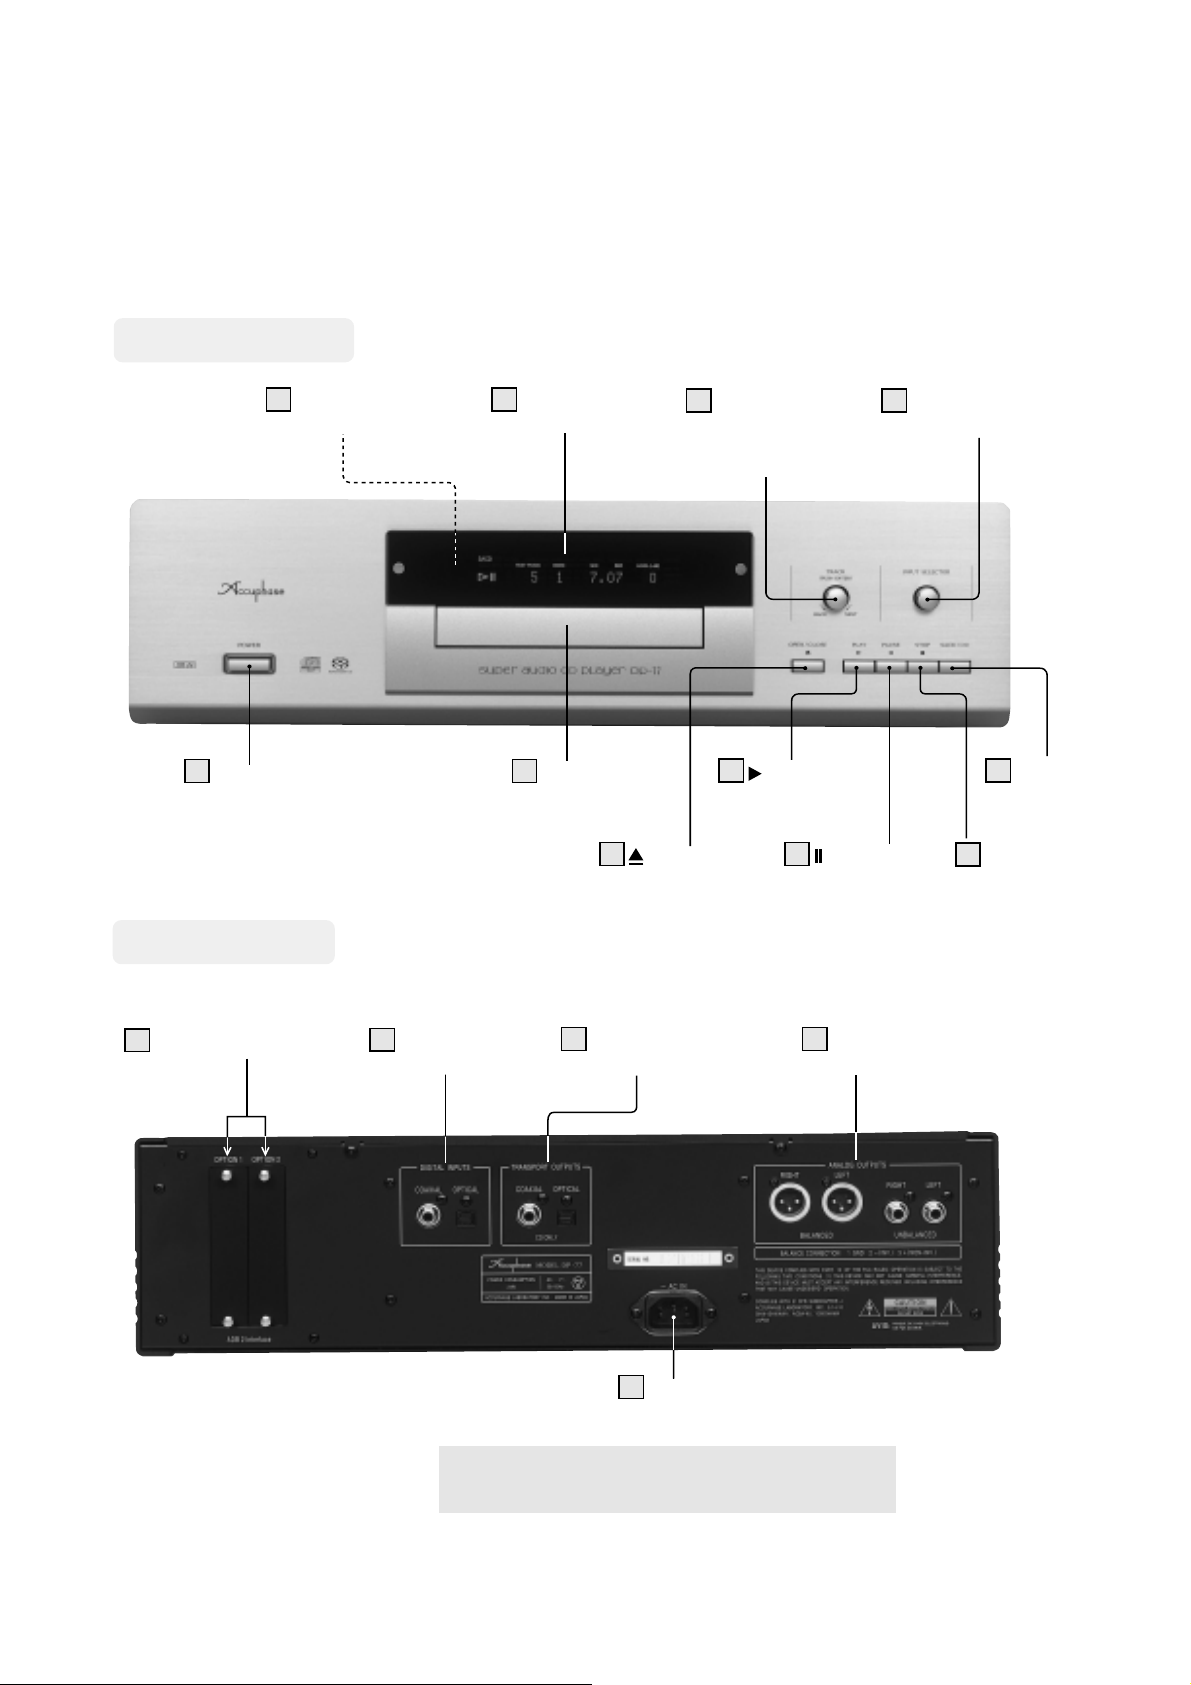
1
Display
6
□
(Display contents are for illustration only, actual indications may differ.)
See page 12, 13
SACD : Lights up during SACD playback
CD : Lights up during CD playback
SACD
MULTI-TEXT TRACK INDEX DISC ARTIST MIN SEC
Lights up
during pause
Lights up
during play
MULTI-TEXT : Lights up when disc contains text in multiple languages
TEXT : Lights up when disc contains text
TRACK : Lights up during track name or track number display
INDEX : Lights up during index display
DISC : Lights up during disc name display
ARTIST : Lights up during artist name display
MIN, SEC : Lights up during play time minutes/seconds display
Lights up during hybrid
disc playback
HYBRID DISC
Lights up during
shuffle playback
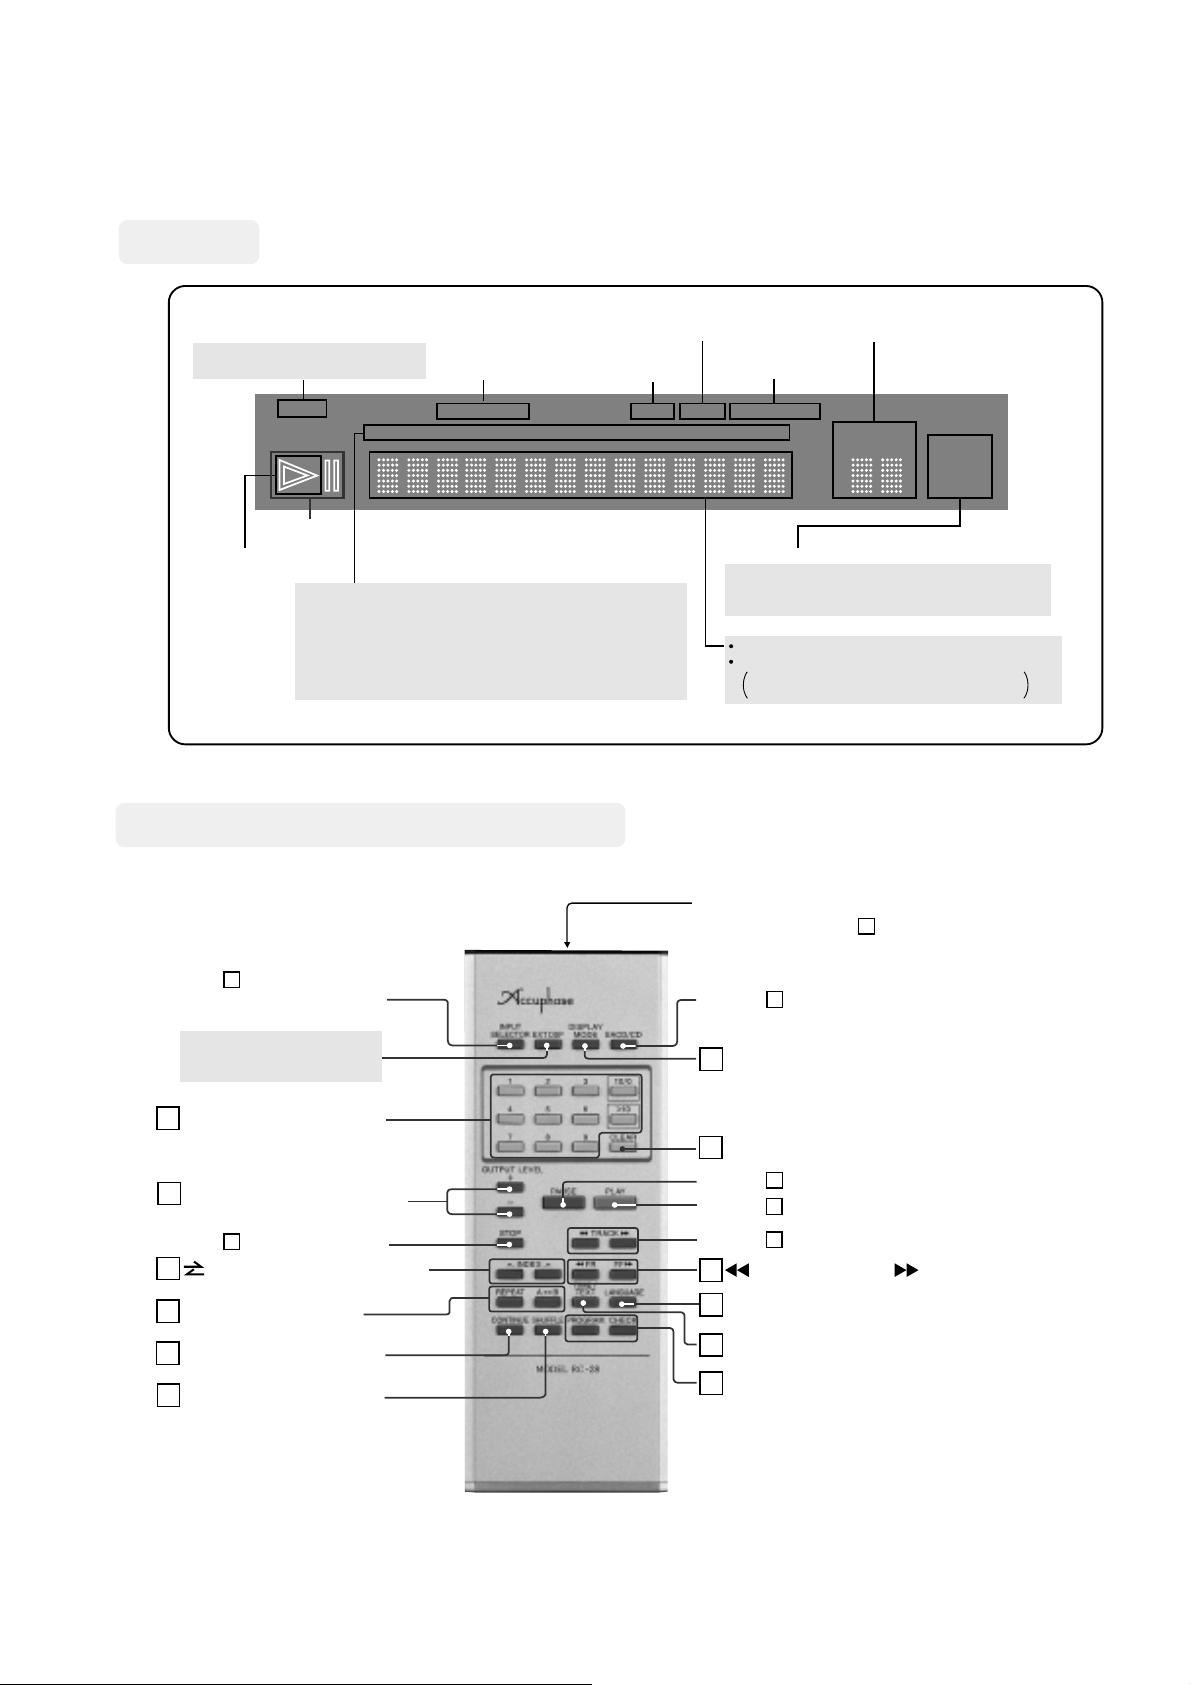
Remote Commander RC-28 (supplied)
(For information on use, see page 34.)
Lights up in program mode
Lights up during
repeat playback
SHUF PROG REPEAT1A-B
Lights up during processor operation
OPT : Optical fiber input of DIGITAL INPUTS is used
COAX : Coaxial input of DIGITAL INPUTS is used
ANALOG : Analog option board is used for input
Shows play track, total number of tracks, play time, etc.
For text information
Max. 14 characters can be shown at one time
Information longer than 14 characters scrolls once
Transmitter
Point at remote sensor
Analog output level
LEVEL (-dB)
8
OPT
COAX
ANALOG
Same as
Input selector buttons
17
18
Same as STOP button
19
20
21
22
11
Because DP-77 does not
have an EXT DSP function,
this button has no effect
Direct play buttons
(page 7, 22)
(page 9, 14)
Output level adjustment buttons
6
Index search buttons
Repeat buttons
CONTINUE button
Shuffle play button
(page 9, 16)
(page 9, 17)
(page 9, 17)
(page 9)
(page 7)
(page 9, 15)
Same as SACD/CD button
23
24
Same as PAUSE button
Same as PLAY button
Same as Track search buttons
25
26
27
28
7
Display mode selector button
CLEAR button
10
(page 9)
5
4
(page 7)
(page 9)
(page 7)
(page 7)
(page 7)
FR (Fast Reverse) / FF (Fast Forward) buttons
LANGUAGE
Text selector button
Time mode/Text switching buttons
Program play buttons
(page 9)
(page 9, 13, 19)
(page 9, 18, 19)
(page 9)
2
2.
WARNING:
Please read this manual and the separate Important Safety Instructions
thoroughly before use, and retain these documents for future reference.
Be sure to connect the power cord of the
DP-77 only to an AC outlet of the same
voltage as indicated on the rear panel of
the unit.
●
This unit can be used in areas with an AC line
frequency of 50 or 60 Hz.
To avoid the danger of electric shock,
handle the power cord with care.
●
Do not use the unit with any other than the supplied power cord.
●
Never touch the plug with wet hands.
●
Do not nick or excessively bend the cord, and
do not place heavy objects on it.
●
If the power cord is damaged, contact your
Accuphase dealer or an authorized service station.
Attempting to replace the feet of the unit is
dangerous. The fastening screws may
touch internal parts, leading to a risk of electric shock or damage to the unit.
Never attempt to remove the top or bottom
plate of the unit. Otherwise there is a severe risk of electric shock and damage to
the unit.
●
If the fuse has blown, contact your Accuphase
dealer or an authorized service station. Do not
attempt to replace the fuse or perform any alterations inside the unit.
In the following cases, immediately turn off
the power and disconnect the power cord
from the AC outlet. Otherwise there is a severe risk of electric shock and damage to
the unit. If you observe smoke coming from
the unit or other signs of a problem, contact your Accuphase dealer or an authorized
service station.
●
The unit has been exposed to water or chemicals.
●
A foreign object (metal or flammable material) has
entered the unit.
●
Smoke or an unusual smell is coming from the unit.
●
The unit was subject to strong shock, dropped, or dam-
aged externally.
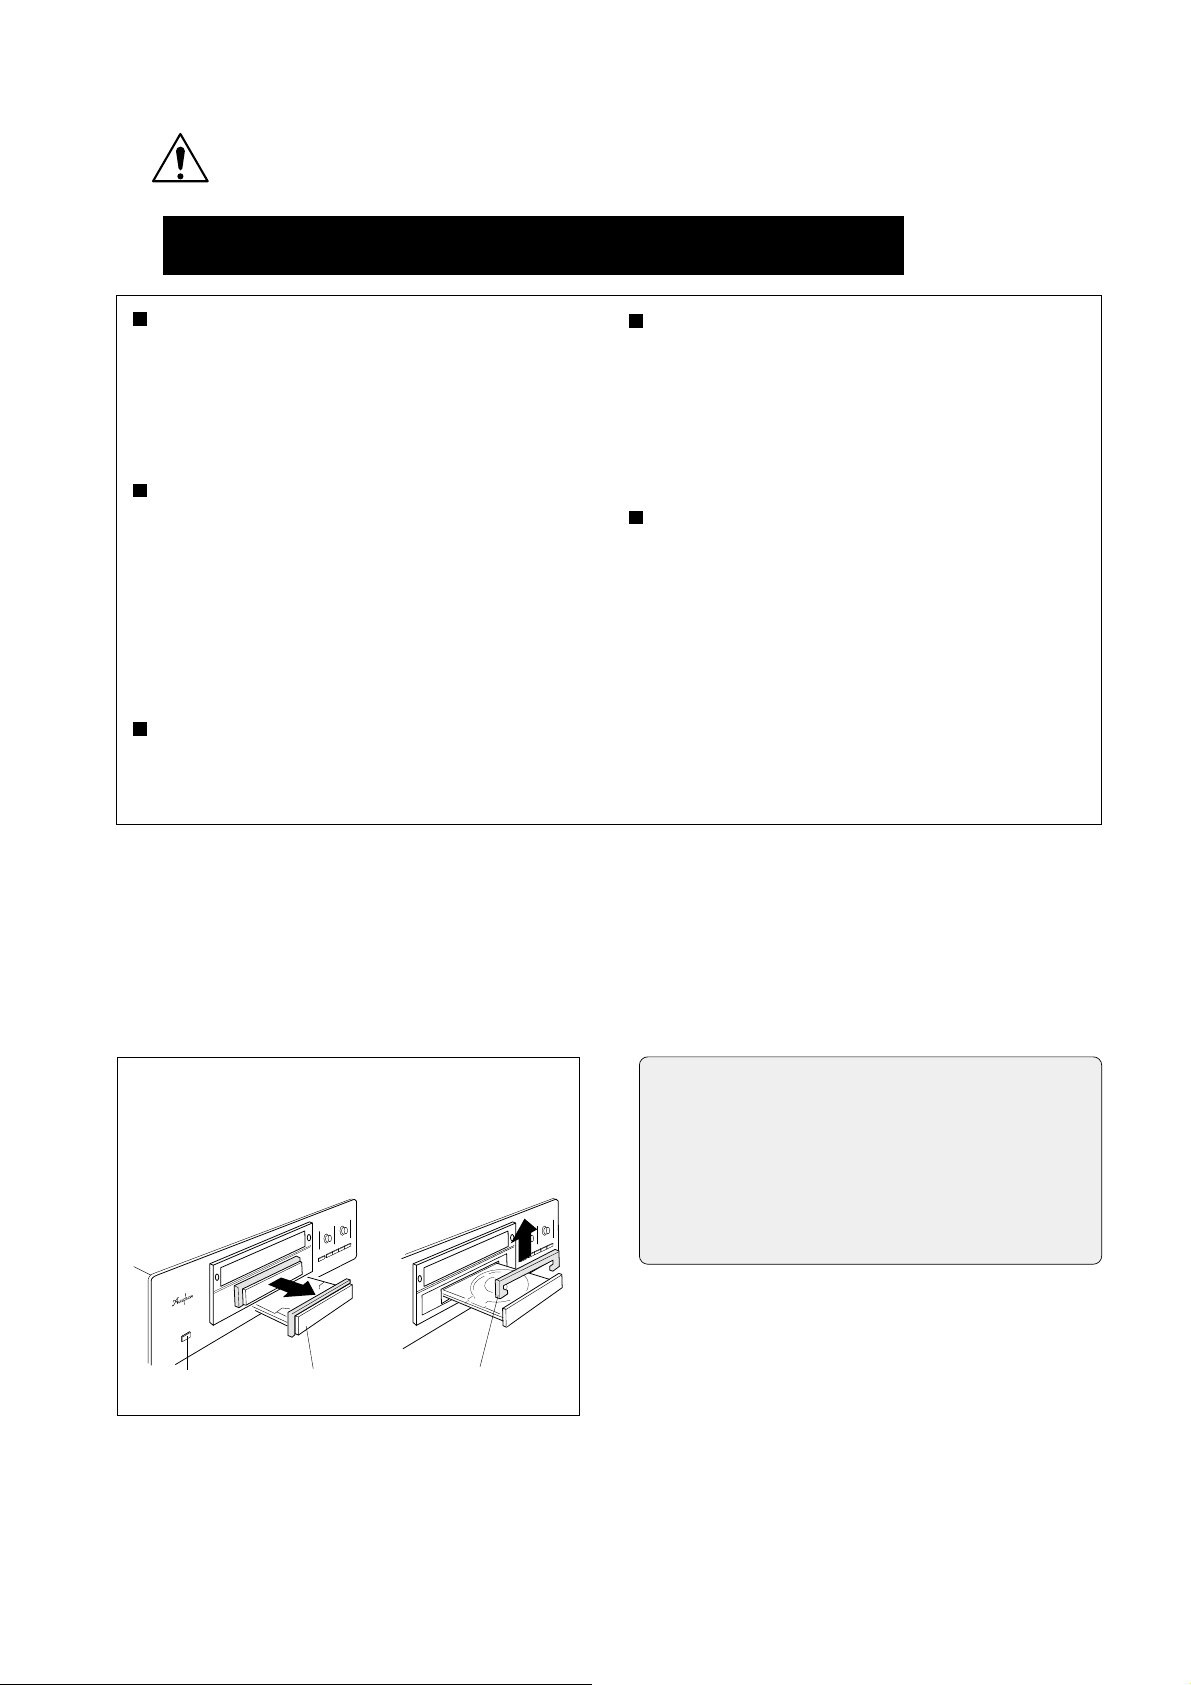
Before Use
To prevent damage during transport, the optical assembly
with the laser pickup is locked and protected by a spacer.
Before use, remove the spacer as shown in the illustration.
Turn the unit on. The disc tray
slides out after about 12 seconds.
Remove the spacer.
Power switch
Disc tray
Remove spacer
Spacer
Verify that the supplied accessories are complete
●
Instruction manual …………………… 1
●
Important Safety Instructions ……… 1
●
AC power cord (2 m)…………………… 1
●
Audio cable with plugs (1 m) ………… 1
●
IEC R03 (size AAA) battery …………… 2
●
Remote commander RC-28…………… 1
3

PRECAUTIONS
■Installation location
Choose a firm, level surface on which to place the unit. To prevent damage or accidents avoid the following locations :
●
Locations without proper air circulation or with high levels of
dust or humidity
●
Locations exposed to direct sunlight
●
Locations close to heating appliances
●
Locations which can get very cold
●
Locations which are not level or are subject to vibrations.
Never stack audio components directly on top of each other.
Keep the unit away from tuners, TV sets, and VCRs
●
If placed close to such equipment, noise and picture distortion may occur (especially when placed close to a room
antenna).
●
Route the power cord of this unit and input/output cables
at a distance from any antenna cables.
■Never view the laser beam directly.
This unit contains a laser that can cause eye injury.
■Turn all components off before making any connections.
When the RCA-type phono plugs of ordinary audio cables are
connected or disconnected, the negative and positive leads do
not make or break contact simultaneously. This momentarily nongrounded condition causes a current surge (heard as a loud
pop noise), which may damage the speakers. To prevent this,
be sure to switch off the power before making input or output
connections.
■Verify that all connections are established correctly before
turning on the POWER switch.
■Always turn the power off before inserting or removing any
option boards.
■Do not turn the POWER switch off and immediately on again.
(Wait at least 10 seconds.)
Usage Precautions
■
Condensation on pickup lens
In the following cases, moisture condensation may form on the
optical lens of the unit:
●
Immediately after the room is heated.
●
When the unit is placed in an extremely damp or humid room.
●
When the unit is moved from a cold to a warm location.
If condensation occurs
The laser pickup cannot read the signals on the disc and the
player does not operate correctly or not at all.
In such a case, remove the disc and leave the unit turned on
for about one hour. This allows the moisture to evaporate and
will restore normal operation.
〜 Disc handling 〜
●
Protect discs from direct sunlight, high temperatures,
and high levels of humidity.
●
After playback, always return the discs to their boxes.
●
Take care not to leave fingerprints or smudges on the recorded (shiny) side of the disc, since these can lead to a
degradation in sound quality.
●
If a disc has become dirty, wipe it lightly with a soft cloth,
moving from the center outward in a radial pattern.
●
Do not use any cleaners, solvents or antistatic sprays, since
these can damage the disc.
■Disconnect the power cord from the AC outlet if the unit is
not be used for an extended period of time.
■Do not use contact refreshers or other chemicals on the input and output jacks and the speaker terminals, since these
can cause aging in resin parts and lead to damage.
■Listening level
The frequency response of SACDs extends into the ultra high
frequency range beyond the threshold of human hearing. If the
volume is turned up while no signal is heard, noise or sudden
loud passages can cause damage to the amplifier or loudspeakers. Always turn down the volume to safe levels.
■HS-Link cable connection
Use HS-Link cable to input the signal from the DP-77 to an audio
component equipped with an HS-Link connector.
●
Use only HS-Link cable from Accuphase.
●
Take care not to accidentally connect the unit to a computer
LAN or similar, using the same RJ-45 connector. This may
result in fatal damage to either equipment.
Unit maintenance
●
If required, clean the unit carefully with a soft, slightly moistened cloth, and then wipe it dry. Never use solvents or abrasive cleaning agents, since these will damage the finish.
●
Do not use contact refreshers or other chemicals on the input and output jacks and the speaker terminals, since these
can cause aging in resin parts and lead to damage.
4
Connection Precautions
Compatible Disc Types
The DP-77 is an integrated SACD/CD player, but the transport and
processor sections, although housed in one enclosure, are entirely
separate and can be used separately, thanks to dedicated input
and output connectors. The unit also has option board slots which
allow increasing the number of digital inputs or outputs, as required.
■Using the DP-77 as an SACD/CD transport……page 20, 21
●
Connect the DIGITAL OUTPUTS to the DC-330, DC-101 or
similar.
Note: The HS-Link output connector carries the SACD or CD digi-
tal signal. The COAXIAL connector carries only the CD
digital signal.
■Using the DP-77 as a digital processor……page 22, 23
●
Connect the digital equipment to the DIGITAL INPUTS.
●
You can also connect digital equipment to the inputs of installed option boards.
■Combination of DP-77 and DG-28
●
Digital connection……… page 25, 26
●
Analog connection……… page 27
/DG-38
■For information on option boards, see pages 28 - 32.
Recording With the DP-77
SACD Digital Recording
For copyright reasons, digital recording from an SACD source is
not possible.
SACD Analog Recording
●
Connect the DP-77 to an analog preamplifier. Analog recording is possible by using the REC outputs of this preamplifier.
* Recording from the analog outputs of an option board in the
DP-77 is not possible.
CD Digital Recording
Using the TRANSPORT OUTPUTS or the digital output on an
option board, digital recording of the CD signal is possible. See
page 24.
* Digital recording of the CD signal via the HS-Link connector is
not possible.
* The SCMS (Serial Copy Management System) prevents sub-
sequent recording of a signal that has already been recorded
once from a digital source. Therefore recording is possible
only for one generation.
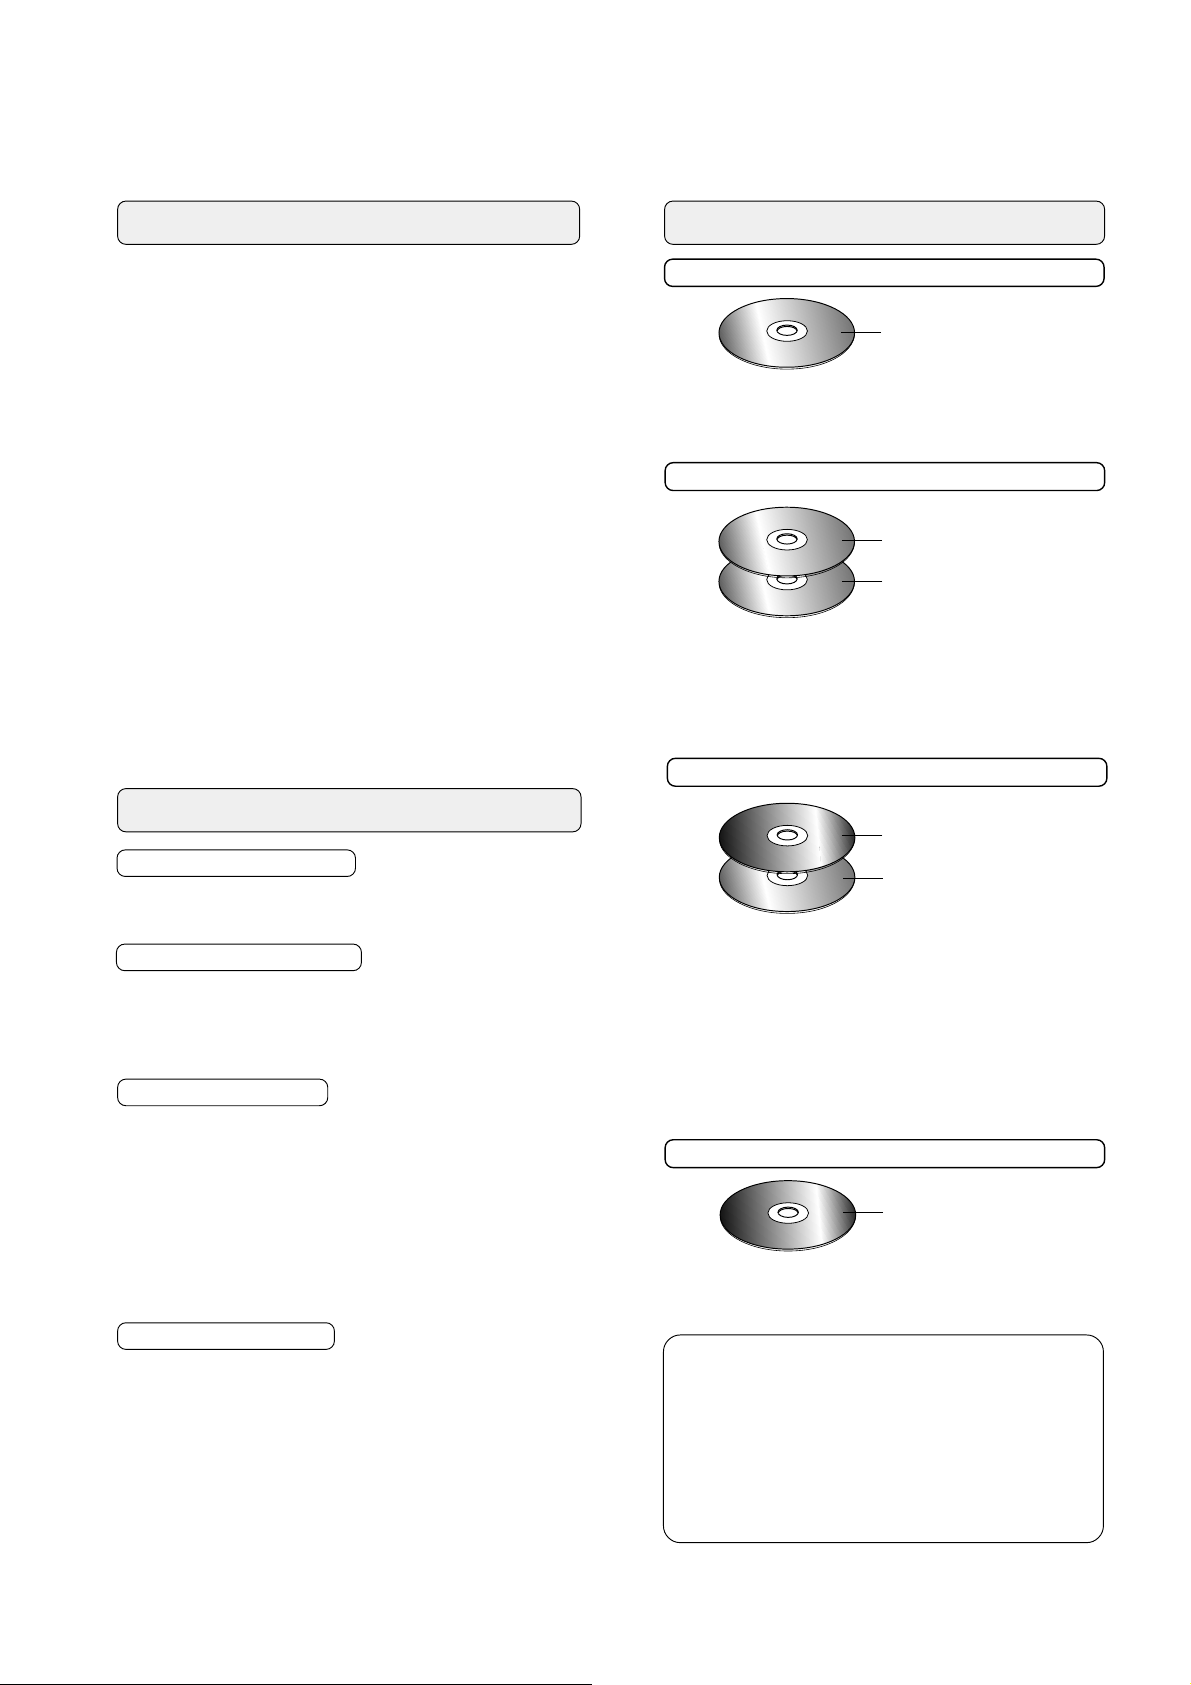
SACD Single Layer Disc
HD (High Density) layer
●
This type of SACD has a single HD layer.
●
The HD layer contains the SACD signal only.
SACD Dual Layer Disc
HD layer
HD layer
●
This type of SACD has two HD layers for extended playing
time.
●
Since the two HD layers are stacked on the same side of
the disc, turning the disc over is not necessary.
SACD + CD Hybrid Disc
CD layer
HD layer
●
This disc contains both an HD layer and a conventional
CD layer.
●
On the DP-77, the user can select the desired layer with
the SACD/CD button.
●
Since the two layers are stacked on the same side of the
disc, turning the disc over is not necessary.
●
The CD layer of the disc can also be played on a conventional CD player.
CD
CD layer
●
This is the conventional CD format.
CD Analog Recording
●
Connect the DP-77 to an analog preamplifier. Analog recording is possible by using the REC outputs of this preamplifier.
●
Recording from the analog outputs of an option board in the
DP-77 is also possible.
* If the HS-Link is used for connection to a DC-330, DC-101 or
similar, recording from the analog outputs of an option board
in such a unit is not possible.
Disc types that cannot be played on the DP-77:
●
CD-ROM
●
DVD-Audio
※If one of the above disc types is inserted by mistake, an
error message is shown and noise may be present in the
output.
※Depending on the recording condition some CD EXTRA
or CD-R discs may not function correctly.
5
●
DVD
●
CD-RW
●
SACD Multi-ch
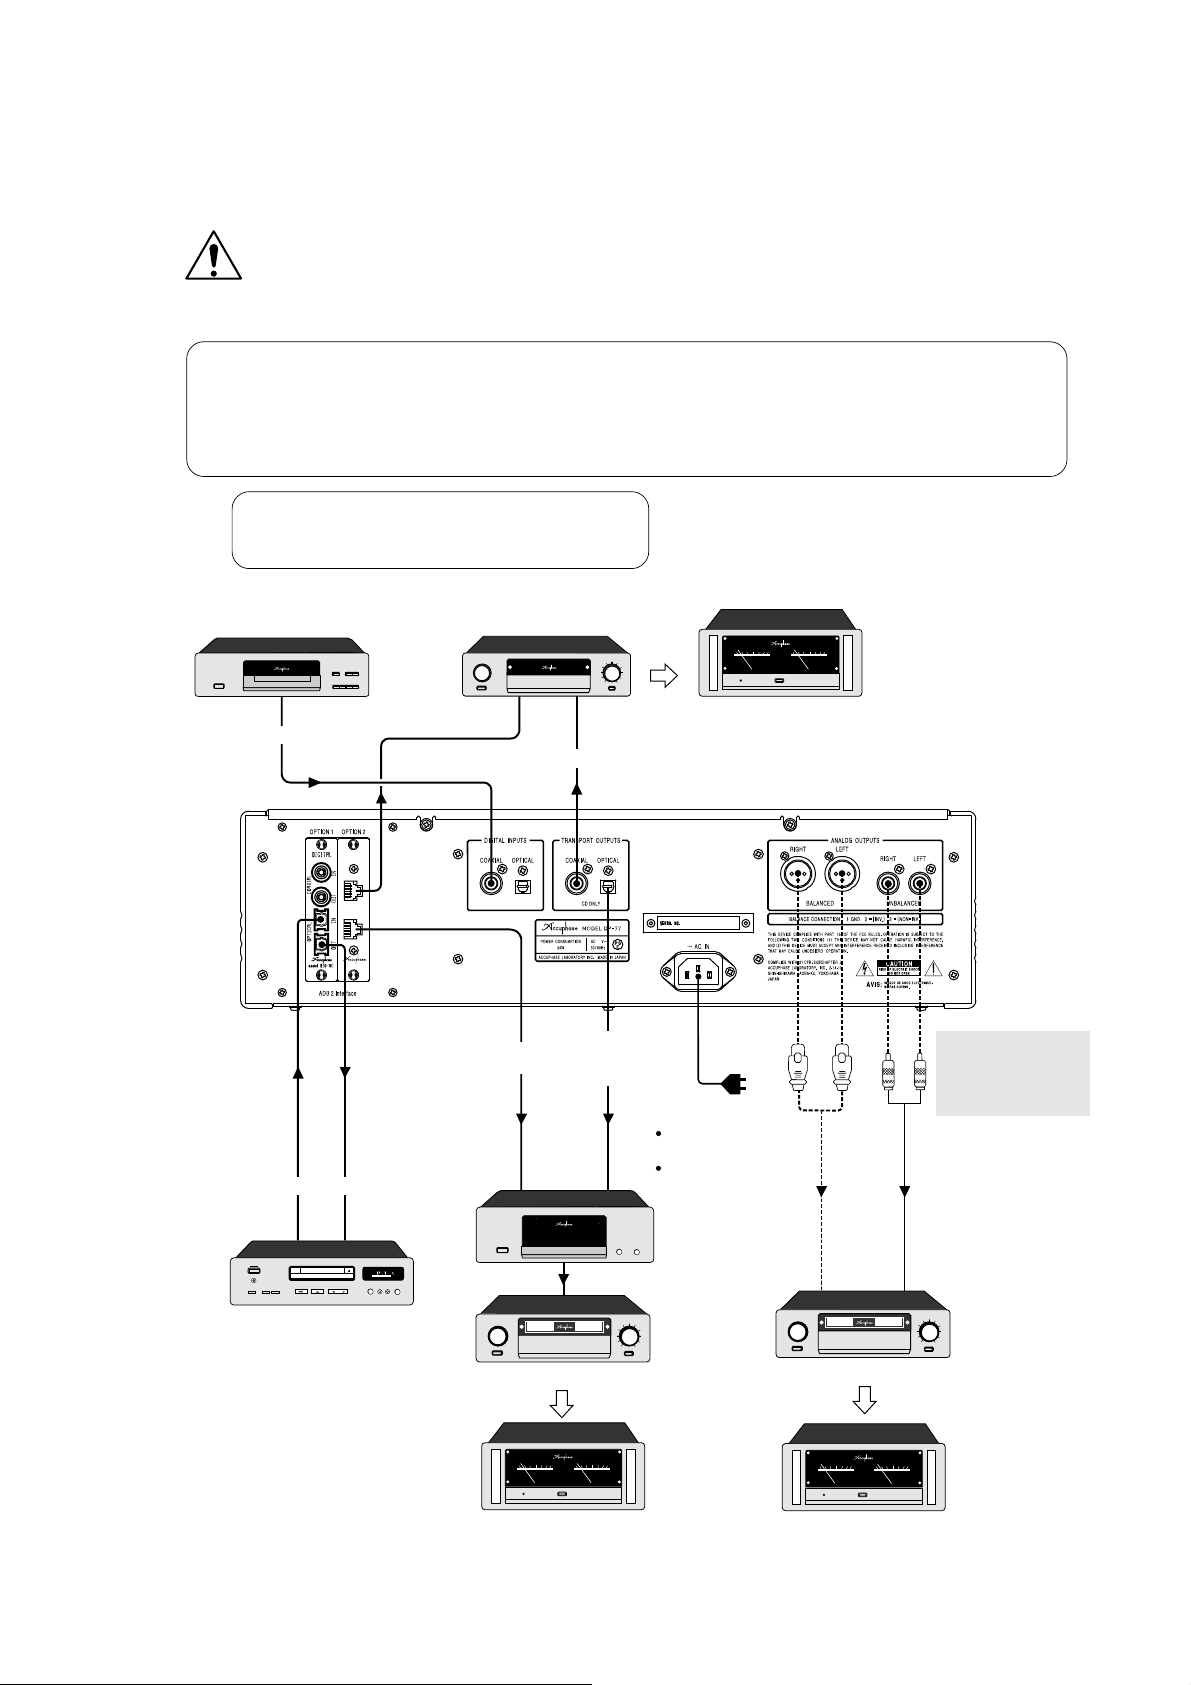
3. Connection Diagram
CAUTION
: Turn off the power to all components before making connections.
The illustration shows a connection example with option boards installed.
●
Note:
For analog input/output connections, use audio cable equipped with RCA type phono plugs, and take care
not to mix up the left and right channels.
●
Do not make connections to one component with balanced and unbalanced cables at the same time. Otherwise
ground loops may occur which can cause noise.
●
For connection to digital equipment, you can use HS-Link cable, 75-ohm coaxial cable, optical fiber cable,
or similar.
Option board installation example (see page 28 - 32)
OPTION 1 : Digital Input/Output Board (DIO-OC1)
OPTION 2 : HS-Link Output Board (DO2-HS1)
CD transport or other
digital component
mmBcompacr dsc p ayer
DP75
75-ohm coaxial cable
N UT E COR
HS-Link cable
(See page 20)
Digital preamplifier
DC-330
V LME
75-ohm coaxial cable
Power amplifier
DIGITAL
OUTPUTS
1
HS Link
2
DO2 HS1
Toslink optical fiber cable
DIGITAL
OUT
DIGITAL
IN
CD-R, DAT, MD or
other digital recorder
HS-Link
cable
OUT E C OR
Toslink
optical fiber
cable
D/A
converter
DC-101
Preamplifier
AC power cord
(supplied with the DP-77)
Use the DP-77 at the rated
power requirement as shown
on the rear panel.
Specifications and shape differ
according to the AC voltage in
the destination area of the unit.
OUME
(See page 21)
Balanced
cables
OU SE C OR
Preamplifier
※
Use shielded cables
for audio connections
(2-conductor shielded
cables for balanced
connections).
Audio connecting
cable with RCA plugs
(supplied)
OUME
Power amplifier
6
Power amplifier
4. Parts and Functions
For detailed explanations, please refer to the pages given in brackets
1
POWER switch
Press this button once to turn the unit on and once more to turn
it off.
For an interval of about 3 seconds after power is turned on, the
output is cut off by a muting circuit, to allow the internal circuits
to stabilize.
●
When the power is switched off, most selected functions are
canceled (except for some settings such as input selector
and output level).
2
Disc tray (page 10)
Slides out when the
The disc tray can be closed by gently pushing its front side,
by pressing the
pressing the
3
OPEN/CLOSE button (page 10, 14)
Pressing this button causes the disc tray to slide out. Pressing
the button once more closes the tray.
4
PLAY button
Press this button to start playback.
5
PAUSE button
OPEN/CLOSE
OPEN/CLOSE
button.
PLAY
(page 10, 14)
(page 10, 14)
button is pressed.
button again, or by
8
Remote sensor (page 34)
The signals from the supplied remote commander RC-28 are
received by this sensor. When using the remote control, point it
at this sensor.
9
Display (page 12)
Shows various information about the operation of the unit and
about the inserted disc.
TRACK (PUSH ENTER)
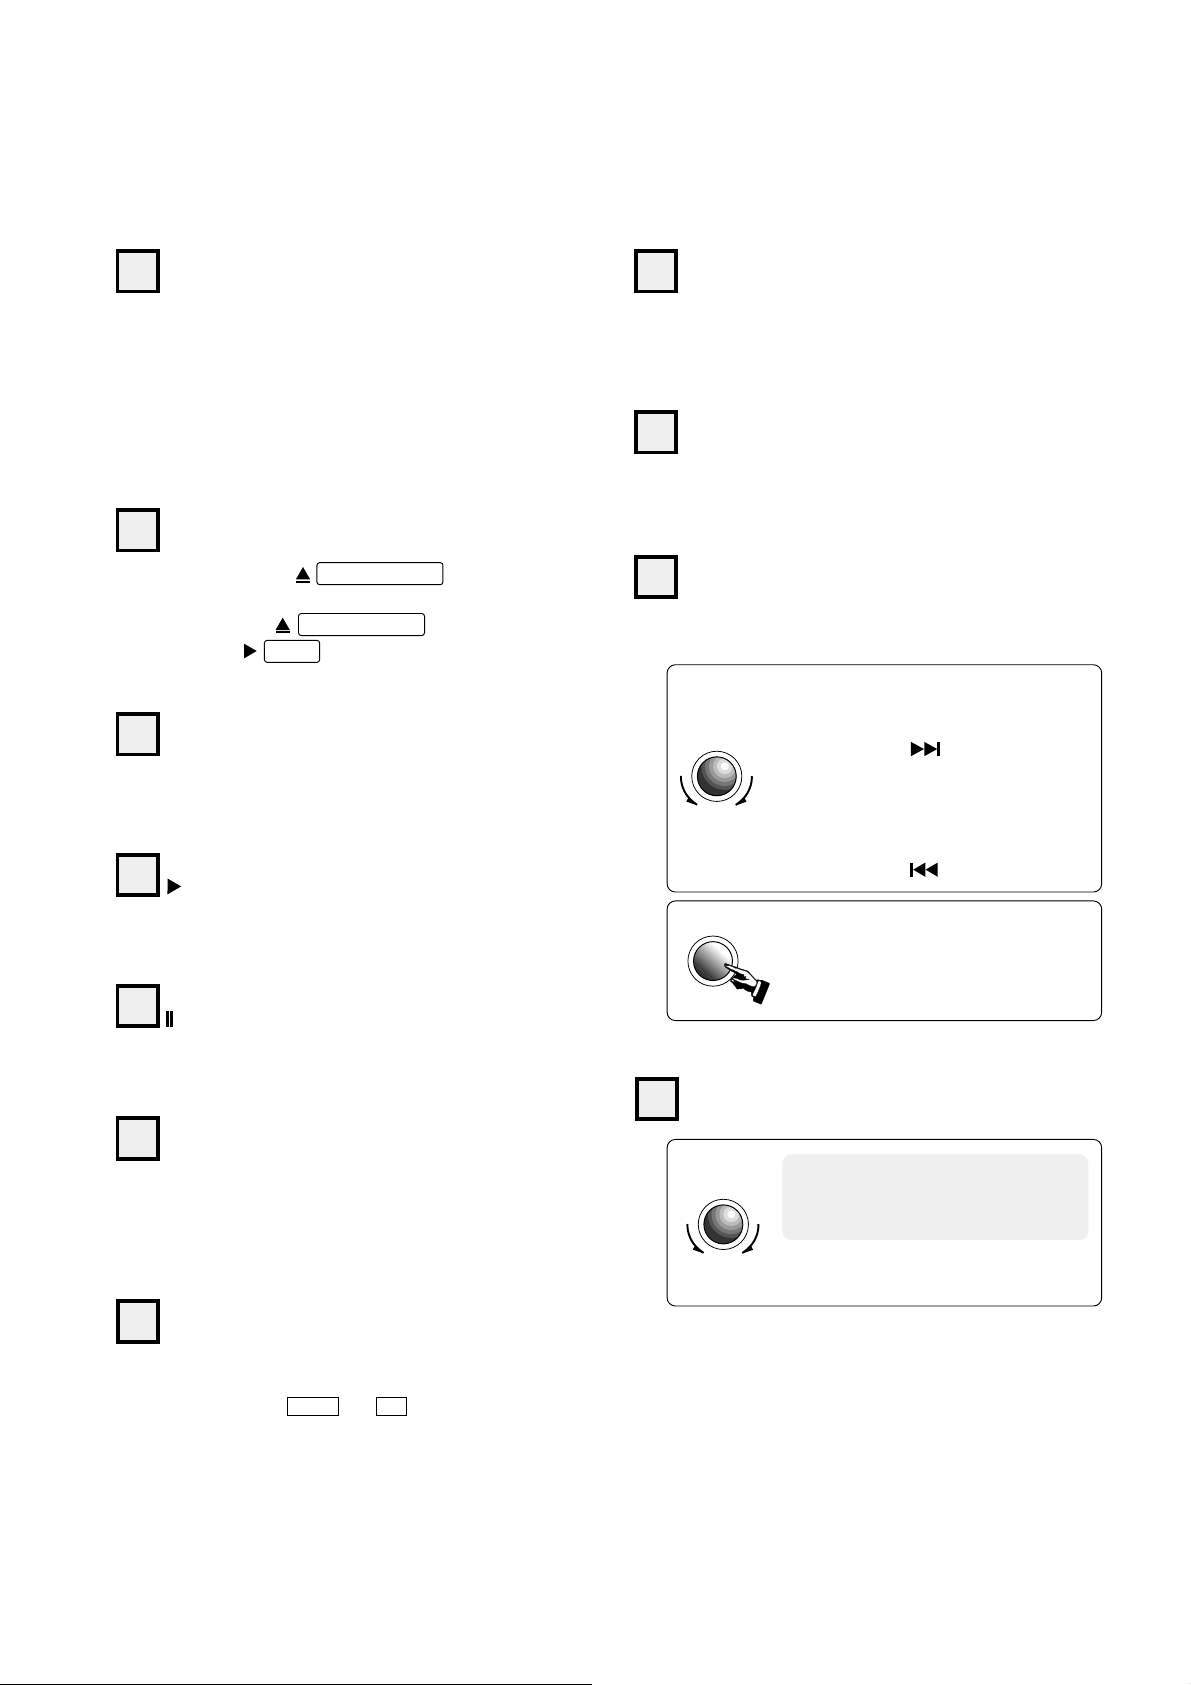
10
Track search knob
※For information on how to use the knob for setting func-
tions, see page 11.
NEXT
Turn the knob clockwise to jump to the next
TRACK
(PUSH ENTER)
BACK
Rotate
TRACK
(PUSH ENTER)
Push
track.
(Same effect as the
BACK
During play or pause, turn the knob counter-
NEXT
clockwise to jump to the beginning of the
current track or to earlier tracks.
(Same effect as the
PUSH ENTER
In the stop condition, you can use this knob
to select a track. Pushing the knob then
starts playback from that track.
(page 10)
track search button.)
track search button.)
Serves to temporarily pause playback.
6
■STOP button
Pressing this button during playback or in the pause mode puts
the unit into the stop mode (page 10, 14).
Holding the button depressed for more than 2 seconds during
the stop mode activates the setting mode (page 11).
7
SACD/CD button (page 10)
When playing a hybrid disc, this button serves to select the
desired mode. With each push of the button, the playback mode
is toggled between SACD and CD , and the respective LED
indicator lights up.
●
Use this button in the stop mode.
11
INPUT SELECTOR (page 22)
INPUT SELECTOR
Rotate
Turn the knob to select one of the
sources connected to the DIGITAL INPUTS on the rear panel or to an option
board in an option board slot.
*The supplied remote commander
RC-28 also allows source selection.
7
OPTION 1, 2
12
Option board slots
(page 24, 28 - 33)
16
AC INLET
These slots serve for installation of option boards with analog
or digital inputs and outputs.
13
DIGITAL INPUTS (page 22, 23)
These inputs allow use of the DP-77 as a digital processor. The
signal can be input using coaxial cable (COAXIAL) or optical
fiber cable (OPTICAL).
14
TRANSPORT OUTPUTS (page 20)
These outputs allow use of the DP-77 as a disc transport.
The digital CD signal is output here.
15
ANALOG OUTPUTS
Connect these outputs to an analog preamplifier.
UNBALANCED connectors
These connectors accept standard unbalanced cables with
RCA-type phono plugs.
Insert the supplied power cord into this connector, and plug the
other end into a wall AC outlet.
WARNING
●
Do not use the unit with any other than the supplied power
cord.
●
The shape of the AC inlet and the plug of the supplied
power cord depend on the voltage rating and destination
country. Using any other type of cable except the supplied power cord poses the risk of fire and damage.
●
This product is available in versions for 120/230 V AC. Make
sure that the voltage shown on the rear panel matches the
AC line voltage in your area.
WARNING
●
Do not open the unit, as this involves a severe risk of
electric shock.
●
If the unit does not operate, the internal fuse may have
blown. Never attempt to replace the fuse yourself. Be sure
to contact your Accuphase dealer or an authorized service
station.
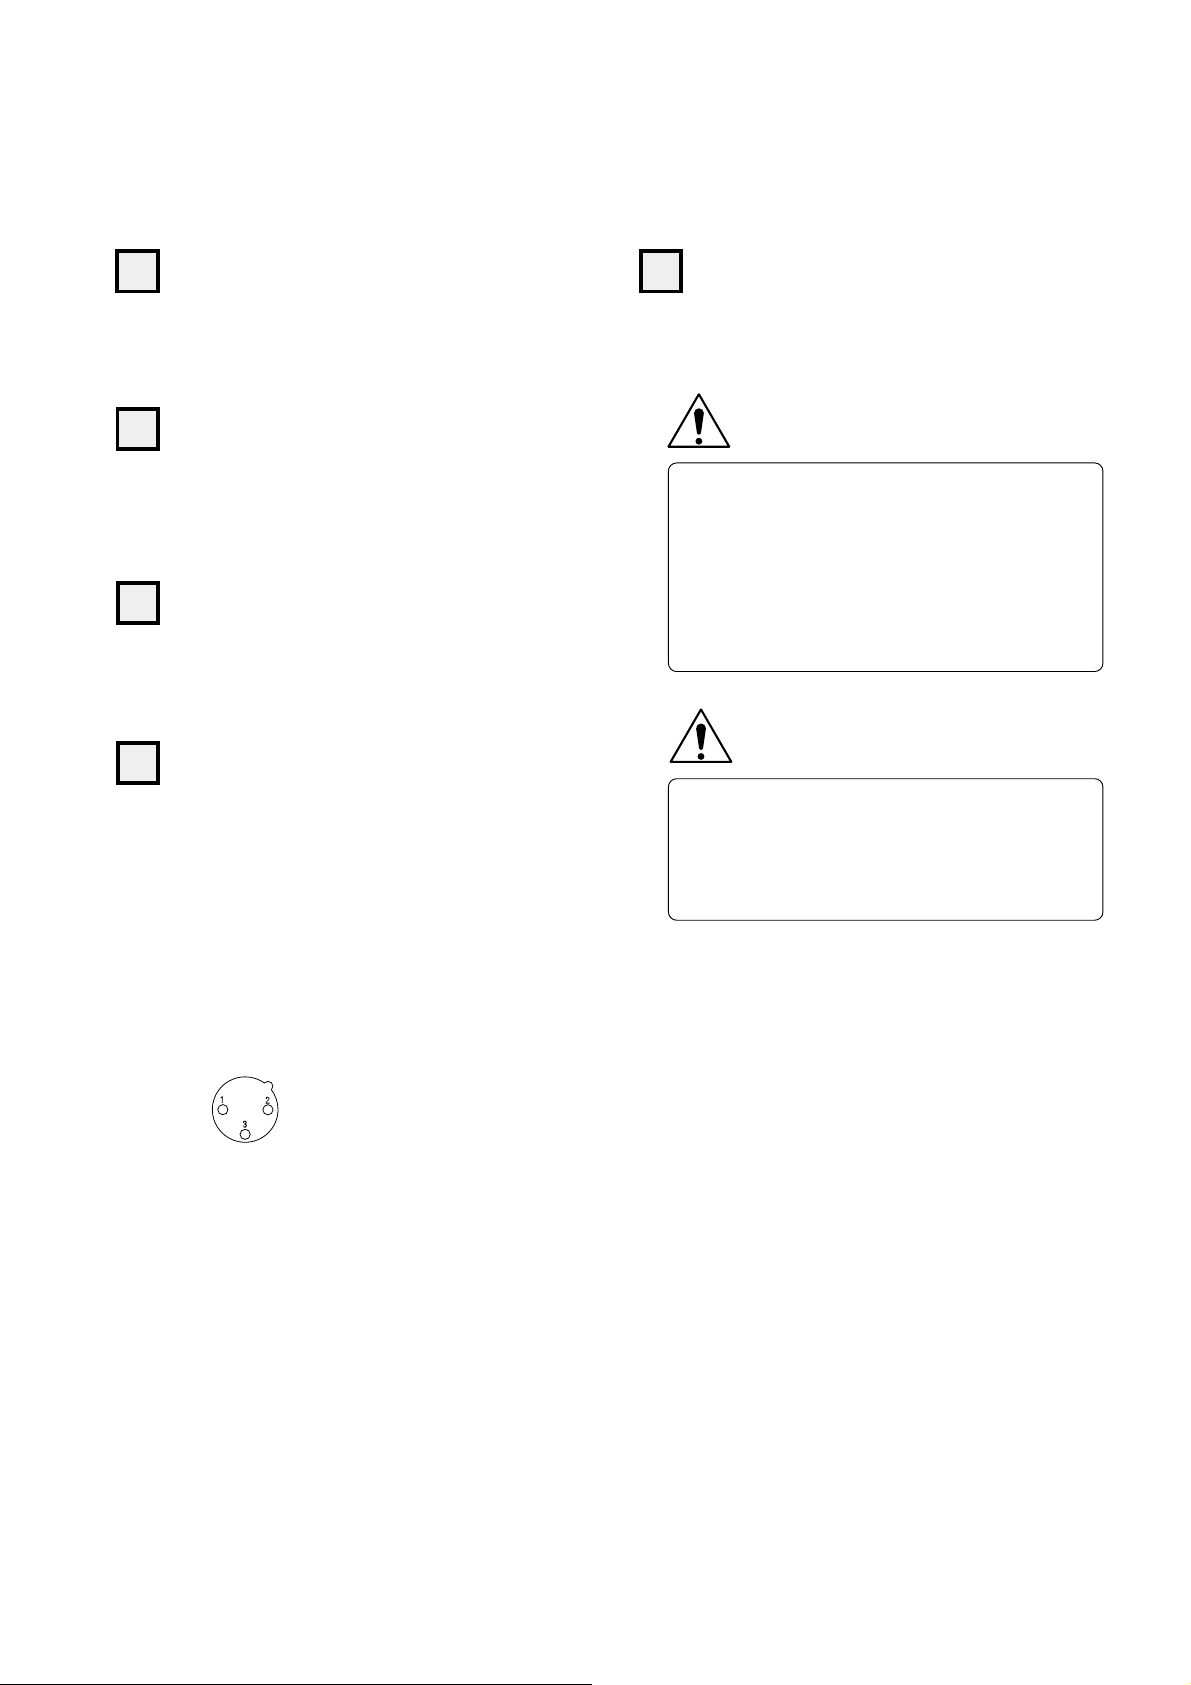
BALANCED connectors
These are balanced connectors which ensure superior signal
transmission free from external noise interference. If the amplifier
has a balanced input, this connection should be used for the
best sound quality.
The pin assignment is as follows:
●
:Ground
●
:Inverted (−)
●
:Non-inverted (+)
●
Balanced audio cables are available from Accuphase.
8
17
l.
l.
Direct play buttons (page 14)
23
DISPLAY MODE: ON/OFF button (page 12)
Serve for specifying a track number directly for playback.
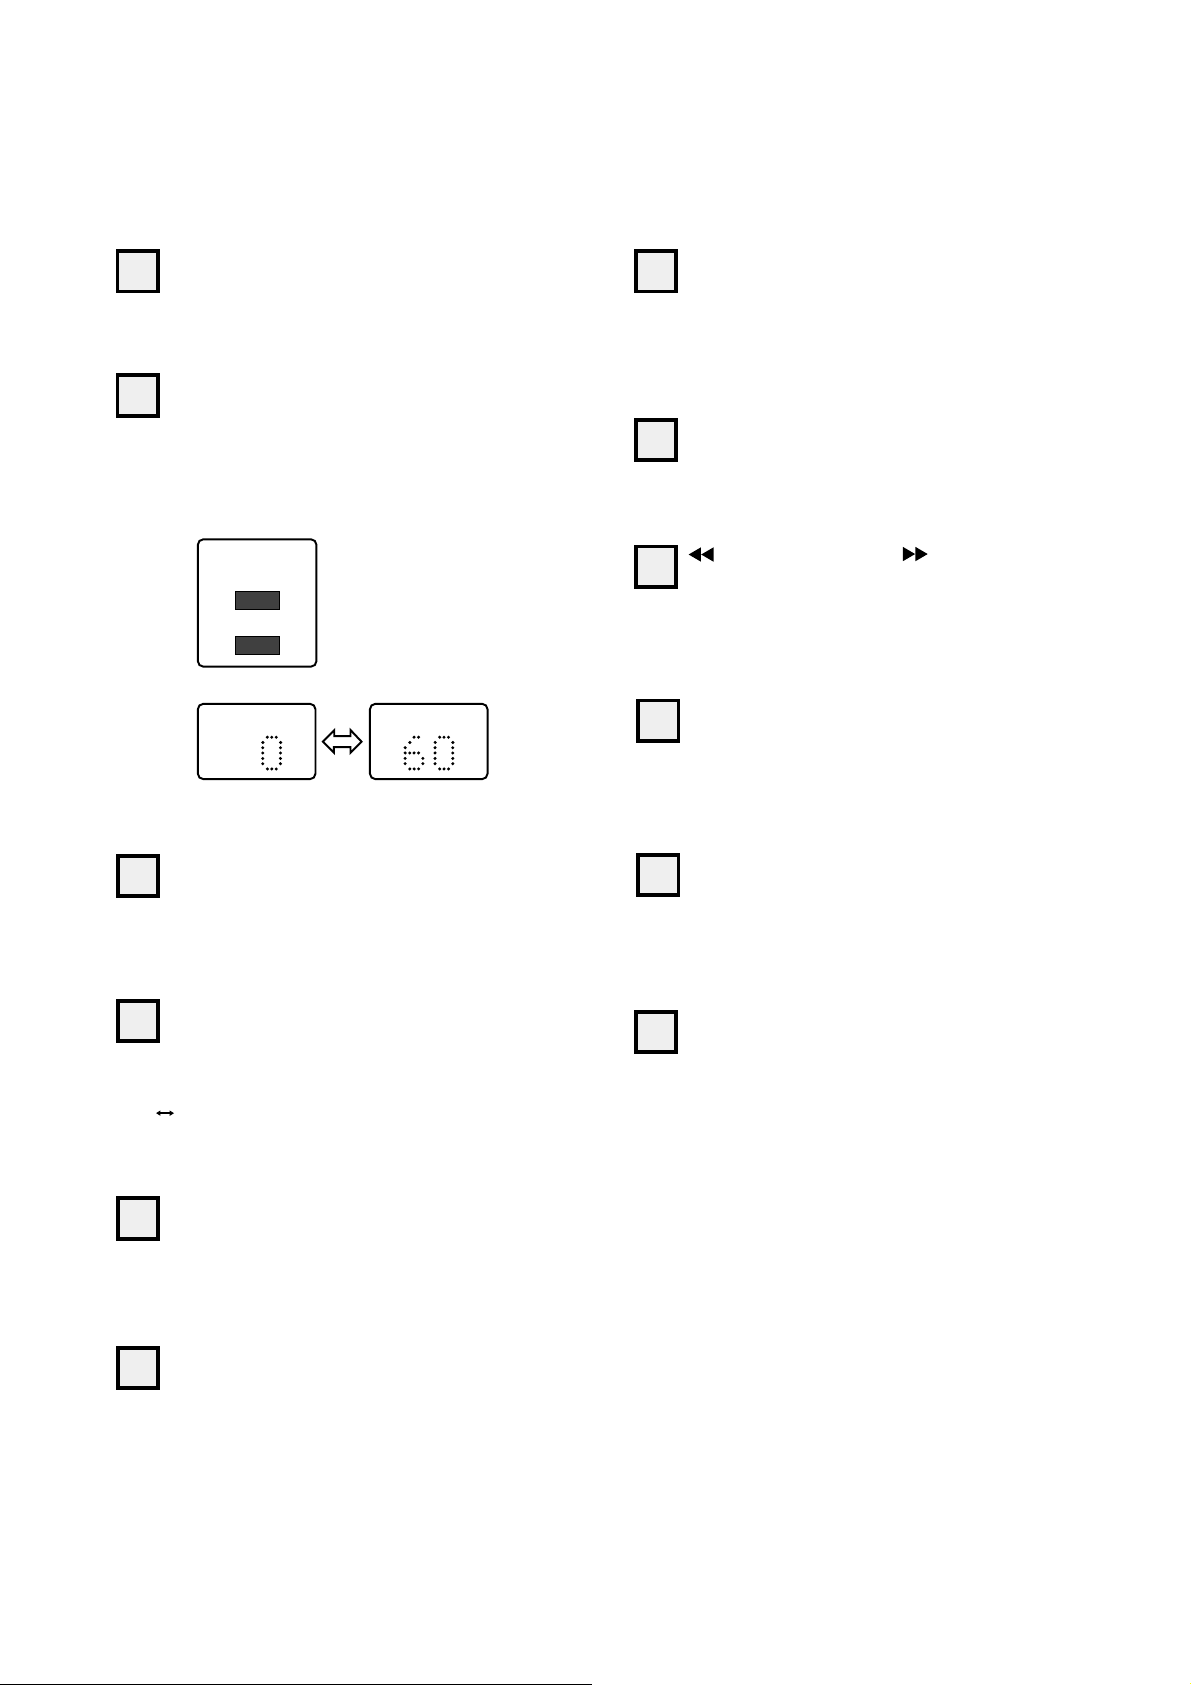
18
OUTPUT LEVEL control buttons
These buttons adjust the analog output level. The digital
principle permits adjustment of the output level in the range
from 0 dB to −60 dB (in 1-dB steps).
●
Normally the 0 dB setting should be used.
OUTPUT LEVEL
+
−
〈Level indication on display〉
LEVEL(−dB)
19
INDEX search buttons (page 15)
On discs containing index codes, these buttons can be used to
jump to the start of an index section.
Press + to increase the leve
Press − to increase the leve
LEVEL(−dB)
1-dB steps
With this button, the display can be turned off during playback.
※During processor operation (see page 22), the display cannot
be turned off.
24
CLEAR button (page 19)
Serves to clear programmed tracks.
25
These buttons can be used during play or pause to locate a
specific point on the disc.
26
When a disc with multi-language text is inserted, this button
serves for selecting the display language.
27
Cycles through the following display settings: elapsed time,
remaining track time, remaining disc time, text.
FR (Fast Reverse)/ FF (Fast Forward)
button
(page 15)
LANGUAGE button (page 13)
TIME/TEXT selector button (page 12, 13, 19)
20
Repeat buttons (page 16, 17)
REPEAT
Repeat playback of entire disc or one track.
B
A
Repeat playback of a section between two points within a
track.
21
CONTINUE button (page 17, 18)
Pressing this button during shuffle or program playback returns
the unit to normal playback.
22
SHUFFLE play button (page 17)
This button activates shuffle playback (all tracks on the disc
are played once in random order).
9
28
Program play buttons (page 18, 19)
PROGRAM
Allows you to create a program to play only your favorite tracks
on a disc or to rearrange the tracks on a disc in any desired
sequence.
CHECK
Serves to check an entered program.
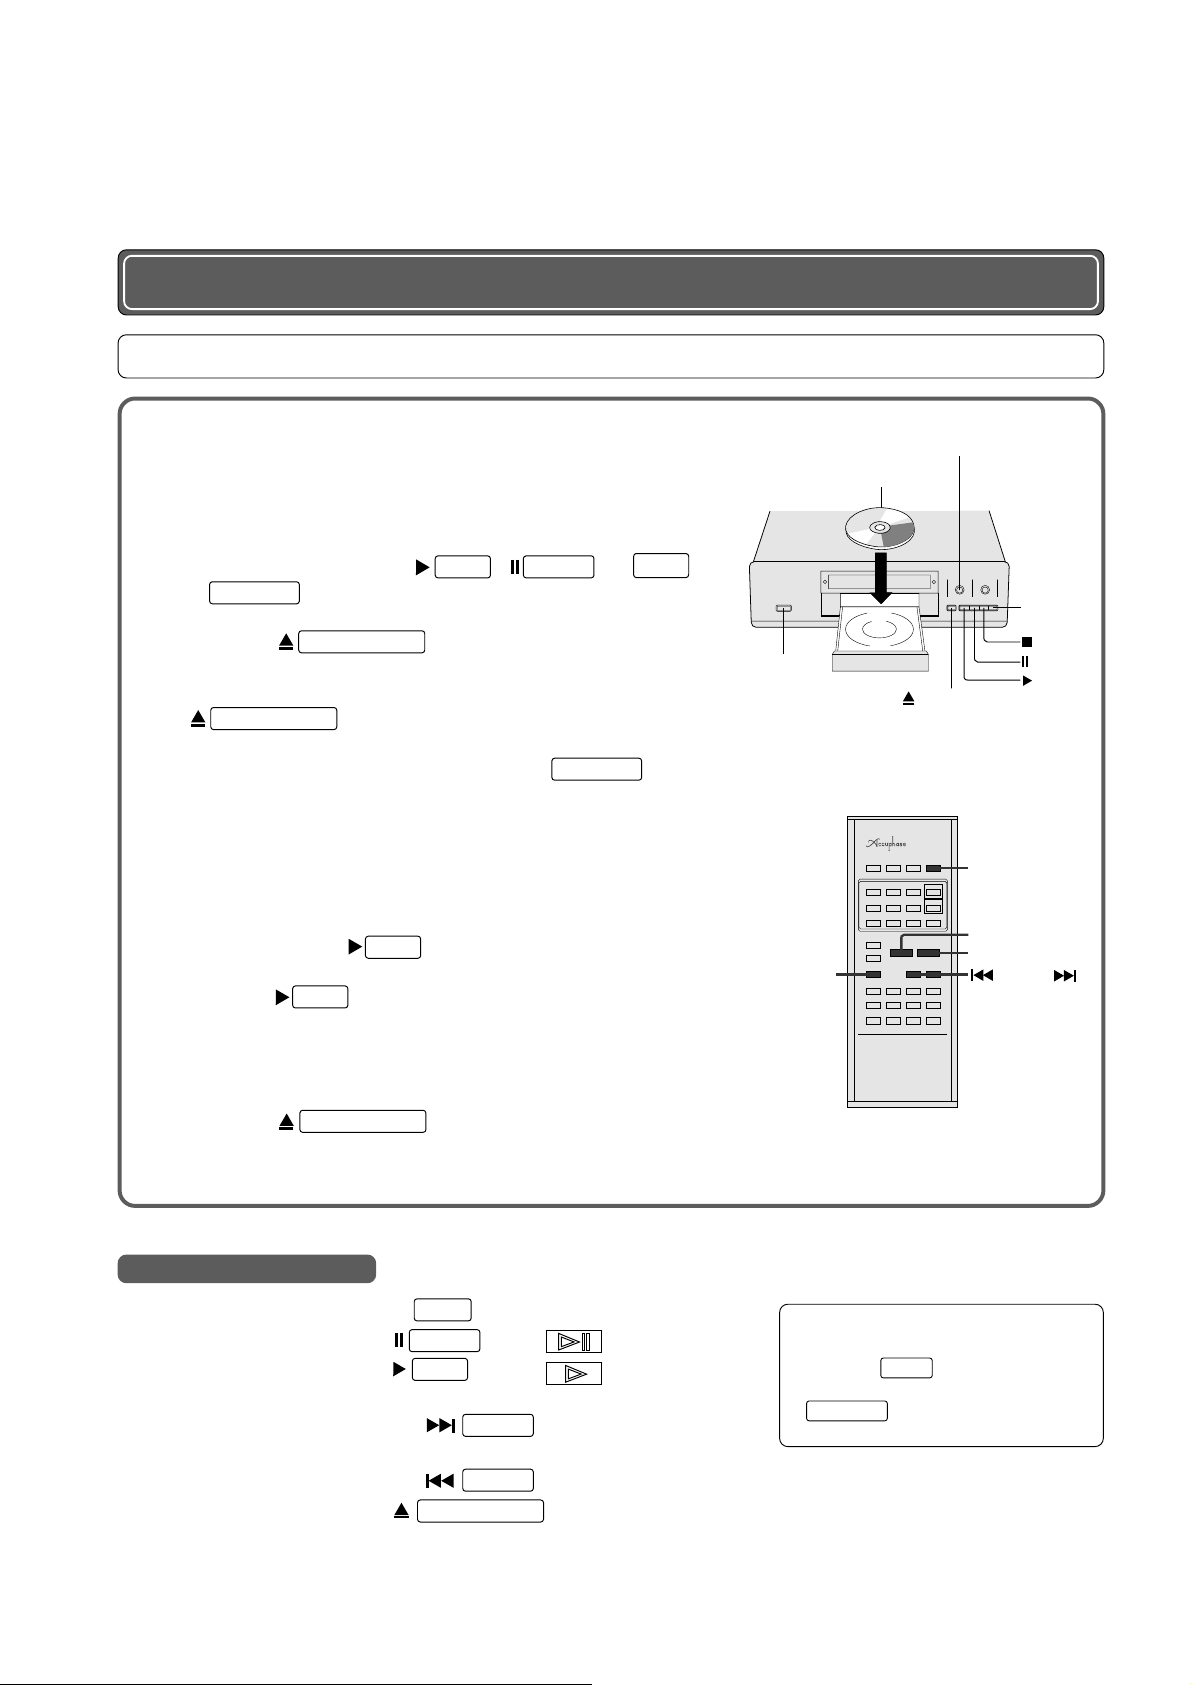
5. Operation
D
Use as a Regular SACD/CD Player
Basic Playback Steps
Press the POWER switch to turn the unit on.
1
If the unit is currently set to processor operation (display sho ws
2
selected input), switch it to SACD/CD operation.
●
Turn the INPUT SELECTOR knob.
●
Alternatively, press the
SACD/CD
Press the
3
Place the disc on the tray with the label facing up. Press the
4
OPEN/CLOSE
5
If the inserted disc is a hybrid disc, use the
button.
OPEN/CLOSE
button to close the tray.
button. The disc tray slides out.
PLAY
,
PAUSE
SACD/CD
, ■
select the desired layer.
Switching cannot be performed during playback.
●
With each push of the button, the setting is toggled between SACD and CD.
●
Choose a suitable setting for the disc. (For information on disc types, see
page 5.)
●
For discs other than hybrid discs, the unit will automatically determine the
button is pressed.
PLAY
6
disc type when the
Press the
button to start playback from the first track.
PLAY
STOP
, or
button to
POWER
STOP
(NEXT/BACK)
Label should face up
s
i
c
u
m
D
C
A
S
OPEN/CLOSE
TRACK
SACD/C
STOP
PAUSE
PLAY
SACD/CD
PAUSE
PLAY
TRACK
When the last track has played to the end, the unit enters the
7
stop mode.
8
Press the
OPEN/CLOSE
button to open the disc tray. After
removing the disc, be sure to close the disc tray again.
Basic functions during playback
Stop play………………………………… ■ button
Pause play …………………………… button (
Resume play…………………………… button ( indicator lights up)
Jump to next track …………………… Turn TRACK knob towards NEXT (right) or
Jump to start of current or previous track
Remove disc…………………………… button
STOP
PAUSE
PLAY
use button
… Turn TRACK knob towards BACK (left) or
use BACK button
TRACK
TRACK
OPEN/CLOSE
indicator lights up)
10
MODEL RC 28
※To switch between layers on a hybrid
(SACD + CD) disc during playback
STOP
Press the
to the stop mode first.
SACD/CD
layer.
button to set the unit
Then use the
button to select the desired
.
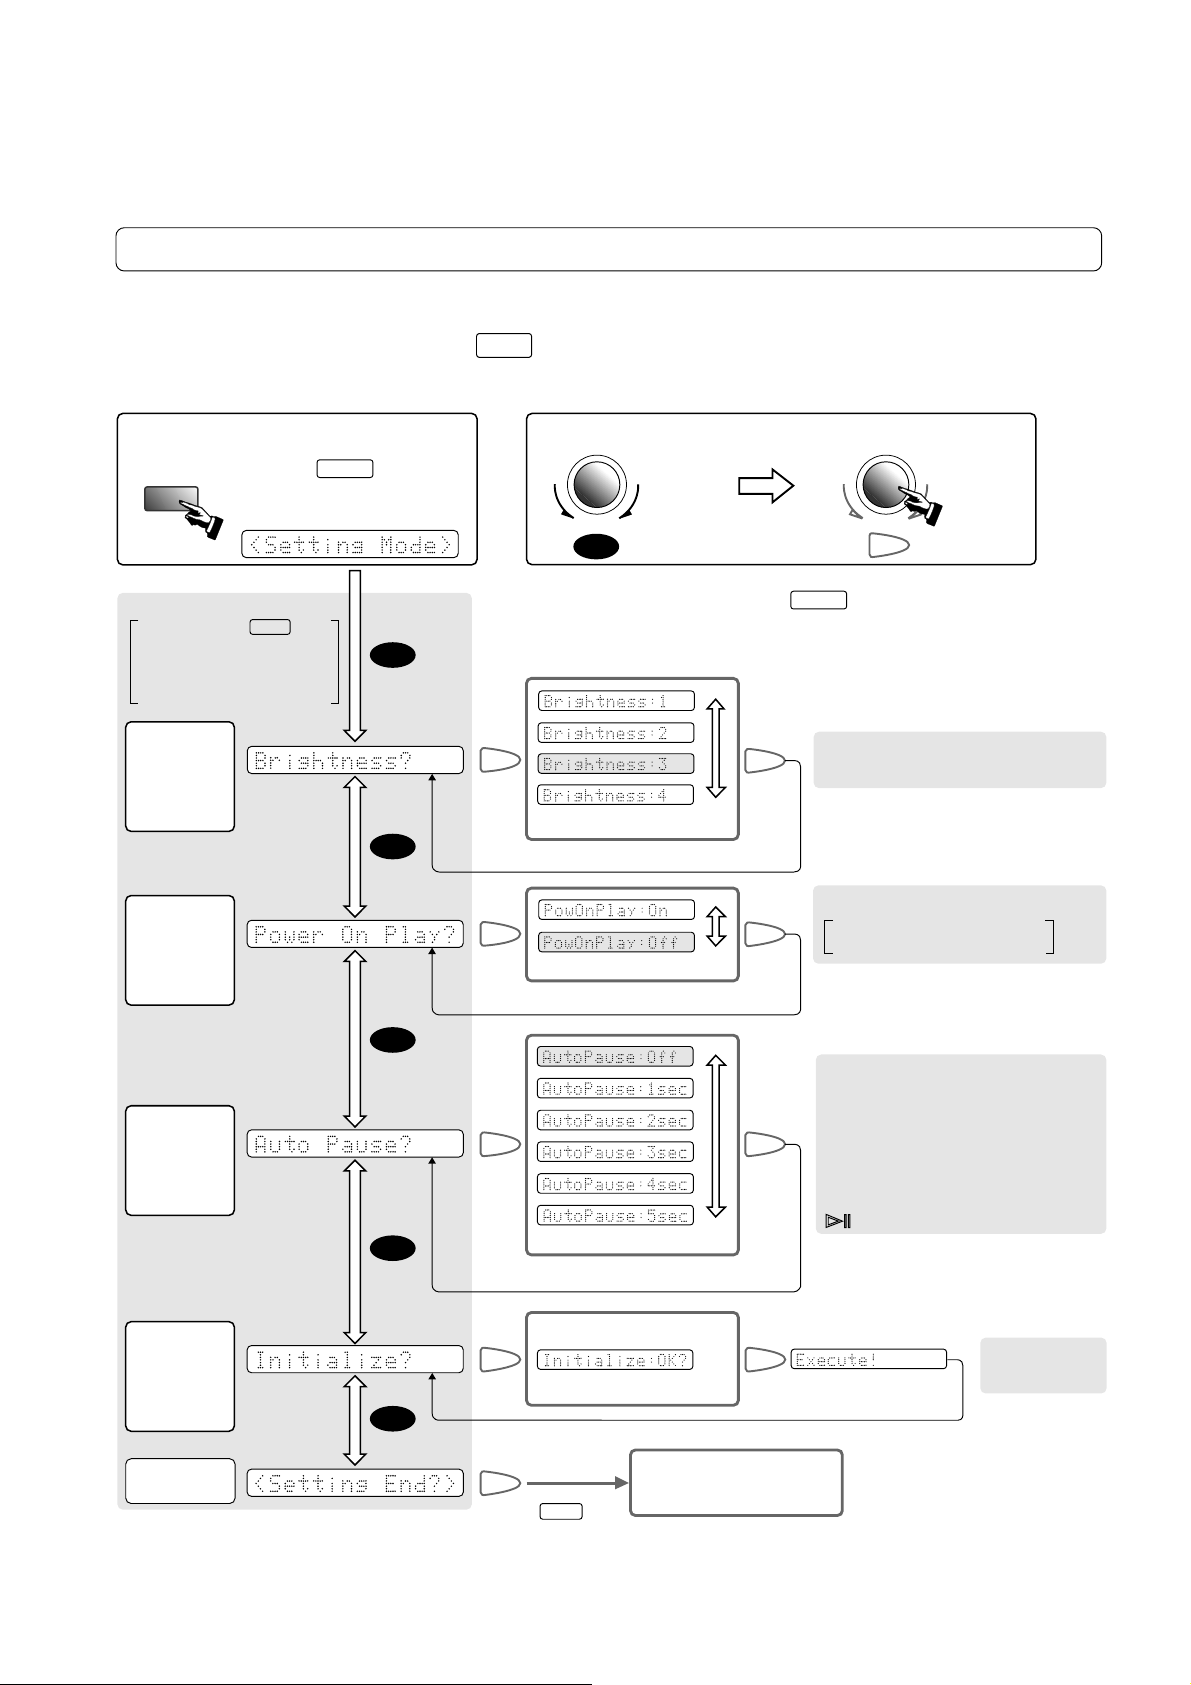
Function Mode Selection
The factory default settings for various functions such as display brightness, power-on play, auto-pause, etc.
can be changed if desired. It is also possible to revert to the factory default settings at any time.
●
To activate the setting mode, hold the ■
The unit will switch into the setting mode, and the TRACK knob can now be used to select and change
settings.
Setting mode
STOP
■
Selecting the setting item
If you press the ■ STOP button
while selecting an item, the
setting mode is canceled and
the display returns to the
previous state.
Keep the
■
DP-77 depressed for 2 seconds
(Not possible with remote commander)
STOP
button on the
Rotate
STOP
button on the DP-77 depressed for at least two seconds.
TRACK
(PUSH ENTER)
(PUSH ENTER)
Turn to
select
BACK
Note
NEXT
Rotate
※
Shading in illustration indicates factory default setting.
※
To cancel a setting, press the
to the previous setting.
(Dark)
■
BACK
button. The indication reverts
STOP
TRACK
Push to
accept
NEXT
Push
Display
brightness
Default setting: 3
Power-on
play
Default setting: Off
Auto-pause
Default setting: Off
Rotate
Rotate
Rotate
Push
Push
Push
Push
(Bright)
Rotate to
select
Return to item selection
Push
Rotate to
select
Return to item selection
Push
Rotate to
select
Return to item selection
This lets you set the display brightness
in four steps, from 1 (dark) to 4 (bright)
When power is turned on while a disc is inserted
On : Playback starts automatically.
Off : Unit goes into stop mode.
Auto-pause time setting for play start
When connected to a preamplifier or other
equipment with different muting times, the
lock-in period of the DP-77 needs to have
sufficient margin, otherwise the start of a track
may be cut off when performing track search.
To prevent this, a pause interval with a
selectable duration of 1 - 5 seconds can be
automatically added to the track start.
During the auto-pause interval, the indication
is shown.
Return
settings to
factory
defaults
End setting
mode
Rotate
Push
Push
or push ■ STOP button
11
Push
Display reverts to
original condition
(Shown for 2 seconds)
Return to item selection
Above 3 items are
returned to their
default settings.
 Loading...