

AccuCold VT65MLCSSADA, VT65MLBISSTBADA, VT65MLBISSHVADA, VT65ML7BIFRADA, VT65MBISSHVADA User Manual
...Page 1
Write Model & Serial No. here:
FELIX STORCH, INC.
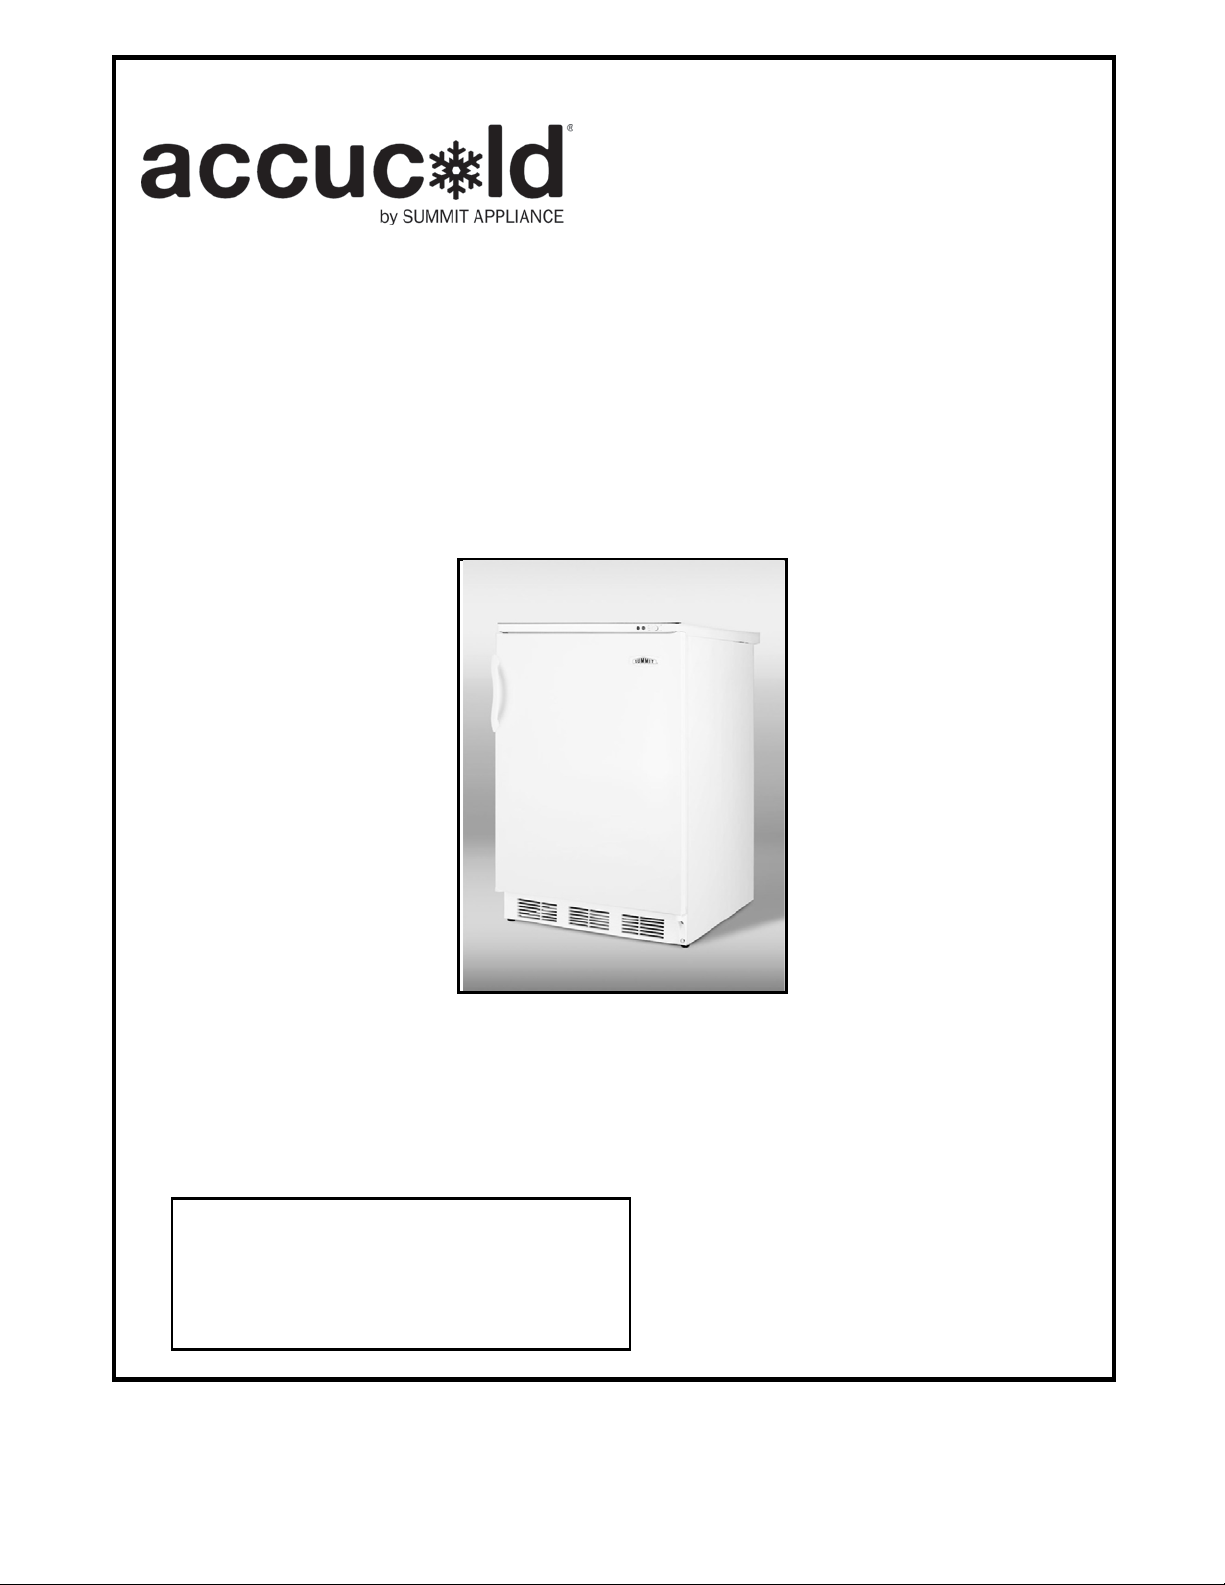
VT65M, VT65ML series
MEDICAL FREEZERS / CONGÉLATEURS ME DICAUX
Models / Modèles CM405
CM411L
CM421BL
(including BI and ADA models /
y compris les modèles BI et ADA),
ALF620, ALF620BI,
ALF620L, ALFB621
BEFORE USE, PLEASE READ AND FOLLOW ALL SAFETY RULES AND OPERATING INSTRUCTIONS
AVANT UTILISATION, S'IL VOUS PLAÎT LIRE ET SUIVRE LES RÈGLES DE SÉCURITÉ ET
Écrivez les numéros de modèle et série ici :
Model: ____________________________
Ser.No:____________________________
Instruction Manual / Mode d’emploi
INSTRUCTIONS DE FONCTIONNEMENT
770 Garrison Avenu e
Bronx, NY 10474
www.summitappliance.com
Page 2

1
IMPORTANT SAFEGUARDS
Your safety and the safety of others ar e very important.
We have provided many important safety messages in this manual and on your appliance.
Always read and obey all safety messages.
This is the Safety Alert Symbol. This symbol alerts you to potential
hazards that can kill or injure you and others. All safety messages will
follow the Safety Alert Symbol and either the word ”DANGER” or
“WARNING”.
DANGER means that failure to heed this
safety statement may result in severe
personal injury or death.
WARNING means that failure to heed
this safety statement may result in
extensive product damage, serious
personal injury, or death.
Safety messages wi ll al e rt you to what the potential hazard is, tell you how to reduce the chance
of injury, and let you know what can happen if the instructions are not followed.
Before the freezer is used, it must be properly positio ned and installed as
described in this m anual, so read the manual carefull y. To reduce the risk
of fire, electrical shock or injury when using the freezer, follow basic pr ecautions, including the following:
• Plug into a grounded 3-prong outlet. Do not remove grounding pro ng, do not use an adapter,
and do not use an extension cord.
• It is recommended that a separate circuit, serving only your freezer, be provided. Use
receptacles that cannot be turned off by a switch or pull chain.
• Never clean freezer parts with flammable fluids. These fumes can create a fire hazard or
explosion. And do not store or use gasoline or other flammable vapors and liquids in the
vicinity of this or any other appliance. The fumes can create a fire hazard or explosion.
• Before proceeding with cleaning and maintenance operations, make sure the power line of the
unit is disconnected.
• Do not connect or disconnect the electric plug when your hands are wet.
• Unplug the freezer or disconnect the power before cleaning or servicing. Failure to do so can
result in electrical shock or death.
• Do not attempt to repair or replace any part of your freezer unless it is specifically
recommended in this manual. All other servicing should be referred to a qualified technician.
Page 3
2
• Use two or more people to move and install the freezer. Failure to do so can result in back or
other injury.
• To ensure proper ventilation for your freezer, the front of the unit must be completely
unobstructed. Choose a well-ventilated area with temperatures above 60
°
F (32°C). This unit must be installed in an area protected from the elements, such as wind,
90
rain, water spray or drips.
• The freezer should not be located next to ovens, radiators or other sources of high heat.
• The freezer must be installed with all electrical connections in accordance with state and local
codes. A standard electrical supply (115V AC only, 60 Hz), properly grounded in accordance
with the National Electrical Code and loca l codes and ordin anc es , is required.
• Do not kink or pinch the power supply cord of the freezer.
• The fuse (or circuit breaker) size should be 15 amperes.
• It is important for the freezer to be leveled in order to work properly. You may need to make
several adjustments to level it.
• Never allow children to operate, play with or crawl inside the freezer.
• Do not use solvent-based cleaning agents or abrasives on the interior. These cleaners may
damage or discolor the interior.
• Do not use this apparatus for other than its intended purpose.
THIS APPLIANCE IS DESIGNED FOR MEDICAL OR PHARMACEUTICAL USE ONLY. IT IS
NOT INTENDED FOR USE AS A HOUSEHOLD FREEZER.
°
F (16°C) and below
Risk of child entrapment
Child entrapment and suffocation are not problems of the past. Junked or abandoned
refrigerators and freezers are still dangerous, even if they will “just sit in the garage a few
days.”
• Before you throw away your old refrigerator or freezer: Take off the doors. Leave
the shelves or drawers in place so that children may not easily climb inside.
• Never allow children to operate, play with, or crawl inside the refrigerator/freezer.
THIS APPLIANCE IS NOT INTENDED FOR USE BY YOUNG CHILDREN OR INFIRM
PERSONS UNLESS THEY HAVE BEEN ADEQUATELY SUPERVISED BY A RESPONSIBLE
PERSON TO EN SURE T HAT TH EY CAN USE T HE AP PLIANC E SAF ELY. YOUNG CHILDREN
SHOULD BE SUPERVISED TO ENSURE THAT THEY DO NOT PLAY WITH THE APPLIANCE.
- SAVE THESE INSTRUCTIONS -
Page 4

3
Table of Contents
Important Safeguards ............................................................................................. 1 - 2
Location of Parts .......................................................................................................... 4
Technical Information .................................................................................................. 5
Installation Instructions .......................................................................................... 6 - 9
Before Using Your Freezer ................................................................................. 6
Installing the Freezer .......................................................................................... 6
Electrical Connection .................................................................................... 6 – 7
Extension Cord ................................................................................................... 7
Reversing the Door Swing ............................................................................ 8 – 9
Door Handle Installation ...................................................................................... 9
Operating Your Freezer ....................................................................................... 10 - 12
Temperature Control for models VT65M, VT65ML, VT65MBI
and VT65MLBI .................................................................................... 10 – 11
Temperature Control for ADA models and models ALF620, ALF620BI,
ALF620L and ALFB621 ............................................................................. 11
Storing Frozen Items ........................................................................................ 12
Defrosting Your Freezer .................................................................................... 12
Care and Maintenance ............................................................................................... 13
Cleaning Your Freezer / Power Failure / Vacation Time
Moving Your Freezer / Energy-Saving Tips
Troubleshooting ......................................................................................................... 14
Limited Warranty ........................................................................................................ 15
French version of this manual ............................................................................ 16 - 31
Page 5
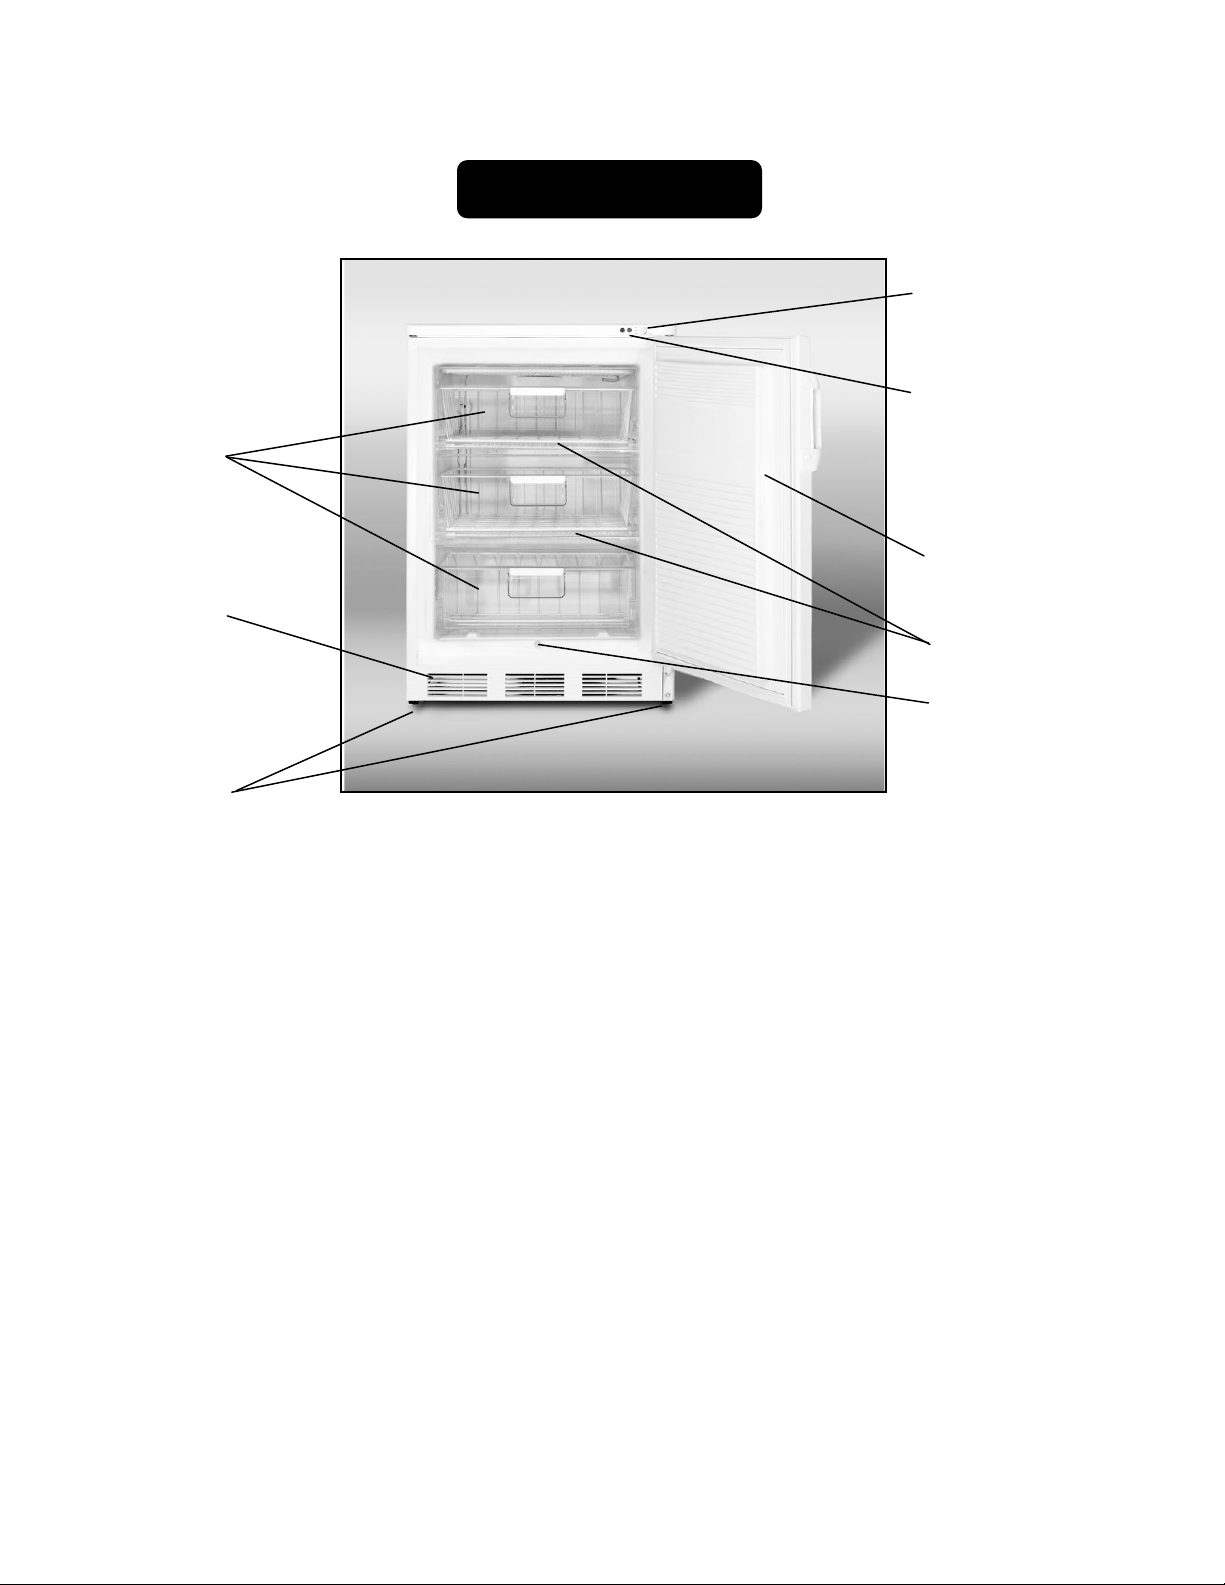
4
Manual thermostat
Door
(f
ront ventilation
Leveling legs
Removable
Fixed
Indicator lights:
Defrost water
NOTE: Models VT65ML and ALF620L have a lock located
drawers
Kick plate
slots)
Location of Parts
(ADA and ALF models
have a digital thermostat
on the kick plate)
Compressor on (yellow)
Temperature alert (red)
shelves
outlet
on the front of the door.
Page 6

5
Model Number
Technical Information
VT65M
VT65ML
(with lock)
VT65MBI
VT65MLBI
VT65MADA
VT65MLADA
ALF620, ALF620L,
ALFB621
ALF620BI
Color
Capacity
Electrical Input
Rated Current
Coldest Internal
Temperature
Refrigerant
Installation
Unit Dimensions
(H x W x D)
NOTES: 1. These freezers are suitable for storing vaccines, pharmaceuticals and other
temperature-sensitive materials. T hey are not designed for the storage of
foodstuffs.
2. Specifications are subject to change without notice.
Free-standing
33.5" x 23.63"
x 23.5"
Built-in or
free-standing
33.5” to 34.5”
x 23.63" x 23.5"
White
3.5 cu. ft.
115V AC/60Hz
1.3A
-25°C
R134a, 2.7 oz.
Free-standing
32.0” x 23.63" x 23.5"
Built-in or
free-standing
Page 7
6
similarly qualified persons in order to avoid a hazard.
Installation Instructions
Before Using Your Freezer
• Remove the exterior and interior packing.
• Check to be sure you have all of the following parts:
3 drawers
1 short drain tube
2 keys (VT65ML and ALF620L models only)
• CAUTION: After unpacking you MUST allow this appliance to stand upright for at
least 2 hours to allow the lubricant and refrigerant to drain back into the
compressor and stabilize. Failure to do so may adversely affect performance and
the lifetime of your unit.
• Remove the drawers and clean them and the interior surfaces of the unit with
lukewarm water using a soft cloth.
Installing the Freezer
• Place the unit on a floor that is strong enough to support the appliance when it is fully
loaded. To level the unit, adjust the two leveling legs at the front.
• Unless the model numbers include the letters BI, these appliances are designed to be
free-standing only, and should not be recessed or built in. When installing, allow at
least 5 inches of space at the sides and top of the unit and 2 inches at the rear, which
will allow the proper air circulation to cool the compressor and condenser.
If your model has the letters BI in its model number, the appliance can be installed
either free-standing or built-in. If the unit will be built into an enclosure, you must still
allow at least 3/16” of clear space on both sides and at the top, and 2” at the back.
Take care that the air vents at the front are never covered or blocked in any way.
• Locate the unit away from direct sunlight and sources of heat (oven, heater, radiator,
etc.). Direct sunlight may affect the acrylic coating and heat sources may increase
electrical consumption. Extremely cold ambient temperatures may also affect the
unit's performance.
• Avoid locating the unit in moist areas. Too much moisture in the air will cause frost to
form quickly on the evaporator, requiring more frequent defrosting of the freezer.
• Plug the unit into an exclusive, properly installed and grounded wall outlet. Do not
under any circumstances cut or remove the third (ground) prong from the power cord.
Any questions concerning power and/or grounding should be directed toward a
certified electrician or authorized service center.
:
:
Electrical Connection :
Improper use of the grounded plug can result in the risk of electrical shock. If the
power cord is damaged, have it replaced by the manufacturer, its service agent or
Page 8

7
This unit should be properly grounded for your safety. The power cord of this unit is
equipped with a three-prong plug that mates with a standard three-prong wall outlet to
minimize the possibility of electrical shock. Do not under any circumstances cut or
remove the third ground prong from the power cord supplied.
This unit requires a standard 115-volt AC/60Hz electrical outlet with three-prong ground.
Have the wall outlet and circuit checked by a qualified electrician to make sure the outlet
is properly grounded. When a standard 2-prong wall outlet is encountered, it is your
responsibility and obligation to have it replaced with a properly grounded 3-prong wall
outlet.
To prevent accidental injury, the cord should be secured behind the unit and not left
exposed or dangling.
The unit should always be plugged into its own individual electrical outlet having a
voltage rating that matches the rating label on the appliance. This provides the best
performance and also prevents overloading house wiring circuits that could cause a fire
hazard from overheated wires.
Never unplug the unit by pulling on the power cord. Always grip the plug firmly and pull
straight out from the receptacle. Repair or replace immediately any power cord that has
become frayed or otherwise damaged. Do not use a cord that shows cracks or abrasion
damage along its length or at either end. When moving the unit, be careful not to
damage the power cord.
Extension Cord
:
Do not use an extension cord with this appliance. If the power cord is too short, have a
qualified electrician or service technician install an outlet near the appliance.
Page 9

8
Reversing the Door Swing
Your freezer can be opened from either the right side or the left. By default, the door
hinge is on the right side. If you prefer it on the left, please follow the appropriate
instructions below:
NOTE: All of the parts that are removed must be kept for the reinstallation of the door.
:
For models VT65M, VT65ML, VT65MBI and VT65MLBI :
1. Upper hinge fastener 4. Handle
2. Lower hinge 5. Door hinge fixture
3. Kick plate 6. Door hinge fixture plug
a. Unscrew the lower hinge and take off the door.
b. Push the kick plate to the right in the new position.
c. Undo the upper hinge fastener and fix it to the opposite side of the housing, where you
have already removed and replaced the fastener with the hole to the opposite side.
d. Put the door on the upper hinge fastener.
e. Fix the lower hinge in the new position.
f. Unscrew the handle and place it on the opposite side.
g. Some screws are covered with caps. Take off these caps before undoing the screws.
h. Check the gasket. It should not be creased and should seal well.
Page 10
9
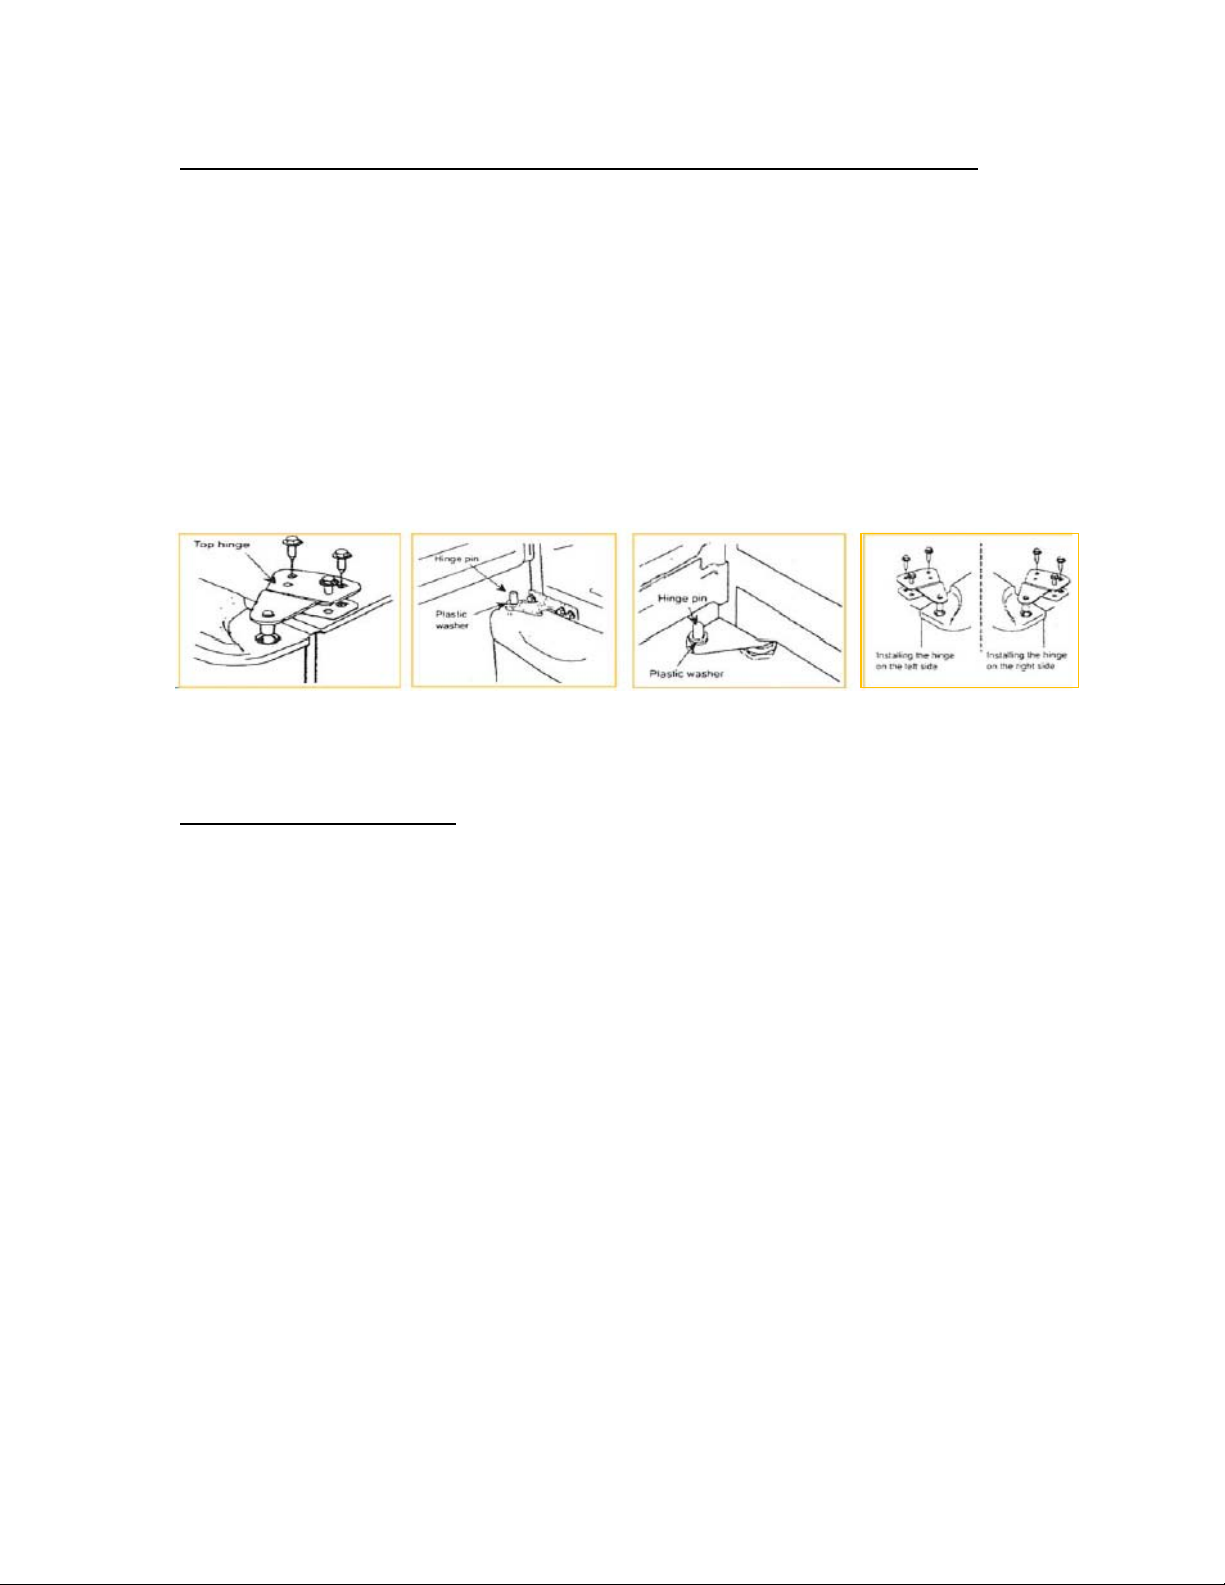
For Models VT65MADA, VT65MLADA, ALF620/L, ALF620BI and ALFB621
a. Take off the upper hinge cover from the door and remove the screws that hold the top
hinge.
b. Lift the hinge straight up to free the hinge pin from the socket in the top of the door.
c. Lift the door up and away to free its bottom socket from the hinge pin.
d. Remove the screws to the bottom hinge.
e. Remove the decorative caps from the opposite side and plug the holes from the
original side with the decorative caps.
f. Move the bottom hinge to the opposite side and tighten the screws. Use any lock
washers or nuts if they were installed in the original installation.
g. Loosely install the left-hand hinge provided with your unit on the top left side of the
unit, moving the decorative caps to the right side.
h. Replace door onto the hinge pin on the bottom hinge. Place top hinge pin into door.
Insert screws into the top hinge and tighten.
If you notice the door not hanging straight, loosen the top hinge screws, adjust the door
until it is level and tighten the screws.
Door Handle Installation
:
:
The door has two screw holes on each side, allowing you to install a handle (included). To
do so, align the handle with the screw holes on the side you prefer. Fix the handle in place
with the included screws, then cover the screw heads with the handle seal (included).
Page 11

10
Operating Your Freezer
NOTE: If the unit is unplugged, has lost power, or is turned off, you must wait 3 to 5
minutes before restarting the unit. If you attempt to restart before this time delay, the
freezer will not start.
Temperature Control for models VT65M, VT65ML, VT65MBI and VT65MLBI
• The temperature control is a dial-operated thermostat
located at the front of the freezer, in the upper right
corner above the door. When the freezer operates
automatically, the interior temperature is controlled by
the thermostat. Normally, the thermostat setting
should be in the middle, between max and min. (See
illustration.)
• We recommend thermostat settings closer to max
only in cases when you want to accelerate cooling
such as before loading a number of unfrozen items.
Settings closer to min help save energy, provided that the freezer is not overloaded.
• The super setting causes the compressor to run continuously and should be used
sparingly. This setting can be used when you want to freeze a large number of
unfrozen items or in case you want to deep-freeze already frozen items. The yellow
light next to the thermostat will be lit when the super setting is active. Remember to
turn the thermostat back to its normal setting after a short time.
• The stop setting halts the cooling process (the compressor turns off), but does not
turn off the freezer. To turn the appliance off completely, you must unplug it.
Modes of Operation for dial-thermostat models
:
:
• Automatic operation – the yellow light is on and off (with the compressor).
The interior temperature is controlled by the thermostat, which turns the cooling
system on and off. The frequency of turning the cooling system on and off depends
on:
– the thermostat setting
– how often the door is opened, and
– ambient temperature.
• Continuous operation – the yellow light is on steady.
The super setting of the thermostat is active, and the cooling system operates
continuously, resulting in a quick freeze. Do not let the freezer operate under these
conditions for long periods of time.
• Temperature alert – the red light is on.
The red light (next to the thermostat) is on when there is a temperature-related
problem in the freezer. See Troubleshooting.
Page 12

11
Switching on the Empty Freezer
Plug in the freezer and set the thermostat to the super position (continuous
operation). (The red and yellow control lights are on.) When the red light goes off,
set the thermostat for normal operation. Wait a couple of hours, then load the
freezer.
:
Freezing Procedure
To freeze larger amounts of unfrozen items (5 pounds or more), turn the thermostat
knob t o super f or continuous operation (yellow light is on). After an hour or so, turn
the thermostat down to its normal setting (yellow light goes off) and load the freezer.
After 24 hours, all items should be frozen.
NOTES:
1. Keep unfrozen items out of contact with frozen ones.
2. There is no need to set the thermostat for continuous operation (super) if you only
intend to freeze smaller quantities of fresh items (4 pounds or less).
:
Temperature Control for ADA models and models ALF620, ALF620BI,
ALF620L and ALFB621
The temperature inside these freezers is controlled by a digital thermostat located in the
kick plate at the front of the unit. Normally, the LED display shows the current
temperature inside the unit. Temperature readings are in degrees Celsius.
The preset temperature range of the thermostat is -10 to -25ºC * (14 to -13°F), and the
operating temperature is factory-set at -25ºC (-13°F). If you find that it is necessary to
change the temperature setting (Set Point) for your appliance, refer to the instructions
below.
The front panel of the digital thermostat is shown here:
To see the Set Point:
Push and immediately release the SET key. The display will show the Set Point
value. Wait 5 seconds and the interior temperature will display again.
:
To change the Set Point:
1. Push and hold the SET key for more than 3 seconds to change the Set Point
value. The value of the Set Point will be displayed.
2. Push the UP or DOWN arrow to the desired setting. The new setting will be
memorized after 15 seconds, provided no other keys are pushed.
* The maximum/minimum range of the digital thermostat (-10 to -25ºC) is preset and
locked by us. To reset this range lock, either call us at 800-932-4267 or find
information on our website under Troubleshooting.
Page 13

12
Storing Frozen Items
Frozen items may be stored in the three drawers, or can be placed directly on the
cooling shelves if one or more of the drawers is removed.
Defrosting Your Freezer
For the most efficient operation and minimum energy consumption, defrost the freezer
when the frost on the freezer walls reaches 1/8 to 1/4 inch in thickness.
:
:
1. If your freezer has a manual thermostat, an hour or so before defrosting, set it to
super (yellow light will be on) so that the freezer contents are well-frozen. After that,
empty the freezer and take care that the items do not begin to thaw. If your unit has a
digital thermostat, just remove and store the contents before defrosting.
2. To start defrosting, unplug the freezer and remove the drawers.
3. Insert the enclosed tubing into the groove in the bottom of
the appliance and place a container underneath to collect
the defrost water. (See illustration.) Defrost ing is
accelerated if the door is left open.
4. Use a sponge or toweling to remove water and melting
ice from the freezer floor. After the frost or ice has melted,
dry the interior of the freezer thoroughly.
5. Restart the freezer by plugging it in and turning the
(manual) thermostat to the desired position. Once the freezer is co ld, put back the
drawers and contents.
CAUTION : Do not use boiling water or an electric device such as a hair dryer to help
speed up the defrosting because this could damage the plastic parts of the unit. In
addition, never use a sharp or metallic instrument to remove frost as it may damage
the cooling coils and will void the warranty. We recommend using a plastic scraper.
Page 14
13
Cleaning Your Freezer:
Care and Maintenance
CAUTION
: Failure to unplug the unit before cleaning can result in electrical shock or
personal injury.
1. Unplug the freezer and remove the frozen items and drawers.
2. Wash the inside surfaces with a solution of lukewarm water and vinegar. Wipe dry
with a clean, soft cloth.
3. Wash the drawers with a mild detergent solution, then rinse and dry thoroughly.
4. Wash the outside cabinet with warm water and mild liquid detergent. Rinse well and
wipe dry with a clean soft cloth.
5. Wring excess water out of the sponge or cloth before cleaning the
area of the temperature control or any electrical parts.
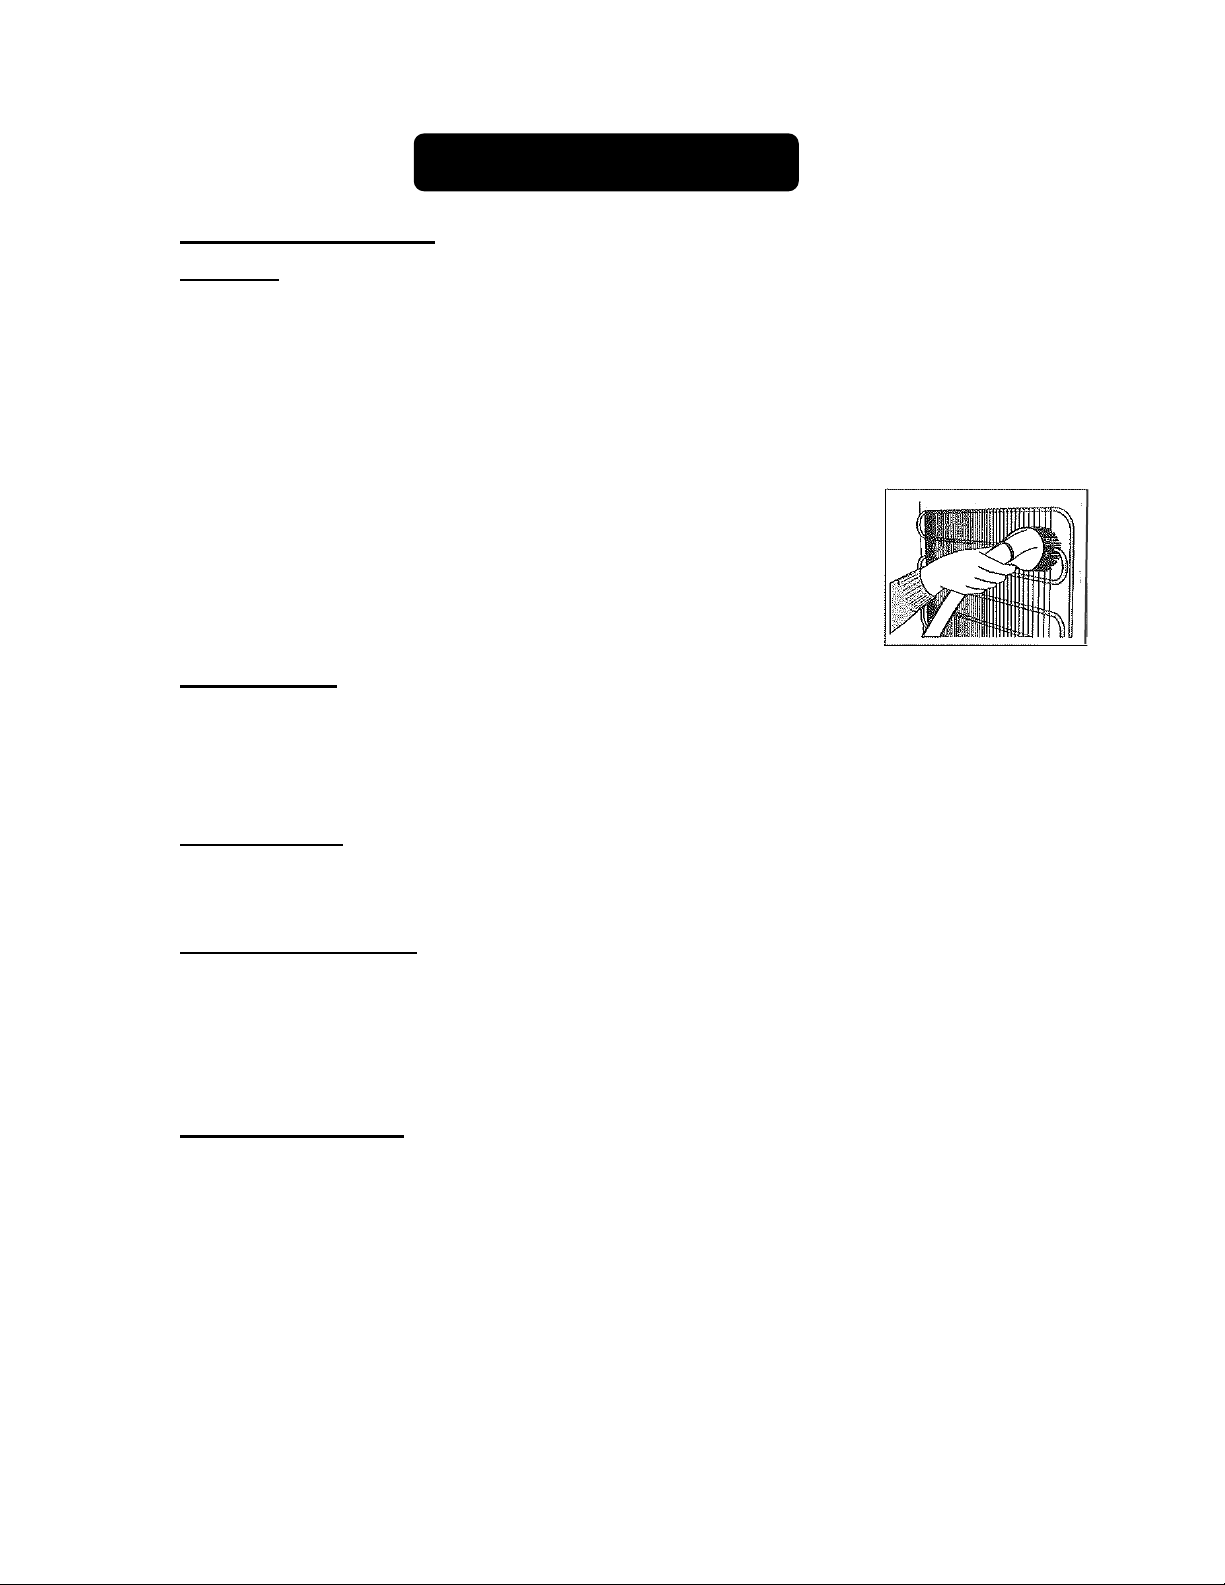
6. From time to time, wipe the condenser on the rear wall with a soft
non-metallic brush or vacuum cleaner. (See illustration.)
7. After you have cleaned the appliance, reconnect it to the power
supply and return the drawers and frozen items back to their place.
Power Failure
Most power failures are corrected within a few hours and should not affect the
temperature of your freezer if you minimize the number of times the door is opened. If
the power is going to be off for a longer period of time, you need to take the proper steps
to protect your frozen items.
Vacation Time
During long absences, remove all the contents of the freezer. Unplug the freezer, clean it
and leave the door open slightly to avoid possible formation of condensation, mold or odors.
Moving Your Freezer
1. Remove the contents of the freezer.
2. Securely tape down all loose items (e.g., drawers) inside your unit.
3. Turn the leveling legs up to the base to avoid damage.
4. Tape the door shut.
5. Be sure the freezer stays secure in the upright position during transportation.
Energy-Saving Tips
:
:
:
:
• The freezer should be located in the coolest area of the room, away from heat-
producing appliances or heating ducts and out of direct sunlight.
• Try not to open the door too often, especially when the weather is damp and hot.
Once you open the door, close it as soon as possible.
• Occasionally check if the appliance is sufficiently ventilated (adequate air circulation
behind and in front of the appliance).
• Set the thermostat from higher to lower settings as soon as possible (depends on
how loaded the appliance is, ambient temperature, etc.).
• Before loading items into the unit, be sure they are cooled to ambient temperature.
• A layer of frost and ice increases energy consumption, so defrost the appliance as
soon as the layer is 1/8"-1/4" thick.
Page 15

14
Troubleshooting
When using the freezer, you may come across some problems that in many cases result
from improper handling of the appliance and can easily be eliminated.
TROUBLESHOOTING GUIDE
The appliance fails to operate after being connected to the power source.
• Check whether the power supply is active and that the (manual) thermostat is not
set to the stop position.
The red light is on (manual thermostat), or unit is not cooling properly (digital
thermostat).
• The door was opened frequently or it was left open too long.
• The door is not properly closed (the door may sag; the gasket may be dirty or
damaged).
• The power supply has been interrupted for a long period of time.
• The appliance may have been overloaded with unfrozen items.
The compressor is running continuously.
• Set the (manual) thermostat from super to another set ting.
• Increase the Set Point on the (digital) thermostat slightly.
• There may be inadequate ventilation of the compressor and condenser. (Assure
there is adequate air circulation behind the appliance and wipe the dust from the
condenser.) The space in front of the front air vents must be clear.
The freezer door is hard to open.
If you try to open the door after it has just recently been closed, you may find it hard
to open. This is because, when you open the door, warm air gets into the
appliance and when it is cooling, lower interior pressure seals the door.
The door can be opened more easily by slightly pressing the gasket against the door
and pulling on the door.
After 5 to 10 minutes, the door can be opened easily.
Noise
Cooling in refrigeration appliances is enabled by the refrigerating system with
compressor, which produces noise. How noisy the appliance is depends on where
it is placed, how it is used and how old the appliance is.
• During the operation of the compressor, the noise of liquid is heard and when
the compressor is not operating, the refrigerant flow is heard. This is a normal
condition and has no influence whatsoever on the lifetime of the appliance.
• After starting the appliance, the operation of the compressor and the refrigerant
flow may be louder. This does not mean that something is wrong. Gradually
the noise is reduced.
• Sometimes a louder noise is heard, which is unusual for the appliance. This
noise is often a consequence of improper placement of the unit. (The freezer
should be placed and leveled firmly on a solid base and it should not touch the
wall or cabinets standing next to it.)
Page 16

15
Limited Warranty
FELIX STORCH, INC.
WARNING! This product may contain chemicals known to the state of California to
higher than threshold limits: NONE.
ONE-YEAR LIMITED WARRAN TY
Within the 48 contiguous United States, for one year from the date of purchase, when this appliance is
operated and maintained according to instructions attached to or furnished with the product, warrantor will
pay for factory-specified parts and repair labor to correct defects in materials or workmanship. Service must
be provided by a designated service company. Outside the 48 states, all parts are warranted for one year
from manufacturing defects. Plastic parts, shelves and cabinets are warranted to be manufactured to
commercially acceptable standards, and are not covered from damage during handling or breakage.
5-YEAR COMPRESSOR WARRANTY
1. The compressor is covered for 5 years.
2. Replacement does not include labor.
ITEMS WARRANTOR WILL NOT PAY FOR:
1. Service calls to correct the installation of your appliance, to instruct you how to use your appliance, to
replace or repair fuses or to correct wiring or plumbing.
2. Service calls to repair or replace appliance light bulbs or broken shelves. Consumable parts (such as
filters) are excluded from warranty coverage.
3. Damage resulting from accident, alteration, misuse, abuse, fire, flood, acts of God, improper
installation, installation not in accordance with electrical or plumbing codes, or use of products not
approved by warrantor.
4. Replacement parts or repair labor costs for units operated outside the United States.
5. Repairs to parts or systems resulting from unauthorized modifications mad e to the applian c e.
6. E xpenses for travel and transportation for product service in remote locations.
7. The removal and reinstallation of your appliance if it is installed in an inaccessible location or is not
installed in accordance with published installation instructions.
CUSTOMER'S SOLE AND EXCLUSIVE REMEDY UNDER THIS LIMITED WARRANTY SHALL BE
PRODUCT REPAIR AS PROVIDED HEREIN. IMPLIED WARRANTIES, INCLUDING WARRANTIES OF
MERCHANTABILITY OR FITNESS FOR A PARTICULAR PURPOSE, ARE LIMITED TO ONE YEAR.
WARRANTOR SHALL NOT BE LIABLE FOR INCIDENTAL OR CONSEQUENTIAL DAMAGES. SOME
STATES DO NOT ALLOW THE EXCLUSION OR LIMITATION OF INCIDE NTAL OR CONSEQUENTIAL
DAMAGES, OR LIMITATIONS ON THE DURA TION OF IMPLIED W ARRANTIES OF MERCHANTABILI TY
OR FITNESS, SO THESE EXCLUSIONS OR LIMITATIONS MAY NOT APPLY TO YOU. THIS WARRANTY
GIVES YOU SPECIFIC LEGAL RIGHTS AND YOU MAY ALSO HAVE OTHER RIGHTS, WHICH VARY
FROM STATE TO STATE.
DISCLAIMER OF IMPLIED WARRANTIES – LIMITATION OF REMEDIES
cause cancer or birth defects or other reproduct ive harm. For more information,
visit: www.summitappliance.com/prop65
Chemicals known by the manufacturer to be present in this product in concentrations
770 Garrison Avenue
Bronx, NY 10474
Phone: (718) 893-3900
Fax: (844) 478-8799
www.medicalrefrigerators.com
For parts and accessory ordering,
troubleshooting and helpful hints, visit:
www.summitappliance.com/support
Page 17

16
MESURES DE SÉCURITÉ IMPORTANTES
AVERTISSEMENT
Votre sécurité et celle des autres sont très importantes.
Nous donnons de nombreux messages de sécurité importants dans ce manuel et sur votre
appareil. Toujours lire et respecter les consignes de sécurité.
Ceci est le symbole de sécurité. Le symbole vous signale les dangers
potentiels qui peuvent tuer ou blesser vous et les autres. Tous les
messages de sécurité suivront le symbole de sécurité et soit les mots
"DANGER" ou "AVERTISSEMENT”.
DANGER signifie que la non
observation de cette prescription de
sécurité peut entraîner d es blessures ou
la mort.
AVERTISSEMENT signifie que la non
observation de cette prescription de
sécurité peut entraîner de graves
dommages au produit, des blessures
graves ou la mort.
Tous les messages de sécurité vous alertent sur le danger potentiel, vous disent comment
réduire le risque de blessure, et vous permettent de connaître ce qui peut arriver si les
instructions ne sont pas suivies.
Avant que le congé lateur soit util isé, il do it être c orrectem ent position né et
installé comme décr it dans ce m anuel, af in de l ire atte nti vement le manuel.
Pour réduire le risque d'incendie, de choc électrique ou de blessure lors de
l'utilisation du congélateur, suivre les précautions de base, y compris ce
qui suit:
• Brancher sur une prise à 3 broches mise à la terre, ne pas retirer broche de terre, ne pas
utiliser un adaptateur, et ne pas utiliser une rallonge.
• Il est recommandé qu'un circuit distinct pour alimenter uniquement votre appareil soit assuré.
Utilisez des récipients qui ne peuvent être désactivés par interrupteur ou une chaîne de
traction.
• Ne jamais nettoyer les pièces de l'appareil avec des liquides inflammables. Ces émanations
peuvent provoquer un risque d'incendie ou d'explosion. Et ne pas stocker ou utiliser de
l'essence ou d'autres vapeurs et liquides inflammables à proximité de cet ou tout autre
appareil. Les vapeurs peuvent créer un risque d'incendie ou d'explosion
• Avant de procéder à des opérations de nettoyage et d'entretien, assurez-vous que la ligne
d'alimentation de l'appareil est débranchée.
• Ne pas brancher ou débrancher la prise électrique lorsque vos mains sont humides.
• Débrancher l'appareil ou couper le courant avant le nettoyage ou l'entretien. Ne pas le faire
peut entraîner un choc électrique ou la mort.
• Ne pas tenter de réparer ou remplacer toute pièce de votre congélateur à moins qu'il ne soit
spécifiquement recommandé dans ce manuel. Tout autre entretien doit être confié à un
technicien qualifié.
Page 18

17
AVERTISSEMENT
• Utilisez deux personnes ou plus pour déplacer et installer le congélateur. Défaut de le faire
peut conduire aux blessures de dos ou d'autres.
• Pour assurer une bonne ventilation de votre appareil, le devant de l'appareil doit être
complètement dégagé. Choisissez un endroit bien ventilé avec des températures supérieures
à 60 ° F (16 ° C) et en dessous de 90 ° F (32 ° C). Cet appareil doit être installé dans un
endroit protégé contre les éléments, tels que le vent, la pluie, de l'eau pulvérisée ou de
gouttes.
• Le congélateur ne doit pas être situé à côté de fours, grilles ou d'autres sources de forte
chaleur.
• L'appareil doit être installé avec toutes les connexions de l'électricité, de l'eau et du drainage
en conformité avec les codes nationaux et locaux. Une alimentation électrique standard (115
V CA seulement, 60 Hz), correctement mise en conformité avec le National Electrical Code et
les codes et règlements locaux, est nécessaire.
• Ne pas plier ou pincer le cordon d'alimentation du congélateur.
• La taille du fusible (ou disjoncteur) doit être de 15 ampères.
• Il est important que l'appareil soit à niveau afin de fonctionner correctement. Vous pouvez
avoir besoin de faire plusieurs ajustements pour y arriver.
• Ne jamais laisser les enfants utiliser, jouer avec ou ramper à l'intérieur du congélateur.
• Ne pas utiliser de produits de nettoyage à base de solvants ou d'abrasifs sur l'intérieur. Ces
nettoyants peuvent endommager ou décolorer l'intérieur.
• Utilisez cet appareil uniquement pour son usage prévu.
CET APPAREIL EST CONÇU POUR L'USAGE MÉDICAL OU PHARMACEUTIQUE SEULEMENT. IL
N'EST PAS DESTINÉ À ÊTRE UTILISÉ COMME CONGÉLATEUR POUR LE MÉNAGE.
Risque d'emprisonnement des enfants!
Des enfants pris au piège et suffoqués n'est pas un scénario du passé. Les appareils jetés ou
abandonnés sont encore dangereux, même s'ils sont « simplement entreposés dans le garage
pendant quelques jours ».
Avant de jeter votre ancien apparei l:
• Retirer les portes. Laissez les étagères ou des paniers en place afin que les enfants ne
puissent pas grimper facilement à l'intérieur
• Ne jamais laisser les enfants utiliser, jouer avec, ou de ramper à l'intérieur du réfrigérateur /
congélateur.
CET APPAREIL EST PAS DESTINÉ À L'USAGE DES JEUNES ENFANTS OU DES PERSONNES
HANDICAPÉES À MOINS QU'ILS AIENT ÉTÉ ADÉQUATEMENT SUPERVISÉ PAR UNE PERSONNE
RESPONSABLE DE FAÇON QU'IL ILS PEUVENT UTILISER LES APPAREIL EN TOUTE SÉCURITÉ.
JEUNES ENFANTS DOIVENT ÊTRE SURVEILLÉS POUR ÉVITER QU'ILS NE PAS JOUER AVEC
L'APPAREIL
.
- CONSERVEZ CES INSTRUCTIONS -
Page 19

18
Table des matières
Mesures de sécurité importantes ....................................................................... 16 - 17
Emplacement des pièces ........................................................................................... 19
Informations techniques ............................................................................................ 20
Instructions d’installation ................................................................................... 21 - 24
Avant d’utiliser votre congélateur ...................................................................... 21
Installation du congélateur ................................................................................ 21
Connexion électrique ......................................................................................... 22
Rallonge ........................................................................................................... 22
Inversion de l'ouverture de la porte ........................................................... 23 – 24
Installation de la poignée de porte ..................................................................... 24
Fonctionnement de votre congélateur ............................................................... 25 - 27
Contrôle de la température pour les
et VT65MLBI ....................................................................................... 25– 26
Contrôle de la température pour les modèles ADA et ALF620, ALF620BI,
ALF620L et ALFB621 ................................................................................ 26
Stockage de produits congelés ......................................................................... 27
Décongélation de votre congélateur ................................................................. 27
Soins et maintien ................................................................................................. 27 - 28
Nettoyage de votre congélateur ................................................................. 27 - 28
Panne de courant ............................................................................................. 28
Vacances .......................................................................................................... 28
Déplacement de votre congélateur ................................................................... 28
Dépannage ........................................................................................................... 29 - 30
Garantie limitée .......................................................................................................... 31
modèles VT65M, VT65ML, VT65MBI
Page 20

19
Thermostat manuel
Porte
(fentes
Pieds de
nivellement
iroirs
Étagères
Indicateurs lumineux:
Sortie de l'eau
REMARQUE: Les modèles VT65ML et ALF620L ont u ne
T
amovibles
Grille
d'aération avant)
Emplacement des pièces
(Modèles ADA et ALF
ont un thermostat
numérique sur la grille)
Compresseur en marche
(jaune)
Alerte de température
(rouge)
fixes
de dégivrage
serrure située à l'avant de la porte.
Page 21

20
Numéro de
modèle
Informations techniques
VT65M
VT65ML (avec
serrure)
VT65MBI
VT65MLBI
VT65MADA
VT65MLADA
ALF620, ALF620L,
ALFB621
ALF620BI
Couleur
Capacité
Entrée électrique
Ampérage
Température
interne la plus
froide
Refrigérant
Installation
Dimensions de
l’unité
(Ha x La x Pr)
NOTES: 1. Ces congélateurs sont appropriés pour la conservation des vaccins, des
produits pharmaceutiques et d'autres matières sensibles à la température.
Ils ne sont pas conçus pour le stockage de denrées alimentaires.
2. Les spécifications sont sujettes à modification sans préavis.
Autoportante
85,1 x 60,0 x
59,7 cm
Encastrée ou
x 60,0 x 59,7 cm
3.5 pieds cubes (99 litres)
R134a, 2.7 onces (76,5 g)
autoportante
85,1 à 87,6
Blanc
115V CA/60Hz
1.3A
-25°C
Autoportante
81,3 x 60,0 x 59,7 cm
Encastrée ou
autoportante
Page 22

21
Instructions d’installation
Avant d'utiliser votre congélateur
• Retirer l'emballage extérieur et intérieur.
• Vérifiez que vous avez toutes les pièces suivantes:
3 tiroirs
1 tube de drainage courte
2 clés (les modèles VT65ML et ALF620L seulement)
• ATTENTION: Après le déballage vous DEVEZ permettre votre appareil de se tenir
debout pendant au moins 2 heur es pour permettre aux lubrifiant et réfrigérant à
écouler dans le compr esseur et se st abi li ser . Ne pas le faire peut affecter les
performances et la durée de vie de l’unité.
• Retirer les tiroirs et le s nett oyer et les surfaces intérieures de l'appareil avec de l'eau
tiède à l'aide d'un chiffon doux.
Installation du congélateur
:
• Placez l'appareil sur un plancher qui est assez solide pour supporter-le quand il est
entièrement chargé. Pour mettre à niveau l'unité, réglez les deux pieds de
nivellement à l'avant.
• À moins que les numéros de modèles incluent les lettres BI, ces appareils sont
conçus pour être autoportants et ne doivent pas être encastrés ou intégrés. Lors de
l'installation, laisser au moins 5 pouces d'espace sur les côtés et le dessus de
l'appareil et 2 pouces à l'arrière, ce qui permettra la circulation de l'air pour refroidir le
compresseur et le condenseur.
Si votre modèle a les lettres de BI dans son numéro de modèle, l'appareil peut être
installé soit autoportant ou encastré. Si l'unité sera construite dans une enceinte,
vous devez toujours prévoir au moins 3/16 " d'espace libre sur les deux côtés et au
sommet, et 2" à l'arrière. Veillez à ce que les fentes d'aération à l'avant ne sont
jamais couvertes ou bloquées en aucune manière.
• Éloignez l'appareil de la lumière directe du soleil et des sources de chaleur (four,
radiateur, etc.). La lumière directe du soleil peut affecter le revêtement acrylique et
les sources de chaleur peuvent augmenter la consommation électrique. Des
températures ambiantes extrêmement froides peuvent également affecter la
performance de l'unité.
• Évitez de placer l'appareil dans les zones humides. Trop d'humidité dans l'air va
provoquer le givre pour former rapidement sur l'évaporateur, ce qui nécessite un
dégivrage plus fréquent du congélateur.
• Branchez l'appareil dans une prise murale exclusive, correctement installée et mise à
la terre. Ne pas en aucun cas couper ou supprimer le troisième pôle (terre) du cordon
d'alimentation. Toute question concernant le pouvoir et / ou mise à la terre doivent
être adressées à un électricien certifié ou à un centre de service agréé.
:
Page 23

22
fabricant, son agent de service ou une personne qualifiée afin d'éviter un danger.
Connexon électrique :
AVERTISSEMENT
Une mauvaise utilisation de la prise de terre peut entraîner un risque de choc
électrique. Si le cordon d'alimentation est endommagé, le faire remplacer par le
Cet appareil doit être correctement mis à la terre pour votre sécurité. Le cordon
d'alimentation de cet appareil est équipé d'une fiche à trois broches qui accouple avec
les prises murales standard à trois broches afin de minimiser le risque de choc
électrique.
Ne pas en aucun cas couper ou supprimer le troisième pôle (terre) du cordon
d'alimentation fourni. Pour votre sécurité, cet appareil doit être correctement mis à la
terre.
Cette unité nécessite une norme électrique de 115 volts CA / 60Hz avec une prise à
terre à trois broches.
Pour éviter toute blessure accidentelle, le cordon doit être fixé derrière l'unité et non
laissé exposé ou pendant.
Ne débranchez jamais l'appareil en tirant sur le cordon d'alimentation. Toujours saisir
fermement la fiche et tirez toute droite sortie de la prise.
L'appareil doit toujours être branché sur une prise murale exclusive, à la terre ayant une
tension qui correspond à l'étiquette apposée sur l'appareil. Cette offre les meilleures
performances et empêche aussi la surcharge des circuits de câblage de la maison qui
pourraient entraîner un risque d'incendie de la surchauffe. Ne jamais débrancher
l'appareil en tirant sur le cordon d'alimentation. Toujours saisir fermement la fiche et tirez
tout droit sorti de la prise. Réparer ou remplacer immédiatement tout cordon
d'alimentation qui est devenu usé ou endommagé. Ne pas utiliser un cordon qui
présente des fissures ou une usure sur sa longueur ou à l'une des extrémités. Lors du
déplacement de l'appareil, veillez à ne pas endommager le cordon d'alimentation.
Rallonge
:
Ne pas utiliser une rallonge avec cet appareil. Si le cordon d'alimentation est trop court,
demandez à un technicien électricien ou technicien qualifié d'installer une prise près de
l'appareil.
Page 24

23
Inversion de l'ouverture de la porte
Votre congélateur peut être ouvert à partir de la droite ou la gauche. Par défaut, la
charnière de porte est sur le côté droit. Si vous préférez-la sur la gauche, s'il vous plaît
suivez les instructions appropriées ci-dessous :
REMARQUE: Toutes les pièces qui sont démontées doivent être conservées pour la
réinstallation de la porte.
:
Pour les modèles VT65M, VT65ML, VT65MBI et VT65MLBI :
1. Dispositif de fixation de charnière supérieure
2. Charnière inférieure
3. Grille
4. Poignée
5. Dispositif de fixation de charnière de porte
6. Bouchon de dispositif de fixation de charnière de porte
a. Dévissez la charnière inférieure et enlever la porte.
b. Poussez la grille à la droite dans la nouvelle position.
c. Défaire le dispositi f de fixation de la charnière supérieure et fixez-le sur le côté opposé
du boîtier, où vous avez déjà su pprimé et remplacé le dispos i ti f de fi xa t ion avec le trou
sur le côté opposé.
d. Mettez la porte sur le dispositif de fixation de la charnière supérieure.
e. Fixez la charnière inférieure dans la nouvelle position.
f. Dévissez la poignée et placez-la sur le côté opposé.
g. Certaines vis sont couvertes avec des bouchons. Enlevez ces bouchons avant de
démonter les vis.
h. Vérifier le joint. Il ne devrait pas être froissé et devrait bien sceller.
Page 25

24
Pour les modèles VT65MADA, VT65MLADA, ALF620/L, ALF620BI et ALFB621
Installation de
Charnière supérieure
Broche
Rondelle
Broche
Rondelle en plastique
a. Enlever le couvercle de la charnière supérieure de la porte et enlever les vis qui
maintiennent la charnière supérieure.
b. Soulevez la charnière droit pour dégager la broche de charnière de la prise dans le
haut de la porte.
c. Soulevez la porte haut et loin pour libérer sa prise en bas de la broche de charnière.
d. Retirer les vis de la charnière inférieure.
e. Retirer les capuchons décoratifs du côté opposé et boucher les trous du côté
d'origine avec les capuchons.
f. Déplacez la charnière inférieure sur le côté opposé et serrer les vis. Utilisez des
rondelles de blocage ou d'écrous s’ils ont été installés dans l'installation d'origine.
g. Installer sans serrer la charnière gauche fournie avec votre appareil sur le côté
supérieur gauche de l'appareil tout en déplaçant les capuchons décoratifs sur le côté
droit.
h. Replacez la porte sur la broche sur la charnière inférieure. Placez la broche de la
charnière supérieure dans la porte. Insérer les vis dans la charnière supérieure et les
serrer.
Si vous remarquez la porte ne pend pas droit, desserrez les vis de la charnière
supérieure, réglez la porte jusqu'à ce qu'elle soit de niveau et serrez les vis.
Installation de la poignée de porte
en plastique
:
la charnière sur
le côté gauche
Installation de
la charnière sur
le côté droit
:
La porte a deux trous de vis sur chaque côté, vous permettant d'installer une poignée
(incluse). Pour ce faire, aligner la poignée avec les trous de vis sur le côté que vous
préférez. Fixer la poignée en place avec les vis fournies, puis couvrir les têtes de vis avec
le joint de la poignée (inclus).
Page 26

25
Fonctonnement de votre congélateur
REMARQUE: Si l'appareil est débranché, a perdu le pouvoir, ou est désactivé, vous
devez attendre 3 à 5 minutes avant de redémarrer l'unité. Si vous essayez de
redémarrer avant ce délai, le congélateur ne démarre pas.
Contrôle de la température pour les modèles VT65M, VT65ML,
VT65MBI et VT65MLBI
• Le contrôle de la température est un thermostat cadran
situé à l'avant du congélateur, dans le coin supérieur droit
au-dessus de la porte. Lorsque le congélateur fonctionne
automatiquement, la température intérieure est
commandée par le thermostat. Normalement, le réglage
du thermostat devrait être dans le milieu, entre max et
min. (Voir l'illustration.)
• Nous recommandons les réglages du thermostat plus près du max seulement dans
les cas où vous voulez accélérer le refroidissement comme avant de charger un
certain nombre d'articles non gelés. Des réglages plus près de min aideront
économiser de l'énergie, à condition que le congélateur ne soit pas surchargé.
• Le réglage de super provoque le compresseur pour fonctionner en continu et doit
être utilisé avec parcimonie. Ce réglage peut être utilisé lorsque vous souhaitez figer
un grand nombre d'articles non gelés ou si vous voulez de surgeler des éléments
déjà figés. La lumière jaune à côté du thermostat est allumé lorsque le réglage de
super est actif. Rappelez-vous de tourner le thermostat à son réglage normal après
une courte période.
• Le réglage de stop arrête le processus de refroidissement (le compresseur éteint),
mais ne désactive pas le congélateur. Pour éteindre l'appareil complètement, vous
devez le débrancher.
:
Modes de fonctionnement pour les modèles avec thermostat à cadran
• Fonctionnement automatique – la lumière jaune est allumée et éteinte (avec le
:
compresseur).
La température intérieure est commandée par le thermostat, ce qui met le système
de refroidissement en marche et hors tension. La fréquence de mettant en marche et
d'éteignant le système de refroidissement dépend de:
– le réglage du thermostat
– la fréquence à laquelle la porte est ouverte, et
– la température ambiante.
• Opération continue – la lumière jaune est allumée fixe.
Le réglage super du thermostat est actif, et le système de refroidissement fonctionne
en continu, ce qui entraîne des gelées rapides. Ne laissez pas le congélateur
fonctionner dans ces conditions pendant de longues périodes de temps.
• Alerte de température – la lumière rouge est allumée.
La lumière rouge (à côté du thermostat) est allumée quand il y a un problème lié à la
température dans le congélateur. Voir Dépannage.
Page 27

26
Mise en marche le congélateur vide
Brancher le congélateur et réglez le thermostat à la position super (fonctionnement
continu). (Les lumières rouges et jaunes sont allumées.) Quand la lumière rouge se
éteint, régler le thermostat pour un fonctionnement normal. Attendre quelques
heures, puis charger le congélateur.
:
Procédure de congélation
Pour congeler de grandes quantités d'articles dégelés (5 livres ou plus), tourner le
bouton du thermostat à super pour un fonctionnement continu (la lumière jaune est
allumée). Après une heure ou deux, tourner le thermostat à sa position normale (la
lumière jaune éteint) et charger le congélateur. Après 24 heures, tous les articles
doivent être congelés.
REMARQUES:
1. Gardez les articles non gelés hors de contact avec des surgelés.
2. Il n'y a pas besoin de régler le thermostat pour un fonctionnement continu (super)
si vous ne souhaitez congeler de petites quantités de produits frais (4 livres ou
moins).
:
Contrôle de la température pour les modèles ADA et les modèles ALF620,
ALF620BI, ALF620L et ALFB621
La température à l'intérieur de ces congélateurs est contrôlée par un thermostat
numérique situé dans la grille à l'avant en bas de l'appareil. Normalement, l'affichage
LED indique la température actuelle à l'intérieur de l'unité. Les relevés de température
sont en degrés Celsius.
La gamme de température préréglée du thermostat est de -10 à -25 ° C * (14 à -13 ° F),
et la température de fonctionnement est réglée en usine à -25 ° C (-13 ° F). Si vous
trouvez qu'il est nécessaire de changer le réglage de la température (Set Point) pour
votre appareil, reportez-vous aux instructions ci-dessous.
Le panneau avant du thermostat numérique est montré ici :
Pour voir le S et Point (point de consigne) :
Presser et relâcher immédiatement la touche SET. L'écran affiche la valeur du
point de consigne. Attendre 5 secondes et la température intérieure va afficher à
nouveau.
Pour changer le Set Point:
1. Appuyez et maintenez la touche SET pendant plus de 3 secondes pour
modifier la valeur du Set Point. La valeur du Set Point sera affichée.
2. Poussez la flèche haute ou basse à la position désirée. Le nouveau réglage
sera mémorisé après 15 secondes, à condition qu'aucune d'autres touches
sont poussées.
* La gamme maximum / minimum du thermostat numérique (-10 à -25 ° C) est
préréglée et verrouillée par nous. Pour réinitialiser cette gamme, soit appelez-nous au
800-932-4267, ou trouvez des informations sur notre site Web, sous Dépannage.
:
Page 28

27
Stockage de produits congelés
Articles congelés peuvent être stockés dans les trois tiroirs, ou peuvent être placés
directement sur les étagères de refroidissement si un ou plusieurs des tiroirs est retiré.
Décongélation de votre congélateur
Pour l'opération la plus efficace et la consommation d'énergie minimale, décongeler le
congélateur lorsque le givre sur les parois du congélateur atteint une épaisseur de 1/8 à
1/4 pouce.
1. Si votre congélateur a un thermostat manuel, une heure ou deux avant le dégivrage,
réglez-le à super (lumière jaune sera allumée) afin que le contenu du congélateur
soit bien congelé. Après cela, vider le congélateur et veiller à ce que les articles ne
commencent à décongeler. Si votre appareil a un thermostat numérique, il suffit de
retirer et de stocker le contenu avant la décongélation.
2. Pour démarrer le dégivrage, débranchez le congélateur et retirez les tiroirs.
3. Insérer la tubulure comprise dans la rainure dans le fond
de l'appareil et placer un récipient en dessous pour
recueillir l'eau de dégivrage. (Voir l'illustration.) Le
dégivrage est accéléré si la porte est laissée ouverte.
4. Utilisez une éponge ou du papier absorbant pour éliminer
l'eau et la fonte des glaces du plancher du congélateur.
Après le givre ou de glace a fondu, sécher l'intérieur du
congélateur à fond.
5. Redémarrez le congélateur en le branchant et en
tournant le thermostat (manuel) à la position désirée. Une fois que le congélateur est
froid, remettre les tiroirs et les contenus.
ATTENTION : Ne pas utiliser d'eau bouillante ou un dispositif électrique comme un
sèche-cheveux pour aider à accélérer le dégivrage, car cela pourrait endommager les
pièces en plastique de l'unité. En outre, ne jamais utiliser un instrument pointu ou
métallique pour enlever le givre car cela pourrait endommager les serpentins de
refroidissement et annulera la garantie. Nous vous recommandons d'utiliser un
grattoir en plastique.
:
:
Soins et entretien
Nettoyage de votre congélateur :
ATTENTION
électrique ou de blessure.
1. Débranchez le congélateur et supprimer les éléments et les tiroirs congelés.
2. Lavez les surfaces intérieures avec une solution d'eau tiède et de vinaigre. Essuyer
avec un chiffon doux et propre.
3. Laver les tiroirs avec une solution de détergent doux, puis rincer et sécher
complètement.
4. Lavez l’extérieur avec de l'eau chaude et un détergent liquide doux. Rincez bien et
séchez avec un chiffon doux et propre.
: Ne pas débrancher l'appareil avant le nettoyage peut entraîner un choc
Page 29

28
5. Essorez l'excès d'eau de l'éponge ou le chiffon avant de nettoyer
la zone du contrôle de la température ou des pièces électriques.
6. De temps en temps, essuyez le condenseur sur la paroi arrière
avec une brosse doux et non métallique ou un aspirateur. (Voir
l'illustration.)
7.
Après avoir nettoyé l'appareil, rebranchez-le à l'alimentation et
retourner les tiroirs et les produits congelés à leur place.
Panne de courant
:
La plupart des pannes de courant sont corrigées en quelques heures et ne devraient
pas affecter la température de votre congélateur si vous réduisez le nombre de fois que
la porte est ouverte. Si l'alimentation va être hors service pendant une période de temps
plus longue, vous devez prendre les mesures appropriées pour protéger vos produits
congelés.
Vacances
:
Pendant de longues absences, supprimer tous les contenus du congélateur. Débranchez le
congélateur, le nettoyer et laisser la porte ouverte légèrement pour éviter la formation
possible de condensation, de moisissure ou des odeurs.
Déplacement de votre congélateur
:
1. Retirer le contenu du congélateur.
2. Solidement scotchez tous les éléments amovibles (par exemple, des tiroirs) à
l'intérieur de votre unité.
3. Tournez les pieds de nivellement jusqu'à la base pour éviter les dommages.
4. Scotchez la porte fermée.
5. Soyez sûr le congélateur reste bloqué en position verticale pendant le transport.
Conseils d'économie d'énergie
:
• Le congélateur doit être situé dans le quartier le plus frais de la pièce, loin des
appareils produisant de la chaleur ou des conduits de chauffage et des rayons directs
du soleil.
• Essayez de ne pas ouvrir la porte trop souvent, surtout quand le temps est humide et
chaud. Une fois que vous ouvrez la porte, fermez-la dès que possible.
• Vérifiez de temps si l'appareil est suffisamment ventilé (circulation d'air suffisante
derrière et devant de l'appareil).
• Réglez le thermostat des réglages hauts vers inférieurs dès que possible (dépend de
la façon dont l'appareil est chargé, température ambiante, etc.).
• Avant de charger les articles dans l'appareil, assurez-vous qu'ils sont refroidis à la
température ambiante.
• Une couche de givre et de glace augmente la consommation d'énergie, donc dégivrer
l'appareil dès que la couche est de 1/8 "à 1/4" d'épaisseur.
Page 30

29
Dépannage
Lorsque vous utilisez le congélateur, vous pouvez rencontrer certains problèmes qui
dans de nombreux cas peuvent résulter d'une mauvaise manipulation de l'appareil et
peuvent être facilement éliminés.
Guide de dépannage
L'appareil ne fonctionne pas après avoir été connecté à la source d'alimentation.
• Vérifiez si l'alimentation est active et que le thermostat (manuel) n'est pas en
position d'arrêt (stop).
La lumière rouge est allumée (thermostat manuel), ou l'unité ne refroidit pas
correctement (thermostat numérique).
• La porte a été ouverte fréquemment ou elle a été laissée ouverte trop longtemps.
• La porte est mal fermée (la porte peut s'affaisser; le joint peut être sale ou
endommagé).
• L'alimentation électrique a été interrompue pendant une longue période de temps.
• L'appareil peut avoir été surchargé avec des articles dégelés.
Le compresseur fonctionne continuellement.
• Réglez le thermostat (manuel) de super sur un autre réglage.
• Augmenter le Set Point (point de consigne) sur le thermostat (numérique)
légèrement.
• Il peut y avoir une ventilation inadéquate du compresseur et le condenseur.
(Assurer une circulation d'air suffisante derrière l'appareil et essuyer la poussière
du condenseur.) L'espace devant les bouches d'air avant doit être clair.
La porte du congélateur est difficile à ouvrir.
Si vous essayez d'ouvrir la porte après qu'il a récemment été fermée, vous la
trouverez peut-être difficile à ouvrir. En effet, lorsque vous ouvrez la porte, l'air
chaud pénètre dans l'appareil et quand il se refroidit, la pression intérieure plus
basse scelle la porte.
La porte peut être ouverte plus facilement en appuyant légèrement le joint contre la
porte et en tirant sur la porte.
Après 5 à 10 minutes, la porte peut être ouverte facilement.
Bruit
Refroidissement dans les appareils de réfrigération est activé par le système de
réfrigération avec compresseur, qui produit le bruit. Comment bruyant est l'appareil
dépend de l'endroit où il est placé, comment il est utilisé et quel âge a l'appareil.
• Pendant le fonctionnement du compresseur, le bruit de liquide est écouté et
lorsque le compresseur ne fonctionne pas, le flux de réfrigérant est écouté.
Ceci est une condition normale et n'a aucune influence sur la durée de vie de
l'appareil.
• Après le démarrage de l'appareil, le bruit du compresseur et du débit de
réfrigérant peuvent être plus fort. Cela ne signifie pas qu'il y a un problème. Peu
à peu, le bruit est réduit.
Page 31

30
• Parfois un bruit plus fort se fait entendre, ce qui est inhabituel pour l'appareil.
Ce bruit est souvent la conséquence d'un mauvais positionnement de l'unité.
(Le congélateur doit être placé et nivelé fermement sur une base solide et il ne
doit pas toucher le mur ou armoires debout à côté de lui.)
Page 32

31
Garantie limitée
FELIX STORCH, INC.
Pour les pièces et la commande des
uits chimiques reconnus par le fabricant qui sont présents dans ce produit en
UN AN DE GARANTIE LIMITÉE
Dans les 48 États américains contigus, pendant un an à partir de la date d'achat, lorsque cet appareil est
utilisé et entretenu conformément aux instructions jointes à, ou fournies avec le produit, le garant paiera
pour les pièces spécifiées en usine et pour la main-d’œuvre pour corriger les vices de matériaux ou de
fabrication. Le service doit être fourni par une compagnie de service désignée. En dehors des 48 États,
toutes les pièces sont garanties pendant un an pour les défauts de fabrication. Les pièces en plastique,
étagères et armoires sont garanties être fabriqués conformément aux normes acceptées dans le commerce
et ne sont pas couvertes contre les dommages ou le bris pendant la manipulation.
GARANTIE DU COMPRESSEUR DE 5 ANS
1. Le compresseur est couvert par la garantie pendant 5 ans.
2. Le remplacement n'inclut pas la main-d’œuvre.
LE GARANT NE SERA PAS TENU DE PAYER POUR CES POINTS :
1. Les appels de service pour rectifier l'installation de votre appareil, pour vous indiquer comment utiliser
votre appareil, remplacer ou réparer des fusibles ou rectifier le câblage ou la plomberie.
2. Les appels de service pour réparer ou remplacer des ampoules ou des étagères cassées. Les pièces à
usure (telles que des filtres) sont exclues de la couverture de la garantie.
3. Les dommages résultant d'un accident, modification, usage impropre ou abusif, incendie, inondation,
actes de Dieu, mauvaise installation, une installation non conforme aux codes d'électricité ou de
plomberie, ou l'utilisation de produits non appr ouv és par le garant .
4. Les pièces de rechange ou les frais de réparation pour les appareils utilisés hors des États-Unis.
5. Les réparations aux pièces ou systèmes résultant de modifications non autorisées apportées à l'appareil.
6. Les frais de déplacement et de transport pour le service produit dans des endroits éloignés.
7. Le retrait et la réinstallation de votre appareil s’il est installé dans un endroit inaccessible ou n'est pas
installé conformément aux instru cti ons d'in stal lation.
LE SEUL ET UNIQUE RECOURS DU CLIENT EN VERTU DE CETTE GARANTIE LIMITÉE EST LA
RÉPARATION DU PRODUIT TEL QUE PRÉCÉDEMENT DÉCRIT. GARANTIE IMPLICITE, Y COMPRIS LES
GARANTIES DE QUALITÉ MARCHANDE OU D'ADÉQUATION À UN US AGE PARTICULIER, SONT LIMITÉES À
UN AN. LE GARANT NE SERA PAS RESPONSABLE DES DO MMAGES DIRECTS OU IN DIRECTS. CERTAI NS
ÉTATS NE PERMETTENT PAS L'EXCLUSION OU LA LIMITATION DES DOMMAGES DIRECTS OU
INDIRECTS, OU LA LIMITATION DE LA DURÉE DES GARANTIES DE QUALITÉ MARCHANDE OU
D'ADAPTATION, DE SORTE QUE CES EX CLUSIONS OU LIMITATIONS PEUVENT N E PAS S’APPLIQUER À
VOUS. CETTE GARANTIE VOUS DONNE DES DROITS SPÉCIFIQUES ET VOUS POUVEZ AUSSI AVOIR
D'AUTRES DROITS POUVANT VARIER D' U N ÉTAT À L’ AUTRE.
770 Garrison Avenue
Bronx, NY 10474
Téléphone: (718) 893-3900
Télécopieur: (844) 478-8799
www.summitappliance.com
EXCLUSION DE GARANTIES IMPLICITES;
LIMITATION DES RECOURS
ATTENTION!
Californie pour caus er le cancer ou des défauts de naissance et d’au tres dangers pour la
reproduction. Pour plus d'informations, visitez le site: www.summitappliance.com/prop65
Prod
concentrations sup ér ieures aux limites permises: AUCUNS.
Ce produit peut contenir des produits chimiques reconnus par l'État de la
accessoires, le dépannage et des
conseils de service, v is itez le site :
www.summitappliance.com/support
 Loading...