

Page 1

DATA LOGGER USER MANUAL (DL2)
Felix Storch, Inc. │770 Garrison Ave. Bronx, NY 10474│ Tel: (718) 893 3900│ Fax: (844) 478 8799 calibration@summitappliance.com
Page 2

2
Data Logger displays current temperature.
The unit will provide a visual and audio alert when temperature rises above or falls below the high and low set points.
The min/max feature is designed to monitor and store the highest and lowest readings until the memory is cleared, or
removal of battery.
The temperature sensor is enclosed in a glycol-filled bottle, protecting it from rapid temperature changes when
refrigerator/freezer door is opened.
Low battery alert function (battery symbol flashes)
Push button to select
o
C or oF temperature display
Measuring temperature range -30 ~ 70
o
C (or -22 ~ 158 oF)
Accuracy : ± 0.5
o
C (-10 ~ 10 oC or 14 ~ 50 oF), in other ranges ± 1 oC ( or ± 2 oF)
User defined logging interval
Powered by a 5VDC power adapter
Rechargeable Li-ion battery to record data up to 20 hours during a power-failure event
6 ft (185 cm) probe-connecting cable
FEATURES
SAVE THIS MANUAL FOR FUTURE REFERENCE
R5100615
Page 3
3
Data logger
Temperature sensor in a
glycol-filled bottle
Instructions manual
Magnetic sticker
(w/instructions)
Rechargeable Lithium
battery
4 GB Memory stick
Power adapter
NIST-traceable calibration
certificate
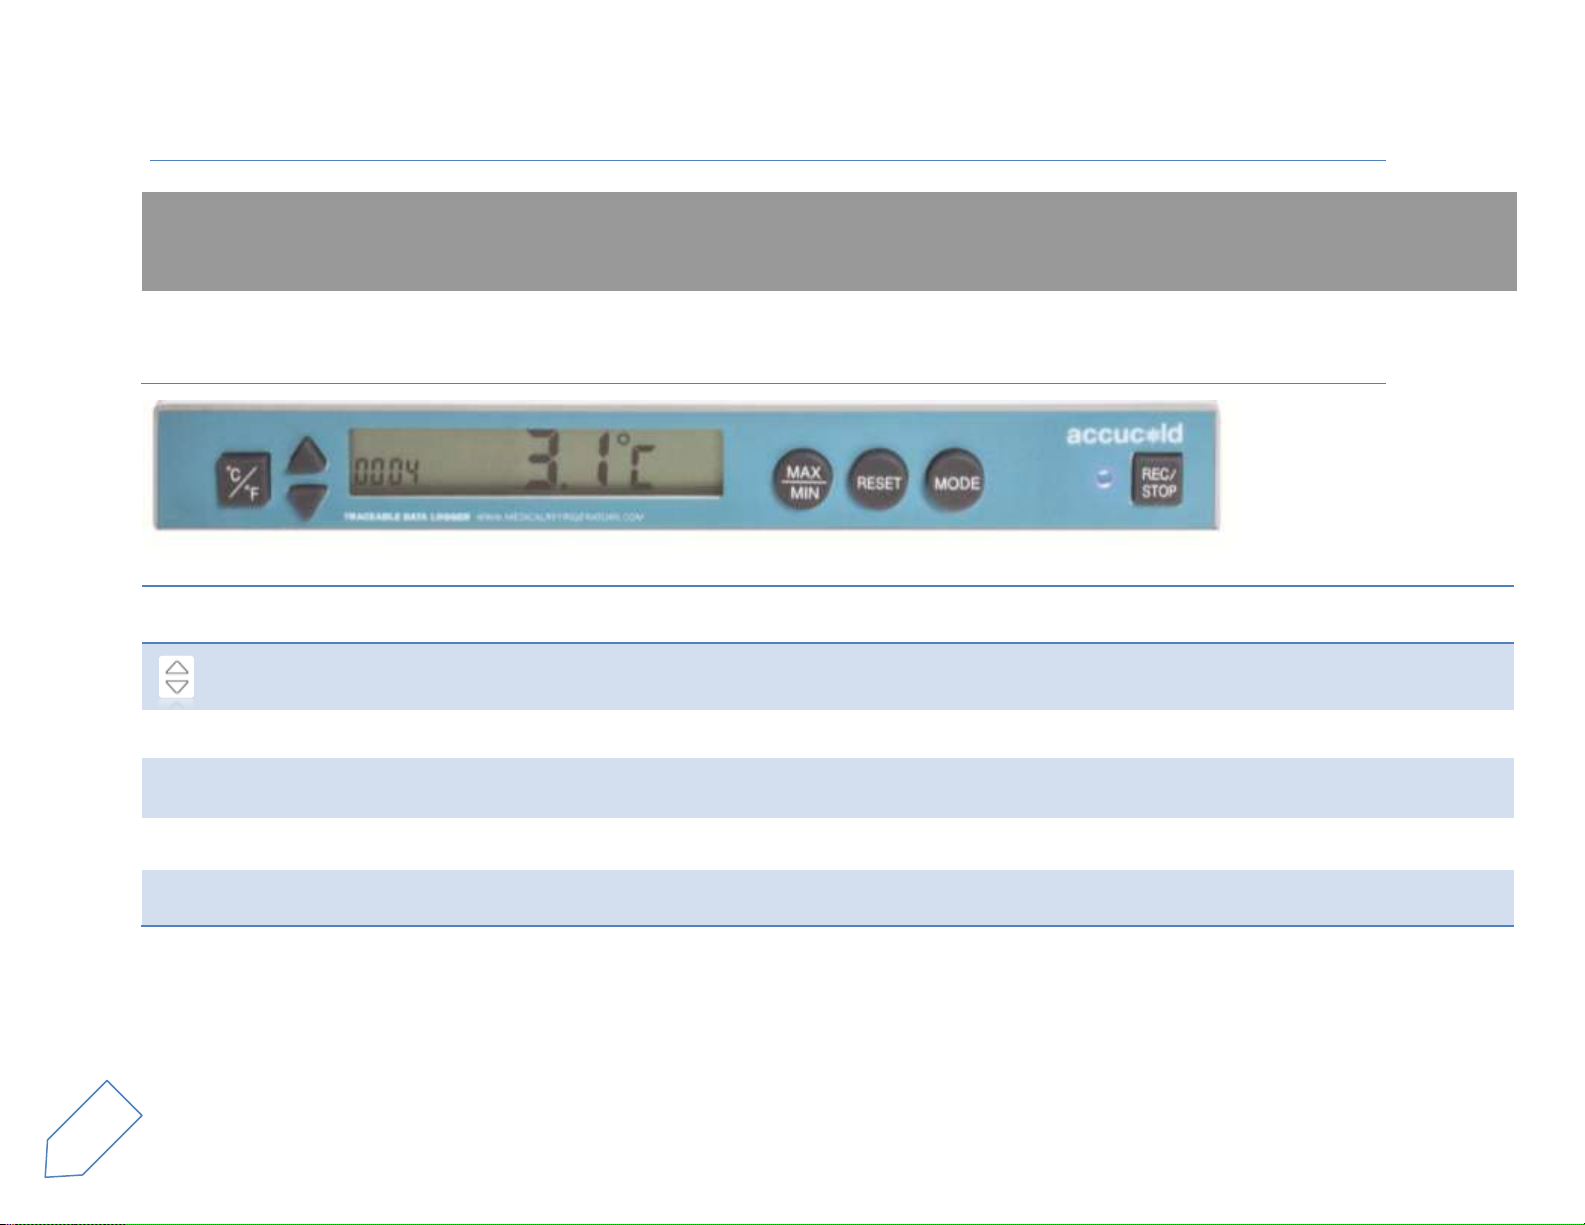
°C/°F
Press the °C/°F button to change the temperature display scale from Fahrenheit
(oF) to Celsius (oC) and back.
Up/Down keys to change settings.
MAX/MIN
Use the MAX/MIN button to display the recorded highest/lowest temperatures.
RESET
Press the RESET button ONCE to ERASE the MIN and MAX history as well as to CLEAR the high and
low alarm indicators.
MODE
Hold the MODE button to cycle through configuration settings.
REC/STOP
Press REC/STOP to STOP or RECORD data. Hold this key for 5 seconds to change logging interval
settings.
Package Contents
Parts and Controls/Features
R5100615
Page 4
4
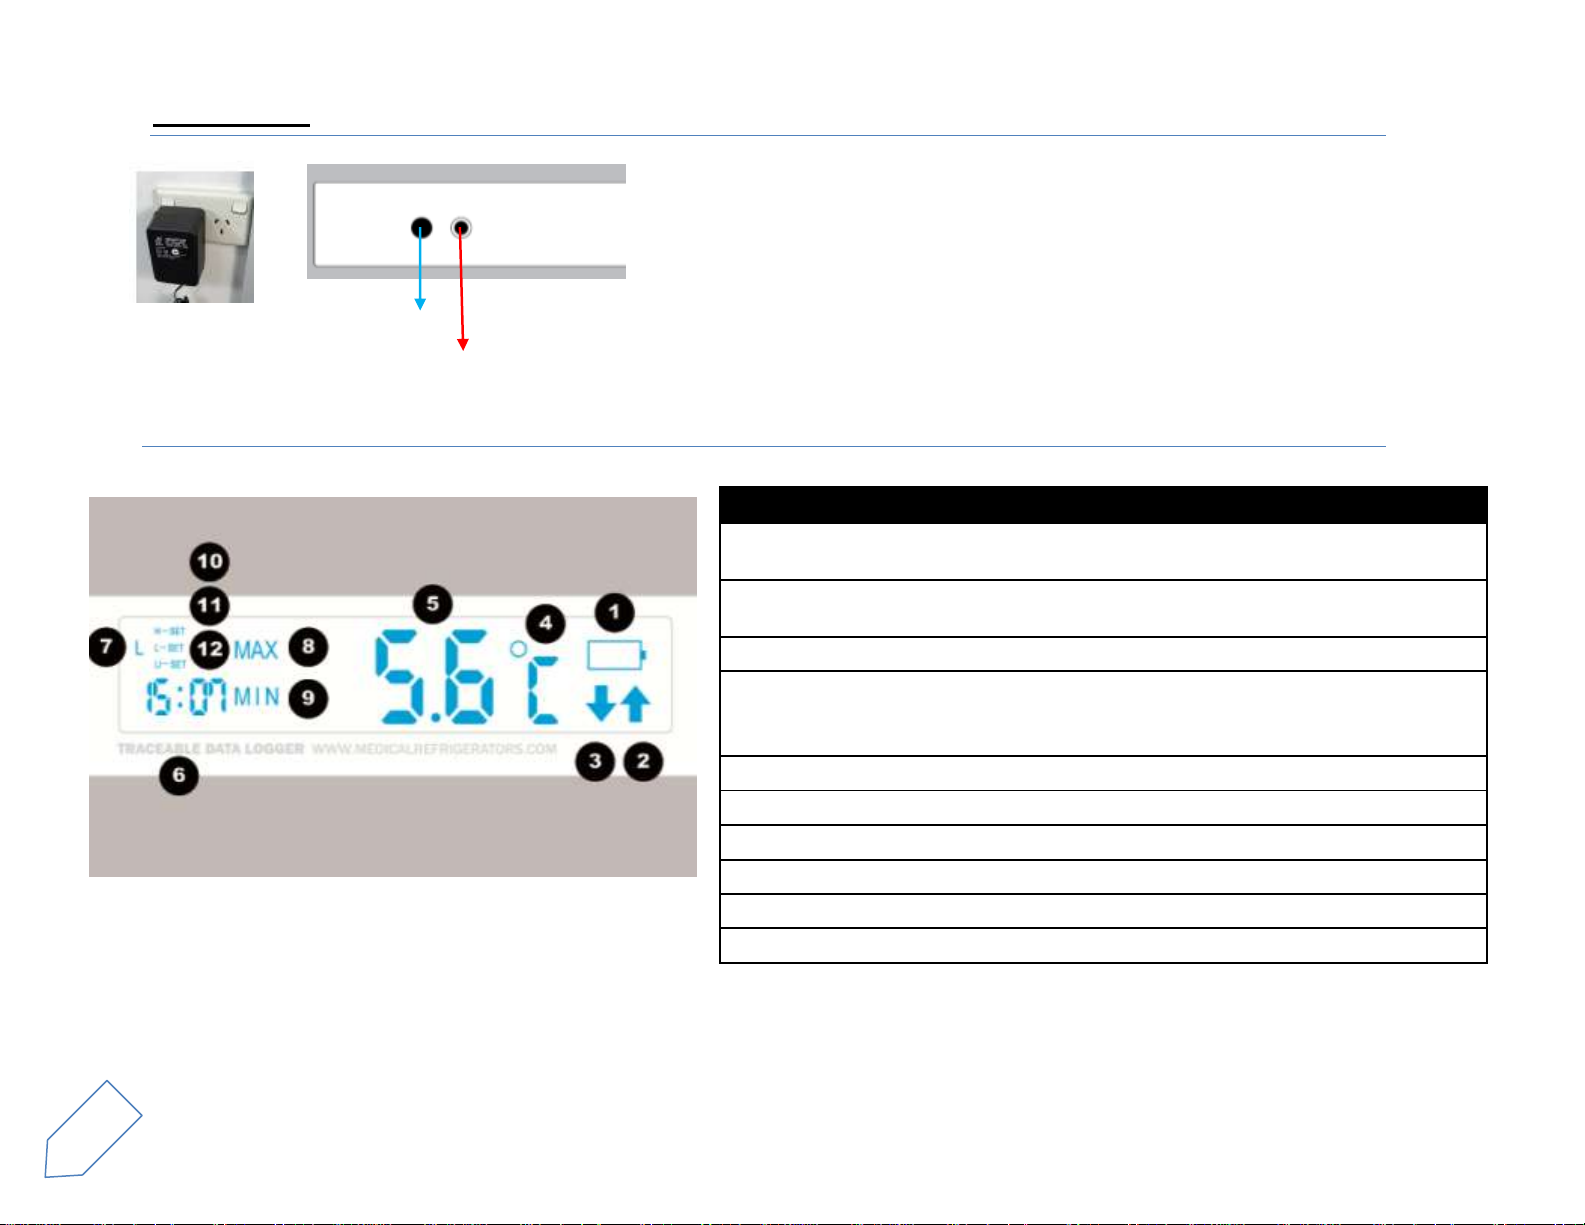
1
Low battery symbol. Replace battery when this appears
2,3
Up arrow (High Alarm), Down arrow (Low Alarm) = Blinks if any
high/low alarm occurred
4
°C: Celsius temperature units
°F: Fahrenheit temperature units
5
Current temperature value is displayed
6
Time icon: Indicates hour and minute (24-hour clock)
Logging interval is displayed when REC/STOP key is pressed and
held for 5 seconds
7
Recording in progress indicator
8
Maximum temperature value during a data logging session is displayed
9
Minimum temperature value during a data logging session is displayed
10
H-SET: High alarm temperature setting mode
11
L-SET: Low alarm temperature setting mode
12
LI-SET: Logging interval setting mode
Temperature probe port
Power
adapter port
Power Adapter: Connect the unit to an AC power outlet.
Data Logger rear view
Do not use force to connect the probe or the power adapter plugs. The power adapter
plug is different from the probe plug.
LCD Display Description
R5100615
Page 5

5
o Logging interval
5 minutes
o Year
2015
o Month
January (01)
o Day
1
o Time
00:00
o High alarm
10 oC
o Low alarm
2 oC
o Display temperature oC
Set Up
Battery: To replace the battery, unscrew the battery compartment cover located on the top of the unit and install the battery. Follow
polarity (+/-) diagram below.
Replace the battery cover. The unit will beep and all segments of the LCD will be activated.
Default Data Logger Settings
R5100615
Page 6

6
Year
From the main display screen:
Hold the MODE key for 3 seconds, then press the Mode key TWICE to enter the
Year setting mode. Use the up and down arrows to adjust the year accordingly.
Press MODE key ONCE to confirm the settings.
Month
From the main display screen:
Hold the MODE key for 3 seconds, then press the Mode key 3x to enter the Month
setting mode. Use the up and down arrows to adjust the month accordingly.
Press MODE key ONCE to confirm the settings.
Day
From the main display screen:
Hold the MODE key for 3 seconds, then press the Mode key 4x to enter the Day
setting mode. Use the up and down arrows to adjust the day accordingly.
Press MODE key ONCE to confirm the settings.
Hour
From the main display screen:
Hold the MODE key for 3 seconds, then press the Mode key 5x to enter the Hour
setting mode. Use the up and down arrows to adjust the hour accordingly.
Press MODE key ONCE to confirm the settings.
Minute
From the main display screen:
Hold the MODE key for 3 seconds, then press the Mode key 6x to enter the Minute
setting mode. Use the up and down arrows to adjust the minute accordingly.
Press MODE key ONCE to confirm the settings.
Setting the Logging interval
From the main display screen:
Hold the REC/STOP key for 3 seconds to enter the Logging Interval setting mode. Use
the up and down arrow keys to adjust the sampling rate accordingly.
Press REC/STOP key ONCE to confirm the settings.
Operation
Programming the Data Logger
LOGGING INTERVAL
This setting tells the logger how frequently you want it to take and store readings. The unit has a logging interval of 20 s to 60 minutes.
R5100615
Page 7

7
By default, the high and low alarm settings are 8 oC and 2 oC respectively. To reset high alarm and low alarm
temperature settings, follow instructions below.
High Alarm Temperature
Setting
This is the high temperature limit. The current temperature is considered out-of-range if
the probe reads a temperature equal to or above the high temperature limit.
From the main display screen:
Hold the MODE key for 3 seconds to enter High Alarm temperature setting mode. Use the up and
down arrows to adjust temperature accordingly.
Press MODE key ONCE to confirm the setting.
Low Alarm Temperature Setting
This is the low temperature limit. The current temperature is considered out-of-range if
the probe reads a temperature equal to or below the low temperature limit.
From the main display screen:
Hold the MODE key for 3 seconds, then press the Mode key ONCE to enter Low Alarm
temperature setting mode. Use the up and down arrows to adjust temperature accordingly.
Press MODE key ONCE to confirm the settings.
Set the high and low alarm temperature limits above and below the refrigerator/freezer operating temperature to prevent
false alarms. Refrigerators are designed to run between 2-8 °C (36-46 °F) while freezers run below -15 °C (5 °F).
HIGH AND LOW ALARM
When an alarm condition occurs will appear on the display along with a beeping sound to alert user. While the beeping sound lasts
for 60 seconds, the high and low indicators will remain on display even when the unit gets back in range. Press RESET to clear. Press
any key ONCE to stop the beeping sound.
Battery Life
The unit comes with a rechargeable lithium battery. In case of power failure the average battery life is about 20 hours when fully charged.
To achieve longer battery life during operation, use a less frequent sample rate.
R5100615
Page 8

8
TO RECORD DATA
To Use
Once the Data Logger has been programmed, place the temperature sensor (in glycol bottle) in the location to be monitored, such as
inside a refrigerator or freezer. Data Logger may be placed on top of unit with LCD display easily visible and the alarm audible. Data Logger
displays internal temperature of unit being monitored, as well as maximum and minimum temperatures reached. The Data Logger’s
maximum and minimum readings reflect the highest and lowest temperatures since the battery was inserted or since the RESET button
was last pressed.
If the temperature measurement rises above or falls below the set temperature range, the alarm will sound. To silence the alarm, press
any key ONCE.
Data Logging / Recording Function
In the Data Logger Setting menu user confirms time, date, and sampling rate.
R5100615
Page 9

9
Date
time
T(F)
T(C)
Hi Alarm
Lo Alarm
Lo Alarm Setting(C)
Hi Alarm Setting(C)
6/30/2015
15:49:38
41.5
5.3 0 0 2 10
6/30/2015
15:49:58
41.5
5.3 0 0 2 10
6/30/2015
15:50:18
41.4
5.2 0 0 2 10
6/30/2015
15:50:38
41.5
5.3 0 0 2 10
6/30/2015
15:50:58
41.5
5.3 0 0 2 10
6/30/2015
15:51:18
41.4
5.2 0 0 2 10
6/30/2015
15:51:38
41.5
5.3 0 0 2 10
6/30/2015
15:51:58
41.4
5.2 0 0 2 10
6/30/2015
15:52:18
41.4
5.2 0 0 2 10
6/30/2015
15:52:38
41.5
5.3 0 0 2 10
6/30/2015
15:52:58
41.4
5.2 0 0 2 10
6/30/2015
15:53:18
41.4
5.2 0 0 2 10
6/30/2015
15:53:38
41.4
5.2 0 0 2 10
Date
Time
(24
hour
clock)
Temperature in
Degrees
Fahrenheit
Temperature in
Degrees
Celsius
High Alarm
temperature
status
0 = no alarm event
1= Alarm event
Low Alarm
temperature
status
0 = no alarm event
1= Alarm event
Low Alarm
Temperature
Setting in
Degrees Celsius
High Alarm
Temperature
Setting in Degrees
Celsius
CSV File
To download data, USB drive is ejected safely and connected to a computer. Open file(s) in Microsoft Excel or any .CSV compatible
program.
Data results will be displayed in tabular form as in the following example:-
R5100615
Page 10

10
Displays ‘NP’
The temperature sensor is not installed correctly.
Display screen not working
Make sure the AC adapter and Li-ion battery are installed correctly.
“Low battery” indicator flashing
Battery may need to be recharged.
Logger is not logging
Press the Rec/Stop key and make sure the L symbol appears on the left side of
the display.
The logger will stop logging if AC power is removed and rechargeable battery is
not connected or not charged.
The logger will stop logging if the USB flash drive memory is full.
A hyphen in place of an alarm event
Date
Time
T(F)
T(C)
Hi Alarm
Lo Alarm
Lo Alarm
Setting(C)
Hi Alarm
Setting(C)
10/29/2014
15:49:25
50.2
10.1
-
-
6
27
10/29/2014
15:50:24
50.2
10.1
-
-
6
27
10/29/2014
16:16:24
79.9
26.6
-
-
6
27
10/29/2014
16:42:24
79.9
26.6
-
-
6
27
Results when user is changing the logging interval and the USB is still logging data
Troubleshooting
R5100615
Page 11

11
Recalibration
It is recommended that Felix Storch, Inc., temperature monitoring products be calibrated every two years to ensure proper function and
accurate measurements; however, your quality system or regulatory body may require more frequent calibrations. To schedule your
recalibration, please contact our ISO/IEC 17025:2005 calibration laboratory accredited by Perry Johnson Laboratory Accreditation, Inc.,
at calibration@summitappliance.com
Care & Maintenance
• Do not disassemble the product, as product damage may result.
• Store the product where it will not be exposed to direct sunlight, dust or high humidity.
• Do not wash or expose the product to water or other liquids.
• Clean the product by wiping with a soft, dry cloth.
• Never use volatile or abrasive liquids or cleaners to clean the product.
• Do not drop the product or subject it to sudden shock or impact.
Customer Support
For technical support, please call 800-932-4267 (U.S. and Canada) or email info@summitappliance.com
For more information, please call ACCUCOLD at 718-893-3900 (U.S. and Canada). See us on the web at www.summitappliance.com
Limited Warranty
SUMMIT products have a limited warranty period of 1 year against defects in materials and workmanship from the date of
purchase. Accessory items and sensors have a limited warranty of 3 months. Repair services have a limited warranty period of
3 months against defects in materials and workmanship. SUMMIT shall, at its option either repair or replace hardware products
that prove to be defective, if a notice to that effect is received within the warranty period. SUMMIT makes no other warranties or
representations of any kind whatsoever, expressed or implied, except that of title, and all implied warranties including any
warranty of merchantability and fitness for a particular purpose are hereby disclaimed.
R5100615
Page 12

12
AccuCold, Div of Felix Storch, Inc. • 770 Garrison Ave. • Bronx, NY 10474 • Tel: 718-893-3900 • Fax: 844-478-8799
R5100615
 Loading...