

Accu-Chek Aviva Plus silver User Manual [en, es]

Aviva
BLOOD GLUCOSE METER /
MEDIDOR DE GLUCEMIA
Owner’s Booklet for Self-Testing Only
Manual del usuario únicamente
para autocontrol


1
Contents
Introduction ...............................................................................................................................................5
The ACCU‑CHEK Aviva Plus System .................................................................................................................6
Important Safety Information ...........................................................................................................................8
About Testing Yourself ......................................................................................................................................9
Before You Start Testing .................................................................................................................................10
Chapter 1: Understanding Your New System .........................................................................................11
The ACCU‑CHEK Aviva Meter .........................................................................................................................11
Coding the Meter ...........................................................................................................................................13
Adjusting the Time and Date – First Time Use ...............................................................................................15
Using the ACCU‑CHEK Aviva Plus System ......................................................................................................17
Chapter 2: Control Testing ......................................................................................................................19
Why Perform Control Tests .............................................................................................................................19
About the Control Solutions ...........................................................................................................................19
Performing a Control Test...............................................................................................................................20
Understanding Out‑of‑Range Control Test Results .........................................................................................24
Chapter 3: Testing Your Blood Glucose ..................................................................................................27
Using the ACCU‑CHEK Multiclix Lancing Device .............................................................................................27
Inserting a Lancet Drum ................................................................................................................................29
Preparing the Lancing Device for Fingertip Testing ........................................................................................30
Performing a Blood Glucose Test with Blood from Your Fingertip ...................................................................31
Changing the Lancet Drum ............................................................................................................................36
Performing a Blood Glucose Test with Blood from Your Palm, Forearm or Upper Arm (Alternate Site Testing) 38

2
Flagging Test Results .....................................................................................................................................47
Understanding Test Results ............................................................................................................................48
Unusual Test Results .................................................................................................................................48
Symptoms of High or Low Blood Glucose .................................................................................................49
Comparing Your Meter Result to a Laboratory Result ................................................................................50
Chapter 4: Meter Memory, Setup, and Downloading ............................................................................51
Memory .........................................................................................................................................................51
Viewing Test Results ......................................................................................................................................53
Meter Setup ...................................................................................................................................................54
Setting the Time and Date .............................................................................................................................55
Setting the Beeper On/OFF ............................................................................................................................57
Setting Test Reminders ..................................................................................................................................59
Setting the Hypoglycemic (Hypo) Alert ...........................................................................................................62
Downloading Your Results to a Computer or PDA ..........................................................................................65
Chapter 5: Cleaning and Disinfecting the Meter and Lancing Device .................................................67
Cleaning and Disinfecting the Meter ..............................................................................................................69
Cleaning and Disinfecting the Lancing Device ...............................................................................................75
Chapter 6: Maintenance and Troubleshooting .......................................................................................79
Changing the Battery .....................................................................................................................................79
Maintenance and Troubleshooting .................................................................................................................81
Display Messages and Troubleshooting .........................................................................................................82

3
Chapter 7: Technical Information ...........................................................................................................89
Product Limitations ........................................................................................................................................89
Specifications ................................................................................................................................................89
Product Safety Information ............................................................................................................................91
Travel Documentation ....................................................................................................................................91
Disposing of the Meter, Test Strips, Lancets, and Batteries ............................................................................92
Explanation of Symbols ..................................................................................................................................93
Warranty ........................................................................................................................................................94
Limited License .............................................................................................................................................96
Additional Supplies ........................................................................................................................................98
Index .........................................................................................................................................................99

4

5
Dear ACCU-CHEK System Owner,
Thank you for choosing the ACCU‑CHEK Aviva Plus system!
Congratulations on your decision to take control of your diabetes. We’ve designed your new ACCU‑CHEK
Aviva Plus system with comfort, convenience, and control in mind to help make living with diabetes a little
easier.
This booklet will help you get the most from your ACCU‑CHEK Aviva Plus system.
To start testing quickly, you can also refer to the Quick Start Guide.
If you have questions, we are here to help. Just contact the ACCU‑CHEK Customer Care Service Center
toll‑free at 1‑800‑858‑8072. We oer assistance 24 hours a day, 365 days a year in many languages. You
can also visit www.accu‑chek.com for diabetes management tools and product demonstrations.
Thanks again for choosing the ACCU‑CHEK Aviva Plus system.
WARNING
Before using the system, please read the Important Safety Information section on the following
pages.

6
The ACCU-CHEK Aviva Plus System
The ACCU‑CHEK Aviva Plus blood glucose monitoring system is intended to be used for the quantitative
measurement of glucose (sugar) in fresh capillary whole blood samples drawn from the fingertips, forearm,
upper arm, or palm. The ACCU‑CHEK Aviva Plus blood glucose monitoring system is intended to be used by a
single person and should not be shared.
The ACCU‑CHEK Aviva Plus blood glucose monitoring system is intended for self testing outside the body (in
vitro diagnostic use) by people with diabetes at home as an aid to monitor the eectiveness of diabetes
control. The ACCU‑CHEK Aviva Plus blood glucose monitoring system should not be used for the diagnosis of
or screening of diabetes or for neonatal use. Alternative site testing should be done only during steady‑state
times (when glucose is not changing rapidly).
The ACCU‑CHEK Aviva Plus test strips are for use with the ACCU‑CHEK Aviva blood glucose meter to
quantitatively measure glucose (sugar) in fresh capillary whole blood samples drawn from the fingertips,
forearm, upper arm, or palm.
This system is intended to be used by a single person and should not be shared.
NOTE
In this Owner’s Booklet the term “blood glucose” is used when referring to “blood sugar.”

7
Need Help?
Just contact the ACCU‑CHEK Customer Care Service Center toll‑free at 1‑800‑858‑8072. We oer assistance
24 hours a day, 365 days a year in many languages. You can also visit www.accu‑chek.com for diabetes
management tools and product demonstrations.
Please complete your Warranty Card and mail it, so you receive the best customer service possible and
product update news.
The system includes:
• ACCU-CHEK Aviva meter with battery
• ACCU-CHEK Aviva Plus test strips and code key*
• ACCU-CHEK Aviva control solution*
• ACCU-CHEK Multiclix lancing device*
(with a black cap for fingertip testing and an AST cap for alternate site testing)
• ACCU-CHEK Multiclix lancet drum*
*may be sold separately

8
Important Safety Information
WARNING
• During normal testing, any blood glucose meter or lancing device may come in contact with
blood. All parts of the kit are considered biohazardous and can potentially transmit infectious
diseases from bloodborne pathogens, even after you have performed cleaning and disinfection.
1,2
• Cleaning and disinfecting the meter and lancing device destroys most, but not necessarily all,
bloodborne pathogens.
3
• The meter and lancing device should never be used by more than one person. Do not share the
meter and lancing device with anyone, including family members, due to the risk of infection
from bloodborne pathogens.
1,2
• If the meter is being operated by a second person who is providing testing assistance to the
user, the meter and lancing device should be cleaned and disinfected prior to use by the second
person.
• Disinfect the meter and lancing device before allowing anyone else to handle them. Do not allow
anyone else to test with the meter or lancing device.
• It is important to keep the meter and lancing device clean and disinfected. For instructions on
how to clean and disinfect the meter and lancing device, see Chapter 5 “Cleaning and
Disinfecting the Meter and Lancing Device.”
• Wash hands thoroughly before and after handling the meter, lancing device, or test strips.

9
About Testing Yourself
WARNING
• If you are very dehydrated or urinating frequently, you may get an inaccurate test result. If you
think you are dehydrated, contact your healthcare professional right away.
• DO NOT CHANGE YOUR TREATMENT BASED ON A SINGLE RESULT THAT DOES NOT MATCH HOW YOU
FEEL OR IF YOU BELIEVE THAT YOUR TEST RESULT COULD BE INCORRECT.
• Some people with diabetes do not experience symptoms of low blood glucose (hypoglycemia).
Others, such as children or people who are unconscious or have certain disabilities, may not be
able to communicate their symptoms to caregivers. For these reasons, do not change any
treatment without first talking to a healthcare professional.
• It is always a good idea to have a back-up testing method available. Failure to test could cause a
delay in treatment decisions and lead to a serious medical condition. Examples of back-up
testing methods include a back-up meter or testing by a laboratory. Ask your healthcare
professional or pharmacist about other possible back-up methods.
• If your blood glucose result doesn’t match how you feel and you have followed the instructions
in this Owner’s Booklet, follow your healthcare professional’s instructions, or contact your
healthcare professional.
NOTE
• Perform a control test when you open a new box of test strips or if you think that your test result is
incorrect. Performing a control test lets you know that the meter and test strips are working properly.
• Refer to your Test Strip and Control Solution Package Inserts for additional health‑related information.

10
Before You Start Testing
About the Meter and Test Strips
WARNING
• Carefully read and follow the instructions in the Owner’s Booklet and Package Inserts for the
test strips and control solutions. It is very important to follow the instructions in order to prevent
a wrong result or improper treatment.
• Inspect the container of test strips before using the test strips for the first time. If you see any
damage to the container cap or if anything prevents the cap from closing properly, do not use
the test strips. Contact the ACCU-CHEK Customer Care Service Center. Damaged test strips can
cause inaccurate results, which could lead to improper treatment.
• The meter, test strips, and control solutions are only for use outside the body (in vitro). Do not
eat the test strips. Do not swallow or inject control solutions or use control solutions for any
purpose other than testing the ACCU-CHEK Aviva Plus system.
NOTE
• Set the time and date on your meter before you begin testing.
• Although you always apply fresh capillary whole blood to the test strip, your system has been
calibrated to deliver plasma‑like values for easier comparison to lab results.
11
Chapter 1: Understanding Your New System
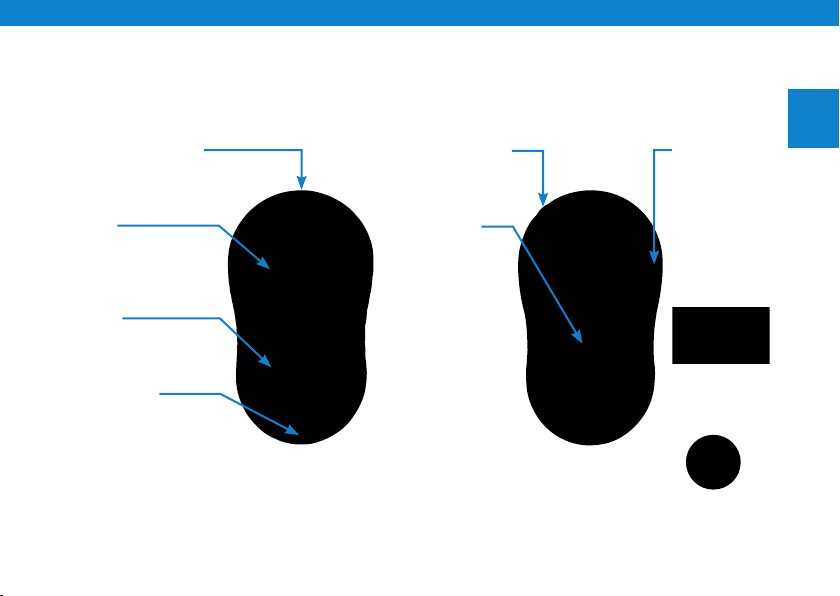
The ACCU-CHEK Aviva Meter
Infrared (IR) Window –
Transfers data from the
meter to a computer or
PDA.
Display –
Shows results,
messages, and results
stored in memory.
Right and Left Arrow
Buttons –
Press to enter memory,
adjust settings, and scroll
through results.
Test Strip Slot –
Insert test strip here.
Power/Set Button –
Turns the meter on
or o and sets
options.
Battery Door –
Flip open the battery
door by pushing the
tab in the direction
of the arrow.
Code Key Slot –
Insert code key
into this opening.
Battery –
Insert with
(+) symbol
facing up.
Code Key
(for example)
12
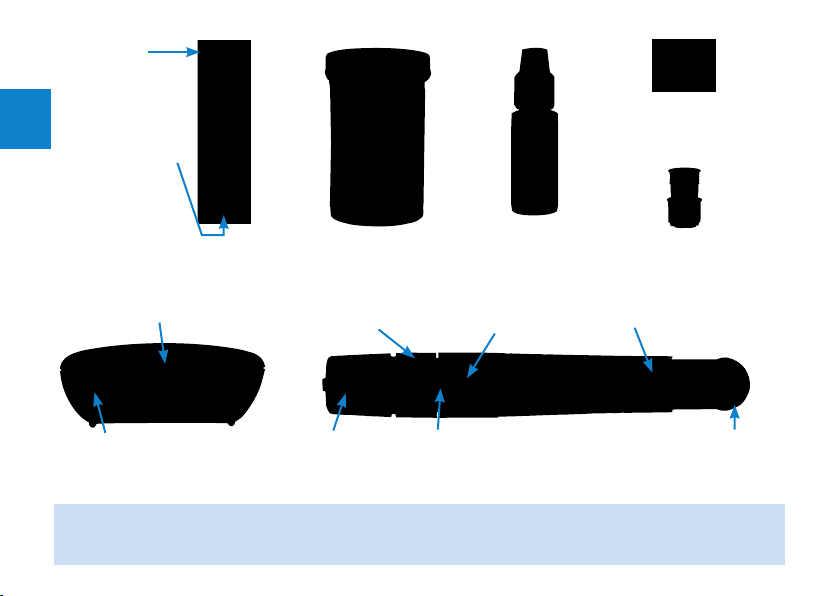
Yellow Window –
Touch blood drop
or control solution
here.
Test Strip Container
Control Solution
Bottle
Golden End –
Insert this end of
the test strip into
the meter.
Infrared (IR) Window
Power/Set Button
Top View
AST Cap -
(for obtaining blood
from alternate sites)
Comfort Dial with
Depth Selection
Release
Button
Cap Depth Indicator
Lancet
Counter
NOTE
Some items may be sold separately.
Lancet Drum
Test Strip
Plunger
Lancing Device

13
1. Make sure the meter is o. 2. Turn over the meter. 3. Remove the old code key
(if there is one in the meter)
and discard it.
Coding the Meter
A new code key is inside each new box of test strips.
WARNING
Change the code key every time a new box of test strips is opened! For accurate results, it is
important to be sure the code key matches the code number on the test strip container.

14
NOTE
• Don’t force the code key into the meter. It is made to go into the meter only one way.
• If “code” and a flashing “‑ ‑ ‑” are displayed, turn o the meter and reinsert a code key into the meter.
4. Turn over the code key so the code number faces
down. Push the code key into the code key slot
until it stops.
5. Leave the code key in the meter until a new box
of test strips is opened. Change the code key
each time a new box of test strips is opened.

15
Adjusting the Time and Date – First Time Use
The meter is preset with the time and date which may need to be adjusted to the local time zone. Setting
the correct time and date in the meter is important to review the results in memory or to download the
results to a computer.
1. Press and release to turn
on the meter. The time and
date appear on the display.
“Set‑up” and the hour flash. If
the correct time and date are
displayed, press and hold
to exit the set‑up mode.
2. Press and release
or to
decrease or increase the hour.
Press and hold
or to
scroll faster.
3. Press and release
to set
the hour. The minutes flash.
decrease increase

16
4.
Repeat steps 2 and 3 to set the minutes, am/pm,
month, day, and year. The flashing field is the one
that is being changed.
5. Once the year is set, press and hold until the
flashing test strip symbol appears. The time and
date are now set.
See Chapter 4, “Meter Setup” to set other options.
NOTE
When you install a new battery, the meter automatically prompts you to check the time and date when you
turn it on. If the time and date are correct, press and hold
to exit
the set‑up mode.

17
Using the ACCU-CHEK Aviva Plus System
• Replace the code key and perform a control test every time you open a new box of test strips.
• Refer to the test strip package insert for test strip storage and system operating conditions.
• Store unused test strips in their original container with the cap tightly closed.
• Close the container tightly immediately after removing a test strip. Moisture can damage the test strips
and produce incorrect results.
• Do not remove test strips from the test strip container and put them into another container, such as a
plastic bag, pocket, purse, wallet, etc.
• Discard the test strips if they are past the “Use By” date printed on the test strip container. If the “Use By”
date is missing or cannot be read, do not use the test strips. Contact the ACCU‑CHEK Customer Care
Service Center at 1‑800‑858‑8072.
• Use the test strip immediately after removing it from the container.
• Do not apply blood or control solution to the test strip before inserting it into the meter. If a result appears
before applying blood or control solution, do not act on that result.
• Do not reuse test strips. Once blood or control solution has been applied to a test strip, discard it. If a
retest is necessary, use a new test strip.

18
WARNING
• DO NOT expose test strips to heat, moisture or humidity. Temperatures outside the required
range, as well as moisture and humidity, can damage your test strips and lead to inaccurate
results.
• DO NOT bend, cut, or alter the test strips.
• DO NOT get dirt, food, or other material on the test strip.
Not following these precautions can lead to inaccurate results.

19
Chapter 2: Control Testing
Why Perform Control Tests
Performing a control test lets you know that the meter and test strips are working properly. You should
perform a control test when:
• You open a new box of test strips
• You left the test strip container open or you think your test strips have been damaged
• You want to check the meter and test strips
• Your test strips were stored in extreme temperatures and/or humidity
• You dropped the meter
• Your test result does not agree with how you feel
• You want to check if you are testing correctly
About the Control Solutions
• Only use ACCU‑CHEK Aviva control solutions.
• The meter automatically recognizes the dierence between the ACCU‑CHEK Aviva control solution and
blood.
• Write the date you open the bottle on the bottle label. The control solution must be discarded 3 months
from the date the bottle was opened (discard date) or on the “Use By” date on the bottle label, whichever
comes first.
• Do not use control solution that is past the “Use By” or discard date.

20
• The control results are not displayed in memory.
• Close the bottle tightly after use.
• The control solution can stain clothing. If you spill it, wash your clothes with soap and water.
• Refer to the control solution package insert for storage conditions.
Performing a Control Test
You need the meter, a test strip, and control solution Level 1 or Level 2. The control level is printed on
the bottle label.
NOTE
Most people just test the Level 1 control. If you wish, you can also test a Level 2 control. A set of
Level 1 and Level 2 control solutions is available for purchase. To order control solutions, talk to your
pharmacist or visit www.accu‑chek.com to order online. Your meter is designed to recognize the
dierence between the ACCU‑CHEK Aviva control solution and blood. The control results are not
displayed in memory.

21
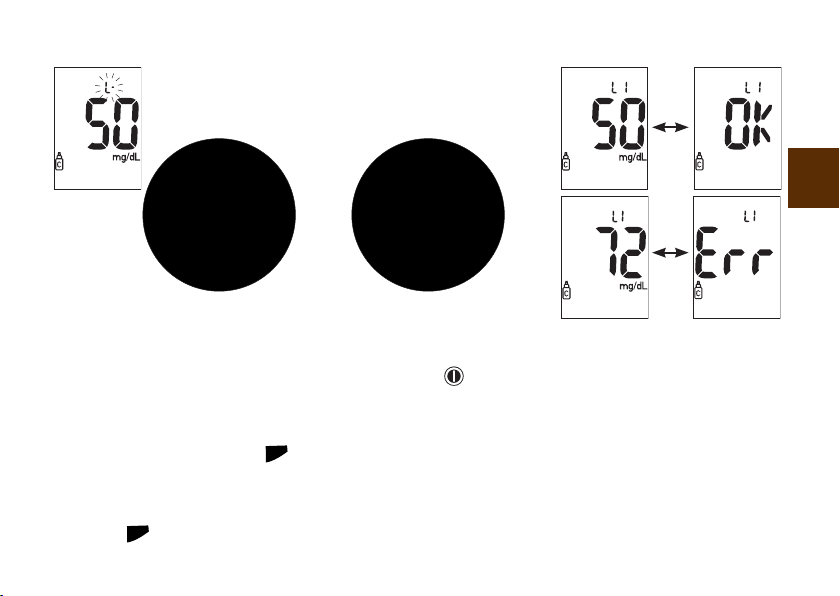
1. To make sure the display is
working properly, turn o the
meter, then press and hold
to see the complete display. All
segments should be clear and
look exactly like the picture. If
any segments are missing
from the display, there may be
a problem with the meter.
Contact the ACCU‑CHEK
Customer Care Service Center
at 1‑800‑858‑8072.
2. Insert the test strip into the
meter in the direction of the
arrows. The meter turns on.
3. Make sure the code number on
the display matches the code
number on the test strip
container. If you miss seeing
the code number, remove the
test strip and reinsert it into
the meter.

22
4. Select the control solution you
want to test. You will enter the
level later in the test.
5. Place the meter on a flat
surface, like a table.
6. Remove the control bottle cap
and wipe the tip of the bottle
with a tissue.
7. Squeeze the bottle until a tiny
drop forms at the tip. Touch the
drop to the front edge of the
yellow window of the test strip.
Do not put control solution
on top of the test strip. When
you see
flash, you have
enough control solution in the
test strip. Wipe the tip of the
bottle with a tissue then cap
the bottle tightly.
OR
23
8. The result appears on the
display, along with the control
bottle symbol and a flashing
“L.” Do not remove the test
strip yet. Press and release
once to mark the result as a
Level 1. If you tested the
Level 2 control, press and
release
a second time.
9. Press and release
to set the
control level in the meter.
10. The control result and “OK”
alternate on the display if the
result is in range. The range is
printed on the test strip
container label. The control
result and “Err” alternate on
the display if the result is out
of range. Remove and discard
the used test strip.
24
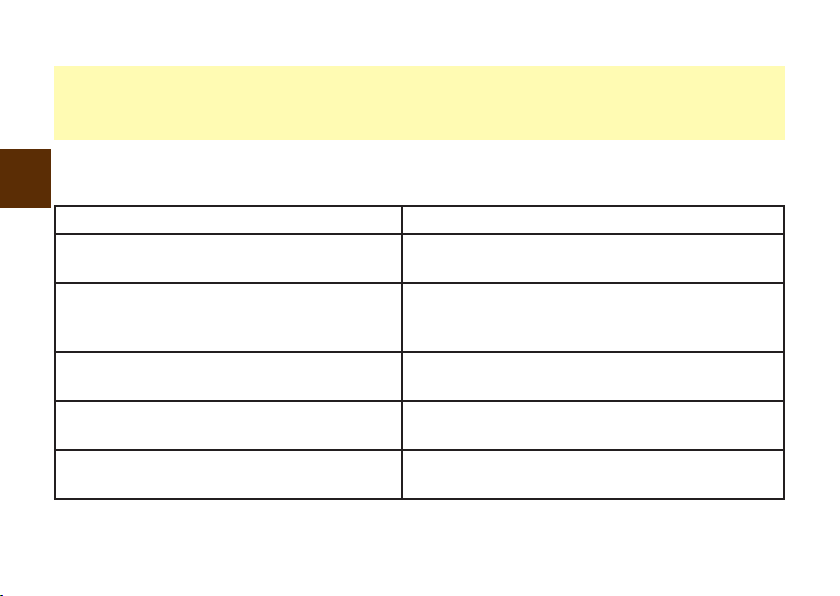
Understanding Out-of-Range Control Test Results
WARNING
The control ranges apply only to control results. They only indicate that your test strips and meter
are working properly. Do not use control results to interpret blood glucose results.
If the control result is not inside the acceptable range (printed on the test strip container), do not use the
meter until you solve the problem. Here are some things you can check:
Troubleshooting Checks Action
1. Are the test strips or control solution past the
“Use By” date or discard date?
If either is past the “Use By” date or discard date,
throw it away.
2. Did you wipe the tip of the control solution
bottle with a tissue prior to use?
Wipe the tip of the bottle with a tissue. Repeat the
control test with a new test strip and a fresh drop of
control solution.
3. Were the test strip container and control
solution bottle always closed tightly?
If you think either may have been uncapped for some
time, replace the test strips or control solution.
4. Was the test strip used immediately after
removing it from the container?
Repeat the control test with a new test strip.
5. Were the test strips and control solution stored
in a cool, dry place?
Repeat the control test with properly stored test strips
or control solution.

25
Troubleshooting Checks Action
6. Did you follow all of the testing instructions? Read Chapter 2, “Control Testing” and test again. If
you still have problems, contact the ACCU‑CHEK
Customer Care Service Center at 1‑800‑858‑8072.
7. Did you choose the correct control solution
level, either 1 or 2, when you performed the
test?
If you chose the wrong control solution level, you can
still compare the control result to the range printed on
the test strip container.
8. Does the code number on the meter display
match the code number on the test strip
container?
If they don’t match, insert the correct code key in the
meter and test again.
9. If you are still unsure of the problem … Repeat the control test with a new test strip. If you
still have problems, contact the ACCU‑CHEK Customer
Care Service Center at 1‑800‑858‑8072.

26

27
Chapter 3: Testing Your Blood Glucose
Using the ACCU-CHEK Multiclix Lancing Device
WARNING
• During normal testing, any blood glucose meter or lancing device may come in contact with
blood. All parts of the kit are considered biohazardous and can potentially transmit infectious
diseases from bloodborne pathogens, even after you have performed cleaning and disinfection.
1,2
• Cleaning and disinfecting the meter and lancing device destroys most, but not necessarily all,
bloodborne pathogens.
3
• The meter and lancing device should never be used by more than one person. Do not share the
meter and lancing device with anyone, including family members, due to the risk of infection
from bloodborne pathogens.
1,2
• If the meter is being operated by a second person who is providing testing assistance to the user,
the meter and lancing device should be cleaned and disinfected prior to use by the second
person.
• Disinfect the meter and lancing device before allowing anyone else to handle them. Do not allow
anyone else to test with the meter or lancing device.
• It is important to keep the meter and lancing device clean and disinfected. For instructions on
how to clean and disinfect the meter and lancing device, see Chapter 5 “Cleaning and
Disinfecting the Meter and Lancing Device.”
• Wash hands thoroughly before and after handling the meter, lancing device, or test strips.
28
NOTE
• Testing with blood from alternate sites requires the AST cap. This is explained later in the chapter.
• The best depth setting is the lowest number that lets you get enough blood for a test. Try dierent
settings to find the one that is right for you.
• Never share your lancing device with anyone.
• ALWAYS use a new, sterile lancet each time you test. NEVER reuse a lancet that has already been used.
With the ACCU‑CHEK Multiclix lancing device, you simply change the lancet with a twist.
The black cap is for fingertip testing only.
The AST cap is for testing other approved sites on the body, not the fingertip.
A new drum has a blue ring that does not move.
A used drum has two visible red stripes, and the blue ring can rotate on the white drum.
You cannot insert a used drum into the lancing device.
 Loading...