

Page 1

3
R
UNNING THE
S
ETUP
W
IZARD
Accessing the
Wizard
3Com recommends that you perform the initial Access Point
configuration from a computer that is directly connected to one of the
LAN ports and not from a wireless connection.
However, you may configure the Access Point from a wireless admin
computer but, note that you may lose contact with the Access Point if
you change the wireless configuration. To communicate with the Access
Point, your wireless NIC should be set as follows:
■
WEP encryption - none
■
Service Area Name/SSID - 3Com
The Access Point setup program is Web-based, which means that it is
accessed through your Web browser (Netscape Navigator or Internet
Explorer).
To use the Setup Wizard:
1 Ensure that you have at least one computer connected to the Access
Point. Refer to Chapter 2
2 Insert the Access Point CD-ROM in the CD-ROM drive on your computer.
A menu will appear; select Gateway Discovery.
Discovery will find the Access Point even if it is unconfigured or
misconfigured.
for details on how to do this.
Page 2
22 C
HAPTER
3: R
UNNING THE SETUP WIZARD
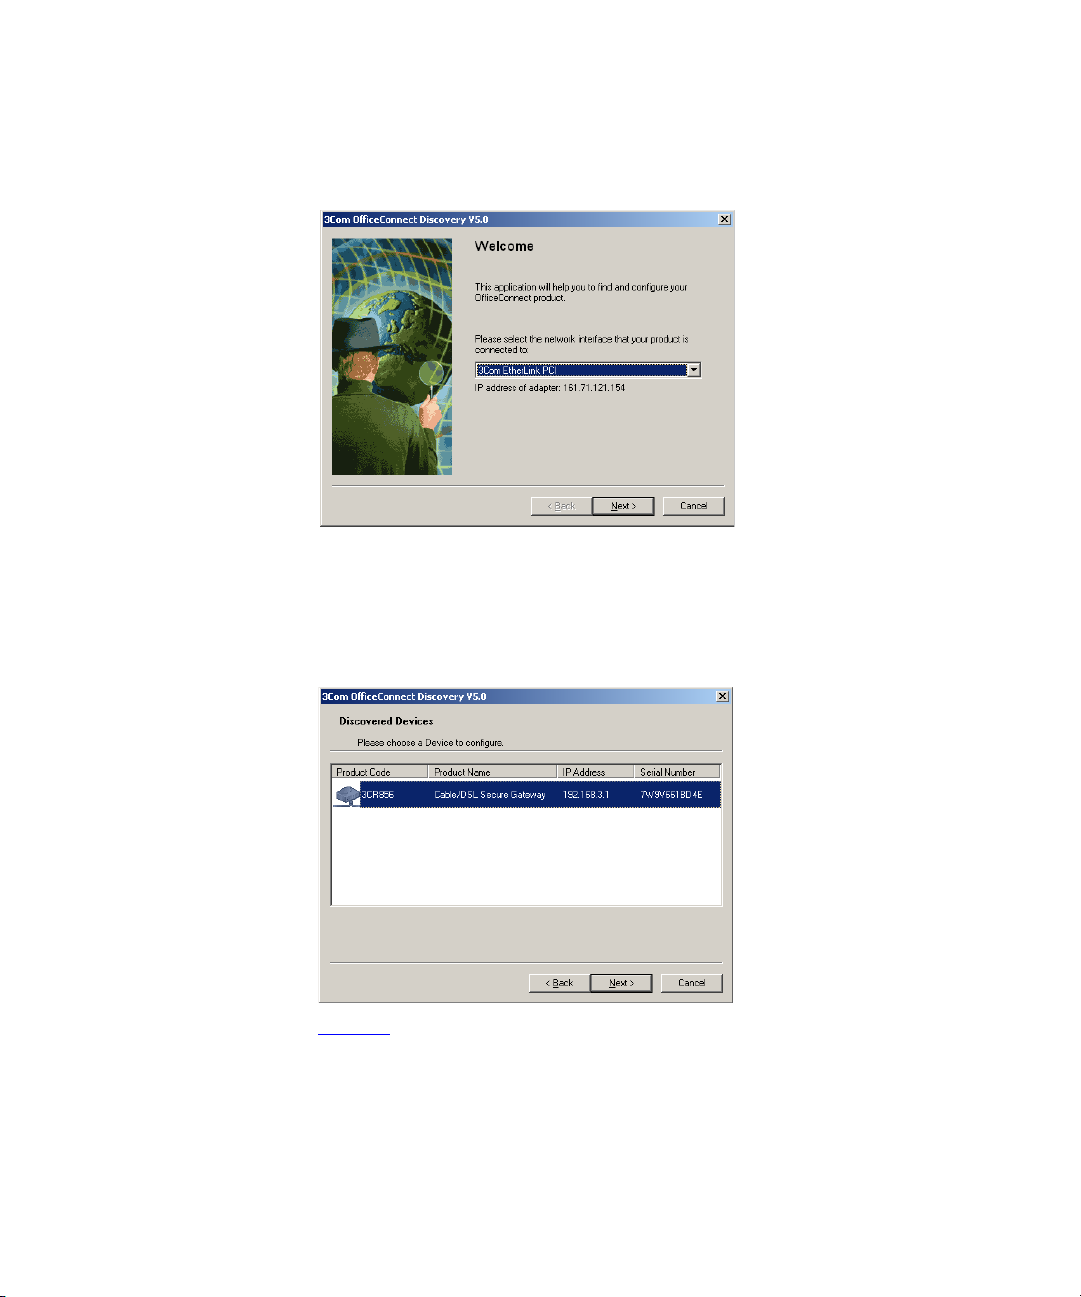
Figure 5 Discovery Welcome Screen
3 When the Welcome screen is displayed, select the NIC from which the
Access Point will be discovered. Then click on Next and wait until the
application discovers the Access Points connected to your LAN.
Figure 6 Discovered Access Point Screen
4 Figure 6
shows an example Discovered Devices screen. Highlight the
11Mbps Wireless Access Point by clicking on it, and press Next.
Page 3
Accessing the Wizard 23
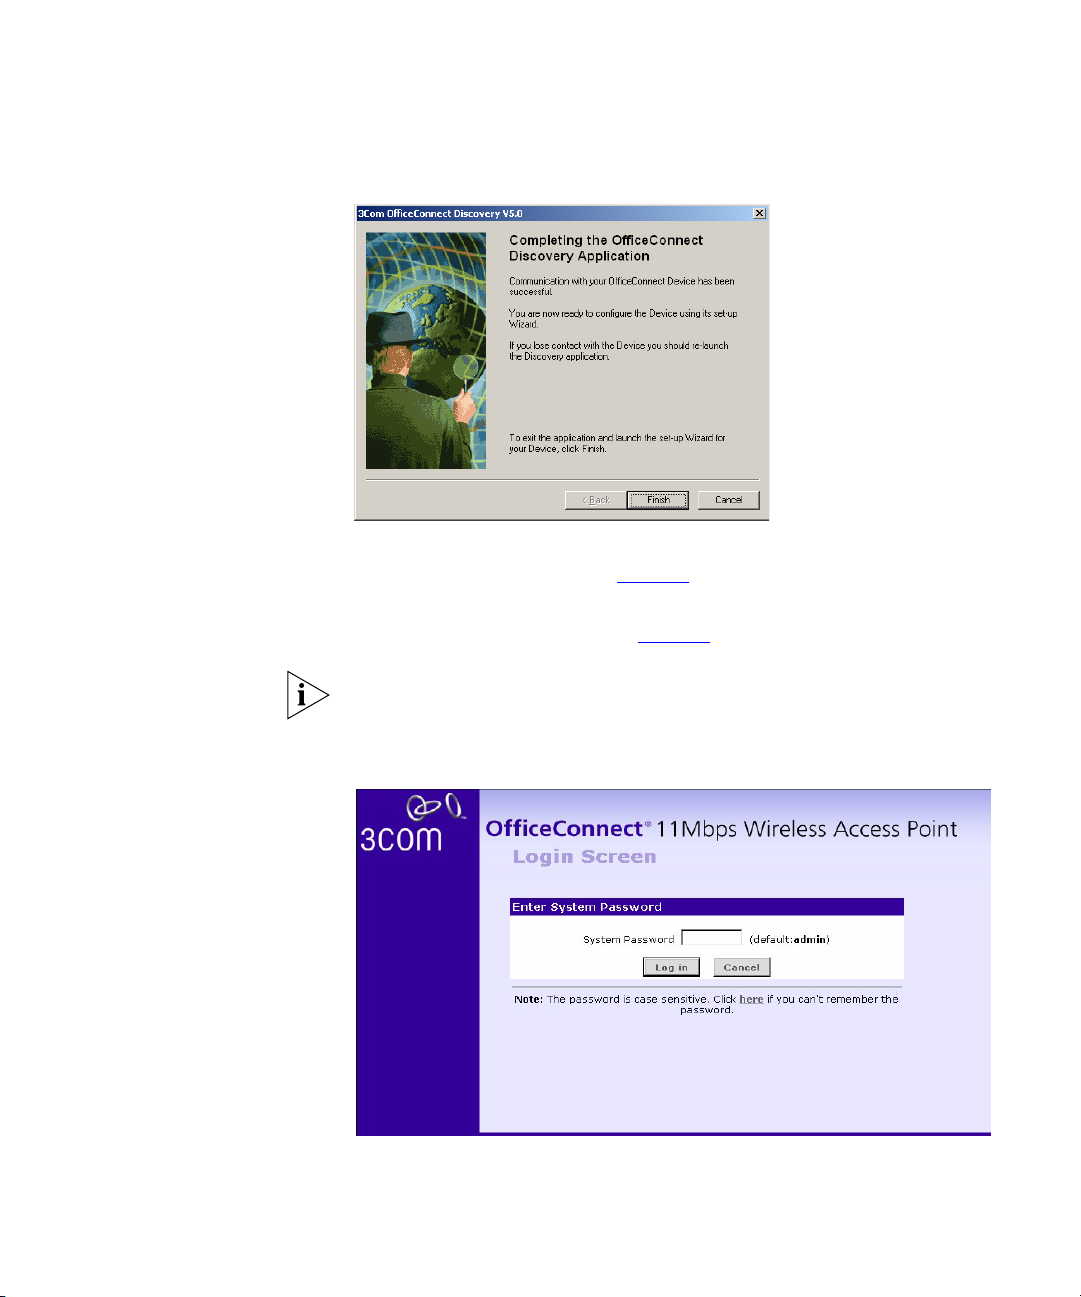
Figure 7 Discovery Finish Screen
5 Click on Finish to launch a web browser and display the login page for
the Access Point as shown in Figure 8
.
6 To log in, enter the password (the default setting is
Password field and click Log in (Figure 8
).
admin
) in the System
Be sure to bookmark this screen for easy reference if you should want to
change the Access Point settings.
Figure 8 Access Point Login Screen
Page 4
24 C
HAPTER
3: R
UNNING THE SETUP WIZARD
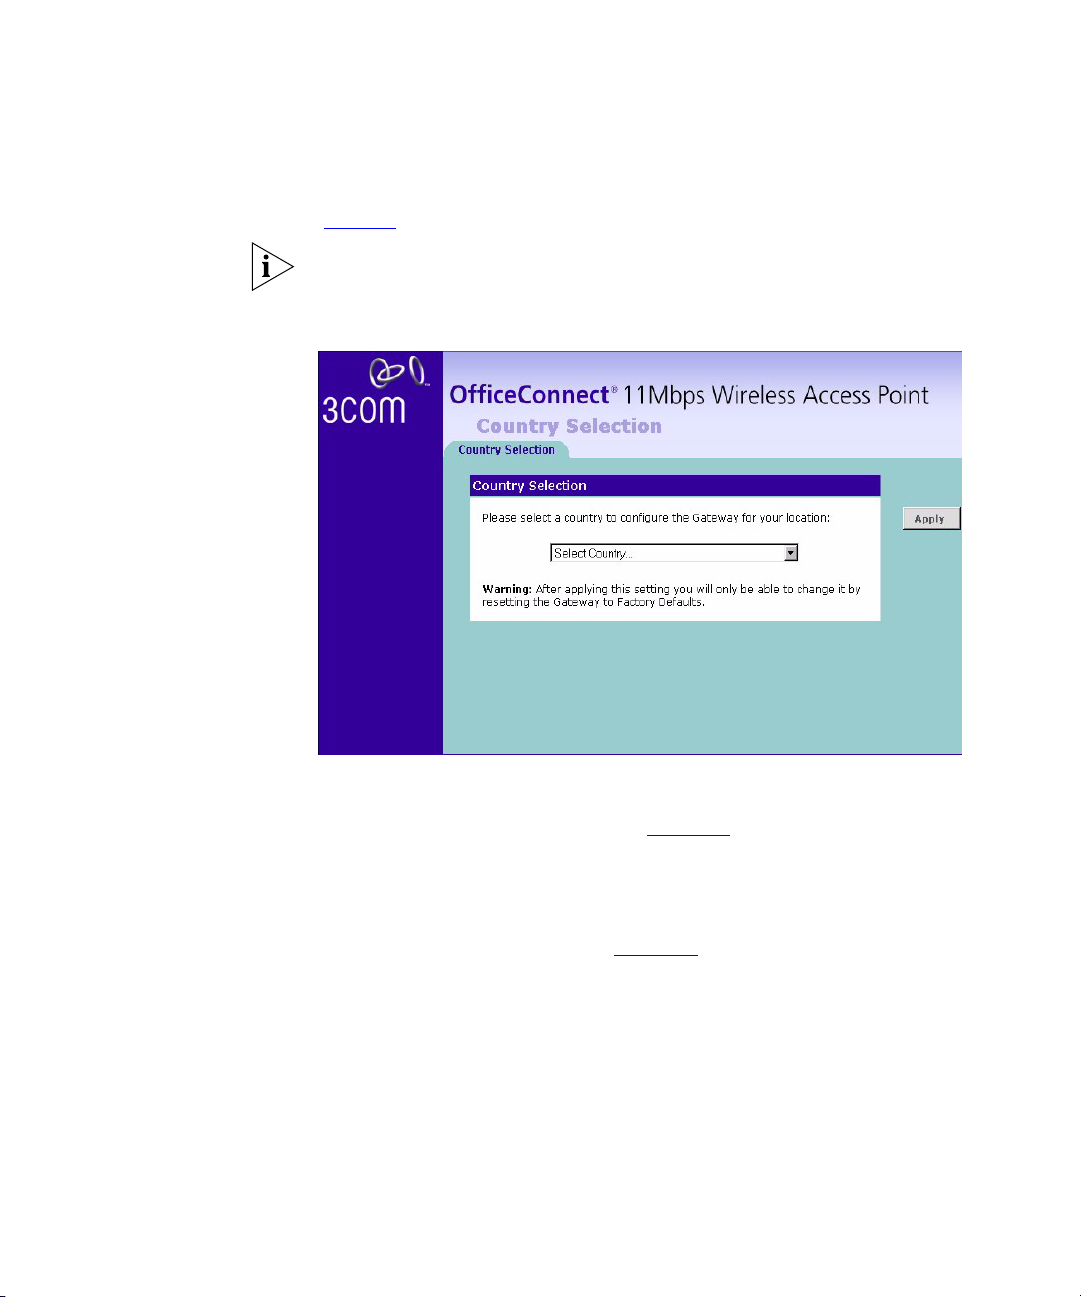
7 If the password is correct, the Country Selection screen appears. Select
the country you wish to configure the Access Point for, then click Apply.
(Figure 9
This screen is only displayed on initial configuration of the Access Point.
Figure 9 Country Selection Screen
).
8 When you have logged in and selected a country either:
■
The Welcome screen will appear (Figure 10). Select the Wizard tab
and click Wizard.
or
■
If your Access Point has not been configured before, the Wizard will
launch automatically (refer to Figure 11
).
9 Click Next.
10 You will be guided step by step through a basic setup procedure.
Page 5

Figure 10 Welcome Screen
Figure 11 Wizard Screen
Accessing the Wizard 25
Page 6
26 C
HAPTER
3: R
UNNING THE SETUP WIZARD
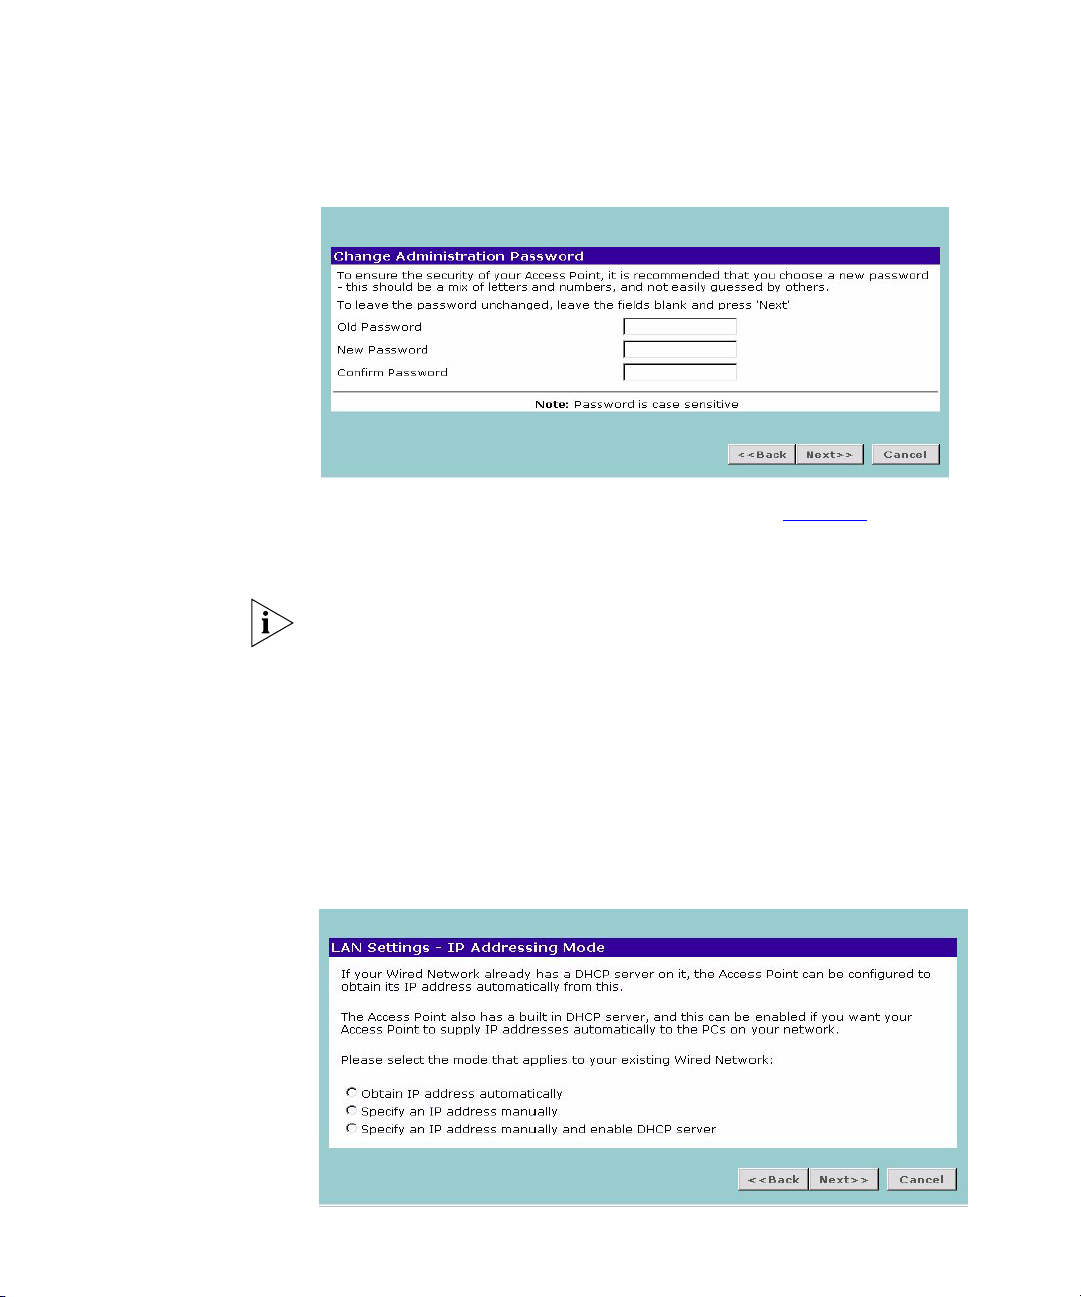
Password
Figure 12 Change Administration Password Screen
When the Change Administration Password screen (Figure 12) appears,
type the Old Password, then a new password in both the New Password
and Confirm Password boxes.
3Com recommends entering a new password when setting up the Access
Point for the first time. The Access Point is shipped from the factory with
a default password,
admin
.
1. Password is case sensitive.
2. Write the new password down and keep it in a safe place, so that you
can change your settings in the future.
LAN Settings
Click Next.
Figure 13 LAN Settings Screen
Page 7
Accessing the Wizard 27
This screen determines how the Access Point obtains its IP address. There
are three options.
Obtain IP Address automatically - The Access Point will obtain an IP
address from a DHCP server already operating on your network.
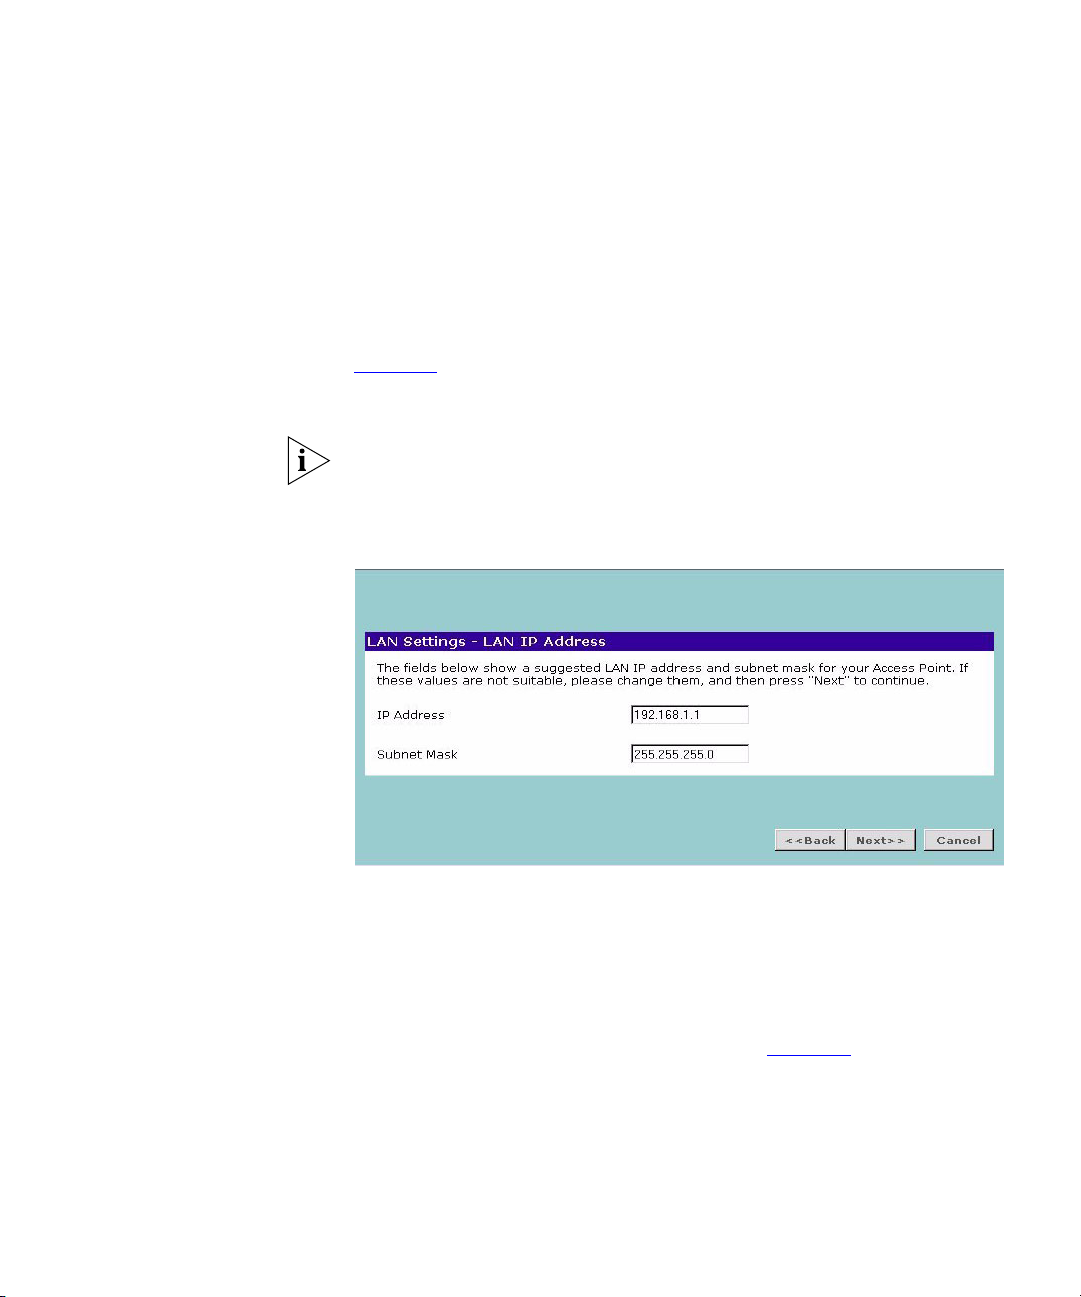
Specify an IP address manually - Select this option to manually
configure the IP address of the Access Point. The screen shown in
Figure 14
is displayed. This screen displays a suggested LAN IP address
and subnet mask of the Access Point. It also allows you to change the IP
address and subnet mask.
3Com recommends that you manually assign your Access Point a static IP
address.
Figure 14 LAN IP Address Screen
Specify an IP address manually and enable DHCP server - The
Access Point contains a Dynamic Host Configuration (DHCP) server that
can automatically configure the TCP/IP settings of every computer on
your network.
To activate the DHCP Server option, select Specify an IP Address manually
and Enable DHCP server. The screen shown in Figure 15
opens.
Page 8

28 C
HAPTER
3: R
UNNING THE SETUP WIZARD
Figure 15 DHCP Server Setup Screen
This screen displays a suggested LAN IP address and subnet mask of the
Access Point. It also allows you to change the IP address and subnet
mask.
Two further fields are available for you to enter the Start address of an
address pool and an End address. The largest available continuous IP pool
will be automatically entered; if this is not appropriate, make your
required changes.
Before enabling the DHCP Server, ensure that there are no other DHCP
servers running on your network.
Page 9

Accessing the Wizard 29
Wireless Settings
Figure 16 Wireless Configuration Screen
This screen displays the current Channel and Service Area Name. It also
allows you to change these settings. There are a maximum of 13 channels,
the number available to you is dependent on the country you reside in.
The Service Area Name default for 3Com products is "3Com". Up to 32
(case sensitive) characters can be entered for the Service Area Name.
3Com strongly recommends that you change the SSID to something
other than the default.
For information on improving your Wireless network security see
Wireless Settings”
“
on page 37.
If you are configuring the Access Point from a wireless computer any
changes you make to the wireless configuration will result in
communication between the Access Point and your computer being lost.
This is why 3Com strongly recommends that you configure the Access
Point from a wired computer.
It is very important that you set up your wireless clients to use the same
Service Area Name or SSID as the one you use on this screen. If your
clients use a different Service Area Name then they will not be able to
communicate with the Access Point.
The choice of channel is less important as Clients will generally search all
of the available channels. You should however make a note of the
channel you select as this may be useful if you experience problems with
your clients.
Page 10

30 C
HAPTER
3: R
UNNING THE SETUP WIZARD
Summary
Figure 17 Configuration Summary Screen
When you complete the Setup Wizard, a configuration summary will
display. Verify the configuration information of the Access Point and then
click Finish to save your settings. 3Com recommends that you print this
page for your records.
If you have made changes to the LAN Settings or wireless configuration
options, you may need to reconfigure the computer you are using in
order to make contact with the Access Point again.
Your Access Point is now configured and ready for use.
See Chapter 4
for a detailed description of the Access Point configuration
screens.
Page 11

4
A
CCESS
P
OINT
C
ONFIGURATION
Navigating
Through the Access
Point Configuration
Pages
Main Menu At the left side of all screens is a main menu, as shown in Figure 18
This chapter describes all the screens available through the Access Point
configuration pages, and is provided as a reference. To get to the
configuration pages, browse to the Access Point by entering the URL in
the location bar of your browser. The URL is
the Access Point>
you have browsed to the Access Point, log in using your system password
(default
page 32
appear in the main part of the screen.
■
■
■
■
admin
. When you click on a topic from the main menu, that page will
Welcome - displays the firmware version of the Access Point, allows
you to change your password, and launch the Wizard
LAN Settings - allows you to configure IP address and subnet mask
information, setup DHCP server parameters, and display the DHCP
client list.
Wireless Settings - enables /disables access from wireless computers,
and provides facilities for improving the security of the wireless
network.
System Tools - allows the administrator to perform maintenance
activities on the Access Point.
).
, for example
http://<IP Address of
http://192.168.1.1
. When
on
■
Status and Logs - displays the current status and activity logs of the
Access Point.
■
Support - contains a comprehensive online help system
Option Tabs Each corresponding menu page may also provide sub-sections which are
accessed through the use of tabs (see Figure 18
sub-section, simply click on the required tab.
for example). To access a
Page 12

32 C
HAPTER
4: A
CCESS POINT CONFIGURATION
Getting Help
On every screen, a Help button is available which provides access to the
context-sensitive online help system. Click Help for further assistance and
guidance relating to the current screen.
Welcome Screen
Notice Board
Figure 18 Access Point Welcome Screen
The Welcome section allows you to view the Notice board and to change
your Password. You can also gain access to the Configuration Wizard.
Accessing the Wizard” on page 21 for details).
(See “
Figure 19 Notice Board Screen
The Notice Board is used to display configuration warning messages.
Page 13

Welcome Screen 33
Password
Figure 20 Password Screen
Changing the Administration Password
You can change the password to prevent unauthorized access to the
Administration System. To do this:
1 Enter the current password in the Old Password field
2 Enter the new password in the New Password field
3 Enter the new password again in the Confirm Password field
4 Click Apply to save the new password
The password is case sensitive.
Wizard
If you have forgotten your password you need to reset the Access Point.
See “
Forgotten Password and Reset to Factory Defaults”
Figure 21 Wizard Screen
on page 54
Click WIZARD... to launch the configuration wizard. Refer to Chapter 3
for information on how to run the wizard.
Page 14

34 C
HAPTER
4: A
CCESS POINT CONFIGURATION
LAN Settings
The LAN Settings menu provides the following options:
Unit Configuration The LAN Settings screen is used to determine how the LAN IP address of
your Access Point is obtained. It can be obtained automatically or you can
manually configure the IP address and optionally configure the DHCP
server.
Figure 22 Unit Configuration Screen
Dynamic IP Address
3Com recommends that you manually assign your Access Point a static IP
address.
Select Dynamic IP Address (automatically allocated) the screen shown in
Figure 22
is displayed. Check all your settings and click Apply.
Page 15

LAN Settings 35
Manually setting the IP address
3Com recommends that you assign your Access Point a static IP address.
1 Select Unit Configuration and then select Static IP Address (to be
specified manually). The screen shown in Figure 23
Figure 23 Unit Configuration Screen For Static IP Address
is displayed.
2 Enter the Access Point IP Address and Subnet Mask in the LAN Settings
field. The default static IP address of the Access Point is 192.168.1.1.
3 If you want to use the Access Point as a DHCP Server, click in the Enable
check box. See “
DHCP Server” for more information about configuring
the DHCP server.
4 Check all of your settings, and then click Apply.
DHCP Server
The DHCP server will give out addresses to both wired and wireless
clients.
Before enabling the DHCP Server, ensure that there are no other DHCP
servers running on your network.
If you want the Access Point to function as a DHCP server on your
network, carry out the following:
1 Select Unit Configuration and then select Static IP Address (to be
specified manually). The screen shown in Figure 23
2 Enter the IP address details as described in “
Manually setting the IP
is displayed.
address” and click Enable against The Access Point acts as a DHCP Server.
The screen shown in Figure 24
.
Page 16

36 C
HAPTER
4: A
CCESS POINT CONFIGURATION
Figure 24 DHCP Server Configuration Screen
3 Clicking Auto Range automatically selects the largest range of addresses
available for your network. Alternatively you can manually enter Start and
End addresses for the IP address pool. THe DHCP server supports up to a
maximum of 253 addresses.
DHCP Clients List
4 Enter any Default Gateway and DNS (Domain Name Server) addresses if
required.
5 Check your settings and click Apply.
Figure 25 DHCP Clients List Screen
Page 17

Wireless Settings
Wireless Settings 37
The DHCP Clients List provides details on the devices that are connected
to the LAN. The list is only created when the Access Point is set up as a
DHCP server. For each device that is connected to the LAN, the IP address,
Host Name, MAC address and Client Type of that device is displayed. As
you connect more devices, the client list will grow to a maximum number
of clients.
The Release button allows the lease time for the IP address that has been
issued to a device to be cleared. The lease time is set at 12 hours. If a PC
has been switched off, using the Release button would allow the 12 hour
lease time to be cleared. The IP address would then be available for
another device if there were no other IP addresses available.
As the IP address is fixed to a MAC address, then each particular
computer will normally be issued with the same IP address. The only time
that a PC will get a different IP address is if the DHCP server has run out
of IP addresses.
To improve the security of your wireless network, 3Com recommends
that you:
1. Change the SSID from its default value - see page 39
2. Enable Encryption - see page 40
3. Enable Connection Control - see page 42
Page 18

38 C
HAPTER
4: A
CCESS POINT CONFIGURATION
Configuration
Figure 26 Configuration Screen
Enable Wireless Networking
Allows you to enable/disable the wireless section of your LAN. When
disabled, no wireless PCs can gain access to your Wired or Wireless LAN
through this Access Point.
Channel Selection
The Channel Selector allows you to specify which Channel the Access
Point will transmit and receive on. If someone else nearby is using the
same Channel as you, there will be a reduction in the performance of
your network. If this seems to be the case, you should select a different
channel number. Usually the Wireless computers will scan to find the
correct channel, but if they don't you must configure them to use the
same Channel number as the Access Point.
Valid channels are country dependent. See “Channels”
on page 83 for a
list of channels approved by each country.
Clear Channel Select allows the Access Point to automatically select the
optimum channel when first powered on.
Page 19

Wireless Settings 39
Service Area Name/SSID
This allows you to name your Wireless network. The field will accept any
alphanumeric string and has a maximum length of 32 characters. Your
Wireless computers must be configured with exactly the same name or
you will not establish a connection. The Service Area Name may also be
referred to as "ESSID" depending on your networking vendor. By default
the Access Point uses the name "3Com". 3Com recommends that you
change the default name.
In order that your wireless computers can connect to the Access Point,
you must:
Use Infrastructure Mode not Adhoc Mode.
■
Have the same Service Area Name as the Access Point.
■
Use the same encryption type and keys as the Access Point.
■
Ensure that the PC is included in the authorized Wireless PCs list if
■
Connection Control is enabled. See page 42
.
Disable Broadcast SSID
This feature can be used to improve the security of your wireless network.
When the tickbox is checked, the Access Point will not broadcast the
Service Area Name/SSID of your wireless network. This will prevent
unauthorized clients from detecting your SSID and attempting to connect
to your network.
If you have a wireless client that can detect all the available SSIDs in your
area, your client will not list the Access Point SSID when this feature is
enabled.
3Com recommends that you install your wireless network with this
feature disabled and then enable it once you have set up the Access Point
and wireless clients.
Access Point Name
This option allows you to name the Access Point. The field accepts any
alphanumeric string upto a maximum of 32 characters. This option is
useful if you have several Access Point units and want to be able to easily
identify them. For example, you may name them Marketing, Research,
Admin.
Page 20

40 C
HAPTER
4: A
CCESS POINT CONFIGURATION
Encryption
Figure 27 Encryption Screen
Wired Equivalent Privacy or WEP allows you to encrypt the traffic
between your Wireless PC and the Access Point. It is important to
remember that with WEP disabled anyone with a Wireless PC can
eavesdrop on your network. 3Com recommends that you get the
network working with WEP disabled first and then enable it as the last
step. This will simplify setting up your network.
If you enable WEP on the Access Point, you must reconfigure your
wireless PCs to use exactly the same Encryption Type and Keys otherwise
the devices will not understand each other.
WEP is for securing data transmitted through wireless communications
between the Access Point and it's wireless clients. Enabling WEP has no
security effect on data transmitted through wired (Ethernet) connections
or through your connections to the Internet.
Wireless Encryption Type
There are two levels of encryption available, 64 bit (sometimes referred to
as 40 bit) and 128 bit. 128 bit will result in a higher level of security, but
may cause a slight decrease in performance. Use the Wireless Encryption
Typ e box to select the desired level.
Page 21

Encryption Keys
Figure 28 Encryption Keys Screen
Wireless Settings 41
A Key is a hexadecimal (0-9, A-F) number used to encrypt and decrypt the
data. There can be up to 4 keys and each key can be as long as 26 digits.
The Access Point also offers a number of methods for converting plain
text into hex keys. The text is much easier to remember than hex keys but
it relies on your wireless adapters also supporting this feature. Different
manufacturers have developed different ways of converting plain text and
so interoperability is not guaranteed. If you are experiencing difficulty, the
Manual Hex Key method is supported by most vendors.
There are four methods available to generate the encryption keys:
■
Manual Key Entry - This method allows you to manually enter hex
keys. Virtually all manufacturers support this scheme. Enter a two digit
hexadecimal number in every box. Hexadecimal numbers are formed
from 0-9 and A-F.
■
3Com Encryption String - This method is supported by 3Com Wireless
products. The string can contain any alphanumeric characters and
must be between 6 and 30 characters long. A single string will
automatically generate 4 unique keys for 64 or 128 bit WEP.
■
ASCII - This method is supported by some adapter cards running
under Windows XP. The string must be exactly 5 characters for 64 bit
Page 22

42 C
HAPTER
4: A
CCESS POINT CONFIGURATION
WEP and 13 characters for 128 bit WEP. You must enter a separate
string for each of the 4 Keys. You can leave a string blank provided
this Key is not selected as the Active Transmit Key.
■
Passphrase - This is another common method and similar to the 3Com
Encryption string. In 64 bit WEP, the passphrase will generate 4
different keys. However, in 128 bit WEP, this method only generates 1
key which is replicated for all 4 keys. The passphrase can be up to 31
characters long and may contain any alphanumeric characters.
Select from the drop down list the key generation method you wish to
use. If you have other wireless products choose the scheme that is
compatible with these, then enter the appropriate information.
If you encounter any difficulty when you enable WEP ensure that you
check that each key on your wireless computer is exactly the same as
each key on your Access Point. In other words, Key number 1 on the
Wireless computer must have the same Hex number as Key number 1 on
the Access Point, Key 2 on the Wireless computer must match Key 2 on
the Access Point and so on.
The Active Transmit Key selects which of the 4 Keys the Access Point uses
when it transmits. You can change the selected key periodically to
increase the security of your network.
Some wireless adapters have only one key available on their WEP
configuration page. If this is the case ensure it is the same as Key 1 on the
Access Point and that it is selected as the active transmit key.
Connection Control This screen allows you to determine if all Wireless PCs or just authorised
Wireless PCs can use the Access Point. Select Connection Control to
display the screen shown in Figure 29
.
Page 23

Wireless Settings 43
Figure 29 Connection Control Screen
A higher level of security can be achieved for your wireless network if you
use both encryption and you specify only certain wireless computers can
connect to the Access Point. By default, any wireless computer that has
the same Service Area Name/SSID, channel and encryption settings as the
Access Point can connect to it.
Select Only Authorised Wireless PCs can connect to the Access Point to
enable and configure this feature.
If you enable this feature from a Wireless PC, it will automatically be
added to the Authorised Wireless PC list.
Authorised Wireless PCs
Figure 30 Connection Control Detail Screen
 Loading...