

Page 1

EtherHub 1500 System
User’s Guide
✚
♦ EtherHub-16i
✚
♦ EtherHub-16mi
Page 2

EtherHub 1500 System
User’s Guide
✚
♦ EtherHub-16i
✚
♦ EtherHub-16mi
Page 3

Copyright (c) 1995 by Accton Technology Corporation. All rights reserved.
No part of this document may be copied or reproduced in any form or by any means without the prior written
consent of Accton Technology Corporation.
Accton makes no warranties with respect to this documentation and disclaims any implied warranties of
merchantability, quality, or fitness for any particular purpose. The information in this document is subject to change
without notice. Accton reserves the right to make revisions to this publication without obligation to notify any person
or entity of any such changes.
.QWHUQDWLRQDO-HDGTXDUWHUV
No. 1 Creation Road III,
Science-based Industrial Park
Hsinchu 300, Taiwan, R.O.C.
Phone: 886-35-770-270
FAX: 886-35-770-267
BBS: 886-35-770-654
Internet: support@accton.com.tw
:8&-HDGTXDUWHUV
1962 Zanker Road
San Jose, CA 95112
Phone: 408-452-8900
FAX: 408-452-8988
BBS: 408-452-8828
FAST FAX: 408-452-8811
Accton, AccView, EtherHub and SwitcHub are trademarks or registered trademarks of Accton Technology
Corporation. Other trademarks or brand names mentioned herein are trademarks or registered trademarks of their
respective companies.
EH1501s
EH1502s
E0895-R01
150482-101
Page 4

FCC Warning
This equipment has been tested and found to comply with the limits for
a Class A digital device pursuant to Part 15 of the FCC Rules. These
limits are designed to provide reasonable protection against harmful
interference when the equipment is operated in a commercial
environment.
This equipment generates, uses, and can radiate radio frequency
energy, and if not installed and used in accordance with the instruction
manual may cause harmful interference to radio communications. Its
operation in a residential area is likely to cause harmful interference in
which case the user will be required to correct the interference at his
own expense.
A shielded transceiver cable is required to be used in order to ensure
compliance with FCC Part 15; it is the responsibility of the user to
provide such cable.
Changes or modifications not expressly approved by the party responsible
for compliance could void the user’s authority to operate the equipment.
Canadian Standards Association (CSA) Statement
This digital apparatus does not exceed the Class A limits for
radio noise emissions from digital apparatus as set out in the
radio interference regulations of the Canadian Department of
Communciations.
FCC Warning i
Page 5

Sicherheitshinweise
1. Die Steckdose muß sich in der Nähe des Gerätes befinden und leicht
änglich sein.
zug
2. Zum Reinigen den Stecker aus der Steckdose ziehen. Beim Reinigen
keine Fl
angefeuchtetes Tuch.
3. Das ...... ger
benutzen, wie z.B. Badezimmer, Schwimmbad, Sp
Eindringen von Wasser kann zur Zerst
4. Das ...... ger
Rollwagen, Gestell usw., aufstellen. Es k
Verletzungen oder Besch
verursachen.
5. Die Bel
fl
Zerst
6. Versuchen Sie niemals dieses Ger
oder Abnehmen des Geh
besteht.
7. Keine Gegenst
durch scharfe Kanten zerst
8. Keinerlei Gegenst
dadurch sonst zu Kurzschl
9. Bei St
10. Bei Reperaturen d
gleichen Eigenschaften verwendet werden. Andere Bauteile k
Feuer, elektrischen Schlag oder andere Gefahren verursachen.
11. Nach Beendigung von Wartungsarbeiten oder Reperaturen durch den
Kundendienst sollte die Sicherheitspr
12. Bei l
spannung zu trennen. Dies verhindert eine Besch
durch eine
Der arbeitsplatzbezogene L
üssigreiniger oder Sprays verwenden, sondern ein
ät nicht in Naßräume oder in der Nähe von Wasser
ülbecken usw. . Das
örung des Gerätes führen.
ät nicht auf einer unstabilen Unterlage, wie z.B.
önnte herunterfallen und
ädigungen von Mensch und Gerät
üftungsöffnungen nicht blockieren oder auf falscher Ober-
äche, wie Bett, Sofa usw., stellen. Durch die Blockierung kann es zur
örung des Gerätes durch Überhitzung kommen.
ät selbst zu warten, da beim Öffnen
äuses die Gefahr eines elektrischen Schlages
ände auf das Anschlußkabel stellen, damit es nicht
ört werden kann.
ände durch die Öffungen in das Gerät stecken, da es
üssen kommen kann.
örungen des Gerätes den Wartungsdienst verständigen.
ürfen nur Orginalersatzteile oder Bauteile mit
önnen
üfung durchgeführt werden.
ängerem Stillstand des Gerätes, ist diese von der Versorgungs-
ädigung des Gerätes
Überspannung in der Zuleitung.
ärmschutzpegel nach DIN 45 635 ist kleiner
70dB (A).
Sicherheitshinweise iii
Page 6

About this Guide
This is an installation guide for the EtherHub 1500 hubs
EtherHub-16i
topics:
+
and EtherHub-16mi+. It covers the following
ì Product description, summary of important features and
specifications
ì Brief description of the EtherHub 1500 System
ì Description of significant components of the unit including
LED indicators, ports, buttons and switches
ì Hardware installation procedure
ì System setup and configuration
ì Applications
v
Page 7

Package Checklist
Package Contents
Carefully unpack the contents of the package and verify them
against the checklist given below. This checklist applies to both
the EtherHub-16i
æ EtherHub-16i
EtherHub-16mi
æ One AC power cord
æ 0.5 meter FlexBus 1500 cable
æ Four rubber feet
æ BNC T-type connector and two 50-ohm (Ω) terminators
(for models with the BNC transceiver module only)
+
and EtherHub-16mi+ unless otherwise specified.
+
(Model No. EH1501s) or
+
(Model No. EH1502s)
In addition, the EtherHub-16mi
æ One serial RS232 connector module which includes 2 DB9
+
package includes the following:
to RJ-45 converter connectors, one DB25 to RJ-45 converter
connector, and one 3-meter parallel UTP cable
æ Diskette containing -
Accton’s EtherHub 1500 System Configuration Program
Please inform your dealer immediately should there be any
wrong, missing, or damaged parts.
If possible, retain the carton, including the original packing
materials. Use them again to repack the unit in case there is a
need to return it for repair.
To qualify for product updates and product warranty
registration, fill in the
Owner Registration Card and return it
to Accton Technology Corporation.
vii
Page 8

Contents
Chapter 1: Overview 1-1
The EtherHub 1500 System 1-1
Features of EtherHub 1500 System 1-4
Distinguishing Factors of EtherHub 1500 System 1-5
Chapter 2: Hardware Description 2-1
Front Panel Displays 2-1
SmartWatch LED Panel 2-2
PWR/CPU 2-3
Interhub 2-3
Isolated (EtherHub-16i
Serial (EtherHub-16mi
Terminator 2-4
Monitor (EtherHub-16i
SNMP (EtherHub-16mi
Jabber 2-6
Alert 2-7
Utilization 2-7
Collision 2-8
Segment LED Indicators 2-9
Hub ID Indicators 2-10
Port Status Indicators 2-10
PARTITION/DISABLE 2-11
LINK/TRAFFIC 2-12
Diagnostic Test LED Indicators 2-13
Configure Button 2-14
STP Station Ports 2-15
Daisy-Chain Switch 2-15
Rear Panel Displays 2-16
Port Connections 2-16
FlexBus 1500™ 2-16
Serial Port (EtherHub-16mi
ALT Port 2-17
BNC Module (10BASE2) 2-18
Power Socket 2-18
Power Switch 2-18
+
only) 2-3
+
only) 2-4
+
only) 2-5
+
only) 2-5
+
only) 2-17
ix
Page 9

EtherHub 1500 System User’s Guide
Chapter 3: Hardware Installation 3-1
Before You Begin 3-1
Hardware Installation 3-2
Stacking Hubs without a Rack 3-3
Mounting Hubs on a Rack 3-4
Connecting the Hub System 3-5
Preparing for System Configuration 3-7
Local Out-of-Band Configuration 3-7
Remote Out-of-Band Configuration 3-8
In-Band Configuration 3-10
Installing an SNMP Backup Agent 3-10
Chapter 4: Setup and Configuration 4-1
System Setup 4-1
Diagnostic Tests 4-1
Upon Power On 4-1
During Normal Operation 4-2
Multi-Segment Architecture 4-2
FlexBus 1500 Management Link 4-3
Hub ID Setting 4-3
SNMP Backup Agent 4-3
Port Backup Function 4-4
Hot Remove Function 4-5
Preparing for Configuration Management 4-5
Out-of-Band Configuration 4-5
EtherHub 1500 System C onf igu ration Program (Et herHu b-16m i
System Menu 4-9
Displaying System Information 4-9
Changing System Configuration 4-10
Assigning Trap Managers 4-10
Downloading System Software 4-11
Restarting the Agent 4-11
Reverting Configuration to Factory Settings 4-11
Control Menu 4-12
Configuring Hub Parameters 4-12
Configuring Port Parameters 4-13
Defining Backup Ports 4-13
Setting the External Configure Buttons 4-14
+
) 4-8
x Contents
Page 10

EtherHub 1500 System User’s Guide
Performance Menu 4-14
Threshold Menu 4-14
Using the Configure Button 4-16
Selections Available 4-18
Chapter 5: Applications 5-1
Attaching Stack to One Segment 5-1
Attaching Stack to Three Segments 5-2
Attaching Stack to Multiple Segments 5-3
Each Hub is Isolated 5-4
Extending the Network with STP/BNC Connections 5-5
Linking a Stack to a Network Management Station 5-6
Interconnecting Segments 5-7
Linking a Distributed Segment 5-8
Linking Distributed Segments 5-9
Operating in Novell NetWare IPX Environment 5-10
Operating in TCP/IP Environment 5-11
Contents xi
Page 11

EtherHub 1500 System User’s Guide
Appendix A: Product Specifications A-1
Features A-1
Physical Characteristics A-1
Specifications for FlexBus 1500 Cable A-2
Attenuation for Horzontal FlexBus 1500 Cable
Error! Bookmark not defined.
NEXT for Horizontal FlexBus 1500 Cable A-3
Standards Compliance A-4
Appendix B: Pin Assignments B-1
FlexBus 1500 Pin Description B-1
RS232 Port Pin Description B-1
DB9 Serial Port to RJ-45 Converter Connector Pin Assignment B-2
DB9 PC’s COM Port to RJ-45 Converter Pin Assignment B-2
DB25 RS232 to RJ-45 Converter Connector Pin Assignment B-3
Connection from EH1502s Serial Port to PC’s COM Port B-3
Connection from EH1502s S eri al Port t o Modem’s DCE Port B-4
Appendix C: Product Support Services C-1
Product Registration C-1
Problem Report C-1
Hardware Repair Service C-1
Software Update and Upgrade Service C-2
Bulletin Board Service (BBS) C-2
Interactive Fast Fax (U.S.A. office) C-3
Technical Support C-3
Limited Warranty C-4
Customer Remedies C-4
Return Process C-5
Ordering Information C-6
Glossary
Index
xii Contents
Page 12

List of Figures
Figure 2.1 The EtherHub-16i+ Front Panel 2-1
Figure 2.2 The EtherHub-16mi
Figure 2.3 SmartWatch
Figure 2.4 SmartWatch
LED Panel for EtherHub-16i
LED Panel for EtherHub-16mi+2-2
Figure 2.5 Daisy-Chain Switch Setting 2-15
Figure 2.6 The EtherHub-16i
Figure 2.7 The EtherHub-16mi
+
Front Panel 2-1
+
Rear Panel 2-16
+
Rear Panel 2-16
+
2-2
Figure 3.1 Stacking Hubs without a Rack 3-3
Figure 3.2 Mounting Hubs Using a Mounting Rack 3-4
Figure 3.3 Connecting Hub’s Serial Port to
Figure 3.4 Connecting Hub’s Serial Port to
PC COM Port 3-7
a Modem 3-8
Figure 3.5 Connect ing Remote PC’s Seria l Port to a Mo dem 3-9
Figure 4.1 Communication Port Dialog Box 4-6
Figure 4.2 DCE/DTE Dialog Box 4-7
Figure 4.3 Phone List Menu 4-7
Figure 4.4 Main Menu 4-7
Figure 5.1 Attaching All Hubs in Stack to One Segment 5-1
Figure 5.2 Attaching Hubs in Stack to 3 Segments 5-2
Figure 5.3 Linking Part of the Stacked Hubs to a Segment 5-3
Figure 5.4 Stacked Hubs Not Linked to a Segment 5-4
Figure 5.5 Linking Stacked Hubs to Unmanaged Hubs
with STP Port Connection 5-5
Figure 5.6 Linking Stacked Hubs to a Network
Management Station 5-6
Figure 5.7 Linking Segments in a Stacked System 5-7
Figure 5.8 Linking a Distributed Segment 5-8
Figure 5.9 Linking Distributed Multi-Segments 5-9
Figure 5.10 System Applied in Novell NetWare IPX
Environment 5-10
Figure 5.11 System Applied in TCP/IP Environment 5-11
xiii
Page 13

Chapter 1: Overview
The EtherHub 1500 System
The EtherHub 1500 System is a powerful and innovative LAN
network enhancement and management product series. Each
component in the system supports a multi-segment bus
architecture that enhances traffic management and network
bandwidth utilization. This system offers the network manager
a wide range of flexible configuration options, allowing you to
effectively increase your network’s bandwidth. In addition, the
entire installation can be monitored and controlled through any
network management station.
The major components of this network system include:
EtherHub-16mi+, a 16-port intelligent hub with an SNMP-
based network management agent for monitoring and
controlling various network components. It includes -
• 16 RJ-45 STP station ports for connecting computers to the
network using shielded or unshielded twisted-pair cable
• 1 optional port for installing an AUI, BNC or Fiber-Optic
module, which permits connection to thick or thin Ethernet
or 10BASE-F cable
• 2 FlexBus 1500 ports for connecting to compatible hubs via
a FlexBus 1500 STP cable
• RJ-45 port 16 which can also be converted to a daisy-chain
port (
• SmartWatch LED panel that provides an easy way to
configure and monitor the system
) using the daisy-chain switch
1-1
Page 14

EtherHub 1500 System User’s Guide
In addition, this hub supports a multi-segment bus architecture
that enhances traffic management and network bandwidth
utilization. With an SNMP agent, this unit not only functions
as an intelligent hub, but can also monitor up to 10 intelligent
hubs connected to it (including itself) through the FlexBus 1500
port connection. The EtherHub-16mi
+
conforms to both the
IEEE 802.3 repeater specification and the Simple Network
Management Protocol (SNMP).
This hub supports both in-band and out-of-band management.
For in-band management, it uses Accton’s optional Network
Management Software, called AccView/Open (not included
with this package) to monitor and control a stacked system. For
out-of-band management, the device’s RS232 port can be
connected to a PC and managed using Accton’s EtherHub 1500
System Configuration Program. Any computer (i.e., XT, AT)
with a COM1~4 RS232 port, at least 640 KB on-board memory ,
and a monochrome, EGA or VGA display can be used.
+
The Etherhub-16mi
can be configured as a stand-alone system
to form a simple LAN networking 2 to 16 computers using the
RJ-45 ports. Or it can be connected to other hubs using the
FlexBus 1500 port connection. Further network expansion can
be achieved using the BNC, AUI or fiber-optic trunk port
connection (optional ALT PORT), or the RJ-45 daisy-chain
port. Workstations are connected to the EtherHub-16mi
+
station ports using shielded or unshielded twisted-pair cable.
1-2 Overview
Page 15

EtherHub 1500 System User’s Guide
EtherHub-16i+, a 16-port intelligent 10BASE- T hub. It includes -
• 16 RJ-45 STP station ports for networking computers to the
network using shielded or unshielded twisted-pair cable
(STP or UTP).
• 1 optional port for installing an AUI, BNC or Fiber-Optic
module, which permits connection to thick or thin Ethernet
or 10BASE-F cable.
• 2 FlexBus 1500 ports for connecting to compatible hubs or
to the EtherHub-16mi
+
via a FlexBus 1500 cable.
• RJ-45 port 16 which can be converted to a daisy-chain port
) using the daisy-chain switch.
(
• Comprehensive LED indicators on the front panel to provide
easy and quick configuration and monitoring the unit.
+
As an intelligent hub, the EtherHub-16i
collects port statistics
and records events for system administration. When stacked with
other intelligent hubs through the FlexBus 1500 ports and
connected to an SNMP management device (e.g., EtherHub-
+
), you can monitor and control all attached hubs through
16mi
in-band and out-of-band communication.
The EtherHub-16i
+
can be used in a stand-alone configuration
to form a simple LAN networking 2 to 16 computers using the
RJ-45 ports. Further network expansion can be achieved using
the BNC, AUI or fiber-optic trunk port connection (optional
ALT PORT), or the RJ-45 daisy-chain port. Workstations are
connected to the EtherHub-16i
+
station ports using shielded or
unshielded twisted-pair.
AccView/Open (SW6102), a Windows-based network
management software package that analyzes and displays data
from the EtherHub-16mi
user to the EtherHub-16mi
+
and transmits commands from the
+
. AccView should be installed on
the network management station (i.e., any workstation used to
manage the network). If segmented architecture is used, the
network management station should be on the same segment as
Overview 1-3
Page 16

EtherHub 1500 System User’s Guide
the SNMP management agent (i.e., EtherHub-16mi+). The
network management station can be a 386 or 486 workstation
with a 10MB hard disk, at least 2 MB on-board memory, a
VGA display, and running Windows version 3.1 or higher (i.e.,
Windows 3.1, 3.11, ’95, NT).
AccView/Open EtherHub Manager, is network management
software specifically designed to manage Accton’s EtherHub
family. This software can be integrated into the following
third-party management platforms -
• SunNet Manager/Sparc (SW6120-1)
• SunNet Manager/X86 (SW6120-2)
• OpenView/Windows (SW6121)
• OpenView/Sparc (SW6122)
• Novell Netware Managment System (SW6124)
Alternative Interface Module -
• BNC (EH1551),
• AUI (EH1552)
• Fiber Optic (EH1553)
Security Kit (SW7300), for intrusion/eavesdropping protection
default module preinstalled in EH1500
Features of EtherHub 1500 System
• Conforms to the SNMP & IEEE Hub Management
Standards, MIB I and MIB II
• Conforms to the IEEE 802.3 repeater specification and the
10BASE-T standard
• Manages up to 10 concentrators using the FlexBus 1500
(STP) cable
• One optional port (BNC, AUI or Fiber-Optic) for connecting
to any Ethernet media via slide-in alternative module
transceiver
1-4 Overview
Page 17

EtherHub 1500 System User’s Guide
• Provides one serial 9-pin RS232 port for out-of-band
network management (EtherHub-16mi
• Supports daisy chaining by using a daisy-chain switch to
+
only)
convert port 16 to a daisy-chain port
• Automatic polarity detection and correction permits
automatic recovery due to wiring errors
• Automatically partitions bad port to protect network
• Adapts to universal wide range voltage power
(i.e., 100V AC to 240V AC +/- 10%, 50~60 +/- 3Hz)
• Flexible installation for desktop, wall mount, or rack
installation (standard 19” size)
Distinguishing Factors of EtherHub 1500 System
• Provides multi-segment architecture allowing the network to
be split into three segments
• Includes a SmartWatch comprehensive LED indicator
panel for reporting network activity, unit configuration and
facilitating problem diagnosis
• Automatic ID assignment and auto-terminator setting for
auto-configuration
• Supports fault-tolerant configuration by allowing port link
backup and agent backup
• Two FlexBus 1500 management ports (BUS IN/OUT) for a
bundled cable containing 3 separate Ethernet segments and
a management link
• Provides front panel configuration using a Configure button
Overview 1-5
Page 18

EtherHub 1500 System User’s Guide
• Supports out-of-band management (using Accton’s proprietary
EtherHub 1500 System Configuration Program), and full
software configurable in-band manag ement using the optional
AccView/Open (network manag ement software)
• Flash ROM on board the EtherHub-16mi
+
for easily updating
the SNMP agent using AccView/Open’s download option
• Stacked hubs can be distributed up to 100-meters in a single
segment configuration
1-6 Overview
Page 19
Chapter 2: Hardware Description
This chapter describes the hardware features of the EtherHub-16i
and EtherHub-16mi+. Except for 3 LED indicators that are unique
to each hub, both products have similar indicators and other front
panel components. Likewise, the rear panel is similar for both
versions, except that the EtherHub-16i
232 serial port. Before connecting any network device to the hub,
read this chapter carefully. For easier management and control of
the hub, familiarize yourself with the front panel indicators and
Configure button.
Front Panel Displays
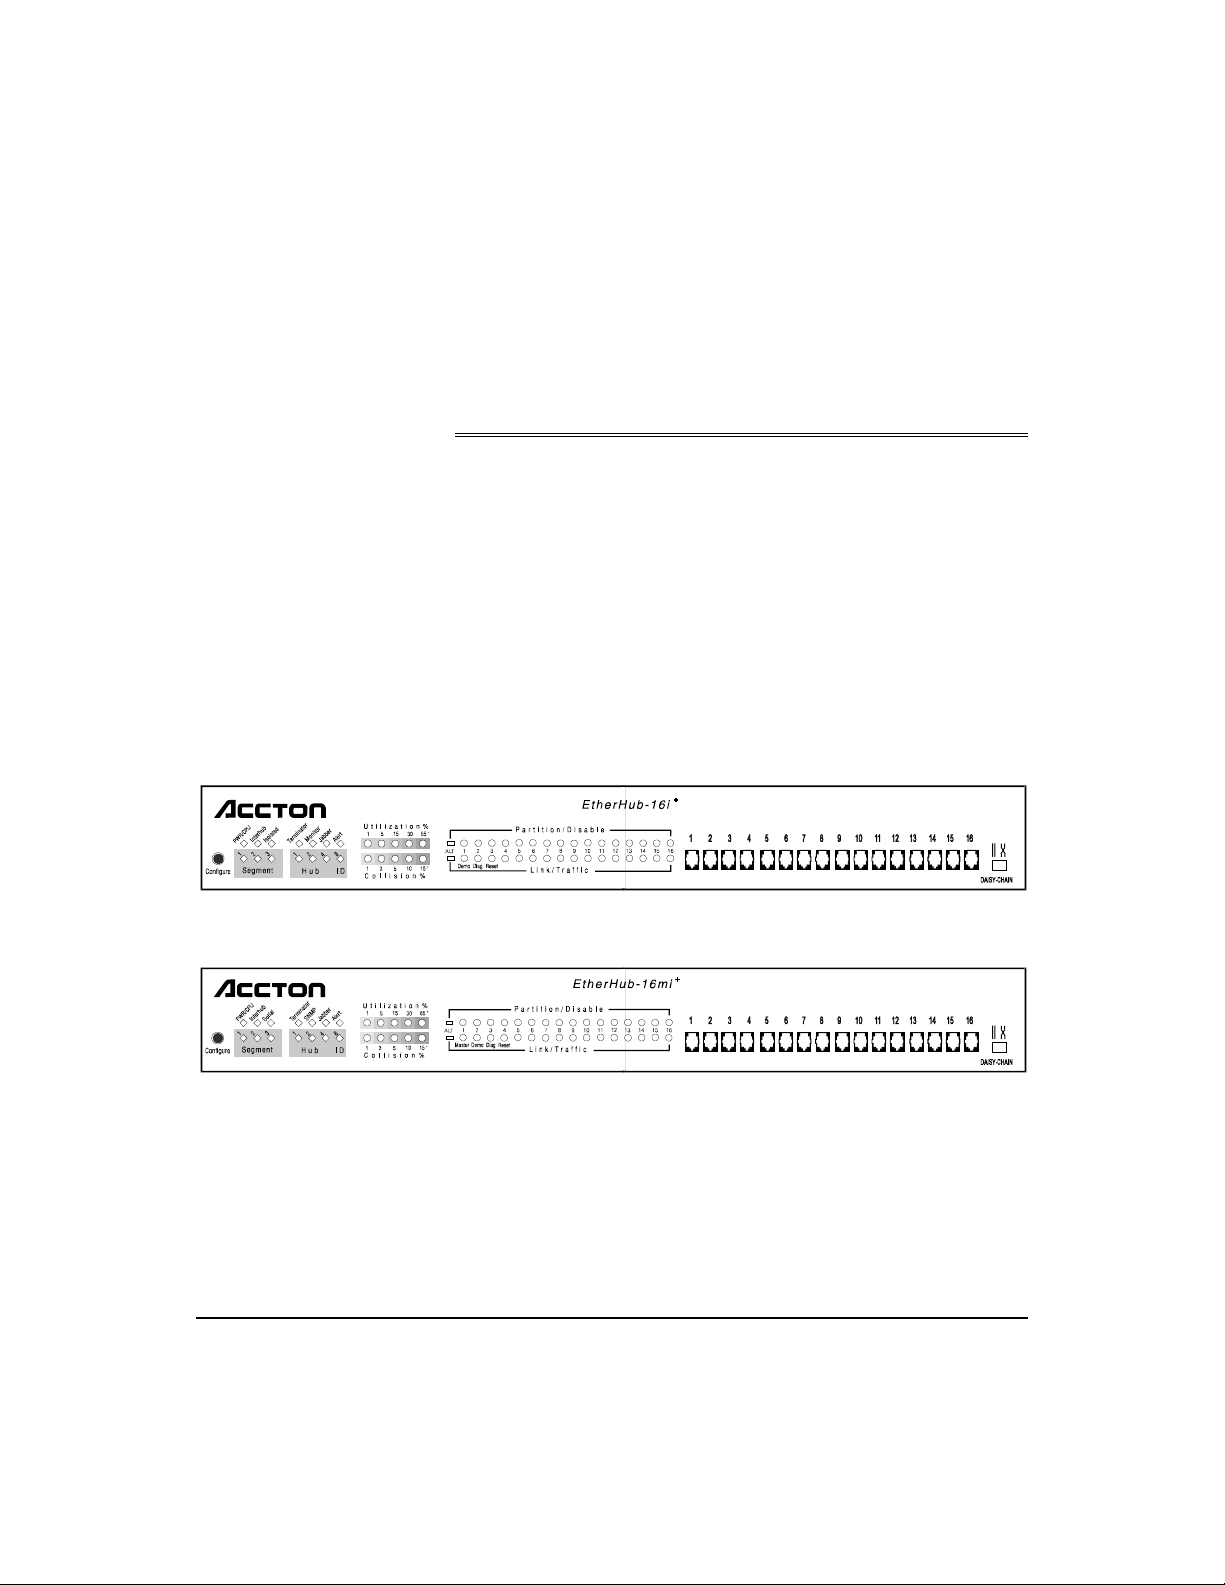
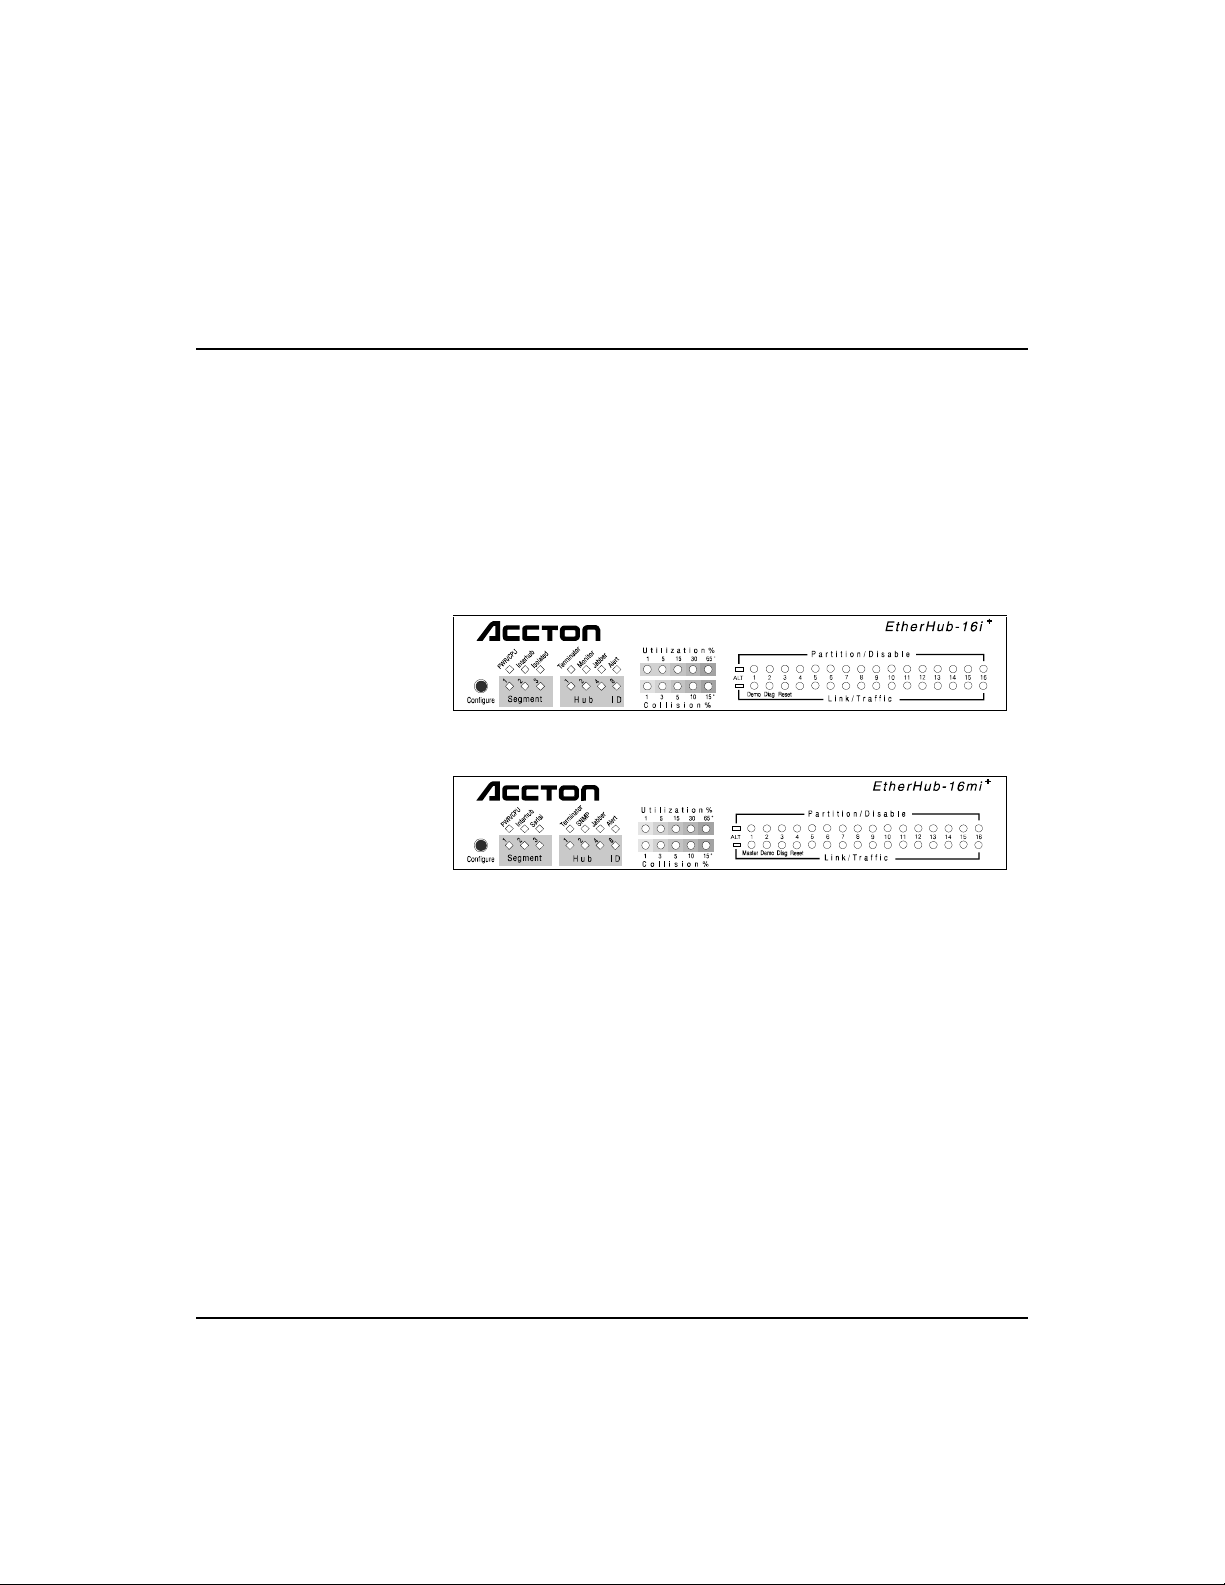
Figure 2.1 The EtherHub-16i+ Front Panel
+
does not support the RS-
+
Figure 2.2 The EtherHub-16mi+ Front Panel
2-1
Page 20
EtherHub 1500 System User’s Guide
SmartWatch LED Panel
Both hubs have a SmartWatch LED panel that includes
comprehensive indicators for monitoring the device and
network status. A quick glance at the front panel tells you if
the unit’s power in ON, if it is monitoring another hub (or
concentrator), or if a problem exists on the network. The
following sections describe the function of each indicator.
Figure 2.3 SmartWatch LED Panel for EtherHub-16i
Figure 2.4 SmartWatch LED Panel for EtherHub-16mi
+
+
2-2 Hardware Description
Page 21

EtherHub 1500 System User’s Guide
PWR/CPU
Color: Green
Label: PWR/CPU
Function: Power indicator
LED Activity Condition Indication
STEADY LIGHT ON Unit is receiving power, CPU is running,
and EH1502s Agent is in Master mode.
BLINKING LIGHT ON Unit is receiving power, CPU is running,
and EH1502s Agent is in Slave mode.
NO LIGHT OFF Power is disconnected; no power received.
Interhub
Color: Green
Label: Interhub
Function: Indicates a valid connection between hub and agent
LED Activity Condition Indication
BLINKING LIGHT ON Hub has a valid connection to the Agent through
the FlexBus 1500 port on the back plane.
NO LIGHT OFF Hub is in a stand-alone configuration. Or hub
does not have a valid connection to the network
system it monitors.
Isolated (EtherHub-16i+ only)
Color: Green
Label: Isolated
Function: Indicates the hub is isolated from Ethernet segment
of the FlexBus 1500 backplane
LED Activity Condition Indication
STEADY LIGHT ON Hub is isolated from all segments.
NO LIGHT OFF Hub is attached to one of the 3 segments of
the FlexBus 1500.
Hardware Description 2-3
Page 22

EtherHub 1500 System User’s Guide
Serial (EtherHub-16mi+ only)
Color: Green
Label: Serial
Function: Indicates connection to a management console
LED Activity Condition Indication
BLINKING LIGHT ON Agent has a valid connection to a
management console using its RS232 serial
port. A valid link only occurs when the
management console is sending a message
to or receiving a message from the agent.
NO LIGHT OFF No connection to a management console.
Terminator
Color: Green
Label: Terminator
Function: Indicates if a unit is located in a terminal position
in a stacked system
The unit has an auto-terminate function that is enabled when it
is at the end of a stack. In a stand-alone configuration, this
LED is ON because of the auto-terminate function.
LED Activity Condition Indication
STEADY LIGHT ON The hub is at the end of a stacked
NO LIGHT OFF The hub is connected to a stacked
2-4 Hardware Description
system or in a stand-alone configuration.
system, but not at the terminal position of
a stack.
Page 23

EtherHub 1500 System User’s Guide
Monitor (EtherHub-16i+ only)
Color: Green
Label: Monitor
Function: Indicates that an SNMP management agent is
connected to and managing the hub
LED Activity Condition Indication
BLINKING ON Hub is connected to and managed by an
Agent.
NO LIGHT OFF Hub is not connected to an Agent.
SNMP (EtherHub-16mi+ only)
Color: Green
Label: SNMP
Function: Indicates that an SNMP frame is being received by
the Agent
LED Activity Condition Indication
BLINKING LIGHT ON Hub is presently receiving an SNMP frame.
NO LIGHT OFF Hub is not receiving an SNMP frame.
In a stacked system where a Master and Slave agent exist, the
SNMP LED of the active agent will blink if an SNMP frame is
received. Normally, this would mean that the Master agent’s
SNMP LED will be ON. However, if the Master agent fails, the
Slave agent’s SNMP LED should light up. See the section on
Master Agent in Chapter 4 for related information.
Hardware Description 2-5
Page 24

EtherHub 1500 System User’s Guide
Jabber
Color: Red
Label: Jabber
Function: Jabber lock-up indicator
Jabber refers to an abnormal Ethernet frame transmission. The
frames causing jabber are normally much too long. This may
result from a malfunctioning Ethernet card and may cause data
loss for all network users.
LED Activity Condition Indication
STEADY LIGHT ON Jabber exists on one or more port
connection (i.e., RJ-45 or ALT port).
NO LIGHT OFF No jabber occurring.
I
IMPORTANT
connections one by one, as follows:
1. Select a port to check.
2. Then unplug its cable connection while checking the Jabber display.
If the Jabber LED goes OFF, you have successfully identified the
defective port. However, if the light remains ON, the port is in good
condition.
3. Replug the cable connection, and select another port to test.
4. Repeat this procedure until you find the port causing the problem.
!
To identify the port causing the problem, check all existing
2-6 Hardware Description
Page 25

EtherHub 1500 System User’s Guide
Alert
Color: Yellow
Label: Alert
Function: Indicates hardware or hub ID setting problems
LED Activity Condition Indication
BLINKING LIGHT ON Hardware or hub ID setting error has occurred.
NO LIGHT OFF No abnormal occurence.
The Alert LED indicates that the device has encountered a problem
F
in one or more hardware components (e.g., EEPROM checksum
error, or Configure button is locked). However, the unit can still
function even if the Alert LED is on. It is also used as a diagnostic
test LED. Refer to the section on
later in this chapter for more information.
Utilization
Label (%) Color Function
1% 5% 15% Green Indicates percentage
30% Amber (yellow) utilization of LAN bandwidth.
65+% Red
Diagnostic Test LED Indicators
The Utilization LEDs indicate the percentage of network
bandwidth used by valid data. The hub updates this display
every 0.5 seconds.
There are 5 LEDs representing the percentage of network
utilization. The corresponding LEDs light to show that the
percentage utilization of LAN bandwidth has reached this level.
When active, these LEDs look like a stereo’s equalizer display.
For example, if network utilization reaches 1%, the LED
labeled 1% will light. However, if network utilization rises
above 1% (e.g., 30%), the LED labeled 30 and all the other
LEDs before it (i.e., 1, 5, and 15) will light in rapid succession.
Hardware Description 2-7
Page 26

EtherHub 1500 System User’s Guide
These LEDs monitor the share of valid network frames
transmitted by this hub within a 10Mbps bandwidth. They
provide a quick way to monitor the current traffic load relative
to the network’s capacity.
Collision
Label (%) Color Function
1% 3% 5% Green Indicates the percentage of packet
10% Amber (yellow) collisions occurring out of the total
15+% Red packets received by the hub.
Collisions occur when two or more devices connected to a hub
attempt to transmit data simultaneously on the network. When
a collision occurs, devices pause and then re-transmit after a
pseudo-random wait period. Because wait periods differ among
devices, successive collisions become increasingly improbable.
The Collision LEDs assist the network manager in monitoring
the percentage of packet collisions occurring relative to the total
packets received by the hub. Similar to Utilization LEDs, the
Collision LEDs have 5 numbers representing collision percentag e.
When collisions reach a level marked on the LED display, the
corresponding LED lights up.
For example, if packet collisions reach 1%, the LED labeled
1% will light up. However, if collisions go beyond 1% (e.g.,
15%), the LED labeled 15+ and all the other LEDs before it
(i.e., 1, 3, 5, and 10) will also light up in rapid succession.
When more than 31 consecutive collisions occur on the cable
F
2-8 Hardware Description
segment connected to a port, that port is automatically partitioned
by the hub. The hub automatically reconnects this port when a data
packet longer than 512 bits (normal) is transmitted or received by
the partitioned port without collision. This applies to all STP ports
and the ALT PORT.
Page 27

EtherHub 1500 System User’s Guide
Segment LED Indicators
Color: Green
Label:
Function: Indicates which segment is attached to the hub
There are 3 Ethernet segments embedded in the FlexBus 1500
ports located on the back plane of the EtherHub 1500 series.
These units can be attached to any one of the three Ethernet
segments. The 3-segment LED indicator displays a
combination of ON/OFF lights to show which segment the unit
is connected to. The table below shows the possible LED
display combination of the segment indicators marked "1 2 3"
and their corresponding meaning.
Segment Description
1 2 3
ON OFF OFF Hub is connected to Segment 1 (Default)
OFF ON OFF Hub is connected to Segment 2
OFF OFF ON Hub is connected to Segment 3
The EtherHub-16i+ can be completely isolated except for the
F
management channel (which is reflected via the Isolated LED).
However, the EtherHub-16mi
+
can not be physically isolated.
Hardware Description 2-9
Page 28

EtherHub 1500 System User’s Guide
Hub ID Indicators
Color: Green
Label:
Function: Indicates Unit ID Setting
In a stacked system, each hub unit has a unique ID. The EtherHub
1500 hub series is equipped with a function that automatically sets
the hub ID, freeing the user from this task. The table below shows
possible display combinations for the hub unit’s ID LED indicators
marked "1 2 4 8" and their corresponding meaning. These LEDs
display the binary equivalent of the selected ID number (displayed
left to right). In normal operation, the LEDS turned ON display a
steady light; while in configuration mode, they blink.
Hub ID LED 1 Hub ID LED 2 Hub ID LE D 4 Hub ID LE D 8 Hub ID Number Setting
ON ON ON ON (DEFAULT) Used for
automatic Hub ID setting.
ON OFF OFF OFF Hub ID 1
OFF ON OFF OFF Hub ID 2
ON ON OFF OFF Hub ID 3
OFF OFF ON OFF Hub ID 4
ON OFF ON OFF Hub ID 5
OFF ON ON OFF Hub ID 6
ON ON ON OFF Hub ID 7
OFF OFF OFF ON Hub ID 8
ON OFF OFF ON Hub ID 9
OFF ON OFF ON Hub ID 10
Port Status Indicators
There are 17 pairs of port status LED indicators. Each pair
consists of a PARTITION/DISABLE LED (top row) and
LINK/TRAFFIC LED (bottom row). Each pair (or column) has
a label referring to the port number the LEDs monitor. For
example, the port status LED pair labeled ALT monitors the
optional port found at the rear panel (labeled ALT PORT). The
other 16 pairs are for the RJ-45 ports on the front panel of the hub.
2-10 Hardware Description
Page 29

EtherHub 1500 System User’s Guide
PARTITION/DISABLE
LED Activity Condition Indication
STEADY RED LIGHT PARTITION Indicates port partitioning due to an
abnormal network condition.
BLINKING RED LIGHT DISABLE Indicates the port has been disabled
NO LIGHT OFF Port is in good condition.
The PARTITION/DISABLE LEDs are also used as diagnostic LEDs.
F
Please refer to the
for more information.
Partition
Diagnostic Test LEDs
section later in this chapter
A port is temporarily partitioned when a line error or too many
collisions are detected on the attached segment. While it is
automatically partitioned, the port continues to receive data
from the segment. However, data is not transmitted onto the
segment. When the problem is corrected or a valid data packet
is received through the port, the port is automatically
reconnected. When partitioning occurs, the port’s
corresponding PARTITION/DISABLE LED will be continually
lit (RED light). Otherwise, this LED should be OFF (unlit).
Disable
Disabling a port is the same as manually partitioning it, except
that you must also manually reconnect it. You can choose to
partition a port even if there is nothing wrong with it. For
example, to prevent a certain device from accessing the network
or to reduce network traffic you may opt to disable the port. No
incoming packet transmission can occur on a disabled port.
Ports can be disabled/enabled using Accton’s AccView/ Open
or the EtherHub 1500 System Configuration Program. They
can also be enabled by activating the factory default settings.
See the section on
Reset Mode in Chapter 4 for information on
reverting to default settings.
Hardware Description 2-11
Page 30

EtherHub 1500 System User’s Guide
LINK/TRAFFIC
LED Activity Condition Indication
STEADY GREEN
LIGHT
BLINKING GREEN
LIGHT
NO LIGHT OFF No valid link has been established on this port.
ON Indicates a valid link has been established on this
port.
ON Indicates the port is receiving packets; blinking is
proportional to the traffic passing through the port.
Link
The corresponding LINK/TRAFFIC LED should light up when
a device (e.g., computer, hub or bridge) establishes a valid
connection using the RJ-45 port. However, for the ALT PORT,
no link connection is tested. The LINK/TRAFFIC LED for
ALT only monitors the traffic condition.
TROUBLESHOOTING
If the LINK/TRAFFIC LED does not light up when a device is connected
to its corresponding port, check that both the hub and connected device
are powered on. For devices connected to the hub using an STP or
UTP cable, check that the cable length does not exceed 100 meters.
You should have standard, straight cables and not cross-over or other
specialized cables.
Traffic
Traffic refers to the movement of packets being received by the
port. A port’s corresponding LINK/TRAFFIC LED will blink
(ON) in proportion to the rate of traffic passing through the
port. Through this LED, the network manager can easily view
the activity on a port.
2-12 Hardware Description
Page 31

EtherHub 1500 System User’s Guide
Diagnostic Test LED Indicators
The RJ-45 PARTITION/DISABLE LEDs not only monitor the
partition or disabling of an RJ-45 port, they also monitor
diagnostic test results.
LED Activity Condition Indication
BLINKING RED
LIGHT
NO LIGHT OFF The corresponding hardware component
ON The corresponding hardware component failed the
diagnostic test.
successfully passed the diagnostic test.
After power on, the hub automatically performs a diagnostic
test. Seven hardware components are tested for EtherHub-16i
while 14 components are tested for EtherHub-16mi
+
. During
this test, STP PARTITION/DISABLE LEDs indicate the
success/failure of each test. The following table shows what
each PARTITION/ DISABLE LED monitors.
PARTITION/DISABLED Test function/component
LED Indicator EtherHub-16i
1 CPU CPU
2 ROM Flash ROM 1
3 RAM SRAM
4 Serial communication
controller
5 Hub control 1 LAN controller ID address
6 Hub control 2 LAN controller share memory
7 Timer LAN controller loop back test
8 N.A. LAN controller INT
9 N.A. Hub controller 1
10 N.A. Hub controller 2
11 N.A. Stack management bus
12 N.A. Serial port RS232 controller
13 N.A. EEPROM
14 N.A. Flash ROM 2
+
EtherHub-16mi
LAN controller initialization
+
,
+
Hardware Description 2-13
Page 32

EtherHub 1500 System User’s Guide
The system tests each component one at a time. The
corresponding LED will display a blinking light (ON) after test
completion to indicate which component failed the test. No
light means all the hub components passed the diagnostics.
For EtherHub-16i
+
, the unit will complete the test cycle even if a
problem is detected on any of the components. For EtherHub- 16m i
the unit will complete the test cycle for components 1 to 12 even
if a problem is detected. However, if a problem is detected on
components 13 or 14, the Alert LED and the corresponding
PARTITION/DISABLED LED will immediately blink ON and
the testing cycle will not be completed.
Configure Button
On the left front panel is a button labeled Configure. Use this
button for the following configuration functions:
• Segment Setting
• Hub ID Setting
• Master Agent Setting (only for EtherHub-16mi
• Demo (LED display demonstration)
• Diagnostics
• Reset
Move from one function to the next by using a "long press" on
the button. LED indicators will light up depending on the
selected system function. Make necessary choices within the
current function using a "short press". Then, use a "long press"
to effect your choice and move on to the next function. See
Using the Configure Button in Chapter 4 for related information.
+
)
+
,
"Long press" in this User’s Guide means pressing the Configure button for
F
2-14 Hardware Description
more than 2 seconds and then releasing it. "Short press" means pressing
the Configure button and immediately releasing it. Also, if the button is not
pressed within 10 seconds, the system returns to normal operation.
Page 33

EtherHub 1500 System User’s Guide
STP Station Ports
The unit has sixteen RJ-45 station ports. Using shielded or
unshielded (STP or UTP) twisted-pair cable, connect your
workstation (via the network interface card’s port) to any
available RJ-45 port.
Port 16 can be converted into a daisy-chain port by enabling the
Daisy-Chain switch (see the following section on the
Switch
for related information). Hence, this port also can be used
Daisy-Chain
to connect the unit to another compatible unit using STP or UTP
cable.
Daisy-Chain Switch
This switch is located on the right side of the front panel beside
Port 16. It is used to enable/disable the daisy-chain function of
said port. When the switch is enabled, Port 16 can be used as a
daisy-chain port to link the unit to another compatible hub.
When the switch is disabled, Port 16 can only be used as a
station port. To enable daisy chaining, slide the switch to the
right (
). To disable daisy chaining, slide it to the left ( ).
Enable Port 16 for
daisy chaining
Figure 2.5 Daisy-Chain Switch Setting
Hardware Description 2-15
Disable Port 16 for
daisy chaining
Page 34

EtherHub 1500 System User’s Guide
Rear Panel Displays
This section describes significant features of the unit’s rear
panel. See Figures 2.6 and 2.7 for illustration.
Connectors
Alternative Port
POWER
SOCKET
POWER
SWITCH
FlexBus 1500
IN OUT
This device complies with Part 15 of the FCC
Operation is subject to the following two
(1) This device may not cause harmful
(2) This device must accept any interference
including interference that may cause
ALT PORT
100-250 VAC
50 -60Hz 1A
ON
OFF
Figure 2.6 The EtherHub-16i+ Rear Panel
POWER
POWER
SOCKET
90-260 VAC
47 -63Hz 1A
SWITCH
ON
OFF
FlexBus 1500
IN OUT
Connectors
SERIAL PORT
This device complies with Part 15 of the FCC
Operation is subject to the following two
(1) This device may not cause harmful
(2) This device must accept any interference
including interference that may cause
Alternative Po rt
ALT PORT
Figure 2.7 The EtherHub-16mi+ Rear Panel
Port Connections
FlexBus 1500™
The unit has two FlexBus 1500™ connectors labeled BUS IN
and BUS OUT for connecting the hub to a compatible hub or a
network management agent. The FlexBus 1500 cable that
comes with this package is used specifically for these ports.
Only hubs cascaded through the BUS IN and BUS OUT
connection can be managed by a network management agent.
2-16 Hardware Description
Page 35

EtherHub 1500 System User’s Guide
BUS IN
Using a FlexBus 1500 cable, connect this port to the BUS OUT
port of an EtherHub-16i
BUS OUT
Using a FlexBus 1500 cable, connect this port to the BUS IN
port of an EtherHub-16i
The unit also supports "hot remove" for the FlexBus 1500 cable. This
F
allows you to unplug the FlexBus 1500 cable while the unit is powered
on.
Serial Port (EtherHub-16mi
+
or any EtherHub 1500 series hub.
+
or any EtherHub 1500 series hub.
+
only)
The unit has one 9-pin RS232 male connector labeled SERIAL
PORT. It is used to connect a workstation or a modem for outof-band communication using Accton’s EtherHub 1500 System
Configuration Program. Use the UTP cable and connection
converter provided with your unit for plugging into a PC or
modem.
ALT Port
The slot labeled ALT PORT is for an optional slide-in
transceiver module. Three types of transceiver modules are
available -
AUI (10BASE2) for thin Ethernet cable
BNC (10BASE5) for thick Ethernet cable (default)
Fiber optic (10BASE-F)
Hardware Description 2-17
Page 36

EtherHub 1500 System User’s Guide
BNC Module (10BASE2)
The BNC module has a built-in transceiver with a BNC port for
connection using thin coaxial cable. The BNC port can link up
to 30 hubs on a thin coaxial cable segment. The thin coaxial
cable that links the BNC ports may be extended up to 185
meters and have computers or other Ethernet devices attached
to it. When connecting two hubs via BNC ports, there should
be at least 0.5 meters (about two feet) of coaxial cable between
the two BNC ports. If the hub is at the end of an Ethernet
cable, plug and lock the 50-ohm (Ω) terminators to the T-type
connector on the BNC port.
Terminate an open end of any T-type connector that is plugged into a
F
BNC port with a 50-ohm (Ω) terminator. In particular, when a hub using
the BNC port connection is at the end of an Ethernet segment, terminate
the open end of the T-type connector with a 50-ohm (Ω) terminator. Also,
if the BNC port is not used, plug a T-type connector to it and terminate
both ends with a 50-ohm (Ω) terminator.
Power Socket
The power socket accepts AC power from 100 to 240V (± 10%) at
50 to 60 Hz (± 3Hz). The hub is equipped with a universal fullrange power source.
Power Switch
The power switch is located at the right side of the rear panel.
It is used to power the unit ON/OFF.
2-18 Hardware Description
Page 37

Before You Begin
Chapter 3: Hardware Installation
This chapter describes how to install the hardware unit.
1. Before installing the hub, verify that the electrical values
meet the following specifications.
AC Power Frequency
100 to 240V (± 10%) 50 to 60Hz (± 3Hz)
The hub is equipped with a power supply that automatically
detects the input voltage level.
2. Leave at least 10 cm. of space at the front and back of the
hub for ventilation. We recommend that the hub be installed
in a cool and dry area.
3. If you plan to stack the hubs in a mounting rack or directly
on top of one another, make sure you have all the mounting
screws, brackets, and tools you need for proper installation.
3-1
Page 38

EtherHub 1500 System User’s Guide
Hardware Installation
1. Find a location for the hub.
F
The unit is suitable for desktop or rack-mount installation. A
good location is at the center of all the devices you want to
link, close to the trunk segment, and near a power outlet.
The EtherHub 1500 hubs can be stacked with other hubs using a
mounting rack or directly on top of one another through the FlexBus
1500 ports. Refer to the sections on
or
Rack
methods.
If you don’t want to stack the hub with other hubs now, skip this
step and proceed to
If you plan to use the hub in a stand-alone configuration, go to Step
4 under
Mounting Hubs on a Rack
Connecting the Hub System
Connecting the Hub System
Stacking Hubs without a
for a description of these
.
.
2. Connect the hub to compatible hubs (e.g., the EtherHub-16i
or EtherHub-16mi+) through the FlexBus 1500 ports. Use
either of the two methods mentioned in this section.
3-2 Hardware Installation
+
Page 39

EtherHub 1500 System User’s Guide
Stacking Hubs without a Rack
1. Stick a self-adhesive rubber foot (comes with this package)
on the 4 hollow spaces at the bottom of the first hub.
2. Place the first hub in the area where you want the stack to be
installed.
3. Repeat step 1 for each hub before stacking them. The rubber
feet cushion the hubs against shock/vibration and provide
space between each hub for ventilation.
EtherHub1500 Hub Stack
(Up to 10 Hubs)
Figure 3.1 Stacking Hubs without a Rack
F
The two mounting brackets and screws on the sides of the hub need not be
removed if you do not mount the hub in a rack. Keep the mounting brackets
and screws, however, for possible future use.
Hardware Installation 3-3
Page 40

EtherHub 1500 System User’s Guide
Mounting Hubs on a Rack
1. Confirm that the rack you will use is an EIA standard-size
19-inch rack.
2. Use the screws provided with the mounting rack to mount
the hub using the hub’s mounting brackets.
EtherHub1500 Hub
U
to 10 Hubs
Figure 3.2 Mounting Hubs Using a Mounting Rack
3-4 Hardware Installation
Page 41

EtherHub 1500 System User’s Guide
Connecting the Hub System
1. Plug one end of the FlexBus 1500 cable (provided) in the
BUS OUT port of the top hub and the other end to the BUS
IN port of the next hub. Repeat this step for each hub in the
stack. The top hub should only have one FlexBus 1500 port
in use (BUS OUT). Refer to the
Chapter 2 for related information.
Hubs in a stack can only be managed by the network management
F
agent through the FlexBus 1500 connection. In a stacked system, we
therefore recommend that you use the FlexBus 1500 ports to make BUS
OUT to BUS IN connections with a network management agent
(EtherHub-16mi
You can also cascade hubs using the daisy-chain port (Port 16).
However, Hubs cascaded using the daisy-chain port cannot be managed
by the management agent. See
+
) or any EtherHub 1500 series hubs.
2. Cascade hubs using the daisy-chain port (Port 16). RJ-45
port 16 can be converted into a daisy-chain port using the
daisy-chain switch. To daisy chain, slide the daisy-chain
switch to the right (
), and plug one end of an STP or UTP
cable to Port 16 and the other end to any RJ-45 port of a
compatible hub. (However, you must not plug both ends to a
daisy-chain port.) Using this type of connection, you can
cascade up to 4 hubs.
FlexBus 1500 section in
Step 2
for details.
I
Do not plug in a phone jack connector to the RJ-45 port. This may
damage the hub. Instead, use only shielded or unshielded twistedpair cables with RJ-45 connectors that conform with FCC standards.
Hardware Installation 3-5
Page 42

EtherHub 1500 System User’s Guide
3. Connect the hub to an Ethernet trunk, if necessary. (Applies
only to hubs with a slide-in module transceiver installed in
the ALT PORT.)
For the default slide-in module, plug the BNC T-type
connector into the BNC port of the hub, and use this port to
connect the device to the RG-58A/U thin Ethernet trunk. If
the unit is at the terminal end of a trunk segment, connect a
50-ohm (
Ω) terminator to the open end of the "T" connector.
If the Ethernet BNC trunk port has no connection, plug in the
BNC T-type connector and lock both ends with a 50-ohm (
terminator.
4. Connect workstations to the hub.
Prepare the workstations you wish to network. Make sure
they have properly installed 10BASE-T network interface
cards, or external 10BASE-T transceivers.
Prepare STP or UTP cables with RJ-45 plugs at both ends.
The length of each cable should not exceed 100 meters.
Connect one end of the cable to the RJ-45 port of the PC’s
network interface card. Connect the other end to an
available station port on the hub.
Ω)
5. Install the power cord and power on the hub.
Plug the power cord into the power socket at the rear of the
hub. Then connect one end of the cord to an electric outlet.
Power on the hub by pressing the power switch to ON.
Check the LED indicator marked PWR/CPU on the front
panel. It should be ON.
The hub will perform a diagnostic test upon power on. Refer
to the section on
Diagnostic Test LED Indicators in Chapter 2 for
more information.
3-6 Hardware Installation
Page 43

EtherHub 1500 System User’s Guide
The unit will automatically select the setting that matches the
input voltage connected. Therefore, no additional
adjustments are necessary when connecting it to any input
voltage within the range marked on the rear panel.
The unit supports a "hot remove" feature which permits you to
F
connect/disconnect cables without powering off the hub and
without disrupting the operation of the hubs in stack.
Preparing for System Configuration
If you are installing the EtherHub-16mi+, prepare it for out-ofband management, if necessary.
Local Out-of-Band Configuration
If you use a local PC to configure the EtherHub 1500, connect
the converter for the PC’s COM port (COM1, COM2, COM3
or COM4) to the converter for the EtherHub-16mi’s serial port
(RS232) using the UTP cable with DB9 connectors at both ends provided as part of the Product Package.
FlexBus 1500
IN OUT
DB9 to RJ-45
Connector
SERIAL PORT
This device com
eration i s sub
O
1
This device ma
2
This device must acce
includin
to Hub
lies with Part 15 of the FCC
ect to the followin
not cause harmful
t an
interference that ma
two
interference
cause
ALT PORT
90-260 VAC
47 -63Hz 1A
ON
OFF
PC
to PC
DB9 to RJ-45
Connector
Figure 3.3 Connecting the Hub’s RS232 Serial Port to a PC C OM Por t
Hardware Installation 3-7
Page 44

EtherHub 1500 System User’s Guide
Remote Out-of-Band Configuration
If you use a remote PC to configure the EtherHub 1500 via
modem connections, at the remote site make sure the modem’s
baud rate is 9600 and that the AT command is supported.
EtherHub 1500 Site
Connect the DB9 to RJ45 converter for the EtherHub-16mi’s
serial port (RS232), and a DB25 to RJ45 converter for the
modem’s serial port (RS232) using the UTP cable provided.
You do not have to set the modem, because the EtherHub-16mi
will automatically configure it to auto-answer mode.
The DB9 to RJ-45 and DB25 to RJ-45 converter connectors come
F
with this package.
+
ALT PORT
9-PIN
to hub
black color
Make sure the
F
modem’s baud
rate is set to 9600.
FLEX -BUS 1500
OUT IN
SERIAL PORT
Figure 3.4 Connecting the Hub’s RS232 Serial Port to a Modem
Remote Site
At the PC site, connect the PC’s COM port (COM1, COM2,
COM3 or COM4) to the modem’s serial port (RS232) using the
UTP cable.
3-8 Hardware Installation
Modem
to modem
gray color
Page 45

EtherHub 1500 System User’s Guide
Modem
FLEX-BUS 1500
IN OUT
SERIAL PORT
9-PIN
black color
PSTN
ALT PORT
to Hub
Modem
to Modem
gray color
PC
Figure 3.5 Connecting the Remote PC’s RS232 Serial Por t t o a Modem
Running the Out-of-Band Configuration Program
Run Accton’s EtherHub 1500 System Configuration Program.
See the section on
Program
in Chapter 4 for more information.
Accton’s EtherHub 1500 System Configuration
Hardware Installation 3-9
Page 46

EtherHub 1500 System User’s Guide
In-Band Configuration
If you use AccView/Open or other network management
software to configure the EtherHub 1500, then set up your inband Network Management Station.
The in-band network management station is the personal
computer used to run your network management software. It
should be connected to any available RJ-45 port of the stacked
system and on the same segment as the SNMP management
agent.
Accton’s EtherHub 1500 System has Windows-based network
management software called AccView/Open. Any PC running
the AccView/Open program can serve as your in-band network
management station. Inquire with your Accton dealer on how
to acquire this package. Also note that the AccView/Open
EtherHub Manager can be integrated into third-party
management platforms as described in Chapter 1.
After hardware installation, you can also configure the hub using the
F
Configure button. For the EtherHub-16mi
Accton’s in-band network management software (AccView/Open) or
the out-of-band program. Proceed to
Installing an SNMP Backup Agent
If you are performing first time installation, just connect two
Agents and let the system automatically choose the Master
agent and the Slave agent.
If you are adding a slave agent to an existing system, peform
the following steps:
1. Before connecting to the system, set the target SNMP agent
to Slave mode using the Configure button. Be sure the
PWR/CPU LED is ON (i.e., blinking).
3-10 Hardware Installation
+
, we recommend using
Chapter 4
for details.
Page 47

EtherHub 1500 System User’s Guide
2. Turn it off again before exceeding 30 seconds to prevent it
from returning to a Master mode.
3. Add the newly configured Slave agent to the Hub stack using
the FlexBus 1500 cable.
4. Turn the Slave agent on again. The new agent will start to
function as a backup to the SNMP system.
Hardware Installation 3-11
Page 48

System Setup
Chapter 4: Setup and Configuration
Diagnostic Tests
Upon Power On
Upon power on, the system performs an internal self-diagnostic
test of major hub components. If any component fails during
the test, the hub will try to complete the diagnostic procedure.
Otherwise, the system will hang. For related information, refer
Diagnostic Test LED Indicators in Chapter 2.
to
The following table shows the components to be tested.
Test Function/Component
EtherHub-16i
CPU CPU
ROM Flash ROM 1
RAM SRAM
Serial communication controller LAN controller initialization
Hub control 1 LAN controller ID address
Hub control 2 LAN controller loop back test
Timer LAN controller INT
+
Hub controller 1
Hub controller 2
Stack management bus
Serial port RS232 controller
EEPROM
Flash ROM 2
EtherHub-16mi
+
4-1
Page 49

EtherHub 1500 System User’s Guide
During Normal Operation
You can use the Configure button any time you want the
system to perform a diagnostic test. However, when testing
begins, the system leaves normal operation. If no problem is
encountered by diagnostics, the system automatically returns to
normal operation.
Multi-Segment Architecture
The EtherHub 1500 system supports multi-segment
configuration through the FlexBus 1500 cabling. Three
Ethernet segments are embedded in the hub’s FlexBus 1500 port
providing 3 isolated segments (i.e., separate collision domains).
You can choose to attach a hub to a segment, or to leave it
isolated except for the management channel. Nodes attached to
a specific segment (e.g., Segment 1) can only communicate
with nodes attached to the same segment. This type of
architecture makes the system more flexible, provides better
traffic load sharing and data protection, and improves network
bandwidth utilization.
Note that the EtherHub-16mi+ cannot be physically isolated.
F
To make this architecture work for your system, plan your
network setup well. Form a common domain for devices that
need to communicate with each other by attaching them to the
same segment. This way you can arrange network resources to
balance traffic and thereby increase overall network efficiency.
To combine the segments into an interconnected network (while at
the same time retaining the higher effective bandwidth and
segment integrity provided by the multi-segment architecture),
attach each segment to a bridge or similar interconnection device,
such as Accton’s Secure Backbone Hub (EtherHub-SBH) or the
Smart Ethernet Switching Hub (SwitcHub-8s).
4-2 Setup and Configuration
Page 50

EtherHub 1500 System User’s Guide
FlexBus 1500 Management Link
The management link in a chain of cascaded hubs must be
connected to manage the stack as a single unit. This means that
only hubs connected using the FlexBus 1500 can be controlled by
an SNMP management agent. At most, 10 hubs can be managed
and linked together using the FlexBus 1500 connection.
Hub ID Setting
In a stacked system, each hub should have a unique ID number to
identify itself. The EtherHub-16i
+
automatically sets its Hub ID
if attached to an SNMP management agent (EtherHub-16mi
through the FlexBus 1500 port. However, for this automatic
function to work, the Hub ID Setting before connecting to the
agent should be set to the factory default (i.e., automatic hub
ID generation; where all Hub ID LEDs are blinking). When
the stack includes a EtherHub-16mi
+
, you can also select hub IDs
using the EtherHub 1500 System Configuration Program via outof-band or with AccView/Open via in-band communication.
Refer to Hub ID Setting in this chapter for more information.
F
If the Hub ID of EtherHub-16mi+ is set to factory default (i.e, 0000), it will
automatically set/change this ID number to 1 when used in a stand-alone
configuration.
SNMP Backup Agent
The EtherHub 1500 system supports a management agent
backup function. This special function allows the hub stack
system to have two SNMP network management agent devices,
wherein one agent is configured as a Master agent and the other
as a Slave (Backup) agent. Normally, the agent in slave mode
behaves as an EtherHub-16i
+
, but if the Master agent fails, the
Slave agent takes over its functions. The data stored in the
+
)
Setup and Configuration 4-3
Page 51

EtherHub 1500 System User’s Guide
Slave agent will be replaced by the Master agent’s data. As a
result, the Slave agent will assume the Master’s IP address when
taking over the system. To manage the stack using the out-ofband control program after the Slave has assumed control, plug
your PC or modem into the DTE port of the Backup agent.
In a redundant hub stack system, only two SNMP agents are
allowed, one as a Master agent and the other as a Slave agent.
The Master agent’s PWR/CPU LED remains steady, while the
Slave agent’s PWR/CPU LED flashes at a regular beat. Placing
two Master agents in the same stack will cause contention,
resulting in either one reverting to a Slave agent automatically.
Care should be taken if this condition arises, as the system will
become unstable and management data may be lost.
For instructions on how to install a Slave agent, refer to
an
SNMP Backup Agent in Chapter 3. For instructions on how to
Installing
set the Master or Slave agent using the out-o f- band management
program or the
Configure button, refer to the Configuration
section later in this chapter.
Port Backup Function
The EtherHub 1500 system supports a port backup function
(i.e., a redundancy link). A hub system can have up to 3 pairs
of redundant links. These links are configurable using the inband or out-of-band management program. When a primary
link fails, the secondary link (backup) automatically takes over.
Note that these links need not be physically connected to the
same device.
A redundant link pair can consist of STP to STP ports, STP to
ALT ports (via an appropriate MAU converter), or ALT to ALT
ports. This means that a STP port linked to a particular device can
have a BNC, AUI or fiber-optic port (ALT port) as backup.
4-4 Setup and Configuration
Page 52

EtherHub 1500 System User’s Guide
Hot Remove Function
The EtherHub 1500 system supports a “hot remove” capability
that allows you to connect/disconnect the EtherHub 1500 hubs
from the system without disrupting the network
Preparing for Configuration Management
There are two methods for configuring the EtherHub 1500
system - using the out-of-band program or using the Configure
button. Optional in-band network management software,
AccView/Open, may also be used to configure the system.
Contact your Accton dealer for more information on
AccView/Open.
Out-of-Band Configuration
Out-of-band configuration requires a computer as your working
platform. There are two valid connection types to the hub:
• Out-of-band onsite connection
The workstation, normally within the vicinity of the hub, is
directly connected to the serial port on the hub.
• Out-of-band modem connection
The workstation is connected to the remote EtherHub-16mi
via modems.
The physical setup and connections required for out-of-band
management are described in greater detail under
System Configuration
in Chapter 3. To open the EtherHub 1500
Preparing for
System Configuration Program, do the following:
1. Insert the distribution diskette provided with your hub into
the PC's floppy drive.
Setup and Configuration 4-5
+
Page 53

To activate a selection press the
keyboard character corresponding to
the highlighted character on screen.
Or, use the arrow keys to move to the
selection and press [Enter].
EtherHub 1500 System User’s Guide
Activate the EtherHub 1500 System Configuration Program
from a local console or via modem connection as described
below. This will open the communication dialog box shown
Figure 4.1.
in
From a local console -
Type “
EH15SCP” at the DOS prompt C:\>EH15SCP
From a remote modem connection -
• When using a PCMCIA FAX/Modem, first add the
following entry to your
device=cardtalk.sys /A /Com3IRQ=4
config.sys file:
• If your PC has a PCMCIA Fax/Modem or multi-I/O card, set
the proper IRQ by typing “
available by entering “
EH15SCP/i [irq #]”. Help is
EH15SCP/?”.
Figure 4.1 Communication Port Dialog Box
3. Using arrow keys, select the workstation’s communication
port connected to the EtherHub-16mi
dialog box will appear as shown in
4-6 Setup and Configuration
+
. The DCE/DTE
Figure 4.2.
Page 54

EtherHub 1500 System User’s Guide
Figure 4.2 DCE/DTE Dialog Box
4. Select the appropriate option in the DCE/DTE dialog box:
• Terminal Channel for local hookup.
• Modem Channel for remote connection via modems.
Select Modem Channel to open the Phone List menu as
shown in
[
Enter
Figure 4.3. Enter the phone number and press
] to start the dialing mechanism.
Figure 4.3 Phone List Menu
Once the connection is established, the main menu for outof-band configuration appears as shown in
Figure 4.4 Main Menu
Figure 4.4
5. Select any of the displayed menu items as described in the
following section.
Setup and Configuration 4-7
Page 55

EtherHub 1500 System User’s Guide
EtherHub 1500 System Configuration Program (EtherHub-16mi
Accton provides a proprietary, user-friendly, menu driven outof-band program (EtherHub 1500 System Configuration
Program). This program allows you to configure the stack
using a PC directly attached to the RS232 port on the
management device (
connected to the RS232 port. With this program you can define
system parameters, manage and control stacked hubs and
associated ports, set threshold levels, and monitor network
conditions. The following table briefly describes the menu
selections available for this program.
Menu Description
System Provides 6 sub-menus:
Information - Defines description for the system.
Configuration - Sets system parameters.
Trap Managers - Configures Communities, IP and IPX trap managers.
Download - Downloads new version of firmware to update your system.
Restart - Restarts your system.
Factory Setting - Reverts all configuration selections to factory default settings.
Control Provides 4 sub-menus:
Hub - Isolates/attaches a hub, or sets the hub’s segment.
Port - Disables/enables a port.
Backup port - Sets up to 3 pairs of backup ports. Each pair contains a master and slave port. The
slave port is normally disabled. When master port fails, the system disables the master
port and enables the slave port to maintain the link.
Push button - Enables/disables Configure button to prevent unauthorized use.
Performance
Threshold
Help On-line help
Exit Exits the program and returns to operating system
Provides 4 sub-menus, namely, System, Segment, Hub and Port. This selection allows you to view
network performance for the selected component. Performance is measured in terms of frames received,
number of bytes, collision rate, CRC errors, alignment errors, and total errors.
Provides 5 sub-menus - System, Any Hub, Any Port, Select Hub and Select Port. This menu allows you to
set threshold levels for the hub or port in terms of frames received, number of bytes, collisions, CRC errors,
alignment errors and total errors.
Please refer to the README.TXT in the distribution diskette for any changes to this program
F
that might occur after the manual is written.
EtherHub-16mi+) or remotely, via a modem
+
only)
4-8 Setup and Configuration
Page 56

EtherHub 1500 System User’s Guide
System Menu
Information
Configuration
Displays EtherHub system information.
Modifies various parameter settings
necessary for communicating with the
management agent.
Trap Managers
Selects management stations to receive trap
messages from the system.
Download
Restart
Factory Settings
Downloads a binary file to the SNMP agent.
Resets the SNMP agent.
Reverts all configuration settings to the
original factory settings.
Displaying System Information
Use the Information command to display and modify system
information about the EtherHub stack, or for quick system
identification. View a description of the system, including:
Name Description
System Description Name and version of the EtherHub-16mi+ software
System Uptime Length of time the EtherHub management agent has been running ( i.e., EtherHub-16mi+)
System Name Name assigned to the EtherHub system
Contact Contact person for the system
Location Specifies the area or location where the system resides
Setup and Configuration 4-9
Page 57

EtherHub 1500 System User’s Guide
Changing System Configuration
Use the Configuration command from the System Menu to
modify current values for the following parameters:
Parameter Description
IP Address IP address of the agent you’re managing. The EtherHub system may be run on SNMP
protocol over UDP/IP transport protocol. In this environment, all systems on the Internet,
such as network interconnection devices and Network Management Stations (e.g., the PC
running AccView) are assigned an IP address.
MAC Address Hardware address of EtherHub-16mi
Subnet Mask Subnet mask of the agent you’ve selected. This mask identifies the host address bits used
for routing to specific subnets.
Default Gateway Default gateway used in passing trap messages from the EtherHub agent to the
management station.
Default NMS For internal use only.
NMS-Download File For internal use only.
IPX Frame Type The selected format used on the LAN; i.e., this type is that used by the IPX network where
the EtherHub-16mi
+
will automatically detect the current type. (Values: 802.3, Ethernet II, SNAP, 802.2)
16mi
IPX Network Number Identifies the IPX network number for the connected slot.
+
is installed. If the specified frame type is not detected, the EtherHub-
+
Assigning Trap Managers
Use the Trap Managers command from the System Menu to
modify current values for the following parameters:
Parameter Description
SNMP Community Names The community strings authorized for trap management access. All community strings used
for IP and IPX Trap Managers must be listed in this table.
Community Name A community entry authorized for trap management access.
Access Management access is restricted to read-only (RO) or read/write (RW).
Status The status of the current entry can be set to VALID or INVALID.
IP Trap Managers IP management stations selected to receive trap messages from the system.
IP Address IP address of the management station.
Community Name The community string required for trap management access.
Status The status of the current entry can be set to VALID or INVALID.
IPX Trap Managers IPX management stations selected to receive trap messages from the system.
Net Number Identifies the IPX network number for the connected slot.
Node ID MAC address of the authorized trap manager.
Community Name The community string required for trap management access.
Status The status of the current entry can be set to VALID or INVALID.
4-10 Setup and Configuration
Page 58

EtherHub 1500 System User’s Guide
Downloading System Software
Use the Download command from the System Menu to load
available software updates into the agent’s flash ROM. The
download file should be an EtherHub 1500 *.bin file from
Accton Technology Corporation; otherwise the agent will not
accept it.
Invoking this command brings up the Download dialog box.
When all entries are confirmed, the display will change to show
the progress of the download process. After downloading the
new software, the agent will automatically restart itself. The
following describes each entry in the dialog box:
Parameter Description
Timeout Time to wait for a response.
Retry Number of attempts to make contact.
Filename The *.bin file to download.
Transferred Block Current number of data block being transferred.
Total Blocks Total number of blocks to transfer.
Restarting the Agent
Use the Restart command from the System menu to reset a
selected agent. LEDs on the agent will light up sequentially as
it executes the initialization test.
Reverting Configuration to Factory Settings
Use the Factory Settings command from the System menu to
change all configuration settings back to the factory defaults.
Setup and Configuration 4-11
Page 59

EtherHub 1500 System User’s Guide
Control Menu
Hub
Includes hub description and commands to
isolate/reattach network connection, or
assign hub to a specified segment.
Port
Includes port description and command to
enable/disable selected port.
Backup Port
Defines master/slave port pairs used for
emergency backup.
Push Button
Enables/disables external
Configure button
on selected hub.
Configuring Hub Parameters
Use the Hub command from the Control menu to configure any
hub in the stack. (Select the required hub using the <F4> and
<F5> function keys.) This menu provides a brief description of
the selected hub, and also allows you to isolate/reattach the hub
from the network.
Parameter Description
Hub ID Hub identifier within the stack. (Up to 10 hubs may be connected via the management channel.)
Note that hub IDs can only be assigned using the Configure button as described later in this chapter.
Position The physical position in the stack.
Name Any user-defined name for the selected hub.
Status
Segment
Type Indicates hub type as EH1501s, or EH1502s (Master or Slave).
Firmware Ver. Indicates the current firmware version number.
The stack connection may be set to ISOLATED or ATTACHED. Note that the Isolated LED will be lit
if the hub is isolated. (Although the status of OTHER is provided, this is for internal use only.)
Attach the hub to a specified segment. The appropriate Segment icon will light up to show that the
hub has been connected.
4-12 Setup and Configuration
Page 60

EtherHub 1500 System User’s Guide
Configuring Port Parameters
Use the Port command from the Control menu to configure the
ports for any hub in the stack. (Select the required hub using
the <F4> and <F5> function keys.) This menu provides a brief
description of the selected hub, and also allows you to
enable/disable any port in the selected hub.
Parameter Description
Hub ID Hub identifier within the stack.
Position The physical position in the stack.
Port Identifier
Name User-defined name for selected port.
Type Connection types include 10BASE-T (RJ-45), BNC, AUI or FIBER.
Status Any port may ENABLED or DISABLED.
Part Indicates if the port is partitioned.
Link State Indicates if the port has a valid connection to an external device.
Numeric identifier 1~16 or ALT.
Defining Backup Ports
Use the Backup Port command in the Control Menu to define
up to three master/slave port pairs. If the connection to the
master port fails, the slave port will automatically take over.
Parameter Description
Backup Set Defines up to three backup port pairs; each of which can be set to ACTIVE or INACTIVE.
Master Port Pair member serving as the primary link.
Hub Hub ID for the master port.
Port Port identifier for the master port.
Slave Port Pair member serving as the backup link.
Hub Hub ID for the slave port.
Port Port identifier for the slave port.
Setup and Configuration 4-13
Page 61

EtherHub 1500 System User’s Guide
Variable
Description
1
Frames
Number of frames passing through this device.
Bytes
Number of bytes passing through this device.
Collisions
Number of simultaneous node transmissions detected by this device.
Allignment Errors
Number of mis-synchronized data packets detected by this device.
CRC Errors
Number of Ethernet Cyclic Redundancy Code errors detected by this device.
Total Errors
Total number of errors, including FCS, allignment, FramesTooLong, ShortEvents, LateEvents,
Jabber, and DataRateMismatches detected on this device.
Setting the External Configure Buttons
Use the Push Button command in the Control Menu to disable
or enable the Configure button on any hub.
Performance Menu
Displays statistics for the System (entire stack), selected
Segment, selected Hub, or all Ports on a specified hub. (Select
any segment or hub using the <F4> and <F5> function keys.)
1 - The values displayed have been accumulated since the last system reboot or counter reset.
Threshold Menu
Select the Threshold command from the menu bar to define
limits for the parameters monitored by the hub system. Limits
can be set for the System (entire stack), Any H
a Select Hub or Select Port. Variables to monitor include
frames, bytes, collisions, frame allignment errors, CRC errors
or total errors. High and low watermarks may be set. While
the trigger action includes warning, warning and isolate (for
hubs), or warning and disable (for ports). When any threshold
is exceeded, the agent will issue an alarm to the network
management station based on the selected action.
4-14 Setup and Configuration
ub or Any Port, or
Page 62

EtherHub 1500 System User’s Guide
Parameter
Description
Frame
The total number of frames.
Bytes
The total number of bytes.
Collisions
Multiple packets transmitted over a medium at the same time, making them unintelligible.
Alignments
Frame alignment errors occur when the received frame is a multiple of 8 bits.
CRCsThis error occurs when the cyclic redundancy code for a frame is wrong.
(The cyclic redundancy code an error-checking algorithm used to indicate frame reception errors.)
Total Errors
The total number of collisions, frame alignment errors and CRC errors.
To set thresholds,
1. Open the Threshold dialog box from the menu bar.
2. Select the system component (Type: System, Any Hub, Any
Port, Select Hub, Select Port). If you choose Select Hub or
Select Port, then choose the Hub ID or Port ID using the
<F2> function key.
3. Select the variable to monitor (Variable: Frames, Bytes,
Collisions, Allignments, CRCs or Total Errors). If you
choose Select Hub or Select Port, then choose the variable
Type using the <F2> function key.
4. Input a decimal value for the low and high watermarks.
5. Select the appropriate action (Action: INACTIVE,
WARNING, WARNING & ISOLATE for hubs, or
WARNING & DISABLE for ports).
6. Implement your settings by pressing the <F3> function key.
Available Threshold Parameters for Hubs and Ports
T: triggered N: not triggered
N
T
H
L
Event Activation
T
After initial event activation (i.e., crossing the high watermark),
the monitored variable must reach the low watermark before
another event is activated (i.e., again crossing the high watermark).
Notes about the hub and port threshold parameters,
• The rate for all values is per one second.
• Threshold entries are stored in the agent.
Setup and Configuration 4-15
Page 63

EtherHub 1500 System User’s Guide
Using the Configure Button
Depending on the model you purchased, there are 5 (EtherHub-
+
) or 6 (EtherHub-16mi+) configuration functions accessed in
16i
sequence using the Configure button, including:
• Segment Setting
• Hub ID Setting
• Master Agent Setting (EtherHub-16mi
• Demo Function
• Diagnostic Function
• Reset Function.
A "long press" on the button allows you to switch from one
function to the next. While a "short press" switches between
selections within each function. LED indicators light up to
indicate which configuration function the system is in.
To avoid unauthorized configuration changes, you may disable the
F
Configure
AccView in-band network management program.
button via the out-of-band configuration program or via the
+
only)
Before using the Configure button, remember that:
• A "long press" means pressing the
more than 2 seconds and then releasing the button. While a
"short press" means pressing the
immediately releasing it.
• A "long press" has 2 functions. (1) It works like an [Enter]
key implementing the last selection displayed by the LED
indicators for the current function. (2) It brings the system to
the next configuration function.
4-16 Setup and Configuration
Configure button for
Configure button and
Page 64

EtherHub 1500 System User’s Guide
• A "short press" is used to switch between the selections
available within each function. For example, in Segment
Setting, there are 4 selections available. By using a "short
press" on the
Configure button, you can move from one
selection (e.g., Attach hub to Segment 1) to the next (e.g.,
Attach hub to Segment 2). Note, however, that a selection will
only take effect after a "long press" on the
Configure button.
• If the button is not pressed within 10 seconds, the system
returns to normal operation effecting all changes made prior
to selecting the current function.
To summarize,
1. Access configuration functions by using a "long press".
LEDs light up to indicate the current configuration function.
(Example: Hub ID LEDs will display a combination of
BLINKING/OFF lights to indicate that the system is in Hub
ID Setting mode.)
2. Compare the LED display you see on the hub’s front panel
with the appropriate LED display in the succeeding pages.
Each LED display corresponds to a selection within a
function. (Example: If the system is in Segment Setting
function, see the LED display table under
Function
in this chapter).
Segment Setting
3. If you want to implement the selection displayed for your hub,
proceed to step 4. Otherwise, move to the next selection
using a "short press". Repeat a "short press" until you find
the selection you want.
4. To implement your selection and continue on to the next
function, use a "long press".
Setup and Configuration 4-17
Page 65

EtherHub 1500 System User’s Guide
Selections Available
This section shows the selections available for each function
and the corresponding LED display. The functions are listed
here in sequence.
Segment Setting
Active LEDs: Segment LEDs
Attach the hub to one segment.
Segment LED 1 Segment LED 2 Segment LED 3 Segment Number Selection
Blinking OFF OFF Attach hub to Segment 1 (DEFAULT)
OFF Blinking OFF Attach hub to Segment 2
OFF OFF Blinking Attach hub to Segment 3
Blinking Blinking Blinking Isolated from all segments*
Note: When the Isolated indicator on the front panel is lit, the segment indicators reflect the previous setting and should be ignored.
Hub ID Setting
Active LEDs: Hub ID LEDs
After setting the segment, the system enters the Hub ID function.
For initial configuration, the Hub ID LEDs will all be blinking
(automatic Hub ID Setting). Otherwise, you will see a combination
of blinking and OFF LEDs. Refer to the following table for the hub
ID Number and its corresponding LED display.
Hub ID LED 1 Hub ID LED 2 Hub ID LED 4 Hub ID LED 8 Hub ID Number Selection
BLINKING BLINKING BLINKING BLINKING Automatic Hub ID setting (DEFAULT).
BLINKING OFF OFF OFF Hub ID 1
OFF BLINKING OFF OFF Hub ID 2
BLINKING BLINKING OFF OFF Hub ID 3
OFF OFF BLINKING OFF Hub ID 4
BLINKING OFF BLINKING OFF Hub ID 5
OFF BLINKING BLINKING OFF Hub ID 6
OFF BLINKING BLINKING OFF Hub ID 6
BLINKING BLINKING BLINKING OFF Hub ID 7
OFF OFF OFF BLINKING Hub ID 8
BLINKING OFF OFF BLINKING Hub ID 9
OFF BLINKING OFF BLINKING Hub ID 10
Note: When the EtherHub-16mi+ is in a stand-alone configuration, the Automatic Hub ID function will set it to Hub ID 1.
4-18 Setup and Configuration
Page 66

EtherHub 1500 System User’s Guide
Master Agent Setting (EtherHub-16mi+ only)
Active LEDs: PARTITION/DISABLE LED 1
LINK/TRAFFIC LED 1 (labeled Master )
You can set the hub as a Master (main) or Slave (backup) agent.
If the Master agent fails, the Slave agent takes over its
functions.
LED Activity Selection
LINK/TRAFFIC LED 1 BLINKING Set hub as Master Agent
PARTITION/DISABLE LED 1 BLINKING Set hub as Slave Agent
For EtherHub-16i+ users, proceed to the next function (Demo).
F
Demo function
Active LEDs: PARTITION/DISABLE LED 1 (EtherHub-16i+)
PARTITION/DISABLE LED 2 (EtherHub-16mi
LINK/TRAFFIC LED (labeled Demo)
Enabling the Demo function will light up all LEDs one at a
time. The LED display will continue until the Demo function is
disabled using the Configure button (PARTITION/DISABLE
LED is OFF).
+
)
LED Activity Selection
LINK/TRAFFIC LED 1 or 2 BLINKING Enable Demo function
PARTITION/DISABLE LED 1 or 2 BLINKING Disable Demo function
Setup and Configuration 4-19
Page 67

EtherHub 1500 System User’s Guide
LINK/TRAFFIC LED 2 or 3
BLINKING
Enable Diagnostic function
PARTITION/DISABLE LED 2 or 3
BLINKING
Stop Diagnostic function
LED
Activity
Selection
LINK/TRAFFIC LED 3 or 4
BLINKING
Enable Reset function
PARTITION/DISABLE LED 3 or 4
BLINKING
Stop Reset function
Diagnostic function
Active LEDs: PARTITION/DISABLE LED 2(EtherHub-16i+)
PARTITION/DISABLE LED 3 (EtherHub-16mi
LINK/TRAFFIC LED(labeled Diag)
Enabling the Diagnostic function will activate diagnostic tests
similar to the one performed upon power on. For diagnostic test
details, refer to the section on
Diagnostic Tests earlier in this chapter.
After succesfully completing Diagnostics, the system returns to
normal operation.
LED Activity Selection
Reset function
Active LEDs: PARTITION/DISABLE LED 3 (EtherHub-16i+)
PARTITION/DISABLE LED 4 (EtherHub-16mi
LINK/TRAFFIC LED (labeled Reset)
Activating the Reset function will revert all selections (made
using the Configure button or by management software) to factory
default settings. To avoid unintentionally resetting the hub, after
you enable the Reset function using standard procedures, use short
presses on the Configure button to light LINK/TRAFFIC LED 15
and then use a long press to confirm your action.
+
)
+
)
4-20 Setup and Configuration
F
I
There are some selections made during configuration or system
management which remain in memory even if the hub is powered off and
on. For example, a port disabled using SNMP management software
(e.g., AccView/Open) will remain disabled even if the hub is powered off
and then on. It can only be enabled by using the management software
or resetting the hub.
Be careful in using the Reset function. Otherwise, you might erase all
the configuration settings you have made.
Page 68

Chapter 5: Applications
The EtherHub 1500 series stackable hubs are designed to
provide network installers flexibility in configuring their
network connections. A hub can be used as a simple standalone hub or connected with other hubs using various
configurations. This chapter includes network applications
using the multi-segment architecture.
Attaching Stack to One Segment
You can attach all hubs in a stacked system to the same
segment. In this example, a stacked system using the FlexBus
1500 port connection is connected to segment 1.
SEGMENT 1
SEGMENT 1
SEGMENT 1
SEGMENT 1
SEGMENT 1
SEGMENT 1
SEGMENT 1
SEGMENT 1
ID1
ID2
ID3
ID4
ID5
ID6
ID7
ID8
EtherHub1500
EtherHub1500 HUB
EtherHub1500 HUB
EtherHub1500 HUB
EtherHub1500 HUB
EtherHub1500 HUB
EtherHub1500 HUB
EtherHub1500 HUB
MANAGEMENT
FlexBus 1500
Figure 5.1 Attaching All Hubs in Stack to One Segment
5-1
Page 69

EtherHub 1500 System User’s Guide
Attaching Stack to Three Segments
This example shows 3 independent Ethernet LANs in a stacked
system. Hubs 1, 2 and 3 are attached to segment 2, while hubs
4 to 7 are attached to segment 1, and hubs 8 to 10 are attached
to segment 3.
EtherHub1500 AGENT
SEGMENT 2
SEGMENT 2
SEGMENT 2
SEGMENT 1
SEGMENT 1
SEGMENT 1
SEGMENT 1
SEGMENT 3
SEGMENT 3
SEGMENT 3
ID 1
ID 2
ID 3
ID 4
ID 5
ID 6
ID 7
ID 8
ID 9
ID 10
EtherHub1500 HUB
EtherHub1500 HUB
EtherHub1500 HUB
EtherHub1500 HUB
EtherHub1500 HUB
EtherHub1500 HUB
EtherHub1500 HUB
EtherHub1500 HUB
EtherHub1500 HUB
MANAGEMENT
SEG. LINK 1
SEG. LINK 2
SEG. LINK 3
Figure 5.2 Attaching Hubs in Stack to 3 Segments
5-2 Applications
FlexBus 1500
Page 70

EtherHub 1500 System User’s Guide
Attaching Stack to Multiple Segments
You can interconnect the hubs in a stack using a multi-segment
configuration. In a stacked system, some hubs may be
connected to a segment while others are isolated (not attached
to a segment). In this example, hubs 1 and 2 are attached to
segment 2, hubs 3 to 5 are attached to segment 1, and hubs 6 to
8 are attached to segment 3. However, hubs 9 and 10 are not
connected to any segment. These hubs form isolated segments.
SEGMENT 2
SEGMENT 2
SEGMENT 1
SEGMENT 1
SEGMENT 1
SEGMENT 3
SEGMENT 3
SEGMENT 3
ISOLATED
ISOLATED
ID 1
ID 2
ID 3
ID 4
ID 5
ID 6
ID 7
ID 8
ID 9
ID 10
EtherHub1500 AGENT
EtherHub1500 HUB
EtherHub1500 HUB
EtherHub1500 HUB
EtherHub1500 HUB
EtherHub1500 HUB
EtherHub1500 HUB
EtherHub1500 HUB
EtherHub1500
EtherHub1500
FlexBus 1500
MANAGEMENT
CHANNEL
SEG. LINK 1
SEG. LINK 2
SEG. LINK 3
Figure 5.3 Linking Part of the Stacked Hubs to a Segment
Applications 5-3
Page 71

EtherHub 1500 System User’s Guide
Each Hub is Isolated
In this example, each hub in the stack is an independent
segment (isolated). Hubs 2 to 10 are not connected to any of
the 3 segments embedded in the FlexBus 1500 cabling; while
the EtherHub-16mi
to Segment 1, is functionally isolated.
+
(EtherHub 1500 Agent), though attached
F
Se
ment 1
ID 1
ID 2
ID 3
ID 4
ID 5
ID 6
ID 7
ID 8
ID 9
ID 1 0
EtherHub1500 AGENT
EtherHub1500 HUB
EtherHub1500 HUB
EtherHub1500 HUB
EtherHub1500 HUB
EtherHub1500 HUB
EtherHub1500 HUB
EtherHub1500 HUB
EtherHub1500 HUB
EtherHub1500 HUB
FlexBus 1500
MANAGEMENT
CHANNEL
SEG. LINK 1
SEG. LINK 2
SEG. LINK 3
Figure 5.4 Stacked Hubs Not Linked to a Segment
The EtherHub-16mi+ is designed to be attached to one of the 3
segments. In this example, the EtherHub-16mi
isolated though attached to a segment. Traffic in each segment is
restricted to that segment and cannot pass to another segment
without a device such as Accton’s Secure Backbone Hub (EtherHubSBH) or Smart Ethernet Switching Hub (SwitcHub-8s) to link them.
+
is functionally
5-4 Applications
Page 72

EtherHub 1500 System User’s Guide
Extending the Network with STP/BNC Connections
Extend your network by connecting any of the hubs in a stacked
system to other compatible hubs using the STP and/or ALT port
connections. In the diagram below, a stand-alone hub is
connected to hub 5 in the stacked system using the STP
connection. The other stand-alone hub is connected to hub 8 in
the stacked system using a BNC connection. However, the
EtherHub 1500 Agent can only manage hubs connected to it
through the FlexBus 1500 connection.
ID 1
ID 2
ID 3
ID 4
ID 5
ID 6
ID 7
ID 8
ID 9
ID 10
BNC port
EtherHub1500 HUB
EtherHub1500 HUB
EtherHub1500 HUB
EtherHub1500 HUB
EtherHub1500 HUB
EtherHub1500 HUB
EtherHub1500 HUB
EtherHub1500 HUB
EtherHub1500 HUB
FlexBus 1500
Segment 1
EtherHub1500
Segment 3
EtherHub1500
SEGMENT 2
SEGMENT 2
SEGMENT 1
SEGMENT 1
SEGMENT 1
SEGMENT 3
SEGMENT 3
SEGMENT 3
Figure 5.5 Linking Stacked Hubs to Unmanaged Hubs
with STP Port Connection
MANAGEMENT
CHANNEL
SEG. LINK 1
SEG. LINK 2
SEG. LINK 3
Applications 5-5
Page 73

EtherHub 1500 System User’s Guide
Linking a Stack to a Network Management Station
In a stacked system, connect the in-band management workstation
to the same segment that the management agent is attached to. In
this example, the management agent is attached to segment 1.
Thus, the in-band management workstation (e.g., running
AccView/Open) should also be connected to segment 1.
EtherHub 1500 AGENT
EtherHub1500 HUB
EtherHub1500 HUB
EtherHub1500 HUB
EtherHub1500 HUB
EtherHub1500 HUB
EtherHub1500 HUB
EtherHub1500 HUB
ACCVIEW
AccView Station
(Segment 1)
SEGMENT 1
SEGMENT 3
SEGMENT 2
SEGMENT 3
SEGMENT 1
SEGMENT 1
SEGMENT 2
SEGMENT 3
MANAGEMENT
CHANNEL
SEG. LINK 1
SEG. LINK 2
SEG. LINK 3
Figure 5.6 Linking Stacked Hubs to a Network Management Station
5-6 Applications
Page 74

EtherHub 1500 System User’s Guide
Interconnecting Segments
The 3 segments within a stacked system can be combined into an
interconnected network using Accton’s EtherHub-SBH. Connect
the EtherHub-SBH to the hub management agent as illustrated
below.
SEGMENT 1
ETHERHUB1500 AGENT
ETHERHUB1500 HUB
ETHERHUB1500 HUB
ETHERHUB1500 HUB
ETHERHUB1500 HUB
ETHERHUB1500 HUB
ETHERHUB1500 HUB
ETHERHUB1500 HUB
SEGMENT 2
ACCVIEW
SEGMENT 1
SEGMENT 2
SEGMENT 2
SEGMENT 3
SEGMENT 1
SEGMENT 2
SEGMENT 3
Figure 5.7 Linking Segments in a Stacked System
EtherHub-SBH
Applications 5-7
Page 75

EtherHub 1500 System User’s Guide
Linking a Distributed Segment
Hubs installed at various locations can be managed by a single
EtherHub 1500 Agent when they are connected to the Agent via
a FlexBus 1500 port connection. Hubs can be connected to a
single-segment domain (i.e., one segment common to all hubs
controlled by the management agent) or can remain isolated.
The maximum segment length using FlexBus 1500 cabling
linking the distributed hubs is 100 meters.
Sin
le Se
ment Confi
uration
SEGMENT 1
ETHERHUB1500 AGENT
SEGMENT 1
SEGMENT 1
SEGMENT 1
SEGMENT 1
SEGMENT 1
SEGMENT 1
SEGMENT 1
ETHERHUB1500 HUB
ETHERHUB1500 HUB
ETHERHUB1500 HUB
ETHERHUB1500 HUB
ETHERHUB1500 HUB
ETHERHUB1500 HUB
ETHERHUB1500 HUB
FlexBus 1500
Figure 5.8 Linking a Distributed Segment
100m
max.
u
to 100m for a sin
ment environment
se
le
5-8 Applications
Page 76

EtherHub 1500 System User’s Guide
Linking Distributed Segments
Hubs installed at various sites can be managed by a single
EtherHub 1500 Agent when they are connected to the Agent via
the FlexBus 1500 port connection. However, all hubs must be
connected to the same segment at the central site. The segment
setting for hubs at all other sites must be set to isolated. (Refer to
Segment Setting function in Chapter 4.) Hubs within the remote
the
stacks can remain isolated or be connected to hubs within the
same location using the STP daisy-chain or the ALT PORT
connection. The maximum segment length using FlexBus 1500
cabling linking the distributed hubs is 100 meters.
Di
trit M
lti-mnt Envirnmnt
ment 1
Se
Se
ment 1
ment 1
Se
Se
ment 1
Se
ment 1
ACCVIEW
AccView S tation
Segment y
Segment y
Segment y
Connected b
Coax Cable
nrl
i
EtherHub1500 AGENT
EtherHub1500 HUB
EtherHub1500 HUB
EtherHub1500 HUB
EtherHub1500 HUB
Rm i #2
EtherHub1500 HUB
EtherHub1500 HUB
EtherHub1500 HUB
~
~
~
FlexBus1500
EtherHub1500
~
EtherHub1500
U
to 100m
by a single SNMP agent
mana
Se
ment x
Se
ment x
ed
Figure 5.9 Linking Distributed Multi-Segments
Applications 5-9
Page 77

Appendix A: Product Specifications
Features
Expansion Up to 10 modules (170 station ports)
Expansion Interface FlexBus 1500 cable
Segmentation Supports 3 or more segments in a stack
Fault Tolerance Hot swappable modules; backup SNMP agent
Physical Characteristics
Station Ports 16 10BASE-T (RJ-45)
Backbone Port Optional
Serial Port Out-of-band management
System Power 100V - 260V AC (±10%), 50- 60 Hz (±3 Hz)
Temperature 0° to 50° C (Standard Operating)
Humidity 5% to 95% (Noncondensing)
Dimensions 440mm x 171mm x 43mm
Microprocessor 8031 (EtherHub-16i
Configuration Automatic hub-ID and bus termination;
SmartWatch™ Comprehensive array of 58 LEDs including
and redundant port link (for EtherHub-16mi
(17.32” x 6.73” x 1.69”)
front panel configuration
network utilization, collision rate, link/traffic,
partitions/disable, 4 module IDs, 3 segments,
power/CPU, interhub, serial port, alert, SNMP
or monitor, terminator, jabber
+
); 80188 (EtherHub-16mi+)
+
)
A-1
Page 78

EtherHub 1500 System User’s Guide
Specifications for FlexBus 1500 Cable
The FlexBus 1500 is a category 5 STP cable used to connect
stacked EH1500+ or compatible hubs. It supports segment
configuration setup and management functions for EH1500+
or compatible hubs. Its specifications are listed below:
Cable performance level high-performance data grade
conductor 8-wire, 4-pair,
insulation polyolefin
shield overall aluminum foil
jacket PVC
operating frequency 100 MHz Max
impedance 102 ± 15% Ohms
attenuation 5.5 dB/1,000 ft
Plug 8-wire shielded modular plug for stranded twisted-pair cable
No special tools are required to install the FlexBus 1500 cable.
These cables are terminated on the plugs in advance.
24 AWG stranded bare copper
Tables A-1 and A-2 list the attenuation and near-end crosstalk
(NEXT) loss v.s. reference frequency. Attenuation is derived
from swept frequency signal level measurements at the output
of 305m (1000 ft) of cable. The maximum attenuation for any
pair shall be less than the values given in Table A-1 for the
frequency range of 0.772 MHz to the highest referenced
frequency.
Near-end crosstalk (NEXT) is derived from swept frequency
measurements using a network analyzer or an s-parameter test
set. A balanced signal is applied to a pair that causes disturbance
while the crosstalk signal is measured at the output port of the
pair being disturbed at the near end of the cable.
A-2 Product Specifications
Page 79

EtherHub 1500 System User’s Guide
Attenuation for Horzontal FlexBus 1500 Cable
Maximum Attenuation in dB for 305m (1000ft) of cable @ 20°C
Frequency (MHz) db
0.064 2.2
0.256 3.2
0.512 4.5
0.772 5.5
1 6.3
413
818
10 20
16 25
20 28
25 32
31.25 36
62.5 52
100 67
Table A-1
NEXT for Horizontal FlexBus 1500 Cable
Worst Pair NEXT Loss in dB @ 305m (1000ft)
Frequency (MHz) db
0.064 2.2
0.256 3.2
0.512 4.5
0.772 5.5
1 6.3
413
818
10 20
16 25
20 28
25 32
31.25 36
62.5 52
100 67
Table A-2
Product Specifications A-3
Page 80

EtherHub 1500 System User’s Guide
Standards Compliance
Standards Ethernet-IEEE 802.3 Repeater Standard and
Safety UL 1950 USA
Electromagnetic Emissions FCC Class A
Environmental Vibration IEC 68-2-34
Repeater Management Standard
CSA 22.2-950 Canada
TÜV/GS/EN60950 Germany
IEC 950 International
Electrostatic IEC 801.2, EN55101-2
RS IEC 801.3, EN55101-3
EFT/Noise IEC 801.4, EN55101-4
Shock IEC 68-2-27
Drop IEC 68-2-32
A-4 Product Specifications
Page 81

Appendix B: Pin Assignments
The following table lists the pin assignments for each pair used
in the FlexBus 1500 cable.
FlexBus 1500 Pin Description
FlexBus 1500 4-pair Wiring Color Codes & Functions
Pair Pin Color Function
14
21
33
47
White/Blue
5
Blue/White
White/Orange
2
Orange/Blue
White/Green
6
Green/Blue
White/Brown
8
Brown/Blue
Segment 2
Segment 3
Segment 1
Management
The following tables describe the port pins for the EtherHub-16mi
(EH1502s). The EtherHub-16i+ uses standard port pin assignments.
RS232 Port Pin Description
EIA
Circuit
CF 109 DCD (Data Carrier Detected) 1 1 8 < -------BB 104 RxD (Received Data) 2 2 3 < -------BA 103 TxD (Transmitted Data) 3 3 2 -------- >
CD 108.2 DTR (Data Terminal Ready) 4 4 20 -------- >
AB 102 SG (Signal Ground) 5 5 7 ---------CC 107 DSR (Data Set Ready) 6 6 6 < -------CA 105 RTS (Request-to-Send) 7 7 4 -------- >
CB 106 CTS (Clear-to-Send) 8 8 5 < -------CE 125 RI (Ring Indicator) 9 9 22 < --------
CCITT
Signal
Description
EH1502s
DB9 DTE
Pin #
PC DB9
DTE
Pin #
Modem
DB25 DCE
Pin #
+
Signal
Direction
DTE -DCE
B-1
Page 82

EtherHub 1500 System User’s Guide
DB9 Serial Port to RJ-45 Converter Connector Pin Assignment
Description RJ-45 Pin
Mapping
DTR (Data Terminal Ready) 1 4
RxD (Received Data) 2 2
TxD (Transmitted Data) 3 3
SG (Signal Ground) 4 5
RI (Ring Indicator) 5 9
CTS (Clear-to-Send) 6 8
RTS (Request-to-Send) 7 7
DCD (Data Carrier Detected) 8 1
DSR (Data Set Ready) NC 6
EH1502s DB9
Connector
DB9 PC’s COM Port to RJ-45 Converter Connector Pin Assignment
Description RJ-45 Pin
Mapping
DTR (Data Terminal Ready) 1 6
RxD (Received Data) 2 3
TxD (Transmitted Data) 3 2
SG (Signal Ground) 4 5
RI (Ring Indicator) 5 9
CTS (Clear-to-Send) 6 7
RTS (Request-to-Send) 7 8
DCD (Data Carrier Detected) 8 1
DSR (Data Set Ready) NC 4
EH1502s DB9
Connector
B-2 Pin Assignments
Page 83

EtherHub 1500 System User’s Guide
DB25 RS232 to RJ-45 Converter Connector Pin Assignment
Description RJ-45 Pin
Mapping
DTR (Data Terminal Ready) 1 20
RxD (Received Data) 2 3
TxD (Transmitted Data) 3 2
SG (Signal Ground) 4 7
RI (Ring Indicator) 5 22
CTS (Clear-to-Send) 6 5
RTS (Request-to-Send) 7 4
DCD (Data Carrier Detected) 8 8
DSR (Data Set Ready) NC 6
EH1502s DB25
Connector
Connection from EH1502s 9-Pin Serial Port to PC’s 9-Pin COM Port
EH1502’s 9-Pin PC’s 9-Pin
Serial Port COM Port
1 DCD ---------------- DCD --------------- 1
2 RXD <-------------- TXD ---------------- 3
3 TXD ---------------- RXD --------------> 2
4 DTR ---------------- DSR --------------> 6
5 SGND -------------- SGND --------------- 5
6 DSR ---------------- DTR --------------- 4
7 RTS ---------------- CTS --------------> 8
8 CTS <-------------- RTS --------------- 7
9 RI ----------------- RI ----------------- 9
Pin Assignments B-3
Page 84

EtherHub 1500 System User’s Guide
Connection from EH1502 9-Pin Serial Port to Modem’s 25-Pin DCE Port
EH1502’s 9-Pin Modem’s 25-Pin
Serial Port DCE Port
1 < ---------- DCD ---------- 8
2 < ---------- RXD ---------- 3
3 ------------ TXD -------- > 2
4 ------------ DTR -------- > 20
5 ----------- SGND --------- 7
6 < ---------- DSR ---------- 6
7 ------------ RTS -------- > 4
8 < --------- CTS ----------- 5
9 < ----------- RI ------------ 22
B-4 Pin Assignments
Page 85

Appendix C: Product Support Services
Product Registration
Fill in the Owner Registration Card and mail it to Accton Technology
Corporation. Accton will keep your record and inform you of any new
Accton unit developments.
Problem Report
If problems occur during unit operation, please check the adapter
configuration settings, cables, connectors, network terminators,
hardware compatibility and other network components.
Write a description of the problem, including what problems occurred,
when they occurred, duration of the problems, the unit number, serial
number, hardware, software and the DOS version that you are using.
Then contact your dealer or Accton Technology Corporation for
assistance.
Hardware Repair Service
You must get an RMA (Return Materials Authorization) number
before returning any hardware for repair. To obtain this number please
inform Accton of your company name, address, unit name and model
number, contact person, telephone number, and a problem description
list. If your unit is under repair warranty you must also give your
purchase date. Carefully pack your hardware. If possible, use the
original carton. Mark the RMA number on the carton and send it to
your dealer.
C-1
Page 86

EtherHub 1500 System User’s Guide
After repair, Accton will inform you of the date of delivery and the
exact amount due. Please send the payment by T/T (Telegram
Transfer), and Accton will send you the fixed component after
receiving payment. With or without warranty, if the hardware is found
to be free of defects, you will only be charged for testing and handling.
Software Update and Upgrade Service
Accton constantly improves its software units by adding enhancements
and new features. Minor software updates are free of charge. If greater
changes have been made to the software, Accton offers software
upgrade services at a specially reduced price.
Bulletin Board Service (BBS)
• In countries other than the U.S., call 886-35-770-654 to reach
Accton Taiwan’s modem line. Modems with 14400 through 2400
baud are supported. Choose 8 data bits, 1 stop bit and no parity.
Standard VT100 terminal emulation is supported
• In the United States, call 408-452-8828 to reach the Accton USA’s
BBS line. Modems with 14400 through 2400 baud are supported.
Choose 8 data bits, 1 stop bit and no parity. Standard VT100
terminal emulation is supported.
C-2 Product Support Services
Page 87

EtherHub 1500 System User’s Guide
Interactive Fast Fax (U.S.A. office)
Printed technical documentation can be FAX’ed to your FAX
machine, 24-hours a day.
• Call 408-452-8811 to reach Accton’s interactive Fast FAX service.
You will need a Touch-Tone phone and a FAX machine (or
equivalent). Choose document 911 for a listing of technical
bulletins.
Technical Support
Your dealer or installer is the person who understands your network
and Accton units. If neither is available to help you, Accton technical
support engineers are available by FAX, mail or phone.
• Send your technical questions by FAX to:
International Headquarters: 886-35-770-267
USA Headquarters: 408-452-8988
• To obtain software upgrades connect via ftp to ftp.accton.com.tw
• Send your technical questions by email to support@accton.com.tw
• Mail your technical questions to:
International Headquarters
Accton Technology Corporation
Attn: Technical Support
No. 1 Creation Road III
Science-based Industrial Park
Hsinchu 300, Taiwan, R.O.C.
USA Headquarters
Accton Technology Corporation
Attn: Technical Support
1962 Zanker Road,
San Jose, CA 95112, U.S.A.
During local business hours, call:
International Headquarters
(Monday through Friday,
8 am to 6 p.m.):
886-35-770-270
Product Support Services C-3
USA Headquarters
(Monday through Friday,
7 am to 5 p.m. Pacific Time):
408-452-8900 or 800-926-9288
Page 88

EtherHub 1500 System User’s Guide
Limited Warranty
Accton warrants to the original owner that the product delivered in this package will
be free from defects in material and workmanship for the lifetime of the product.
For the warranty to apply, you must register your purchase by returning the
registration card indicating the date of purchase and including proof of purchase.
There will be a minimal charge to replace consumable components, such as fuses,
power transformers, and mechanical cooling devices. The warranty does not cover
the product if it is damaged in the process of being installed. Accton recommends
that you have the company from whom you purchased this product install it.
THE ABOVE WARRANTY IS IN LIEU OF ANY OTHER WARRANTY,
WHETHER EXPRESS, IMPLIED OR STATUTORY, INCLUDING BUT NOT
LIMITED TO ANY WARRANTY OF MERCHANTABILITY, FITNESS FOR A
PARTICULAR PURPOSE, OR ANY WARRANTY ARISING OUT OF ANY
PROPOSAL, SPECIFICATION OR SAMPLE. ACCTON SHALL NOT BE
LIABLE FOR INCIDENTAL OR CONSEQUENTIAL DAMAGES. ACCTON
NEITHER ASSUMES NOR AUTHORIZES ANY PERSON TO ASSUME FOR
IT ANY OTHER LIABILITY.
Customer Remedies
If the product is found to be defective within the first two years from the later of date
of purchase or date of manufacture, Accton’s entire liability and your exclusive
remedy for any breach of warranty, shall be, at its option, to repair or replace the
product at no charge except as set forth below. If the product is found to be
defective after two years from the later of date of purchase or date of manufacture,
Accton will charge a process and handling fee, provided that you deliver the product
along with a return material authorization (RMA) number either to the company
from whom you purchased it or to Accton. Accton warrants the repaired or replaced
product to be free from defects in material and workmanship for the remainder of the
original product’s warranty period. Consumable components are warranted only for
two years.
C-4 Product Support Services
Page 89

EtherHub 1500 System User’s Guide
Return Process
Before you may return any Accton product to Accton, you must request an RMA
number by calling, FAXing or writing Accton’s Service Department at the address
listed below. If you ship the product, you must assume the risk of damage or loss in
transit. You must use the original container (or the equivalent) and pay the shipping
charge. Accton may replace or repair the product with either a new or
reconditioned product, and the returned product becomes Accton’s property. At
Accton’s sole discretion, Accton will issue a credit for either a comparable
replacement Accton product or credit the original purchase price towards the
purchase of any Accton product for any unrepairable, defective product.
This warranty does not cover replacement of products damaged by abuse, accident,
misuse, neglect, alteration, repair, disaster, improper installation or improper testing.
ACCTON SHALL NOT BE HELD LIABLE FOR ANY LOSS OF PROFITS,
LOSS OF USE, INCIDENTAL, CONSEQUENTIAL OR SPECIAL DAMAGES
CAUSED BY THE USE OF THIS PRODUCT OR INABILITY TO USE IT, EVEN
IF THE COMPANY OR ACCTON HAS BEEN ADVISED OF SUCH LIABILITY
OR OTHER SPECIAL CLAIMS.
If you purchased this product in the USA, be aware that some states do not allow
limitations on how long an implied warranty lasts, so the above limitations may not
apply to you. Some states do not allow the exclusion or limitation of incidental or
consequential damages, so the above limitations or exclusions may not apply to you.
This warranty gives you specific legal rights and you may have other rights which
vary from state to state. All parts or components contained in this product are
covered by Accton’s Limited Lifetime Warranty for this product. The product may
contain fully tested, recycled parts, warranted as if new.
For warranty information:
All territories except North and South America:
Accton Technology Corporation, International Headquarters
No. 1, Creation Rd. III, Science-based Industrial Park, Hsinchu 300, Taiwan, R.O.C.
Phone: 886-35-770-270 Fax: 886-35-770-267 BBS: 886-35-770-654
North and South America:
Accton Technology Corporation, USA Headquarters
1962 Zanker Road, San Jose, CA 95112, U.S.A.
Phone: 408-452-8900 Fax: 408-452-8988 BBS: 408-452-8828
Product Support Services C-5
Page 90

EtherHub 1500 System User’s Guide
Ordering Information
• EtherHub-16i
+
(EH1501s) Intelligent 16-port 10BASE-T (RJ-45) multi-
segment Ethernet hub with one 10BASE2
(BNC) backbone port
•
EtherHub-16mi+ (EH1502s) Intelligent 16-port 10BASE-T (RJ-45) multi-
segment hub with one 10BASE2 (BNC)
backbone port and SNMP agent
•
Alternative Module for Backbone Port
EH1552 AUI transceiver interface module
EH1553 Fiber-optic transceiver ST connector interface
module
•
EtherHub-SBH (EH2001) Secure multi-segment backbone hub
•
SwitcHub-8s (EH2002) 8-port smart Ethernet switching hub
•
AccView/Open (SW6102) Windows-based network management
software
•
EtherHub 1500 Security Module (SW7300) Security kit for intrusion and eavesdropping
protection
C-6 Product Support Services
Page 91

Glossary
10BASE-T
IEEE’s specifications for running Ethernet using twisted-pair.
AccView/Open
AccView/Open is a complete network management product with
modules for managing Accton devices.
Alt Port
An optional port found on the backplane of the EtherHub. A BNC,
AUI or Fiber-Optic module can be installed in the ALT port.
AUI (attachment unit interface)
A 15-pin interface specified by the IEEE 802.3 standard for connecting a PC,
server, or other device to an Ethernet transceiver or Media Access Unit
(MAU).
Daisy-Chain Port
STP Port 16 of the EtherHub. When the daisy-chain switch is set to
OUT (e.g.,
compatible hubs in a daisy-chain configuration.
), Port 16 can be used to connect the EtherHub to other
EtherHub 1500 System
Accton's LAN enhancement and management products. Each
component in the system carries a multi-segment bus architecture that
enhances traffic management and network bandwidth utilization.
EtherHub-16i
Accton's 16-port intelligent 10BASE-T hub. It is a component of
Accton's EtherHub 1500 System.
EtherHub-16mi
Glossary 1
+
+
Page 92

EtherHub 1500 System User’s Guide
A 16-port intelligent hub with an SNMP-based network management
agent. It is a component of Accton’s EtherHub 1500 System.
Ethernet
A network communication system developed and standardized by
DEC, Intel, and Xerox, using baseband transmission, CSMA/CD
access, logical bus topology, and coaxial cable. The successor IEEE
802.3 standard provides for integration into the OSI model and
extends the physical layer and media with repeaters and
implementations that operate on fiber optics, broadband, and
unshielded twisted-pair.
FlexBus 1500 Ports
STP ports found at the backplane of the EtherHub labeled BUS IN and
BUS OUT. These ports are used for linking the hub to other
compatible hubs using Accton’s FlexBus 1500 STP cable.
Jabber
Refers to an abnormal Ethernet frame transmission. The frames
causing jabber are normally much too long. It may come from a
malfunctioning Ethernet card and may cause data loss for all network
users.
LED
Light emitting diode on the front panel of the EtherHub used for
monitoring a hub or network condition. A LED display corresponds to
a hub condition.
MIB
An acronym for Management Information Base. It is a set of database
objects that contains information about the device. Note that MIB II
and Bridge MIB are simply subordinate components of the overall
MIB.
Multi-Segment Architecture
2 Glossary
Page 93

EtherHub 1500 System User’s Guide
Type of architecture that enhances traffic management and network
bandwidth utilization by segregating network traffic.
Network Management Station
The computer used to run AccView/Open. It is used by the network
manager to monitor the network.
Out-of-Band
A way of communicating with a network device from outside the
standard network channels.
RJ-45 Connector
Most common terminator for unshielded twisted-pair wiring.
RS232 Serial Port
An interface where data moves over the same wire bit-by-bit.
Simple Network Management Protocol (SNMP)
The application protocol offering network management services in the
Internet suit of protocols.
Shielded Twisted-Pair (STP)
Twisted-pair wire covered with an external aluminum-foil or wovencopper shield designed to reduce excessive noise pick up or radiation.
Terminator
A resistor placed at each end of an Ethernet cable to make sure that
signals do not reflect back and cause errors.
Glossary 3
Page 94

Index
A
Accton’s Out-of-Band Program
EtherHub 1500 System Configuration Program • 4-8
AccView/Open • 1-2, 1-4, 1-5, 2-11
Alert LED • 2-7
Allignment Errors • 4-14
ALT Port • 2-17, 2-18
Alternative Interface Module • 1-4
Applications • 5-1
Attaching Hubs in Stack to Multi-Segments • 5-3
Attaching Hubs in Stack to Three Segments • 5-2
Attaching Stacked Hubs to One Segment • 5-1
Each Hub is an Isolated Segment • 5-4
Extending the Network with STP/ALT Connections
• 5-5
Linking a Distributed Segment • 5-8
Linking a Stack to a Network Management Station
• 5-6
Linking Distributed Multi-Segments • 5-9
Operating in Novell NetWare IPX Environment • 5-10
Operating in TCP/IP Environment • 5-11
Assigning Trap Managers • 4-10
B
Backup Port • 4-12
BNC Module • 2-18
Bulletin Board Service • C-2
BUS IN • 2-17
BUS OUT • 2-17
Bytes • 4-14, 4-15
C
Canadian Standards Association • i
Changing System Configuration • 4-10
Collision LED • 2-8
Collisions • 4-14, 4-15
Community Name • 4-10
Configuration • 4-9
Using the Configure Button • 4-16
Configuration Functions
Demo function • 4-19
Diagnostic function • 4-20
Hub ID Setting • 4-18
Master Agent Setting • 4-19
Reset function • 4-20
Segment Setting • 4-18
Configure Button • 2-14
long press • 4-16
short press • 4-16
Configuring Hub Parameters • 4-12
Configuring Port Parameters • 4-13
Connecting the Hub System • 3-5
Control Menu • 4-12
CRC Errors • 4-14, 4-15
D
Daisy-Chain Switch • 2-15
Default Gateway • 4-10
Defining Backup Ports • 4-13
Demo function • 4-19
Diagnostic function • 4-20
Diagnostic Test LED Indicators • 2-13
Diagnostic Tests • 4-1
Disable • 2-11
Download • 4-9, 4-11
E
EtherHub 1500 System • 4-9
EtherHub 1500 System Configuration Program • 4-8
EtherHub-16i
EtherHub-16mi
+
• 1-3
+
• 1-1
1
Page 95

EtherHub 1500 System User’s Guide
EtherHub-SBH • 1-3
Event Activation • 4-15
F
Factory Settings • 4-9
FCC Warning • i
flash ROM • 4-11
FlexBus 1500 • 2-16
Management Link • 4-3
Specifications • A-2
Frame • 4-14, 4-15
Frame alignment errors • 4-15
H
Hardware Description • 2-1
Front Panel • 2-1
Rear Panel • 2-16
Hardware Installation • 3-1
Hardware Repair Service • C-1
Hot Removable Function • 4-5
Hub ID • 2-10, 4-12
Hub ID LEDs • 2-10
Hub ID Setting • 4-3, 4-18
Hub Position • 4-12
J
Jabber • 2-6
L
LED Indicators
Alert • 2-7
Collision • 2-8
Diagnostic Test LED Indicators • 2-13
Hub ID LEDs • 2-10
Interhub • 2-3
Isolated LED • 2-3
Jabber • 2-6
Monitor • 2-5
PWR/CPU • 2-3
Segment LEDs • 2-9
Serial • 2-4
SNMP • 2-5
Terminator • 2-4
Utilization • 2-7
Limited Warranty • C-4
Link • 2-12
Link State • 4-13
LINK/TRAFFIC LEDs • 2-12
Local Out-of-Band Configuration • 3-7
I
In-Band Configuration • 3-10
Information • 4-9
Installing an SNMP Backup Agent • 3-10
Interactive Fast Fax • C-3
Interhub LED • 2-3
IP Trap Managers • 4-10
IPX Frame Type • 4-10
IPX Network Number • 4-10
IPX Trap Managers • 4-10
Isolated LED • 2-3
2 Index
M
MAC Address • 4-10
Management Link • 4-3
Master Agent Setting • 4-19
Master Port • 4-13
Monitor LED • 2-5
Mounting Hubs on a Rack • 3-4
Multi-Segment Architecture • 4-2
Page 96

EtherHub 1500 System User’s Guide
O
Ordering Information • C-6
Out-of-Band Configuration • 4-5
Out-of-Band Configuration Program • 3-9
P
partition • 4-13
PARTITION/DISABLE LEDs • 2-11
Performance Menu • 4-14
Pin Assignments
Connection from EH 1502 9-Pin Ser ia l Port to
Modem's 25-Pin DCE Port • B-4
Connection from EH1502s 9-Pin Serial Port to
PC's 9-Pin COM Port • B-3
DB25 RS232 to RJ-45 Converter Connector • B-3
DB9 PC's COM Port to RJ-45 Conv erte r Conne ctor • B -2
DB9 Serial Port to RJ-45 Converter Connector • B-2
RS232 Port Pin Description • B-1
Port Backup • 4-4
Port Connections
ALT Port • 2-17
BNC Module • 2-18
FlexBus 1500 • 2-16
Serial Port • 2-17
Port Status LEDs • 2-10
Position
Hub • 4-12
Product Features • 1-4, 1-5
Product Specifications • A-1
Product Support Services • C-1
Bulletin Board Service • C-2
Hardware Repair Service • C-1
Interactive Fast Fax • C-3
Software Update and Upgrade Service • C-2
Technical Support • C-3
Push Button • 4-12
PWR/CPU LED • 2-3
R
Remote Out-of-Band Configuration • 3-8
Reset function • 4-20
Restarting the agent • 4-9, 4-11
Retry (Downloading) • 4-11
Reverting Configuration to Factory Settings • 4-11
S
Security Kit • 1-4
Segment • 4-12
Segment LEDs • 2-9
Segment Setting • 4-18
Serial LED • 2-4
Serial Port • 2-17
Setting the External Configure Buttons • 4-14
Setup and Configuration • 4-1
System Setup • 4-1
Sicherheitshinweise • ii
Slave Port • 4-13
SmartWatch LED Panel • 2-2
SNMP LED • 2-5
SNMP Backup Agent • 4-3
Software Update and Upgrade Service • C-2
Special Features • 1-5
Stacking Hubs without a Rack • 3-3
Standards Compliance • A-2
Station Ports • 2-15
Subnet Mask • 4-10
System information • 4-9
System Menu • 4-9
System Setup • 4-1
T
Technical Support • C-3
Terminator LED • 2-4
The EtherHub 1500 • 1-1, 2-10, 4-4, 4-5
Threshold Menu • 4-14
Threshold parameters • 4-15
Index 3
Page 97

Timeout (Downloading) • 4-11
Total Errors • 4-14, 4-15
Traffic • 2-12
Trap Managers • 4-9
TROUBLESHOOTING • 2-12
U
Using the Configure Button • 4-16
Utilization LEDs • 2-7
EtherHub 1500 System User’s Guide
4 Index
Page 98

EH1501s
EH1502s
E0895-R01
150482-101
 Loading...