

Accent 1400 Hardware Manual
1400
Hardware Manual
for Dedicated Devices
Prentke Romich Company
17373-Mv1.4

Acknowledgements
PRC HEADQUARTERS
1022 Heyl Rd
Wooster, OH 44691
Telephone: (330) 262-1984 • (800) 262-1984
Fax: (330) 263-4829
E-mail Address: info@prentrom.com
Web Site Address: www.prentrom.com
Copyright/Trademark Information
© 2015 Prentke Romich Company. All rights reserved. Under copyright la ws this document may not be copied, in whole or in part, without the written co nsent of
the Prentke Romich Company.
Accent, Freedom Switch, NuEye, NuPo int, and NuVoice are tra demarks of Prentke Romich Company.
Minspeak and Unity are registered trademarks of Semantic Compaction Systems, I nc. in the United States and in other countries.
Semantic Compaction is a trademar k of Semantic Compaction Systems, Inc.
Microsoft and Windows are registered trademarks of Microsoft Corporation in the United States and/or other countries.
Bluetooth Wireless Technology is a registered trademark. The Bluetooth word ma rk and logos are owned by the Bluetooth SIG, I nc. and any use of such marks by
PRC is under license. Other tradema rks and trade names are those of their respective owners.
17373-Mv1.4 ∙ 12/10/2015
Electronic Interference Information
This device complies with Part 15 of the FCC Rules. Opera tion is subject to two conditions: (1) this device may not cause ha rmful interference, a nd (2) this device
must accept a ny interference received, including interference that may cause undesired ope ration.
Warning! Changes or modifications to this product whic h are not authorized by Prentke Romich Company could e xceed FCC limits and negate your a uthority to use
this product.
This equipme nt has been tested and found to comply with the limits for a Class B digital device, pursua nt to Part 15 of the FCC Rules. These limits are designed to
provide reasonable protection against harmful interference in a residential installation. This equipment ge nerates, uses and can radiate radio frequency energy and ,
if not installed and used in accordance with the instructions, may cause harmf ul interference to radio communicatio ns. However, there is no guarantee that
interference will not occur in a particular installation. You can determine whether this product is causing interference in your ra dio or tele vision by turning this
product off. If the interference stops, it was probably caused by this product or one of its accessories. You can attempt to correct the interference by using o ne or
more of the following measures:
• Turn the television or radio antenna until the interfere nce stops.
• Move this product to one side or the other of the television or radio.
• Move this product farther away from the television or radio.
• Plug this pro duct into a n outlet tha t is on a different circuit from the televisio n or radio; that is, this product s hould be controlled by different circuit
breakers/fuses from the television or radio.
• If necessary, contact a Prentke Romich Company service technician for assistance.
This Class B digital apparatus meets all requirements of the Canadia n Interference-Causing Equipmen t Regulations. Cet appareil numérique de la classe B respect
toutes les exigences du Règlement sur le matériel brouiller du Canada.
Warnings
This device is not intended to be an emergency call device or sole communicatio n aid.
When operating this device in a medical environment, do not use with any product that is not medically approved. Follow all rules for appropriate cell phone a nd
wireless device use.
Do not use this device close to sources of RF radiation or you may encounter interference. Move away, if possible, from the source of the interference.
Any mounts used should be fitted by a qualifie d person. Failure to install the mounting system accordi ng to the ma nufacturer's instructions may result in an injury
to the user. Be certain that the user's view is not obstructed by the mounting.
Analysis of positioning by a qualified person is required to prevent repetitive stress injuries to the user.
Cords and straps are pote ntial entanglement/strangulation hazards. Please consider this prior to placing these items with device users.
Small parts could present a choking or other hazard.
Do not use the device if the screen is cracked or broken.
Implantable Medical Devices
A minimum se paration of six (6) inches should be maintained between a handheld wireless mobile device and an imp lantable medical device, such as a pacemaker
or implantable cardioverter defibrillator, to avoid potential interference with the device.
Persons who have such devices:
• Should ALWAYS kee p the mobile device more than six (6) inches from the ir implantable me dical device when the mob ile device is turned ON;
• Should not carry the mo bile device in a breast pocket;
• Should turn the mobile device OFF immediately if there is any reason to suspec t that inte rference is taking place
• Should read a nd follow the directions from the manufacturer of your implantable medical device. If you have any questio ns about using your wire less mobile
device with an implantable medical device, consult your health care provider.
Accent 1400 Hardware Manual for Dedicated Devices Page 2

End User Licensing Agreement
You have acquired a PRC device which includes software licensed by PRC from Microsoft Licensing Inc. or its affiliates ("MS"). Those installed software products of
MS origin, as well as associated media, printe d materials and "online" or elect ronic documentation (software) are protected by internatio nal intellectual pro perty
laws and trea ties.
IF YOU DO NOT AGREE TO THIS END USER LICENSE AGREEMENT (EULA), DO NOT USE THE DEVICE OR COPY THE SOFTWARE. INSTEAD, PROMPTLY CONTACT
PRENTKE ROMICH COMPANY FOR INSTRUCTIONS. ON RETURN OF THE UNUSED DEVICE(S) FOR A REFUND. ANY USE OF THE SOFTWARE, INCLUDING BUT NOT
LIMITED TO USE ON THE DEVICE, WILL CONSTITUTE YOUR AGREEMENT TO THIS EULA (OR RATIFICATION OF ANY PREVIOUS CONSENT).
GRANT OF SOFTWARE LICENSE.
This EULA grants you the following license:
• You may use t he SOFTWARE only on yo ur PRC device.
• NOT FAULT TOLERANT. THE SOFTWARE IS NOT FAULT TOLERANT. PRC HAS INDEPENDENTLY DETERMINED HOW TO USE THE SOFTWARE AND MS HAS RELIED
UPON PRC TO CONDUC T SUFFICIENT TESTING TO DETERMINE THAT THE SOFTWARE IS SUITABLE FOR SUCH USE.
• NO WARRANTIES FOR THE SOFTWARE. THE SOFTWARE is provided "AS IS" and with all faults. THE ENTIRE RISK AS TO SATISFACTORY QUALITY,
PERFORMANCE, ACCURACY, AND EFFORT (INCLUDING LACK OF NEGLIGENCE) IS WITH YOU. ALSO THERE IS NO WARRANTY AGAINST INTERFERENCE WITH
YOUR ENJOYMENT OF THE SOFTWARE OR AGAINST INFRINGEMENT. IF YOU HAVE RECEIVED ANY WARRANTIES REGARDING THE DEVICE OR SOFTWARE,
THOSE WARRANTIES DO NOT ORIGINATE FROM, AND ARE NOT BINDING ON, MS.
• Note on Java Support. The S OFTWARE may contain s upport for programs written in Java. Java technology is not fault to lerant and is not designed,
manufactured, or intended for use or resale as online control equipment in hazardous environments re quiring fail-safe performance, s uch as in the operation
of nuclear facilities, aircraft navigation or communication systems, air traffic control , direct life support machines, or weapons s ystems, in which the failure of
Java technology could lead directly to death, personal injury or seve re physical or environmental damage. Sun Microsystems, Inc. has contractually obligated
MS to make this disclaimer.
No Liability for Certain damages. EXCEPT AS PROHIBITED BY LAW, MS SHALL HAVE NO LIABILITY FOR ANY INDIRECT, SPECIAL CONSEQUENTIAL OR
INCIDENTAL DAMAGES ARISING FROM OR IN CONNECTION WITH THE USE OR PERFORMANCE OF THE SOFTWARE. THIS LIMITATION SHALL APPLY EVEN IF
ANY REMEDY FAILS OF ITS ESSENTIAL PURPOSE. IN NO EVENT SHALL MS BE LIABLE FOR ANY AMOUNT IN EXCESS OF U.S. TWO HUNDRED FIFTY DOLLARS
(U.S. $250.00).
• Limitations on Reverse Engineering, Decompilation and Disassembly. You may not reverse engineer, decompile, or disassembl e the SOFTWARE, except and
only to the extent that s uch activity is expressly permitted by applicable law notwithstanding this limitation.
• SOFTWARE TRANSFER ALLOWED BUT WITH RESTRICTIONS. You may permane ntly transfer rights under this EU LA only as part of a permanent sale or
transfer of the Device, and only if the recipient agrees to this EULA. If the SOFTWARE is an upgrade, any transfer mus t also include all prior versions of
SOFTWARE.
• EXPORT RESTRICTIONS. You acknowledge that SOF TWARE is subject to U.S. export jurisdiction. You agree to comply with al l applicable international and
national laws that apply to the SOFTWARE, including U.S. Export Administratio n Regulations, as well as end-user, end-use a nd destination restric tions issue d
by U.S. and other governments. For additional information see http://www.microsoft.com/exporting/.
Accent 1400 Hardware Manual for Dedicated Devices Page 3

This page intentionally left blank
Accent 1400 Hardware Manual for Dedicated Devices Page 4

Contents
Introduction ....................................................................................................................... 7
Overview of Features ........................................................................................................ 7
Front View........................................................................................................................... 7
Back View ............................................................................................................................ 8
Side View ............................................................................................................................ 9
Commonly Used Features ................................................................................................. 10
Turning the Accent On or Off/Putting to Sleep ............................................................ 11
Turning on the Accent ...................................................................................................... 11
Putting to Sleep/Waking the Accent ................................................................................. 11
Restarting the Accent ....................................................................................................... 11
Powering Off the Accent ................................................................................................... 11
Charging the Batteries ................................................................................................... 12
Replacing or Removing the Bumper Guards ............................................................... 13
Positioning or Removing the Wire Stand ..................................................................... 14
Opening the Wire Stand ................................................................................................... 14
Removing the Wire Stand ................................................................................................. 15
Removing or Reattaching the Handle ........................................................................... 16
Attaching the Port Cover ................................................................................................ 17
Applying a Screen Protector .......................................................................................... 18
Removing or Replacing the Device Frame ................................................................... 19
Removing the Frame ......................................................................................................... 19
Attaching the New Frame ................................................................................................. 20
Attaching the Device Frame More Securely ..................................................................... 21
Attaching, Raising, and Removing a Keyguard ........................................................... 22
Attaching the Keyguard .................................................................................................... 22
Raising the Keyguard ........................................................................................................ 23
Removing the Keyguard .................................................................................................... 23
Attaching or Removing a TouchGuide ......................................................................... 24
Attaching the TouchGuide ................................................................................................ 24
Removing the TouchGuide ............................................................................................... 24
Attaching a Carry Strap .................................................................................................. 25
Removing the Wheelchair Mounting Plate ................................................................... 26
Mounting a NuEye Module ............................................................................................. 27
Mounting a NuPoint Module .......................................................................................... 28
Accent 1400 Hardware Manual for Dedicated Devices Page 5

Setting Up and Using a Freedom Switch™ ................................................................... 29
Connecting the Freedom Switch ....................................................................................... 29
Disconnecting the Freedom Switch .................................................................................. 29
Using Multiple Freedom Switches .................................................................................... 30
Using the Freedom Switch with a Wired Switch ............................................................... 30
Mounting the Freedom Switch ......................................................................................... 31
Replacing the Freedom Switch Battery............................................................................. 32
Using the Cameras.......................................................................................................... 33
Managing Power Settings .............................................................................................. 34
Using the Maintenance Menu Power Options ................................................................. 34
Performing a Full Shutdown ............................................................................................. 35
Setting Up a Wi-Fi Connection ...................................................................................... 36
Updating NuVoice ........................................................................................................... 37
Updating NuVoice via a Wi-Fi Connection ........................................................................ 37
Updating NuVoice via USB Flash Drive ............................................................................. 37
Storing Your Device ........................................................................................................ 38
Disposing of the Device or Batteries ............................................................................ 38
Cleaning and Disinfecting .............................................................................................. 39
Routine Cleaning and Disinfecting .................................................................................... 39
Disinfecting a Device and Accessories for Multiple Users ................................................ 40
Troubleshooting .............................................................................................................. 41
Battery Troubleshooting ................................................................................................... 41
General Troubleshooting .................................................................................................. 41
NuVoice Troubleshooting ................................................................................................. 42
Accent 1400 Hardware Manual for Dedicated Devices Page 6
Introduction
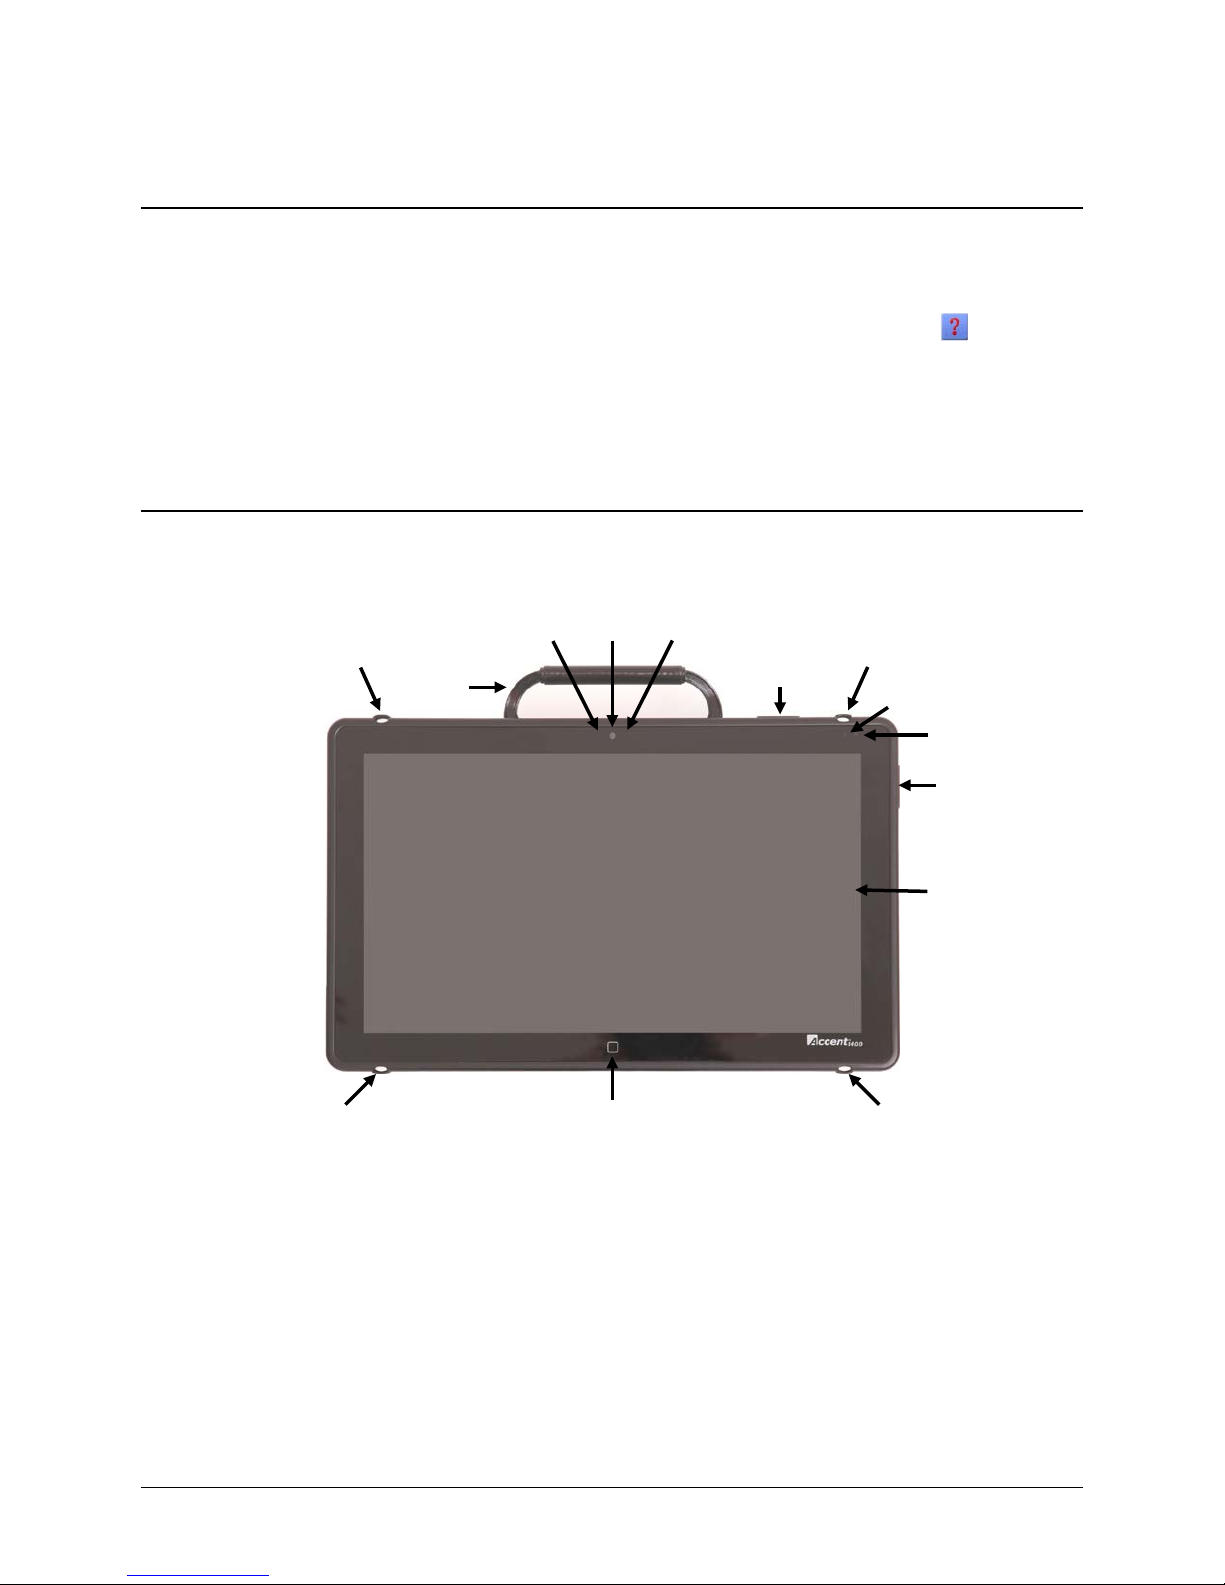
Carry Strap Holder
Carry Strap Holder
Camera
Light Sensor
Camera Indicator
Display Screen
Power Button
Volume Button
Battery/Charging LED
Power LED
Handle
Carry Strap Holder
Tools Key
Carry Strap Holder
The Accent™ 1400 is a speech-generating device that offers user-friendly features to make speaking fast
and easy for individuals with severe speech impairments. This manual describes how to use and
maintain your device.
To learn about the NuVoice™ software that comes with your device, use the Help button
to the right
of the text display area when the device is turned on. You can also download the latest versions of the
NuVoice Software Manual and this manual from the PRC web site: www.prentrom.com/support.
Overview of Features
Front View
Accent 1400 Hardware Manual for Dedicated Devices Page 7
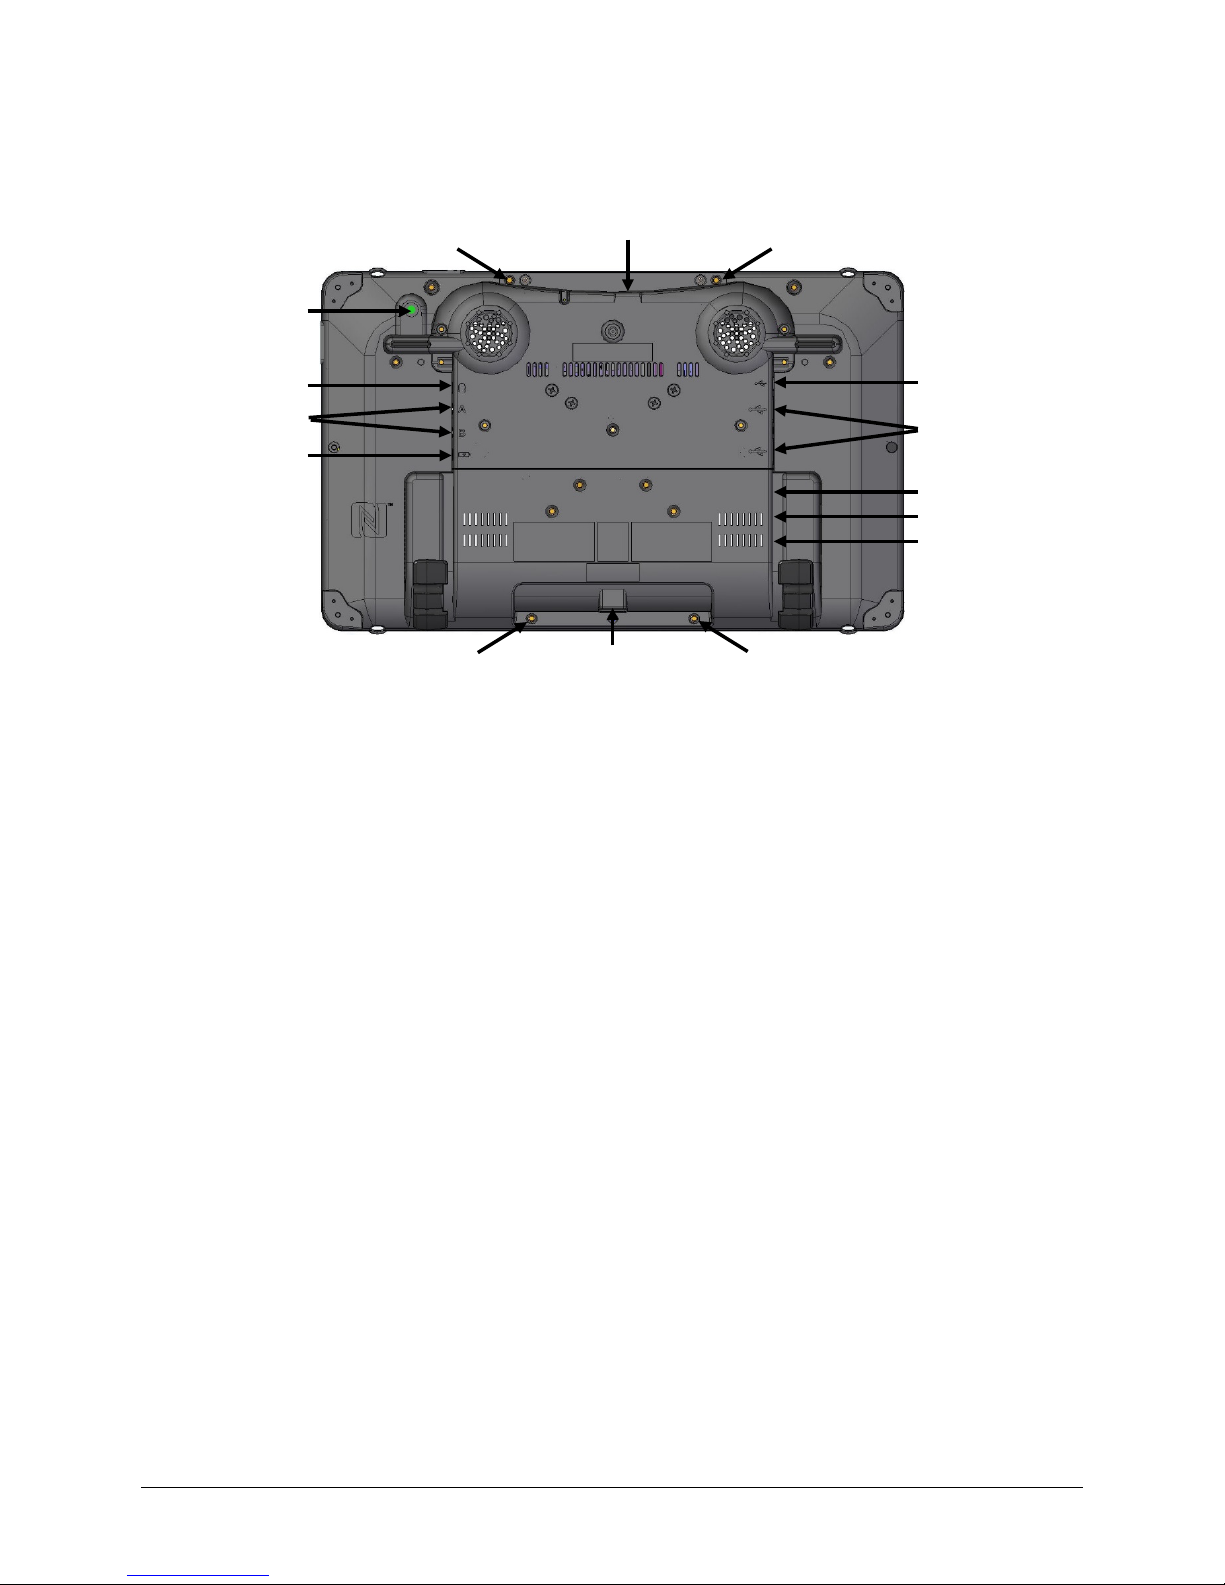
Back View
1
If you use a switch or switches for access to your device, plug them into switch jacks A and B. To use a joystick, you will need a Y-
2
Functional only with purchase of the Integrated Feature Pack. The external access mini port allows you to connect to an external
3
The HDMI port allows you to connect a secondary screen to the device for visually challenged communicators.
Switch Jacks A and B 1
Rear Camera
Headphone Jack
Charging Port
USB Connector for
External Access
USB 2.0 Ports
USB 3.0 Port
HDMI Port 3
SD Card Slot
Mini USB Connector for
NuPoint™ Head Tracker
Attachment Point for Device
Frame or NuEye Module
Attachment Point for Handle or
Attachment Point for Handle or
NuPoint Head Tracker
Attachment Point for Device
NuPoint Head Tracker
NuEye™ Module
Mini Port 2
Frame or NuEye Module
adapter. If you have a joystick plugged in and it does not respond normally, reverse the way it is plugged in (plug switch A into jack
B, switch B into jack A).
device if you have the integrated feature pack.
Accent 1400 Hardware Manual for Dedicated Devices Page 8
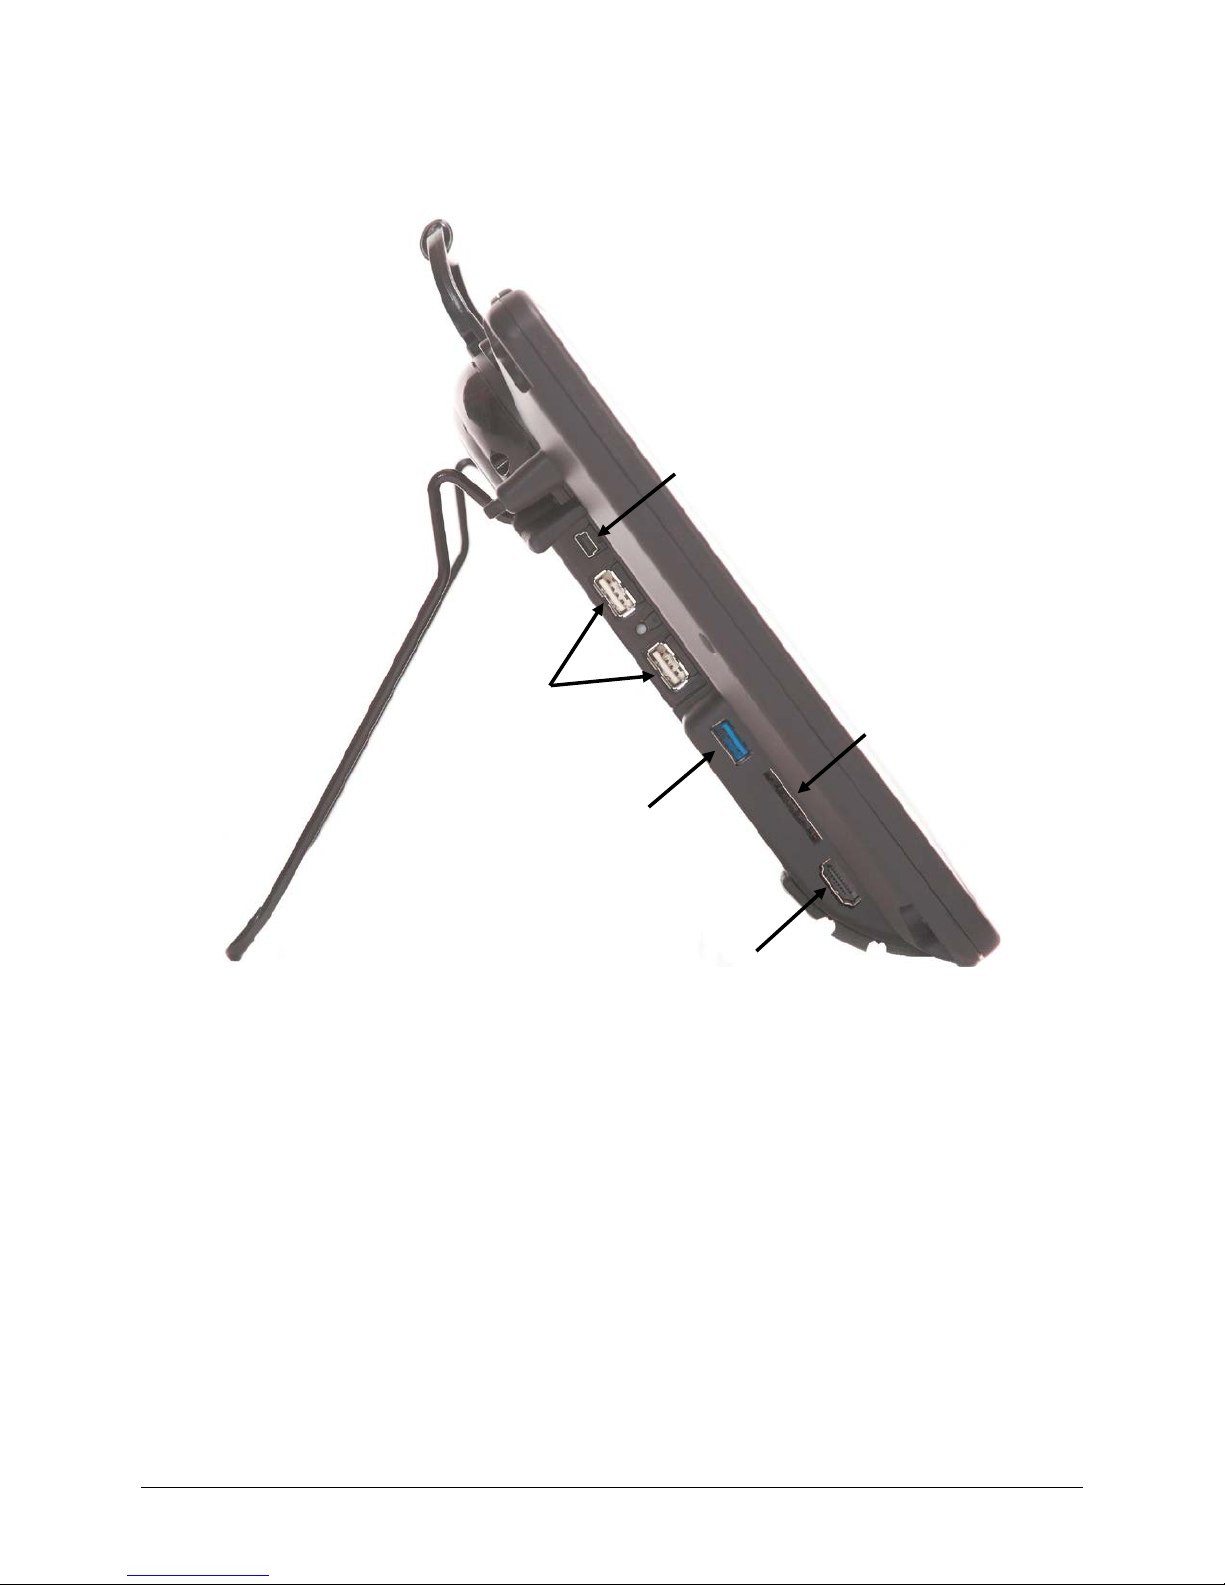
Side View
1
Functional only with purchase of the Integrated Feature Pack. The external access mini port allows you to connect to an external
2
The USB 2.0 ports support USB 2.0 accessories only.
3
The USB 3.0 port supports USB 3.0 and USB 2.0 accessories.
4
The HDMI port allows you to connect a secondary screen to the device for visually challenged communicators.
SD Card Slot
USB 2.0 Ports 2
External Computer
USB 3.0 Port 3
HDMI Port 4
Access Mini Port 1
device if you have the integrated feature pack.
Accent 1400 Hardware Manual for Dedicated Devices Page 9
In NuVoice: Select the Tools key twice to open the Toolbox. Alternatively, press the
Tools Key
Power Button
Volume
Button
Commonly Used Features
Touch Screen
Important! Do not use sharp, pointed objects on the touch screen. The touch screen is designed to be used
with your finger or the stylus that came with your device. This stylus is made specifically for a capacitive
touch screen. Anything else will harm your touch screen and may cause your device to stop working.
The touch screen is a liquid crystal display (LCD). Should the display break (unlikely except in extreme
circumstances) and you come into contact with the liquid crystal, wash and rinse your skin thoroughly. Be
careful to avoid splintered glass.
For information on cleaning the touch screen, see “Cleaning the Touch Screen” on page 39.
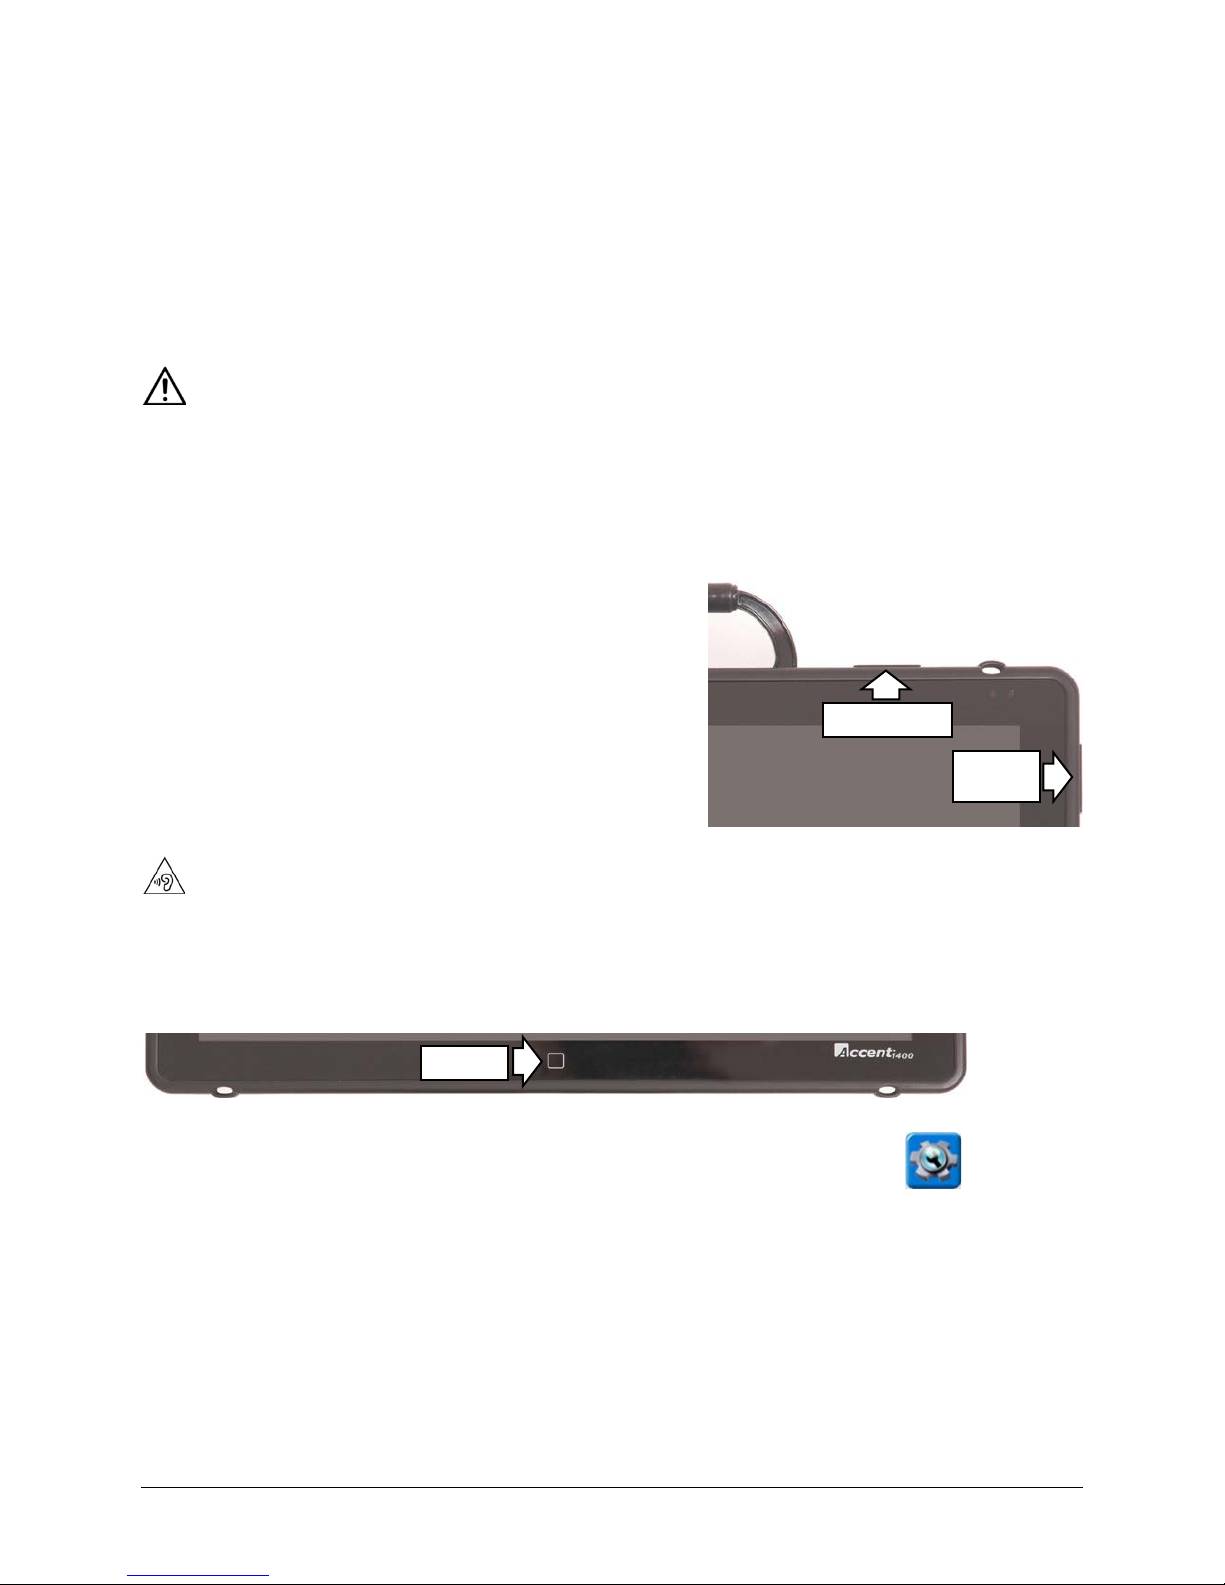
Power Button
When you press the power button, the power LED will
illuminate and the device will open to NuVoice. For detailed
information about using this button, see “Turning the Accent
On or Off/Putting to Sleep” on page 11. For information on
changing how the power button operates, see “Managing
Power Settings” on page 34.
Volume Button
Use the volume button to increase or decrease the volume.
You can also use the volume controls in NuVoice.
To prevent possible hearing damage, do not listen to earphones at high volume levels for long periods.
Tools Key
On the Device: Press the Tools key twice to open the Toolbox. Alternatively, press the Tools key once to
open a menu of frequently used tools (including the Toolbox).
Tools key once to open a menu of frequently used tools (including the Toolbox).
Accent 1400 Hardware Manual for Dedicated Devices Page 10

Turning the Accent On or Off/Putting to Sleep
This section explains how to turn on the device, put the device into sleep mode and wake it, restart the
device, and power the device off. You can change the operation of the power button. For information
about setting up the power button in NuVoice, see “Managing Power Settings” on page 34.
Turning on the Accent
1. Press and hold the power button located on the top edge of the device. When you hear a beep,
release the button. The green power LED will illuminate.
• The LED will remain illuminated while the device is on.
• The LED will blink when the device is in sleep mode.
2. Wait for the NuVoice software to load. This will take about 45 seconds.
3. First time only: Review the NuVoice Software Agreement and select I Agree. The Exploration Wizard
will load.
4. Once the Exploration Wizard loads, check the battery status level. For details, see “Charging the
Batteries” on page 12.
Putting to Sleep/Waking the Accent
When you finish using the Accent for the day, put it in sleep mode overnight. To put the device to sleep,
do either of the following:
• Quickly press and release the power button or
• Select the Sleep key in the NuVoice Toolbox
When the device is inactive for a prolonged period, it will go into sleep mode automatically. The green
power LED will blink while the device is in sleep mode. To wake the device, do either of the following:
• Select the Tools key on the front of the device or
• Quickly press and release the power button
Restarting the Accent
It is recommended that you restart your Accent once per week. To restart the device:
1. Select the Tools key and then select the Toolbox key.
2. Select Maint Menu and then select Power Management.
3. Select Restart and then select Yes at the confirmation prompt.
Powering Off the Accent
When you don’t plan to use the Accent or want to store it for more than a couple days, it is best to
power off the device completely.
1. Select the Tools key.
2. Select the Shutdown option.
3. Select Yes at the confirmation prompt.
Accent 1400 Hardware Manual for Dedicated Devices Page 11
Charging the Batteries
Important! Always use the battery charger that came with your device. Any other charger may damage
the batteries. If you think your charger needs to be replaced, call the PRC Service Department at (800)
262-1990; outside the U.S., call your distributor. Service can determine if replacement is necessary and
direct you to the correct charger.
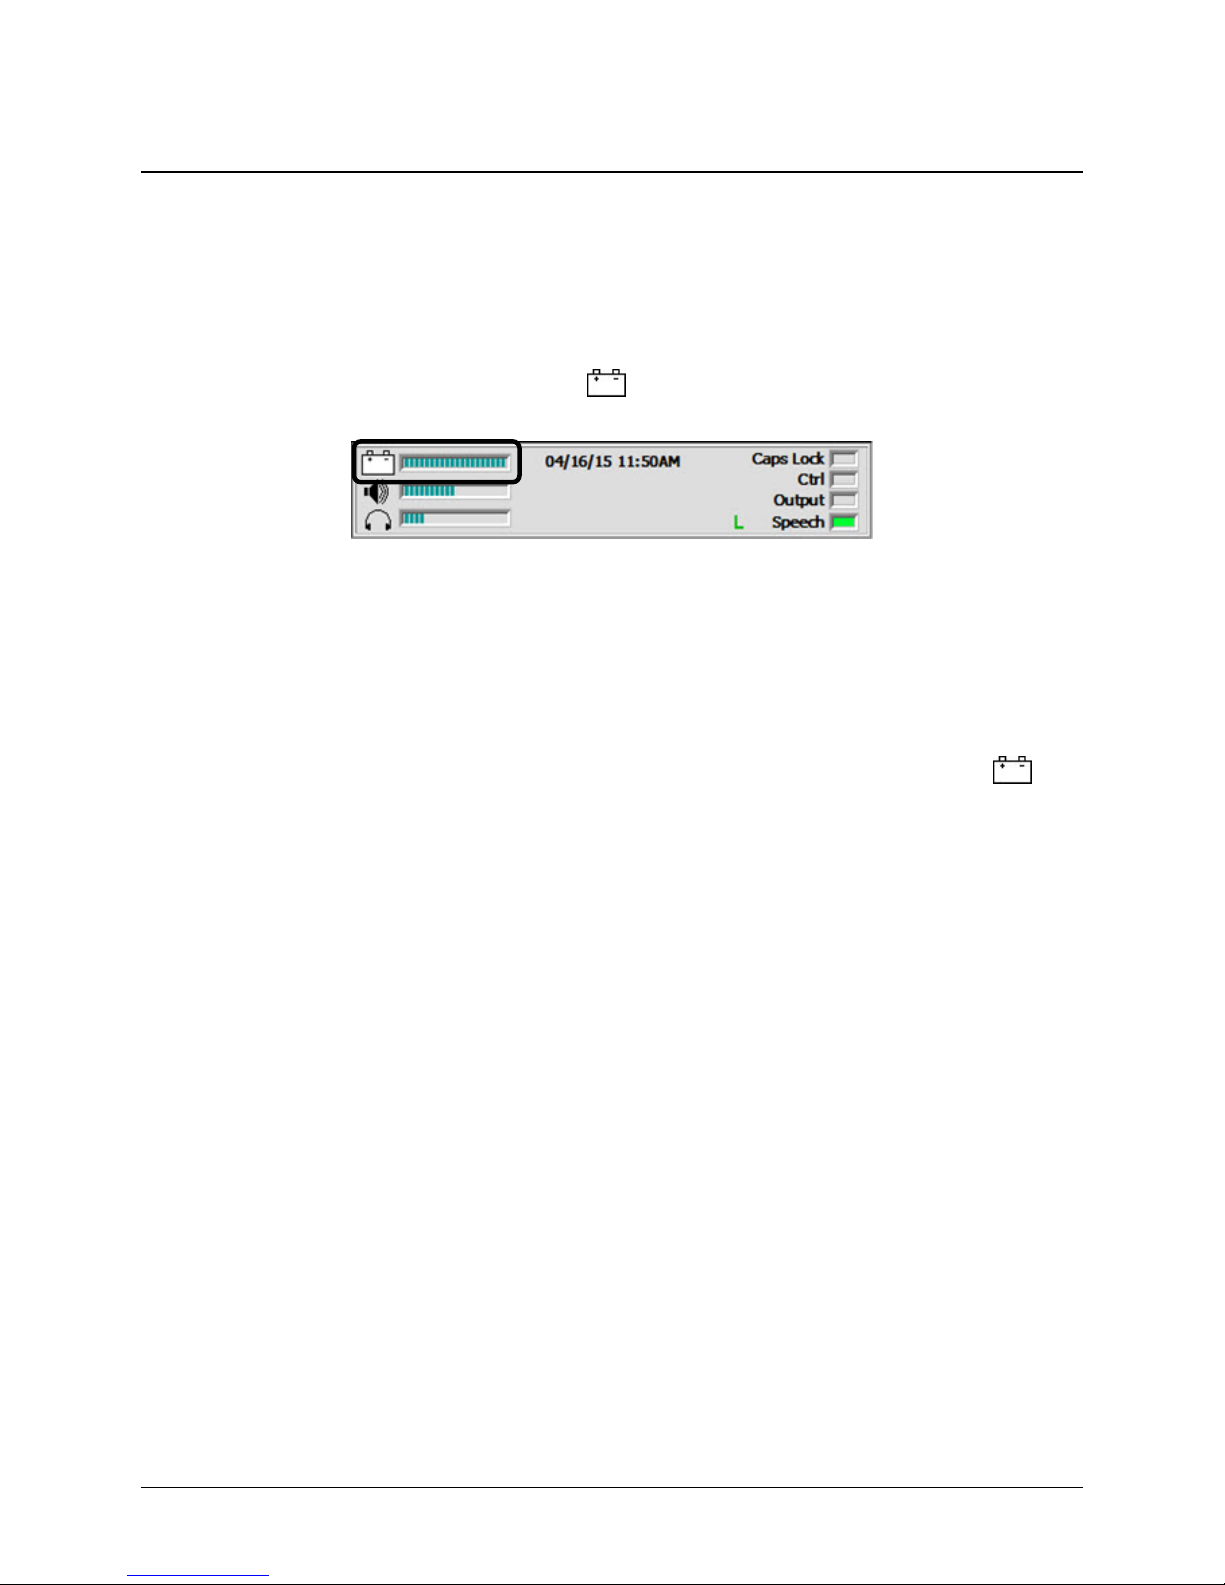
How long the batteries last depends on how you use your device. You may be able to get up to 18 hours
of use from one charge, or you may use your device so heavily that a charge only lasts about 10 hours.
Check the battery status next to the battery icon
batteries’ charge level.
Note: You can also check the Maintenance Menu’s Battery Menu for battery information.
The time required to fully charge the batteries varies depending on the charge level when the charge
begins. When the device needs charging, locate the charging port on the back of the device and connect
the battery charger.
in the status display area to quickly view the
Charging Dangerously Low or Dead Batteries
To fully charge dangerously low batteries will take about 10 hours. If the batteries are totally dead, an
additional two hours may be required. Please note that battery status next to the battery icon
the status display area will not show a charge for the first few hours of charging.
Batteries that are not fully depleted will require less time to recharge.
in
Best Practice
Plug in your battery charger every night when you go to bed and any time you see the low battery
warning and/or see the low battery LED come on.
If you cannot plug in the charger overnight, it is best to power off the device to conserve battery charge.
The Battery/Charging LED
When the device is on: The battery/charging LED is not illuminated. When the batteries have less than
15% (about three hours) of its power remaining, the LED will blink yellow.
When the device is plugged into the charger: The battery/charging LED will glow yellow. When the
device is fully charged, the LED will turn green and remain on until the charger is unplugged.
Accent 1400 Hardware Manual for Dedicated Devices Page 12
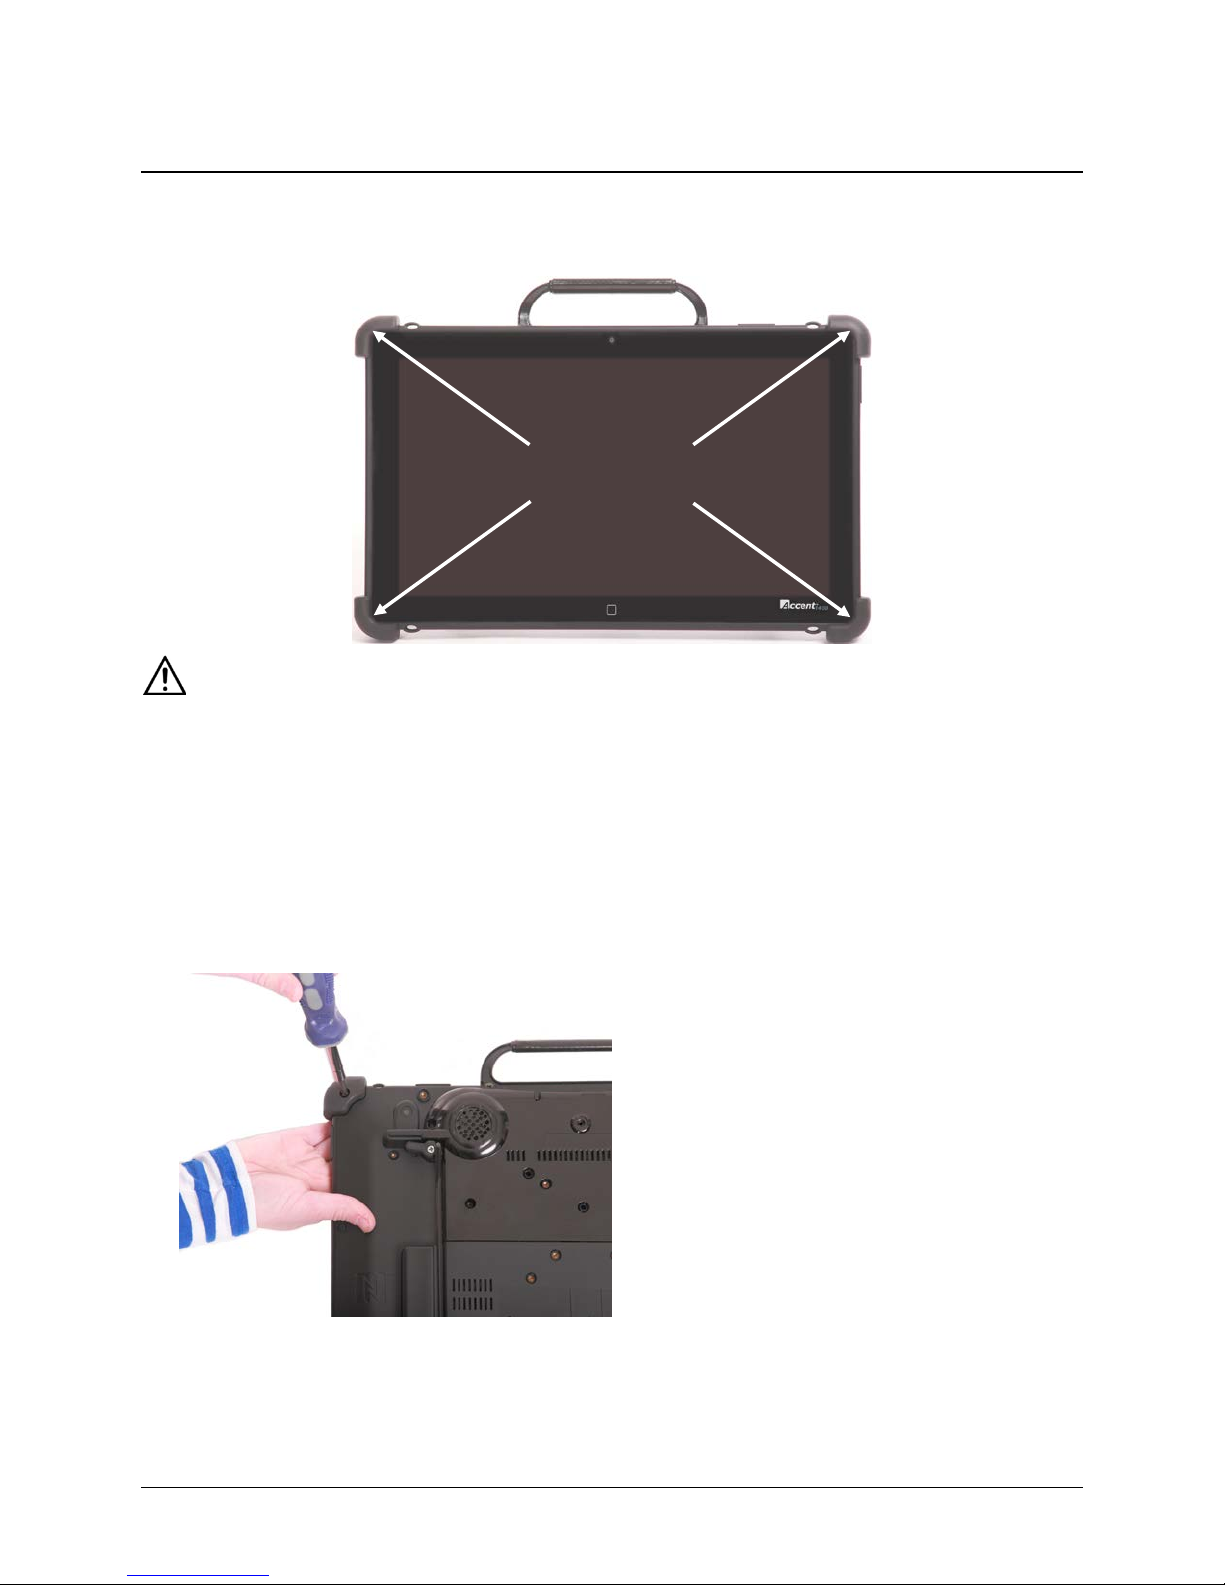
Replacing or Removing the Bumper Guards
Bumper Guards
Your Accent shipped with bumper guards attached to all four corners of the device to provide extra
protection. Four larger bumper guards were also included. If you want to replace the bumper guards,
follow these instructions.
If you replace the bumper guards, be sure to secure them with the screws. Otherwise they can be pulled
loose, creating a choking hazard.
1. From one of the corners of the device, remove the mounting screw and the bumper guard.
Note: Save the screw. You will need it to attach the replacement bumper guard (in step 3).
2. Push the replacement bumper guard onto the corner.
3. Insert the mounting screw through the hole in the guard and into the hole in the device.
Note: Be sure to insert the same screw that you removed in step 1.
4. Tighten the screw.
5. Repeat steps 1 – 4 for the other three corners.
To remove the bumper guards: Remove the mounting screws, pull the bumper guards off the corners,
and store the bumper guards and screws in a safe location in case you need them later.
Accent 1400 Hardware Manual for Dedicated Devices Page 13
 Loading...