

Page 1
Page 2
3
FCC RF EXPOSURE INFORMATION
WARNING! Read this information before using you phone
In August 1996 the Federal Communications
Commission(FCC) of the United States with its action in
Report and Order FCC 96-326 adopted an updated safety
standard for human exposure to radio frequency
electromagnetic energy emitted by FCC regulated
transmitters. Those guideline are consistent with the safety
standard previously set by both U.S and international
standards bodies. The design of this phone complies with the
phone complies with the FCC guidelines and these
international standards.
Use only the supplied or an approved. Unauthorized
antennas, modifications, or attachments could impair call
quality, damage the phone, or result in violation of FCC
regulations.
Near-Body Operation
This device was tested for typical body-worn operations with
the back of phone kept 2.5 cm. from the body.
To maintain compliance with FCC RF exposure
requirements, maintain a 2.5 cm. separation distance
between the user’s body and the phone, including the
antenna.
Page 3

Safety Precautions
4
Checking Parts
5
Setting up Your Phone
6
Getting to Know Your Phone
9
Display Icons
10
Function Keys
11
Basic Operation
Placing Calls
14
Redial
14
Receiving Calls
15
Adjusting Volumes
16
Choosing the Ring Tone
17
On-Hook Call
17
Internal Phone Book
The Internal Phone Book
20
Storing Numbers in Memory 20
Searching for Numbers in Memory
21
Erasing a Number in Memory
23
One-Touch Calling
24
Two-Touch Calling
24
Useful Features
Call Logs
26
Electronic Dialing
27
Displaying Your Phone Number
28
Mute
28
Silent Scratchpad
29
Sending Your Phone Number
30
Selecting Time Mode
31
Setting the Alarm
31
Checking and Clearing Call Times 32
Setting Warning Beeps
32
Advanced Features
Changing Greeting Message
34
System Reset
34
Restricting Use of the Phone
35
Locking the Phone
37
Changing the Lock Code
38
Tone Length
38
Optional Features
Call Forwarding
40
Call Waiting
40
Three-Way Calling
40
Message Service
40
Miscellaneous
Menu Options Table
46
FWT Setting
48
Conversation and Message Menu
50
Specifications
50
TABLES OF CONTENTS
Page 4

1. Avoid placing the phone in a dusty location, or near a source of gas or fire.
2. Don’t shake, hit or drop the phone.
3. If you clean the outside of the phone, use only a soft, dry cloth. The
chemicals in alcohol, benzine or acetone can damage the surface of the
phone.
4. Do not twist or pull the cord out of the phone.
5. Do not disassemble the phone.
6. DO NOT use the power adapter if:
The power cord is damaged.
The phone has been dropped or damaged in any way.
7. Use only the provided adapter. Do not use the -
adapter for any other purpose.
8. Use only the provided antenna.
Do not use the antenna for any other purpose.
9. Frequency and length of use can affect the life of the self-charging battery.
Contact your customer service if the battery is not operating properly.
10. Use only the designated self-charging battery. Dispose of exhausted
batteries properly. Never discard a battery in or near fire or flame.
11. Do not use the telephone near water, for example, near a bathtub, sink, wet
basement, or swimming pool.
NOTE : The input voltage and the shape of the plug on this phone may vary
from country to country.
4
USER’S MANUAL
SAFETY PRECAUTIONS
•
•
Page 5
Once you have unpacked your phone, make sure that you have all the parts shown
below. If any piece is missing or broken, please call your customer service.
1. Main Set 2. Hand Set
3. AC/DC Adapter 4. User’s Manual
5. Antenna 6. External Battery(optional)
7. Data Cable-USB(Optional) 8. Data Cable-RS-232C(optional)
5
USER’S MANUAL
CDMA WIRELESS LOCAL LOOP PHONE
CHECKING THE PARTS
1 2
3
654
87
Page 6
NOTE :The input voltage and the shape of the plug may vary from country to country.
The input and output voltage of the adapter is indicated on the adapter.
Do not use the phone with unspecified voltage.
6
USER’S MANUAL
SETTING UP YOUR PHONE
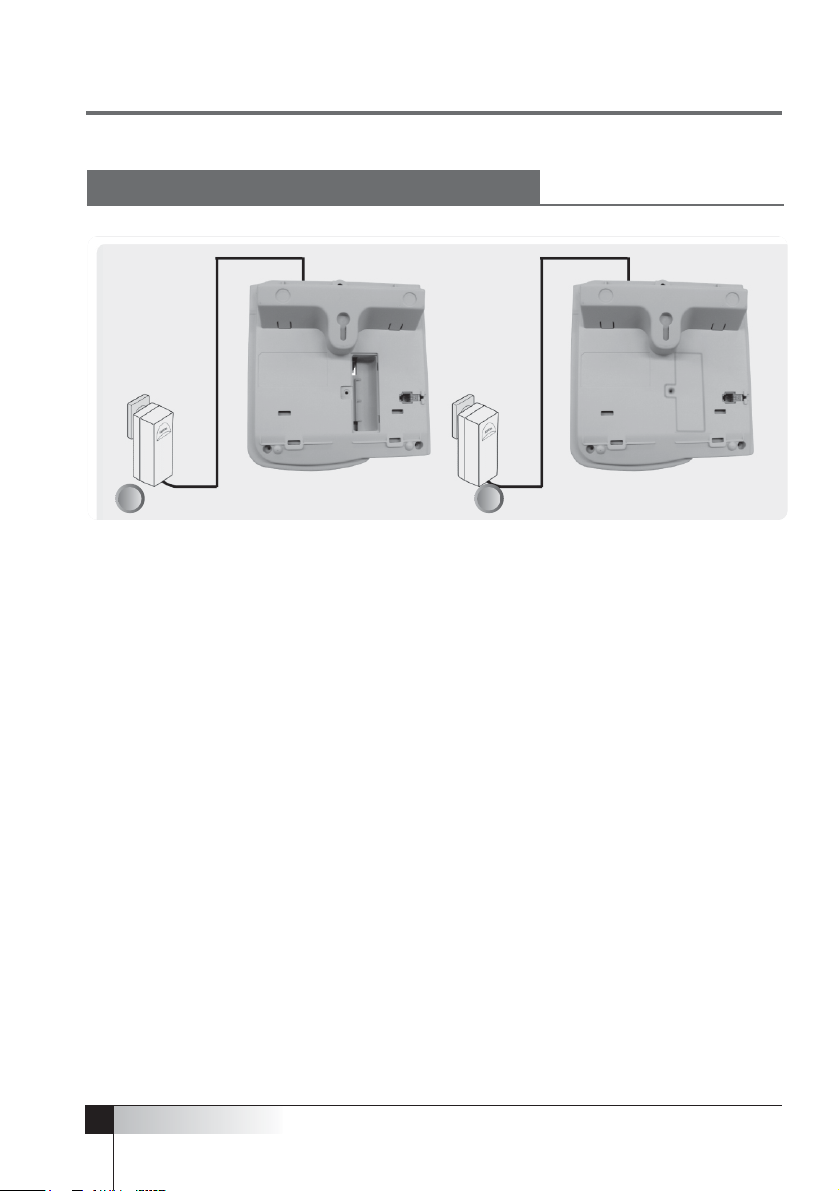
Attach the handset Connect the antenna
Plug the AC/DC adapter into the
jack on the back of the
telephone
Plug the AC/DC adapter into an
appropriate wall outlet
INSTALLING THE PHONE
1
2
3 4
This phone operates by receiving D.C. power from the specified D.C. adapter,
which is connected to electrical outlet. The phone is equipped with a rechargeable
external battery to back up power failure.
Page 7
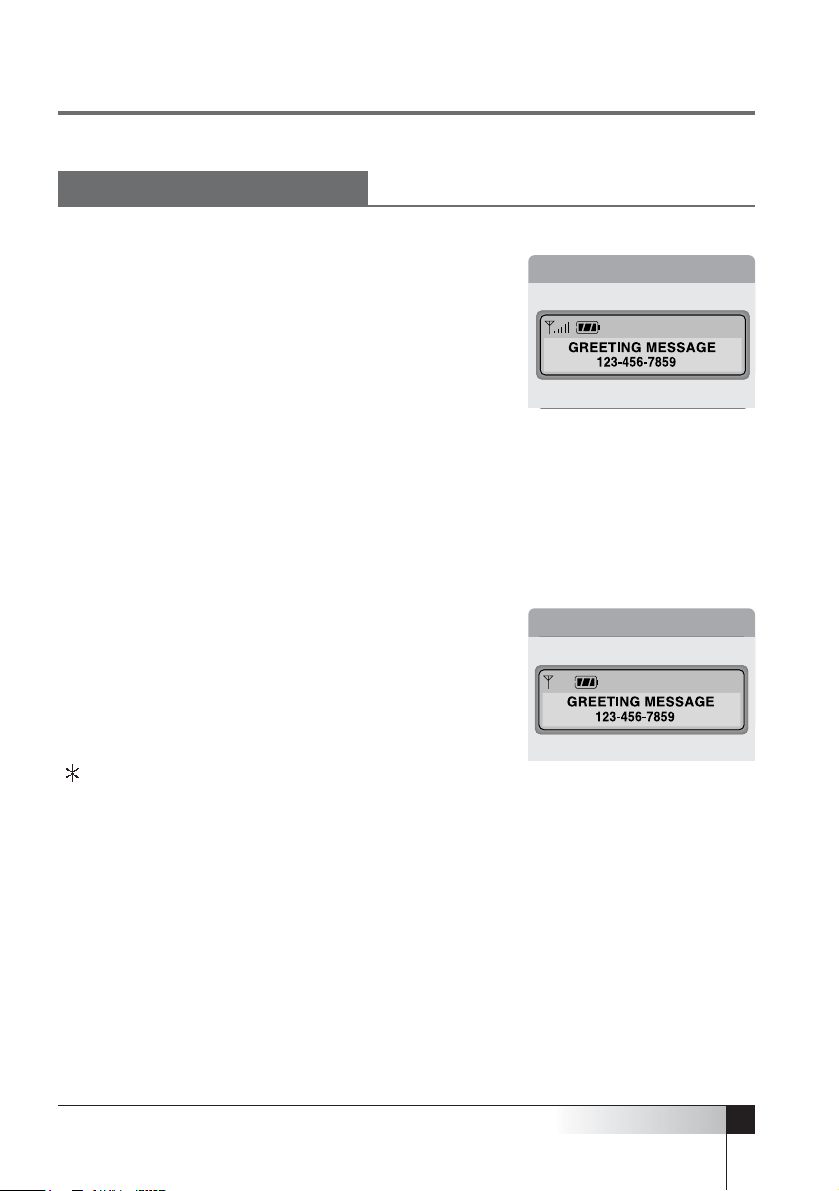
Display in service area
When the power cord is connected properly, Power LED
will light.
All segments in the LCD window will turn on briefly.
When the service LED at the top of the phone is on,
service is available.
The display will show the greeting, time and date.
You can change the greeting(See page 34).
Display in area with no service
When there is no service in your area, the signal icon
does not appear in the display.
In this case, contact your service provider.
7
USER’S MANUAL
CDMA WIRELESS LOCAL LOOP PHONE
SERVICE STATUS CHECK
Display in service area
Display in area with no service
Battery icon indicates when use battery.
Page 8
USER’S MANUAL
INSTALLING THE BATTERY
Remove the back cover of the phone Insert the battery
1 2
8
NOTE :
Please put the battery switch located in battery slot at "1" position after
insert the battery.
Page 9
9
USER’S MANUAL
CDMA WIRELESS LOCAL LOOP PHONE
GETTING TO KNOW YOUR PHONE
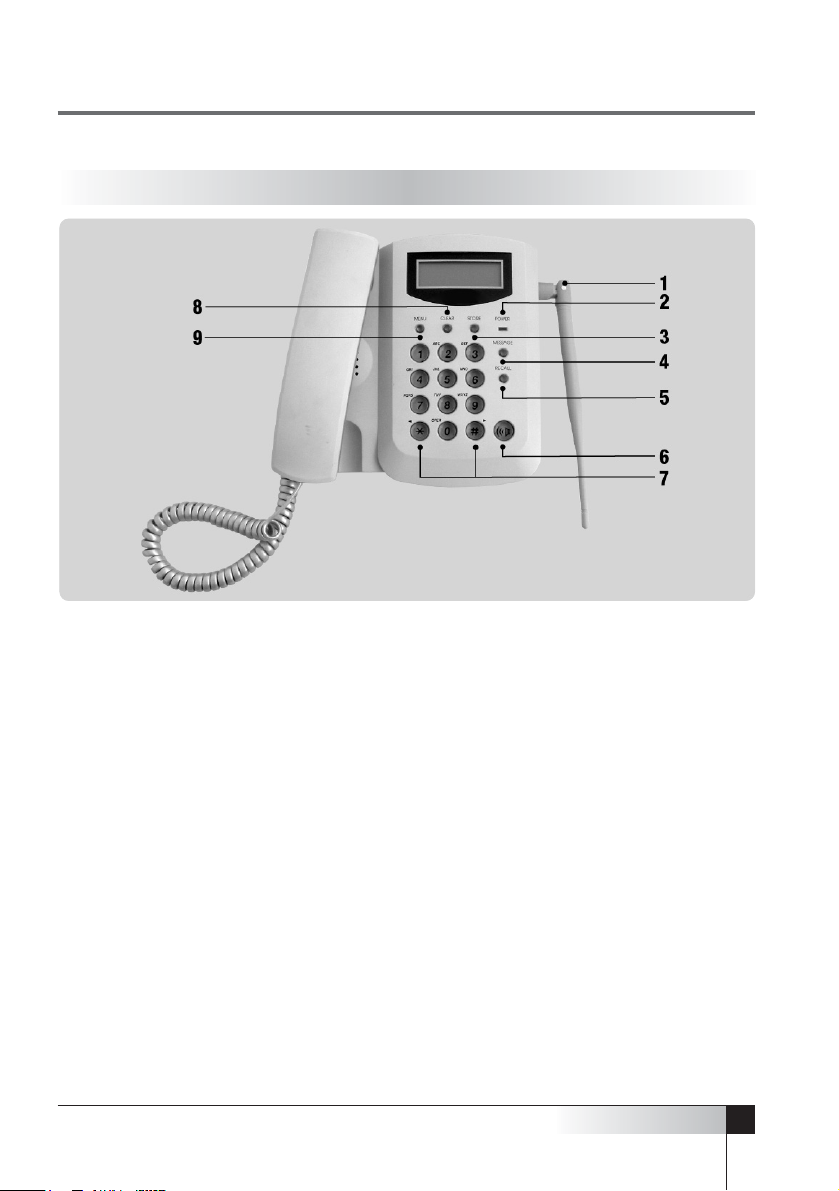
1. Antenna :
Adjusting the antenna improves the sound quality of the call.
2. Power/RSSI LED :
The Power LED lights when the power is connected. Under
battery power, this LED is always blinking.
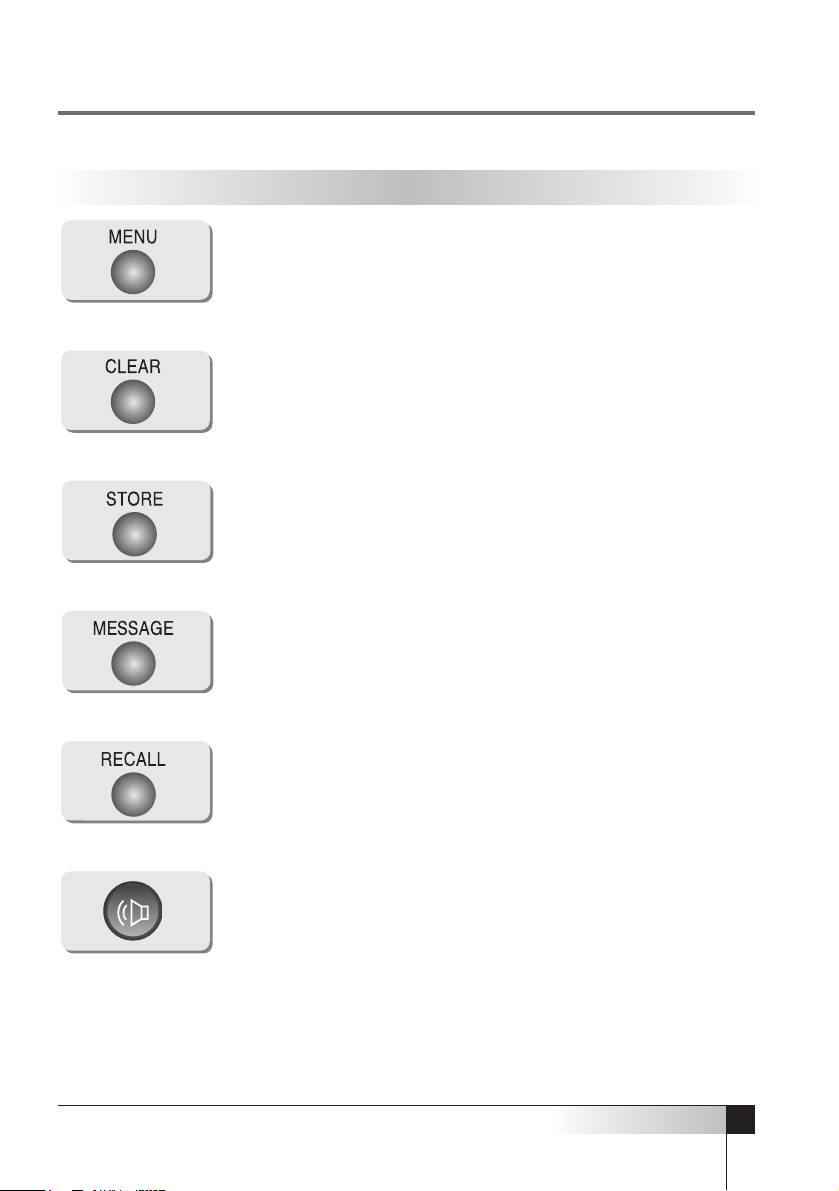
3. STORE :
Stores phone numbers, and any settings you select in the menu within the
phone’s memory.
4. MESSAGE :
Press to retrieve messages.
5. RECALL :
Allows you to redial the last number called.
6. On-Hook :
Allows you to enter phone number without lifting the handset off the hook.
7. Shift Keys :
Press to move the cursor when entering letters and to scroll through
menu options and displays.
8. CLEAR :
Lets you clear your last entry.
9. MENU :
Press to access the phone’s menus.
Page 10
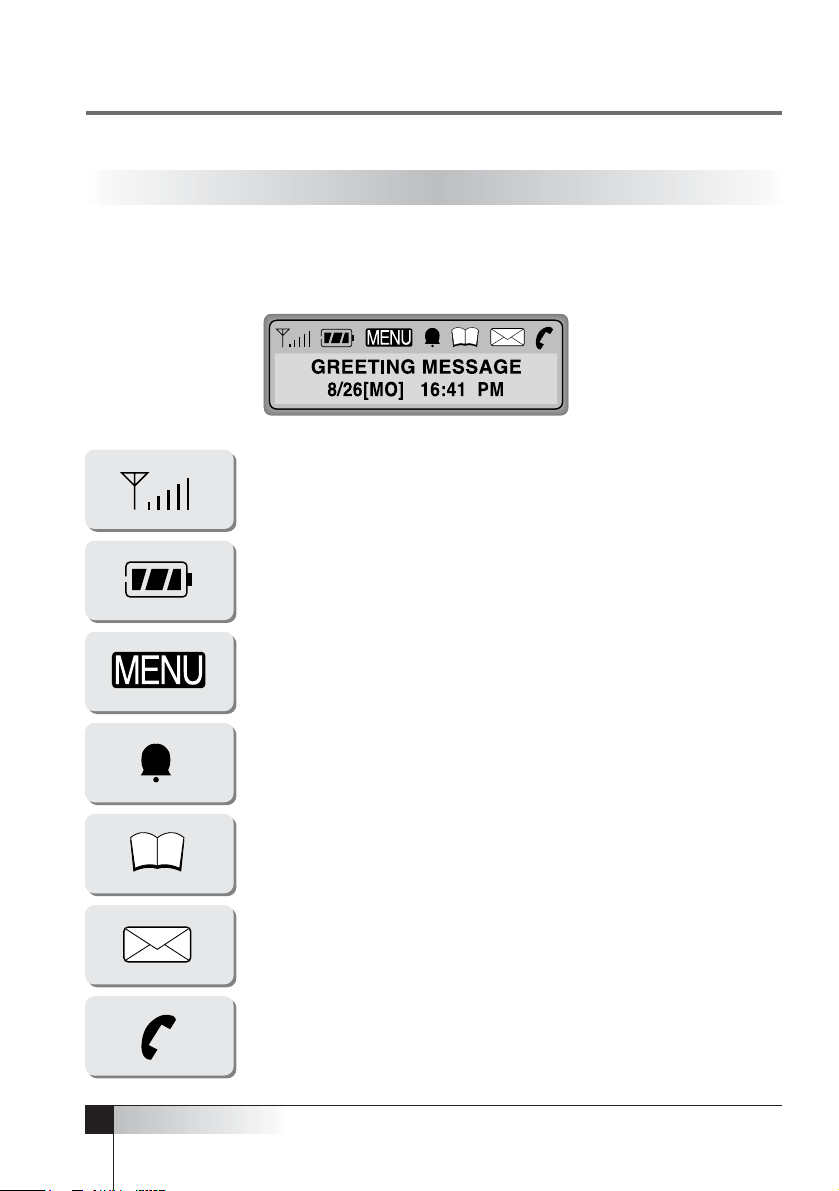
Icons display on the screen to indicate what features you are using and the status of
the phone, signal strength, and battery.
10
USER’S MANUAL
DISPLAY ICONS
Indicates the strength of the current signal. The more bars, the
stronger the signal.
Indicates the level of battery power. The more bars, the more
power. When the battery is low, the icon blinks and an alert tone
sounds.
Indicates that you are using the phone’s menu.
Indicates that you have set your phone’s alarm.
Indicates that you are in the phone’s internal phone book.
Flashes when you have a page, a text message or a voice mail
message.
Indicates that a call is in progress.
Page 11
11
USER’S MANUAL
CDMA WIRELESS LOCAL LOOP PHONE
Press this key to display the phone’s main menu.
Press this key to store a number in the phone’s internal phone
book and to save menu settings.
Press this key to retrieve messages.
Press this key to redial the last number called.
The ON-HOOK button is used to enter a number, without lifting
the handset off the hook.
Clears information from the display screen.
To erase one character from the display screen, press it once.
To erase all the characters on the screen, press and hold down.
To go back one step when you’re accessing a menu, briefly press
it once.
FUNCTION KEYS
•
•
•
Page 12

3
Page 13

Placing Calls
Redial
Receiving Calls
Adjusting Volumes
Choosing the Ring Tone
On-Hook Call
Basic Operation
Page 14
3
1. First, check to see that your WLL Phone is turned on. If
the Power / RSSI LED is lit,
the power is on.
2. Pick up the handset or press to hear a dial tone.
If the service is not available, you hear a no service|
tone (intermittent tone).
3. Using the keypad, dial the desired telephone number.
The LCD window displays the number.
4. press .
5.
When the other person answers, begin your conversation.
If you pressed in step 2, pick up the handset before
you begin conversation.
6. To end the call, replace the handset.
PLACING CALLS
REDIAL
NOTE : Modifying a phone number.
– Modifying the number by one digit : Press briefly.
– Modifying the entire number : Press and hold.
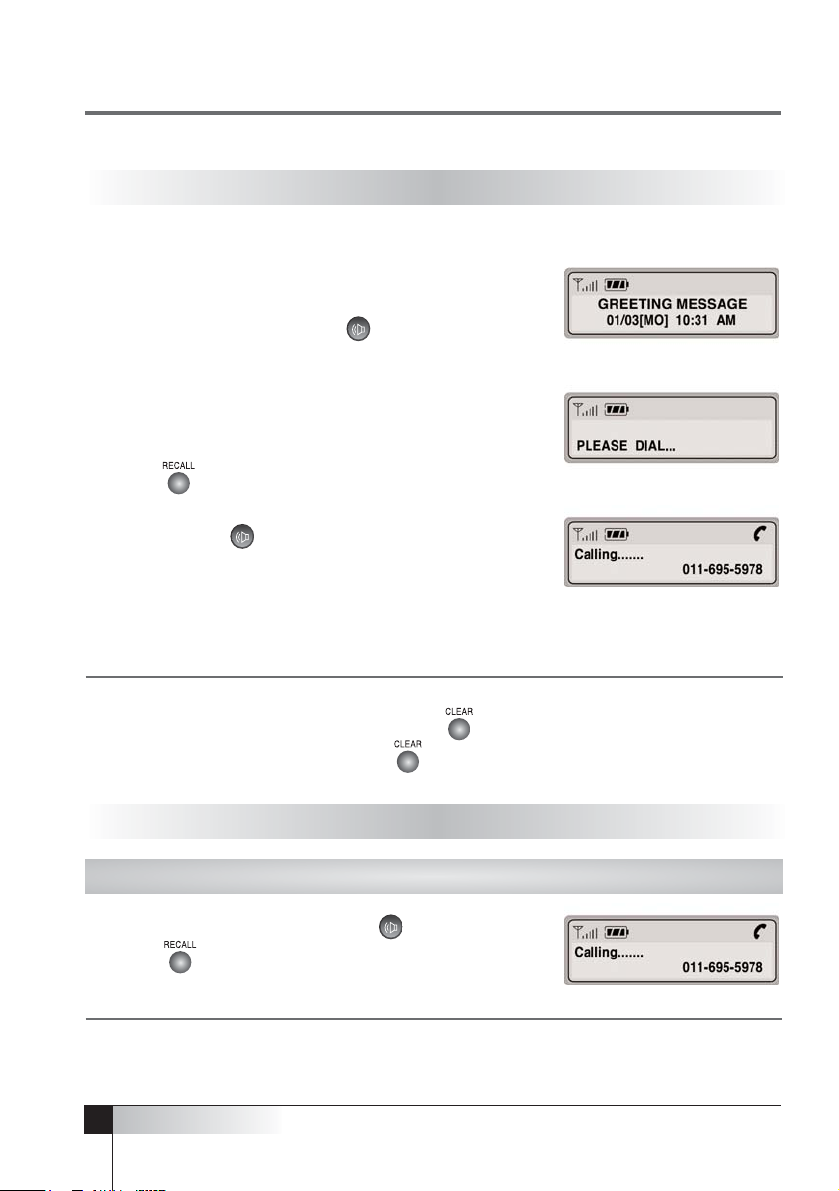
Redial the last number you dialed by using this feature.
1. Pick up the handset, or press .
2. Press .
To speak to the other person, pick up the handset.
NOTE : You cannot redial in the above manner when
the power is just on. ‘NO LAST CALL!’ will display.
USER’S MANUAL
14
Page 15
15
USER’S MANUAL
CDMA WIRELESS LOCAL LOOP PHONE
RECEIVING CALLS
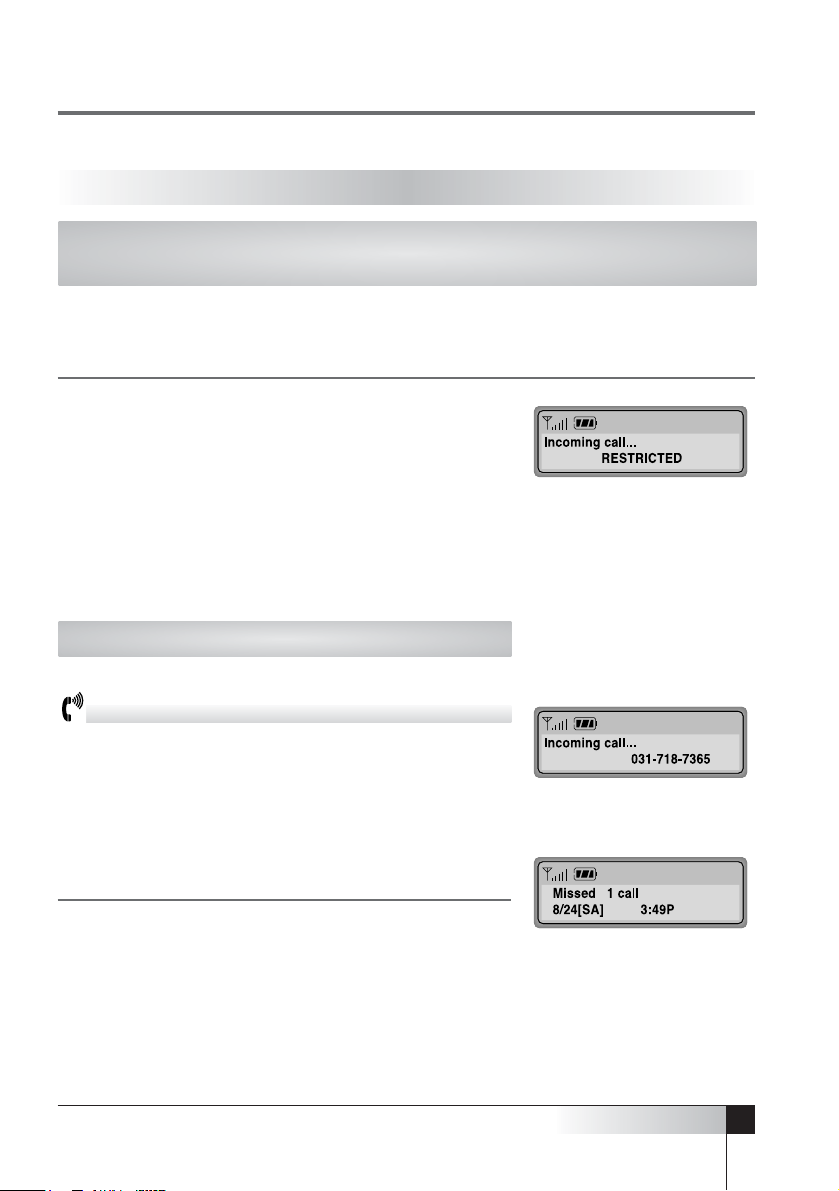
When you receive an incoming call, your phone will ring and blink "Incoming
Call" display in LCD window and the LED on the phone will blink.
1. Simply pick up the handset to answer the call.
2. To disconnect, replace the handset.
NOTE : If a call comes in while the incoming call restriction
function is set, ‘INCOMING CALL RESTRICTED’
displays and you cannot receive the call until you
enter the lock code.
If you select ‘Silent’ in the phone ring volume
selection function, the phone will not ring. Instead,
the incoming call light will blink.
When Caller ID is activated.
Caller ID Display
The Caller ID feature displays the caller’s number when
the phone rings. If the caller’s name and number are
stored together in your phone’s memory, the caller’s name
willdisplay.
Contact your service provider to activate this feature.
NOTE : If there is a missed call (the call not answered),
the missed call number will display
Page 16
3
USER’S MANUAL
ADJUSTING VOLUMES
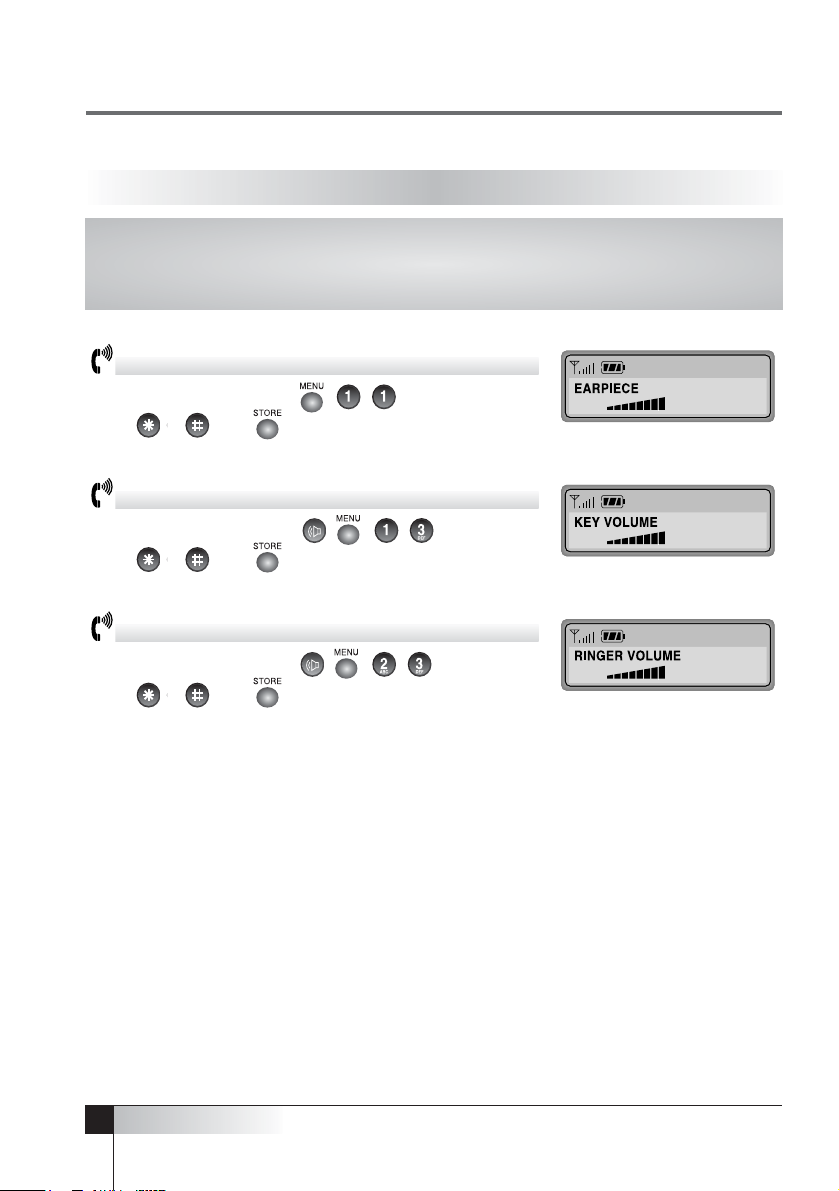
Controlling conversation volume
Lift the handset and press , , and
press or . and to adjust voice volume.
Controlling key tone volume
Lift the handset and press , , , and
press or . and to adjust key tone volume.
Controlling ring tone volume
Lift the handset and press , , , and
press or . and to adjust ring tone volume.
You can control the sound volumes on your phone, including the key tone (the
sound you hear when you press a key), the conversation volume (the sound of
the other party during a phone call) and the ring volume of an incoming call.
16
Page 17

17
USER’S MANUAL
CDMA WIRELESS LOCAL LOOP PHONE
CHOOSING THE RING TONE
You can choose from ten different ring tones.
1. Press and to select ‘Ring/Alert’.
2. Press to select ‘Ring Tone’.
3. Press or . to scan ring tones.
4. Press to save the desired ring tone setting.
ON-HOOK CALL
This feature allows you to make a call without picking up the handset.
1. Press .
You will hear the dial tone through the speaker.
Dial tone time : 20 sec.
2. Enter the phone number you want to call.
3. When you hear the other party answer, pick up the
handset and begin the conversation.
NOTE : If you do not pick up the handset, the other party will not be able to hear you.
To make a Quick Call
Pick up the handset, or press , enter the phone number of the party you want to
call, and then press . The call connects immediately.
Page 18

Page 19

The Internal Phone Book
Storing Numbers in Memory
Searching for Numbers in Memory
Erasing a Number in Memory
One-Touch Calling
Two-Touch Calling
Internal Phone Book
Page 20

1. press .
2. Enter the desired telephone number up to 28.
3. Press .
4. Enter a name by pressing the alphanumeric keys.
NOTE : If you do not wish to enter a name, just skip
over this step. You can only input 16 letters
5. Press .
6. Press to store at an empty location displaying
automatically.
7. To assign a specific location, Press a 2-digit location
number between 01 and 99.
To store the number in the next memory location,
Press or .
NOTE : If you are selecting a location between 1 and 9
enter zero (0) before that number. If there is no
empty location, the message ‘MEMORY(01-99)
IS FULL!’ will display.
If the message ‘MEMORY USED!’ displays,
8. Press .
9. To store the number in confidential, press or and
select ‘SECRET’.
10. Press .
20
USER’S MANUAL
THE INTERNAL PHONE BOOK
STORING NUMBERS IN MEMORY
Your phone has an ‘Internal Phone Book’ in which you can store up to 99
frequently called names and numbers. You can set them up for convenient,
one-touch or two-touch dialing, and you can store them as confidential phone
numbers.
Page 21

USER’S MANUAL
CDMA WIRELESS LOCAL LOOP PHONE
21
SEARCHING FOR NUMBER IN MEMORY
Searching by Location Number
1. Press and and .
2. Enter the two-digit memory location to display the
number. The name displays.
3. Press and the number displays and can be modified.
NOTE : If the location is empty, ‘Empty Location!’
will displays.
4. When the desired number displays.
To make the call, press .
To exit the function, press .
Searching by Name
1. Press and and in sequence.
2. Press and you can enter all or part of the name by
pressing the alphanumeric keys on the keypad.
Example) Enter A to find all names beginning from the
letter A.
3. Press . The phone briefly displays the memory
location number along with the name and number of the
first match. If the number displayed is not the one you
want, press or to scroll through the list until the
desired number displays.
4. When the desired number displays, press to dial the
number automatically.
If you do not remember which telephone numbers have been stored in the
various memory locations, you can scroll through memory to find a specific
entry.
Page 22

22
USER’S MANUAL
Searching All
1. Press and and in sequence.
2. To browse all stored list, press or .
3. Press to select one among the list and
see the details.
4. When the desired number displays,
press to make the call,
Searching Confidential Number
To see the phone number stored in a
confidential memory location, follow these steps :
1. Press and and in order.
2. Search the one who you want to look
by a searching method said previously and
The name (if any) displays.
3. Press , "INPUT LOCK CODE" displays.
4. Enter the lock code.
NOTE : The lock code is preset to ‘0000’ at the factory.
5. To make the call, press .
To exit the function, press .
Page 23

23
USER’S MANUAL
CDMA WIRELESS LOCAL LOOP PHONE
ERASING A NUMBER IN MEMORY
To Erase a Specific Number
1. Press and and in order.
2. Search the one who you want to look by a searching
method said previously and The name (if any) displays.
3. Press on one who you want to erase among the list.
4. Press to erase it. Confirming message displays.
5. To confirm, press . To cancel, press .
6. If you erase a secret one, you have to enter lock code
instead of pressing to confirm.
NOTE : In order to erase everything in the memory,
you must reset the phone.
Page 24

24
USER’S MANUAL
ONE-TOUCH CALLING
TWO-TOUCH CALLING
Memory locations 01 ~ 09 are special one-touch dialing locations. You can dial
the numbers stored in 01~09 by pressing one key. You do not need to precede
the numbers with a zero when using one-touch dialing.
1. Pick up the handset or press .
2. Press and hold the number of the location number
and hold it down for at least one second.
3. The number displays and dials automatically.
1. You can easily dial phone numbers stored in memory
by pressing the two-digit memory location.
2. Briefly press the first digit of the memory location
number, then press the second digit and hold it down
for at least one second.
Example) To dial location 23, briefly press the ,
then press and hold for a moment.
3. The number stored displays and dials automatically.
Page 25

Call Logs
Electric Dialing
Displaying Your Phone Number
Mute
Silent Scratchpad
Sending Your Phone Number
Selecting Time Mode
Setting the Alarm
Checking and Clearing Call Times
Setting Warning Beeps
Useful Features
Page 26

26
USER’S MANUAL
Redialing Outgoing Calls
1. Pick up the handset or press .
2. Press to redial the last outgoing call.
NOTE : If there’s no last call record, "MEMORY
EMPTY" will appear with an alarm.
3. To display the phone numbers of the last 10 outgoing
calls, press , , and press or until the
desired number displays. To redial the number in the
display, press .
4. To exit the function, press .
Returning Incoming Calls
To display a list of recently received calls.
1. Press , , .
NOTE : If there’s no incoming call record, "INCOMING
CALL MEMORY EMPTY!" message will
appear with An alarm.
2. Press or until the desired number displays.
3. To redial the number in the display, press .
4. To exit the function, press .
NOTE : This function is available only when caller ID is
activated.
Erasing All Numbers in Redial Memory
1. Press , .
2. Press to select ‘Erase Logs’, and then
press or select ‘Erase’.
3. Press . to erase all outgoing and incoming numbers.
CALL LOGS
Your phone stores the last 10 outgoing calls and the last 10 incoming calls
(only when Caller ID function is activated). You can display and redial these
numbers.
Page 27

27
USER’S MANUAL
CDMA WIRELESS LOCAL LOOP PHONE
Electronic Dialing With Several Pause Symbols
You can send more than one series of numbers using more than one pause.
Ex) ‘02-541-3000p1234p5678’
Call the 025413000 number first. Pick up the handset.
When you are prompted to enter the next number,
press and ‘1234’ will be dialed automatically.
After that, if you press again, ‘5678’ will be dialed.
Entering a Hard Pause
You can enter a hard pause between numbers by
Pressing while entering digits. The hard pause
displays as ‘p’ on the phone. A hard pause is useful
when you access an interactive voice response system,
such as an automated banking system.
Electronic Dialing Using Pause
This method is used to send numbers while you are in
conversation. You can use the pause symbol in more
than one position. Up to 30 positions are possible,
including the pause symbol. You can store them all in
memory with a reference number.
1. Pick up the handset or press .
2. Enter the phone number and press .
Pause symbol ‘p’ will appear in the display.
3. Enter the numbers to be dialed electronically.
4. When the call connects, you are prompted to enter the
number to be dialed electronically.
5. Press .
ELECTRONIC DIALING
This function is used for a computer service, pager, or home automation
provided by a bank or a stock company. If ‘SILENT KEY’ is set, electronic
dialing is not available.
Page 28

28
USER’S MANUAL
Displaying Your Phone Number
1. Press .
2. Press to select ‘Security’.
3. Enter the lock code.
NOTE : The lock code is preset to ‘0000’ at the factory.
4. Press to select ‘My Phone#’.
The screen displays the phone number.
DISPLAYING YOUR PHONE NUMBER
You can display your own phone number.
1. Press during conversation.
2. Press to select ‘Mute’.
The message ‘MUTE’ blinks. The other party can no
longer hear you, but you can hear them.
3. Press and again when you wish to resume the
conversation.
The message ‘MUTE’ disappears from the display and
you can speak to the other party.
MUTE
This feature lets you mute the microphone, so that the other party cannot hear
your voice or the sound of your surroundings. This function is available only
during a telephone conversation.
Page 29

29
USER’S MANUAL
CDMA WIRELESS LOCAL LOOP PHONE
Turning off the Key tone
1. Press during conversation.
2. Press to select ‘Scratchpad’.
The message ‘Scratchpad’ displays.
3. Enter the desired number.
There is no key tone when you press the keys during
a conversation.
SILENT SCRATCHPAD
You can check your own phone number or press a number during a
conversation without transmitting the dial tones to the other party.
This function is available only during a telephone conversation.
Turning on the Key tone
1. Press .
2. Press to select ‘Scratchpad’.
The message ‘Scratchpad’ disappears and the key tone sounds
NOTE : If you do not turn on the key tone, you cannot use ARS (Automatic Response
System) service or Call Pager.
Page 30

30
USER’S MANUAL
1. When the pager prompts to enter your phone number
after calling a paging system, press .
2. Press to select ‘Send Tel #’.
Your phone number is transmitted automatically.
SENDING YOUR PHONE NUMBER
When leaving a message on another party’s pager, you may be prompted to
enter your phone number. You can conveniently transmit your number to the
pager by pressing two keys instead of the entire number. If ‘SILENT KEY’ is
set, you cannot use this feature. This function is available only during a
telephone conversation.
Page 31

31
USER’S MANUAL
CDMA WIRELESS LOCAL LOOP PHONE
1. Press , , and in sequence.
2. Select ‘RELEASE’ to off alarm. Bell icon disppears.
SELECTING TIME MODE
SETTING THE ALARM
You can set the alarm sound daily or one time only.
Setting / Canceling the Alarm Time
1. Press , , and in sequence.
2. Select one method of alarm by pressing or .
Daily : Alarm sounds daily.
One time : Alarm sounds only one time.
3. Press .
If the alarm function is set, ‘ALARM TIME’, date,
present time, and alarm hour displays.
4. Input alarm time.
Hours should be input as 24hour units.
To modify the alarm time, press or .
You can enter a specific time for the alert to sound.
5. Press and enter the number of minutes that you
want the alert to sound.
6. Press .
When the alarm time arrives, a melody sounds and
‘<ALARM TIME>’ displays. The sound will stop if you
press any button.
1. Press , , in sequence.
2. Select one time display mode by pressing or .
AM/PM Type : Time displays with AM/PM.
24 Hour Type : Time displays as 24 hour units.
No Time and Date : Not display time and date.
3. Press .
Page 32

32
USER’S MANUAL
CHECKING AND CLEARING CALL TIMES
Checking the Last Call Time
1. Press , , in sequence.
2. Press to clear the display.
Checking Accumulated Air Time
1. Press , , in sequence.
2. Press to clear the display.
Reset Accumulated Air Time
1. Press , , in sequence.
2. Select ‘YES’ by pressing .
3. Press .
SETTING WARNING BEEPS
You can set your phone to sound warning beeps during conversation that indicate:
each minute you are on a phone call
when you are out of the service area
1. Press , , in order to select ‘1min Alert’.
2. Press or to choose the status ‘ON/OFF’.
3. Press .
4. Press , , in order to select ‘Svc Alert’.
5. Press or to choose the status ‘ON/OFF’.
6. Press .
•
•
Page 33

Changing Greeting Message
System Reset
Restricting Use of the Phone
Locking the Phone
Changing the Lock Code
Tone Length
Advanced Features
Page 34

34
USER’S MANUAL
1. Press .
2. Press ‘Security’.
3. Enter the lock Code
NOTE : The lock code is preset to ‘0000’.
4. Press to select ‘Greeting’, Press .
5. Enter your new greeting message by pressing the
alphanumeric keys.
6. Press .
CHANGING GREETING MESSAGE
This feature lets you change the greeting message that displays when you turn
on the phone.
1. Press .
2. Press , "Security".
3. Enter the lock code.
NOTE : The lock code is preset to ‘0000’.
4. Press to select ‘Reset Phone’.
5. Press or to choose the status ‘RESET/CANCEL’.
6. Press . ‘Erasing memory...’ blinks while the phone is
reset.
NOTE : This feature will erase everything in memory, the telephone book inclusive.
SYSTEM RESET
To reset all of your phone’s features to the manufacturer’s defaults, follow
these steps :
NOTE : Press to choose Capital, Small and Special character.
Page 35

35
USER’S MANUAL
CDMA WIRELESS LOCAL LOOP PHONE
Restricting Outgoing Calls
In this mode, the phone cannot originate a call.
If you try to call, ‘OUTGOING CALL RESTRICTED’ will
display.
Restricting Incoming Calls
In this mode, you cannot answer an incoming call.
If the phone receives an incoming call, ‘INCOMING
CALL RESTRICTED’ will display.
Restricting Long Distance Calls
In this mode, you cannot make a long distance call.
If you try to dial a long call number, ‘LONG DISTANCE
CALL RESTRICTED’ will display.
Restricting International Calls
In this mode, you cannot make an international call.
If you try to dial a international phone number,
‘INTERNATIONAL CALL RESTRICTED’ will display.
RESTRICTING USE OF THE PHONE
You can restrict the use of the phone by unauthorized persons. There are 4
restriction modes you can choose as follows :
Page 36

36
USER’S MANUAL
Setting Restriction Modes
1. Press .
2. Press , "Security".
3. Enter your lock code.
NOTE : The lock code is preset to ‘0000’ at the factory.
4. Press to select ‘Restrict’.
5. Select the desired menu by pressing the number
1. Outgoing, 2. Incoming, 3. Long Call, 4. Intl. Call
6. Press or to select the status, ‘RESTRICT/CANCEL’
7. Press .
Voice Privacy
The voice privacy menu offers protection from illegal
wiretapping.
1. Press .
2. Press , "Security".
3. Enter your lock code.
NOTE : The lock code is preset to ‘0000’ at the factory.
4. Press to select "Voice Privacy".
5. Select the desired menu, "Enhance or Standard".
6. Press or to select.
7. Press .
Page 37

37
USER’S MANUAL
CDMA WIRELESS LOCAL LOOP PHONE
Locking the Phone
1. Press .
2. Press to select ‘Security’.
At this time, the display will show ‘ENTER LOCK CODE’
3. Enter the lock code.
NOTE : The lock code is preset to ‘0000’ at the factory.
4. Press to select ‘SET LOCK’, and you can set
the desired lock state.
Choice "Never, On power up, Now, Aways".
The default setting is "Never".
5. Press or to select the status, ‘SET’.
6. Press to auto lock the phone. – LOCKED – displays.
If you try to dial numbers, it will ask you to key in Lock
Code.
NOTE : The lock code is preset to ‘0000’ at the factory.
7. If you want to unlock the phone.
8. Follow the same steps above and select
‘never’ on the step 5.
LOCKING THE PHONE
You can lock your phone so that calls cannot be made by unauthorized
persons. You can still receive incoming calls when your phone is locked by
entering the lock code when the phone rings. Turning the phone off does not
erase this feature; the phone stays in mode until you reset it.
Page 38

38
USER’S MANUAL
1. Press .
2. Press to select ‘Security’ and then enter the
current lock code.
NOTE : The lock code is preset to ‘0000’ at the factory.
3. Press to select ‘New Code’.
4. Enter your new lock code.
NOT E : The lock code must be four numeric digits.
5. Press .
6. Re-enter new lock code for verification
7. Press to confirm.
NOTE : If the digits for confirmation is not matched with
digits you enter first, ‘DO NOT MATCH TRY
AGAIN!’ displays. You can repeat from step 4.
above.
Tone Length : Some phones you call may be able to
recognize only long tones. You may have to change the
tone length to LONG for some calls that you place.
Press , , : “DTMF Ton Length”
NOTE : When calling a paging system, your phone should
be in the Short mode.
CHANGING THE LOCK CODE
TONE LENGTH
When you purchase your phone, the lock code is preset to 0000. You can
change the lock code to any 4-digit code.
Page 39

Call Forwarding
Call Waiting
Three-Way Calling
Message Service
Optional Features
Page 40

40
USER’S MANUAL
CALL FORWARDING
MESSAGE SERVICE
Call Forwarding is a feature on your phone that lets you forward your incoming calls to
another phone number, even if your phone is turned off. Also, you can receive calls
while Call Forwarding is activated.
Contact your service provider to activate Call Forwarding.
CALL WAITING
Call Waiting alerts you to a second incoming call while you are on the phone.
To respond to a call waiting, press or the hook switch.
Contact your service provider to activate Call Waiting.
THREE-WAY CALLING
Three-Way Calling is a feature on your phone that lets you set up a three-way
conversation with two other persons. or the Hook switch is used with Three-Way
Calling.
Contact your service provider to activate Three-Way Calling.
Message Service can be used only when provided by your CDMA service
provider. Check that the CDMA service provider you use is providing message
service before using this function. The messages are stored in the order they
are received. If there are messages that the user has not checked, icon
will display.
Page 41

41
USER’S MANUAL
CDMA WIRELESS LOCAL LOOP PHONE
Receiving Voice Messages
1. If a voice message is received, ‘--VOICE MAIL--’ and
will display.
2. Press to connect voice mail center and hear the
message.
3. Press again to call back if the caller leaves a phone
numbers.
Note : If the phone number is stored in the phone book
with a name, the name will display instead of the
phone number.
Sending Text Messages
1. Press , , . in sequence.
2. Enter the dial number and Press .
3. Write message using the alphanumeric keypad.
Note : Press to choose capital, small latters and
special character.
4. Press . A call back number will show your phone
number automatically.
It can be changed as you like.
5. Press . Select message type NORMAL, URGENT,
EMERGENCY, using or .
Note : Emergency or Urgent message is available only
when your service provider support it.
6. Press to send the message.
Note : Sending text message is available only when
your service provider support it.
Page 42

42
USER’S MANUAL
Receiving Page Messages
1. If a page message is received, PHONE NUMBER and
1 will display.
2. Press to call back or to erase Page message.
Note : If the phone number is stored in the phone book
with a name, the name will display instead of the
phone number.
Note : If the incoming message tone is operating, a beep
tone will be sound at intervals of two minutes until
you check the message. If a new message is the
same as the previous message, ‘DUPLICATE’ will
display.
Receiving Text Messages
1. If a text message is received, CALL BACK NUMBER
and display.
2. Press or scroll down the message.
3. Press and one more to show the number.
4. Press . The message will erase.
Note : If the phone number is stored in the phone book
with a name, the name will display instead of the
phone number.
Page 43

Checking Received Voice Messages
Press and in sequence.
The message volume which is stored in the voice
service center and the last received time will display.
USER’S MANUAL
CDMA WIRELESS LOCAL LOOP PHONE
43
Viewing Received Text Messages
1. Press and in sequence.
The received message list will display.
2. Press or select message you want to see.
3. Press . Received message and time will display. If
there is a phone number, it will display as well. If the
message is long, it will scroll down in 3 seconds
automatically. Press or to scroll up and down
manually.
4. Press twice if you want to call back.
5. To view the next message, press .
The screen will return to step 2 above.
Erasing the Selected Message
1. Press and or .
2. Press or to select the message you want to erase.
3. Press . The message will display.
4. Press once more.
5. Press again to erase the message.
Press to cancel erasing.
Page 44

Setting Message Lock
1. Press , and in sequence.
2. Press or to select ‘SET/RELEASE’
3. Press .
If you set message lock, the phone will ask Lock Code
whenever you press button.
NOTE : The lock code is preset to ‘0000’ at the factory.
44
USER’S MANUAL
Clearing All Received Messages
1. Press , in sequence.
2. Press or to select ‘ERASE/CANCEL’
3. Press .
Setting Message Alert
1. Press , and in sequence.
2. Press or to select ‘SET/RELEASE’
3. Press .
If you set the message alert, the LED will blink with an
alert when a message arrives. If you release the
message alert, the LED will blink without an alert.
Page 45

Menu Option Table
Conversation and Message Menu
FWT Setting
Specifications
Miscellaneous
Page 46

46
USER’S MANUAL
I II III Explanation
MENU OPTION TABLE
1: Sound
2 : Ring / Alert
3 : Time
4 : Security
Tone Length
short / long
Ring Type
Bell + Lamp / Lamp
Ring Tone
Monotone1~6/Melody1~4
Ringer Volume
1 min Alert
On/Off
Svc Alert
On/Off
Alarm Tone
Monotone1~6/Melody1~4
Set/ Release
Clear Air Time
Yes/No
Select Time
No Time & Date/
AM/PM/24 Hours
1. Outgoing
2. Int. Call
3. Receive Call
4. Long Call
SYSTEM RESET
RESET/CANCEL
AUTO LOCK
SET/RELEASE
Standard / Enhanced
Adjust the volume on earpiece when to
conversation.
Sets length of tone (when DTMF
number is sent) to short or long
Adjust Key Volume
Determines whether the phone alerts
the incoming call with sound and lamp
or only with lamp
Selects ring sound
Adjusts the ring volume
Determines whether alert beeps at one
minute intervals when you make or
receive a call
Determines whether alert beep should
sound when you are out of the service
area
Selects alarm sound
Sets/ Release an alarm
Shows the time of last call made
Shows accumulated call time
Resets accumulated call time
Selects time expression mode
Used to change greeting
Used to change lock code
Used to limit outgoing calls
Used to limit international call
Used to limit incoming calls
Used to limit long distance calls
Returns the phone to factory setting
Used to lock the phone
Used to check your phone number
Protect illegal wiretapping
1: Hand Set Vol
2: DTMF Ton Len
3: Key Volume
1: Ring Type
2: Ring Tone
3: Ring Volume
4: 1 min Alert
5: Svc Alert
6: Alarm Tone
1: Alarm
2: Call time
3: Air Time
4: Clr Air Time
5: Select Time
1: Greeting
2: New Code
3: Restrict
4: Reset Phone
5: Auto Lock
6: My Phone#
7: Voice Privacy
* The lock code is preset to 0000 at the factory.
Page 47

Data Port Setting
Data Service Rate Setting
DM Rate Setting
English
Espanol
Indonesia
Data/fax off
Fax/Next call
Fax until off
Data/Next call
Data until off
1. Port Map
2. DS Baud
3. Diag Baud
Default
Latin America
East Europe
China/Siria
Nicaragua
India
Language Setting
47
USER’S MANUAL
CDMA WIRELESS LOCAL LOOP PHONE
* At MENU, press “ ” to return to the previous menu.
I II III Explanation
MENU OPTION TABLE
5: Phone Book
6: Call Logs
Used when searching for a phone
number in the phone book by
all/number/stored memory reference
number
Used when erasing a phone number
in the phone book by memory and
number
Stores ten phone numbers called most
recently
Stores ten phone numbers of calls
received most recently
Erase outgoing / Incoming log
Auto SendTime Setting
SEARCH OPTION
NAME / MEMORY / NUMBER
SEARCH OPTION
NAME / MEMORY / NUMBER
1 Sec~10 Sec, No
1 : Search
2 : Erase
1 : Outgoing
2 : Incoming
3 : Erase Logs
7.Settings
1: Auto SendTime
2: Language
3: Rx Data Mode
4: SIO
5: Audiable Tone
Data Receiving Mode Setting
Dial tone Setting
Page 48

48
USER’S MANUAL
Page 49

49
USER’S MANUAL
CDMA WIRELESS LOCAL LOOP PHONE
Page 50

March, 2006 Revision
50
USER’S MANUAL
CONVERSATION AND MESSAGE MENU
SPECIFICATIONS
During a Telephone Conversation
1 : MUTE
2 : Hand Set Vol
3 : SEND TEL#
4 : Scratchpad
Message Menu
1 : VOICE MAIL
2 : TEXT MAIL
3 : MESSAGE SENDING
4 : MESSAGE ERASE
5 : MESSAGE OPTION
Battery Backup Time depends on the battery capacity.
*
Page 51

- Additional Page -
FCC Compliance Information
This device complies with Part 15 of FCC Rules.
Operation is subject to the following two conditions:
(1) This device may not cause harmful interference, and
(2) This device must accept any interference received.
Including interference that may cause undesired operation.
Information to User
This equipment has been tested and found to comply with the limits for a Class B digital
device, pursuant to part 15 of the FCC Rules. These limits are designed to provide
reasonable protection against harmful interference in a residential installation. This
equipment generates, uses and can radiate radio frequency energy and, if not installed
and used in accordance with the instructions, may cause harmful interference to radio
communications. However, there is no guarantee that interference will not occur in a
particular installation. If this equipment does cause harmful interference to radio or
television reception, which can be determined by turning the equipment off and on, the
user is encouraged to try to correct the interference by one or more of the following
measures:
- Reorient or relocate the receiving antenna.- Increase the separation between the
equipment and receiver.
- Connect the equipment into an outlet on a circuit different from that to which the
receiver is connected.
- Consult the dealer or an experienced radio/ tv technician for help.
 Loading...