


Instruction Manual
09610 Rev. A
MODEL: T1X2 Ski Adapter
World’s First Portable, Remote-Control Aircraft Tugs

Contents
1. Components and Required Tools
2. Installation Guide
2-1. Initial Setup
2-2. Installing the Ski Adapter
2-3. Loading
2-4. Unloading
2-5. Warranty
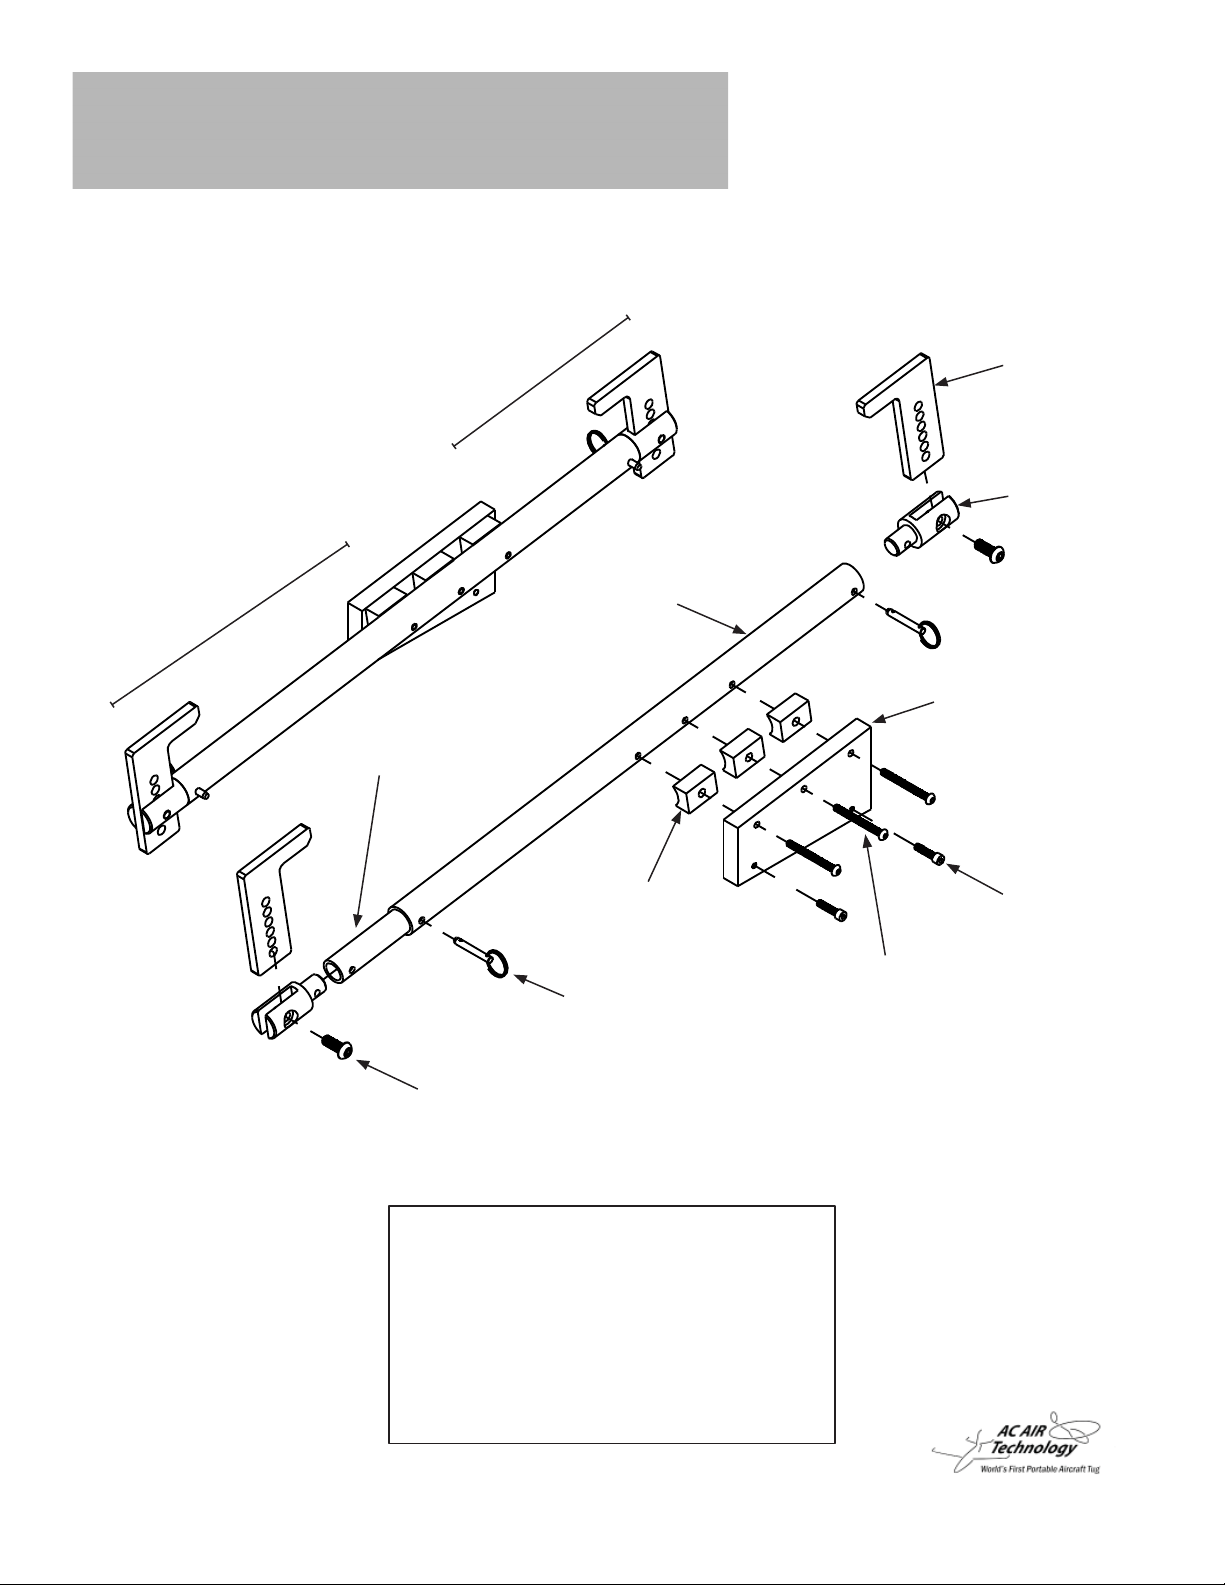
1. Components and Required Tools
Back End (Short Side)
Front End ( Long Side)
Grab Plate
End Cap
Outside Tube
Mounting Plate
Inside Tube
Grab Plate Screw
Mouting Plate Spacer
Lock Pin
Required Tools:
3/16” Hex Drive
7/32” Hex Drive
5/32” Hex Drive
Cradle Screw
Mounting Plate Screw

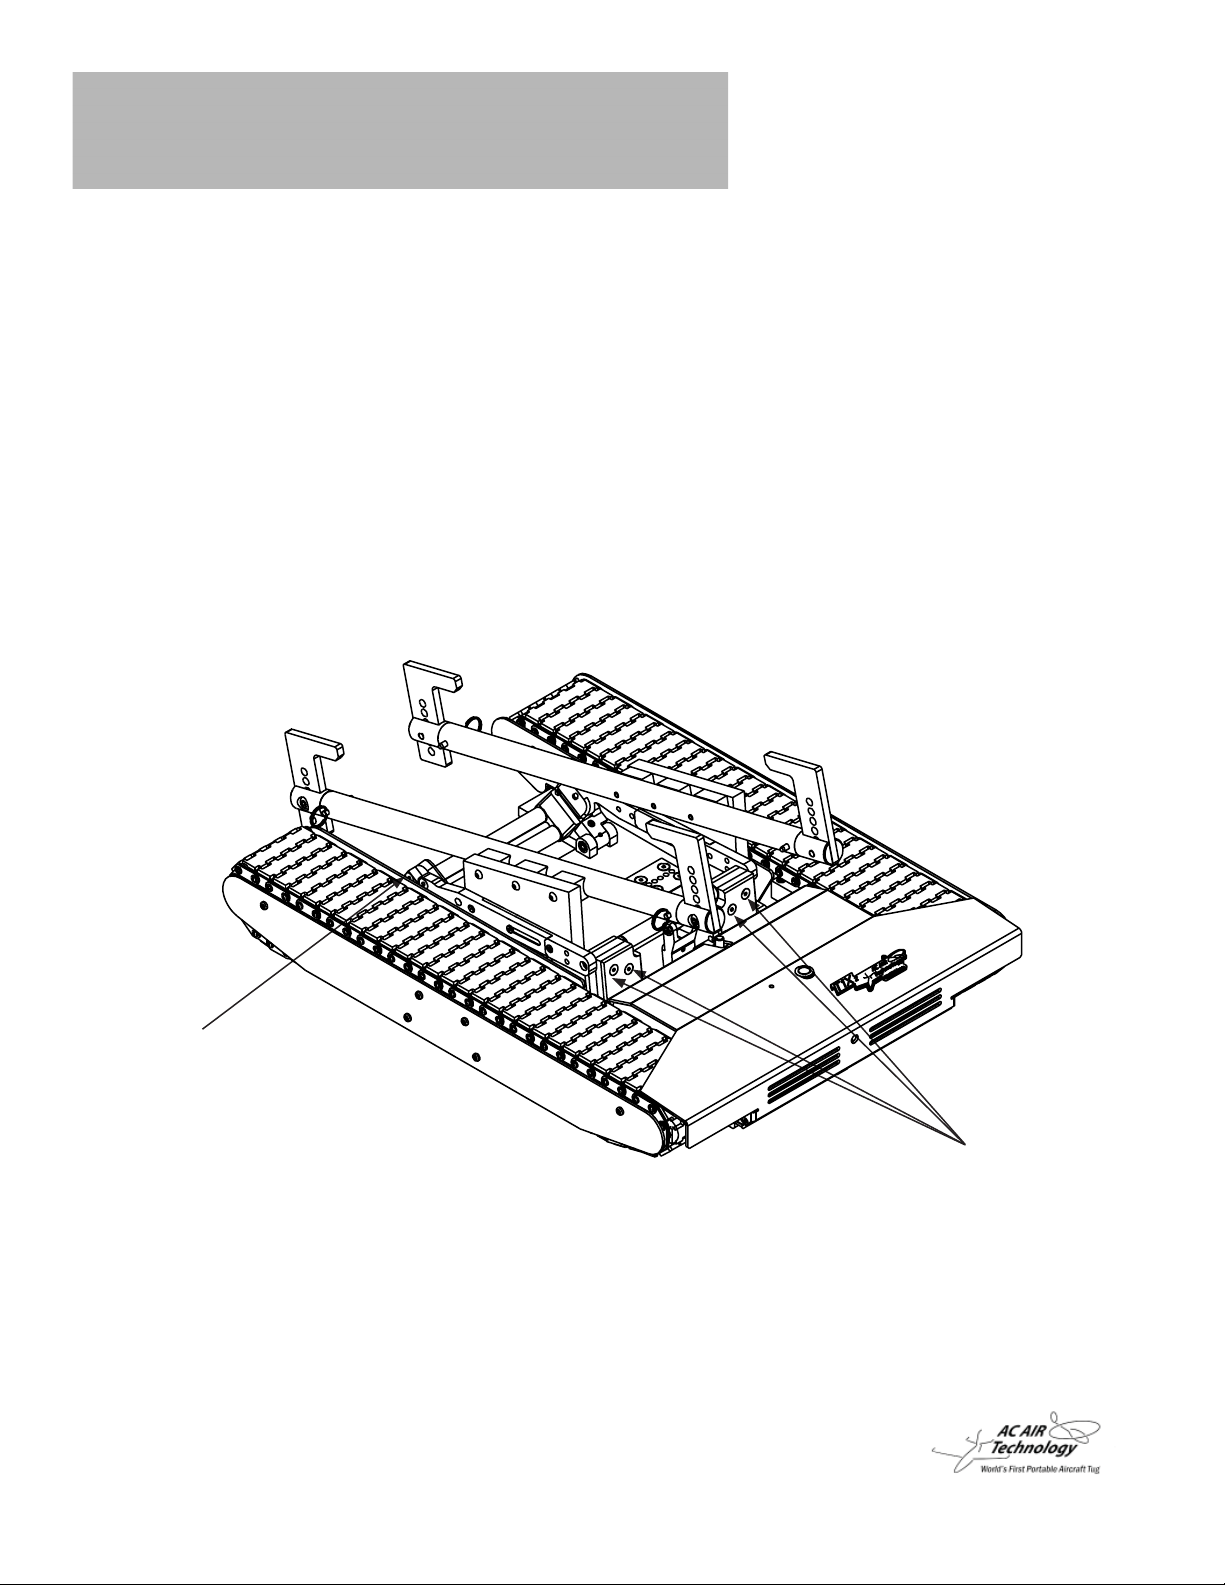
2. Installation Guide
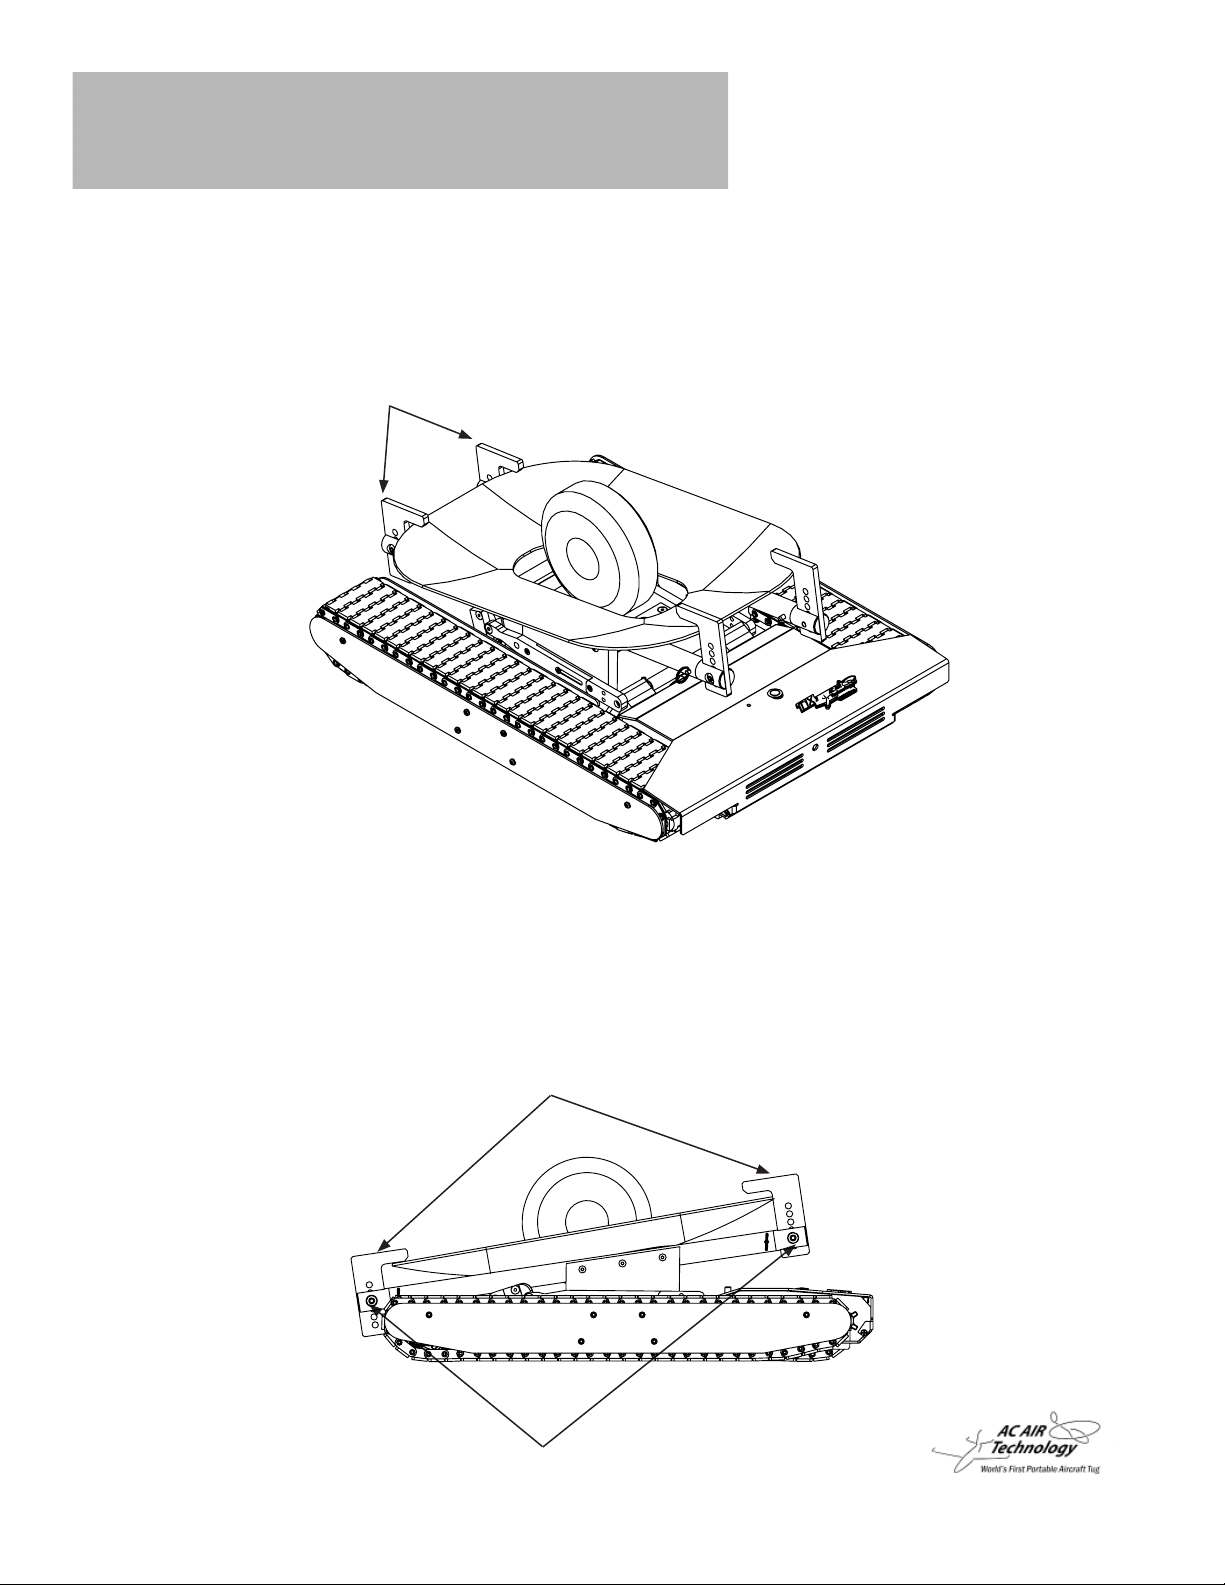
2-1. Initial Setup
1. Remove the dovetail spacers, adjustment pins, and spacer plate.
2. Remove the 2 cradle link adjustment pins.
Adjustment Pin
Dovetail Spacer
Spacer Plate
2 Cradle Link Adjustement Pins

2. Installation Guide
2-1. Initial Setup
3. Manually unlatch the wheel cradle using the manual latch lever and set the cradle in the
“down” position.
4. Using a 5/32” hex drive, loosen the 4 cradle back end adjustment screws and pull
the back end “up” to it’s highest position.
5. Tighten the 4 cradle back end adjustment screws.
4 Cradle Back End Adjustment Screws
Cradle Back End
Cradle in “Down” Position
Manual Latch Lever

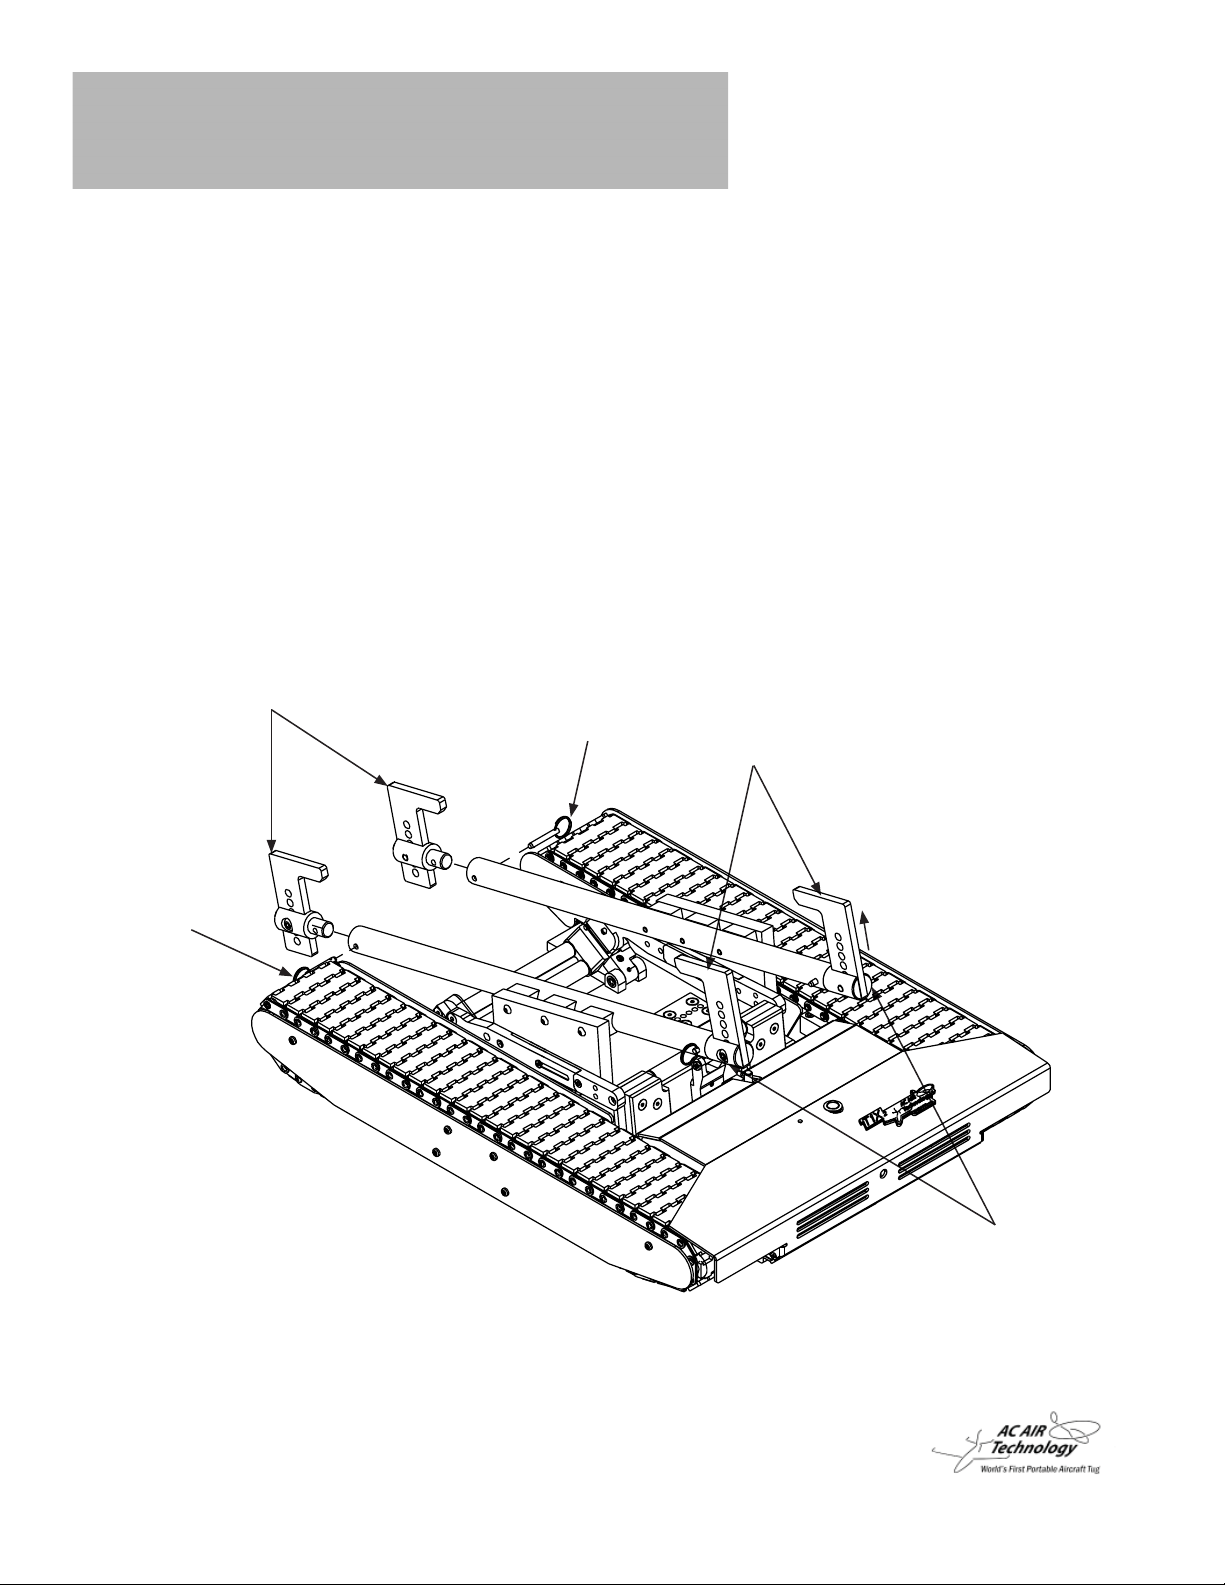
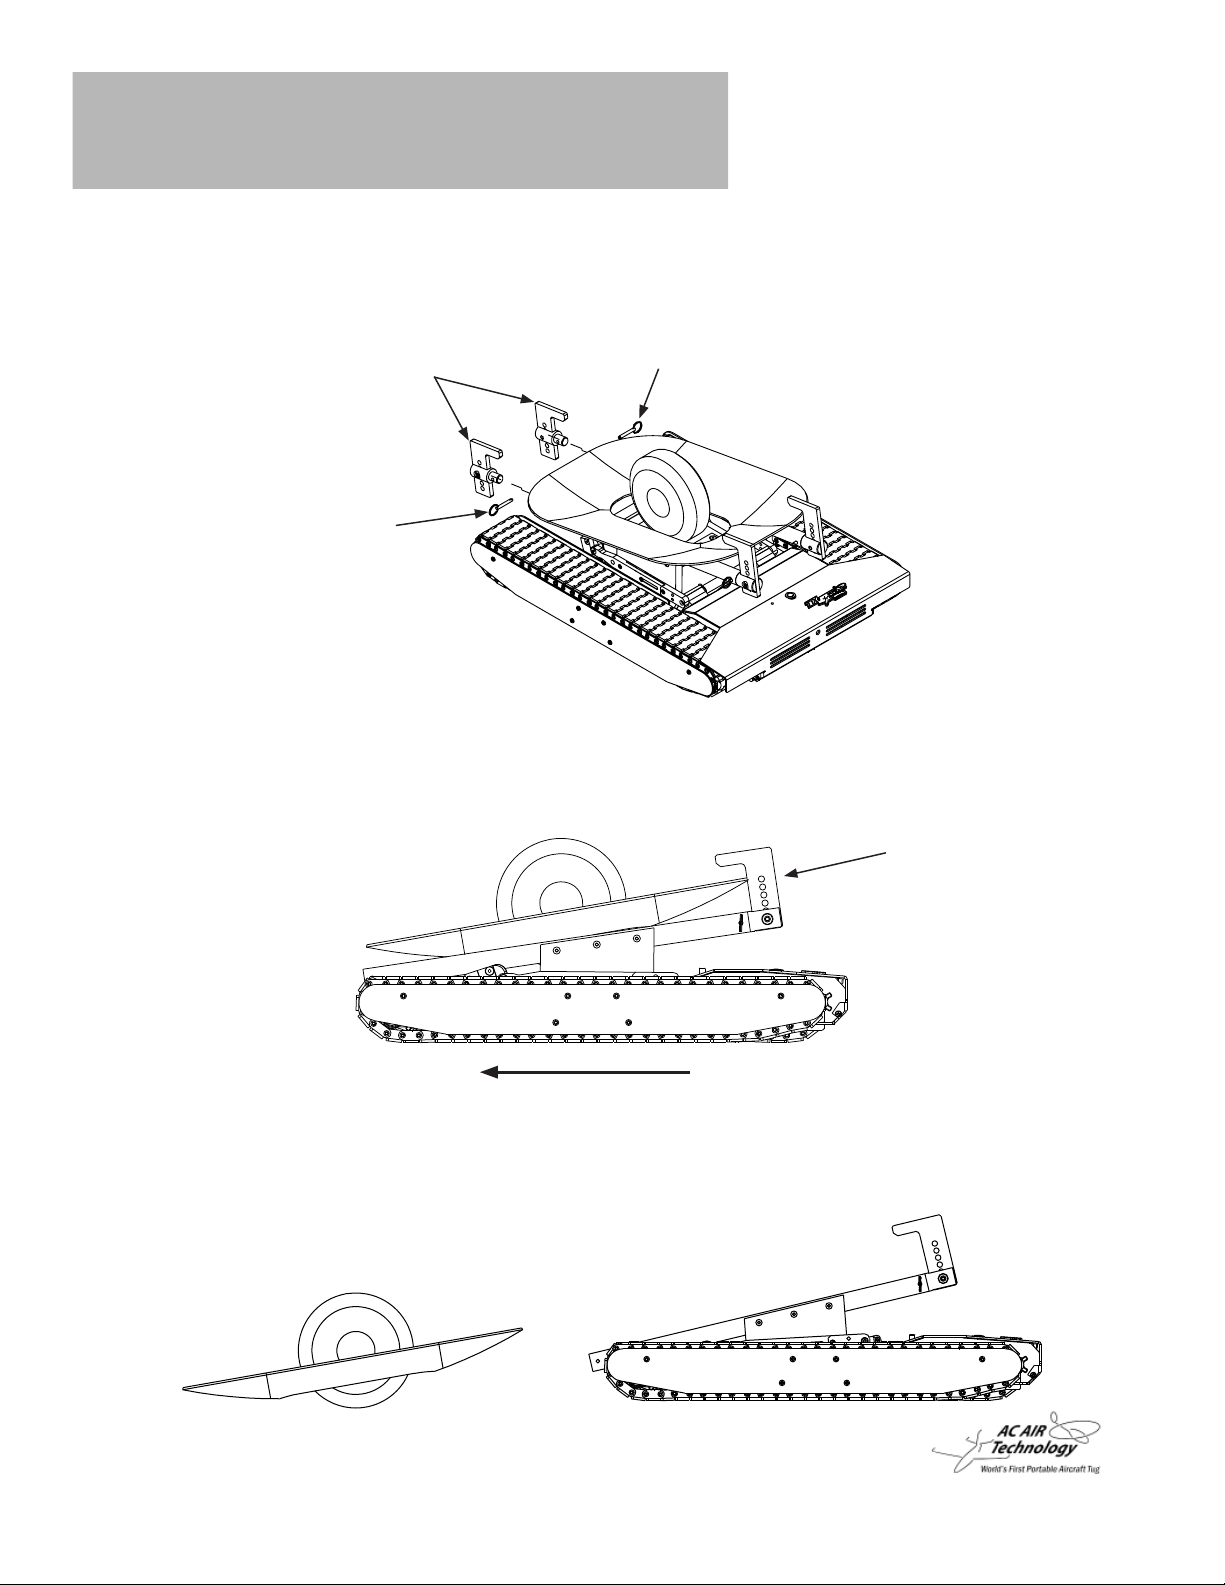
2. Installation Guide
2-1. Initial Setup
6. Using a 5/32” hex drive, remove 2 cradle front end adjustment screws and set
the front end to its highest “up” position.
7. Tighten the 2 cradle front end adjustment screws.
Cradle Front End in Highest Position
2 Cradle Front End
Adjustement Screws

2. Installation Guide
Note: Initial setup needs to be performed one time
before following these steps.
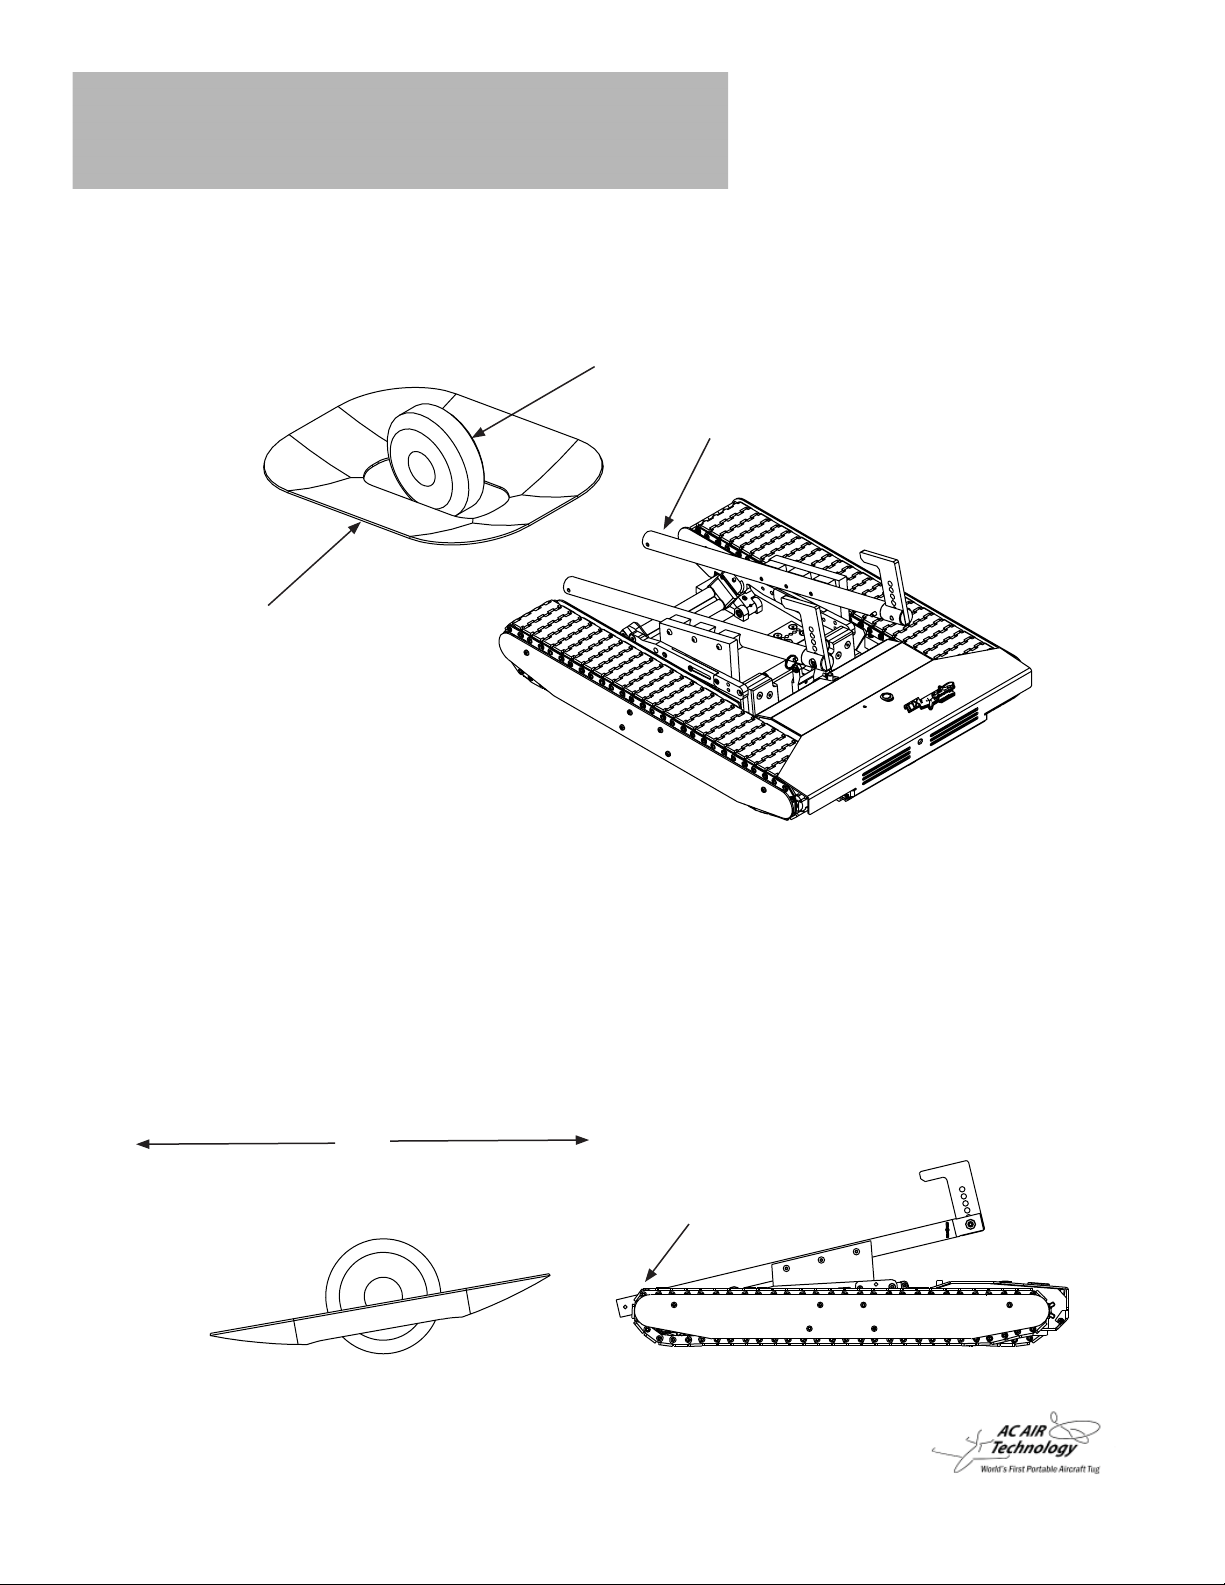
2-2. Installing the Ski Adapter
before following these steps.
1. Manually unlatch the cradle using the manual latch lever (It will make it easier to install the
ski adapter).
2. Using a 3/16” hex drive, remove the ski adapter cradle screws and position the ski
adapter inside the wheel cradle.
3. Tighten the 4 ski adapter cradle screws onto the wheel cradle.
Note: Initial setup needs to be performed one time
Ski Adapter
4 Ski Adapter Cradle Screws
Insert Ski Adapter Cradle Screws Here
2. Installation Guide
2-2. Installing the Ski Adapter
4. With the wheel cradle in the “down” position use a 5/32” hex drive to loosen 4 cradle back
end adjustement screws and push the back end “down” to the lowest position.
5. Tighten the 4 cradle back end adjustement screws.
6. Using a 5/32” hex drive, remove 2 cradle front end adjustment screws and set
the front end to its lowest position.
7. Tighten the 2 cradle front end adjustment screws.
2 Cradle Front End
Adjustment Screws
(one on each side)
4 Cradle Back End Adjustment Screws
2. Installation Guide
2-3. Loading
1. Remove the Ski Adapter front ends by removing 2 lock pins.
2. Using a 7/32” hex drive, remove the 2 back end grab plate screws and position the
back end grab plates in the highest position as shown below.
3. Loosely install the 2 back end grab plate screws.
4. Manually unlatch the wheel cradle using the manual latch lever and set the
cradle in the “down” position.
Front Ends
Lock Pin
Back End Grab Plates
Lock Pin
Grab Plate Screws
2. Installation Guide
2-3. Loading
5. Position the tug so that the ski adapter is centered on the aircraft ski.
Aircraft Tire
Ski Adapter
Aircraft Ski
6. The aircraft ski should sit above the ski adapter as you drive the tug under the aircraft ski.
Please note that the aircraft can only be loaded in one direction with
the front of the aircraft facing towards the front of the tug.
Back of Aircraft
Front of Aircraft
Front of Tug

2. Installation Guide
2-3. Loading
7. Continue to drive the tug underneath the aircraft ski until the cradle locks in the “up”
position and is fully engaged onto the cradle latch. The aircraft ski should sit under
the grab plate.
*LOAD WITH CAUTION*
Check that the top of the grab
plate will clear your aircraft
Aircraft ski under
the Grab Plate
Note: The aircraft tire will be sitting above the tug main plate.
2. Installation Guide
2-3. Loading
8. Install the Ski Adapter front ends and lock pins to secure the aircraft ski in place.
Ski Adapter Front Ends
9. Adjust the 4 grab plates and tighten the 4 grab plate screws. Leave space between the
grab plates and aircraft ski for easy removal while unloading (next section).
Grab Plates
Grab Plate Screws
2. Installation Guide
2-4. Unloading
1. Remove the Ski Adapter front ends by removing 2 lock pins.
Front Ends
Lock Pin
Lock Pin
2. Apply slight pressure to the back end of the ski adapter by pushing the tug in the direction
shown below. Then hold the latch release switch on the radio controller.
Ski Adapter Back End
Push tug slightly in this direction
3. Once the latch releases, continue holding the latch release switch on the radio
controller and then drive the tug away fron the aircraft. The wheel cradle should
pivot to the down position as you move the tug.

2-5. Warranty
LIMITED WARRANTY
Your new AC Air Technology Tug is warranted to the original purchaser (only) for one full year
from the date of purchase to be free from factory defects in material and workmanship. During
this 12-month period, AC Air Technology will repair or replace, at our discretion, the defective
component determined by AC Air Technology to be defective.
This warranty does not apply to damage or defect resulting from mis-use, improper application, commercial use, or attempted repair by “non-AC Air Technology” service staff. The warranty does not cover shipping or handling cost or any incidental or consequential damage.
Batteries and tracks are not covered by warranty.
DAMAGE LIMITS
AC Air Technology shall not be liable for any damage, indirect or consequential, loss of profi ts
or commercial or production loss, or other special loss or damage in any way connected with
this product regardless whether such claim is based on warranty, in contract, negligence, or
strict liability. In no event shall the liability of AC Air Technology exceed the individual price of
the product on which liability is asserted. AC Air Technology has no control of the set up, application, use, modifi cation, or misuse of this product, thus no liability shall be assumed or ac-
cepted for any resulting damage or injury. By the fi rst act of use, set up or assembly, the user
in using the product accepts all resulting liability. Failure to operate this product in a safe and
responsible manner can result in damage or injury, both to the user as well as to others, the
product, or property. This product is not a toy and is NOT intended to be used by children with
out adult supervision. It is essential to read the entire manual and warranty/liability information
prior to fi rst use/application/installation of this product to operate correctly and avoid damage/
injury,
In cases where the purchaser or user are not prepared to accept liability associated with the
use of this product, the user or purchaser is advised to return the unused product immediately
in unused condition to the place of purchase.
RETURN PROCEDURE
When sending equipment in for requested warranty service, please include a note describing
the problems/concerns with the equipment. You must include your name, address, telephone
number and email for prompt service. To request warranty service, a copy of your original
sales receipt must be included. Warranty is approved and preformed at the discretion of AC Air
Technology service department. You are required to pay all postage, shipping and insurance
charges.
 Loading...