

Page 1

Secvest 2WAY
BOM-No. 121568 63
INSTALLATION INSTRUCTIONS
1
Page 2

Preface
Introduction
Dear customers,
Many thanks for your purchase of the SECVEST 2WAY wireless alarm centre. This
device is built according to state-of-the-art technology.
It complies with current domestic and European regulations. Conformity has been
proven, and all related certifications are available from the manufacturer on request
(www.abus.com).
To ensure safe operation, it is your obligation to observe these installation
instructions!
In the event of questions, please contact your local specialist dealer.
Everything possible has been done to ensure that the contents of these instructions
are correct.
However, neither the author nor ABUS Security-Center GmbH & Co. KG can be held
liable for loss or damages caused directly or indirectly by these instructions, whether
real or alleged.
We reserve the right to make changes to these instructions without prior notice.
© ABUS Security-Center GmbH & Co. KG, 10-2011, V5-07-52
This wireless alarm centre is used to secure your property in combination with
detectors and transmitters. Among others, it can be used to protect your company
premises, house, garage, summer house or weekend cottage.
The alarm centre registers unauthorised break-ins by switching outputs that can be
connected to visual, acoustic or silent alarm transmitters.
The alarm centre contacts and connected components must be kept free of moisture
(bathrooms and similar surroundings must be strictly avoided). Use of this product for
other than the described purpose may lead to damage of the product.
Other hazards such as short-circuits, fire, electric shock etc. are also possible. The
PSU is designed for operation with a 230 V AC / 50 Hz mains power supply. No part
of the product may be changed or modified in any way.
Connection to the public power network is subject to country-specific regulations.
Please be aware of applicable regulations in advance.
2
Page 3

Contents
PREFACE......................................................................................................................2
INTROD UCTION ..........................................................................................................2
CONTENTS ..................................................................................................................3
1. EXAMPLE : SECURING A SINGLE -FAMILY HOUSE ..............................................7
1.1 CELLAR INST ALLATION.........................................................................................8
1.2 GROUND FLOOR INSTALLATION .............................................................................9
1.3 TOP FLOOR INSTALLATION .................................................................................10
1.4 NUMBER OF COMPONENTS ................................................................................11
1.5 DETECTOR LIST ................................................................................................12
2. INSTALLING THE SYSTEM ................................................................................13
2.1 230 V a 50 HZ MAINS CONNECTION...................................................................13
2.2 PSTN TELEPHONE CONNECTION .........................................................................14
3. TRAINING T HE DETECTORS .............................................................................14
3.1 ASSIGNING TH E ZONE NAME ..............................................................................15
3.2 CHECKING THE DETECTOR RANGE ........................................................................16
3.3 CHECKING THE SIGNAL STRENGTH OF THE DETECTOR ...............................................16
3.4 INSTALLING AND TRAINING THE I NFO MODULE .......................................................17
3.5 ACCESSING THE ALARM CENTRE ..........................................................................18
3.6 INTERNAL ALARM ACTIVE (PRT SET ALL) ...............................................................19
3.7 FORWARDING ALARM MESSAGES OVER THE TELEPHONE (SPEECH DIALLER) ..................20
3.8 INFORMING O THER PERSONS ..............................................................................22
3.9 SIGNALLER .....................................................................................................22
3.10 CONFIGURE A USER .....................................................................................23
4. SCOPE OF DELIVE RY ........................................................................................26
5. ACCESSORIES (NOT INCLUDED IN SCOPE OF DELIVERY ) ................................27
5.1 WIRED DETECTOR ............................................................................................28
5.2 REMOTE CONTROLS..........................................................................................28
5.3 TRANSMITTER .................................................................................................29
5.4 COMMUNICATION MODULES .............................................................................29
5.5 MODULES AND EXTERNAL SIRENS ....................................................................... 30
5.6 ACCESSORIES ................................................................................................. 31
5.7 WIRELESS TESTING BOX .................................................................................... 31
6. SAFETY INFORMATION .................................................................................. 32
7. NOTES ON CONNECT ION AND EXTENSION OPTIONS ................................... 34
8. NOTES ON THE SE CURITY SY STEM ................................................................ 35
8.1 OPENING THE ALARM CENTRE HOUSING .............................................................. 35
8.2 CONNECTIONS ON THE TOP PART OF THE ALARM CENTRE ........................................ 35
8.3 CONNECTIONS ON THE BASE PLATE OF THE ALARM CENTRE ...................................... 36
8.4 SHUTTING OFF UNUSED CABLE INPUTS................................................................. 36
8.5 ASSEMBLING THE BASE PLATE ............................................................................ 36
8.6 CONNECTING THE ALARM CENTRE TO THE 230 V MAINS SUPPLY .............................. 37
8.7 CONNECTING WIRED COMPONENTS ................................................................... 37
8.8 CONNECTING THE ANALOGUE TELEPHONE CONNECTION ......................................... 38
8.9 CONNECTING EXTERNAL LOUDSPEAKERS / MICROPHONES ....................................... 38
8.10 INSERTING THE RECHARGEABLE BATTERIES FOR EMERGENCY POWER SUPPLY........... 38
8.11 CLOSING THE ALARM CENTRE........................................................................ 39
8.12 NOTES ON TESTING THE ALARM CENTRE .......................................................... 39
8.13 FINAL TASKS .............................................................................................. 39
8.14 CODE RESET (CODE DEFAULT) ....................................................................... 39
9. EXPLANA TION OF T ERMS .............................................................................. 40
10. OVERVIEW OF THE ALARM CE NTRES ............................................................ 41
11. GRAPHIC DISPLAY .......................................................................................... 42
12. INSTALLE R MENU ........................................................................................... 43
12.1 FIRST STEPS IN THE INSTALLER MENU .............................................................. 43
12.2 OVERVIEW OF MENU ITEMS IN THE INSTALLER MENU ......................................... 43
13. ADDING D ETECTOR S ...................................................................................... 44
13.1 AUTO LEARN ............................................................................................. 44
13.2 DELETING THE DETECTOR OR DETECTOR WITH ZONE INFORMATION ...................... 45
13.3 DETECTOR ALREADY IN USE .......................................................................... 46
13.4 DELETE ALL............................................................................................... 46
3
Page 4

13.5 ADDING THE ZONE 01 DETECTOR MANUALLY ....................................................47
13.6 EDITING DETECTORS (ZONES) ........................................................................48
13.7 ASSIGNING TH E ZONE NAME ..........................................................................48
13.8 SELECTING THE ZONE TYPE ............................................................................49
13.9 SELECTING PARTITIONS.................................................................................50
13.10 SELECTING ZONE CHARACTERISTICS .................................................................51
13.11 EXAMPLES OF ZONE PROPERTIES ....................................................................52
14. OUTPUTS .........................................................................................................52
14.1 ADDING OUTPUTS .......................................................................................52
14.2 EDITING OUTPUTS .......................................................................................53
14.3 ASSIGNING THE OUTPUT NAME ......................................................................53
14.4 INVERT OUTPUT ..........................................................................................54
14.5 SELECTING THE OUTPUT TYPE ........................................................................54
14.6 EXAMPLE: “USER DEFINED” OUTPUT TYPE .......................................................55
14.7 ADDING RF (WIRELESS) OUTPUTS ..................................................................55
14.8 WAM OUTPUTS .........................................................................................56
15. OTHER D EVICES...............................................................................................57
15.1 EXTERNA L SIREN .........................................................................................58
15.2 INFO MODULE/INT SIREN .............................................................................59
15.2.1 Updates / Disabled .......................................................................59
15.2.2 Rdy-to-Set LED ..............................................................................60
15.3 ADD WAM ...............................................................................................60
15.3.1 WAM as wireless repeater ...........................................................62
15.3.2 WAM as output module ...............................................................62
15.3.3 WAM as wireless transmi tter / rec eiver .......................................62
15.3.4 WAM as siren module ..................................................................62
15.4 ARMING STATION........................................................................................62
15.4.1 Editing the arming station ............................................................63
15.4.2 Arming station with new function ................................................64
15.4.3 Switching outputs .........................................................................64
16. PARTITIONS.....................................................................................................67
16.1 PARTITION TYPES ........................................................................................67
16.2 EXIT DELAYS OF THE PARTITION ......................................................................68
16.3 ENTRY DELAYS OF THE PARTITION ...................................................................68
16.4 ACTIVATING THE PARTITION RESPONSE ........................................................... 68
16.5 INTERNAL ACTIVATION OF THE PARTITION........................................................ 69
16.6 BEHAVIOUR OF FE ZONES AT INTERNAL ACTIVATION .......................................... 69
16.7 BEHAVIOUR OF ER ZONES AT INTERNAL ACTIVATION ......................................... 69
17. SYSTEM O PTIONS ........................................................................................... 69
17.1 USER ACCESS............................................................................................. 70
17.2 REMOTE CONTROL / REMOTE ACCESS BY TELEPHONE ......................................... 70
17.3 SELECTING A LANGUAGE .............................................................................. 72
17.4 DEFAULT SETTINGS ..................................................................................... 72
17.5 INSTALLER CO DE ........................................................................................ 72
17.6 DEACTIVATION IN THE EVENT OF DELAYS ......................................................... 72
17.7 PA RESPONSE ............................................................................................ 73
17.8 AUTO REARM ............................................................................................ 73
17.9 SIREN DELAY ............................................................................................. 73
17.10 SIREN TIME............................................................................................... 73
17.11 STRAY ON ENT DLY...................................................................................... 73
17.12 SUPERVISION............................................................................................. 73
17.13 JAMMING ................................................................................................. 74
17.14 BATT LOAD TEST ........................................................................................ 74
17.15 SIREN IN PSET ........................................................................................... 74
17.16 FORCE SET ................................................................................................ 75
17.17 RF SIREN OPTIONS ..................................................................................... 75
17.18 TAMPER ALARM ......................................................................................... 75
17.19 TIME SOURCE FOR THE CLOCK ....................................................................... 75
17.20 RUNTIME FOR INTERNAL TRANSDUCER............................................................ 75
18. IP NETWOR K .................................................................................................. 76
19. DOWNLOAD SETTINGS .................................................................................. 77
19.1 ACCOUNT NAME ....................................................................................... 77
19.2 CONNECTI ON TYPE ..................................................................................... 77
19.3 RINGS TO ANSWER ..................................................................................... 78
19.4 ANSWER ON 1 RING ................................................................................... 78
19.5 ACCESS MODE .......................................................................................... 78
19.6 PHONE BOOK ............................................................................................ 78
19.7 IP NETWORK............................................................................................. 79
4
Page 5

19.8 SECURE CALLBACK.......................................................................................79
19.9 MODEM BAUD RATE ...................................................................................79
20. REPORT ING .....................................................................................................79
20.1 ALARMS ....................................................................................................80
20.1.1 Call mode......................................................................................81
20.1.2 Primary telecoms ..........................................................................81
20.1.3 Phone Book (ALARMS) ..................................................................81
20.1.4 IP-Network ...................................................................................81
20.1.5 Account numbers..........................................................................82
20.1.6 Report Type ..................................................................................82
20.1.7 Fast Format C hannel ....................................................................82
20.1.8 FF Report Restorals.......................................................................83
20.1.9 SIA Report Mode...........................................................................83
20.1.10 SIA Report Restorals .....................................................................84
20.1.11 Contact ID Reports .......................................................................84
20.1.12 Force Test Call Now ......................................................................85
20.1.13 Dynamic Test Call .........................................................................85
20.1.14 Static Test Call ..............................................................................85
20.1.15 Burg-Comms-Rearm .....................................................................86
20.1.16 Send Tamper as Burg....................................................................86
20.1.17 No Transmission ...........................................................................86
20.2 SOCIAL CARE..............................................................................................86
20.2.1 Call Mode .....................................................................................87
20.2.2 Primary Telecoms .........................................................................87
20.2.3 Phone Book (Social Care) ..............................................................87
20.2.4 Account Numbers .........................................................................87
20.2.5 Report Type ..................................................................................88
20.2.6 Call Acknowledge .........................................................................88
20.3 SPEECH DIALLER .........................................................................................88
20.3.1 Call Mode .....................................................................................89
20.3.2 Primary Telecoms .........................................................................89
20.3.3 Messages ......................................................................................89
20.3.4 Phone Book...................................................................................89
20.3.5 Trigger ..........................................................................................89
20.3.6 Destinations..................................................................................90
20.3.7 Call Acknowledge .........................................................................90
20.3.8 Alarm call with voice message .................................................... 91
20.4 SMS ....................................................................................................... 91
20.4.1 Call Mode..................................................................................... 91
20.4.2 Primary Telecoms ........................................................................ 91
20.4.3 Messages ..................................................................................... 91
20.4.4 Phone Book .................................................................................. 92
20.4.5 SMS Trigger s ................................................................................ 92
20.4.6 PSTN SMS..................................................................................... 92
20.4.7 Destinations ................................................................................. 93
20.5 REPORTING OPTIONS .................................................................................. 93
20.5.1 Line Fault ..................................................................................... 93
20.5.2 GSM Omit Digit............................................................................ 94
20.5.3 Reporting when part set .............................................................. 94
21. SOCIAL C ARE .................................................................................................. 95
21.1 START/END MONITORING AT ....................................................................... 95
21.2 MONITORING INTERVAL .............................................................................. 95
21.3 SET VOLUME ............................................................................................. 95
22. TEST FUNCTION.............................................................................................. 95
22.1 TESTING THE LOCAL SIREN ............................................................................ 96
22.2 TESTING THE LOUDSPEAKER.......................................................................... 96
22.3 TESTING THE KEYPAD .................................................................................. 96
22.4 WALK TEST ............................................................................................... 97
22.5 DETECTOR SIGNALS .................................................................................... 97
22.6 EXT SIRENS ............................................................................................... 97
22.7 WAM SIGNAL........................................................................................... 97
22.8 ARMING STATION ...................................................................................... 97
22.9 OUTPUTS ................................................................................................. 97
22.10 TELECOMMANDS ....................................................................................... 97
22.11 PENDANTS ................................................................................................ 97
22.12 PA DETECTOR ........................................................................................... 97
22.13 TAG......................................................................................................... 97
22.14 ARMING STATION WITH SECVESTKEY FUNCTIONALITY........................................ 98
23. VIEWING THE LOG ......................................................................................... 98
24. ABOUT PANEL ................................................................................................ 98
5
Page 6

25. INSTALLING ADDITIONAL MOD ULES ..............................................................99
26. FITTING THE ISDN MODULE..........................................................................100
27. FITTING THE GSM MO DULE ..........................................................................100
28. FITTING THE ETHERNET MOD ULE.................................................................101
29. FITTING THE GPRS MODULE .........................................................................101
30. FINAL TASKS ..................................................................................................102
31. MODULE CERTIFICATION ..............................................................................102
32. CONNECT ING AND PROGRAMMING ............................................................102
32.1 ESTABLISH ING THE LOCAL USB-CONNECTION .................................................102
32.2 PROGRAMMING .......................................................................................103
33. TECHNICAL DATA ..........................................................................................103
34. DECLARATION OF CONFORMITY ..................................................................104
35. GLOSSARY .....................................................................................................10 5
6
Page 7
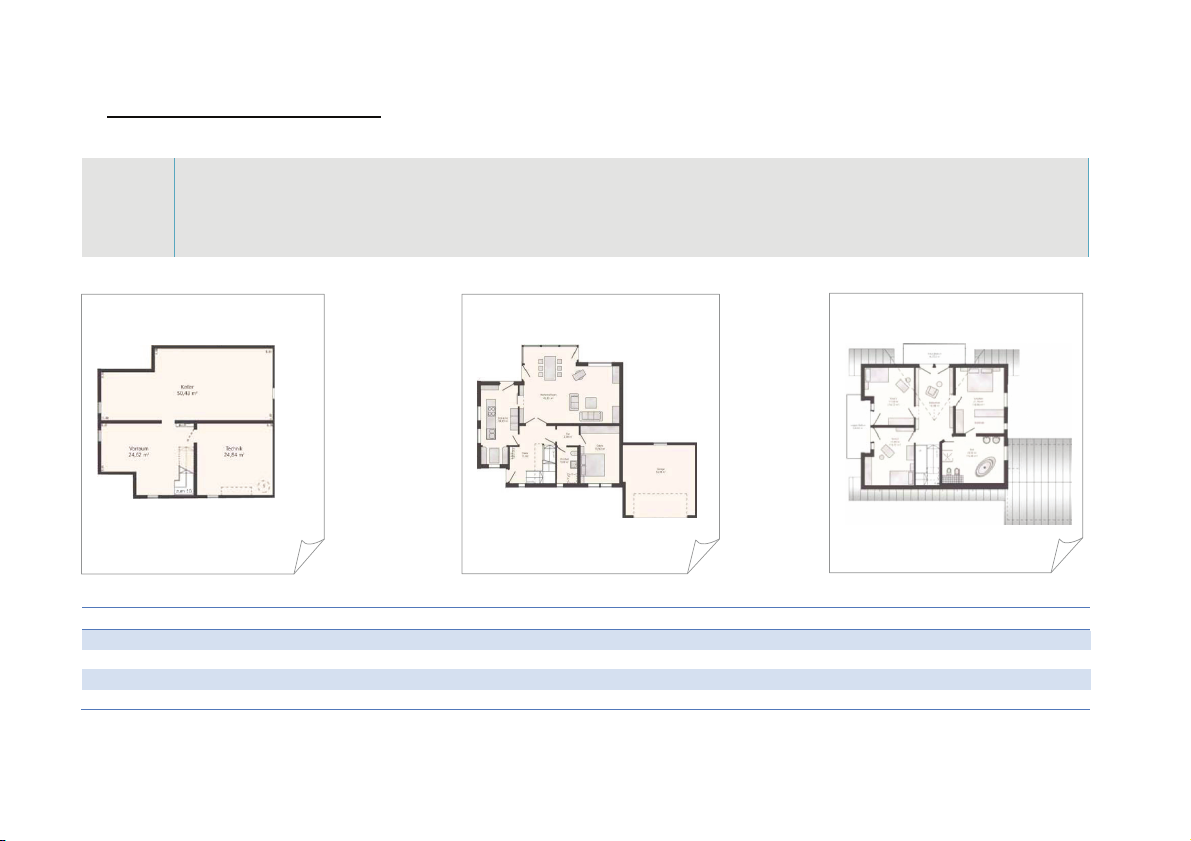
1. Example: Securing a single-family house
This example can be used for better understanding of house security
- To protect your house so that you can still move around whilst the system is activated (external perimeter protection)
- To have a status display on each floor
Planning
- To establish social care for persons in need of help
- To activate / deactivate the system by remote control and a key switch
- To arm the system completely when leaving the house (external active)
Cellar
External security Internal security Alarm
Window Motion Internal siren
External doors Smoke External siren
Garage doors Water Strobe
Telephone
Ground floor
Top floor
7
Page 8
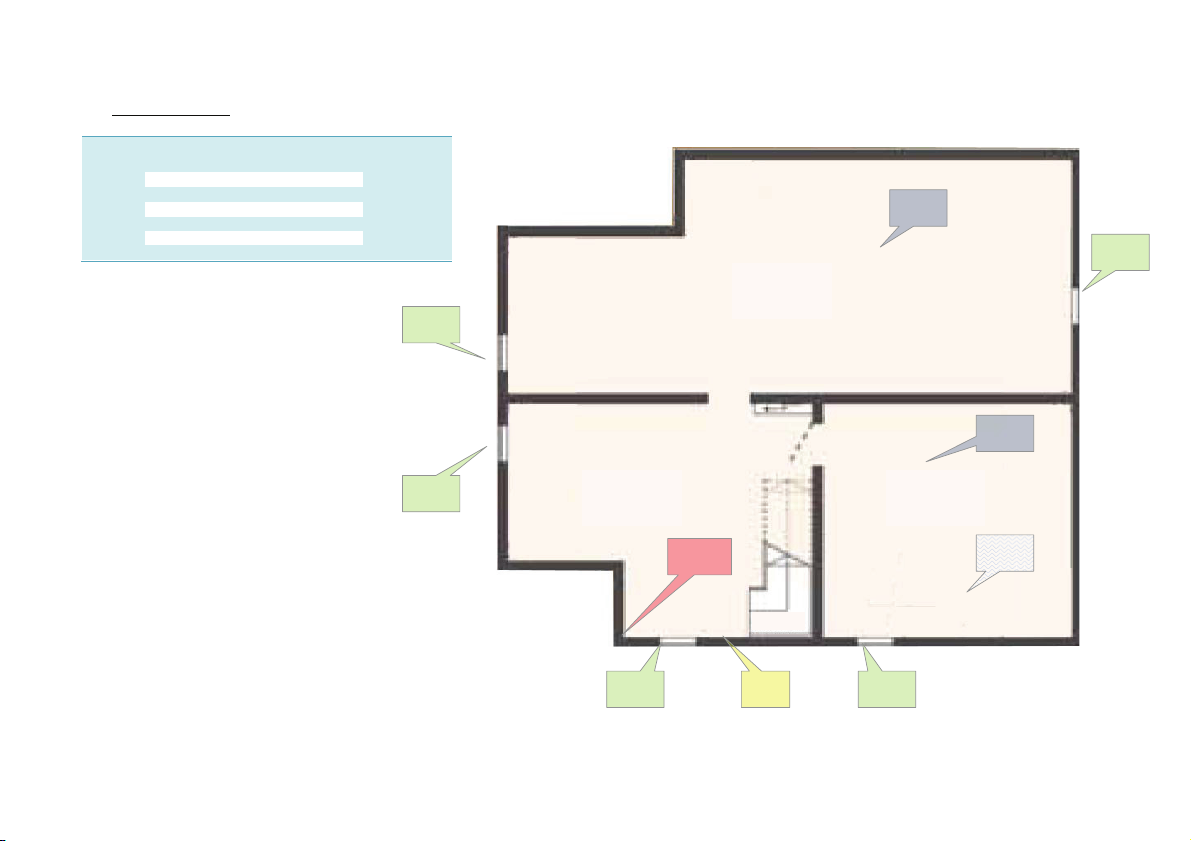
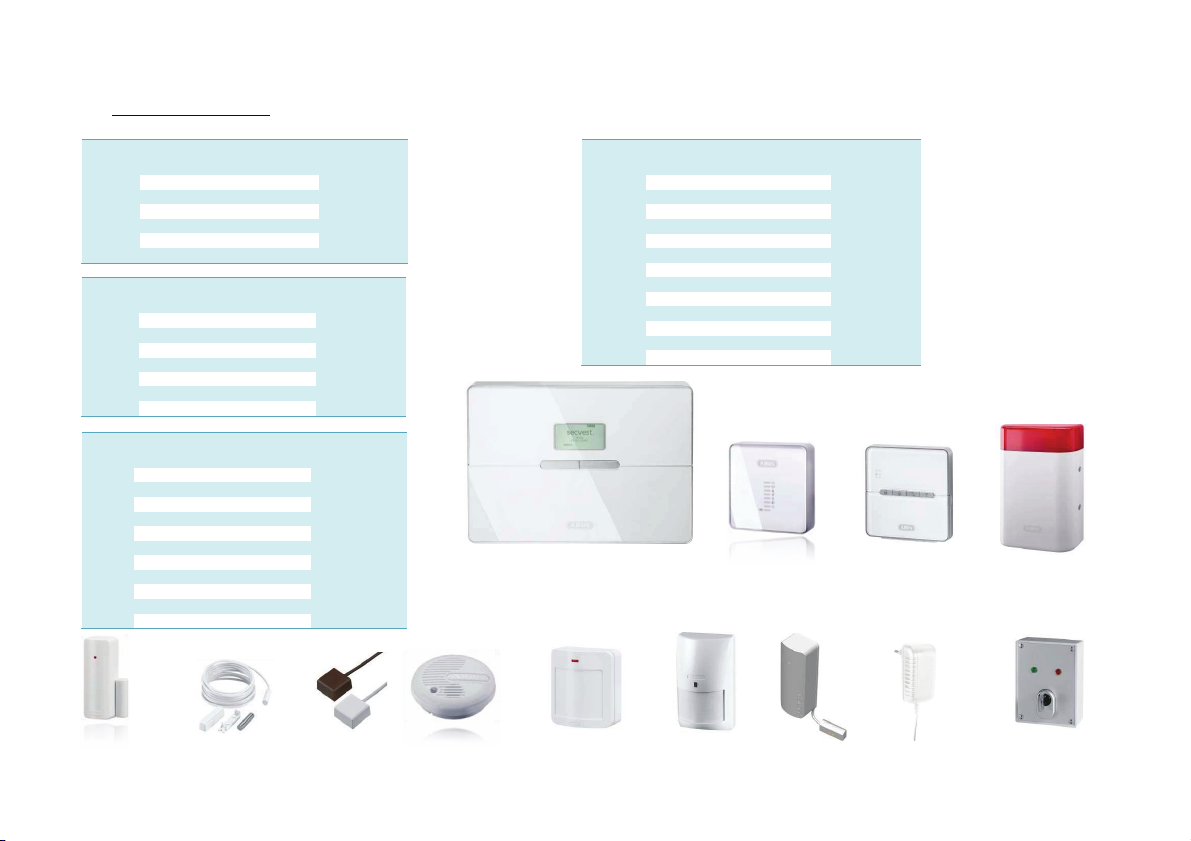
1.1 Cellar installation
Number Installed components
Cellar
1 Info module IM
1 Motion sensor MS
1 Water detector WD
3 Smoke detector SD
5 Opening detector OD
5 Glass breakage detector
Abbr .
OD
OD
MS
SD
OD
SD
WD
IMOD OD
8
Page 9
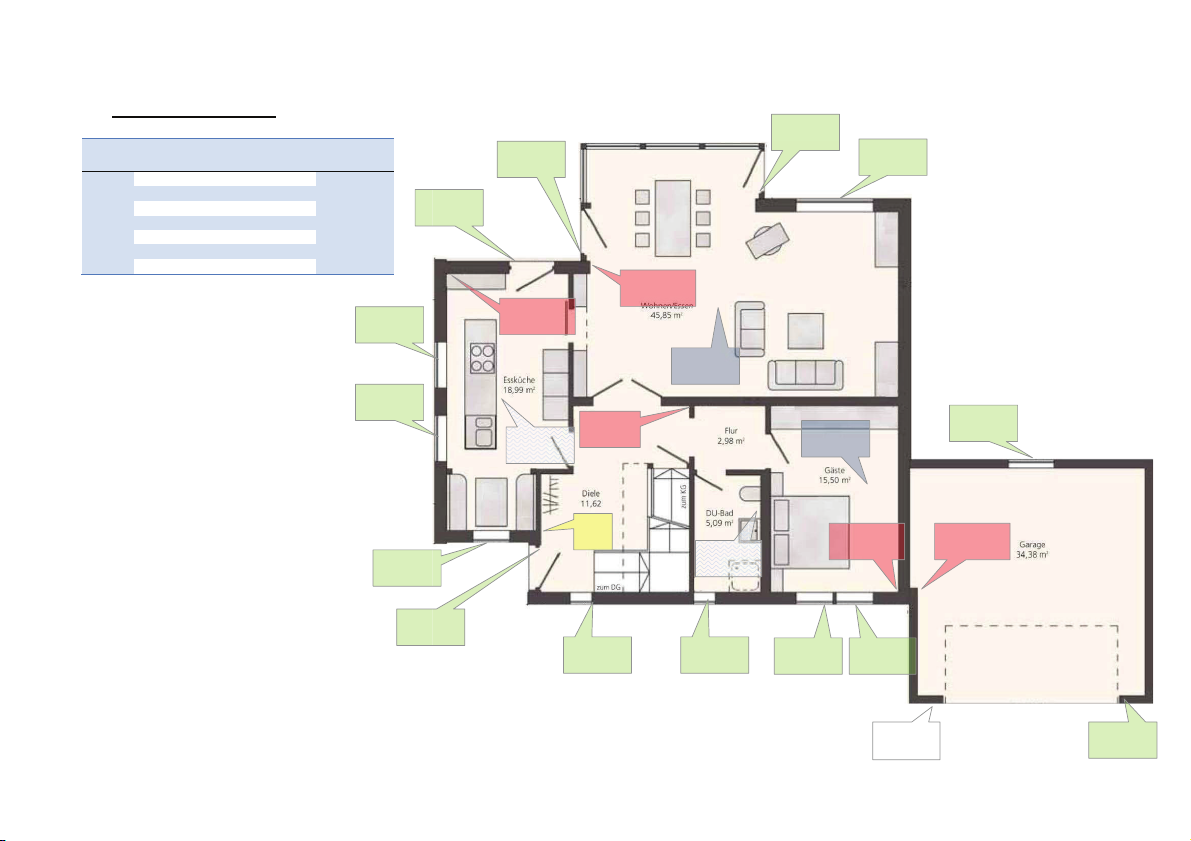
1.2 Ground floor installation
No. Installed components
1Secvest 2WAY C
5 Motion sensor MS
1 Water detector WD
3 Smoke detector SD
14 Opening detector - with OD
16 Glass breakage detector
1 Wireless key switch WKS
Ground f loor
Abbr.
OD
OD
OD
OD
MS
WD
MS
MS
SD
OD
SD
OD
OD
OD
OD
C
OD OD
9
WD
MS
MS
ODOD
WKS
OD
Page 10
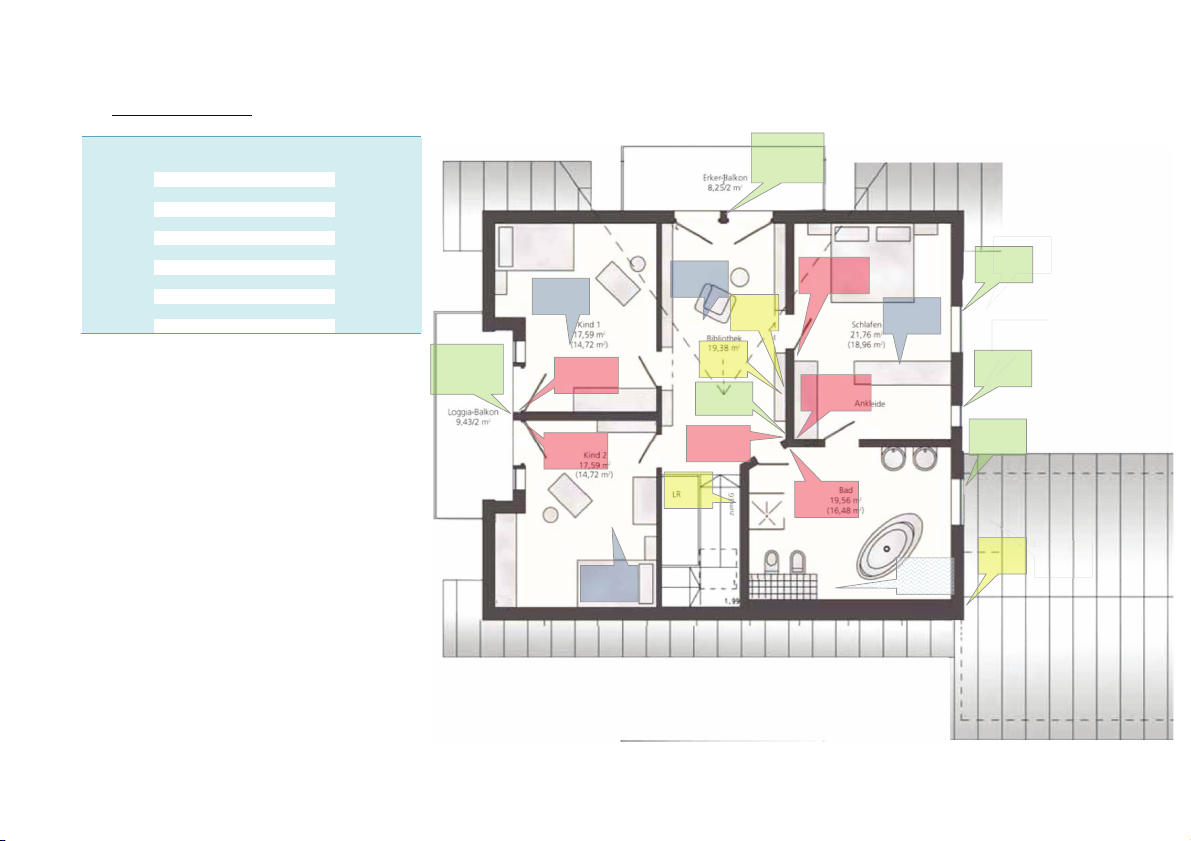
1.3 Top floor installation
O
O
O
No. Installed components
Abbr .
Top floor
1 Control panel CP
1 Internal siren IS
3 Wireless motion sensor WLMS
3 Wired motion sensor WMS
1 Water detector WD
4 Smoke detector SD
6 Opening detector OD
9 Glass breakage detector
4 Wired opening detector WOD
4 Info module IM
1 External siren ES
OD +
WOD
SD
WLMS
WLMS
SD
OD +
WOD
OD
D
OD
OD
OD
ES
OD
D
OD
D
SD
CP
IM
OD
WMS
IS
WLMS
SD
WMS
WMS
WD
10
Page 11
1.4 Number of components
No. Installed components
Cellar
1 Info module IM
1 Motion sensor MS
1 Water detector WD
3 Smoke detector SD
5 Opening detector OD
5 Glass breakage detector
No. Installed components
Ground floor
1Secvest 2WAY C
5 Motion sensor MS
1 Water detector WD
3 Smoke detector SD
14 Opening detector - with OD
16 Glass breakage detector
1 Wireless key switch WKS
No. Installed components
Abbr .
Top floor
1 Control panel CP
1 Internal siren IS
3 W ireless motion sensor WLMS
3 W ired m otion sensor WMS
1 W ater detector WD
4 Smoke detector SD
6 Opening detector OD
9 Glass breakage detector
4 W ired opening detector WOD
4 Info module IM
1 External siren ES
Abbr .
Abbr .
No. Installed components
1 Control panel CP
8 Info module IM
1Secvest 2WAY C
1 W ireless key switch WKS
1 External siren ES
1 Internal siren IS
9 Motion sensor WLMS
5 Wired motion sensor WMS
4 Water detector WD
10 Smoke detector SD
25 Opening detector OD
3 Wired opening detector KB
30 Glass breakage detector
Secvest 2WAY
Total
Info module
Abbr .
Arming st ation
External wireless siren
Opening dete ctor
Wired
opening detect or
Glassbrea kage
detector
Smoke detecto r
Motion sensor
11
Wired
motion sensor
Water detecto r
Power adapte r
Key switch
with status di splay
Page 12
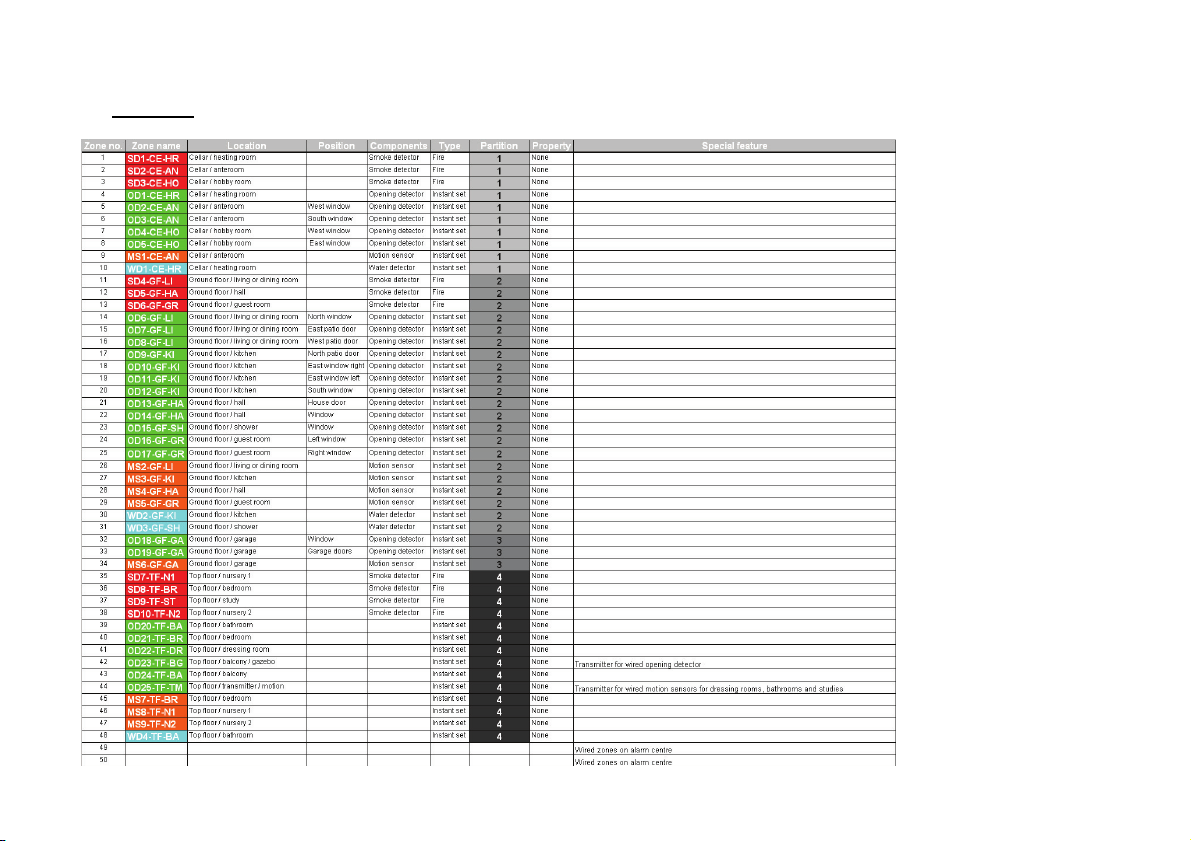
1.5 Detector list
Create a detector list for the 50 zones after making your initial planning
12
Page 13
2. Installing the system
The following pages describe basic system programming.
A step-by-step guide of the most important aspects on the Secvest 2WAY system is
presented.
Attach the Secvest 2WAY alarm centre.
The alarm centre may only be installed by qualified specialists.
The device is designed for indoor use only.
The PSU is connected to the 230 V a 50 Hz domestic mains
network over a separate, electrically protected line.
Connecting the system to the 230 V AC a 50 Hz mains network is
subject to national regulations. Check that no voltage is present in
the connection cable when fitting. Connect the 230 V power
supply to the mains connector according to EN60950-1 as shown
in the diagram. Remember to fix the cable in the cable clamp to
relieve tension on the cable.
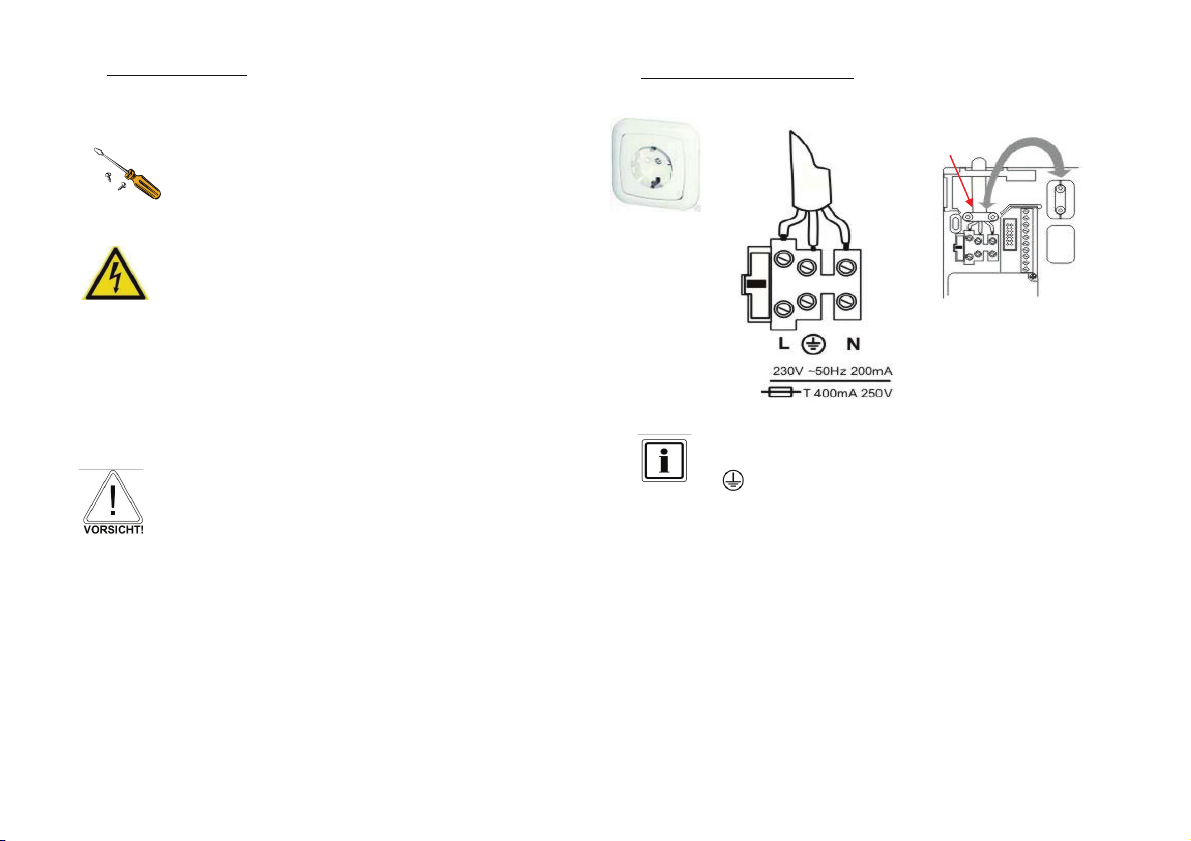
2.1 230 V aa50 Hz mains connection
230 Volt a 50 Hz
Colour configuration of the lines:
L Brown or black
Detach the cable relief points
and secure the power cable.
Always replace the mains fuse with one of the same type. Never
use fuses with higher voltage ratings than those specified.
The green/yellow (earth) wire should be slightly longer than the
live and neutral wires.
Green/yellow
NBlue
13
Page 14
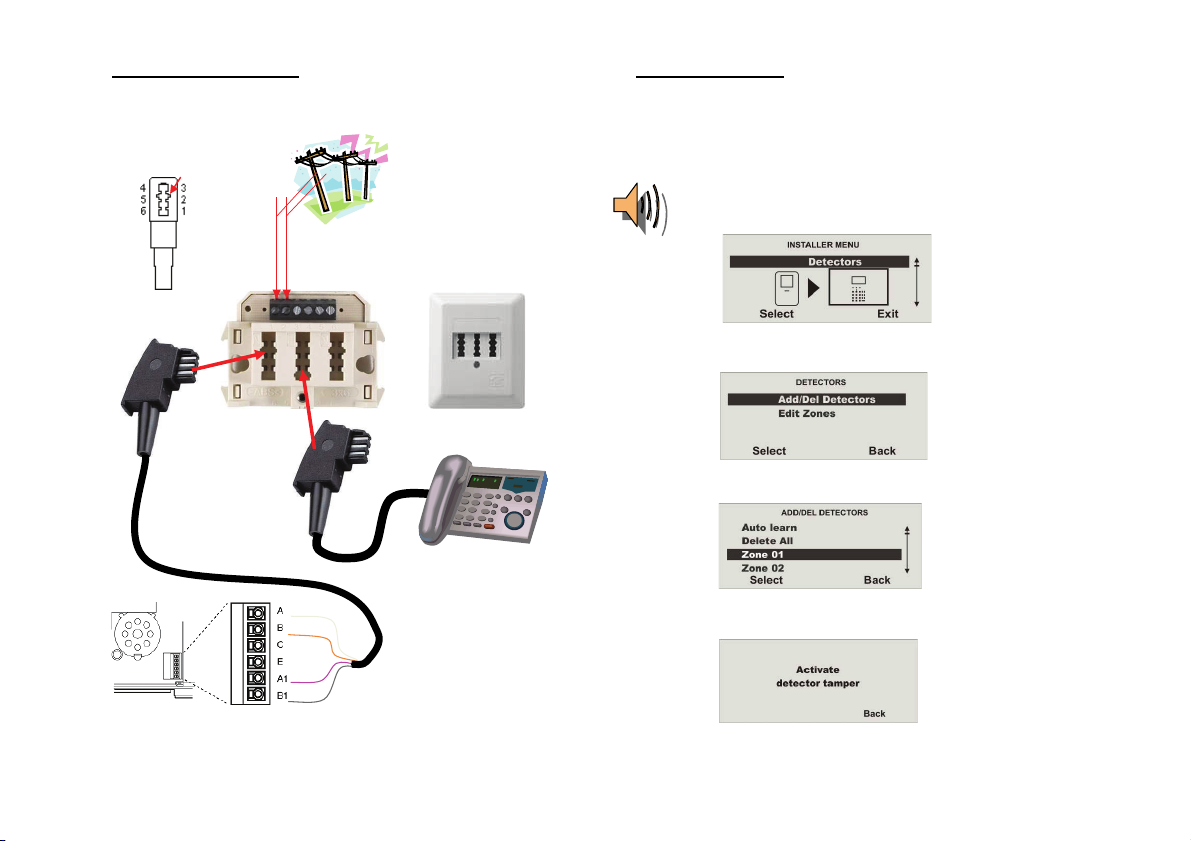
2.2 PSTN telephone connection
The alarm centre is conn ected to the telephone conn ection as follows.
Coding
B1 Æ Å B
Æ Å A
A1
a b
TAE N-plug
3. Training the detectors
Call up the installer menu.
Enter a valid installer code (default setting = 7890): 7 8 9 0
It may also be necessary to enter the administrator code 1234 (default).
“You are now in the installer menu”
¾ Select the Detectors menu item.
¾ Select Add/Del Detectors.
White
Brown
Pink
Grey
PSTN connection on Secvest 2WAY
¾ Select Zone 01.
¾ You will now be prompted to activate the Tamper contact.
14
Page 15
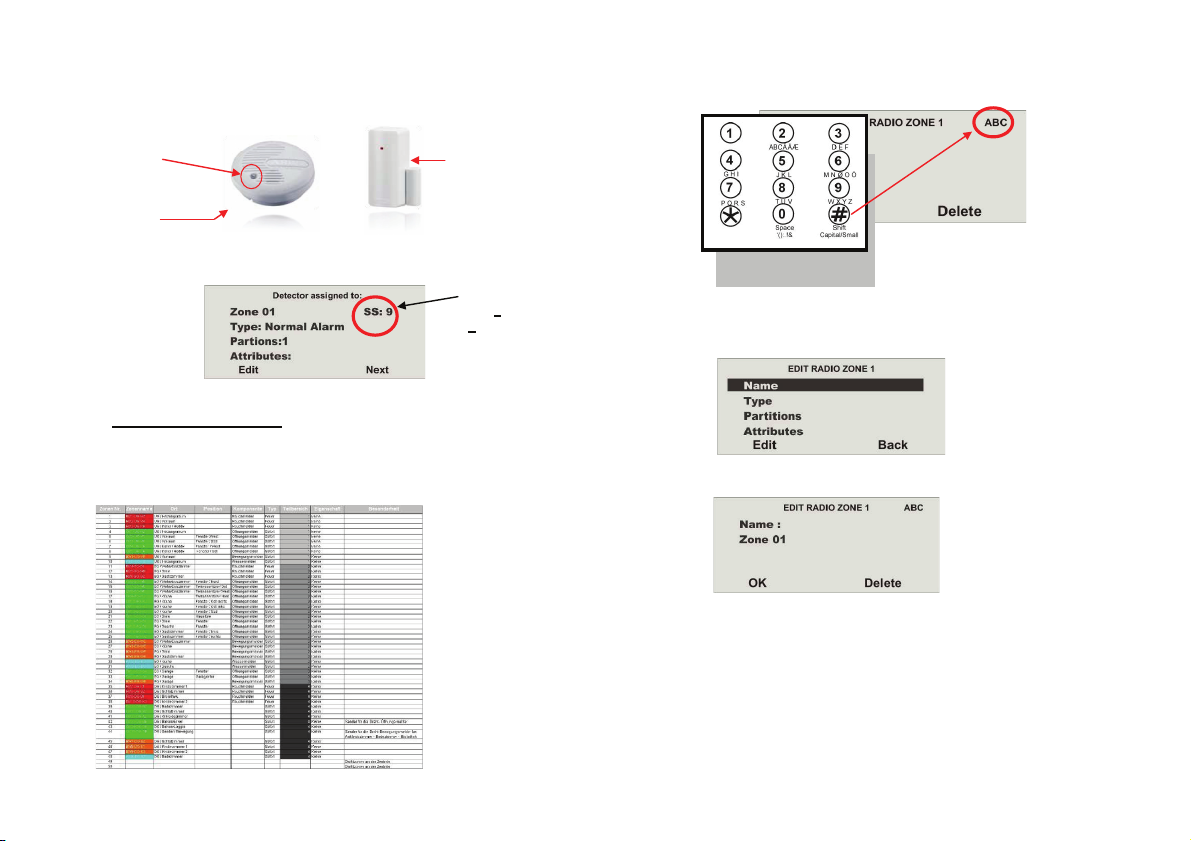
When using the smoke detector, press the test button and hold it until the alarm
sounds (about 10 seconds). Press the wall break contact on the opening detector.
The Secvest display confirms successful training by showing the display: Detector
assigned to:
Enter letters and characters via the keypad.
Letter-to-key assignment:
Test button
IR LED on
bottom
¾ Now edit Zone 01.
Smoke detecto r
3.1 Assigning the zone name
Use the created detector list for this purpose.
Detector list
Opening dete ctor
Wall b rea k
contact
Display of
the signa l
s
trength
The letters and characters can be selected by pressing the keys several times. The
cursor goes to the next position after around two seconds.
Select the Name menu item.
Delete the existing name (Zone 01) and assign a unique name for the zone (m ax. 12
characters).
Example: SD for a smoke detector, then the number, location (e.g. CE for the cell ar)
and the room (e.g. HR for the heating room). Detector name: SD1-CE-HR
Now train the detector at the furthest possible distance for the range test.
15
Page 16
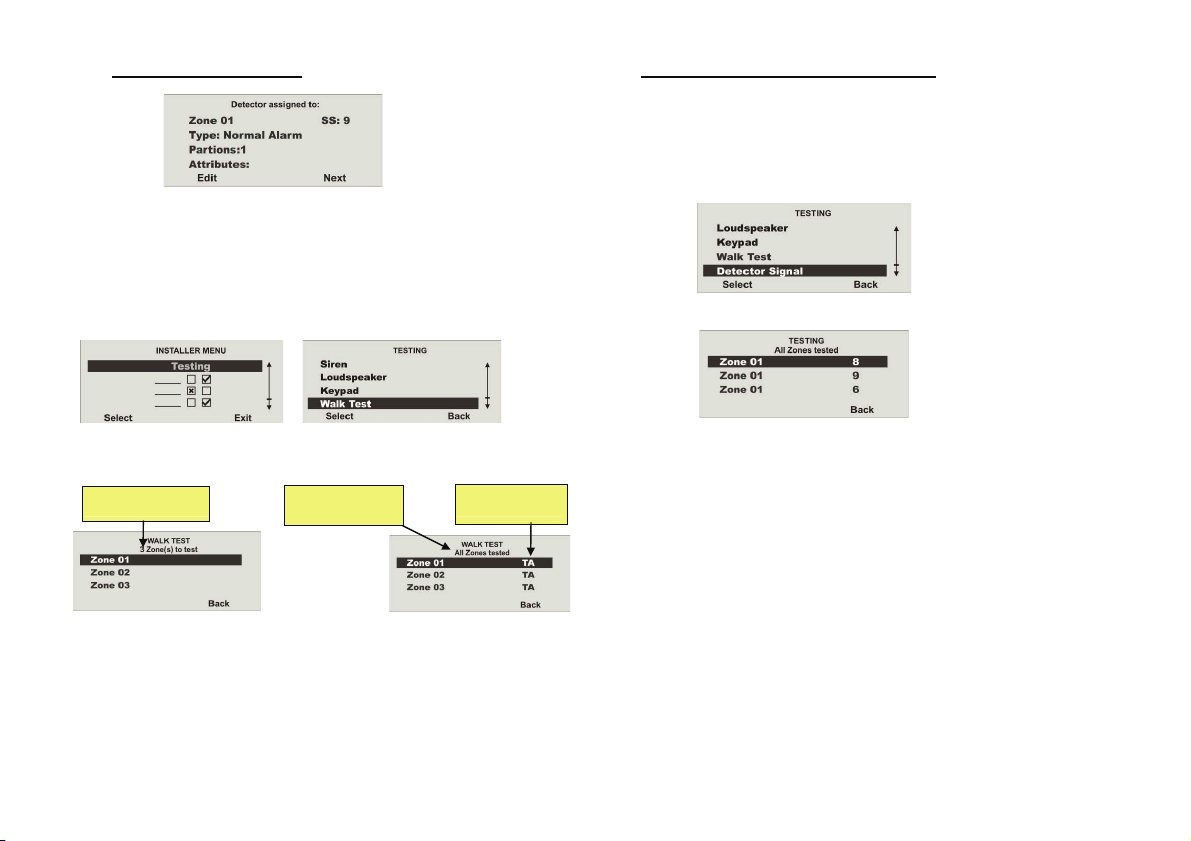
3.2 Checking the detector range
End training by pressing Next and going Back to the main menu. Go to Installer
Menu Æ Test Æ Walk Test and carry out a walk test by triggering an alarm
messa ge (A).
As smoke detectors do not have a tamper contact, only the alarm is displayed (A).
The display with the number of tested zones without tamper contacts remains.
On detectors with tamper switches, the tam per message is displayed (T), then the
alarm display (A) when the detector is triggered.
3.3 Checking the signal strength of the detector
The detector signal strength test is made in the same way as the walk test.
The displayed signal strength corresponds to the reception strength of the last
received signal on this detector.
The signal strength must be higher than 3 for satisfactory wireless communication. If
the detector signal is too weak, use a repeater (accessory module) to ensure good
wireless communication.
Select the Detector Signa ls menu item.
Select Test Select Walk Test
Number of zone s
“A” is shown next to the trained smoke detectors. “T” is displayed next to detectors
with tamper contacts.
Go to the floor where installation is to be m ade and trigger the previously trained
detectors.
Information:
All zon es test ed
Trigger an
alarm (A).
T = Tamper
A = Alarm
“A” should be shown next to every zone.
The signal strength is displayed next to the tested zone.
The signal strength display is automatically updated every 5 minutes.
16
Page 17
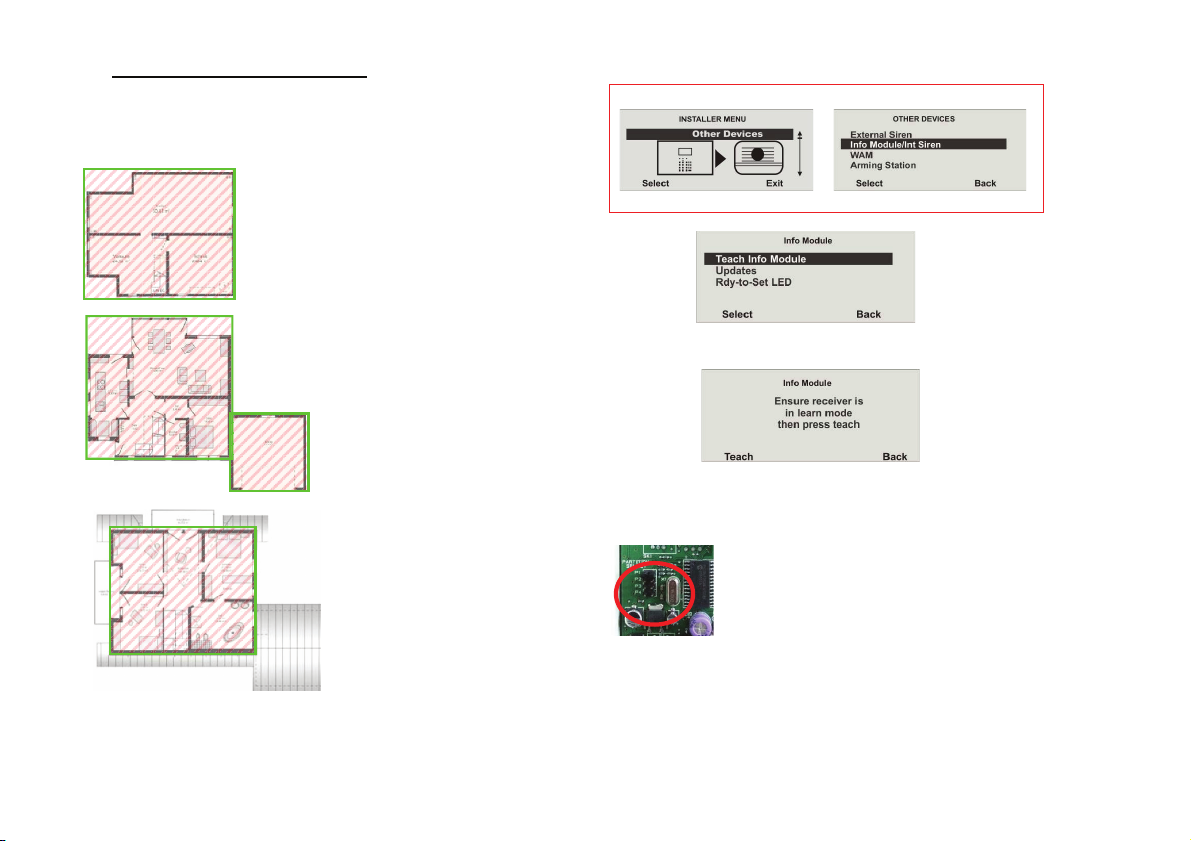
3.4 Installing and training the info module
The example shows a house in four partitions. The status of each partition should be
displayed on each floor. Each partition can be activated or deactivated separately.
Therefore, an info module must be installed for each partition. Please note that the
info modules require a 12 V power supply.
Train the alarm centre to the info module.
In the installer menu:
Partiti on 1 (cella r)
Select t he Info Mod ule/ Int Siren menu it em.
Æ
1
Partition 2 (ground floor)
Select the Teach Device menu item.
2
Partition 3 (garage)
3
Partition 4 (top floor)
4
Set the info module / internal siren to learning mode.
See the product instructions for more details.
After switching to learning mode, activate the transmission of wireless information
Info module
If the receiver beeps twice, the learn message was correctly received. End the
learning procedure by pressing Yes. Cancel the process by pressing No. The
learning procedure now starts again.
No further settings have to be m ade on the info module or internal siren. Even in the
event of power outage, the info module or internal siren retains the wireless
information of the alarm centre.
from the centre by pressing SEND. Ensure that each of the
info modules is assigned to the partition using the jumpers.
P1 = Partition 1 Æ (cellar)
P2 = Partition 2 Æ (ground floor)
P3 = Partition 3 Æ (garage)
P4 = Partition 4 Æ (top floor)
17
Page 18
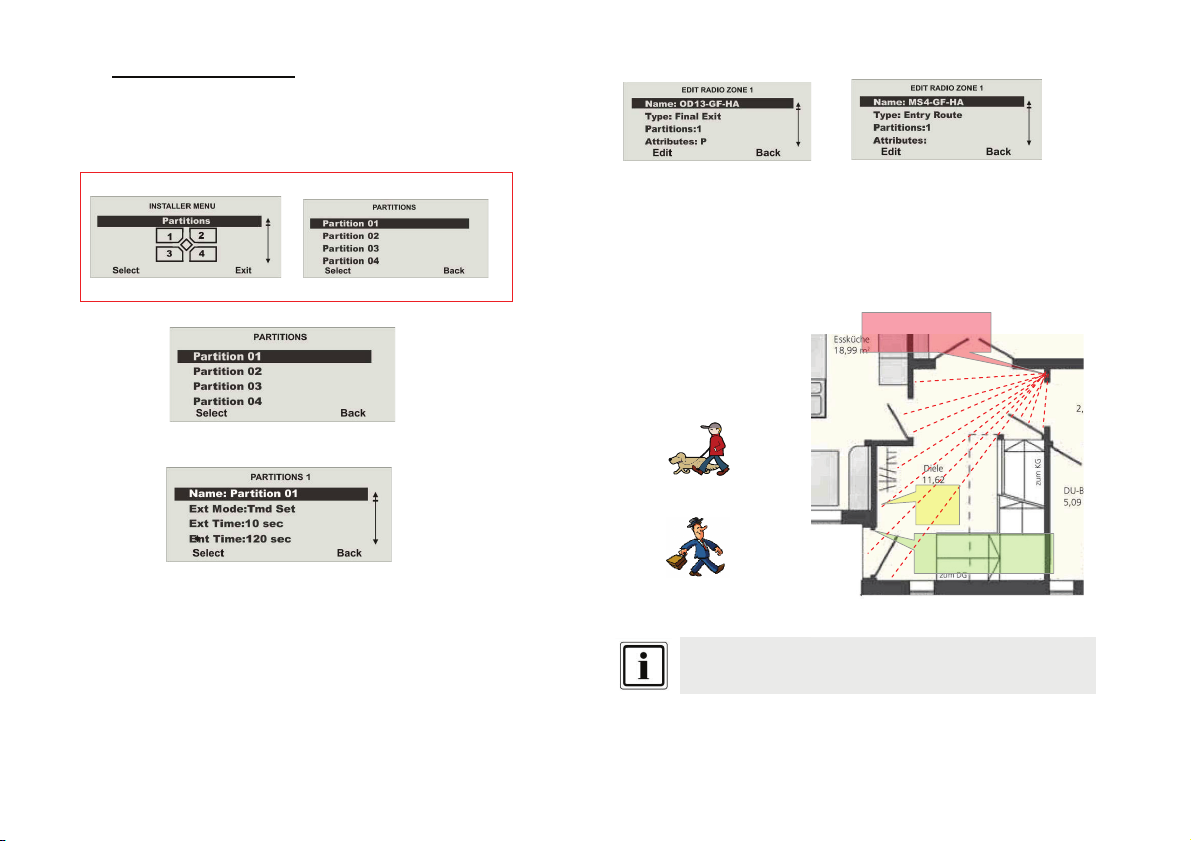
3.5 Accessing the alarm centre
In order to not trigger an alarm when leaving (Ext Time) or entering (Ent Time) the
area, a delay time must be defined for accessing the centre in Partition 01.
Access the installer menu and set the exit or entry delay under the “Partitions” menu
item.
In the installer menu:
Select t he Partitions menu item.
Æ
Select Partions 01.
Select the “Name” menu item, then enter a new name for the partition: Ground floor
Select the type: Time
Set 10 seconds for the exit delay time and 120 seconds for the entry delay time.
In our example, the ground floor (Partition 01) is set as follows: Opening detector
OD13-GF-H A Type: Final Exit
Motion sensor MS4-GF-HA Type: Entry Route
When the house is exited, the system is activated within 10 seconds.
When returning to the house, you have 120 seconds to di sable the system.
MS4-GF-HA
Å Exit = 10 seconds
Entrance = 120 seconds Æ
You must deactivate the system within 120 seconds and may not enter
any other areas where the detectors are not set to Entry Route.
C
OD13-GF-HA
18
Page 19
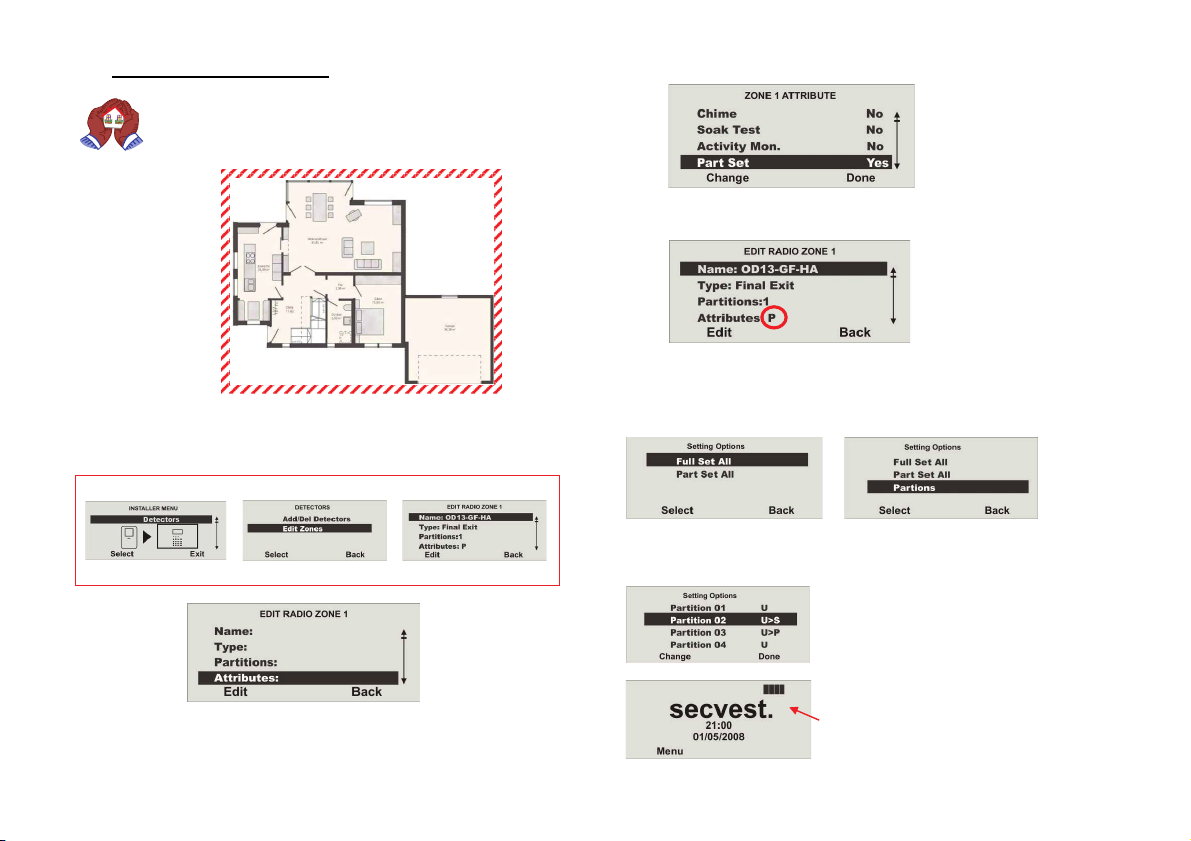
3.6 Internal alarm active (Prt Set All)
This setting is used when the inside of the house should be accessed
freely whilst being protected against break-ins from the outside.
The detectors must be configured so that external surveillance is
created.
Change Part Set to Yes.
The Part Set setting is displayed with I.
Set the detector for external surveillance to “Part Set”.
The alarm centre then only reacts to detectors with the Part Set setting.
Call up the installer menu:
In the installer menu:
Æ Æ
Select the Edit Zones menu item.
Select the Attributes m enu item .
When activation is made, you also have the possibility of Part Set All in addition to
Full Set All.
If more than one partition is assigned to the user, then this user can also select the
partitions.
The user can activate the partitions, activate them internally and deactivate them .
U = Deactivated
S = Activated
P = Internally activated
U>P means that the partition status has been
changed from Deactivated to Internally
activated.
The system shows the partition status at
the top-right of the display. A letter is only
shown in the partition (bar), when at least
one detector is present in this partition.
19
Page 20
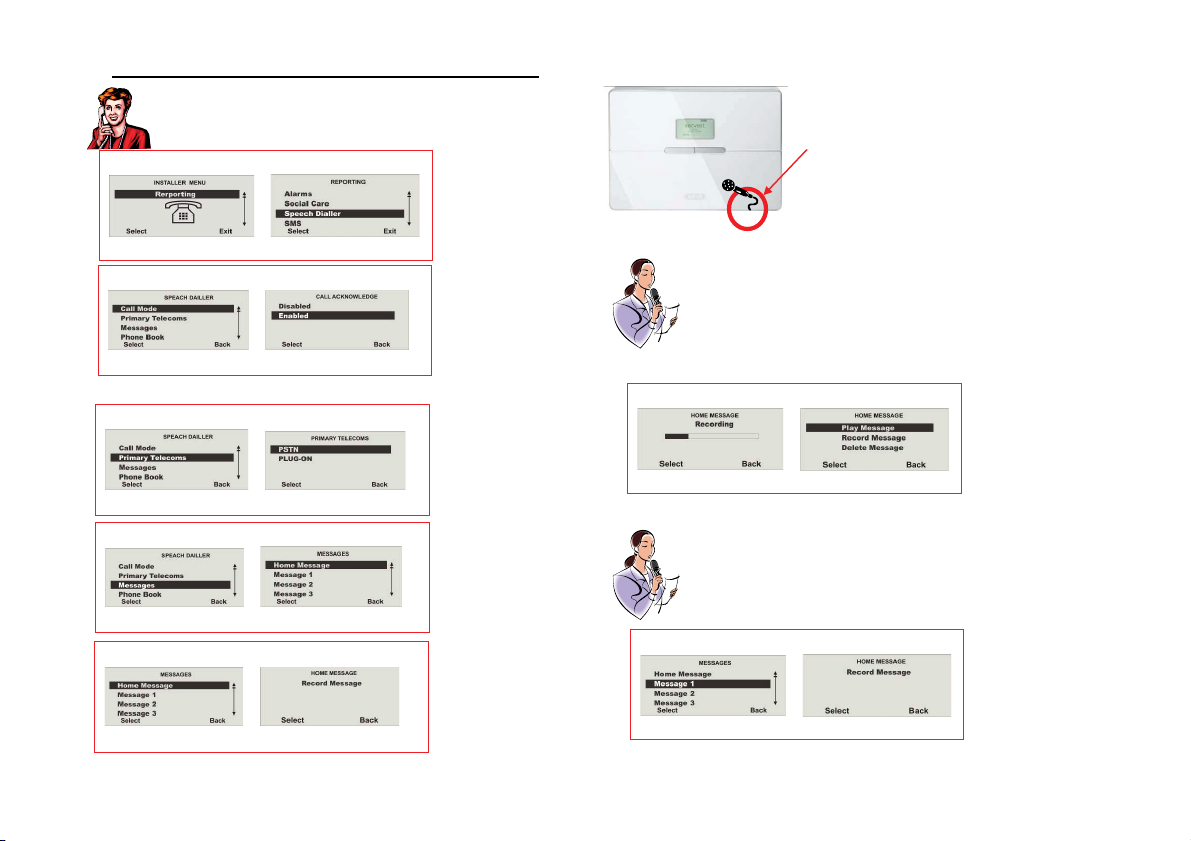
3.7 Forwarding alarm messages over the telephone (speech dialler)
This setting is used for informing the user over the telephone.
Call up the installer menu and select the “Reporting” menu item.
In the installer menu:
Installed microphone
Select the Speech Dialler menu item.
In the speech dialler menu:
Æ
Æ
Select the Enabled menu item.
Select the installed telephone connection (PSTN) on the Secvest.
In the speech dialler menu:
Æ
Select the PSTN menu item.
In the speech dialler menu:
Æ
Select the Home Message menu item.
In the messages menu :
Start recording by pressing Select.
Æ
The recording should contain the following information:
Who is calling:
“Break-in on detector system of Smith family”
Location:
“Sample Street 1 in Sampletown”
This announcement (max. 12 seconds) is made before every other message (1 - 4).
In the home messages men u:
Play the recorded message by pre ssing Select.
Dictate message 1 - 4 (maximum 8 seconds).
Example: Message 1:
In the messages menu :
Æ
“Fire”
Message 2: “Burglary”
Message 3: “Water”
Message 4: “Socia l care”
Æ
Select the Message 1 menu item.
20
Page 21
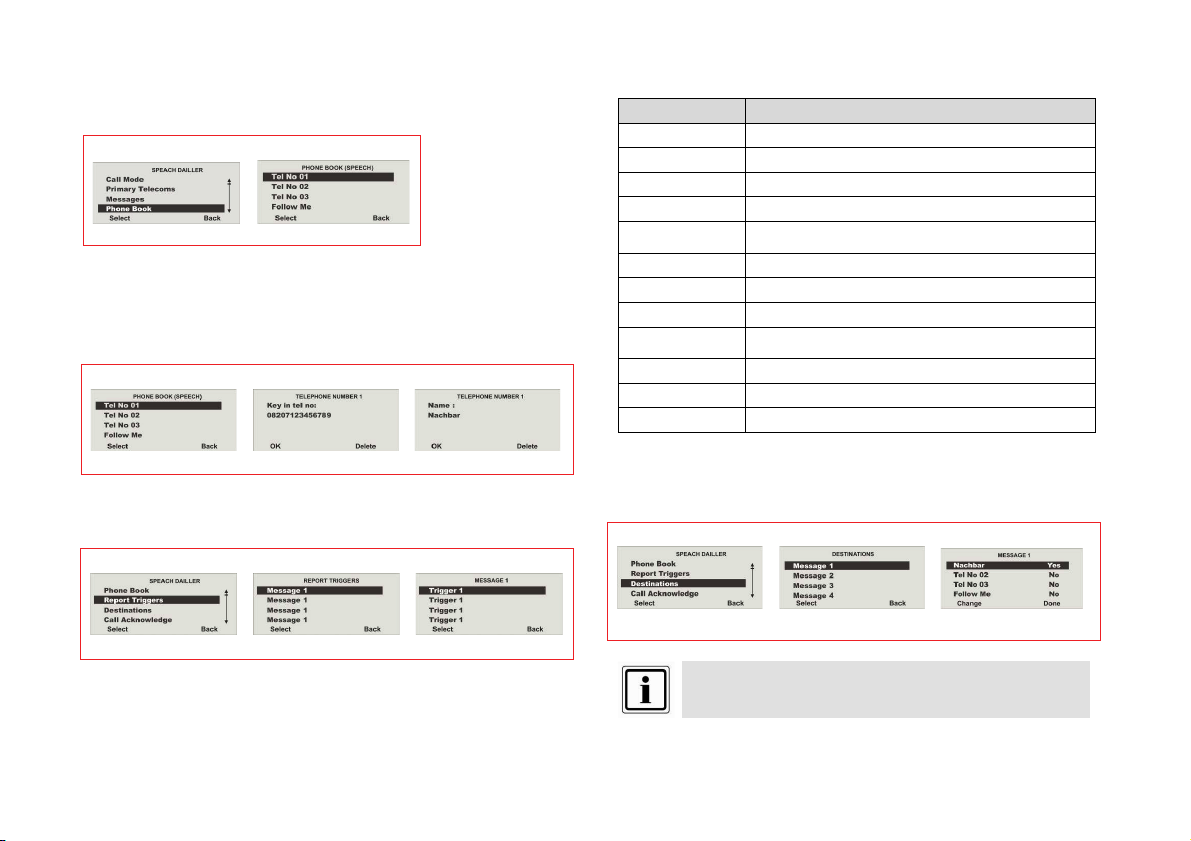
Enter a maximum of four names and numbers in the telephone book who
Select theTelephone Number 0
g
are to be called when an event occurs.
The call sequence starts with number 01, then number 02 up to the “Follow me”
number.
In the speech dialler menu:
Æ
1 menu item.
A dial pause of three seconds can be entered using the “
Please note that the last telephone number is designated as the Follow me number.
The wireless centre shows this number in the user menu. A user can change this
number in the system user menu. This allows the user to forward all voice messages
programmed for this field.
In the phone book (speech dialler) menu:
*” key.
Æ Æ
Enter the first phone number and name and confirm each by pressin
Allocate a trigger to a message.
Up to five triggers can be allocated to a message.
In the speech dialler menu:
OK.
Æ Æ
Select the Trigger 1 menu item.
Trigger list
Trigger Triggere d by
None Triggers do not trigger messages
Fire Smoke detector
Panic Panic transmitter
Medical Emergency call transmitter, pendants
Burglary
Soak Test Fail Detector in test or monitoring mode
Technical Water detector
Social Care Pendants
Social Inactive
Mains Error Power outage
Tamper Tamper
Jamming Jamm ing
Enter the destination in case of a trigger.
In the speech dialler menu:
Opening, motion, glass breakage and vibration
detector
Room monitor ing alarm when no movement is
detected
Æ Æ
Select the Destination for Message 1.
This message is announced four times.
21
Page 22
3.8 Informing other persons
In the speech dialler menu:
Select the Enabled menu item.
Æ
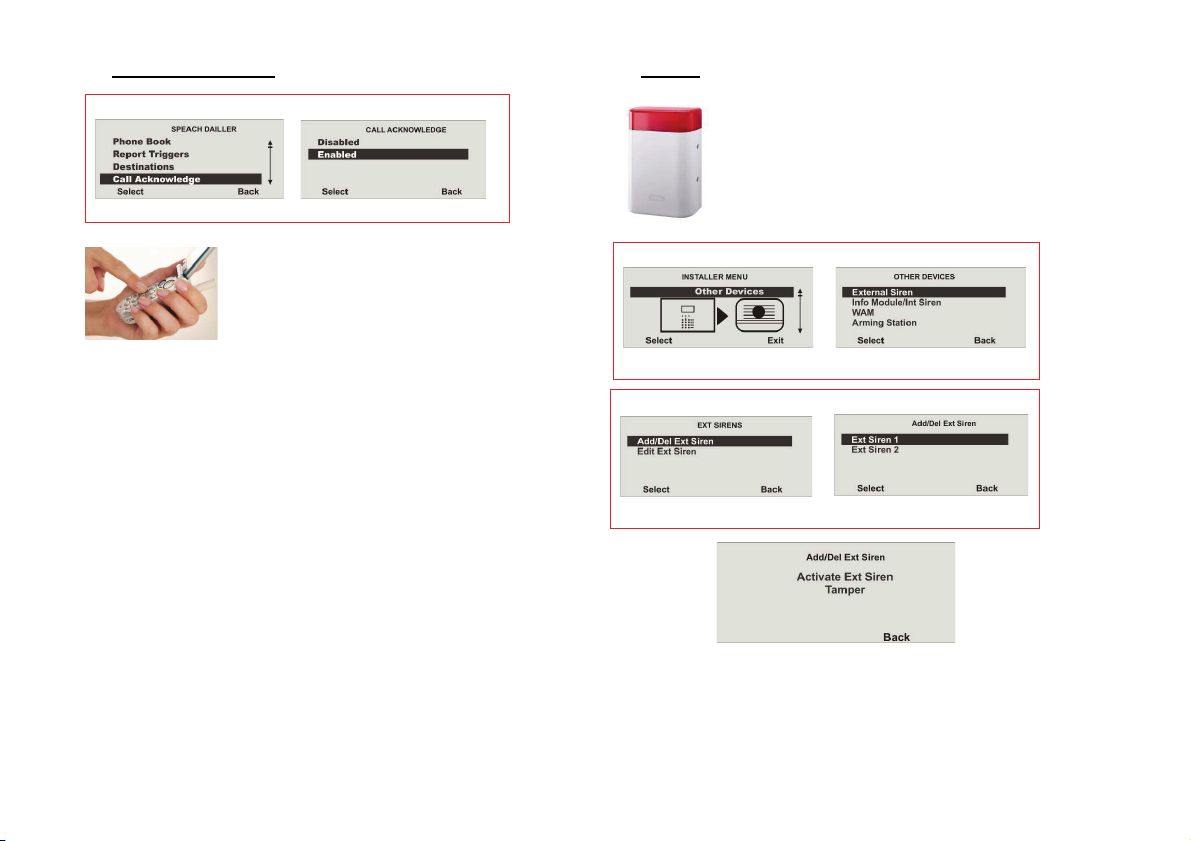
3.9 Signaller
To prevent manipulation of the siren, it should be attached
out of arm’s reach (at least 3 metres from the ground).
Please also take local legislations into account. In some
European countries, the use of external sirens is forbidden or
the maximum alarm duration is restricted. Contact your local
authorities for more information in case of doubt
.
When the called party answers a call from the speech
dialler, they can end the call by sending back a DTMF
“5”.
When the “Call Acknowledge” function is activated, the
wireless centre ends the call to this number when it
has received a DTMF “5”. When the centre does not
receive a DTMF “5”, then it attempts to make a further
When the “Call Acknowledge” function is deactivated, the wireless centre ends
further call attempts to this number as soon as it determines that a call is
answered (i.e. when the receiver has answered). The called party can use DTMF
“5” to end the call.
Please note that the wireless centre now calls all other programmed numbers on
the voice dialler after receiving a DTMF “5”.
To prevent calls to other programmed numbers on the voice dialler, the called party
can confirm a call by sending back a DTMF “9”. The wireless centre stops all further
call attempts after receiving the “9” signal.
call (up to three times).
In the installer menu:
Æ
Select Ex t Siren.
In the EXT SIRENS menu:
Æ
Select Ex t Siren 1.
Trigger the tamper contact of the siren.
22
Page 23
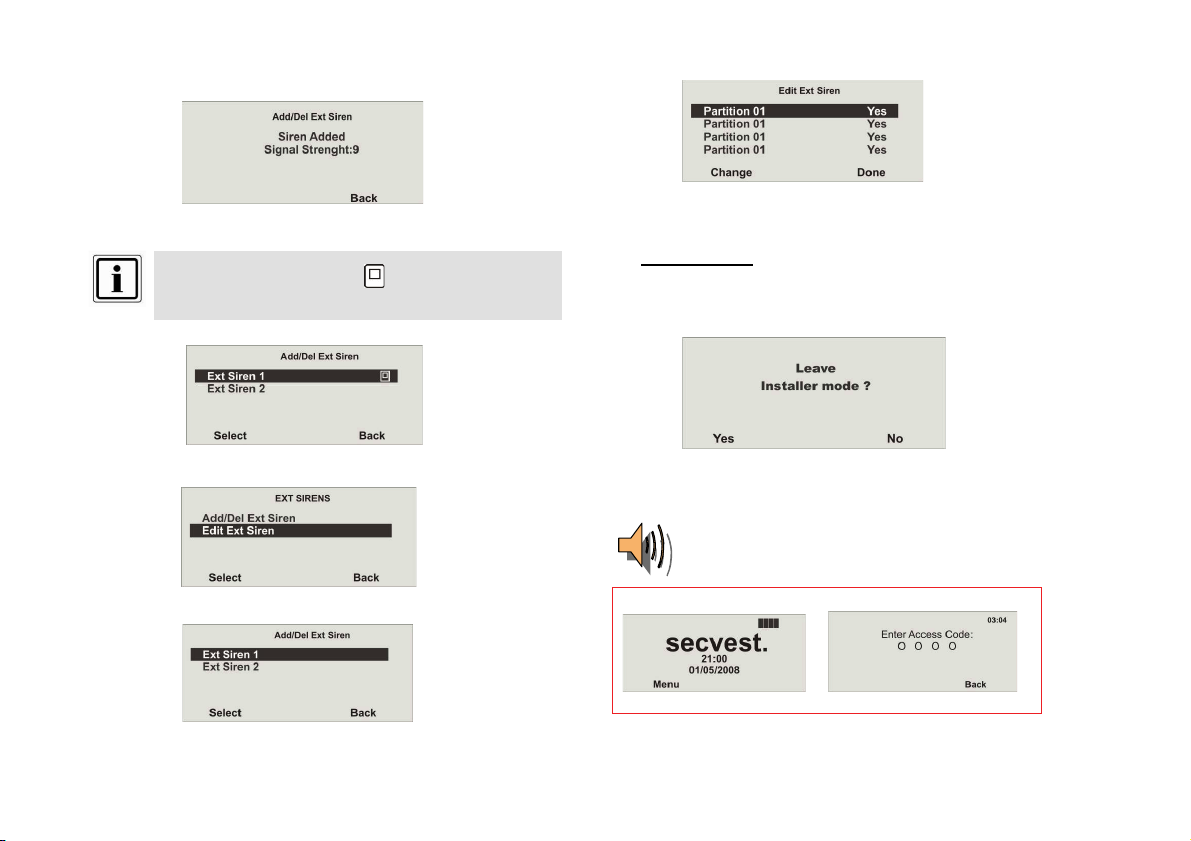
When the sirens have been trained, the alarm centre beeps twice as confirmation.
A message is displayed with the siren confirmation and the signal strength value.
Leave this display by pressing Back.
If a siren has been trained, then the symbol is shown next to the
siren number.
Select the trained Ext Siren.
If the external siren should be activated w hen the relevant partition triggers a local or
external alarm, then the partition must be set to Yes.
3.10 Configure a user
Up to 50 users can be configured.
User 01 is always the administrator and cannot be deleted.
Leave the installer menu:
Leave this display by pressing Back.
Select “Edit Ext Siren”.
Confirm by pressing Yes
When exiting the installer menu, the following announcement is played:
.
“You have exited the installer menu”
Secvest
Æ
Access the user menu by entering the administrator code 1234 (default).
23
Page 24
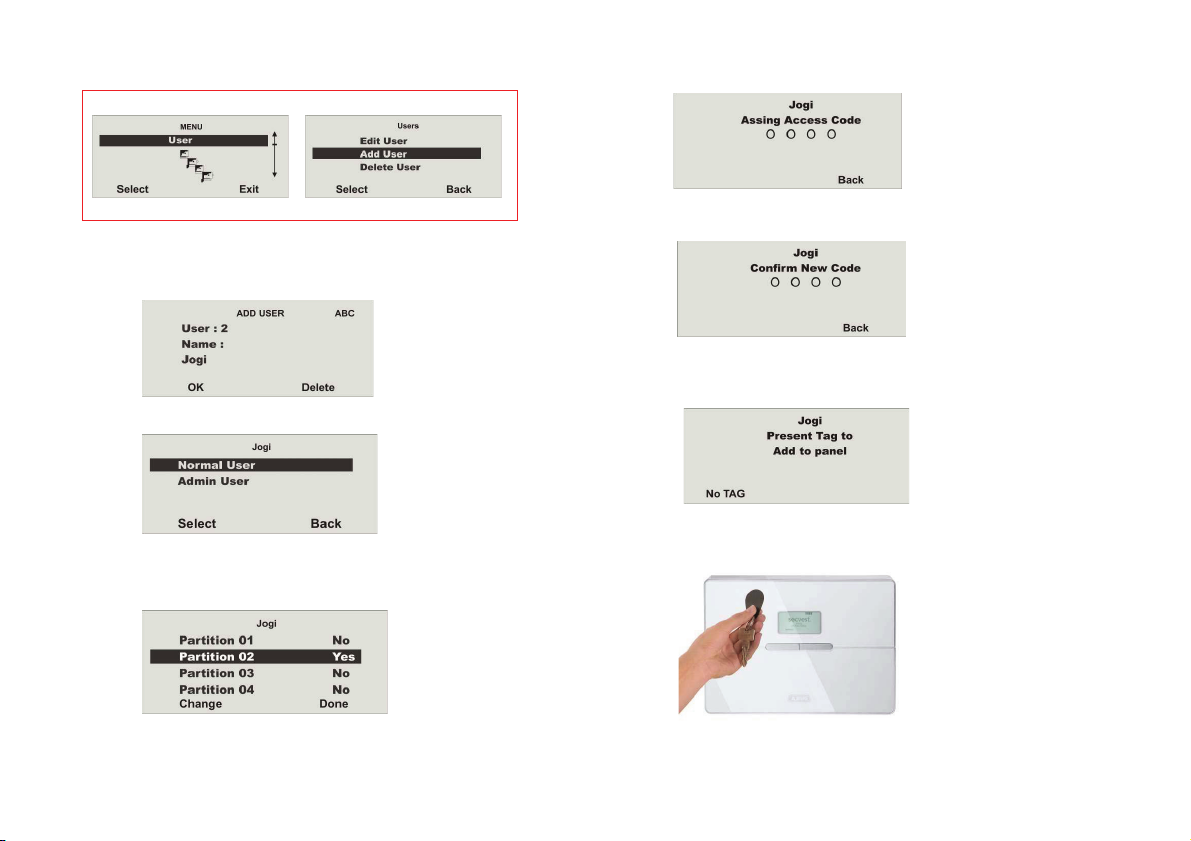
You are now in the user menu (administrator).
User menu
Select t he “User” menu item.
You have a guest that may only access the ground floor.
Enter a user name.
Confirm with OK.
Select the Normal User user status.
Allocate the relevant access rights to the user (e.g. for the ground floor partition
only).
Change the authorisation to No or Yes and confirm by pressing Done
Æ
.
Now enter an access code for your guest.
Confirm the access code by repeating it.
You now have the possibility of training diverse components for activation.
If you do not wish to train chip keys (tags), then confirm by pressing
No Tags…
24
Page 25
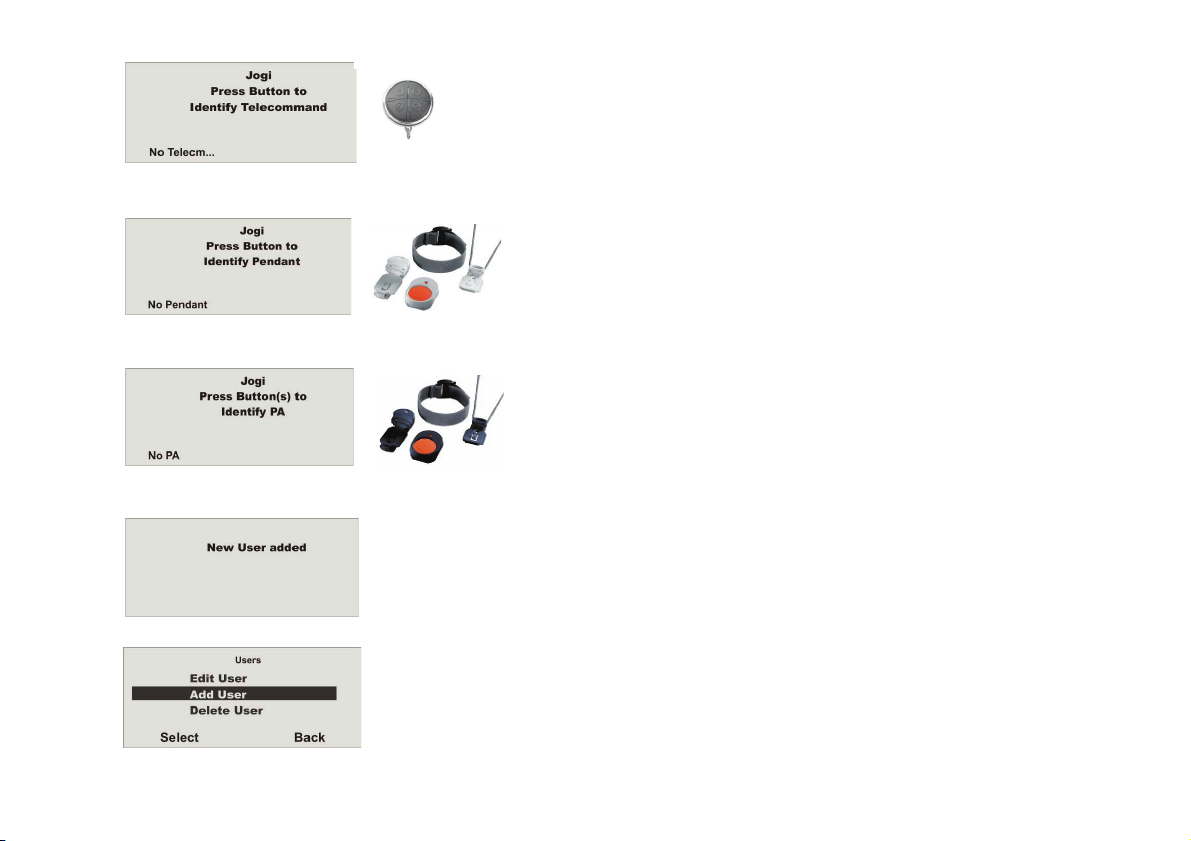
If you do not wish to train telecommands (remote control), then confirm by pressing
No Telecommands…
If you do not wish to train social care, then confirm by pressing
No Social…
If you do not wish to train panic transmitters, then confirm by pressing No PA…
The user is added with this display.
Further users can now be added.
.
25
Page 26
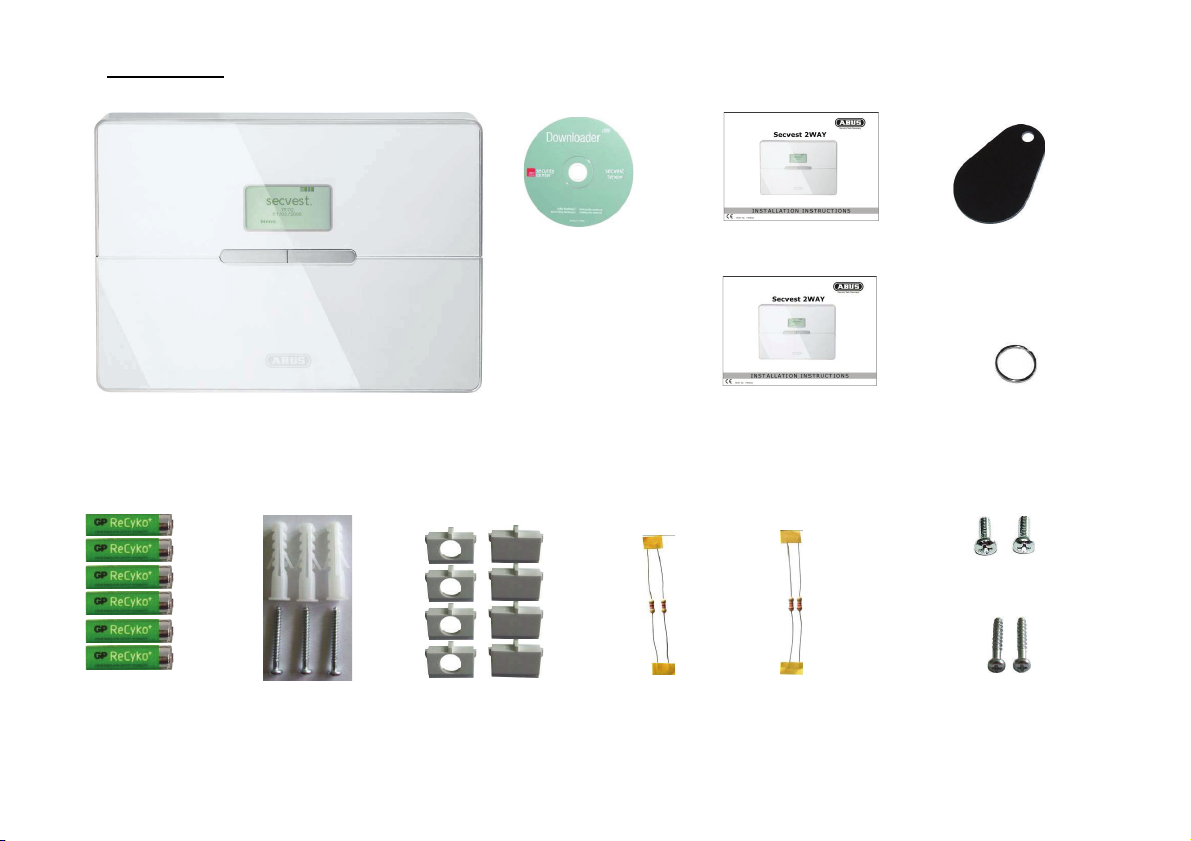
4. Scope of delivery
Secves t 4 wireless alarm centre
6 x NiMH R6 AA
rechargeable
batteries
1.2 V / 2000 mAh
3 x wall plugs
3 x screws
(wall fixation)
Downloader CD
8 x hole adapters
26
2 x 4.7 k
Installation instructions
Operating instructions
2 x 2.2 k
Chip key (tag)
Keyring
2 x housing screws
2 x screws
(tension relief)
Page 27
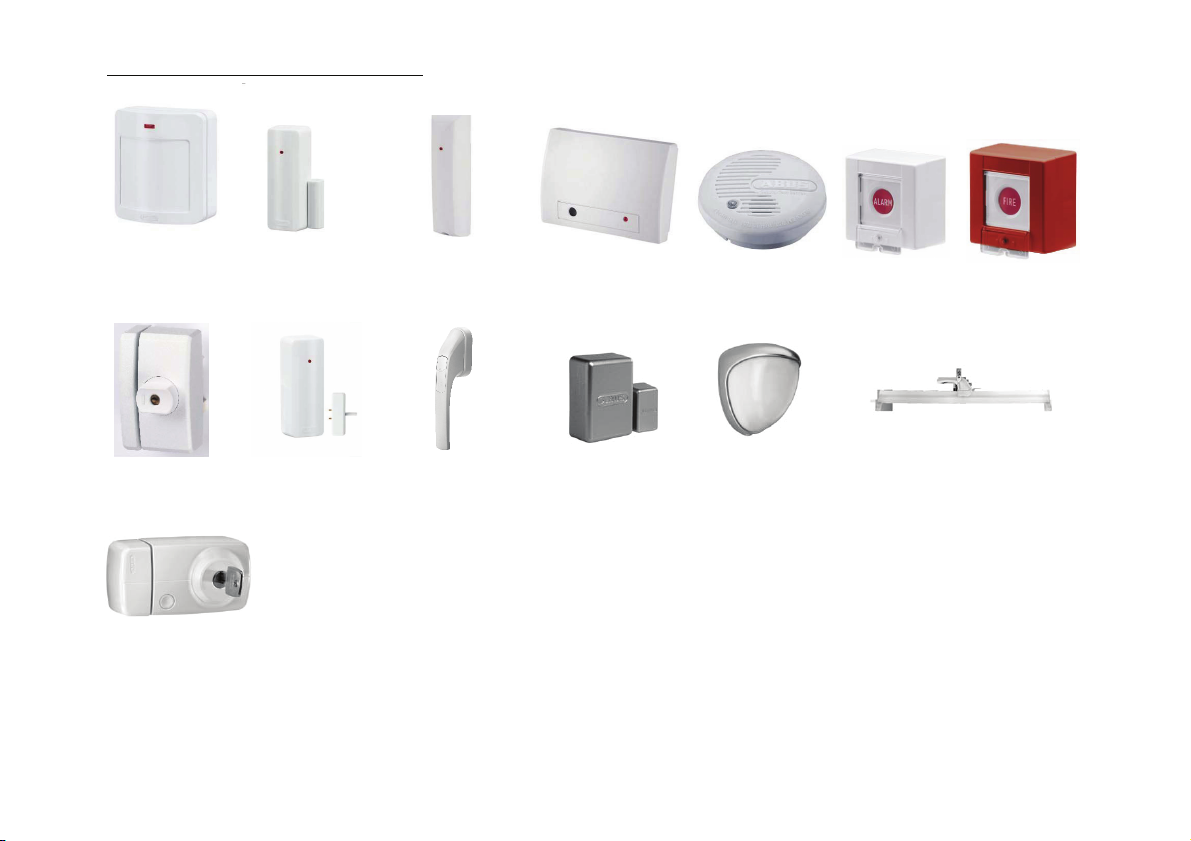
5. Accessories (not included in scope of delivery)
Motion sensor
FU8350
FU8360 (PET)
FTS96E
FU8400
Door additive-lock
FU81x0
Opening detector
FU8320 (CC)
FU8321 (FSL)
Water detector
FU8330
Seismic sensor
FU8380
Window handle
FG 350 E
FU8430
Glass breakage detector
FU8370
Mini-opening detector
FU8325
27
Smoke detector
FU8340
Outdoor-motion
sensor
Alarm detector
FU8300
Window bar yoke
FOS 550E
Fire alarm
FU8310
FU842x
Page 28
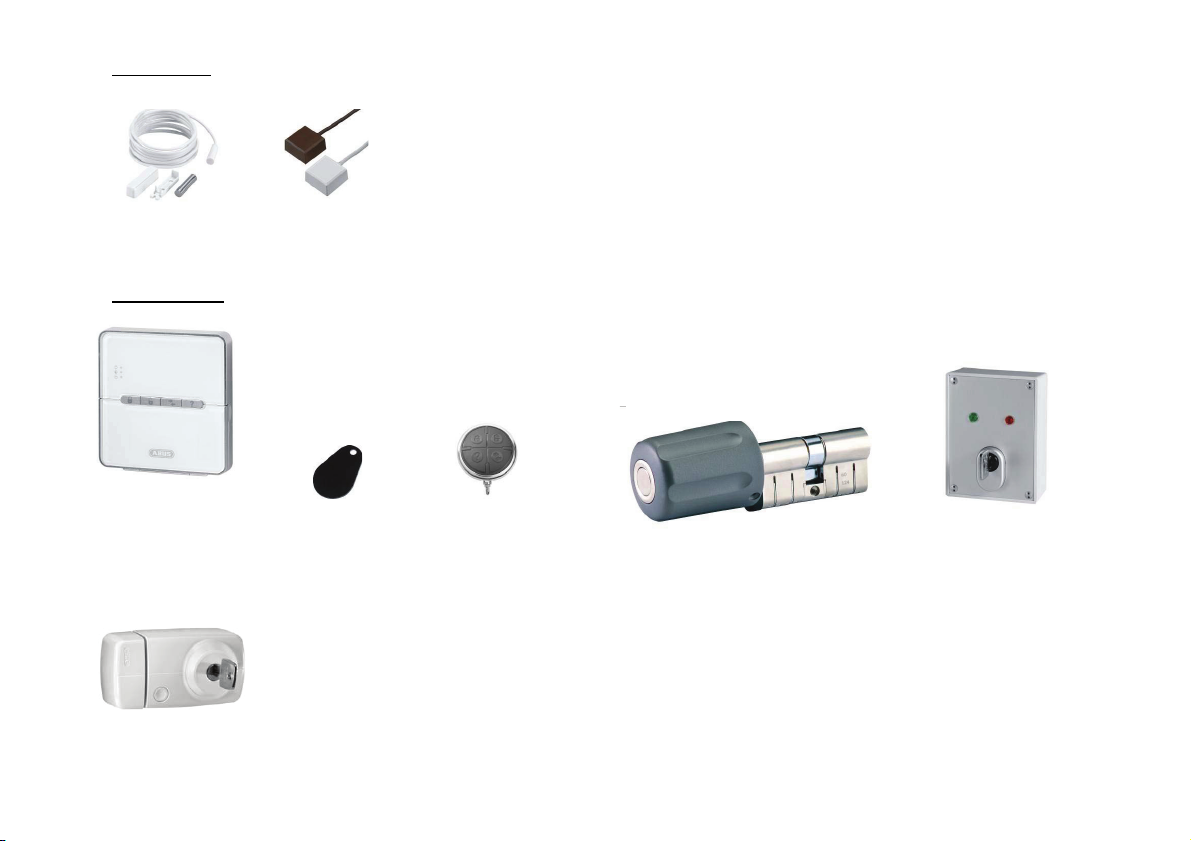
5.1 Wired detector
(
)
MK1010W
MK1300W with WKS
5.2 Remote controls
Arming station
FU8110
FU8360
PET
Door additive-lock
FU81x0
FU7300
Chip key (tag)
AZ5501
Remote control
FU8100
Wireless cylinder
FU59xx
Key switch with
status display
FU8165
28
Page 29
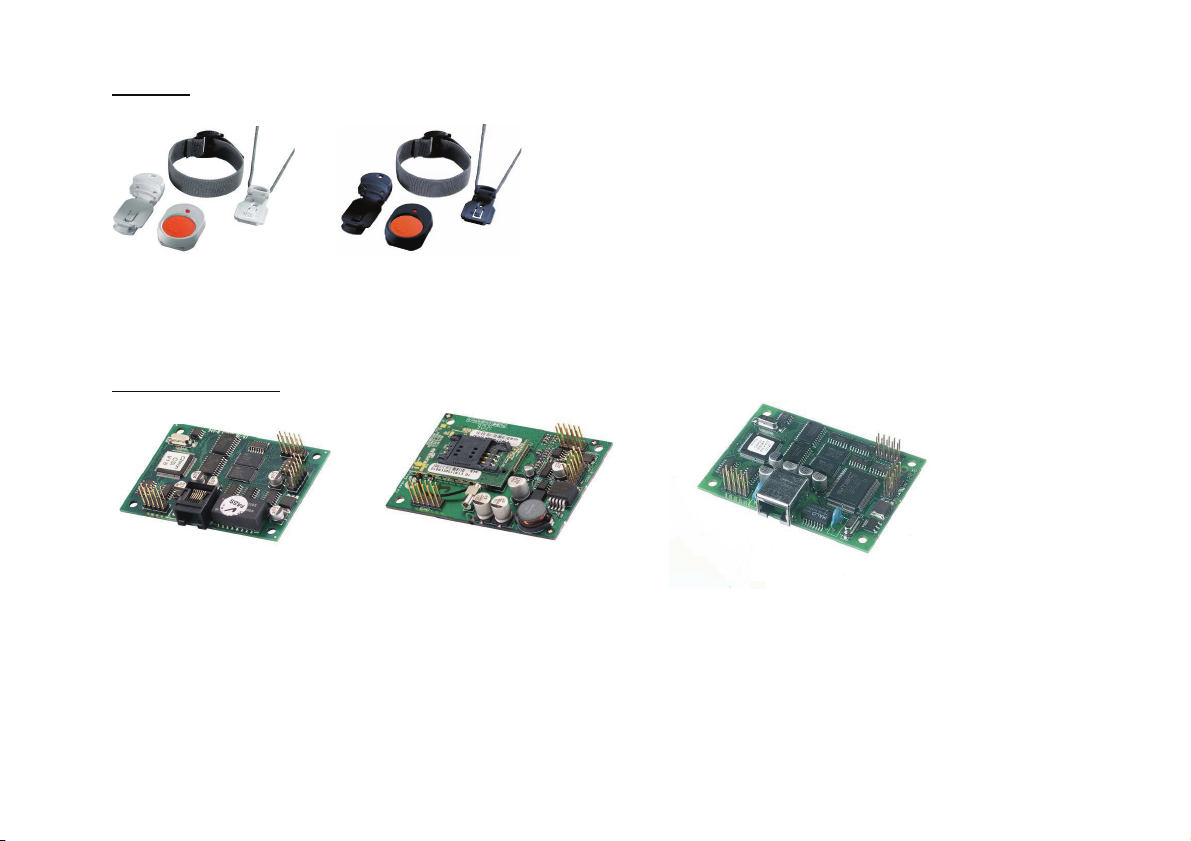
5.3 Transmitter
Emergency call
transmitter (pendant)
FU8390
5.4 Communication modules
ISDN module
FU8020
Panic transmitter
FU8305
GSM module
FU8010
IP module
FU8030
29
Page 30
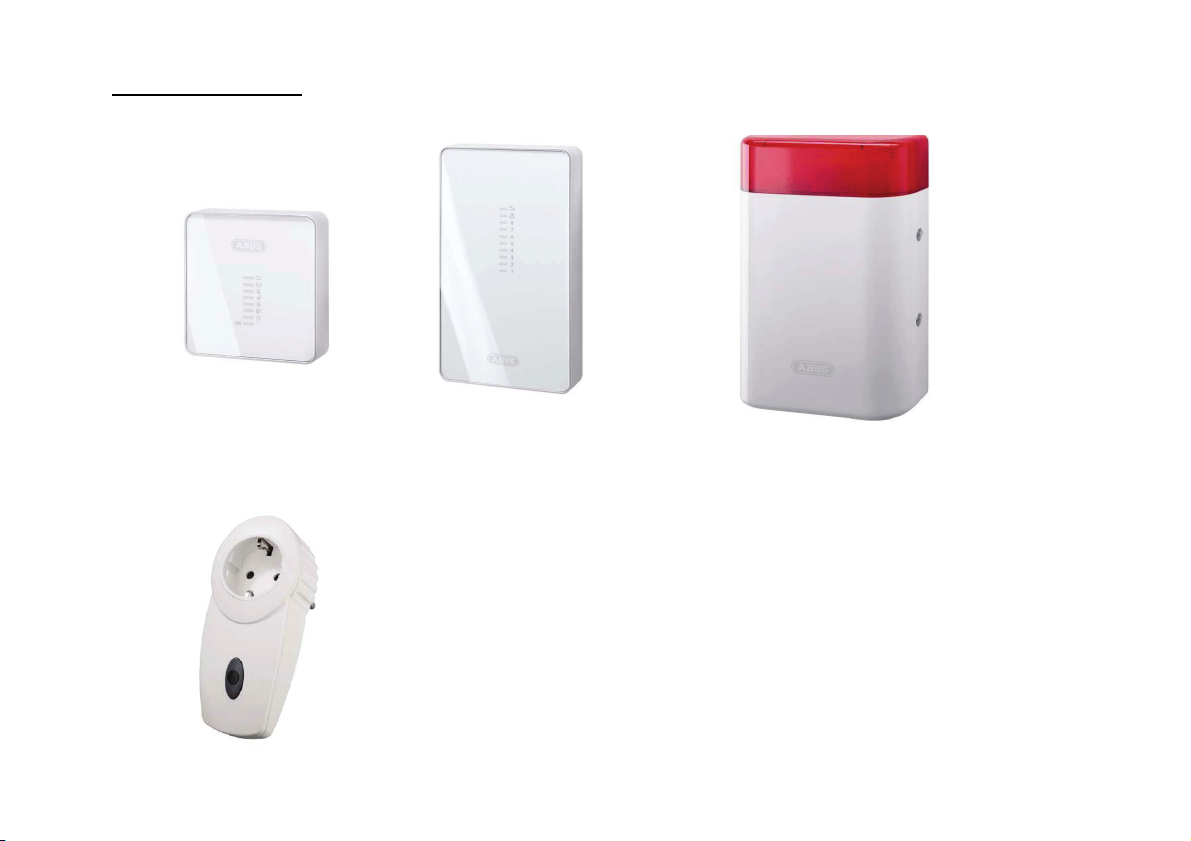
5.5 Modules and external sirens
Info module
FU8200
Power socket
FU8240
Accessory module
FU8210
Wireless external siren
FU8220
30
Page 31

5.6 Accessories
6 V standby
rechargeable battery
for the accessory
module
FU3821
5.7 Wireless testing box
868 MHz wireless testing
box
FU3801
12 V / 1 A PSU
FU3822
12 V / 1 A built-in PSU
for 55 mm
UP switch boxes
TVAC35200
PC cable
FU3810
31
Page 32

6. Safety information
WARNING!
To avoid fire and injury, please note the following:
x Securely fasten the device in a dry location in the
building.
x Ensure sufficient ventilation for the alarm centre.
x Do not expose the alarm centre to temperatures
under 0 °C or above 50 °C.
x The alarm centre is designed for indoor us e only.
x Humidity must not exceed 90% (non-condensed).
x Ensure that no metal objects can be inserted into the
equipment from outside.
x Ensure that the power supply is disconnected before
carrying out any work on the alarm centre.
Caution!
Please observe the following precautionary measures
to ensure trouble-free operation of your system.
x The alarm centre is supplied with power from the
built-in PSU.
x The PSU is connected to the 230 V AC domestic
mains network over a separate, electrically protected
line.
x Connection work to the domestic mains network is
subject to country-specific regulations.
x Emergency standby power is supplied by an internal
rechargeable battery.
x Always replace fuses with ones of the same rating,
never higher.
32
IMPORTANT
INFORMATION!
On burglar alarm centres in general:
Improper or careless installation work may lead to
misinterpretation of signals and false alarms. The
costs resulting from the deployment of emergency
services (e.g. fire or police) are borne by the operator
of the equipment. Therefore, please read the
instructions very carefully and follow the installation
instructions for lines and components precisely.
Page 33

!WARNING!
Warning: Radiation level of the emitted high frequency
The emitted high frequency of this component is below
the European limit values, which are considered safe.
Nonetheless, the product must be attached so that the
possibility of a user being exposed to it during
normal operation is kept to a minimum. To keep the
radiation level to a minimum,
users must be more than 200 mm away from the
component during normal operation.
!IMPORTANT
INFORMATION!
Information on the EU directive on waste electrical and
electronic equipment:
To protect the environment, do not dispose of the
device with domestic refuse at the end of its service
life. It can be disposed of at one of the appropriate
collection points in your country. Please obey your
local regulations when disposing of material.
Dispose of the device in accordance with EU directive
2002/96/EC – WEEE (Waste Electrical and Electronic
Equipment). If you have any questions, please contact
the department of your local authority which is
responsible for waste disposal. Used equipment can
be disposed of, for example, by your local or municipal
authority, the local waste disposal company or your
dealer.
33
!IMPORTANT
INFORMATION!
Information on the European RoHS directive:
The device complies with the RoHS directive.
Compliance with the RoHS directive m eans that the
product or component does not contain more than the
following maximum concentrations of the following
substances in homogeneous materials, unless the
substance is part of an application that is excluded
from the RoHS directive:
a) 0.1% lead (by weight)
b) Mercury
c) Hexavalent chromium
d) Polybrominated biphenyl (PBB) and polybrominated
diphenyl ether
e) 0.01% cadmium (by weight)
Page 34

7. Notes on connection and extension options
Alarm centre characteristics:
The wireless alarm centre is the central part of an electronic
security system for protecting your property (e.g. apartment,
house, garage, shops etc.). It secures the monitored areas in
combination with other components such as wireless detectors
and signallers. The alarm is triggered by unauthorised break-in
attempts.
The alarm centre can be programmed either via the integrated keypad or using the
software (either locally or over remote data transfer). The alarm centre can also be
activated via the integrated keypad or via wireless control equipment such as wireless
cylinders or keypads.
The wireless alarm centre can transmit an alarm over analogue or digital telephone
equipment. The alarm can also be transmitted via the GSM network using the optional
GSM module. Alarms can be transmitted digitally to a command centre, via PSTN,
ISDN, GSM, ethernet and GPRS or by speech messages to selected recipients (e.g.
neighbours).
The wireless alarm centre has 32 wireless zones and 2 wired zones that are
connected directly to the alarm centre. The alarm centre analyses signals from the
trained wireless components according to the zone programming. It can then also
analyse wireless communication for attem pts to tamper with it.
x 48 freely programmable wireless zones, all of which can be programmed as
follows: Normal Alarm, Final Exit, Entry Route, 24 Hour, Fire, Panic, Key Sw
Moment, Key Sw Latched, Technical or Key Box.
x 2 freely programmable wired alarm zones in the wireless alarm centre that can be
programmed in the same w ay as the wireless zones.
x Separately evaluated tamper and battery m onitoring for every wireless zone.
x 4 x arming stations, 16 x wireless remote controls, 16 x social care emergency
call transmitters, 8 x accessory m odules, 50 x proximity key switches.
x 2 wired relay outputs in the wireless alarm centre and 32 programmable wireless
outputs that can be allocated to a specific event (alarm, fire, panic etc.).
x Integrated PSU (230 V AC primary) for alarm centre power supply and recharging
the battery.
x Emergency power supply via 6 x 1.2 V NiCd rechargeable batteries (supplied).
x Simple programming and operation via the integrated keypad or software.
x The status of the alarm zones and the alarm centre is displayed on a plain-text
display.
x Zone blocking as a way of temporarily removing individual alarm zones from
surveillance.
x Access authorisation for operating and programming using a 4-digit code.
x 250 x alarm and event memory with date and time display.
34
Page 35

8. Notes on the security sy stem
High-frequency emission warning!
The limit value of the emitted high-frequency signals for these components is below
the European standard (considered as safe). Nonetheless, the device must be
attached so that potential contact with users during normal operation is kept to a
minimum. To keep signal emissions to a minimum, users must be more than 200 mm
away from the components during norm al operation.
8.1 Opening the alarm centre housing
When installing the alarm centre, follow the sequence listed here.
Firstly, loosen the two housing screw s on the bottom of the wireless alarm centre as
illustrated.
Open the top part (1) of the wireless alarm centre and detach the base plate (2) from
the rest of the system. Pay special attention to the cable connections.
8.2 Connections on the top part of the alarm centre
The following diagram shows the connections on the top part of the alarm centre.
(1)
(2)
Number Description
1 Internal siren
2 Battery compartment
3 Internal lou dspeaker
4 Connection for the analogue telephone line (PSTN)
5 Kickst art and Codes Defaulted jump er (KS + RE SET)
6 Connection for e xternal loudsp eaker and microphone
(separate device )
7 Connection for extensi on modules (ISDN / GSM / ethernet /
GPRS)
8 Connecting cable between base plate and top part
9 Loudspeaker volume control (S/W <5.01.10)
10 USB port
35
Page 36

8.3 Connections on the base plate of the alarm centre
The following diagram shows the connections on the base plate of the alarm centre.
Number Description
1 Cable clamp (tension relief) for the 230 V AC mains line
2 Connection socket for the connection cable
3 230 V AC mains connection
4 Connection clamps for wired zones and outputs
8.4 Shutting off unused cable inputs
Use the hole adapter supplied to close off the cable inputs that are not used. Pay
attention to the diagram below:
8.5 Assembling the base plate
Fix the base plate to the wall as show n in the diagram. Ensure that the alarm centre
is installed so that the rear is not screened by hidden metal. Fix the de vice at a
height where the user can easily read the information on the display.
36
Page 37

8.6 Connecting the alarm centre to the 230 V mains supply
Z 50
Z 49
Connecting the alarm centre to the 230 V AC mains network is subject to national
regulations. Check that no voltage is present in the connection cable when fitting.
Connect the 230 V power supply to the mains connector according to EN60950-1 as
shown in the diagram. Remember to fix the cable with suitable tension relief.
8.7 Connecting wired components
If wired components are connected to the wireless alarm, then connect them as
shown in the diagram. Please note that the detec tors can only be connected in this
way (DEOL).
Zone closed with a 2.2 kOhm line resistance (two resistors inserted). The 4.7 kOhm
resistor is also inserted, but is bypassed by the alarm contact of the detector (see
illustration).
In this variation, the tamper contact and alarm contact are monitored in one zone. In
the event of a change of resistance, the alarm centre can distinguish whether the
cause is an alarm or tamper attempt. Note that there are two different resistance
values:
A: 2.2 kOhm (red, red, red, gold)
B: 4.7 kOhm (yellow, violet, red, gold)
Colour configuration of the lines:
L : Brown or black
: Green/yellow
N: Blue
Always replace the mains fuse with one of the same type. Never use
fuses with higher voltage ratings than those specified.
The green/yellow (earth) wire should be slightly longer than the live
and neutral wires.
37
Switch outputs O/P1 and O/P2:
Disconnected, single pole relay contacts
DC: 24 V / 1 A
AC: 120 V / 0.5 A
Page 38

8.8 Connecting the analogue telephone connection
8.10 Inserting the rechargeable batteries for emergency power supply
Connection instructions for ISDN / GSM / ethernet and GPRS modules can be found
in chapter 24. Connect the analogue telephone line as shown in the diagram:
A-B
Connection of an external
analogue line
In UK only
A1-B 1
Connection of analogue
terminal devi ces (e.g.
telephone o r fax)
8.9 Connecting external loudspeakers / microphones
In addition to the internal loudspeaker and microphone, a further loudspeaker /
microphone can be connected to the w ireless alarm centre as shown in the diagram.
Insert the six batteries correctly into the compartment. Replace the batteries every
two years at the latest with batteries of the same type. Only use batteries with the
following specifications:
1.2 V, 2100 mAh, NiMH, AA/R6 type
Battery charging:
A battery that is new or has not been used for a longer period does not
develop its full capacity until after approximately 5 charging and
discharging cycles.
38
Page 39

8.11 Closing the alarm centre
8.13 Final tasks
Reconnect the top part to the base plate. Remember to connect the connection cable
of the base plate to the alarm centre. At the same time, check that all other
connections (emergency power supply and loudspeaker) are correctly connected to
the top part.
Close the alarm centre and attach it to the bottom part using the housing screws.
Do not connect to 230 V AC mains power supply until the alarm centre is correctly
fitted.
8.12 Notes on testing the alarm centre
To test the alarm centre functions without fixing it to the wall and without 230 V AC
mains voltage, the system must be activated us ing the kickstart.
After inserting the charged batteries, put the wireless alarm centre into operation by
short-circuiting the kickstart jumper on the upper side of the alarm centre.
All connections are now made and the wireless alarm centre is ready for
programming.
Note: When connec ting the alarm centr e to the power supply for the first ti me,
you are prompted to select the language used for the display. The standard
programming options for a certain countr y are then loaded.
The alarm centre is now in user mode, irrespective of whether it was put into
operation through connection to the 230 V AC mains voltage or using the kickstart
jumper.
Before starting programming, read the explanation of terms in the following chapter.
If you are familiar with these terms, you can skip the next chapter and start
programming the alarm centre.
8.14 Code reset (code default)
You can carry out a code reset if you have forgotten your installer or administration
code. All user settings (including trained remote controls) are deleted, and the
administrator and installer codes are reset to the factory default settings. Settings in
the installer menu are kept.
The installer code is then 7890.
The administrator code is then 1234.
1. Disconnect the alarm centre from the
power supply (remove PSU and battery
connection).
2. Short-circuit the Codes Defaulted jumper.
3. Connect the power supply.
4. The signal tone sounds.
5. Remove the Codes Defaulted jumper.
The tamper switch housing must not be pressed.
39
Page 40

9. Explanation of terms
Before starting to program the alarm centre, you should become familiar with
the terms used.
SYSTEM ACTIVATED
When the wireless alarm centre is activated, it monitors all zones for changes and
triggers a local alarm and an external alarm (optional).
SYSTEM DEACTIVATED
When the wireless alarm centre is deactivated, only zones that are always active are
monitored (e.g. 24 Hour, Technical and Fire). An alarm triggered by one of these
zones usually results in an internal alarm.
INTERNAL/EXTE RNAL ACTIVE
In addition to the complete activation of the burglar alarm centre, individual partitions
(1, 2, 3, 4) can also be activated. It is also possible to activate the system internally.
This means that system partitions are activated whilst the house occupants are at
home. To use the functions internally, at least one detector must be allocated the
“Part Set” zone attribute (see “Training detectors”).
INTERNAL ALARM
In the event of an internal alarm, only internal signallers are activated.
LOCAL ALARM
In the event of a local alarm, the connected outdoor sirens are also activated.
EXTERNAL ALARM
In the event of an external alarm , the alarm is also transmitted via telephone in
addition to the activation of the acoustic and visual signalling devi ces.
SIL ENT ALAR M
In the event of a silent alarm, the connected acoustic and optical signalling devices
are not activated. Transmission is only made over the telephone line.
PARTITIONS
The wireless alarm system has a total of 4 partitions. Each of these partitions can be
activated or deactivated independently of one another. Each detector can be
assigned to one or more partitions. The detector is not monitored until all partitions
where the detector is assigned have been activated (exception: detectors that are
always active, such as Fire or 24 Hour detectors).
REPORTING
Four possible transmission methods for external alarms are found under the
“Reporting” point in the installer menu.
ALARMS
This transmission method is used when the wireless centre is assigned to a security
centre. Data transfer is made using a digital protocol. This method of alarm
transmission cannot be used to transmit an alarm to a private telephone connection.
The SIA Report, Contact ID and Fast Format Channel modes are available.
SOCIAL CARE
As with “Alarms”, this transmission type is only designed for transmitting a digital
report. However, other reports are also available. This alarm transmission type is not
suitable for transmitting an alarm to a private telephone connection.
SPEECH DIALLER
This transmission type is used to transmit an alarm to a private telephone
connection. The device works as the opposite of an answering machine. Previously
recorded texts are transmitted to pre-programmed telephone numbers according to
the trigger.
The called party hears the recorded text and can acknowledge the alarm call if
necessary.
SMS
Transmission over SMS is made in a similar way to the transfer of an anal ogue voice
message. Previously entered SMS messages are sent to pre-programmed num bers
according to the trigger. SMS messages can also be set over the analogue
telephone connection, depending on the network provider and approved services
(SMS over PSTN).
40
Page 41

10. Overview of the alarm centres
1 – Chip key reader
2 – Graphic display Multiple-line display
3 – Integ rated si ren
4 – Activation button
5 – Deactivation button
6 – Control butt ons
7 – Keypad alarm keys for panic, fire,
medical and social call em ergencies
8 – Keypad for programming and
operating the alarm centre
9 – Integ rated loudspeaker
10 – Integrated microph one
11 – Service flap
41
Page 42

11. Graphic display
The graphic display informs you about all events concerning the wireless
alarm system. The following is an overview of the different display messages
and their meaning:
This symbol appears if a voice message
exists that should be listened to. An
acoustic message is issued every time
the wireless alarm system is deactiva-
ted. This is: “You have a message”
This symbol appears when activity
monit oring is activated. Remember to define
the monitoring time period. Activity
monit oring only works when the wireless
alarm system is d eactivated .
.
partition 1-4
The four black bars stand for the
four individual partitions of the
wireless alarm system. A letter
in the black bar represents the
state of the partition (1–4). The
letters and their meaning:
U: Deactivated
A: Activated
I: Inte rnal ly activated
Note: A letter is only displayed
in the partition (bar) when at
least one detector is present in
this partition.
Menu
Press the button under the menu
display. The wireless alarm system
then prompts you to enter your access
code (user code). If the code is
accepted, the user menu is accessed.
All user functions that were released by
the user can be made here. Note that
some functions in the user menu
require a user code with administrator
rights (master code).
21:00
01/05/2008
Displays the current time and date.
42
This symbol indicates an error in
the wireless alarm system that
must be resolved immediately.
For a summary of the different
error displays and their
meaning, see the table at the
end of these instructions. To
display the error, press the
button under the display.
You are then prompted to enter
a valid user code.
Page 43

12. Installer menu
The wireless alarm centre is configured in the installer menu.
There are two ways of programming the wireless alarm centre:
A: Over the keypad on the wireless alarm centre.
B: Over the software (either locally or by remote data transmission).
The following section describes how to program the wireless alarm centre using the
keypad. To program the wireless alarm centre using the software, please consult the
software instructions.
The menu is graphically designed to be used almost intuitively. The control buttons are
used to navigate around the menu.
Using the arrow keys, you can navigate up and down within a menu item.
The keys on the left and right side relate to the text displayed above the keys in the
display.
12.1 First steps in the installer menu
In the user mode, proceed as follows:
If you are in user mode, you must first change to the installer mode. Do this as follows:
Enter a valid installer code (default setting = 7890): 7 8 9 0
You may also have to enter an administrator code (default setting = 1234) or user
code. The following announcement is heard:
“You are now in the installer menu”
When exiting the installer menu, the following announcement is played:
“You have exited the installer menu”
If the code is entered incorrectly four times in succession, the keypad
(except for the alarm buttons) is then locked for 90 seconds.
12.2 Overview of menu items in the installer menu
In the installer menu, wireless detectors can be trained, controllable outputs can be
configured and partitions can be defined. The following table provides an overview of
the various menu items:
Menu item Settings
Detector Train/delete detector, configure zones
Outputs Add and edit outputs
Other Devices
Partitions Assign partitions to zones, configure partitions
Set up external sirens, WAM (Wireless Accessory Module),
info module, arming station
43
Page 44

System Options
)
IP Network Configure IP settings
Download Configure download settings
Reporting Configure telephone settings, define transmission types
Social Care Set social care, define activation times
Tes t
View Log Read the event log
About Panel Read information about software and hardw are versions
Perform user functions, select language, restore default
settings, change installer code, define delay and siren times,
configure supervision and jamming detection
Centre and detector test, output test, walk test, wireless
communication
13. Adding detectors
In the installer menu:
Æ
Function Meaning
Auto learn If this item is selected, you can walk through your
Delete All This function is used to delete all trained wireless
Zone xx This item can be used to:
property and activate the detectors one after the other
(by triggering the tamper contacts). The detectors send a
learn message and the alarm centre now automatically
stores the book-in messages in sequence according to
the zone locations.
detectors and zone attributes.
a) Manually train a detector for this zone
b) Delete a detector from this zone without deleting
the zone attribute
c
Delete a detector and its zone attribute
13.1 Auto learn
Select Auto learn if you want the wireless alarm centre to dial the first free zone.
¾ Select Auto learn.
¾ You will now be prompted to activate the Tamper contact of the detector.
¾ Select Add/Del Detectors.
44
Page 45

This display shows which zone the detector has been trained to, the zone type
programmed for this zone, the partition that the detector monitors and the additional
zone attributes.
SS is also displayed, which shows the received signal strength. This value should be
higher than 3 for satisfactory communication.
To identify the detector at a later date, m ark it with the zone number.
If this message is displayed, consult the foll owing chapter (9.4).
13.2 Deleting the detector or detector with zone information
Do you want to delete the detector or the detector with zone information?
If a detector has been trained, then the symbol is shown next to the
zone number.
In the case of an assigned zone of a W AM (WAM function 3 transmitter/receiver) "w2"
appears, for example.
In the installer menu:
Æ Æ
Select the Add/Del Detector s menu item.
Select the zone you wish to delete.
To delete the detector only, select the Delete Detector ID menu item and confirm with
Next
.
After training, select the menu item by pressing Next
.
Confirm deletion by pressing Yes.
45
Page 46

Some detectors do not have tamper contacts (e.g. smoke detectors)
and only send an alarm (A). The display with the number of tested
zones without tamper contacts remains.
To delete the detector and the zone inform ation, select the Default Zone menu item
and confirm with Next
Confirm deletion by pressing Yes.
.
13.3 Detector already in use
In exceptional cases, the message“Detector already in use” may be
displayed during training of the detector. This occurs after the training
confirmation is received as the detector sends the signal more than
once.
In this case, the display is meaningless.
Checking the detector:
This detector may have already been trained for another zone. Conduct a walk test to
find out which zone this detector has been trained to.
Go to Installer Menu Æ Test Æ Walk Test and carry out a walk test by triggering a
tamper contact (T) and an alarm (A).
Select Test Select Walk Test
Number of zone s
to be tested
T and A are displayed next to the trained zone (detector).
Information:
All zon es test ed
Trigger a tamper
contact (T) and
an alarm (A).
13.4 Delete All
Do you want to delete all detectors and zone information?
In the installer menu:
Æ Æ
Select the Add/Del Detector s menu item.
46
T = Tamper
A = Alarm
Page 47

Select the Delete All menu item.
¾ You will now be prompted to activate the Tamper contact.
Example: Motion sensor
Confirm deletion by pressing Yes
.
13.5 Adding the zone 01 detector manually
In the installer menu:
Æ Æ
Select the Add/Del Detector s menu item.
¾ Select Zone 01.
Please ensure that no other active detectors are in the tamper state.
¾ The detector was successfully trained.
To ensure satisfactory communication, the signal strength should be
more than 3.
47
Tamper contact
(wall break contact)
Display of
the signa l
trength
s
Page 48

13.6 Editing detectors (zones)
In the installer menu:
Select the Edit Zones menu item.
Æ Æ
The detector transmits its standard settings automatically to the alarm centre after
training. This setting can be changed at any time.
Editing Zone 01
13.7 Assigning the zone name
It is sensible to assign a clear and unique zone name so that detector can be identified
quickly in the event of a malfunction.
Example: MS for motion sensor and Office01 as location
Detector name: MS-Office01
Enter letters and characters via the keypad.
Letter-to-key assignment:
The letters and characters can be selected by pressing the keys several times. The
cursor goes to the next position after around two seconds.
Select the Name menu item.
Delete the existing name (Zone 01) and assign a unique name for the zone (m ax. 12
characters).
Confirm the new name by pressing OK
A mold “keyboard layout for programming” can be found on
www.abus.com in the download-area.
.
48
Page 49

13.8 Selecting the zone type
The preset zone type can be changed here. Pay attention to the zone type descriptions
in this chapter.
Select the Type menu item.
Press Select to confirm the corresponding Zone Type.
ZONE TYPE
A zone is a detector that has been trained for the wireless alarm centre.
Zones can have very different attributes. The detector does not know if the wireless
alarm centre is active or not. A detector therefore always sends an alarm to the centre
if a change is registered. The wireless alarm centre then evaluates whether this
message triggers an alarm response or not.
NOT USED
Zones where no wireless detector has been trained or where no detector has been
wired to the input (not used) should be programmed as a “Not Used” zone type. The
alarm system does not react when an event triggers this detector.
NORMAL ALARM
If the alarm centre is active, this zone immediately triggers an alarm if a wireless
detector sends a change to the wireless alarm centre or if the state of the alarm zone
changes (e.g. alarm contact is opened).
“Normal Alarm” zone type with FTS 96 E function
To use the FTS 96 E wireless window lock (item no. FU841x) or the FTS 96 wireless
upgrade set (item no. FU8402), program the “Normal Alarm” zone type in the alarm
centre.
x W hen the alarm centre is deactivated, these detectors are m onitored for
detachment and opening. The window must be closed and the FTS 96 E
locked. Monitoring begins 30 seconds after locking
(the FTS 96 E requires a self-calibration time of 30 seconds).
x Monitoring is no longer made when the FTS 96 E is unlocked. If an attempt is
made to open the window without unlocking the FTS 96 E first, then an alarm
can be triggered by movements to the window sash.
x A passive glass breakage detector (item no. FU7300) can be connected to the
FTS 96 E. If this detector registers a glass breakage, then this always leads to
an alarm in the alarm centre. The alarm centre carries out the actions
specified for the activated or deactivated state.
ENTRY ROUTE
This zone does not trigger an alarm if an entry/exit zone has previously activated the
entry delay time. An immediate alarm is triggered if no entry delay was previously
activated. This zone type can be used for a motion sensor in the entrance hall pointing
to the entry door (fitted with an opening detector). This detector can be used as an
entry/exit detector for internal activation. This zone can be opened when you exit the
programming menu.
FINAL EXIT
If the burglar alarm centre is active, this zone triggers an alarm following a s pecified
delay time (entry delay). This zone type can be used for an opening detector on the
entrance. When you leave the premises, closing this zone can also be used for ending
the exit delay. This detector can be used as a NORMAL ALARM detector for internal
activation.
24 HOUR
This zone always triggers an immediate alarm. If the wireless alarm centre is
deactivated, the alarm is first heard via the i ntegrated buzzer in the alarm centre.
When activated, the siren output is also activated. If a 24-hour zone is locked, this
applies to the deactivated state only.
FIRE
This zone always triggers an alarm, irrespective of whether the burglar alarm centre is
activated or deactivated. The alarm is made over the signaller in the wireless alarm
centre and the external siren as a pulsed fire alarm tone. Only train fire alarm s for this
zone.
49
Page 50

PANIC
This zone always triggers an alarm, irrespective of whether the burglar alarm centre is
activated or deactivated. A panic alarm can also be transmitted silently (reporting). The
programming menu can only be exited w hen this zone is closed.
TECHNICAL
When deactivated, a technical zone triggers an alarm and reporting. When activated,
only reporting but no alarm is triggered. If an alarm occurs in this zone when activated,
then this is displayed when the alarm centre is deactivated. This zone type can be
used for water detectors.
Social care messages when communicating with ALARMS
xThe “QA” code in the SIA protocol in “Basic”, “Summary”, “Intermediate” and“Full”.
xThe “101” code in the Contact ID protocol.
KEY SW MOMENT
Train a key switch (pulse) to the wireless alarm centre. Any change to this zone
changes the state of the alarm centre from active to inactive or vice versa (following
the delay time).
KEY SW LATCHED
A key switch (permanent) can be connected to the burglar alarm centre. Any change to
this zone changes the state of the alarm centre from active to inactive or vice versa
(following the delay time). Please note that you can only operate the alarm centre via
the key switch. If the status is unclear (e.g. key switch closed and deactivated on the
control panel), then the alarm centre may return to active state.
KEY BOX
This zone is mainly used in Scandinavia. If this zone is opened, the trigger is stored in
the memory of the burglar alarm centre. The can also be transmitted via the telephone
dialler. No alarm is triggered.
If a zone of this type is necessary, the user connects the alarm wiring of this zone
(usually the auxiliary contact of a door) to an external key box and the tamper wiring to
the housing switch. If the housing is opened, the wireless centre saves the trigger and
notifies the alarm reception.
EXIT NORM ALM
A zone programmed as “Exit Norm Alm” behaves in a similar way to a “Norm al” zone.
However, a zone of this type initiates an alarm when the detector is triggered during
the delay time.
PERIMETER WARNING
This zone triggers a pre-alarm, if the alarm system has been set or part set.
The control panel beeps twice every five seconds. "Perimeter Warn" appears on the
display every five seconds.
The wireless external sirens FU8220 and FU8250 flash and beep every five seconds
for approx. one second.
The info module FU8200 beeps once every second and the red alarm LED lights up.
The indoor siren FU8230 beeps once every second. It must however be supplied by a
power supply unit for this and the jumper "Alarm Only" must not be inserted.
(This sound is an "Info" sound, not an "Al arm" sound.)
The duration of all signals is 30 seconds.
An output of the "Perimeter Warn" type is enabled for 30 seconds.
Only the door chime sounds when the system is disabled, if configured.
13.9 Selecting partitions
The trained detectors are assigned to Partition 01 as standard.
To assign the detector to another partition, proceed as follows:
Select the Partitions menu item.
At least one partition must be marked with Yes.
Select the relevant partition in which this zone is to be monitored. Confi rm by pressing
“Done”.
50
Page 51

Example: Shared office
Further proper ties can be allocated to the zone here.
An overview of partition characteristics can be found in chapter 15.1 of these
instructions.
The following types can be assigned to one or more partitions: Normal Alarm, Entry
Route, Final Exit, Key Sw Latched, Key Box, Exit Norm. Alm.
If you plan to use internal active partitions, you must ensure that the
internally activated options are identical for all zones used by more than
one partition.
The wireless centre does not allow allocation of the following zone types
to more than one partition: 24 Hour, Fire, PA, Technical Alarm, Key Sw
Moment, Perimeter Warn.
13.10 Selecting zone characteristics
Select the Attributes m enu item .
Property Meaning
Chime
Soak Test
Activity Mon.
Part Set
Force Set
Dis. Sabotage
Lock
51
When the alarm centre is deactivated and this zone is
triggered, the centre emits an acoustic signal.
If a detector tends to trigger false alarms, activate the
detector test (soak test). This setting is automatically
reset after 14 days. During this time, the detector
triggers no al arms on the alarm centre. All triggering
behaviour is noted in the memory (logbook).
The detector function is inverted. This is only to be
used in connection with the Social Care function. An
alarm is triggered on the alarm centre if the detector
reports no alarms within a specific period.
This zone is monitored if the partition of this zone or all
partitions are internally activated.
If a zone is assigned this property, then this zone is hid
automatically if it was open during activation.
Installer Menu Æ Detectors Æ Edit Zones Æ Attributes Æ
Dis. Sabotage Yes /No
xFactory setting: No
xIf “Yes” is selected, sabotage monitoring on the
FTS 96 E wireless window protection system is
switched off when the alarm system is
deactivated.
o“W” is shown in the “Attributes” line in the
This attribute can only be assigned to a zone of the
"Normal Alarm" type. The partition
can only be set or part set when this zone is closed.
Opening this zone
does not trigger an alarm.
display.
Page 52

The Soak Test function should only be set when the detector has a
tendency of triggering false alarms. This function works automatically.
To test the detector range, use the walk test function. Do not activate
the detector test, as this function ensures that a message is stored in
the memory and no alarms are triggered when the wireless alarm
system is activated. The wireless alarm system sets the zone back to
normal after 14 days.
The Force Set function must be activated additionally in the System
Settings / Force Set menu.
13.11 Examples of zone properties
Part Set:
Detectors with the Part Set attribute secure your property from the outside.
You can move freely around the property.
This means:
The alarm centre only reacts to
detectors with the Part Set
property.
14. Outputs
The controller has 34 outputs.
The first two outputs (O/P1 and O/P2) are w ired outputs.
Outputs 3 to 34 are wireless outputs. They can be accessed using a FU8210
accessory module or a wireless socket.
Switch outputs O/P1 and O/P2:
Disconnected, single pole relay contacts
DC: 24 V / 1 A
AC: 120 V / 0.5 A
14.1 Adding outputs
The Secvest has two wire outputs.
Select the Outputs m enu item.
Force Set:
An interior door is secured with an opening detector. The detector is assigned the
Force Set property. The system can then also be activated when this door is open.
This detector is then no longer used for monitoring.
52
Page 53

14.2 Editing outputs
In the installer menu:
Select Add Output.
Select (HW)Output 01
Confirm by pressing Yes
Now edit Zone 01.
Select the Edit Output menu item.
Æ Æ
Now edit Zone 01.
.
Select the Name menu item.
14.3 Assigning the output name
It is sensible to assign a clear and unique output name so that the output can be
identified quickly in the event of a malfunction.
Delete the existing name (Output01) and assign a unique name for the output (max.
12 characters).
Enter letters and characters via the keypad.
53
Page 54

Letter-to-key assignment:
The letters and characters can be selected by pressing the keys several times. The
cursor goes to the next position after around two seconds.
Confirm the changes by pressing OK.
14.4 Invert output
Whether the relevant output is inverted or operates without being inverted can
be selected here. Select yes or no.
14.5 Selecting the output type
The output properties can be changed here.
This menu can also be used to automatically activate and deactivate the
alarm centre at a defined time. See the following page for more
information (“Manual” output type).
Select Type to configure the output. An overview of output types can be found in the
following table.
Type Meaning
Not Used This output is not in use and is never activated. (Exception:
Local This output is activated on local alarm s for the defined siren
E/E Follow This output is activated for the duration of the delay time
Armed Lamp This output is activated as long as one partition is internally
24 Hour This output is activated if a 24-hour zone triggers an alarm.
Strobe This output is activated for a local alarm and remains active
Strobe Set This output is activated for approx. 10 seconds following
Pulse Set This output is activated for approx. 1 second following
Pulse Unset This output is activated for approx. 1 second following
Setting Complete This output is activated for approx. 10 seconds following
Siren P1 - P4 This output is activated on local alarms in the selected
Strobe Set P1 - P4 This output is activated for a local alarm in the selected
Technical This output is activated if a technical zone triggers an alarm.
Medical This output is activated if a medical emergency call is
Panic This output is activated if a panic alarm is activated.
Fire This output is activated if a fire alarm is activated.
Zone Follow This output follows the state of a zone. An overview of
complete power loss).
duration. Output does not switch in the case of a technical
alarm.
Output does not switch in the case of an alarm with a part
set system, when "System Options --> Siren in PSet -->
Disabled"
(entry/exit delay active). Output does not switch in the case
of the partition type "Silent Set" and "Instant Set" .
or externally activated.
until the wireless alarm centre is deactivated.
successful activation of the wireless alarm centre and is
used for acknowledging activation. The function must also
be activated in the partition menu. This output is also
activated for a local alarm and remains active until the
wireless alarm centre is deactivated.
successful activation of the wireless alarm centre.
successful deactivation of the wireless alarm centre as well
as for a panic or fire alarm.
successful activation of the wireless alarm centre.
partition for the defined siren duration. Output does not switch
in the case of a technical alarm or panic alarm.
partition and remains active until the wireless alarm centre is
deactivated. The output is also activated for 10 seconds
after successful activation of the partition.
activated.
zones is displayed when this type is selected. Select a
corresponding zone.
54
Page 55

User Defined This zone can be remote-controlled by various components
g
FullSet RDY P1 - P4 This output is activated when the partition is ready to be
Part Set P1 - P4 This output is activated if a partition is internally activated.
Full Set P1 - P4 This output is activated if the partition is activated.
Jamming Installer Menu Æ Outputs Æ Edit Outputs Æ Type Æ
Perimeter Warning This output is enabled for approx. 30 seconds when a zone
System Fail This output is enabled for approx. four seconds when a
AC Fail This output is enabled as long as AC Fail appears in the
Reporting failure This output is enabled as long as a reporting failure is
Tampering This output is enabled as long as an element of the alarm
Bur
Any FULL SET This output is enabled as long as at least a partition is fully
such as remote control units or the code keypad. The output
can also be assigned times at which it is to be activated and
deactivated. If this output type is selected, the times at
which the output is to be activated or deactivated can be
entered at the end (see the note below).
activated. A detector has been assigned to several
partitions. The relevant partition is ready, even if the
detector is still open.
Jamming
xThe corresponding output switches when jamming is
detected.
with the attribute "Perimeter Warn" triggers an alarm.
system failure occurs.
display. (Menu --> Facilities On/Off --> Mains Fail Rep Yes,
see A2-III users)
present and the monitoring is switched to reporting failure.
system reports tampering.
This output is only enabled by a burglar alarm.
enabled.
End data entry by pressing Back.
14.6 Example: “User Defined” output type
After selecting the User Defined output type and entering the times, you can then
connect the programmed output with a wired input (programmed as “Key Sw
Latched”). In this way, the alarm centre can be activated and deactivated at a defined
time.
In addition, the “User Defined” output can also be remote-controlled. Program the
remote control unit in the user menu under “System -> Remote controls” (see user
manual).
14.7 Adding RF (wireless) outputs
In the installer menu:
Æ Æ
Select the Add Output menu item.
The training procedure for the wireless output module is described here (function not
yet available).
Select the function User Defined, for exam ple.
55
Do not add outputs if the WAM (W ireless Accessory Module) is used as
an output module, as this reserves the outputs automatically. Consult
chapter 14.3 (Other devices / Adding WAMs).
Proceed as follows to add a wireless output (not necessary for outputs
on the accessory module):
Page 56

14.8 WAM outputs
In the installer menu:
Select (RF)Ou tput 03, for example.
Select SEND to send the learn signal to the receiver.
If the receiver beeps twice, the learn message was correctly received. End the learning
procedure by pressing Yes.
To cancel data entry, press No.
The learn procedure is now started again.
Add another output by pressing Add.
To edit the trained output, press Edit and proceed as detailed in chapter 13.2
(“Editing out puts”).
Select the Edit Output menu item.
Æ Æ
The WAM wireless outputs can be edited after training the WAM as a wireless
transmitter or receiver (function 3).
Please note that the disconnected W AM outputs have a maximum load
of 500 mA at 24 V. This is an opto-isolator with a forward resistance of
2
Select output 31 using the arrow keys (W AM 1).
WAM 1 output 1 Secve st output 31
Edit the menu point under output 31
Select the Name menu item.
.
56
Page 57

Assign a new name and finish data entry by pressing OK.
Select the Type menu item.
An overview of output types can be found in chapter 13.5.
15. Other Devices
The following components can be added under this menu item:
External siren Internal siren
Info module
WAM
Arming station
Secvest Key Door-additive-lock
57
Page 58

15.1 External siren
In the installer menu:
When the sirens have been trained, the alarm centre beeps twice as confirmation. A
message is displayed with the siren confirmation and the signal strength value.
Select Ex t Sirens
Select Add/Del Ext Siren.
Select the corresponding Siren.
Trigger the tamper contact of the siren.
Æ
Leave this display by pressing Back.
If a siren has been trained, then the symbol is shown next to the
siren number.
Leave this display by pressing Back.
Select “Edit Ext Siren”.
Select the trained Ext Siren.
58
Page 59

If the external siren should be activated w hen the relevant partition triggers a local or
external alarm, then the partition must be set to Yes.
15.2 Info Module/Int Siren
In the installer menu:
Æ
Select Info Module/Int Siren.
If the receiver beeps twice, the learn message was correctly received. End the learning
procedure by pressing Yes. Cancel the process by pressing No.
The learn procedure is now started again.
No further settings have to be made on the info module or internal siren. Even in the
event of power outage, the info module or internal siren retains the wireless
information of the alarm centre.
15.2.1 Update s / Disabled
This menu item is used to remove the info module or internal siren effectively from the
wireless centre (for exam ple, when the info module is no longer needed). The wireless
centre can also be prevented from updating the info module display. Deactivation frees
up some of the processing capacities on the wireless centre and accelerates reactions
to other components. The “Info Module/Int Siren” module provides the Updates option
for this purpose.
Select the Teach Info Module menu item.
Set the info module / internal siren to learning mode. See the product instructions for
more details. After switching the info m odule or internal siren to learning m ode,
activate the transmission of wireless information from the centre by pressing SEND.
Select the Updates menu item.
When Enabled is selected, the wireless centre continues data transmission to the info
module / internal siren.
When Disabled is selected, the wireless centre stops data transmission to all info
modules. The default menu setting for this option is Disabled.
The wireless centre changes the setting to Enabled when the identity of the wireless
centre is imported into an info module.
59
Page 60

15.2.2 Rdy-to-Set LED
This function must also be set if the info module is equipped with properties of the
“Ready” display. This signals that at least one zone in the partition is open (zones
connected with “Force Set” property). Proceed as follows:
The “Rdy-to-Set LED” function may result in increased wireless traffic as
the status change of a detector must also be sent to the info module. If
this results in system malfunctions, then the “Rdy-to-Set LED” function
must be deactivated. As described in the info module, the red LED on
the info module lights up as long as a zone is open (also applies to
“Force Set” zones). This indicates that the system cannot be activated
(or can only be activated with hidden zones).
15.3 Add WAM
Please ensure that reserved outputs and zones are allocated to each
WAM. See the table on reserved WAM outputs and zones.
Accessory module Reserved outp uts Reserved zo nes
WAM 1 31 - 34 48
WAM 2 27 - 30 47
WAM 3 23 - 26 46
WAM 4 19 - 22 45
WAM 5 15 - 18 44
WAM 6 11 - 14 43
WAM 7 07 - 10 42
WAM 8 03 - 06 41
Program the accessory module as detailed in the WAM installation
instructions (e.g. as a wireless receiver / transmitter (function 3))
Select the Rdy-to-Set LED m enu item.
To display the ready display on the info module, select Enabled and confirm by
pressing Select.
To deactivate the function, select Disabled and confirm by pressing Select.
After programming the accessory module according to the instructions, it can be added
to the system.
In the installer menu:
Æ
Select WAM.
Select Add/Del WAM
.
60
Page 61

Select the corresponding accessory module (WAM).
In total, up to eight accessory modules can be trained.
Select a module (e.g. WAM 1
Trigger the tamper contact on the W AM.
Trained WAM modules have the
Exit the menu by pressing Back
Check the information of the info module.
).
symbol next to the WAM number.
.
Select WAM 1.
When the WAM is trained, it also transmits its programming so that you can see the
function in which the WAM has been trained under “View WAM”.
Function Meaning
Not Used The universal module is not trained.
1 Wireless Repeater W ireless signals received from trained wireless detectors
2 Output Module Up to four WAM relays can be activated from the wireless
3 T/R Module Transmission/receiver module for connecting wired
4 Sounder Module For connecting a wired external wireless siren or
(trained in the WAM) are forwarded to the alarm centre
following reception. No other settings have to be made
here.
alarm centre according to the programming.
detectors (water detectors) or a block lock / key switch.
compact alarm device.
Select View WAM.
61
Page 62

15.3.1 WAM as wireless repeater
15.3.4 WAM as siren module
WAM function 1
If the accessory module is trained with the wireless repeater function, then the wireless
repeaters whose signals are to be transmitted via this module must also be trained to
the WAM. Consult the WAM operating instructions for more information.
15.3.2 WAM as output module
WAM function 2
If the WAM is trained with the output function, the alarm centre automatically reserves
the respective outputs for this module in the alarm centre.
Outputs 31 – 34 for WAM 1 Outputs 15 – 18 for WAM 5
Outputs 27 – 30 for WAM 2 Outputs 11 – 14 for WAM 6
Outputs 23 – 26 for WAM 3 Outputs 07 – 10 for WAM 7
Outputs 19 – 22 for WAM 4 Outputs 03 – 06 for WAM 8
These outputs no longer have to be added manually. Make the settings for the output
functions as described in the Editing outputs section. Outputs reserved by the WAM
are described as shown in the following diagram. These outputs must be configured,
but do not have to be added.
Consult the operating instructions of the WAM for more details.
15.3.3 WAM as wireless transmitter / receiver
WAM function 3
In the same way as the WAM as output module, the WAM as transmitter / receiver
technology module also occupies the 4 outputs. In addition to the outputs, one
wireless zone is reserved that corresponds to input 1. These must be configured at the
end according to the function connected in the WAM.
Consult the operating instructions of the WAM for more details.
The occupied wireless zone is displayed.
WAM 1 – Wireless zone 48 WAM 5 – Wireless zone 44
WAM 2 – Wireless zone 47 WAM 6 – Wireless zone 43
WAM 3 – Wireless zone 46 WAM 7 – Wireless zone 42
WAM 4 – Wireless zone 45 WAM 8 – Wireless zone 41
The second WAM input is used as a tamper line for the corresponding reserved
wireless zone.
WAM function 4
After configuring the WAM as a siren module, you w ill see a display in which you have
to define the partition where the siren is to be activated. This setting is made in the
same way as for the external sirens.
For details on the connection of compact alarm devices in the WAM, please consult
the accessory module operating manual.
15.4 Arming station
Up to four arming stations can be trained.
In the installer menu:
Æ
Select the arming station.
Select ADD/DEL Arming Stat..
Select the corresponding arming station.
62
Page 63

Trigger the tamper contact on the arming station (see the station operating
instructions). When the arming station has been trained, the wireless alarm centre
beeps twice in acknowledgement. At the same time, the graphic display shows the
symbol next to the arming station number.
15.4.1 Editing the arming station
In the installer menu:
Æ
Select the arming station.
Select the trained arming station 1.
Select the corresponding key.
Select the function from the table and allocate it to the arming station key. Confirm the
selection by pressing Select.
Function Meaning
Not Used This button has no function on the arming station.
Full Set After entering the user code and pressing this button, the
Part Set After entering the user code and pressing this button, the
Unset After entering the user code and pressing this button, the
Output channel After entering the user code and pressing this button, the
After assigning a function to the button, program all other buttons of the arming station
in the same way. For more details on the operation and installation of the ar ming
station, see the product instructions enclosed.
The entered user code defines which partition is activated or
deactivated. When the user code is authorised to activate partitions 1
and 3, then these are activated after the user code is entered and the
“Full Set” function key is pressed. This also applies to deactivation.
alarm centre is fully activated.
alarm centre is activated internally.
alarm centre is fully deactivated.
function of the output can be configured as follows:
63
Page 64

15.4.2 Arming station with new function
The arming station can also be used outdoors (IP54).
Using the “Instant Set” function, the alarm centre can be activated without any exit
delay after entry of the user code.
The additional “Instant Set” function only applies
to the 2WAY arming station
15.4.3 Switching outputs
15.4.3.1 Using the arming station
The outputs can be switched using the arming station or the remote control.
Each of the four keys on the arming station can be assigned to an output, as can the
double-arrow key on the remote control.
Edit armi ng station
F2 key
F3 key
F4 key
Instant Set Y
Select Back
Select:
Y = Instant activation (outdoors)
N = With 10 second exit delay (in secure indoor area)
Standard setting: 2WAY arming station
F1 key: Full Set
F2 key: Unset
F3 key: Part Set
F4 key: Not used (status query)
Program mable keys
Program mable key
64
Page 65

Now program the F3 function key on the arming station.
Call up the installer menu.
INSTALLER MENU
Other Dev ices
Select Close
OTHER DEVICES
Ext Sirens
Info Mod ule/Int Sir ens
WAM
Arming station
Select Back
Under Other Devices, select the Arming station menu point.
ARMING STATIO N (E)
Add/Del arming stat ion
Edit arming stat ion
Select Back
Under Edit arming station, select the trained Arming station 1.
The trained arming station is indicated by the symbol.
Edit armi ng station
Edit arming station
Arming station 1
Arming station 2
Arming station 3
Arming station 4
Select Back
F1 key
F2 key
F3 key
F4 key
Select Back
Now
Arming st atio n (1) F3
select the F3 key.
Full Set
Part Set
Unset
Output number
Select Back
Select the Output number menu point.
Arming st atio n (1) F3
(HW)Output 01
(HW)Output 02
(RF)Output 03
(RF)Output 04
Select Back
Now select the (HW)Output 01
Arming st atio n (1) F3
On
Off
Toggle
Impulse
Select Back
Select the Impulse function (approx. 4 seconds).
Go back to the installer menu and change Output 01 to the user defined setting.
INSTALLER MENU
Outputs
Select Close
Under Outputs, select the Edit output menu point.
(HW)Output 01
Name: Output 01
Type: Not used
Edit Back
Edit Output 01 and select User Defined as type.
Now go back to the operating mode.
You can now switch output 01 using the F3 function key.
OUTPUTS
Add output
Edit output
Select Back
(HW)Output 01
Name: Output 01
Type: User Defined
On at: 00 : 00
Off at: 00 : 00
Edit Back
65
Page 66

15.4.3.2 Using the remote control
Now program the double-arrow key on the remote control.
Access the user menu as an administrator.
MENU
System se tting
Select Close
SYSTEM SETTINGS
Date & Time
Edit Outputs
Telecommands
Call Downloader
Select Back
Under System setting, select the Telecommands (re mote control) menu point
TELEC OMMANDS
Edit
Delete
Delete All
Select Back
Select the Edit menu point and press any key on the remote control, or alternatively
select No Telecommands…
EDIT TELECOMMAND
EDIT TELECOMMAND
Please press the
re lev a nt ke y o n th e
telecomm and
No Telecommands... Back
TC01:User01
TC02:User02
TC03:User03
Select Back
When No Telecommands... is selected, you can select a user to receive the new
function here.
TC01,T4:User01
Internal act ivation
Output number
Select Back
Output number
(HW)Output...
Select Back
Now select the (HW)Output.. .
On
(HW)Outp ut 01
Off
Toggle
Impulse
Select Back
Select the Impulse function for output 01.
Go back to the system settings menu and press the double-arrow key
on the remote control to check the settings.
Output 01 now switches for approx. 4 seconds.
66
Page 67

16. Partitions
y
y
(
In the installer menu:
Æ
Select Partitions.
Select the corresponding function.
For an overview of functions and their attributes, see the table below.
Do not attempt to use a PIR zone as the input or output for a partition.
PIR wireless detectors have an inactive period after each activation to
save battery power. When a partition is activated (or activated
internally), the PIR detector m ay still be blocked. During this time, no
signal for completion of the activation process can be sent.
Function Meaning
Name Select this point to rename a partition. Enter the name in the
Type Select this point to define the output mode of the partition.
Exit Delay Exit delay times 10, 20, 30, 45, 60 or 120 sec.
Entry Dela
Response Response in the event of an alarm in this partition.
Part Set Behaviour of this partition at internal activation (exit delay).
P.Set FE As Behaviour of entry/exit zone at internal activation. The
as for zones or output names.
same wa
Properties of each output mode can be found in the next
section.
Entry delay time 10, 20, 30, 45, 60 or 120 sec.
options are as follows:
FE as FE – The entry/exit zone retains the entry/exit
FE as NA – The entry/exit zone changes its attribute at
attribute even for internal activation.
internal activation to “Instant Set”.
P.Set ER As Behaviour of the “Entry Route” zone at internal activation
Strobe on Set Behaviour of activation acknowledgement. The options are
Strobe Follow Unset Behaviour of deactivation acknowledgement. Programming
Strobe on Set Acknowledgement of enabling.
Strobe on Unset Acknowledgement of disabling. The configuration is effected
ER remains ER or ER becomes FE).
as follows:
OFF – No visual acknowledgement on external siren after
successful activation.
ON – Visual acknowledgement on external siren after
successful activation.
is made in the same way as activati on acknowledgement.
OFF
After successfully enabling the alarm system, there is no
acoustic acknowledgement of the external siren.
ON
After successfully enabling the alarm system, there is an
acoustic acknowledgement of the external siren.
in the same way as the acknowledgement of enabling.
16.1 Partition types
Select the corresponding exit mode.
For an overview of exit modes and their attributes, see the table below.
Function Meaning
Timed Set The partition is activated following expiry of the defined exit
User Defined The partition is activated when a zone is closed with the
time.
entry/exit property. In a closed zone (closed door), the alarm
system waits with enabling until this zone has been opened
and closed again.
Approx. eight seconds after closing the door the system is
enabled.
67
Page 68

Instant Set The partition is activated immediately. This exit mode is
(
Silent Set Same as the “Timed Set” exit mode, except that no exit signal
As Prtn 1
recommended for activation over remote control or wireless
cylinders.
can be heard during the delay time.
This option is available for partitions 2, 3 and 4. When this
option is selected, the system uses the same type as for
partition 1.
16.2 Exit delays of the partition
After entering the exit mode for the parti tion, a delay time must be entered in the
following cases:
Exit mode = Timed Set or
Exit mode = Silent Set
Select the Ext Time m enu point.
After Ext Time has been c onfirmed with the Select button, the following graphic
display is shown:
Select the corresponding exit time,10,20,30,45,60,120sec.
16.3 Entry delays of the partition
The entry delay is defined in the same way as the exit delay. Configure the entry delay
time for each exit mode.
16.4 Activating the partition response
Select the corresponding alarm response for the partition in the event of an alarm with
activated partition or system.
Function Meaning
Local In the event of an alarm, the internal siren and the
External In addition to the activation of the local siren, the alarm is
optional) external siren are activated.
also transmitted by telephone.
68
Page 69

16.5 Internal activation of the partition
Each individual partition can also be internally activated. This means that you can
remain in the building without losing all-round protection. With internal activation, some
detectors are not monitored – e.g. motion sensors.
The exit mode for internal activation is programmed in the same way as the exit m ode
for normal activation of the partition.
16.6 Behaviour of FE zones at internal activation
It is sometimes important that zones with the entry/exit attribute for normal activation
lose or change this attribute for internal surveillance – for example, a magnetic contact
on the house entrance door. This is usually programmed as an entry/exit zone, and
starts the delay time when the premises are entered. However, if the premises are
activated internally (e.g. at night), it is assumed that nobody will enter via thi s zone. In
this case, change the zone attribute to “Instant Set” so that an intruder who enters the
house via the entrance door triggers an instant alarm.
Select the relevant alarm response for the partition. The following options are available
as shown in the table 11.
Function Meaning
Final Exit The zone also retains its attribute with internally activated
Instant Set The zone changes its attribute to “Instant Set” for
Selection menu for zone behavi our for internally activated partitions
partitions.
internally activated partitions.
16.7 Behaviour of ER zones at internal activation
The configuration of zone behaviour with the “Entr y Route” attribute for
internally activated partitions is made in the same way.
17. System options
Select System Options.
Select the corresponding function. For a list of functions and their attributes, see the
table below.
Function Meaning
User Access In this menu, the options available to the user in the user
Remote Access This menu controls the access of remote control functions.
Language Select the language for voice output and the graphic
Restore Defaults Used for restoring the factory settings and setting the
Installer Code Used for entering a new user code.
Deactivate Delay Used for deactivating the alarm centre / partition using the
PA Response Used for setting the behaviour in the event of a panic alarm.
Auto Rearm Used for setting the alarm centre response following an
Siren Delay Used for setting the length of the siren delay.
Siren Time Used for setting the siren duration.
Delay On Entry Alarm Used for setting the delay time for an entry alarm.
Supervision Used for setting the response of the alarm centre in the
Jamming Used for setting the response of the alarm centre in the
menu are defined.
displays. You can choose between two languages.
country parameters (important for telephone
communication).
remote control within the entry delay time.
When this function is activated, the alarm centre can only
be deactivated using the remote control within the entry
delay time. When this function is deactivated, the wireless
alarm centre can be deactivated using the remote control at
any time.
alarm.
event of supervision failure.
event of wireless jamming.
69
Page 70

Batt Load Test Used for activating the battery test function.
Siren in PSet Used for controlling the siren properties with an internally
Force Set Used for activating and deactivating the Force Set function
RF Siren Options Used for setting the response of the wireless siren.
activated system.
or activating it with a confirmation.
17.1 User access
Select the corresponding options for the user from the table. To activate a function for
the User, press Change.
The option must be set to “Y” in order for it to be used.
Function Meaning
Record Voice Memo Enables the user to record a voice message.
Reset After Alarm Enables the user to reset the wireless alarm centre
Dual key function Activates the alarm buttons on the keypad for the user.
Zone Tamper Reset Enables the user to reset the wireless alarm centre with
Omit All Enables the user to lock all open zones simultaneously
Social Care Key Activates the “Social Care” key on the keypad for the
Quick set Enables the activation of the alarm centre without a user
Switching 2W AY
Replies on / off
following an alarm using the user code. When “N” is
selected, the user can only set the alarm to silent. The
installer must reset the system by entering the user code.
Every user can reset the dual key function.
the user code following a tamper alarm. When “N” is
selected, the user can only set the alarm to silent. The
installer must reset the system by entering the user code.
with a single button.
user.
code.
Installer Menu Æ System Options Æ User Access Æ 2
Way Replies Æ Y/N
x“Y” (yes) is the default factory setting.
xWhen “N” (no) is selected, no feedback is sent to
the FU8100 wireless remote control, FU8110
wireless control unit and FU59xx Sec vest Key
2WAY wireless cylinder.
17.2 Remote control / remote access by telephone
This function enables a user to give commands to the wireless alarm centre from a
remote location using the telephone keypad. The available commands are as follows.
Function Input
Deactivate system #0*0
Activate system #0*1
Activate system internally #0*2
Disable sirens #1*0
Reset system #1*1
Query system #3*
Switch ON output nn #9*nn*1
Switch OFF output nn #9*nn*0
Switch output nn #9*nn*
More information can be found in the operating manual. There are two possibilities
here:
Call-out control
When set to Y, the user can control the system remotely when answering a call from
the wireless alarm centre.
When set to N, the user can still use the rem ote commands for the voice dialler, but
not the remote control options.
Call-in control
When set to Y, the user can call the wireless alarm centre remotely. A user can send
commands using the telephone keypad after identifying themselves to the wireless
alarm centre with an access code.
When “Call-in control” is set to “Y”, the wireless alarm centre does not
answer any incoming calls from the dow nloader.
70
Page 71

xYou can now listen to the “Voice prompts” of the alarm centre on the phone.
xThe “Voice prompts” with special key combinations (see also chapter on “Remote
control by telephone”) are as follows:
o#0*0 = Deactivate system
“The alarm system is deactivated”
In the event of an alarm, also: “Reset is required”. (Enter the
following key combination “#1*1”.)
o#0*1 = Activate system
“The alarm system is activated”
Note:
The alarm system is activated, even if zones of the type
“Normal Alarm” and “Exit Norm.Alm” are still open. These
zones are omitted.
You have forgotten to set your alarm system at
home. This behaviour allows you to set your alarm
remotely, even if some interior doors
are open.
For controlling with the Realtime Monitor of the
downloader, the same behavi our occurs.
o#0*2 = Activate internal system
“The alarm system is activated internally”
Note:
The alarm system is activated internally, even if none of the
zones has the “Attribute” “Part setting – yes” or if zones of
the type “Normal Alarm” and
“Exit Norm.Alm” are still open. All these zones are omitted.
Refer to the note above as well.
o#1*0 = Disable sirens
In the event of an alarm: “An alarm has been triggered”
o#1*1 = Reset system
In the event of an activated system: “The alarm system is
activated”
In the event of a deactivated system: “The alarm system is
deactivated”
In the event of an internally activated system: “The alarm
system is activated internally”
After an alarm (key combination #0*0 is pressed beforehand):
“The alarm system is deactivated”
o#3* = Query system
In the event of an activated system: “The alarm system is
activated”
In the event of a deactivated system: “The alarm system is
deactivated”
In the event of an internally activated system: “The alarm
system is activated internally”
In the event of an alarm: “An alarm has been triggered”
Note
In the event of an alarm, first press the “#0*0” key combination for “Deactivate system”
and then the “#1*1” key combination for “Reset system”.
71
Page 72

17.3 Selecting a language
guag
Select the desired language.
17.4 Default settings
Select the corresponding functions from the table.
The system loads all default settings (apart from the access codes) and
the log.
The log is write-protected and cannot be deleted by the installer.
Function Meaning
Country defaults After confirming the “Country defaults”, a list of different
Restore Defaults Confirm this function to reset all settings to the factory
countries is displayed. Each country has its own alarm
settings. This option can be used to select the default
settings for a certain country.
Select the country where the alarm centre is installed.
For Austria or Switzerland, select D. The setting does not
relate to the lan
defaults for the selected country.
e selected.
17.5 Installer code
Enter the new four-digit installer code. You are then prompted to repeat the new
installer code. If both inputs are identical, the new code is stored and is active.
The default installer code is 7890. Security Center recommends
changing this code to one of your choice.
The installer code allows access to the installation menu and can be used to carry out
an installer reset. The installer code cannot be used to activate or deactivate the
system.
17.6 Deactivation in the event of delays
Select whether deactivation of the alarm system using the remote control is only
possible when the delay time was previously started (trigger of entry or exit zone). If
this function is deactivated, then the system can also be deactivated when the delay
time is not running.
72
Page 73

17.7 PA response
Select whether an external alarm is also made in the case of a panic alarm (Full), or
whether only a telephone message is sent (Silent).
17.8 Auto rearm
Select how often the system should reactivate itself following expiry of the alarm time
(ext. siren duration).
The system activates all closed zones again, but not the detectors that still send alarm
signals.
When the system is reactivated, an acoustic internal alarm is emitted by the w ireless
alarm centre instead of the normal entry tone when a user enters the property.
17.9 Siren Delay
Select whether the siren is to start immediately or after the selected delay time
following the triggering of a local or external alarm.
17.10 Siren Time
Select how long the siren should sound when a local or external alarm is triggered.
17.11 Stray on ent dly
Additional delay when the entry delay time is exceeded or the entrance to the property
differs.
Select whether an additional 30 seconds is allowed before an external alarm is
triggered after the delay time is exceeded or a different entrance path is used. If this
function is activated, only an internal alarm is triggered after expiry of the entry delay
time or when other zones are triggered. If this function is deactivated, an internal alarm
is triggered immediately after expiry of the entry delay time or when other zones are
triggered.
This option is used to fulfil t he demands listed under guideline EN 50131-1.
17.12 Supervision
The alarm centre monitors whether the detector is present and active. Wireless
detectors send a message every 10 minutes and WAMs send a message every 4
minutes. When the status message is disabled, the alarm centre is in charge.
There is no siren delay for a Fire Alarm, Panic Alarm or 24 Hour Alarm.
When the detector message is lost for more than two hours, then this is classified as
Fault, Tamper or Alar m:
73
Page 74

Function Meaning when system is
Deactivated No response. No response.
Fault Fault is reported by telephone. Fault is reported on the
Tamper External alarm.
Alarm External alarm.
This option is used to fulfil the wireless supervision demands listed under
guideline EN 50131-3.
activated
Transmission of supervision
failure and tamper.
Transmission of supervision
failure and alarm.
When this option is activated, the wireless centre prevents the user from
activating the system when a detector has lost contact with the wireless
centre for more than 15 minutes.
Meaning when system is
deactivated
display and by signal tone.
Fault is reported on display
and by signal tone.
External alarm.
Transmission of supervision
failure and tamper.
Alarm message on display
and signal tone.
17.13 Jamming
Select whether the alarm system should display a warning in the case of jamming
detection. If this function is enabled, a w arning is shown on the display if jamming is
detected.
17.14 Batt Load Test
Select whether the alarm system should test the battery capacity at every disa rmin g
or every 23 hours. If the function is disabled, the system tests other less important
functions every hour.
When the wireless centre communicates or plays / records a message,
the test is delayed until these activities are finished. If no mains power is
present, the wireless centre makes the test as soon as it is reconnected.
17.15 Siren in PSet
When Activated is selected, the alarm system also starts a local alarm when activated
internally.
When the function is deactivated, only an internal alarm is triggered when the system
is activated internally. When programmed, trans-mission of the alarm to a security
centre (optional) is made every time.
Installer Menu Æ System Options Æ Jamming Æ Disabled
xFactory setting: Disabled
xIf “Fault” is selected, a warning is shown on the display when jamming is
detected. If an output is programmed for jamming, then this is switched.
Communication measures set accordingly are also started.
xIf “Fault + Sounders” is selected, all signallers are also activated.
oNote: This setting does not conform to EN50131 standards!
Fault
Fault + Sounders
74
Page 75

17.16 Force Set
When On is selected, the zones with the “Z” zone attribute are automatically hidden
when the alarm system or partition is activated (provided the zones are open).
When Confirm is selected, the zones with the “Z” zone attribute are automatically
hidden when the alarm system or partition is activated (provided the zones are open).
You must confirm this proce dure to activate the system or partition and hide the
zones. Press the active key on the remote control twice.
This setting must not be used when a wireless cylinder is implemented.
When OFF is selected, it is not possible to activate the alarm system or partition
when at least one zone is open, even when this is programmed with the “Z” zone
attribute.
When “Force Set” is activated, the system does not comply to EN50131.
17.17 RF Siren Options
This menu is used to select how the w ireless siren responds in case of fire, burglary or
panic alarms. There are two possibilities here:
Siren+S trobe
The siren and strobe are activated by the wireless siren in the event of an alarm.
Strobe
Only the strobe is activated by the wireless siren in the event of an alarm.
17.18 Tamper alarm
Installer Menu Æ System Options Æ Send unset Tampers Æ Disabled
xFactory setting: Disabled
xWhen “Enabled” is selected, tamper alarms are transmitted over the selected
communication method, even when the alarm centre is deactivated. This
applies to ALARMS, SPEECH DIALLER and SMS communication.
Enabled
17.19 Time source for the clock
Installer menu Æ S yst em op tions Æ Time source Æ Mains frequency*
xChoose the time source here for synchronising the clock and date.
xThe “Crystal” option is sometimes useful if interference frequencies in the mains
supply line impact the accuracy of the time.
oNote: the accuracy for crystal is approx. ±3.9 min per month.
Crystal
17.20 Runtime for internal transducer
Installer menu Æ S yst em op tions Æ Int. siren time Æ 0 / 1.5 / 3 / 5 / 10 / 15 / 20 min /
Forever*
xSelect the runtime of the internal transducer here (alarm centre, wireless internal
siren, wireless info module) after a burglar alarm.
xFor security reasons, there is no time restriction for a fire alarm or panic
alarm.
xSpecial behaviour for using the entry delay:
Requirements :
o The internal transducers (alarm centre, wireless internal siren, wireless info
module) are silenced once the internal siren time has elapsed.
o The alarm centre has been automatically reactivated.
(see also “Installer menu Æ System options Æ Activate automatically”)
Behaviour:
If you now step into the entry area (detectors of the type “Final
Exit” and “Entry Route” are opened), the internal transducers
(alarm centre, wireless internal si rens, wi reless info m odule)
trigger an alarm tone.
The normal entry tone will not be signalled in this case.
o Note:
When you use the entry delay, you usually expect the normal entry tone.
This entry tone can be heard as long as the entry delay time is running. If
you now hear an alarm tone after opening the entrance door, you know
straight away that the alarm centre has detected a burglary in your absence.
The delay time runs on nevertheless. Therefore, deactivate your alarm
centre within the delay time. However, only do this if you feel able to take
action yourself. A burglar might still be on the premises! If you do not
do this, you will hear another burglar alarm once the delay time has
elapsed.
Inform any other people who have access to your premises of how to deal
with the alarm centre.
xOnce you have selected the “Forever” option, then the internal transducers
(alarm centre, wireless internal siren, wireless info module) trigger the alarm
tone until the alarm centre is deactivated.
75
Page 76

18. IP Network
When an ethernet or GPRS module is attached, this menu allows the user to allocate
the wireless centre an individual IP address. This is then used for IP alarms or the IP
download.
Before programming the wireless centre using the IP network, please
ensure the following:
1. You have understood the basic IP terminology.
2. You have received the necessary inform ation from your Internet
service provider.
If an ISDN module has been installed, this menu permits the assignment a separate
telephone number (MSN) to the radio centre.
The alarm system then only reacts to this telephone number.
With an installed ethernet module, the menu contains the following options:
IP Address
Enter the individual IP address of the wireless alarm centre. The IP address consists of
four groups. Each group is three digits long and separated from the next group by a
“dot”, e.g. “192.168.000.001”. Press “ * ” to enter the dot.
If you leave this field blank, the wireless alarm centre uses DHCP
(Dynamic Host Control Protocol) to obtain the IP address from the DHCP
server.
IP Port Number
Enter the port number. This is the port that the alarm centre “listens to” if a downloader
application tries to establish a connection to the alarm centre via the Internet. The
format is a number which can be up to 5 digits long. The default port is 55132.
IP Subnet Mask
Enter the subnetwork mask as needed (e.g. 255.255.255.000). This number has the
same format as the IP address.
Gateway IP Address
Should one be required, enter the gatew ay IP address. This number has the same
format as the IP address.
When the data detailed above has been entered, you can see which IP
address has been given by the wireless alarm centre by accessing
“System Options” -> “About Comms” in the user menu.
With an installed GPRS module, the menu contains the following options:
IP Address
Enter the individual IP address of the wireless alarm centre, or leave blank. The IP
address consists of four groups. Each group is three digits long and separated from
the next group by a “dot”, e.g. “192.168.000.001”.
Press “* ” to enter the dot.
IP Port Number
Enter the port number or leave blank. This is the port that the alarm centre “listens to” if
a downloader application tries to establish a connection to the alarm centre via the
Internet. The format is a number which can be up to 5 digits long. The default port is
55132.
The wireless alarm centre has no IP address on delivery. The data is
transmitted by the service provider following the first successful
connection over GPRS.
GPRS APN
Enter the corresponding address (Access Point Name) for your network here.
GPRS Username
Enter your user name here.
GPRS Password
Enter your password.
Consult your service provider for your GPRS data!
When the data detailed above has been entered and the connection has
been made, you can see which IP address has been given by the
wireless alarm centre by accessing “System Options” -> “About Comms”
in the user menu.
If an ISDN module has been installed, the menu contains the following options:
Enter telephone number:
Enter the MSN for the radio centre here. The system then only reacts to this telephone
number at the S0.
If no telephone number is stored here, the alarm centre "rings" one of the telephone
numbers (MSN) that is valid for this S0 with each call.
76
Page 77

19. Download settings
Select the corresponding function. For a list of functions and their attributes, see the
table below.
Select “Download”.
19.1 Account Name
If no account na me is entere d here by the software, no thing is
displayed here.
Function Meaning
Account Name The account name is allocated by the download software in
Connection Type Defines whether the connection is direct via USB cable or
Rings to Answer If the analogue line is not used exclusively for remote
Answer on 1 ring If this function is enabled, the call to remote maintenance is
Access Mode Defines which type of connection setup should be made by
Phone Book Enter tw o numbers here. One is used for secure callback.
IP Network Enter the data here if the downloader should communicate
Secure Callback Enable this function to start the connection from the wireless
Modem Baud Rate Sets the baud rate of the modem on the PC that performs
order to guarantee a secure connection. The account name
is displayed as soon as it is entered.
telephone.
maintenance, the setting defines when the w ireless alarm
centre accepts the call.
made in two steps. The software calls the wireless alarm
centre and waits for two rings. The centre now waits for a
second call and accepts this call immediatel y.
telephone.
with the wireless alarm centre using the Internet protocol.
alarm centre.
remote maintenance.
19.2 Connection Type
Select whether the connection between the PC and the wireless centre should be
made via telephone line (remote) or directly between the PC and the alarm centre via
USB cable (local).
When remote dialling is used, “Rings to Answer” and “Answer on 1 ring”
must be programmed (please note that “Secure Callback” does not work
with this option).
This option does not work when “Call-in control” is set to “Yes” under
remote access.
When dialling locally, the wireless alarm centre exits the “Connection
Type” menu if the downloader does not make a call within 30 minutes.
77
Page 78

19.3 Rings to Answ er
Select when the wireless alarm centre should accept a call. To select a number of
rings, press Select.
If the value is set to 255, the alarm centre never answers the call.
19.4 Answer on 1 ring
“Secure Callback” must be deactivated (default) until the first
accompanying upload is made. This first upload can be made in the user
menu or installation menu. The downloader operator can use “Secure
Callback”, even when the alarm system is programmed to accept calls
automatically.
Select when the wireless alarm centre s hould accept a call. To select Answer on 1
ring, press Select under the display.
If this function is enabled, the call to remote maintenance is made in steps. The
software calls the wireless alarm centre, waits for two rings and then hangs up.
This activates the alarm syste m to accept the call. If the next call arrives within
10 to 90 seconds, the alarm centre accepts the call immediately. This skips the
“Rings to Answer” function.
19.5 Access Mode
Select which functions are used for the remote maintenance access mode over remote
data transmission (see table).
Function Meaning
Call out only The wireless alarm centre cannot be called from outside
Secure Callback W ith this setting, the remote maintenance call is started
Answer on 1 ring The alarm centre accepts the call after the defined
for remote maintenance. A call to the rem ote
maintenance PC must be made manually over the user
menu.
from the alarm centre by the remote maintenance PC.
The alarm centre is called by the rem ote maintenance
PC. A call is connected where the alarm centre checks
the remote maintenance authorisation. If the parameters
are OK, the alarm centre hangs up and calls the phone
number in the phone book. Remote maintenance can
now be carried out.
number of rings or according to the selected dial-in
function.
19.6 Phone Book
Select which number should be changed.
Enter the callback number of the installer. These phone numbers can be dialled
in the user menu to start a remote maintenance call manually.
78
Page 79

19.7 IP Network
If an ethernet module is attached to the wireless alarm centre, then it is possible for the
downloader to communicate with the wireless alarm centre using the Internet protocol.
This menu allows you to save two IP addresses that can be called by the wireless
alarm centre to start a download. The user starts the call by dialling one of the IP
addresses. The available options are as follows:
IP Address 1
Enter the IP address used by the downloader. The IP address consists of four groups.
Each group is three digits long and separated from the next group by a “dot”, e.g.
“192.168.000.001”. Press “*” to enter the dot.
IP Port 1
Enter the port number of IP address 1. This port “listens to” the downloader on the
remote PC.
IP Address 2
Enter an alternative IP address used by the downloader.
IP Port 2
Enter the port number used by the alternative IP address.
19.8 Secure Callback
Select the Secure Callback menu item.
19.9 Modem Baud Rate
Select the baud rate (bps) for data transmission. If you do not know the baud rate of
your modem, select “Auto”. The alarm centre sets the baud rate automatically. If the
connection runs with problems, we recommend setting a lower baud rate. In this case,
set the value to 300.
20. Reporting
Select the corresponding function. For a list of functions and their attributes, see the
table below.
Select whether or not the alarm centre receives a third callback number from the
remote maintenance PC. When the downloader is connected, it transfers the number
to the alarm centre. The alarm centre then uses this number to call back the rem ote
maintenance PC. In this case, the user cannot see the callback number. The callback
number can be changed at any time by the remote maintenance PC.
Function Meaning
Alarms Settings for the transmission of logs to an ARC.
Social Care Settings for the transmission of social care messages.
Speech Dialler Settings for the transmission of voice messages (voice
SMS Settings for the transmission of text m essages (SMS).
Reporting Options Settings for Line Fail reporting, GSM omit digit and
dialler).
Report in PSet
79
Page 80

“Low battery” message for a zone by ALARM and SMS
xThe alarm centre only transmits one “Low battery” error message a day for a
detector by ALARM and SMS. This occurs separately for each zone.
Note:
When a battery comes to the end of its service life, the voltage
drops when energised (of the detector s ending) to below
the threshold for “Low battery”. In the break between two
transmissions (mostly supervision messages), the battery
can recover if it is not completely at the end of its service
life. The voltage increases again to above the threshold for
“Low battery”.
The alarm centre records eve ry one of these “Low battery”
and “Low battery – OK” messages in the log.
If the charging status of the battery is constantly low (at the
end of its service life), then the message is sent at the
beginning of this status. This message is not repeated
every day.
Sequence of reporting types
xThe sequence of reporting is now as follows:
oALARMS
oSocial Care
oSMS
oSpeech Dialler
xSending the report (ALARMS, Social Care) and the SMS is done very quickly.
For the Speech Dialler function, transmitting the recorded voice messages
takes longer.
Note:
If a burglar damages the alarm centre or telephone line,
then the most important alarm messages have already
been sent.
20.1 Alarms
Select the corresponding function. For a list of functions and their attributes, see the
table below.
Function Meaning
Call Mode Settings for reporting alarm messages.
Primary Telecoms Settings for the primary transmission path of alarm
Phone Book Used for selecting a phone number for transmitting alarm
IP Network Settings for transmission over the Internet.
Account Numbers Used for entering the customer account numbers from
Report Type Used for entering the digital command centre report for
Fast Format Channel Settings within the Fast Format report.
FF Report Restorals Settings within the Fast Format report for resetting.
SIA Report Mode Settings within the SIA report.
SIA Report Restorals Settings within the SIA report for resetting.
Contact ID Reports Settings within the Contact ID report.
Force Test Call Now Starts a test call immediately.
Dynamic Test Call Settings for the dynamic test call.
Static Test Call Settings for the static test call.
Burg Comms Rearm Settings for automatic reactivation of the transfer in the
Send Tamper as Burg Settings for transmitting a tamper alarm as a burglar
reporting.
messages.
the command centre.
transmission of alarms to the command centre.
Fast Format report.
alarm.
80
Page 81

20.1.1 Call mode
Select the corresponding function. For a list of functions and their attributes, see the
table below.
20.1.3 Phone Book (ALARMS)
Select which number should be changed. Enter the callback number of the c ommand
centre that you received for transmitting the respective report. Press the star key to
enter a dial pause. Each dial pause interrupts the dial procedure for 3 seconds.
Function Meaning
Deactivated No alarm messages are transmitted to the command
Single The alarm centre transmits alarm messages to the first
Alternate The alarm centre first transmits alarm messages to the
centre.
phone number in the phone book together with the first
account number for identification. If transmission if not
confirmed,
the centre repeats the call up to 15 times.
first phone number in the phone book. If the line is busy,
the alarm is transmitted to the second number in the
phone book. This continues up to 15 times until
confirmed, always alternating between the two phone
numbers.
20.1.2 Primary telecoms
Select which primary transmission path should be used. This transmission path is used
as long as transmission is possible using it.
20.1.4 IP-Network
IP address for alarm messages
When an ethernet module is attached, the w ireless alarm centre can report alarms to a
suitable receiver over the Internet. There are two types of receivers, an IRIS Polling
Engine or a special application that runs on the PC of the alarm reception. A separate
IP address must be saved for each receiver type. Two IP addresses can be entered
when communicating with the alarm reception using a receiver. The wireless alarm
centre sends data to the second IP address in the alarm reception when the call to the
first IP address fails and
Reporting, Alarms, Call Mode, Alternate
is selected.
This menu also offers a storage location for the character string used by the receiver to
identify each individual wireless alarm centre. This identification code depends on the
account number of the alarm reception.
The available options are as follow s:
Wireless alarm centre name
Enter a character string of up to 32 characters. This character string must be unique
for each wireless centre that communicates with a receiver.
IP address of the Polling Engine
Enter the IP address of the IRIS Polling Engine. The IP address consists of four
groups. Each group is three digits long and separated from the next group by a “dot”,
e.g. “192.168.000.001”. Press “ * ” to enter the dot.
IP address 1 of the alarm reception
Enter the main IP address of the alarm reception.
IP address 2 of the alarm reception
Enter the alternative IP address of the alarm reception.
81
Page 82

20.1.5 Account numbers
Enter the account number that you have received for transmitting from the command
centre.
Select which account number should be c hanged.
20.1.6 Report Type
Select the report type to be used for digital alarm transmission to the command centre.
The command centre usually indicates which type of report to select.
The available report types are as follows:
Fast Format Channel, Contact ID Reports, SIA Level I, SIA Level II, SIA Level III,
Extended SIA Level III and CID in SMS.
Installer Menu Æ Reporting Æ Alarm s Æ Account Numbers Æ Account No P 1
x“P” (partition) has now been added (previously “Account No 1” etc.).
xAn ID must be entered for the corresponding partition so that alarm messages for
various events in this partition are transmitted correctly.
In the SIA format, the system reports alarms using a six-digit customer code.
If a code of four or five digits is entered, the system adds leading zeros to extend the
code
to the correct length. Customer 1234 becomes 001234, for example.
With CID, the system only sends the last four digits of the customer code.
With Fast Format, codes of four, five or si x digits can be used. The system adds a
leading zero,
to extend a five-digit code to one containing six digits.
The system leaves codes containing four and six digits unchanged.
Account No P 2
Account No P 3
Account No P 4
When “CID in SMS” is selected, then the phone number of the alarm
reception must be entered under “Reporting -> Alarms -> Save Phone
Book”. The SMS protocol must also be entered under “Reporting ->
SMS -> PSTN-SMS” and the SMS service c entre number must be
saved. For more information on PSTN-SMS protocols and the SMS
service centre number, see section 10.10.4.6.
20.1.7 Fast Format Channel
Select an item and assign an alarm to the channels of the Fast Format report.
Each of the eight channels can be assigned one of the following attributes:
Not Used
Fire
Panic
Burglary
Sets/Unsets
Technical Alarm
RF Battery Failure
RF Superv ision Loss
RF Jamming
82
Page 83

Network Error (see note 3)
y
g
y
y
Tamper Alarm
Unset (see note 1)
Set (see note 1)
Zone Omitted (see note 2)
Medical Alarm
Key Box
1. Open and close have the same functions as “Open/Close”, but are
made on two separate channels.
2. Zone blocked: The wireless alarm centre sends this signal for five
seconds when the user blocks a zone.
3. The wireless alarm centre either delays the reporting or logging of
network errors, or exits the installation menu with a network error after
15-18 minutes (random selection). In Germany, the wireless alarm
centre waits at least 60 minutes before reporting.
The channels are preset as follows:
Channel Setting
1Fire
2 Panic
3 Burglar
4 Enabled / Disabled
5 Om it
6 Not Used
7 Not Used
8 Technical
20.1.8 FF Report Restorals
Select whether the restoration of a function (closing of an alarm zone, error clearance)
should be transmitted to the command centre. If this function is disabled, only faults or
alarms are transmitted to the comm and centre but not the restoration (OK message) of
this function.
20.1.9 SIA Report Mode
Select this, then select the Level of the transmission. The following table details which
events should be transmitted for the SIA 1 report.
Trigger Basic SIA
Medical control panel MA MA MA MA
Soci al Care QA QA QA QA
Fire FA FA FA FA
Fire control panel FA FA FA FA
Fire control panel OK - FR FR FR
Fire OK - FR FR FR
Panic PA PA PA PA
Panic control panel PA PA PA PA
Panic control panel OK - PR PR PR
Panic OK - PR PR PR
Bur
lar
Burglary OK - - BR BR
Cover tamper contact - TA TA TA
Cover tamper contact OK - - TR TR
Tamper ext. siren - - TA TA
Tamper ext. siren OK - - TR TR
Tam pe r s en so r TA TA TA TA
Tamper sensor OK - - TR TR
Tamper s
stem - TA TA TA
Tam pe r s ys tem OK - - TR TR
Key box open - - BA BA
Key box closed - - BR BR
Technical alarm - UA UA UA
Technical alarm OK - UR UR UR
Power failure - - - AT
Powe r failure OK - - - AR
Reset - OR OR OR
Battery fault - - - YT
code
without
zone no. or
user
BA BA BA BA
Sum SIA
code without
zone no. or
user
Middle SIA
code with
zone no.
and user
83
Complete SIA
code with
zone no.
and user
Page 84

Battery fault OK - - - YR
g
y
g
Battery missing - - - YM
Battery missing OK - - - YR
ISDN/GSM fault - - - LT
ISDN/GSM fault OK - - - LR
PSTN fault - - - LT
PSTN fault OK - - - LR
Jammin
Supervision fault - - BZ BZ
Supervision fault OK - - - RF battery fault - - XT XT
Set - CL CL CL
Internal active - CL CL CL
Unset - OP OP OP
Key switch s et CS CS CS CS
Ke
switch unse t OS OS OS OS
Download successful - - RS RS
Tamper user code - JA JA JA
Omit zone BB BB BB BB
Man. trigger test report RX RX RX RX
Period. test report RP RP RP RP
Time / day changed - - - J T
Prog. mode start - LB LB LB
Pro
. mode end - LS LS LS
User code changed - - - JV
User code deleted - - JX
Default password setting
loaded
End time limit EA EA EA EA
The following connection is recommended in Germany and Austria:
Under “Report Type”, select SIA 1
Under SIA Report, select Basic
The codes are now transmitted according to the table without zone
numbers and users.
Under SIA Report, select Sum
The codes are now transmitted again according to the table without zone
numbers and users.
Under SIA Report, select Middle
The codes are now transmitted again according to the table with zone
numbers and users added.
- - XQ XQ
- - RH RH
User 00 = Installer
User 01 = Admin User
User 02-50 = User
User 51 = Quick set
User 52 = Key Sw Latched/ Key Sw Moment
User 53 = Downoader
20.1.10SIA Report Restorals
Select whether the restoration of a function (closing of an alarm zone, error clearance)
should be transmitted to the command centre. If this function is disabled, only faults or
alarms are transmitted to the comm and centre but not the restoration (OK message) of
this function.
20.1.11Contact ID Reports
Select whether the restoration of a function (closing of an alarm zone, error clearance)
should be transmitted to the command centre. If only the basic function is enabled,
only faults or alarms are transmitted to the command centre but not the reset of this
function.
All transmitted messages are listed in the table. If “Basic + Restore” is selected, then
all messages plus their reset command are transmitted.
Trigger CID Basic code with zone
Medical control pan el 100 100
Social care 101 101
Fire 110 110
Fire control panel 110 110
no. and user
CID Basic + Restore
code with zone no. and
user
84
Page 85

Fire control panel OK - 110
Fire OK - 110
Panic 120 120
Panic control panel 120 120
Panic control panel OK - 120
Panic OK - 120
Duress 121 211
Burglary 130 130
Burglary OK - 130
Cover tamper contact 137 137
Cover tamper contact OK - 137
Tamper ext. siren 137 137
Tamper ext. siren OK 137 137
Tamper sensor 137 137
Tamper sensor OK 137 137
Tamper system 137 137
Tamper system OK 137 137
Key box open 150 150
Key box cl osed 150 150
Technical alarm - 150
Technical alarm OK 150 150
Power failure 301 301
Power failure OK - 301
Reset 305 305
Battery fault 311 311
Battery fault OK - 311
Battery missing 311 311
Battery missing OK - 311
ISDN/GSM fault 351 351
ISDN/GSM fault OK - PSTN fault 351 351
PSTN fault OK - Jamming 380 380
Supervision f ault 381 381
Supervision f ault OK - RF battery fault 384 384
Set 401 401
Internal active 401 401
Unset 401 401
Key switch set 409 409
Key switch unset 409 409
Download succe ssful 412 412
Tamper user code 461 461
Omit zone 573 573
Man. trigger test report 601 601
Period. test report 602 602
Time / day changed 625 625
Prog. mode start 627 627
Prog. mode end 628 628
User code changed - -
User code deleted - Default passw ord setting
loaded
End time limit - -
When the “CONTACT ID Basic” report type is selected, the codes are transferred
according to the table including the zone numbers and users.
--
20.1.12Force Test Call Now
Use this option to start a test call immediately on the wireless alarm centre.
Select the Force Test Call Now menu i tem .
When Force Test Call Now is confirmed with Select, the wireless alarm centre opens
communications with the emergency command centre immediately.
20.1.13Dynamic Test Call
Select whether the wireless alarm centre should make a test call ever y 24 hours.
If the function is enabled, the call is made every 24 hours following the last
transmission.
The dynamic test call has the advantage that a test transmission is only
made to the command centre when no transmissions have been made in
the previous 24 hours. If the “Enable/Disable” transmission is
programmed, then it can occur that no test transmissions are made for
several days when the system is enabled or disabled once per day.
20.1.14Static Test Call
When a static test call is selected, the system makes a test call at a certain time or day
of the month.
To make a test call at a specific time ev ery da y, select Reporting -> ALARMS -> Static
Test Call -> Daily.
Enter a number between 01 and 24 on the display to select the call time. For example,
when 20 is entered, the wireless alarm centre makes a static test call at 20:00 every
day.
85
Page 86

To make a test call once per month, select
Reporting -> ALARMS -> Static Test Call -> Monthly.
This setting must only be selected when transmitting to a social care unit
using a digital protocol. For voice message transmission, select the next
menu item (Configuring speech dialler).
Enter a number between 01 and 31 on the display to select the day of the m onth
where the test call should be made. The w ireless alarm centre makes a test call at
01:00 on the selected day.
Please note that the wireless alarm centre makes the call arbitrarily up to 16 minutes
before or after the defined time. This ensures that the alarm reception is not
overloaded with test calls from systems set at the same time.
Select
Reporting -> ALARMS -> Static Test Call -> Disabled
to deactivate static test calls.
20.1.15Burg-Comms-Rearm
Select whether the alarm centre should reset channel 3 (burglary) of the Fast Format
report following expiration of the delay tim e and then rearm it in the event of a new
alarm. If this function is enabled, all zones in the alarm state are hidden. If the function
is disabled, then this channel is also disabled until the alarm centre is deactivated and
reset.
20.1.16Send Tamper as Burg
Select whether the wireless alarm centre should transmit a tamper alarm as a burglar
alarm. This is important since there are command centres that cannot evaluate the
resetting of a tamper alarm. If this function is enabled, then a burglar alarm is
transmitted in the event of a tamper message (BA (SIA) or 130 (contact ID)).
20.1.17No Transmission
20.2 Social Care
The wireless alarm centre sends a social care message for the following alarm types:
Emergency
The user presses Social Care on the alarm center or activates an emergency call
transmitter (pendant). The wireless alarm centre then reports this to the emergency
call centre with the SOCIAL CARE KEY event (SCANCOM channel 2).
Activity
A zone with the activity monitoring attribute is triggered when inactivity is detected in a
programmed zone (see zone type).
Whilst the system is deactivated, the wireless alarm centre checks whether this zone
reports any activity. If the zone remains inactive for longer than the pre-programmed
time (see point 20.), then the wireless centre reports a medical alarm and sends an
INACTIVITY MESSAGE (SCANCOM channel 3) to the emergency call centre.
When the system is activated, the activity monitoring zone is used as a normal alarm.
Select the corresponding function. For a list of functions and their attributes, see the
table below.
Function Meaning
Call Mode Setting for reporting emergency messages.
Primary Telecoms Settings for the primary transmission path of
Phone Book Used for selecting a phone number for transmitting
Account Numbers Used for entering the customer account numbers from
Report Type Used for entering the digital command centre report for
Call Acknowledge Setting for confirming emergency call transmission.
emergency messages.
emergency messages.
the command centre.
the transmission of emergency calls to the command
centre.
86
Page 87

20.2.1 Call Mode
Select the corresponding function. For a list of functions and their attributes, see the
table below.
20.2.3 Phone Book (Social Care)
Select which number should be changed.
Enter the callback number of the command centre that you received for transmitting
the respective report. Press the star key to enter a dial pause. Each dial pause
interrupts the dial procedure for 3 seconds.
Function Meaning
Deactivated No social care messages are transmitted to the social
Single The alarm centre transmits social care messages to the
Alternate The alarm centre first transmits social care messages to
care unit.
first phone number in the phone book together with the
first account number for identification. If transmission if
not confirmed, the alarm centre repeats the call up to 15
times.
the first phone number in the phone book. If the line is
busy, then the social care message is transmitted to the
second number in the phone book. This continues up to
15 times until confirmed, always alternating between the
two phone numbers.
20.2.2 Primary Telecoms
Select which primary transmission path should be used. This transmission path is used
as long as transmission is possible using it.
20.2.4 Account Numbers
Select which account nu mber should be changed.
Enter the account number that you have received for transmitting from the command
centre.
Save all account numbers that should be transmitted by the wireless alarm centre
during a social care report.
An account number can be eight characters long when reporting social care
messages.
When the Scancom or Scanfast report types are used (see below), then the wireless
alarm centre uses the last four to six characters of the account number. When four
characters are entered, then the wireless alarm centre only uses these four characters.
When five characters are entered, the w ireless centre adds a zero to the front of the
number (number now has six digits).
When the Tunstall report type is used, the wireless centre adds zeroes to the front of
the number to increase shorter account numbers to eight characters.
Installer Menu Æ Reporting Æ Social Care Æ Account Numbers Æ Account No P 1
x“P” (partition) has now been added (previously “Account No 1” etc.).
xAn ID must be entered for the corresponding partition so that social care
messages in this partition are transmitted correctly.
Account No P 2
Account No P 3
Account No P 4
87
Page 88

20.2.5 Report Type
Select a report. For a list of report types and their attributes, see the table below.
After transmitting the alarm according to the selected digital report type, the w ireless
alarm centre opens an audio channel. Depending on the report type selected, various
functions are now available.
Function SCANCOM SCANFAST TUNSTALL
Talk DTMF tone “2” Not available DTMF “C”
Listen DTMF tone “1” Not available DTMF “*”
Toggle DTMF tone “*” Not available Not available
Confirm call DTMF tone “5” Not available DTMF “#”
Playback basic
message
Social care messages can be triggered in the following ways:
1. The wireless alarm centre reports to the social care unit when the
2. To identify the caller, the w ireless alarm centre sends the hom e
3. The wireless alarm centre sends an SMS message
Social Care communication mode is activated. For example, the
SCANCOM report contains a channel 8 in order to show that a twoway voice path is available. The wireless alarm centre opens a twoway voice channel at the end of the report, and leaves it open until
the wireless centre receives a DTMF comm and “5” or a time lock is
made. The social care centre can send commands to the wireless
alarm centre by using DTMF tones during the two-way voice call.
The available commands are found in the following table.
messa ge (see “Speech Dialler”). Pleas e note that you must us e the
speech dialler menu to record the home message.
(see SMS communication)
DTMF tone “3” Not available Not available
20.2.6 Call Acknowledge
Select whether the social call must be acknowledged by the receiver by pressing
DTMF button “5” or not. If the function is disabled, the call is considered to have been
transmitted when the called party accepts it.
20.3 Speech Dialler
The “Speech Dialler” function of the w ireless alarm centre describes the option of
sending a voice message to a (mobile) telephone in addition to the digital transmission
of a report to a command centre in the event of an alarm.
The wireless alarm system has an installed speech dialler. Using the internal
microphone, the wireless alarm centre can record five voice messages and send them
to up to four pre-programmed phone numbers to report an alarm. One message is
designated as a “home message”, and is always played at the start of a transmission.
This message should be used to identify the wireless alarm centre and its location. The
remaining four messages can be used to rec ord the triggers that cause an alarm (e.g.
“Fire” or “Social Care”). The w ireless alarm centre plays these messages after the
home message. The alarm centre can record up to 12 seconds of speech for the home
message and up to 8 seconds for each alarm message. When programming the
speech dialler, connect each message with the specific alarm type to be reported.
Select a target set for each message. Each target then corresponds to one of the
telephone numbers to be dialled.
When social care or inacti vity sta rts the voice message, the alarm centre also op ens a
voice path to the c alled number. Usi ng the telephon e keypad , the r ecipient of the voice
messages can cont rol the connection by sending back DTMF tones to the ala rm centr e.
The available commands ar e as foll ows:
Function Button
Tal k DTMF “2”
Playback DTMF “1”
Toggle DTMF “*”
End call DTMF “5”
Playback home message and alarm
message
Switch off all calls DTMF “9”
DTMF “3”
88
Page 89

Select the corresponding function. For a list of functions and their attributes, see the
table below.
Function Meaning
Call Mode Setting for transmitting voice messages.
Primary Telecoms Settings for the primary transmission path of the voice
Messages Recording of messages for voice messages.
Phone Book Used for entering phone numbers where voice messages
Trigger Used for linking the voice message to a trigger.
Destinations Used for linking the voice message to a phone number.
Call Acknowledge Setting for confirming the voice message.
messages.
should be sent.
20.3.1 Call Mode
Function Meaning
Deactivated The voice dialler is deactivated.
Activated The voice dialler is activated.
20.3.2 Primary Telecoms
Select which primary transmission path should be used. This transmission path is used
as long as transmission is possible using it.
20.3.3 Messages
Select the corresponding function. For a list of functions and their attributes, see the
table below.
Function Meaning
Home Message
(approx. 12 sec)
Trigger message 1-4
(each approx. 8 sec)
At least one home message and one trigger message must be recorded. Do not
forget to save the message following recording.
Select this function and follow the instructions in the
display. This message is played back at every voice
message transmission. Record the data for the location
of the alarm centre here (name, address, city).
Recording of messages for different triggers. Four
messages are available. For example, record “Fire
alarm”, “Burglar alarm” etc.
20.3.4 Phone Book
Enter the phone numbers to be dialled. Phone numbers are assigned to messages
under the “Destinations” menu item. Press the star key to enter a dial pause. The dial
pause is displayed as a comma. Each dial pause interrupts the dial procedure for 3
seconds.
The wireless alarm centre can then be used to enter a name for this number. The
alarm centre shows these names in the phone book so that you can see which
destination was used for the message.
Please note that the last telephone number is designated as the Follow me number.
The wireless centre shows this number in the user menu. The user can enter a new
number in this field. This allows the user to forward all voice messages programm ed
for this field.
20.3.5 Trigger
Up to five different triggers can be connected to each voice message using the
wireless alarm centre. A trigger is an option that can be selected from a list of alarm
types.
89
Page 90

Select the Trigger menu point.
g
After Trigger has been confi rmed with the Select button, the following graphic display
is shown: (Please note that the home m essage does not appear. This is always sent
by the alarm centre at the start of every transmission.)
Select to which of the displayed telephone numbers the voice message should be
sent. Mark phone numbers to be called in the event of an trigger for this voice
message with YES.
Five voice messages are available in total. The home message is
always transmitted first by the alarm centre. The alarm centre then
transmits message 1, 2, 3 or 4 to the selected phone number.
Please also note the instructions in the operating manual, section 18.7.
Additional Facilities - Zone Name Prom pts
Select a Message where a Trigger should be allocated.
At this point, you link a message with an event (trigger). Select the message to be
programmed. A list of five triggers is then shown on the display. Select a trigger. A list
of available alarm triggers is then shown:
None Fire Panic
Medical Bur
Technical Alarm Social Emergency Social Inactivity
AC Fail Tam pers Jamming
Select one of these for this trigger. After selection of the alarm trigger, the list of
triggers is shown again on the display. An alarm trigger can be programmed for each
of the five triggers in the list. When an alarm is selected for each trigger, the alarm
triggers are connected to the triggers and one or more triggers are connected to a
message.
Carry out this assignment for all four m essages. After assigning a recorded voice
message to an event (trigger), assign it to one or more phone numbers to be dialled in
the event of an alarm trigger.
Soak Test Fail
20.3.6 Destinations
Select a message where one or more phone numbers should be assigned.
After selecting a message, an over view of the phone numbers entered previously
under “Phone Book” is displayed. If the telephone number has been given a name,
then this is shown in the display instead of the running number.
20.3.7 Call Acknowledge
Select whether the alarm transmission of the voice message must be confirmed by the
receiver or not.
When the called party answers a call from the voice dialler, they can end the call by
sending back a DTMF “5” (see section 10.10.3.8).
When the “Call Acknowledge” function is activated, the wireless centre ends the call
to this number when it has received a DTMF “5” . When the centre does not receive a
DTMF “5”, then it attempts to make a further call (up to three times).
When the “Call Acknowledge” function is activated, the wireless centre ends further
call attempts to this number as soon as it determines that a call is answered (i.e.
when the receiver has answered). The called party can use DTMF “5” to end the call.
Please note that the wireless centre now calls all other programmed numbers on the
voice dialler after receiving a DTMF “5”.
To prevent calls to other programmed numbers on the voice dialler, the called party
can confirm a call by sending back a DTMF “9”. The wireless centre stops all further
call attempts after receiving the “9” signal.
The telephone numbers 1 to 4 are called in the following sequence:
1-2-3-4--1-2 -3-4--1 -2-3-4
If all the numbers have not been configured, the processing follows an
analogous sequence.
90
Page 91

20.3.8 Alarm ca ll with voice me ssage
It may take several seconds until the text message is announced when an alarm call
with voice message is received. After the announcement of the text message, an audio
connection is established. Consult the following table for details on controlling after
establishment of the audio connection. Please remember that an alarm call may need
to be confirmed on the telephone by pressing “5” or “9”.
Talk DTMF tone “2”
Listen DTMF tone “1”
Toggle DTMF tone “*”
End call DTMF tone “5”
Playback home message and alarm
message
Switch off all calls DTMF tone “9”
DTMF tone “3”
20.4 SMS
In addition to alarm transmission by digital report or voice text, the alarm centre can
also send a trigger by SMS. The alarm centre can send alarm messages by SMS to
any of the four phone numbers. Each alarm message is an individual SMS m essage
comprised of the following elements:
A home message and the message itself.
(The alarm centre must be programmed with the contents of these messages.)
The text of the r eport entr y that corresponds to the trigger that caused the alarm.
The time and da te of the ala rm.
The name of the zone that caused the alarm.
Select the SMS menu item.
Select the corresponding function. For a list of functions and their attributes, see the
table below.
Function Meaning
Call Mode Setting for transmitting text messages (SMS).
Primary Telecoms Settings for the primary transmission path of the SMS
Messages Used for entering the text message via the keypad.
Phone Book Used for entering phone num bers where SMS messages
SMS Trigger Used for assigning an SMS message to one or more
message.
are to be sent.
triggers.
20.4.1 Call Mode
This option is used to activate or deactivate SMS communications.
20.4.2 Primary Telecoms
Select which primary transmission path should be used. This transmission path is used
as long as transmission is possible using it.
20.4.3 Messages
Select the corresponding function. For a list of functions and their attributes, see the
table below.
Function Meaning
Home Message The home message can be 12 characters long. Use the text
Trigger message 1-4Each numbered message can be 30 characters long. Enter a
to identify the wireless alarm centre. The alarm centre sends
the home message text to each telephone number
programmed for SMS messages. The alarm centre sends the
home message text at the beginning of each SMS message.
message that relates to the type of alarm trigger selected.
,
91
Page 92

20.4.4 Phone Book
Enter the phone numbers to be dialled.
Press the star key to enter a dial pause. The dial pause is displayed as a comma.
Each dial pause interrupts the dial procedure for 3 seconds. The display can then be
used to enter a name for this number. The alarm centre shows these names in the
phone book so that you can see which destination was used for the message.
20.4.5 SMS Triggers
Select a trigger. For a list of triggers and their attributes, see the table below. A set of
alarm triggers can be connec ted to each message. “Y” can be entered next to
more than one trigger in the list.
Trigger Meaning
Tamper Transmits an SMS in the event of a tamper alarm.
Alarms Transmits an SMS in the event of an alarm (fire, panic
Sets/Unsets Transmits an SMS when the alarm centre is
System Transmits an SMS in the event of a system trigger.
etc.).
activated/deactivated.
20.4.6 PSTN SMS
If SMS messages should be sent over the PSTN line but no GSM module is attached,
then additional data must be programmed in this menu. It is possible to send SMS
messages over many analogue telephone connections. To do this, the connection
must be authorised and all telecommunications devices between the APL or first TAE
sockets and the alarm system must support the CLIP function.
Select the corresponding function. For a list of functions and their attributes, see the
table below.
Function Meaning
Report Type Select the protocol specified by your SMS service centre.
Service Center
Tel No
Own Tel N o Some service centres require the calling number before they
Ask your chosen service provider for the protocol used and the SMS service centre
number. Some examples are listed below.
For T-Com (Germany), select protocol TAP8N1 (service centre 01712521001)
For Vodafone (Germany), select protocol UCP8N1 (service centre 01722278800)
For Austria, select protocol TAP7E1 (service centre 0900664914)
For Denmark, select protocol UCP8N1 (service centre 9011201)
For Switzerland, select protocol UCP8N1 (service centre 0794998990)
The available options are as follow s: TAP 8N1, TAP 7E1,
UCP 8N1 and UCP 7E1.
Enter the provided phone number of the service centre. The
service centre number and protocol must be identical.
Consult the technical support team of the service provider
you wish to use. When asking for the service centre phone
number, also ask which protocol is supported. When
necessary, press the star key to enter a two second pause.
This is displayed as a comma.
accept a processing request for an SMS. This is also used
for the clear charging of SMS messages. Enter the phone
number of the analogue line here.
92
Page 93

20.4.7 Destinations
Select a message where one or more phone numbers should be assigned.
After selecting a message, an over view of the phone numbers entered previously
under “Phone Book” is displayed. If the telephone number has been given a name,
then this is shown in the display instead of the running number.
Select which of the displayed telephone num bers should be sent the SMS message.
Mark phone numbers to be called in the event of a trigger for this SMS message with
YES.
Five SMS messages are available in total. The home message is
always transmitted first by the alarm centre. The alarm centre then
transmits message 1, 2, 3 or 4 to the selected phone number.
20.5 Reporting Options
20.5.1 Line Fault
This menu can be used to program the system so that it reacts with an acoustic or
silent alarm when the alarm centre determines a fault in the remote transmission lines.
Select the Line Fault menu item.
When a GSM or ISDN module is integrated, then line faults can be set for the PSTN
line that is directly attached to the alarm centre or for the installed module.
Select whether the telephone line is to be monitored and how a fault should be
reported to the user. The options are as follows:
Function Meaning
Deactivated The telephone line is not monitored.
Audible The telephone line is monitored. A fault is saved in the
Silent Set The setting is similar to “Audible” but without a warning
event log. When inactive, a telephone line fault is
signalled with an acoustic warning tone that can be
silenced by entering the user code. A line fault is shown
on the display.
The system can be activated again with a line fault
present.
When active, there is no warning tone and nothing is
displayed. However, any programmed siren delay time is
automatically set to zero seconds in the event of a line
failure.
tone.
93
The audible response corresponds to NACOSS recommendations in
the event of a line fault.
Page 94

20.5.2 GSM Om it Digit
Installer menu Æ Reporting Æ Reporting options Æ GSM omi t di git : No *
xIf you select “GSM omit digit: Yes” , the first digit of the phone number saved in
the phone book for a GSM connection will not be dialled.
o If you want to make a call to a public network exchange from a
telephone in an extension system, you have to first enter the
external access code (prefix) before
you dial the actual phone number.
o In this case, the external access code must be in first place in the
alarm centre phone book. Then the actual target phone number
follows. The external access code can be obtained from the
administrator of the extension system or from the extension system
manual. It is usually “0”; in Britain it is usually “9”.
Format of the telephone number: 0 0123 4567890.
o The alarm centre can then also be connected to an analogue
extension system.
This extension does not now have to be switched to an outgoing
xUse an extension line in a private extension system which has a prefix
xThe “GSM omit digit: Yes” option impacts the phone books of:
xSending SMSs is usually only done via GSM. You can save the normal phone
prefix automatically.
automatically programmed or a norm al analogue telephone connection, then
select “GSM omit digit: No”.
oALARMS
oSocial Care
oSpeech Dialler.
numbers in the phone book.
Format of the telephone number: 0123 4567890.
oFor a private extension system, the alarm centre is connected to an
analogue extension without an automatic prefix.
If you now want to also send a text message which starts the alarm
system on an analogue connection, make the settings at:
Installer menu Æ Reporting Æ SMS Æ PSTN SMS Æ SMS Service
Centre
before the external access code of the actual service centre phone
number.
Format of the telephone number: 0 0123 4567890.
GSM omit digit: Yes
20.5.3 Reporting when part set
Installer menu (L21) --> Reporting (L28) --> Reporting Options (L1124) --> Report in
PSet: (L1131) Yes* (L62) /No (L63)
If "No" is selected and a partition is part set, an alarm for this partition is not reported.
Reporting = Alarms(L663), Speech Dialler (L247), SMS (L248)
For security reasons, this setting has no effect on the reporting of alarm s
for "Panic" (L561), "Fire" (L560), "Medical" (L620), "Social Emergency" (L571) and
"Social Inactivity" (L572).
If "Yes" is selected, all alarms are reported.
94
Page 95

21. Social Care
Select the corresponding function. For a list of functions and their attributes, see the
table below.
Function Meaning
Start/End Monitoring at Enter the monitoring period.
Monitoring Interval Enter the monitoring interval.
Set Volume Volume for the output of the voice connection.
21.1 Start/End Monitoring at
Select the start time for monitoring (activity check). At the start time, all detectors
programmed for activity monitoring are activated. If they are not triggered at least once
during the monitoring interval, a social call alarm is issued.
Confirm the time by pressing OK.
Enter the monitoring end time in the same way as the start time.
When the wireless alarm centre monitors an activity zone, the
on the display in the top-right corner.
symbol appears
21.2 Monitoring Interval
Select the monitoring interval in hours. Within this interval, ever y detector programmed
for activity monitoring must be triggered at least once to avoid the triggering of a social
care alarm. Select the monitoring interval so that it is within the monitoring
period defined b y the monitoring start an d end times.
Confirm the chosen interval by pressing OK.
21.3 Set Volume
After a social care alarm is triggered, a voice connection is established over the
telephone (provided this is programmed in the “Social Care” or “Speech Dialler”
settings). If the loudspeaker volume is too low, then it can be changed under “Set
Volume”.
After the announcement of the text message, an audio connection is established.
Consult the following table for details on controlling after establishment of the audio
connection. Please remember that an alarm call may need to be confirm ed on the
telephone by pressing “5” or “9”.
Talk DTMF tone “2”
Listen DTMF tone “1”
Toggle DTMF tone “*”
End call DTMF tone “5”
Playback home message and alarm
message
Switch off all calls DTMF tone “9”
DTMF tone “3”
22. Test function
Select the corresponding function. For a list of functions and their attributes, see the
table below.
In the installer menu:
Select the Local menu item.
Æ
95
Page 96

Function Meaning
(
Local Tests the function of the local sirens in the alarm centre.
Loudspeaker Tests the function of the local loudspeaker in the alarm
Keypad Tests the keypad input function.
Walk Test Used to go through each trained detector and test its
Detector Signals Tests the signal strength of the trained detectors.
Ext Sirens Tests the signal strength of the external sirens.
WAM Tests the signal strength of the wireless accessory
Arming Station Tests the signal strength of the arming station.
Outputs Tests the outputs through manual activation.
Telecommands Tests the button functions and the owner of the trained
Pendants Tests the function of the emergency call transmitter
PA Detector Tests the function of the panic detector.
Tag Tests the function of the chip key (tag).
Secvest Key Tests the function of the Secvest Keys
centre.
function.
module.
remote control units (telecommands).
pendant).
22.1 Testing the local siren
Activate the siren by pressing On/Off.
After confirming with On/Off, the internal siren is activated. You should now hear the
alarm tone. ON is also shown in the top-right corner of the display.
22.2 Testing the loudspeaker
Activate the loudspeaker by pressing Play/Stop under the display.
After confirming with Play/Stop, the loudspeaker is activated. You should now hear the
voice messages. You can now listen to all voice messages saved in the display.
Playing is also shown in the top-right corner of the display. The following graphic
display is shown:
To stop the test, press the control key under the Play/Stop display again.
22.3 Testing the keypad
Press all keys on the keypad in succession. Press the double keys simultaneously to
start the test. The corresponding character is shown on the display in response.
To stop the test, press the control key under the On/Off display again.
96
Page 97

22.4 Walk Test
A list of all detectors trained to the system is shown on the display.
Activate all detectors on the premises in succession. If a detector is recognised, the
alarm centre issues a double signal tone. It also shows whether a tamper contact (T)
and/or an alarm (A) is triggered.
The number of zones to be tested (alarm and tamper) is shown at the top of the
display.
After all detectors have been tested, the display shows All Zones tested.
22.5 Detector Signals
Make the detector signal strength test in the same way as the walk test. The signal
strength displayed corresponds to the reception strength of the last received and
weakest signal of this detector. For the test, the reception strength of the alarm centre
is reduced by 6 dB. The signal strength should be higher than 3 to ensure satisfactory
wireless communication. If the detector signal is too weak, use a repeater (accessory
module) to ensure good wireless communication.
22.6 Ext Sirens
The test of the external siren is used for displaying the signal strength. The signal
strength should be higher than 3.
22.7 WAM Signal
The test of the WAM signal is used for displaying the signal strength. The signal
strength should be higher than 3.
22.8 Arming Station
The test of the arming station signal is used for displaying the signal strength. The
signal strength should be higher than 3.
22.9 Outputs
A list of all outputs installed on the system is shown on the display. Select the output to
be tested. Press Done to end the test. When the test is ended, check whether the
output has the required status.
Ensure that nobody attempts to activate the WAM using a remote
control or social care transmitter during the test.
22.10Telecommands
Press the buttons of the remote control (telecommand). The alarm centre displays the
identity, the user, which button was pressed and what the button is used for. The test
of the remote control signal is used for displaying the signal strength. The signal
strength should be higher than 3.
22.11Pendants
Press the button on the pendant. The identity of the user assigned to the pendant is
displayed. The pendant test is used for dis playing the signal strength. The signal
strength should be higher than 3.
22.12PA Detector
Press both buttons on the PA detector transmitter. The identity of the user assigned to
the panic alarm is displayed. The test of the PA detector is used for displaying the
signal strength. The signal strength s hould be higher than 3.
22.13Tag
Hold the chip key (tag) at the top-left corner on the front of the alarm centre. If the chip
key is detected, the alarm centre shows the user assigned to the chip key. Only one
chip key can be assigned to each user. Chip keys are assigned to users in the user
mode.
97
Page 98

22.14Arming Station with SecvestKey functionality
Installer Menu Æ Testing Æ Secvest Key
Select the corresponding Secvest Key 2W AY wireless cylinder (Door
Lock 1, Door Lock 2, Door Lock 3 or Door Lock 4). The wireless
cylinder functions and correct positioning of DIP switch 3 to the door
hinge in the Secvest Key 2WAY can be tested here.
“Unlocked” is shown on the Secvest 2WAY display when the door is
unlocked. “Locked” is shown when the button on the Secvest Key
2WAY wireless cylinder is pressed and the door is then locked. The
received signal strength is also shown.
23. Viewing the log
A list of log displays can be found in the user manual.
24. About Panel
Select the About Panel menu item.
An overview of the displayed data is shown in the following table:
Main S/W: Software status of the firmw are in the alarm centre
Part No.: Software status of the firmware in the alarm centre
Radio: Software status of the wireless communication
German: Software status of the OSD l anguage
98
Page 99

25. Installing additional modules
j
Before connecting the ISDN / GSM / ethernet / GPRS module to the alarm centre,
disconnect the electric power supply. Firstly, access the installer menu on the alarm
centre. This prevents a tamper alarm from being triggered when the top part is
removed from the base plate. Loosen the housing screws on the lower side of the
wireless alarm centre as shown in the diagram.
the top part around and remove the four housing screws (1) on the bottom. Ensure that
you also disconnect the loudspeaker cable and the battery supply cable (2).
Open the top part and disconnect the connecting cable between the base plate and the
top part.
Turn
Carefully remove the cover of the top part. Be careful when handling the siren
connection and the tamper spring. The PCB of the wireless alarm centre can now be
seen.
1 Base of ISDN/GSM module 2 USB port
3 Siren connector 4 Tam per switch
5 Microphone 6 Kickstart
7 Code reset jumper 8 Battery connection
9 Loudspeaker connection 10 Chip key reader
umper
99
Page 100

26. Fitting the ISDN module
Insert the ISDN module carefully and exactly into the base of the ISDN module. Ensure
that all base feet are correctly attached to the base holder.
Plug in the ISDN cable.
27. Fitting the GSM module
Before inserting the GSM module, ins ert a SIM card into the GSM module. Any SIM
cards whose PIN code can be disabled are suitable (or SIM cards with a PIN
changed to “0000”). If you have not done so already, insert the SIM card into a
mobile phone and deactivate the PIN request (or change it to 0000). Now insert the
SIM card into the GSM module. Fix the antenna of the GSM module by fitting it
carefully and exactly into the base of the ISDN module. Ensure that all base feet are
correctly attached to the base holder.
Fix the antenna cable as shown and stick the antenna to the interior of the housing.
100
 Loading...