

ORRA™ LOW PROFILE INSTRUCTION MANUAL
a. Congratulations
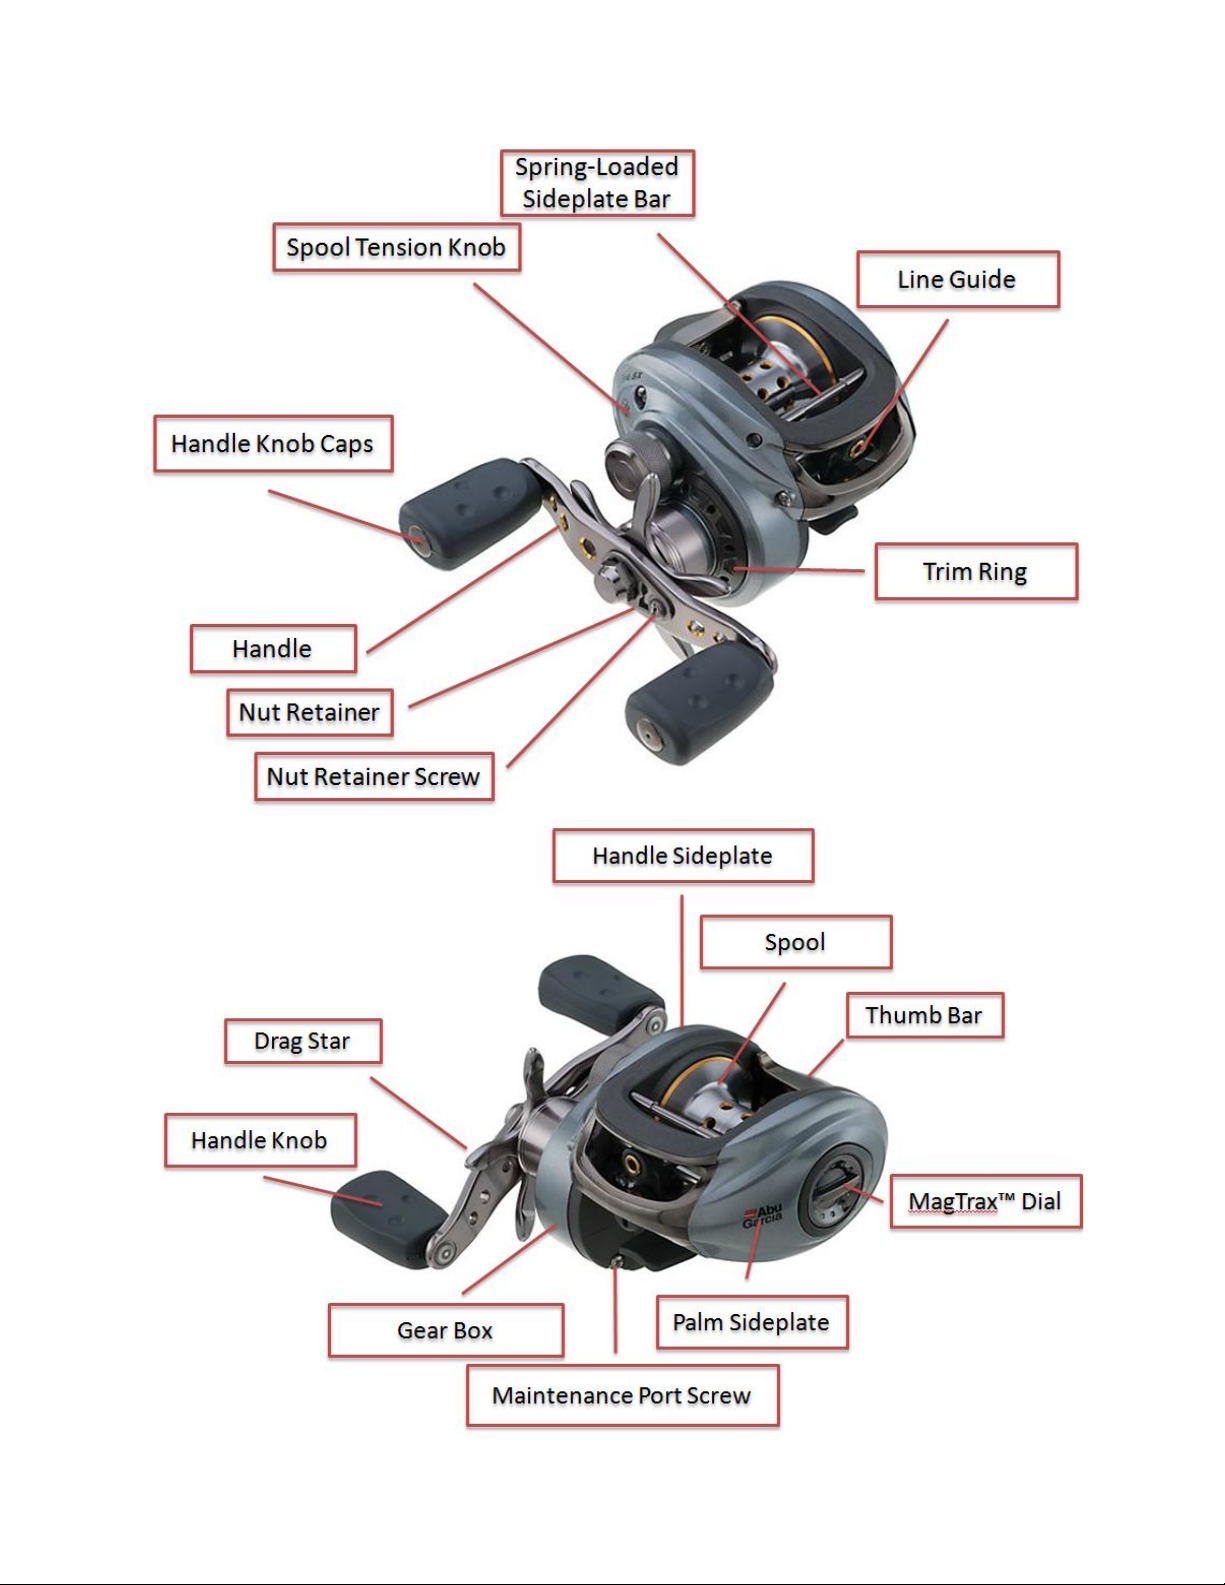
b. Pictures of Components
c. Family Info
d. How to Fill with Line
e. Drag Adjustment
f. Spool Tension Knob
g. Removing the Sideplate
h. Reel Function
i. Maintenance
j. Warranty Information
Star drag
Line guide
Handle
Spool
Spool Tension Knob
Palm Sideplate
Thumbscrew
Knobs
Thumb Bar
Brake Dial
Handle Sideplate
Gear Box
Frame
Nut Retainer
Handle Nut
Maintenance Port Screw
Nut Retainer Screw
Trim Ring
Handle Knob Caps
A. CONGRATULATIONS:
Thank you for purchasing one of the world’s most advanced low profile reels. The combination
of low profile design, ultra-lightweight materials and precision engineering makes Abu Garcia®
THE choice for serious anglers around the globe. These reels are widely used by pros on the
tournament circuit, guides, record seeking experts and anglers who demand the very best from
their equipment. Rely on Abu Garcia® quality and dependability to keep the fun in fishing.
The following guide will explain how to get the most out of your new Orra™ low profile reel.
Each element is described by its name and function. Some features are not found on every reel
model. Read these instructions carefully before using your reel to ensure a proper understanding
of its operation.
B. COMPONENTS:
Include:

C. THE ORRA FAMILY OF LOW PROFILE REELS:
Born from the Revo® series, the Orra™ family combines performance, reliability and precision
engineering.
D. HOW TO FILL THE SPOOL WITH LINE
All Orra™ low profile reels are designed for monofilament, braid and fluorocarbon lines.
Personal preference and fishing conditions will determine line selection. Begin by passing the
line through the guide located on the front of the reel. Secure the line to the reel using the arbor
knot. Control the filler spool by inserting a pencil into the spool hub. While maintaining tension
on the line with your fingers, wind the reel handle and continue to fill with line to approximately
1/16” (1.5 mm) below the top of the reel spool for best results (show picture). Do not overfill.
(CLICK HERE to learn how to tie the arbor knot in this video)
Braided Line
Some anglers prefer to add a monofilament backing to the reel spool before attaching braided
line. This helps reduce line slip. Using the above instructions, fill the spool with enough
monofilament line to cover the spool. Tie the tag end of the monofilament backing to the
braided line using a uni-to-uni knot, Albright knot or equivalent. Continue to fill the spool with
braid to approximately 1/16” (1.5 mm) inside the upper lip of the spool. Do not overfill.
(CLICK HERE to learn how to tie the uni-to-uni knot in this video)
E. DRAG ADJUSTMENT
All Orra™ low profile reels deliver smooth and reliable drag tension. Control the amount of
drag by turning the adjustment star inside the reel handle. Rotate the star clockwise (right) to
increase drag or counterclockwise (left) to decrease drag. For best results the drag should be
adjusted to approximately one-third of the breaking test of the line being used. This can be
accomplished by tying the line to a spring scale for precise adjustment. Make sure the reel is
first mounted on a rod and the line has been run though the rod guides before tying to the scale.
The drag should always release before the line reaches its breaking point. Factors such as line
type, technique and fishing conditions may require adjustment to these recommendations. Any
drag setting above half of the line strength risks line breakage.
If a spring scale is unavailable, tie the line to a secure point. With the rod tip up (about a 45
degree vertical angle), apply pressure by turning the handle. Gradually tighten the drag
adjustment star by rotating it clockwise. When the line reaches its breaking point, loosen the
adjustment star ¼ turn.
F. SPOOL TENSION KNOB

The spool tension knob controls how fast the spool spins when casting. It is located on the
sideplate of the reel next to the handle. With the rod-reel-line-lure properly assembled, place the
tip of the thumb on the line to hold the spool. Depress the thumb bar with the pad of your thumb
to disengage the gears. Allow the lure to drop to the ground. If the lure does not fall when the
thumb bar is depressed, turn the spool tension knob counterclockwise (left) to reduce tension on
the spool. If the lure falls to the ground and the spool continues to rotate, spool tension is too
loose. Rotate the knob clockwise (right) to increase tension. Additional casting brakes, if
applicable, are designed for fine tune adjustment.
It is normal to experience backlashes when learning how to cast a low profile reel. In the event
that you are just learning how to cast, tighten the spool tension knob an extra ¼ to ½ a turn and
slowly back it off as you learn to cast.
G. REMOVING THE SIDEPLATE
Orra™ reels are equipped with a removable palm sideplate that allows access to the spool. To
open the sideplate, slide the spring-loaded sideplate bar away from the palm sideplate with your
thumb. While holding the sideplate bar in the “open” position, twist the sideplate in an upward
motion until it reaches the stop position. The sideplate can now be removed.
H. REEL FUNCTION
How to Adjust the Braking System: Orra™ reels feature the adjustable MagTrax™ magnetic
brake system that delivers excellent casting control. For maximum casting distance and minimal
tendency of line over run, it is necessary to adjust the braking system to match the weight of the
lure and angler preference.
- MagTrax™ Brake -
The MagTrax™ magnetic brake delivers consistent braking pressure throughout the entire cast
resulting in smooth, controlled casts. A turn of the dial towards the “MAX” setting moves the

magnetic braking system closer to the spool. As the magnets get closer to the spool, they apply
more braking force and slow the rotation of the spool.
Turn the exterior MagTrax™ brake dial to fine tune spool tension. Rotate the dial towards the
“MAX” label to increase braking force or in the opposite direction to reduce braking force.
- Basic Casting Technique -
a) Depress thumb bar while keeping the tip of the thumb on the spool to control the lure. Hold
the rod and reel so that that handle is pointing upward.
b) Holding the rod and reel in front of the body, bring the rod backward so the tip reaches a
point above and behind the shoulder. To cast, bring the rod back in front of the body in a single
motion without stopping
c) Release the thumb from the spool as the rod is brought forward so that the lure is launched
slightly upward and outward toward your target. As the lure approaches the water surface stop
the spool with your thumb. If you don’t stop the spool as the lure hits the water, the spool will
continue to rotate causing a backlash (a.k.a bird’s nest)
In the event that you experience backlashes, tighten the spool tension knob ½ a turn at a time to
apply more braking force until you no longer have an issue with line overrun. Also try casting
with the wind – instead of against it – until you get comfortable casting without experiencing a
backlash. As you get more comfortable casting, reduce the amount spool tension by rotating the
spool tension knob ¼ turn at a time to maximize casting distance.
I. MAINTENANCE
As with any precision product, your Orra™ reel will require regular maintenance. Gently rinse
the reel with fresh water, wipe it dry and lubricate according to the accompanying diagram
(picture of oil and grease points). Orra™ Reels are equipped with a main gear access door called
the Maintenance Port. This feature allows anglers to easily grease the main gear without taking
the reel completely apart. To use this feature, locate the lube port screw pictured below.
Using a small philips head screwdriver, rotate the screw counterclockwise until free. The small
“door” can now be removed. Lightly grease the exposed main gear with quality grease such as
Abu Garcia Reel Lube. Once maintenance has been completed, reposition the door over the
maintenance port and reinstall the maintenance port screw. Tighten the screw with a philips
head screwdriver by rotating it clockwise. Do not over tighten.

To keep your reel working at peak efficiency, clean and lubricate after each use. At least once a
season your reel should be disassembled for a thorough cleaning and re-lubrication. Refer to the
exploded parts view supplied with your reel. Reel maintenance kits can be purchased at your
local tackle store and include everything you need to properly service your reel. If you do not
wish to perform this work yourself any nearby Abu Garcia Service Center is fully qualified to do
this for you.
J. LIMITED WARRANTY
ONE YEAR LIMITED WARRANTY
(FOR USA AND CANADA ONLY)
This "limited warranty" has been drafted to comply with the Magnuson-Moss Warranty Federal
Trade Commission Improvement Act which is effective for goods manufactured on or after
December 31, 1976. For the period indicated, Abu Garcia will, at its option, repair or replace and
return the covered items found to be defective in material or workmanship at no charge except
for shipping cost. Abu Garcia will have no other obligation and will not be liable for incidental
or consequential damages. Abu Garcia makes no implied warranty of merchantability or fitness
for any period beyond the stated duration of each Limited Warranty. This Warranty does not
cover damage by addition or alteration of the product, accidental damage or loss, abuse, failure
to provide reasonable and necessary maintenance or normal expected wear. Damage that is
determined to be of this nature will be repaired at consumer's expense. This Warranty does not
extend to products which are put to commercial or rental use.
This Warranty extends only to the original purchaser of the reel, and does not give any rights to
any other person. Some states do not allow exclusions of incidental or consequential damages or
limitations of the duration implied warranties, so the above exclusion and limitation may not
apply to you. This Warranty gives you specific legal rights and you may have other rights which
vary from state to state. Do not send cash or checks to cover the cost of repair for products on
which the Limited Warranty period has expired. Abu Garcia's Authorized Repair Centers will
notify you of the amount due, including handling and shipping charges. Wholesalers and dealers
(unless an Abu Garcia Authorized Center) are not authorized to make in-warranty repairs or
adjustments on behalf of Abu Garcia. The terms of the Warranty cannot be changed except in
writing by an officer of Abu Garcia. Abu Garcia rods or reels requiring warranty repair
should NOT be returned to the store of purchase.
For information on where to send your products for service, Click Here.
 Loading...