

SPECIFICATIONS
INPUT: Composite Video Audio AL / AR RCA x 3
S-Video 4Pin-MINDIN x 1 Audio AL / AR RCA x 2
Component Video RCA x 3 Audio AL / AR RCA x 2
RGBHV / VGA 15 - Pin & Stereo Audio 3.5mm mini jack
** VGA is of pass through, hence NO scaling.
RS232 9-Pin Female D Connector x 1
OUTPUT: D-SUB1: D-SUB-15 pin & 3.5mm Mini Audio jack x 1
SELECTABLE 640 x 480, 800 x 600, 1024 x 768, 1280 x 1024, 1280 x 1024,
OUTPUT RESOLUTION: 1600 x 1200-OSD, 1400 x 900-OSD, 1680 x 1050-OSD
OUTPUT TIMING: 60 Hz
MAX RESOLUTION: 1680 x 1050 @ 60 Hz
CABLE LENGTH (INPUT): 1 to 3 meter
CABLE LENGTH (OUTPUT): Up to 20 meter (* Depending on the cable rating)
POWER SOURCE: 12V DC 3Amp
MAIN VOLUME: 32 steps digital volume control
DIMENSIONS: (200 x 115 x 45) mm | Weight : 800 g
HOUSING: Metal
ACCESSORIES: AC-DC Power Adaptor 12V-DC, 3A
** For detail and updated RS-232 Command protocol for programming,
please visit and download from www.abtussingapore.com
* Specifications are subject to changes without notice.
Presentation
Scaler Switcher
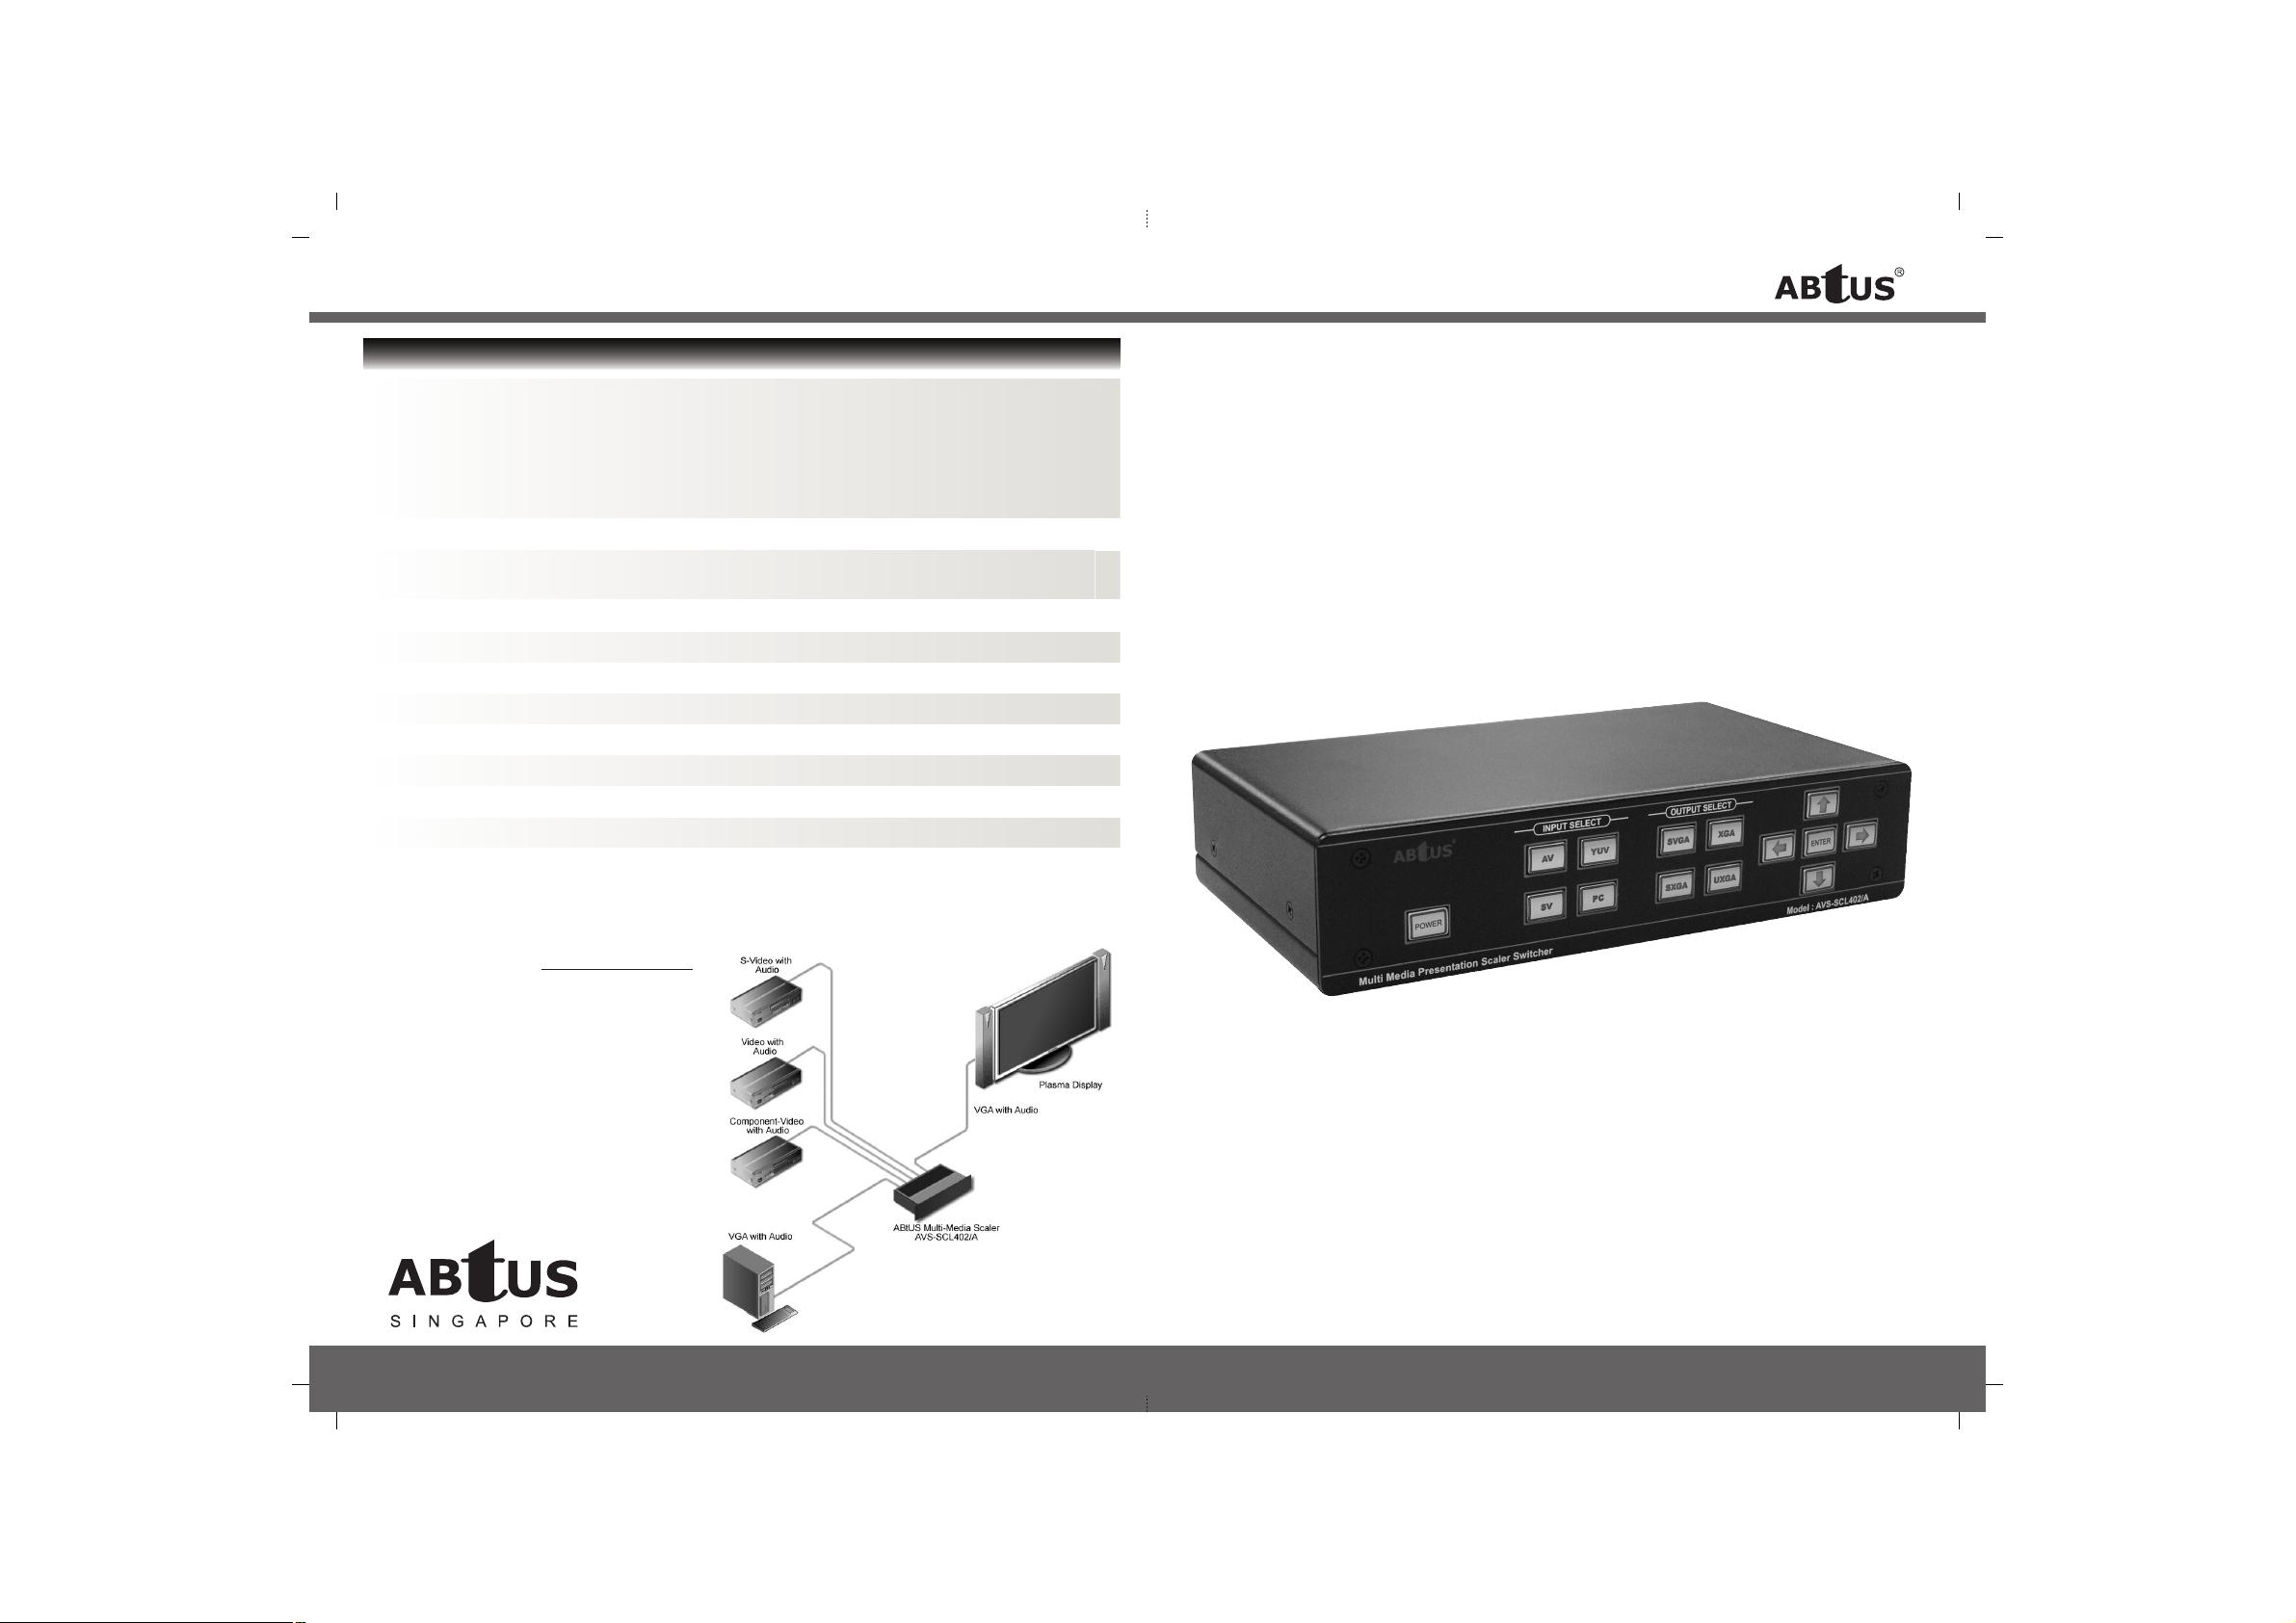
4:1 Multi Media Presentation Scaler Switcher
Configuration Diagram:
Model: AVS-SCL402/A
ABtUS SINGAPORE PTE LTD
www.abtussingapore.com
User Operation Guide
PRODUCT DESCRIPTION
The ABtUS AVS-SCL402/A is a Pro-AV Scaler switcher that takes up to 8 different Video Input formats. It
scales any Composite, s-Video (Y/C), component video (YUV) or computer graphics video signal up or down
to a selectable graphics output resolution, and provide glitch-free switching between sources through an image
capturing memory switching technology.
PRODUCT HIGHLIGHTS
· Motion adaptive de-interlacing/interlacing
· 3D Noise reduction (NTSC/PAL)
· 3D Comb filter (NTSC/PAL)
· Film-mode detection 2:2/3:2 pull down
· Support Remote control
· Support RS232 control interface
· Image capturing memory switching technology
· Support friendly Windows AP
· OSD full function control
FRONT PANEL VIEW
1 2 3 4
ITEM DESCRIPTION
1. POWER Push Power to trun ON or OFF system
2. INPUT SELECT Input Signal:
3. OUTPUT SELECT Select output resolution
4. FUNCTION KEY (1). Enter or leave OSD menu
(1). CV : Signal input from Composite Video and Audio
(2). YC : Signal input from S-Video and Audio
(3). YUV : Signal input from Component Video and Audio
(4). VGA : Signal input VGA and Audio input
Select able range: 640x480, 800, 600, 1024x768, 1280x1024 @60Hz
ENTER
(2). Volume control when not in OSD. When in OSD menu,
it is used to changes selected item
(3). When in OSD menu, it is used to scroll up or down.
RS-232 PROTOCOL AND CONTROL CODE
BACK PANEL VIEW
1 2 3 4 5 6 7 8
ITEM DESCRIPTION
1. RS-232 I/O port: for remote controlling
2. VGA/Audio IN
3. VGA/Audio OUT
4. Component Video IN (Y, Cb, Cr)
5. Component Audio IN
02 07
ITEM DESCRIPTION
6. Composite Video/Audio IN
7. S-Video/Audio IN
8. DC Power IN (Before plugging in the power,
please check if the power is : 12 V DC 3Amp)
* Specifications are subject to changes without notice.

User Operation Guide
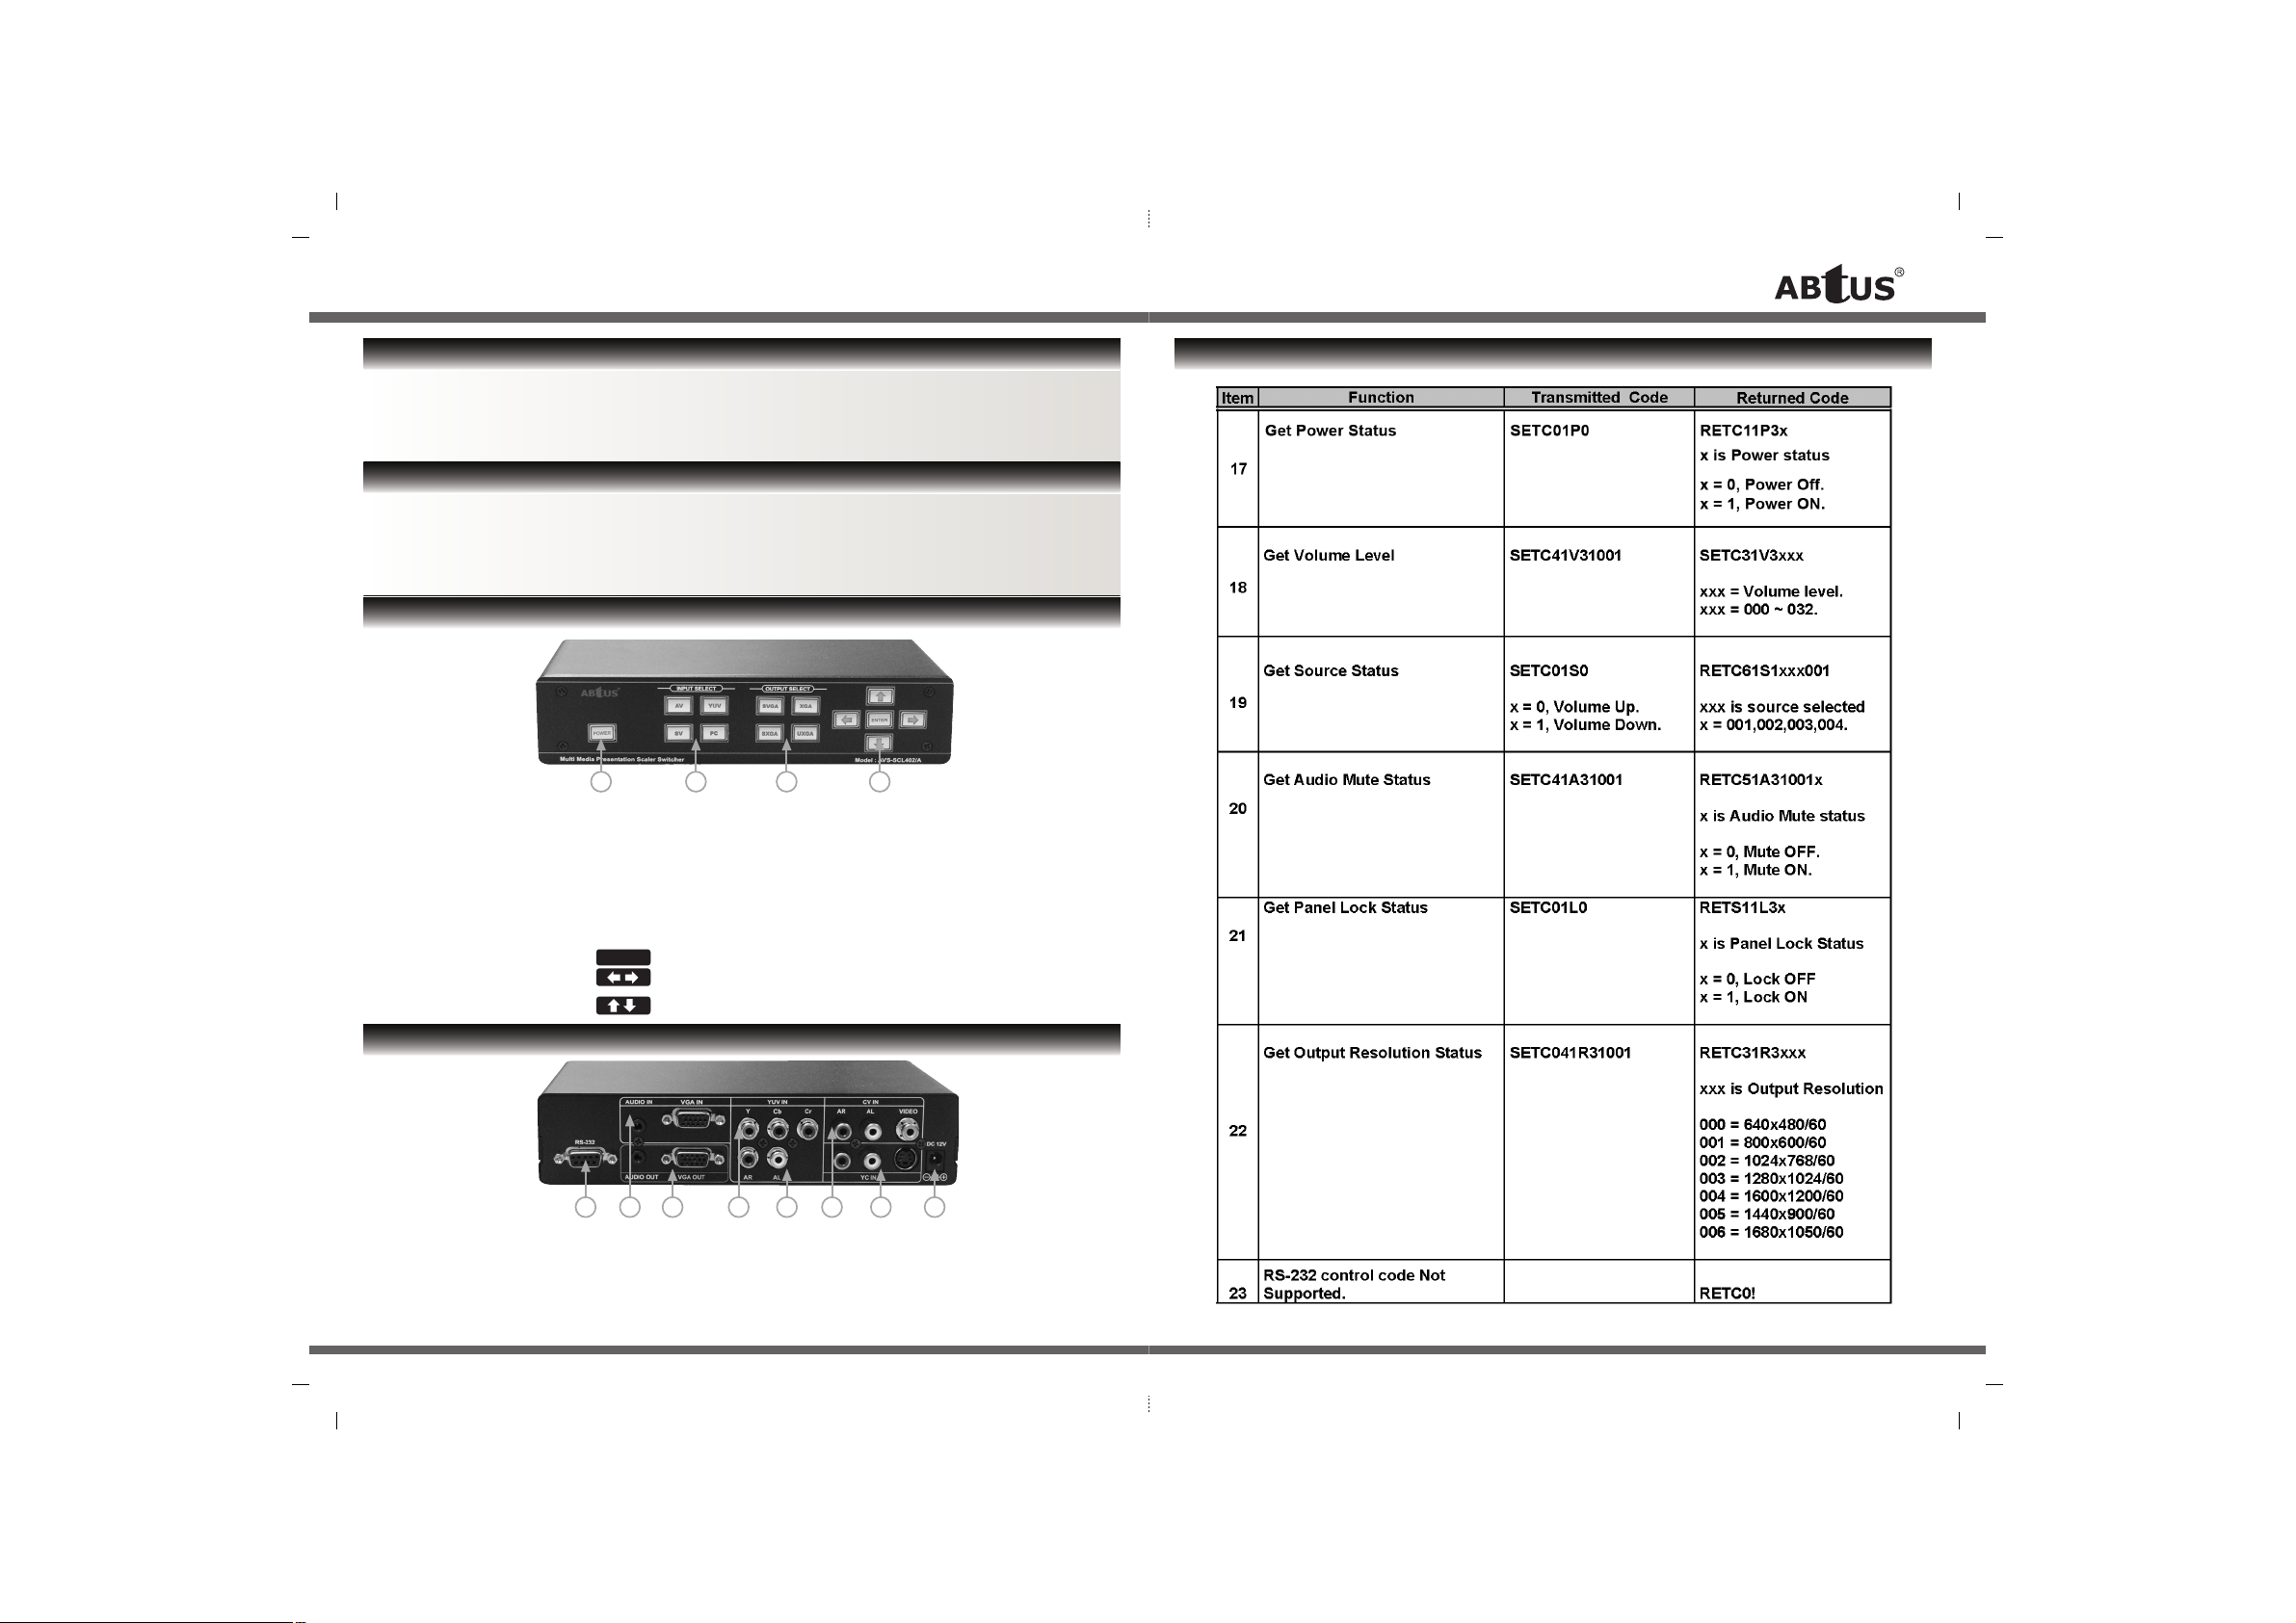
RS-232 PROTOCOL AND CONTROL CODE
1. Communication Protocol
Baud Rate: 9600 bps
Data Length: 8 bits
Parity: Non parity
Stop bit: One bit
X on/off: None
3. RS-232 Control Code
Control code format are of standard ASCII code. Follow are the detail code and description:
(2) RS-232 Connection
OSD USER MENU
This scalar comes with OSD menu function, it can store the user desired contrast,
brightness and other setting. All function in the OSD menu can be change from
the front panel control as shown, setting for each function will then be stored
accordingly separately.
1. When the unit is under operating mode (Power ON) press
"ENTER" on the front panel to open the main menu
2. Press" ", " " from the front panel to select the desired item on the OSD menu
3. Press "
4. Press "ENTER" from the front panel again to go back to the last OSD menu
or to leave OSD menu
"," " from the front panel to change the setting or enter the next OSD
OSD STRUCTURE
ITEM DESCRIPTION
1 Display the current input source selected
2 Display the current input source format
3 OSD menu options
4 Display the current setting of the selected item
ENTER
1. Contrast
Change picture contrast
06 03
* Specifications are subject to changes without notice.
2. Brightness
Change picture brightness.

User Operation Guide
3. Saturation
Change picture color, to
make it more colorful or
faded
5. Noise reduce
Reduce the interference.
The higher the setting the
less interference you will
get, but it could cause
picture distortion, so it is
advices that the user
should change the setting
to own preference.
4. Sharpness
Change the picture
sharpness
6. Hue
Changing picture Hue.
Increasing the Hue will
make the picture red
while decreasing the
Hue will make the
picture green.
10. Self pattern out
Output a while page for
turning of screen. (it is
recommended to use this
setting when auto adjust
doesnt work and there is
abnormal with the
screen)
11. Information
Display current signal input
source, input format and
out resolution.
7. Setting:
Enter other setting menu
9. Blue back ground
When there is no signal
input, the back ground
setting is blue in color
04 05
8. Recall color
Recall current source
Contrast, Brightness,
Saturation, Sharpness.
Noise reduce and Hue
to factory setting
12. Output Mode
Change and selection of
Output resolution setting
13. Exit
Leaving the OSD menu
14. Volume
When OSD menu is closed, use
the t and u on the front panel
to control the volume level
* Specifications are subject to changes without notice.
 Loading...