

Page 1
Page 2

1
Caution
2
3
3
4
4
5
6
88
88
1010
1111
111
13
14
16
17
18
18
19
Safety Information
Unit an d Accessory
Product Feature
Getting Started
Front View
Rea rr VV iew
Remote Control Key Functions
Menu Operation
Basic operation
Picture menu options
Audio menu options
Setup menu options
Feature menu options
Parental menu options
Feature menu options in VGA
Feature menu options in Component
Playing the DVD Player
Basic Control Function
OSD Menu In DVD Mode
21
22
23
Disc Care
Simpl e Troubleshooting
TTechincal Specifications
Page 3
Caution
caution
The lightening flash with arrowhead symbol, within an equilateral triangle is
intended to alert the user to the presence of un-insulated "dangerous voltage"
within the products enclosure that may be of s ufficient magnitude to constitute a
risk of electric shock to the persons.
The exclamation point within an equilateral triangle is intend to alert the user to
the presence of important operating and maintenance (servicing) instructions in
the literature accompanying the appliance.
Co r rec t dispo sal of t his Pr odu ct
W aste Electrical & Electronic Equipment (WEEE)
Your product is designed and manufactured with high quality materials and
components which can be recycled and reused.
This symbol means that electrical and electronic equipment, at their end-of-life,
should be disposed of separately from your household waste.
Please dispose of this equipment at your local community waste
collection/recycling centre.
In the European Union there are separate collection systems for used electrical
and electronic products. Please help us to conserve the environment we live in!
1
Page 4

Safety Information
To ensure reliable and safe operation of this equipment, please read carefully all the
instructions in this user guide, especially the safety information below.
El ectri cal safety
The TV set should only be connected to a mains supply which matches that stated on
the label.
To prevent overload, don't share the same mains supply socket with too many other
items of equipment.
Do not place any connecting wires where: they may be stepped on or tripped ove r.
Do not place heavy items on them, which may damage the leads.
Hold the main plug, not the wires, when removing from a socket.
During a thunderstorm or while leaving the TV fo r lo ng p er io ds , se t th e sw it ch o ff.
Do not allow water or moisture to enter the TV or mains adaptor. Do NOT use in wet or
moist areas, such as Bathrooms, steamy kitchens or near swimming pools.
Pull the plug out immediatel y, and seek professional help if: the mains plug or cable is
damaged, liquid is spilt onto the set, or if it is accidentally exposed to water or moisture,
anything accidentally penetrates the ventilation slots, the set doesn't work normall y.
Do not remove the safety covers. T he re a re n o us er s er vi ce ab le p ar ts inside.You may
invalidate the warrant y. This apparatus must only be serviced by qualified personnel.
To avoid battery leakage, remove exhausted batteries from the remote control, or when
not using far a long period.
Do not break open or throw exhausted batteries on a fire.
Ph ysica l sa etyf
Do not block ventilation slots in the hack cover. You may place the TV in a cabinet, but
ensure at least 5cm (2") clearance all around.
Do not tap or shake the TV screen, or you may damage the internal circuits.Take good
care of the remote control.
To clean the TV use a soft dry cloth. Do not use solvents or petrol based fluids.
Do not install near any heat sources such as radiators, heat registers stoves or other
apparatus (including amplifiers) that produce heat.
Do not defeat the safety purpose of the polarized or grounding-type plug. A p ol ar iz ed
plug has two blades with one wider than the other. A grounding type plug has two
blades and a third grounding prong, the wide blade or the third prong is provided for
your safet y. If the provided plug does not fit into your outlet, consult an electrician for
replacement of the obsolete outlet.
Protect the power cord from being walked on or pinched particularly at plugs.
Use only attachments/accessories specified by the manufacturer.
Unplug this apparatus during lightning storms or when unused for long periods of time.
Refer all servicing to qualified service personnel. Servicing is required when the appara-
tus has been damaged in any way, such a s po we r- su pp ly c or d or p lu g is d am ag ed ,
liquid has been spilled or objects have fallen into the apparatus, has been exposed to
rain or moisture, does not operate normally or has been dropped.
Please always connect an apparatus with Class I structure to a main socket with protec-
tive earthing connection.
Please make sure both main plug and appliance coupler work properl y.
2
Page 5

Unit and Accessory and Product Feature
AUTO
EJECT
MUTE
POWER
MENU
S.MODE
P.MODE
TITLE
SOURCE
LCD-MENU
DISPLAY
DVD-SETUP
ENTER
VOL+
CH+
CH-
VOL-
PLAY
STOP
SLOW/STEP
AUDIO
/PAUSE
GOTO
CC
SUBTITLE
MTS
ANGLE
ZOOM
INTRO
AB
PROGAM
PEPEAT
Mains adaptor
3
Mains cable
Page 6
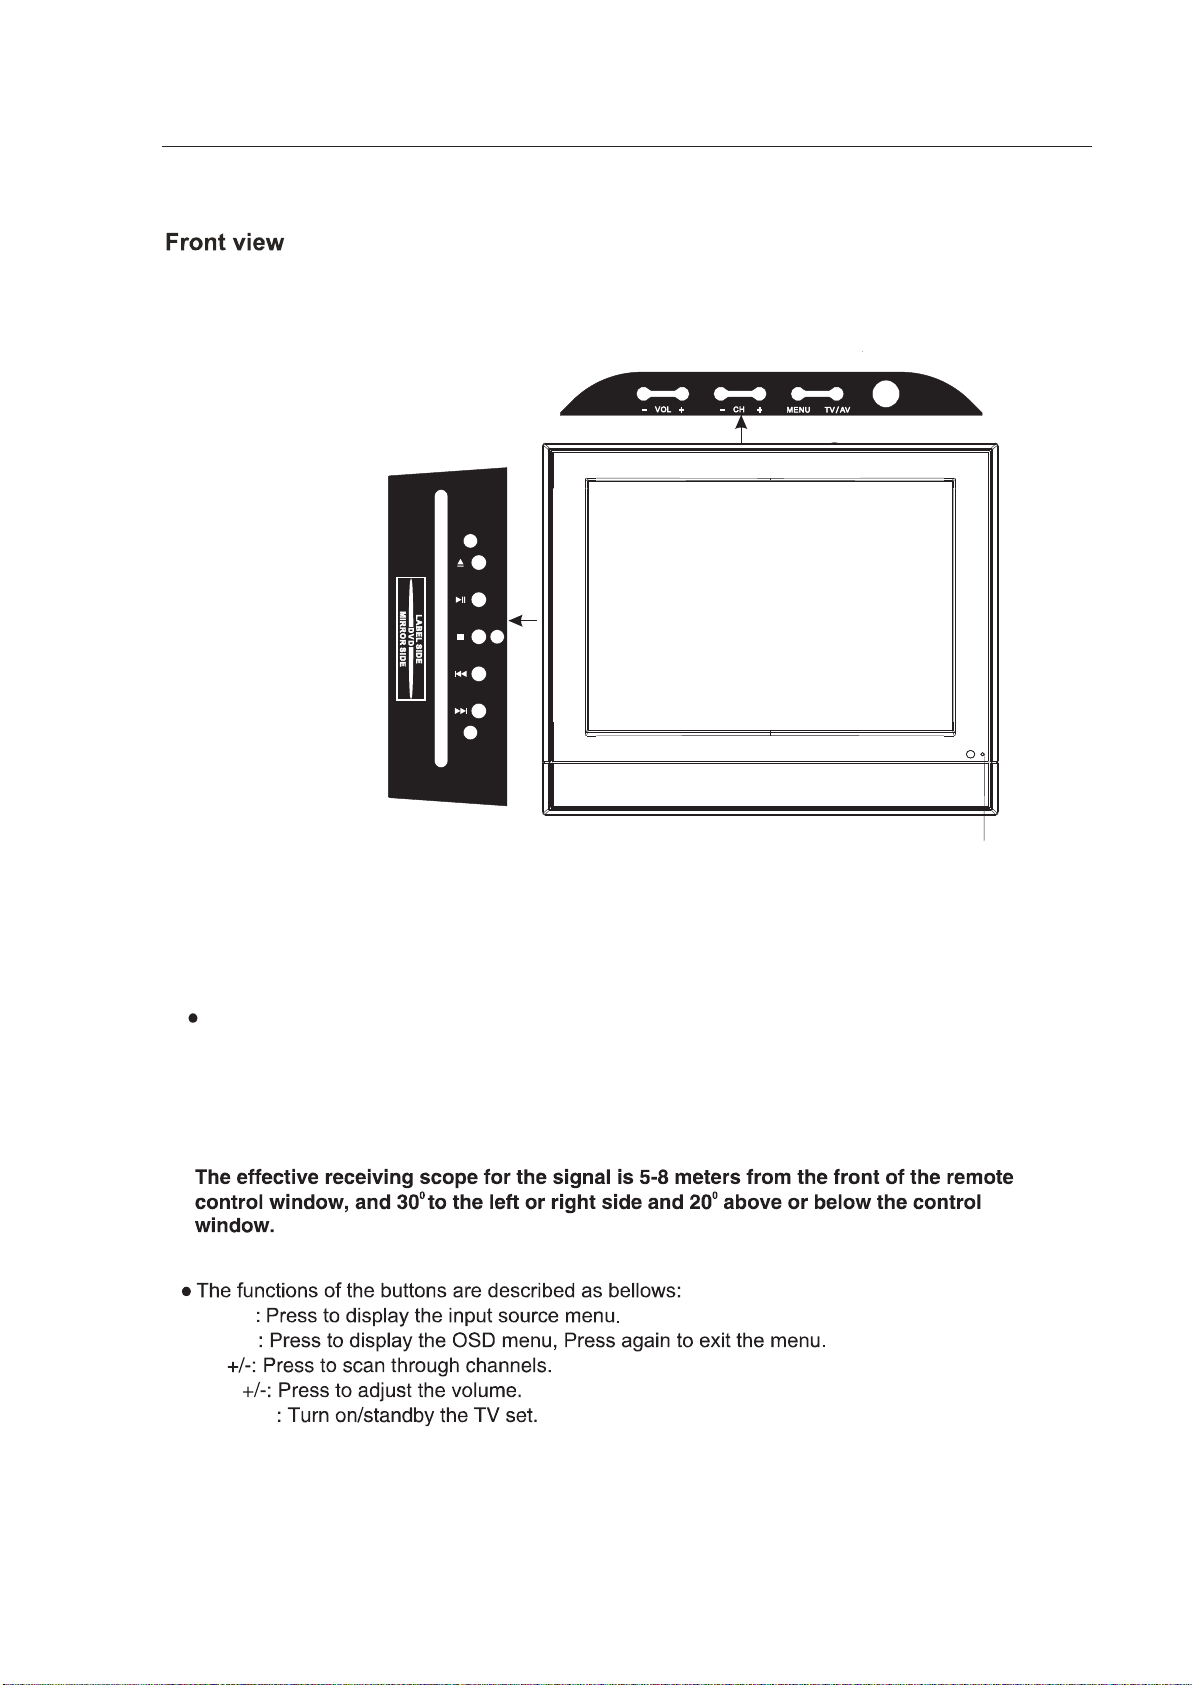
Getting Started
Inse rt a 12cm disc wi th the
labe l side facing t owards you
Getting S ta rted
(IR) Infrared R eceiver: Receives IR signals fr om the remote control.
(Power on/Sta ndby) LED Indicator: PressPOW ER to turn o n and off,
Indicator on(Red) Standby mode
Indicator on(Green) Power on mode
TV/AV
MENU
CH
VOL
POWER
LED
4
Page 7

Getting Started
Name Function Description
POWER (DCIN)
HDMI IN
PC Audio in
VGA IN
YPbPr
S- i de o INV
Video IN
(A L/RUDIO)
Earphone Connect it to your head phone or other audio equipment
ANT 75Ω
Connect to Mains Adapter
Connect to HDMI of DVD or other equipment
PC audio input
VGA signal from computer output
Connect to the composite terminal of your DVD/VCR
S-Video signal input
Video signal input
Audio signal input for AV
Connect to antenna or cable source
5
Page 8

Remote Control Key Functions
POW ER
P.M ODE
LCD -MENU
VOL +
PLAY
/PAU SE
CC
PRO GAM
S.M ODE
DVD -SETU P
ENT ER
VOL -
STO P
MTS
INT RO
MUT E
TIT LE
DIS PLAY
CH-
SLO W/STE P
GOT O
ZOO M
PEP EAT
AUT O
EJE CT
MEN U
SOU RCE
CH+
AUD IO
SUB TITLE
ANG LE
AB
POWER
Switch on LCD TV at standby mode or vice versa.
MUTE
Press to mute the sound. Press again or press
VOL+
to resume.
AUTO EJECT
DVD eject
P.MODE
Press repeatedly to cycle through the available
video
picture modes.
S.MODE
Press to cycle through the different sound settings.
TITLE
Press to select the DVD title.
MENU
DVD play list/ DISC menu.
NUMBER B UTTONS
Press 0-9 to select a TV channel directly when
you
are watching TV. The channel change after 2 seconds.
Press this button to enter a program number for
multiple program channel such as 2-1,etc.
Return to the previous channel viewed.
LCD-MENU
TV system setup.
DVD-SETUP
DVD system setup.
DISPLAY
Press to display the source and channel’s information.
SOURCE
Press to cycle through the input source in following:
Composite Component
TV
S-Video
VGA
HDMI DVD
THUMBSTICK
Allows you to navigate the on-screen menus and
adjust the system settings to your preference.
6
Page 9

POW ER
P.M ODE
LCD -MENU
S.M ODE
DVD -SETU P
ENT ER
MUT E
TIT LE
DIS PLAY
AUT O
EJE CT
MEN U
SOU RCE
CH+/-
Press to scan through channels. To scan quickly
channels, press and hold down either+/-button.
VOL+/-
Press to increase/decrease the sound level.
Play/P ause
Play/Pause DVD program.
STOP
Stop DVD program.
SLOW/S TEP
Play DVD programs at slow speed.
AUDIO
Select DVD disc language.
CC
DVD fast reverse. / Press to display the closed caption.
MTS
DVD fast forward. / Press to select the audio channels.
GOTO
Play your favorite title/chapter/track.
SUBTIT LE
Select DVD disc subtitle.
VOL +
PLAY
/PAU SE
CC
PRO GAM
VOL -
STO P
MTS
INT RO
CH-
SLO W/STE P
GOT O
ZOO M
PEP EAT
CH+
AUD IO
SUB TITLE
ANG LE
AB
DVD previous chapter.
DVD next chapter.
ZOOM
Select display mode:FULL/4:3 .
In DVD source this buttons to adjust DVD picture size.
ANGLE
Select DVD picture angle.
PROGRA M
Press this button to change the playback order.
It varies according to the different discs.
INTRO
If you play CD,it will scan program with 3S.
REPEAT
Repeat playing the title or chapter.
A-B
Select and play the preferable paragraph of DVD
program by pressing this key twice at the beginning
and end of it.
7
Page 10

Menu Operation
Menu Operation
Basic operation
The OSD (On Screen Display) function enables you to adjust the screen status conveniently since it provides
graphical presentation.
Intitial Setup Menu
NOTE: If this is the first time you run the LCD TV, the Initial Setup Menu will appear in the picture, and
the items of this menu also exist in other menus, so you are able to change the values after you
set them up.
Initial Setup Menu
Menu Language
Tuning Band
Auto Ch Search
English
Air
Enter
To Move To Select To Exit
Menu Language
Press ▼ / ▲ button to select this item, then press ENTER/► button to select the OSD language.
Tuning Band
Select Tuning Band mode. (Available tuning band mode: Air, Cable STD, Cable HRC, Cable IRC, Cable Auto.)
If sets Air, the range of channel is 2-69, and if sets Cable,the range of channel is 1-135.
Auto Ch Search
Press ▼ / ▲ button to select this item, then press ENTER/► button to enter the Auto Channel Search Program.
Menu
Choosing a TV channel
1. Press CH+/CH- button on the front panel or on the remote control.
Press CH+ button for the next channel
Press CH - button for the previous channel.
2. Press 0-9 buttons and -/-- button.
You can select the channel by pressing 0 to 9 buttons directly for the channel you want.
Press the button to enter a program number for digital program channel.-/--
3. Example:
To select 1-digit channel (e.g. Channel 5): Press the 5 and ENTER button.
To select 2-digit channel (e.g. Channel 20): Press the 2 and 0 buttonts,then press ENTER button.
To select 3-digit channel (e.g. Channel 103): Press the 1 and 0 and 3 buttons,then press ENTER button.
To select a program number for multiple program channel (e.g. Channel 2-1):Press the 2 button, then press -/-- and 1
button,then press ENTER button.
Note: After select the digit button, the digit will be memorized.
8
Page 11

Menu Operation
Volume adjustment
1. Press VOL+/- to adjust the volume.button
Volume 40
2. Press MUTE( ) button to mute the TV, Press MUTE( ) button again or VOL+/- button to cancel the mute function.
The OSD ( On Screen Display) in this document may be different from your TV’s, because this is just an
reference for your product.
OSD Adjustment
- Press MENU button to display the main menu.
- Press buttons to select the available menus. ◄/►/▲/▼
Picture
Audio
Setup
Feature
Picture
Audio
Setup
Feature
Picture Mode
Contrast 50
Brightness 50
Sharpness 50
Color 50
Tint 50
Aspect Ratio
Enter
To Move To Select To Exit
Time Set
Sleep Timer
Advanced Video Menu
Parental Control
Closed Caption
Enter
To Move To Select To Exit
Standard
Full screen
Menu
Off
Menu
Picture
Audio
Setup
Feature
Picture
Audio
Setup
Feature
Audio Language
Audio Mode
Bass 50
Treble 50
Balance 0
Enter
To Move To Select To Exit
Menu
Tuning Band
Signal Level
Auto Channel Search
Add On SearchChannel
Manual SetChannel
Channel Labels
Menu Language
Reset
Enter
To Move To Select To Exit
Menu
English
Voice
Air
English
9
Page 12

Selecting input source
You can select the input source by pressing input button on the remote control or on the front panel.
Sourc e list
TV
Composite
S-Video
Component
VGA
HDMI
DVD
Menu Operation
Enter
To Move To Select To Exit
Menu
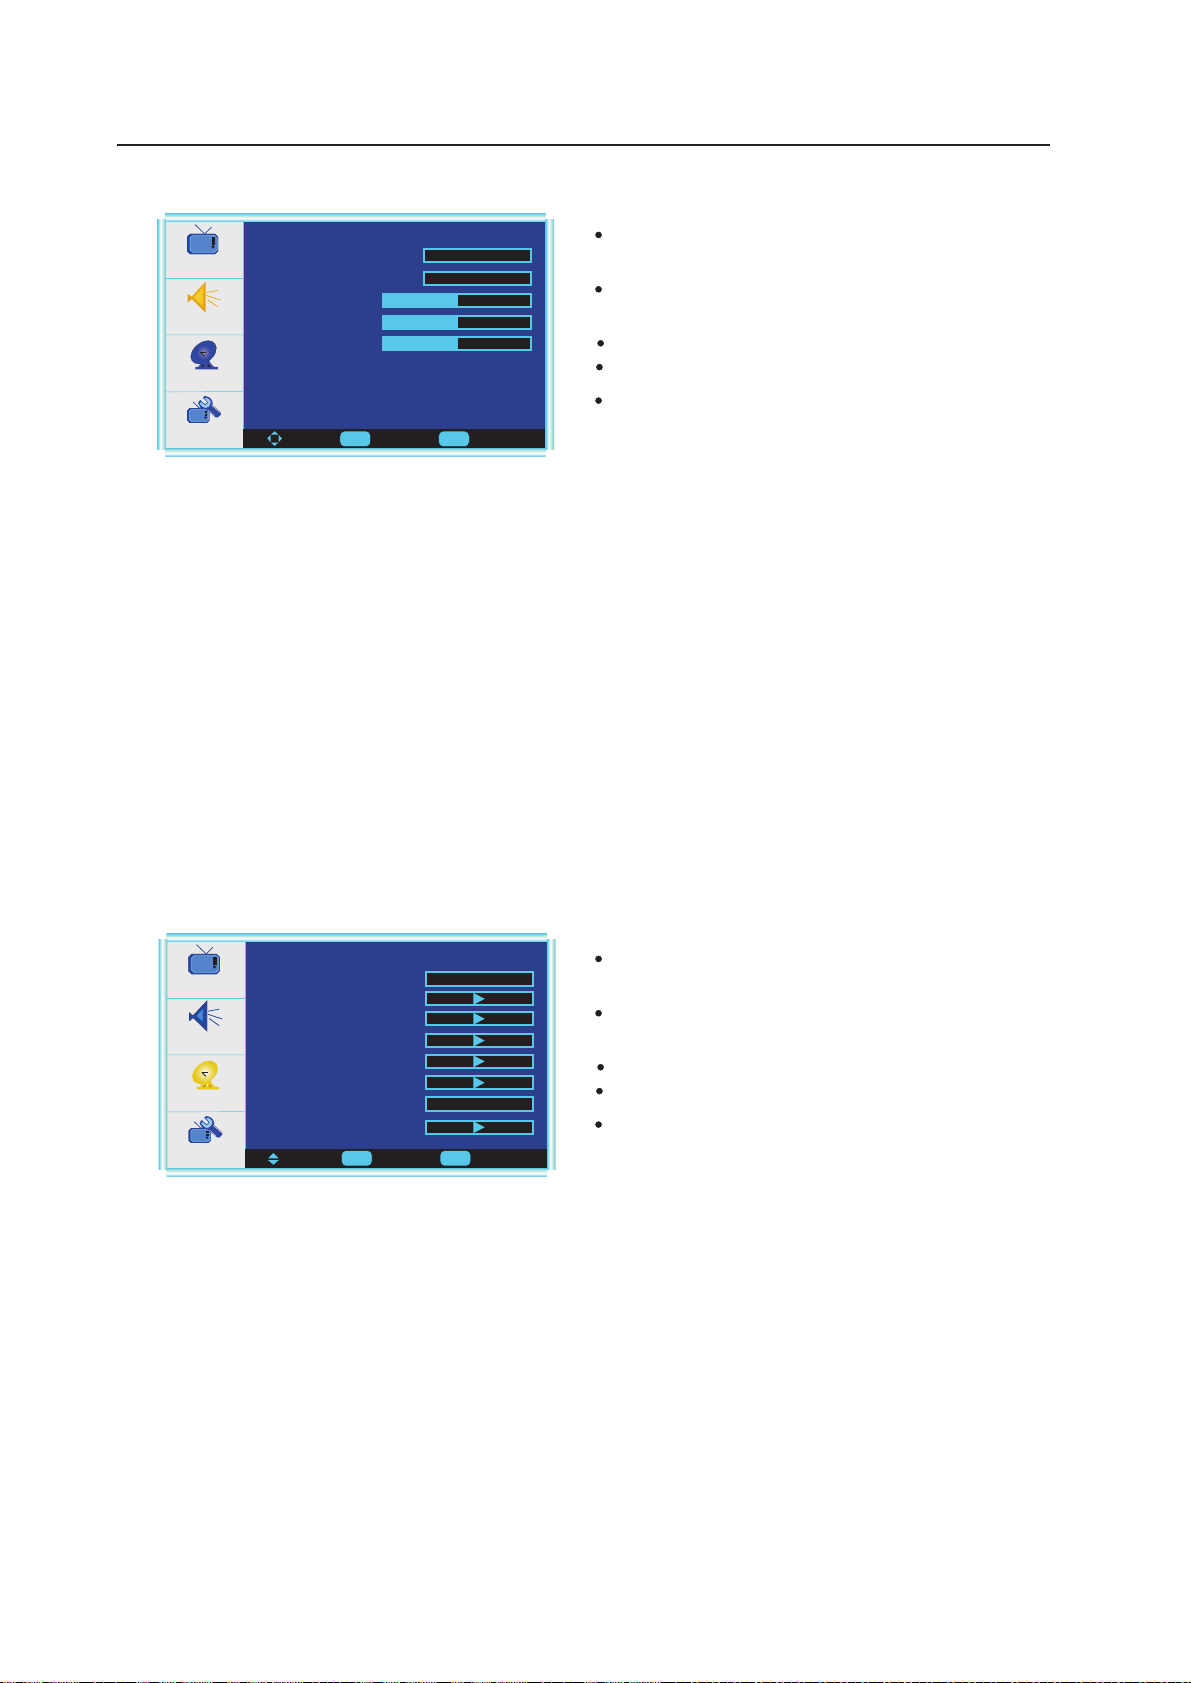
Picture menu options
Press MENU button on the front panel or the remote control to
display the main menu.
Press ▲/▼ button to select the PICTURE menu, then press
► button for the submenu.
Press ▲/▼ button to select the item you want to adjust.
Press ENTER/► button repeatedly to adjust the value.
When you are satisfied with your choice, press ◄ button to go
to the previous menu, or press MENU/EXIT button to exit.
Picture
Audio
Setup
Feature
Picture Mode
Contrast 50
Brightness 50
Sharpness 50
Color 50
Tint 50
Aspect Ratio
Enter
To Move To Select To Exit
Standard
Full Screen
Menu
Picture Mode
Select Picture Mode in PICTURE menu. (Available picture mode: Standard, Vivid, Bright, User.)
You should set the Picture Mode to “User” first if you want to change the value of Contrast/Brightness/Sharpness/Color/Tint,
TIPS: you can select the picture mode directly by pressing PMODE button repeatedly.
Contrast
Press ▼ / ▲ button to select this item, then press ENTER/► button to adjust the contrast of the picture.
Contrast 50
Brightness
Press ▼ / ▲ button to select this item, then press ENTER/► button to adjust the brightness of the picture.
Sharpness
Press ▼ / ▲ button to select this item, then press ENTER/► button to adjust the sharpness of the picture.
Color
Press ▼ / ▲ button to select this item, then press ENTER/► button to adjust the color saturation of the picture.
Tint
Press ▼ / ▲ button to select this item, then press ENTER/► button to adjust the tint of the picture.
NOTE: The Tint item is not available but in NTSC color system.
Aspect Ratio
Press ▼ / ▲ button to select this item, then press ENTER/► button to adjust the aspect the aspect ratio of the picture.
(Available aspect ratio: FullScreen, Normal, Zoom, Wide, Cinema, Waterglass.)
10
Page 13
AUDIO menu options
Menu Operation
Picture
Audio
Setup
Audio Language
Audio Mode
Bass 50
Treble 50
Balance 0
English
Voice
display the main menu.
Press ▲/▼ button to select the AUDIO menu, then press
► button for the submenu.
Press ▲/▼ button to select the item you want to adjust.
Press ENTER/► button repeatedly to adjust the value.
When you are satisfied with your choice, press ◄ button to go
Press MENU button on the front panel or the remote control to
Feature
Enter
To Move To Select To Exit
Menu
to the previous menu, or press MENU/EXIT button to exit.
Audio Mode
Select Audio Mode in AUDIO menu. (Available audio mode: .)
User/Voice/Concert/Jazz
You should set the Picture Mode to “User” first if you want to change the value of Bass/Treble.
TIPS: you can select the picture mode directly by pressing SMODE button repeatedly.
Audio Language
Press ▼ / ▲ button to select this item, then press ENTER/► button to adjust the aspect the audio language.
NOTE: This item will be unavailable if the program system does not provide several audio languages.
Bass
Press ▼ / ▲ button to select this item, then press ENTER/► button to adjust the bass value.
Treble
Press ▼ / ▲ button to select this item, then press ENTER/► button to adjust the Treble value.
Balance
Press ▼ / ▲ button to select this item, then press ENTER/► button to adjust the sound balance.
Setup menu options
Press MENU button on the front panel or the remote control to
display the main menu.
Press ▲/▼ button to select the SETUP menu, then press
► button for the submenu.
Press ▲/▼ button to select the item you want to adjust.
Press ENTER/► button repeatedly to adjust the value.
When you are satisfied with your choice, press ◄ button to go
to the previous menu, or press MENU/EXIT button to exit.
Picture
Audio
Setup
Feature
Tuning Band
Signal Level
Auto Channel Search
Add On SearchChannel
Manual SetChannel
Channel Labels
Menu Language
Reset
Enter
To Move To Select To Exit
Air
English
Menu
Tuning Band
Select Tuning Band mode. (Available tuning band mode: Air, Cable STD, Cable HRC, Cable IRC, Cable Auto.)
If sets Air, the range of channel is 2-69, and if sets Cable,the range of channel is 1-135.
11
Page 14

Menu Operation
Signal Level
In DTV mode, you can refer the strength of the current channel ,and you can tune manually and adjust the angle, orientation of the antenna etc.
Weak Normal Good
Contrast 80
Auto Channel Search
Press ▼ / ▲ button to select this item, then press ENTER/► button to enter the Auto Channel Search Program.
Auto Ch Search - Air
Performing First Pass
Analog Found
Digital Found
Progress(%) 12
Exit
To Exit
Scanning
2
0
Add On Channel Search
Press ▼ / ▲ button to select this item, then press ENTER/► button to enter the Add On Channel Search Program.
This function will add the channels not found before, and will not delete the channels unavailable at present.
Add On Ch Search - Air
Performing First Pass
Analog Found
Digital Found
Progress(%) 12
Exit
To Exit
Scanning
2
0
Manual Channel Set
Press ENTER button to display a channel list that you can select channel as below:
Manual Channel Set Menu
Ch 42 -1 ATSCdmo Viewable
Ch 2 -0 Viewable
Ch 11 -0 Viewable
Ch 22 -0 Viewable
Ch 31 -0 Viewable
Ch 52 -0 Viewable
Ch 54 -0 Viewable
Ch 66 -0 Viewable
Ch 68 -0 Viewable
To Move To Change To Select
Channel labels
Allows you to name the channel selected. press ◄/► button to select the position of letter, press ▲/▼ button to set the name.
Channel Labels Menu
Enter
Ch 42-1 ATSC dmo
To Move To Change
Exit
To Exit
Menu Language
Press ▼ / ▲ button to select this item, then press ENTER/► button to select the OSD language.
12
Page 15

Reset
Press to reset all items to the default value. ENTER/► button
Reset ALL?
OK Cancel
Feature menu options
Press MENU button on the front panel or the remote control to
Picture
Audio
Setup
Feature
Time Set
Sleep Timer
Advanced Video Menu
Parental Control
Closed Caption
Enter
To Move To Select To Exit
Off
Menu
Time Set
Press ▼ / ▲ button to select this item, then press ENTER/► button for Time Set Menu.
display the main menu.
Press ▲/▼ button to select the FEATURE menu, then press
► button for the submenu.
Press ▲/▼ button to select the item you want to adjust.
Press ENTER/► button repeatedly to adjust the value.
When you are satisfied with your choice, press ◄ button to go
to the previous menu, or press MENU/EXIT button to exit.
Menu Operation
Time Set Menu
Time Set Mode
Time Zone
Year
Date
Time
To Move To Exit
Enter
To Select
Auto
Pacific
2008
Mar 29
10:00 AM
Exit
Time Set Mode
Press ENTER/► button to select the time set mode from AUTO and MANUAL.
(Available aspect ratio: FullScreen, Normal, Zoom, Wide, Cinema, Waterglass.)
You should set the Time Set Mode to “Manual” first if you want to change the value of Time Zone/Year/Date/Time.
Time Zone
Press ▼ / ▲ button to select this item, then press ENTER/► button to select the time zone for your TV.
Sleep Timer
Select the sleep time to put automatically the TV in standby mode. Timer can be selected
as 5min/10min/15min/30min/45min/
60min/90 min/120 min/180 min/240 min/Off.
Also you can select the sleep time by pressing SLEEP button repeatedly..
Advanced Video Menu
Press ▼ / ▲ button to select this item, then press ENTER/► button for Advanced Video Menu.
Advanced Video Menu
Noise Reduction
Color Temperature
3D Y/C
Adaptive Contrast
Gradient Enable
Blue Screen
Audio Only
Medium
Normal
On
On
On
On
To Move To Exit
Enter
To Select
Exit
13
Page 16

Noise Reduction
Press ENTER/◄/► button to select the level of noise reduction from Off/Low/Medium/High.
Color Temperature
Press ENTER/◄/► button to select the color temperature from Cool/Normal/Warm.
3D/YC
Press ENTER/◄/► button to set the 3D/YC on or off.
Adaptive Contrast
Press ENTER/◄/► button to set the Adaptive Contrast on or off.
Gradient Enable
Press ENTER/◄/► button to set the Gradient Enable on or off.
Blue Screen
Press ENTER/◄/► button to set the Blue Screen on or off.
Audio only:
Press ENT ER /button t o tu rn off th e video pictu re ,listen th e audio only.
Menu Operation
Parental Control
You need to enter the password for the submenu. And the original password is 0000.
Enter Password
*
Parental Control Menu
Password Set
Master Lock
Unrated lock
On
On
US Ratings
Canadian Rating
Advanced Rating
To Move To Select To Exit
Password Set
You need to enter the correct old password before setting a new password, and after set the new password, you need to
enter it again to confirm it.
Enter Old Password
*
Enter
Enter New Password
*
On
Exit
Confirm New Password
*
Master Lock
Press ENTER/► button to set the Master Lock on/off, if you set this function on, all the parental control lock will be
unavailable and it can play all kinds of programs.
Unrated Lock
Press ENTER/► button to set the Unrated Lock on/off, if you set this function on, all the programs will be locked even they
are unrated program.
14
Page 17

US Ratings
Press ▼ / ▲ button to select this item, then press ENTER/► button for US Ratings Menu.
Canadian Rating Menu
Press ▼ / ▲ button to select this item, then press ENTER/► button for Conadian Rating Menu.
Menu Operation
US Ratings Menu
MPAA TV Rating
NONE
G
PG
PG-13
R
NC-17
X
To Move To Exit
ALL L S VFVD
NONE
TV-Y
TV-Y7
TV-G
TV-PG
TV-14
TV-MA
Enter
To Select
Exit
Canadian Rating Menu
Canadian English Candlan French
E
C
C8+
G
PG
14+
18+
To Move To Exit
Enter
Advanced Rating
Press ▼ / ▲ button to select this item, then press ENTER/► button to set advanced rating on/off.
Closed Caption
Press ▼ / ▲ button to select this item, then press ENTER/► button for Closed Caption Menu.
Closed Caption
CC Mode
Analog CC
Digital CC
Advanced CC Settings
To Move To Exit
Enter
To Select
CC Off
CC1
CS1
Exit
CC Mode
Press ENTER/► button to select CC Mode from CC Off / CC On / CC Mute.
Analog CC
Press ENTER/► button to select Analog CC Mode.
Digital CC
Press ENTER/► button to select Digital CC Mode.
Advanced CC Settings
Press ENTER/► button for Advanced CC Settings Menu.
13 ans+
16 ans+
18 ans+
To Select
E
G
8 ans+
Exit
Digital Closed Caption
- Style:
Style
Size
Font
Text Color
Text Opacity
Background Color
Background Opacity
Edge Effect
Edge Color
CC SAMPLE
To Move To Exit
Enter
To Select
Press ENTER/► button to select CC Style between Automatic and Custom, you need to set it to Custom first if
Automatic
Automatic
Automatic
Automatic
Automatic
Automatic
Automatic
Automatic
Automatic
Exit
you want to change the value of items below.
- Size: Normal/Large and Small.
- Font: From Font1 to Font7.
- Text Color: Red/Green/Blue/Yellow/Magenta/Cyan/Black/White.
15
Page 18

- Text Opacity: Solid/Flashing/Transparent/Translucent.
- Background Color: Black/White/Red/Green/Blue/Yellow/Magenta/Cyan.
- Background Opacity: Solid/Flashing/Transparent/Translucent.
- Edge Effect: None/Raised/Depressed/Uniform/Left Shadow/Right Shadow.
- Edge Color: Black/White/Red/Green/Blue/Yellow/Magenta/Cyan.
Feature menu options in VGA
Press Input button to select the input source to VGA.
Menu Operation
Picture
Time Set
Sleep Timer
Off
Advanced Video Menu
Audio
Setup
Feature
VGA Set
Press ▼ / ▲ button to select VGA Set, then press ENTER/► button for VGA Setting Menu.
VGA Set
To Move To Select To Exit
OK
Menu
VGA Setting-1024x768@70Hz
H-Position
V-Position
Clock
Phase
Auto Adjust
Setting
50
50
50
50
Preset
To Move To Select To Exit
OK
Menu
H-Position
Press ENTER/► button to adjust the horizontal position of the picture.
V-Position
Press ENTER/► button to adjust the vertical position of the picture
Clock
Press ENTER/► button to adjust the clock of the picture.
Phase
Press ENTER/► button to adjust the phase of the picture.
Auto Adjust
Press ENTER/► button to auto adjust the VGA setting.
Setting
Press ENTER/► button to reset the VGA setting to factory default.
16
Page 19

Feature menu options in Component
Press Input button to select the input source to component.
Menu Operation
Picture
Time Set
Sleep Timer
Off
Advanced Video Menu
Audio
Setup
Feature
Component Set
Press ▼ / ▲ button to select Set, then press ENTER/► button for Setting Menu.Component Component
Component Set
To Move To Select To Exit
OK
Menu
Component Setting-720x480I@30/29.97Hz
H-Position
V-Position
Clock
Phase
50
50
50
50
Auto Adjust
Setting
To Move To Select To Exit
OK
Preset
Menu
H-Position
Press ENTER/► button to adjust the horizontal position of the picture.
V-Position
Press ENTER/► button to adjust the vertical position of the picture
Clock
This function is unavailable in component mode.
Phase
Press ENTER/► button to adjust the phase of the picture.
Auto Adjust
This function is unavailable in component mode.
Setting
Press ENTER/► button to reset the Setting to factory default.Component
17
Page 20

DVD Operation
DVD Operation
Tit le : DV D Video discs are usually divided into several numbered sections called titles.
Chapter: A title comprises smaller numbered sections called chapters.
Play ing the DVD Pla yer
1. Press the ‘SOURCE button to select ‘DVD’ mod e, i f no d is c is i ns er te d ye t, t he d is pl ay s ho ws ‘ No D is c’ .
2.Insert a DVD with the label printed side facing towards you.
3.The TV will first display ‘Loading’, then change to ‘DVD-video’. Most DVDs will show some preliminary
information then stop at a main menu screen.
4. Press PLAY/PAU SE t o pl ay i t di re ct ly. Or press the DVD-MENU button to access the disc menu during
playback.
5.Use the direction button on the remote control to select the desired option. Press ENTER to select the
option or press the button. Playback will now commence.
6.After playback, press the EJECT button on remote control or EJECT but to n on TV/DVD to remove the
disc.
Note: No function‘’ wil l so me ti me s ap pe ar o n th e sc re en a ft er a b ut to n is p re ss ed . This indicates that the
function is not supported at the current time.
Gett ing Started
Carefully remove the TV / DVD and all other items from the box. You may wish to store the packaging for
future use.
Please read these instructions thoroughly before use.
Compatible Discs
The DVD player supports the following disc formats:
12cm DVD Video Discs.
►
12cm Compact Disc Audio Discs.
12cm Still High Resolution
WARNING! DO NOT INSERT OR PLAY 8CM DISCS, THEY WILL GE T ST UC K.
Basic Control Function
Play/Pause
1.Press the ► button to play/ pause the DVD. The screen will freeze its current picture when paused.
2. For resume play, press the ► button.
Stop
After pressing the button to stop playback. 'Press Play Key To Continue' will be displayed on the top left
on the screen, also '■' on the top right. Press the► button to resume playback.
Press the''button twice to stop playback completely. '' Will be displayed on the screen.
Fast Playback
You can search eithe r fo rw ar ds o r ba ck wa rd s fo r a pa rt ic ul ar p ar t of t he D VD .
To search forwards, press the buttons►►.
The playback speed is doubled and 'FORWARD X2' is displayed.
Each subsequent press of the ►►button toggles among different speeds (►►2X - ►►4X - ►►8X ►►16X - ►►32X -PLAY),up to 32 times the normal speed. Pressing the buttons ►► after '' ►►32X'
reverts to normal playback speed.
To resume normal playback at any time, press the► buttons.
To search backwards, press the button. This operates in the same way as the ►►button but in the
reverse direction.
Subtitles
Most DVDs are recorded with subtitles and some have the subtitles available in different languages.
To select subtitles, press the SUB-T button.
If different languages are available, repeatedly press the SUB-T bu tt on u nt il t he l an gu ag e yo u re qu ir e is
displayed.
18
Page 21

DVD Operation
Chapter Selection
During playback you can select different chapters of the DVD.Press DVD-MENU to the root menu.
Press direction buttons or Next, PREVIOUS buttons to choose different chapters. Note: It is just for
reference.
Press ENTER button to confirm.
Audio Configuration
Some DVDs are recorded with multiple audio channels. These can be used for different languages or for
commentaries.
Repeatedly press the AUDIO button to select the desired audio channel.
Repeat Chapter/Title
To repeat playback of a chapter, press the REPEAT button while the chapter is playing. 'Chapter' will be
displayed.
To repeat playback of the title, press the REPEAT button twice.
To repeat playback of the title, press the REPEAT button three times.'All' will be displayed.
Press the REPEAT button four times to cancel repeat playback.
'Title' will be displayed.
Program Play
1. Compatible with DVD, CD, HD-CD, WMA, Digital Audio disc /JPEG discs.
2. The Program Playback option allows you to enter the order in which you want chapters or tracks to play,
maximum to 16.
3. Program Menu: If PBC is on, this operation will turn PBC off while the chapters / tracks play in programmed
order.
4. According to the highlight, use the Numeric buttons to enter the chapters / tracks in the order you want
them to play. Then press Play or use Arrow buttons to highlight the "PLAY" item and press Enter. The
chapters /tracks will play in the programmed order. You can program maximum 16 titles / chapters / tracks.18
5. According to the Direction Indicator on the menu, you can press Arrow buttons to highlight where youwant to
enter.
6. During Program Playback, if program button is repressed, the program order and the contents will be
displayed on the screen, and the Program Playback will be stopped; also you can press Stop and
Play to resume normal playback.
7. Notes:
To clear the program order, use Arrow buttons to highlight the "CLEAR" item, then press Enter.
To modify the program order, use Arrow buttons to highlight the item you are changing and enter the
new chapter / track you want to program directly.
8. The program indicator in the screen and the playing chapter / track illuminate.
Note: Some discs do not support the repeat function, different disc shows different information.
OSD Menu In DVD Mode
General Setup Page
Press SOURCE button on the remote control ,then select DVD item in Source list
a. Press DVD-SETUP button on remote control during playing DVD, it will show following menu:
(When the DVD menu displayed ,the DVD system will auto pause. Press SETUP again, it will go on)'
b. Press “▼/▲”to choose the items, then enter the desired item with ENTER button. It has been set
already when the desired item becomes red.
Note: Press Left button to get back the previous menu.
c. Press SETUP to exit the menu.
19
Page 22

DVD Operation
d. The items of the menu as below:
OSD Lang.: Set the language of OSD menu. Default setting is English.
Last Memory: set it on to memorize the last stop point. During playing the DVD, you change to other
mode. When you come back to DVD mode, it can play automatically from the last stop point.
Aud io S et up P ag e
a. Press SETUP button on remote control during playing DVD, Press “ ” un ti l it w il l sh ow f ol lo wi ng m en u:
◄/►
(When the DVD menu displayed ,the DVD system will auto pause. Press SETUP again, it will go on)'
b. Press “▼/▲”to choose the items, then enter the desired item with ENTER button. It has been set already
when the desired item becomes red.
Note: Press Left button to get back the previous menu.
c. Press SETUP to exit the menu.
d. The items of the menu as below:
Downmix: choose the downmix mode. There is only one item--stereo.
Preference Page
a. Press SETUP button on remote control during there no disc in the DVD player , Press “ ” until
◄/►
Preference will show following menu:(When the DVD menu displayed ,the DVD system will auto pause.
Press SETUP again, it will go on)'
b. Press “▼/▲”to choose the items, then enter the desired item with ENTER button. It has been set already
when the desired item becomes red.
Note: Press Left button to get back the previous menu.
c. Press SETUP to exit the menu.
d. The items of the menu as below:
20
Page 23

Disc Care
Audio;Choose the default language you would prefer to for DVD titles.
Subtitle: Set the language of subtitle menu or turn off the Subtitle.
Note: not all DVD discs are recorded or offer subtitles in multiple language.
Disc Menu: set the default language of Disc menu.
Parental: movies rated higher than the level set will not be played by selecting a certain access level. The
parental lock can only be changed after input the correct password.
Note: This function is available only when the discs have rating encoded on.
It will ask a password when you select a level except for Adult. The factory setting of the password is
136900. Press Down button to the 'OK' after finishing input of the password, then press ENTER button to
confirm and go back to the previous menu.
Password: Reset the password. The password should be 4-digit, and the initial password is 136900
(It is also the supercode).
Note: Press Down button to the 'OK' after finishing input of the password, then press ENTER button to
confirm and go back to the previous menu.If you forget the old password, you can always use the factory
setting password '136900'.
Default: Default the factory' settings EXCEPT the password.
Disc Care
About Disc Terms Tit le
Generally, pictures or music compressed on a DVD are divided into several sections, "title".
Chapter
The smaller section unit of picture or music in a DVD under the title, usually one title is comprised of one
or more chapters and each of them is numbered for easy searching, but some discs may not have a
recording chapter.
Track
A segment of picture or music on a CD, Each track is numbered for searching.
Care of Disc
Video disc contains high-density compressed data that needs proper handling.
1. Hold the disc with fingers by outer edge and/or the center spindle hole. Do not touch the discs surface.
2.Do not bend or press the disc.
3.Do not expose the disc to direct sunlight or heating sources, Stere discs in cabinet vertically, and in dry
condition.
Prevent exposure to:
Direct sunlight
Heat or exhaust from a heating device
Extreme humidity
Clean the disc surface with a soft, dry cleaning cloth, Wipe the disc surface gently and radically from
center toward the outer edge.
Do not apply thinner, alcohol, chemical solvent, or sprays when cleaning. Such cleaning
fluids will permanently damage the disc surface.
21
Page 24

Simple Troubleshooting
Simple Troubleshooting
22
Page 25

Techincal Specifications
TV
TV System
Screen siz e
Resolution
Aerialinput
Audio output power
Power Consumption
Remote control
Techincal Specifications
ATSC/NTSC
15"(diagonal)
1280x800pixels (RGB)
75 (unbalanced)
2x3 W
45W
Type
Control distance
Control angle
Batteries
Weight
infrared
5m
30° (horizontal)
2 x 1.5 V, size AAA
70 g (without battery)
23
 Loading...